Embed Size (px)
Citation preview
Article ID: 5054
Configuring a Guest Wireless Network
Overview
Expanding your small business network with a Cisco Small Business Wireless Access Point is an excellent way to get your employees connected to the network from anywhere. Products like the WAP371 can easily be integrated into an existing network and provide the latest 802.11ac high-speed wireless connection. The Cisco wireless Guest Access feature offers the same mobility and convenience that is provided to employees to client and other visitors to the network.
The Cisco Wireless Guest Access feature provides a convenient, cost-effective way to offer wireless access to visitors while maintaining security on your internal network. Wireless guest networks provide the following basic functionality:
Provides Internet access to guests through an open connection Traffic on the guest network is kept separate from the business network Wireless access for each guest is isolated to prevent guests from communicating
with one another over the network.
Key Features
Inter-VLAN Routing
Combining the Inter-VLAN routing provided by a Cisco RV router with the wireless SSID isolation feature provided in a Cisco small business wireless access point offers a simple and secure solution for guest access on any existing Cisco small business network at no additional cost.
Wireless SSID Isolation
The Wireless SSID Isolation feature separates users on the Guest Wireless network from users on the normal wireless network. Additionally, by enabling Wireless Isolation (within SSID), wireless users on the Guest Network will be separated from each other as well. This allows you to provide your users with additional security.
802.1Q Encapsulation
The IEEE 802.1Q standard is used to handle transferring traffic from multiple VLANs over a single link (the “trunk”). When a packet is marked as “tagged”, it will be sent over the link with identifying information allowing the receiving end to identify which VLAN it belongs to. “Untagged” traffic is sent over the link with no identifying information. Traffic marked “Excluded” is not allowed to cross the link.
Devices Used
RV130 Router (1.0.1.3) SG300 Series Gigabit PoE+ Managed Switch (1.4.0.88) WAP371 Wireless Access Point (1.1.2.3)
Note: The devices used are not the only ones applicable to this configuration. This setup may also apply to your network. Please consult the admin guides for your specific devices to determine if the Guest Network feature is available.
Note: The WAP371 requires an 802.3at compliant power source if it is to be powered over an Ethernet cable. This is available in all Cisco PoE+ switches or through the use of an 802.3at PoE injector.
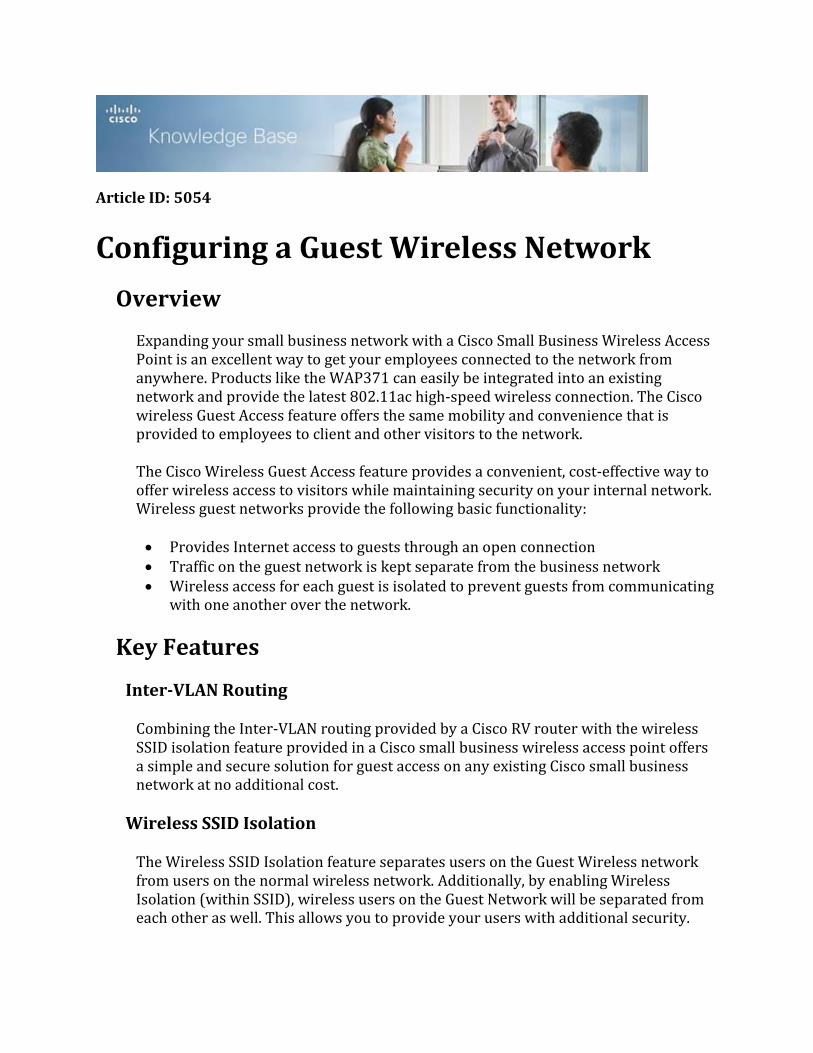
Network Topology
For our scenario, we will have the WAN port of our RV130 plugged in to our broadband Internet connection, and Port 1 on the RV 130 plugged in to port G9 of our SG300. We will also have Port 1 on our SG300 plugged in to the Ethernet port of our WAP371. We will be using the 5GHz band on the WAP371 in order to take advantage of the higher bandwidth.
Adding and Configuring a Guest Access VLAN on the RV130
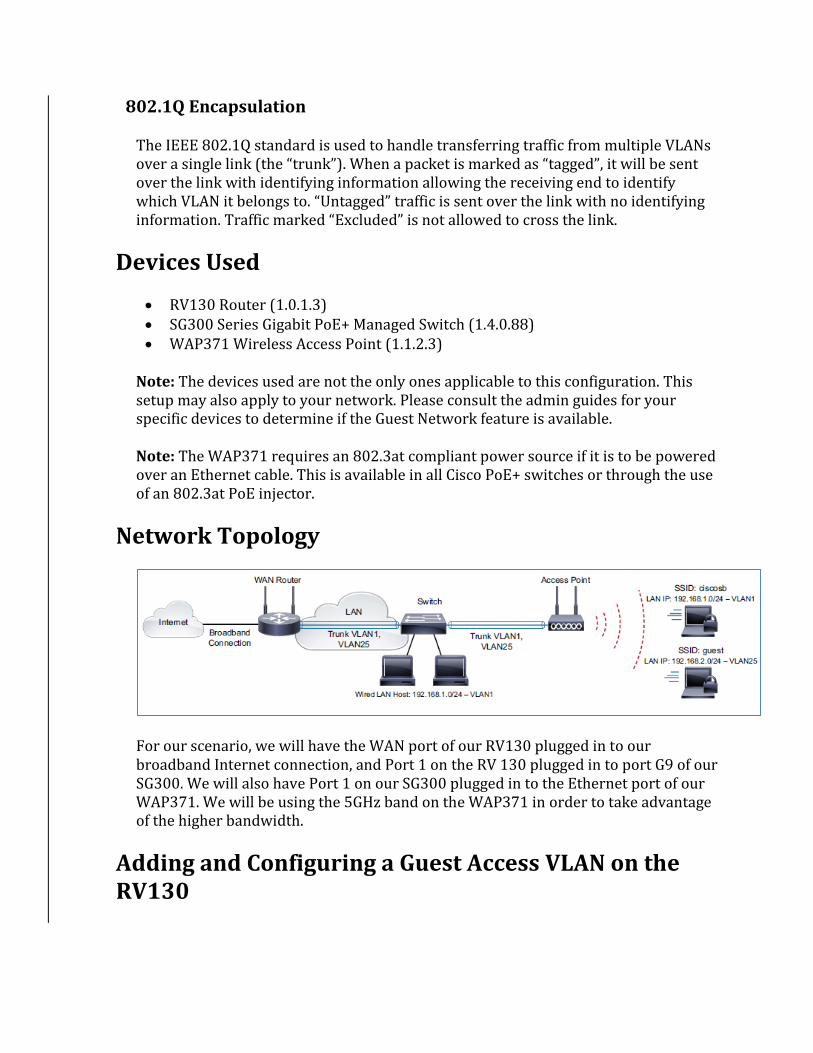
Step 1. Open the web configuration utility for your router and navigate to Networking > LAN > VLAN Membership. The VLAN Membership page open:
Step 2. Click Add Row to add a new VLAN to the table. A new row will appear in the VLAN setting table.
Step 3. Enter a number for your guest VLAN ID in the VLAN ID field. Remember this ID number as it will apply to settings on the switch and wireless access point as well. In this example VLAN ID 25 is chosen for the guest network.

Step 4. In the Description field, enter a name for the VLAN. Because this will be used for guest network access in this example, it has been named as Guest.
Step 5. For the drop-down lists for each port, select Tagged for the port connecting the router to the switch. This will mark packets from the guest VLAN so they can be identified by the other device on the receiving end. For all other unconnected ports, select Excluded to block traffic from the guest VLAN going to these ports. In this example the RV130 is connected to the SG300 through LAN port 1. For additional

information regarding “tagged” and “untagged” traffic, refer to 802.1Q Encapsulation in the Key Features section of this document.
Step 6. Click Save to save your newly created guest VLAN.
Adding and Configuring a Guest Access VLAN on the SG300
In this section, guest access VLAN 25 will be added to the SG300 switch and the VLAN will be included on its trunk to the router. Skip to Adding and Configuring a Guest Access VLAN on the WAP371 if you plan to connect your wireless access point directly to the RV130 router.
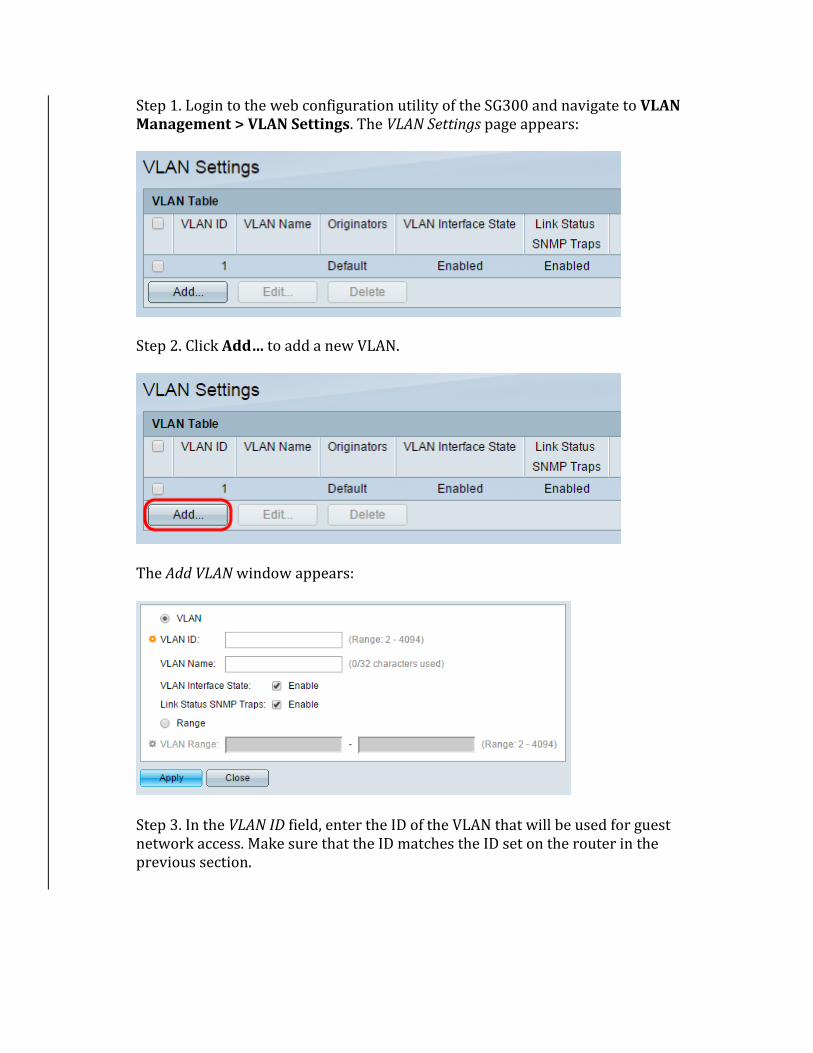
Step 1. Login to the web configuration utility of the SG300 and navigate to VLAN Management > VLAN Settings. The VLAN Settings page appears:
Step 2. Click Add… to add a new VLAN.
The Add VLAN window appears:
Step 3. In the VLAN ID field, enter the ID of the VLAN that will be used for guest network access. Make sure that the ID matches the ID set on the router in the previous section.
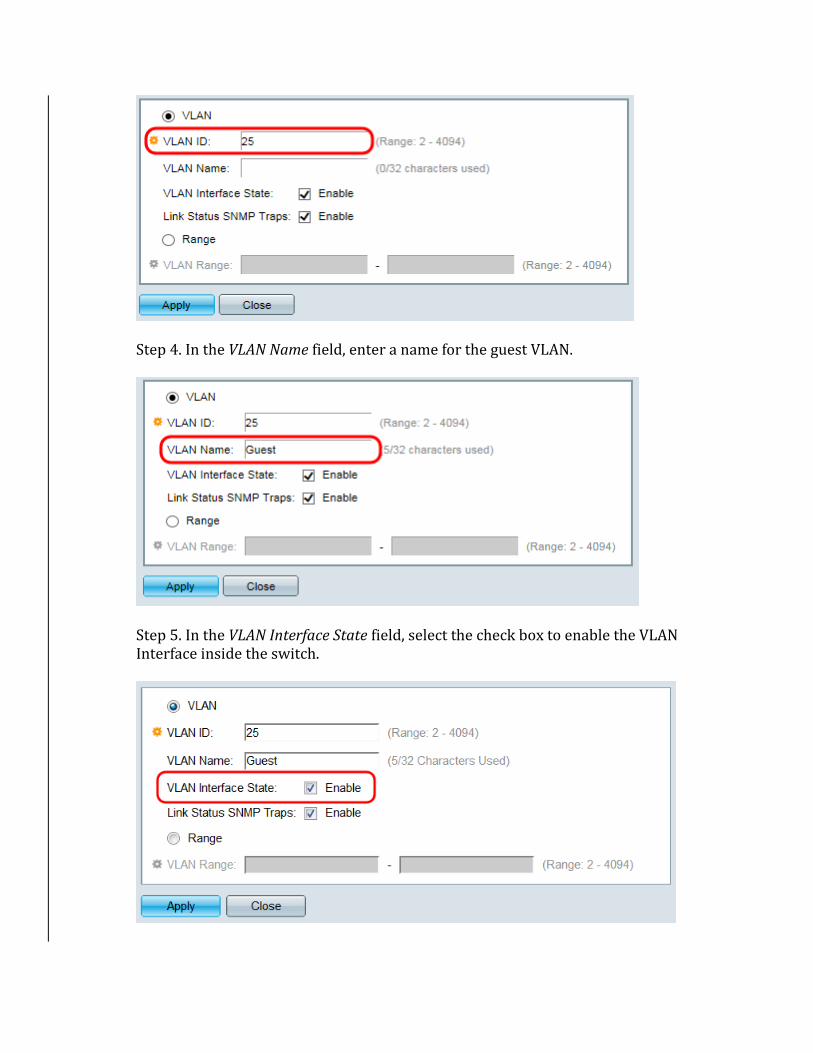
Step 4. In the VLAN Name field, enter a name for the guest VLAN.
Step 5. In the VLAN Interface State field, select the check box to enable the VLAN Interface inside the switch.
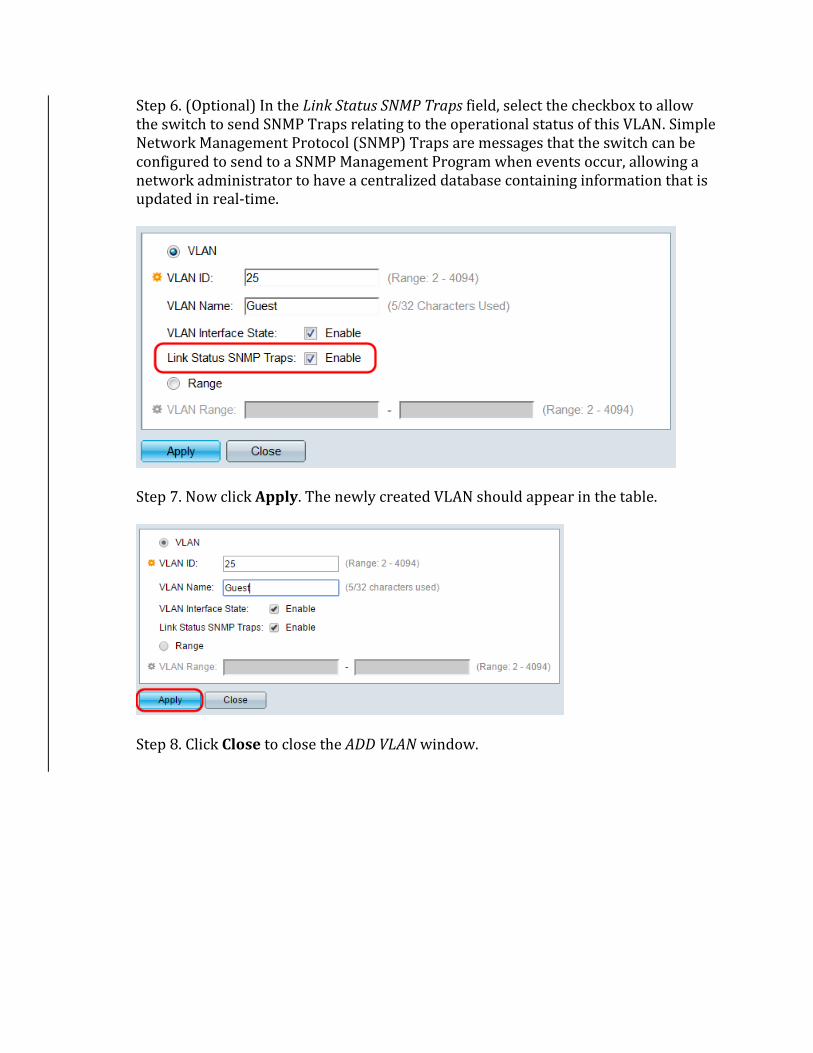
Step 6. (Optional) In the Link Status SNMP Traps field, select the checkbox to allow the switch to send SNMP Traps relating to the operational status of this VLAN. Simple Network Management Protocol (SNMP) Traps are messages that the switch can be configured to send to a SNMP Management Program when events occur, allowing a network administrator to have a centralized database containing information that is updated in real-time.
Step 7. Now click Apply. The newly created VLAN should appear in the table.
Step 8. Click Close to close the ADD VLAN window.
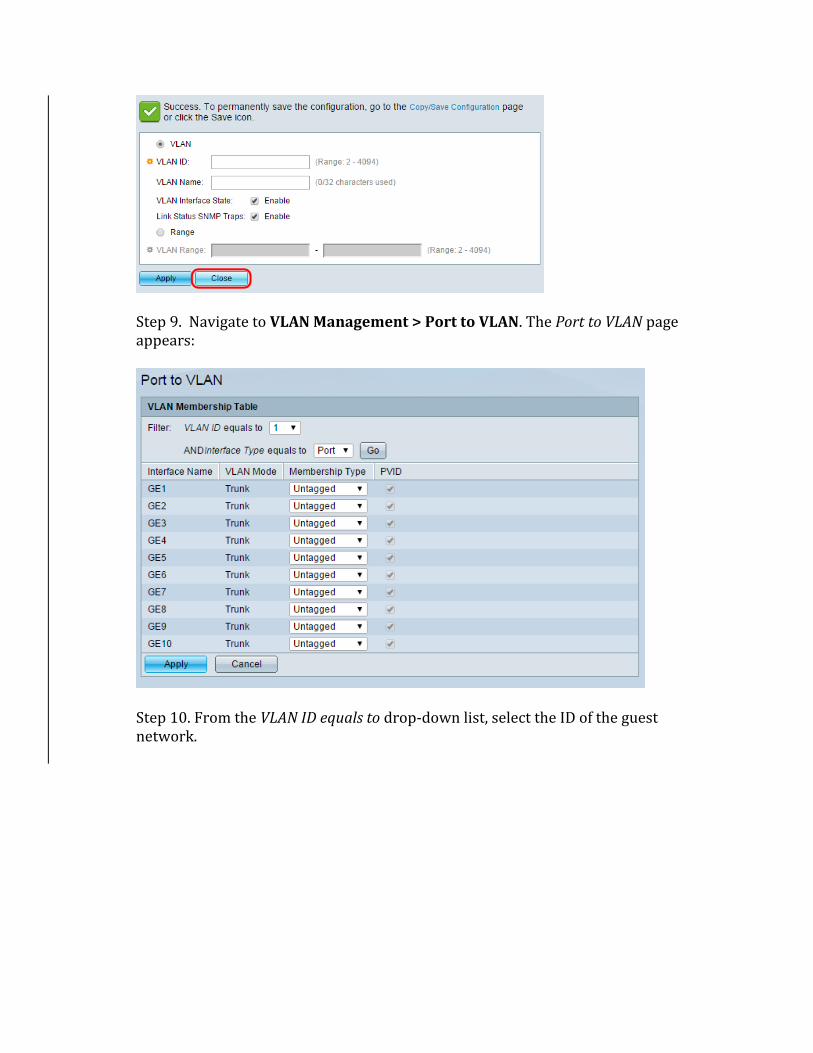
Step 9. Navigate to VLAN Management > Port to VLAN. The Port to VLAN page appears:
Step 10. From the VLAN ID equals to drop-down list, select the ID of the guest network.
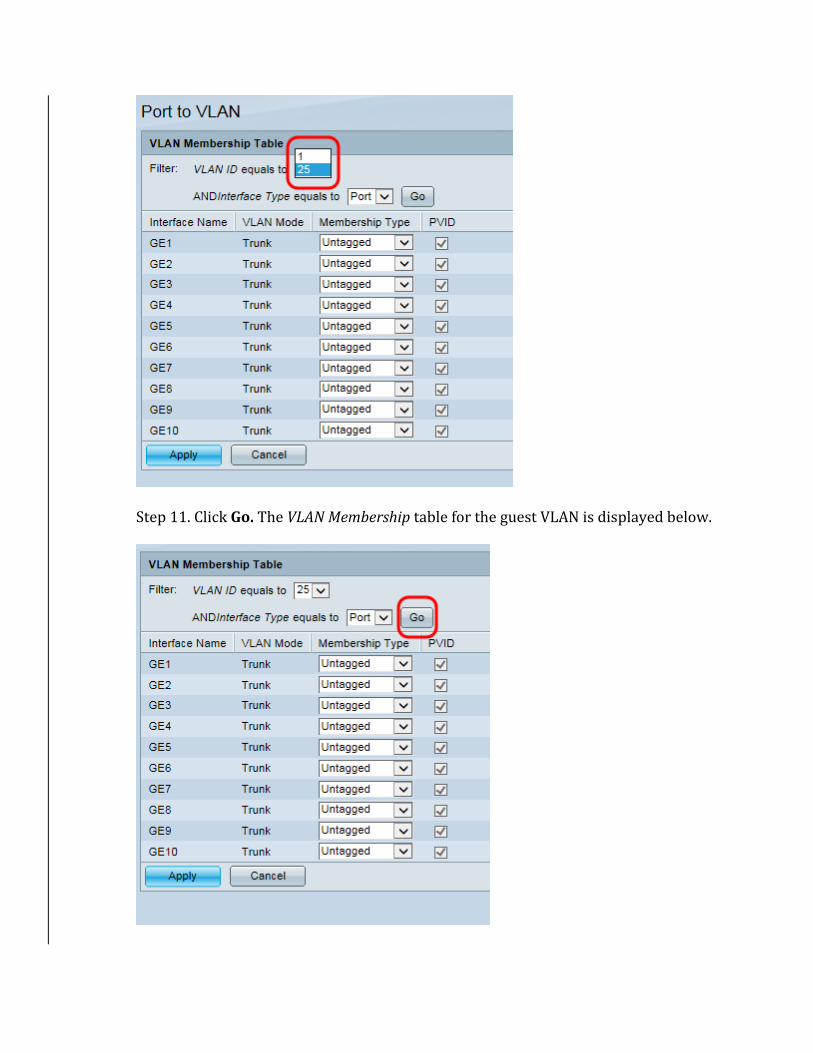
Step 11. Click Go. The VLAN Membership table for the guest VLAN is displayed below.
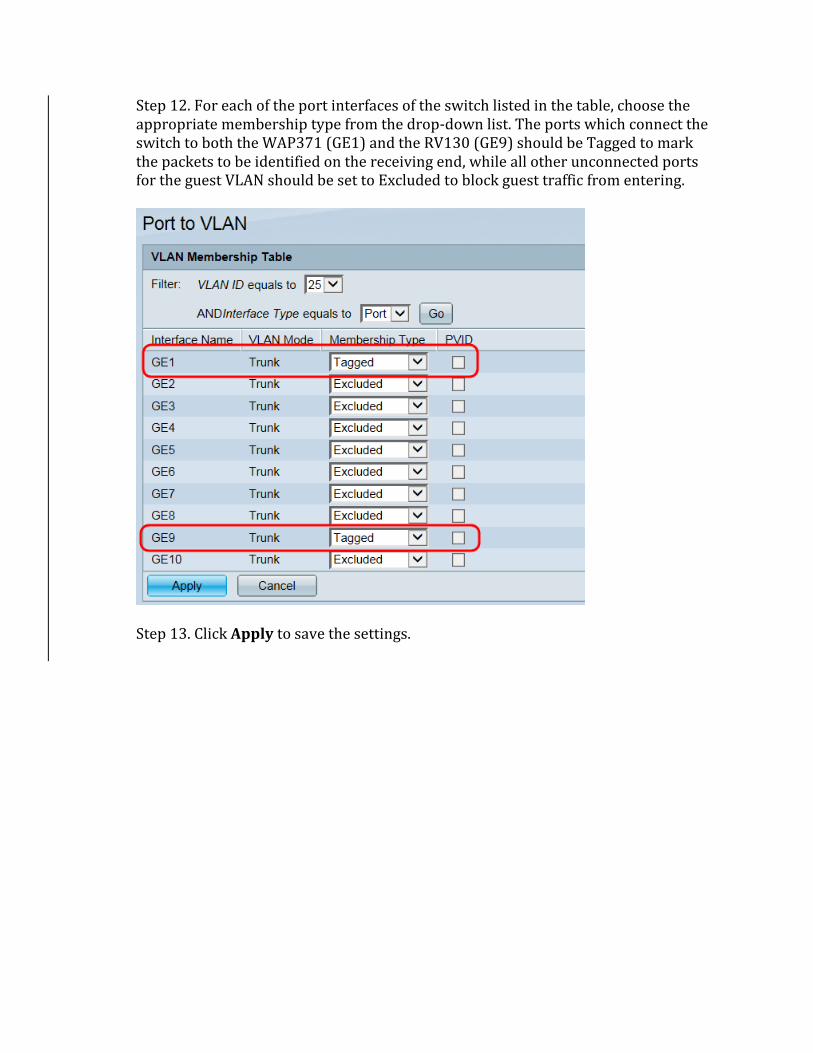
Step 12. For each of the port interfaces of the switch listed in the table, choose the appropriate membership type from the drop-down list. The ports which connect the switch to both the WAP371 (GE1) and the RV130 (GE9) should be Tagged to mark the packets to be identified on the receiving end, while all other unconnected ports for the guest VLAN should be set to Excluded to block guest traffic from entering.
Step 13. Click Apply to save the settings.
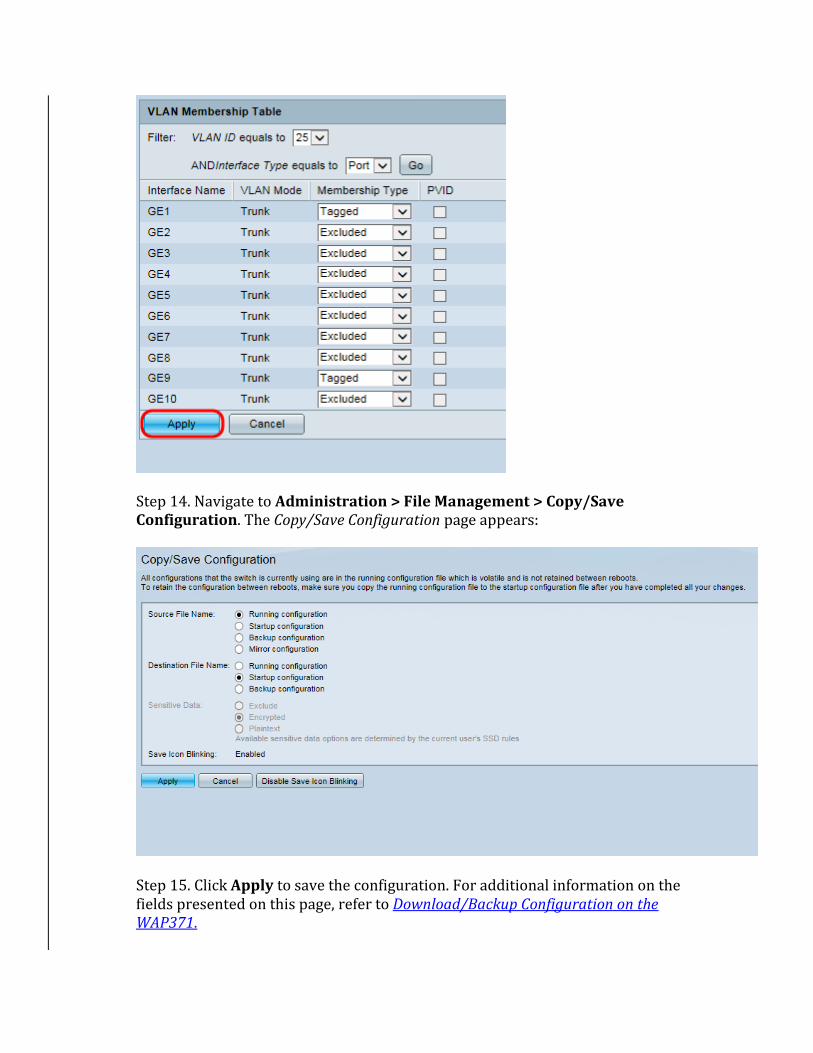
Step 14. Navigate to Administration > File Management > Copy/Save Configuration. The Copy/Save Configuration page appears:
Step 15. Click Apply to save the configuration. For additional information on the fields presented on this page, refer to Download/Backup Configuration on the WAP371.
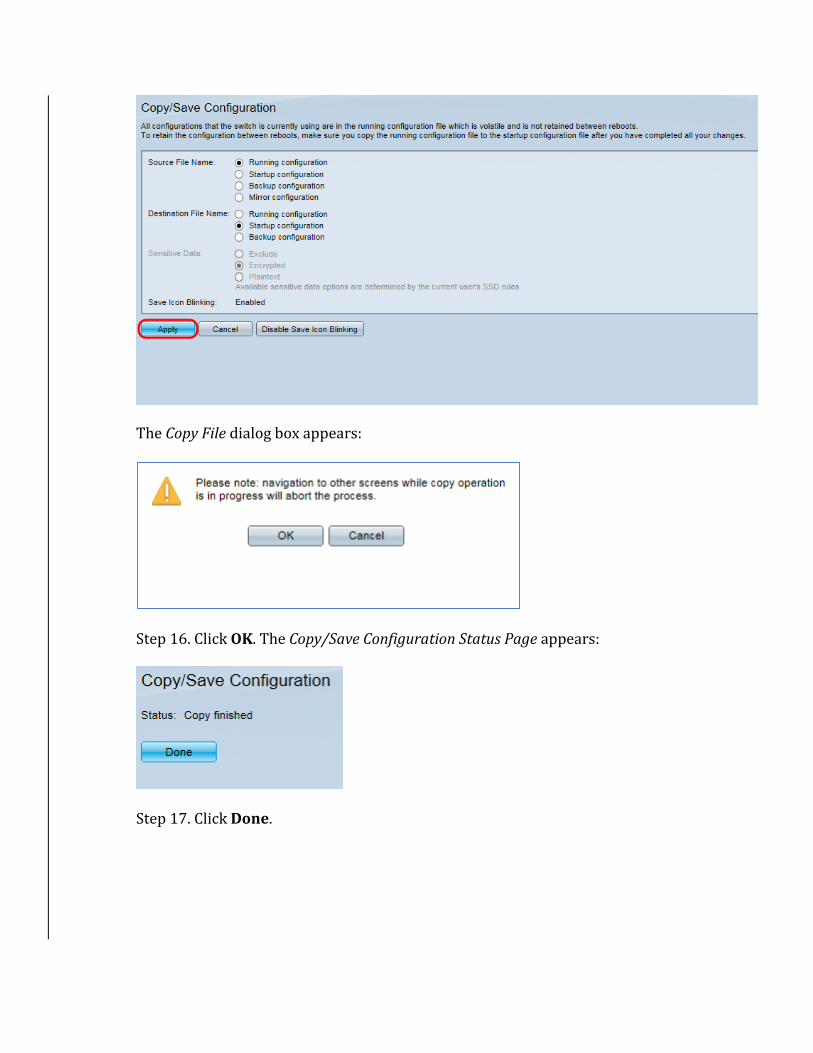
The Copy File dialog box appears:
Step 16. Click OK. The Copy/Save Configuration Status Page appears:
Step 17. Click Done.
Adding and Configuring a Guest Access VLAN on the WAP371
In this section, a separate SSID is created for guest access and security settings are applied to the wireless network.
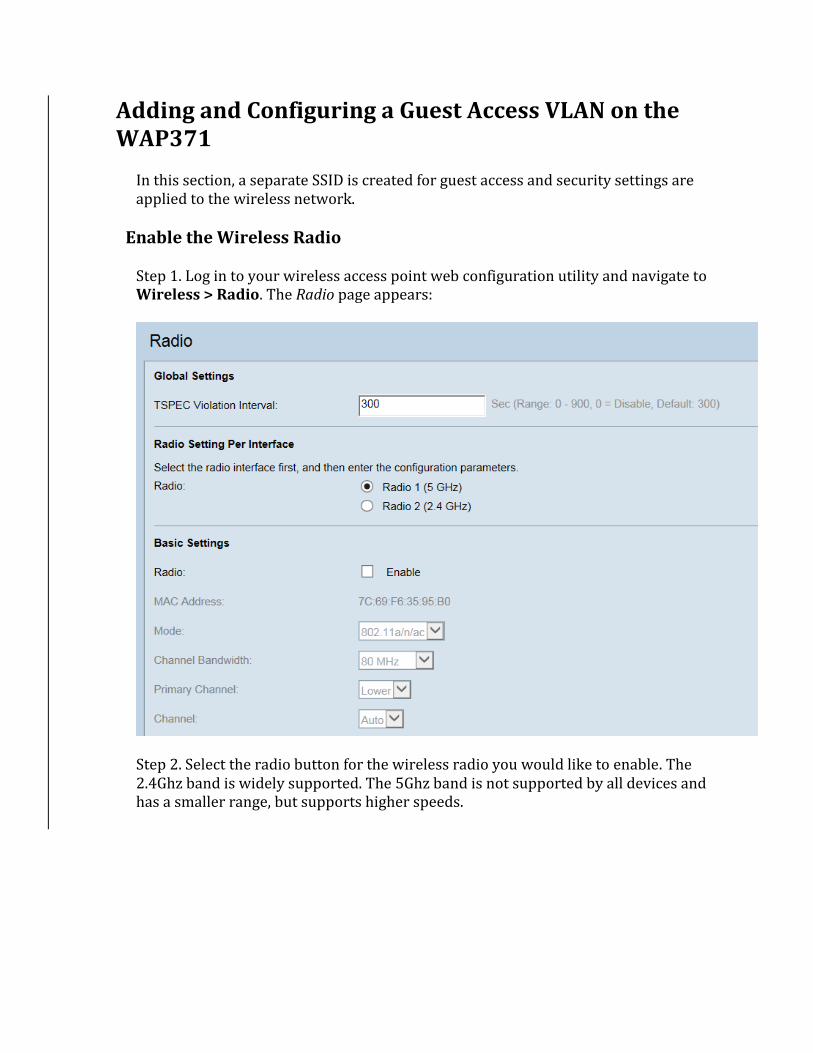
Enable the Wireless Radio
Step 1. Log in to your wireless access point web configuration utility and navigate to Wireless > Radio. The Radio page appears:
Step 2. Select the radio button for the wireless radio you would like to enable. The 2.4Ghz band is widely supported. The 5Ghz band is not supported by all devices and has a smaller range, but supports higher speeds.
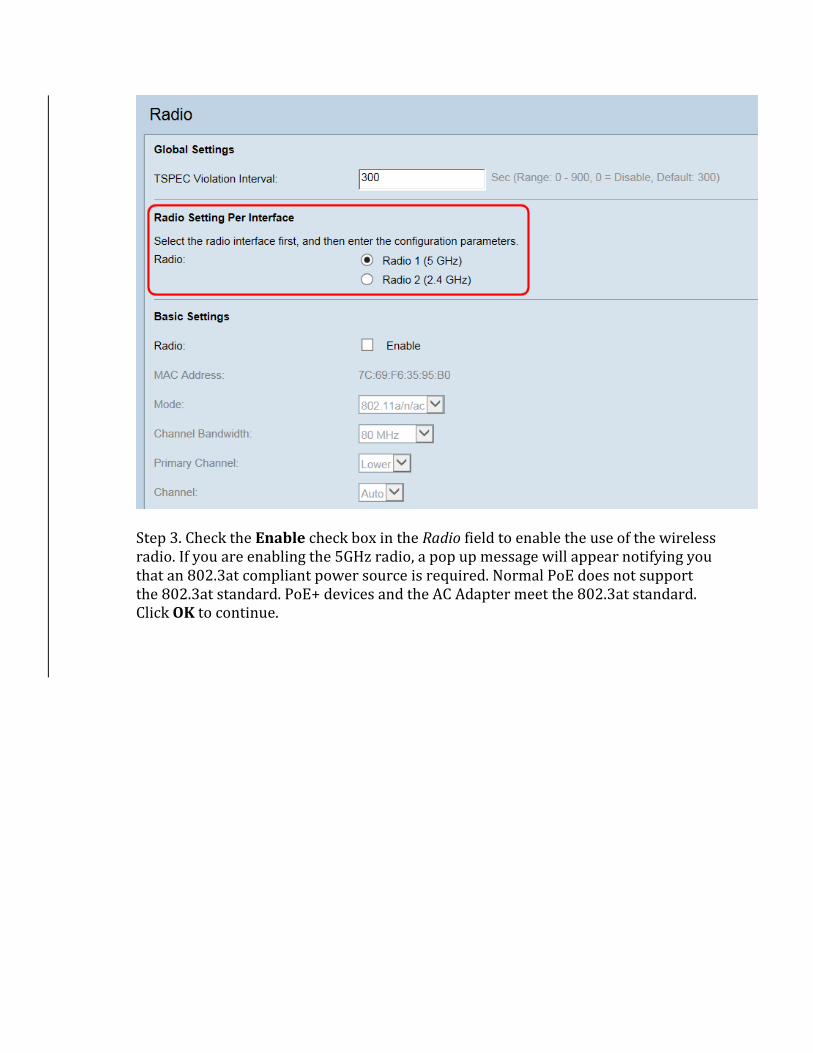
Step 3. Check the Enable check box in the Radio field to enable the use of the wireless radio. If you are enabling the 5GHz radio, a pop up message will appear notifying you that an 802.3at compliant power source is required. Normal PoE does not support the 802.3at standard. PoE+ devices and the AC Adapter meet the 802.3at standard. Click OK to continue.
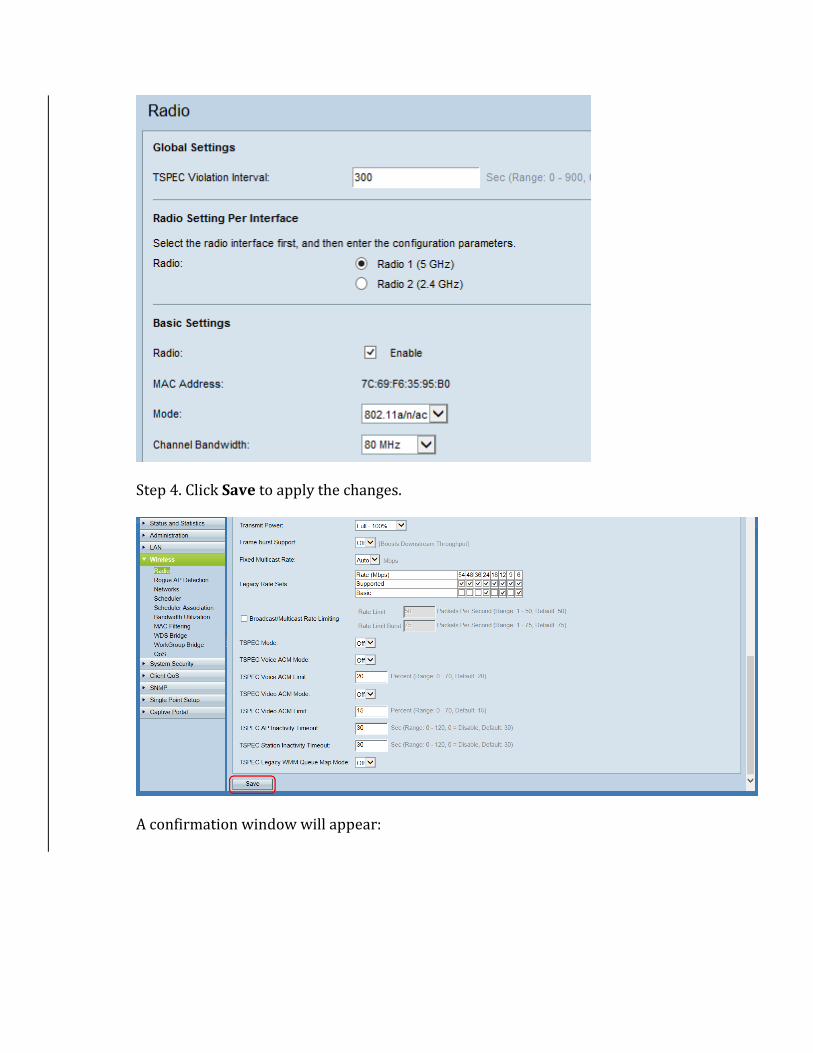
Step 4. Click Save to apply the changes.
A confirmation window will appear:
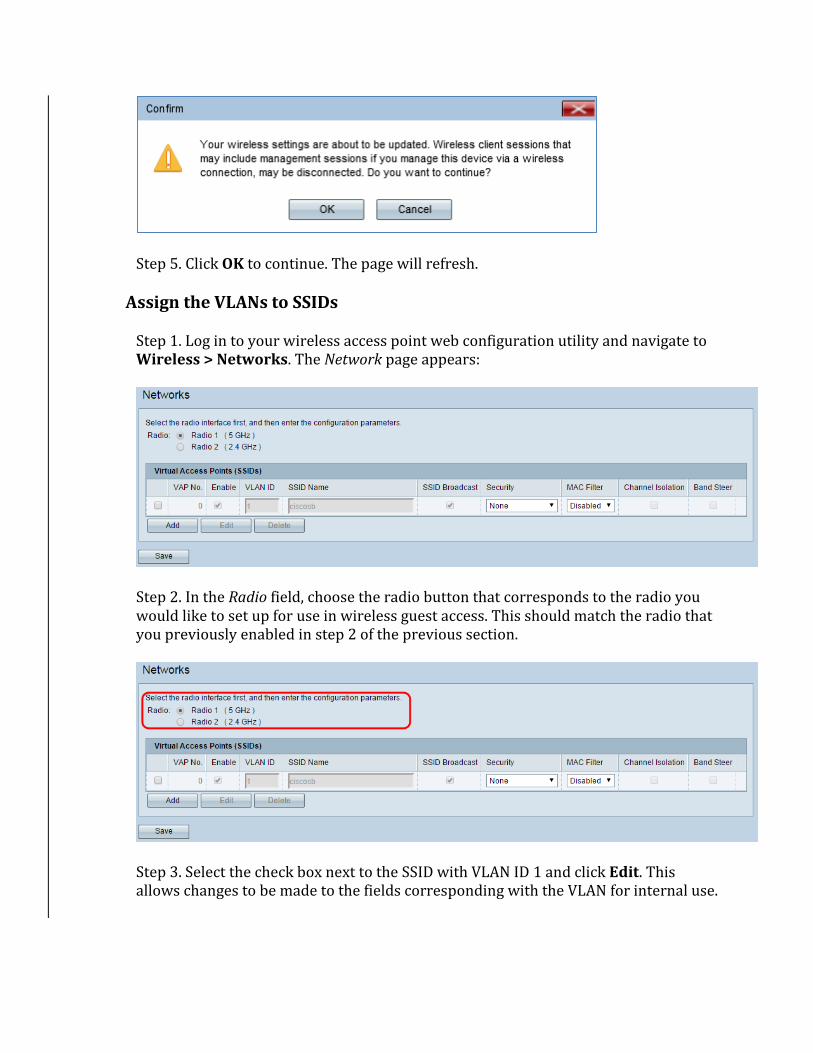
Step 5. Click OK to continue. The page will refresh.
Assign the VLANs to SSIDs
Step 1. Log in to your wireless access point web configuration utility and navigate to Wireless > Networks. The Network page appears:
Step 2. In the Radio field, choose the radio button that corresponds to the radio you would like to set up for use in wireless guest access. This should match the radio that you previously enabled in step 2 of the previous section.
Step 3. Select the check box next to the SSID with VLAN ID 1 and click Edit. This allows changes to be made to the fields corresponding with the VLAN for internal use.
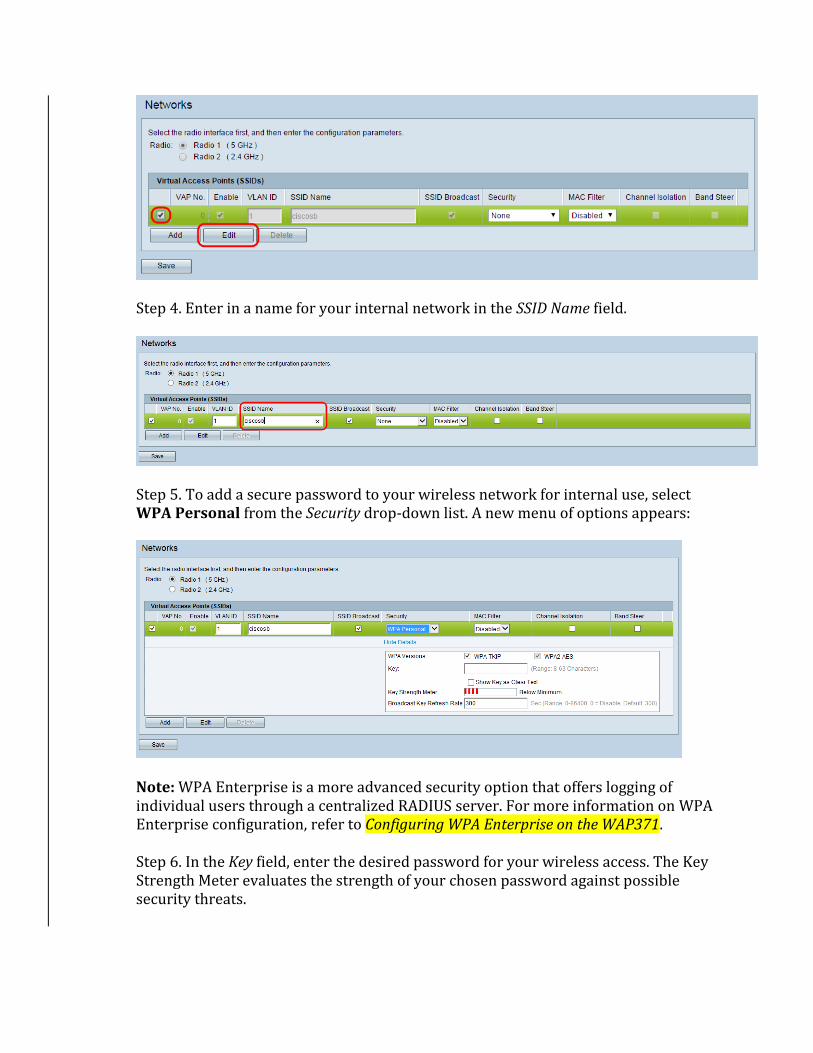
Step 4. Enter in a name for your internal network in the SSID Name field.
Step 5. To add a secure password to your wireless network for internal use, select WPA Personal from the Security drop-down list. A new menu of options appears:
Note: WPA Enterprise is a more advanced security option that offers logging of individual users through a centralized RADIUS server. For more information on WPA Enterprise configuration, refer to Configuring WPA Enterprise on the WAP371.
Step 6. In the Key field, enter the desired password for your wireless access. The Key Strength Meter evaluates the strength of your chosen password against possible security threats.
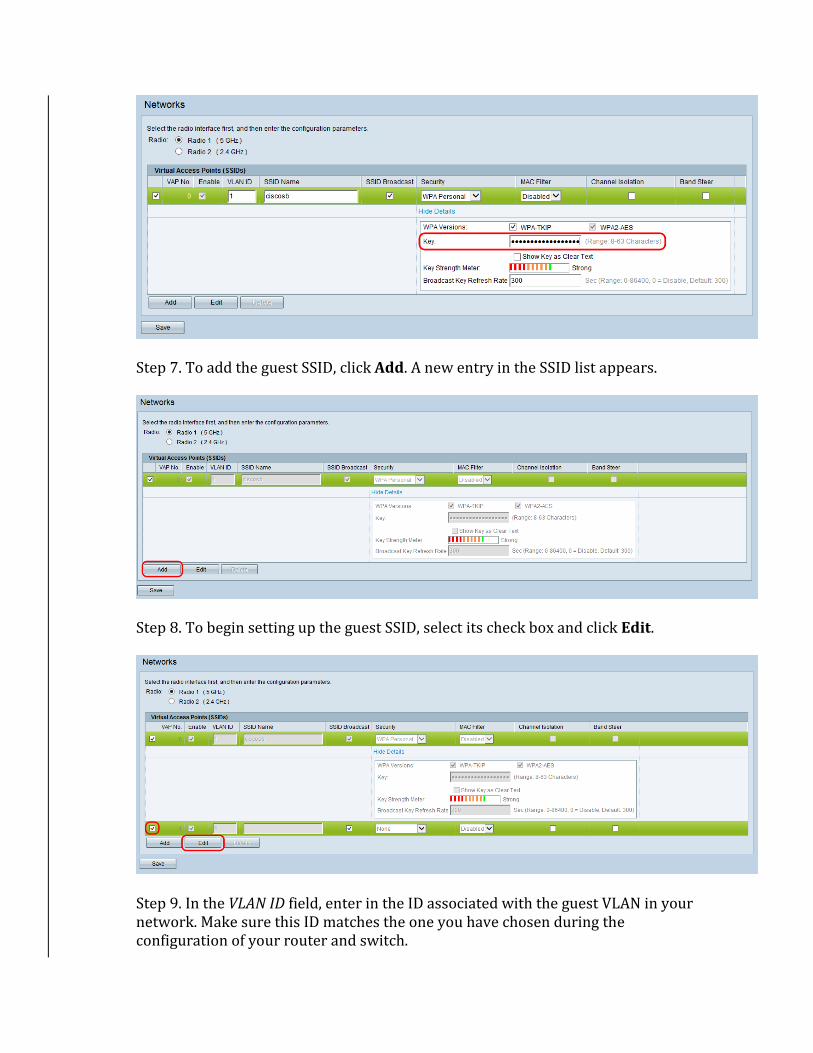
Step 7. To add the guest SSID, click Add. A new entry in the SSID list appears.
Step 8. To begin setting up the guest SSID, select its check box and click Edit.
Step 9. In the VLAN ID field, enter in the ID associated with the guest VLAN in your network. Make sure this ID matches the one you have chosen during the configuration of your router and switch.
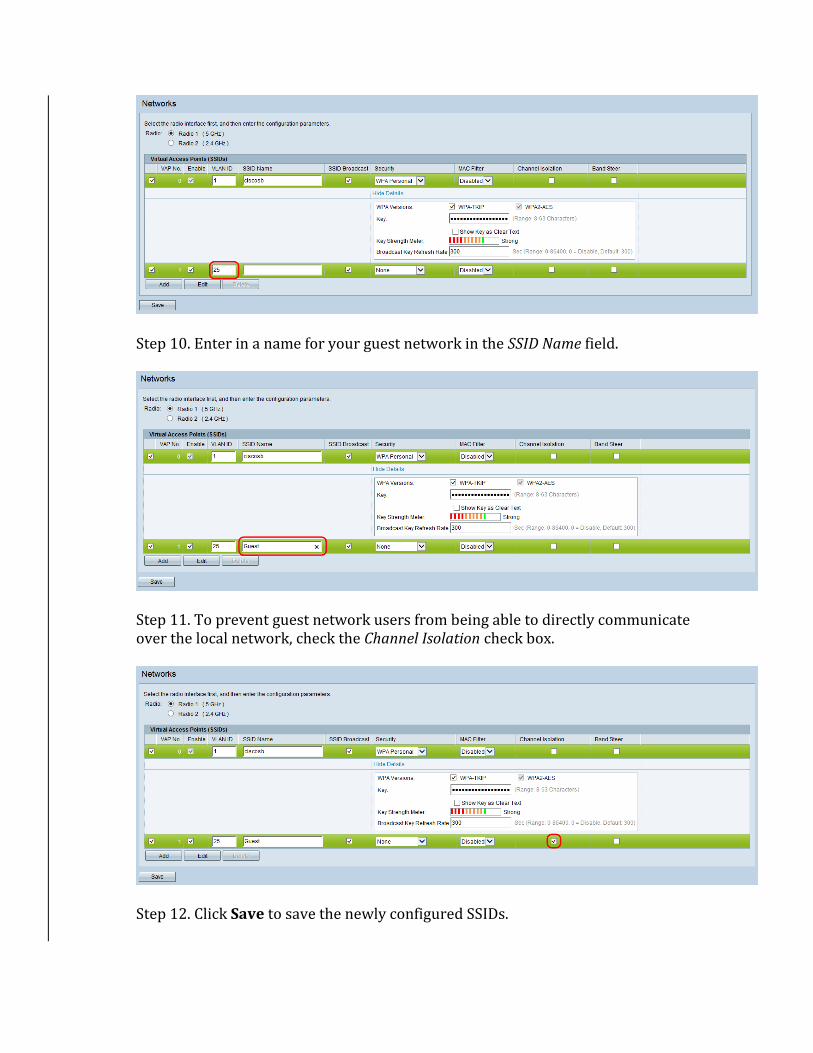
Step 10. Enter in a name for your guest network in the SSID Name field.
Step 11. To prevent guest network users from being able to directly communicate over the local network, check the Channel Isolation check box.
Step 12. Click Save to save the newly configured SSIDs.
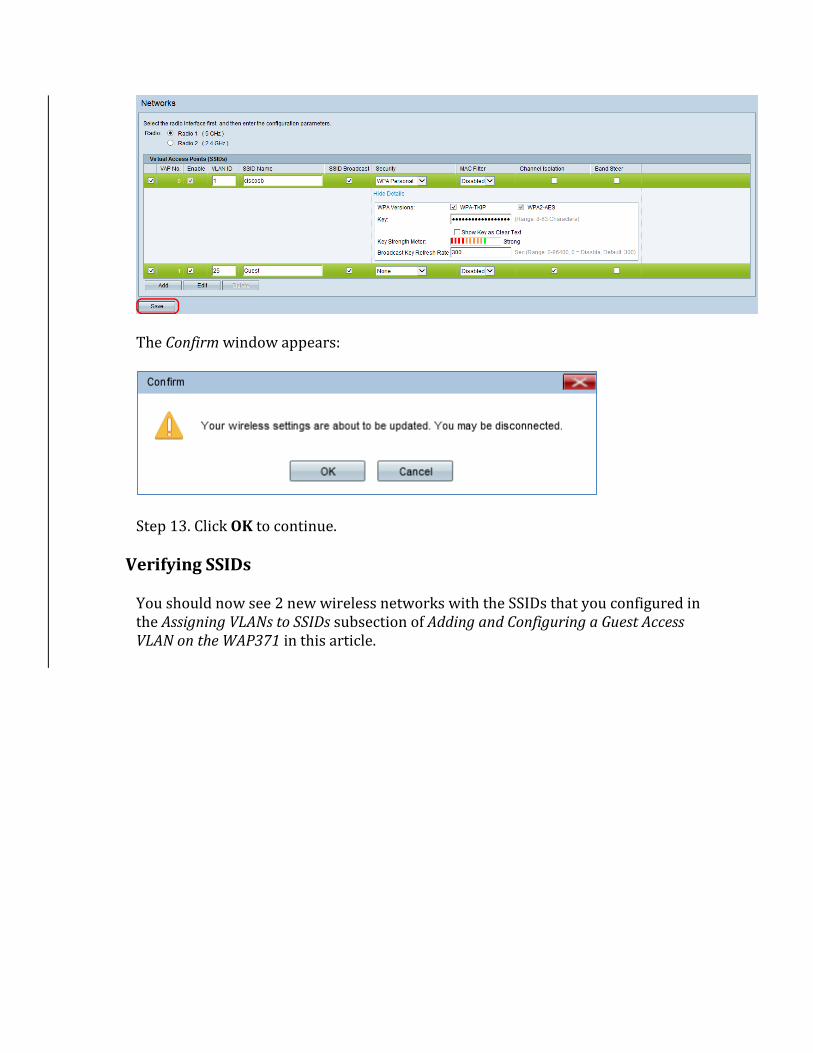
The Confirm window appears:
Step 13. Click OK to continue.
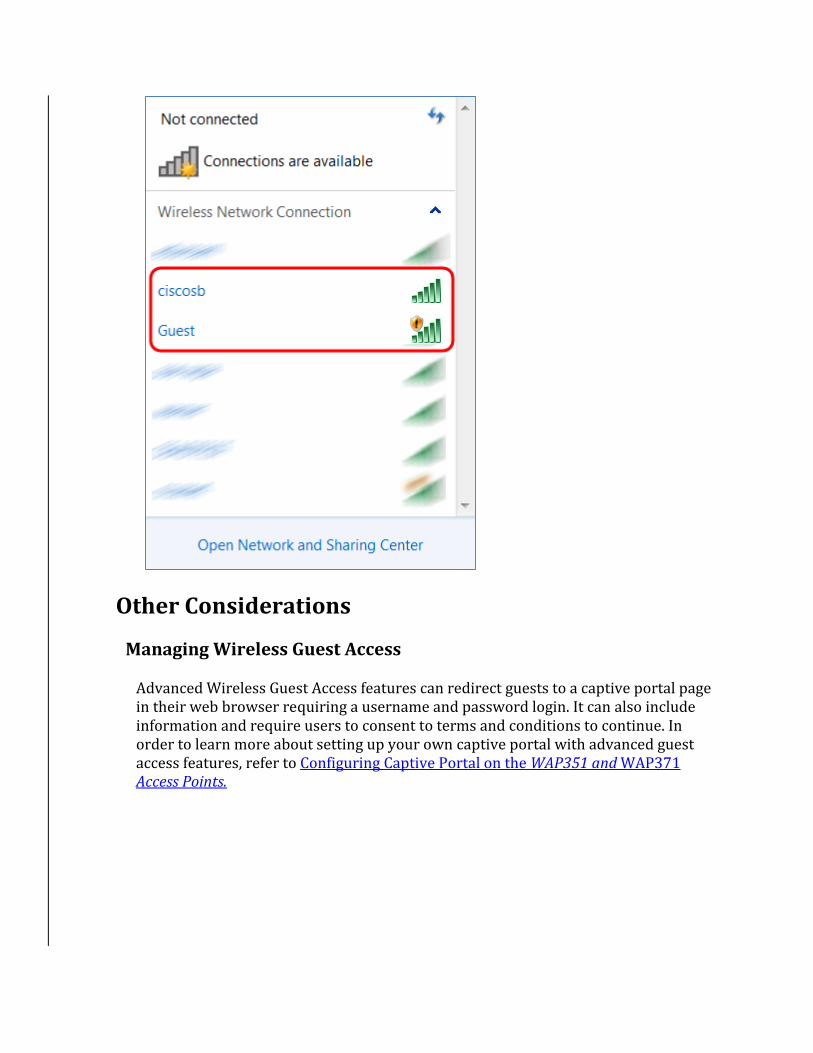
Verifying SSIDs
You should now see 2 new wireless networks with the SSIDs that you configured in the Assigning VLANs to SSIDs subsection of Adding and Configuring a Guest Access VLAN on the WAP371 in this article.
Other Considerations
Managing Wireless Guest Access
Advanced Wireless Guest Access features can redirect guests to a captive portal page in their web browser requiring a username and password login. It can also include information and require users to consent to terms and conditions to continue. In order to learn more about setting up your own captive portal with advanced guest access features, refer to Configuring Captive Portal on the WAP351 and WAP371 Access Points.