Embed Size (px)
Citation preview
Configure 802.1x - PEAP with FreeRadius andWLC 8.3 Contents
IntroductionPrerequisitesRequirementsComponents UsedConfigureNetwork DiagramInstall httpd Server and MariaDBInstall PHP 7 on CentOS 7Install FreeRADIUSFreeRADIUSWLC as Authentication, Authorization, and Accounting (AAA) Client on FreeRADIUSFreeRADIUS as RADIUS Server on WLCWLANAdd Users to freeRADIUS DatabaseCertificates on freeRADIUSEnd Device ConfigurationImport FreeRADIUS CertificateCreate WLAN ProfileVerifyAuthentication Process on WLCTroubleshoot
Introduction
This documents describes how to set up a Wireless Local Area Network (WLAN) with 802.1xsecurity and Protected Extensible Authentication Protocol (PEAP) as Extensible AuthenticationProtocol (EAP). FreeRADIUS is used as the external Remote Authentication Dial-In User Service(RADIUS) server.
Prerequisites
Requirements
Cisco recommends that you have basic knowledge of these topics:
Linux●
Vim editor●
AireOS Wireless LAN Controllers (WLCs)●
Note: This document is intended to give the readers an example on the configurationrequired on a freeRADIUS server for PEAP-MS-CHAPv2 authentication. The freeRADIUSserver configuration presented in this document has been tested in the lab and found to workas expected. The Cisco Technical Assistance Center (TAC) does not support freeRADIUSserver configuration.
Components Used
The information in this document is based on these software and hardware versions:
CentOS7 or Red Hat Enterprise Linux 7 (RHEL7) (Recommended 1 GB RAM and at least 20GB HDD)
●
WLC 5508 v8.3●
MariaDB (MySQL)●
FreeRADIUS●
PHP 7●
The information in this document was created from the devices in a specific lab environment. All ofthe devices used in this document started with a cleared (default) configuration. If your network islive, make sure that you understand the potential impact of any command.
Configure
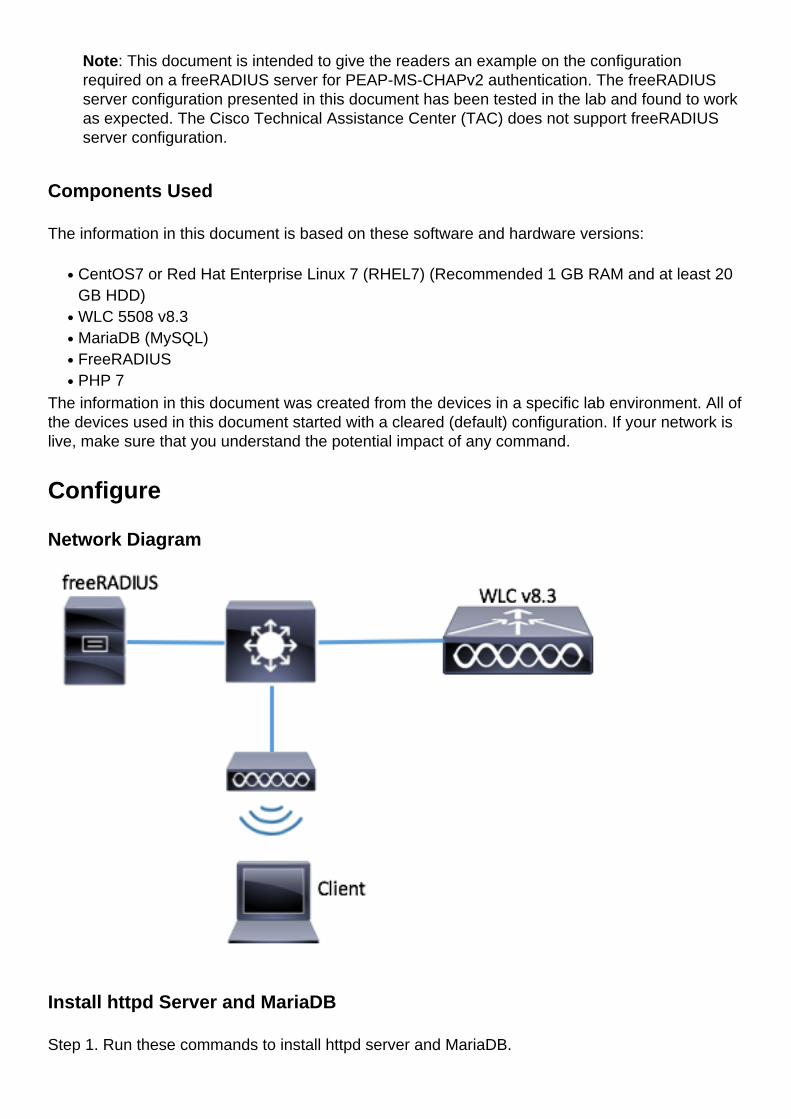
Network Diagram
Install httpd Server and MariaDB
Step 1. Run these commands to install httpd server and MariaDB.
[root@tac-mxwireless ~]# yum -y update
[root@tac-mxwireless ~]# yum -y groupinstall "Development Tools"
[root@tac-mxwireless ~]# yum -y install httpd httpd-devel mariadb-server mariadb
Step 2. Start and enable httpd (Apache) and MariaDB server.
[root@tac-mxwireless ~]# systemctl enable httpd
[root@tac-mxwireless ~]# systemctl start httpd
[root@tac-mxwireless ~]# systemctl start mariadb
[root@tac-mxwireless ~]# systemctl enable mariadb
Step 3. Configure initial MariaDB settings to secure it.
[root@tac-mxwireless ~]#mysql_secure_installation
Note: Run all parts of this script. It is recommended for All MariaDB Servers in productionuse. Read each step carefully.
[root@tac-mxwireless ~]#mysql_secure_installation
Step 4. Configure Database for freeRADIUS (use same password configured in Step 3).
[root@tac-mxwireless ~]#mysql_secure_installation
Install PHP 7 on CentOS 7
Step 1. Run these commands to install PHP 7 on CentOS7.
[root@tac-mxwireless ~]#mysql_secure_installation
Install FreeRADIUS
Step 1. Run this command to install FreeRADIUS.
[root@tac-mxwireless ~]#mysql_secure_installation
Step 2. Make radius.service start after mariadb.service.
Run this command:
[root@tac-mxwireless ~]#mysql_secure_installation
Add a line in [Unit] section:
[root@tac-mxwireless ~]#mysql_secure_installation
[Unit] section must look like this:
[root@tac-mxwireless ~]#mysql_secure_installation
Step 3. Start and enable freeradius to start at boot up.
[root@tac-mxwireless ~]#mysql_secure_installation
Step 4. Enable firewalld for security.
[root@tac-mxwireless ~]#mysql_secure_installation
Step 5. Add permanent rules to default zone to allow http, https and radius services.
[root@tac-mxwireless ~]#mysql_secure_installation
Step 6. Reload firewalld for changes to take effect.
[root@tac-mxwireless ~]#mysql_secure_installation
FreeRADIUS
In order to configure FreeRADIUS to use MariaDB, follow these steps.
Step 1. Import the RADIUS database scheme to populate RADIUS database.
[root@tac-mxwireless ~]#mysql_secure_installation
Step 2. Create a soft link for Structured Query Language (SQL) under /etc/raddb/mods-enabled.
[root@tac-mxwireless ~]#mysql_secure_installation
Step 3. Configure SQL module /raddb/mods-available/sql and change the database connectionparameters to suite your environment.
[root@tac-mxwireless ~]#mysql_secure_installation
SQL section must look similar to this.
[root@tac-mxwireless ~]#mysql_secure_installation
Step 4. Change group right of /etc/raddb/mods-enabled/sql to radiusd.
[root@tac-mxwireless ~]#mysql_secure_installation
WLC as Authentication, Authorization, and Accounting (AAA) Client onFreeRADIUS
Step 1. Edit /etc/raddb/clients.conf in order to set shared key for WLC.
[root@tac-mxwireless ~]#mysql_secure_installation
Step 2. At the bottom, add your controller ip address and the shared key.
[root@tac-mxwireless ~]#mysql_secure_installation
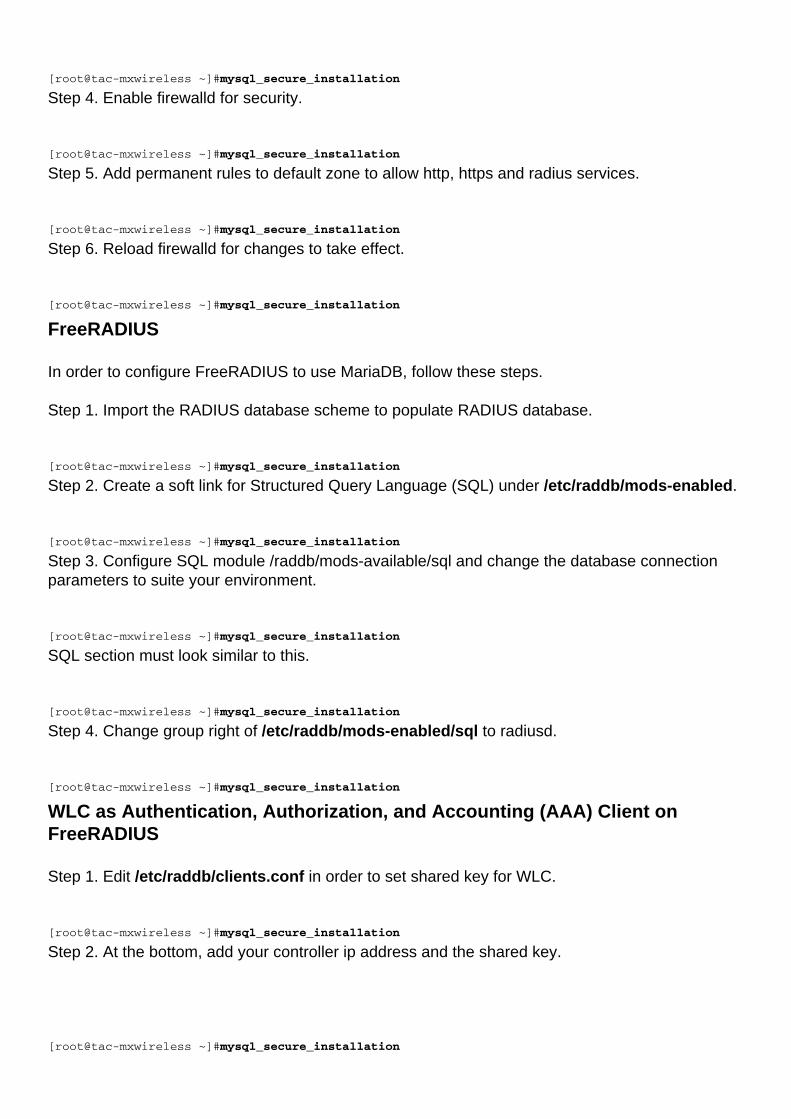
FreeRADIUS as RADIUS Server on WLC
GUI:
Step 1. Open the GUI of the WLC and navigate to SECURITY > RADIUS > Authentication >New as shown in the image.
Step 2. Fill the RADIUS server information as shown in the image.
CLI:
[root@tac-mxwireless ~]#mysql_secure_installation
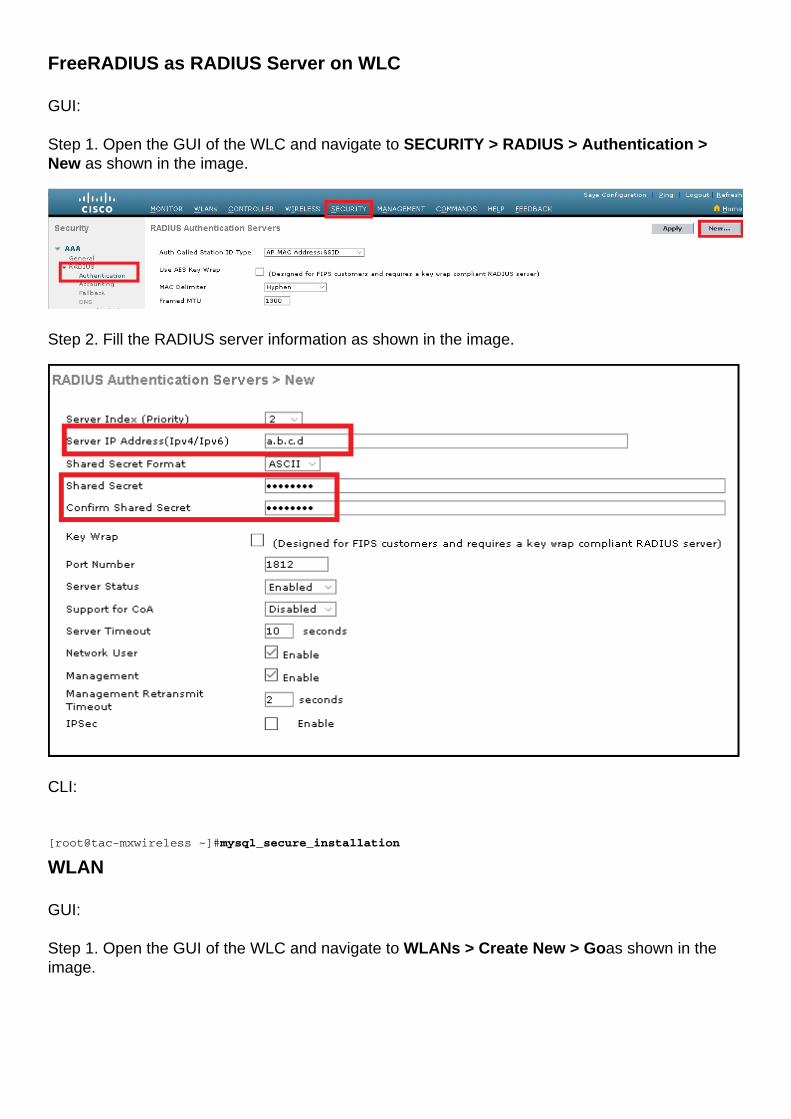
WLAN
GUI:
Step 1. Open the GUI of the WLC and navigate to WLANs > Create New > Goas shown in theimage.
Step 2. Choose a name for the Service Set Identifier (SSID) and profile, then click Applyas shownin the image.
CLI:
[root@tac-mxwireless ~]#mysql_secure_installation
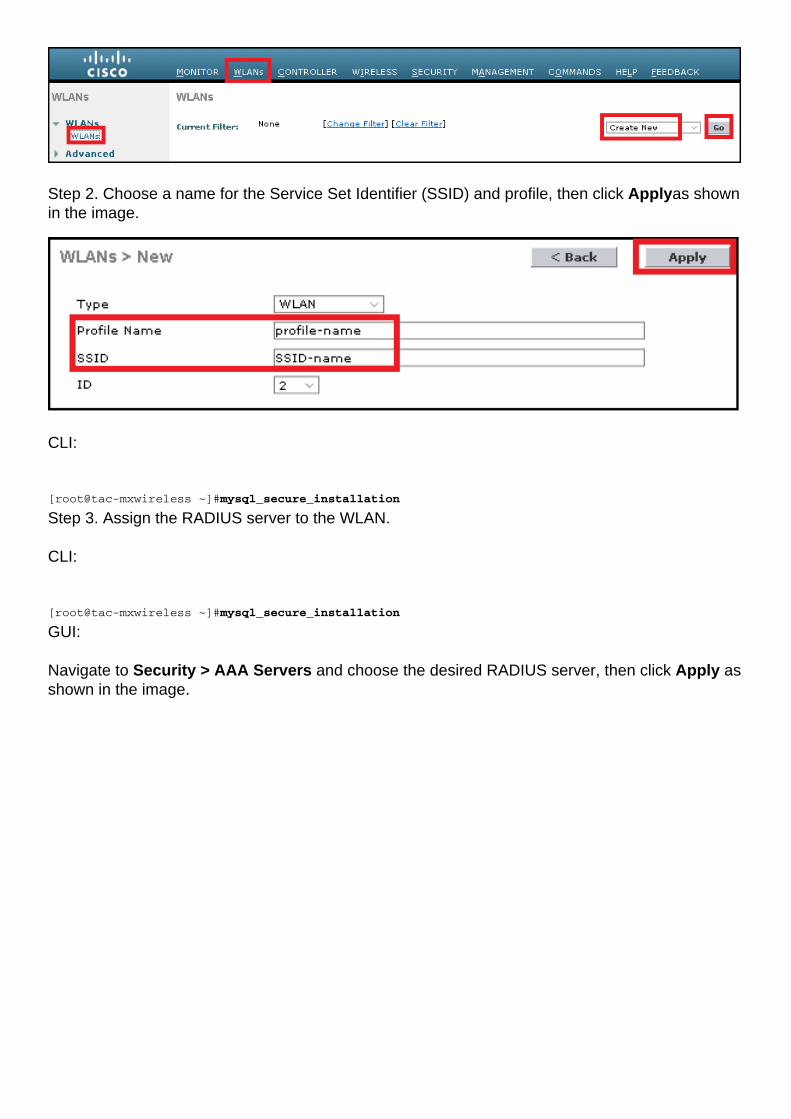
Step 3. Assign the RADIUS server to the WLAN.
CLI:
[root@tac-mxwireless ~]#mysql_secure_installation
GUI:
Navigate to Security > AAA Servers and choose the desired RADIUS server, then click Apply asshown in the image.
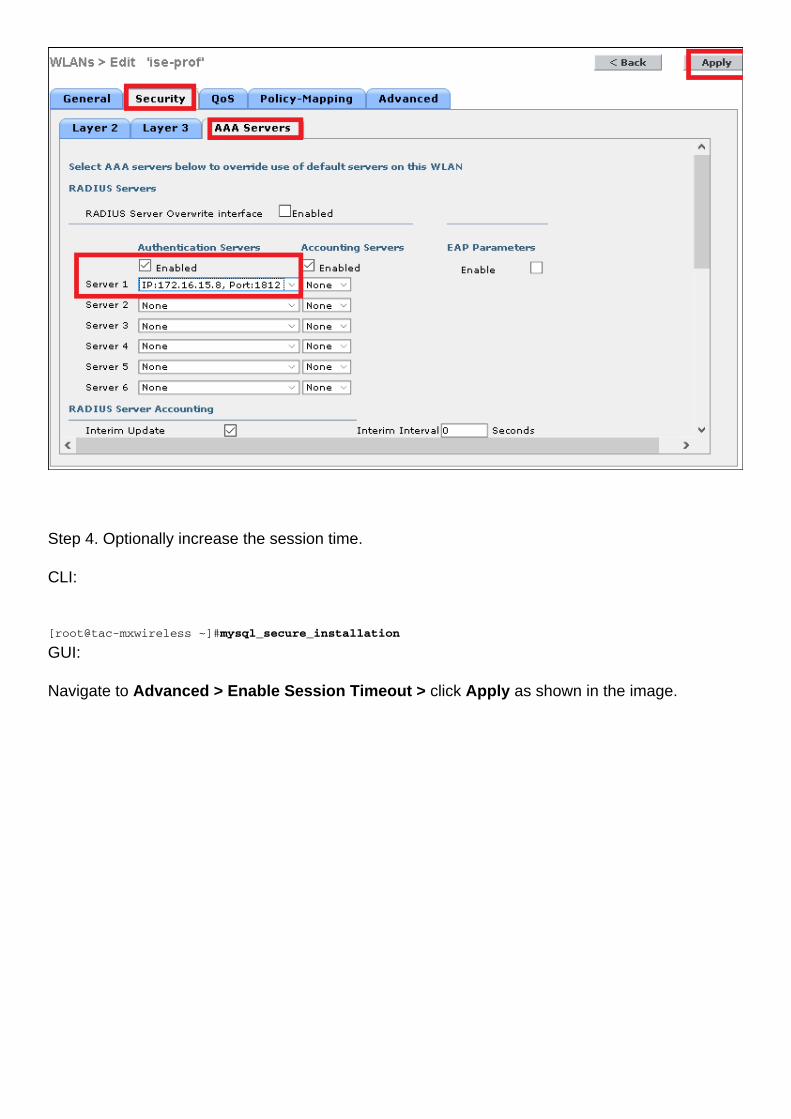
Step 4. Optionally increase the session time.
CLI:
[root@tac-mxwireless ~]#mysql_secure_installation
GUI:
Navigate to Advanced > Enable Session Timeout > click Apply as shown in the image.
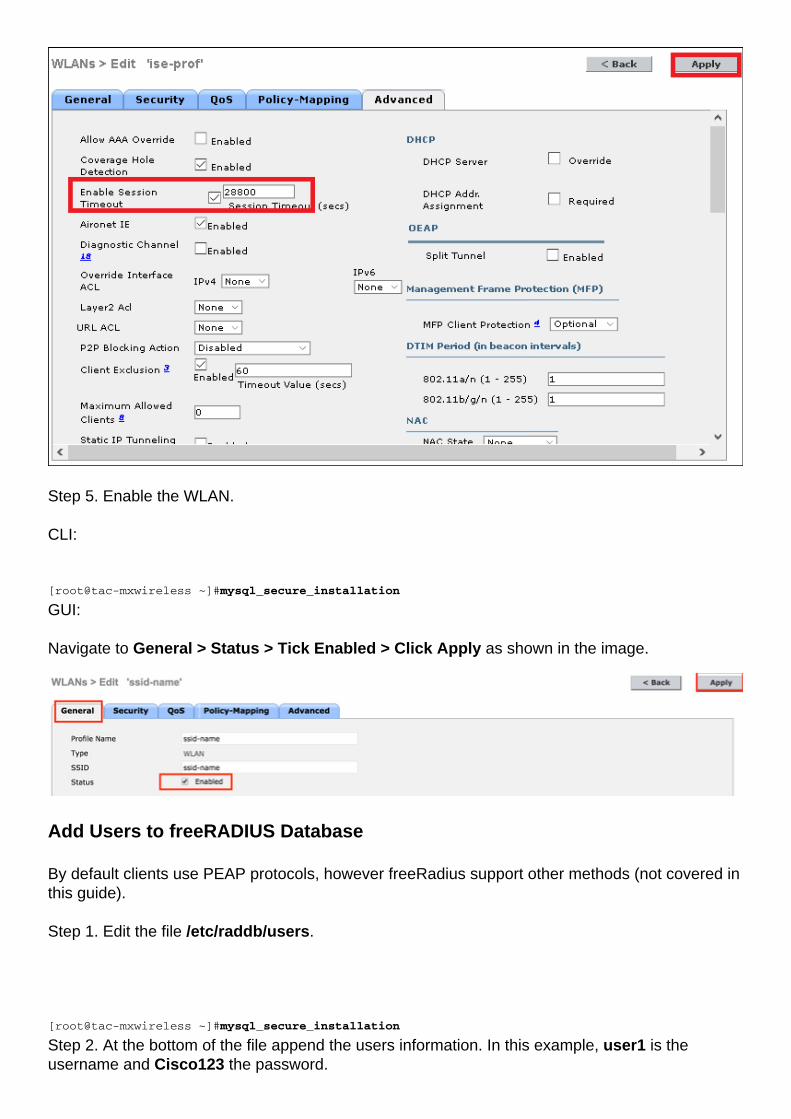
Step 5. Enable the WLAN.
CLI:
[root@tac-mxwireless ~]#mysql_secure_installation
GUI:
Navigate to General > Status > Tick Enabled > Click Apply as shown in the image.
Add Users to freeRADIUS Database
By default clients use PEAP protocols, however freeRadius support other methods (not covered inthis guide).
Step 1. Edit the file /etc/raddb/users.
[root@tac-mxwireless ~]#mysql_secure_installation
Step 2. At the bottom of the file append the users information. In this example, user1 is theusername and Cisco123 the password.
[root@tac-mxwireless ~]#mysql_secure_installation
Step 3. Restart FreeRadius.
[root@tac-mxwireless ~]#mysql_secure_installation
Certificates on freeRADIUS
FreeRADIUS comes with a default Certification Authoritiy (CA) certificate and a device certificatewhich are stored in the path /etc/raddb/certs. The name of these certificates are ca.pemand server.pem. server.pem is the certificate that clients receive while they go through theauthentication process. If you need to assign a different certificate for EAP authentication you cansimply delete them and save the new ones in the same path with that exact same name.
End Device Configuration
Configure a laptop Windows machine to connect to an SSID with 802.1x Authentication andPEAP/MS-CHAP (Microsoft version of the Challenge-Handshake Authentication Protocol) version2.
In order to create the WLAN profile on the windows machine there are two options:
Install the self-signed certificate on the machine to validate and trust freeRADIUS server inorder to complete the authentication
1.
Bypass the validation of the RADIUS server and trust any RADIUS server used to performthe authentication (not recommended, as it can become a security issue). The configurationfor these options are explained on End device configuration - Create the WLAN Profile.
2.
Import FreeRADIUS Certificate
If you use the default certificates installed on freeRADIUS, follow these steps in order to import theEAP certificate from the freeRADIUS server into the end device.
Step 1. Get the cert from FreeRadius:
[root@tac-mxwireless ~]#mysql_secure_installation
Step 2. Copy and paste the output of the previous step into a text file and change extension to .crt
Step 3. Double click the file and select Install Certificate... as shown in the image.
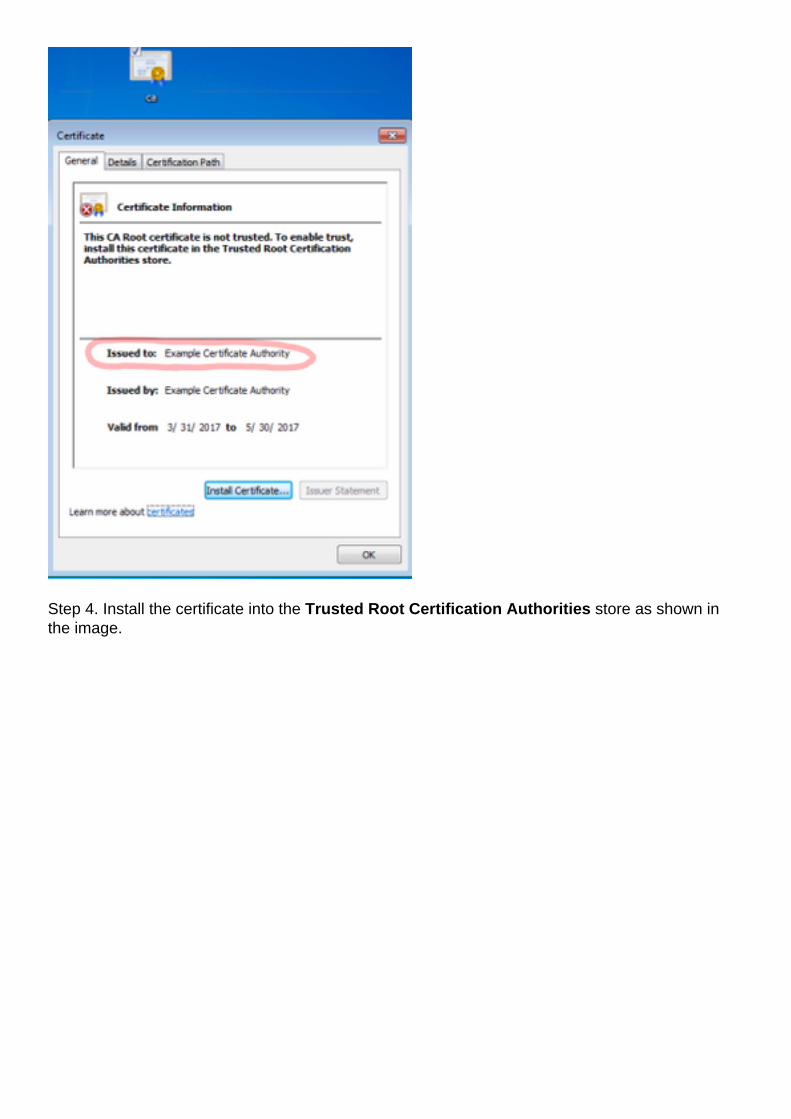
Step 4. Install the certificate into the Trusted Root Certification Authorities store as shown inthe image.
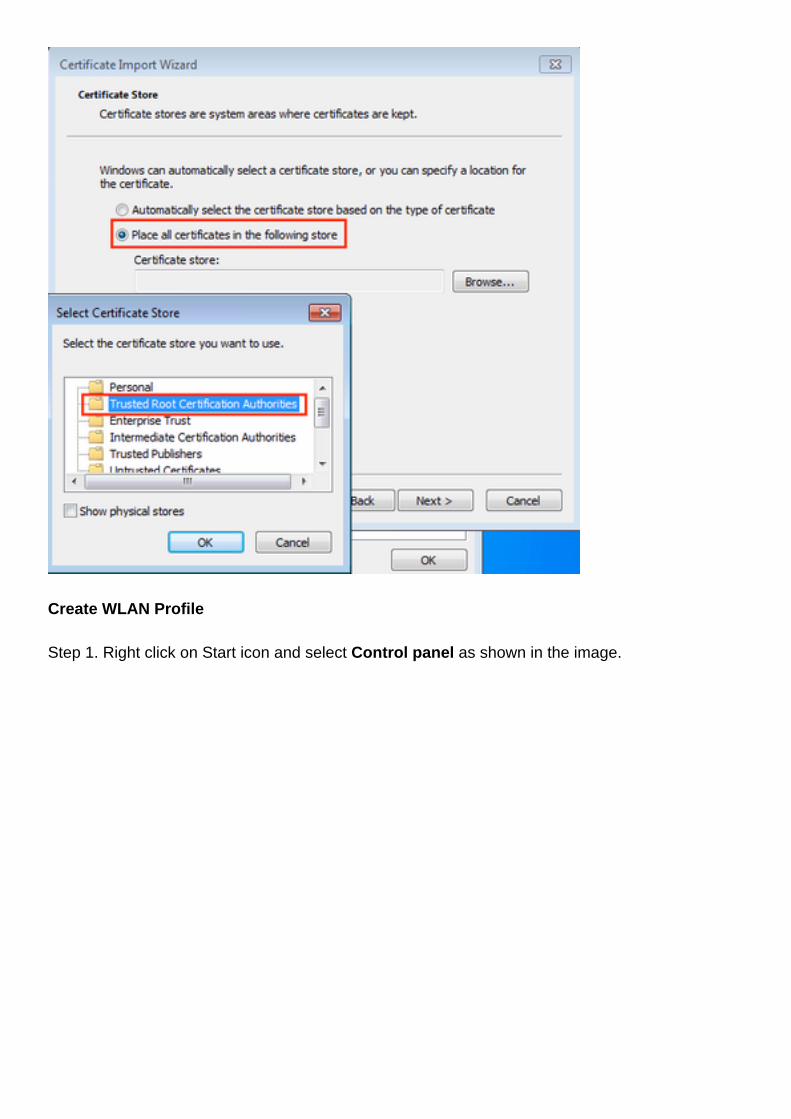
Create WLAN Profile
Step 1. Right click on Start icon and select Control panel as shown in the image.

Step 2. Navigate to Network and Internet > Network and Sharing Center> click Set up a newconnection or network as shown in the image.
Step 3. Select Manually connect to a wireless network and click Nextas shown in the image.
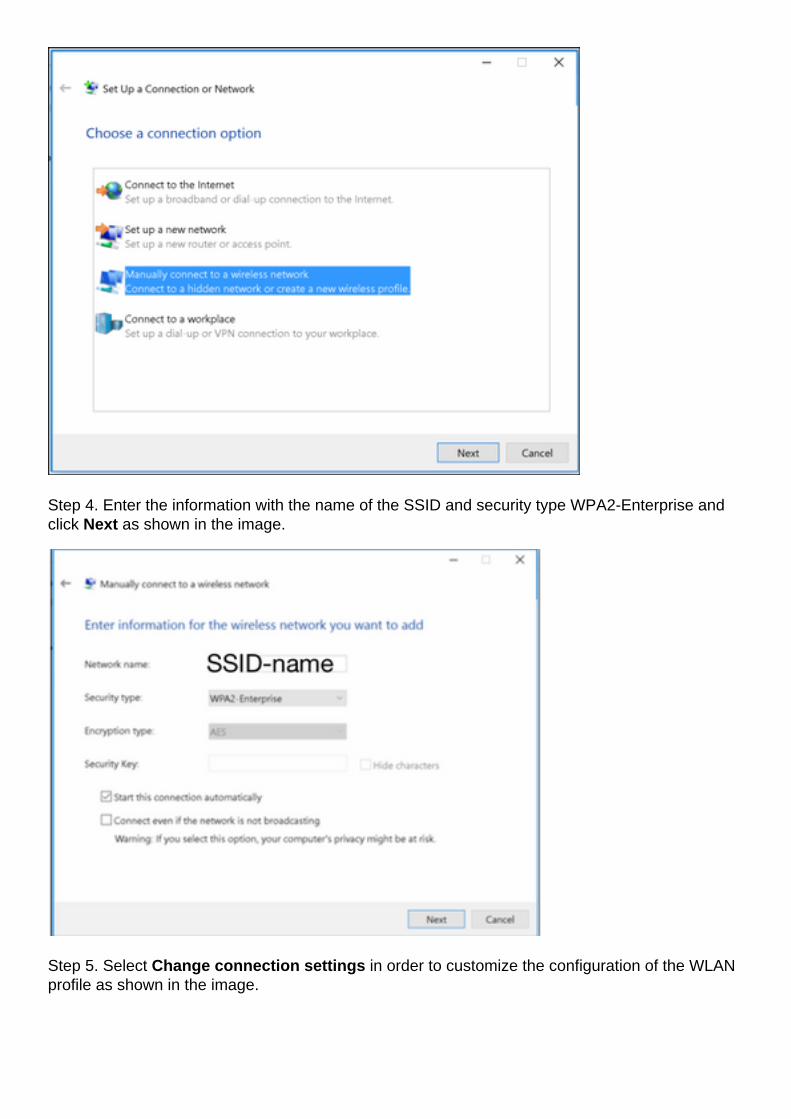
Step 4. Enter the information with the name of the SSID and security type WPA2-Enterprise andclick Next as shown in the image.
Step 5. Select Change connection settings in order to customize the configuration of the WLANprofile as shown in the image.
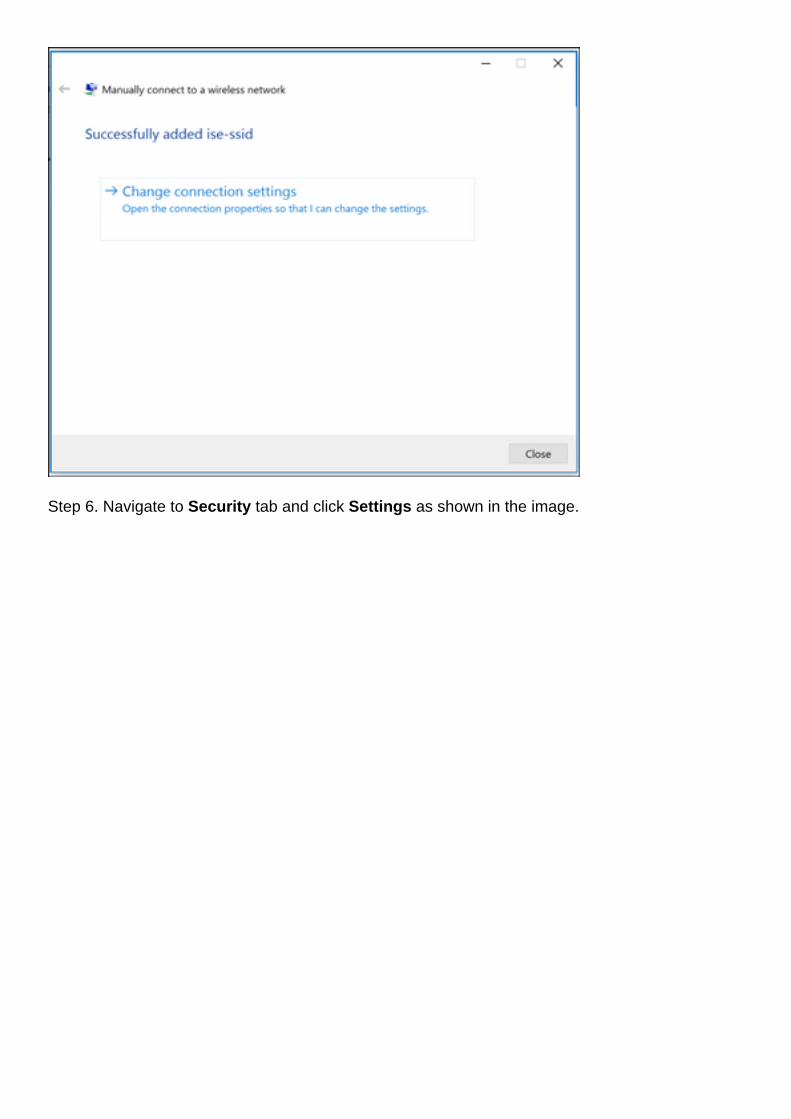
Step 6. Navigate to Security tab and click Settings as shown in the image.

Step 7. Choose if RADIUS server is validated or not.
If yes, enable Verify the server's identity by validating the certificate and from Trusted RootCertification Authorities: list select the self-signed certificate of freeRADIUS.
After that select Configure and disable Automatically use my Windows logon name andpassword..., then click OK as shown in the images.
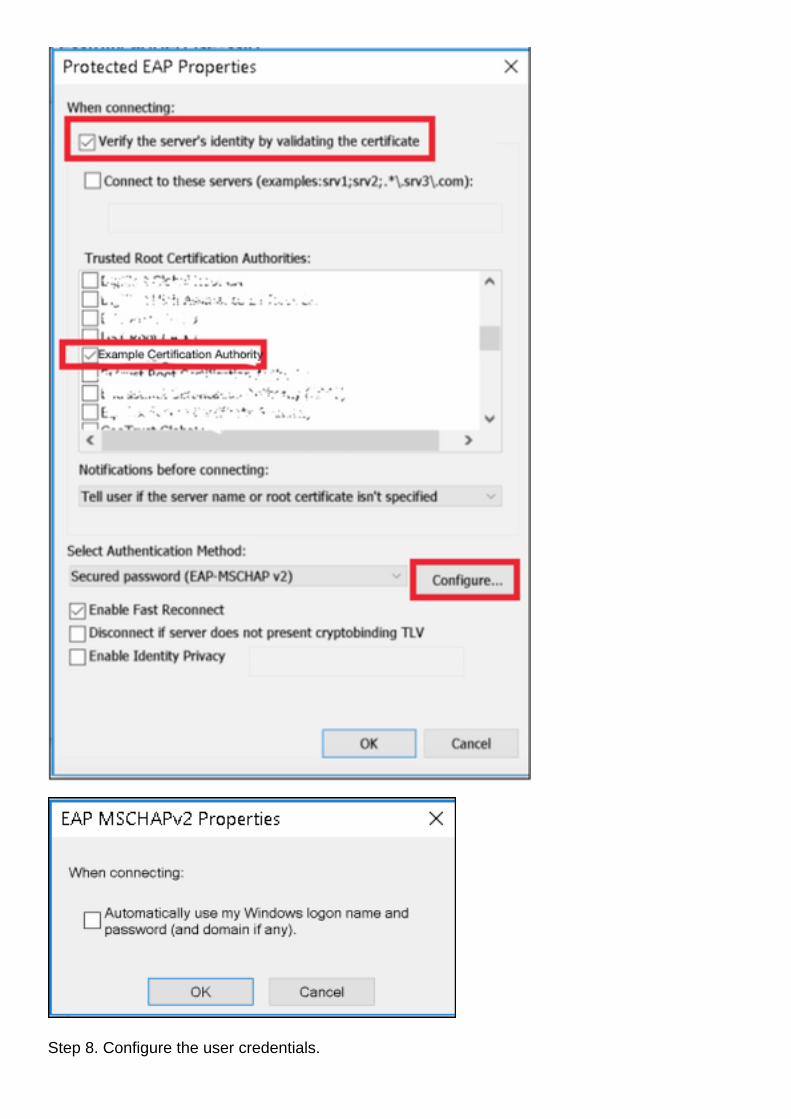
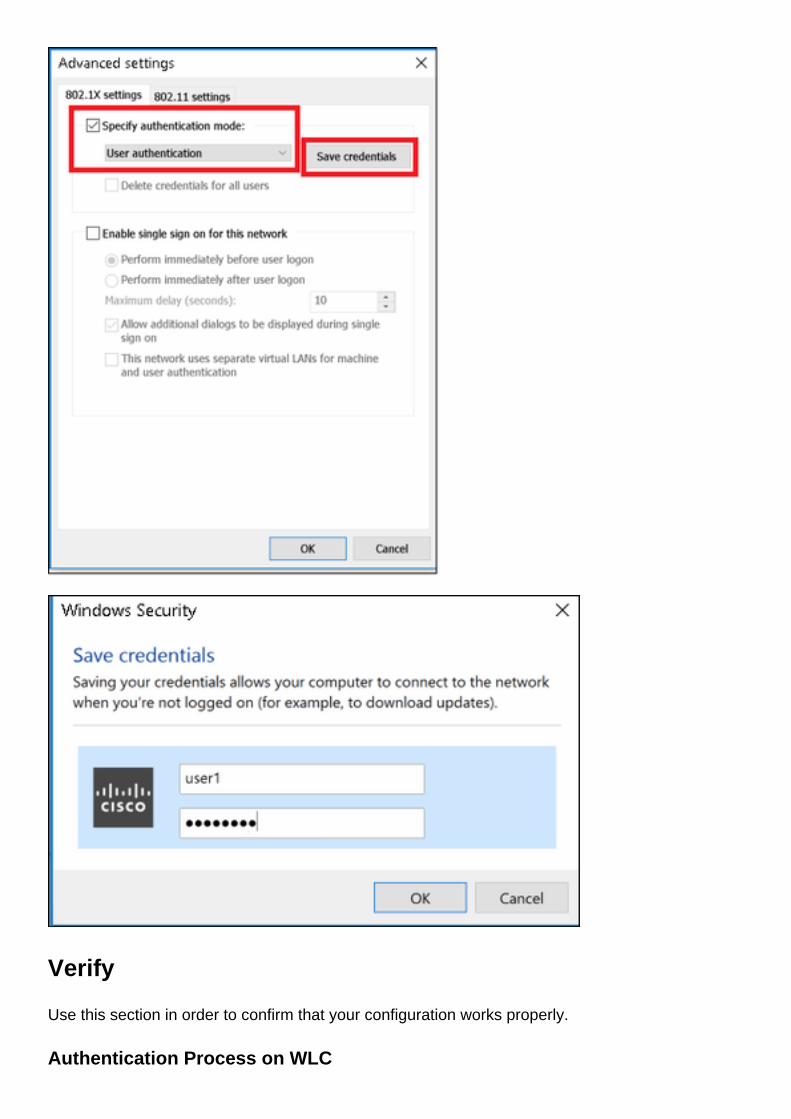
Step 8. Configure the user credentials.
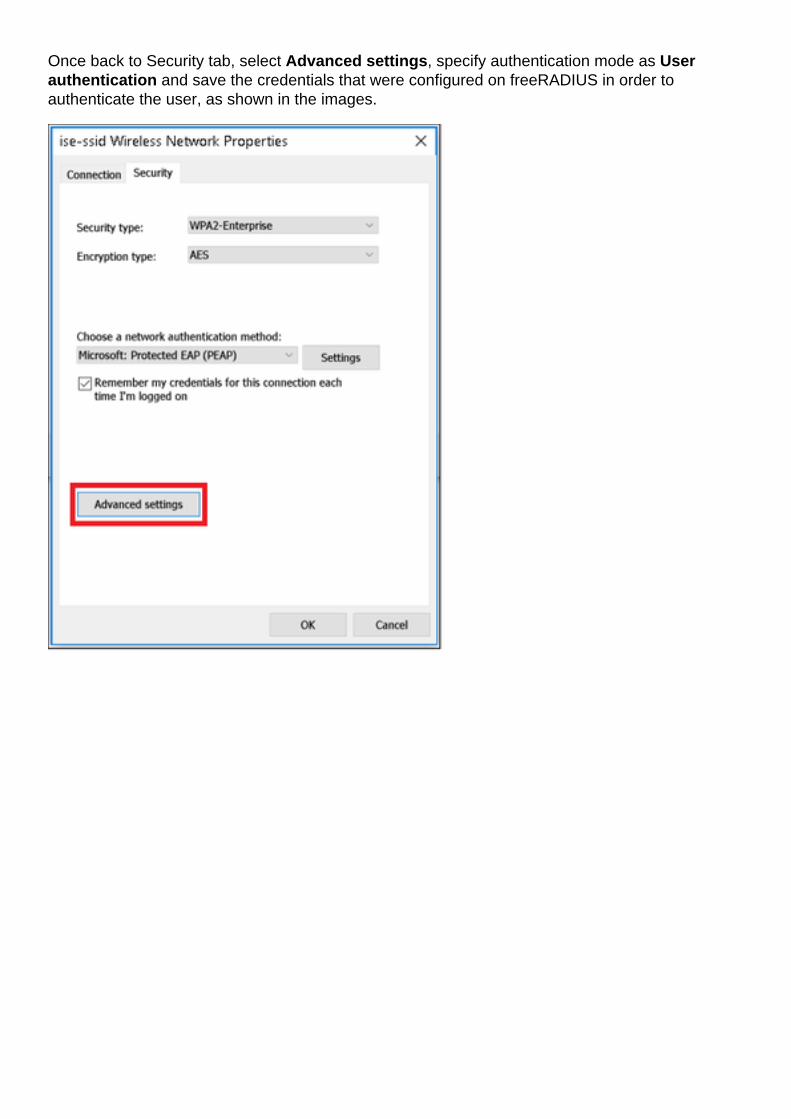
Once back to Security tab, select Advanced settings, specify authentication mode as Userauthentication and save the credentials that were configured on freeRADIUS in order toauthenticate the user, as shown in the images.
Verify
Use this section in order to confirm that your configuration works properly.
Authentication Process on WLC
Run the next commands in order to monitor the authentication process for a specific user:
[root@tac-mxwireless ~]#mysql_secure_installation
For an easy way to read debug client outputs, use the Wireless debug analyzer tool:
Wireless Debug Analyzer
Troubleshoot
There is currently no specific troubleshooting information available for this configuration.