Embed Size (px)
Citation preview
Solarwinds+SNMP+Configuration+Guide +
+
Configuration+Guide+–+Monitoring+Meraki+Access+Points+with+Solarwinds+Orion+using+SNMP+
!
April!2011! This configuration guide describes how to configure the Solarwinds Orion
Network Monitoring System to monitor and alert on the status of Meraki Enterprise wireless networks.
!!!!!!!!!!!!
!
+
Solarwinds+SNMP+Configuration+Guide +
!
Copyright
© 2011 Meraki, Inc. All rights reserved.
Trademarks
Meraki® is a registered trademark of Meraki, Inc.
+
+
+
+
+
+
+
+
+
+
www.meraki.com 660 Alabama St. San Francisco, California 94110
Phone: +1 415 632 5800 Fax: +1 415 632 5899
Solarwinds+SNMP+Configuration+Guide +
1. SNMP+
Simple Network Management Protocol (SNMP) is an Internet-standard protocol for monitoring and managing devices on IP networks. Devices that typically support SNMP include routers, switches, servers, workstations, printers, and wireless access points. SNMP exposes management data in the form of a database of variables on the managed systems called a Management Information Base (MIB) that describe the system configuration. The MIB can then be queried by managing applications.
SNMP is used by third-party network management systems (NMS) to allow administrators to monitor large networks with many different types of IP devices from various vendors from a single dashboard. These platforms can be configured to send alerts to administrators when triggered by events, such as a wireless access point dropping offline. NMS products are often used by managed service providers (MSPs) that are responsible for managing many networks for different customers simultaneously, or sometimes by administrators of very large networks with many campuses.
Solarwinds+SNMP+Configuration+Guide +
2. Using+SNMP+with+Meraki+
Meraki wireless access points are managed through the Web-based Dashboard, a fully featured management console that allows administrators to monitor and manage their network from anywhere. The Meraki Dashboard is intended to be the primary management interface for Meraki wireless networks, as it contains a variety of powerful tools for network management, visibility and diagnostics that are unique to Meraki cloud-managed networks. In addition, Meraki now offers a line of branch office routers, the MX series, which allow an administrator to manage both their wireless and wired network from the Meraki Dashboard.
However, in certain instances an administrator may already have a large network or group of networks that they are monitoring using a third-party NMS to allow them basic monitoring of various vendors equipment at multiple sites from a single-pane of glass. In this situation there may be a requirement to be able to monitor basic statistics about the Meraki network from the existing NMS.
The Meraki Cloud Controller runs an SNMP agent that can be queried for a basic set of status information about Meraki wireless access points. Meraki’s MIB contains the following information about APs:
• Device MAC address
• Device Serial number
• Device name
• Device status (online or offline)
• Device last contacted at date and time
• Current client count
• Mesh status (gateway or repeater)
• Public IP address
• Product code (e.g. MR16-HW)
• Product description (e.g. Meraki Cloud-controller 802.11n AP)
• Name of the network that the AP resides in
• Packets/bytes in/out on each physical interface
The intent of providing this SNMP interface is to allow an administrator to integrate high-level monitoring of Meraki APs with their existing processes and

Solarwinds+SNMP+Configuration+Guide +
systems. For troubleshooting, advanced monitoring or management functionality an administrator will still need to use the Meraki Dashboard.
Solarwinds+SNMP+Configuration+Guide +
3. Solarwinds+Orion+Network+Performance+Monitor+
Solarwinds Orion Network Performance Monitor (NPM) is one of the more popular NMS platforms for monitoring and managing third-party network devices. It is a comprehensive network management and data center monitoring tool that monitors and analyzes real-time network performance statistics for routers, switches, wireless access points, servers and other SNMP-enabled devices. Orion can provide the following functionalities:
• Performance and health monitoring of IP networking devices
• Monitoring of virtual machines
• Receive alerts for network events
• Automated network discovery
• Dynamic network mapping
• Drill-down network troubleshooting
• Robust reporting capabilities
• Simple, scalable deployment
Solarwinds Orion NPM can be used for basic monitoring of the health and status of Meraki wireless APs. Configuration will be detailed in the following section.
Solarwinds+SNMP+Configuration+Guide +
4. Configuring+Orion+NPM+with+Meraki+SNMP+
This section will describe how to configure Solarwinds Orion NMS to monitor Meraki wireless APs using SNMP. The version of Solarwinds Orion that was used in this example was:
Solarwinds Orion Core 2010.2.1 SP1, NPM 10.1.1 SP1, IVIM 1.0.0
This guide assumes that Solarwinds Orion has already been installed. It also assumes that the networks to be monitored have already been created in the Meraki Dashboard.
4.1 Adding the Meraki Cloud Controller to the Solarwinds Orion Web Console
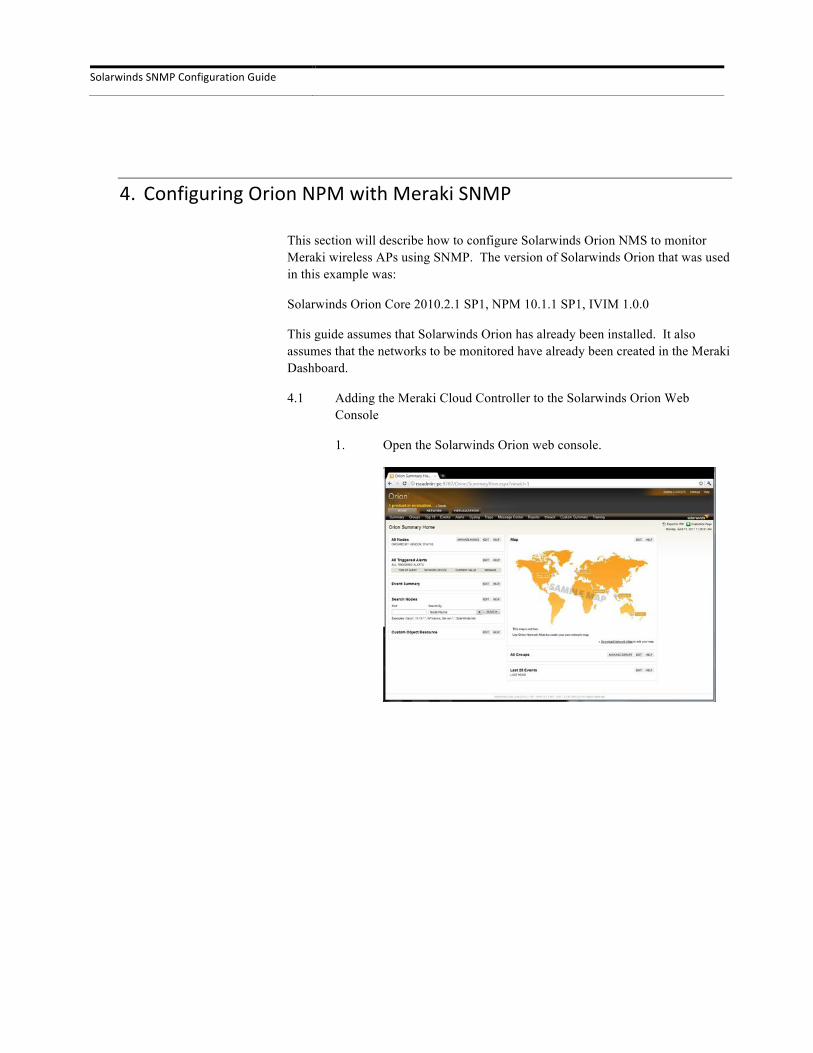
1. Open the Solarwinds Orion web console.
Solarwinds+SNMP+Configuration+Guide +
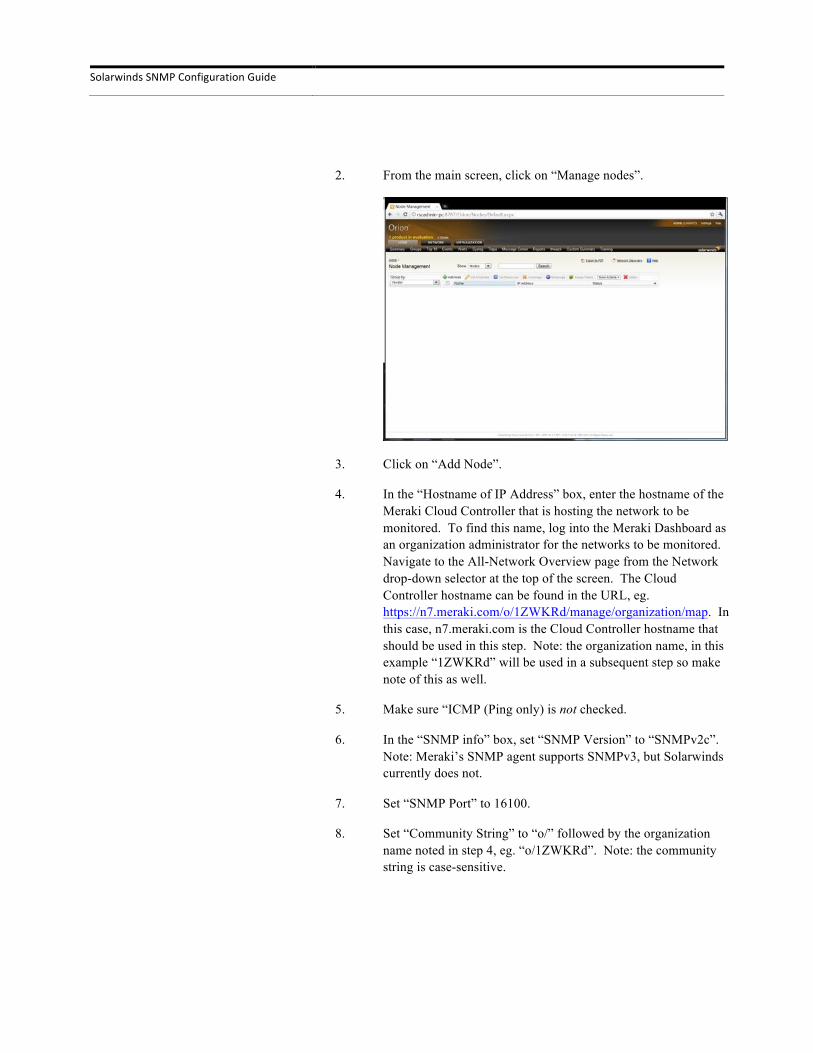
2. From the main screen, click on “Manage nodes”.
3. Click on “Add Node”.
4. In the “Hostname of IP Address” box, enter the hostname of the Meraki Cloud Controller that is hosting the network to be monitored. To find this name, log into the Meraki Dashboard as an organization administrator for the networks to be monitored. Navigate to the All-Network Overview page from the Network drop-down selector at the top of the screen. The Cloud Controller hostname can be found in the URL, eg. https://n7.meraki.com/o/1ZWKRd/manage/organization/map. In this case, n7.meraki.com is the Cloud Controller hostname that should be used in this step. Note: the organization name, in this example “1ZWKRd” will be used in a subsequent step so make note of this as well.
5. Make sure “ICMP (Ping only) is not checked.
6. In the “SNMP info” box, set “SNMP Version” to “SNMPv2c”. Note: Meraki’s SNMP agent supports SNMPv3, but Solarwinds currently does not.
7. Set “SNMP Port” to 16100.
8. Set “Community String” to “o/” followed by the organization name noted in step 4, eg. “o/1ZWKRd”. Note: the community string is case-sensitive.
Solarwinds+SNMP+Configuration+Guide +
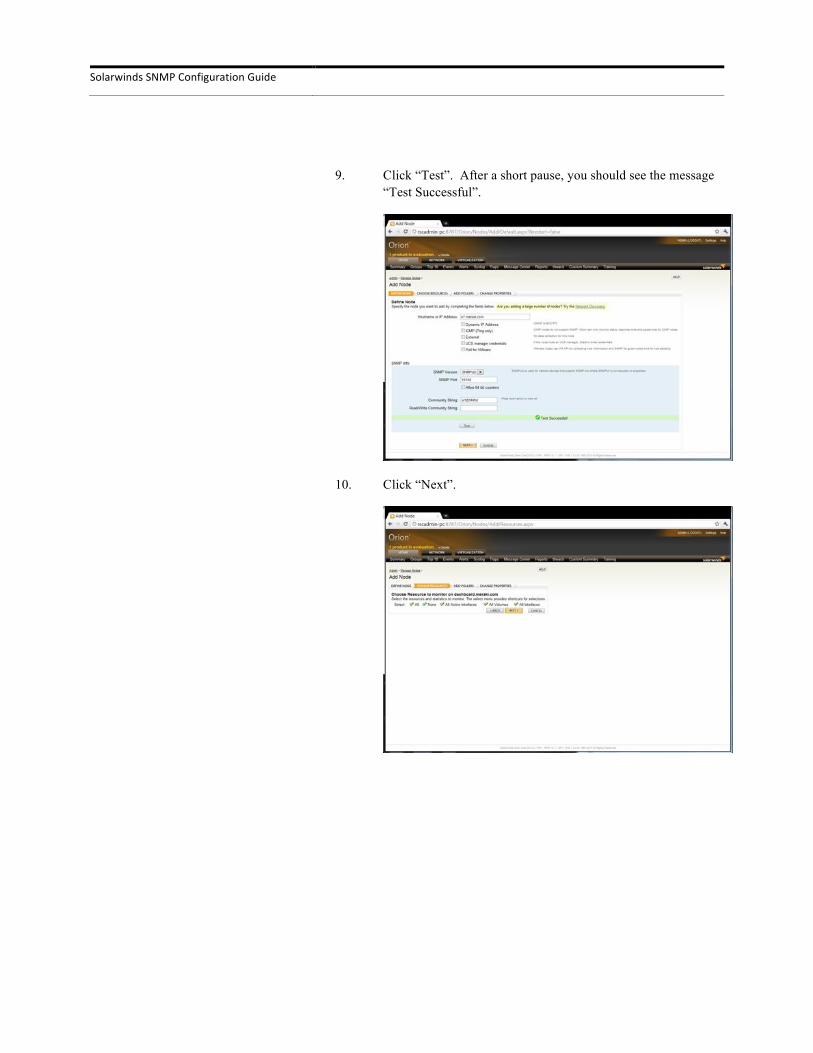
9. Click “Test”. After a short pause, you should see the message “Test Successful”.
10. Click “Next”.
Solarwinds+SNMP+Configuration+Guide +
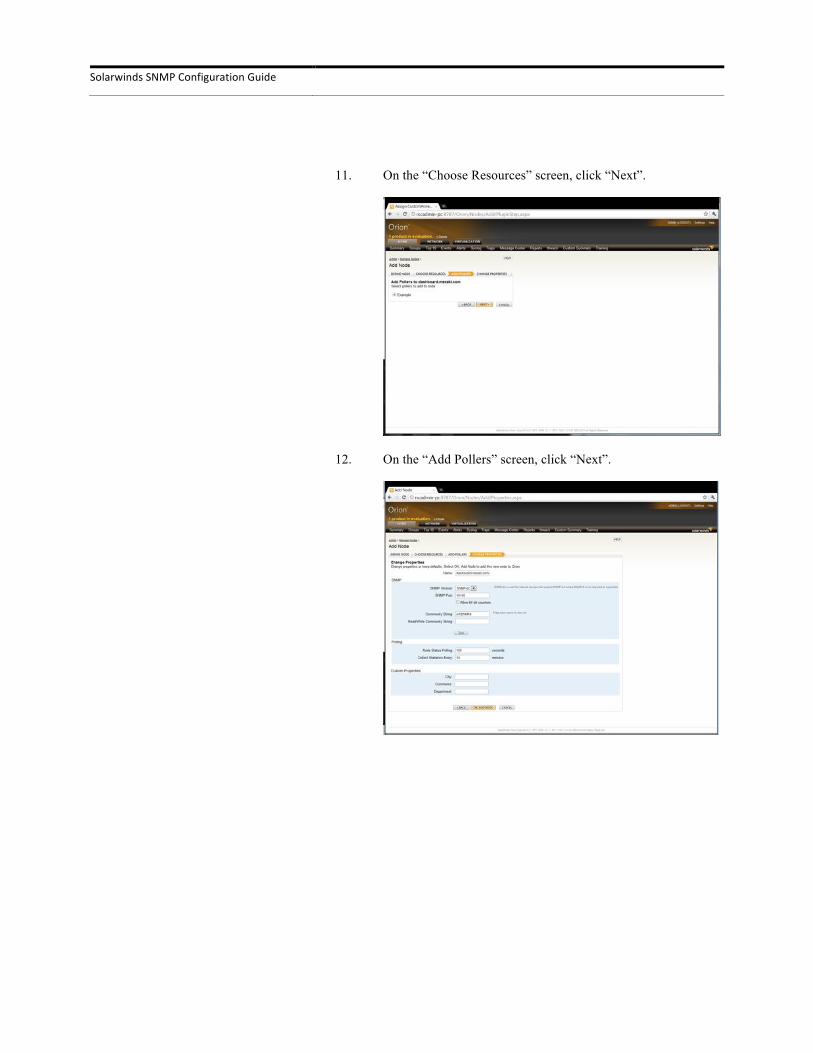
11. On the “Choose Resources” screen, click “Next”.
12. On the “Add Pollers” screen, click “Next”.
Solarwinds+SNMP+Configuration+Guide +
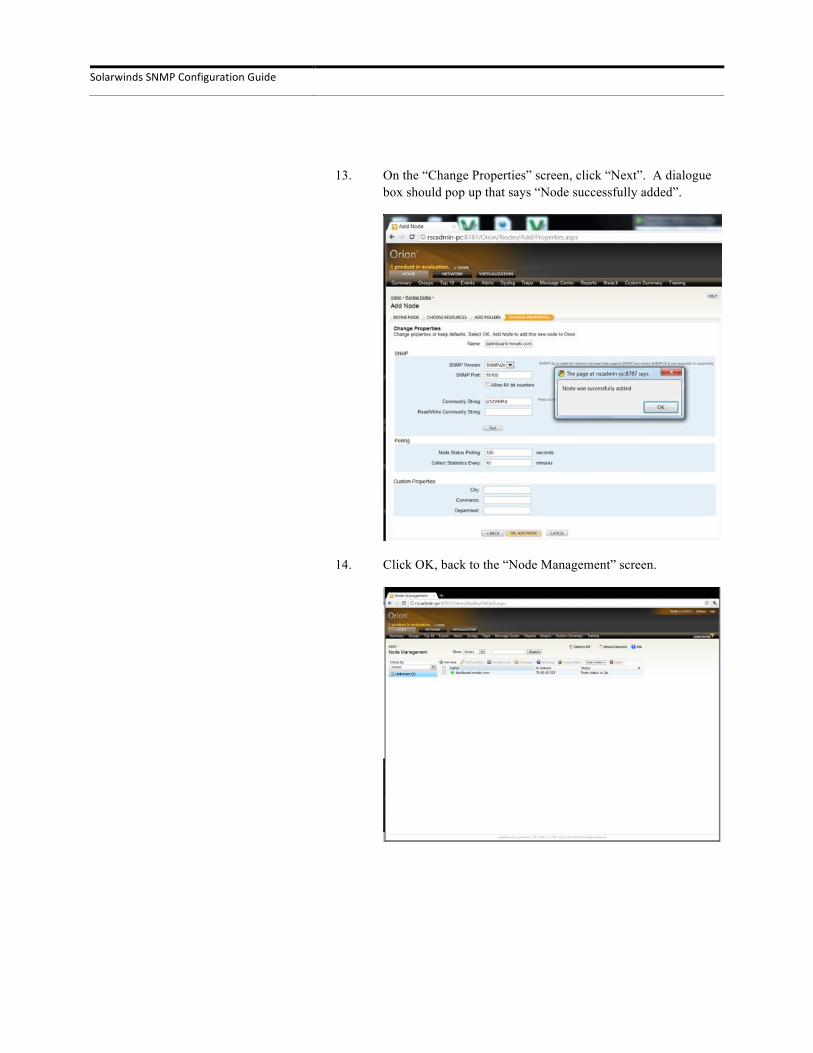
13. On the “Change Properties” screen, click “Next”. A dialogue box should pop up that says “Node successfully added”.
14. Click OK, back to the “Node Management” screen.
Solarwinds+SNMP+Configuration+Guide +
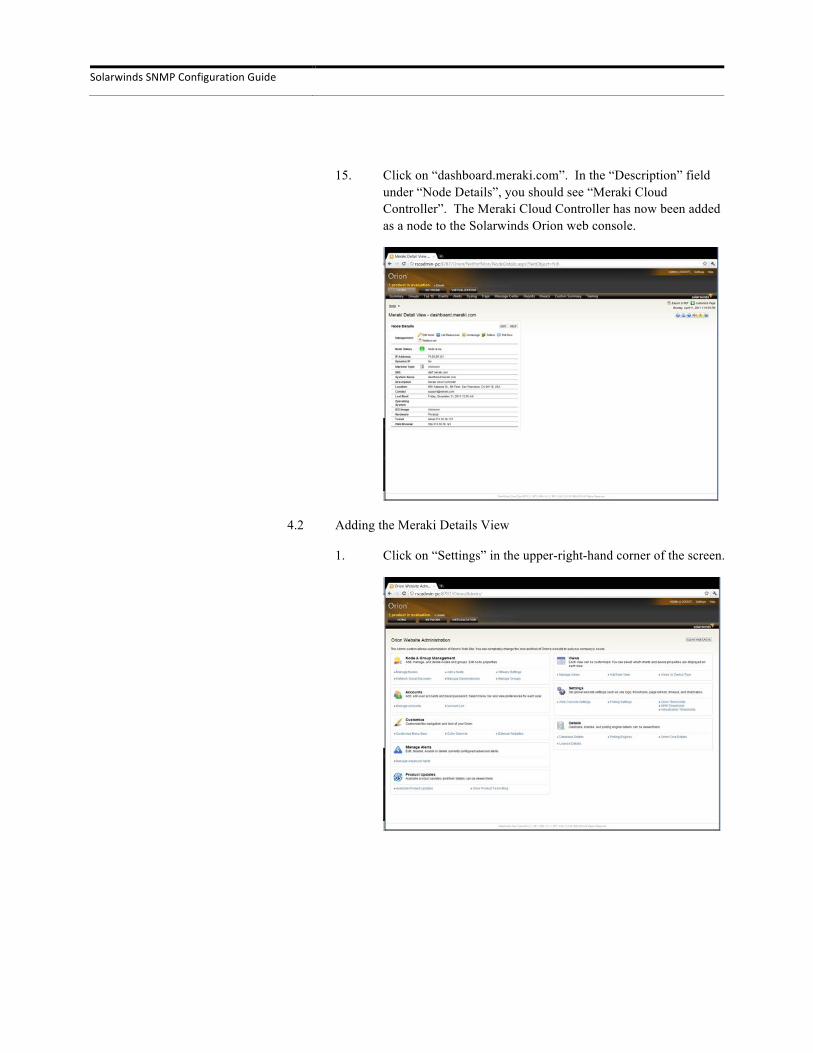
15. Click on “dashboard.meraki.com”. In the “Description” field under “Node Details”, you should see “Meraki Cloud Controller”. The Meraki Cloud Controller has now been added as a node to the Solarwinds Orion web console.
4.2 Adding the Meraki Details View
1. Click on “Settings” in the upper-right-hand corner of the screen.
Solarwinds+SNMP+Configuration+Guide +
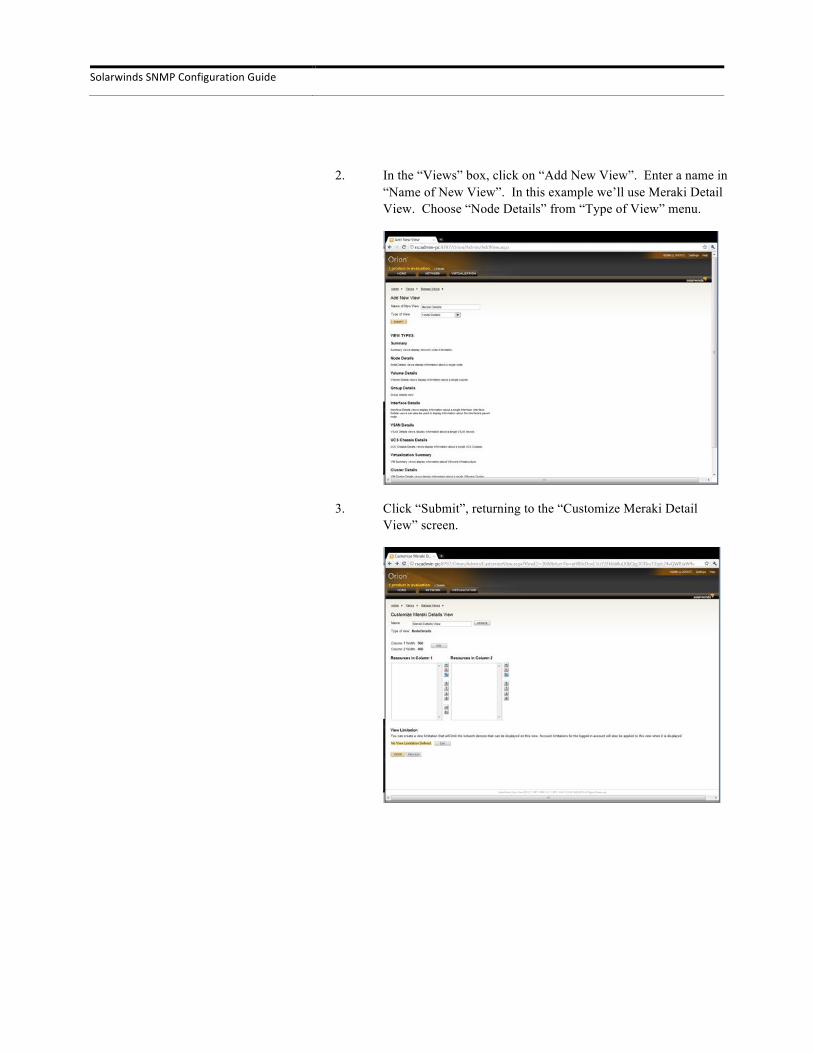
2. In the “Views” box, click on “Add New View”. Enter a name in “Name of New View”. In this example we’ll use Meraki Detail View. Choose “Node Details” from “Type of View” menu.
3. Click “Submit”, returning to the “Customize Meraki Detail View” screen.
Solarwinds+SNMP+Configuration+Guide +
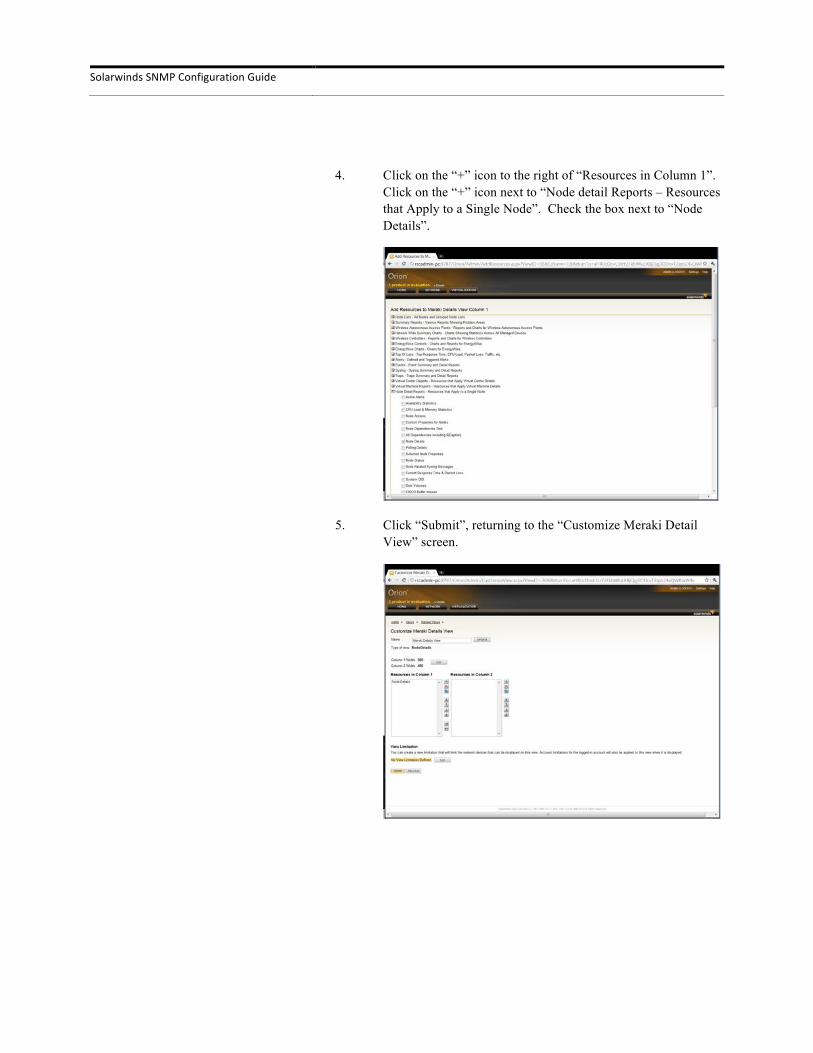
4. Click on the “+” icon to the right of “Resources in Column 1”. Click on the “+” icon next to “Node detail Reports – Resources that Apply to a Single Node”. Check the box next to “Node Details”.
5. Click “Submit”, returning to the “Customize Meraki Detail View” screen.
Solarwinds+SNMP+Configuration+Guide +
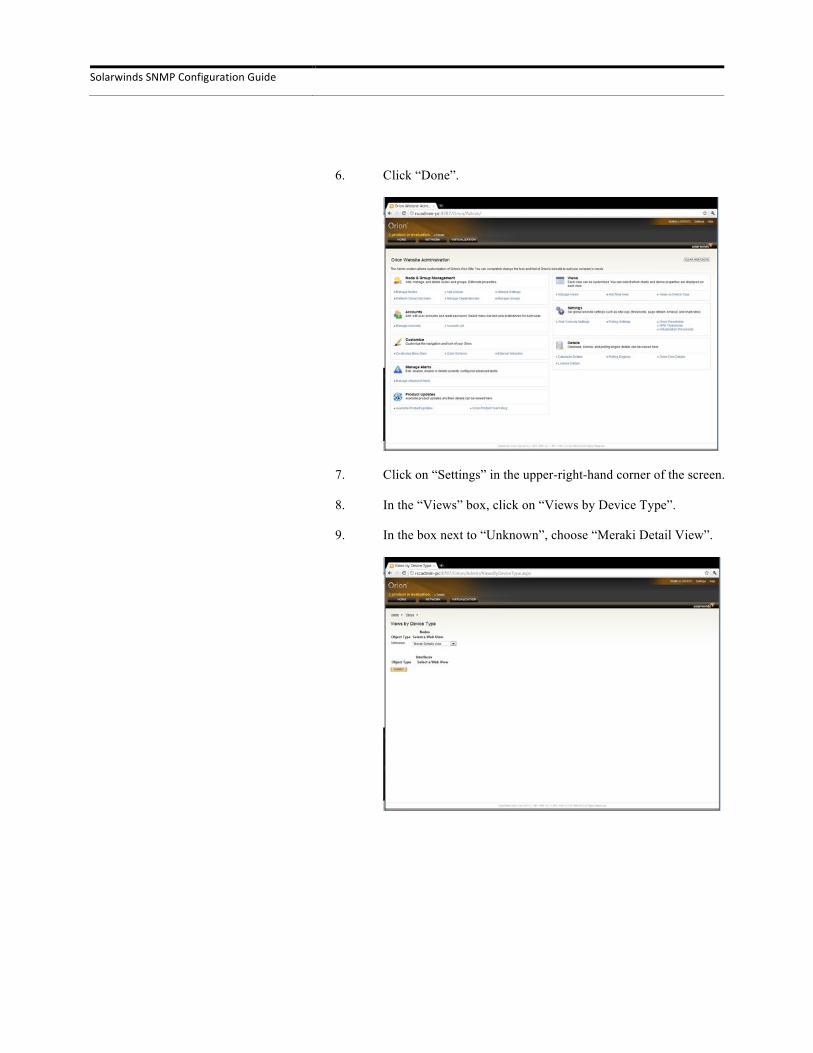
6. Click “Done”.
7. Click on “Settings” in the upper-right-hand corner of the screen.
8. In the “Views” box, click on “Views by Device Type”.
9. In the box next to “Unknown”, choose “Meraki Detail View”.
Solarwinds+SNMP+Configuration+Guide +
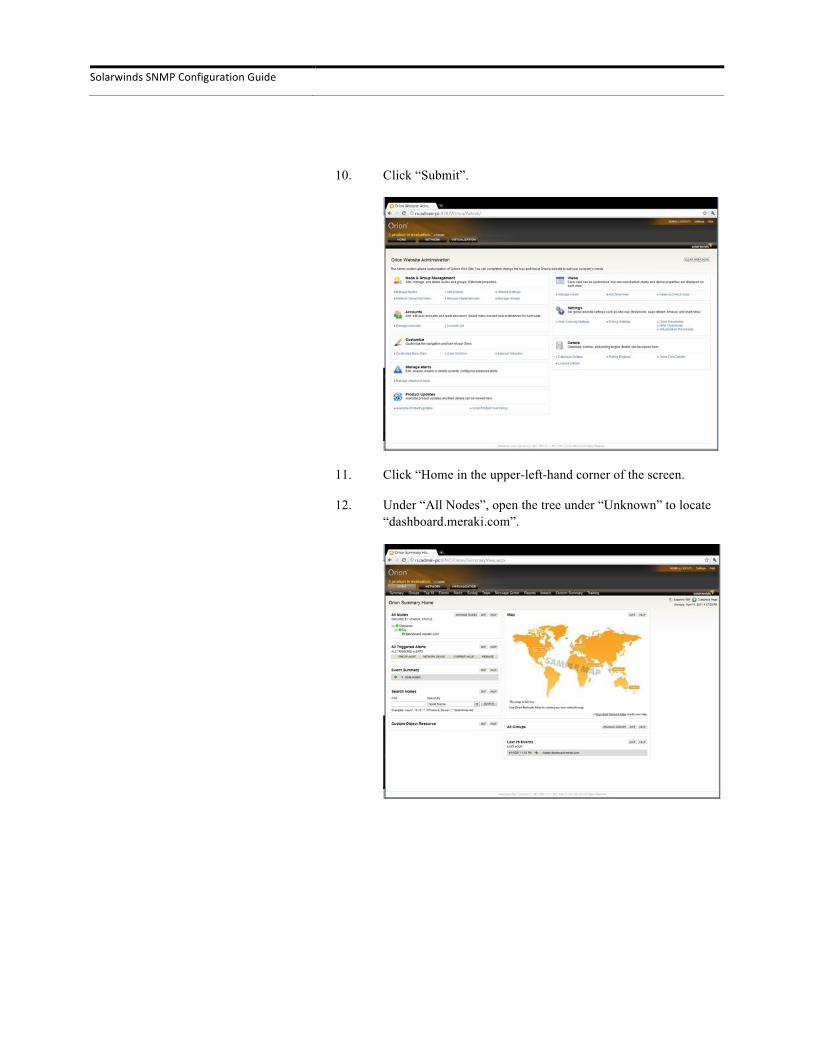
10. Click “Submit”.
11. Click “Home in the upper-left-hand corner of the screen.
12. Under “All Nodes”, open the tree under “Unknown” to locate “dashboard.meraki.com”.
Solarwinds+SNMP+Configuration+Guide +
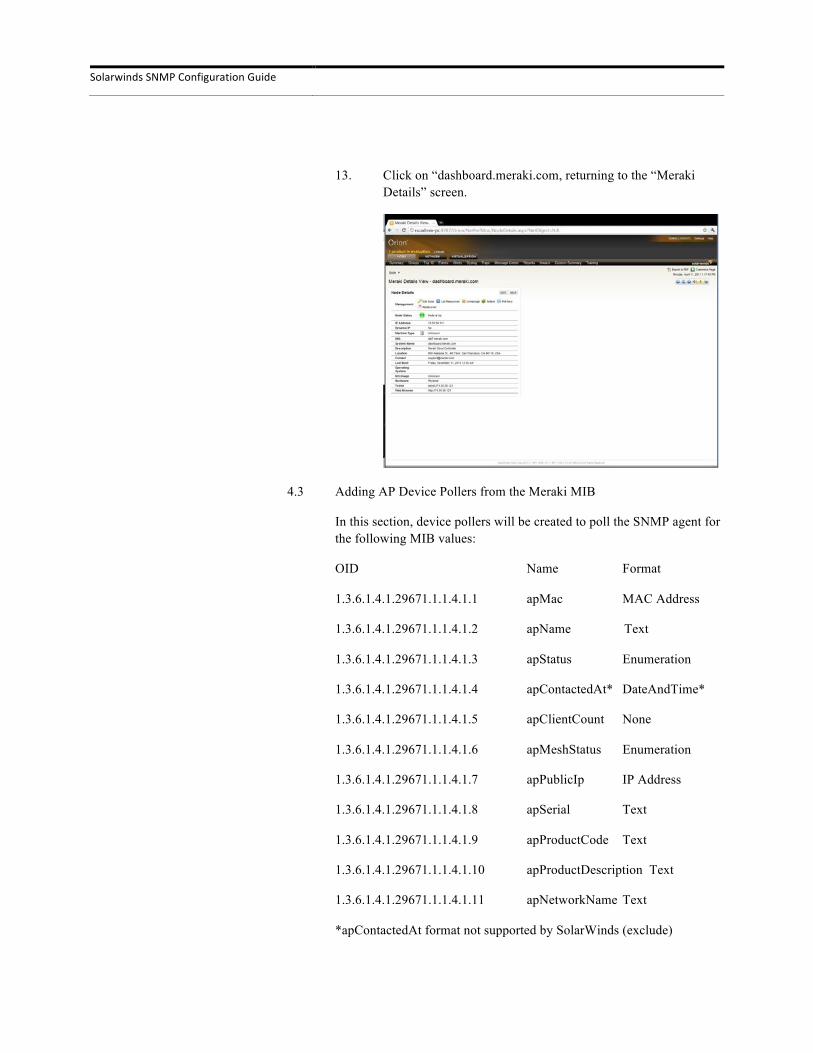
13. Click on “dashboard.meraki.com, returning to the “Meraki Details” screen.
4.3 Adding AP Device Pollers from the Meraki MIB
In this section, device pollers will be created to poll the SNMP agent for the following MIB values:
OID Name Format
1.3.6.1.4.1.29671.1.1.4.1.1 apMac MAC Address
1.3.6.1.4.1.29671.1.1.4.1.2 apName Text
1.3.6.1.4.1.29671.1.1.4.1.3 apStatus Enumeration
1.3.6.1.4.1.29671.1.1.4.1.4 apContactedAt* DateAndTime*
1.3.6.1.4.1.29671.1.1.4.1.5 apClientCount None
1.3.6.1.4.1.29671.1.1.4.1.6 apMeshStatus Enumeration
1.3.6.1.4.1.29671.1.1.4.1.7 apPublicIp IP Address
1.3.6.1.4.1.29671.1.1.4.1.8 apSerial Text
1.3.6.1.4.1.29671.1.1.4.1.9 apProductCode Text
1.3.6.1.4.1.29671.1.1.4.1.10 apProductDescription Text
1.3.6.1.4.1.29671.1.1.4.1.11 apNetworkName Text
*apContactedAt format not supported by SolarWinds (exclude)
Solarwinds+SNMP+Configuration+Guide +
To create the pollers, follow these steps:
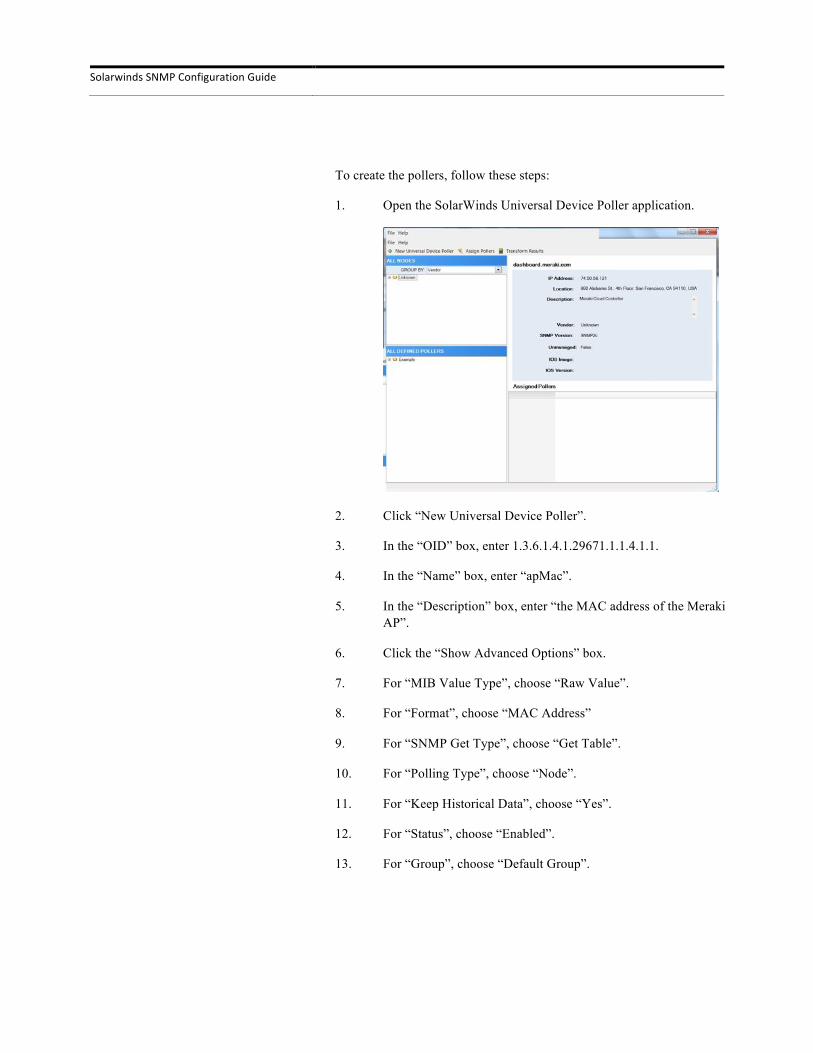
1. Open the SolarWinds Universal Device Poller application.
2. Click “New Universal Device Poller”.
3. In the “OID” box, enter 1.3.6.1.4.1.29671.1.1.4.1.1.
4. In the “Name” box, enter “apMac”.
5. In the “Description” box, enter “the MAC address of the Meraki AP”.
6. Click the “Show Advanced Options” box.
7. For “MIB Value Type”, choose “Raw Value”.
8. For “Format”, choose “MAC Address”
9. For “SNMP Get Type”, choose “Get Table”.
10. For “Polling Type”, choose “Node”.
11. For “Keep Historical Data”, choose “Yes”.
12. For “Status”, choose “Enabled”.
13. For “Group”, choose “Default Group”.
Solarwinds+SNMP+Configuration+Guide +
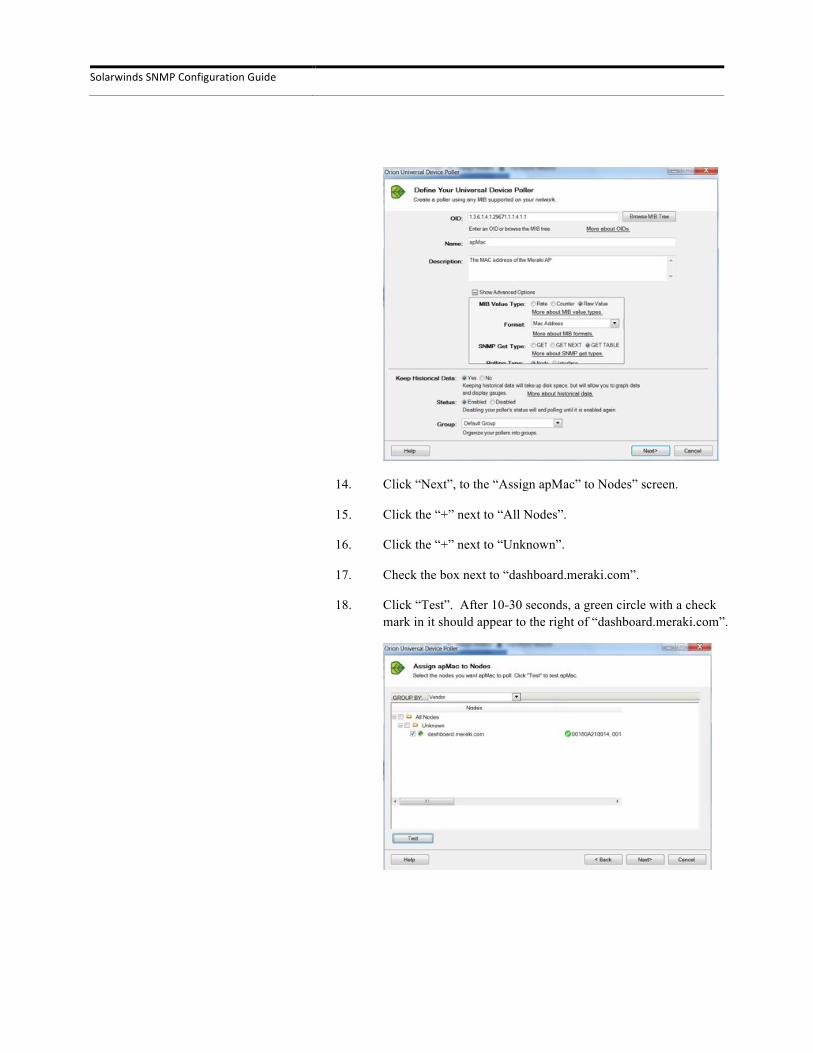
14. Click “Next”, to the “Assign apMac” to Nodes” screen.
15. Click the “+” next to “All Nodes”.
16. Click the “+” next to “Unknown”.
17. Check the box next to “dashboard.meraki.com”.
18. Click “Test”. After 10-30 seconds, a green circle with a check mark in it should appear to the right of “dashboard.meraki.com”.

Solarwinds+SNMP+Configuration+Guide +
19. Click “Next”, to the “Label the Rows in Your Table” screen. Choose “Use interface names from Orion”.
20. Click “Next”, to the “Display apMac Results on Orion Website” screen. Under “Do you want to display results on your Orion website”, choose “Yes”. Scroll down in the table and click the checkbox in the “Table” column next to “Meraki Details”. Check the box next to “Do not show this poller if it is not assigned”.
Solarwinds+SNMP+Configuration+Guide +
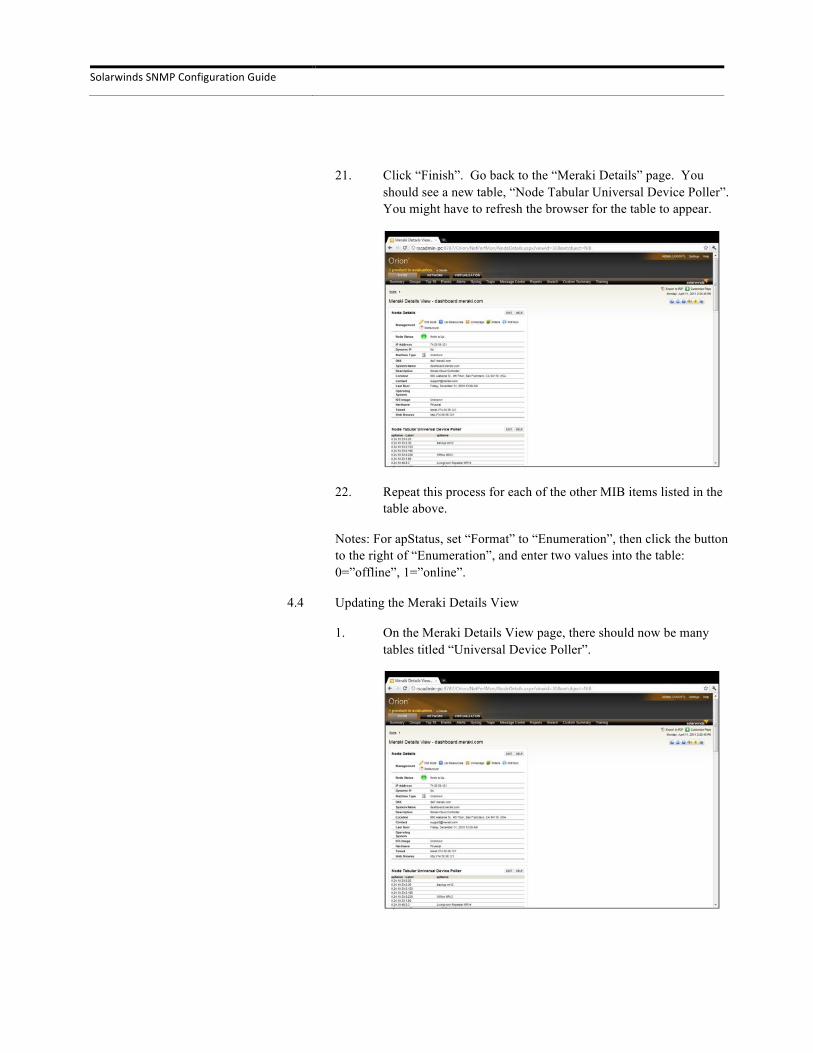
21. Click “Finish”. Go back to the “Meraki Details” page. You should see a new table, “Node Tabular Universal Device Poller”. You might have to refresh the browser for the table to appear.
22. Repeat this process for each of the other MIB items listed in the table above.
Notes: For apStatus, set “Format” to “Enumeration”, then click the button to the right of “Enumeration”, and enter two values into the table: 0=”offline”, 1=”online”.
4.4 Updating the Meraki Details View
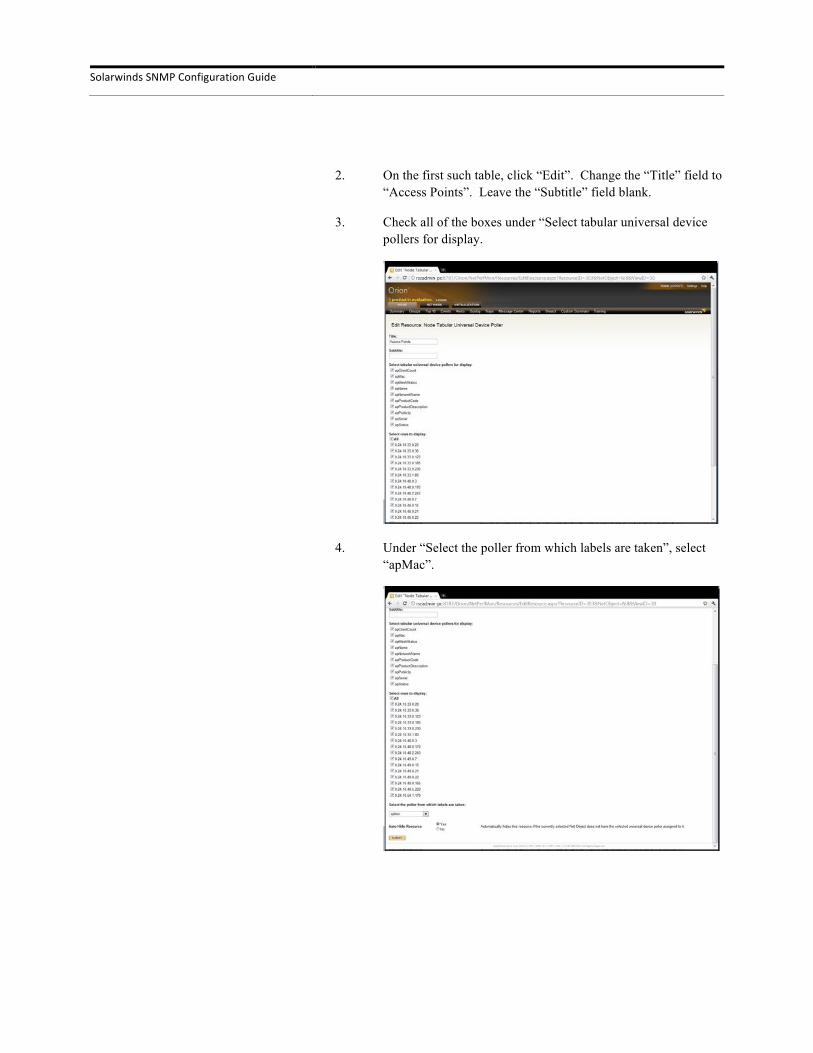
1. On the Meraki Details View page, there should now be many tables titled “Universal Device Poller”.
Solarwinds+SNMP+Configuration+Guide +
2. On the first such table, click “Edit”. Change the “Title” field to “Access Points”. Leave the “Subtitle” field blank.
3. Check all of the boxes under “Select tabular universal device pollers for display.
4. Under “Select the poller from which labels are taken”, select “apMac”.
Solarwinds+SNMP+Configuration+Guide +
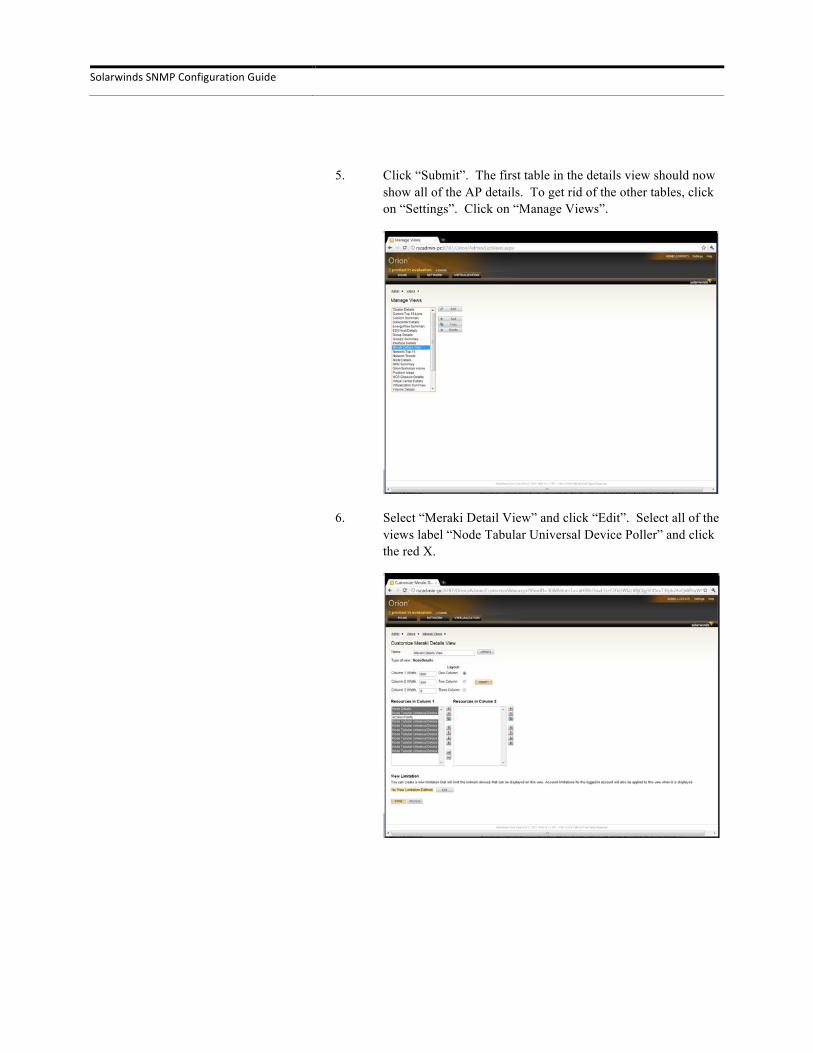
5. Click “Submit”. The first table in the details view should now show all of the AP details. To get rid of the other tables, click on “Settings”. Click on “Manage Views”.
6. Select “Meraki Detail View” and click “Edit”. Select all of the views label “Node Tabular Universal Device Poller” and click the red X.
Solarwinds+SNMP+Configuration+Guide +
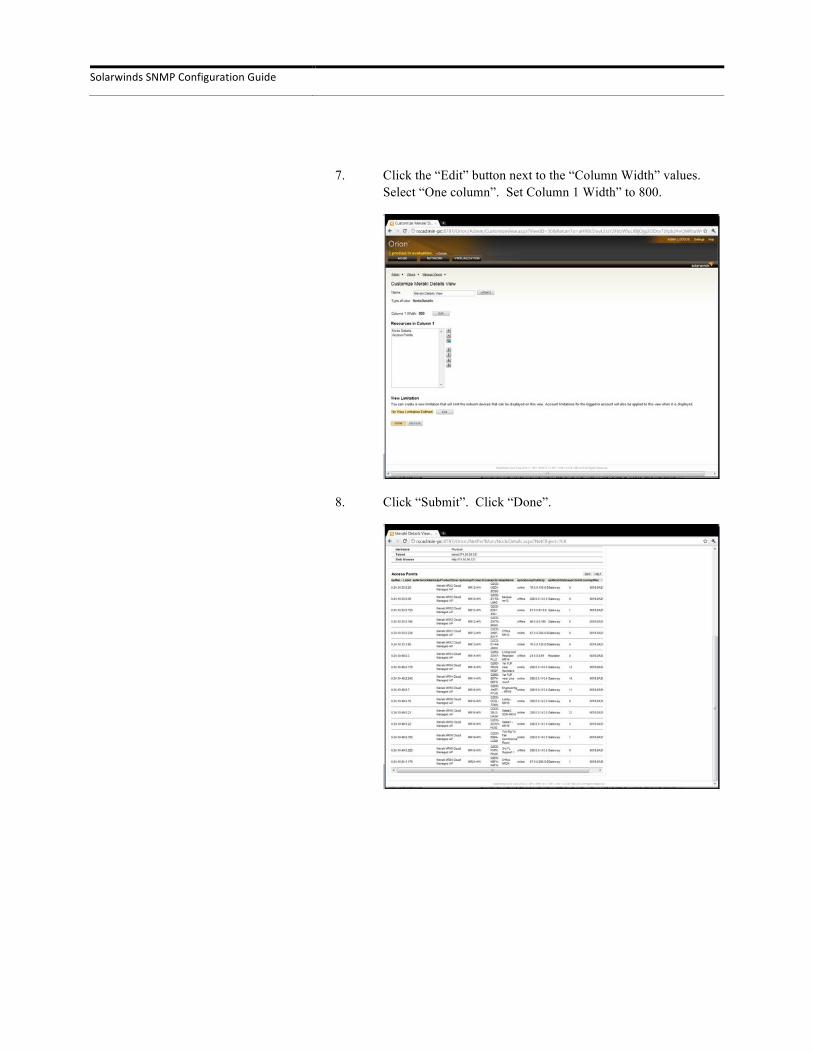
7. Click the “Edit” button next to the “Column Width” values. Select “One column”. Set Column 1 Width” to 800.
8. Click “Submit”. Click “Done”.
Solarwinds+SNMP+Configuration+Guide +
4.5 Configure an Email Alert for Offline AP
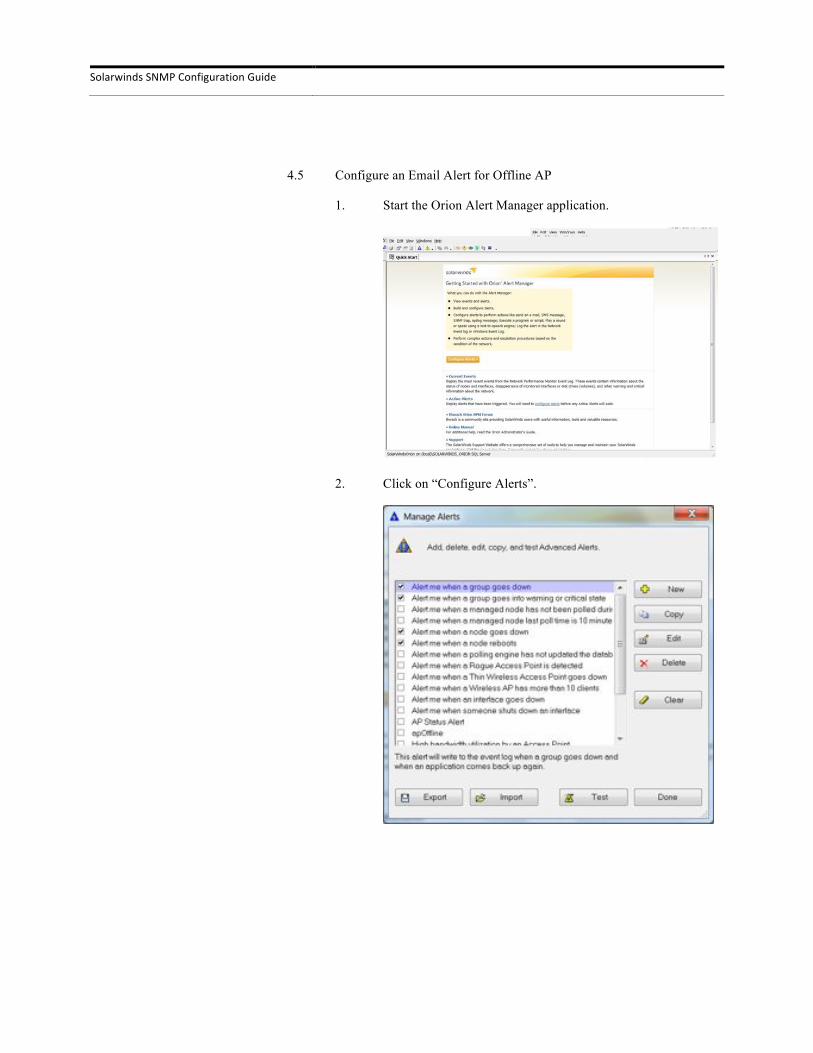
1. Start the Orion Alert Manager application.
2. Click on “Configure Alerts”.
Solarwinds+SNMP+Configuration+Guide +
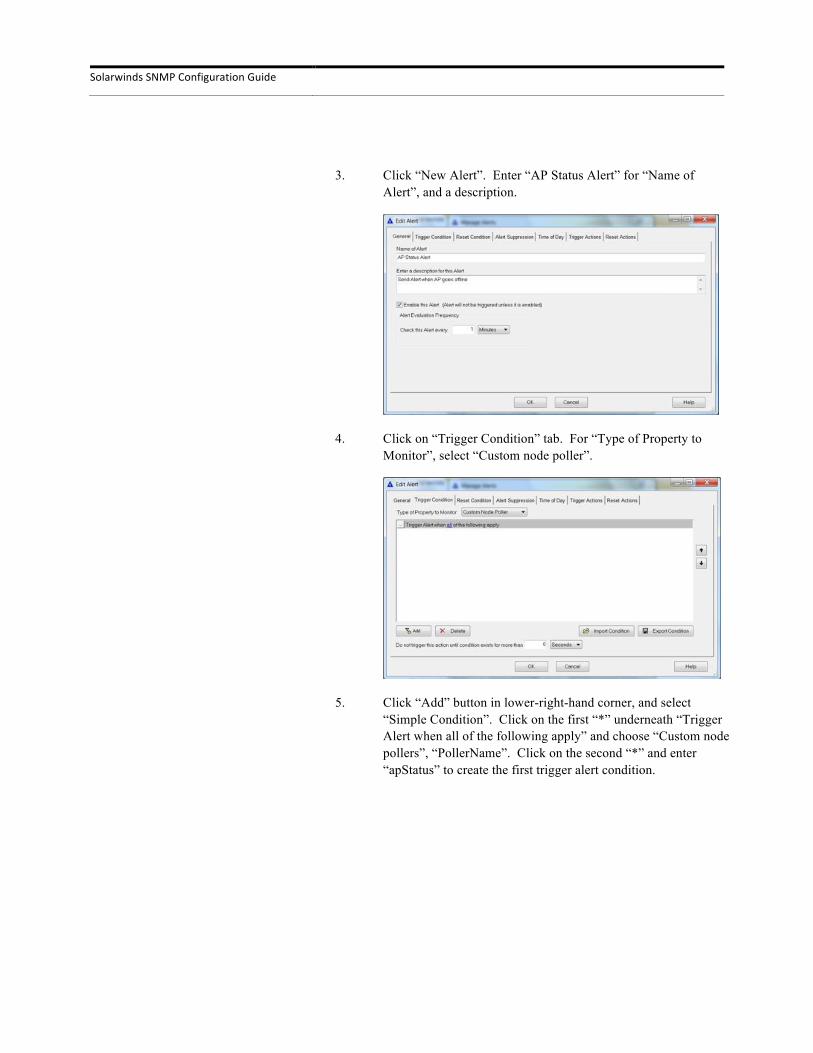
3. Click “New Alert”. Enter “AP Status Alert” for “Name of Alert”, and a description.
4. Click on “Trigger Condition” tab. For “Type of Property to Monitor”, select “Custom node poller”.
5. Click “Add” button in lower-right-hand corner, and select “Simple Condition”. Click on the first “*” underneath “Trigger Alert when all of the following apply” and choose “Custom node pollers”, “PollerName”. Click on the second “*” and enter “apStatus” to create the first trigger alert condition.
Solarwinds+SNMP+Configuration+Guide +
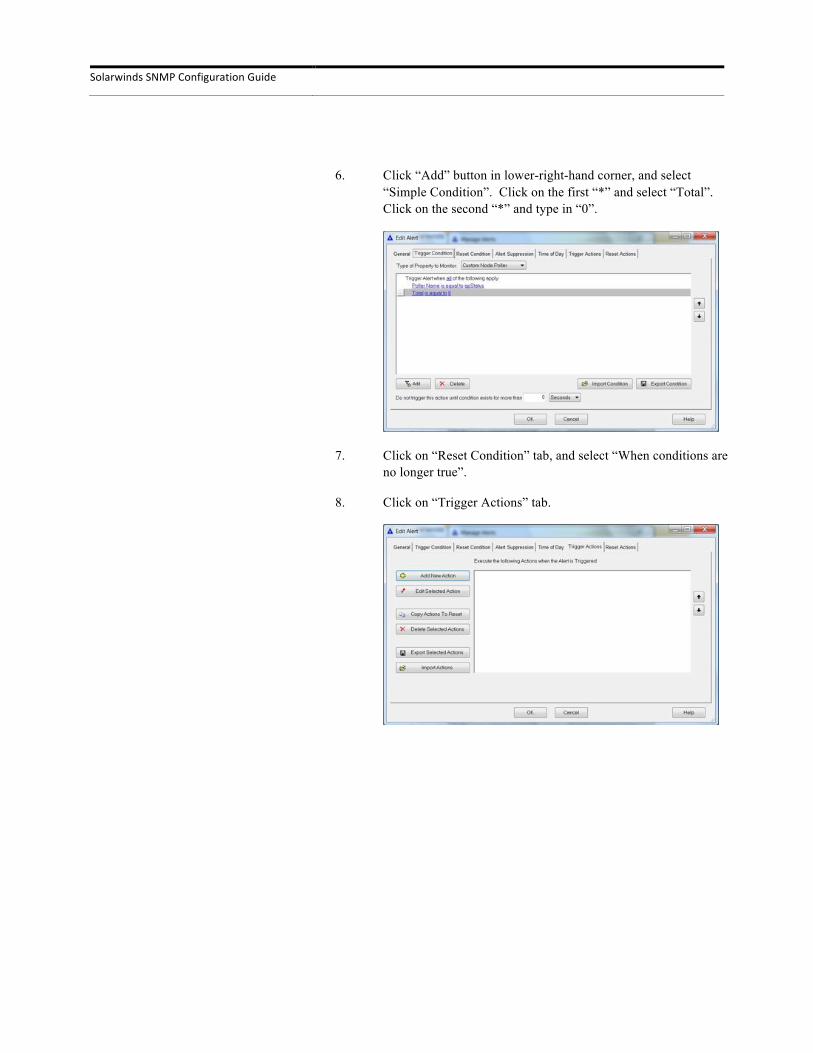
6. Click “Add” button in lower-right-hand corner, and select “Simple Condition”. Click on the first “*” and select “Total”. Click on the second “*” and type in “0”.
7. Click on “Reset Condition” tab, and select “When conditions are no longer true”.
8. Click on “Trigger Actions” tab.
Solarwinds+SNMP+Configuration+Guide +
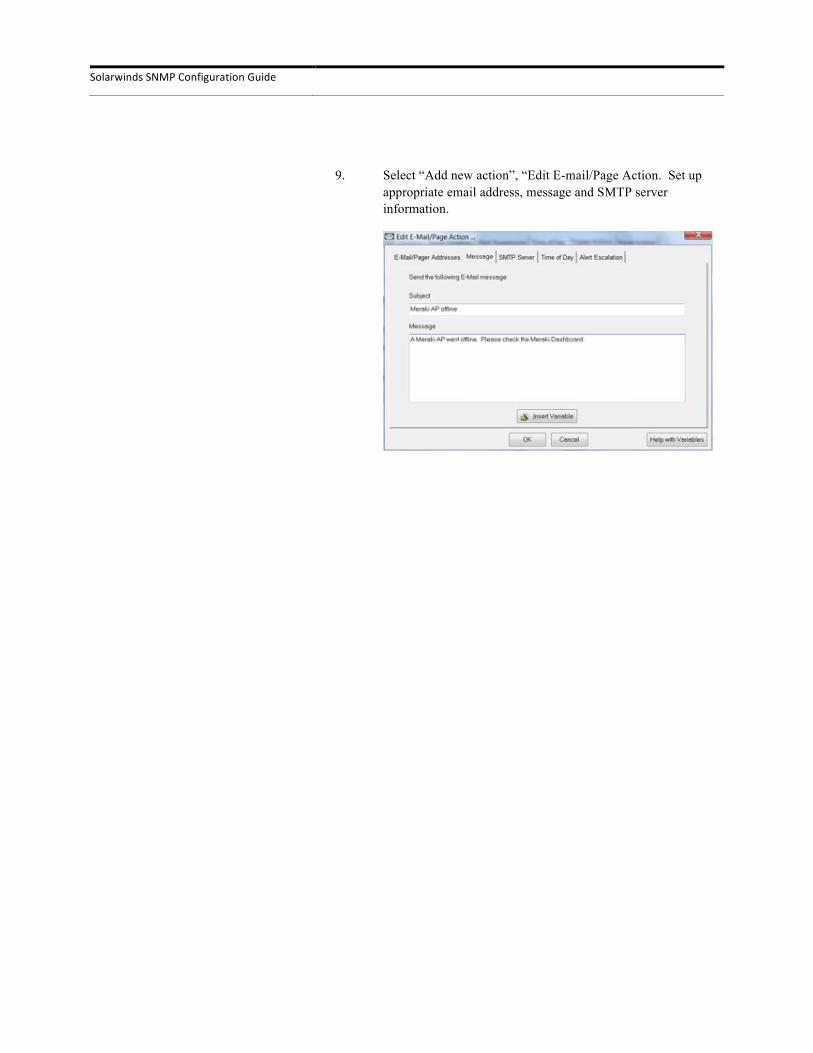
9. Select “Add new action”, “Edit E-mail/Page Action. Set up appropriate email address, message and SMTP server information.