Embed Size (px)
Citation preview
Configuration GuideManaging MAC VLAN
TP-LINK Managed Switches
CONTENTS I
CONTENTS
1 MAC VLAN ...........................................................................................................................................................1-1
2 MAC VLAN Configuration.................................................................................................................................1-2
2.1 Using the GUI ........................................................................................................................................................................1-2
2.1.1 Configuring 802.1Q VLAN .................................................................................................................................1-2
2.1.2 Binding the MAC Address to the VLAN ........................................................................................................2-1
2.1.3 Enabling MAC VLAN for the Port ....................................................................................................................2-1
2.2 Using the CLI..........................................................................................................................................................................2-2
2.2.1 Configuring 802.1Q VLAN .................................................................................................................................2-2
2.2.2 Binding the MAC Address to the VLAN ........................................................................................................2-2
2.2.3 Enable MAC VLAN for the Port ........................................................................................................................2-3
3 Example for Configuring MAC VLAN .............................................................................................................3-1
3.1 Network Requirements ......................................................................................................................................................3-1
3.2 Configuration Scheme .......................................................................................................................................................3-1
3.3 Using the GUI ........................................................................................................................................................................3-2
3.4 Using the CLI..........................................................................................................................................................................3-4
4 Appendix: Default Parameters ........................................................................................................................4-1
MAC VLAN 1-1
Managing MAC VLAN
1 MAC VLAN
VLAN is generally divided by ports. This way of division is simple but isn’t suitable for those
networks that require frequent topology changes. With the popularity of mobile office, a terminal
device may access the switch via different ports. For example, a terminal device that accessed the
switch via port 1 last time may change to port 2 this time. If port 1 and port 2 belong to different
VLANs, the user has to re-configure the switch to access the original VLAN. Using MAC VLAN can
free the user from such a problem. It divides VLANs based on the MAC addresses of terminal
devices. In this way, terminal devices always belong to their original VLANs even when their
access ports change.
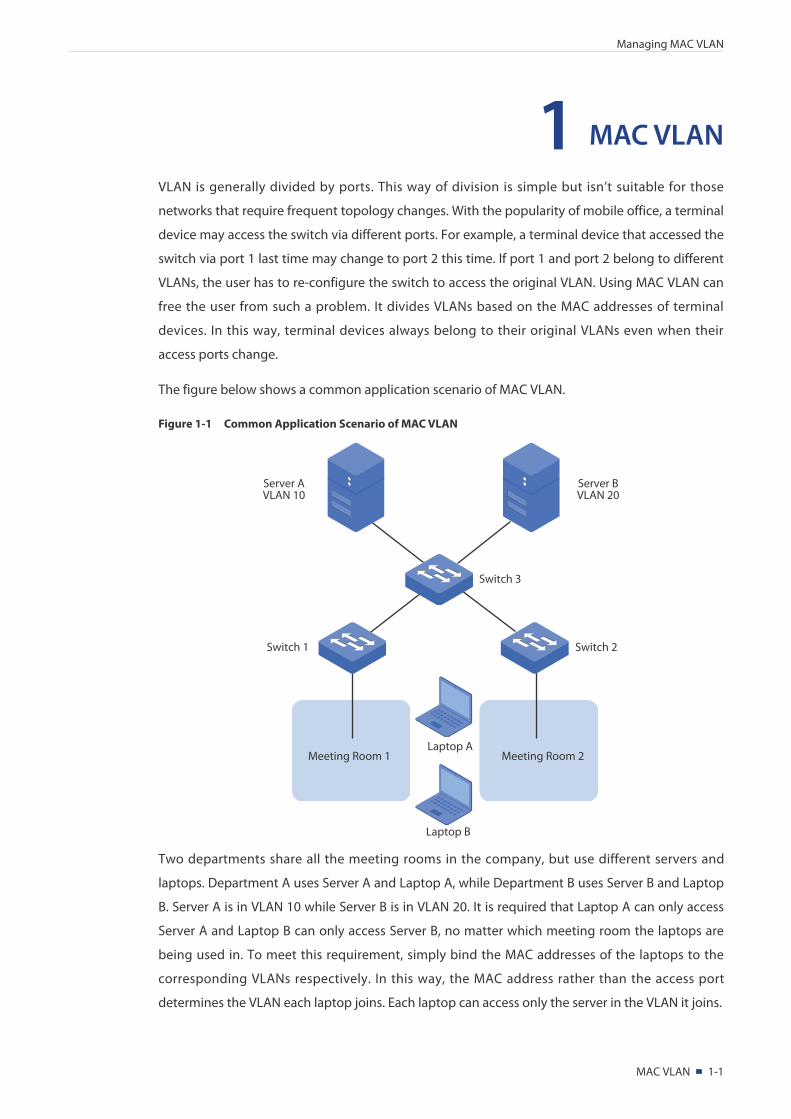
The figure below shows a common application scenario of MAC VLAN.
Figure 1-1 Common Application Scenario of MAC VLAN
Meeting Room 1Laptop A
Laptop B
Meeting Room 2
Switch 3
Switch 1 Switch 2
Server BVLAN 20
Server AVLAN 10
Two departments share all the meeting rooms in the company, but use different servers and
laptops. Department A uses Server A and Laptop A, while Department B uses Server B and Laptop
B. Server A is in VLAN 10 while Server B is in VLAN 20. It is required that Laptop A can only access
Server A and Laptop B can only access Server B, no matter which meeting room the laptops are
being used in. To meet this requirement, simply bind the MAC addresses of the laptops to the
corresponding VLANs respectively. In this way, the MAC address rather than the access port
determines the VLAN each laptop joins. Each laptop can access only the server in the VLAN it joins.
MAC VLAN Configuration 2-1
Managing MAC VLAN
2 MAC VLAN Configuration
To complete MAC VLAN configuration, follow these steps:
1) Configure 802.1Q VLAN.
2) Bind the MAC address to the VLAN.
3) Enable MAC VLAN for the port.
Configuration Guidelines
When a port in a MAC VLAN receives an untagged data packet, the switch will first check whether
the source MAC address of the data packet has been bound to the MAC VLAN. If yes, the switch
will insert the corresponding tag to the data packet and forward it within the VLAN. If no, the
switch will continue to match the data packet with the matching rules of other VLANs (such as the
protocol VLAN). If there is a match, the switch will forward the data packet. Otherwise, the switch
will process the data packet according to the processing rule of the 802.1 Q VLAN. When the port
receives a tagged data packet, the switch will directly process the data packet according to the
processing rule of the 802.1 Q VLAN.
2.1 Using the GUI
2.1.1 Configuring 802.1Q VLAN
Before configuring MAC VLAN, create an 802.1Q VLAN and set the port type according to network
requirements. For details, refer to Managing 802.1Q VLAN.
MAC VLAN Configuration 2-2
Managing MAC VLAN
2.1.2 Binding the MAC Address to the VLAN
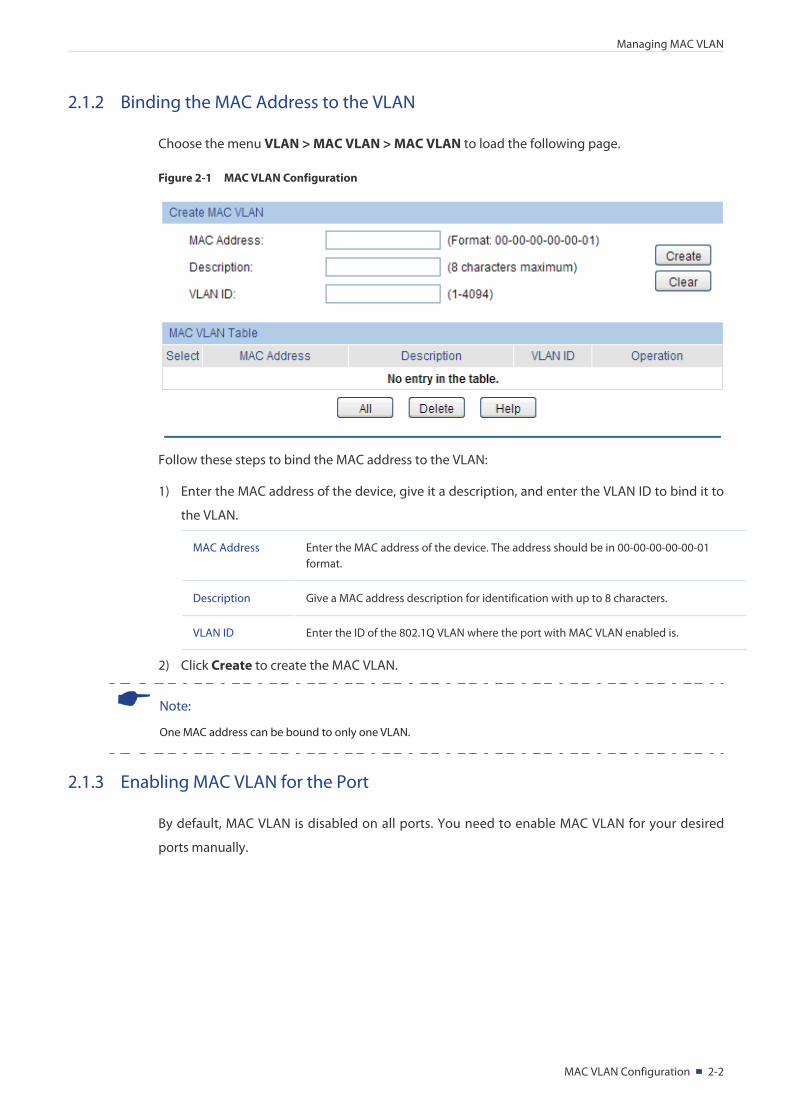
Choose the menu VLAN > MAC VLAN > MAC VLAN to load the following page.
Figure 2-1 MAC VLAN Configuration
Follow these steps to bind the MAC address to the VLAN:
1) Enter the MAC address of the device, give it a description, and enter the VLAN ID to bind it to
the VLAN.
MAC Address Enter the MAC address of the device. The address should be in 00-00-00-00-00-01 format.
Description Give a MAC address description for identification with up to 8 characters.
VLAN ID Enter the ID of the 802.1Q VLAN where the port with MAC VLAN enabled is.
2) Click Create to create the MAC VLAN.
Note:
One MAC address can be bound to only one VLAN.
2.1.3 Enabling MAC VLAN for the Port
By default, MAC VLAN is disabled on all ports. You need to enable MAC VLAN for your desired
ports manually.
MAC VLAN Configuration 2-3
Managing MAC VLAN
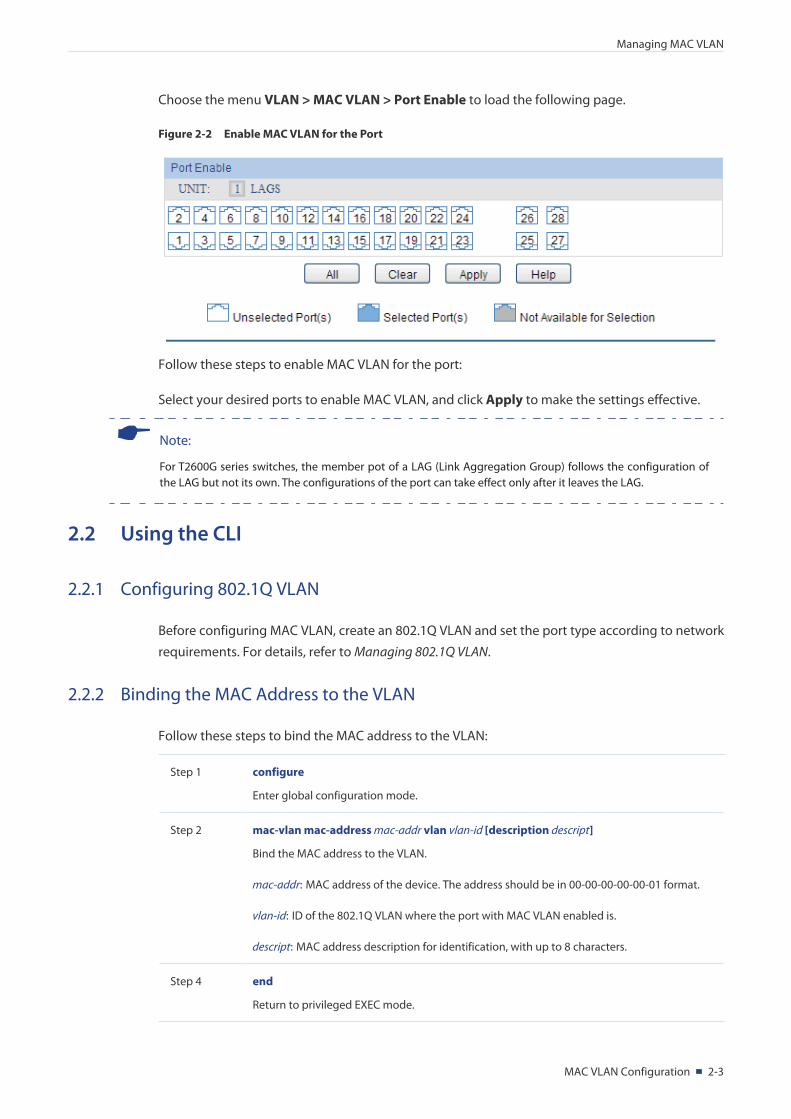
Choose the menu VLAN > MAC VLAN > Port Enable to load the following page.
Figure 2-2 Enable MAC VLAN for the Port
Follow these steps to enable MAC VLAN for the port:
Select your desired ports to enable MAC VLAN, and click Apply to make the settings effective.
Note:
For T2600G series switches, the member pot of a LAG (Link Aggregation Group) follows the configuration of the LAG but not its own. The configurations of the port can take effect only after it leaves the LAG.
2.2 Using the CLI
2.2.1 Configuring 802.1Q VLAN
Before configuring MAC VLAN, create an 802.1Q VLAN and set the port type according to network
requirements. For details, refer to Managing 802.1Q VLAN.
2.2.2 Binding the MAC Address to the VLAN
Follow these steps to bind the MAC address to the VLAN:
Step 1 configure
Enter global configuration mode.
Step 2 mac-vlan mac-address mac-addr vlan vlan-id [description descript]
Bind the MAC address to the VLAN.
mac-addr: MAC address of the device. The address should be in 00-00-00-00-00-01 format.
vlan-id: ID of the 802.1Q VLAN where the port with MAC VLAN enabled is.
descript: MAC address description for identification, with up to 8 characters.
Step 4 end
Return to privileged EXEC mode.
MAC VLAN Configuration 2-4
Managing MAC VLAN
Step 5 copy running-config startup-config
Save the settings in the configuration file.
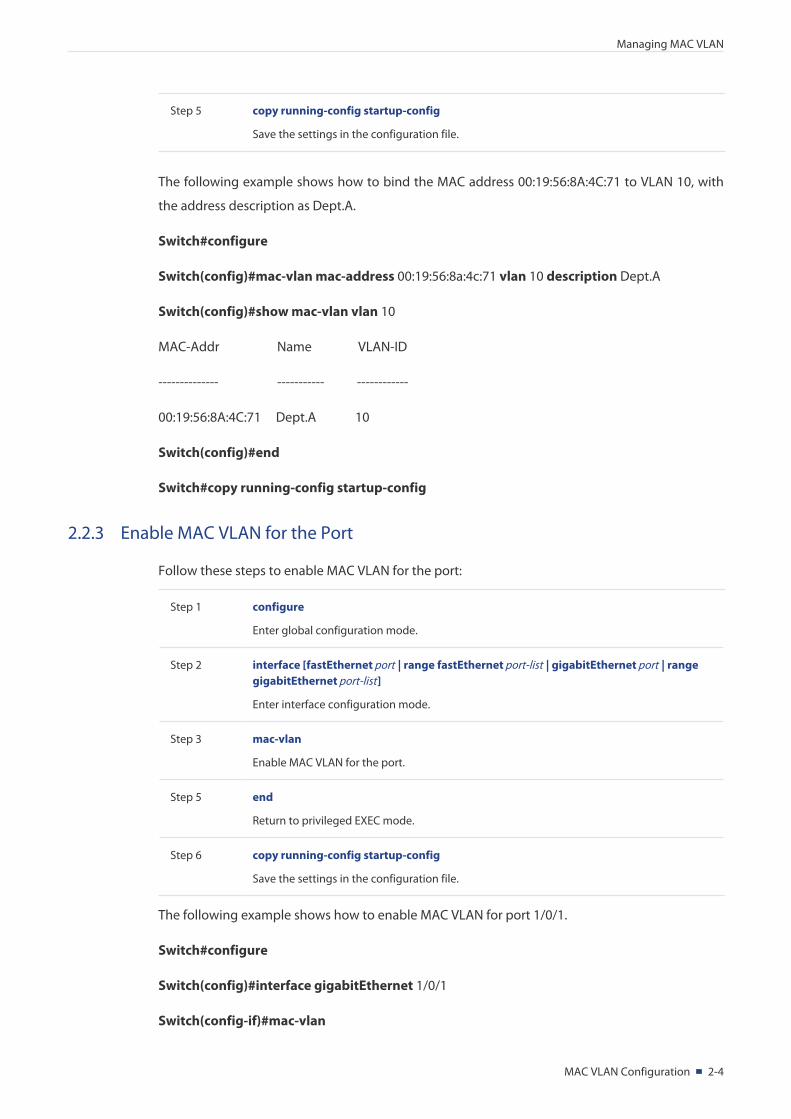
The following example shows how to bind the MAC address 00:19:56:8A:4C:71 to VLAN 10, with
the address description as Dept.A.
Switch#configure
Switch(config)#mac-vlan mac-address 00:19:56:8a:4c:71 vlan 10 description Dept.A
Switch(config)#show mac-vlan vlan 10
MAC-Addr Name VLAN-ID
-------------- ----------- ------------
00:19:56:8A:4C:71 Dept.A 10
Switch(config)#end
Switch#copy running-config startup-config
2.2.3 Enable MAC VLAN for the Port
Follow these steps to enable MAC VLAN for the port:
Step 1 configure
Enter global configuration mode.
Step 2 interface [fastEthernet port | range fastEthernet port-list | gigabitEthernet port | range gigabitEthernet port-list]
Enter interface configuration mode.
Step 3 mac-vlan
Enable MAC VLAN for the port.
Step 5 end
Return to privileged EXEC mode.
Step 6 copy running-config startup-config
Save the settings in the configuration file.
The following example shows how to enable MAC VLAN for port 1/0/1.
Switch#configure
Switch(config)#interface gigabitEthernet 1/0/1
Switch(config-if)#mac-vlan
MAC VLAN Configuration 2-5
Managing MAC VLAN
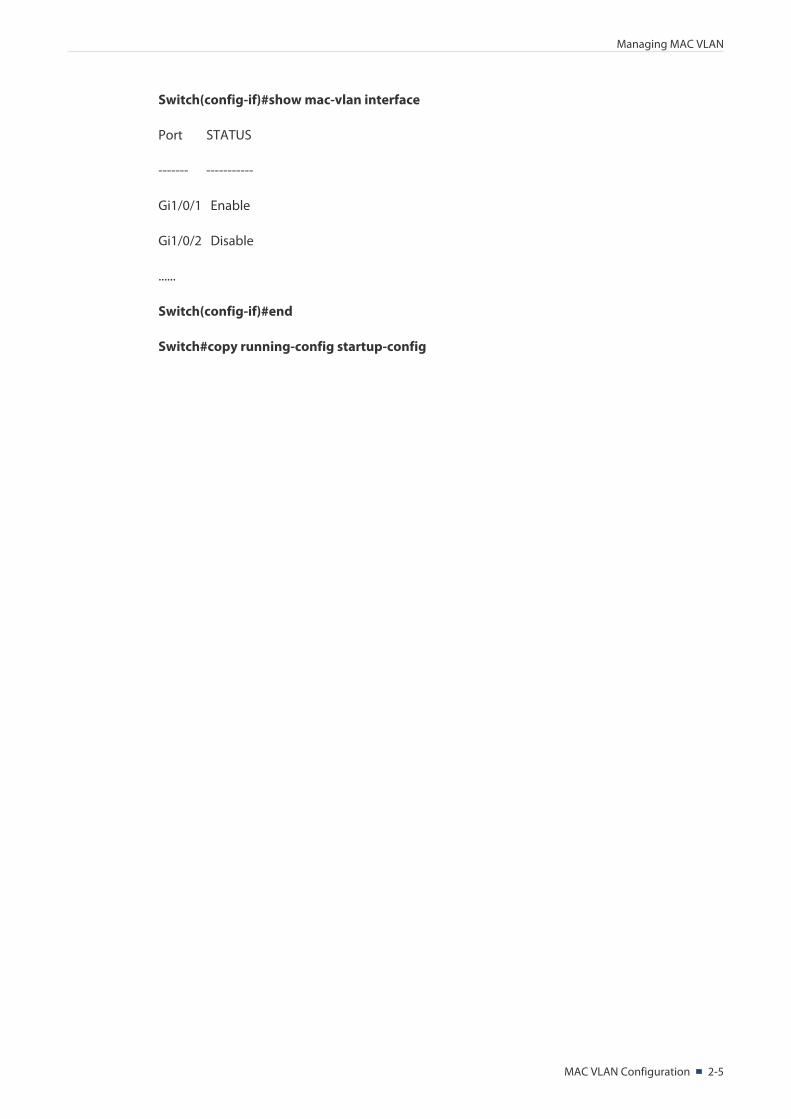
Switch(config-if)#show mac-vlan interface
Port STATUS
------- -----------
Gi1/0/1 Enable
Gi1/0/2 Disable
......
Switch(config-if)#end
Switch#copy running-config startup-config
Example for Configuring MAC VLAN 3-1
Managing MAC VLAN
3 Example for Configuring MAC VLAN
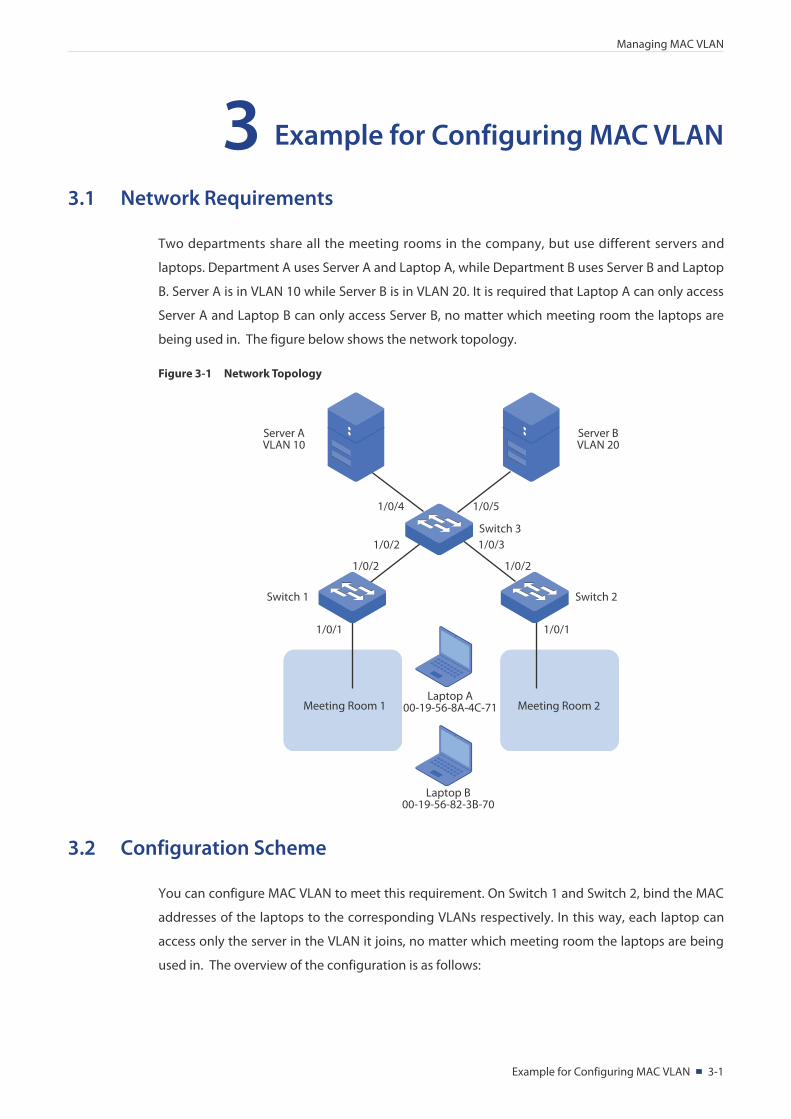
3.1 Network Requirements
Two departments share all the meeting rooms in the company, but use different servers and
laptops. Department A uses Server A and Laptop A, while Department B uses Server B and Laptop
B. Server A is in VLAN 10 while Server B is in VLAN 20. It is required that Laptop A can only access
Server A and Laptop B can only access Server B, no matter which meeting room the laptops are
being used in. The figure below shows the network topology.
Figure 3-1 Network Topology
Meeting Room 1Laptop A
00-19-56-8A-4C-71
Laptop B00-19-56-82-3B-70
Meeting Room 2
Switch 31/0/31/0/2
1/0/2 1/0/2
1/0/11/0/1
1/0/51/0/4
Switch 1 Switch 2
Server BVLAN 20
Server AVLAN 10
3.2 Configuration Scheme
You can configure MAC VLAN to meet this requirement. On Switch 1 and Switch 2, bind the MAC
addresses of the laptops to the corresponding VLANs respectively. In this way, each laptop can
access only the server in the VLAN it joins, no matter which meeting room the laptops are being
used in. The overview of the configuration is as follows:
Example for Configuring MAC VLAN 3-2
Managing MAC VLAN
1) Create VLAN 10 and VLAN 20 on each of the three switches, set different port types, and add
the ports to the VLANs based on the network topology. Note: For the ports connecting the
laptops, set the port type as General, and set the egress rule as Untag.
2) On Switch 1 and Switch 2, bind the MAC addresses of the laptops to their corresponding
VLANs, and enable MAC VLAN for the ports.
Exampled with T2600G-28TS, the following sections provide configuration procedure in two
ways: using the GUI and using the CLI.
3.3 Using the GUI
Configurations for Switch 1 and Switch 2:
The configurations of Switch 1 and Switch 2 are similar. The following introductions take Switch 1
as an example.
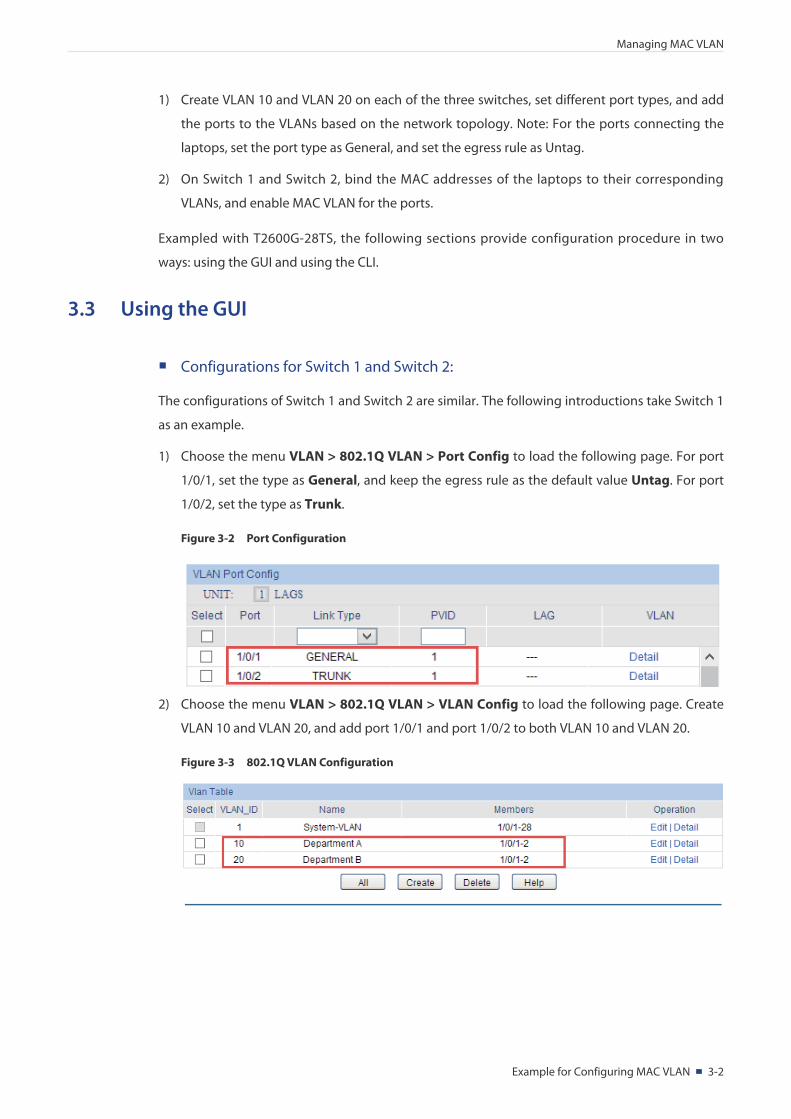
1) Choose the menu VLAN > 802.1Q VLAN > Port Config to load the following page. For port
1/0/1, set the type as General, and keep the egress rule as the default value Untag. For port
1/0/2, set the type as Trunk.
Figure 3-2 Port Configuration
2) Choose the menu VLAN > 802.1Q VLAN > VLAN Config to load the following page. Create
VLAN 10 and VLAN 20, and add port 1/0/1 and port 1/0/2 to both VLAN 10 and VLAN 20.
Figure 3-3 802.1Q VLAN Configuration
Example for Configuring MAC VLAN 3-3
Managing MAC VLAN
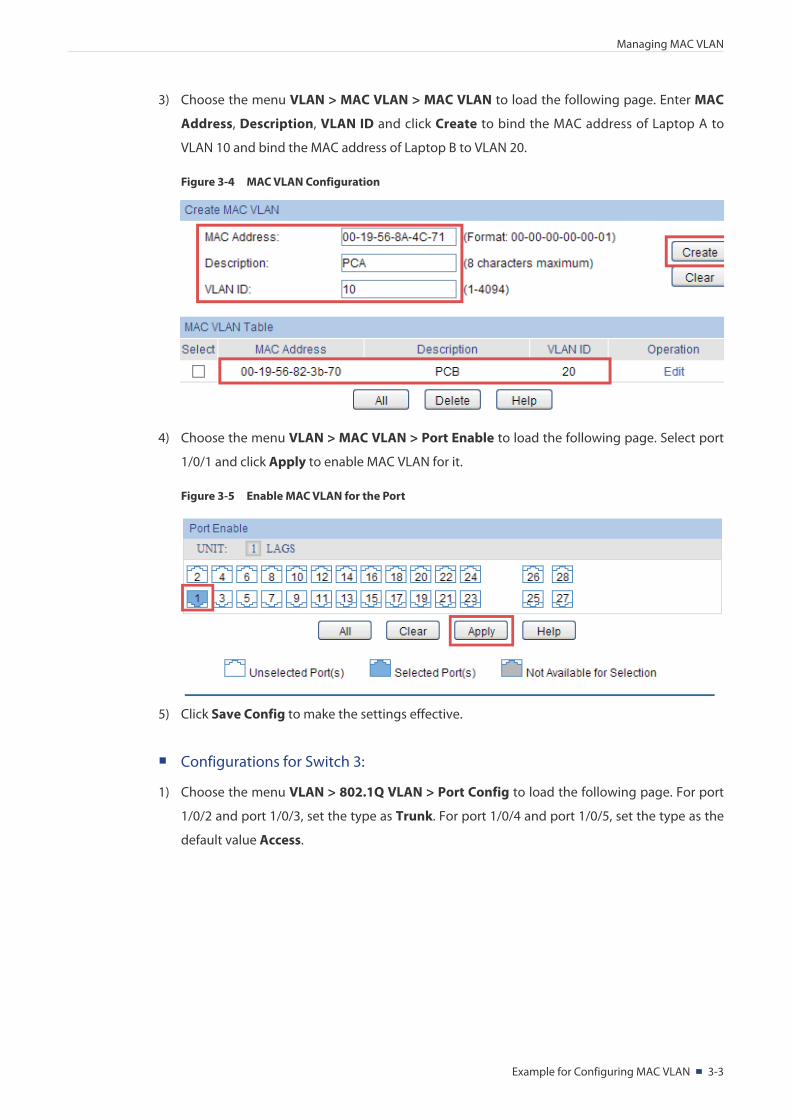
3) Choose the menu VLAN > MAC VLAN > MAC VLAN to load the following page. Enter MAC
Address, Description, VLAN ID and click Create to bind the MAC address of Laptop A to
VLAN 10 and bind the MAC address of Laptop B to VLAN 20.
Figure 3-4 MAC VLAN Configuration
4) Choose the menu VLAN > MAC VLAN > Port Enable to load the following page. Select port
1/0/1 and click Apply to enable MAC VLAN for it.
Figure 3-5 Enable MAC VLAN for the Port
5) Click Save Config to make the settings effective.
Configurations for Switch 3:
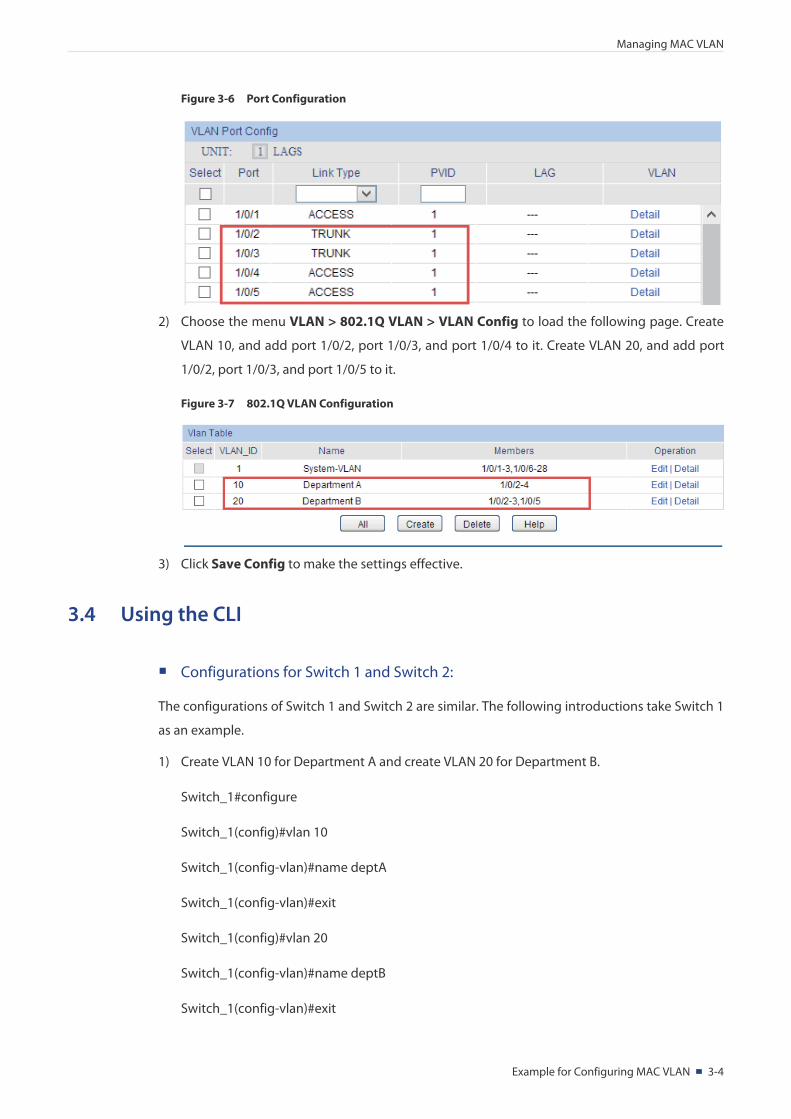
1) Choose the menu VLAN > 802.1Q VLAN > Port Config to load the following page. For port
1/0/2 and port 1/0/3, set the type as Trunk. For port 1/0/4 and port 1/0/5, set the type as the
default value Access.
Example for Configuring MAC VLAN 3-4
Managing MAC VLAN
Figure 3-6 Port Configuration
2) Choose the menu VLAN > 802.1Q VLAN > VLAN Config to load the following page. Create
VLAN 10, and add port 1/0/2, port 1/0/3, and port 1/0/4 to it. Create VLAN 20, and add port
1/0/2, port 1/0/3, and port 1/0/5 to it.
Figure 3-7 802.1Q VLAN Configuration
3) Click Save Config to make the settings effective.
3.4 Using the CLI
Configurations for Switch 1 and Switch 2:
The configurations of Switch 1 and Switch 2 are similar. The following introductions take Switch 1
as an example.
1) Create VLAN 10 for Department A and create VLAN 20 for Department B.
Switch_1#configure
Switch_1(config)#vlan 10
Switch_1(config-vlan)#name deptA
Switch_1(config-vlan)#exit
Switch_1(config)#vlan 20
Switch_1(config-vlan)#name deptB
Switch_1(config-vlan)#exit
Example for Configuring MAC VLAN 3-5
Managing MAC VLAN
2) For port 1/0/2, set the type as Trunk, and add it to both VLAN 10 and VLAN 20.
Switch_1(config)#interface gigabitEthernet 1/0/2
Switch_1(config-if)#switchport mode trunk
Switch_1(config-if)#switchport trunk allowed vlan 10,20
Switch_1(config-if)#exit
3) For port 1/0/1, set the type as General, set the egress rule as untagged, and add it to
both VLAN 10 and VLAN 20. Then enable MAC VLAN for port 1/0/1.
Switch_1(config)#interface gigabitEthernet 1/0/1
Switch_1(config-if)#switchport mode general
Switch_1(config-if)#switchport general allowed vlan 10,20 untagged
Switch_1(config-if)#mac-vlan
Switch_1(config-if)#exit
4) Bind the MAC address of Laptop A to VLAN 10 and bind the MAC address of Laptop B to VLAN
20.
Switch_1(config)#mac-vlan mac-address 00:19:56:8A:4C:71 vlan 10 description PCA
Switch_1(config)#mac-vlan mac-address 00:19:56:82:3B:70 vlan 20 description PCB
Configurations for Switch 3:
1) Create VLAN 10 for Department A and create VLAN 20 for Department B.
Switch_3#configure
Switch_3(config)#vlan 10
Switch_3(config-vlan)#name deptA
Switch_3(config-vlan)#exit
Switch_3(config)#vlan 20
Switch_3(config-vlan)#name deptB
Switch_3(config-vlan)#exit
2) For port 1/0/2 and port 1/0/3, set the type as Trunk, and add them to both VLAN 10 and VLAN
20.
Switch_3(config)#interface gigabitEthernet 1/0/2
Example for Configuring MAC VLAN 3-6
Managing MAC VLAN
Switch_3(config-if)#switchport mode trunk
Switch_3(config-if)#switchport trunk allowed vlan 10,20
Switch_3(config-if)#exit
Switch_3(config)#interface gigabitEthernet 1/0/3
Switch_3(config-if)#switchport mode trunk
Switch_3(config-if)#switchport trunk allowed vlan 10,20
Switch_3(config-if)#exit
3) For port 1/0/4 and port 1/0/5, set the type as Access, and add them to both VLAN 10 and
VLAN 20.
Switch_3(config)#interface gigabitEthernet 1/0/4
Switch_3(config-if)#switchport mode access
Switch_3(config-if)#switchport access vlan 10
Switch_3(config-if)#exit
Switch_3(config)#interface gigabitEthernet 1/0/5
Switch_3(config-if)#switchport mode access
Switch_3(config-if)#switchport access vlan 20
Switch_3(config-if)#end
Switch_3#copy running-config startup-config
Configuration File
Switch 1:
Switch_1#configure
Switch_1(config)#vlan 10
Switch_1(config-vlan)#name deptA
Switch_1(config-vlan)#exit
Switch_1(config)#vlan 20
Switch_1(config-vlan)#name deptB
Switch_1(config-vlan)#exit
Example for Configuring MAC VLAN 3-7
Managing MAC VLAN
Switch_1(config)#interface gigabitEthernet 1/0/2
Switch_1(config-if)#switchport mode trunk
Switch_1(config-if)#switchport trunk allowed vlan 10,20
Switch_1(config-if)#exit
Switch_1(config)#interface gigabitEthernet 1/0/1
Switch_1(config-if)#switchport mode general
Switch_1(config-if)#switchport general allowed vlan 10,20 untagged
Switch_1(config-if)#mac-vlan
Switch_1(config-if)#exit
Switch_1(config)#mac-vlan mac-address 00:19:56:8A:4C:71 vlan 10 description PCA
Switch_1(config)#mac-vlan mac-address 00:19:56:82:3B:70 vlan 20 description PCB
Switch_1(config)#end
Switch_1#copy running-config startup-config
Switch 2:
Switch_2#configure
Switch_2(config)#vlan 10
Switch_2(config-vlan)#name deptA
Switch_2(config-vlan)#exit
Switch_2(config)#vlan 20
Switch_2(config-vlan)#name deptB
Switch_2(config-vlan)#exit
Switch_2(config)#interface gigabitEthernet 1/0/2
Switch_2(config-if)#switchport mode trunk
Switch_2(config-if)#switchport trunk allowed vlan 10,20
Switch_2(config-if)#exit
Switch_2(config)#interface gigabitEthernet 1/0/1
Switch_2(config-if)#switchport mode general
Example for Configuring MAC VLAN 3-8
Managing MAC VLAN
Switch_2(config-if)#switchport general allowed vlan 10,20 untagged
Switch_2(config-if)#exit
Switch_2(config)#mac-vlan mac-address 00:19:56:8A:4C:71 vlan 10 description PCA
Switch_2(config)#mac-vlan mac-address 00:19:56:82:3B:70 vlan 20 description PCB
Switch_2(config-if)#mac-vlan
Switch_2(config-if)#end
Switch_2#copy running-config startup-config
Switch 3:
Switch_3#configure
Switch_3(config)#vlan 10
Switch_3(config-vlan)#name deptA
Switch_3(config-vlan)#exit
Switch_3(config)#vlan 20
Switch_3(config-vlan)#name deptB
Switch_3(config-vlan)#exit
Switch_3(config)#interface gigabitEthernet 1/0/2
Switch_3(config-if)#switchport mode trunk
Switch_3(config-if)#switchport trunk allowed vlan 10,20
Switch_3(config-if)#exit
Switch_3(config)#interface gigabitEthernet 1/0/3
Switch_3(config-if)#switchport mode trunk
Switch_3(config-if)#switchport trunk allowed vlan 10,20
Switch_3(config-if)#exit
Switch_3(config)#interface gigabitEthernet 1/0/4
Switch_3(config-if)#switchport mode access
Switch_3(config-if)#switchport access vlan 10
Switch_3(config-if)#exit
Example for Configuring MAC VLAN 3-9
Managing MAC VLAN
Switch_3(config)#interface gigabitEthernet 1/0/5
Switch_3(config-if)#switchport mode access
Switch_3(config-if)#switchport access vlan 20
Switch_3(config-if)#end
Switch_3#copy running-config startup-config
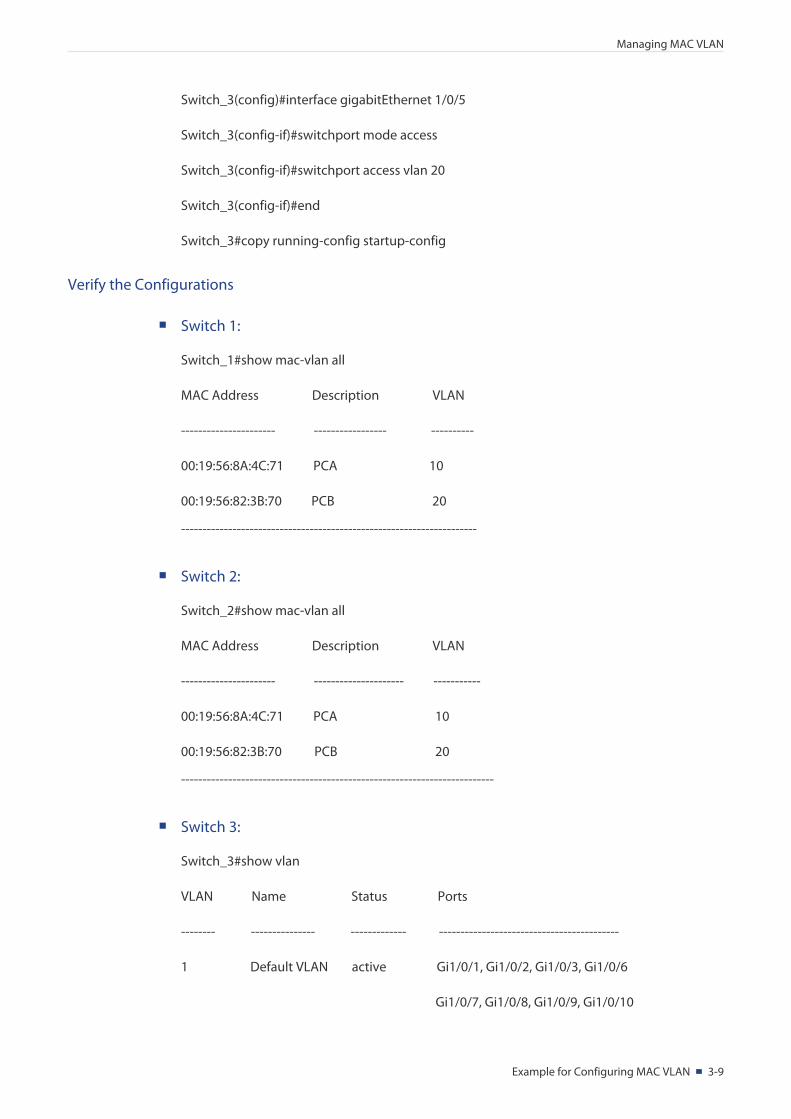
Verify the Configurations
Switch 1:
Switch_1#show mac-vlan all
MAC Address Description VLAN
---------------------- ----------------- ----------
00:19:56:8A:4C:71 PCA 10
00:19:56:82:3B:70 PCB 20
---------------------------------------------------------------------
Switch 2:
Switch_2#show mac-vlan all
MAC Address Description VLAN
---------------------- --------------------- -----------
00:19:56:8A:4C:71 PCA 10
00:19:56:82:3B:70 PCB 20
-------------------------------------------------------------------------
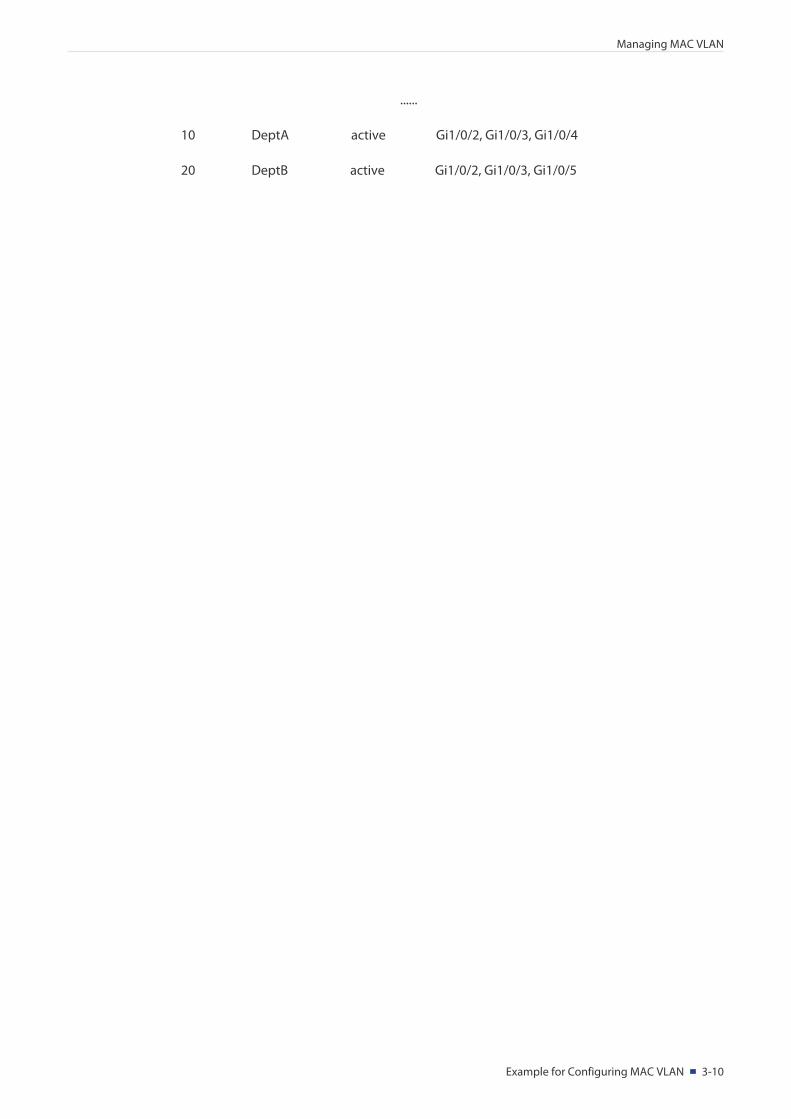
Switch 3:
Switch_3#show vlan
VLAN Name Status Ports
-------- --------------- ------------- ------------------------------------------
1 Default VLAN active Gi1/0/1, Gi1/0/2, Gi1/0/3, Gi1/0/6
Gi1/0/7, Gi1/0/8, Gi1/0/9, Gi1/0/10
Example for Configuring MAC VLAN 3-10
Managing MAC VLAN
......
10 DeptA active Gi1/0/2, Gi1/0/3, Gi1/0/4
20 DeptB active Gi1/0/2, Gi1/0/3, Gi1/0/5
Appendix: Default Parameters 4-1
Managing MAC VLAN
4 Appendix: Default Parameters
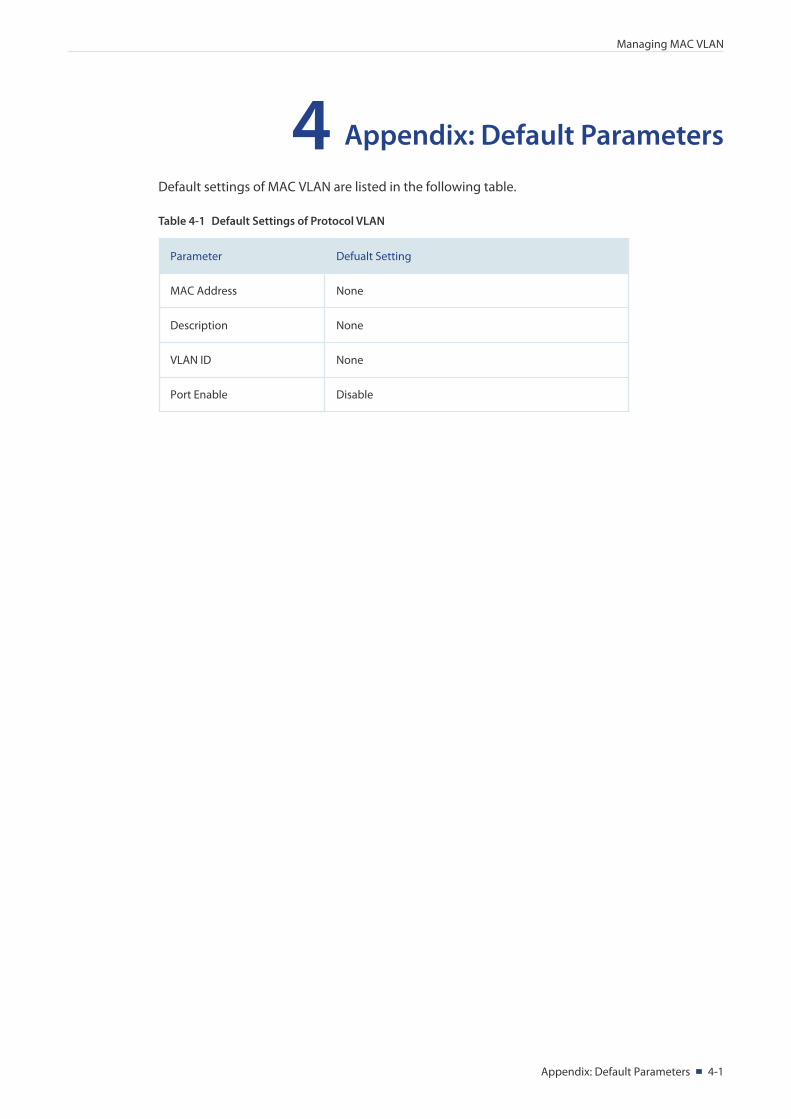
Default settings of MAC VLAN are listed in the following table.
Table 4-1 Default Settings of Protocol VLAN
Parameter Defualt Setting
MAC Address None
Description None
VLAN ID None
Port Enable Disable
![Dell PowerConnect 5524 Command Reference · Use the no form to remove an address. Syntax mac -address -table static mac -address interface vlan vlan -id [action ] no mac -address](https://img.pdfslide.us/doc/110x75/5f832c0c0e24e1744129f015/dell-powerconnect-5524-command-reference-use-the-no-form-to-remove-an-address-syntax.jpg)