Embed Size (px)
Citation preview
1
ConcurTravel and Expense Management Training
2
Financial Services consists of the Comptroller’s Office and nine different departments. The departments within Financial Services you will most often interact with include:
1. Aurora Finance
• Administers access and system upkeep for all systems; Banner, FAST, Concur, and EPIC. Give customer support and training for Banner, FAST, and EPIC.
2. Purchasing Services
• Determines how to best purchase an item, eligibility of desired expenses/purchases, how to purchase electronic hardware or software, which EPIC process to use and how to navigate EPIC contracts.
3. Research and Special Fund Accounting Services
• Helps you understand your research grant and compliance, approves your Tri-Council Statement of Account, Concur and paper claim expense reports on research funds.
4. Supplier Payment Services
• Answers inquiries on the payment of Concur or paper claims, or regarding cheques. Refer to SPS’s website to find your unit contact.
5. Travel Services
• Provides Concur system navigation and training, Travel and Business Expense Claim Policy and Procedure interpretation, inquiries on paper claims on operating funds, Travel and Expense credit cards, gift cards, cash advances, and purchasing card reconciliations.
Financial Services

3
What is Concur?
Concur is the University's Travel and Expense tool. University air travel arrangements, hotel accommodations and car rentals are reserved using the Concur online booking tool (OBT). Travel expenses for employees are claimed and reimbursed via the Concur expense management tool (EMT). The benefits of using Concur include:
• Increases approval and reimbursement time in relation to paper claims
• Improves institutional transparency and accountability
• Allows users to track their claims throughout the approval process and retains an online record of priors claims
• Transparent auditing practices
• Provides for online travel bookings centered around the U of M policy
4
U of M Policies and Procedures
When you’re booking travel, acquiring equipment, or incurring expenses on behalf of the University, the polices and procedures that may affect you include:
• Travel and Business Expense Claims Policy and Procedure
• Purchasing Policy and Procedure
• Human Resources Policy
• Research Grant and Tri-Council Compliance
• Departmental procedure and requirements
5
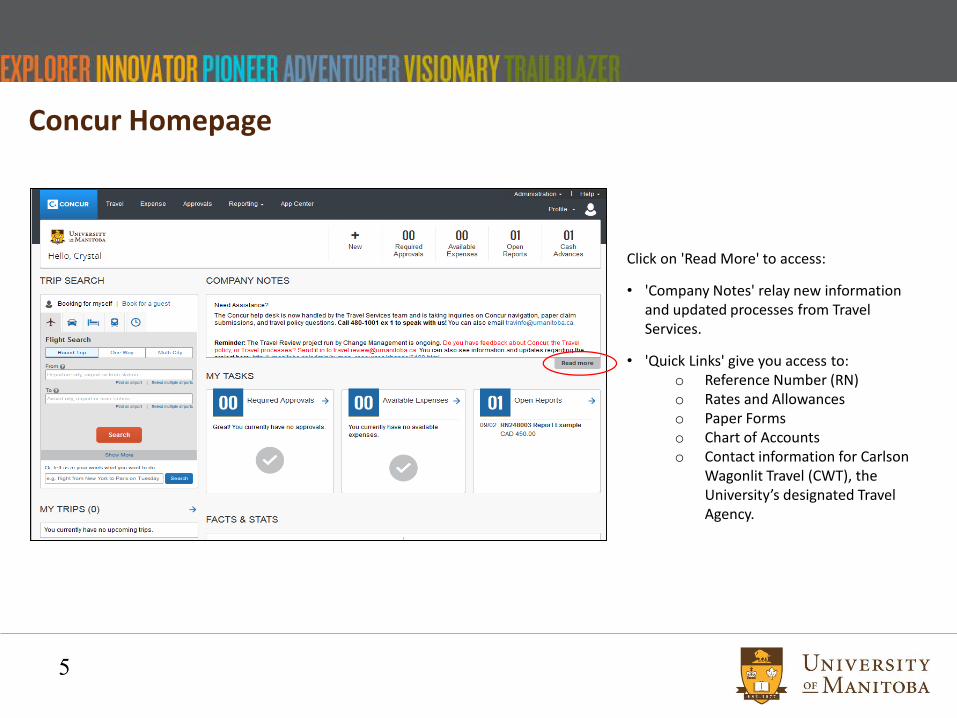
Concur Homepage
Click on 'Read More' to access:
• 'Company Notes' relay new information and updated processes from Travel Services.
• 'Quick Links' give you access to:o Reference Number (RN)o Rates and Allowanceso Paper Formso Chart of Accounts o Contact information for Carlson
Wagonlit Travel (CWT), the University’s designated Travel Agency.
6
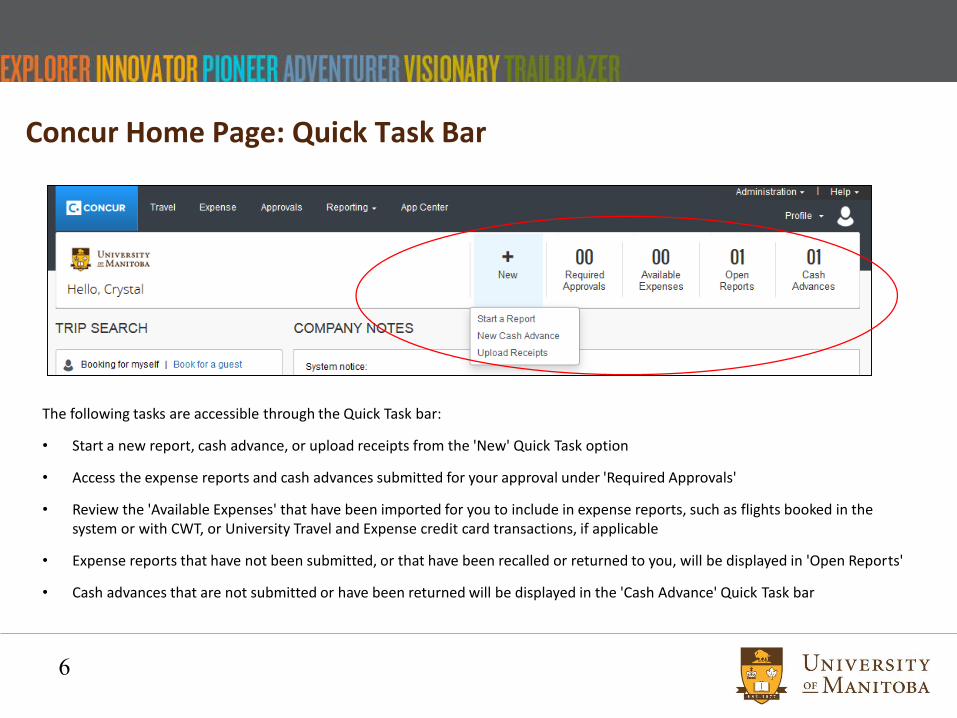
Concur Home Page: Quick Task Bar
The following tasks are accessible through the Quick Task bar:
• Start a new report, cash advance, or upload receipts from the 'New' Quick Task option
• Access the expense reports and cash advances submitted for your approval under 'Required Approvals'
• Review the 'Available Expenses' that have been imported for you to include in expense reports, such as flights booked in the system or with CWT, or University Travel and Expense credit card transactions, if applicable
• Expense reports that have not been submitted, or that have been recalled or returned to you, will be displayed in 'Open Reports'
• Cash advances that are not submitted or have been returned will be displayed in the 'Cash Advance' Quick Task bar
7
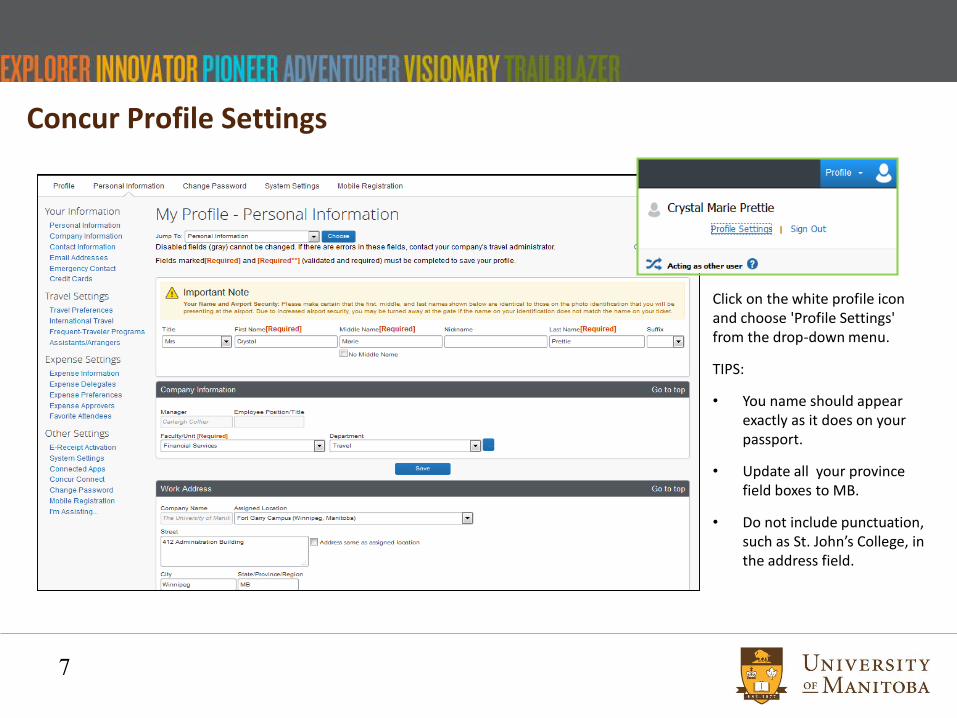
Concur Profile Settings
Click on the white profile icon and choose 'Profile Settings' from the drop-down menu.
TIPS:
• You name should appear exactly as it does on your passport.
• Update all your province field boxes to MB.
• Do not include punctuation, such as St. John’s College, in the address field.
8
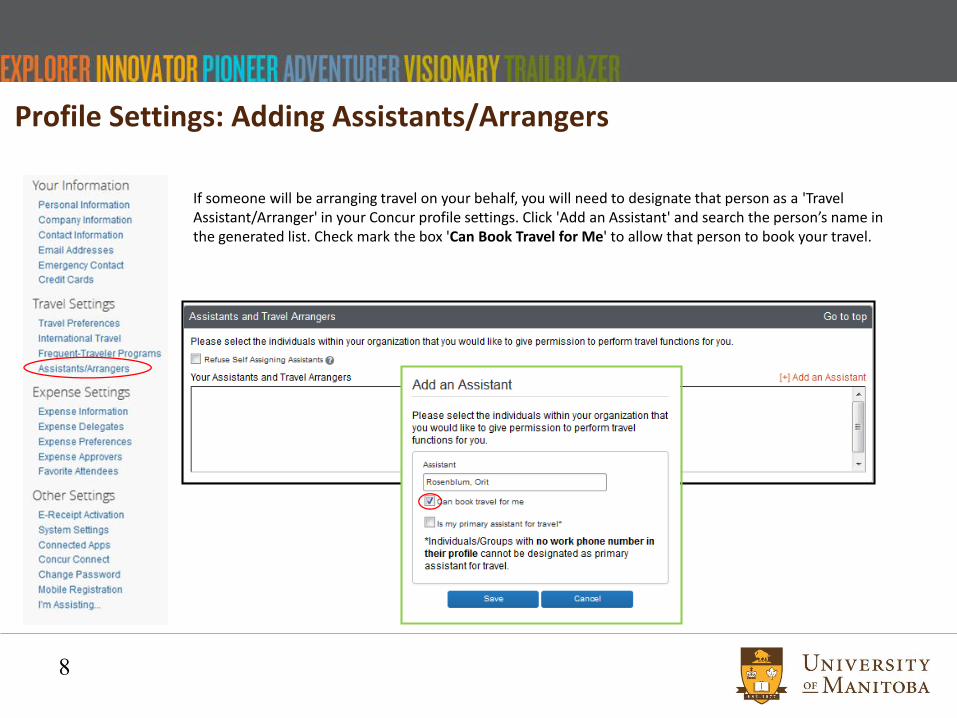
Profile Settings: Adding Assistants/Arrangers
If someone will be arranging travel on your behalf, you will need to designate that person as a 'Travel Assistant/Arranger' in your Concur profile settings. Click 'Add an Assistant' and search the person’s name in the generated list. Check mark the box 'Can Book Travel for Me' to allow that person to book your travel.
9
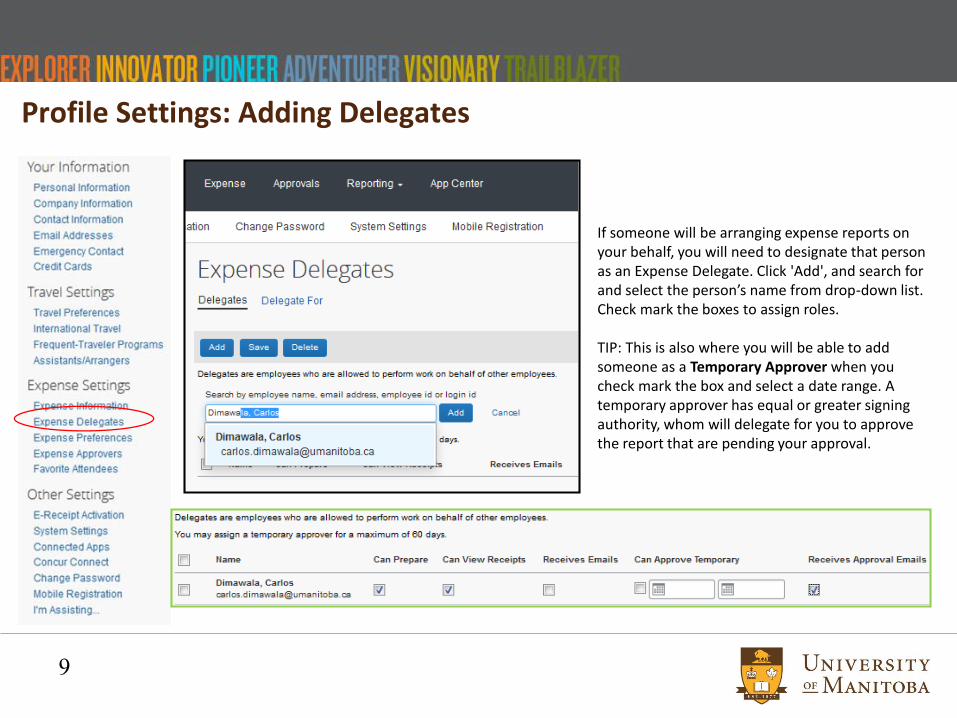
If someone will be arranging expense reports on your behalf, you will need to designate that person as an Expense Delegate. Click 'Add', and search for and select the person’s name from drop-down list. Check mark the boxes to assign roles.
TIP: This is also where you will be able to add someone as a Temporary Approver when you check mark the box and select a date range. A temporary approver has equal or greater signing authority, whom will delegate for you to approve the report that are pending your approval.
Profile Settings: Adding Delegates
10
RN and FOAPWhen you are ready to book travel or create expense reports, you will need a Reference Number (RN) and a FOAP.
A Reference Number (RN) is a six-digit number used to differentiate between trips and travelers in the Concur system and FAST. Every flight/trip for each individual should have its own unique RN. In Concur, you can locate a RN from the homepage, under 'Company Notes', or through a link in the report header when you start a new expense report. You can also obtain a RN on the U of M website.
A FOAP is:
Fund – Identifies source of funding
Organization – Identifies who is responsible for funding
Account – Identifies what funding is spent on or type of revenue
Program – Classifies revenue or expense according to purpose of Unit or grant
Speak to your Business Manager or Research Grantee to obtain a FOAP
11
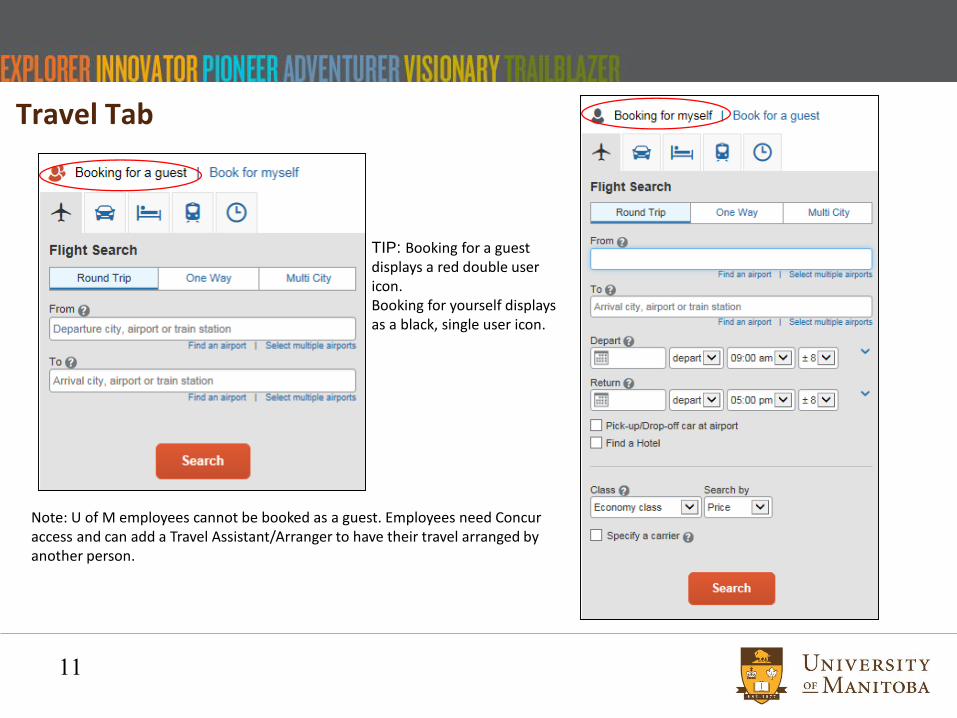
Travel Tab
Note: U of M employees cannot be booked as a guest. Employees need Concur access and can add a Travel Assistant/Arranger to have their travel arranged by another person.
TIP: Booking for a guest displays a red double user icon.Booking for yourself displays as a black, single user icon.
12
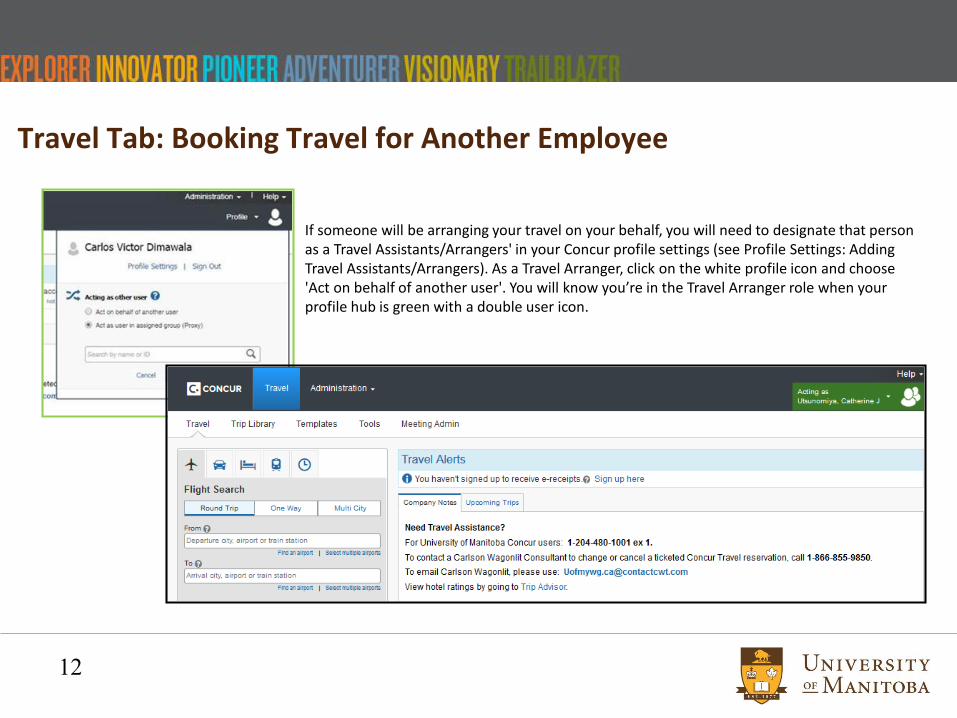
Travel Tab: Booking Travel for Another Employee
If someone will be arranging your travel on your behalf, you will need to designate that person as a Travel Assistants/Arrangers' in your Concur profile settings (see Profile Settings: Adding Travel Assistants/Arrangers). As a Travel Arranger, click on the white profile icon and choose 'Act on behalf of another user'. You will know you’re in the Travel Arranger role when your profile hub is green with a double user icon.
13
To book a flight for yourself as a University of Manitoba employee:
- Book through Concur
- Book through Carlson Wagonlit Travel (CWT), our designated travel agent
- Book through your desired travel agency or booking website. You must use your Travel Credit Card for this method; you cannot use a personal credit card. If you are a delegate, the traveler’s Travel Credit Card must still be used, not your own.
Incurring Expenses - Airfare
To book a flight for a student or guest:- Book through Concur for a guest - Book through CWT (no credit card required) - Allow the person to book their own flight out of pocket. They will be reimbursed through the ‘Guest/Student Travel and Business Expense Claim’ form
To book a flight for a companion: - Book through CWT - Book through your desired travel agency or booking website (and pay for your companion’s flight on a personal credit card)
Allowable Flight Classes: - Economy flights within Canada and the US- Flex flights outside Canada and the US: only your one-over-one must approve. - Premium economy flights to countries outside Canada and the US not listed in Section 2.10 c) in the Procedure
14
Incurring Expenses – MealsWhen travelling on University-related business, there are several ways to claim meal expenses.
Meals with Receipts:The 'Meals with Receipts' expense type is used for meals you ate during University-related business travel. In order to claim under 'Meals with Receipts', you must provide itemized restaurant receipts (not just the credit card slips) with your claim.
Per Diems:Claiming a 'Per Diem' does not require receipts. You are entitled to $60 maximum per day during University-related business travel in Canada, and up to a maximum of $110 per day during travel outside of Canada. Please refer to the per diem foreign allowance in the procedure to see the applicable rate (see section 2.20 b).
Hospitality:The 'hospitality' expense type is used for meal expenses that you have covered for someone else other than yourself, even if it is during University-related business travel. If you pay for another person's meal, the whole charge for the meal must be charged as hospitality. This expense type also allows for additional approvals to deem higher amounts reimbursable. In order to claim hospitality charges, you are required to submit itemized restaurant receipts (not just credit card slips) with your claim, and your guest's (or guests') name(s) must be included in the claim.
Note: All hospitality claims need to be approved before they will be reimbursed. Remember that while your one-over-one can sign off on hospitality that is under $40.00 per person, your Dean or Director’s approval is required for hospitality expenses that are $40.00 or more per person.
Note: Hospitality is generally not an eligible expense that can be charged to a research grant. Please confirm with your Research Accountant whether or not a hospitality expense is allowable before it is incurred.
15
When travelling on University-related business, other expenses that may be processed through Concur include:
• Accommodations: may be reserved through Concur or directly with the vendor. If you are travelling to attend a conference, the conference may offer a group booking rate that is less expensive than hotel rates in Concur. To book a room at a conference rate, follow booking instructions provided in your conference material.
• Car Rentals: reservations can be made in Concur or directly with the vendor.
• Conference Registration: may be claimed in a Concur expense report or processed in EPIC.
• Mileage: incremental to your regular commute may be claimed.
• Parking.
• Taxis, shuttles, or buses.
• Other travel related expenses as approved by your department.
Incurring Expenses
16
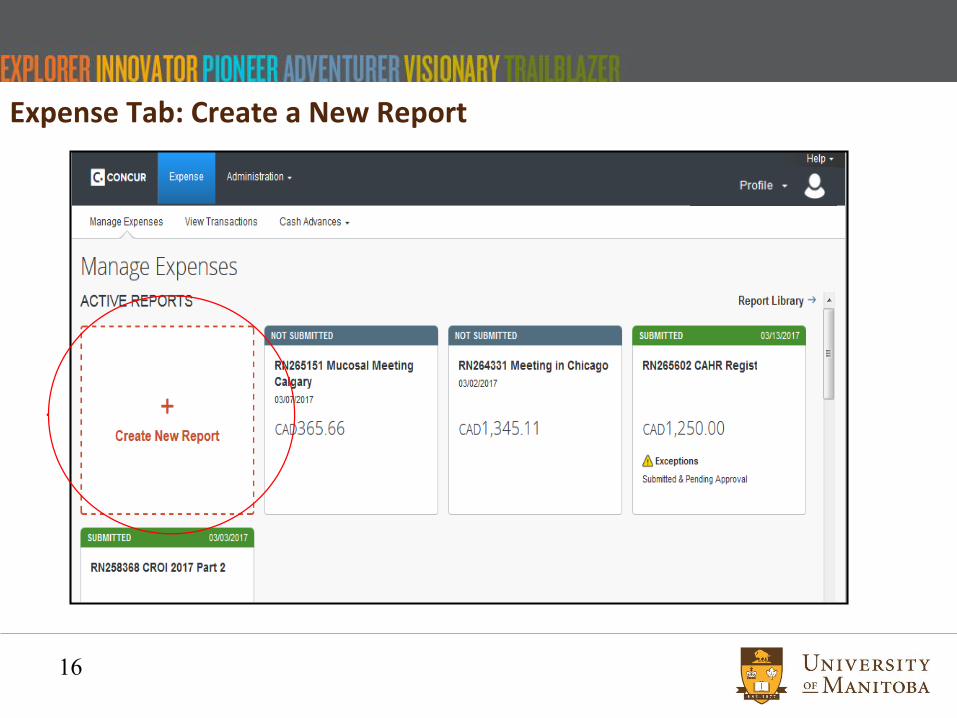
Expense Tab: Create a New Report
17
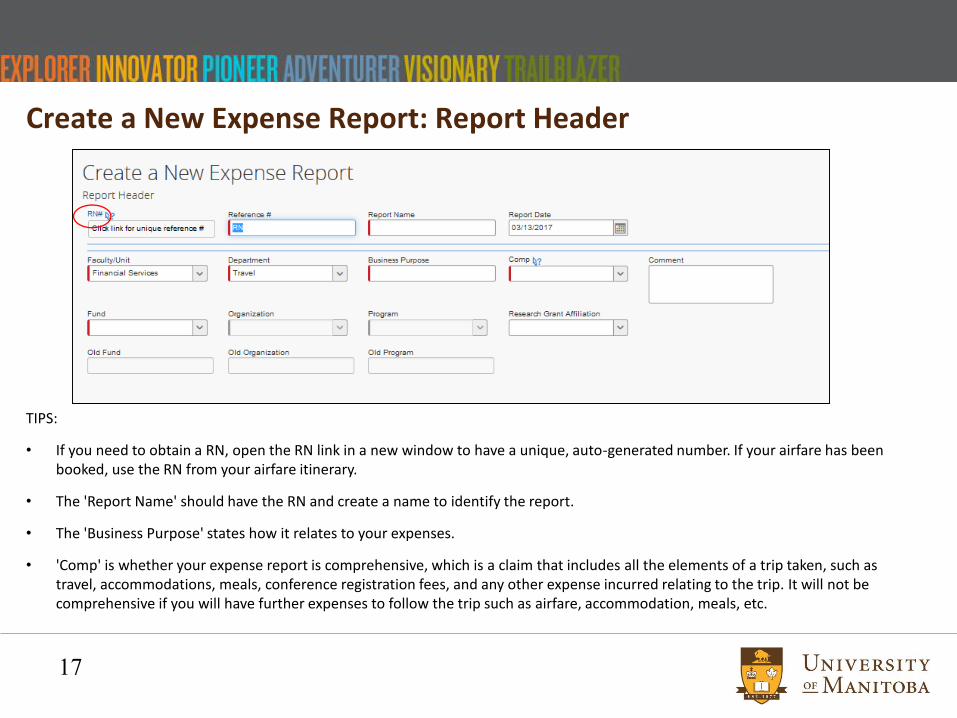
Create a New Expense Report: Report Header
TIPS:
• If you need to obtain a RN, open the RN link in a new window to have a unique, auto-generated number. If your airfare has been booked, use the RN from your airfare itinerary.
• The 'Report Name' should have the RN and create a name to identify the report.
• The 'Business Purpose' states how it relates to your expenses.
• 'Comp' is whether your expense report is comprehensive, which is a claim that includes all the elements of a trip taken, such as travel, accommodations, meals, conference registration fees, and any other expense incurred relating to the trip. It will not be comprehensive if you will have further expenses to follow the trip such as airfare, accommodation, meals, etc.
18
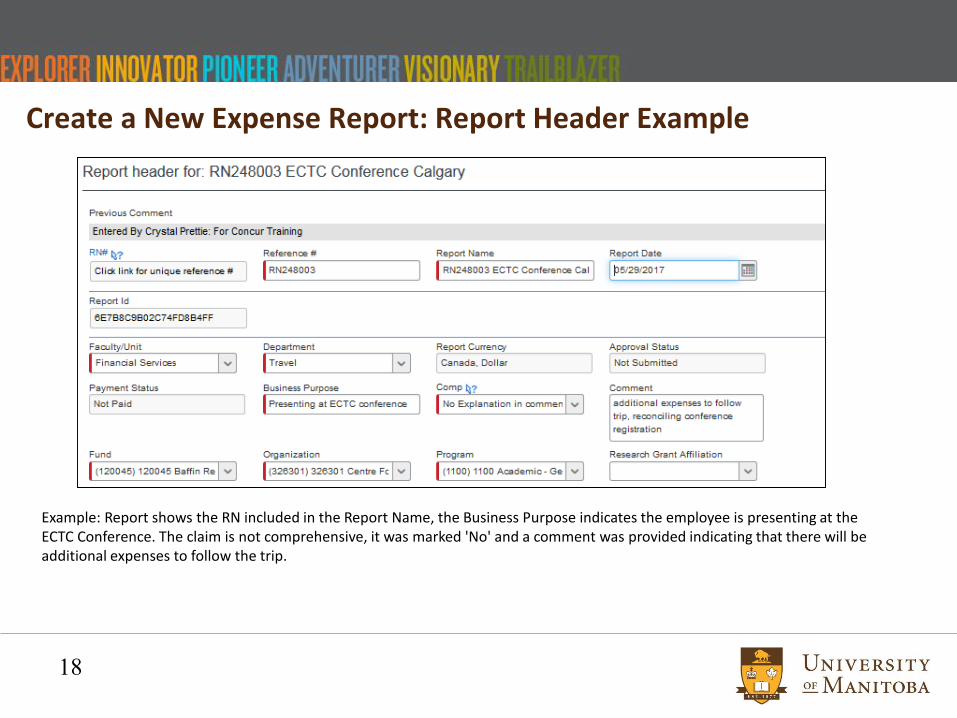
Create a New Expense Report: Report Header Example
Example: Report shows the RN included in the Report Name, the Business Purpose indicates the employee is presenting at the ECTC Conference. The claim is not comprehensive, it was marked 'No' and a comment was provided indicating that there will be additional expenses to follow the trip.
19
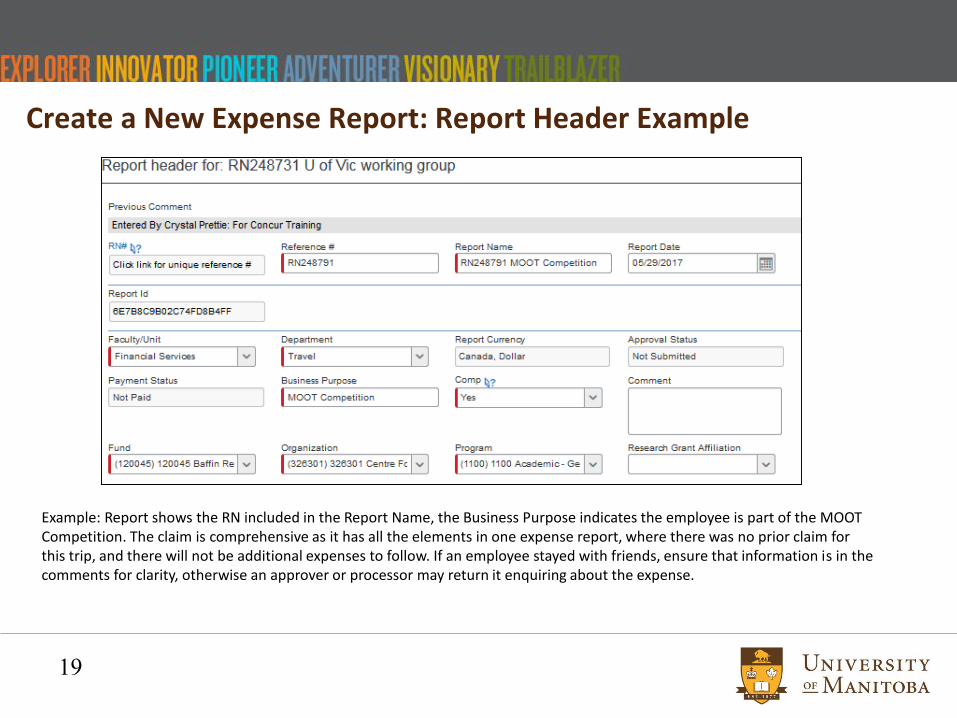
Create a New Expense Report: Report Header Example
Example: Report shows the RN included in the Report Name, the Business Purpose indicates the employee is part of the MOOT Competition. The claim is comprehensive as it has all the elements in one expense report, where there was no prior claim for this trip, and there will not be additional expenses to follow. If an employee stayed with friends, ensure that information is in the comments for clarity, otherwise an approver or processor may return it enquiring about the expense.
20
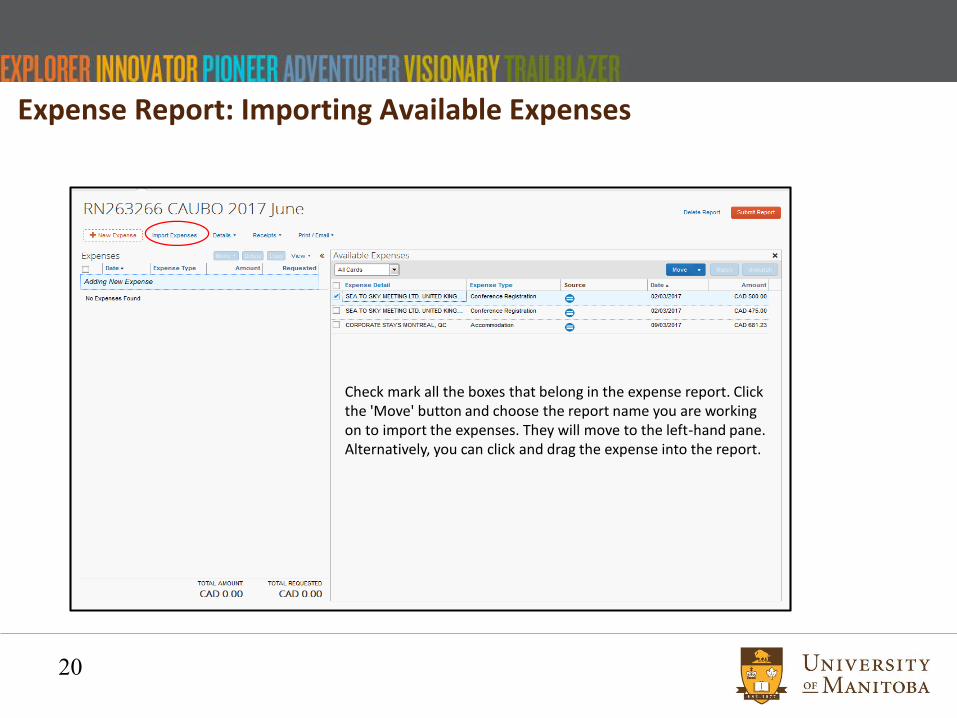
Expense Report: Importing Available Expenses
Check mark all the boxes that belong in the expense report. Click the 'Move' button and choose the report name you are working on to import the expenses. They will move to the left-hand pane. Alternatively, you can click and drag the expense into the report.
21
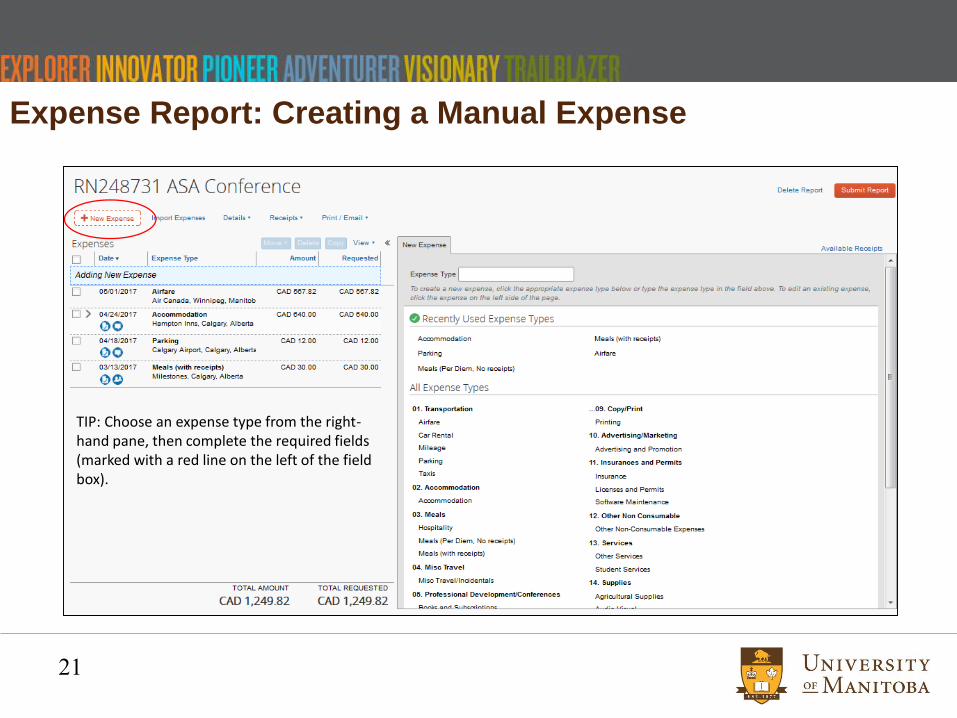
Expense Report: Creating a Manual Expense
TIP: Choose an expense type from the right-hand pane, then complete the required fields (marked with a red line on the left of the field box).
22
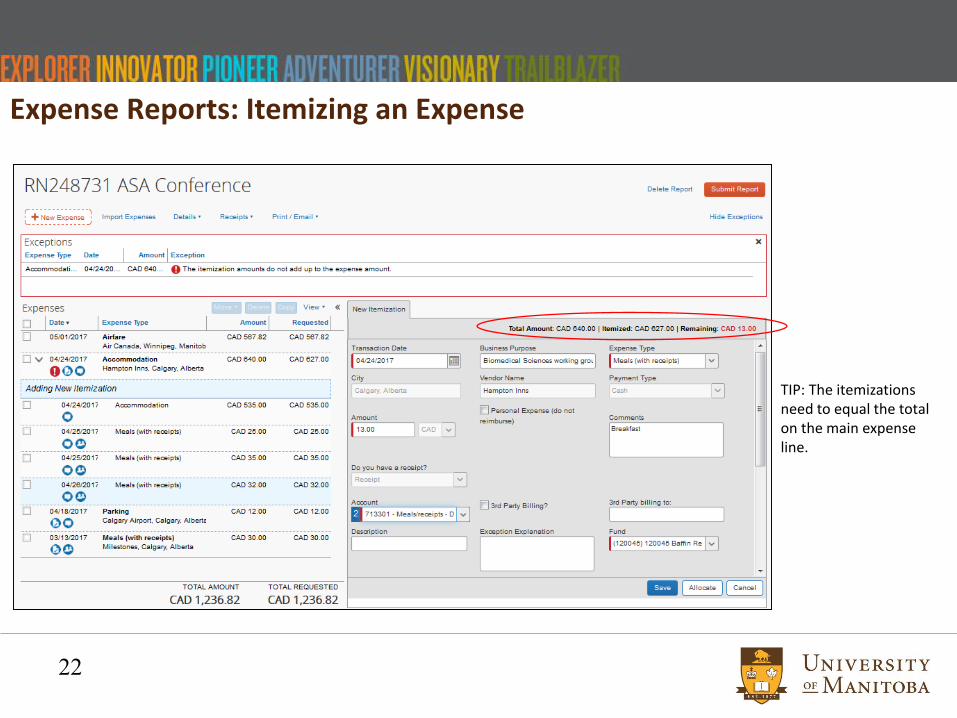
Expense Reports: Itemizing an Expense
TIP: The itemizations need to equal the total on the main expense line.
23
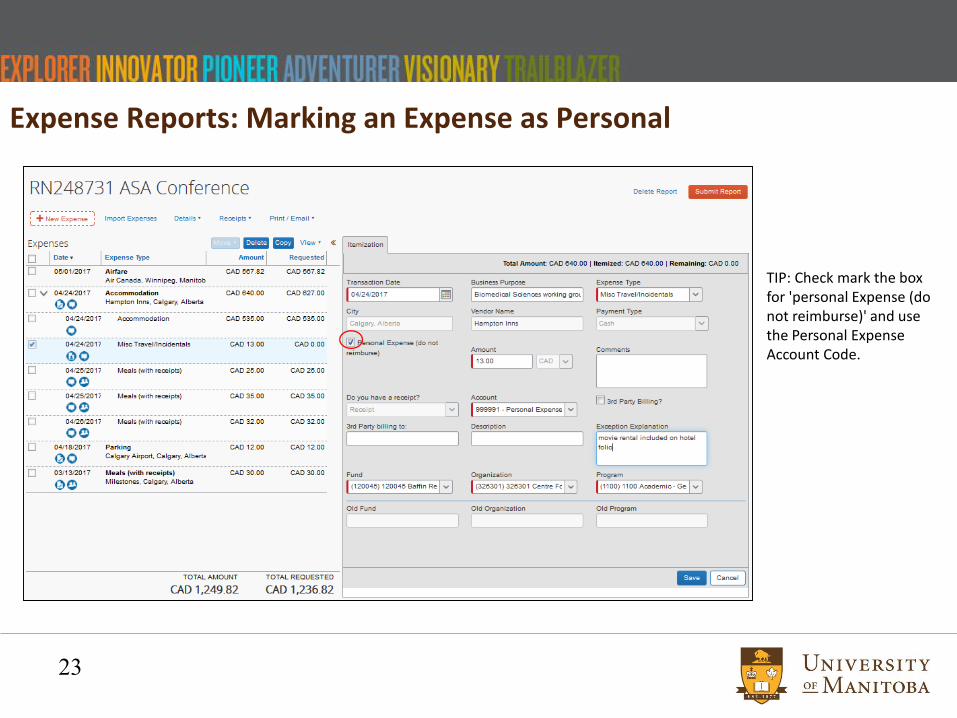
Expense Reports: Marking an Expense as Personal
TIP: Check mark the box for 'personal Expense (do not reimburse)' and use the Personal Expense Account Code.
24
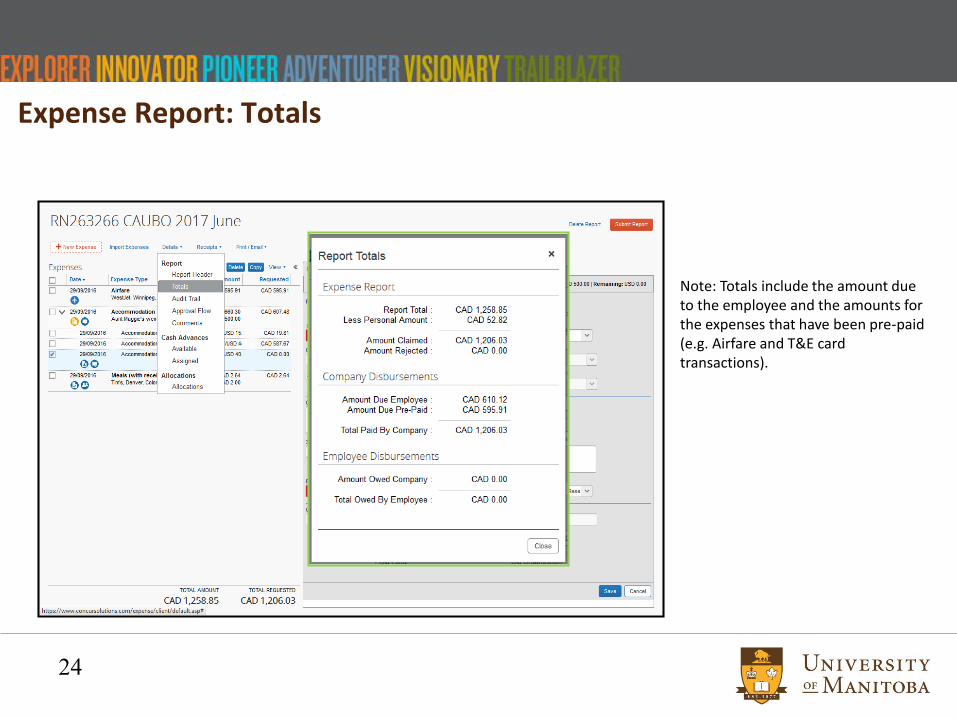
Expense Report: Totals
Note: Totals include the amount due to the employee and the amounts for the expenses that have been pre-paid (e.g. Airfare and T&E card transactions).
25
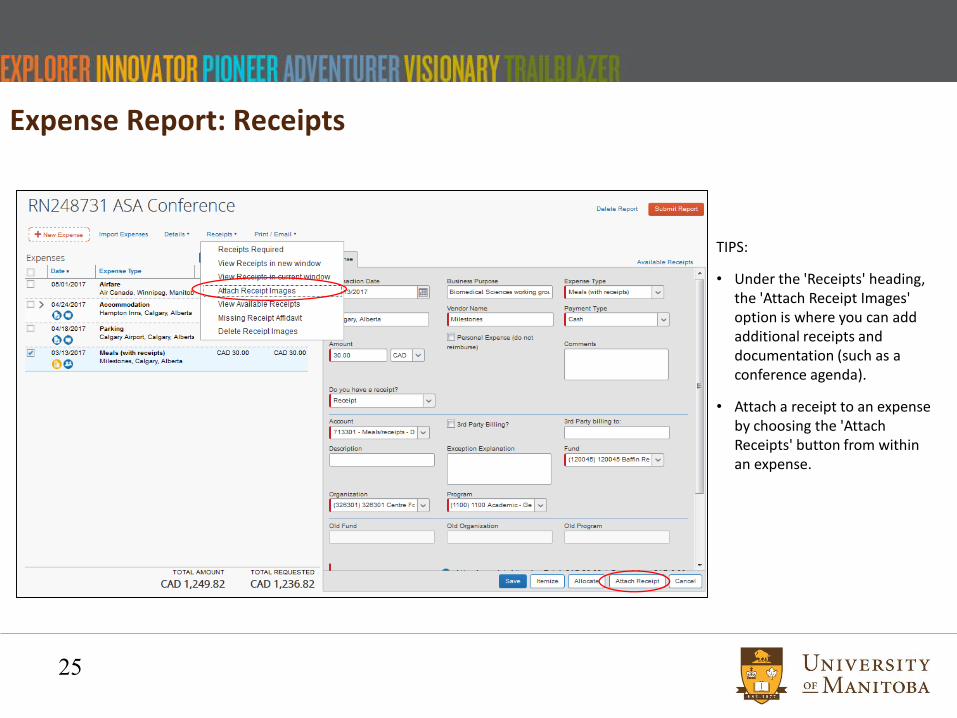
Expense Report: Receipts
TIPS:
• Under the 'Receipts' heading, the 'Attach Receipt Images' option is where you can add additional receipts and documentation (such as a conference agenda).
• Attach a receipt to an expense by choosing the 'Attach Receipts' button from within an expense.
26
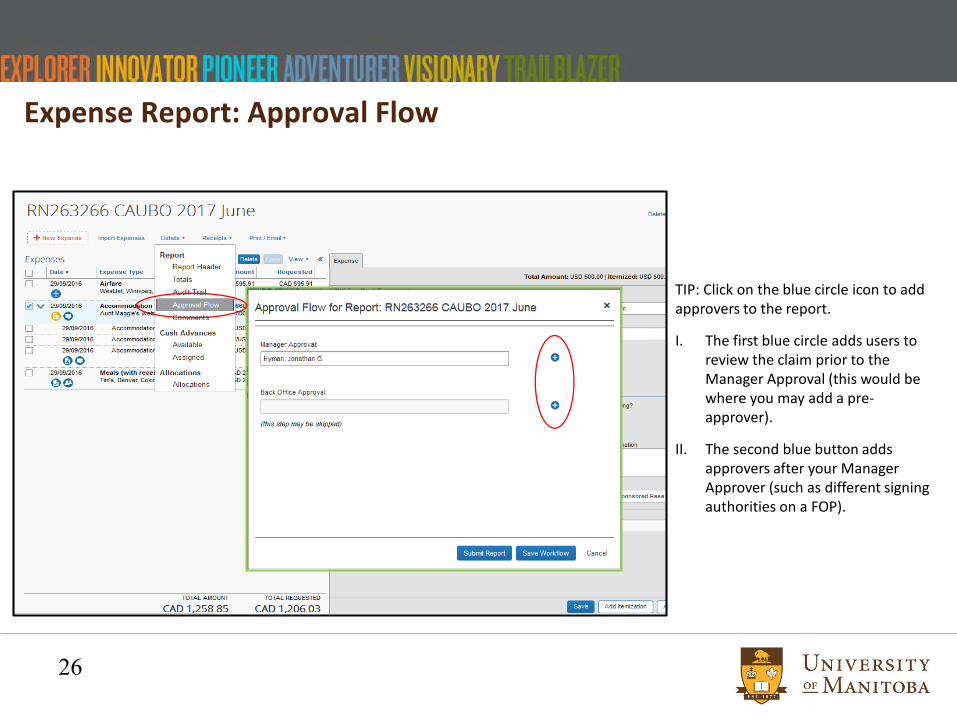
Expense Report: Approval Flow
TIP: Click on the blue circle icon to add approvers to the report.
I. The first blue circle adds users to review the claim prior to the Manager Approval (this would be where you may add a pre-approver).
II. The second blue button adds approvers after your Manager Approver (such as different signing authorities on a FOP).
27
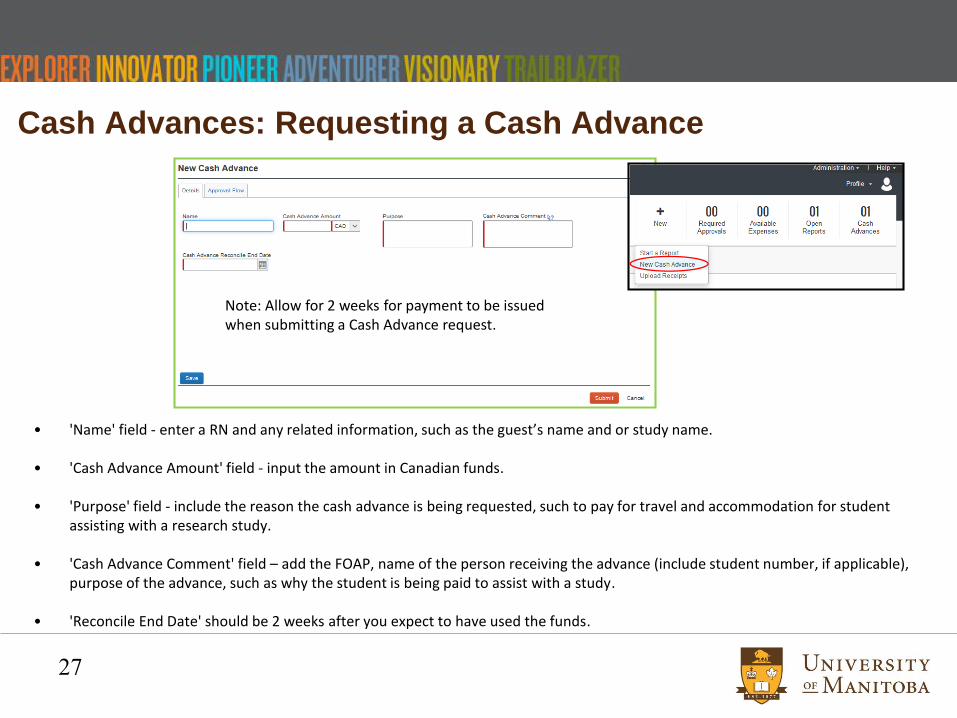
• 'Name' field - enter a RN and any related information, such as the guest’s name and or study name.
• 'Cash Advance Amount' field - input the amount in Canadian funds.
• 'Purpose' field - include the reason the cash advance is being requested, such to pay for travel and accommodation for student assisting with a research study.
• 'Cash Advance Comment' field – add the FOAP, name of the person receiving the advance (include student number, if applicable), purpose of the advance, such as why the student is being paid to assist with a study.
• 'Reconcile End Date' should be 2 weeks after you expect to have used the funds.
Cash Advances: Requesting a Cash Advance
Note: Allow for 2 weeks for payment to be issued when submitting a Cash Advance request.
28
Once all expenses have been incurred, complete a Department Deposit Report and return all remaining money to the Cashiers’ Office. On the form, you will input the required fields, including the RN, and amount of money being returned. The money must me returned to the FOP that issued the funds, and the Account code where the money is returned to is 760005. Ensure you obtain a receipt to include on your Concur reconciliation report.
In Concur, you can reconcile the cash advance return along with additional expenses incurred with the same trip/RN. To account for any remaining cash advance funds that have been returned to the Cashiers’ Office, choose the ‘Cash Advance Return’ expense type and the Cash Advance Return expense account number, 999999.
Scan and attach the receipt from the Cashiers’ Office as documentation.
TIP: review the total of the cash advance when you click on the ‘Details' heading, then choose ‘Totals’.
Cash Advances: Returning a Cash Advance
29
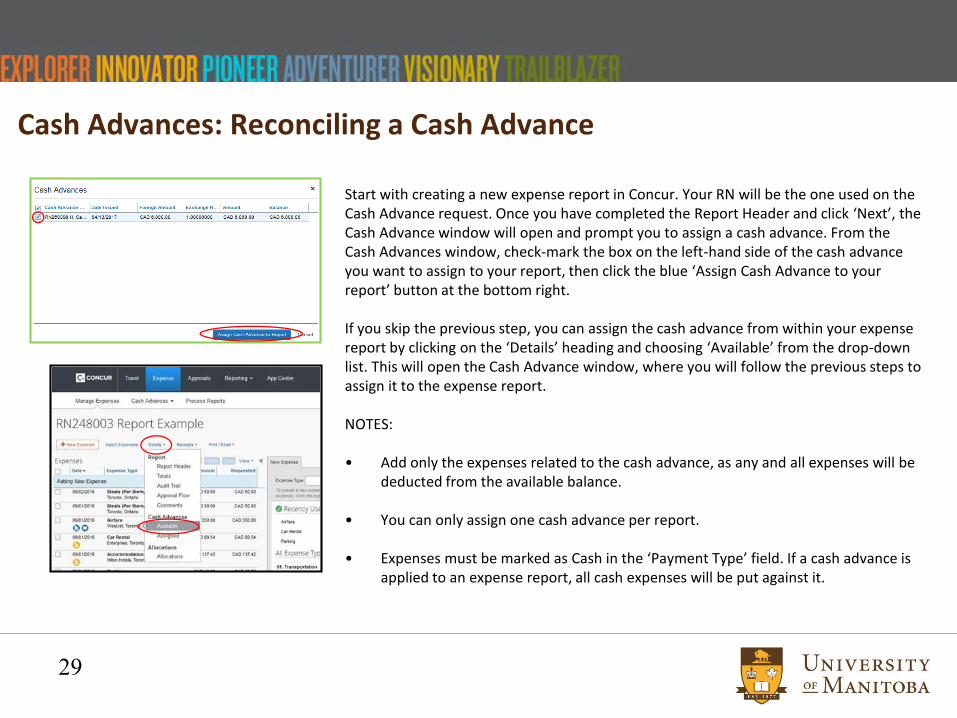
Start with creating a new expense report in Concur. Your RN will be the one used on the Cash Advance request. Once you have completed the Report Header and click ‘Next’, the Cash Advance window will open and prompt you to assign a cash advance. From the Cash Advances window, check-mark the box on the left-hand side of the cash advance you want to assign to your report, then click the blue ‘Assign Cash Advance to your report’ button at the bottom right.
If you skip the previous step, you can assign the cash advance from within your expense report by clicking on the ‘Details’ heading and choosing ‘Available’ from the drop-down list. This will open the Cash Advance window, where you will follow the previous steps to assign it to the expense report.
NOTES:
• Add only the expenses related to the cash advance, as any and all expenses will be deducted from the available balance.
• You can only assign one cash advance per report.
• Expenses must be marked as Cash in the ‘Payment Type’ field. If a cash advance is applied to an expense report, all cash expenses will be put against it.
Cash Advances: Reconciling a Cash Advance
30
Notes