Embed Size (px)
Citation preview
Computer Maintenance
Disk Operating System (DOS)
Copyright © Texas Education Agency, 2011. All rights reserved. 1

Computer Maintenance
Disk Operating System (DOS)
2Copyright © Texas Education Agency, 2011. All rights reserved.

3
I. MS-DOS After shaking hands with the IBM representatives, Microsoft co-founder/CEO, Bill Gates began to search for an OS (operating system) compatible with Intel’s 8086 microprocessor. What he found was a primitive OS made by a small shop owner called QDOS (Quick-and-Dirty Operating System). He bought the rights to it for a few thousand dollars. After a few minor changes, Microsoft released their very first edition of MS-DOS (Microsoft Disk Operating System) version 1.1. All though a primitive OS by today’s standards, it performed all the required operations for an OS.
Brief History of Microsoft’s Operating Systems
Copyright © Texas Education Agency, 2011. All rights reserved.

4
I. MS-DOS Through the years MS-DOS went through a variety of changes until Microsoft released its final pure DOS version, 6.22. Microsoft made a deal with PC vendors that when they sold a PC a version of MS-DOS installed on the machine, until MS-DOS 5.0 you could not purchase MS-DOS in a store! DOS is a text based single-tasking operating system, meaning you can only run one program at one time.
Brief History of Microsoft’s Operating Systems
Copyright © Texas Education Agency, 2011. All rights reserved.

5
II. Windows Generation 1 (Windows 3.x) The first 5 versions of Windows (3.0, 3.1, for Workgroups 3.1, 3.11, for Workgroups 3.11), referred to as Windows 3.x, all need DOS installed to run because they were designed an add-on for DOS not as a standalone OS. The first version of Windows was simply for managing files & running programs and did not have any memory-management features and was therefore not capable of multi-tasking. The “For Workgroups” edition to Windows had added features for networking a LAN.
Brief History of Microsoft’s Operating Systems
Copyright © Texas Education Agency, 2011. All rights reserved.

6
III. OS/2
In the mid 1980’s Microsoft & IBM were working on an OS that, at the time, they thought would make DOS obsolete. This OS was called OS/2. The first versions of Windows were little more than test-beds for OS/2. OS/2 was designed to take advantage of the advanced functions of Intel’s 286 microprocessor. The success of Windows made Microsoft ambitious and IBM nervous, causing friction in their alliance. In 1992 IBM took OS/2 and without the help of Microsoft, improved it with version 2.20 claiming it ran Windows applications better than Windows but without the use of DOS. It quickly flopped in the markets.
Brief History of Microsoft’s Operating Systems
Copyright © Texas Education Agency, 2011. All rights reserved.

7
IV. Windows Generation 2 (Windows 9x)
Microsoft decided instead of confusing end-users with version numbers, their products would now carry a year of its release. Hence the Windows 95, it had some significant changed to its interface which made it look more like Mac or OS/2, but existing programs designed for Windows 3.x ran much slower on Windows 95, nor was it compatible with hardware which was used on Windows 3.x , it also lacked the use of some utilities. Regardless of the downsides Windows yet again took the market by storm.
Brief History of Microsoft’s Operating Systems
Copyright © Texas Education Agency, 2011. All rights reserved.

8
IV. Windows Generation 2 (Windows 9x)
The next Windows made in 98 was named Windows 98 and is today the most popular OS. Windows 98 was basically Windows 95 revised, revised, & revised again, with added features. It cleared up a lot of bugs and problems that were unknown with the launch of Windows 95. Windows 95/98 is commonly referred to as Windows 9x because they are so similar.
Brief History of Microsoft’s Operating Systems
Copyright © Texas Education Agency, 2011. All rights reserved.

9
V. Windows Generation 3
The cousin to Windows 95 was another OS for Networking which was called Windows NT, it had added features for networks, but lacked the compatibility with some Windows 95/98 programs. This is where a lot of people get confused with which OS is the correct OS for them. Windows 3.x for Workgroups and Windows NT were designed for networking and for corporate machines.
Brief History of Microsoft’s Operating Systems
Copyright © Texas Education Agency, 2011. All rights reserved.

10
V. Windows Generation 3
Windows 2000 and Windows Millennium Edition are often confused with each other. You would think that since Windows 2000 is named for the year 2000 it was the next step up from 98, right? Wrong!
It’s actually a step up from Windows NT. It was “built on NT technology” and therefore has added features that the average home user will never use! While all-in-all one of the best OSs, it was not designed for home use. Windows 2000 is often referred to as W2K or Win2K.
Brief History of Microsoft’s Operating Systems
Copyright © Texas Education Agency, 2011. All rights reserved.

11
V. Windows Generation 3
Millennium Edition (Windows ME) has a bad name in the industry because Microsoft rushed to get it out on the market so that people wouldn’t buy Windows 2000 thinking it was for home use. Well the theory is that since they rushed it must have bugs. ME was an upgrade to Windows 98. Whether or not Windows ME has more bugs than most we may never know.
Win2K and ME both have a unique feature called System Restore which will restore the system back to a previous state, a great tool that until Win2k and Win ME was only available through 3rd party software like Adaptec’s Go Back.
Brief History of Microsoft’s Operating Systems
Copyright © Texas Education Agency, 2011. All rights reserved.

12
VI. Windows Generation 4 Windows eXPerience or Windows XP for short is a “Hybrid” OS. It is an upgrade to Windows 2000 and NT. It’s a hybrid because it has the compatibility of Windows 98, the stability and security of Windows 2000.
Windows XP Home Edition is for the home user, and Windows XP Professional is for networking and corporate use.
Brief History of Microsoft’s Operating Systems
Copyright © Texas Education Agency, 2011. All rights reserved.
13
DOS
Copyright © Texas Education Agency, 2011. All rights reserved.

14
DOS Development Timeline
Copyright © Texas Education Agency, 2011. All rights reserved.

Boot Process
1. BIOS runs POST
2. BIOS loads the MBR into memory
3. MBR starts IO.SYS
4. IO.SYS starts MSDOS.SYS
15Copyright © Texas Education Agency, 2011. All rights reserved.

Boot Process
5. MSDOS.SYS initializes hardware
6. MSDOS.SYS looks for and runs CONFIG.SYS (if present)
7. IO.SYS regains control and it loads COMMAND.COM
16Copyright © Texas Education Agency, 2011. All rights reserved.

Boot Process
8. COMMAND.COM looks for and runs AUTOEXEC.BAT (if present)
9. The DOS shell is complete and the Prompt is displayed
17Copyright © Texas Education Agency, 2011. All rights reserved.

18
The special function keys available during the DOS Startup are summarized as follows:
F5 (also Left Shift key) – Skips CONFIG.SYS and AUTOEXEC.BAT filesF8 – Proceeds through the CONFIG.SYS and AUTOEXEC.BAT files one step at a time waiting for Confirmation form the user.
Function Keys
Copyright © Texas Education Agency, 2011. All rights reserved.

19
Remember the files involved the DOS bootup process and the order of their execution.
The following list summarizes the files and their execution order required for bootup in an MS-DOS system:
• IO.SYS
• MSDOS.SYS
• CONFIG.SYS
• COMMAND.COM
• AUTOEXEC.BAT
Boot Order
Copyright © Texas Education Agency, 2011. All rights reserved.

20
Assigning and Using Filenames
1. All files must have a filename.
2. All filenames must be different than any other filename in the system, or on the disk presently in use.
3. DOS filenames are up to 8 characters long with an optional 3-character extension (separated from the basic filename by a period).
4. When using a filename in a command, you must also use its extension, if one exists.
Copyright © Texas Education Agency, 2011. All rights reserved.

21
5. Some special characters are not allowed in filenames. These are: [ ] : ; + = \ / > ? ,
6. When telling DOS where to carry out a command, you must tell it on which disk drive the operation is to be performed. The drive must be specified by its letter name followed by a colon (A: or C:).
7. The complete and proper way to specify a file calls for the drive specifier, folder, subfolder, the filename, and the file-name extension, in that order ( B:filename.ext).
Assigning and Using Filenames
Copyright © Texas Education Agency, 2011. All rights reserved.

22
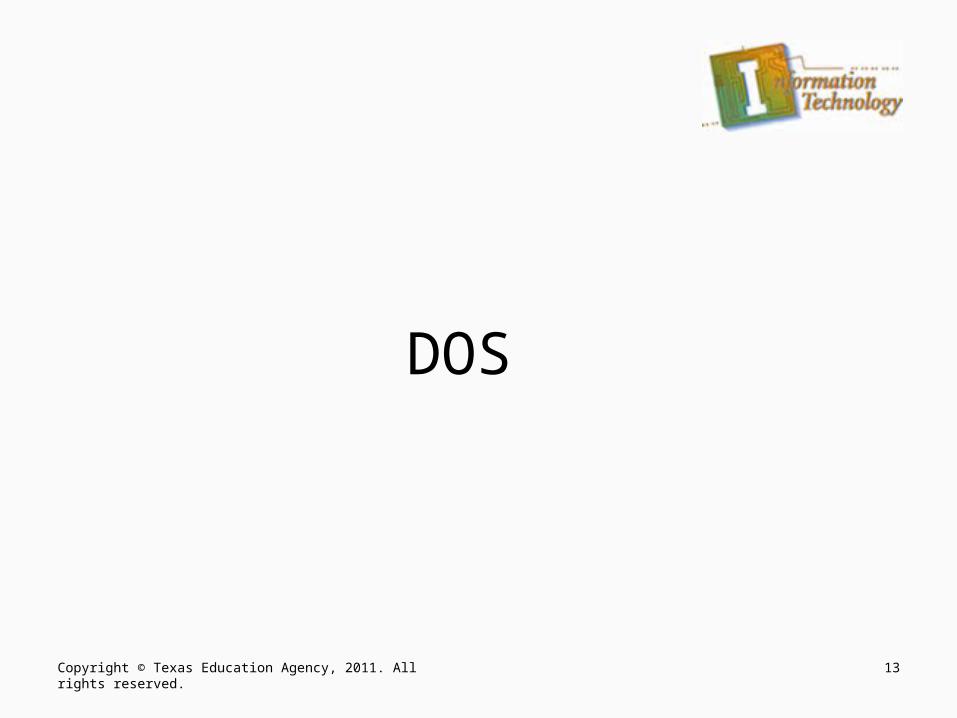
DOS Commands
Copyright © Texas Education Agency, 2011. All rights reserved.

A switch is added to the command by adding a space, a fore-slash (/), and a single letter:
COMMAND (space) option /switch Common DOS command switches
include /P for page, /W for wide format, and /S for system. Different switches are used to modify different DOS commands. In each case, the DOS User’s Guide should be consulted for switch definitions available with each command.
23
Command Switches
Copyright © Texas Education Agency, 2011. All rights reserved.
DOS CommandsCommand Type Function
DIR Internal Displays the contents of a directory
CD Internal Changes to a specified directory
MD Internal Creates a new directory
RD Internal Removes a directory
DEL Internal Deletes a file
TREE Internal Lists all of the directory and subdirectory names on a specified disk.
DELTREE Internal Deletes directory, subdirectory, files
24Copyright © Texas Education Agency, 2011. All rights reserved.

DOS CommandsCommand Type Function
SET Internal Displays the contents of the environment variablesSET DIRCMD=0
MEM External Displays memory properties
COPY External Copies a file
TYPE Internal Displays the contents of a text file
CLS External Clear screen
ATTRIB Internal Displays file attributes+/- a,r,h,s
CON Internal Console in conjunction with COPY, write the contents of the screen to a file.
25Copyright © Texas Education Agency, 2011. All rights reserved.

DOS CommandsCommand Type Function
FDISK External Partitions fixed disks
TIME Internal Sets the System Time
DATE Internal Sets the System Date
CHKDSK External Displays the status of a disk
DISKCOPY External Copies one floppy to another
EDIT Internal Text Editor
REN Internal Rename a text file
PROMPT Internal Changes the appearance of the DOS prompt.C:\>PROMPT $P$G
26Copyright © Texas Education Agency, 2011. All rights reserved.

FDisk Command
FDISK is used to configure or display information about the partitions on a hard disk. CAUTION: Using FDISK can modify or delete partitions on a hard drive. If this happens all the data on that partition is gone!
FDISK / [options]
OPTIONS:• /EXT Creates an Extended Partition. • /LOG Creates a Logical DOS Volume in the Extended Partition. • /MBR This switch can be used to repair a Master Boot Record that
has been corrupted or damaged. • /PRI Creates a Primary Partition.
27Copyright © Texas Education Agency, 2011. All rights reserved.

Format Command
Formats a disk for use with MS-Dos.
FORMAT drive: [/Options]OPTIONS:• /B Allocates space on the formatted disk for system files.• /S Copies system files to the formatted disk• /C Tests the clusters on a disk that are currently marked "bad." By default,
FORMAT does not retest the clusters; it simply leaves them marked "bad". This will recheck them.
• /SELECT It unformats a disk and makes it a non-system disk. • /V[:label] Specifies a volume label. If the /V switch is omitted, or label is not
specified, a prompt for a volume label is displayed after formatting is completed. If a label is specified and more than one disk is formatted in a session, all of the disks will be given the same volume label.
28Copyright © Texas Education Agency, 2011. All rights reserved.
Label Command
Allows you to change the name of the drive or disk.LABEL [drive:] [label]OPTIONS:
• Drive The location of the disk to be named. • Label The new volume label.
29Copyright © Texas Education Agency, 2011. All rights reserved.

Config.sys File
The Config.sys allows you to load drivers such as HIMEM.sys and any driver ending with .sys. To load device files in memory type "DEVICEHIGH“.
• REM in front of the line will prevent the line from loading the next time you boot up the computer.
edit Config.sys
REM *****This is the Config.sys file*****
DEVICE=C:\WINDOWS\HIMEM.SYSDOS=HIGH,UMBDEVICE=C:\WINDOWS\EMM386.EXE NOEMS
30Copyright © Texas Education Agency, 2011. All rights reserved.

AutoExec.bat
It allows you to boot various programs and device drivers. The Autoexec tells DOS were to find directories and files. Below is a example of what the Autoexec.bat. • REM in front of the line will prevent the line from loading the next
time you boot up the computer.
edit Autoexec.bat@echo off REM *****This is the AutoExec.bat file*****LH C:\WINDOWS\COMMAND\MSCDEX.EXE /D:MSCD0001 LH C:\MOUSE\MOUSE.EXECLS
• CLS is to clear the screen after all the files is loaded.
31Copyright © Texas Education Agency, 2011. All rights reserved.

32
Optimizing at the DOS Level: HIMEM.SYS
HIMEM.SYS is the device driver required by Dos to use extended memory. The Device=Himem.sys line must come before the Device=Emm386.exe and DOS=HIGH,UMB lines. The default values for HIMEM.SYS are designed to work with most hardware.Device= Himem.sys [/Options]DOS=HIGH,UMB
OPTIONS:• /A20Control:ON HIMEM always takes control of the A20 line (Default).• /A20Control:OFF HIMEM only takes control of the A20 line if it is off when
Himem.sys loads. • /EISA Specifies that HIMEM should allocate all available extended memory.• /NOEISA Specifies that HIMEM should not do EISA scanning for extended
memory.• /TestMem:ON Memory testing is undertaken at startup (Default).• /TestMem:Of Memory testing is not undertaken at startup. This option will
slightly speed the startup process.Copyright © Texas Education Agency, 2011. All rights reserved.

Optimizing at the DOS Level: Emm386
This allows you to extended the memory in DOS, without this
or any other extended memory manager your computer would only have the basic 640kb. Although few programs these days use expanded memory, EMM386 is still needed to allow access to the upper memory area.
Device=Emm386 [options] [Parameters]OPTIONS:
• ON Activate on startup.• OFF Not activated at startup.• AUTO Not activated at startup but is automatically activated if any program calls for it.• NOEMS Provides access to the upper memory area but does not provide any
expanded memory. • NoHi Emm386.sys remains entirely in conventional memory• H=handles How many handles EMM386 can use. Values range 2 through 255. The
default value is 64.
33Copyright © Texas Education Agency, 2011. All rights reserved.

34
Specifies the number of files that MS-DOS can access at one time.FILES=xOPTIONS:
• x The number of files that can be accessed at one time. x can be from 8 to 255 (default is 8) A value of 30 has been recommended as a good general purpose figure.
Optimizing at the DOS Level: Files
Copyright © Texas Education Agency, 2011. All rights reserved.

35
Optimizing at the DOS Level: Buffers
Used to specify the number of "disk buffers" and "secondary cache buffers" to be made available in memory. Buffers are used to temporarily store information while it is being moved between disk and memory. Secondary cache buffers act as cache memory to hold unused parts of files in anticipation of their use.
BUFFERS=n [,m] OPTIONS:• N Number of disk buffers to be allocated. n must be from 1 to 99 (default is
30) • M Number of buffers in the secondary buffer cache. m must be from 0 to 8
(default is 0)• The number of buffers should be set to 10 if SMARTDRV is being used and
20 if not. Using more than 10 buffers with SMARTDRV decreases efficiency, and using more than 20 buffers without SMARTDRV uses more of the system’s conventional memory area.
Copyright © Texas Education Agency, 2011. All rights reserved.

36
Sets up areas in memory called "Interrupt Stacks" to store interrupts from hardware. This helps to prevent MS-Dos being overwhelmed by multiple devices simultaneously demanding processor action. STACKS=n,sOPTIONS:
• n The number of stacks. n can be from 8 to 64 or 0. The default is 9. • s The size (in bytes) of each stack. s can be 32 to 512 or 0 (if n is 0). The
default is 256.
Optimizing at the DOS Level: Stacks
Copyright © Texas Education Agency, 2011. All rights reserved.

37
Optimizing at the DOS Level: SmartDrive
SMARTDrive is a disk-caching utility. SMARTDRV [/Options]Options:
• /X Disables write-behind caching for all drives. • /U Do not load CD-ROM caching module. • /F Writes cached data before command prompt returns (default).
• /N Doesn't write cached data before command prompt returns.
• /L Prevents SMARTDrive from loading itself into upper memory.
• /V Displays SMARTDrive status messages when loading. • /Q Does not display status information. • /S Displays additional information about SMARTDrive's status.• Set the memory cache size for the SMARTDRV.EXE command
in the AUTOEXEC.BAT file to the largest size possible.
Copyright © Texas Education Agency, 2011. All rights reserved.

38
Uses part of the computer's random-access memory (RAM) to simulate a hard disk drive. RAM drives can be useful when working with programs that do frequent disk read/write operations. Device=\DOS\RamDrive.sys [Options] [Parameters]
• DiskSize Specifies the size of the RAM drive in Kb. Valid values is from 4 to 32767 or max amount of memory available, whichever is less. (Default is 64).
• SectorSize Specifies SectorSize can be 128, 256, or 512 bytes (Default: 512). If a value is specified for SectorSize, DiskSize must also be specified.
• NumEntries Specifies the maximum number of files and directories you can create in the RAM drive's root directory. It can be from 2 to 1024 entries (Default is 64).
• /A Creates the RAM drive in expanded memory. You must enable Expanded-memory manager EMM386 in the CONFIG.SYS.
• /E Creates the RAM drive in extended memory. You must enable extended memory manager Himem.sys in the CONFIG.SYS.
Optimizing at the DOS Level: RamDrive
Copyright © Texas Education Agency, 2011. All rights reserved.

Enables the loading of the real-mode DrvSpace driver (DrvSpace.bin) into upper memory.
DeviceHigh=[Path]DrvSpace.sys /Move [/NoHMA] [/Low]OPTIONS:
• /Low Prevents DrvSpace.sys from loading at the top of conventional memory. The only occasion on which this switch would be required is if some Dos program cannot work with DrvSpace located at the top of conventional memory.
• /Move Moves DrvSpace.bin to its final location. • /NoHMA Prevents DrvSpace.sys from moving DrvSpace.bin into the high
memory area (HMA).
39
Optimizing at the DOS Level: DriveSpace
Copyright © Texas Education Agency, 2011. All rights reserved.

40
These activities are illustrated by the sample CONFIG.SYS file:
Device=C:\DOS\HIMEM.SYS DOS=HIGH,UMBDevice=C:\DOS\EMM386.EXE NOEMSFILES=30BUFFERS=15STACKS=9,256Device=C:\DOS\SMARTDRV.EXE /VDevice=C:\DOS\RAMDRIVE.SYS /A
Copyright © Texas Education Agency, 2011. All rights reserved.

Adding DOSKEY
41Copyright © Texas Education Agency, 2011. All rights reserved.

Adding DOSKEY
Command used to either allow you to redo a particular command or to repeat a command. DosKey is designed to assist in working from the command line, by remembering previous commands, or being able to record macros. DOSKEY allows you to use the arrow keys to display previous commands.
DOSKEY [/Switches]OPTIONS:
• /BUFSIZE:size Sets size of the buffer for macros and commands buffer (default:512)
• /HISTORY Displays all commands stored in memory• /KEYSIZE:size Sets size of keyboard type-ahead buffer (default:15).• /LINE:size Sets maximum size of line edit buffer (default:128).
42Copyright © Texas Education Agency, 2011. All rights reserved.

DOSKEY Commands
Esc clears current commandCtrl + Left/Right cursor Moves the cursor back/forward one
word.Home/End Moves the cursor to beginning/end of line.Left/Right cursor Moves the cursor back/forward one
character. Page Up/Down Recalls the oldest/most recent command in the
bufferUp/Down cursor To scroll up (and back) through the list of
stored commands. Each press of the "up" key recalls the previous command and displays it on the command line.
43Copyright © Texas Education Agency, 2011. All rights reserved.

Adding DOSKEY
Edit the AUTOEXEC.BAT file At the end of the file add
DOSKEY.COM Save and Exit Restart
44Copyright © Texas Education Agency, 2011. All rights reserved.
Prompt CommandTo change the command prompt. Allows you to choose the kind of prompt you would like to see at DOS, the prompt is the "C:\>"
PROMPT [options]OPTIONS:• $B | (pipe) • $D Current date • $G >(greater-than sign) • $H Backspace (erases previous character) • $L <(less-than sign) • $N Current drive • $P Current drive and path • $Q= (equal sign) • $T Current Time • $_ Carriage return and line feed • $$ $(dollar sign)
45Copyright © Texas Education Agency, 2011. All rights reserved.

Configuring the CD
46Copyright © Texas Education Agency, 2011. All rights reserved.

Configuring the CD
Create a directory on your C drive named CDROM
MD C:\CDROM Insert the driver disk Copy the drive to the CDROM Directory COPY A:\OAKCDROM.SYS C:\
CDROM
47Copyright © Texas Education Agency, 2011. All rights reserved.

Configuring the CD
Open the CONFIG.SYS file Configure the CDROM driver
DEVICEHIGH=C:\CDROM\OAKC DROM.SYS /D:CD_DRIVE
Save and Exit
48Copyright © Texas Education Agency, 2011. All rights reserved.

Configuring the CD
Open the AUTOEXEC.BAT file At the end of the file type: LOADHIGH C:\DOS\MSCDEX.EXE
/D:CD_DRIVE On the next line type: LASTDRIVE=Z Save and Exit Restart the computer for changes to take
effect. Watch for errors when starting.
49Copyright © Texas Education Agency, 2011. All rights reserved.
Adding Network Support
50Copyright © Texas Education Agency, 2011. All rights reserved.

Adding Network Support
Insert the Network Client 3.0 for MS-DOS into our CD drive.
Type d:\ Type setup [Enter] [Enter] Accept the default path of C:\NET Select Network adapter not shown
on list below
51Copyright © Texas Education Agency, 2011. All rights reserved.

Adding Network Support
Set path to D:\PCM100 [Enter] Select Linksys EtherFast … (PCM100) Username: Your Name [Enter]
52Copyright © Texas Education Agency, 2011. All rights reserved.

Adding Network Support
Look at the Setup Page: Change Names- configures your
user, computer, workgroup and domain names.
Change Setup Options- specifies the type of client you want to install.
Change Network Configurations- enables you to specify the driver for your network card and protocol to use.
53Copyright © Texas Education Agency, 2011. All rights reserved.

Adding Network Support
Select Change Names [Enter] Username: Your Name Computer Name: Cisco## Workgroup name: Workgroup Domain Name: CISCO Select List names are correct
[Enter]
54Copyright © Texas Education Agency, 2011. All rights reserved.

Adding Network Support
Select Change Setup Options [Enter] Redir Options: Full Redirector Startup Options: Run Network Client Logon Validation: Logon to Domain Net Pop Hot Key: N
Select option are correct [Enter]
55Copyright © Texas Education Agency, 2011. All rights reserved.

Adding Network Support
Select Network config [Enter] Select Add Protocol [Enter] Select Microsoft TCP/IP [Enter] Select Network config is correct
56Copyright © Texas Education Agency, 2011. All rights reserved.

Adding Network Support
Select The Listed options are correct [Enter] The OEM Driver is located at D:\ When installation is complete, remove the CD,
insert the NIC card, plug in cable, and restart the computer.
57Copyright © Texas Education Agency, 2011. All rights reserved.

Network Commands
Net start- loads the programs for logging on to the network (AUTOEXEC.BAT was configured by default to run this command at startup).
Net stop- unload the client and disconnects.
58Copyright © Texas Education Agency, 2011. All rights reserved.

Network Commands
Net view \\computer_name- view a list of shared resources on the specified computer.
Net use E: \\computer_name\share_name- assign a drive letter to a shared folder.
59Copyright © Texas Education Agency, 2011. All rights reserved.

Network Commands
Net use- view a list of the shared resources currently connected.
Net use lpt1 \\computer_name\shared_printer_name- connect your computer to a shared printer on the server.
60Copyright © Texas Education Agency, 2011. All rights reserved.

MS-DOS External Commands
61Copyright © Texas Education Agency, 2011. All rights reserved.

PATH setup
Displays or sets a search path for executable files. Allowing you to specify a directory to be used as a default directory that DOS will look at when using a DOS command. When Dos searches for a file, after first looking in the current directory, it looks through the directories in the PATH statements.
PATH=path1;path2• When a number of paths are listed, they must be separated by
semicolons with NO spaces.
62Copyright © Texas Education Agency, 2011. All rights reserved.

Changing the PATH
Edit the AUTOEXEC.BAT file Change the path to:
PATH C:\NET;C:\DOS Save and Exit Restart
63Copyright © Texas Education Agency, 2011. All rights reserved.