Embed Size (px)
Citation preview

How To Use The JW Library App-Windows 10
JW.ORG 2018
This is a Multi-Page Document showing the many Features of the JW Library
App for Windows 10. It also documents many of the settings and a “How To” for getting around in the app. I’m sure this document doesn’t show
everything; however, it is quite detailed and with pictures. Also, this app updates and changes from time to time so, ask for a new updated copy if
yours is different than shown here. You may also need to update your version
of JW Library App, which is covered in this document.
If after reading this Document you still have questions, please let me know so
I can improve this Book. Also, if you find any errors, please let me know.
Thanks.
Enjoy!
Proverbs 1:5 "A wise person listens and takes in more instruction;
A man of understanding acquires skillful direction"
For more details, and/or for other devices, see the links below.
Support for Windows
https://www.jw.org/en/online-help/jw-library/windows/
Support for Android
https://www.jw.org/en/online-help/jw-library/android/
Support for iPad, iPhone, and iPod Touch
https://www.jw.org/en/online-help/jw-library/ios/
2

How To Use The JW Library App-Windows 10
JW.ORG 2018
App Updates
You will receive updates from time to time for your JW Library App. This is because the App gets better with new features. Also because of glitches in the App. Usually the App
will update automatically, but you can check to make sure.
Here are the steps to make sure your App is up to date.
Step 1: Locate the Microsoft Store App pictured below. May be on task bar (1) or on
Start (2).
3

How To Use The JW Library App-Windows 10
JW.ORG 2018
Step 2: Locate the Three Dots (menu icon) at the top right of the App, this access the
menu, pictured below. Note: If you need to install the JW App, this is the place, type
JW in the Search Bar to find it.
4

How To Use The JW Library App-Windows 10
JW.ORG 2018
Step 3: Once you’ve clicked or touched on the Three Dots (Menu Icon) you will see
“Downloads and updates”, pictured below, click or touch it.
5

How To Use The JW Library App-Windows 10
JW.ORG 2018
Step 4: Simply click or touch “Get Updates”, shown below.
Note: If you see the Update Symbol Icon below on any Document or Media file, it
means it needs updated.
6

How To Use The JW Library App-Windows 10
JW.ORG 2018
App Icons
The App has many “Icons”. Let’s have a closer look at them.
Add or Remove Translations Icon:
The Bible Icon:
7

How To Use The JW Library App-Windows 10
JW.ORG 2018
The Bookmark Icon:
The Weeks Icon (Calendar):
8

How To Use The JW Library App-Windows 10
JW.ORG 2018
The Cloud Icon (item not installed):
The Delete Icon:
9

How To Use The JW Library App-Windows 10
JW.ORG 2018
The Highlight Icon:
The History Icon:
10

How To Use The JW Library App-Windows 10
JW.ORG 2018
The Home Icon:
The Language Icon:
11

How To Use The JW Library App-Windows 10
JW.ORG 2018
The Marginal References Icon:
The Media Icon:
12

How To Use The JW Library App-Windows 10
JW.ORG 2018
The Meetings Icon:
The Menu Icon 1:
13

How To Use The JW Library App-Windows 10
JW.ORG 2018
The Menu Icon 2:
The Play Icon:
14

How To Use The JW Library App-Windows 10
JW.ORG 2018
The Publications Icon:
The Search Icon:
15

How To Use The JW Library App-Windows 10
JW.ORG 2018
The Settings Icon:
The View Image Icon (song book):
16

How To Use The JW Library App-Windows 10
JW.ORG 2018
The View Text Icon (song book):
The Study Notes Icon:
17

How To Use The JW Library App-Windows 10
JW.ORG 2018
The Backup and Restore Icon:
The Text Settings Icon:
18

How To Use The JW Library App-Windows 10
JW.ORG 2018
The Updates Icon:
The Refresh Icon:
19

How To Use The JW Library App-Windows 10
JW.ORG 2018
Getting Started
Once you open the App you will want to make sure that it checks for New or Updated Documents and Media. Look for the Dots running across the top of the App, as shown in
the picture below (1). Also shown in picture: (2) Favorites (3) Teaching Toolbox (4) What’s New (5) Frequently Used (6) Daily Text. Also, you can Manually Check for New
Items here (7). Notice the Pending Update Icon (8). Notice also the Navigation Icons on
the left. Important: Don’t Try to do Anything Until it has Finished Checking for Updates!
This page is known as the “Home Page”. No matter where you are in the App you can
always get back here by clicking or touching on the “Home Icon” at the top left, Home
Icon shown below.
20

How To Use The JW Library App-Windows 10
JW.ORG 2018
When you click or touch the Menu Icon on the top left, the Slid-Out Menu will appear so
that you can read the Listed Choices, or you can click or touch directly on the Icon of your
choice, as shown below.
Besides the choices already mentioned on the “Home” page, located at the bottom are shortcuts that take you to the JW.ORG Website, JW Broadcasting, Watchtower Online
Library, JW.ORG Donations, and The Online Help, as shown below.
21

How To Use The JW Library App-Windows 10
JW.ORG 2018
History
The “History Icon” is located on the top right of the “Home Page” and in other areas. It can come in handy if you want to get back to something you were already reading. No
matter where you are in the App, if you click or touch on a reference in the History you
will be taken there immediately.
22

How To Use The JW Library App-Windows 10
JW.ORG 2018
When you click or touch the History Icon a dropdown menu appears showing your
History (1) and a way to clear it (2), as shown below.
23

How To Use The JW Library App-Windows 10
JW.ORG 2018
Settings
There are some Settings you may need to access. Below shows you how to access these
Settings, they are located at the bottom left.
If you have Two Screens and you want the Videos and Pictures to Show on your Extended
Screen, make sure this Button is set to On, as seen below.
24

How To Use The JW Library App-Windows 10
JW.ORG 2018
The Other Settings are as follows: (1) allows you to Change the Default Location to store
your Videos, (2) allows you to Change the Default Location to store your Music, (3) shows the App Version, and (4) allows you to Download or Stream over your Cellular Account (if
your mobile device has this option). All seen below.
25

How To Use The JW Library App-Windows 10
JW.ORG 2018
Text Settings If you want to Change the Text Size, click or touch the Text Settings Icon at the top right,
as shown below.
Just click and hold, or touch and hold the Slider and Move it to the Left for Smaller Text,
or to the Right for Larger Text, as shown below.
26

How To Use The JW Library App-Windows 10
JW.ORG 2018
The Bible
The Next choice on the menu is “The Bible”. Probably the most used part of the App. One thing to keep in mind, since the addition of the “New Study Bible”, you will need to Check
for Updates of newly added Bible Books. Not all the Bible Books are included in the New Study Bible, yet. Therefore, as they add them you will need to update the Bible to see,
use, and hear them. This will be covered in this part. First, let’s access the Bible, shown
in the picture below.
Here is the Bible Icon:
27

How To Use The JW Library App-Windows 10
JW.ORG 2018
After you click or touch the Bible or Bible Icon, it will open to the Bible. However, if this
is the first time you have accessed the Bible you will need to pick and download a Translation to get started. I suggest that you pick the “Study Edition”. You can also install
other Translations to use for comparison, as well as, other Languages. After you have installed the Bible and want to install other Translations, other Languages, or check for
updates, there is only one way to do it, click or touch the “Language Icon”, at the top right
of your screen, as shown below.
Here is the Language Icon, use it anywhere to install other Languages for The Bible,
Documents, and Media.
28

How To Use The JW Library App-Windows 10
JW.ORG 2018
When you click or touch the Language Icon a dropdown menu will appear with the other
Translations, languages, and updates, as shown below. (1) Shows this Translation is installed. (2) Shows that this Translation is NOT installed, you must click or touch it if
you want it installed. (3) Shows that this Translation is installed, but in need of an update. Any Translations with this icon must be updated. Click or touch them to start the update.
If it asks, “Later or Download”, choose Download. (4) Shows other Languages NOT
installed. When you are done, click or touch the “Done” button (5) shown below.
29

How To Use The JW Library App-Windows 10
JW.ORG 2018
You can also hear the New Study Bible by clicking or touching the “Play Button” at the
top right. However, only the finished Bible Books of the Study Edition can be played.
You will see a Streaming Task Bar at the bottom of the screen now. This allows you to
pause (1), rewind (2), fast forward (3), and close (4) the streaming Bible Book. This also
applies to any Document you may want to listen to, as shown below.
30

How To Use The JW Library App-Windows 10
JW.ORG 2018
When you click or touch on a verse number (1) a Pop-Up Menu (2) will appear.
If you click or touch the Bible Icon, as shown below, it will bring up your other Translations.
31

How To Use The JW Library App-Windows 10
JW.ORG 2018
Reminders Here are some reminders when using the Bible. (1) shows your other Translations, (2)
allows you to Customize your Translation order, (3) takes you back one verse, (4) moves
ahead one verse, and (5) allows you to play the verse you are on.
32

How To Use The JW Library App-Windows 10
JW.ORG 2018
Customize
If you choose to Customize your Translation list, click or touch the “Customize Button”, as shown above. The Customize Menu will appear allowing you to Add a Bible Book, Remove
a Bible Book, or Move a Bible Book. The Picture below shows adding a Bible Translation
that is already installed.
33

How To Use The JW Library App-Windows 10
JW.ORG 2018
The next picture below, show how to Remove a Translation from your list. This does NOT
remove it from the App only from the list.
34

How To Use The JW Library App-Windows 10
JW.ORG 2018
You can rearrange your list by clicking on the Translation and Holding on to it (once you’ve
clicked on it, hold the left click down, do not release it), or long press it if you have a touch screen. It will release from the list and allow you to move it up or down. Let go of it when
you have it in the place you want it to stay, as shown below.
35

How To Use The JW Library App-Windows 10
JW.ORG 2018
Online Library
You can also View or Play the Bible on the Website, Watchtower Online Library, by clicking or touching the Three Dots (Menu Icon) in the top right corner. A menu will appear that
says, “Open in Online Library”, click or touch it, as shown below.
36

How To Use The JW Library App-Windows 10
JW.ORG 2018
The nice thing about Playing it on the Online Library (1) is that you can also start playing
from any verse. If you click or touch on a Verse (2) you will see the Play Icon above it (3). Click or touch the Play Icon and it will begin playing from there, if it’s a Completed
Bible Book.
37

How To Use The JW Library App-Windows 10
JW.ORG 2018
Features You have the same features in the App Version of the Bible as you do with the Printed
Version. (1) Introduction, (2) Books, (3) Index, (4) Appendix A, (5) Appendix B, (6)
Appendix C, as shown below.
38

How To Use The JW Library App-Windows 10
JW.ORG 2018
Bookmarks
You can Bookmark Bible Verses, as well as other Publications, by clicking or touching on
the verse number. A menu will appear, click or touch the Bookmark Icon, as shown below.
Here is the Bookmark Icon, click or touch it when you want to add or view a Bookmark.
39

How To Use The JW Library App-Windows 10
JW.ORG 2018
Now just click or touch an empty place on the Bookmarks Menu to add it, seen below.
Click or touch “Done” when finished, shown above.
40

How To Use The JW Library App-Windows 10
JW.ORG 2018
Notice in the picture below that not only did it add the Bookmark (1), but it shows a
Bookmark Icon by the Bookmarked Verse (2). It’s also the same color as the Bookmark
that it’s on.
To Delete the Bookmark, click or touch the Three Dots (Menu Icon) (1) and select Delete
(2), as shown below.
41

How To Use The JW Library App-Windows 10
JW.ORG 2018
Publications
The Next choice on the menu is “Publications”. First, let’s access Publications, shown in
the picture below.
Here is the Publications Icon:
42

How To Use The JW Library App-Windows 10
JW.ORG 2018
Notice the Arrows down the left side, those are the different Publications you can access.
First, you will need to install them. Also, once they are installed you must keep them updated, they do not update automatically. (1) shows that this Book is installed, (2)
shows that this Book has been added to Favorites on the Home Page, (3) shows that this Book needs updated, click or touch it to update it, and (4) shows that this Book is NOT
installed, click or touch it to install it.
43

How To Use The JW Library App-Windows 10
JW.ORG 2018
You can also remove a Publication by clicking or touching the Three Dots (Menu Icon) in
the Top Right Corner of the Publication and selecting “Delete”, as shown below.
You may need to install a Publication in a different Language. Click or touch the “Language
Icon”, shown below.
44

How To Use The JW Library App-Windows 10
JW.ORG 2018
Start typing the Language you want to install in the Search Bar, as shown below.
Languages start to appear on the list as you type. When you see the one you want, click
or touch it to install it.
45

How To Use The JW Library App-Windows 10
JW.ORG 2018
Notice that the Page Numbers appear in small type, as shown below.
If you want to see the Document on the full page click or touch the Icon below.
46

How To Use The JW Library App-Windows 10
JW.ORG 2018
Publications Updates
From time to time your Publications will need updated. If you see “Pending Updates”, as
shown below, you will need to update them.
This is the easiest way to update them. Rather than go through all your Publications, click or touch on “Pending Updates”. This will take to where they are all listed. You can click
or touch on the “Download Icon” at the top right and Update them ALL at the same time,
as shown below.
47

How To Use The JW Library App-Windows 10
JW.ORG 2018
Media
The Next choice on the menu is “Media”. First, let’s access Media, shown in the picture
below.
Here is the Media Icon:
48

How To Use The JW Library App-Windows 10
JW.ORG 2018
Video
Media is where you will find Videos, Audio, and Music Videos. This is also where you need
to check for Media Updates. The picture below shows Videos.
49

How To Use The JW Library App-Windows 10
JW.ORG 2018
Media Updates
If you see “Pending Updates”, click or touch it. This will take you to the Media that needs
updating.
Click or touch the Update All Icon to get all updates, as shown below.
51

How To Use The JW Library App-Windows 10
JW.ORG 2018
Meetings
The Next choice on the menu is “Meetings”. First, let’s access Meetings, shown in the
picture below.
Here is the Meetings Icon:
52

How To Use The JW Library App-Windows 10
JW.ORG 2018
Life and Ministry
The App knows which day of the week it is, so it will either show the Life and Ministry or
Watchtower Study, depending on the day. Below shows the Mid-Week Meeting.
53

How To Use The JW Library App-Windows 10
JW.ORG 2018
Watchtower Study
The Watchtower Study (1) will show the Study Article for that week. You must click or
touch the Article Name (in blue) (2) to see it, as shown below.
54

How To Use The JW Library App-Windows 10
JW.ORG 2018
Media Files
To display the Videos, Pictures, and Songs for that Meeting, you will need to click or touch
the Media Icon in the top right corner, as shown below.
Below is the Media Icon:
55

How To Use The JW Library App-Windows 10
JW.ORG 2018
Getting Media Files
After clicking or touching the Media Icon, it will take you to the Media Files for that Meeting. If you need to Download a Video (Cloud Icon) (1), click or touch it. A menu will appear
asking you what Quality of Video you want to download (2). The higher the number the better the quality. 720p being the Best Quality, and 240p being not so good. If you have
the room, the Best Quality is my suggestion. If the Publications are installed the pictures will show up, as shown below. Also, for the Weekend Meeting, the Brother’s Song for His
Discourse can be accessed by clicking or touching “More Songs” (3), as shown below.
If you need to prepare for a Future Week, click or touch the Weeks Icon (calendar) in the
top right corner, as shown below.
56

How To Use The JW Library App-Windows 10
JW.ORG 2018
After clicking or touching the Weeks Icon, a Menu will appear showing past, present, and
future weeks. Highlighted in gray is the current week you are in (1). Click or touch a future week (2) to show that Week’s Meetings. You can also view and watch that week’s
Media files.
57

How To Use The JW Library App-Windows 10
JW.ORG 2018
If you are in the Mid-Week Meeting and click or touch the Congregation Bible Study (1),
you will notice that it loads on the right side of the window (study window) (2). However, if you want to go directly to that place in this Publication click or touch directly on the
Book to transport you there, as shown below. This will work for any Publication or Bible
Books.
58

How To Use The JW Library App-Windows 10
JW.ORG 2018
Shown below is after clicking or touching the Publication and being taken directly to the
Book.
59

How To Use The JW Library App-Windows 10
JW.ORG 2018
If you click or touch on a Hypertext (link) on the right side (study window), it now opens
in the Same Window. Shown below is a Hypertext (link) to a Bible Verse.
Here are the results of clicking or touching that Hypertext or Link, as shown below.
60

How To Use The JW Library App-Windows 10
JW.ORG 2018
Navigation
As you navigate around the App, especially in the Meetings Part of it, you will find that you need to get back to a previous screen or page. Look for the Arrow in the Top Left
Corner, it’s your friend. See it below
61
How To Use The JW Library App-Windows 10
JW.ORG 2018
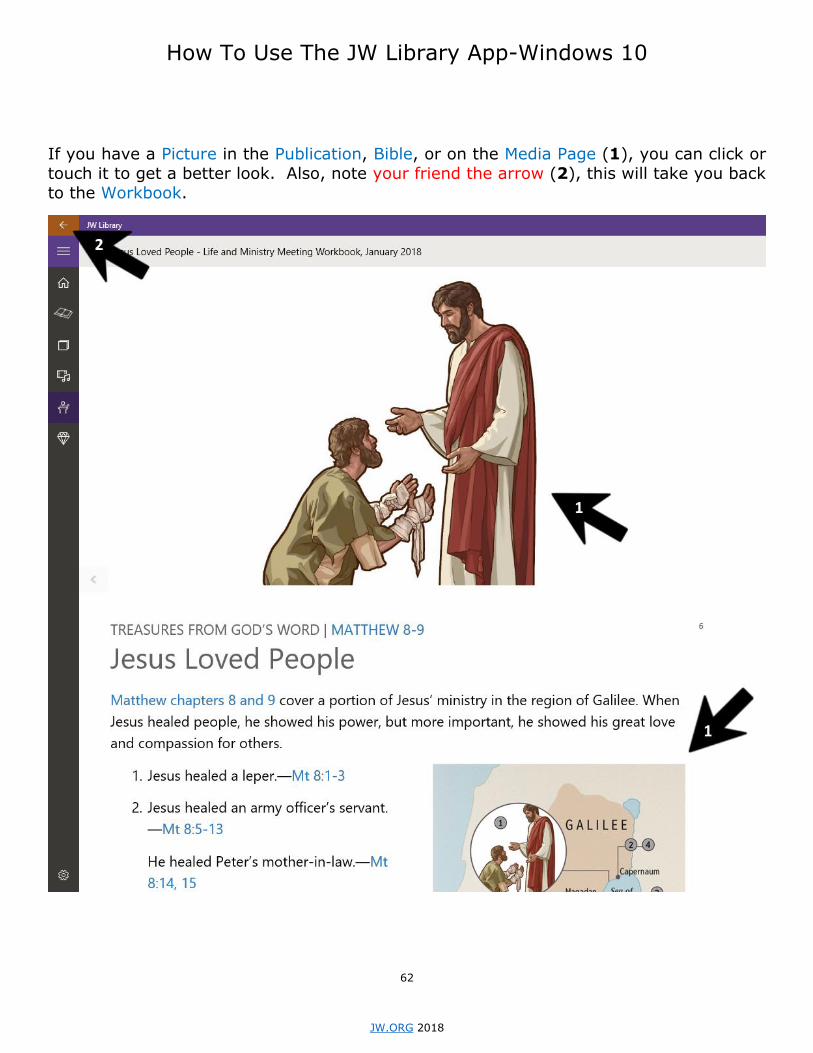
If you have a Picture in the Publication, Bible, or on the Media Page (1), you can click or
touch it to get a better look. Also, note your friend the arrow (2), this will take you back
to the Workbook.
62

How To Use The JW Library App-Windows 10
JW.ORG 2018
Picture Navigation
If you click or touch on a Picture here are your choices. (1) this is where you can Minimize the Picture without closing it, (2) this is where you Close the Picture, (3) you can Advance
to the Next Picture, (4) this makes the Picture Full Screen.
63
How To Use The JW Library App-Windows 10
JW.ORG 2018
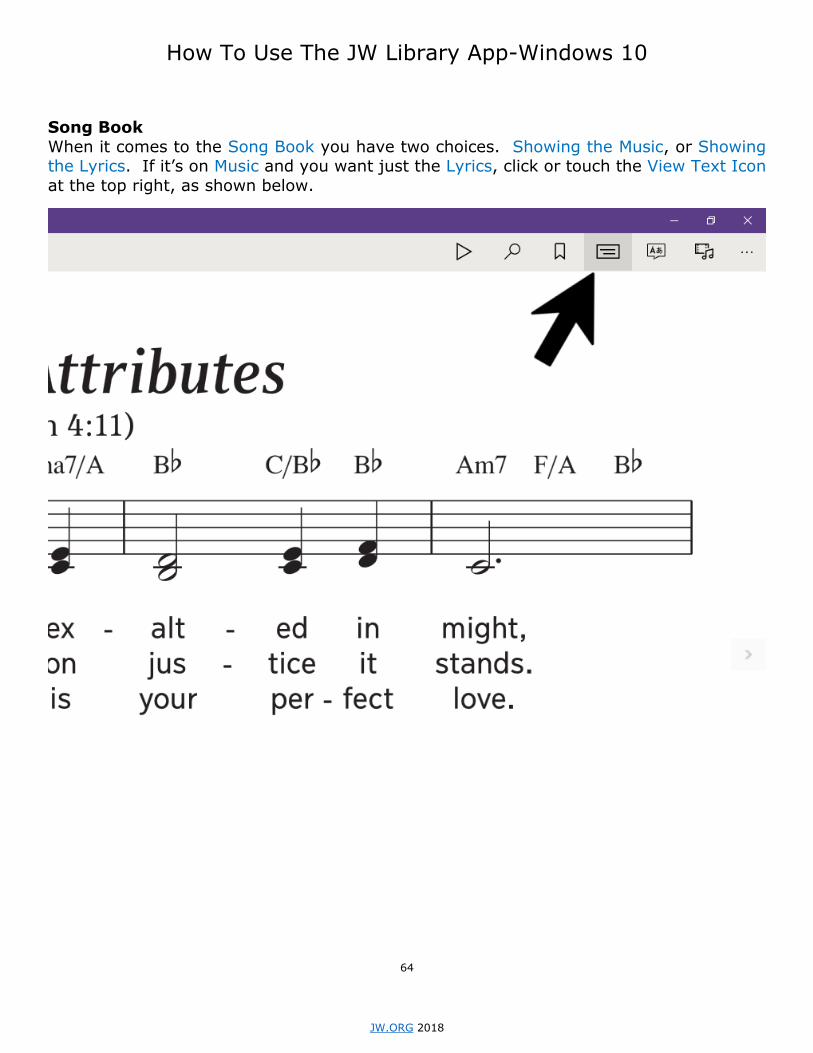
Song Book
When it comes to the Song Book you have two choices. Showing the Music, or Showing the Lyrics. If it’s on Music and you want just the Lyrics, click or touch the View Text Icon
at the top right, as shown below.
64

How To Use The JW Library App-Windows 10
JW.ORG 2018
Likewise, if it’s on Lyrics and you want the Music, click or touch the View Image Icon at
the top right, as shown below.
View Text Icon
View Image Icon
65
How To Use The JW Library App-Windows 10
JW.ORG 2018
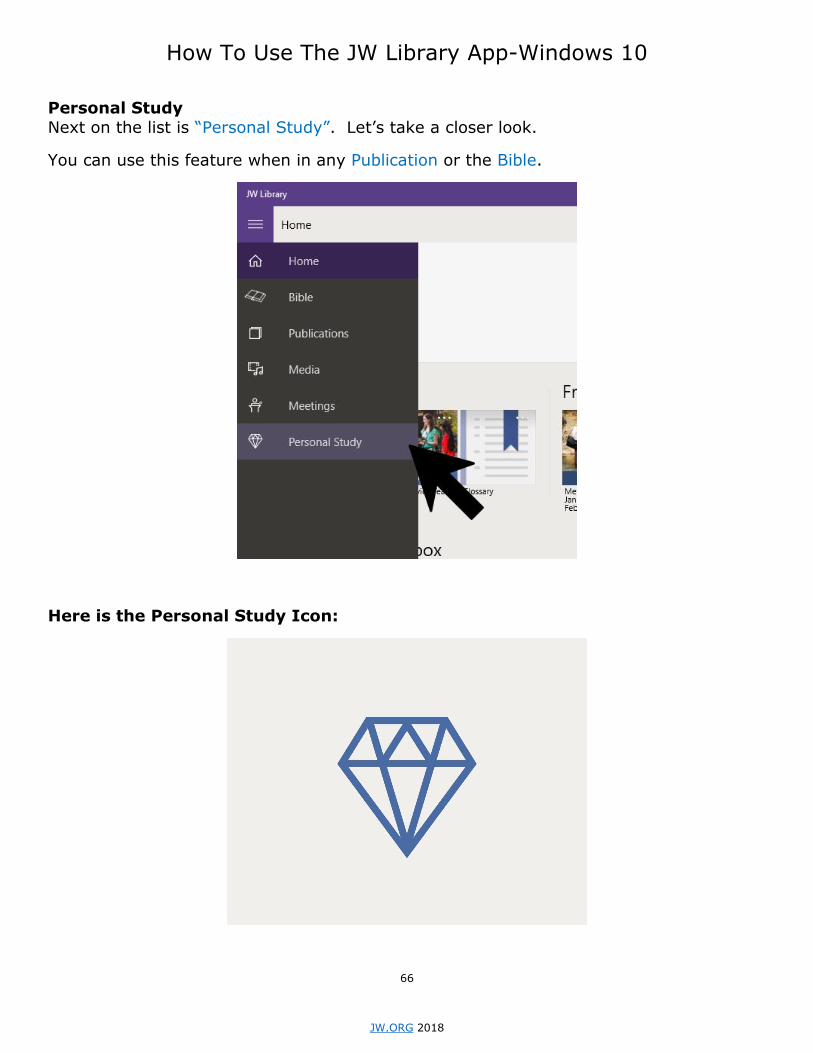
Personal Study
Next on the list is “Personal Study”. Let’s take a closer look.
You can use this feature when in any Publication or the Bible.
Here is the Personal Study Icon:
66
How To Use The JW Library App-Windows 10
JW.ORG 2018
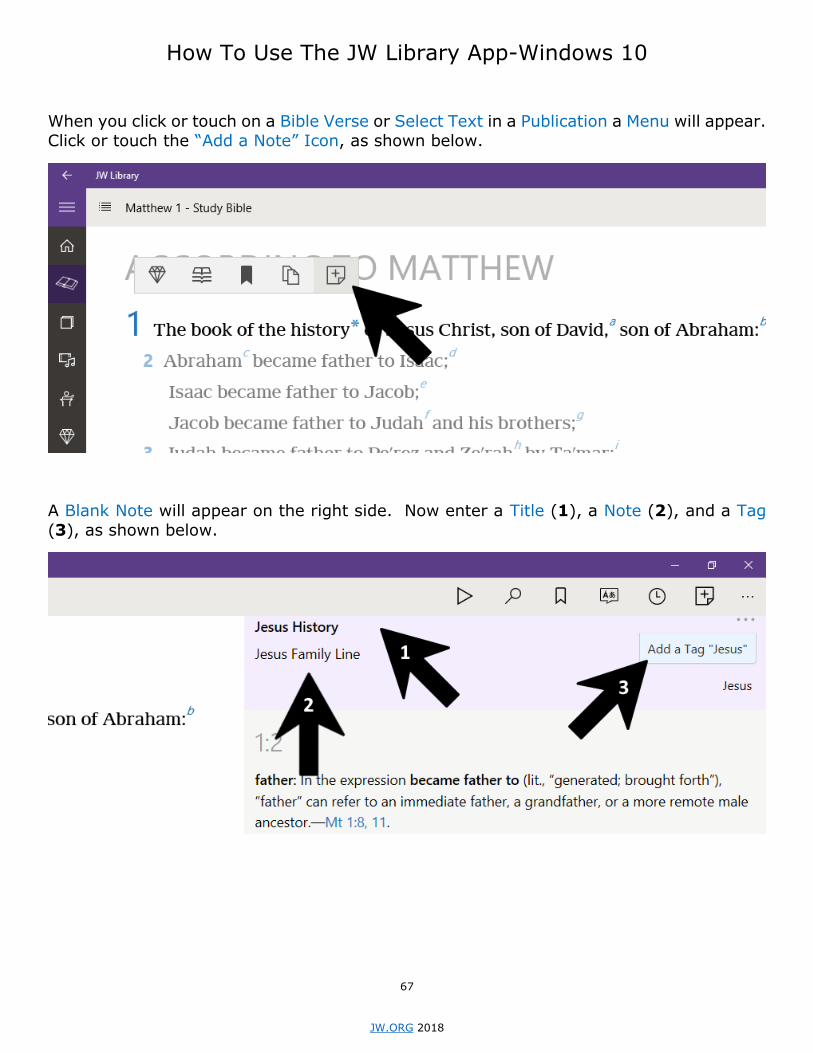
When you click or touch on a Bible Verse or Select Text in a Publication a Menu will appear.
Click or touch the “Add a Note” Icon, as shown below.
A Blank Note will appear on the right side. Now enter a Title (1), a Note (2), and a Tag
(3), as shown below.
67

How To Use The JW Library App-Windows 10
JW.ORG 2018
Now when you go to your Personal Study Notes (1) you will see the Notes you created.
When you get many Tags (2) accumulated you will be able to click or touch on a Tag and it will bring up all your Notes for that Tag. Also, you will notice that the Bible Verse or
Publication will be listed at the bottom of your Note (3) so that you can go directly to it
from here. Thank You Brothers!
68

How To Use The JW Library App-Windows 10
JW.ORG 2018
You may need to Delete a Study Note. Click or touch the Menu Icon (1), and select Delete
(2), as shown below.
You can Backup or Restore your Notes in case of emergencies. Start by clicking or
touching the Backup and Restore Icon, as shown below.
69

How To Use The JW Library App-Windows 10
JW.ORG 2018
Here is the Backup and Restore Icon:
Click or touch Create a backup, as shown below.
70
How To Use The JW Library App-Windows 10
JW.ORG 2018
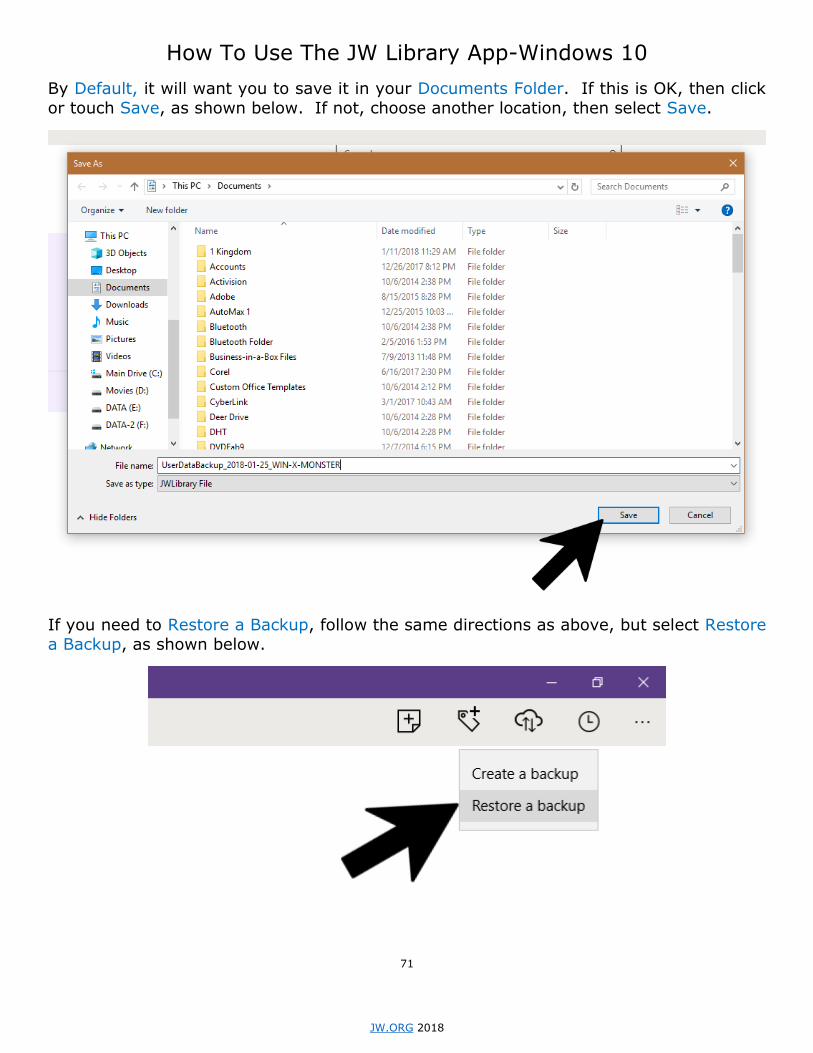
By Default, it will want you to save it in your Documents Folder. If this is OK, then click
or touch Save, as shown below. If not, choose another location, then select Save.
If you need to Restore a Backup, follow the same directions as above, but select Restore
a Backup, as shown below.
71

How To Use The JW Library App-Windows 10
JW.ORG 2018
You will need to select a Backup that has been saved (1), then click or touch Open (2),
as shown below.
72
How To Use The JW Library App-Windows 10
JW.ORG 2018
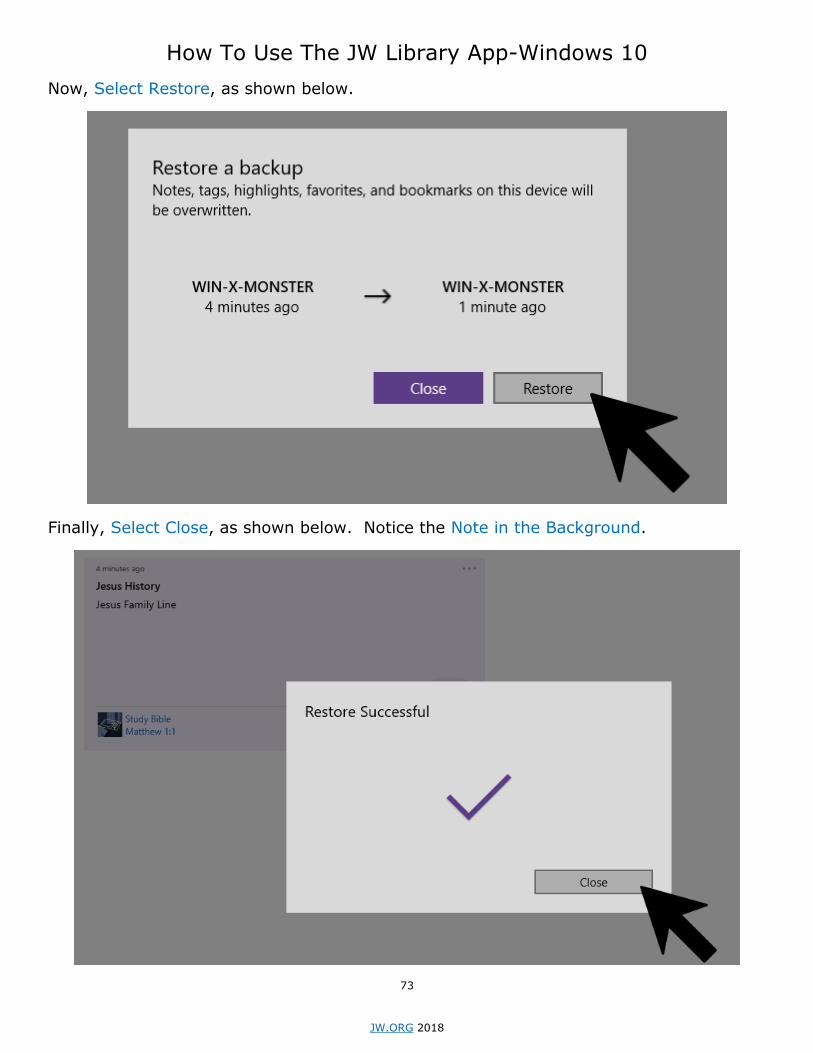
Now, Select Restore, as shown below.
Finally, Select Close, as shown below. Notice the Note in the Background.
73

How To Use The JW Library App-Windows 10
JW.ORG 2018
Features
The App has many “Features”. Let’s look at some.
Let’s start with “Search”. You can use this feature when you are in the Bible or the Insight
Book. Click or touch the Search Icon on the top right, as shown below.
Here is the Search Icon:
74

How To Use The JW Library App-Windows 10
JW.ORG 2018
A dropdown menu with a Search Bar will appear. Start typing in it, as shown below.
It will give you choices to Search All (1), or Insight Book Topics (2), as shown below.
75
How To Use The JW Library App-Windows 10
JW.ORG 2018
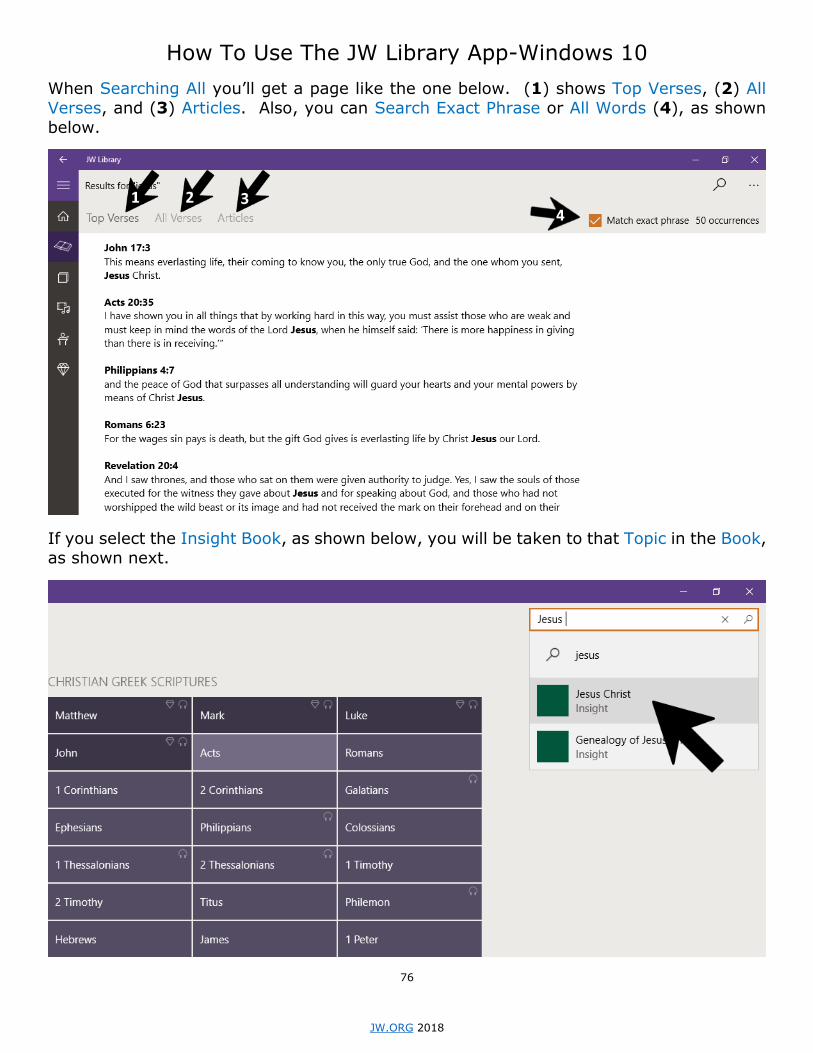
When Searching All you’ll get a page like the one below. (1) shows Top Verses, (2) All
Verses, and (3) Articles. Also, you can Search Exact Phrase or All Words (4), as shown
below.
If you select the Insight Book, as shown below, you will be taken to that Topic in the Book,
as shown next.
76

How To Use The JW Library App-Windows 10
JW.ORG 2018
Insight Book showing Topic of “Jesus Christ”.
77

How To Use The JW Library App-Windows 10
JW.ORG 2018
Highlighting
You can Highlight Text in Publications and the Bible. First, left click and drag your mouse to select the text, or touch and press with your finger. A menu will appear showing the
Colored Highlight Icon, as shown below.
Here is the Highlight Icon:
78

How To Use The JW Library App-Windows 10
JW.ORG 2018
Once you click or touch the Highlight Icon, it will expand and give you a choice of colors,
pick one, as shown below. The Text will now be Highlighted in that Color, as shown below.
79

How To Use The JW Library App-Windows 10
JW.ORG 2018
Delete Highlights
You may not want to leave it Highlighted or you may have Highlighted the Wrong Section. Now what? You can Delete the Highlights. Click or touch the Highlighted area and a menu
will appear, select the Delete Icon, as shown below.
Here is the Delete Icon:
80

How To Use The JW Library App-Windows 10
JW.ORG 2018
You can also Select Text and add the whole thing to a Note. Useful for talks or comments.
Select the text like before, except click or touch the Add a Note Icon, as shown below.
See it Added to a Note below (1), Icon Added to Paragraph as well (2), shown below
81

How To Use The JW Library App-Windows 10
JW.ORG 2018
You can copy the text to the Clipboard so you can Paste it onto a Document. Select the
text like before, except click the Clipboard Icon, as shown below. Now you can open a Word or Text Document and Right Click and Paste, or go to the Top Menu under Edit and
select Paste. You can also Copy from the Right Column (Study Window) by Right Clicking
or Touching on the Selected Text.
You can Bookmark this in the same way, just click or touch the Bookmark Icon, as shown
below.
82