Embed Size (px)
Citation preview
11
COMPONENTS OF A COURSE
Introductory session
Welcome: Welcome participants to the courseIntroductions: Introduce yourself as the instructor. Invite
participants to introduce themselves or one another. This “breaks the ice” by getting people to speak early. You may, also, use this step to ask participants about their previous experience in the subject matter of the course and their expectations about the course.
Administrative details: Describe the training facilities if the participants are unfamiliar with it. Include the locations of washrooms, restaurant or cafeteria, telephones, message center, fitness or rest facilities, fire exits… etc. Also, explain what the hours of instruction will be (daily start and stop times, breaks and lunch time).

22
Links: Relate the course to the job, to other previous courses or to already acquired knowledge.
Objectives: State the purpose of the course, or, if possible, what the participants will be able to do is the end of the course.
Outline: State the key points to be covered during the course and the methods to be used (what types of exercises or other activities). Post the key point on the flipchart (one of for each day, perhaps), and leave this posted throughout the course. This will help participants situate themselves throughout the course and will help you maintain control.
Motivators: Tell the participants how learning this course will benefit them personally (for example by making their work easier or by helping them deal with problem situations professionally).

33
Sessions: Present each session as describes in your course manual. Ensure that you cover all teaching points included. Use the methods describes (lectures, discussions, exercises…etc.) or choose other methods that seem more appropriate to the needs of your participants, but ensure your keep participants involved throughout the session. Use the visual aids provided or developed by you.
Summary: Briefly, recap the major points that were covered during the course. Check for understanding and answer any final questions.Links: Link their new knowledge or skills to their jobs. Check how the participants plan to apply it.

44
Certificates:Hand-out the certificates to all participants who
attended the full course, if these are available.Evaluation:
Ask participants to evaluate the course, using either questionnaires or group discussions.
Good-byes:Thank participants for their participation. If
appropriate, give participants your telephone number if they have further questions after the course.

55
Links: Relate what they are about to learn to acquired knowledge, experience back on the job or previous sessions.Objective: State the purpose of the sessions, or if possible, what the participant will be able to do at the end of this session.Outline: State the key points to be covered (the what) and the methods to be used (the how).Motivators: Tell the participants how learning the contents of the session will benefit them personally.

66
Training points: Present the actual session content in a clear and logical manner.Verbal and visual aids: Add verbal aids i.e. examples, illustrative stories, statistics, and pertinent facts from the participants’ workplace, to support the training points. Use visual aid i.e. transparencies, prepared flipcharts, and videos, to support your ideas.Exercise: Use a variety of exercises, such as role plays and case studies to involve the participants in their training and let them practice their new knowledge and skills. Include other activities such as lectures and discussions to help participants learn.

77
Summary: Recap all that has happened, with highlights
on the main teaching points. Check for understanding and clarify misunderstandings.
Link: Link their new knowledge or skills to their
jobs. Check hoe the participants plan to apply it. Link this session to the ones that will follow.

88
ParticipantsThere are a number of factors which affect the content of the course or session. One of the factors is who the participants are, why they are in a training session, what they know and think about the subject. The number of participants may also affect the training strategy. During preparation of the course or session, the following consideration should be taken:

99
The type of training methodologies: Some approaches are better applied to smaller groups whereas others can only be effective with larger groups.The timing of the sessions: Exercises and group discussions must be timed. If you have a small group, group discussions will take less time and, therefore, more training material or exercise must be added. However, if you have a large group, you have to consider how much time it will take for certain exercises (including the required time for debriefing) and for a good group discussion afterwards.The types of visuals and training aids: Not all visual aids are effective on all group sizes. For instance, flipcharts are better for smaller groups whereas overhead projectors are good for larger groups.

1010
The more knowledgeable you are about the course content, the more you can feel comfortable adding examples, anecdotes and other information to the course material. Similarly, the more often you train, the more comfortable you will feel in using various training methodologies that involve participants.The first time you reach a particular course, it is usually best to follow the course content including the order of training points, exactly and to use the visual aids and methodologies suggested since these have been tested and found to work well with the course timing. When you grow more comfortable with the material, on subsequent courses, you may choose to personalize the course by adding some elements or changing the order of training points, the visual aids or some of the exercises.

1111
Check out the available equipment and always consider ways of presenting the information. Although you may have prepared an excellent session, if the equipment you require is not available, you will have to adapt.
Decide in advance what part of your course or session can be eliminated or reduced in case the unexpected occurs, for example, a fire drill, large talkative participants. In such cases, it might be necessary to drop an exercise or to use a methodology which takes less time than originally planned one.

1212
Title: INTRODUCTORY SESSION
Learning objective:
Duration: 75 minutes
Teaching Points Methodology Time in Minutes
1. Welcome, Introduction:Instructor (name, background)Participants (name, position, experience, expectations
Individual Introduction 15
2. Administrative Details:Description of facilities (cafeteria, washrooms, parking telephones, message center, fire exits
Lecture 10
3. Course Introduction:Links:This course will build on your experience in giving presentations and 1 on 1 training.Objectives: PreparationTeachingOutline: Refer to timetableMotivatorsYou will learn how to maximize learning. You will enhance your training communication skills
Lecture
Flipcharts & Participants’manual
Flipchart
15
4. Characteristics of Adult learning Exercise Intro – 1: Good Learning ExperienceIntroduction: 5 minutesExercise : 10 minutesDebrief : 20 minutes
35

1313
Example of 5” X 8” Cards
Types of lesson preparations: Intro Session Card 61Adding notes to session plans provided (Show Examples)
Advantage: Easy to use, already available Disadvantage: Not much space
2Using index cards (Show Examples)
Advantage: Easy manipulate (hand shaking less visible)
Disadvantage: Need time to prepare, must number pages3 Using visual aids (notes on flipchart, transparency borders) (Show Examples)
Advantage: Invisible Disadvantage: Not much room, must plan carefully

1414
notes. They may use short forms such as “QTC”(Question to class), to remind them to ask specific questions and “FC” (Flipchart), to remind them to write answers on flipchart or to refer to a prepared flipchart. They, also, find it helpful to number their transparencies and flipcharts and cross-reference their notes.Some instructors, also, use color coding on their cards. For example, black ink for content information, blue for directions (for example, to distribute handouts or show an example or ask a question) and red for visual aids (transparencies or flipcharts).It is a good idea to use fairly large index cards ( for example 5” X 8”) since these can contain more information than smaller cards and to allows writing in large bold letter leaving lots of white space. Using key word and phrases is, also, preferable to full sentences.

1515
The important thing is to develop a style with which you will be comfortable. Experiment with different approaches and find one, or a combination, that works well for you.Other note preparation methods include using your visual aids for notes. For example, you may include additional information in pale pencils on your prepared flipcharts to remind you of what to say. If you write small and in pale pencil, participants will not be able to see those notes and you will appear to be speaking without notes. You can also write on the borders of your transparencies. However, there is a minimal room on those visual aids. It is, also important to know which side of the flipchart you will stand so that you can easily see he notes.

1616
Methods that are not recommended include writing out your lesson completely, in full sentences, whether you use session plan forms, index cards or any other media, because it leaves you with two choices in front of the class. The first choice is to read your notes to the class or alternatively to ignore the notes while training since it is impossible to look at the class and follow those types of notes simultaneously. It is obvious that both choices are unsatisfactory.Another method that is not recommended is to
memorize the session since this is very time-consuming and allow no flexibility to adapt to the needs of the participants. It is, also, dangerous since you could easily, with any nervousness, experience memory blank. This especially occurs if the participants interrupt you to ask a question. Participants should never feel that they need to interrupt you to ask a question in any case. On the contrary, you should be asking participants often during the course.

1717
Time is a resource we are all trying to save, yet we always seem to be running out of it. Like all other natural resources, it is becoming expensive and scarce. Time constantly pressures you. While training, you must train a certain amount of material during a given time frame. Here is a list of time management pitfalls you should watch out for during design of the session plan and training:

1818
Ensure you cover only what participants need to know:Subject matter experts, training in there area of expertise
will often tend to include much material for the time given. The instructor has to make sure that all needs to know are covered first and then, if time permits, the should know and finally the nice to know. Keep introduction short: The introduction of a session should be short and to the point. It should outline in a brief overview what is to come, explain why, and link it to some interests of the participants. It can be a great time waster if the instructor gets trapped into a discussion of the details of what is to be covered and answers questions dealt with in the body of the lesson.

1919
Give clear instructions:Always make sure the participants know what is expected of them and give them a definite time within which to do it. Clear, precise instructions for all tasks can save repetition. Circulate among the participants to make sure they are on the right track.Be prepared:Being well prepared to train is a vast time saver. Preview the session and make sure you know what, when and how things are to be done. You will be aware of the time available and of the sequence of events and assignments to be completed. You will know where you have to “brush up”you knowledge. The better you know your topic, the more comfortable you will be in front of the participants.
2020
Organize your training room: Knowing your seating arrangement before a class is helpful but room organization includes more than that. Arrange handouts in sequence before the session in order to save time. Have broken audio-visual equipment replaced or repaired before the course begins. Set equipment before the class, checking sightlines from all parts of the room. If you must move the equipment out of the way, put tape markers on the floor so you can replace it quickly.Build an extra time for the unexpected: Anything can happen in class during the session, have you allowed time for the unforeseen?! The unexpected can include any number of things that may take two to three minutes each. Several such interruptions per session can be expensive in terms of lost time so be prepared to handle them.Build in re-training time: Any training point can appear to be uncomplicated and straightforward to the instructor but the participant might not have your expertise. Does your session allow for some re-training?!

2121
Stay on track:Often in class discussions, participants will get sidetracked.
While you may not want to cut off the discussion, you have to intervene to get the topic back on track. You can often redirect by using good questioning techniques that will not make anyone feel they have been reprimanded. If this questioning does not work, you should intervene directly to get back on track.Questions:Exercise control during question and discussion periods. If a question or topic is of concern to only one participant, offer to discuss it at break or lunch time.Post an outline of your session and leave it visible:It will help you and the participants stay on track. Participants will be less likely to ask question on items to be covered later.

2222
Put the actual time by each training point: For example. 10:15 Time management is put on the teaching notes and not on the session schedule. This way, you can add more details or drop details or examples to stay on schedule.
Ask the group fro time to time if the pace is right or if it istoo fast or too slow.
Be prepared to drop or trim certain components of your session rather than rush the participants through: For example, if the group cannot finish an assignment on time, review what they have done and then negotiate with them to decide what part of the schedule should be modified.
Telling participants at the very beginning of the course or the session that time will be tight: This seems to help them make a greater effort to stay within the time frame.

2323
If you are a new instructor, take heart!
Your judgment on timing will improve with
experience.

2424
1. Review the course manual thoroughly to ensure your comfort with the course content and flow: In other words, the order in which the content is covered, the training activities to be done and the training methods used as well as the visual aids provided.
2. Obtain as much information as possible on the participants who will be attending your course: How many are there? What is their present skill or knowledge level in the subject matter of the course? What is their present attitude about the subject matter and about the training course? Whether they agree with the message in the course? Have the agreed willingly to attend this course or has their management imposed it on them?

2525
3. Prepare your personal notes in whatever format you feel comfortable with:Follow steps 4 to 8 as you prepare your notes.
4. Study the methods or techniques suggested in your course:Plan how you could modify the methods or techniques depending on the group interests, their ability to grasp the content, the objective of the session and the available time.
5.Formulate pertinent questions to stimulate involvement:Inserting challenging questions into your session plan will ensure
maximum participation and learning.6.Add examples, illustrations, quotations and statistics to
make the learning concrete and practical:These will add interest to the course and help integrate the learning into long term memory.

2626
7. Plan how to maximize the results of each exercise:Ensure that the participants know the purpose of the
exercise. Include enough time to introduce it, to explain it, and to debrief it. Exercises are crucial to the learning process because they give participants the opportunity to apply what they are learning. Even if you must drop parts of a session, try not to cut out an exercise.
8. Design a variety of visuals to simplify complex procedures and concepts:Wait until you have finalized the content before you work on the visuals.
9.Have all your materialprepared well before the course and allow for delays or other problems.
10.Set up your training room well before the arrival of participants:Use the following checklist

2727
CHECKLIST FOR CLASSROOM ORGANIZATIONIt is important that the training environment be conductive to learning. Adult learners want a comfortable, well organized classroom so that they can concentrate on their learning. When you are setting up a classroom for training, consider the following:LOCATION
1Is the room suitable from the standpoint of size, number of participants, material to be presented and so forth? Will the people in the back be able to see? An ideal training space has a size and a shape that allows a variety of seating configurations.
2Are there facilities available close at hand (washrooms, telephone, canteen, fire exits...etc.). Consider your lesson plan, did you set aside enough time for breaks if the canteen is not close at hand?3Are the chairs comfortable to sit in for long periods of time? Chairs should swivel and be upholstered in material that “breathes”?4Are there tables available to put handouts, supplies…etc? How much space will that take?5What arrangements can be made for parking, for receiving important messages…etc?
EQUIPMENT6Do I have the right equipment?
7Is the equipment in good working conditions?8Are there enough electrical outlets and are they suitable for the load required?9If using projectors is there a screen available or will I have to use the wall? Even a white wall will absorb too much light. Is there enough space for the projector and the screen? The screen should be positioned diagonally across one of the front corners of the room. It should be at least 1.25 meters off the floor.1Are there whiteboards and easels available?1What type of easels is supplied? Who supplies the paper?1Is there enough space for the easels?
ENVIRONMENT1Will there be a minimum number of distractions? For example noise, people moving around…etc.
1Is the room acoustically good? Hard ceiling and wall reflects sound and make hearing difficult because of echoes. Curtains and carpeting can help.1Are there windows with scenery, paintings on the wall, bright colors in the room that could cause participants’ attention to waiver?1Is the room pleasing? For example, warm, soft colors and textured wall coverings are the best.1Are the heating, ventilation and air conditioning systems quiet and can you control them?1What kind of lighting arrangement is available? Lighting should be a combination of an incandescent and fluorescent with local control for partial and complete illumination.

2828
U SHAPE TABLE ARRANGEMENT: Best for discussion, meetings and groups of 30 people or fewer
VCR, Large screen TV
Instructor Desk
Screen
Overhead Projector
Flipchart movable

2929
HORIZONTAL WORK TABLE ARRANGEMENT: Suitable for any group size. Good for work-lecture combination groups of 15 – 100 people. Projection of screen size increases in larger rooms. Ceiling height should increase accordingly. Best for dissemination of information and meetings at which little discussion is expected or desired.
Instructor Desk
Screen
Overhead Projector
Flipchart movable
Flipchart movable

3030
Instructor Desk
Screen
Overhead Projector
Flipchart movable
VCR, Large screen TV
CLUSTERS: Suitable for small group exercises and discussions. Also allows trainer mobility among groups

3131
Before deciding on whether to use visual aids, you should review the following checklist to make sure that a visual aid is really your best option.
1. Is your visual worth making?2. Is it essential to the understanding of your session?3. Is it aimed at your trainees?4. Does it deserve the emphasis which a visual gives?5. How you clearly defined your objective?

3232
Once you have decided on a visual aid, ensure that it has the following characteristics:
ReadableAudience relatedUnderstandableInteresting
Up to dateAccurateConciseClear
Remember that the purpose of using a visual aid is to support and increase the trainees’ learning. The type of visual aid that you select depends on:Type of program being givenFacilities available and locationTime available for presentationType most useful for that specific groupCost
Consider all those factors before deciding on the type of visual aid to use. Some aids may be quite suitable for a specific group while their cost may be prohibitive. Others, though inexpensive, may not beappropriate for the program.
3333
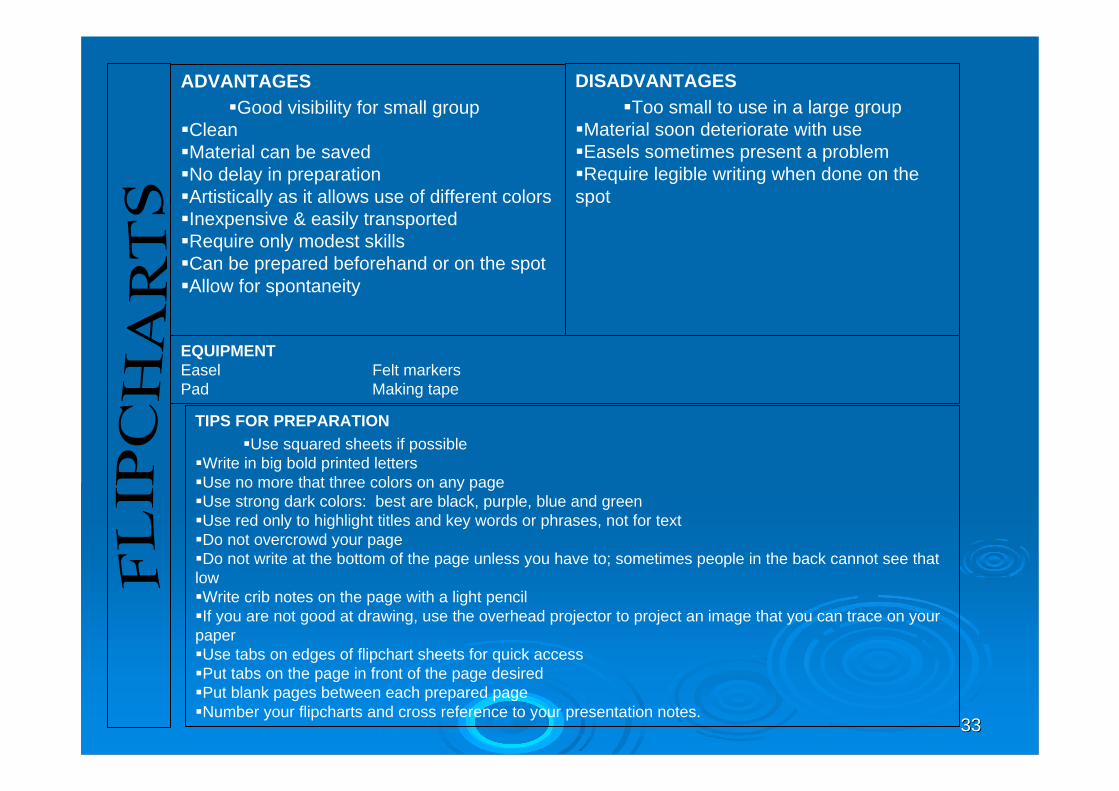
ADVANTAGESGood visibility for small group
CleanMaterial can be savedNo delay in preparationArtistically as it allows use of different colorsInexpensive & easily transportedRequire only modest skillsCan be prepared beforehand or on the spotAllow for spontaneity
DISADVANTAGESToo small to use in a large group
Material soon deteriorate with useEasels sometimes present a problemRequire legible writing when done on the
spot
EQUIPMENTEasel Felt markersPad Making tape
TIPS FOR PREPARATIONUse squared sheets if possible
Write in big bold printed lettersUse no more that three colors on any pageUse strong dark colors: best are black, purple, blue and greenUse red only to highlight titles and key words or phrases, not for textDo not overcrowd your pageDo not write at the bottom of the page unless you have to; sometimes people in the back cannot see that
lowWrite crib notes on the page with a light pencilIf you are not good at drawing, use the overhead projector to project an image that you can trace on your
paperUse tabs on edges of flipchart sheets for quick accessPut tabs on the page in front of the page desiredPut blank pages between each prepared pageNumber your flipcharts and cross reference to your presentation notes.

3434
ADVANTAGESQuiet inexpensive
Do not need total blackoutCommunicator can face the audience
and maintain eye contactAudience can view with equal
effectiveness from most parts of the roomThey are cleanUser has access to more professional
art and color effects are enhancedMaterial can be Preserved
Material can be presented in any sequenceOperator requires little skillCan be done easily
DISADVANTAGESSomething of the spontaneity of
an evolving story is sometimes lost by the prepared material
Span of audience attention is a maximum of 30 minutesNeed electrical powerRequire legible writing when done on
the spot
EQUIPMENTProjector Screen or white wallPower source Maybe: a power bar extension cordTIPS FOR PREPARATION
Use a maximum of 6 to 8 words per line, 8 to 10 lines per pageUse a maximum of three colorsUse bold contrasting colors (not pastels)Write in legible letters, minimum 8mm (0.25 inch) highTo check readability, place the prepared transparency on the floor, if you can
clearly read it when standing, it should be legible to the participants at the back of the roomWrite only on top of three quarters of the transparencyUse the transparency horizontally instead of verticallyWrite from the left to right not up to down

3535
ADVANTAGESHave no limit as far as
information availabilityEliminate note-taking, ensure all
pertinent material / information is distributedSupplement other materialsDistributed material can be an
excellent introduction or conclusion to the topic in questionCan present information otherwise
hard to explain
DISADVANTAGESRequire additional instructor time
to prepare the material and arrange for duplication
Add to the cost of the training session
EQUIPMENTNone
TIPS FOR PREPARATIONEnsure the handout is complete, relevant to the subject, useful and
necessaryCheck your copies to ensure clarityMake sure you have sufficient copies. Consider printing al least three to five
extrasConsider what other material participants will need to carryIf they need to be stapled, three hole punched…etc, make sure it is done,
otherwise you should have the supplies on hand to staple or punch


![HCI in Healthcare – Introductory Session · HCI in Healthcare – Introductory Session 4 March 2019 Lecturers etc § [EMR] Geraldine Fitzpatrick geraldine.fitzpatrick@tuwien.ac.at](https://img.pdfslide.us/doc/110x75/5f50311839b2fb77f4417f4b/hci-in-healthcare-a-introductory-session-hci-in-healthcare-a-introductory-session.jpg)