Embed Size (px)
Citation preview
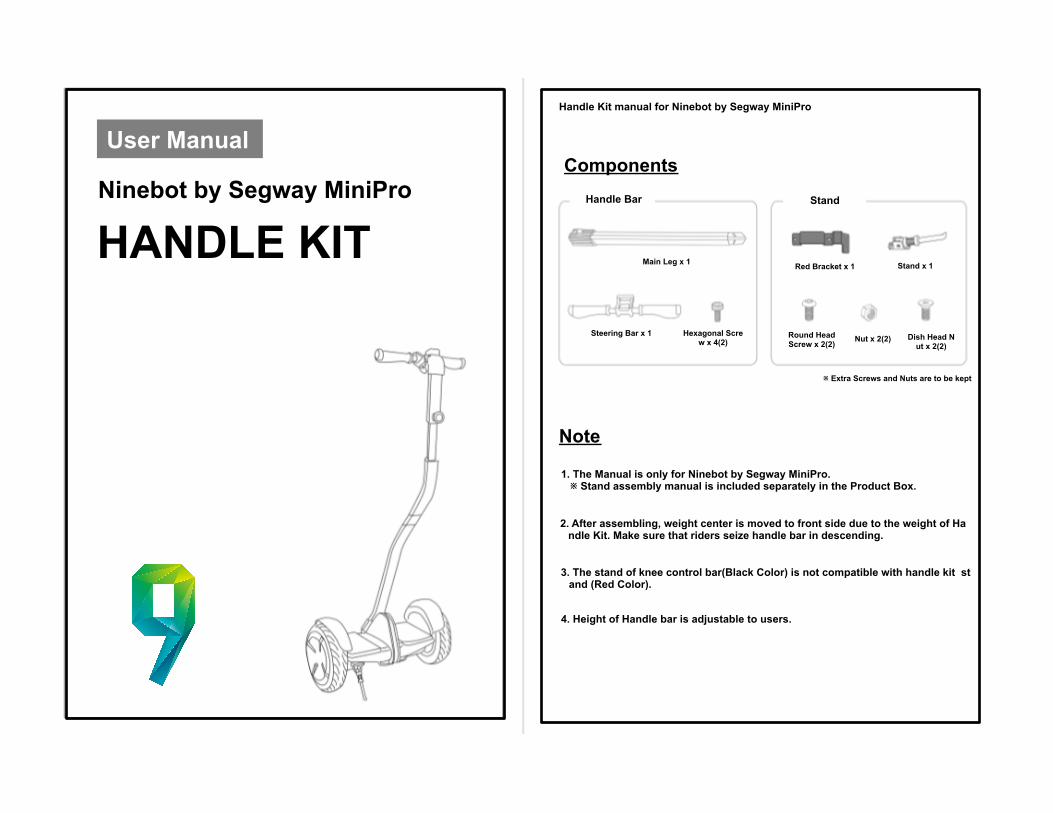
User Manual
Ninebot by Segway MiniPro
HANDLE KIT
Handle Kit manual of Ninebot Mini Pro
Components Handle Bar Stand
Main Leg x 1
Steering Bar x 1 Hexagonal Screw x 4(2)
Red Bracket x 1 Stand x 1
Round Head Screw x 2(2) Nut x 2(2) Dish Head N
ut x 2(2)
※ Extra Screws and Nuts are to be kept
Note
1. The Manual is only for Ninebot by Segway MiniPro. ※ Stand assembly manual is included separately in the Product Box.
2. After assembling, weight center is moved to front side due to the weight of Handle Kit. Make sure that riders seize handle bar in descending.
3. The stand of knee control bar(Black Color) is not compatible with handle kit stand (Red Color).
4. Height of Handle bar is adjustable to users.
Handle Kit manual for Ninebot by Segway MiniPro

Handle Kit manual of Ninebot by Segway MiniPro
Disconnect knee control pad from knee bar
※ 2.5mm hexagonal wrench required
Store disconnected knee control bar for future use
Use hexagonal screws(4) ※ 2.5mm hexagonal wrench required
Assemble knee bar with steering bar as follows
Connect main leg to main frame steering socket as follows
After connecting, close the tool-free release to secure.
Release screw at bottom of main leg
If not released, main leg is not connected with Ninebot
Connect assembled handle kit to mini pro
After connecting, close screw to secure
Assembly completed
Assembling
Manufactured by
for
9bot-store.com
Please send us suggestions or requests at [email protected]

User Manual Stand of Ninebot by Segway MiniPRO
(Exclusive for Handle Kit)
Components
Red Bracket x 1 Round-head screw x 4 Nut x 4
Stand x 1 Dish-head screw x 4
Note
1. Stand is to be attached in front side of mini pro.
2. This stand is only for handle kit
3. Be sure that stand is folded when riding
4. Do not use stand when power is on
5. Color of bracket is Red
6. Extra screws and nuts are for future use

Assembling 1. Connect red bracket to stand as follows. (use
Dish-head screws and nuts
2. Dispart knee control bar from mini pro and make up-side down
Knee bar connection side
3. Assemble stand part into bottom of mini pro with round-head screw
※ Stand is to be located in front side of mini pro. Otherwise mini pro may inclines
Use round-head screw(2)