Embed Size (px)
Citation preview

COMPLETE USER GUIDE

Mio LINK User Guide 02
TABLE OF CONTENTSWelcome03 Getting Started
03 Important Safety Information
04 Your Mio LINK
Using Mio LINK05 Getting Your Heart Rate
06 Heart Rate Zones
07 Customizing Heart Rate Zones
Using Mio LINK With Apps & Devices08 Working With A Receiving Device
08 Pairing With Apps
09 Pairing With Receiving Devices Such As Bike Computers
Maintaining Your Mio LINK09 Charging The Battery
10 Using Your Mio LINK In Water
11 Caring For Your Mio LINK
11 MioLINKSpecifications
Warranty and Regulations12 Warranty & Service
13 Exclusions And Limitations Of Liability; Disclaimers
14 Copyright and Trademarks
14 Regulations and Conformity
HAVE ANY QUESTIONS ABOUT YOUR MIO LINK?We’re ready to help!
Your complete satisfaction is our goal, so your feedback is crucial.
If you have any thoughts, questions, or concerns, just contact our knowledgeable support team at:
1.877.770.1116
mioglobal.com/support
facebook.com/mioglobal
twitter.com/mioglobal
Setup your heart rate zones and register for product updates

Mio LINK User Guide 03
WARRANTY & REGULATIONS
WELCOMECongratulations on your purchase of Mio LINK, the performance-level, strapless, continuous heart rate monitor that you can wear on your wrist. Mio LINK uses ANT+™ and Bluetooth® Smart technology to transmit your heart rate data to smartphones and other compatible devices. Download the Mio GO app for a fully personalized, interactive workout, or take advantageofhundredsofotherfitnessapps.
Remember to register your Mio LINK through the Mio GO app, or online at mioglobal.com/register for full warranty service.
GETTING STARTED
What’s Included1. Mio LINK
2. USB Charger
3. Quick Start Guide
2 3
QUICK START GUIDE
Setup your heart rate zones and register for product updates
IMPORTANT SAFETY INFORMATIONConsult your doctor before beginning a new exercise program.
Mio LINK provides very accurate heart rate measurements. However, it is not a medical device. TheLINKandUSBdonglecontainstrongmagnets.Ifyouuseapacemaker,defibrillator,orother implanted electronic devices, consult your doctor before using a Mio LINK.
See Charging The Battery for important battery care and battery safety information.
1

Mio LINK User Guide 04
Activating Your Mio LINK1. Remove your Mio LINK from the packaging.
2. Fasten the LINK onto your wrist.
3. Press and hold the button to activate Mio LINK. The LED will light up.
4. After a few seconds, the LED light will turn off.
5. Mio LINK is now activated and in standby mode.
Wearing Your Mio LINKTo accurately monitor your heart rate:
• Fasten Mio LINK snugly on your wrist. The optical sensor on the back should make good contact with your skin.
• You should wear Mio LINK above, and not directly on top, of your wrist bone • If you have a smaller wrist, wear Mio LINK higher on your forearm. • If you use Mio LINK for biking, wear it higher on your forearm, since the bending of the
wrist will affect the heart rate reading. • If you often have cold hands or poor circulation, try exercising for a few minutes to
increasebloodflowbeforeyoubegintotrackyourheartrate.
LED
Optical Sensor
USB Dongle Charging Pins
Sensor Lights
YOUR MIO LINK
Button

Mio LINK User Guide 05
USING MIO LINKGETTING YOUR HEART RATEYou can get your real-time heart rate when you put Mio LINK in Heart Rate (HR) Mode. You must be wearing the LINK to obtain an accurate heart rate reading. The heart rate may take a few seconds to Button LED Optical Sensor USB Connector Charging Pins Charging Pins stabilize while your body is adjusting to the physical activity; we recommend activating Heart Rate Mode during the warm up stage of your workout.
Turning On HR Mode1. While standing still, press and hold the Button until the LED lights up. The color
of tis LED is an indicator of the battery level. (See Charging The Battery for more information).
2. Mio LINK will immediately begin searching for your HR, indicated by the pulsing LED light.
3. Hold your arm still until the LED blinks in a distinctively slower pattern. This means the LINK has found your heart rate. The LED color at this point is an indicator for the HR zone. For more details, please refer to Heart Rate Zones.
If no valid heart rate signal is found within the initial 2 minutes, the LED will light up in red for 2 seconds, then the LINK will automatically leave Heart Rate Mode and turn off. Please refer to Troubleshooting.
Duringyourworkout,ifyouseearedLEDflashinginasteadypattern(ONfor1second,OFFfor 1 second), the LINK has lost connection to your heart rate. Please refer to Troubleshooting.
Turning Off HR ModePress and hold the Button until the LED lights up for 2 seconds. The color of this LED indicates the battery level. (See Charging The Battery for more information).
Troubleshooting• Minimize wrist movement when Mio LINK is searching for your initial heart rate. • You may need to tighten the strap. • Try wearing the LINK higher on your forearm. • On colder days, activate the heart rate reading before heading outdoors. • If you are still having trouble, try wearing the LINK on your other wrist.

Mio LINK User Guide 06
HEART RATE ZONESYour target heart rate (HR) zone consists of your upper HR limit and your lower HR limit. These limits are usually a percentage of your maximal heart rate (MHR). If you do not know your MHR or upper and lower HR limits, you can check with your doctor, or use this following MHR calculation method as guidance:
MHR = 208 – ( 0.7 x Age )
Using Heart Rate Zones AlertsTraining Zone Mode is the factory default on Mio LINK. To switch to Zone Alert Mode, or to customize the upper and lower boundaries of each HR zone, please refer to Customizing Heart Rate Zones.
Training Zone Mode (5-Zone)The LED light will blink slowly to indicate your current HR zone. You can customize the upper and lower boundaries of each HR zone through the Mio GO app. Please see Customizing Heart Rate Zones for more details.
COLOR DESCRIPTION LOWER HR LIMIT UPPER HR LIMIT Cyan Resting 0% of MHR <50% of MHR
Blue Warm Up / Recovery 50% of MHR <60% of MHR
Green Fat Burn & Endurance 60% of MHR <70% of MHR
Yellow Aerobic Fitness 70% of MHR <80% of MHR
Magenta Anaerobic Intensive 80% of MHR <90% of MHR
Red Peak Performance 90% of MHR 220 BPM
Note: This table is only a suggested range.
Zone Alert Mode (1-Zone)In Zone Alert Mode, the LED will blink slowly to indicate whether you are below, within, or abovethetargetHRzone.AdoubleLEDflashindicatesyourheartrateisoutsideofthetargetHR zone by 10 BPM or more.
COLOR DESCRIPTION LOWER HR LIMIT UPPER HR LIMIT Blue Below Target HR Zone 0% of MHR <65% of MHR
Green Within Target HR Zone 65% of MHR <85% of MHR
Red Above Target HR Zone 85% of MHR 100% of MHR
Note: This table is only a suggested range.

Mio LINK User Guide 07
CUSTOMIZING HEART RATE ZONESToachievethefullpotentialoftrainingwithMioLINK,youshouldconfigureyourLINKthroughthe Mio GO app. Mio GO allows you to:
• Customize your upper and lower limits of each HR zone• Switch between Training Zone Mode and Zone Alert Mode • Register your LINK to receive full warranty service and product updates
Mio GO is available for download in the Apple App Store and Google Play store.
Note: Currently, the Android version of Mio GO will be for setup only. Full features coming soon!
Configuring your Mio LINK1. Turn on the Heart Rate Mode of your Mio LINK.
2. Open the Mio GO app on your smartphone or tablet. If you are opening the app for thefirsttime,youwillbeaskedtoregisterandconnectyourLINK,aswellassetupauserprofile.ForinstructionsonpairingyourLINKwithMioGO,pleaseseeUsing Mio LINK With Devices And Apps.
3. Tap the Connect icon to see all your previously connected devices.
4. Select your LINK from the list of connected devices. When your LINK has successfully connected to Mio GO, a Setup Mio LINK button will appear.
5. Tap Setup Mio LINKtoaccesstheconfigurationsettingsofyourLINK.6. The screen will clearly indicate whether your LINK is currently in Training Zone Mode
or Zone Alert Mode.
7. Select Zone Alert Mode or Training Zone Mode.
8. Choose to customize your lower and upper HR limits by either % Max HR or BPM.
9. Tap each zone to change the lower and upper boundaries. Tap Done.
10. Tap Save Zone Settings to save.
11. YourLINKisnowconfiguredandreadytosupportyourworkout!
FormoreinformationorforassistancewithconfiguringyourMioLINK,pleasevisit mioglobal.com/support.

Mio LINK User Guide 08
USING MIO LINK WITH APPS & DEVICESMio LINK can be used as a stand-alone heart rate monitor with heart rate (HR) zone indicator. You can also transmit your real-time HR data, using ANT+ or Bluetooth Smart technology, to any compatible smartphones and exercise equipment computers. Connect your Mio LINK toacompatibledevicetotakeadvantageofthewiderangeoffitnessappsavailable.Foracomplete list of compatible devices, please visit mioglobal.com/apps.
Compatible devices will only capture LINK’s HR data in real-time. This requires you to have the device with you while you are tracking your heart rate.
WORKING WITH A RECEIVING DEVICE• When Mio LINK is in Heart Rate Mode, it will transmit your HR data through Bluetooth
Smart and ANT+ wireless technology simultaneously, allowing Mio LINK to be discovered from compatible devices.
• Wear the receiving device on your arm, in your front pocket, or in front of you on a belt or bike handlebar. Do not position the device behind you (e.g. in a back pocket or backpack).
• Heart rate calculation of the LINK is not based on instant R-R interval, and will not work for apps that require heart rate variability (HRV) data.
Tip:ThefirsttimeyouuseyourLINKwithareceivingdeviceorapp,youmustpairtheLINKtothedeviceorapp.Pairingcanpreventsignalinterferencewhenothersensors and devices are in the area.
Tips For Pairing• Mio LINK must be in Heart Rate Mode. • Position the receiving device within 3 meters (9 feet) of your LINK. • Stay 10 meters (30 feet) away from other ANT+ or Bluetooth sensors and devices.
PAIRING WITH APPS1. If you want to pair through ANT+, you will need a device with built-in ANT support, or
an ANT+ dongle (for details, visit http://www.thisisant.com). If you want to pair through Bluetooth Smart technology, turn on the Bluetooth function of your device.
2. Turn on Heart Rate Mode on your Mio LINK.3. Open the app that you would like to pair with. Instructions vary for each app, but
typically, you can add or scan for a heart rate sensor within the app’s settings.
Note:Pairingmustbecompletedwithintheappsettings,andnotinyoursmartdeviceBluetooth settings.
Mio LINK User Guide 09
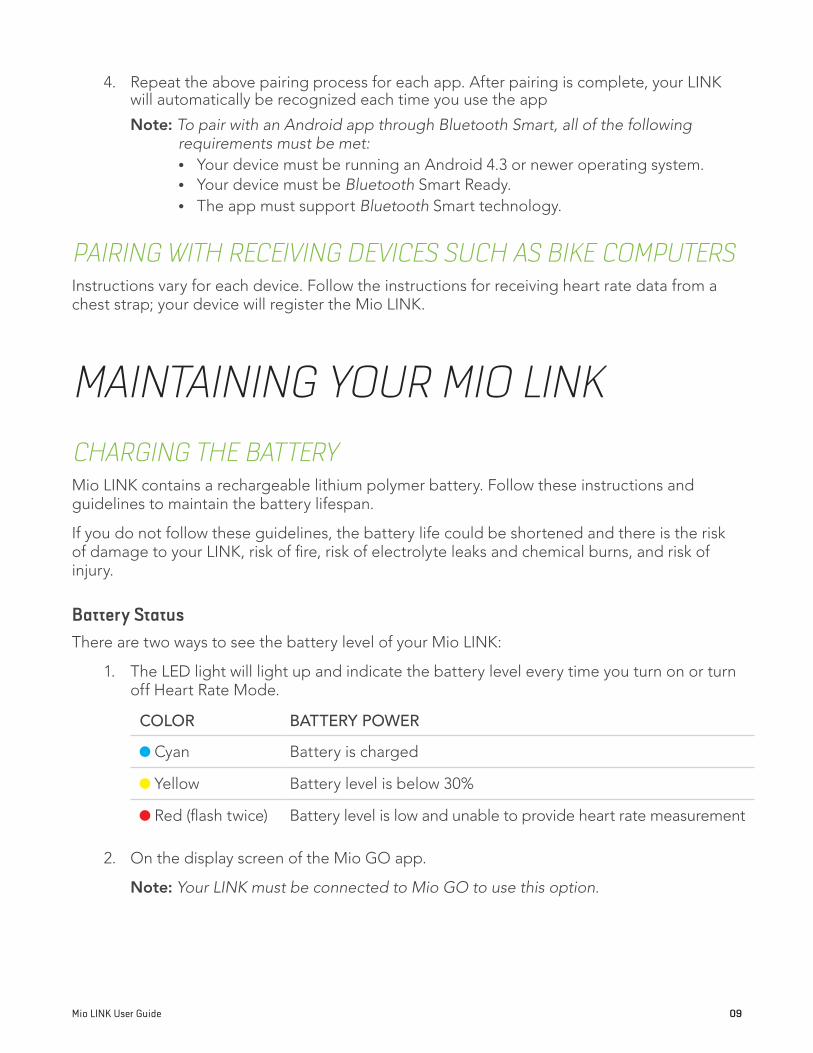
4. Repeat the above pairing process for each app. After pairing is complete, your LINK will automatically be recognized each time you use the app
Note: To pair with an Android app through Bluetooth Smart, all of the following requirements must be met:• Your device must be running an Android 4.3 or newer operating system. • Your device must be Bluetooth Smart Ready. • The app must support Bluetooth Smart technology.
PAIRING WITH RECEIVING DEVICES SUCH AS BIKE COMPUTERSInstructions vary for each device. Follow the instructions for receiving heart rate data from a chest strap; your device will register the Mio LINK.
MAINTAINING YOUR MIO LINKCHARGING THE BATTERYMio LINK contains a rechargeable lithium polymer battery. Follow these instructions and guidelines to maintain the battery lifespan.
If you do not follow these guidelines, the battery life could be shortened and there is the risk ofdamagetoyourLINK,riskoffire,riskofelectrolyteleaksandchemicalburns,andriskofinjury.
Battery StatusThere are two ways to see the battery level of your Mio LINK:
1. The LED light will light up and indicate the battery level every time you turn on or turn off Heart Rate Mode.
COLOR BATTERY POWER Cyan Battery is charged
Yellow Battery level is below 30%
Red(flashtwice) Battery level is low and unable to provide heart rate measurement
2. On the display screen of the Mio GO app.
Note:YourLINKmustbeconnectedtoMioGOtousethisoption.

Mio LINK User Guide 10
Battery LifeEvery full charge of Mio LINK will provide 8 to 10 hours of battery life in Heart Rate Mode.
Charging Your Mio LINK1. Make sure the 4 charging pins on the back of the Mio LINK are dry. If not, dry them with a
towel.
2. Plug the USB connector of the USB dongle into the USB port of your computer.
3. Attach the 4 charging pins on the back of the LINK to the 4 charging pins on the USB dongle. The magnets in the charging pins will help the two pieces lock into place.
The LED light will fade in and out slowly in a cyan color to indicate that the battery is charging. When the battery is fully charged, the LED light will turn off.
Battery Care Guidelines• Recharge the battery at least once every 6 months. • Do not expose Mio LINK to high temperatures. • Use your LINK in the temperature range of 5°C to 45°C (41°F to 113°F). • Store the LINK in the temperature range of 0°C to 25°C (32°F to 77°F). • Do not disassemble, puncture, or incinerate the LINK strap or battery. • If the band casing breaks and the battery is exposed, keep the battery away from
children.
Battery Replacement• The battery lifetime is approximately 300 charge cycles. If the battery is charged on a
weekly basis, the battery should last for 5 years. • When the battery charge length is noticeably shorter than before, visit
mioglobal.com/supporttofindouthowtoreplacethebattery.• Contact your local recycling authority for information about disposing of the band or
battery.
USING YOUR MIO LINK IN WATER• Mio LINK is water-resistant and can be worn while swimming. • Important: Do not press the Button under water. • The accuracy of the heart rate monitor might be reduced in cold water or if you are
using large arm movements. • Do not wear your LINK while diving. • RF transmission does not work under water. • After swimming, remove the LINK strap from the main unit. Rinse both with tap water
and dry with a soft cloth.

Mio LINK User Guide 11
CARING FOR YOUR MIO LINKCleaning Your Mio LINK
• Wipe the optical sensor area and charging pins with a damp cloth as needed. Use mild soap to remove oil or dirt. If you use Mio LINK regularly, weekly cleaning is recommended.
• Avoid scratching the optical sensor area to protect your LINK from damage. • Do not expose the LINK to strong chemicals such as gasoline, cleaning solvents,
acetone,alcohol,orinsectrepellents.Chemicalscandamagetheseal,case,andfinish.• After swimming, remove the strap from the main unit. Rinse both with tap water and
dry with a soft cloth.
Other Care Tips• Do not attempt to disassemble or service your Mio LINK. • Protect your LINK from impact shocks, extreme heat, and extended exposure to direct
sunlight.• The LINK is water-resistant only if the buttons and casing remain intact.
MIO LINK SPECIFICATIONSMaximum Readable Heart Rate: 220 BPM
Minimum Readable Heart Rate: 30 BPM
Operating Temp: 5°C to 45°C (41°F to 113°F)
Case: ABS
Caseback: PC+GF
Caseback Charging Pins: SUS316
Strap: Silicon
Water Resistance: 30M
Battery: 60mAh Lithium Polymer
Expected Battery Life: Up to 5 Years
Magnets: Neodymium – iron – boron (NdFeB)
Radio Frequency/Protocol: 2.4 GHz ANT+ and Bluetooth Smart Wireless Technology

Mio LINK User Guide 12
WARRANTY AND REGULATIONSWARRANTY & SERVICEBesuretovisitourProductSupportpagestofindonlinehelp,FAQs,videos,andmanualsforyour product: mioglobal.com/support.
Mio Limited Warranty InformationThis product is warranted to the original purchaser to be free from defects of quality, materials or workmanship at the time of delivery for the Limited Warranty Period (see below). During the Limited Warranty Period, Physical Enterprises Inc. (Mio Global) will, at its sole discretion, remedy such defects free of charge either by a) repairing, or b) replacing, or c) refunding the original purchase price (excluding taxes, shipping, handling, duties, and similar amounts), subject to the terms and conditions of this Limited Warranty. Processing of all warranty claims will be handled by the distributor of the product for the geographic area where the original purchase was made. To obtain warranty service, contact the store/dealer where the product was purchased to make a warranty claim.
Warranty PeriodThe “Limited Warranty Period” starts on the date of purchase and lasts for one year, endingonthefirstanniversaryofthedateofpurchase.Yourstore/dealer(oritsimporterordistributor) may have offered you a longer warranty period as part of the sale; Mio Global is not responsible for such longer warranty period so please contact your store/dealer for more information. The Limited Warranty Period will automatically expire without notice, and this Limited Warranty is not enforceable, if (as determined at the sole discretion of Mio Global):
1. the product has been opened or otherwise tampered with (except where permitted by the relevant documentation, such as to properly replace batteries as instructed);
2. the product has been serviced by a person other than Mio Global;
3. the serial number has been removed, altered or made illegible in any way; or
4. the product was not purchased from an authorized reseller of Mio Global (please contact Mio Global to obtain a list of authorized resellers).
Please refer to mioglobal.com/supportforcountry-specificwarrantyinformation.
Exclusions and LimitationsThis Limited Warranty does not cover, and customers will not be entitled to any claim under this Limited Warranty or otherwise for:
1. problems arising from abuse or rough, careless, or improper handling (and without limiting the foregoing, damage resulting from bending or dropping the product will be deemed the result of abuse or improper use);
2. problems arising from misuse contrary to intended or recommended use;

Mio LINK User Guide 13
3. problems arising from alteration of the Mio product, such as moisture or water damagesufficienttoaffecttheproperfunctionoftheproduct,anddamagetotheproduct case or visible cracking of the face;
4. problems arising from the use of the Mio product with any product, accessory, software and/or service not manufactured or supplied by Mio Global; or
5. replaceable batteries, or user manuals or any third- party items;
in each case as determined at the sole discretion of Mio Global.
EXCLUSIONS AND LIMITATIONS OF LIABILITY; DISCLAIMERSTHIS LIMITED WARRANTY IS ONLY VALID AND ENFORCEABLE IN THE COUNTRY OF PURCHASE. TO THE MAXIMUM EXTENT PERMITTED BY APPLICABLE, MANDATORY LAWS:
1. THIS LIMITED WARRANTY IS YOUR SOLE AND EXCLUSIVE REMEDY AND IS IN LIEU OF ALL OTHER WARRANTIES, REPRESENTATIONS, GUARANTEES OR CONDITIONS, WHETHER EXPRESSED OR IMPLIED;
2. NEITHER THIS LIMITED WARRANTY, NOR ANY OTHER WARRANTY, GUARANTEE, REPRESENTATION OR CONDITION, INCLUDING ANY IMPLIED WARRANTY AND CONDITION (WHETHER FOR MERCHANTABILITY OR FITNESS FOR A PARTICULAR PURPOSE, OR OTHERWISE), WILL EXTEND BEYOND THE LIMITED WARRANTY PERIOD;
3. MIO GLOBAL, OR ANY OF ITS AFFILIATES OR THEIR RESPECTIVE EMPLOYEES, OFFICERS, DIRECTORS, REPRESENTATIVES AND AGENTS (COLLECTIVELY, THE “PHYSICAL ENTITIES”), SHALL NOT BE LIABLE FOR SPECIAL, INCIDENTAL, PUNITIVE, INDIRECT OR CONSEQUENTIAL DAMAGES, INCLUDING BUT NOT LIMITED TO LOSS OF ANTICIPATED BENEFITS, LOSS OF DATA, LOSS OF USE, COST OF CAPITAL, COST OF ANY SUBSTITUTE EQUIPMENT OR FACILITIES, CLAIMS OF THIRD PARTIES, DAMAGE TO PROPERTY RESULTING FROM THE PURCHASE OR USE OF THE ITEM OR ARISING FROM BREACH OF THE WARRANTY, BREACH OF CONTRACT, NEGLIGENCE, STRICT TORT, OR ANY LEGAL OR EQUITABLE THEORY, EVEN IF MIO GLOBAL KNEW OF THE LIKELIHOOD OF SUCH DAMAGES;
4. WITHOUT LIMITING THE FOREGOING, THE PHYSICAL ENTITIES DO NOT WARRANT THAT THE OPERATION OF THE PRODUCT WILL BE UNINTERRUPTED OR ERROR FREE, OR THAT THE PRODUCT WILL WORK WITH ANY HARDWARE OR SOFTWARE PROVIDED BY A THIRD PARTY, AND EXPRESSLY DISCLAIM ANY DAMAGES RESULTING FROM INACCURACY OR MATHEMATICAL INACCURACY OF THE PRODUCT OR THE LOSS OF STORED DATA; AND
5. THE PHYSICAL ENTITIES SHALL NOT BE LIABLE FOR DELAY IN RENDERING WARRANTY SERVICE.
SOME PROVINCES, STATES OR OTHER JURISDICTIONS DO NOT ALLOW LIMITATIONS ON THE LENGTH OF IMPLIED WARRANTIES OR CONDITIONS, OR DO NOT ALLOW THE EXCLUSION OR LIMITATION OF CERTAIN TYPES OF DAMAGES, OR THE EXCLUSION OR LIMITATION OF LIABILITY FOR DEATH OR PERSONAL INJURY CAUSED BY THAT PARTY’S NEGLIGENCE. IF THAT IS TRUE OF THE ORIGINAL PURCHASER’S PROVINCE, STATE OR JURISDICTION, THE ABOVE LIMITATIONS OR EXCLUSIONS SHALL NOT APPLY EXCEPT TO THE MAXIMUM EXTENT PERMITTED BY SUCH APPLICABLE LAW. YOU HAVE SPECIFIC RIGHTS UNDER THIS LIMITED WARRANTY. HOWEVER, YOU MAY ALSO HAVE OTHER RIGHTS WHICH VARY FROM JURISDICTION TO JURISDICTION AND NOTHING IN THIS LIMITED WARRANTY WILL APPLY TO REDUCE OR ELIMINATE ANY OF YOUR MANDATORY, STATUTORY RIGHTS.
Contacting Mio GlobalFor all matters related to this Limited Warranty, please contact Mio Global:
1.877.770.1116

Mio LINK User Guide 14
COPYRIGHT AND TRADEMARKS©2014 Physical Enterprises Inc. All rights reserved. Mio and the Mio logo are trademarks of Physical Enterprises Inc. registered in the U.S. and other countries.
Mio® is a registered trademark of Physical Enterprises Inc. iPhone® is a registered trademark of Apple Inc. Android™ is a registered trademark of Google Inc.
ANT+™ is a trademark of Dynastream Innovations Inc. Visit http://www.thisisant.com/directory Bluetooth® word mark and logos are registered trademarks owned by Bluetooth SIG, Inc. and any use of such marks by Physical Enterprises Inc. or Mio is under license.
Other trademarks and trade names are those of their respective owners.
REGULATIONS AND CONFORMITYThe Mio LINK Regulatory Sheet is available for download at mioglobal.com/support.
EU RESIDENTS: Do not dispose of this product as unsorted municipal waste. It is your responsibility to return this product to your local recycling service.
EU-DECLARATION OF CONFORMITY Physical Enterprises Inc. declares this heart rate band (Mio LINK) in compliance with EMC directive 2004/108/EC. Please e-mail [email protected] to request a copy of the Declaration of Conformity.
If there are electrostatic disturbances in the environment, the product may malfunction or display an error. In this case, reset the product or relocate to an area without such disturbances.
Model #56P
Made in China