Embed Size (px)
Citation preview

Complete User Guide for the ImageCast Optical Scanner
Firmware Version 4.9.10 | Rev. 4/15/2013
ONONDAGA
COUNTY
COMPLETE USER GUIDE FOR THE
IMAGECAST OPTICAL SCANNER
Complete User Guide for the ImageCast Optical Scanner
1
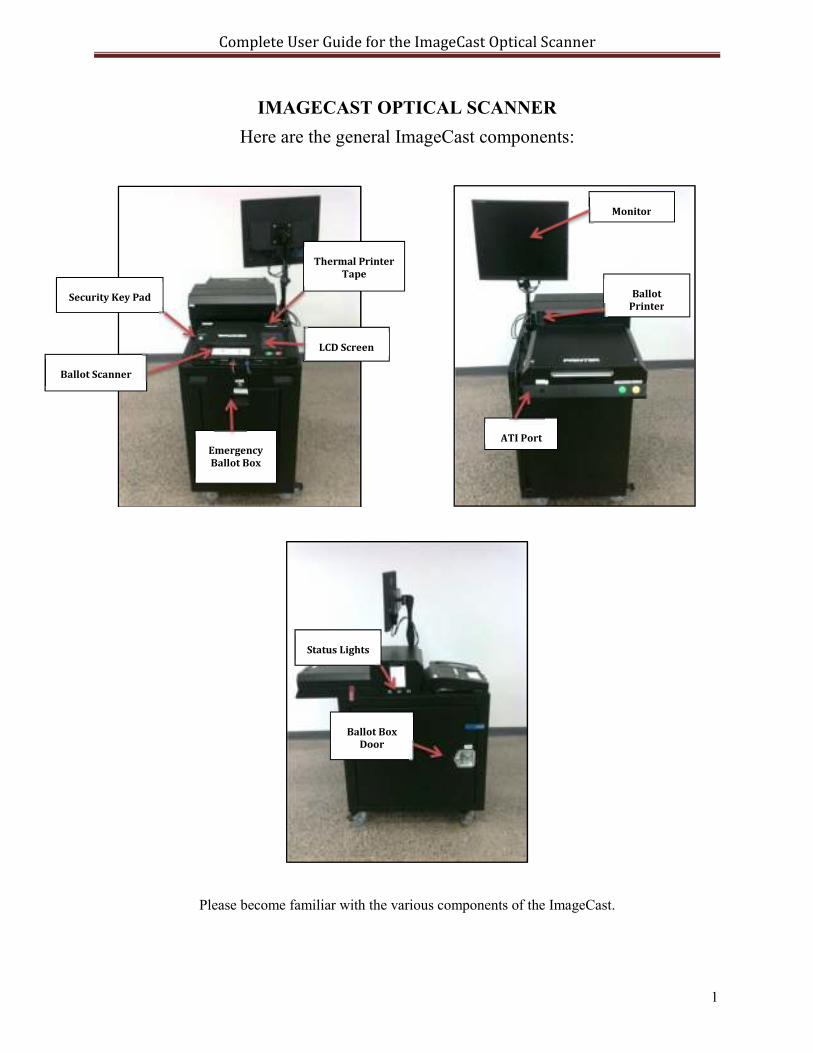
IMAGECAST OPTICAL SCANNER
Here are the general ImageCast components:
Please become familiar with the various components of the ImageCast.
Emergency
Ballot Box
Security Key Pad
Ballot Scanner
Thermal Printer
Tape
LCD Screen
Monitor
ATI Port
Ballot
Printer
Ballot Box
Door
Status Lights

Complete User Guide for the ImageCast Optical Scanner
2
Volume
Adjustment
Next
Contest/
Category
Select/Enter
Audio Tactile Interface (ATI)
ATI Paddle
Rate of Audio
control
Next
Candidate
Help/Pause
Port for
headphones
Port for sip & puff
adaptation
ATI Port
with cable
connected

Complete User Guide for the ImageCast Optical Scanner
3
OPENING OF THE POLLS
The ImageCast will have been delivered prior to your arrival at the polling location
on election morning. The ImageCast should be covered when you arrive.
1. Check the top of the ImageCast to make sure that the machine is the correct
one for the polling location.
2. Cut the zip-tie at the bottom of the ImageCast cover. Remove and fold
the cover. Place the cover aside until the closing of the polls.
3. Remove the two foam pieces covering the scanner and printer. Place
the pieces aside until the closing of the polls.

Complete User Guide for the ImageCast Optical Scanner
4
4. Position the machine in the location described in the provided layout for
your polling location.
5. Lock the wheels so the machine does not roll at any point throughout the
day.
6. Inside the LOWEST district’s black suitcase, you will find a green canvass
bag containing your ImageCast ballot box/Emergency Ballot Box door key
and the Statement of Canvass. These items will be in the clear, plastic
envelope shown below.

Complete User Guide for the ImageCast Optical Scanner
5
7. Unclip the power cord and plug it into the nearest outlet. Feel free to
use the extension cord provided in the ballot box if needed. If you use the
extension cord, please use the duct tape provided to tape down the cord so
no one trips over it throughout the day.
8. Unlock and empty the contents of the ballot box. Inside the ballot box you
will find the blue canvass ballot bags, ADA Paper Envelope, and the
transparent bin containing all of the ADA devices, supplies and the metallic
bag. Remember to record the blue ballot box seal on the Statement of
Canvass.
9. Press the power button on the UPS/APC box in the bottom right hand corner
of the ballot box. Hold until you hear a beep.
Power Button

Complete User Guide for the ImageCast Optical Scanner
6
10. Place the privacy sleeve on the printer end of the ImageCast.
11. Attach the privacy cover to the monitor.
12. Set up the folding blue privacy screen around the scanner end of the
ImageCast.
Complete User Guide for the ImageCast Optical Scanner
7
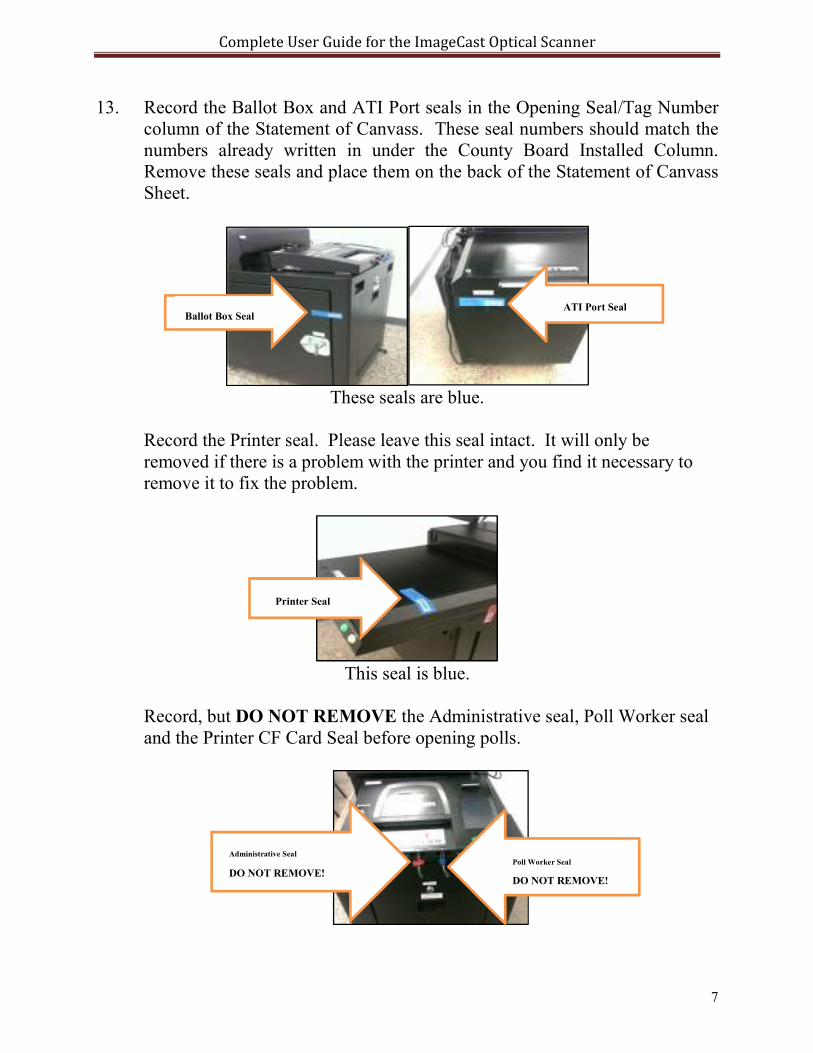
13. Record the Ballot Box and ATI Port seals in the Opening Seal/Tag Number
column of the Statement of Canvass. These seal numbers should match the
numbers already written in under the County Board Installed Column.
Remove these seals and place them on the back of the Statement of Canvass
Sheet.
These seals are blue.
Record the Printer seal. Please leave this seal intact. It will only be
removed if there is a problem with the printer and you find it necessary to
remove it to fix the problem.
This seal is blue.
Record, but DO NOT REMOVE the Administrative seal, Poll Worker seal
and the Printer CF Card Seal before opening polls.
Ballot Box Seal ATI Port Seal
Printer Seal
Poll Worker Seal
DO NOT REMOVE!
Administrative Seal
DO NOT REMOVE!

Complete User Guide for the ImageCast Optical Scanner
8
2 Democrats/2Republicans inspectors MUST sign the Statement of Canvass
form.
14. Locate the gray metallic bag from the items removed from the ballot box.
Inside is the security key and additional blue seals that you will use to
replace any seals removed throughout the day.
15. At this point the ImageCast should be beeping and the LCD screen will read
“Please insert Security Key to Authenticate Election Files”. Place the
security key on the security key pad of the scanner. Hold the key there until
the beeping stops and the LCD screen displays a password page.
KEY IN “12345678” AND PRESS ENTER
Printer CF Card Seal
DO NOT REMOVE!

Complete User Guide for the ImageCast Optical Scanner
9
16. After the password is entered correctly, the LCD will read “Key Accepted.
Validating Election Files. Please Wait.”
17. In the next screen you will be asked to verify that the date and time are
correct.
HOW TO ADJUST DATE AND TIME (ONLY IF NECESSARY)
To adjust date and time, you will move through five screens. You can only adjust one category at a time
(ex: Year, Month, Day, Hour, and Min). You will use the “+++” to increase numbers and “---“ to decrease
numbers. Hit either button as many times as it takes to get to the desired number. When you get to the
number you are looking for, you will select “DONE.” Selecting “DONE” will take you to the next
category screen until you are finished.
Once the date and time are confirmed, the boot up process will continue with the familiar checklist module.
Allow the process to hit 100%. DO NOT HIT “NEXT.” If you hit “Next,” the scanner will function but
the ballot marking device will not properly boot up.
If the date and time are correct, Select
“YES.” The Module Checklist will appear.
If you need to adjust the date and time,
Select “NO.” You will need to follow the
instruction below for adjusting date and
time.

Complete User Guide for the ImageCast Optical Scanner
10
18. The Administrative menu will appear. Select “Open Poll.”
19. When asked if you would like to print a status report or a zero report, choose
ZERO.
20. A report will print out after you select “Zero”. Please tear the tape off.
Verify that the Total Scanned and Total Voters read “0”. Also, make sure
there is a “0” count for every candidate on the ballot. Verify that the
headings at the top of the report list the correct voting location and all the
election districts within the site. Once this information is confirmed to be
correct, make sure 4 inspectors sign the report. Two from each party. If the
information is wrong, please call the BOE. Place the printed tape in the
clear, plastic folder with the Statement of Canvass.
PRESS
PRESS

Complete User Guide for the ImageCast Optical Scanner
11
21. When asked if you would like to print more copies. Press NO.
22. The LCD Screen will read “System Ready.” This screen will remain on the
LCD unless the security key is used to access the administrative menu.
23. Verify that the ballot box is empty. Lock the ballot box door. Now reseal
the ballot box door with an extra blue seal found in the gray metallic bag.
Please record the new seal number under the column labeled “Inspector –
Installed Daytime Replacement Seal/Tag Number”.

Complete User Guide for the ImageCast Optical Scanner
12
24. Connect the yellow/blue ATI cord into the ATI port at the back of the
printer. The other end of the ATI cord will be plugged into the top of the
ATI paddle.
25. Plug headphones into the ATI paddle. The port will be on the bottom of the
paddle and labeled “Audio”.
26. Please keep the ballot box key and the security key on the polling inspector
table for easy access.
The following supplies should also be left at the inspector table:
• Rocker Paddles
• Sip & Puff device
• ADA sanitary supplies
• Envelope of ADA ballot paper
• Plastic Envelope containing Statement of Canvass, Poll Site Ballot
Transmittal, and opening machine tapes
• Duct tape
• Gray metallic bag with extra blue seals
27. The ImageCast is now set up for the day. If there are any problems, please
call the Board of Elections.

Complete User Guide for the ImageCast Optical Scanner
13
VOTING USING THE IMAGECAST SCANNER
1. Two Inspectors, one from each political party, should jointly supervise
verifying voter sign in at the inspector’s table. When a person approaches
the Inspectors’ table, complete the following steps:
� Greet the Voter
� Ask the voter his or her name, Party Enrollment (if Primary) and
residence address.
2. Check the Poll Book to determine if the voter is ELIGIBLE to vote. At a
primary, look in each separate section of the book. Do NOT give any
voter a ballot until you confirm they are eligible to vote in your election
district. Once you have found the voter by name in the poll book, confirm
the voter’s address to what is printed in the book.
3. Turn the book toward the voter and have them sign in the space provided.
Compare this signature to the original, pre-printed signature. If the
signatures match, the Election Inspectors must initial in the space provided
to the right of the page next to voter’s name, address, etc.
4. Rip off a ballot at the perforation of the ballot book.
5. In the Poll Book, record the Stub number in the space provided after the
voters name.
6. Hand the voter their ballot, a BOE issued pen and a privacy sleeve. Instruct
the voter to mark their ballot in one of the privacy booths set up in the
polling location.
• Be sure the voter understands they must completely fill in the oval next to
the candidate’s name they wish to vote for.
• In a general election, remind the voter of any propositions on the back of the
ballot.
• Instruct the voter to deposit their voted ballot into the scanner of the
ImageCast to cast their ballot.
STUB #
Complete User Guide for the ImageCast Optical Scanner
14
If the ballot is entirely voted; the ballot will automatically be cast with a message
on the LCD screen reading “Ballot has been successfully cast.”
If there are any potential problems with the way a ballot was marked, the
ImageCast will notify the voter with a warning message on the LCD screen. There
are four warning scenarios:
OVER VOTE WARNING:
This warns the voter that they have selected more than the allowed number of
candidates for the contest(s) indicated.
A detailed warning message will appear on the LCD screen. The message will
contain specific information on which contests were over voted. The message will
also instruct the voter that he/she can obtain a new ballot from an inspector or cast
the ballot as is, with contests that will not be counted.
The voter can ignore the over vote warning and cast the ballot by hitting the green
Cast button.
If the voter feels that they made a mistake, they can hit the red Return button, to
return the ballot. The voter must turn in the spoiled ballot to the inspector in order
to obtain a new ballot. The inspector will give the voter a “spoiled ballot”
envelope to seal their ballot into. The inspector must retain all spoiled ballots and
send them back to the Board of Elections at the end of the night in the manila
spoiled ballot envelope. Voters are only allowed two spoiled ballots. Record the
second and/or third stub number in the poll book in the designated spot for
additional ballots. Make sure to mark the ballot as a “replacement” on the stub.
BLANK BALLOT:
This warns the voter that they made no selections on the ballot.
If the blank ballot was intentional, the voter can cast the ballot by hitting the green
Cast button.
If the voter feels that they made a mistake, they can hit the red Return button, to
return the ballot and make any corrections to it. After correcting the ballot, the
voter must deposit the ballot into the scanner again.

Complete User Guide for the ImageCast Optical Scanner
15
AMBIGUOUS MARKS:
This warns the voter that one or more ambiguous marks were detected on the
ballot. For example, if the voter did not fill in the oval dark enough, or there are
stray marks on the ballot, this warning will be produced.
The scanner will automatically return the ballot. No option to cast this ballot will
be given. The LCD screen can provide the voter with a list of contests where the
ambiguous marks were found. The voter must review the ballot. Perhaps darken
the ovals, or turn the spoiled ballot in, to obtain a new ballot.
MISREAD BALLOT:
This warns the voter that the scanner could not read the ballot. The ballot may
have been inserted into the scanner incorrectly, or the ballot may be physically
damaged (torn or folded, for example)
The scanner will automatically return the ballot. The voter must acknowledge this
warning by pressing the “ok” button on the LCD. Re-insert the ballot into the
scanner.
If the ballot repeatedly generates this message, the voter must spoil the ballot and
obtain a new ballot. Record the second and/or third stub number in the poll book
near the original stub number in the poll book. Make sure to mark the ballot as a
“replacement” on the stub.
VISUAL REVIEW OF BALLOT
PLEASE NOTE: If the voter would like a visual review of the selections they
made, one can be given on the LCD screen of the scanner. The voter must
request a review prior to inserting the ballot into the scanner.
To enable a ballot review, the inspector will complete the following steps:
• Place the security key to the security key pad on the scanner. The
administrative menu will appear.
• Select Ballot Review.
• Select Visual.
• The voter then inserts their ballot into the scanner. A review of their
selections will be displayed on the LCD. They must then hit the green Cast
button or the red Return button.

Complete User Guide for the ImageCast Optical Scanner
16
PREPARING FOR AN ACCESSIBLE VOTING SESSION (BMD/AUDIO)
1. A voter requesting to use the BMD portion of the machine will need to sign
in the poll book. You will ask them their name, find them in the poll book,
and have them sign the poll book. Write BMD followed by their counter
number in the space provided for the stub number. For an example, the first
person to vote in the polling place on the BMD would be labeled as BMD 1
while the fifth person using the BMD would be BMD 5.
2. Remove the privacy sleeve and insert a sheet of blank ballot stock in the
printer slot. Once the paper is fed in, reattach the privacy sleeve.
3. Please place ear covers on the headphones.
4. Set the voter up with the headphones and the ATI paddle. If they request to
use the Sip and Puff or rocker paddles, please refer to those sections in this
manual. Inform the voter that some basic instructions will be given to them
once the accessible voting session begins.
Complete User Guide for the ImageCast Optical Scanner
17
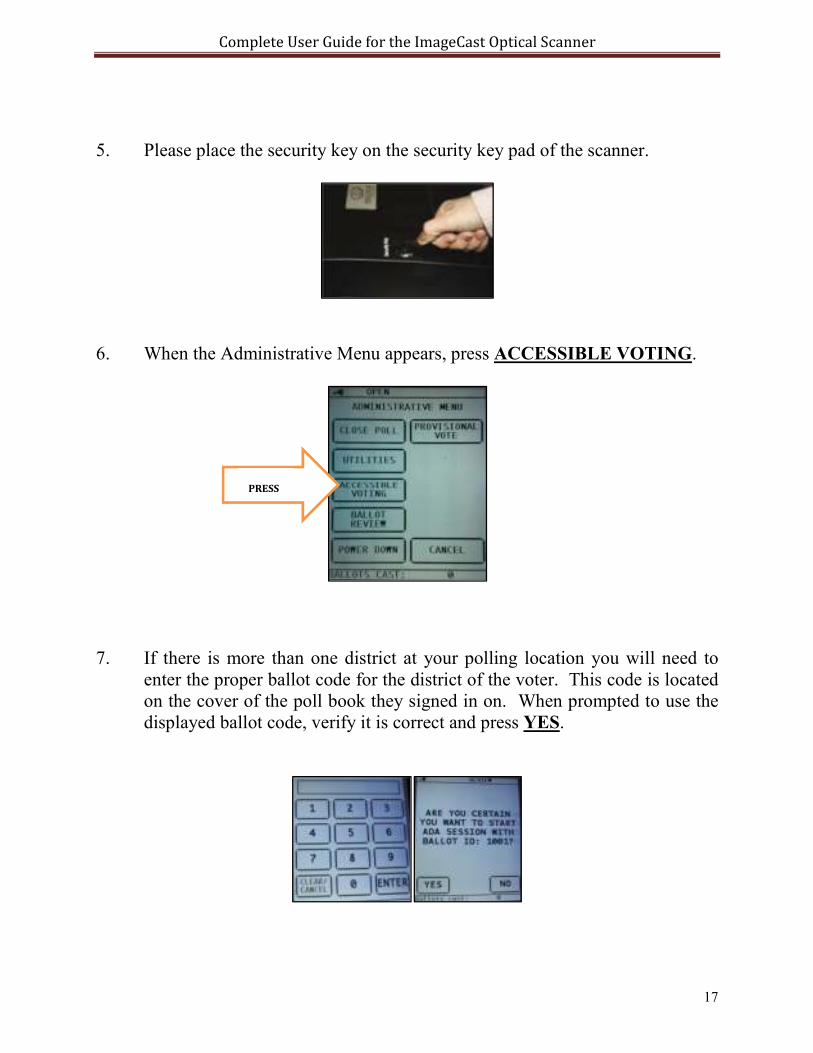
5. Please place the security key on the security key pad of the scanner.
6. When the Administrative Menu appears, press ACCESSIBLE VOTING.
7. If there is more than one district at your polling location you will need to
enter the proper ballot code for the district of the voter. This code is located
on the cover of the poll book they signed in on. When prompted to use the
displayed ballot code, verify it is correct and press YES.
PRESS

Complete User Guide for the ImageCast Optical Scanner
18
8. Once the voter begins their voting session please return to the table. You
should be able to view the three status lights displayed on the side of the
ImageCast. These lights will help you monitor the voter’s progress without
disrupting them. Use the table below to help decipher the different light
patterns.
Light Definitions Table
Solid Red Unit is starting up or is not operational.
Flashing Green Unit is ready for use by the next voter.
Alternating Green
and Amber
Voter is navigating/marking their ballot.
Flashing Amber Voter’s ballot is being printed.
Solid Amber Voter has inserted their ballot and is reviewing it.
Alternating Amber
and Red
Unit has an error and is not functioning.
Alternating Red,
Amber and Green
Voter has pressed the Help button. A bipartisan inspector
team should ask the voter how they can assist them.
Note: The Inspectors will have to monitor this during an
Audio session.
9. At this point the voter will mark the ballot using the ATI paddle. If the voter
needs assistance during the voting session, one Democrat and one
Republican will need to respond to them.

Complete User Guide for the ImageCast Optical Scanner
19
10. After the voter has finished voting, the ballot will begin to print. This will
take a few minutes to complete. If the voter asks, you can assist them in
taking off the privacy sleeve with the printed ballot in it.
Do not let the voter leave once the ballot is printed. They still need to
cast the ballot in the scanner!
11. The printed ballot needs to be inserted into the scanner.
PLEASE NOTE: If the voter would like additional audio/visual review, they
must inform an inspector prior to depositing their ballot into the scanner.
To enable an accessible review, the inspector will complete the following steps:
• Place the security key to the security key pad on the scanner. The
administrative menu will appear.
• Select Ballot Review.
• Select Accessible Voting.
• The voter then inserts their ballot into the scanner. A review of their
selections will be read back through the headphones and displayed on the
monitor if they choose. The voter will then accept or reject the ballot using
the ATI or other interface device.

Complete User Guide for the ImageCast Optical Scanner
20
12. Once the ballot has been printed, and the voter changes their mind about
their candidate choices, they will have to go through a voting session all
over again. The ballot needs to be marked “SPOILED”, placed in a “Spoiled
Ballot” envelope and given to the inspector to retain.
13. Please discard the ear covers on the headphones after the voting session is
completed.

Complete User Guide for the ImageCast Optical Scanner
21
SETTING UP THE SIP & PUFF
If a voter requests to use the Sip & Puff during an accessible voting session you
will need to follow the instructions below. Please note: if a voter wants to use
their own device and it is compatible (meaning it can be plugged into the port at
the bottom of the ATI paddle), then they are more than welcome to use it.
1. Remove the Sip & Puff from the clear case. Use the clamp to attach the
device to the voter’s chair or where ever it is comfortable for the voter.
2. Connect the black cord into the small circular port on the Sip & Puff. Attach
the other end of the cord to the ATI paddle in the port labeled “Sip and
Puff”.
3. Put on the sanitary gloves. Use the alcohol wipe to clean off the clear end of
the Sip & Puff before attaching the green filter and straw to it.

Complete User Guide for the ImageCast Optical Scanner
22
4. Follow steps one through thirteen of Preparing for an Accessible Voting
Session instructions.
5. After the voter is finished, discard the green filter and straw. Use an alcohol
wipe to clean off the clear end of the Sip and Puff. The rest of the unit is
placed back into the clear case.
Note: A voter using the Sip & Puff device has two options. Sipping is
comparable to the red “X” on the ATI paddle. Sipping selects the candidate.
Puffing is comparable to the blue “DOWN ARROW” on the ATI paddle.
Puffing allows the voter to move through the ballot.

Complete User Guide for the ImageCast Optical Scanner
23
SETTING UP THE ROCKER PADDLES
If a voter requests to use the rocker paddles during an accessible voting session
you will need to follow the instructions below. Please note: If a voter wishes to
use their own device and they are compatible (meaning it can be plugged into the
port at the bottom of the ATI paddle), then they are more than welcome to do so.
1. Pull the rocker paddles out of the clear case. They are two paddles
connected together by a black cord. One of the paddles is blue and labeled
with an R for right while the other is red and labeled with an L for left.
2. Ask the voter how they will be using the paddles and place them
appropriately.

Complete User Guide for the ImageCast Optical Scanner
24
3. To connect the rocker paddles to the ATI, please plug the end of the rocker
paddle cord into the port of the ATI labeled “Sip & Puff”.
4. Follow steps one through thirteen of Preparing for an Accessible Voting
Session instructions.
5. Once the voter has cast their ballot, please return the rocker paddles to the
clear case they came in.
Note: A voter using the rocker paddles has two options. The red paddle is
comparable to the red “X” button on the ATI and allows the voter to select.
The blue paddle is comparable to the blue “DOWN ARROW” on the ATI
and allows the voter to move to the next candidate.

Complete User Guide for the ImageCast Optical Scanner
25
CLOSING THE POLLS
1. Check the emergency ballot box for any emergency ballots. Also check the
printer for any additional ballots or blank paper by pressing the red release
button located under the printer. If there are any ballots, a republican and a
democrat inspector will need to scan the emergency ballots after 9:00pm.
2. Use the security key to return to the Administrative Menu.
3. On the Administrative Menu, press CLOSE POLL. A screen will now
appear asking if you “are certain you wish to close the polls”. Select YES,
and the close polls report will automatically begin to print. Tear off the
report and have 4 inspectors (two of each party) sign off on the report. Fold
the tape up and put in the clear, plastic envelope with your statement of
canvass.
PRESS
PRESS

Complete User Guide for the ImageCast Optical Scanner
26
4. When asked if you wish to print more copies, select NO unless there is a
poll watcher(s). In this case, print an additional copy and allow the poll
watcher(s) to record the results.
5. Now select POWER DOWN on the Administrative Menu. When asked
“are you certain you wish to shut down tabulator,” please select YES.
6. Break the blue seal and unlock the ballot box door. Turn off the machine by
pressing the power button on the UPS/APC box.
PRESS
PRESS

Complete User Guide for the ImageCast Optical Scanner
27
RECORD THE FOLLOWING ON THE
“POLL SITE BALLOT TRANSMITTAL FORM”
7. Remove all the ballots in the main ballot box and place them in the blue
canvass bag. Collect any ballots containing write-ins (they are diverted to
the right hand side of the ballot box) and place in the RED folder. The red
write-in folder will also be returned in the blue canvass bag.
8. Count any unused ballots and place them in the blue canvass bag.
9. Count and then place any spoiled ballots in the MANILA envelope and
place in the blue canvass bag.
10. If you were unable to scan your emergency ballots, place them in the
MANILA Emergency Ballot folder and place in the blue canvass bag.
11. Count the number of voted and unused affidavit ballots issued and place
them in the blue canvass bag.
12. The blue canvass bag with all the ballots will be returned in the lowest
district black suitcase. If everything does not fit in one blue canvass bag or
one black suitcase, please divide up the contents between the lowest two
districts blue bags and black suitcases.
13. Unplug the machine. Remove all duct tape from the floor and throw it
away. Roll up the extension cord and place it back inside the ImageCast.
Clamp the power cord back into place with the clip.

Complete User Guide for the ImageCast Optical Scanner
28
14. Unplug the headphones from the ATI paddle. Close up the headphones and
return them to the clear case.
15. Unplug the ATI cable from the ATI port, and ATI paddle. Return the ATI
cord and paddle to the clear case.
16. Remove all privacy covers and return them to the ballot box.
17. Set aside two blue seals, the black suitcase seal and the Statement of
Canvass. Return the clear case containing all of the devices, to the ballot
box. Close and lock ballot box door. Return the ballot box door key in the
metallic bag.
18. BE SURE THE POWER TO THE MACHINE IS COMPLETELY OFF
BEFORE STARTING THIS NEXT STEP! TO ENSURE YOUR
MACHINE IS COMPLETELY POWERED OFF, LOOK FOR TWO
LITTLE LED LIGHTS ON THE FRONT OF THE SCANNER. IF
THE MACHINE IS POWERED OFF CORRECTLY, THE LIGHTS
WILL NO LONGER BLINK.

Complete User Guide for the ImageCast Optical Scanner
29
19. Using scissors cut the POLLWORKER (BLUE) seal off the scanner.
Open the door by pushing the clip to the left. Press the little black button
just to the right side of the slot to release the card. Place the card in the red
canvass bag found in the front of the lowest districts black suitcase. Do not
lock the red canvass bag up in the black suitcase! Inspectors in the city will
drop this off to the Board of Elections along with their black suitcases.
Inspectors in the towns will hand off the red canvass bag to a memory card
runner that will visit the polling site. Keep the bag handy!
BE SURE TO CLOSE AND SNAP THE “POLLWORKER DOOR” WHEN
FINISHED REMOVING THE MEMORY CARD
20. Place new seals on the ballot box door and the ATI port. Record these
new seal numbers, along with the other three remaining seals, under the
“Polls Closed” column of the Statement of Canvass. Return the Statement
of Canvass to the clear plastic folder.
SEALS THAT NEED TO BE REPLACED AND RECORDED:
BALLOT BOX SEAL ATI PORT SEAL
PUSH THIS
BUTTON

Complete User Guide for the ImageCast Optical Scanner
30
SEALS THAT NEED TO BE RECORDED:
21. Replace the foam pieces back on the machine.
22. Put the cover back on ImageCast and secure it with the zip-tie provided in
the metallic bag.
23. Check your return of supply form to make sure all supplies are returned in
the correct bag and sealed in the black suitcase.
PRINTER SEAL
PRINTER
CF CARD
SEAL
ADMINISTRATIVE
SEAL

Complete User Guide for the ImageCast Optical Scanner
31
CONCERNS AND PROBLEMS TO AVOID:
1. The ImageCast must be opened and ready for voters
• General Election 6AM
• Primary Election 12 Noon
2. DO NOT refer to the ImageCast machine as the “disabled
machine”. ALL voters may use this machine.
3. DO NOT discourage any voter from using the BMD
portion of the ImageCast.
4. NEVER use the term “Handicapped” to a voter. They are
“persons with a disability”.
5. Make sure to attach the power cord to the cord clip located
on the side of the Imagecast. DO NOT TRY TO PUSH
THE “POWER CORD” INTO THE BALLOT BOX.
6. DO NOT BREAKDOWN THE BLACK MONITOR
PRIVACY SCREEN. Return them to the ballot box intact.
7. A Reminder: the ADA paper envelope will be taken out of
the ballot box as you set up the machine for the day. All
VSS must know where to find this envelope. So keep it
handy. An accessible voting session requires one sheet of
blank paper from this envelope. Do not put in a printed
ballot from the ballot booklets!