Embed Size (px)
Citation preview

Complete Guide toSelectingConstructing & Managing a Concrete Pool
SPATA Gold,
Silver and
Bronze Award
Winners for
Self Build Pools
Concrete Pool Guide st3 july24pjw 24/5/07 8:51 am Page 2

Contents
Introduction and Planning 2
Preparation & Excavation 10
1
2
Construction 123
Finishing 204
Pool Care 265
Whilst the authors, All Swim Ltd and the publishers
have taken every care to verify the information
contained in this publication, they cannot be held
responsible for any consequential loss or damage
however caused.
If at any time you are uncertain about any technical
information or procedures, please do not hesitate to
contact All Swim on 0800 0268415.
The authors and their agents accept no responsibility
for any injury or action arising from the use of these
instructions.
All technical information in this guide is correct at
time of print.
Complete Guide to
SelectingConstructingand Managinga Concrete Pool
1
Concrete Pool Guide st3 july24pjw 24/5/07 8:51 am Page 4

Why Buy a Swimming Pool?Year after year we promise ourselves more leisure time as well as more time spent with
the family, - we rarely achieve it. The pace of modern life is so fast that it’s easy to
neglect these things and that’s why one of the best ways to make the most of this
valued time is to add a swimming pool to your garden. Pools are no longer a luxury
purchase and are readily available in a vast range of designs at affordable prices. Just
imagine how much fun your children would have splashing around with their friends,
or how much you and your family would enjoy swimming in the privacy of your own
back garden.
Can I Build it Myself?Unlike a liner pool, a concrete pool requires a more complex type of construction, this
is because in a concrete pool it is the walls that form the waterproof membrane,
because of this we would strongly recommend that all concrete pools are undertaken
only with the aid of a reputable builder.
Do I need Planning Permission?The majority of authorities do not insist on planning permission for the building of a
private swimming pool in the back garden of a domestic property in the U.K. However,
if you are thinking of erecting an enclosure over the pool, then permission is required
and you are advised to consult your local authority before commencement.
Even though planning permission is not normally required All Swim recommend that
you contact your local authority before commencement of any work in order to check
the requirements of local legislation.
What Size Pool Should I Buy?The size of pool you choose is related to the area available in your garden as well as
any budgetary constraints, but we find the most popular size of pool is 9m x 4.3m (30ft
x 14ft). The advantage of building a concrete pool is that it can be built to any size or
shape to suit your requirements, and as a rule the length of a pool is twice its width
and the depth is dependent on your requirements – are you planning to use the pool
for diving, serious swimming or having fun. When choosing the depth of your pool it is
worth bearing in mind, that the water level is normally kept half way up the skimmer
– which is approximately 4” from the top of the pool wall. Therefore, in a 4ft (1.2m)
deep pool, the water depth is only 3’ 8” (1.1m).
When you finally decide on a pool size you will need to consider such points as –
access for heavy machinery, underground cables and pipes, overhead telephone and
electricity wires, high water table as well as the ground structure.
When choosing a concrete pool it is strongly recommended that a Roman End (Inbuilt
Step Unit) is added to the pool, as it is not only aesthetically pleasing but also allows
easier access in and out of the pool.
Introduction & Planning1
2
Concrete Pool Guide st3 july24pjw 24/5/07 8:51 am Page 5

Why Choose a Concrete Pool?Concrete pools are still the ultimate choice and are composed of a concrete shell with
steel reinforcement. A concrete pool can be built to any size, shape or depth, and you
can choose from an almost infinite variety of beautiful mosaic tiles or pacelite (white
cement premixed with small marble chippings sized from 1mm – 3mm) to decorate the
pool interior.
A well-constructed concrete pool can stand the test of time but with the exceptional
stresses and strains it is subjected to it is imperative that the correct installation
methods are followed.
Shaped and Free Form PoolsAs mentioned previously concrete pools can be built to any size or shape and a
popular variation of the standard rectangular pool is the ‘L’ shape where the main pool
is designed for adults whilst the remainder is devoted to steps and an area for children.
Other popular concrete pool shapes are the ‘Kidney’ and the ‘Teardrop’; although
there are limitless different shapes, there is no great advantage in a shaped pool
except that the finished appearance is completely individual. It must be remembered
when choosing an unusual shape pool the cost of covers will be substantially more
than for the standard rectangle shape.
What is Supplied in the Kit?An All Swim Do-It-Yourself swimming pool kit includes the rapid sand filter and a
correctly sized swimming pool self priming pump, skimmer(s), inlet(s), outlet, main
drain, pipework, valves and sufficient plumbing fittings to position the filter within ten
feet (3m) of the pool, multi-water test kit, pool maintenance kit and initial chemicals.
What we do not provide are the basic building materials such as cement, sand,
chippings, concrete blocks or reinforcing bar, however, all these materials are
obtainable locally from a builders merchants.
For detailed contents of All Swim Pool Kits please consult the current concrete pool kit
price list.
Note: All Swim D-I-Y pool kits comply with the latest S.P.A.T.A (The Swimming Pool and
Allied Trade Association) standards relating to the supply of D-I-Y pool kits: -
SPATA is the nationally recognised organisation, which sets the standards within
the swimming pool industry and ensures that member companies maintain those
standards providing the customer with the highest quality of product and
service. Members trade under a code of ethics offering customers both formal
safeguards and the peace of mind essential when you want to place an order. All
members are carefully vetted on application and must have at least three years
proven experience in the industry. Member’s work is periodically inspected to
ensure that they comply with SPATA standards and are able to maintain the
quality of work expected of them.
3
Concrete Pool Guide st3 july24pjw 24/5/07 8:51 am Page 6
Introduction & Planning1
4
Indoor Pools
More and more of our customers decide to build their pools indoors giving a truly all
year round swimming experience. All Swim can supply all the technical expertise and
specialist equipment for indoor pool construction – If you are considering an indoor
pool please ask for our additional indoor pool literature.
Delivery
The basic pool kit is normally despatched free of charge within 3 working days (UK
Mainland only). However, coping stones and heating systems are sent direct from the
manufacturer and usually take approximately 14 days. All customers are notified of
approximate delivery dates upon receipt of order.
Location of a Pool
Once you have decided to invest in a swimming pool, the next decision is where to
position it, and as always there are a few points to consider –
(a) The pool should be positioned away from trees so that it benefits from the sun
as much as possible. A pool located in a suntrap not only helps keep the
bathers warm but will also help cut heating costs. It also has the advantage
that it will help to reduce the amount of work required during the autumn
months.
(b) The proximity of the house for entertaining, changing facilities, toilets and
electrical services.
(c) The filtration plant will require housing as well as an electrical supply; -
sometimes an existing building can be utilised.
(d) Availability of water supply – usually a garden hose to the nearest outside tap
is all that is required.
(e) The provision of a sitting area at the shallow end of the pool.
(f) It is also preferable to have pedestrian access to the pool at the shallow end.
(g) Shelter from the wind.
(h) If a gas, electric heater or heat pump is used the cost of electrical or gas
connections must also be considered.
Concrete Pool Guide st3 july24pjw 24/5/07 8:51 am Page 7
Running Costs
Today’s pools properly looked after, may need never be emptied, except in the event of
the need for major repair work.
Once the pool has been commissioned for the season, the pool water must be regularly
treated to maintain chemical, physical and biological standards, whilst minimising the
risk of damage to pool fittings and equipment. There is a wide choice of water
treatment products available to help maintain pool water safely and easily and many
of them are also environmentally friendly. Taking an average 9m x 4.3m (30’ x 40’)(10,000 gallons) pool, the cost of chemicals would be as little as £150 - £200 for a full
year. With experience, and the help of modern technology and products, pool
maintenance should take only 20-30 minutes each week in the summer. Off-season, a
pool, which has been professionally closed down, may only need one or two checks
during the winter months.
To help you in the running of your pool All Swim supply a complete guide to pool
water care with all pool kits.
Optional Extras
When building a swimming pool it is important to consider the optional extras
available, as in some instances once the decision is made the products can then only
be installed with a great deal of effort and expense. Some products to consider are:-
Diving Boards, Slides, Counter Current Systems, Heating, Underwater Lighting, Mosaic
Tiles and Deluxe Coping Stones. These products are covered here and also in more
detail in our supplementary leaflet, but if you require further information, please don’t
hesitate to contact us.
Diving Boards
Diving Boards add to the enjoyment of a pool but are not as popular as they used to
be a few years ago, this is because the trend for home swimming pools has tended
towards shallower, smaller pools in which more family games are played.
NOTE: If you are considering a diving board you must have a pool 32’ x 16’ (10m x 5m)
or larger with a minimum water depth of 8’0”(2.13m) also if you decide you wish to
dive in the pool then the following rules must be followed – All pools that have a
water depth of less than 4’9”(1.5 metres) are deemed to be non-diving, where the
depth in the deep end is between 4’9”(1.5m) and 8’(2.13m) only diving off the side of
the pool, up to a freeboard of 6”(150mm) is to be permitted. In this case no diving
board can be fitted but the diving point must be clearly marked on the paving or
coping above the deep end wall. Therefore, diving must only take place from the
diving point. Where the water depth in the deep end is 8’(2.13m) or greater a diving
board can be fitted but the diving point must be clearly defined.
For further information on installing a diving board please contact us for the latest
recommendations.
5
Concrete Pool Guide st3 july24pjw 24/5/07 8:51 am Page 8

Slides
Pool slides are becoming more popular as not only do they give more fun to all the
family they only require a 3’ (0.91m) water depth. They are available either straight or
curved and come fitted with water jets to enhance the fun!
Exercise Swimming
Swimmers who want a pool for exercise should enquire about counter current
swimming units, these units produce an adjustable current of water to swim against,
so enabling a long swim to be carried out in a small pool: - this is gaining rapid
popularity with all ages.
Mosaic Tiles
Before completing the inside of your pool the final finish needs to be decided upon,
you could either paint or pacelite the pool or alternatively the whole pool can be
finished in mosaic tiles. This finish gives a very sophisticated look to the pool and any
design can be used, with many standard designs such as dolphins, sea horses,
penguins, etc. readily available at reasonable prices.
Pool Heating
Heating a pool is not as expensive as most people imagine, the use of a solar blanket
without any other form of heating can raise the pool temperature by as much as 10
degrees Fahrenheit in the summer and must be considered to be a basic component of
any pool.
However, to obtain the maximum and most pleasurable use of your pool, we would
recommend the installation of a pool heating system, there are three systems available
that All Swim would recommend: -
a) A Heat Exchanger working from the domestic heating boiler
b) An independent Pool Heater
c) Calorex Heat Pump
Introduction & Planning1
6
Concrete Pool Guide st3 july24pjw 24/5/07 8:51 am Page 9

Heat Exchanger SystemThis is a simple system using a stainless steel heat exchanger, which utilises the
domestic heating system. The return to the pool flows through the heat exchanger
whilst the primary flow and return are run from the domestic heating boiler. The pool
water connections to the heat exchanger are made with high temperature unions and
a thermostat inserted into the heat exchanger is linked to a motorised valve, which
controls the pool water temperature. It is necessary with this system to keep the high
temperature primary flow and return mains as short as possible in order to prevent
high heat losses.
This system has the advantage of being the lowest capital cost system for pool heating,
however, your existing boiler’s output must be sufficient for the pool size chosen.
Independent Pool Heater
Oil or gas fired heaters are normally used when the pool is either too far away from
the house for the central heating boiler to be utilised, or when the output required is
greater than the existing domestic boiler. Electric heaters can be used when oil and gas
are not available but this type of heating has a comparatively high running cost.
Calorex Heat Pump
Calorex heat pumps are designed for maximum efficiency by making use of dormant
heat within the outside air. A heat pump takes full advantage of this heat and
upgrades it substantially before transferring it to the pool water. The illustration shows
typical ratios between heat output and input at various temperatures.
Sunshine is not essential for this system as all it needs is air; A heat pump can work
with air temperatures as low as -15 degrees centigrade (dependent on the model
chosen) and then becomes more efficient as the temperature increases.
A heat pump can be sited inside a filter house with adequate ventilation or outside on
a concrete plinth adjacent to it. Only basic electrical work and simple plumbing
connections are required to connect the unit to the return pipework after the filter.
The capital cost of this system is comparable to that of a boiler installation, however,
once installed this system provides pool owners with the pool temperature they want
at an economical running cost.
Note: A suitably qualified engineer must carry out any work associated with the
heating of your pool.
7
Concrete Pool Guide st3 july24pjw 24/5/07 8:51 am Page 10

Introduction & Planning1
Underwater Light
An underwater light certainly transforms a pool during the late evening. One light is
sufficient for pools up to 28’ x 14’(8.5m x 4.3m) but the larger pools do benefit from
the use of two lights. Alternatively fibre optic lighting can create a stunning effect for
a pool with both underwater and perimeter lighting systems available. There are six
colour choices which can either be set on one colour or cycle through each colour at a
chosen speed. This really does add an extra dimension to your swimming pool.
Autoleveller
An automatic pool water top up system which eliminates the need for manual top up
from a hose pipe.
Automatic Pool Covers
Numerous types of automatic pool covers are now available which can add to the
benefits of ease of use and safety to the pool area.
Coping Stones
A complete set of 9” reconstituted Portland stone copings are included in your pool kit
but we would recommend, except where space is very limited, that the deluxe
12” coping be used as the extra fine finish and width will really set off the finish to
your pool. Alternative finished edging stones in natural stone are also available.
8
Concrete Pool Guide st3 july24pjw 24/5/07 8:51 am Page 11

Safety
Finally and most importantly you must always consider the safety aspects of your
swimming pool, particularly when small children, non-swimmers, the elderly or pets
are involved. If you have opted for a pool with a deep end it is imperative that all
swimmers are aware of its start point and depth, it is recommended if a hopper pool
has been chosen that the start of the deep end is visibly identified.
In order to make a pool as safe as possible it is recommended that it be supervised at
all times. Also where possible :–
a) Locate the pool close to the house and in full view of the kitchen window.
b) Install a safety cover.
c) Install safety fencing, with a fully lockable gate.
d) Install preformed step units so if in the unfortunate event someone falls in, these
shallower steps are an easier way out.
e) Make available floating Lifebuoys.
9
Concrete Pool Guide st3 july24pjw 24/5/07 8:51 am Page 12

PreparationMarking Out the Pool
Whatever the shape or size of the pool the following instructions for construction are
virtually identical, with the obvious differences in the digging and setting out.
The pool builder has first to determine the length, width and depth required. Once this
is done the inside dimensions of the pool are marked out along with the excavation
lines, which are 0.5m larger all the way around, to allow for the thickness of the walls
and backfilling.
Excavation
It is obviously easier and quicker to have a mechanical excavator from your local plant
hire company, than to excavate by hand. Nowadays, excavators can be hired which
will pass through 36”(915mm) openings but the smaller the excavator, the longer the
work will take. A J.C.B. could easily dig a pool 9m x 4.3m (30ft x 14ft) in a day, if the
soil is being retained on site.
If the soil can be used in your garden to form a bank, or to fill in a lower area of
ground, it will be a lot easier and cheaper than if the soil has to be removed from site
by the use of hired lorries, obviously the removal of soil from site also extends the
time taken to dig the pool.
The finished deepest point of your pool is a matter of personal choice as is the length
of the shallow area of the pool, but should be more than 1/3rd of the length of the
pool. However, if it is preferred a slope can start immediately at the shallow end wall
and continue to the deep end wall (Wedge shaped).
The pool should be dug 12”(310mm) deeper that the finished dimensions to allow for
the concrete floor which is 9”(230mm) thick, and for a 3”(75mm) layer of stone rejects
(often called crush and run). If, however, the subsoil proves wet and unmanageable it
is best to use a 3”(75mm) layer of dry-lean concrete which is porous and allows the
passage of water, whilst giving a dry surface to enable work on the pool to proceed.
The floor should be shaped perfectly, and if any places are dug too deep then these
must be filled with dry-lean concrete to prevent any settlement.
If the subsoil is gravel, shale or good draining rocky strata, the layer of rejects is not
necessary and the concrete floor can be laid direct onto the subsoil. In these
conditions the over dig would be 9”(230mm) instead of 12”(310mm), except around the
perimeter of the pool where the concrete foundations of the pool walls are always
12”(310mm) in depth.
Note: All the dimensions quoted are assuming that the pool is built on normal stable
subsoil conditions. If the pool is on unstable foundations, e.g. running sand, consult
for special instructions.
Preparation & Excavation2
10
Concrete Pool Guide st3 july24pjw 24/5/07 8:51 am Page 13

11
Water Problems
Often when digging the deep end of a pool, water will seep slowly into the excavation or, not
so commonly an underground spring may discharge a large volume of water. If this happens
it must be dealt with immediately in order to keep the excavation dry during construction of
the pool:-
Over dig the pool by a further 24”(600mm) at the deepest point. Purchase three concrete
manhole sections and fit these one on top of the other in the pit. Trench a 1.5”(38mm) ABS
pipe from the centre of this under pool drainage point to outside the curtilage of the pool.
Then cap the end of the pipe and drill into it on one side so that there are numerous small
holes for drainage. The pit is then surrounded by reject shingle to allow easy entry of water.
Drainage Pit
A diaphragm pump, which can be hired from your local plant hire company, is connected to
the end of this pipe and the excavation is pumped dry. A second pipe and pump can be
connected to this drainage pit if necessary.
Concrete Pool Guide st3 july24pjw 24/5/07 8:51 am Page 14
Poor Finishie Tiles/Render
Low SuctionLevel With Pool Finish
Hydrostatic Relief Valve
Collection TubeHardcore Gravel
ConcretePool Shell
Ensure That FittingIs Flush With Pool Finish
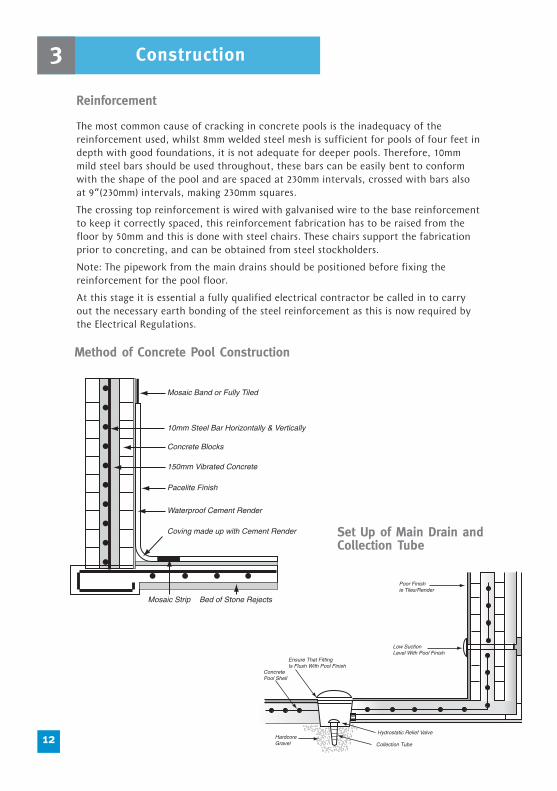
Reinforcement
The most common cause of cracking in concrete pools is the inadequacy of the
reinforcement used, whilst 8mm welded steel mesh is sufficient for pools of four feet in
depth with good foundations, it is not adequate for deeper pools. Therefore, 10mm
mild steel bars should be used throughout, these bars can be easily bent to conform
with the shape of the pool and are spaced at 230mm intervals, crossed with bars also
at 9”(230mm) intervals, making 230mm squares.
The crossing top reinforcement is wired with galvanised wire to the base reinforcement
to keep it correctly spaced, this reinforcement fabrication has to be raised from the
floor by 50mm and this is done with steel chairs. These chairs support the fabrication
prior to concreting, and can be obtained from steel stockholders.
Note: The pipework from the main drains should be positioned before fixing the
reinforcement for the pool floor.
At this stage it is essential a fully qualified electrical contractor be called in to carry
out the necessary earth bonding of the steel reinforcement as this is now required by
the Electrical Regulations.
Construction3
12
Mosaic Band or Fully Tiled
Concrete Blocks
Pacelite Finish
Waterproof Cement Render
Mosaic Strip Bed of Stone Rejects
Coving made up with Cement Render
150mm Vibrated Concrete
10mm Steel Bar Horizontally & Vertically
Set Up of Main Drain andCollection Tube
Method of Concrete Pool Construction
Concrete Pool Guide st3 july24pjw 24/5/07 8:51 am Page 15

Location Of Main Drain and Pipework
The main drain is then placed in the middle of the deep end floor ensuring that the top
1.5”(40mm) will be above the finished concrete slab in order to allow for the rendering
and the finishing.
Run the pipe from the main drain through the concrete floor slab to outside the
proposed pool walls, then bring the pipe up to the top of the pool. The end of this pipe
should then be sealed to prevent any debris falling into the pipework during
construction. Similarly, the main drain sump pot should also be protected to keep out
concrete during construction.
Note: The main drain comes fitted with a hydrostatic relief valve and collection tube.
It is important that this collection tube goes down into the under pool drainage pit.
Concreting
With the main drain positioned and all the reinforcing fabricated, the floor is now
ready for concreting. It is always best to carry out all the concreting on the same day,
as this results in the strongest floor, if this is not possible it should be done on
successive days.
It is always advisable to use ready mix concrete as the proportions and mixing are
always constant. The concrete should be mixed to a strength of 30-newt and when it is
delivered it needs to be a 50-slump mix (this is the amount of moisture that is
required). When moving the concrete into the pool it is important that it goes well
under the reinforcement, at this stage plenty of labour needs to be available to help
with the levelling and vibrating.
After the concrete has been positioned it must be vibrated with a vibrating poker, the
purpose of vibrating the concrete is to thoroughly agitate the mixture into a perfect
dense structure with no possibility of air spaces or air pockets. This vibrating is done
by pushing a vibrating poker into the concrete, the water then rises through the
cement over a circle of approximately 27”(700mm), this is then texture brushed and
finished forming a good base for rendering.
Vibrating pokers can be hired from most plant hire companies.
13
Concrete Pool Guide st3 july24pjw 24/5/07 8:51 am Page 16

Construction3
14
Pool Pipe Layout
ShallowEnd
Main Drain
Skimmer
18' x 9' 20' x 10' 24' x 12'
2"2"2"
32' x 16' 38' x 16' 40' x 20'
LowSuction
Return Inlet
ShallowEnd
Main Drain
Skimmer
28' x 14' 30' x 14'
LowSuction
Return Inlet
ShallowEnd
Main Drain
Skimmers
LowSuction
Return Inlet
(8.5m x 4.3m) (9.0 x 4.3m)
(35mm)
(50mm)
(5.5m x 2.8m) (6.0 x 3m) (7.3 x 3.7m)
(10m x 5.0m) (11.5m x 5.0m) (12.2m x 6.0m)
Concrete Pool Guide st3 july24pjw 24/5/07 8:51 am Page 17
15
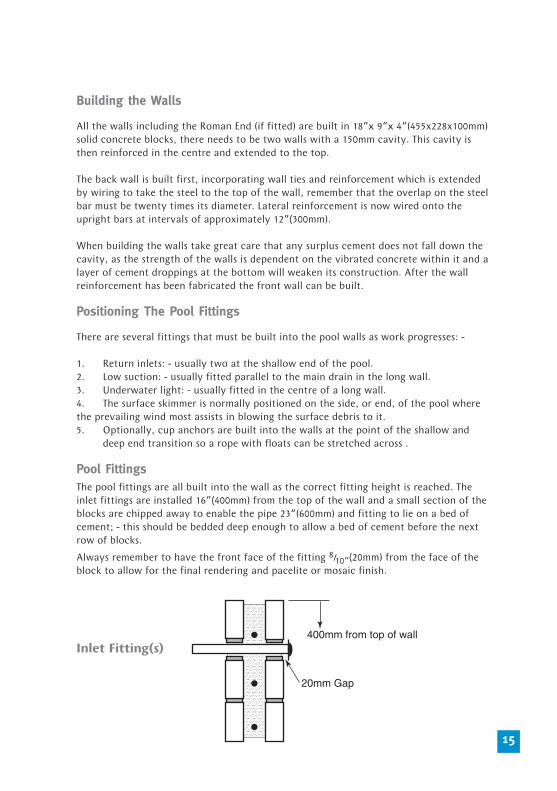
400mm from top of wall
20mm Gap
Inlet Fitting(s)
Building the Walls
All the walls including the Roman End (if fitted) are built in 18”x 9”x 4”(455x228x100mm)
solid concrete blocks, there needs to be two walls with a 150mm cavity. This cavity is
then reinforced in the centre and extended to the top.
The back wall is built first, incorporating wall ties and reinforcement which is extended
by wiring to take the steel to the top of the wall, remember that the overlap on the steel
bar must be twenty times its diameter. Lateral reinforcement is now wired onto the
upright bars at intervals of approximately 12”(300mm).
When building the walls take great care that any surplus cement does not fall down the
cavity, as the strength of the walls is dependent on the vibrated concrete within it and a
layer of cement droppings at the bottom will weaken its construction. After the wall
reinforcement has been fabricated the front wall can be built.
Positioning The Pool Fittings
There are several fittings that must be built into the pool walls as work progresses: -
1. Return inlets: - usually two at the shallow end of the pool.
2. Low suction: - usually fitted parallel to the main drain in the long wall.
3. Underwater light: - usually fitted in the centre of a long wall.
4. The surface skimmer is normally positioned on the side, or end, of the pool where
the prevailing wind most assists in blowing the surface debris to it.
5. Optionally, cup anchors are built into the walls at the point of the shallow and
deep end transition so a rope with floats can be stretched across .
Pool FittingsThe pool fittings are all built into the wall as the correct fitting height is reached. The
inlet fittings are installed 16”(400mm) from the top of the wall and a small section of the
blocks are chipped away to enable the pipe 23”(600mm) and fitting to lie on a bed of
cement; - this should be bedded deep enough to allow a bed of cement before the next
row of blocks.
Always remember to have the front face of the fitting 8/10”(20mm) from the face of the
block to allow for the final rendering and pacelite or mosaic finish.
Concrete Pool Guide st3 july24pjw 24/5/07 8:51 am Page 18

Construction3
16
25mm below top of wall
Concrete infillReinforcement
Soil
Surface Water Skimmer
The diagram shows that the top
of the skimmer throat is
approximately 1”(25mm) below
the top of the wall, leaving
room for 1”(25mm) of cement
finish on top.
As the body of the skimmer is
outside the pool it is advisable
that a box of concrete is built
around it with reinforcements
tied to the pool wall, this is a
safeguard against subsidence of
the backfill, which could break
the body of the skimmer.
Surface Skimmer
The surface skimmer has two functions. It removes surface debris, flies etc., from the
pool surface and is also used as the vacuum point for attaching the vacuum kit for
cleaning the bottom of the pool. The skimmer is positioned in the centre of the long
wall, on the side opposite the prevailing wind, so that the wind will assist in blowing
the surface debris to it. If the pool is so placed that the prevailing wind blows down
the length of the pool, it is good practice to have a second skimmer installed on the
short side of the pool as well as in the normal position.
The skimmer is supplied in two basic parts, the extended throat and the main body of
the skimmer; however, it does come with a fitting for the connection of the necessary
pipework. The throat and main body must be glued together before fixing the skimmer
in the pool wall: - Clean all surfaces to be joined then paint the surfaces with the
solvent cement. Hold both faces together until firm. When set, paint the internal and
external edges with solvent and leave for 24 hours to fully set. The skimmer rim is then
bedded onto a bed of cement with cement carefully tamped around the sides and
placed 25mm down from the top of the pool wall. The front of the skimmer should
project 20mm from the face of the blockwork to allow for rendering and mosaic.
The water level in the pool is normally kept half way up the mouth of the skimmer and
in consequence the water level of the pool is approximately 4” from the top of the
pool wall.
Concrete Pool Guide st3 july24pjw 24/5/07 8:51 am Page 19

17
Underwater Light
An underwater light certainly transforms a pool during the late evening. One light is
sufficient for pools up to 28’x14’ (8.5m x 4.3m) but the larger pools do benefit from the
use of two lights. When deciding the position of a pool light, one should always try
and install the light on the side of the pool nearest the house or the sitting area; In
this position the pool will be lit up without seeing the light itself. Therefore, the best
position for the light, if it complies with the previous rule, is in the centre of one of
the long walls.
When positioning the underwater light make sure it is installed 34”(875mm) down from
the underside of the pool coping as in the event of bulb failure the light unit can then
be lifted out of the water and changed above water level. The conduit from the light is
then attached to the niche with a waterproof joint which should then lead out
through the back wall up to the deck box fitted at paving level. The niche should be
thoroughly concreted with reinforcement and tied into the pool walls in the same
manner as the skimmer.
Transformer to Deck Box Cable Runs
Although detailed instructions are given with the transformer the following
information is essential.
a) Under no circumstances can the cable lengths between the deck box and
transformer be less than 16’ (5 metres) or more than 164’ (50 metres).
b) The cable run between the transformer and the deck box is to be in 2 Core, 4 or
6mm square conductor, PVC sheathed, and PVC insulated, single wire armoured
cable.
c) The four output charges of the transformer allow a range of lengths of the above
cables to be used to connect the transformer to the deck box. The range is as
follows:-
Length of Cable Run In :-
4mm2 6mm2 10mm2
13V 5m - 8m 6m - 12m 13 - 25m
14V 9m - 12m 12m - 17m 26 - 38m
15V 12m - 16m 18m - 24m 26 - 38m
16V 16m - 20m 24m - 30m 39 - 50m
Concrete Pool Guide st3 july24pjw 24/5/07 8:51 am Page 20

Construction3
18
Deck Box
Cable to Transformer
Conduit
Light Niche
20mm
Cup Anchorcemented intoblockwork
Underwater Light
Cup Anchors
If required a small hole is knocked into the top course of blocks and the cup anchors
are cemented into position. The face of the anchor should be 8/10” (20mm) proud of the
block face to allow for the render and finishes.
Infilling between Walls
The strongest part of the walls is the 6”(150mm) of vibrated reinforced concrete
between the two rows of blocks, but before this can be carried out, it is policy to
allow the inner wall a few days to set. Whilst the wall is setting supporting buttresses
are erected at 3m intervals in order to help stabilise them.
The infill is then carried out with Ready mix concrete with a minimum 30 Newt mix (as
per the floor). This infill is shovelled around in layers of about 12”(300mm) and
vibrated with the poker to ensure even consolidation, again for maximum strength it is
preferable that this operation is completed on the same day.
Note: It is important that the infilling is not done in layers of greater than 12”(300mm)
Concrete Pool Guide st3 july24pjw 24/5/07 8:51 am Page 21
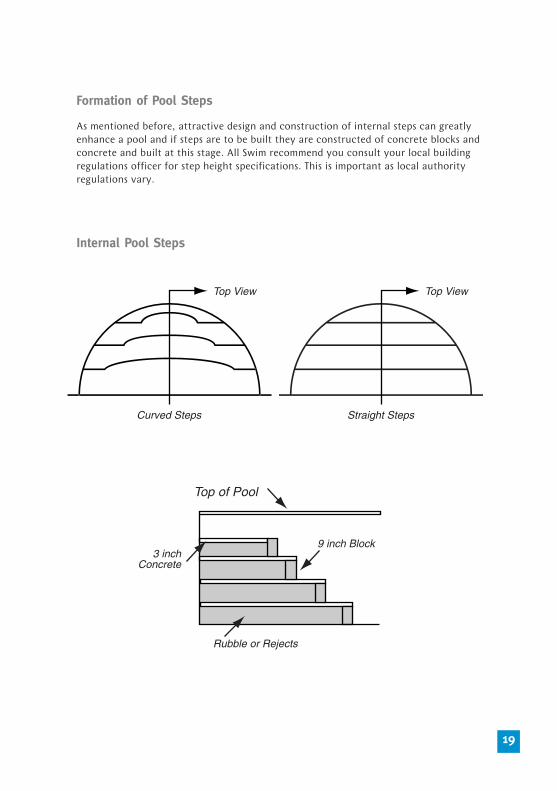
Formation of Pool Steps
As mentioned before, attractive design and construction of internal steps can greatly
enhance a pool and if steps are to be built they are constructed of concrete blocks and
concrete and built at this stage. All Swim recommend you consult your local building
regulations officer for step height specifications. This is important as local authority
regulations vary.
Internal Pool Steps
19
Curved Steps
Top View
Straight Steps
Top View
3 inchConcrete
Top of Pool
9 inch Block
Rubble or Rejects
Concrete Pool Guide st3 july24pjw 24/5/07 8:51 am Page 22
Finishing4
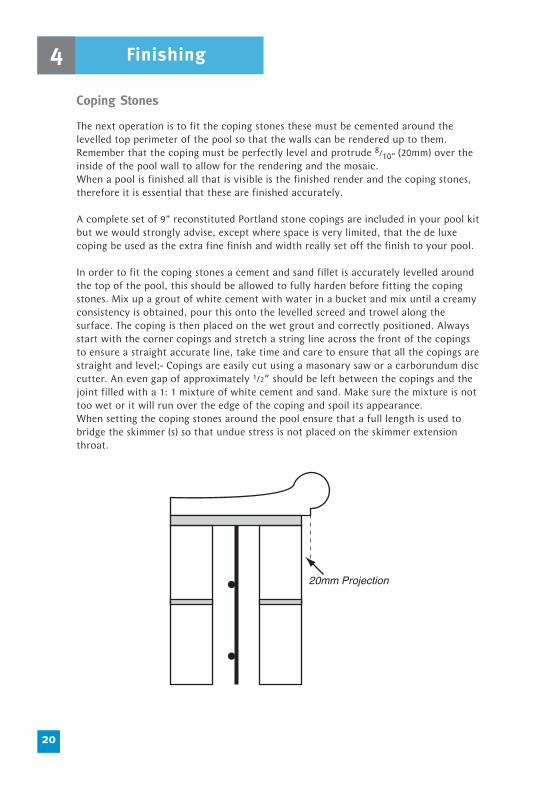
Coping Stones
The next operation is to fit the coping stones these must be cemented around the
levelled top perimeter of the pool so that the walls can be rendered up to them.
Remember that the coping must be perfectly level and protrude 8/10” (20mm) over the
inside of the pool wall to allow for the rendering and the mosaic.
When a pool is finished all that is visible is the finished render and the coping stones,
therefore it is essential that these are finished accurately.
A complete set of 9” reconstituted Portland stone copings are included in your pool kit
but we would strongly advise, except where space is very limited, that the de luxe
coping be used as the extra fine finish and width really set off the finish to your pool.
In order to fit the coping stones a cement and sand fillet is accurately levelled around
the top of the pool, this should be allowed to fully harden before fitting the coping
stones. Mix up a grout of white cement with water in a bucket and mix until a creamy
consistency is obtained, pour this onto the levelled screed and trowel along the
surface. The coping is then placed on the wet grout and correctly positioned. Always
start with the corner copings and stretch a string line across the front of the copings
to ensure a straight accurate line, take time and care to ensure that all the copings are
straight and level;- Copings are easily cut using a masonary saw or a carborundum disc
cutter. An even gap of approximately 1/2“ should be left between the copings and the
joint filled with a 1: 1 mixture of white cement and sand. Make sure the mixture is not
too wet or it will run over the edge of the coping and spoil its appearance.
When setting the coping stones around the pool ensure that a full length is used to
bridge the skimmer (s) so that undue stress is not placed on the skimmer extension
throat.
20
20mm Projection
Concrete Pool Guide st3 july24pjw 24/5/07 8:51 am Page 23

Mosaic Band
Timber Batten usedto hold Mosaic Band
Mosaic Strip laid to give guide for Pacelite
Wall of Pool
WaterproofRender
The inside of the pool shell must now be rendered with a waterproof render
incorporating “Sealocrete”, “Vandex” or equivalent. However, before beginning all
corners should be rounded out with a 6”(150mm) cove of waterproof cement and all
surfaces must be pasted with a mixture of cement and water that incorporates
waterproofer; this sticky mixture will act as a bond between the rendering and the
wall or floor preventing it “lifting” off the surface.
When rendering with either the waterproof render or the pacelite only mix up small
batches of material and keep it well “knocked up” otherwise the materials will go
hard and become unusable. The walls should be rendered first followed by the floor
and all the surfaces of the steps. The first render should be scratched when nearly
dry to give a good key for the final pacelite and mosaic finish.
If the top of the pool walls and edge of the floor are going to be finished with a
10”(250mm) band of coloured vitrified glass mosaics and the remainder being
finished with pacelite a thin batten of wood 1/4“ (5mm – 7mm) thick is nailed around
the pool with the bottom of the batten 10”(250mm) from the underside of the
coping, another batten is also fitted in a position on the floor. Before finishing the
pool with the pacelite, the area should be pasted with a slurry of water and white
cement to ensure perfect bonding, the pacelite is then rendered up the walls to the
batten. When the pacelite on the walls has set, the battens on the walls are then
removed. The sheets of mosaic are then fitted, they come supplied in sheets of
12”(300mm) square with the face of the mosaic covered with brown paper, these are
cut into 10”(250mm) and 2”(50mm) strips which are then fitted around the top
perimeter of the pool and fixed with Cerafix or other swimming pool tile adhesive.
Similarly the 2”(50mm) strips are fitted around the perimeter of the cove on the
floor of the pool. This bottom strip of mosaics then gives a perfect guide for the
thickness of the pacelite, which is then rendered on the floor and steps.
The following day, or when dry, the brown paper covering the face of the mosaics
can be thoroughly wetted with a brush and water, and removed, the mosaics are
then ready for grouting with white cement or a special white grouting. The grouting
is made into a paste and rubbed over the entire mosaic front with the surplus being
cleaned off with a damp rag or sponge. 21
Detail of Pool ShowingInternal Finishes
Concrete Pool Guide st3 july24pjw 24/5/07 8:51 am Page 24
Finishing4
Mosaic on Steps
After waterproof rendering the steps it is a suggestion that a 2”(50mm) mosaic band
is used to make a defining line on the front edge of each step. This looks very
effective and marks the front of each step for safety reasons. This mosaic band
should be set 3”(75mm) away from the front of the steps to allow for the final
pacelite finish.
Pacelite
Pacelite is mixed with water to form a fatty mix and rendered onto the pool surfaces
using wooden or stainless steel floats to a thickness of 1/4“ (5 – 7mm); - this is to
prevent any iron staining to the bright white finish. Pacelite must never be allowed
to dry too quickly or crazing of the surface can result, dampening of the pool
surfaces is essential in hot weather until the pool is filled. Within twenty-four hours
of rendering the pacelite should be lightly buffed with a silicon carbide disc on a
flexible head, it is most important after buffing to remove all the pacelite dust from
the pool as this can set hard and block up the main drain and pipework.
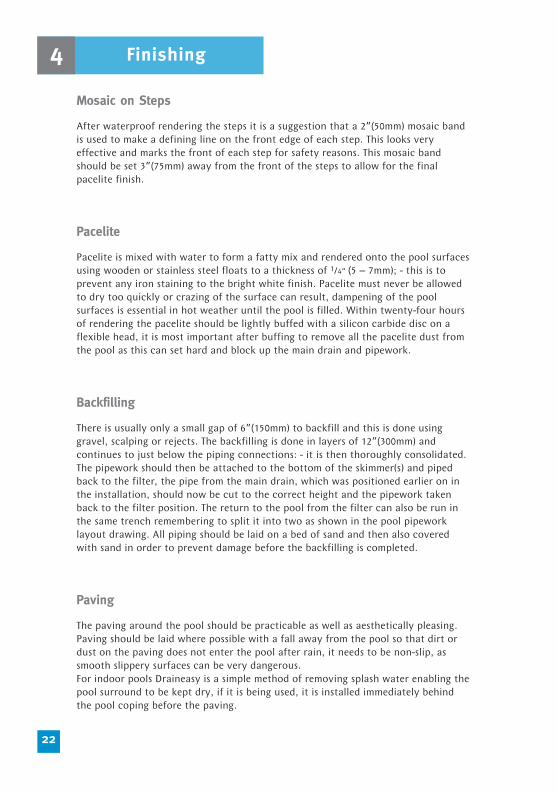
Backfilling
There is usually only a small gap of 6”(150mm) to backfill and this is done using
gravel, scalping or rejects. The backfilling is done in layers of 12”(300mm) and
continues to just below the piping connections: - it is then thoroughly consolidated.
The pipework should then be attached to the bottom of the skimmer(s) and piped
back to the filter, the pipe from the main drain, which was positioned earlier on in
the installation, should now be cut to the correct height and the pipework taken
back to the filter position. The return to the pool from the filter can also be run in
the same trench remembering to split it into two as shown in the pool pipework
layout drawing. All piping should be laid on a bed of sand and then also covered
with sand in order to prevent damage before the backfilling is completed.
Paving
The paving around the pool should be practicable as well as aesthetically pleasing.
Paving should be laid where possible with a fall away from the pool so that dirt or
dust on the paving does not enter the pool after rain, it needs to be non-slip, as
smooth slippery surfaces can be very dangerous.
For indoor pools Draineasy is a simple method of removing splash water enabling the
pool surround to be kept dry, if it is being used, it is installed immediately behind
the pool coping before the paving.
22
Concrete Pool Guide st3 july24pjw 24/5/07 8:51 am Page 25

Plant RoomThe pool equipment needs to be sited in a shed or outhouse, preferably the building
needs to be located as close to the pool as possible and must have an electrical
supply. It also needs to be of an adequate size to contain the pool pump, filter and
heating system; ideally there would be enough space to gain easy access to all sides
of the pool filter.
Fitting the Filter
The filter and the required filter media are supplied separately and to fill your filter
place the funnel supplied with the filter over the standpipe and then begin filling
the filter with the media, make sure that the media is added carefully to the filter
and bedded down well around the filter fingers in the bottom of the filter, ensure
that no media gets into the vertical standpipe of the filter. After placing the media
wash off the threads at the top of the filter with a hose pipe to prevent any sand
damage, when the multi-port valve is fitted remove the funnel.
When starting the filter for the first time ensure the multi-port valve is in the
backwash position to prevent any of the fine carrier in the media being deposited in
the pool. For more information see ‘Priming the Pool Pump’.
A filter should be run continually in the season to ensure perfect water quality, we
do not advise the intermittent use of a filter by the use of a time clock, as we find
the water quality suffers and problems ensue.
23
Filter
Waste
Pump
Heater
Main Drain/Low Suction
Skimmer
Skimmer
Return to Pool
Denotes location of valve
Concrete Pool Guide st3 july24pjw 24/5/07 8:51 am Page 26

The directional lever on your filter is known as a multi-port valve. Its purpose is to
control water flow to perform various functions. The lever should not be moved to
any particular function without first switching off the swimming pool pump. The
nameplate on the multi-port valve indicates the six possible positions:-
1) Filter
The normal operating position for the filter when the pool water is being circulated
through the sand bed contained in the filter chamber. The filter sand bed removes
fine suspended matter as water passes through the filter before being returned to
the pool.
2) Backwash
A rise of about 5lbs above the clean running pressure indicates the filter requires
backwashing. The positioning of the multi-port lever in the backwash position will
reverse the flow of water through the sand bed and direct the water and dirt out
through the waste port of the filter, this waste port can be permanently plumbed to
discharge over a drain or alternatively a backwash hose can be used.
The filter is run in the backwash position for approximately two minutes during
which time a visual check on the sightglass will confirm when all the dirt has been
removed.
3) Rinse
Having backwashed, or cleaned the filter, the multi-port lever is relocated to the
rinse position. The pump is run for approximately 15 seconds in this position in
order that the filter is rinsed clean. On completion of this function the multi-port
lever is returned to the filter position. The frequency of cleaning a filter would
depend on the pool usage. Having ‘backwashed’ and ‘rinsed’, ‘clean running’,
pressure should now be restored and noted.
4) Recirculation
A position rarely used. In operation, would circulate pool water via the pipework
only and not through the filter and obviously gives a higher flow rate. This is
occasionally used for rapid dispersal of chemicals to treat particular pool water
imbalances.
5) Closed
A swimming pool pump incorporates a small plastic basket to trap larger particles,
which might otherwise foul the impellor of the pump and cause damage. The basket
located in the pump housing requires a periodic clean. A drop in pressure at the
pressure gauge would indicate this basket is choked and requires cleaning. Having
switched off the pump, the multi-port lever is located in the closed position to
prevent pool water syphoning from the filter on the removal of the lid. Remember
to return the lever to normal filter position on completion and switching on of the
plant.
6) Waste
When the multi-port lever is located in this position, water is passed out through
the waste port without passing through the filter. The use of this position will lower
the pool water level rapidly after periods of heavy rain.
Finishing4
24
Concrete Pool Guide st3 july24pjw 24/5/07 8:51 am Page 27

25
Priming the Pump
When an installation is to be started for the very first time the procedure detailed
below is carried out.
As the new filter media has a fine carrier in it, it must be removed prior to the
normal use of the filter. This is done by setting the multi-port valve to ‘BACKWASH’
and carrying out the pump priming procedure. The fine carrier will then be
separated from the filter media and discharged to waste. By looking at the sight
glass on the multi-port valve, it can be seen when dirty water has been discharged.
When the sight glass is clear, turn off the pump, turn the multi-port handle to
‘RINSE’ and turn the pump on again. This setting will re-bed the filter media, whilst
still discharging the water to waste. Normally about 15 seconds is all that is required
in this position.
The pool pump must never be run without first filling the strainer pot on the pool
pump with water.
The procedure to prime the pump is as follows: -
a) Make sure the pool is full. When the water level is low it is very difficult to
prime the pump.
b) Close the valves on the skimmer(s) and low suction lines.
c) Make sure that the multi-port valve on the filter is set at ‘FILTER’.
d) Remove the pump lid and fill to the top with water. Refit the lid making sure
the lid is seating correctly on the rubber ‘O’ ring.
e) Switch on the pump and immediately open one of the valves. After a few
minutes the pump should have primed itself and start pumping. The pressure
gauge will rise. If this does not happen within three minutes, turn off the
valve, switch off the pump and go through the procedure again.
When vacuuming the pool, if the vacuum head is lifted out of the water or if the
Skim Vac Kornea is not properly seated, the pump can lose its prime. If this happens
normal procedure for priming the pump must be carried out.
If the pump will not prime there is generally an air leak in front of the pump. It
could be that the pump strainer lid is not seated correctly or the socket union
between the pump and the valves is not fully tightened.
Check that the rubber ‘O’ ring has been replaced in the socket union.
Electrical Connections
A fully qualified electrician must carry out all electrical work, please refer to
manufacturer’s handbook for installation procedures.
Concrete Pool Guide st3 july24pjw 24/5/07 8:51 am Page 28

Pool Water ‘Multi’ Test Kit
The pool water multi test kit included in All Swim pool kits, is a simple test kit which
enables the pool owner to keep the pool in perfect condition.
A Swimming pool has to be kept physically clean, which is carried out by vacuuming
the pool, the skimmer and the rapid sand filter and bacteriologically pure, which is
carried out by the addition of chlorine to the pool. All bacteria and algae entering
the pool are killed by the correct dosage of chlorine to the pool water.
The multi test kit carries out the following simple tests and allows you to keep your
pool at the following target values
Test Target Value
Chlorine Level 1.0 – 1.5ppm(parts per million)
PH (Plus also Acid & Alkali Demand) 7.4 – 7.6
Total Alkalinity 80 – 100 ppm
We suggest that all our customers refer to our free water care handbook and also
take advantage of our FREE water testing service. This service is particularly
beneficial when opening the pool in the Spring and in the Autumn when winterising
the pool. This service gives a detailed computerised water analysis and will help keep
your pool in perfect condition.
Normal Routine Maintenance
1) Skimmer Check the basket in the surface skimmer frequently, especially in the
autumn when leaves are falling, or after high winds. It is possible for
the basket to fill up with leaves, so reducing the flow of water and
consequently starving the pump of water. Check the water level in the
pool and top up when necessary. Ideally the pool water level should be
half way up the skimmer
2) Filter Check the pressure gauge. Always backwash the filter when the
pressure reads 5lbs above clean running pressure. When the filter is
dirty only 1/4 - 1/3 of the pool water is being passed through the filter
and hence a very poor filtration cycle takes place.
3) Pump Check the course strainer in the pump periodically, especially after
cleaning the pool. When replacing the lid of the pump, make sure that
there is no dirt or debris on the rubber sealing ring and that the lid is
firmly closed. A REDUCED reading on the pressure gauge is indicative of
a badly choked strainer basket. The pump refusing to prime or the
presence of fine air bubbles being blown into the pool from the pool
inlet(s), is indicative of an air leak at the pump strainer lid.
Pool Care5
26
Concrete Pool Guide st3 july24pjw 24/5/07 8:51 am Page 29

Pool Vacuum
A pool vacuum system works in a similar way to a domestic carpet vacuum, but uses
water instead of air.
Some wind blown debris is bound to sink to the floor of the pool and to remove this
most pool owners vacuum their pools once a week. The vacuum hose and extending
handle are attached to the vacuum head, the hose is then filled with water; - This is
easily done if the vacuum head is allowed to rest on the pool bottom, whilst the
hose is pushed vertically down into the water in an overhand manner, - this will
expel all the air easily. The hose is then attached to the Kornea vacuum plate, which
in turn is fitted over the skimmer basket after the removal of the floating collar.
Alternatively, the easier way to vacuum the pool is by investing in an automatic
pool cleaner, the principles of operation are the same, except you no longer need to
vacuum the pool yourself it is done automatically either day or night.
Method of Procedure
Backwash filter to ensure maximum suction.
Fit vacuum head, hose and handle.
Fill vacuum hose.
Fit Kornea to hose and attach to skimmer.
Shut off low suction valve.
Vacuum Pool.
Remember to always keep the vacuum head below water level.
Backwashing of the filter may be necessary during vacuuming, if the pool has been
allowed to get very dirty.
If while vacuuming the suction is lost completely or reduced in power, check the
following points:
Does the filter need backwashing?
Is the skimmer basket full?
Is the pump strainer basket full?
Is the Kornea seated on the basket properly?
Is the vacuum head or hose blocked with leaves?
Solar Blanket
A necessity for every pool owner - a solar blanket floats on the surface of your pool
(bubbles downward) letting the sun raise the water temperature whilst retaining the
warmth until you are ready to swim. In season it can raise the pool water
temperature by as much as 10 degrees Fahrenheit, and at night it insulates the pool
so that a major proportion of the day’s heat is retained. For owners of heated pools,
the solar blanket means big savings in pool heating costs, whilst the transmission
and retention of free solar heating reduces the cost of conventional pool heating.
27
Concrete Pool Guide st3 july24pjw 24/5/07 8:51 am Page 30

Pool Care5
Winter Debris Cover
A winter debris cover protects the pool from dirt and leaves in the winter when the
pool is not in use, it is manufactured from a strong close woven UV stabilised
polyethylene yarn that permits controlled seepage yet screens out leaves and debris.
It helps keep the pool in good condition for easy re-opening at the start of the
season. The cover is supplied 2’ (600mm) larger than the pool water area to sit neatly
over the coping stones; it is then held in place with stainless steel springs and ‘P’
anchors. Fitting the cover is very easy only necessitating the drilling of small holes
in the pool surround.
Winter Care
As stated before a pool must be kept full of water at all times. In winter as water
freezes, care must be taken to stop damage occurring to the pool as well as the
expensive pool equipment. Pool steps and diving boards should be removed and
stored, and all the pool equipment drained and serviced.
In order to ensure that the pool water stays clean and sparkling through the winter,
make sure that the pH is correct, shock dose the pool with All Swim shock granules
and add the required amount of liquid winterclear (5 Litres per 12,000 gallons).
The pool should be kept clear of leaves,this can be carried out by the use of a leaf
net or more conveniently by the fitting of a winter debris cover.
The skimmer must be winterised to prevent it being damaged by ice, this is carried
out by first removing the skimmer flap or floating collar assembly as well as the
skimmer basket. A plastic bottle securely tightened and weighted with stones is then
placed in the skimmer; - this acts as an expansion bottle and in freezing weather will
be compressed by the ice instead of cracking the skimmer body.
The pump, filter and heater must all be drained but before doing so make sure the
filter has been well backwashed to prevent the solidifying of dirt in the filter media
over the winter period.
The pump has two drain out plugs, one on the bottom of the pump strainer pot and
the other on the impellor housing, the pump is then best removed and stored in a
warm dry atmosphere for the winter in order to prevent condensation attacking the
pump windings. The filter is then drained by opening the plug at the base.
If a heat pump is fitted, the two unions should be loosened and a hosepipe inserted
into the top connection to enable the heat exchanger to be flushed out with clean
water.
Regular monitoring of the pool in winter is essential, as rainfall will increase the
level of water in the pool. If the water level rises to coping level and subsequently
freezes, it could cause lifting of the pool coping stones.
28
Concrete Pool Guide st3 july24pjw 24/5/07 8:51 am Page 31

Summary of Winter Care
Clean pool and remove all leaves
Backwash filter and reduce water level to normal height (halfway up skimmer)
Check and adjust pH
Add winterising chemicals
Take out skimmer collar assembly and basket
Put expansion bottle in skimmer
Fit winter debris cover
Drain pump, filter and heater
Store pump in a warm dry atmosphere
Ensure pool water level does not rise to coping level
Concrete Pool Guide st3 july24pjw 24/5/07 8:51 am Page 32

Link Trade ParkPenarth RoadCardiff. CF11 8TQ
T 029 20705059
F 029 20713340E [email protected] www.allswimltd.com
Concrete Pool Guide st3 july24pjw 24/5/07 8:51 am Page 1