Embed Size (px)
Citation preview

Competency Based Training (CBT) Curriculum Guide
for Shuttering Carpenter
[Market Oriented Short Term (MOST), Modular Curriculum]
Developed by: Skills and Employment Programme-Bangladesh (SEP-B)
i
Table of Contents
1. INTRODUCTION: .............................................................................................................. 1
2. AIMS: ............................................................................................................................... 1
3. OBJECTIVES: .................................................................................................................... 1
4. DESCRIPTION: .................................................................................................................. 1
5. COURSE STRUCTURE: ...................................................................................................... 2
6. DURATION: ...................................................................................................................... 2
7. TARGET GROUP: .............................................................................................................. 2
8. GROUP SIZE: .................................................................................................................... 2
9. TARGET LOCATION: ......................................................................................................... 2
10. MEDIUM OF INSTRUCTION: ............................................................................................ 2
11. PATTERN OF ATTENDANCE: ............................................................................................ 3
12. FOCUS OF THE PROGRAM:.............................................................................................. 3
13. ENTRY CRITERIA: ............................................................................................................. 3
14. FOLLOW UP SUGGESTION:.............................................................................................. 3
15. CERTIFICATE REQUIREMENT: .......................................................................................... 3
16. TRAINEES EVALUATION DETAILS: ................................................................................... 3
17. TRAINERS’ QUALIFICATION: ............................................................................................ 4
18. TRAINER – TRAINEES RATIO: ........................................................................................... 4
19. SUGGESTION FOR INSTRUCTION: ................................................................................... 4
20. LIST OF MODULES AND SUB MODULES: ......................................................................... 5
21. MODULE SEQUENCE: ...................................................................................................... 5
22. DETAILS OF MODULES AND SUB MODULES: .................................................................. 5
22.1 Module- 1: Practice Occupational Health and Safety (OHS) Procedure .............. 7
22.2 Module- 2: Apply Fundamental Skills of Shuttering Works ................................ 12
22.3 Module-3: Prepare formwork for shuttering work. ........................................... 22
22.4 Module- 4: Install Formwork for Shuttering Work ............................................. 29
22.5 Module : 5 Dismantle Formwork. ....................................................................... 42
23. LIST OF TOOLS, EQUIPMENT & MATERIALS: ................................................................. 46
24. PHYSICAL FACILITIES FOR 20 TRAINEES: ....................................................................... 47
25. LIST OF TOOLS IN THE HAND TOOL BOX: ...................................................................... 48
26. SUGGESTED REFERENCE BOOKS: .................................................................................. 48
27. CURRICULUM TERMS AND DEFINITION: ....................................................................... 48
28. CURRICULUM DEVELOPMENT TEAM: ........................................................................... 49
29. REFERENCES (FOR DEVELOPING CURRICULUMS): ........................................................ 50
31. SPECIAL NOTE FOR TRAINING PROVIDERS: .................................................................. 50
1
1. INTRODUCTION:
The TVET system has a large role to play in economic growth and social development as workforce
provider to the labor market and as provider of skills to those who are looking for employment. In the
case of Bangladesh, the TVET sector needs major reforms to ensure that issues of quality and capacity,
relevance, and access are properly addressed.
This curriculum guide is designed and developed using competency based training (CBT) approach with
the aim of producing skilled human resources for respective trade and occupation. This is based on the
tasks to be performed for Shuttering Carpenter occupation. The modules are included in course
structure section of this curriculum guide. The training methodology is learner friendly where
theoretical inputs, demonstration, guided and individual practices will be sufficiently provided to
master the skills at the industry standards. Sufficient and updated tools and equipment will also be
used during the training to provide hands on skills to the trainees. The curriculum guide is developed
in consultation with the trainer, mid-level industry supervisors, and skilled workers. Curriculum Design
Africa has been involved to develop the curriculum.
2. AIMS:
The main aim of this training program is to produce medium level skilled workforce required for the
construction sector in the formal and informal sector and create better opportunities for employment
as well as two (2) International Consultants from South Africa.
3. OBJECTIVES:
At the end of the training course, the trainees will be able to:
Apply occupational safety and health procedures at the work place
Apply fundamental skills of shuttering work
Prepare formwork for shuttering work
Install formwork for shuttering work
Dismantle formwork
4. DESCRIPTION:
This is a competency based training package for the unemployed and underemployed workforce of
Bangladesh. The curriculum is based on the tasks to be performed in the Shuttering Carpenter
occupation and subsequently these tasks have been grouped to form various modules. This will provide
flexibility for the trainees to learn one module at a time. The modules are included in the ‘Course
Structure’ section of this curriculum guide. The training methodology will be learner-centered where
theoretical input, demonstration, guided and individual practices will sufficiently be provided to the
trainees to master their skills at business and industry standards. Sufficient tools, equipment and aids
will also be used during the training to provide hands on skills to the trainees.
2
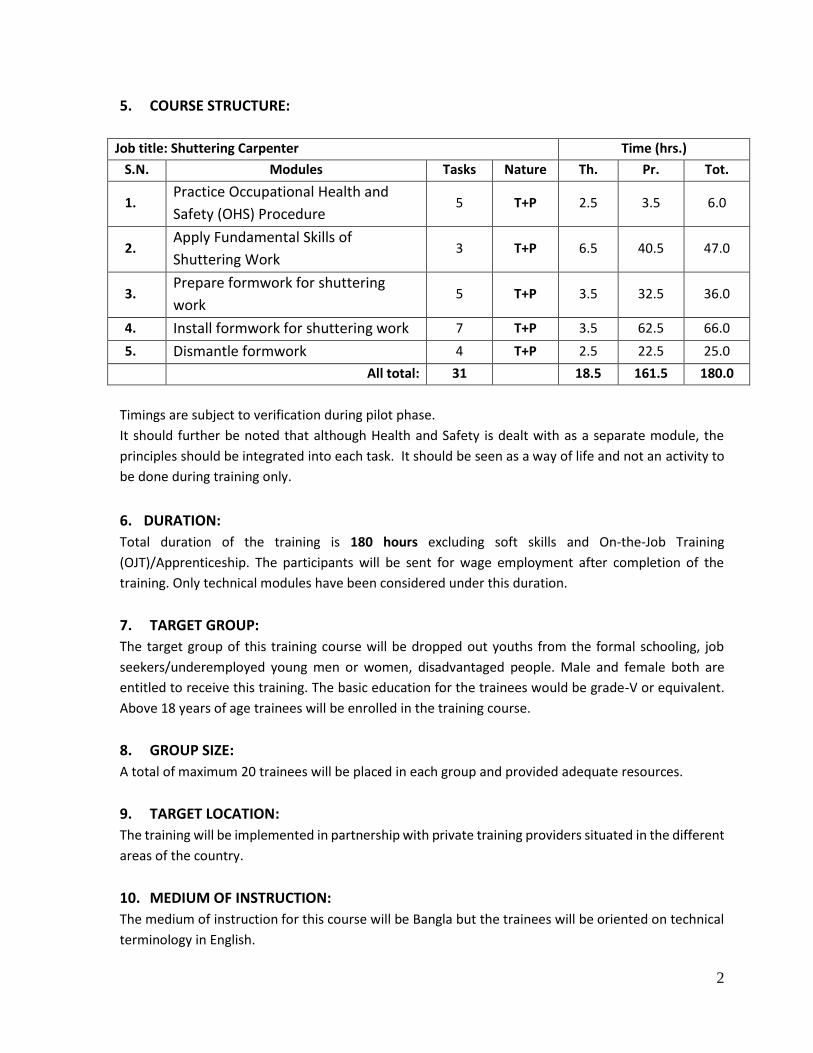
5. COURSE STRUCTURE:
Job title: Shuttering Carpenter Time (hrs.)
S.N. Modules Tasks Nature Th. Pr. Tot.
1. Practice Occupational Health and
Safety (OHS) Procedure 5 T+P 2.5 3.5 6.0
2. Apply Fundamental Skills of
Shuttering Work 3 T+P 6.5 40.5 47.0
3. Prepare formwork for shuttering
work 5 T+P 3.5 32.5 36.0
4. Install formwork for shuttering work 7 T+P 3.5 62.5 66.0
5. Dismantle formwork 4 T+P 2.5 22.5 25.0
All total: 31 18.5 161.5 180.0
Timings are subject to verification during pilot phase.
It should further be noted that although Health and Safety is dealt with as a separate module, the
principles should be integrated into each task. It should be seen as a way of life and not an activity to
be done during training only.
6. DURATION:
Total duration of the training is 180 hours excluding soft skills and On-the-Job Training
(OJT)/Apprenticeship. The participants will be sent for wage employment after completion of the
training. Only technical modules have been considered under this duration.
7. TARGET GROUP:
The target group of this training course will be dropped out youths from the formal schooling, job
seekers/underemployed young men or women, disadvantaged people. Male and female both are
entitled to receive this training. The basic education for the trainees would be grade-V or equivalent.
Above 18 years of age trainees will be enrolled in the training course.
8. GROUP SIZE:
A total of maximum 20 trainees will be placed in each group and provided adequate resources.
9. TARGET LOCATION:
The training will be implemented in partnership with private training providers situated in the different
areas of the country.
10. MEDIUM OF INSTRUCTION:
The medium of instruction for this course will be Bangla but the trainees will be oriented on technical
terminology in English.
3
11. PATTERN OF ATTENDANCE:
At least 90% attendee will be required during the theory and practical classes to appear in the internal
and final assessment.
12. FOCUS OF THE PROGRAM:
Since this course is a competency based training, the focus is given on the performance of the trainees
rather than the theoretical input. Where practicable at least 80% of the total training time is allocated
for practical training and 20% for theory.
13. ENTRY CRITERIA:
The following criteria will be considered for the individual to enter into this training program:
Education: Class 5 or equivalent
Age: 18 years and above
Physical and mental health
14. FOLLOW UP SUGGESTION:
The training institutes who implement CBT program will build rapport with the employers to link
graduates with the industries for employment.
Placement: Within one month after completion of the training program, the graduates will be assisted
in finding out appropriate and decent wage-based job relevant to the occupation concerned.
To measure the success in job, the follow up will be taken as below:
First follow-up- three months after placement of graduates in job and the next follow up six months
after placement of graduates in job.
15. CERTIFICATE REQUIREMENT:
Training service provider will certify the graduates as a Semi-Skilled Shuttering Carpenter only after
successful completion of the training program though systematic skills testing. Certification can also
be linked to the Bangladesh Technical and Education Board (BTEB) at the relevant NTVQF level through
Recognition of Prior Learning (RPL).
16. TRAINEES EVALUATION DETAILS:
Monthly evaluation will be conducted to ensure the performance of the learners. Final evaluation will
be conducted to evaluate the participants at the end of the training course. Trainees must secure 100%
marks in practical and 80% marks in theoretical examination.
4
17. TRAINERS’ QUALIFICATION:
Preference will be given to the trainer’s having the following criteria:
Minimum five years’ experience in the respective occupation
Working experience as an Instructor/Trainer
Trade course/Diploma Engineering in Civil Technology
18. TRAINER – TRAINEES RATIO:
For theoretical class, trainer and trainee ratio should be 1:20.
For practical class, trainer and trainee ratio should be 1:10.
And for final practical assessment 1:1
19. SUGGESTION FOR INSTRUCTION:
Where practicable:
At least 80% time of the course will be allocated for practical purpose
At least 20% time of the course will be allocated for theoretical purpose
Follow the safety rules
Create a friendly learning environment
Arrange the materials and equipment at the right place
Trainer/Instructor will be available in the training classes/labs in time
Take attendance of participants
Learner centered training
Encourage the participants to speak
Arrange question and answer (Q&A) sessions
Make plans for classroom / workshop instructions
Prepare lesson plans for theoretical and practical classes
5
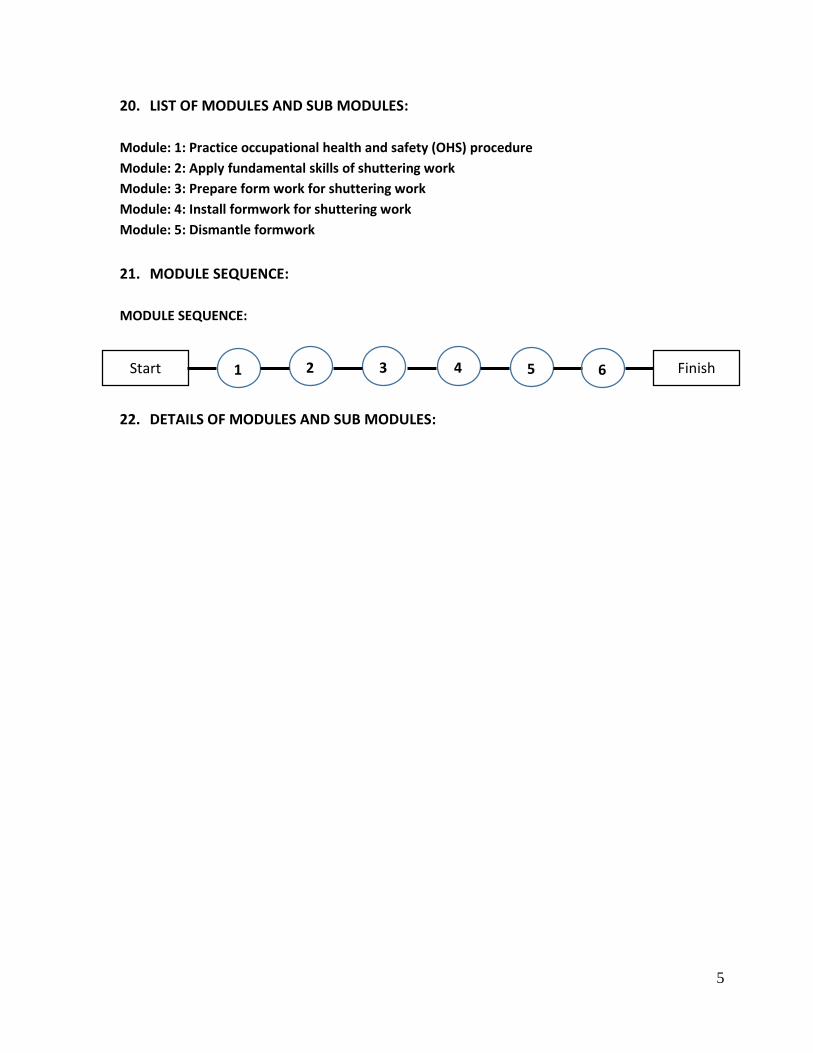
20. LIST OF MODULES AND SUB MODULES:
Module: 1: Practice occupational health and safety (OHS) procedure
Module: 2: Apply fundamental skills of shuttering work
Module: 3: Prepare form work for shuttering work
Module: 4: Install formwork for shuttering work
Module: 5: Dismantle formwork
21. MODULE SEQUENCE:
MODULE SEQUENCE:
22. DETAILS OF MODULES AND SUB MODULES:
1 2 3 4 Start Finish 5 6
6
Module 1: Practice Occupational Health and Safety (OHS) Procedure
7
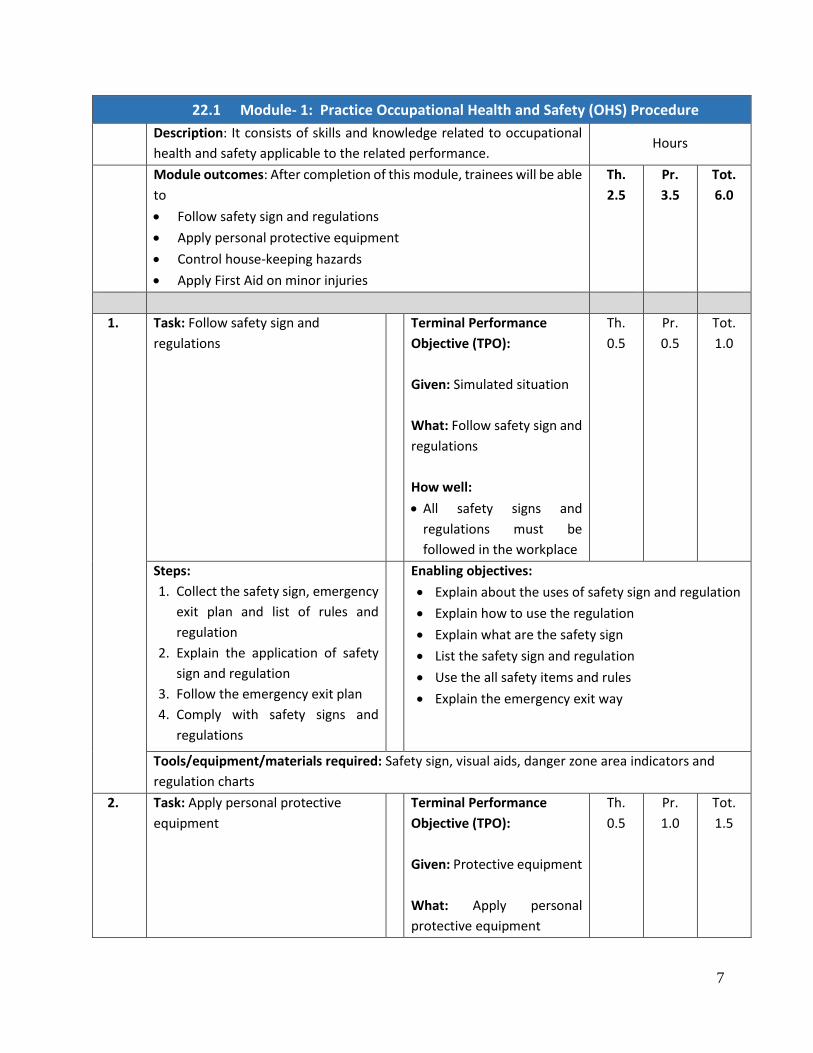
22.1 Module- 1: Practice Occupational Health and Safety (OHS) Procedure
Description: It consists of skills and knowledge related to occupational
health and safety applicable to the related performance. Hours
Module outcomes: After completion of this module, trainees will be able
to
Follow safety sign and regulations
Apply personal protective equipment
Control house-keeping hazards
Apply First Aid on minor injuries
Th.
2.5
Pr.
3.5
Tot.
6.0
1. Task: Follow safety sign and
regulations
Terminal Performance
Objective (TPO):
Given: Simulated situation
What: Follow safety sign and
regulations
How well:
All safety signs and
regulations must be
followed in the workplace
Th.
0.5
Pr.
0.5
Tot.
1.0
Steps:
1. Collect the safety sign, emergency
exit plan and list of rules and
regulation
2. Explain the application of safety
sign and regulation
3. Follow the emergency exit plan
4. Comply with safety signs and
regulations
Enabling objectives:
Explain about the uses of safety sign and regulation
Explain how to use the regulation
Explain what are the safety sign
List the safety sign and regulation
Use the all safety items and rules
Explain the emergency exit way
Tools/equipment/materials required: Safety sign, visual aids, danger zone area indicators and
regulation charts
2. Task: Apply personal protective
equipment
Terminal Performance
Objective (TPO):
Given: Protective equipment
What: Apply personal
protective equipment
Th.
0.5
Pr.
1.0
Tot.
1.5
8
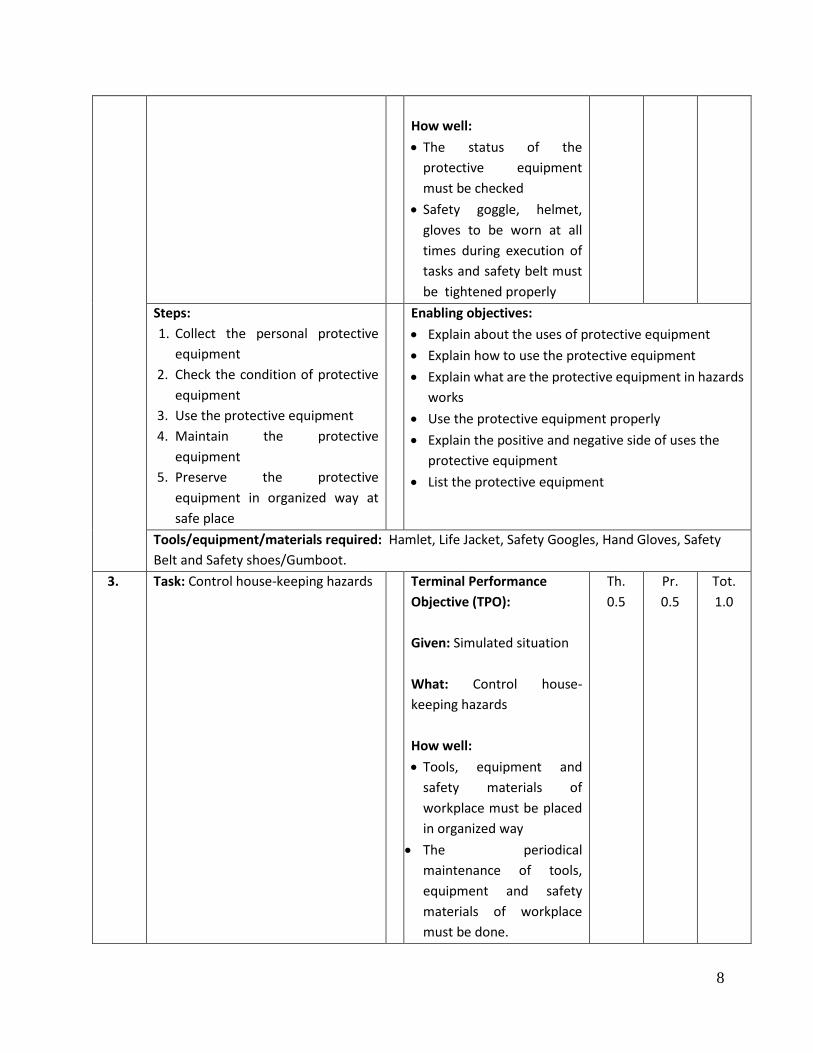
How well:
The status of the
protective equipment
must be checked
Safety goggle, helmet,
gloves to be worn at all
times during execution of
tasks and safety belt must
be tightened properly
Steps:
1. Collect the personal protective
equipment
2. Check the condition of protective
equipment
3. Use the protective equipment
4. Maintain the protective
equipment
5. Preserve the protective
equipment in organized way at
safe place
Enabling objectives:
Explain about the uses of protective equipment
Explain how to use the protective equipment
Explain what are the protective equipment in hazards
works
Use the protective equipment properly
Explain the positive and negative side of uses the
protective equipment
List the protective equipment
Tools/equipment/materials required: Hamlet, Life Jacket, Safety Googles, Hand Gloves, Safety
Belt and Safety shoes/Gumboot.
3. Task: Control house-keeping hazards Terminal Performance
Objective (TPO):
Given: Simulated situation
What: Control house-
keeping hazards
How well:
Tools, equipment and
safety materials of
workplace must be placed
in organized way
The periodical
maintenance of tools,
equipment and safety
materials of workplace
must be done.
Th.
0.5
Pr.
0.5
Tot.
1.0
9
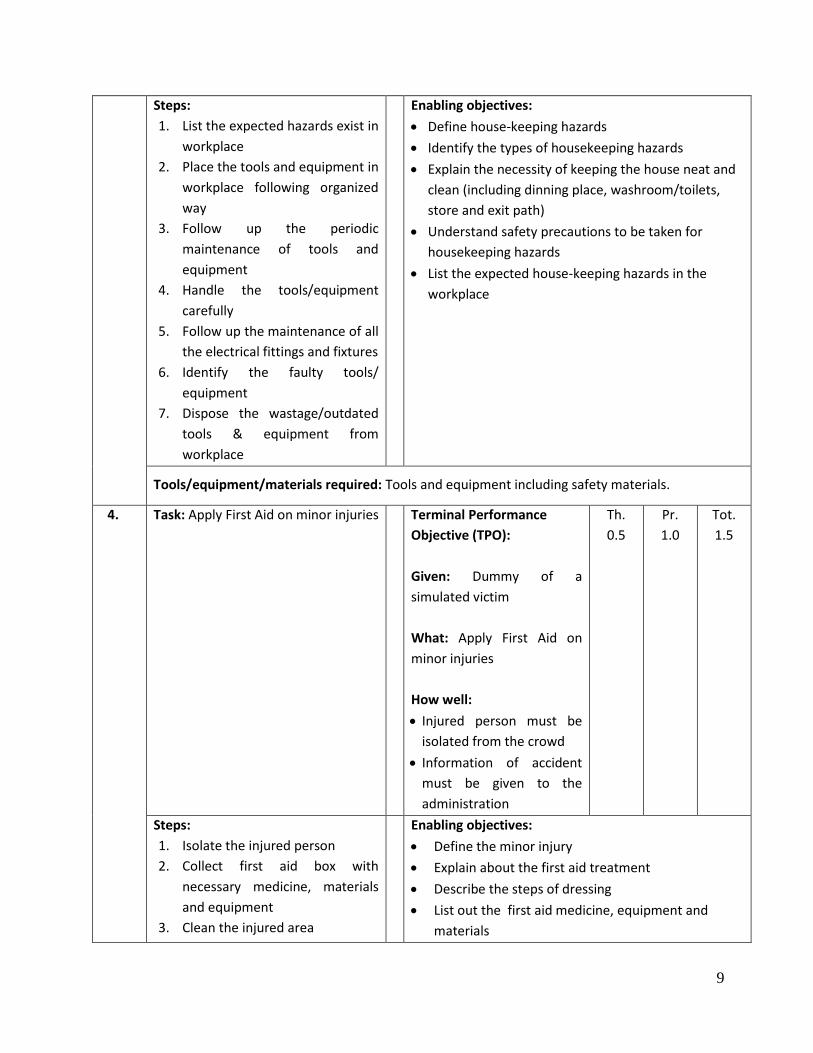
Steps:
1. List the expected hazards exist in
workplace
2. Place the tools and equipment in
workplace following organized
way
3. Follow up the periodic
maintenance of tools and
equipment
4. Handle the tools/equipment
carefully
5. Follow up the maintenance of all
the electrical fittings and fixtures
6. Identify the faulty tools/
equipment
7. Dispose the wastage/outdated
tools & equipment from
workplace
Enabling objectives:
Define house-keeping hazards
Identify the types of housekeeping hazards
Explain the necessity of keeping the house neat and
clean (including dinning place, washroom/toilets,
store and exit path)
Understand safety precautions to be taken for
housekeeping hazards
List the expected house-keeping hazards in the
workplace
Tools/equipment/materials required: Tools and equipment including safety materials.
4. Task: Apply First Aid on minor injuries
Terminal Performance
Objective (TPO):
Given: Dummy of a
simulated victim
What: Apply First Aid on
minor injuries
How well:
Injured person must be
isolated from the crowd
Information of accident
must be given to the
administration
Th.
0.5
Pr.
1.0
Tot.
1.5
Steps:
1. Isolate the injured person
2. Collect first aid box with
necessary medicine, materials
and equipment
3. Clean the injured area
Enabling objectives:
Define the minor injury
Explain about the first aid treatment
Describe the steps of dressing
List out the first aid medicine, equipment and
materials
10
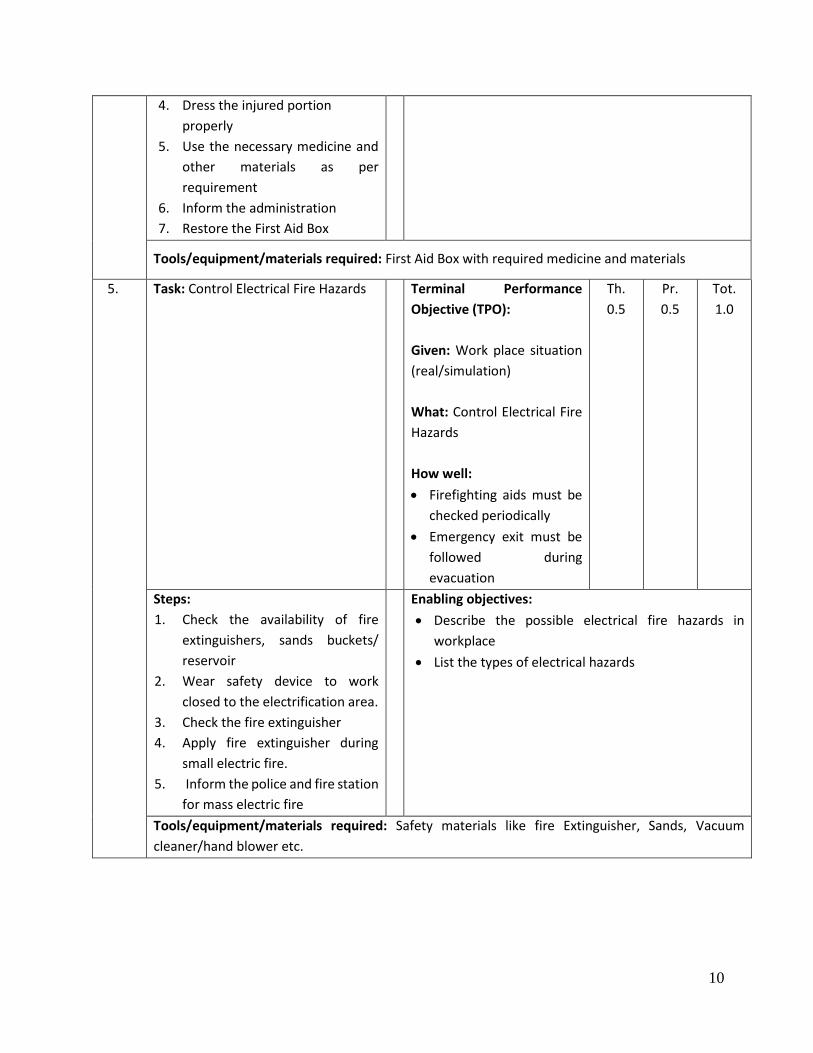
4. Dress the injured portion
properly
5. Use the necessary medicine and
other materials as per
requirement
6. Inform the administration
7. Restore the First Aid Box
Tools/equipment/materials required: First Aid Box with required medicine and materials
5. Task: Control Electrical Fire Hazards
Terminal Performance
Objective (TPO):
Given: Work place situation
(real/simulation)
What: Control Electrical Fire
Hazards
How well:
Firefighting aids must be
checked periodically
Emergency exit must be
followed during
evacuation
Th.
0.5
Pr.
0.5
Tot.
1.0
Steps:
1. Check the availability of fire
extinguishers, sands buckets/
reservoir
2. Wear safety device to work
closed to the electrification area.
3. Check the fire extinguisher
4. Apply fire extinguisher during
small electric fire.
5. Inform the police and fire station
for mass electric fire
Enabling objectives:
Describe the possible electrical fire hazards in
workplace
List the types of electrical hazards
Tools/equipment/materials required: Safety materials like fire Extinguisher, Sands, Vacuum
cleaner/hand blower etc.
11
Module 2: Apply Fundamental Skills of Shuttering Work
12
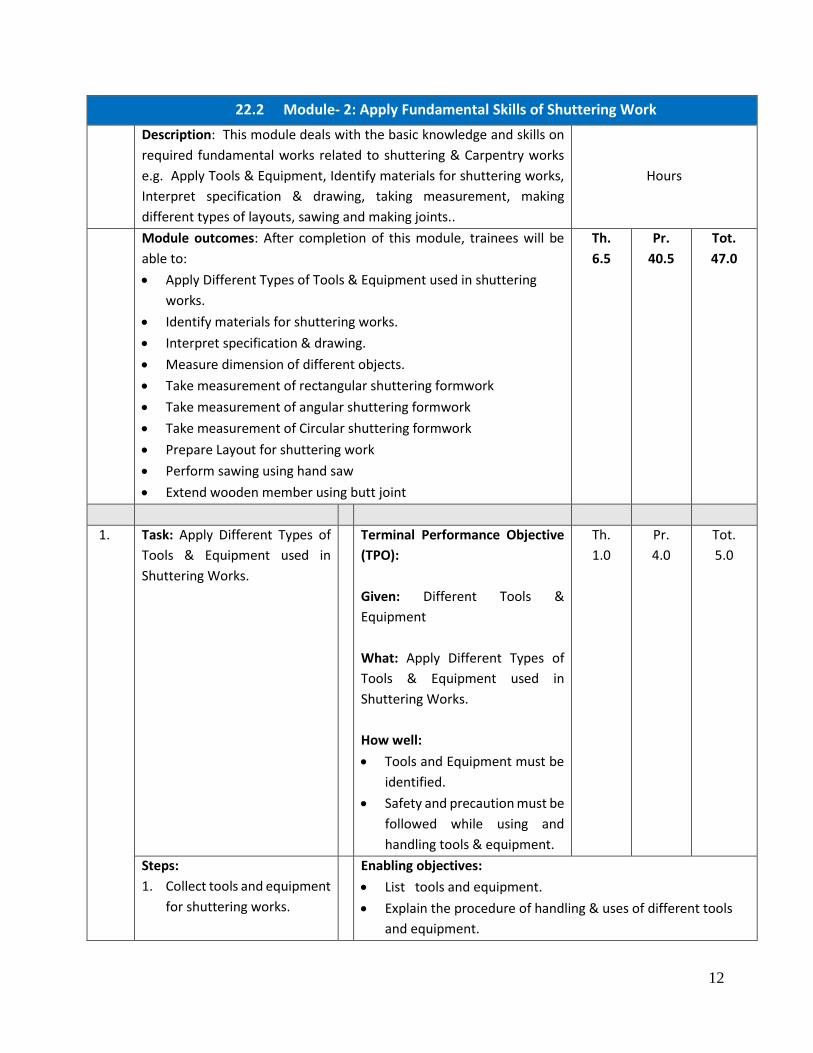
22.2 Module- 2: Apply Fundamental Skills of Shuttering Work
Description: This module deals with the basic knowledge and skills on
required fundamental works related to shuttering & Carpentry works
e.g. Apply Tools & Equipment, Identify materials for shuttering works,
Interpret specification & drawing, taking measurement, making
different types of layouts, sawing and making joints..
Hours
Module outcomes: After completion of this module, trainees will be
able to:
Apply Different Types of Tools & Equipment used in shuttering
works.
Identify materials for shuttering works.
Interpret specification & drawing.
Measure dimension of different objects.
Take measurement of rectangular shuttering formwork
Take measurement of angular shuttering formwork
Take measurement of Circular shuttering formwork
Prepare Layout for shuttering work
Perform sawing using hand saw
Extend wooden member using butt joint
Th.
6.5
Pr.
40.5
Tot.
47.0
1. Task: Apply Different Types of
Tools & Equipment used in
Shuttering Works.
Terminal Performance Objective
(TPO):
Given: Different Tools &
Equipment
What: Apply Different Types of
Tools & Equipment used in
Shuttering Works.
How well:
Tools and Equipment must be
identified.
Safety and precaution must be
followed while using and
handling tools & equipment.
Th.
1.0
Pr.
4.0
Tot.
5.0
Steps:
1. Collect tools and equipment
for shuttering works.
Enabling objectives:
List tools and equipment.
Explain the procedure of handling & uses of different tools
and equipment.
13
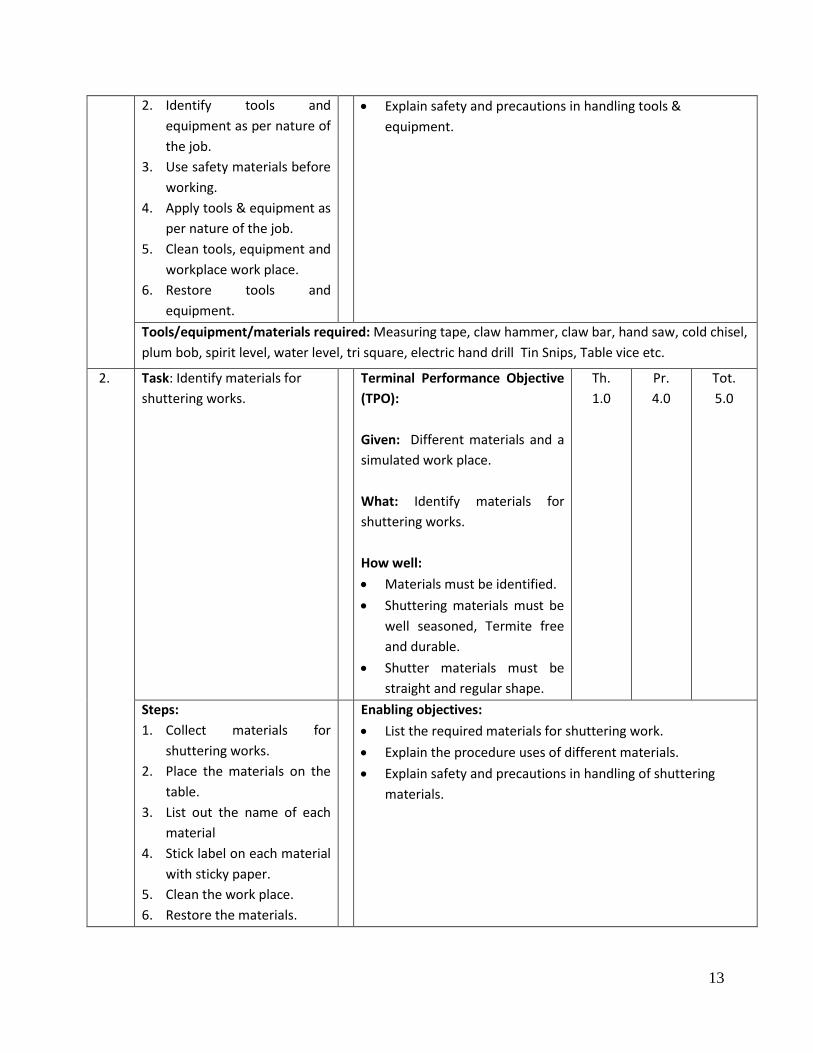
2. Identify tools and
equipment as per nature of
the job.
3. Use safety materials before
working.
4. Apply tools & equipment as
per nature of the job.
5. Clean tools, equipment and
workplace work place.
6. Restore tools and
equipment.
Explain safety and precautions in handling tools &
equipment.
Tools/equipment/materials required: Measuring tape, claw hammer, claw bar, hand saw, cold chisel,
plum bob, spirit level, water level, tri square, electric hand drill Tin Snips, Table vice etc.
2. Task: Identify materials for
shuttering works.
Terminal Performance Objective
(TPO):
Given: Different materials and a
simulated work place.
What: Identify materials for
shuttering works.
How well:
Materials must be identified.
Shuttering materials must be
well seasoned, Termite free
and durable.
Shutter materials must be
straight and regular shape.
Th.
1.0
Pr.
4.0
Tot.
5.0
Steps:
1. Collect materials for
shuttering works.
2. Place the materials on the
table.
3. List out the name of each
material
4. Stick label on each material
with sticky paper.
5. Clean the work place.
6. Restore the materials.
Enabling objectives:
List the required materials for shuttering work.
Explain the procedure uses of different materials.
Explain safety and precautions in handling of shuttering
materials.
14
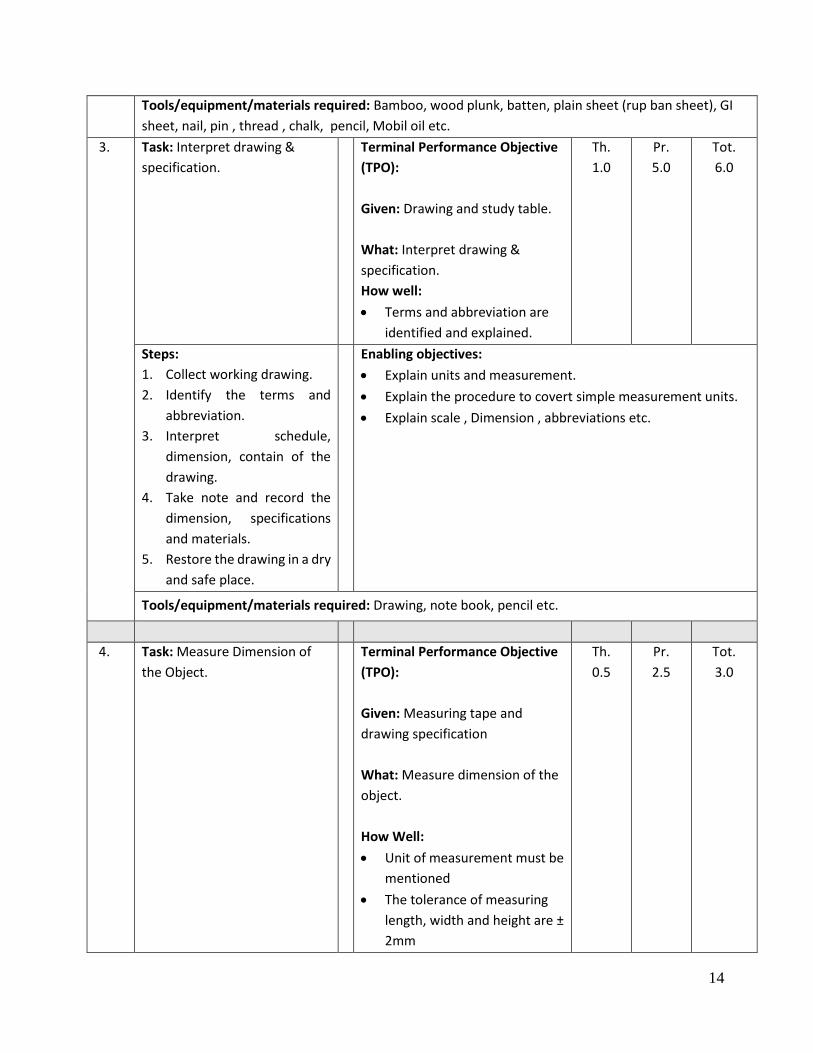
Tools/equipment/materials required: Bamboo, wood plunk, batten, plain sheet (rup ban sheet), GI
sheet, nail, pin , thread , chalk, pencil, Mobil oil etc.
3. Task: Interpret drawing &
specification.
Terminal Performance Objective
(TPO):
Given: Drawing and study table.
What: Interpret drawing &
specification.
How well:
Terms and abbreviation are
identified and explained.
Th.
1.0
Pr.
5.0
Tot.
6.0
Steps:
1. Collect working drawing.
2. Identify the terms and
abbreviation.
3. Interpret schedule,
dimension, contain of the
drawing.
4. Take note and record the
dimension, specifications
and materials.
5. Restore the drawing in a dry
and safe place.
Enabling objectives:
Explain units and measurement.
Explain the procedure to covert simple measurement units.
Explain scale , Dimension , abbreviations etc.
Tools/equipment/materials required: Drawing, note book, pencil etc.
4. Task: Measure Dimension of
the Object.
Terminal Performance Objective
(TPO):
Given: Measuring tape and
drawing specification
What: Measure dimension of the
object.
How Well:
Unit of measurement must be
mentioned
The tolerance of measuring
length, width and height are ±
2mm
Th.
0.5
Pr.
2.5
Tot.
3.0
15
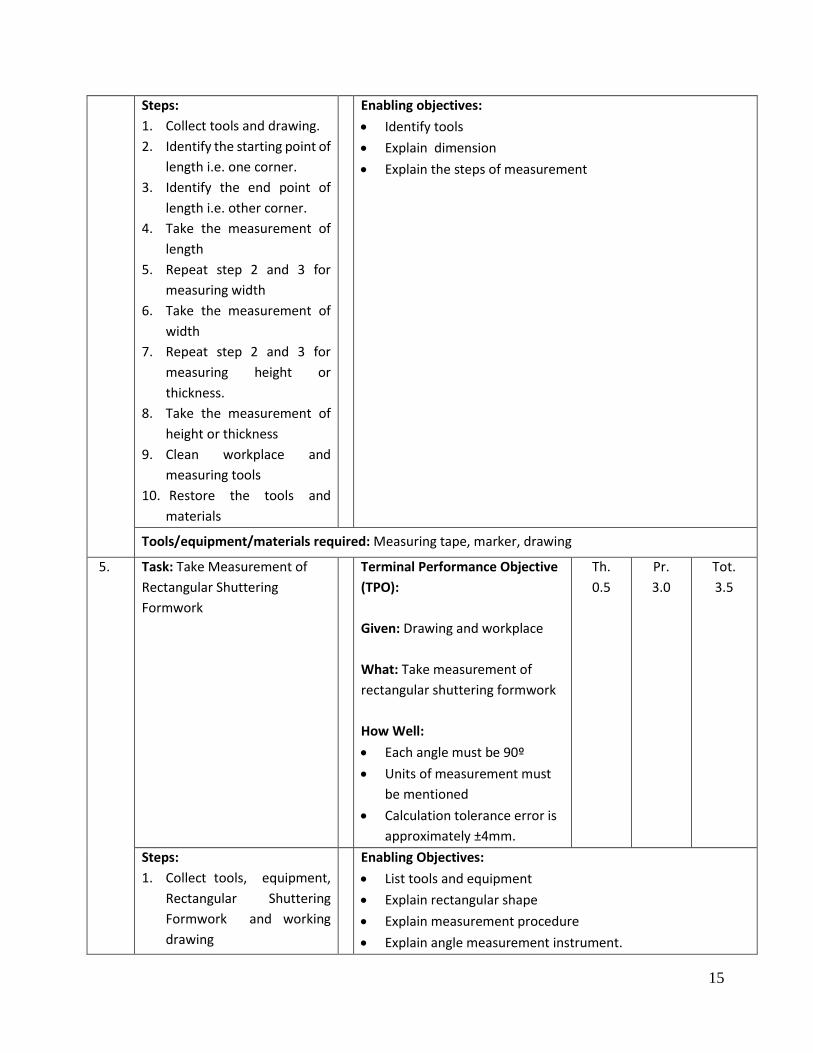
Steps:
1. Collect tools and drawing.
2. Identify the starting point of
length i.e. one corner.
3. Identify the end point of
length i.e. other corner.
4. Take the measurement of
length
5. Repeat step 2 and 3 for
measuring width
6. Take the measurement of
width
7. Repeat step 2 and 3 for
measuring height or
thickness.
8. Take the measurement of
height or thickness
9. Clean workplace and
measuring tools
10. Restore the tools and
materials
Enabling objectives:
Identify tools
Explain dimension
Explain the steps of measurement
Tools/equipment/materials required: Measuring tape, marker, drawing
5. Task: Take Measurement of
Rectangular Shuttering
Formwork
Terminal Performance Objective
(TPO):
Given: Drawing and workplace
What: Take measurement of
rectangular shuttering formwork
How Well:
Each angle must be 90º
Units of measurement must
be mentioned
Calculation tolerance error is
approximately ±4mm.
Th.
0.5
Pr.
3.0
Tot.
3.5
Steps:
1. Collect tools, equipment,
Rectangular Shuttering
Formwork and working
drawing
Enabling Objectives:
List tools and equipment
Explain rectangular shape
Explain measurement procedure
Explain angle measurement instrument.
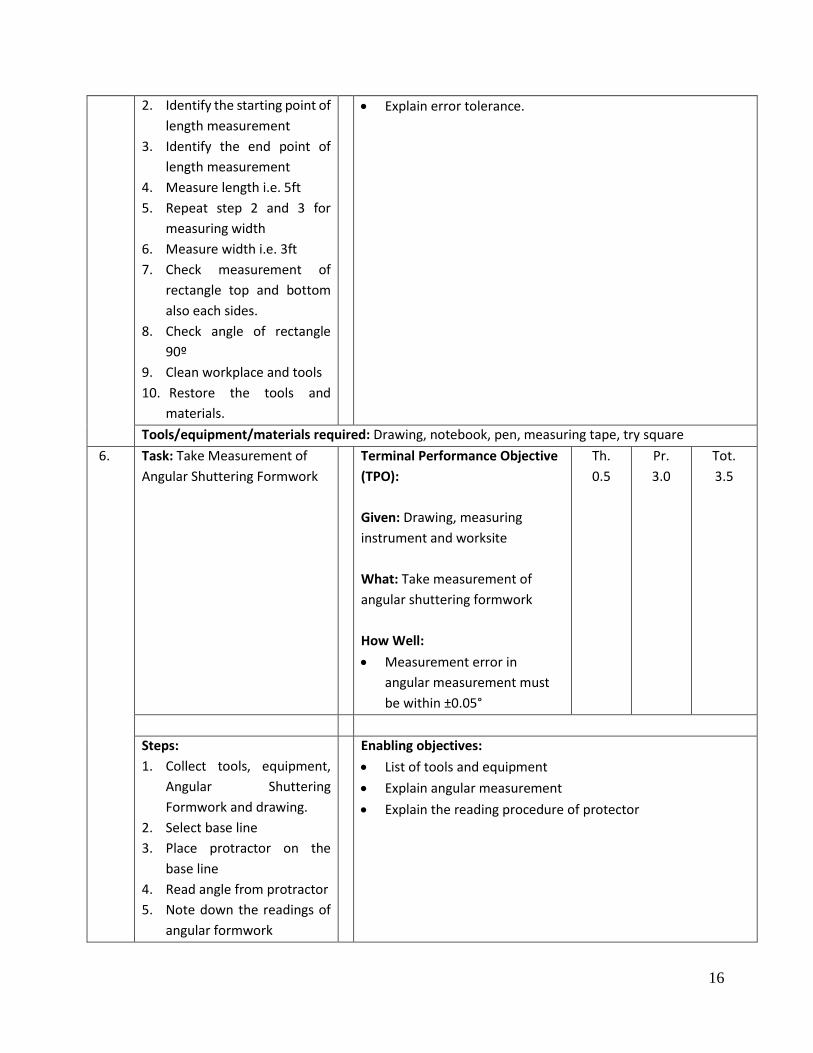
16
2. Identify the starting point of
length measurement
3. Identify the end point of
length measurement
4. Measure length i.e. 5ft
5. Repeat step 2 and 3 for
measuring width
6. Measure width i.e. 3ft
7. Check measurement of
rectangle top and bottom
also each sides.
8. Check angle of rectangle
90º
9. Clean workplace and tools
10. Restore the tools and
materials.
Explain error tolerance.
Tools/equipment/materials required: Drawing, notebook, pen, measuring tape, try square
6. Task: Take Measurement of
Angular Shuttering Formwork
Terminal Performance Objective
(TPO):
Given: Drawing, measuring
instrument and worksite
What: Take measurement of
angular shuttering formwork
How Well:
Measurement error in
angular measurement must
be within ±0.05°
Th.
0.5
Pr.
3.0
Tot.
3.5
Steps:
1. Collect tools, equipment,
Angular Shuttering
Formwork and drawing.
2. Select base line
3. Place protractor on the
base line
4. Read angle from protractor
5. Note down the readings of
angular formwork
Enabling objectives:
List of tools and equipment
Explain angular measurement
Explain the reading procedure of protector
17
6. Clean workplace and tools.
7. Restore the tools and
materials.
Tools/equipment/materials required: Drawing, protractor, pen, Notebook
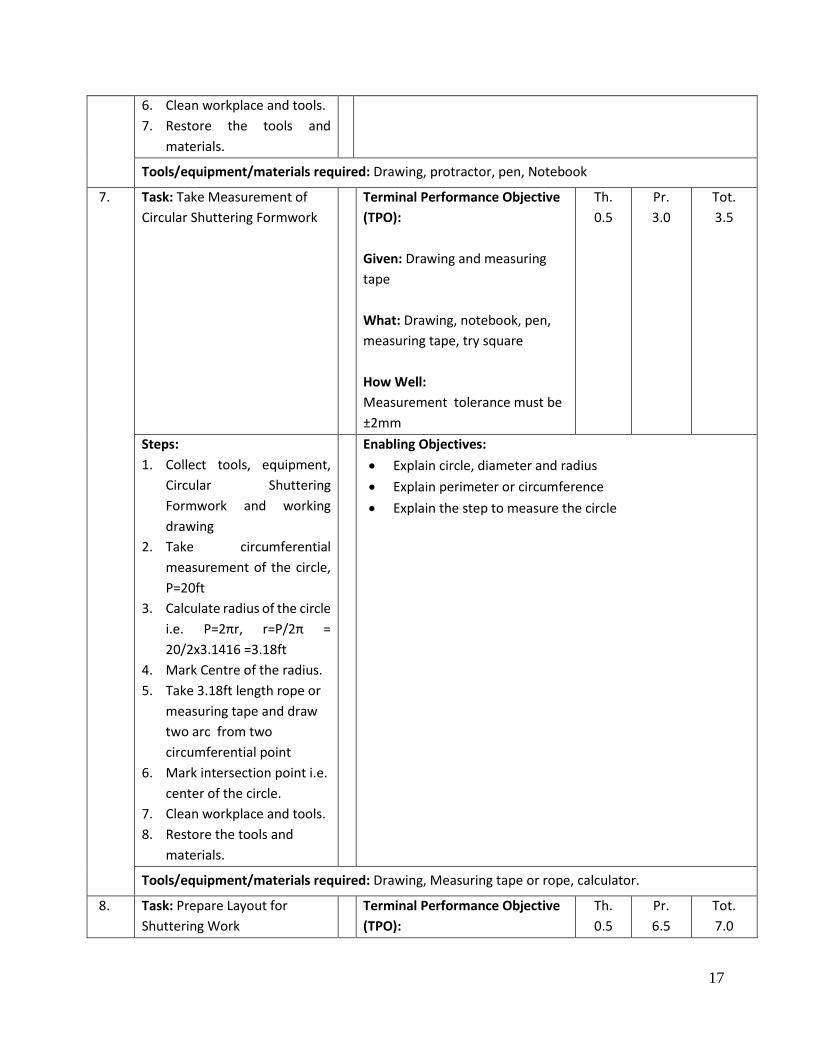
7. Task: Take Measurement of
Circular Shuttering Formwork
Terminal Performance Objective
(TPO):
Given: Drawing and measuring
tape
What: Drawing, notebook, pen,
measuring tape, try square
How Well:
Measurement tolerance must be
±2mm
Th.
0.5
Pr.
3.0
Tot.
3.5
Steps:
1. Collect tools, equipment,
Circular Shuttering
Formwork and working
drawing
2. Take circumferential
measurement of the circle,
P=20ft
3. Calculate radius of the circle
i.e. P=2πr, r=P/2π =
20/2x3.1416 =3.18ft
4. Mark Centre of the radius.
5. Take 3.18ft length rope or
measuring tape and draw
two arc from two
circumferential point
6. Mark intersection point i.e.
center of the circle.
7. Clean workplace and tools.
8. Restore the tools and
materials.
Enabling Objectives:
Explain circle, diameter and radius
Explain perimeter or circumference
Explain the step to measure the circle
Tools/equipment/materials required: Drawing, Measuring tape or rope, calculator.
8. Task: Prepare Layout for
Shuttering Work
Terminal Performance Objective
(TPO):
Th.
0.5
Pr.
6.5
Tot.
7.0
18
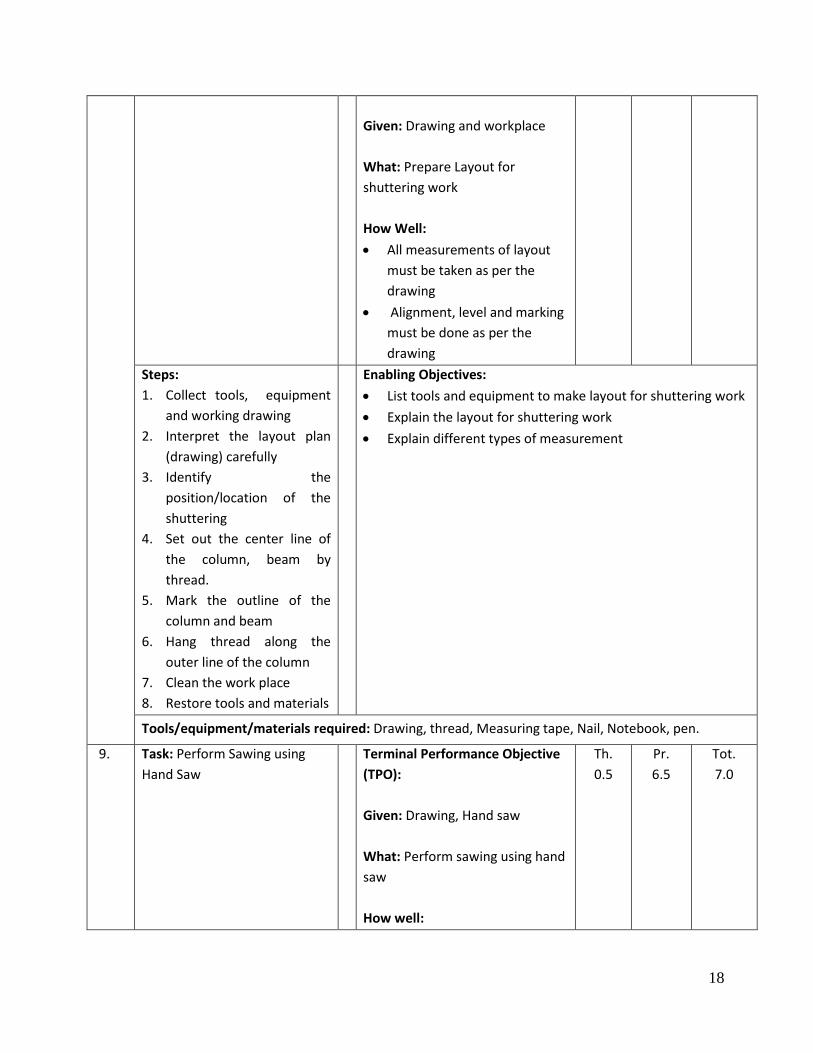
Given: Drawing and workplace
What: Prepare Layout for
shuttering work
How Well:
All measurements of layout
must be taken as per the
drawing
Alignment, level and marking
must be done as per the
drawing
Steps:
1. Collect tools, equipment
and working drawing
2. Interpret the layout plan
(drawing) carefully
3. Identify the
position/location of the
shuttering
4. Set out the center line of
the column, beam by
thread.
5. Mark the outline of the
column and beam
6. Hang thread along the
outer line of the column
7. Clean the work place
8. Restore tools and materials
Enabling Objectives:
List tools and equipment to make layout for shuttering work
Explain the layout for shuttering work
Explain different types of measurement
Tools/equipment/materials required: Drawing, thread, Measuring tape, Nail, Notebook, pen.
9. Task: Perform Sawing using
Hand Saw
Terminal Performance Objective
(TPO):
Given: Drawing, Hand saw
What: Perform sawing using hand
saw
How well:
Th.
0.5
Pr.
6.5
Tot.
7.0
19
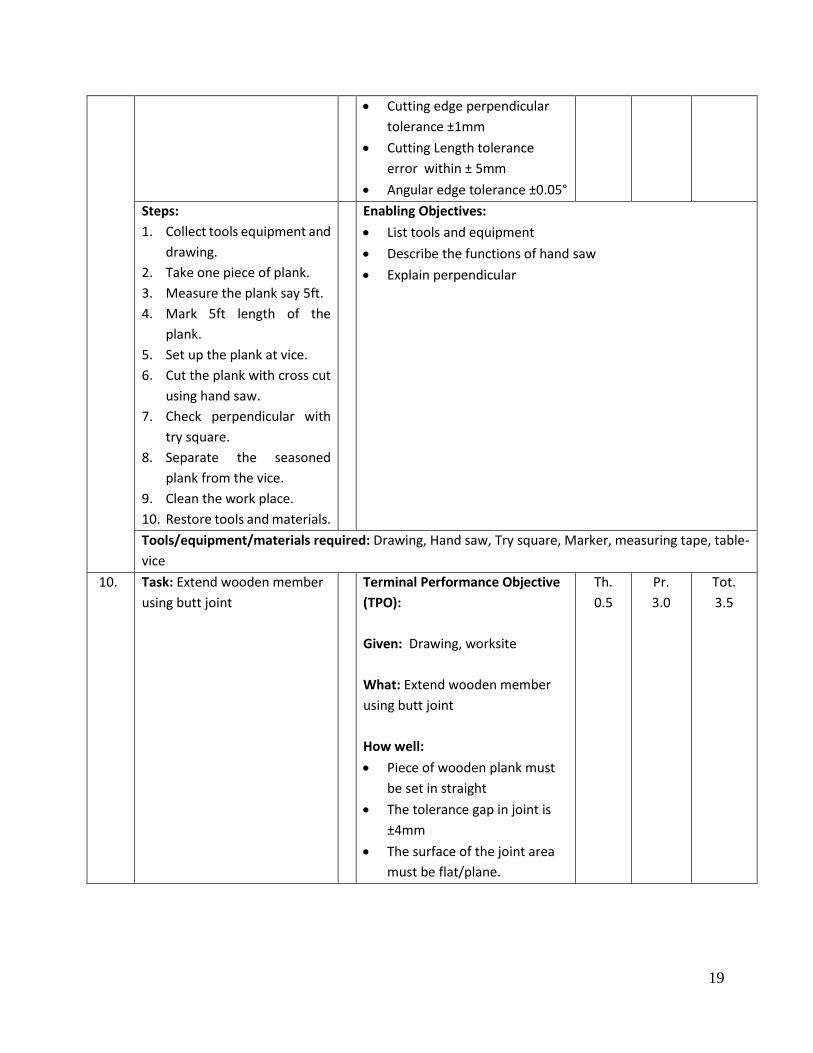
Cutting edge perpendicular
tolerance ±1mm
Cutting Length tolerance
error within ± 5mm
Angular edge tolerance ±0.05°
Steps:
1. Collect tools equipment and
drawing.
2. Take one piece of plank.
3. Measure the plank say 5ft.
4. Mark 5ft length of the
plank.
5. Set up the plank at vice.
6. Cut the plank with cross cut
using hand saw.
7. Check perpendicular with
try square.
8. Separate the seasoned
plank from the vice.
9. Clean the work place.
10. Restore tools and materials.
Enabling Objectives:
List tools and equipment
Describe the functions of hand saw
Explain perpendicular
Tools/equipment/materials required: Drawing, Hand saw, Try square, Marker, measuring tape, table-
vice
10. Task: Extend wooden member
using butt joint
Terminal Performance Objective
(TPO):
Given: Drawing, worksite
What: Extend wooden member
using butt joint
How well:
Piece of wooden plank must
be set in straight
The tolerance gap in joint is
±4mm
The surface of the joint area
must be flat/plane.
Th.
0.5
Pr.
3.0
Tot.
3.5

20
Steps:
1. Collect tools, equipment
and drawing
2. Take a plank of 5ft long and
1 ft width
3. Take a small piece of plank
1.5ft long and 6” width
4. Take another plank size
5’x1’
5. Set small piece at the
bottom of first plank
6. Set second plank face to
face of the first plank
7. Join top two plank with
small piece using nail.
8. Check straightness by
placing thread at starting
point to end point
9. Check the up and down of
the joint by sprit level or
water level or eye estimate
10. Clean the work place
11. Restore tools and materials.
Enabling objectives:
List the required tools, equipment and drawing
Explain the process to join the pieces of plank
Explain the procedure to check the plane/flat surface by
sprit level or water level
Tools/equipment/materials required: Drawing, Plank, measuring tape, Nail, Hammer, Saw, sprit level
or water level.

21
Module 3: Prepare Formwork for Shuttering Work
22
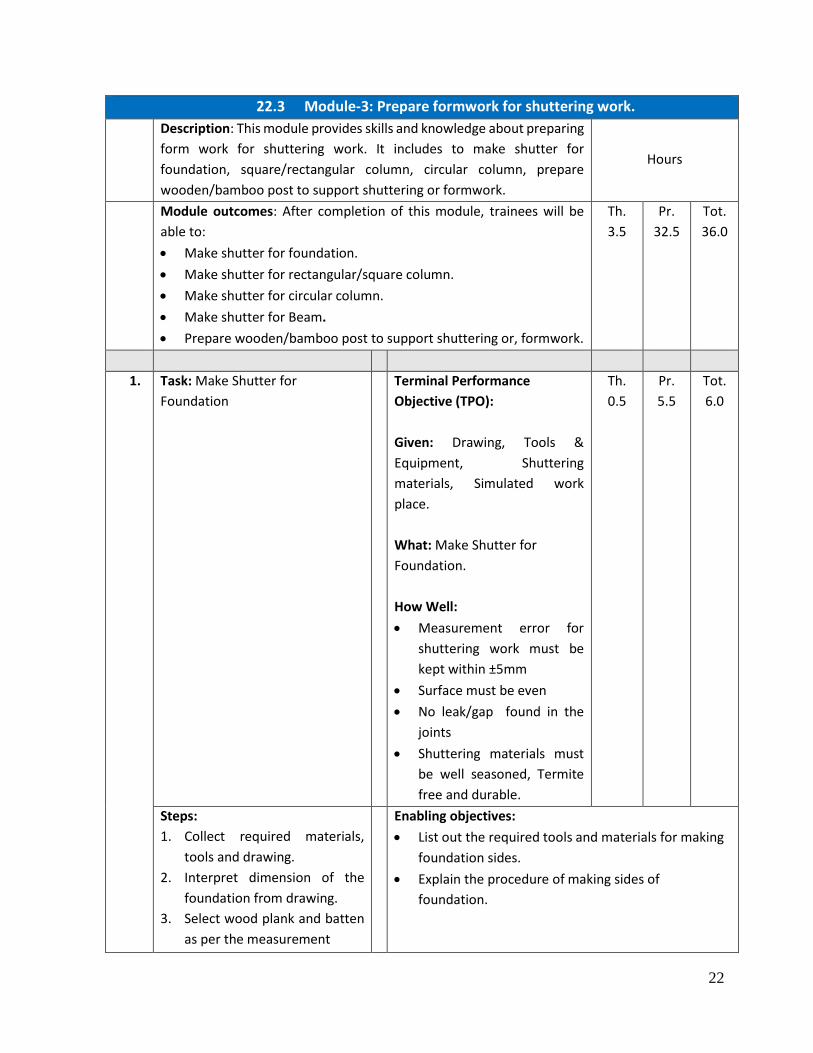
22.3 Module-3: Prepare formwork for shuttering work.
Description: This module provides skills and knowledge about preparing
form work for shuttering work. It includes to make shutter for
foundation, square/rectangular column, circular column, prepare
wooden/bamboo post to support shuttering or formwork.
Hours
Module outcomes: After completion of this module, trainees will be
able to:
Make shutter for foundation.
Make shutter for rectangular/square column.
Make shutter for circular column.
Make shutter for Beam.
Prepare wooden/bamboo post to support shuttering or, formwork.
Th.
3.5
Pr.
32.5
Tot.
36.0
1. Task: Make Shutter for
Foundation
Terminal Performance
Objective (TPO):
Given: Drawing, Tools &
Equipment, Shuttering
materials, Simulated work
place.
What: Make Shutter for
Foundation.
How Well:
Measurement error for
shuttering work must be
kept within ±5mm
Surface must be even
No leak/gap found in the
joints
Shuttering materials must
be well seasoned, Termite
free and durable.
Th.
0.5
Pr.
5.5
Tot.
6.0
Steps:
1. Collect required materials,
tools and drawing.
2. Interpret dimension of the
foundation from drawing.
3. Select wood plank and batten
as per the measurement
Enabling objectives:
List out the required tools and materials for making
foundation sides.
Explain the procedure of making sides of
foundation.
23
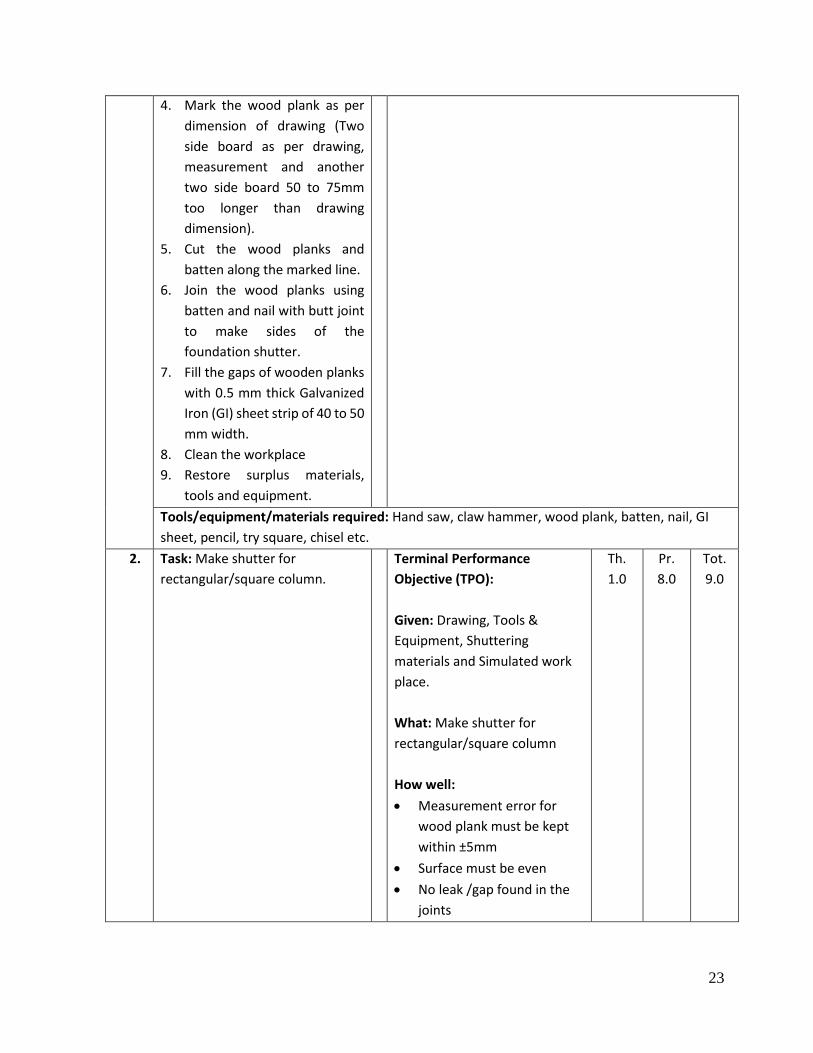
4. Mark the wood plank as per
dimension of drawing (Two
side board as per drawing,
measurement and another
two side board 50 to 75mm
too longer than drawing
dimension).
5. Cut the wood planks and
batten along the marked line.
6. Join the wood planks using
batten and nail with butt joint
to make sides of the
foundation shutter.
7. Fill the gaps of wooden planks
with 0.5 mm thick Galvanized
Iron (GI) sheet strip of 40 to 50
mm width.
8. Clean the workplace
9. Restore surplus materials,
tools and equipment.
Tools/equipment/materials required: Hand saw, claw hammer, wood plank, batten, nail, GI
sheet, pencil, try square, chisel etc.
2. Task: Make shutter for
rectangular/square column.
Terminal Performance
Objective (TPO):
Given: Drawing, Tools &
Equipment, Shuttering
materials and Simulated work
place.
What: Make shutter for
rectangular/square column
How well:
Measurement error for
wood plank must be kept
within ±5mm
Surface must be even
No leak /gap found in the
joints
Th.
1.0
Pr.
8.0
Tot.
9.0

24
Shuttering materials must
be well seasoned, Termite
free and durable.
Steps:
1. Collect required materials,
tools and drawing.
2. Interpret dimension of the
square column from drawing.
3. Select wood plank and batten
as per the measurement
4. Mark the wood plank as per
dimension
5. Cut the wood planks and
batten as per the dimension.
6. Join the wood planks using
batten and nail with butt joint
to make sides of the
square/rectangular column.
7. Fill the gaps of wooden planks
with 0.5 mm Galvanized Iron
(GI) sheet strip of 40 to 50 mm
width.
8. Clean the workplace
9. Restore surplus materials,
tools and drawing.
Enabling objectives:
List out the required tools and materials for making
foundation shutter.
Explain the procedure of making sides of square
/rectangular column.
Tools/equipment/materials required: Hand saw, claw hammer, wood plank, nail, GI sheet,
pencil, try square, chisel etc.
3. Task: Make Shutter for Circular
Column.
Terminal Performance
Objective (TPO):
Given: Drawing, Tools &
Equipment’s, Shuttering
materials and simulated work
place.
What: Make shutter for circular
column.
How well:
Th.
1.0
Pr.
9.0
Tot.
10.0
25
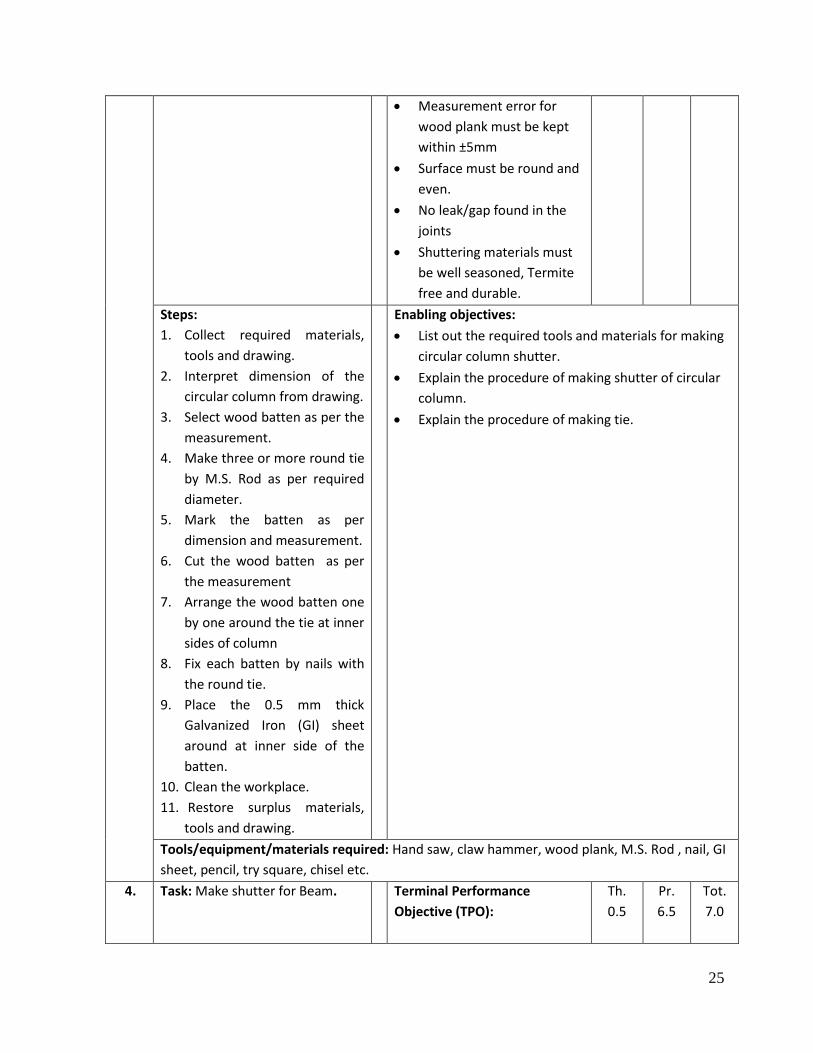
Measurement error for
wood plank must be kept
within ±5mm
Surface must be round and
even.
No leak/gap found in the
joints
Shuttering materials must
be well seasoned, Termite
free and durable.
Steps:
1. Collect required materials,
tools and drawing.
2. Interpret dimension of the
circular column from drawing.
3. Select wood batten as per the
measurement.
4. Make three or more round tie
by M.S. Rod as per required
diameter.
5. Mark the batten as per
dimension and measurement.
6. Cut the wood batten as per
the measurement
7. Arrange the wood batten one
by one around the tie at inner
sides of column
8. Fix each batten by nails with
the round tie.
9. Place the 0.5 mm thick
Galvanized Iron (GI) sheet
around at inner side of the
batten.
10. Clean the workplace.
11. Restore surplus materials,
tools and drawing.
Enabling objectives:
List out the required tools and materials for making
circular column shutter.
Explain the procedure of making shutter of circular
column.
Explain the procedure of making tie.
Tools/equipment/materials required: Hand saw, claw hammer, wood plank, M.S. Rod , nail, GI
sheet, pencil, try square, chisel etc.
4. Task: Make shutter for Beam.
Terminal Performance
Objective (TPO):
Th.
0.5
Pr.
6.5
Tot.
7.0
26
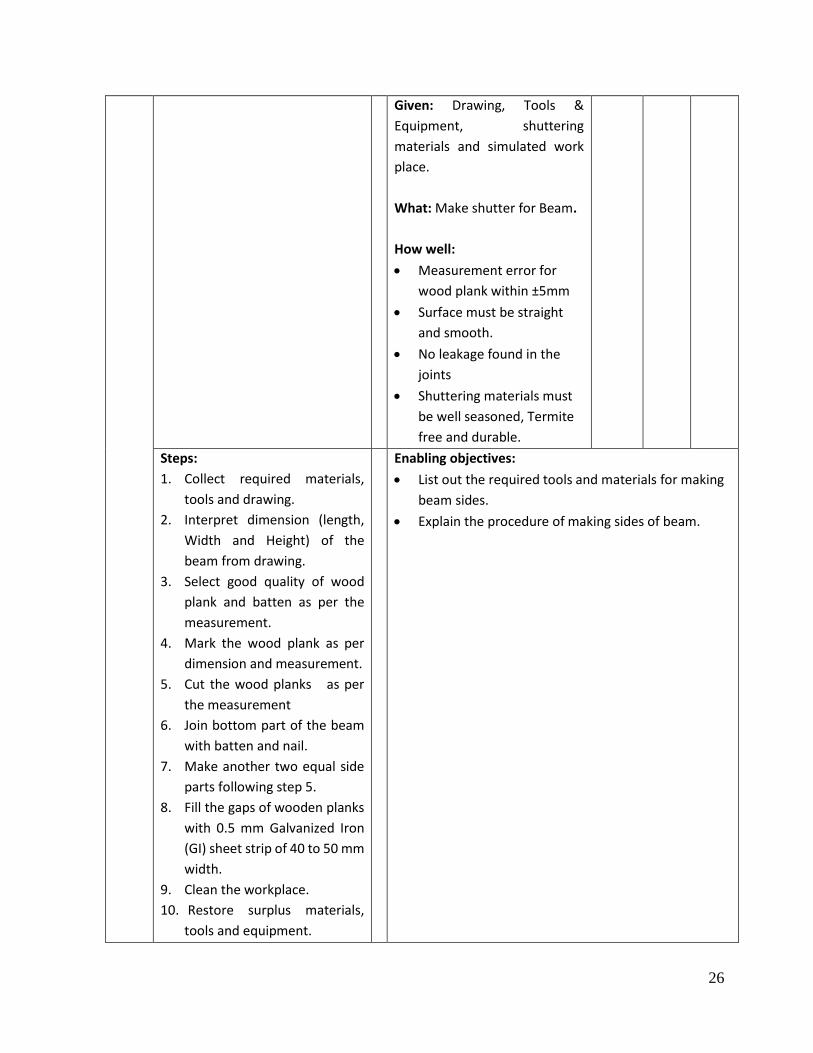
Given: Drawing, Tools &
Equipment, shuttering
materials and simulated work
place.
What: Make shutter for Beam.
How well:
Measurement error for
wood plank within ±5mm
Surface must be straight
and smooth.
No leakage found in the
joints
Shuttering materials must
be well seasoned, Termite
free and durable.
Steps:
1. Collect required materials,
tools and drawing.
2. Interpret dimension (length,
Width and Height) of the
beam from drawing.
3. Select good quality of wood
plank and batten as per the
measurement.
4. Mark the wood plank as per
dimension and measurement.
5. Cut the wood planks as per
the measurement
6. Join bottom part of the beam
with batten and nail.
7. Make another two equal side
parts following step 5.
8. Fill the gaps of wooden planks
with 0.5 mm Galvanized Iron
(GI) sheet strip of 40 to 50 mm
width.
9. Clean the workplace.
10. Restore surplus materials,
tools and equipment.
Enabling objectives:
List out the required tools and materials for making
beam sides.
Explain the procedure of making sides of beam.

27
Tools/equipment/materials required: Hand saw, claw hammer, wood plank, Batten, nail, GI
sheet, pencil, try square, chisel etc.
5. Task: Prepare Bamboo Post for
Supporting the Formwork.
Terminal Performance
Objective (TPO):
Given: Drawing, necessary tools
and materials and simulated
work place.
What: Prepare Bamboo Post
for Supporting the Formwork.
How well:
Bamboo post must be
made from lower portion
of bamboo.
Bamboo must be matured,
strong and termed free.
Th.
0.5
Pr.
3.5
Tot.
4.0
Steps:
1. Collect necessary tools and
materials.
2. Calculate the length of
bamboo post for the relevant
work.
3. Mark up the post according to
the length.
4. Cut the bamboo as per
measurement using hand saw.
5. Cut grove at top of the
bamboo post at a height of 75
mm apprx.
6. Use wooden Ledge & brace to
make bracket at the top
portion of the bamboo post by
using nail for lintel and beam
shuttering.
7. Clean the work place.
8. Restore the surplus materials.
Enabling objectives:
Explain the use of bamboo post in shuttering work.
Explain how to make bamboo post.
Tools/equipment/materials required: Hand saw, claw hammer, Batten, nail, pencil, and tripod.

28
Module 4: Install Formwork for Shuttering Work
29
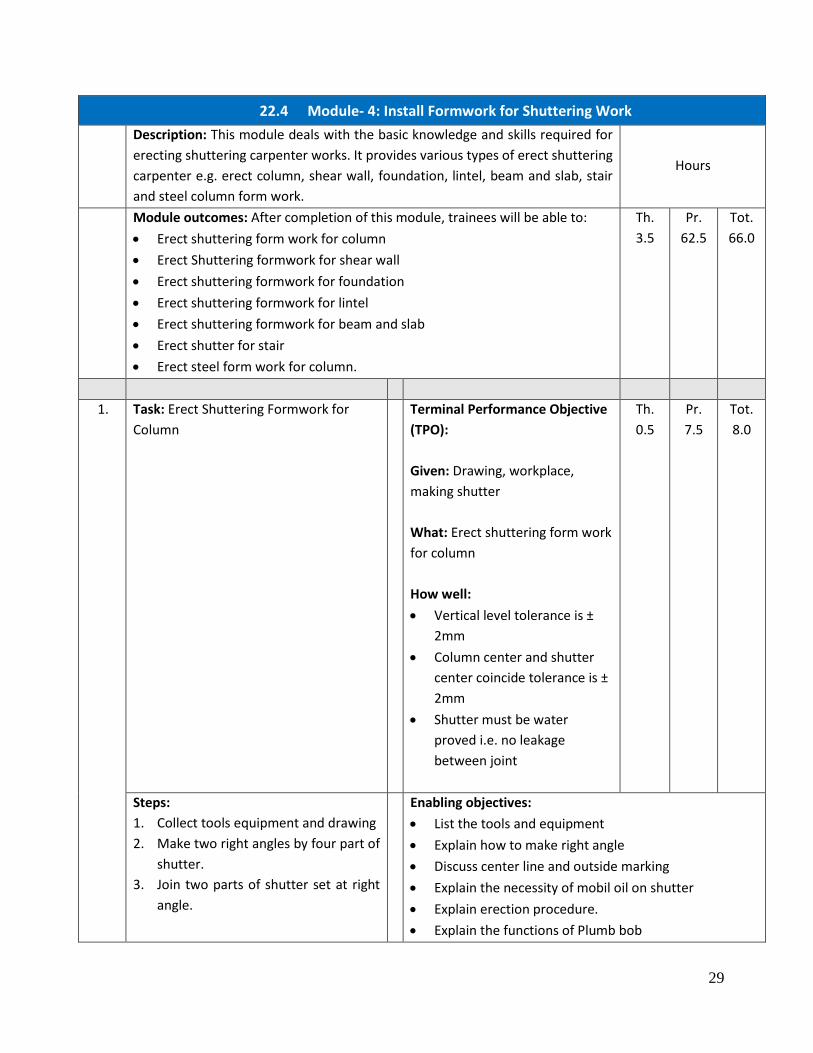
22.4 Module- 4: Install Formwork for Shuttering Work
Description: This module deals with the basic knowledge and skills required for
erecting shuttering carpenter works. It provides various types of erect shuttering
carpenter e.g. erect column, shear wall, foundation, lintel, beam and slab, stair
and steel column form work.
Hours
Module outcomes: After completion of this module, trainees will be able to:
Erect shuttering form work for column
Erect Shuttering formwork for shear wall
Erect shuttering formwork for foundation
Erect shuttering formwork for lintel
Erect shuttering formwork for beam and slab
Erect shutter for stair
Erect steel form work for column.
Th.
3.5
Pr.
62.5
Tot.
66.0
1. Task: Erect Shuttering Formwork for
Column
Terminal Performance Objective
(TPO):
Given: Drawing, workplace,
making shutter
What: Erect shuttering form work
for column
How well:
Vertical level tolerance is ±
2mm
Column center and shutter
center coincide tolerance is ±
2mm
Shutter must be water
proved i.e. no leakage
between joint
Th.
0.5
Pr.
7.5
Tot.
8.0
Steps:
1. Collect tools equipment and drawing
2. Make two right angles by four part of
shutter.
3. Join two parts of shutter set at right
angle.
Enabling objectives:
List the tools and equipment
Explain how to make right angle
Discuss center line and outside marking
Explain the necessity of mobil oil on shutter
Explain erection procedure.
Explain the functions of Plumb bob
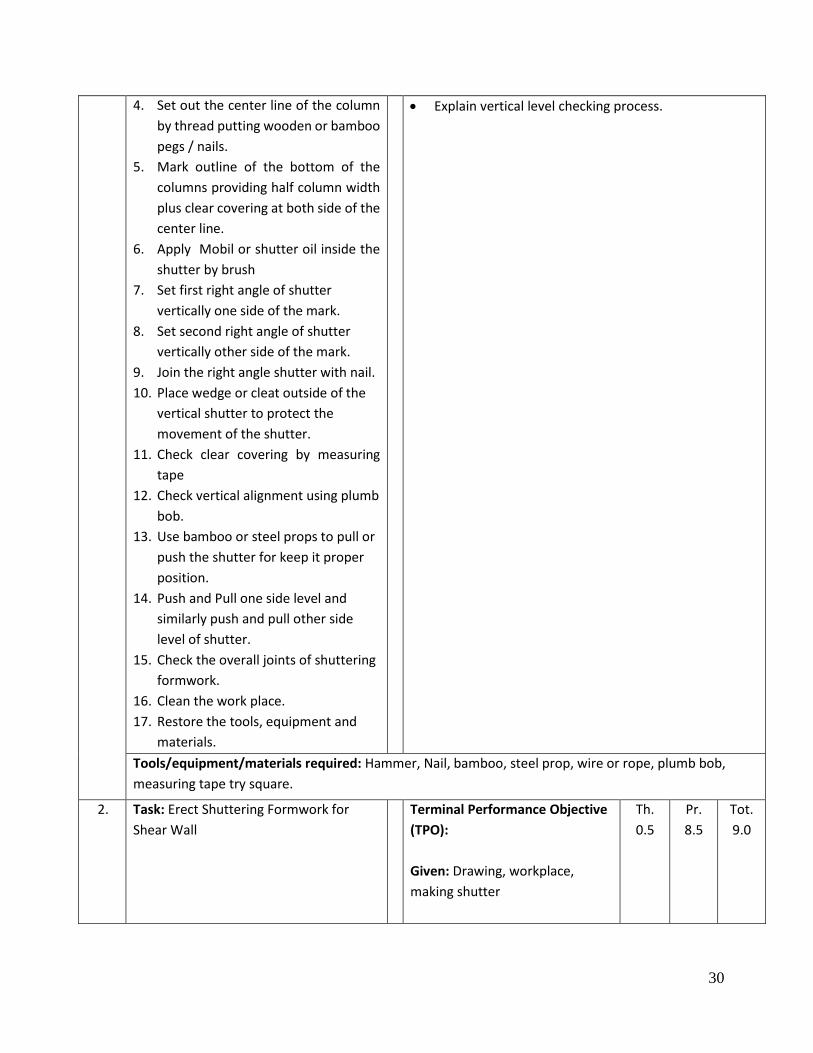
30
4. Set out the center line of the column
by thread putting wooden or bamboo
pegs / nails.
5. Mark outline of the bottom of the
columns providing half column width
plus clear covering at both side of the
center line.
6. Apply Mobil or shutter oil inside the
shutter by brush
7. Set first right angle of shutter
vertically one side of the mark.
8. Set second right angle of shutter
vertically other side of the mark.
9. Join the right angle shutter with nail.
10. Place wedge or cleat outside of the
vertical shutter to protect the
movement of the shutter.
11. Check clear covering by measuring
tape
12. Check vertical alignment using plumb
bob.
13. Use bamboo or steel props to pull or
push the shutter for keep it proper
position.
14. Push and Pull one side level and
similarly push and pull other side
level of shutter.
15. Check the overall joints of shuttering
formwork.
16. Clean the work place.
17. Restore the tools, equipment and
materials.
Explain vertical level checking process.
Tools/equipment/materials required: Hammer, Nail, bamboo, steel prop, wire or rope, plumb bob,
measuring tape try square.
2. Task: Erect Shuttering Formwork for
Shear Wall
Terminal Performance Objective
(TPO):
Given: Drawing, workplace,
making shutter
Th.
0.5
Pr.
8.5
Tot.
9.0
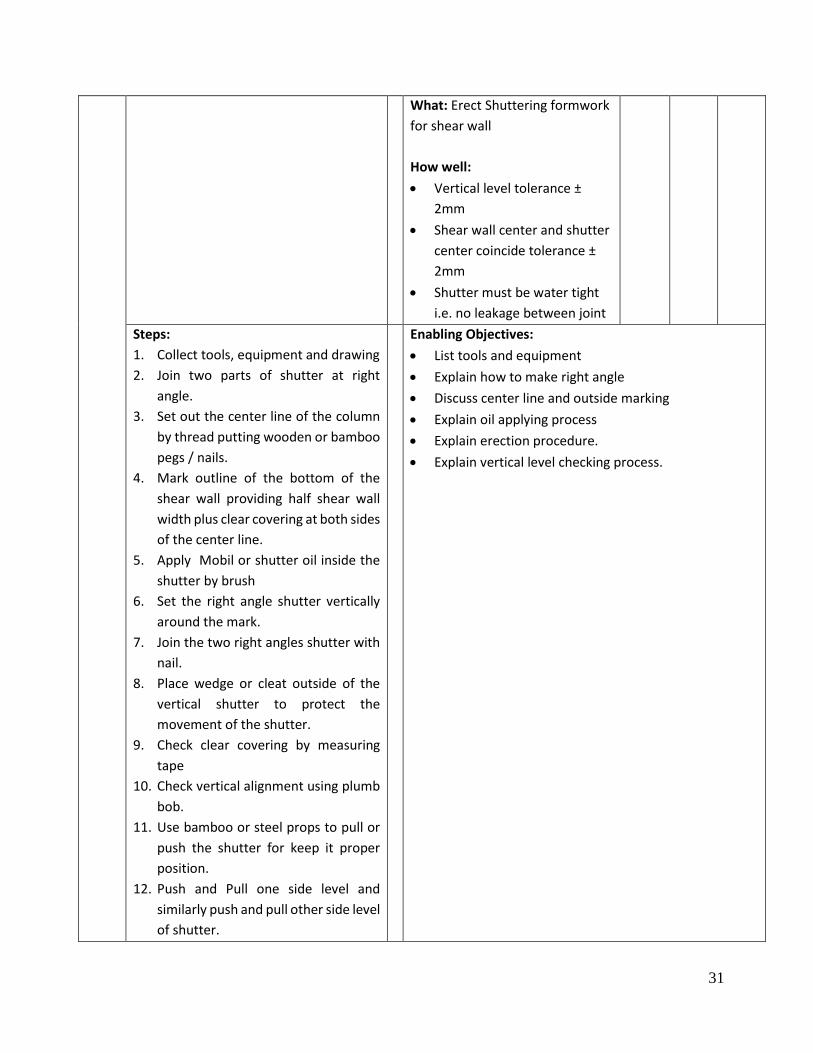
31
What: Erect Shuttering formwork
for shear wall
How well:
Vertical level tolerance ±
2mm
Shear wall center and shutter
center coincide tolerance ±
2mm
Shutter must be water tight
i.e. no leakage between joint
Steps:
1. Collect tools, equipment and drawing
2. Join two parts of shutter at right
angle.
3. Set out the center line of the column
by thread putting wooden or bamboo
pegs / nails.
4. Mark outline of the bottom of the
shear wall providing half shear wall
width plus clear covering at both sides
of the center line.
5. Apply Mobil or shutter oil inside the
shutter by brush
6. Set the right angle shutter vertically
around the mark.
7. Join the two right angles shutter with
nail.
8. Place wedge or cleat outside of the
vertical shutter to protect the
movement of the shutter.
9. Check clear covering by measuring
tape
10. Check vertical alignment using plumb
bob.
11. Use bamboo or steel props to pull or
push the shutter for keep it proper
position.
12. Push and Pull one side level and
similarly push and pull other side level
of shutter.
Enabling Objectives:
List tools and equipment
Explain how to make right angle
Discuss center line and outside marking
Explain oil applying process
Explain erection procedure.
Explain vertical level checking process.
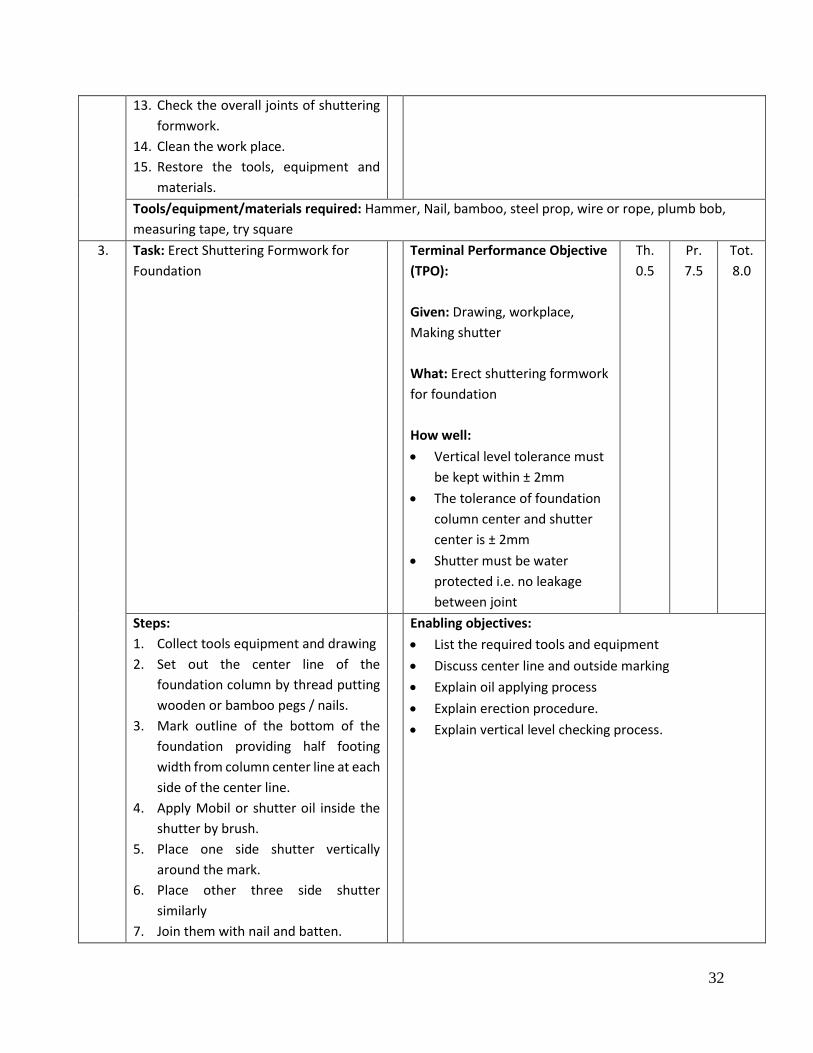
32
13. Check the overall joints of shuttering
formwork.
14. Clean the work place.
15. Restore the tools, equipment and
materials.
Tools/equipment/materials required: Hammer, Nail, bamboo, steel prop, wire or rope, plumb bob,
measuring tape, try square
3. Task: Erect Shuttering Formwork for
Foundation
Terminal Performance Objective
(TPO):
Given: Drawing, workplace,
Making shutter
What: Erect shuttering formwork
for foundation
How well:
Vertical level tolerance must
be kept within ± 2mm
The tolerance of foundation
column center and shutter
center is ± 2mm
Shutter must be water
protected i.e. no leakage
between joint
Th.
0.5
Pr.
7.5
Tot.
8.0
Steps:
1. Collect tools equipment and drawing
2. Set out the center line of the
foundation column by thread putting
wooden or bamboo pegs / nails.
3. Mark outline of the bottom of the
foundation providing half footing
width from column center line at each
side of the center line.
4. Apply Mobil or shutter oil inside the
shutter by brush.
5. Place one side shutter vertically
around the mark.
6. Place other three side shutter
similarly
7. Join them with nail and batten.
Enabling objectives:
List the required tools and equipment
Discuss center line and outside marking
Explain oil applying process
Explain erection procedure.
Explain vertical level checking process.
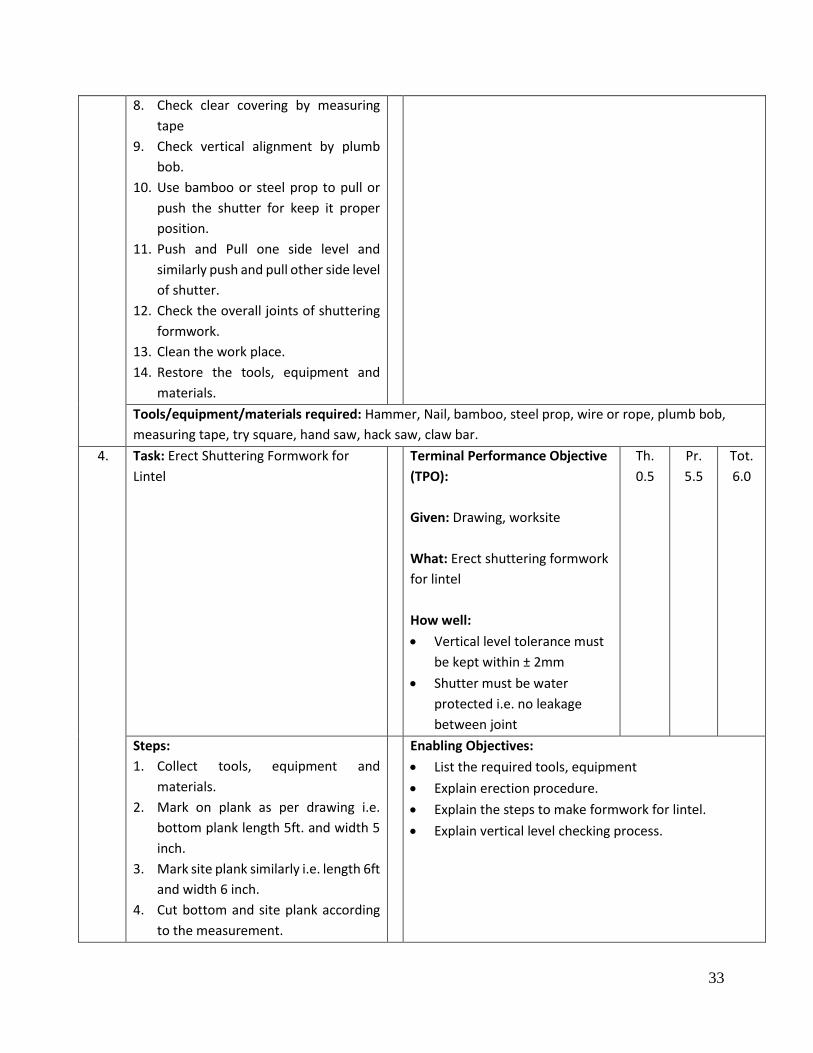
33
8. Check clear covering by measuring
tape
9. Check vertical alignment by plumb
bob.
10. Use bamboo or steel prop to pull or
push the shutter for keep it proper
position.
11. Push and Pull one side level and
similarly push and pull other side level
of shutter.
12. Check the overall joints of shuttering
formwork.
13. Clean the work place.
14. Restore the tools, equipment and
materials.
Tools/equipment/materials required: Hammer, Nail, bamboo, steel prop, wire or rope, plumb bob,
measuring tape, try square, hand saw, hack saw, claw bar.
4. Task: Erect Shuttering Formwork for
Lintel
Terminal Performance Objective
(TPO):
Given: Drawing, worksite
What: Erect shuttering formwork
for lintel
How well:
Vertical level tolerance must
be kept within ± 2mm
Shutter must be water
protected i.e. no leakage
between joint
Th.
0.5
Pr.
5.5
Tot.
6.0
Steps:
1. Collect tools, equipment and
materials.
2. Mark on plank as per drawing i.e.
bottom plank length 5ft. and width 5
inch.
3. Mark site plank similarly i.e. length 6ft
and width 6 inch.
4. Cut bottom and site plank according
to the measurement.
Enabling Objectives:
List the required tools, equipment
Explain erection procedure.
Explain the steps to make formwork for lintel.
Explain vertical level checking process.
34
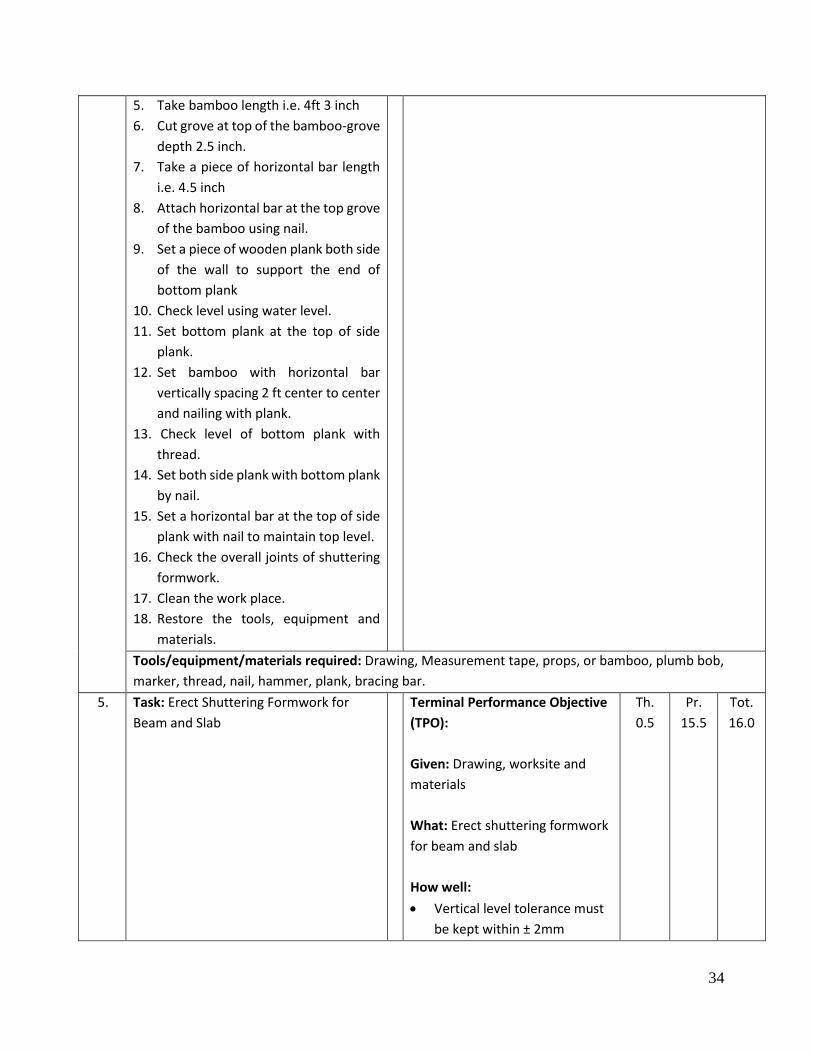
5. Take bamboo length i.e. 4ft 3 inch
6. Cut grove at top of the bamboo-grove
depth 2.5 inch.
7. Take a piece of horizontal bar length
i.e. 4.5 inch
8. Attach horizontal bar at the top grove
of the bamboo using nail.
9. Set a piece of wooden plank both side
of the wall to support the end of
bottom plank
10. Check level using water level.
11. Set bottom plank at the top of side
plank.
12. Set bamboo with horizontal bar
vertically spacing 2 ft center to center
and nailing with plank.
13. Check level of bottom plank with
thread.
14. Set both side plank with bottom plank
by nail.
15. Set a horizontal bar at the top of side
plank with nail to maintain top level.
16. Check the overall joints of shuttering
formwork.
17. Clean the work place.
18. Restore the tools, equipment and
materials.
Tools/equipment/materials required: Drawing, Measurement tape, props, or bamboo, plumb bob,
marker, thread, nail, hammer, plank, bracing bar.
5. Task: Erect Shuttering Formwork for
Beam and Slab
Terminal Performance Objective
(TPO):
Given: Drawing, worksite and
materials
What: Erect shuttering formwork
for beam and slab
How well:
Vertical level tolerance must
be kept within ± 2mm
Th.
0.5
Pr.
15.5
Tot.
16.0
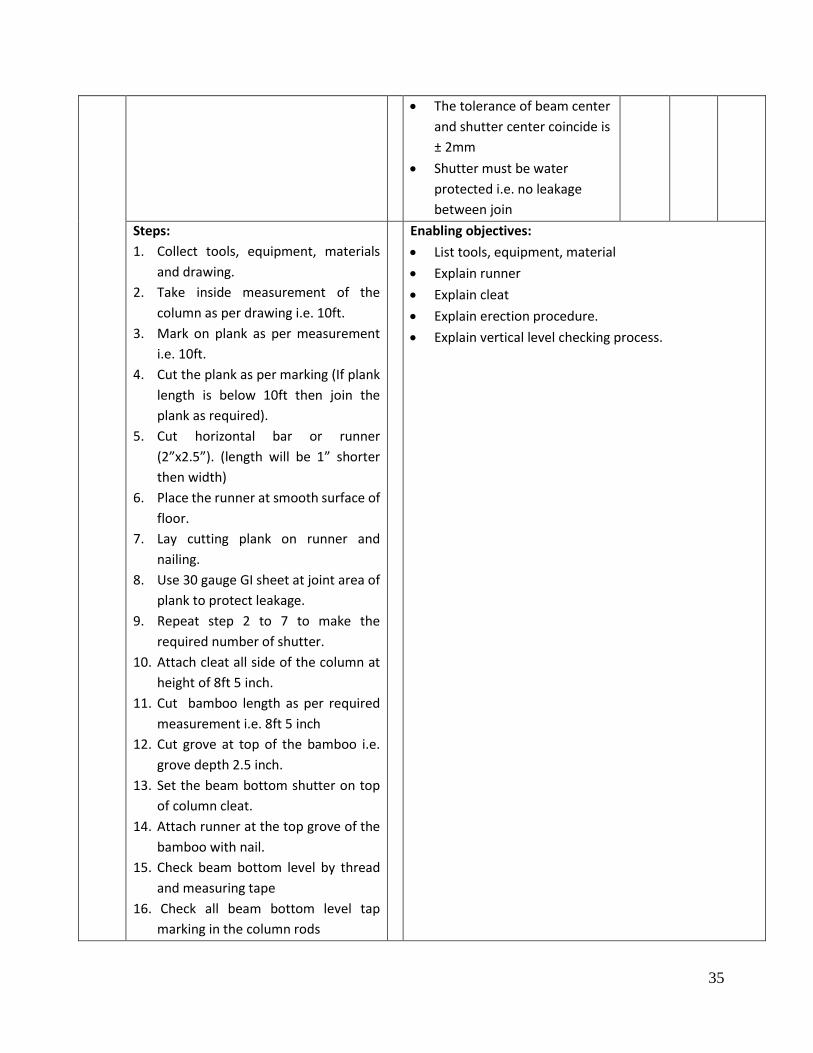
35
The tolerance of beam center
and shutter center coincide is
± 2mm
Shutter must be water
protected i.e. no leakage
between join
Steps:
1. Collect tools, equipment, materials
and drawing.
2. Take inside measurement of the
column as per drawing i.e. 10ft.
3. Mark on plank as per measurement
i.e. 10ft.
4. Cut the plank as per marking (If plank
length is below 10ft then join the
plank as required).
5. Cut horizontal bar or runner
(2”x2.5”). (length will be 1” shorter
then width)
6. Place the runner at smooth surface of
floor.
7. Lay cutting plank on runner and
nailing.
8. Use 30 gauge GI sheet at joint area of
plank to protect leakage.
9. Repeat step 2 to 7 to make the
required number of shutter.
10. Attach cleat all side of the column at
height of 8ft 5 inch.
11. Cut bamboo length as per required
measurement i.e. 8ft 5 inch
12. Cut grove at top of the bamboo i.e.
grove depth 2.5 inch.
13. Set the beam bottom shutter on top
of column cleat.
14. Attach runner at the top grove of the
bamboo with nail.
15. Check beam bottom level by thread
and measuring tape
16. Check all beam bottom level tap
marking in the column rods
Enabling objectives:
List tools, equipment, material
Explain runner
Explain cleat
Explain erection procedure.
Explain vertical level checking process.
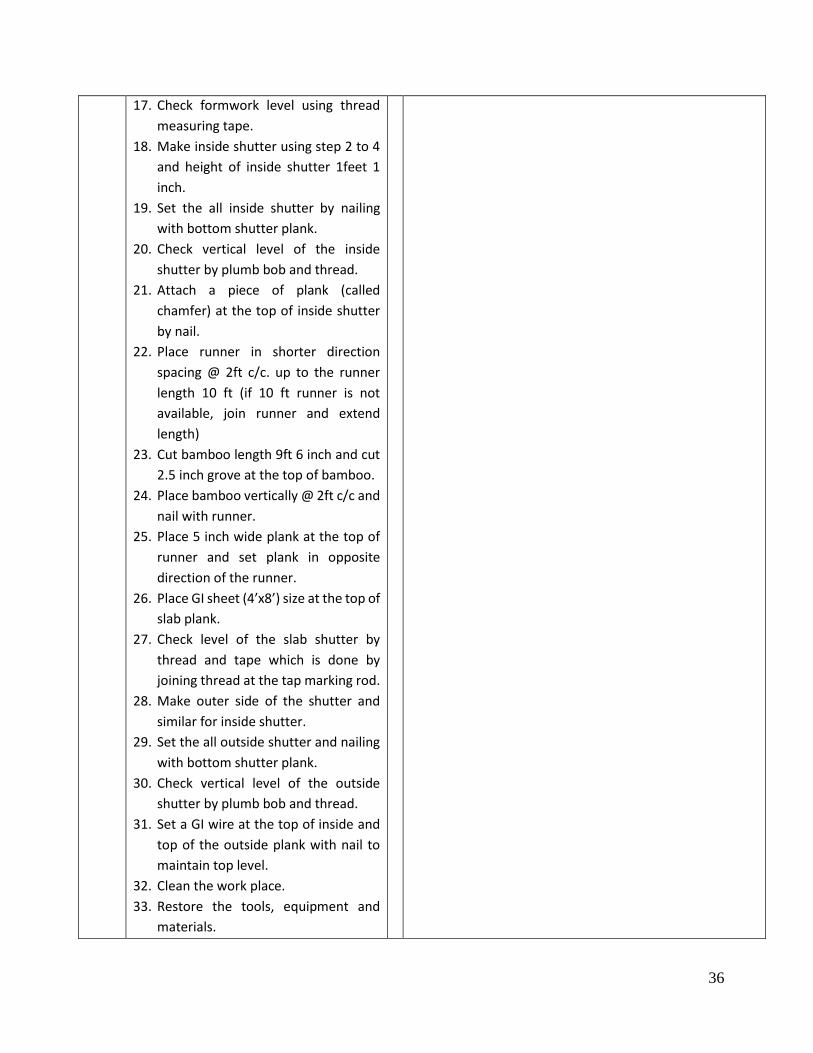
36
17. Check formwork level using thread
measuring tape.
18. Make inside shutter using step 2 to 4
and height of inside shutter 1feet 1
inch.
19. Set the all inside shutter by nailing
with bottom shutter plank.
20. Check vertical level of the inside
shutter by plumb bob and thread.
21. Attach a piece of plank (called
chamfer) at the top of inside shutter
by nail.
22. Place runner in shorter direction
spacing @ 2ft c/c. up to the runner
length 10 ft (if 10 ft runner is not
available, join runner and extend
length)
23. Cut bamboo length 9ft 6 inch and cut
2.5 inch grove at the top of bamboo.
24. Place bamboo vertically @ 2ft c/c and
nail with runner.
25. Place 5 inch wide plank at the top of
runner and set plank in opposite
direction of the runner.
26. Place GI sheet (4’x8’) size at the top of
slab plank.
27. Check level of the slab shutter by
thread and tape which is done by
joining thread at the tap marking rod.
28. Make outer side of the shutter and
similar for inside shutter.
29. Set the all outside shutter and nailing
with bottom shutter plank.
30. Check vertical level of the outside
shutter by plumb bob and thread.
31. Set a GI wire at the top of inside and
top of the outside plank with nail to
maintain top level.
32. Clean the work place.
33. Restore the tools, equipment and
materials.
37
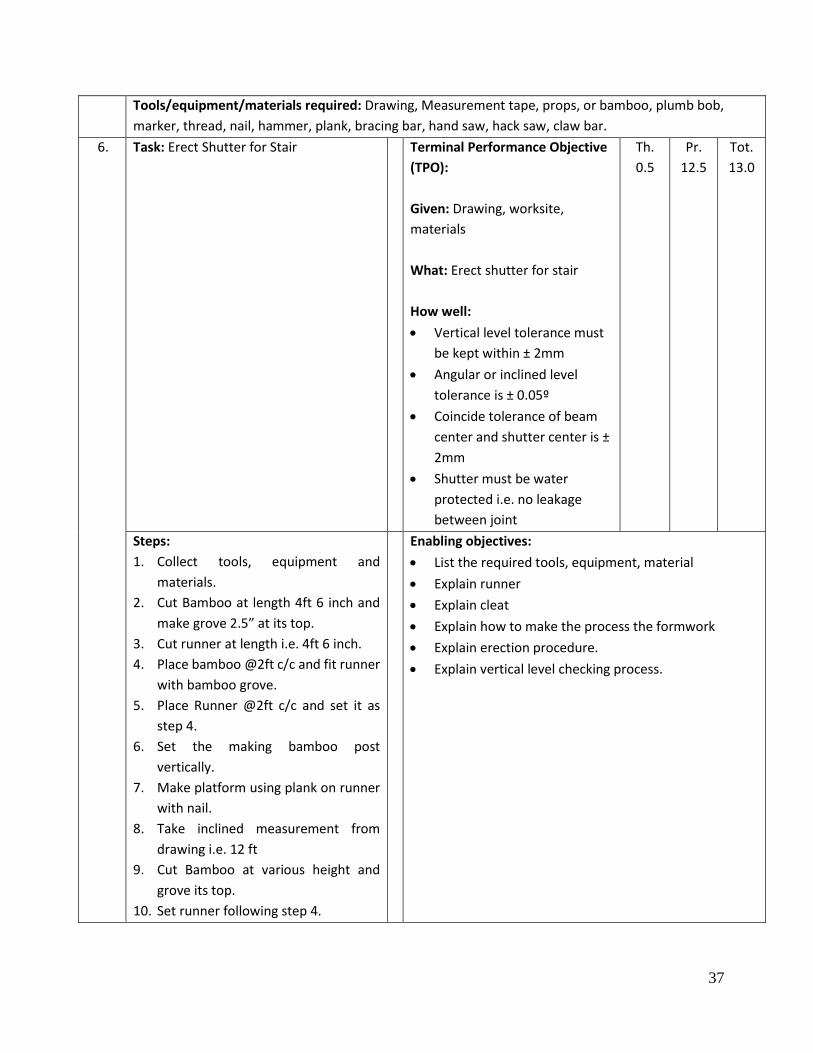
Tools/equipment/materials required: Drawing, Measurement tape, props, or bamboo, plumb bob,
marker, thread, nail, hammer, plank, bracing bar, hand saw, hack saw, claw bar.
6. Task: Erect Shutter for Stair Terminal Performance Objective
(TPO):
Given: Drawing, worksite,
materials
What: Erect shutter for stair
How well:
Vertical level tolerance must
be kept within ± 2mm
Angular or inclined level
tolerance is ± 0.05º
Coincide tolerance of beam
center and shutter center is ±
2mm
Shutter must be water
protected i.e. no leakage
between joint
Th.
0.5
Pr.
12.5
Tot.
13.0
Steps:
1. Collect tools, equipment and
materials.
2. Cut Bamboo at length 4ft 6 inch and
make grove 2.5” at its top.
3. Cut runner at length i.e. 4ft 6 inch.
4. Place bamboo @2ft c/c and fit runner
with bamboo grove.
5. Place Runner @2ft c/c and set it as
step 4.
6. Set the making bamboo post
vertically.
7. Make platform using plank on runner
with nail.
8. Take inclined measurement from
drawing i.e. 12 ft
9. Cut Bamboo at various height and
grove its top.
10. Set runner following step 4.
Enabling objectives:
List the required tools, equipment, material
Explain runner
Explain cleat
Explain how to make the process the formwork
Explain erection procedure.
Explain vertical level checking process.
38
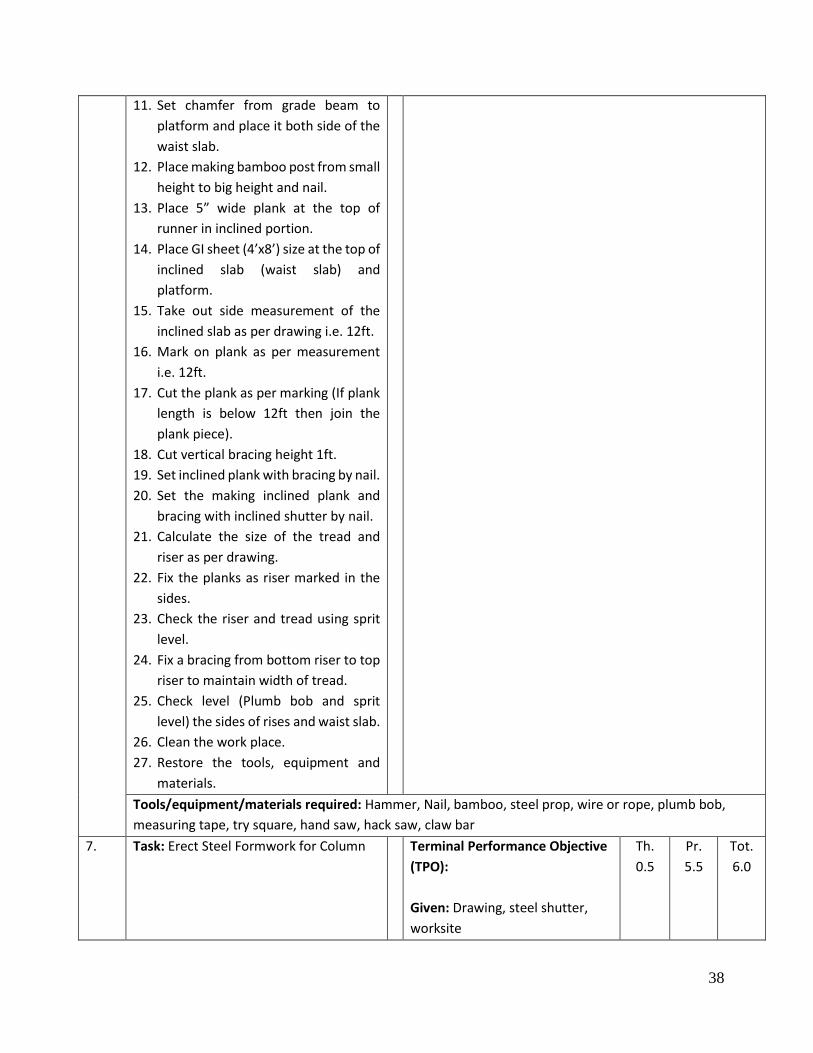
11. Set chamfer from grade beam to
platform and place it both side of the
waist slab.
12. Place making bamboo post from small
height to big height and nail.
13. Place 5” wide plank at the top of
runner in inclined portion.
14. Place GI sheet (4’x8’) size at the top of
inclined slab (waist slab) and
platform.
15. Take out side measurement of the
inclined slab as per drawing i.e. 12ft.
16. Mark on plank as per measurement
i.e. 12ft.
17. Cut the plank as per marking (If plank
length is below 12ft then join the
plank piece).
18. Cut vertical bracing height 1ft.
19. Set inclined plank with bracing by nail.
20. Set the making inclined plank and
bracing with inclined shutter by nail.
21. Calculate the size of the tread and
riser as per drawing.
22. Fix the planks as riser marked in the
sides.
23. Check the riser and tread using sprit
level.
24. Fix a bracing from bottom riser to top
riser to maintain width of tread.
25. Check level (Plumb bob and sprit
level) the sides of rises and waist slab.
26. Clean the work place.
27. Restore the tools, equipment and
materials.
Tools/equipment/materials required: Hammer, Nail, bamboo, steel prop, wire or rope, plumb bob,
measuring tape, try square, hand saw, hack saw, claw bar
7. Task: Erect Steel Formwork for Column Terminal Performance Objective
(TPO):
Given: Drawing, steel shutter,
worksite
Th.
0.5
Pr.
5.5
Tot.
6.0
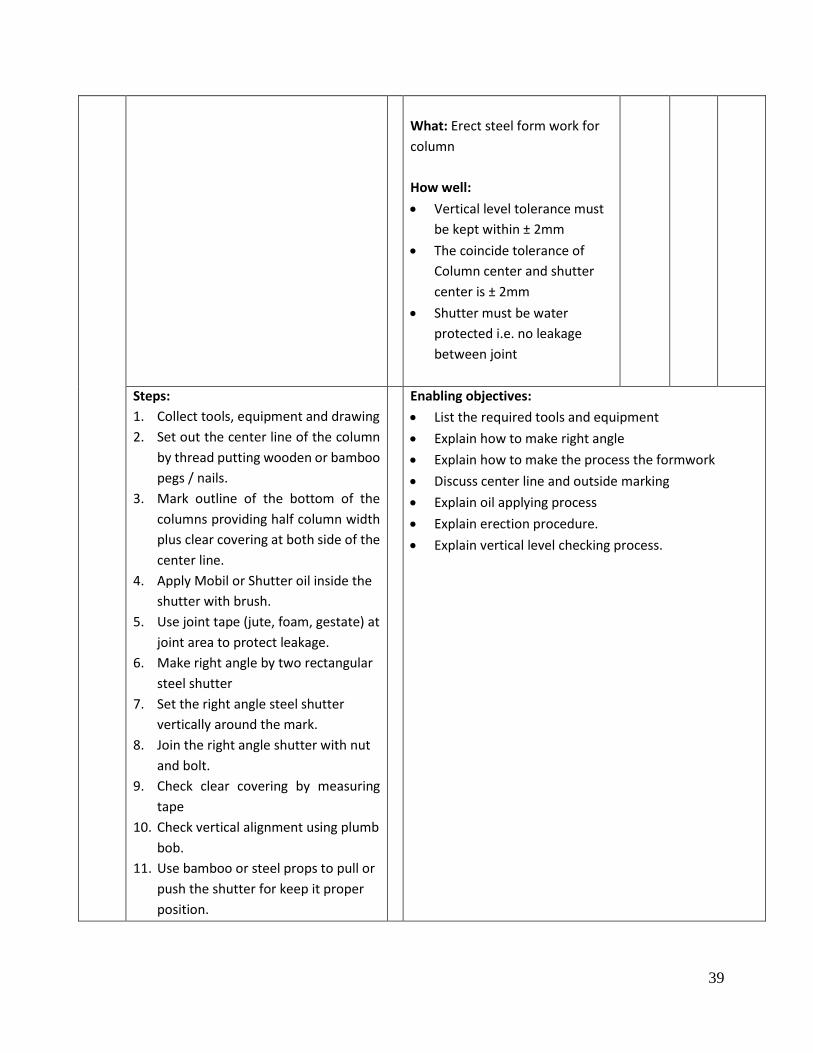
39
What: Erect steel form work for
column
How well:
Vertical level tolerance must
be kept within ± 2mm
The coincide tolerance of
Column center and shutter
center is ± 2mm
Shutter must be water
protected i.e. no leakage
between joint
Steps:
1. Collect tools, equipment and drawing
2. Set out the center line of the column
by thread putting wooden or bamboo
pegs / nails.
3. Mark outline of the bottom of the
columns providing half column width
plus clear covering at both side of the
center line.
4. Apply Mobil or Shutter oil inside the
shutter with brush.
5. Use joint tape (jute, foam, gestate) at
joint area to protect leakage.
6. Make right angle by two rectangular
steel shutter
7. Set the right angle steel shutter
vertically around the mark.
8. Join the right angle shutter with nut
and bolt.
9. Check clear covering by measuring
tape
10. Check vertical alignment using plumb
bob.
11. Use bamboo or steel props to pull or
push the shutter for keep it proper
position.
Enabling objectives:
List the required tools and equipment
Explain how to make right angle
Explain how to make the process the formwork
Discuss center line and outside marking
Explain oil applying process
Explain erection procedure.
Explain vertical level checking process.
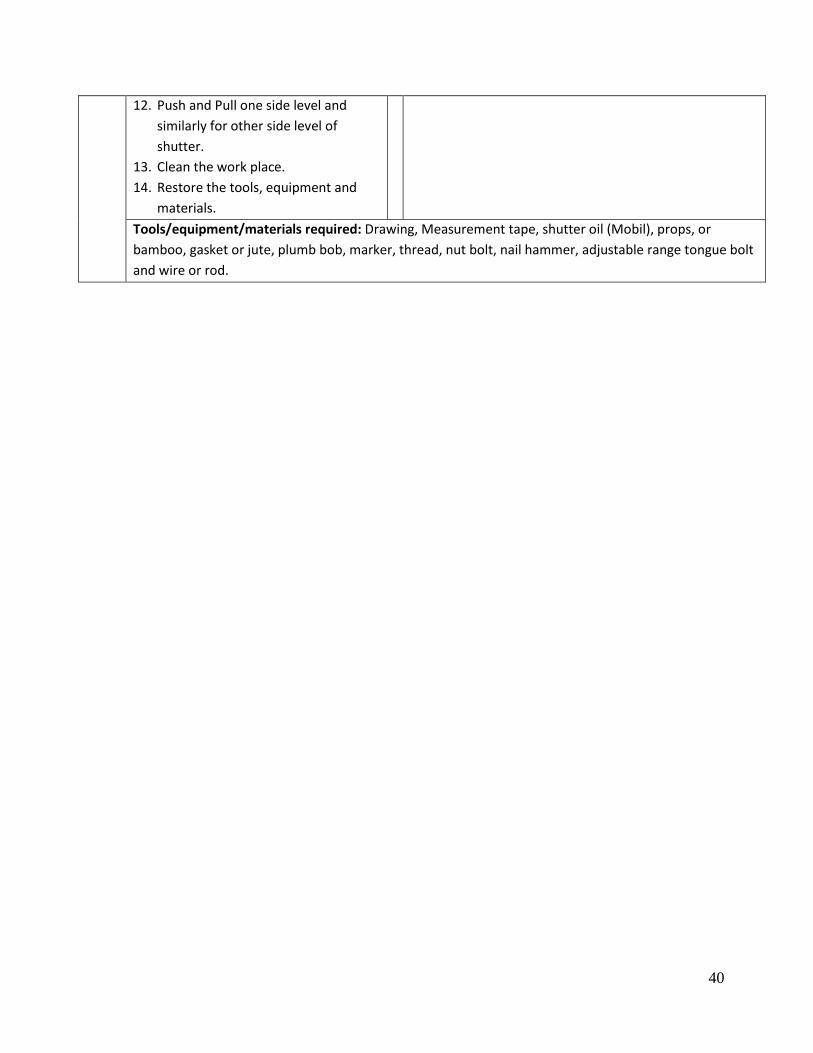
40
12. Push and Pull one side level and
similarly for other side level of
shutter.
13. Clean the work place.
14. Restore the tools, equipment and
materials.
Tools/equipment/materials required: Drawing, Measurement tape, shutter oil (Mobil), props, or
bamboo, gasket or jute, plumb bob, marker, thread, nut bolt, nail hammer, adjustable range tongue bolt
and wire or rod.

41
Module 5: Dismantle Formwork
42
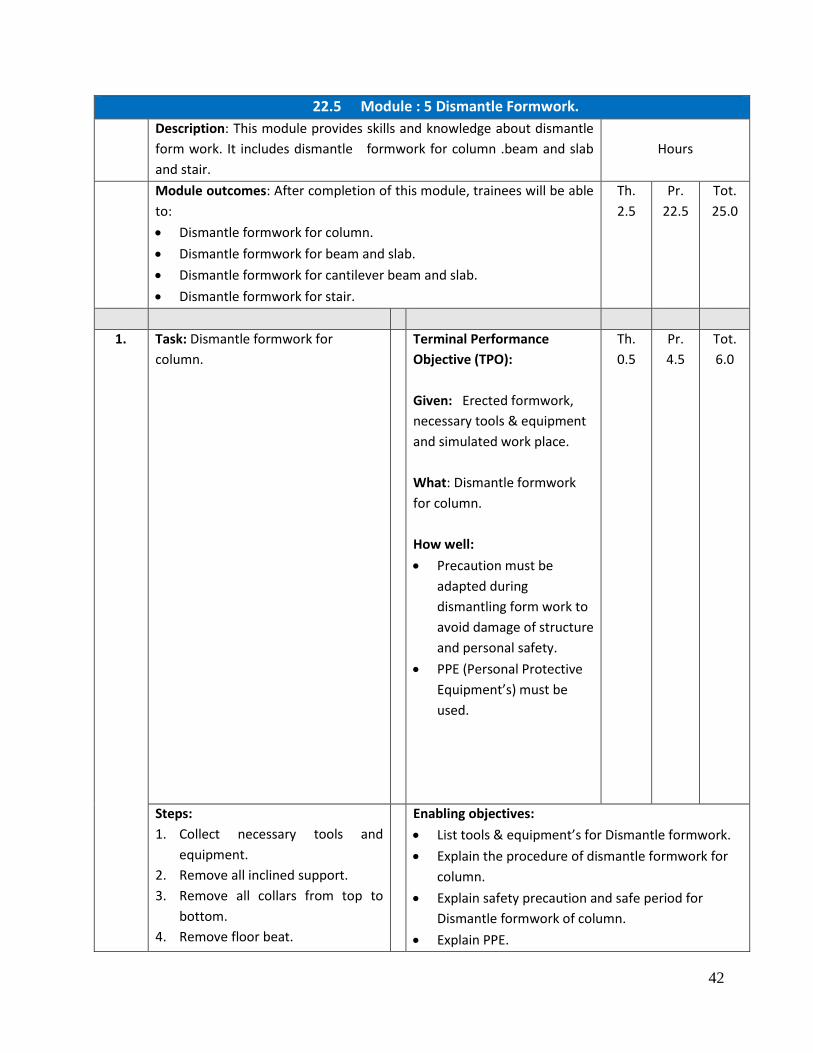
22.5 Module : 5 Dismantle Formwork.
Description: This module provides skills and knowledge about dismantle
form work. It includes dismantle formwork for column .beam and slab
and stair.
Hours
Module outcomes: After completion of this module, trainees will be able
to:
Dismantle formwork for column.
Dismantle formwork for beam and slab.
Dismantle formwork for cantilever beam and slab.
Dismantle formwork for stair.
Th.
2.5
Pr.
22.5
Tot.
25.0
1. Task: Dismantle formwork for
column.
Terminal Performance
Objective (TPO):
Given: Erected formwork,
necessary tools & equipment
and simulated work place.
What: Dismantle formwork
for column.
How well:
Precaution must be
adapted during
dismantling form work to
avoid damage of structure
and personal safety.
PPE (Personal Protective
Equipment’s) must be
used.
Th.
0.5
Pr.
4.5
Tot.
6.0
Steps:
1. Collect necessary tools and
equipment.
2. Remove all inclined support.
3. Remove all collars from top to
bottom.
4. Remove floor beat.
Enabling objectives:
List tools & equipment’s for Dismantle formwork.
Explain the procedure of dismantle formwork for
column.
Explain safety precaution and safe period for
Dismantle formwork of column.
Explain PPE.
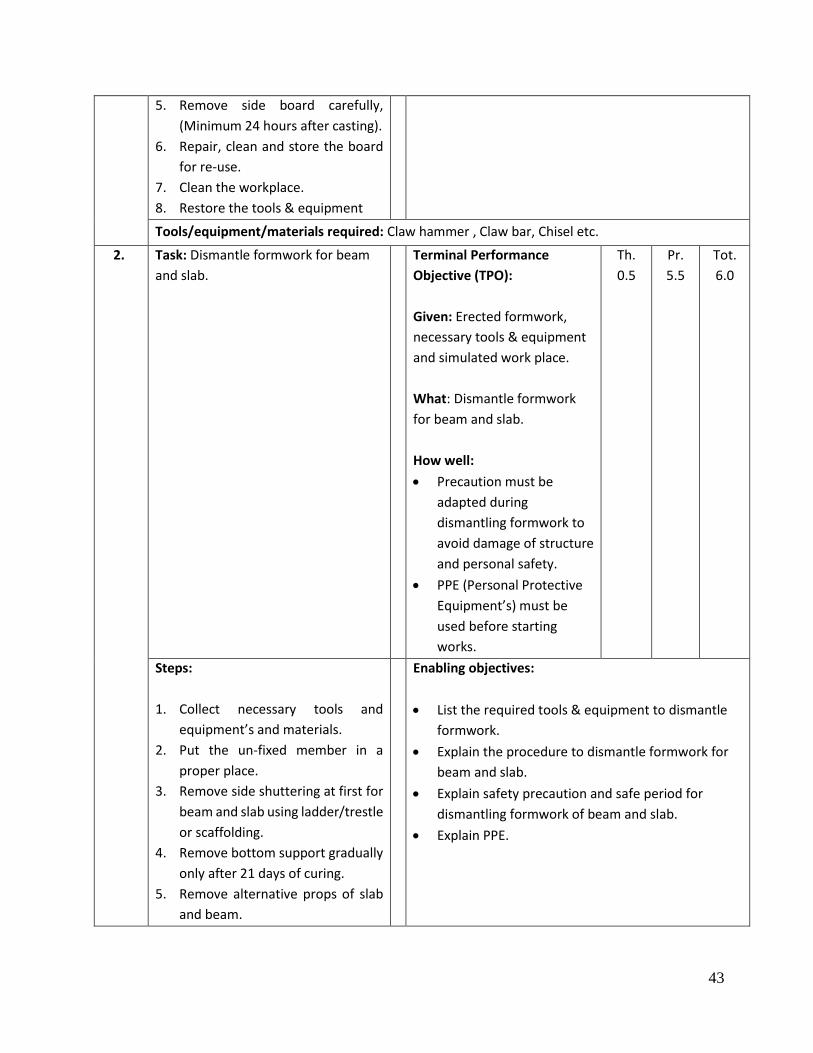
43
5. Remove side board carefully,
(Minimum 24 hours after casting).
6. Repair, clean and store the board
for re-use.
7. Clean the workplace.
8. Restore the tools & equipment
Tools/equipment/materials required: Claw hammer , Claw bar, Chisel etc.
2. Task: Dismantle formwork for beam
and slab.
Terminal Performance
Objective (TPO):
Given: Erected formwork,
necessary tools & equipment
and simulated work place.
What: Dismantle formwork
for beam and slab.
How well:
Precaution must be
adapted during
dismantling formwork to
avoid damage of structure
and personal safety.
PPE (Personal Protective
Equipment’s) must be
used before starting
works.
Th.
0.5
Pr.
5.5
Tot.
6.0
Steps:
1. Collect necessary tools and
equipment’s and materials.
2. Put the un-fixed member in a
proper place.
3. Remove side shuttering at first for
beam and slab using ladder/trestle
or scaffolding.
4. Remove bottom support gradually
only after 21 days of curing.
5. Remove alternative props of slab
and beam.
Enabling objectives:
List the required tools & equipment to dismantle
formwork.
Explain the procedure to dismantle formwork for
beam and slab.
Explain safety precaution and safe period for
dismantling formwork of beam and slab.
Explain PPE.
44
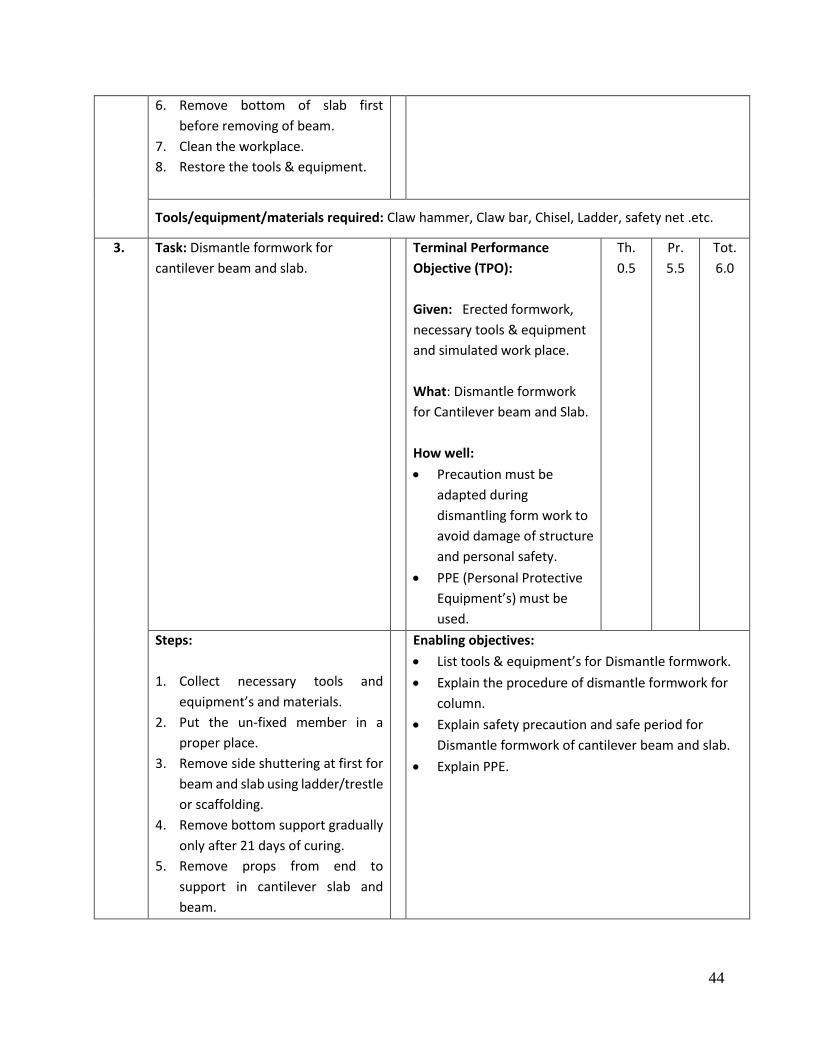
6. Remove bottom of slab first
before removing of beam.
7. Clean the workplace.
8. Restore the tools & equipment.
Tools/equipment/materials required: Claw hammer, Claw bar, Chisel, Ladder, safety net .etc.
3. Task: Dismantle formwork for
cantilever beam and slab.
Terminal Performance
Objective (TPO):
Given: Erected formwork,
necessary tools & equipment
and simulated work place.
What: Dismantle formwork
for Cantilever beam and Slab.
How well:
Precaution must be
adapted during
dismantling form work to
avoid damage of structure
and personal safety.
PPE (Personal Protective
Equipment’s) must be
used.
Th.
0.5
Pr.
5.5
Tot.
6.0
Steps:
1. Collect necessary tools and
equipment’s and materials.
2. Put the un-fixed member in a
proper place.
3. Remove side shuttering at first for
beam and slab using ladder/trestle
or scaffolding.
4. Remove bottom support gradually
only after 21 days of curing.
5. Remove props from end to
support in cantilever slab and
beam.
Enabling objectives:
List tools & equipment’s for Dismantle formwork.
Explain the procedure of dismantle formwork for
column.
Explain safety precaution and safe period for
Dismantle formwork of cantilever beam and slab.
Explain PPE.
45
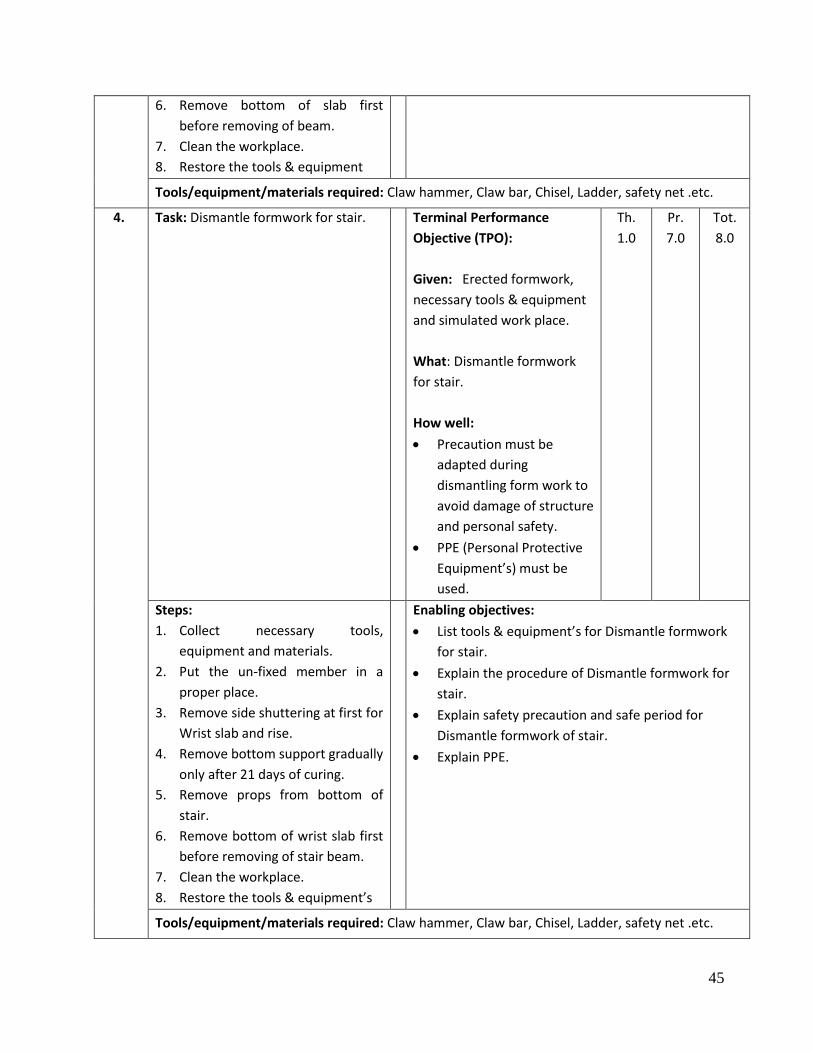
6. Remove bottom of slab first
before removing of beam.
7. Clean the workplace.
8. Restore the tools & equipment
Tools/equipment/materials required: Claw hammer, Claw bar, Chisel, Ladder, safety net .etc.
4. Task: Dismantle formwork for stair.
Terminal Performance
Objective (TPO):
Given: Erected formwork,
necessary tools & equipment
and simulated work place.
What: Dismantle formwork
for stair.
How well:
Precaution must be
adapted during
dismantling form work to
avoid damage of structure
and personal safety.
PPE (Personal Protective
Equipment’s) must be
used.
Th.
1.0
Pr.
7.0
Tot.
8.0
Steps:
1. Collect necessary tools,
equipment and materials.
2. Put the un-fixed member in a
proper place.
3. Remove side shuttering at first for
Wrist slab and rise.
4. Remove bottom support gradually
only after 21 days of curing.
5. Remove props from bottom of
stair.
6. Remove bottom of wrist slab first
before removing of stair beam.
7. Clean the workplace.
8. Restore the tools & equipment’s
Enabling objectives:
List tools & equipment’s for Dismantle formwork
for stair.
Explain the procedure of Dismantle formwork for
stair.
Explain safety precaution and safe period for
Dismantle formwork of stair.
Explain PPE.
Tools/equipment/materials required: Claw hammer, Claw bar, Chisel, Ladder, safety net .etc.
46
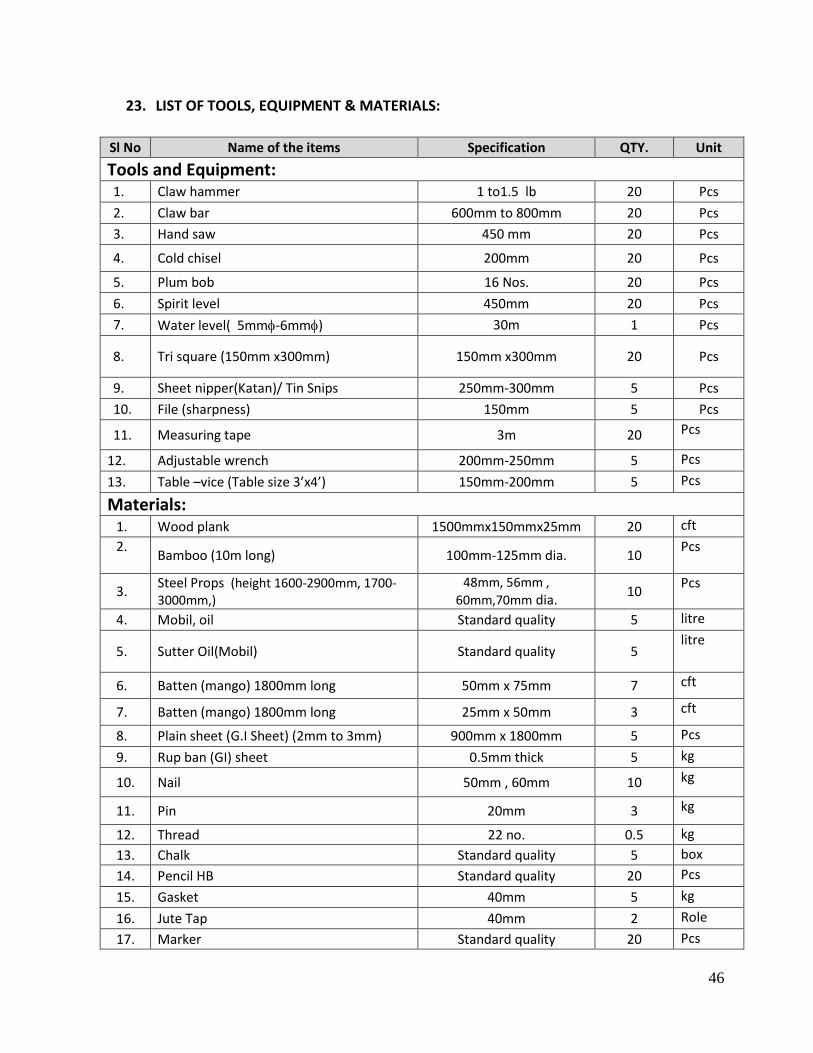
23. LIST OF TOOLS, EQUIPMENT & MATERIALS:
Sl No Name of the items Specification QTY. Unit
Tools and Equipment: 1. Claw hammer 1 to1.5 lb 20 Pcs
2. Claw bar 600mm to 800mm 20 Pcs
3. Hand saw 450 mm 20 Pcs
4. Cold chisel 200mm 20 Pcs
5. Plum bob 16 Nos. 20 Pcs
6. Spirit level 450mm 20 Pcs
7. Water level( 5mm-6mm) 30m 1 Pcs
8. Tri square (150mm x300mm) 150mm x300mm 20 Pcs
9. Sheet nipper(Katan)/ Tin Snips 250mm-300mm 5 Pcs
10. File (sharpness) 150mm 5 Pcs
11. Measuring tape 3m 20 Pcs
12. Adjustable wrench 200mm-250mm 5 Pcs
13. Table –vice (Table size 3’x4’) 150mm-200mm 5 Pcs
Materials: 1. Wood plank 1500mmx150mmx25mm 20 cft
2.
Bamboo (10m long) 100mm-125mm dia. 10 Pcs
3. Steel Props (height 1600-2900mm, 1700-3000mm,)
48mm, 56mm ,
60mm,70mm dia. 10
Pcs
4. Mobil, oil Standard quality 5 litre
5. Sutter Oil(Mobil) Standard quality 5 litre
6. Batten (mango) 1800mm long 50mm x 75mm 7 cft
7. Batten (mango) 1800mm long 25mm x 50mm 3 cft
8. Plain sheet (G.I Sheet) (2mm to 3mm) 900mm x 1800mm 5 Pcs
9. Rup ban (GI) sheet 0.5mm thick 5 kg
10. Nail 50mm , 60mm 10 kg
11. Pin 20mm 3 kg
12. Thread 22 no. 0.5 kg
13. Chalk Standard quality 5 box
14. Pencil HB Standard quality 20 Pcs
15. Gasket 40mm 5 kg
16. Jute Tap 40mm 2 Role
17. Marker Standard quality 20 Pcs
47
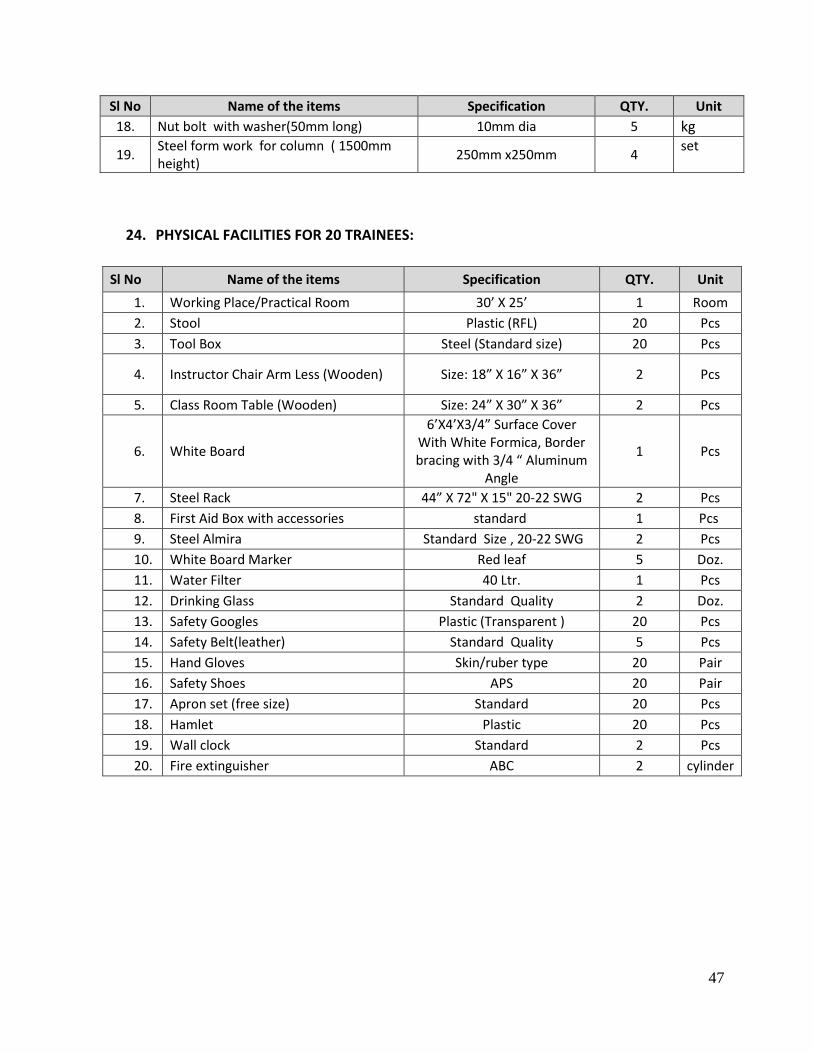
Sl No Name of the items Specification QTY. Unit
18. Nut bolt with washer(50mm long) 10mm dia 5 kg
19. Steel form work for column ( 1500mm height)
250mm x250mm 4 set
24. PHYSICAL FACILITIES FOR 20 TRAINEES:
Sl No Name of the items Specification QTY. Unit
1. Working Place/Practical Room 30’ X 25’ 1 Room
2. Stool Plastic (RFL) 20 Pcs
3. Tool Box Steel (Standard size) 20 Pcs
4. Instructor Chair Arm Less (Wooden) Size: 18” X 16” X 36” 2 Pcs
5. Class Room Table (Wooden) Size: 24” X 30” X 36” 2 Pcs
6. White Board
6’X4’X3/4” Surface Cover With White Formica, Border bracing with 3/4 “ Aluminum
Angle
1 Pcs
7. Steel Rack 44” X 72" X 15" 20-22 SWG 2 Pcs
8. First Aid Box with accessories standard 1 Pcs
9. Steel Almira Standard Size , 20-22 SWG 2 Pcs
10. White Board Marker Red leaf 5 Doz.
11. Water Filter 40 Ltr. 1 Pcs
12. Drinking Glass Standard Quality 2 Doz.
13. Safety Googles Plastic (Transparent ) 20 Pcs
14. Safety Belt(leather) Standard Quality 5 Pcs
15. Hand Gloves Skin/ruber type 20 Pair
16. Safety Shoes APS 20 Pair
17. Apron set (free size) Standard 20 Pcs
18. Hamlet Plastic 20 Pcs
19. Wall clock Standard 2 Pcs
20. Fire extinguisher ABC 2 cylinder
48
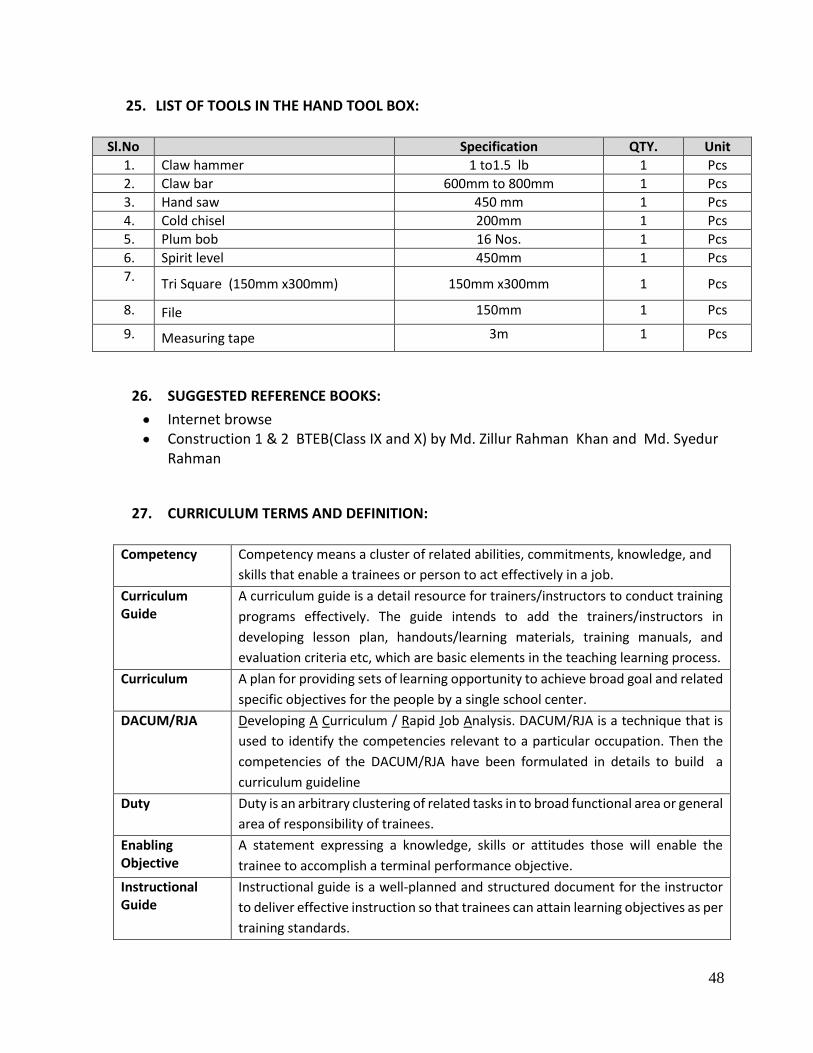
25. LIST OF TOOLS IN THE HAND TOOL BOX:
Sl.No Specification QTY. Unit
1. Claw hammer 1 to1.5 lb 1 Pcs
2. Claw bar 600mm to 800mm 1 Pcs
3. Hand saw 450 mm 1 Pcs
4. Cold chisel 200mm 1 Pcs
5. Plum bob 16 Nos. 1 Pcs
6. Spirit level 450mm 1 Pcs
7. Tri Square (150mm x300mm) 150mm x300mm 1 Pcs
8. File 150mm 1 Pcs
9. Measuring tape 3m 1 Pcs
26. SUGGESTED REFERENCE BOOKS:
Internet browse Construction 1 & 2 BTEB(Class IX and X) by Md. Zillur Rahman Khan and Md. Syedur
Rahman
27. CURRICULUM TERMS AND DEFINITION:
Competency Competency means a cluster of related abilities, commitments, knowledge, and
skills that enable a trainees or person to act effectively in a job.
Curriculum Guide
A curriculum guide is a detail resource for trainers/instructors to conduct training
programs effectively. The guide intends to add the trainers/instructors in
developing lesson plan, handouts/learning materials, training manuals, and
evaluation criteria etc, which are basic elements in the teaching learning process.
Curriculum A plan for providing sets of learning opportunity to achieve broad goal and related
specific objectives for the people by a single school center.
DACUM/RJA Developing A Curriculum / Rapid Job Analysis. DACUM/RJA is a technique that is
used to identify the competencies relevant to a particular occupation. Then the
competencies of the DACUM/RJA have been formulated in details to build a
curriculum guideline
Duty Duty is an arbitrary clustering of related tasks in to broad functional area or general
area of responsibility of trainees.
Enabling Objective
A statement expressing a knowledge, skills or attitudes those will enable the
trainee to accomplish a terminal performance objective.
Instructional Guide
Instructional guide is a well-planned and structured document for the instructor
to deliver effective instruction so that trainees can attain learning objectives as per
training standards.
49
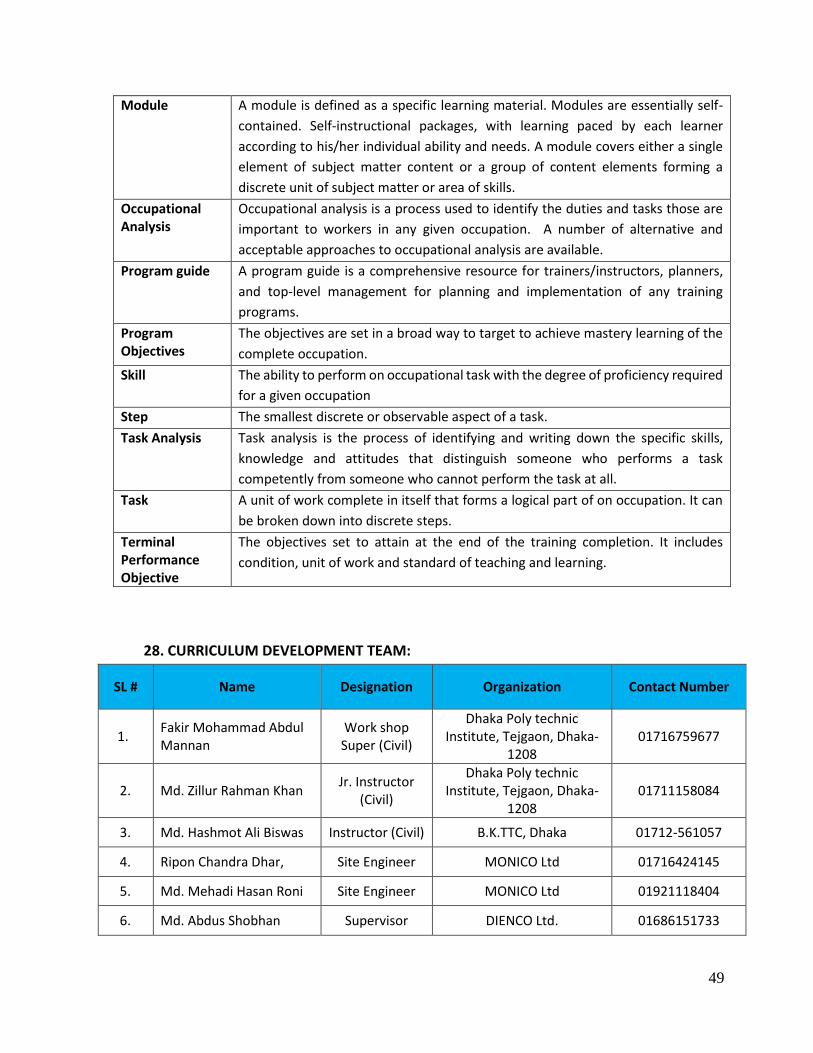
Module A module is defined as a specific learning material. Modules are essentially self-
contained. Self-instructional packages, with learning paced by each learner
according to his/her individual ability and needs. A module covers either a single
element of subject matter content or a group of content elements forming a
discrete unit of subject matter or area of skills.
Occupational Analysis
Occupational analysis is a process used to identify the duties and tasks those are
important to workers in any given occupation. A number of alternative and
acceptable approaches to occupational analysis are available.
Program guide A program guide is a comprehensive resource for trainers/instructors, planners,
and top-level management for planning and implementation of any training
programs.
Program Objectives
The objectives are set in a broad way to target to achieve mastery learning of the
complete occupation.
Skill The ability to perform on occupational task with the degree of proficiency required
for a given occupation
Step The smallest discrete or observable aspect of a task.
Task Analysis Task analysis is the process of identifying and writing down the specific skills,
knowledge and attitudes that distinguish someone who performs a task
competently from someone who cannot perform the task at all.
Task A unit of work complete in itself that forms a logical part of on occupation. It can
be broken down into discrete steps.
Terminal Performance Objective
The objectives set to attain at the end of the training completion. It includes
condition, unit of work and standard of teaching and learning.
28. CURRICULUM DEVELOPMENT TEAM:
SL # Name Designation Organization Contact Number
1. Fakir Mohammad Abdul Mannan
Work shop Super (Civil)
Dhaka Poly technic Institute, Tejgaon, Dhaka-
1208 01716759677
2. Md. Zillur Rahman Khan Jr. Instructor
(Civil)
Dhaka Poly technic Institute, Tejgaon, Dhaka-
1208 01711158084
3. Md. Hashmot Ali Biswas Instructor (Civil) B.K.TTC, Dhaka 01712-561057
4. Ripon Chandra Dhar, Site Engineer MONICO Ltd 01716424145
5. Md. Mehadi Hasan Roni Site Engineer MONICO Ltd 01921118404
6. Md. Abdus Shobhan Supervisor DIENCO Ltd. 01686151733
50
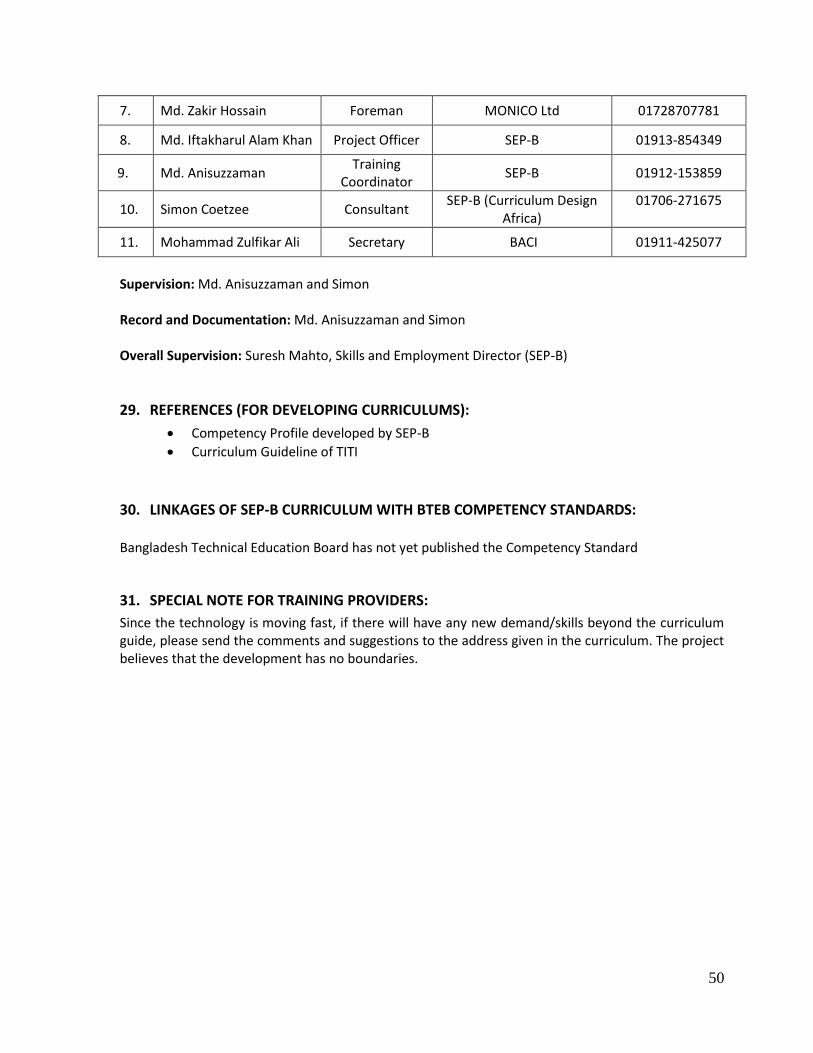
7. Md. Zakir Hossain Foreman MONICO Ltd 01728707781
8. Md. Iftakharul Alam Khan Project Officer SEP-B 01913-854349
9. Md. Anisuzzaman Training
Coordinator SEP-B 01912-153859
10. Simon Coetzee Consultant SEP-B (Curriculum Design
Africa) 01706-271675
11. Mohammad Zulfikar Ali Secretary BACI 01911-425077
Supervision: Md. Anisuzzaman and Simon Record and Documentation: Md. Anisuzzaman and Simon Overall Supervision: Suresh Mahto, Skills and Employment Director (SEP-B)
29. REFERENCES (FOR DEVELOPING CURRICULUMS):
Competency Profile developed by SEP-B
Curriculum Guideline of TITI
30. LINKAGES OF SEP-B CURRICULUM WITH BTEB COMPETENCY STANDARDS: Bangladesh Technical Education Board has not yet published the Competency Standard
31. SPECIAL NOTE FOR TRAINING PROVIDERS:
Since the technology is moving fast, if there will have any new demand/skills beyond the curriculum guide, please send the comments and suggestions to the address given in the curriculum. The project believes that the development has no boundaries.

51
Skills and Employment Programme-Bangladesh (SEP-B)
Road No # 10, House # 5, Level-3
Baridhara, Dhaka
Phone: 01782-388923