Embed Size (px)
Citation preview

1
Compass Learning Student Guide

Logging In
OverviewBefore you can log in, you need the Web address for your school's Compass Learning site. The address may bewww.thelearningodyssey.com, or it may be a special address set up for your school. You can get this informationfrom your teacher or school administrator. Your teacher will also be able to give you your user name, password,and school code. Enter this information on the login page.
Click Log In. The first page you see will be your student home page.
2

Your Student Home Page
OverviewYour home page shows all of the Compass Learning apps used by your school. On your home page, you mightsee tiles for more than one app. For example, you might see tiles for Odyssey, but in addition, you might also seetiles for Pathblazer or Hybridge.
You can have work assigned to you in more than one app. In the example below, the student home page showstiles for three apps - Pathblazer Reading, Pathblazer Math, and Odyssey.
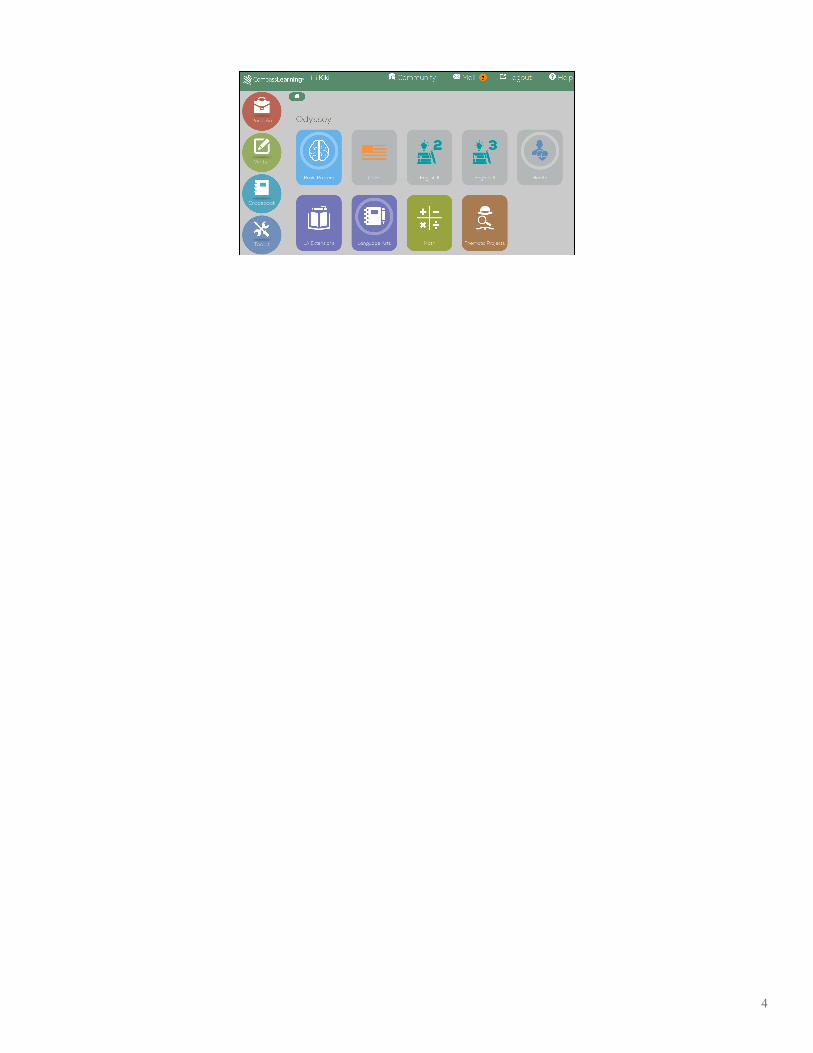
Where do I Have Assignments Waiting?The first time you click the Odyssey tile, you will see your Odyssey subjects. Subjects where you have workassigned will appear with a circle around them. In the example below, the student has access to various subjectareas, and she has assignments waiting in Brain Buzzers, Health, and Language Arts.
3
4

Your Student Portfolio
OverviewYour student portfolio shows a summary of your current work, your new assignments, and assignments in progress. Italso gives you the option to run a report on your work so you can review all of your current scores at once. To view yourportfolio, click the portfolio icon on the left side of your student launch pad.
Recent Work
In your portfolio, click the Recent Work tab to view your work.
You can view work for the day, week or month by clicking the corresponding button on the left.
5

Assignments
You can view your assignments (and the status of each assignment) by clicking the Assignments tab in your Portfolio.
Reports
You can use the Reports tab in your portfolio to run reports on your own work. These reports show you:
• All the activities you have finished;
• How much time you spent on each activity;
• Your score on each activity;
• Your answers on quizzes and tests.
6
The Writer Tool
OverviewThe Writer tool is designed to help you improve and develop your writing skills. Your teachers will create and assignWriter projects for you as part of your assignment, and you can use features available in the tool to help you during thewriting process.
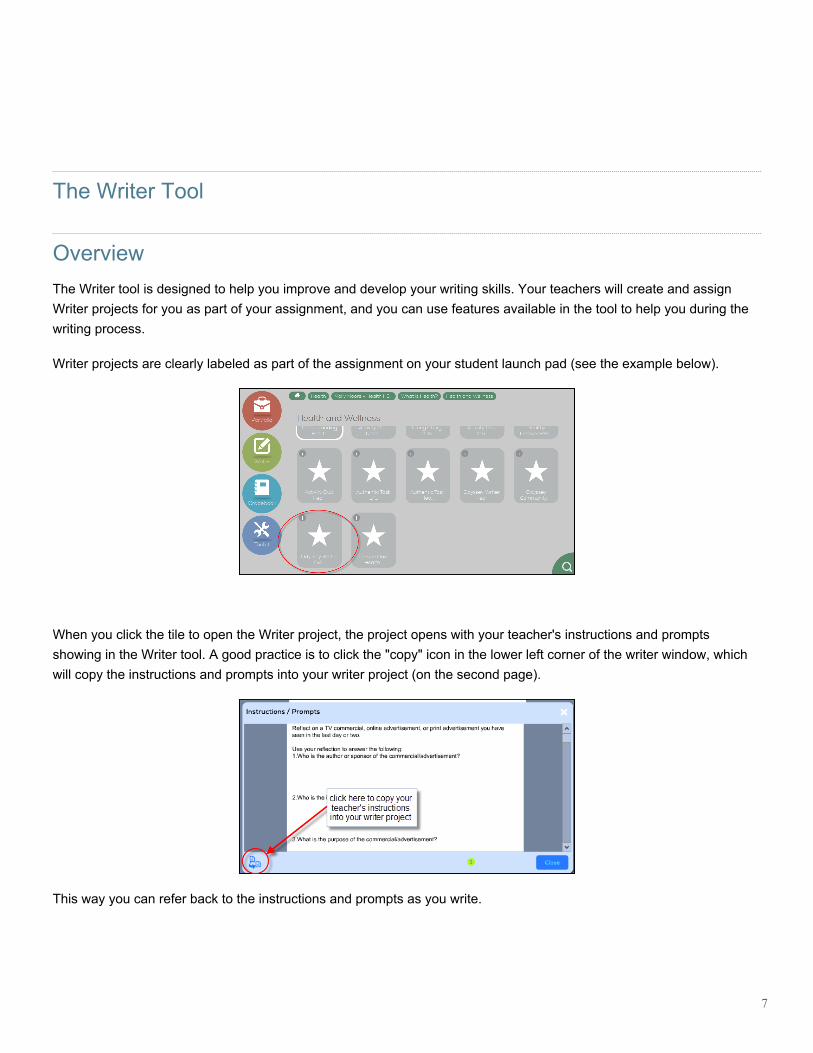
Writer projects are clearly labeled as part of the assignment on your student launch pad (see the example below).
When you click the tile to open the Writer project, the project opens with your teacher's instructions and promptsshowing in the Writer tool. A good practice is to click the "copy" icon in the lower left corner of the writer window, whichwill copy the instructions and prompts into your writer project (on the second page).
This way you can refer back to the instructions and prompts as you write.
7

If you prefer, you can read the instructions and prompts when you first open the project and then close the instructionswindow and begin writing. (However, if you wish to refer back to the instructions and prompts, you will have to close andre-open the project.)
The Drafting Tool
When you open a Writer project, you will be in the Drafting section. (This is also the section that opens if you are alreadyin the Writer tool and you click File > New Project.) In the Drafting tool area, you can write free-form (the is no pre-designed outline or page structure in the Drafting tool).
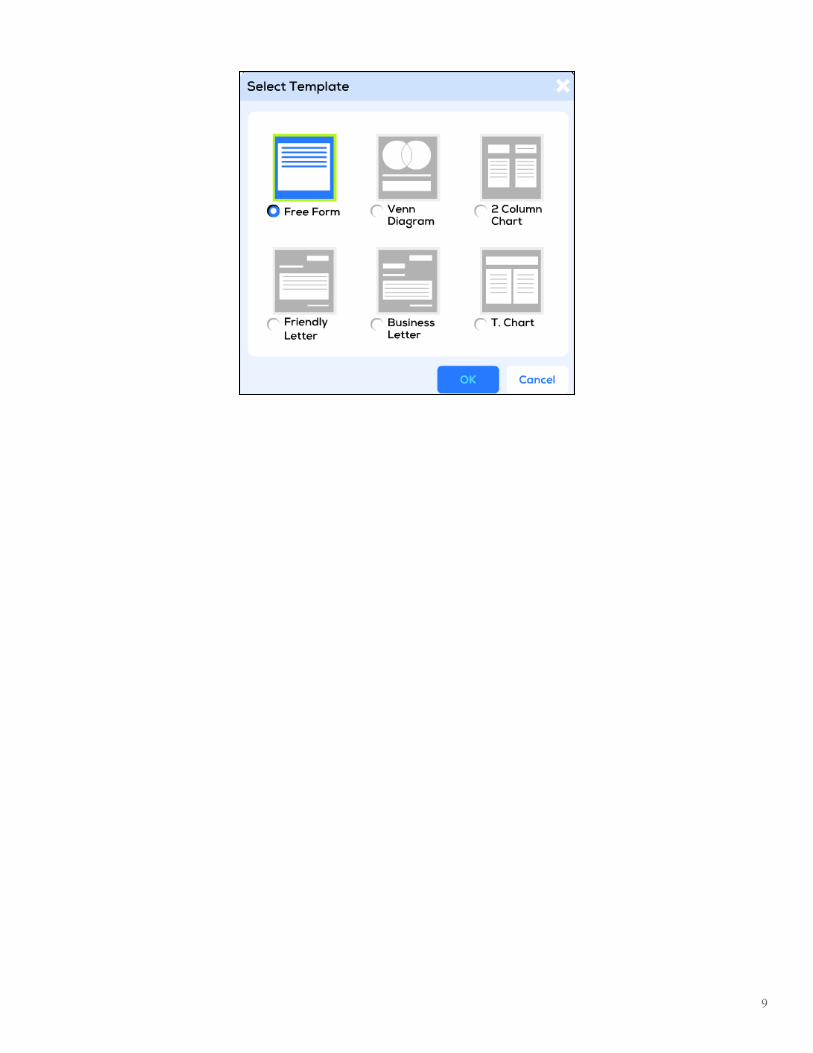
Page Templates
From the drafting tool, clicking the New Page icon at the top of the page gives you the option to select a template foryour next page. Using a template may help you to structure your writing project, but you are not required to use them. Ifyou wish to continue writing in free-form on your new page, select the Free Form template. The other templates may behelpful to you depending upon the type of Writing project you are working on.
8
9
Notecard
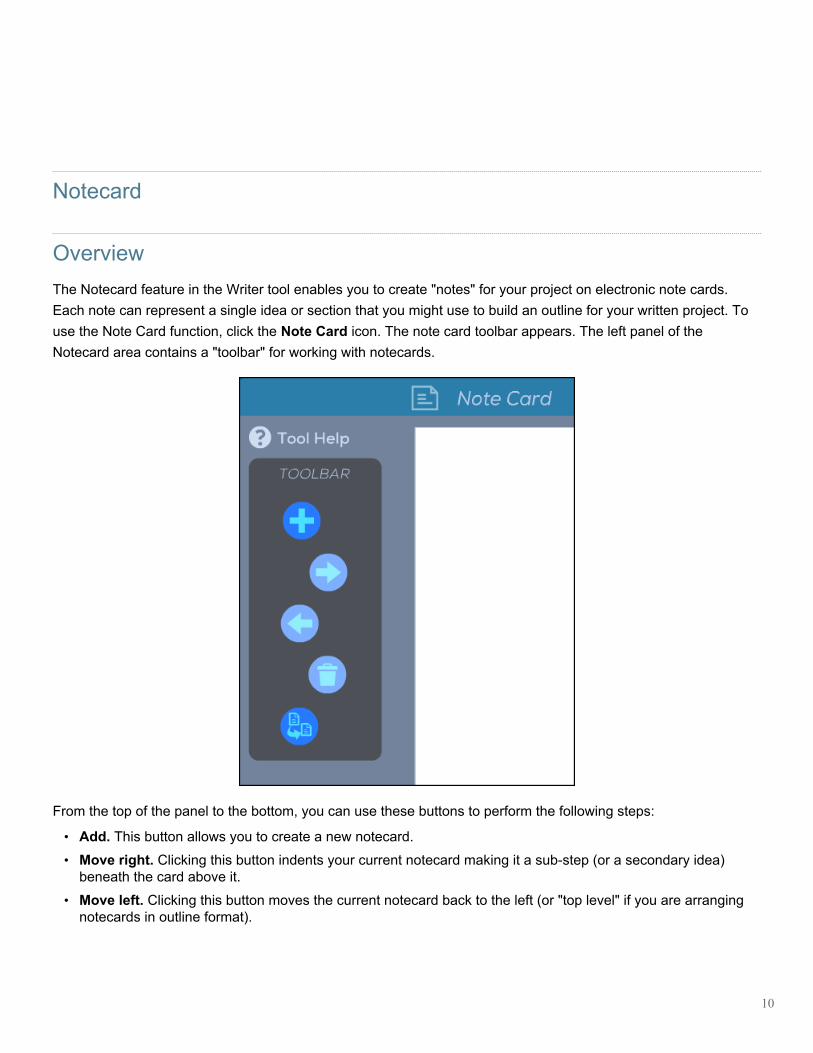
OverviewThe Notecard feature in the Writer tool enables you to create "notes" for your project on electronic note cards.Each note can represent a single idea or section that you might use to build an outline for your written project. Touse the Note Card function, click the Note Card icon. The note card toolbar appears. The left panel of theNotecard area contains a "toolbar" for working with notecards.
From the top of the panel to the bottom, you can use these buttons to perform the following steps:
• Add. This button allows you to create a new notecard.• Move right. Clicking this button indents your current notecard making it a sub-step (or a secondary idea)
beneath the card above it.• Move left. Clicking this button moves the current notecard back to the left (or "top level" if you are arranging
notecards in outline format).
10

• Delete. This button deletes the current notecard.• Paste to Draft. This button will move your notecards into the draft of your writer project, on a new page. This
way, you will have your notecards in the drafting section in an outline format. You can also continue to writefree-form content in the Drafting section.
11

The Graphic Organizer
OverviewThe Graphic Organizer in the Writer tool is synchronized with the Notecard function. It enables you to organize notecards into different sequences -- you can move topics around and reorganize them to test out different structures foryour writing projects. As you move notecards around in the organizer, you can see a "graphical" relationship betweenthem, so you can think about how the subjects in each notecard are related, and how you want to stucture them in yourWriter project.
For example, imagine that you have created four notecards to start outlining the structure of your writing project, andthat you have saved these notecards to your project, so that you can see them on their dedicated page.
Next, click the Graphic Organizer icon at the top of the Writer window. In the Graphic Organizer section, you will seeyour notecards represented as boxes that are connected, and that you can move around the page.
12
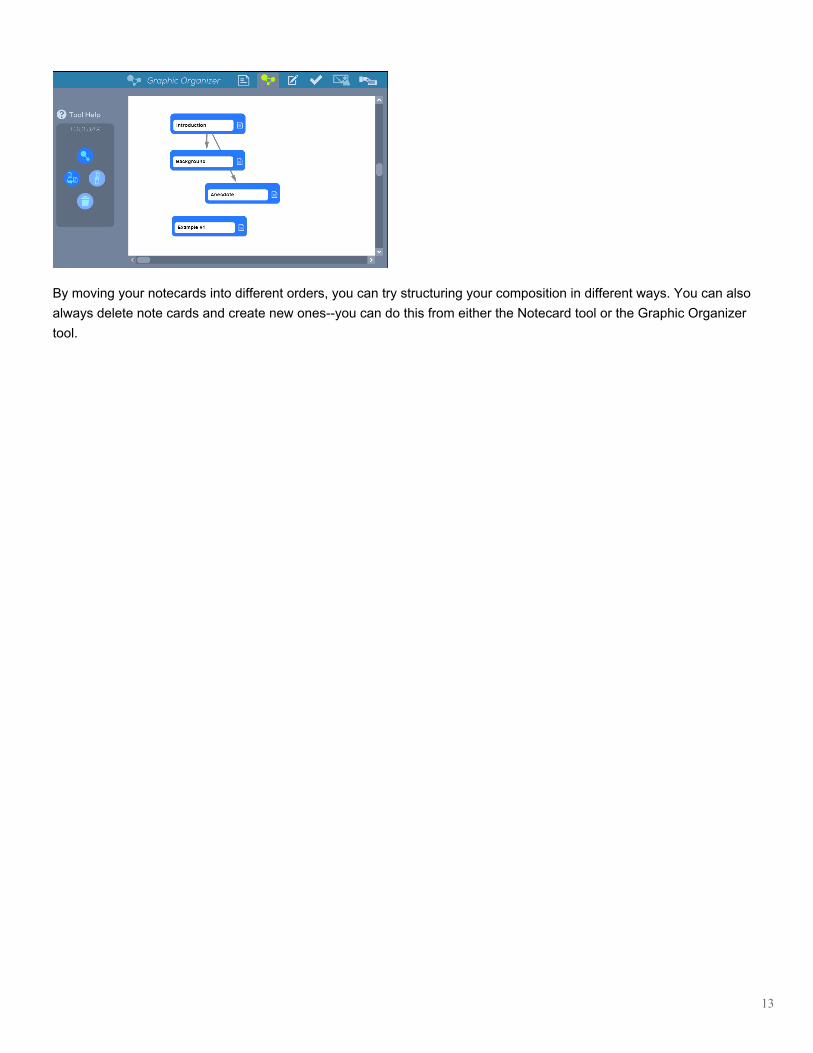
By moving your notecards into different orders, you can try structuring your composition in different ways. You can alsoalways delete note cards and create new ones--you can do this from either the Notecard tool or the Graphic Organizertool.
13

The Student Toolkit
OverviewThe Student Toolkit contains resources that may be helpful to you as you work in different subject areas. Toolkitresources include, among others: glossary, Writer templates, calculator, algebra tiles, base ten blocks, counters,conversion chart, periodic table, formula chart, and postulates and theorems. Opening the toolkit from the studentlaunch pad displays the full set of resources. Opening the toolkit from within an assignment displays the toolkitbased on the assignment’s subject.
To open the toolkit from within your student launchpad, just click the toolkit icon from the left side of the launchpad.
Clicking this icon opens the toolkit, which lists the various subject you may be working on. Select a subject to seethe toolkit resources that apply to that subject.
14

15

Gradebook
OverviewClick the Gradebook icon on the left side of your home page to open your student Gradebook.
The Gradebook provides an overview of the work you have completed in each of your courses, including project status,completion date, and total score.
Finding Information in the GradebookThe Gradebook tracks your scores and the amount of work you have completed in a course. In the example below, thestudent has accessed his Gradebook and is viewing the course information for Evolutionary Biology.
16

The pull-down menu at the top of the page enables you to select the course you want to view. Click the drop-down arrowto view a list of your courses. From this list, select the course you want to see.
The View options allow you to display your Gradebook information either sequentially, by activity type, or by status. (Inthe example above, information is displayed sequentially.)
The blue row at the bottom of the Gradebook shows the percentage of work completed in the course, as well as thestudent's overall score.
In this example, the student has completed six out of six items in the course (including activities, quizzes, and tests), sothe Gradebook shows that 100% of work has been completed. The other number in this row - 71% - reflects thestudent's overall score in the course. This number is calculated by averaging all of the student's scores on scoredactivities, and any other scores that the teacher has entered manually.
Where are My Letter Grades?
If you don't see letter grades in your Gradebook, your teacher may have chosen not to associate letter grades with yournumerical scores. Teachers can set this up when they build your courses. If you have questions about letter grades andnumerical scores, talk to your teacher.
17