Embed Size (px)
Citation preview

©2003 Sony Corporati
CompMiniDOperating Instr
MXD-D40
4-245-486-11(2)
act Disc isc Deck
uctions
on
0

2GB
To prevent fire or shock hazard, do not expose the unit to rain or moisture.To prevent fire, do not cover the ventilation of the apparatus with news papers, table-cloths, curtains, etc. And don’t place lighted candles on the apparatus.
To prevent fire or shock hazard, do not place objects filled with liquids, such as vases, on the apparatus
This appliance is classified as a CLASS 1 LASER product. This label is located on the rear exterior.
The following caution label is located inside the apparatus.
Don’t throw away the battery with general house waste, dispose of it correctly as chemical waste.
For the customer in the U.S.A.
This symbol is intended to alert the user to the presence of uninsulated “dangerous voltage” within the product’s enclosure that may be of sufficient magnitude to constitute a risk of electric shock to persons.
This symbol is intended to alert the user to the presence of important operating and maintenance (servicing) instructions in the literature accompanying the appliance.
Owner’s RecordThe model and serial numbers are located on the rear of the unit. Record the serial number in the space provided below. Refer to them whenever you call upon your Sony dealer regarding this product.
Model No. MXD-D400 Seral No.
CautionThe use of optical instruments with this product will increase eye hazard.
WARNINGThis equipment has been tested and found to comply with the limits for a Class B digital device, pursuant to Part 15 of the FCC Rules. These limits are designed to provide reasonable protection against harmful interference in a residential installation. This equipment generates, uses, and can radiate radio frequency energy and, if not installed and used in accordance with the instructions, may cause harmful interference to radio communications. However, there is no guarantee that interference will not occur in a particular installation. If this equipment does cause harmful interference to radio or television reception, which can be determined by turning the equipment off and on, the user is encouraged to try to correct the interference by one or more of the following measures:
– Reorient or relocate the receiving antenna.
– Increase the separation between the equipment and receiver.
– Connect the equipment into an outlet on a circuit different from that to which the receiver is connected.
– Consult the dealer or an experienced radio/TV technician for help.
CAUTIONYou are cautioned that any changes or modifications not expressly approved in this manual could void your authority to operate this equipment.
Except for European modelENERGY STAR® is a U.S. registered mark. As an ENERGY STAR® partner, Sony Corporation has determined that this product meets the ENERGY STAR® guidelines for energy efficiency.
WARNING
IN NO EVENT SHALL SELLER BE LIABLE FOR ANY DIRECT, INCIDENTAL OR CONSEQUENTIAL DAMAGES OF ANY NATURE, OR LOSSES OR EXPENSES RESULTING FROM ANY DEFECTIVE PRODUCT OR THE USE OF ANY PRODUCT.

3GB
How to use this manual...........................4Playable discs..........................................4
Getting StartedUnpacking ...............................................7Hooking up..............................................7
CD/MP3/MD – PlayLoading a CD..........................................9Playing a CD ...........................................9
— Normal Play/Shuffle Play/Search PlayPlaying an MP3 file ..............................10
— Normal Play/Shuffle Play/Search PlayLoading an MD .....................................11Playing an MD ......................................12
— Normal Play/Shuffle PlayLocating a specific track .......................13
—AMS FunctionPlaying repeatedly.................................14
— Repeat PlayCreating your own program ..................14
— Program PlayPlaying only the tracks in the desired
group ...............................................15Falling asleep to music..........................16
— Sleep TimerChanging the pitch of the MD ..............17
— Pitch Control FunctionUsing the display...................................18
MD – RecordingBefore you start recording ....................19Recording a CD on an MD ...................20
— CD-MD Synchro Recording/High-Speed CD-MD Synchro Recording
Recording on an MD manually.............21— Manual Recording
Starting recording with 6 seconds of prestored audio data........................22— Time Machine Recording
Marking track numbers .........................23Making a space between tracks 3 seconds
long automatically ..........................24— Smart Space
Adjusting the recording level ............... 25— Music Synchro-Recording
Recording the current CD track............ 27— REC-IT Function
Synchro-Recording with an external audio equipment ....................................... 27
Fading in and out .................................. 28— Fader
Recording tips....................................... 29
MD – EditingEditing tips............................................ 30Registering tracks in groups ................. 31
— Group FunctionLabeling an MD/group/track ................ 32
— Name FunctionCreating a new group............................ 34
— Create FunctionReleasing group registrations ............... 35
— Release FunctionErasing recordings ................................ 36
— Erase FunctionMoving recorded tracks ........................ 38
— Move FunctionCombining recorded tracks................... 39
— Combine FunctionDividing recorded tracks ...................... 40
— Divide FunctionUndoing the last edit............................. 41
— Undo FunctionChanging the recorded level after recording 41
— S.F Edit Function
TroubleshootingProblems and remedies......................... 43Self-diagnosis display........................... 44Messages............................................... 45
Additional InformationPrecautions............................................ 46System limitations of MDs ................... 47Specifications........................................ 48List of button locations and reference
pages............................................... 49
Table of Contents

4GB
• Before operating the by referring to “Gettin
• This manual mainly ethe remote, but the sabe performed using thaving the same or si
You can play back the fdeck. Other discs canno
List of playable
You can play MP3 filessee “Playing a disc with
Discs that thisplay
• CD-ROMs (PHOTO• CD-Rs/CD-RWs oth
the following format– music CD format– MP3 format that c
Level 1/Level 2, R
* A logical format of files defined by ISO (InternatOrganization)
How to use th
Playable disc
Format of discs Disc log
Audio CDs
MD
CD-R/CD-RW
deck, connect your deck g Started.”
xplains operations using me operations can also
he buttons on the deck milar names.
ollowing discs on this t be played back.
discs
on the deck. For details, MP3 files” on page 5.
deck cannot
Notes on CD-R and CD-RW• This deck can play CD-R/CD-RW discs
edited by the user. However, note that playback of some discs may not be possible depending on the recording device used for recording or the disc condition.
• CD-R and CD-RW discs that have not been finalized (processing to allow play by a normal CD player) cannot be played.
• The deck may be unable to play MP3 format files that do not have the extender “.MP3” at the end of the file name.
• Attempting to play non-MP3 format files that have the extender “.MP3” may result in noise or malfunction.
• The recommended bit rate for playing MP3 files is 128kbps or more.
• Playback of dtsCDs or recording from digital dtsCDs to MDs is not supported.
Music discs encoded with copyright protection technologiesThis product is designed to playback discs that conform to the Compact Disc (CD) standard. Recently, various music discs encoded with copyright protection technologies are marketed by some record companies. Please be aware that among those discs, there are some that do not conform to the CD standard and may not be playable by this product.
is manual
s
o Contents
Audio
Audio
Audio
CDs included)er than those recorded in s:
onforms to ISO9660* omeo or Joliet
and folders on CD-ROMs, ional Standard

Playing a disc
About MP3 filesMP3 (MPEG 1 Audio Ltechnology and format fsequence. The file is coof its original size. Sounhuman hearing are compwe can hear are not comPlayback of same MP3 possible, depending on The encoding method (for encoding) will affecMP3 files created. The bMP3 files is 128 kbps.
About ID3 tagsAn ID3 tag is song infoname, album title, and aattached to MP3 files.
Notes on discsYou can play MP3 files recRs (recordable CDs), and CThe disc must be in the ISOformat, or Joliet or RomeoYou can use a disc recorde
*1ISO 9660 FormatThe most common internlogical format of the filesThere are several specificnames must be in the 8.3characters in the name, noin the extension “.MP3”) names can be no longer tcan be no more than eigh2 specifications allow fillong.For Joliet or Romeo in thsure of the contents of th
*2Multi SessionThis is a recording methodata using the Track-At-Conventional CDs beginthe Lead-in and end at anMulti Session CD has mLead-in to Lead-out segmsession.CD-EXTRA: A format inare recorded in the tracksdata in the tracks of sessiMixed CD: A format in w
with MP3 files
ayer-3) is a standard or compressing a sound mpressed to about 1/10 ds outside the range of ressed while the sounds pressed.
files may not be the recording.i.e., the bit rate selected t the sound quality of the it rate typically used for
rmation (such as track rtist name) that is
orded on CD-ROMs, CD-D-RWs (rewritable CDs). 9660*1 level 1 or level 2
in the expansion format. d in Multi Session*2.
ational standard for the and folders on a CD-ROM. ation levels. In Level 1, file format (no more than eight more than three characters
and in capital letters. Folder han eight characters. There t nested folder levels. Level e names up to 31 characters
e expansion format, make e writing software, etc.
recorded in the first track and CD-DA (audio) data in the following tracks within a session.
Notes• With format other than ISO 9660 level 1, folder
names or file names may not be displayed correctly.
• When naming, be sure to add the file extension “.MP3” to the file name.
• If you add the extension “.MP3” to a file other than MP3, the unit cannot recognize the file properly and will generate random noise that could damage your speakers.
• The following discs take a longer time to start playback.
– a disc recorded with a complicated tree structure.
– a disc recorded in Multi Session.
Cautions when playing a disc that is recorded in Multi SessionCD-DA (audio) data or MP3 files stored on a Multi Session CD may be subject to some restrictions on playback.
– If the disc begins with a CD-DA session, it is recognized as a CD-DA (audio) disc, and playback continues until an MP3 session is encountered.
– If the disc begins with an MP3 session, it is recognized as an MP3 disc, and playback continues until a CD-DA (audio) session is encountered.
– The playback range of an MP3 disc is determined by the tree structure of files produced by analyzing of the disc.
– A disc with a mixed CD format will be recognized as a CD-DA (audio) disc.
5GB
d that enables adding of Once method. at a CD control area called area called Lead-out. A
ultiple sessions, with each ent regarded as a single
which CD-DA (audio) data of session 1 and computer on 2.hich computer data are
6GB
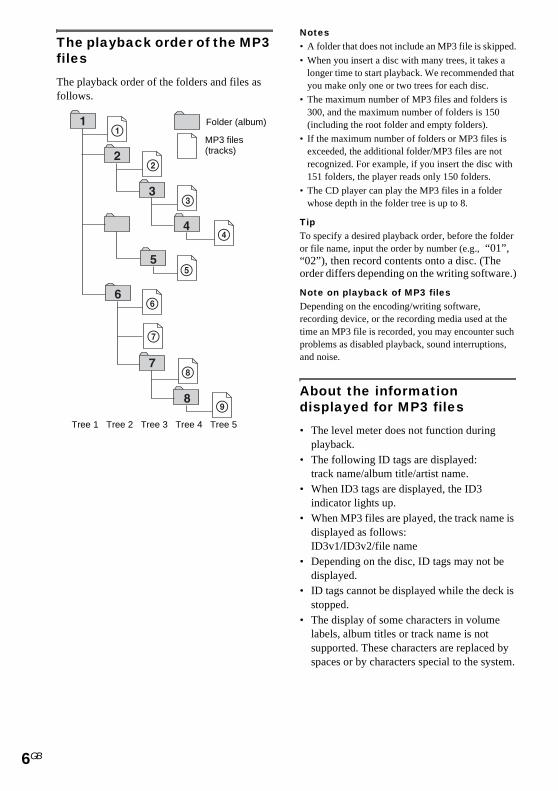
The playback ofiles
The playback order of tfollows.
Tree 1 Tree 2 Tree
rder of the MP3
he folders and files as
Notes• A folder that does not include an MP3 file is skipped.
• When you insert a disc with many trees, it takes a longer time to start playback. We recommended that you make only one or two trees for each disc.
• The maximum number of MP3 files and folders is 300, and the maximum number of folders is 150 (including the root folder and empty folders).
• If the maximum number of folders or MP3 files is exceeded, the additional folder/MP3 files are not recognized. For example, if you insert the disc with 151 folders, the player reads only 150 folders.
• The CD player can play the MP3 files in a folder whose depth in the folder tree is up to 8.
TipTo specify a desired playback order, before the folder or file name, input the order by number (e.g., “01”, “02”), then record contents onto a disc. (The order differs depending on the writing software.)
Note on playback of MP3 filesDepending on the encoding/writing software, recording device, or the recording media used at the time an MP3 file is recorded, you may encounter such problems as disabled playback, sound interruptions, and noise.
About the information displayed for MP3 files
• The level meter does not function during playback.
• The following ID tags are displayed: track name/album title/artist name.
• When ID3 tags are displayed, the ID3 indicator lights up.
• When MP3 files are played, the track name is displayed as follows:ID3v1/ID3v2/file name
• Depending on the disc, ID tags may not be displayed.
Folder (album)
MP3 files (tracks)
3 Tree 4 Tree 5
• ID tags cannot be displayed while the deck is stopped.
• The display of some characters in volume labels, album titles or track name is not supported. These characters are replaced by spaces or by characters special to the system.
Check that you received• Audio connection co• Remote commander • Sony R6 (size-AA) b
Inserting two Rbatteries into t
NoteIf you do not use the remotremove the batteries to avobattery leakage and corros
TipWhen the remote no longeboth batteries with new on
Getting Started
Unpacking
Gettin
g S
tarted
the following items:rds (2)(remote) (1)atteries (2)
6 (size AA) he remote
e for a long period of time, id possible damage from
ion.
r operates the deck, replace es.
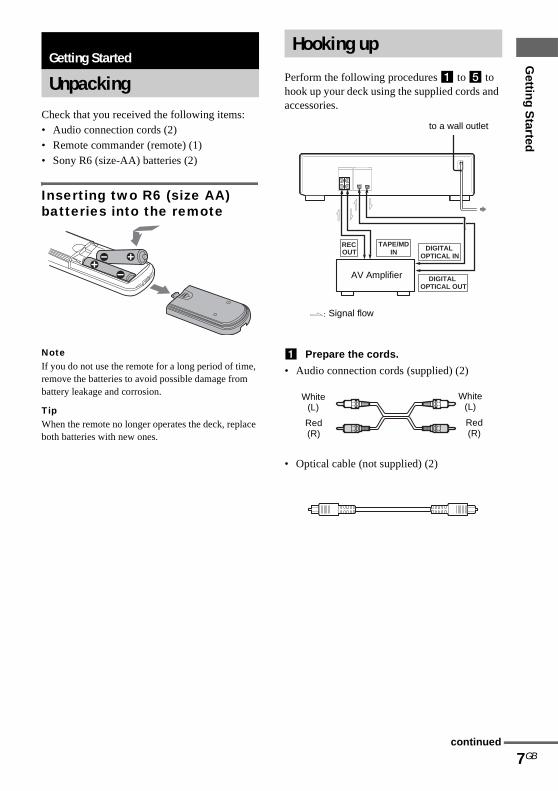
Perform the following procedures 1 to 5 to hook up your deck using the supplied cords and accessories.
1 Prepare the cords.
• Audio connection cords (supplied) (2)
• Optical cable (not supplied) (2)
Hooking up
RECOUT
TAPE/MDIN
DIGITAL OPTICAL OUT
OPTICAL INDIGITAL
Signal flow
AV Amplifier
to a wall outlet
Red(R)
White(L)
White(L)
Red(R)
7GBcontinued
8GB
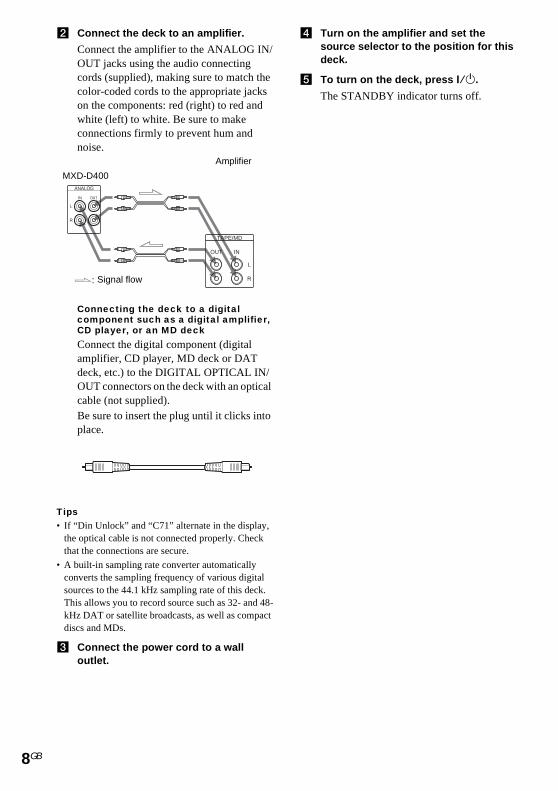
2 Connect the deck
Connect the amplifOUT jacks using thcords (supplied), mcolor-coded cords on the componentswhite (left) to whitconnections firmlynoise.
Connecting the dcomponent suchCD player, or an
Connect the digitalamplifier, CD playdeck, etc.) to the DOUT connectors oncable (not suppliedBe sure to insert thplace.
Tips• If “Din Unlock” and “C7
the optical cable is not cothat the connections are s
• A built-in sampling rate converts the sampling fresources to the 44.1 kHz sThis allows you to recordkHz DAT or satellite brodiscs and MDs.
3 Connect the powoutlet.
ANALOG
IN
L
R
OUT
Signal flow
MXD-D400
to an amplifier.
ier to the ANALOG IN/e audio connecting aking sure to match the
to the appropriate jacks : red (right) to red and e. Be sure to make to prevent hum and
eck to a digital as a digital amplifier, MD deck
component (digital er, MD deck or DAT IGITAL OPTICAL IN/ the deck with an optical ).e plug until it clicks into
1” alternate in the display, nnected properly. Check ecure.
converter automatically quency of various digital
4 Turn on the amplifier and set the source selector to the position for this deck.
5 To turn on the deck, press ?/1.
The STANDBY indicator turns off.
TAPE/MD
L
R
INOUT
Amplifier
ampling rate of this deck. source such as 32- and 48-
adcasts, as well as compact
er cord to a wall
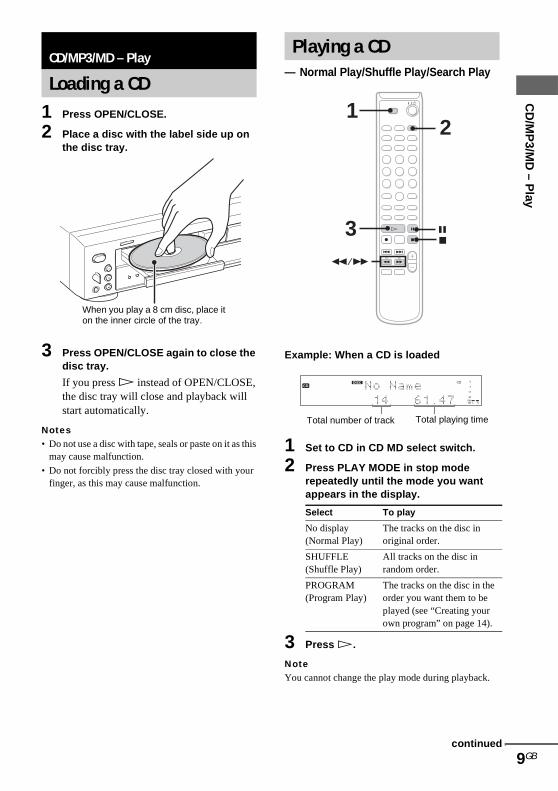
1 Press OPEN/CLO
2 Place a disc withthe disc tray.
3 Press OPEN/CLOdisc tray.
If you press H insthe disc tray will clstart automatically.
Notes• Do not use a disc with tap
may cause malfunction.
• Do not forcibly press thefinger, as this may cause
CD/MP3/MD – Play
Loading a CD
When you play aon the inner circ
CD
/MP
3/MD
– Play
SE.
the label side up on
SE again to close the
tead of OPEN/CLOSE, ose and playback will
e, seals or paste on it as this
disc tray closed with your malfunction.
Example: When a CD is loaded
1 Set to CD in CD MD select switch.
2 Press PLAY MODE in stop mode repeatedly until the mode you want appears in the display.
8 cm disc, place it le of the tray.
Playing a CD— Normal Play/Shuffle Play/Search Play
Select To play
No display (Normal Play)
The tracks on the disc in original order.
SHUFFLE (Shuffle Play)
All tracks on the disc in random order.
21
3m/M
xX
Total number of track Total playing time
9GB
3 Press H.
NoteYou cannot change the play mode during playback.
PROGRAM (Program Play)
The tracks on the disc in the order you want them to be played (see “Creating your own program” on page 14).
continued

10GB
Other operations
TipIf “—Over—” appears whthe disc has reached to its turn AMS counter clockwiNoteTracks that are only a few short to scan using the sear
To Do this
Stop play Press x
Pause Press Xplay.
Find a point in a track (Search)
Keep prplaybacdesired
Find a point quickly by observing the display (High-speed Search)
Keep prplaybacdesired
There isthis ope
Remove a disc Press O
ile you are pressing M, end. Press m or . (or se) to go back.
seconds long may be too ch function.
Example: When an MP3 disc is loaded
Playing the desired album
1 Set to CD in CD MD select switch.
2 Press PLAY MODE in stop mode repeatedly until the mode you want appears in the display.
.
. Press again to resume
essing m or M during k and release it at the point.
essing m or M during k pause until you find the point.
no sound output during ration.
PEN/CLOSE on the deck.
Playing an MP3 file— Normal Play/Shuffle Play/Search Play
Select To play
No display (Normal Play)
The tracks on the disc in original order.
ALBUM (ALBUM Play)
All MP3 audio tracks in the album on the disc you have selected in original order.
4
3
21
MP3
SHUFFLE (Shuffle Play)
All tracks on the disc in random order.
ALBUM SHUFFLE (Album Shuffle Play)
The MP3 audio tracks in the album on the disc you have selected in random order.
PROGRAM (Program Play)
The tracks on the disc in the order you want them to be played (see “Creating your own program” on page 14).
3 Press ALBUM/GRrepeatedly until tnumber appears.
When using the buALBUM (“ALBUMand turn AMS.
4 Press H.
Playing the desiralbum
1 Do step 1 to 3. (sdesired album” o
When using the buALBUM. “ALBUM
2 Press . or >AMS on the deckor track number a
3 Press H.
Notes• If no album CD is played
CDs are played in the sammode.
• If you do not select an althe first track of the first
• You cannot change the p
• “0.00” appears when skiver.2 (at the beginning oSkip time changes depen
Other operationsSee “Other operations”
CD
/MP
3/MD
– Play
OUP – or + he desired album
ttons on the deck, press SELECT” appears)
ed track in the
ee “Playing the n page 10)
ttons on the deck, press SELECT” disappears.
repeatedly (or turn ) until the desired title ppears.
while in “ALBUM” mode, e way as in “Normal Play”
bum, playback starts from album.
lay mode during playback.
pping a portion of ID3 tag f the track).ding ID3 tag ver.2 capacity.
on page 10.
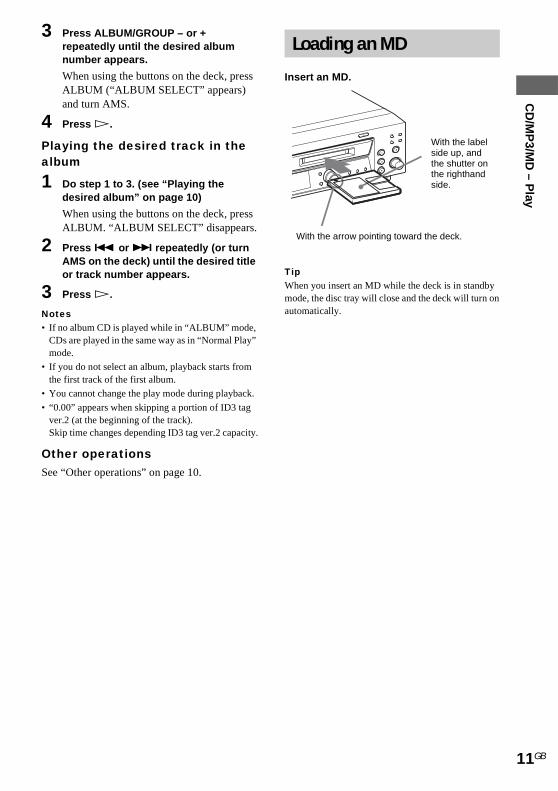
Insert an MD.
TipWhen you insert an MD while the deck is in standby mode, the disc tray will close and the deck will turn on automatically.
Loading an MD
With the arrow pointing toward the deck.
With the label side up, and the shutter on the righthand side.
11GB

12GB
Example: When a MD
1 Set to MD in CD M
2 Press PLAY MODrepeatedly (or tumode you want a
3 Press H.
NoteYou cannot change the pla
Playing an M— Normal Play/Shu
Select To
No display (Normal Play)
Thor
SHUFFLE (Shuffle Play)
Ara
PROGRAM (Program Play)
Thorplow
1
3m/M
Total number of trac
is loaded
D select switch.
E in stop mode rn AMS) until the ppears in the display.
Other operations
TipIf “—Over—” appears during High-speed Search, the disc has reached to its end. Press m or . (or turn AMS counter clockwise) to go back.
Notes
• If the disc reaches the end during Search, the deck stop.
• Tracks that are only a few seconds long may be too short to scan using the search function.
Dffle Play
play
e tracks on the MD in iginal order.
ll tracks on the MD in ndom order.
2
xX
k Total playing time
To Do this
Stop play Press x.
Pause Press X. Press again to resume play.
Find a point in a track (Search)
Keep pressing m or M during playback and release it at the desired point.
Find a point quickly by observing the display during playback pause (High-speed Search)
Keep pressing m or M until you find the desired point.
There is no sound output during this operation.
Remove a MD Press EJECT on the deck.
y mode during playback.
e tracks on the MD in the der you want them to be ayed (see “Creating your n program” on page 14).
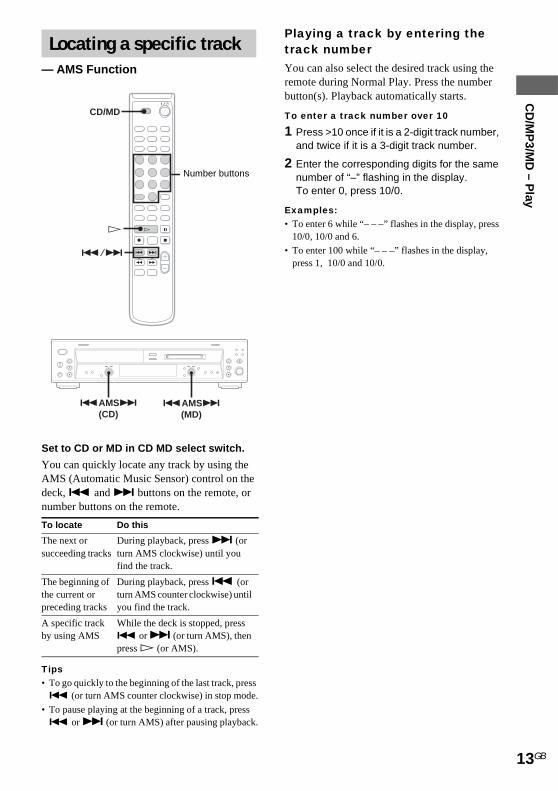
Set to CD or MD in CD
You can quickly locate AMS (Automatic Musideck, . and > bunumber buttons on the r
Tips• To go quickly to the begi. (or turn AMS coun
• To pause playing at the b. or > (or turn AM
Locating a sp— AMS Function
To locate Do this
The next or succeeding tracks
During turn AMfind the
The beginning of the current or preceding tracks
During turn AMyou find
A specific track by using AMS
While t. orpress H
./>
H
CD/MD
.AMS>(CD)
CD
/MP
3/MD
– Play
MD select switch.
any track by using the c Sensor) control on the ttons on the remote, or emote.
Playing a track by entering the track numberYou can also select the desired track using the remote during Normal Play. Press the number button(s). Playback automatically starts.
To enter a track number over 10
1 Press >10 once if it is a 2-digit track number, and twice if it is a 3-digit track number.
2 Enter the corresponding digits for the same number of “–” flashing in the display.To enter 0, press 10/0.
Examples:• To enter 6 while “– – –” flashes in the display, press
10/0, 10/0 and 6.
• To enter 100 while “– – –” flashes in the display, press 1, 10/0 and 10/0.
ecific track
playback, press > (or S clockwise) until you
track.
playback, press . (or
.AMS>(MD)
Number buttons
13GB
nning of the last track, press ter clockwise) in stop mode.
eginning of a track, press S) after pausing playback.
S counter clockwise) until the track.
he deck is stopped, press > (or turn AMS), then
(or AMS).

14GB
You can play all the tracdisc.
1 Set to CD or MD switch.
2 Press REPEAT d“REPEAT” or “RE
REPEAT: For all tREPEAT 1: For a s
To cancel RepeaPress REPEAT repeate“REPEAT” and “REPE
TipYou can perform Repeat PProgram Play. In Shuffle Pshuffled and played back rmode, programmed tracks
Playing repea— Repeat Play
2
1
ks or a single track on a
in CD MD select
uring playback until PEAT 1” appears.
he tracks on the disc.ingle track only.
t Playdly until both AT 1” disappear.
lay during Shuffle Play or lay mode, all the tracks are
P
You can make a program of up to 25 steps.
1 Set to CD or MD in CD MD select switch.
2 Press PLAY MODE in stop mode repeatedly until “PROGRAM” appears.
3 Press . or > repeatedly (or turn AMS) until the desired title or track number appears.
AL: When you select “AL” in MP3 Play, all MP3 audio tracks in the album you
tedly Creating your own program
— Program Play
21
3
4
6
CLEAR
ALBUM/GROUP+/–
Selected track number Total playing time
epeatedly. In Program Play are played back repeatedly.
have selected in original order.
4 Press YES (or AMS).
The track is programmed.The step number appears, followed by the last programmed track number.
5 To program additional tracks, repeat steps 3 and 4.
6 Press H.
Program Play starts.
Other operations
Tips• The program you made r
finishes. To play the samHowever, the program isdisc tray, eject the MD o
• “– – –:– –” appears whenCD exceeds 100 minutestime of the MD exceeds
• “– – –:– –” appears whenprogramed. The total pladisplayed during MP3 Pl
To Do th
Cancel Program PlayPressmode“PROdisap
Check the program order
Pressturn A
Select the desired tracks using the number buttons
Pressperfo
Add a track to the end of the program
Perfo
Program an MP3 Press(or pAMSstep
Erase the program Presstime yis cleprogr
CD
/MP
3/MD
– Play
emains after Program Play e program again, press H. cleared when you open the r pull out the power cord.
the total playing time of the or when the total playing 1,000 minutes.
the MP3 files are ying time cannot be ay.
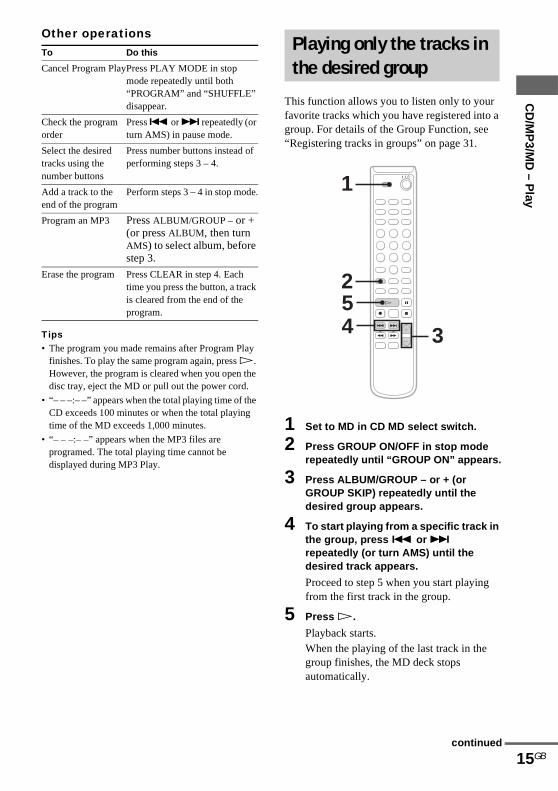
This function allows you to listen only to your favorite tracks which you have registered into a group. For details of the Group Function, see “Registering tracks in groups” on page 31.
1 Set to MD in CD MD select switch.
2 Press GROUP ON/OFF in stop mode repeatedly until “GROUP ON” appears.
3 Press ALBUM/GROUP – or + (or GROUP SKIP) repeatedly until the desired group appears.
4 To start playing from a specific track in the group, press . or > repeatedly (or turn AMS) until the desired track appears.
Proceed to step 5 when you start playing
is
PLAY MODE in stop repeatedly until both GRAM” and “SHUFFLE”
pear.
. or > repeatedly (or MS) in pause mode.
number buttons instead of rming steps 3 – 4.
rm steps 3 – 4 in stop mode.
ALBUM/GROUP – or + ress ALBUM, then turn ) to select album, before 3.
CLEAR in step 4. Each ou press the button, a track
ared from the end of the am.
Playing only the tracks in the desired group
34
2
1
5
15GB
from the first track in the group.
5 Press H.
Playback starts.When the playing of the last track in the group finishes, the MD deck stops automatically.
continued

16GB
NoteIf you select a group that dregistered and press H, ptrack of the first group on
TipYou can change play modeRepeat Play/Program Playgroup. To select the desiremode before step 3.
oes not have any tracks layback starts from the first the MD.
(Normal Play/Shuffle Play/) only for the tracks in the d play mode, select the play
You can set the deck to turn off after a certain time, so that you can fall asleep to music.You can specify the time until the deck turns off by 30 minutes.
Press SLEEP.
Each time you press the button, the minute display (the turn-off time) changes cyclically as follows:SLEEP OFF t 30min t 60min t 90min t 120min
Other operations
Falling asleep to music — Sleep Timer
To Press
Check the remaining time
SLEEP once.
SLEEP
Change the time to turn off
SLEEP to select the time you want.
Cancel the Sleep Timer Function
SLEEP repeatedly until “SLEEP OFF” appears.

You can change the pitch oplayback speed. The tone f
Setting the pitcautomatically iStep Control Fu
You can lower the pitch byequals 12 steps.)
1 Set to MD in CD M
2 Press MENU/NO “Setup Menu” ap
3 Press . or >AMS) until “PitchYES (or AMS).
4 Press . or >AMS) to select ththen press YES (
5 Press MENU/NO.
Changing theMD
— Pitch Control Fu
2,5
1
3,4
CD
/MP
3/MD
– Play
f the MD by lowering the alls at lower pitches.
h n steps (Auto nction)
up to 36 steps. (One octave
D select switch.
repeatedly until pears.
repeatedly (or turn
Finely controlling the pitch (Fine Control Function)
You can fine control the playing speed in 0.1% increments from -87.5% to 0.0%.
1 Set to MD in CD MD select switch.
2 Press MENU/NO repeatedly until “Setup Menu” appears.
3 Press . or > repeatedly (or turn AMS) until “Pfine” appears, then press YES (or AMS).
4 Press . or > repeatedly (or turn AMS) to select the desired value, then press YES (or AMS).
5 Press MENU/NO.
To recall the factory settingPress CLEAR while setting the value.
Notes• The playing sound drops out momentarily when you
change the fine control value.
• The fine control value reverts to “0.0%” (factory setting) and the step value returns to “0” (factory setting) when you turn off the deck or eject the MD.
• When a dot (.) appears to the right of the step value in the pitch display, this indicates that you have performed fine adjustment (see this page) and the pitch value is between steps. The step and fine control values are linked; changing one value also changes the other.
pitch of the
nction
CLEAR
3,4
17GB
” appears, then press
repeatedly (or turn e desired step value, or AMS).
18GB
You can use the displayinformation such as totaplaying time of the tracremaining time of the crecordable time of the M
Changing the d
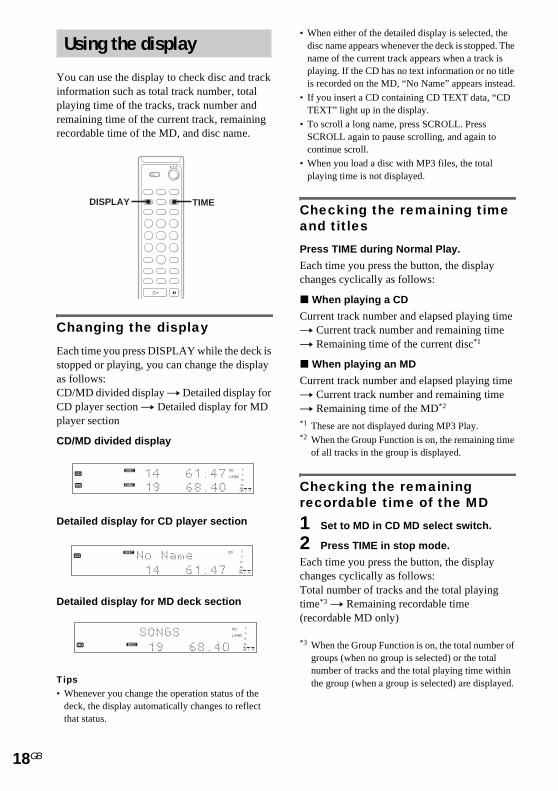
Each time you press DISstopped or playing, youas follows:CD/MD divided displayCD player section t Dplayer section
CD/MD divided displa
Detailed display for C
Detailed display for M
Tips• Whenever you change th
deck, the display automathat status.
Using the dis
DISPLAY
to check disc and track l track number, total
ks, track number and urrent track, remaining
D, and disc name.
isplay
PLAY while the deck is can change the display
t Detailed display for etailed display for MD
y
D player section
• When either of the detailed display is selected, the disc name appears whenever the deck is stopped. The name of the current track appears when a track is playing. If the CD has no text information or no title is recorded on the MD, “No Name” appears instead.
• If you insert a CD containing CD TEXT data, “CD TEXT” light up in the display.
• To scroll a long name, press SCROLL. Press SCROLL again to pause scrolling, and again to continue scroll.
• When you load a disc with MP3 files, the total playing time is not displayed.
Checking the remaining time and titles
Press TIME during Normal Play.
Each time you press the button, the display changes cyclically as follows:
x When playing a CD
Current track number and elapsed playing time t Current track number and remaining time t Remaining time of the current disc*1
x When playing an MD
Current track number and elapsed playing time t Current track number and remaining time t Remaining time of the MD*2
*1 These are not displayed during MP3 Play.*2 When the Group Function is on, the remaining time
of all tracks in the group is displayed.
Checking the remaining recordable time of the MD
1 Set to MD in CD MD select switch.
2 Press TIME in stop mode.
Each time you press the button, the display changes cyclically as follows:
play
TIME
D deck section
e operation status of the tically changes to reflect
Total number of tracks and the total playing time*3 t Remaining recordable time (recordable MD only)
*3 When the Group Function is on, the total number of groups (when no group is selected) or the total number of tracks and the total playing time within the group (when a group is selected) are displayed.

MDs (MiniDisc) let youplay music with high qufeature of MDs is trackmarking feature lets youspecific point or easily However, depending onthe recording method annumbers are recorded d
When the sourceis:• CDs loaded in t
player– The MD deck perform
– Track numbers are auon the original CD. Hare not marked depen(page 5).
• Other digital coconnected to thOPTICAL IN jac
– The MD deck perform
– Track numbers are mdepending on the sou
• Other analog coconnected to thjacks
– The MD deck perform
– A track number is maa recording only, butLevel Synchro Recortrack numbers are ausync with the level o
Note on MD tracOn an MD, the track nutrack start and end poinrecorded in the TOC** sound information. Youquickly by modifying th
MD – Recording
Before you st
MD
– Reco
rdin
g
digitally record and ality sound. Another
marking. The track quickly locate a
edit the recorded tracks. the source you record, d the way the track
iffer.
you record from
his deck’s CD
s digital recording.*
tomatically marked as owever, track numbers ding on the track
mponents e DIGITAL k
s digital recording.*
arked differently rce you record.mponents e ANALOG IN
s analog recording.
rked at the beginning of when you turn on the ding Function (page 23), tomatically marked in f the input signal.
When recording MP-3 format files on a CD-R or CD-RWOnly normal-speed CD synchro recording is supported. This is because the digital signal of the MP3 file is first converted to an analog signal before it is recorded.
About recording errors• With the following kinds of discs, you may
experience a reading failure or noise when recorded on an MD:
– Discs with adhesive labels attached to them
– Irregularly shaped discs (for example, heart- or star- shaped)
– Discs with printed text concentrated on one side only
– Scratched discs
– Dirty discs
– Warped discs• If the following occurs during CD playback or
recording, a reading error may occur or noise may be produced in the recorded results:
– The disc tray or other part of the deck is bumped.
– The deck is placed on an uneven or soft surface.
– The deck is located near a speaker, door, or other source of vibration.
• If the above reading errors occur, an extra soundless track may be created. You can erase these extra tracks using Erase Function (page 36).
* For details on the limitations of digital recording, see “System limitations of MDs” on page 47.
** TOC: Table Of Contents
art recording
19GB
k numbersmbers (track sequence), t information, etc., are area independent of the can edit recorded tracks e TOC information.
continued
20GB
After recording
Press EJECT to remo1 (power) to turn off
“TOC” starts flashing. Trecording is completed.
Before pulling ouMD recording is compleof Contents (TOC) is upupdated when you ejectturn off the deck. Do nobefore updating the TOTOC (while “TOC” ligensure a complete recor
Protecting a rec• To protect a recorded
side of the MD to opposition, the MD canrecord on the MD, slslot.
• If the MD is record p“Protected” appear acannot be recorded. Rslide the record proteposition.
Tab
Slide the tab
ve the MD or press ?/ the deck.
he TOC is updated and
t the power cordted when the MD Table dated. The TOC is
the MD or press ?/1 to t pull out the mains lead C or while updating the hts up or flashes) to ding.
orded MD MD, slide the tab on the en the slot. In this not be recorded. To ide the tab to close the
rotected, “C11” and lternately and the MD emove the MD, then
ction tab to the closed
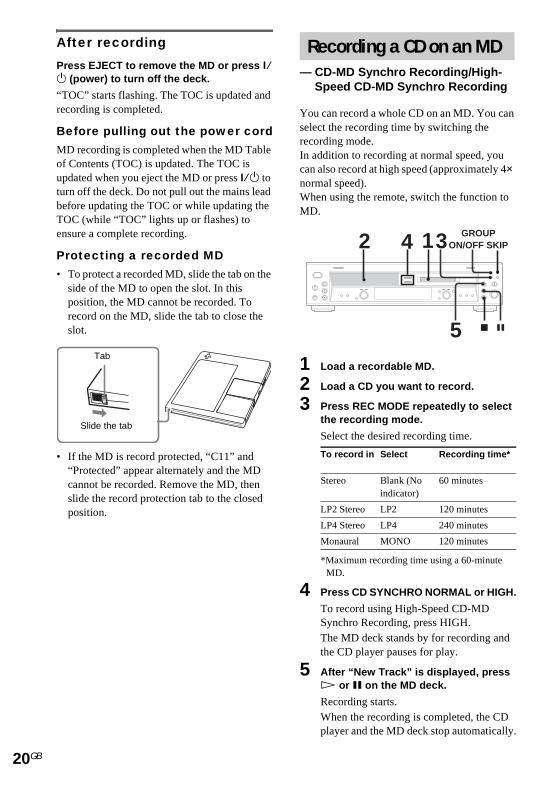
You can record a whole CD on an MD. You can select the recording time by switching the recording mode.In addition to recording at normal speed, you can also record at high speed (approximately 4× normal speed).When using the remote, switch the function to MD.
1 Load a recordable MD.
2 Load a CD you want to record.
3 Press REC MODE repeatedly to select the recording mode.
Select the desired recording time.
*Maximum recording time using a 60-minute MD.
Recording a CD on an MD— CD-MD Synchro Recording/High-
Speed CD-MD Synchro Recording
To record in Select Recording time*
Stereo Blank (No indicator)
60 minutes
LP2 Stereo LP2 120 minutes
LP4 Stereo LP4 240 minutes
Monaural MONO 120 minutes
2 3
x X
14
5
GROUPON/OFF SKIP
4 Press CD SYNCHRO NORMAL or HIGH.
To record using High-Speed CD-MD Synchro Recording, press HIGH.The MD deck stands by for recording and the CD player pauses for play.
5 After “New Track” is displayed, press H or X on the MD deck.
Recording starts.When the recording is completed, the CD player and the MD deck stop automatically.

To stop recordinPress x.
To record using FunctionPress GROUP ON/OFF“GROUP ON” appearsALBUM/GROUP – or repeatedly until “New Ggroup appears after step
To record only ytracksYou can record only yousing the Program Playperform steps 1 to 5 of program” (page 14).
About recording• When recording MP3 file
audio CD format. This mincrease beyond the capa
• To protect copyrighted mrestrictions are applied wthe deck:
1)Only normal-speed CDsupported.
2)The digital signal of than analog signal befor
3)The recording level ca
• During recording, the elaMD on the display may dconstitute a probrem.
Notes • You cannot pause the rec
• If the MD play mode is sProgram Play, the play mPlay in step 5.
Tips• For details about LP2/LP
for long times” on page 2
• For details about High-SRecording, see page 29.
MD
– Reco
rdin
gg
the Group
repeatedly until after step 2. Press + (or GROUP SKIP) roup” or the desired 4.
our favorite CD
ur favorite CD tracks. Between steps 2 and 3, “Creating your own
MP3 filess, the files are converted to ay cause the data volume to city of the disc.
usic contents, the following hen recording MP3 files on
synchro recording is
e MP3 files is converted to e it is recorded.
nnot be adjusted.
psed time for the CD and iffer slightly. This does not
ording.
et to the Shuffle Play or ode switches to Normal
4 recording, see “Recording
You can record just the portions you like from a CD, or other connected component.When using the remote, switch the function to MD.
1 Load a recordable MD.
2 Press INPUT repeatedly to select the desired source to record.
• CD: To record from this deck’s CD player.
• OPT: To record from the digital component connected to the DIGITAL OPTICAL IN jack.
• ANALOG: To record from the analog component connected to the ANALOG IN jacks.
3 Press REC MODE repeatedly to select the recording mode.
Select the desired recording time.
Recording on an MD manually
— Manual Recording
To record in Select Recording time*
Stereo Blank (No indicator)
60 minutes
2
3xX
4
5
GROUPON/OFF SKIP
6
21GB
9.
peed CD-MD Synchro
*Maximum recording time using a 60-minute MD.
4 Press REC z.
The MD deck stands by for recording.
5 Press H, then start playing the desired source to record.
LP2 Stereo LP2 120 minutes
LP4 Stereo LP4 240 minutes
Monaural MONO 120 minutes
continued
22GB
To stop recordinPress x.
To record using FunctionPress GROUP ON/OFF“GROUP ON” appearsALBUM/GROUP – or repeatedly until “New Ggroup appears after step
NotesYou cannot record over exiare recorded after the exist
Tips• You can check the remai
MD during recording by
• For details about LP2/LPfor long times” on page 2
• You can adjust the recor
g
the Group
repeatedly until after step 2. Press + (or GROUP SKIP) roup” or the desired 3.
sting tracks. The new tracks ing tracks.
ning recordable time on the pressing TIME.
4 recording, see “Recording 9.
ding level (page 25).
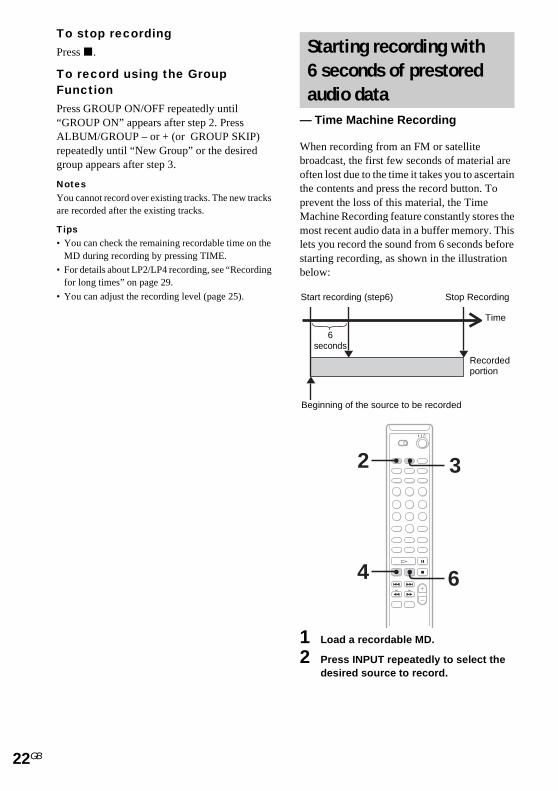
When recording from an FM or satellite broadcast, the first few seconds of material are often lost due to the time it takes you to ascertain the contents and press the record button. To prevent the loss of this material, the Time Machine Recording feature constantly stores the most recent audio data in a buffer memory. This lets you record the sound from 6 seconds before starting recording, as shown in the illustration below:
Starting recording with 6 seconds of prestored audio data
— Time Machine Recording
64
2 3
Start recording (step6)
Beginning of the source to be recorded
Stop Recording
6 seconds
Time
Recorded portion
1 Load a recordable MD.
2 Press INPUT repeatedly to select the desired source to record.
3 Press REC MODEthe recording mo
Select the desired r
*Maximum recordingMD.
4 Press z.
The MD deck stand
5 Start playing the record.
6 Press T.REC at thstart recording.
To stop Time MaPress x.
NoteThe MD deck starts storingstands by for recording in sthe source. If less than 6 secpress T.REC (or AMS), Tistarts with less than 6 seco
TipFor details about LP2/LP4for long times” on page 29
To record in Selec
Stereo Blankindica
LP2 Stereo LP2
LP4 Stereo LP4
Monaural MON
MD
– Reco
rdin
g repeatedly to select de.
ecording time.
time using a 60-minute
s by for recording.
desired source to
e desired point to
chine Recording
audio data when the deck tep 4 and you start playing onds have passed when you me Machine Recording nds of audio data.
recording, see “Recording .
After recording
Use the Divide Function (page 40).
At any point during recording
— Track Mark
You can mark track numbers during manual recording of any source.
Press z during manual recording at the point you want to add a track mark.
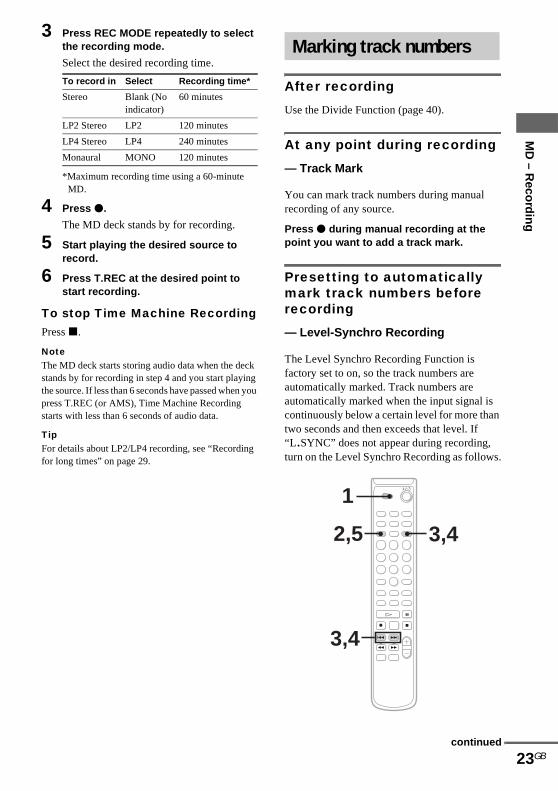
Presetting to automatically mark track numbers before recording
— Level-Synchro Recording
The Level Synchro Recording Function is factory set to on, so the track numbers are automatically marked. Track numbers are automatically marked when the input signal is continuously below a certain level for more than two seconds and then exceeds that level. If “L.SYNC” does not appear during recording, turn on the Level Synchro Recording as follows.
t Recording time*
(No tor)
60 minutes
120 minutes
240 minutes
O 120 minutes
Marking track numbers
2,5 3,4
1
23GB
3,4
continued
24GB
1 Set to MD in CD M
2 Press MENU/NO “Setup Menu” ap
3 Press . or >AMS) until “T.Mapress YES (or AM
4 Press . or >AMS) until “T.Mathen press YES (
“L.SYNC” lights u
5 Press MENU/NO.
To continue recordprocedures describrecording.
Other operations
* When the recording sourand the track numbers arbecause of noise, set thisnumbers are marked easi“–50 dB”.
Notes• Track numbers are not m
track.
• When recording a CD, trwhere you paused recordmight be recorded as thesingle track number whethe same CD is recorded
To Do th
Turn off the Level Synchro Recording Function
In sterepea“T.Mpress
Change the trigger lever for Level Synchro Recording*
After repea“LS(TYES (> rto seledB anpress MEN
D select switch.
repeatedly until pears.
repeatedly (or turn rk” appears, then S).
repeatedly (or turn rk LSync” appears, or AMS).
p.
ing, follow the ed for each type of
ce is tape or radio program e not marked properly level higher so that track ly. The factory setting is
arked depending on the
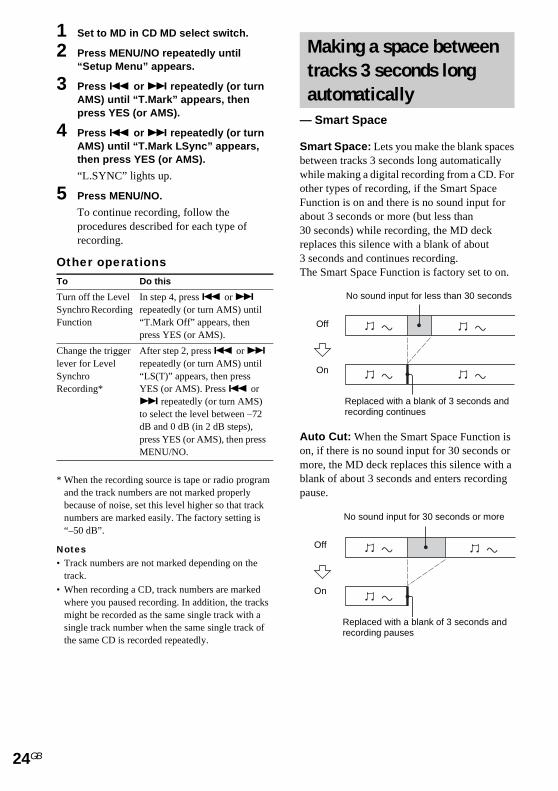
Smart Space: Lets you make the blank spaces between tracks 3 seconds long automatically while making a digital recording from a CD. For other types of recording, if the Smart Space Function is on and there is no sound input for about 3 seconds or more (but less than 30 seconds) while recording, the MD deck replaces this silence with a blank of about 3 seconds and continues recording.The Smart Space Function is factory set to on.
Auto Cut: When the Smart Space Function is on, if there is no sound input for 30 seconds or more, the MD deck replaces this silence with a blank of about 3 seconds and enters recording pause.
is
p 4, press . or > tedly (or turn AMS) until ark Off” appears, then YES (or AMS).
step 2, press . or > tedly (or turn AMS) until )” appears, then press or AMS). Press . or epeatedly (or turn AMS) ct the level between –72 d 0 dB (in 2 dB steps), YES (or AMS), then press U/NO.
Making a space between tracks 3 seconds long automatically
— Smart Space
No sound input for less than 30 seconds
Replaced with a blank of 3 seconds and recording continues
Off
On
No sound input for 30 seconds or more
Off
ack numbers are marked ing. In addition, the tracks same single track with a n the same single track of repeatedly.
Replaced with a blank of 3 seconds and recording pauses
On

1 Set to MD in CD M
2 Press MENU/NO “Setup Menu” ap
3 Press . or >AMS) until “S.Spapress YES (or AM
4 Press . or >AMS) until “S.Spapress YES (or AM
5 Press MENU/NO.
To continue recordprocedures describrecording.
To turn off the SFunctionIn step 3, press . or AMS) until “S.Space OYES (or AMS).In step 4, press . or AMS) until “S.Space OYES (or AMS).
2,5
1
3,4
MD
– Reco
rdin
g
D select switch.
repeatedly until pears.
repeatedly (or turn ce Off” appears, then S).
repeatedly (or turn ce On” appears, then S).
ing, follow the ed for each type of
mart Space
> repeatedly (or turn n” appears, then press
When recording on an MD, you can adjust the recording level to the desired volume. You can adjust the recording level not only when making an analog recording, but also when making a digital recording from a CD, etc.Adjusting the analog recording level can be performed using the buttons on the deck only.
Adjusting the recording level when making an analog recording
1 Press INPUT repeatedly until “ANALOG” appears.
2 Press REC z.
The MD deck stands by for recording.
3 Start playing the desired source to record.
4 Turn REC LEVEL on the deck to adjust the recording level.
Adjust to the optimum level while making sure that “OVER” does not appear in the display at the loudest portion.
3,4
Adjusting the recording level
14
2
Adjust the level so as not
25GB
> repeatedly (or turn ff” appears, then press
ANALOG
to light up “OVER”.
continued

26GB
5 Stop playing the
To continue recordprocedures describrecording.
Adjusting the rwhen making arecording
1 Press INPUT repe“OPT” appears.
2 Press REC z.
The MD deck stan
3 Start playing the record.
4 Press MENU/NO “Setup Menu” ap
5 Press . or >AMS) until “CD” then press YES (
4,71
5,62
4
sound source.
ing, follow the ed for each type of
ecording level digital
atedly until “CD” or
6 Press . or > repeatedly (or turn AMS) to adjust the recording level.
Adjust to the optimum level while making sure that “OVER” does not appear in the display at the loudest portion.
7 Press MENU/NO.
8 Stop playing the sound source.
Tips• You can also adjust the recording level during
recording.
• Once adjusted, the recording level is maintained until you adjust it again.
• You cannot adjust the recording level during CD-MD Synchro Recording.
• You cannot adjust the recording level during MD playback.
5
15,6
2
,7
5
ds by for recording.
desired source to
repeatedly until pears.
repeatedly (or turn or “OPT” appears, or AMS).

You can record specificlistening to them. This fput only the tracks you
1 Set to CD in CD M
2 Press H to start
Make sure that the stopped.
3 Press REC-IT whyou want to reco
Play returns to the recording starts. Thend of the track, bufrom the next track
To stop RecordinPress x.
Note• Make sure that the remai
MD is longer than the pl
• The recording level specnot applied during REC-reference level (0.0 dB) i
• During MP3 playback, Rmade. For details about “When recording MP-3 fCD-RW” on page 19
Recording thtrack
— REC-IT Function
1
2
MD
– Reco
rdin
g
tracks on a CD while unction allows you to like onto the MD.
D select switch.
playback.
MD deck section is
en you hear a track rd.
start of the track and e recording stops at the
t CD playback continues .
g
By using the MUSIC SYNC button on the remote, you can automatically start recording in sync with a CD in the deck or the signal input from the program source connected to the deck.
1 Do steps 1 to 4. (see “Recording on an MD manually” on page 21).
2 Switch the function to MD.
3 Press MUSIC SYNC.
“REC” and “SYNC” flash and the deck changes to recording pause.
4 Start playing the program source you want to record.
e current CD
3
Synchro-Recording with an external audio equipment
— Music Synchro-Recording
3
2
27GB
ning recordable time on the aying time of the CD track.
ified in the Setup Menu is IT Recording. The initial s used instead.
EC-IT Recording cannot be the MP3 recording, See ormat files on a CD-R or
The deck starts recording automatically.
To stop Music Synchro-RecordingPress x.
NoteWhen Music Synchro-Recording, the Smart Space Function and the Auto Cut Function turn on automatically regardless of their setting (“On” or “Off”).
28GB
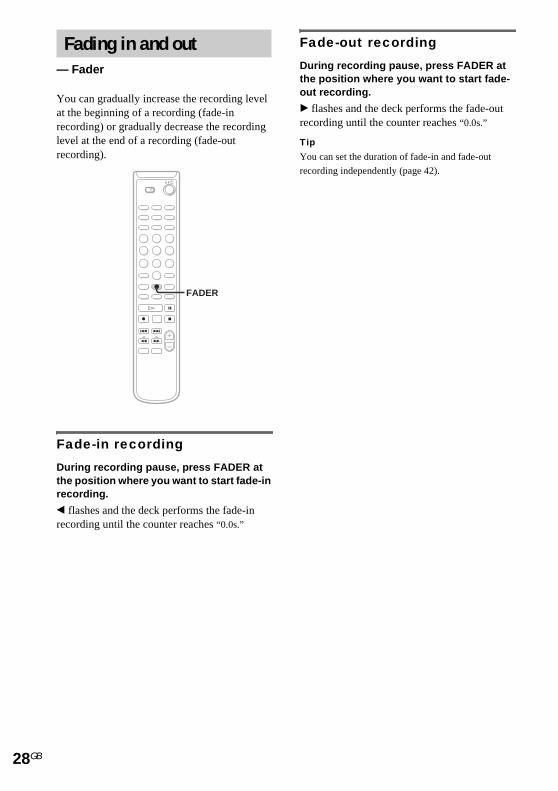
You can gradually increat the beginning of a rerecording) or graduallylevel at the end of a recrecording).
Fade-in record
During recording pauthe position where yorecording.
b flashes and the deck recording until the coun
Fading in and— Fader
ase the recording level cording (fade-in decrease the recording ording (fade-out
ing
se, press FADER at u want to start fade-in
performs the fade-in ter reaches “0.0s.”
Fade-out recording
During recording pause, press FADER at the position where you want to start fade-out recording.
B flashes and the deck performs the fade-out recording until the counter reaches “0.0s.”
Tip
You can set the duration of fade-in and fade-out
recording independently (page 42).
out
FADER

Recording for l
This deck has two longLP2 and LP4 (MDLP rePress REC MODE to seRefer to each pages aboand 21). MDs recorded in MDLPback only on the deck w
MDs recorded in MDLPplayed back on the deckMDLP mode.
Notes• Even if the recording mo
sound from the speakers asource (in stereo when re
• Some MDs recorded in Medited so that “LP:” is diplayback is not possible play back these MDs on aMDLP mode. However, mode, so “LP:” is not displayed back.
Tips• LP4 stereo mode (4× lon
achieves a long stereo respecial compression deckon sound quality, Stereo recording (2× long time recommended.
• You can mix the recordin
• The selected recording mrecording has finished. Tmode, press REC MODE
Recording tip
MD – R
ecord
ing
ong times
time recording modes: cording).
lect the recording mode. ut recording (pages 20
Stereo mode are played ith the following marks.
Stereo mode cannot be that does not support
de is set to “MONO”, the re output as recorded in the cording the stereo source).
DLP Stereo mode are splayed to indicate that when an attempt is made to deck that does not support
this deck supports MDLP played when these MDs are
g time recording mode) cording time by use of a . When placing emphasis
recording or LP2 stereo recording mode) is
g mode in an MD.
ode is kept even after o change the recording
High-Speed CD-MD Synchro Recording
When recording an entire CD as is or in the programmed track order, you can record at higher speed than normal (approximately 4× normal speed).
If you cannot use High-Speed CD-MD Synchro RecordingA reading failure has occurred, and the deck is trying to read the data again.• If the retry was successful, the deck continues
with High-Speed CD-MD Synchro Recording.
• If the condition of the inserted CD or the deck is poor, and retry fails, High-Speed CD-MD Synchro Recording is disabled. In this case, “Retry” and “NORMAL” flash in the display and the MD deck automatically starts recording in normal CD-MD Synchro Recording. Note the monitoring of the recorded signal is not possible when this occurs.
Notes• You cannot record over existing tracks. The new
tracks are recorded after the existing tracks.
• When recording all the tracks on a CD, be sure to use a recording MD with a longer remaining time than the CD play time.
• You cannot pause recording during CD-MD Synchro Recording and High-Speed CD-MD Synchro Recording.
• If the CD play mode is set to Repeat Play or Shuffle Play, it automatically switches to Normal Play.
• The following items are either inoperative or cannot be used during High-Speed CD-MD Synchro Recording:
– The Auto Cut Function
– The recording level specified in the Setup menu
s
29GB
repeatedly.• There is no sound output during High-Speed CD-MD
Synchro Recording.

30GB
Before you sta
You can edit an MD on• The MD is recordabl• The MD play mode iCheck the following, be
1 Check the tab of
Slide the tab to cloIf the MD is protecMD.
2 Press PLAY MODboth “SHUFFLE”disappear.
You can edit the Mmode. You cannot eProgram Play mod
To quit while edPress MENU/NO.
MD – Editing
Editing tips
rt editing
ly when:e.s Normal Play.fore editing.
the MD to be edited.
se the slot.ted, you cannot edit the
E repeatedly until and “PROGRAM”
D only in Normal Play dit the MD in Shuffle or
e.
iting
Operation buttons for Editing
After editing
Press EJECT to remove the MD or press ?/1 (power) to turn off the deck.
“TOC” starts flashing. The TOC is updated and editing is completed.
Before pulling out the mains leadMD editing is completed when the MD Table of Contents (TOC) is updated. The TOC is updated when you eject the MD or press ?/1 to turn off the deck. Do not pull out the mains lead before updating the TOC or while updating the TOC (while “TOC” lights up or flashes) to ensure a complete editing.
MENU/NO
./>
YES
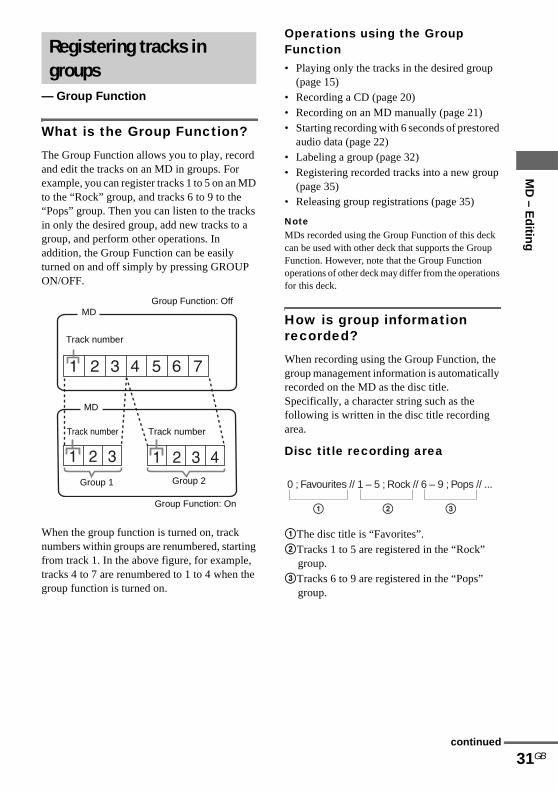
What is the Gro
The Group Function alland edit the tracks on anexample, you can registto the “Rock” group, an“Pops” group. Then youin only the desired grougroup, and perform othaddition, the Group Funturned on and off simplON/OFF.
When the group functionumbers within groups from track 1. In the abotracks 4 to 7 are renumbgroup function is turned
Registering trgroups
— Group Function
MD
Track number
MD
Group 1
Track number
MD
– Ed
iting
up Function?
ows you to play, record MD in groups. For
er tracks 1 to 5 on an MD d tracks 6 to 9 to the can listen to the tracks p, add new tracks to a er operations. In ction can be easily y by pressing GROUP
n is turned on, track are renumbered, starting ve figure, for example, ered to 1 to 4 when the
Operations using the Group Function• Playing only the tracks in the desired group
(page 15)• Recording a CD (page 20)• Recording on an MD manually (page 21)• Starting recording with 6 seconds of prestored
audio data (page 22)• Labeling a group (page 32)• Registering recorded tracks into a new group
(page 35)• Releasing group registrations (page 35)
NoteMDs recorded using the Group Function of this deck can be used with other deck that supports the Group Function. However, note that the Group Function operations of other deck may differ from the operations for this deck.
How is group information recorded?
When recording using the Group Function, the group management information is automatically recorded on the MD as the disc title. Specifically, a character string such as the following is written in the disc title recording area.
Disc title recording area
1The disc title is “Favorites”.2Tracks 1 to 5 are registered in the “Rock”
group.3Tracks 6 to 9 are registered in the “Pops”
acks in
Group 2
Track number
Group Function: Off
Group Function: On
0 ; Favourites // 1 – 5 ; Rock // 6 – 9 ; Pops // ...
2 31
31GB
on. group.
continued
32GB
Therefore, when an MDGroup Function is loadesupport the Group Functhe Group Function turncharacter string is displadisc title.
Note that if you rewstring by mistake usFunction, you may bGroup Function of t
* “GROUP ON” flashes. Tagain, first perform the pgroups on an MD” (pageregistrations of all tracks
If “Group Full!” aoperationYou cannot start recordinsufficient character spmanagement. Delete un(disc title or track titles)possible (page 34).
Notes• The Group Function sett
eject the MD or turn off
• When the Group Functioregistered to a group are played.
• You cannot change the g
• The new group is added with tracks registered.
• When you newly record group, the new track is atracks in the group.
• Up to 99 groups can be r
• When you newly record group, the track numbersrecorded track may changis turned off.
• If you load a disc with grinformation written in ot“GROUP ON” flashes. Ithe Group Function.
recorded using the d on a deck that does not tion or on this deck with ed off, the above yed in its entirety as the
rite this character ing the Name e unable to use the
hat MD.*
o use the Group Function rocedure for “Releasing all 36) and release the
on the MD.
ppears during
ing because there is ace for group necessary characters until group recording is
ing is stored even if you the deck.
n is on, tracks which are not not displayed and cannot be
roup order.
after any existing groups
a track into an existing dded after any existing
egistered on a single MD.
a track into an existing following the newly e when the Group Function
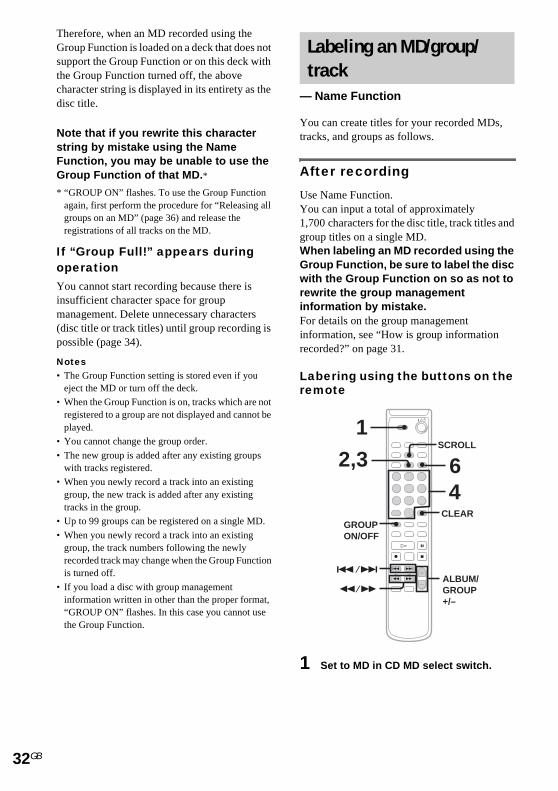
You can create titles for your recorded MDs, tracks, and groups as follows.
After recording
Use Name Function.You can input a total of approximately 1,700 characters for the disc title, track titles and group titles on a single MD.When labeling an MD recorded using the Group Function, be sure to label the disc with the Group Function on so as not to rewrite the group management information by mistake.For details on the group management information, see “How is group information recorded?” on page 31.
Labering using the buttons on the remote
Labeling an MD/group/track
— Name Function
2,3
1
46
CLEAR
./>
GROUPON/OFF
ALBUM/
SCROLL
oup management her than the proper format, n this case you cannot use
1 Set to MD in CD MD select switch.
m/M GROUP+/–

2 Perform the follodepending on wh
To label a track
Press . or >desired track numbNAME EDIT/SEL
To label an MD
Press NAME EDITtotal number of traGroup Function is
To label a group
Press GROUP ON“GROUP ON” appALBUM/GROUP the desired group aEDIT/SELECT whtracks within the de
3 Press NAME EDITthe desired type
4 Enter a character
5 Repeat steps 3 anthe name.
Character type
Alphabet (upper caseblank space/symbols
Alphabet (lower caseblank space/symbols
Numbers
Character type D
Alphabet Ple>
chfl
Numbers Pn
Blank space P
´ – / , . ( ) : ! ? P
& + < > _ = “ ; # $ % @ `
P>
The cursor starts fla
MD
– Ed
iting
wing procedure at you want to label:
repeatedly until the er appears, then press ECT.
/SELECT while the cks (or groups when the on) is displayed.
/OFF repeatedly until ears, then press – or + repeatedly until ppears. Press NAME ile the total number of sired group is displayed.
/SELECT to select of character.
.
6 Press YES.
To change the characterIn step 3 or 4, press m or M repeatedly until the character to be changed flashes, press CLEAR to erase the character, then repeat steps 3 and 4.
To add a characterAfter steps 1 and 2, press m or M until the cursor comes to the point you want to add a character, then proceed to step 3.
Labering using the buttons on the deck
1 Press MENU/NO repeatedly until “Edit Menu” appears.
2 Turn AMS until “Nm In?” appears in the display and press AMS.
3 Turn AMS to select “Disc” to label an MD, or to specify the track or group to label.While recording, go to step 5.
4 Press AMS or YES.A flashing cursor appears in the display.The deck starts playing and you can name a track while monitoring the sound.
5 Press TIME to change the type.
6 Turn AMS to select the character.The selected character flashes.Letters, numbers, symbols, and a space appear in sequential order as you turn AMS.To enter a space, press AMS while the
Select
s)/ Selected AB
s)/ Selected ab
Selected 12
o this
ress the corresponding tter button (or . or
) repeatedly until the
shing.
Character type Select
Alphabet (upper cases) “A”
Alphabet (lower cases) “a”
Numbers “0”
Symbols “ ´ ”
33GB
d 4 to enter the rest of
cursor is flashing. (You cannot select a space for the first character to the title.)
7 Press AMS to enter the select character.The selected character stops flashing and the cursor flashes waiting for the input of the next character.
8 Repeat steps 6 and 7 until you have entered the entire title.
9 Press YES.
aracter to be entered ashes, then press M.
ress the corresponding umber buttons.
ress 10/0.
ress 1 repeatedly.
ress 1, then press . or repeatedly.
continued
34GB
NoteIf you enter the symbol “//disc titles such as “abc//defthe Group Function.
Tips• You can label a track titl
playback repeats until yo
• During the CD-MD SyncCD-TEXT information i
Checking the t
To check the disc titles,mode. To check the tracduring playback. The tithe display.To check the group titleOFF repeatedly in stop ON” appears, press ALBGROUP SKIP) repeategroup appears, then preTo stop scrolling, pressbutton again to resume
Erasing the titl
1 To erase group tiON/OFF repeated“GROUP ON” ap
2 Press MENU/NO
3 Press . or >AMS) until “Nm Epress YES (or AM
4 Press . or >“Disc” (to erase ttitle or the group
5 Press YES (or AM
“Complete!” appea
NoteYou cannot erase the title oany tracks registered.
” between the characters in ”, you may be unable to use
e during playback. The u finish labeling.
hro Recording (page 20), s recorded automatically.
itles
press SCROLL in stop k title, press SCROLL
tle appears scrolling in
s, press GROUP ON/mode until “GROUP UM/GROUP – or + (or
dly until the desired ss SCROLL. SCROLL. Press the scrolling.
es
tles, press GROUP ly in stop mode until
pears.
in stop mode.
repeatedly (or turn rase?” appears, then S).
repeatedly until he disc title), the track title appears
S).
rs.
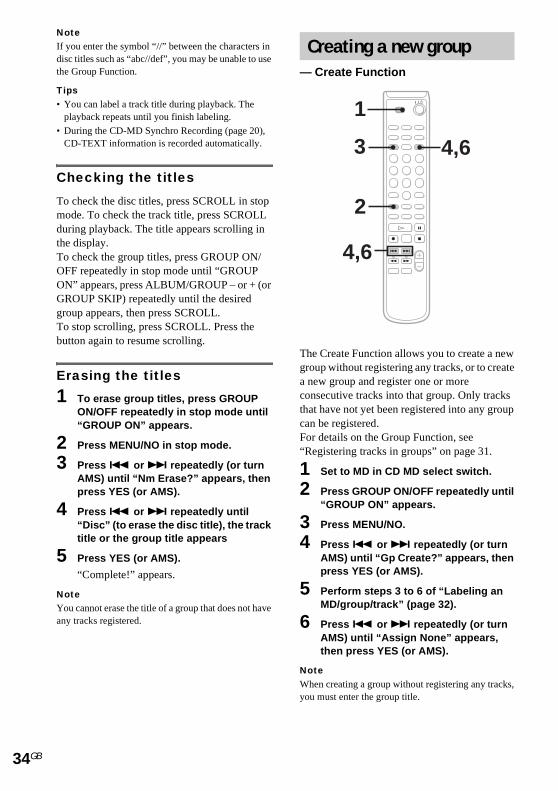
The Create Function allows you to create a new group without registering any tracks, or to create a new group and register one or more consecutive tracks into that group. Only tracks that have not yet been registered into any group can be registered.For details on the Group Function, see “Registering tracks in groups” on page 31.
1 Set to MD in CD MD select switch.
2 Press GROUP ON/OFF repeatedly until “GROUP ON” appears.
3 Press MENU/NO.
4 Press . or > repeatedly (or turn AMS) until “Gp Create?” appears, then press YES (or AMS).
Creating a new group— Create Function
3
4,6
2
4,6
1
f a group that does not have
5 Perform steps 3 to 6 of “Labeling an MD/group/track” (page 32).
6 Press . or > repeatedly (or turn AMS) until “Assign None” appears, then press YES (or AMS).
NoteWhen creating a group without registering any tracks, you must enter the group title.

To register trac
In step 6, press . oturn AMS) to select thtrack you want to reg(or AMS).
When registering only oagain. When registeringpress . or > (or tselect the number of theregister, then press YES
Notes• You cannot register the s
group.
• If you do not enter a grou(group number)” appears
TipYou can also register trackdeck that does not support
MD
– Ed
iting
ks into a group
r > repeatedly (or e number of the first
ister, then press YES
ne track, press YES two or more tracks, urn AMS) repeatedly to last track you want to (or AMS).
ame track to more than one
p title in step 5, “Group ** as the group title.
s that were recorded on a the Group Function.
These functions allow you to release group registrations simply by specifying the group for which you want to release the registrations. In addition, you can also release the registrations of all groups on an MD at once.For details on the group management information, see “Registering tracks in groups” on page 31.
Releasing a single group
— Group Release Function
You can release a specified group and erase that group. (However, note that the tracks are not
Releasing group registrations
— Release Function
35
2
5,6
1
4
35GB
erased.)
1 Set to MD in CD MD select switch.
2 Press GROUP ON/OFF repeatedly until “GROUP ON” appears.
3 Press ALBUM/GROUP – or + (or GROUP SKIP) repeatedly until the desired group appears.
4 Press MENU/NO.
continued

36GB
5 Press . or >AMS) until “Gp Rthen press YES (
“REL Gp** (selectappears.
6 Press YES (or AM
Releasing all g
— All Release Func
1 In step 5 above, prepeatedly (or turuntil “Gp All RELpress YES (or AM
“All REL??” appea
2 Press YES (or AM
repeatedly (or turn elease?” appears, or AMS).
ed group number)??”
S).
roups on an MD
tion
ress . or > n AMS) repeatedly ?” appears, then S).
rs.
S).
The MD deck lets you erase unwanted tracks quickly and easily.You can restore the erased contents using the Undo function immediately after the erasing (page 41). However, you cannot restore the erased contents after performing other editing. Before erasing, make sure if it is all right to erase the content.The three options for erasing recordings are:• Erasing a single track (Track Erase Function)• Erasing all tracks (All Erase Function)• Erasing a portion of a track (A-B Erase
Function)
Erasing a single track
— Track Erase Function
When you erase a track, the total number of tracks on the MD decreases by one and all the tracks following the erased one are renumbered.
Example: Erasing track 2
As the track numbers are renumbered as above, it is recommended to erase from the latter tracks when erasing several tracks, so as not to change
Erasing recordings— Erase Function
Erase track 2Track number
Original tracks
After ERASE
A B C D
A C D
the track numbering of unerased tracks.
1 Set to MD in CD MD select switch.
2 Press MENU/NO.
3 Press . or > repeatedly (or turn AMS) until “Tr Erase?” appears, then press YES (or AMS).
Playback of the selected track starts.

4 Press . or >AMS) until the deappears.
5 Press YES (or AM
“Complete!” appeastep 4 is erased andfollowing track stalast track, the playbstarts.
Note If you erase all the tracks witself is also erased.
Erasing all trac
— All Erase Functi
You can erase all the coMD (the disc title, groutracks and their titles) a
1 Set to MD in CD M
2 Press MENU/NO.
3 Press . or >AMS) until “All Epress YES (or AM
“All Erase??” appe
4 Press YES (or AM
NoteIf you perform the above oFunction is on, not only theall the tracks on the MD ar
MD
– Ed
iting
repeatedly (or turn sired track number
S).
rs. The track selected in playback of the
rts. When you erase the ack of the previous track
ithin a group, the group
ks
on
ntents recorded on an p titles, all recorded t once.
D select switch.
repeatedly (or turn rase?” appears, then S).
ars.
S) again.
peration when the Group tracks within the group, but e erased.
Erasing a portion of a track
— A-B Erase Function
You can specify a portion within a track and erase the portion with ease. You can shift the desired portion by frame*, minute or second intervals.This function is convenient to erase the unneccessary parts recorded from satellite broadcast or radio programs.
* 1 frame is 1/86 second.
Example: Erasing a portion of track 2
1 Set to MD in CD MD select switch.
2 Press MENU/NO.
3 Press . or > repeatedly (or turn AMS) until “A-B Erase?” appears, then press YES (or AMS).
Playback starts.
4 Press . or > repeatedly (or turn AMS) until the desired track number appears.
5 While monitoring the sound, press YES (or AMS) at the starting point of the portion to be erased (point A).
“—Rehearsal—” and “Point A ok?” appear alternately while the deck repeats a few
1 2
1 2 3
3Track number
Original tracks
After A-B ERASE
A B A B B B C
A B (A + C) C
Point A Point B
37GB
seconds of a portion before point A.
continued

38GB
6 Press YES (or AMcorrect.
“Point B set” appesetting the ending perased (point B) staIf the point A is inM repeatedly to fla
indication, then press
AMS).
You can shift the p(1 frame) intervals* You can shift the po
Monaural mode and4-frame intervals (i
7 Continue playbacreaches point B, AMS).
“A-B Ers” and “Poalternately and the the few seconds bepoint B successive
8 Press YES (or AMcorrect.
“Complete!” appeathe portion betweenPlayback starts frotrack.If the point B is inM repeatedly to the portion to be ermonitoring the souAMS).You can shift the p(1 frame) intervals* You can shift the po
Monaural mode and4-frame intervals (i
Minut
S) if point A is
ars and playback for oint of the portion to be rts.correct, press m or
sh minute, second, or frame
. or > (or turn
oint by 1/86 second .*int by 2-frame intervals (in LP2 stereo mode) or by
n LP4 stereo mode).
k until the deck then press YES (or
int B ok?” appear deck repeats a portion of fore point A and after ly.
S) if point B is
rs for a few seconds and point A and B is erased.
m the beginning of the
correct, press m or find the ending point of ased (point B) while nd, then press YES (or
You can use this function to change the order of any track on the disc. When you move tracks, the tracks are automatically renumbered.
Example: Moving track 3 to position 2
1 Set to MD in CD MD select switch.
2 Press MENU/NO.
3 Press . or > repeatedly (or turn AMS) until “Move?” appears, then press YES (or AMS).
Playback starts.
4 Press . or > repeatedly (or turn AMS) until the desired track number to move appears, then press YES (or AMS).
5 Press . or > repeatedly (or turn AMS) until the new track position appears.
6 Press YES (or AMS).
Secondes Frame
Moving recorded tracks— Move Function
Track number
Original tracks
After MOVE
A B C D
A C B D
Original track number
New track position
oint by 1/86 second .*int by 2-frame intervals (in LP2 stereo mode) or by
n LP4 stereo mode).
“Complete!” appears for a few seconds and the moved track starts playing.
NoteWhen you move a track to a track number that is registered into a group, the moved track is re-registered into the group. In addition, if you move a track that is registered into a group to a track number that is not registered into a group, the group registration of the moved track is released. However, when the Group Function is on, you can only move tracks within the selected group.

You can use this functiointo a single track. The decreases by one and alcombined ones are renu
Example: Combining
Example: Combining
1 Set to MD in CD M
2 Press MENU/NO.
3 Press . or >AMS) until “Compress YES (or AM
Playback starts.
4 Press . or >AMS) until the firstwo to be combinpress YES (or AM
For example, to com4.
Combining retracks
— Combine Functi
Track number
Original tracks
After COMBINE
A
A
Original tracks
After COMBINE
Track number
A B
B C
MD
– Ed
iting
n to combine 2 tracks total number of tracks l tracks following the mbered.
track 3 to track 1
track 1 to track 4
D select switch.
repeatedly (or turn bine?” appears, then S).
repeatedly (or turn t track number of the
5 Press . or > repeatedly (or turn AMS) until the second track number of the two to be combined appears.
6 Press YES (or AMS).
“Complete!” appears for a few seconds. Playback of the track starts.
Notes• When you combine two tracks that are registered into
different groups, the second track is reregistered into the group containing the first track. In addition, if you combine a track that is registered to a group with a track that is not registered to a group, the second track takes the same registration setting as the first track. However, when the Group Function is on, you can only combine tracks within the selected group.
• Tracks recorded in different recording modes (stereo, LP2, LP4 or MONO) cannot be combined.
• If both of the combined tracks have track titles, the title of the second track is erased.
corded
on
B C D
C B D
C D
D A
Second track number to be continuedFirst track number
39GB
ed appears, then S).
bine track 1 to 4, select

40GB
You can use this functioafter recording. You cawhen recording from taand track numbers are nautomatically, and wantotal number of tracks ithe tracks following therenumbered.
Example: Dividing tra
1 Set to MD in CD M
2 Press MENU/NO.
3 Press . or >AMS) until “Dividpress YES (or AM
Playback starts.
4 Press . or >AMS) until the dedivide appears.
5 While monitoring(or AMS) at the p
“—Rehearsal—” abe divided is playe
6 Press YES (or AMbe divided is cor
“Complete!” appeathe newly created t
Dividing reco— Divide Function
Track number
Original tracks
After DIVIDE
A B
A B
n to mark track numbers n also use this function pes or radio programs ot marked
t to mark tracks. The ncreases by one and all divided ones are
ck 2 into two tracks
D select switch.
repeatedly (or turn e?” appears, then S).
repeatedly (or turn sired track number to
the sound, press YES oint to be divided.
ppears and the portion to d repeatedly.
S) again if the point to rect.
If the point to be divided is incorrect, press m or M repeatedly to flash minute,
second, or frame indication, then press . or
> (or turn AMS).
You can shift the point by 1/86 second (1 frame) intervals.** You can shift the point by 2-frame intervals (in
Monaural mode and LP2 stereo mode) or by 4-frame intervals (in LP4 stereo mode).
NoteIf you divide a labeled track (page 32) into two tracks, only the first track retains the track title.
Example:
rded tracks
Divide track 2 into track B and C
C D
C D
SecondMinutes Frame
The new track is not labeled.
A B C
A B C
rs for a few seconds and rack starts playing.

You can use this functioand restore the contentscondition before the ediNote, however, that youyou do any of the follow• Do another edit.• Do the recording pro• Update the TOC by t
ejecting the MD.• Disconnect the powe
1 Press MENU/NO
2 Press . or >AMS) until “Undo
“Undo?” does not aediting function tha
3 Press YES (or AM
Following messagethe last edit.
4 Press YES (or AM
Undoing the l— Undo Function
Editing
Labeling discs or trac
Erasing the titles
Creating a new group
Releasing a group
Releasing all groups
Deleting a portion of track
Deleting a track
Deleting all the tracks
Moving tracks
Dividing a track
Combining tracks
MD
– Ed
iting
n to cancel the last edit of the MD to the t. cannot undo the edit if ing after the edit:
cedure.urning off the deck or
r cord.
in stop mode.
repeatedly (or turn ?” appears.
ppear when there is no t can be canceled.
S).
appears depending on
You can change the volume of recorded tracks. The original track is recorded over at the new recording level. When changing the recording level, you can select Fade-in Recording to gradually increase the signal level at the start of recording, or Fade-out Recording to gradually decrease the signal level at the end of the recording.
Changing the overall recording level
1 Set to MD in CD MD select switch.
2 Press MENU/NO.
3 Press . or > repeatedly (or turn AMS) until “S.F Edit?” appears, then press YES (or AMS).
4 Press . or > repeatedly (or turn AMS) until “Tr Level?” appears, then press YES (or AMS).
Playback starts.
5 Press . or > repeatedly (or turn AMS) until the track number you want to change the recording level appears, then press YES (or AMS).
“Level 0dB” appears.
6 While monitoring the sound, press . or > repeatedly (or turn AMS) to change the recorded level.
The recording level can be changed from –12 dB to +12 dB, in 2 dB steps. Change to
ast edit
Message
ksName Undo?
Group Undo?
a
Erase Undo?
Move Undo?
Divide Undo?
Combin Undo?
Changing the recorded level after recording
— S.F Edit Function
41GB
S) again.the optimum level while making sure that “OVER” does not appear in the display at the loudest portion.
ANALOG
Adjust the level so as not to light up “OVER”.
continued

42GB
7 Press YES (or AM
“Edit OK?” appear
8 Press YES (or AM
The deck starts rectrack.“S.F Edit ** %” apbeing recorded. Anroughly equal to or time of the track is over the track. Whe“Complete!” appea
Fade-in and FaRecording
1 Set to MD in CD M
2 Press MENU/NO.
3 Press . or >AMS) until “S.F Epress YES (or AM
4 Press . or >AMS) until “Fadeappears, then pre
Playback starts.
5 Press . or >AMS) until the trato change the recthen press YES (
“Time5.0s” appear
6 While monitoringor > repeatedlchange the Faderecording time.
The deck plays therecorded over usinRecording. You cavalue between 1.0 sin 0.1 second steps.longer than the trac
7 Press YES (or AM
“Edit OK?” appear
S).
s.
S) again.
ording over the existing
pears while the track is amount of time that is longer than the playback required when recording n the recording finishes, rs.
de-out
D select switch.
repeatedly (or turn dit?” appears, then S).
repeatedly (or turn In?” or “Fade Out?” ss YES (or AMS).
repeatedly (or turn ck number you want ording level appears, or AMS).
s.
the sound, press . y (or turn AMS) to -in or Fade-out
portion that will be g Fade-in or Fade-out n set the time at any
8 Press YES (or AMS) again.
The deck starts recording over the existing track.“S.F Edit ** %” appears while the track is being recorded. When the recording finishes, “Complete!” appears.
To cancel the operationPress MENU/NO during step 3 through 7. After pressing YES (or AMS) in step 8 to start recording, you cannot interrupt the operation.
Notes• You cannot change the recording level of the tracks
recorded in MDLP mode.
• Repeatedly changing the recording level results in poor sound quality.
• The recording level will not return to the exact original level once the recording level has been changed even if it returned to the original level.
• You cannot undo the S.F Edit Function even if you use the Undo Function.
econd and 15.0 seconds, You cannot set the time k.
S).
s.

If you experience any odifficulties while using troubleshooting guide tproblem.
CD player sectio
The player does not st• Insert a CD.
• Place the CD properly
• Clean the CD.
• Remove the CD, then about an hour until the
MD deck section
The deck does not ope• The MD may be dama
appears). Take the M“Read Error” remain
The deck does not play• Remove the MD, then
place for several hourevaporates.
• Press ?/1 to turn the
• Slide the MD into the up and the arrow poin
• Replace the disc with
The deck does not rec• The MD is record-pro
“C11” alternate). Retab to close the slot (p
• Connect the optional c(page 7).
• Press INPUT repeatedsource correctly.
• Readjust the recording
• A premastered MD is recordable MD.
• There is not enough tiit with another recordrecorded tracks, or era
• There has been a powcord has been disconnData recorded to that precording procedure.
Troubleshooting
Problems and
Trou
blesh
oo
ting
f the following the deck, use this o help you remedy the
n
art playing.
.
leave the deck turned on for moisture evaporates.
rate or operates poorly.ged (“Read Error”
D out and insert it again. If s, replace the MD.
back. leave the deck in a warm s until the moisture
deck on.
disc slot with the label side ting towards the opening.
one that has been recorded.
ord.tected (“Protected” and move the MD and slide the age 20).
omponent properly
ly to select the recording
The deck does not edit.• Press PLAY MODE repeatedly until both
“PROGRAM” and “SHUFFLE” disappear.
• Remove the MD and slide the tab to close the slot (page 20).
The sound has a lot of static.• Strong magnetism from a television or a similar
device is interfering with operations. Move the deck away from the source of strong magnetism.
The three- or five letters appear.• The Self-Diagnosis Function is on. Check the
table on page 44.
Others
No sound is output.• Make the connections properly.
• Operate the amplifier property.
• When using the headphones, turn PHONE LEVEL to turn up the output level.
The remote does not function.• Make sure that there is no obstacles between the
deck and the remote.
• Point the remote at the remote sensor on the deck.
• Replace the batteries in the remote.
After you’ve attempted the prescribed remediesIf the deck still does not operate properly, or if other problems not described above occur, turn off the deck, then reinsert the plug into the power outlet.If the problem persists, reset the deck as follows:
1 Turn off the deck and unplug the AC power cord.
2 Reinsert the plug into the power outlet while pressing down ?/1.
remedies
43GB
level (page 25).
inserted. Replace with a
me left on the MD. Replace able MD with fewer se unnecessary tracks.
er failure or the AC power ected during recording. oint may be lost. Repeat the
Should any problem persist even after resetting the deck, consult your nearest Sony dealer.
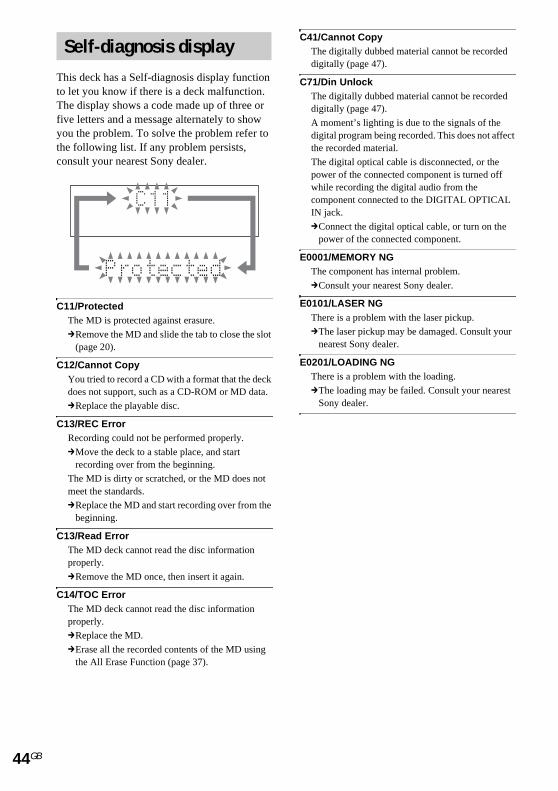
44GB
This deck has a Self-diato let you know if thereThe display shows a cofive letters and a messayou the problem. To sothe following list. If anyconsult your nearest So
C11/ProtectedThe MD is protected ag
cRemove the MD and s(page 20).
C12/Cannot CopyYou tried to record a CDdoes not support, such a
cReplace the playable d
C13/REC ErrorRecording could not be
cMove the deck to a starecording over from t
The MD is dirty or scrameet the standards.
cReplace the MD and sbeginning.
C13/Read ErrorThe MD deck cannot reproperly.
cRemove the MD once
C14/TOC ErrorThe MD deck cannot reproperly.
cReplace the MD.
cErase all the recordedthe All Erase Function
Self-diagnosi
gnosis display functionis a deck malfunction. de made up of three or ge alternately to show lve the problem refer to problem persists,
ny dealer.
ainst erasure.
lide the tab to close the slot
with a format that the deck s a CD-ROM or MD data.
isc.
performed properly.
ble place, and start he beginning.
tched, or the MD does not
tart recording over from the
ad the disc information
, then insert it again.
C41/Cannot CopyThe digitally dubbed material cannot be recorded digitally (page 47).
C71/Din UnlockThe digitally dubbed material cannot be recorded digitally (page 47).
A moment’s lighting is due to the signals of the digital program being recorded. This does not affect the recorded material.
The digital optical cable is disconnected, or the power of the connected component is turned off while recording the digital audio from the component connected to the DIGITAL OPTICAL IN jack.
cConnect the digital optical cable, or turn on the power of the connected component.
E0001/MEMORY NGThe component has internal problem.
cConsult your nearest Sony dealer.
E0101/LASER NGThere is a problem with the laser pickup.
cThe laser pickup may be damaged. Consult your nearest Sony dealer.
E0201/LOADING NGThere is a problem with the loading.
cThe loading may be failed. Consult your nearest Sony dealer.
s display
ad the disc information
contents of the MD using (page 37).
One of the following mflash in the display duri
Blank DiscThe inserted recordablethe MD have been erase
Cannot CopyAn attempt was made todigitally dubbed MD (p
Cannot Edit• You tried to edit in Pro
• The track is recorded
• The MD is record-pro
CD Error!An operational error hassection. Wait a few secooperation again.
Disc Full!The MD is full (see Syst
Edit NOWYou pressed ?/1 whilerecording level after recmode.
If you turn off the deck wchanges that you have mproperly. Finish the chamode before turning off
ImpossibleYou tried to make an im(page 30).
Incomplete!Adjustment of the recorFade-in and Fade-out prthe deck was either subjdamaged or dirty disc in
Initialize (flashing wheThe power was off for ainitializing itself.
Name Full!The title capacity of the(about 1,700 characters)
No ChangeWhile attempting to charecording, you pressed Yactually changing the rewas made.
Messages
Troub
lesho
otin
g
essages may appear or ng operation.
MD is new, or all tracks on d.
make a second copy from a age 47).
gram or Shuffle Play mode.
in MDLP mode.
tected.
occurred in the CD player nds, and then try the
em Limitations on page 47).
in S.F Edit (changing the ording, Fade-in, Fade-out)
hile in S.F Edit mode, any ade will not be made
nges and leave S.F Edit the deck.
possible editing operation
ding level after recording or ocedures have failed since ect to vibration or there is a the tray.
—No Disc—There is no disc in the MD deck, or no disc in the CD player.
No NameThe disc or track has not been labeled.
PremasteredAn attempt was made to record on the premastered MD.
RetryThe deck is retrying reading data from the CD during High-Speed CD-MD Synchro Recording (page 29).
Step Full!You tried to program more tracks (steps).
TrProtectedTracks and other data that have been checked out on Net MD equipment are protected, so you cannot use some of the MD editing functions.
45GB
n you turn on the deck) long time, so the deck is
MD has reached its limit .
nge the recording level after ES (or AMS) without
cording level, so no change

46GB
On safety• AC power cord must be c
service shop.
• The unit is not disconnecsource (mains) as long aoutlet, even if the unit its
On placement• Do not place the deck in
• Do not place the deck in
– Extremely hot or cold
– Dusty or dirty
– Very humid
– Subject to vibrations
– Subject to direct sunlig
– near a Tuner, TV set o
On condensation iIf the deck is brought direclocation, or is placed in a vmay condense on the lensethis occur, the deck may ncase, remove the CD or MDon for about an hour until
Notes on MDs• Do not open the shutter t
shutter immediately if th
• Affix the label supplied wspecified label indentatioaround the shutter or in oshape of the indentation
• Wipe the disc cartridge wdirt.
• Do not expose the MD tosources such as hot air dparked in direct sunlight
Additional Informa
Precautions
Label position
hanged only at the qualified
ted from the AC power s it is connected to the wall elf has been turned off.
an inclined position.
locations where it is;
ht.
r Video deck.
n the decktly from a cold to a warm ery damp room, moisture s inside the deck. Should ot operate property. In this
and leave the deck turned the moisture evaporates.
o expose the MD. Close the e shutter opens.
ith the disc only to the n. Do not affix the label ther locations. Note that the depends on the disc.
Notes on CDs• Before playing, clean the disc with a cleaning cloth.
Wipe the disc from the center out.
• Do not use solvents such as benzene, thinner, commercially available cleaners or anti-static spray intended for vinyl LPs.
• Do not expose the disc to direct sunlight or heat sources such as hot air ducts, nor leave it in a car parked in direct sunlight.
• Do not use discs encircled with a protection ring. This may cause a malfunction to the deck.
• When using discs that have glue or similar tacky substance on the label side of the disc or that used a special ink when the label was printed, there is a chance that the disc or label may become attached to parts inside this unit. When this occurs, it may not be possible to remove the disc, and may also cause this unit to malfunction. Be sure to check that the label side of the disc is not sticky before using.The following types of disc should not be used:
– Rental or used discs with attached seals where the glue extends beyond the seal. The perimeter of the seal on the disc is tacky.
– Discs that have labels printed using a special ink that feels tacky when touched.
• CDs with non-standard shapes (e.g., heart, square, star) cannot be played on this unit. Attempting to do so may damage the unit. Do not use such CDs.
Cleaning the cabinetClean the cabinet, panel and controls with a soft cloth slightly moistened with mild detergent solution. Do not use any type of abrasive pad, scouring powder or solvent such as thinner, benzene or alcohol.
tion
Shutter
ith a dry cloth to remove
direct sunlight or heat ucts, nor leave it in a car .
The recording system inlimitations described beNote, however, that thethe inherent nature of thitself, not to mechanica
“Disc Full!” appearhas reached the mtimeWhen 255 tracks have beenFull!” appears regardless oMore than 255 tracks cannTo continue recording, erasanother recordable MD.
“Disc Full!” appearmaximum number reachedFluctuations in emphasis winterpreted as track intervaland causing “Disc Full!” to
“Group Full!” appe• When the Group Functio
be displayed if editing isthere are insufficient chamanagement. Delete anygroup titles or other char
• Even when the Group Fumanagement informationwhen Move, Divide and performed, so “Group Fu
The remaining recnot increase even numerous short traTracks shorter than 12 secoerasing them may not incre
* During Stereo recording.In Monaural or LP2 stereIn LP4 stereo mode: abo
“Impossible” appeA-B Erase FunctionFunctionThis happens when you hamany times. This is due to MD deck and is not a mech
System limita
Add
ition
al Info
rmatio
n
your MD deck has the low.se limitations are due to e MD recording system l causes.
s before the MD aximum recording
recorded on the MD, “Disc f the total recorded time. ot be recorded on the MD. e unnecessary tracks or use
s before the of tracks (255) is
ithin tracks are sometimes s, increasing the track count appear.
ars in the displayn is on, “Group Full!” may performed. This means racters for group unnecessary disc titles, acters.
nction is off, the group is updated automatically other editing operations are ll!” may be displayed.
ording time does after erasing cksnds* are not counted, so ase the recording time.
o mode: about 24 secondsut 48 seconds.
The total recorded time and the remaining time on the MD do not add up to the maximum recording timeRecording is done in minimum units of 2 seconds* each, no matter how short the material. The recorded contents may be shorter than the maximum recording capacity. Disc space may also be reduced by scratches.
* During Stereo recording.In Monaural or LP2 stereo mode: about 4 secondsIn LP4 stereo mode: about 8 seconds.
The sound may drop-out while searching the edited tracksTracks created through editing may exhibit sound dropout during searching because high-speed playback requires time to search for the position on the disc when the tracks are not in order.
Track numbers cannot be markedEven in the Level Synchro Recording, the track numbers may not be marked at the beginning of the track:
• if the input signal is below a certain fixed level for less than 2 seconds between tracks.
• if the input signal is below a certain fixed level for more than 2 seconds in the middle of the track.
• if you record a track that is 4 seconds or less*.
* During Stereo, Monaural or LP2 stereo recording mode (In LP4 stereo recording mode: 8 seconds or less).
Extra tracks are createdWhen there is a long silence between CD tracks, an extra track may be created.
The number of tracks on the CD and the recorded MD is differentWhen there are short tracks on the CD, track numbers may not be marked for these tracks, and the number of tracks recorded on the MD may differ from that of the CD.
tions of MDs
47GB
ars when you use or Combine
ve edited the same track a technical limitation of the anical error.
continued

48GB
Guide to the SerialSystemDigital audio components,DATs let you copy music processing music as a digi
To protect the copyrighteduses the Serial Copy Manayou to make only a single source through digital-to-d
You can make only copy* through a digconnection.For example:
1 You cannot make a sedigital input jack onto from the first-generatideck digitally.
2 You can make a copydigitally recorded ana(for example, an analcassette tape) or frombroadcast programmesecond copy.
* A first-generation copy ma digital signal made on dexample, if you record frthe MD deck, you make
Copy Management
such as CDs, MDs, and easily with high quality by tal signal.
music programs, this deck gement System that allows copy of a digitally recorded igital connections.
a first generation ital-to-digital
cond digital copy via the another DAT or MD deck on copy recorded by the
of a digital signal from a logue sound programme ogue record or a music a digital satellite , but you cannot make a
eans a digital recording of igital audio equipment. For
om this deck’s CD player to a first-generation copy.
CD player sectionSystem Compact Disc digital
audio systemLaser Semiconductor laser
(λ=780 nm) Frequency response 20 Hz – 20 kHz (±0.5 dB)Wow and flutter Below measureable limit
(±0.001% W.PEAK)
MD deck sectionSystem MiniDisc digital audio systemDisc MiniDiscLaser Semiconductor laser
(λ=780 nm) Emission duration: continuous
Sampling frequency 44.1 kHzFrequency response 20 Hz – 20 kHz (±0.5 dB)
Inputs
Outputs
GeneralPower requirements U.S.A. and Canada 120 V AC, 60 Hz Europe 230 V AC, 50/60 HzPower consumption 19 watts
Specifications
Jack type Input impedance
Rated input
Minimum input
ANALOG IN Pin jack 47 kilohms 500 mVrms 250 mVrms
DIGITAL OPTICAL IN
Squqre optical connector jack
Optical wave length:660 nm
– –
Jack type Rated output Load impedance
ANALOG OUT Pin jack 2 Vrms (at 47 kilohms)
Over 10 kilohms
DIGITAL OPTICAL OUT
Squqre optical connector jack
-18 dBm Optical wave length:660 nm
PHONES Stereo phone jack
10 mW 32 ohms
Less than 1 watt (at the power saving mode)
Dimensions (w/h/d) incl. projecting parts and controls Approx. 430 × 108 × 399 mm
Mass Approx. 5.4 kg
Supplied accessoriesSee page 7.
US and foreign patents licensed from Dolby Laboratories.
Design and specifications are subject to change without notice.
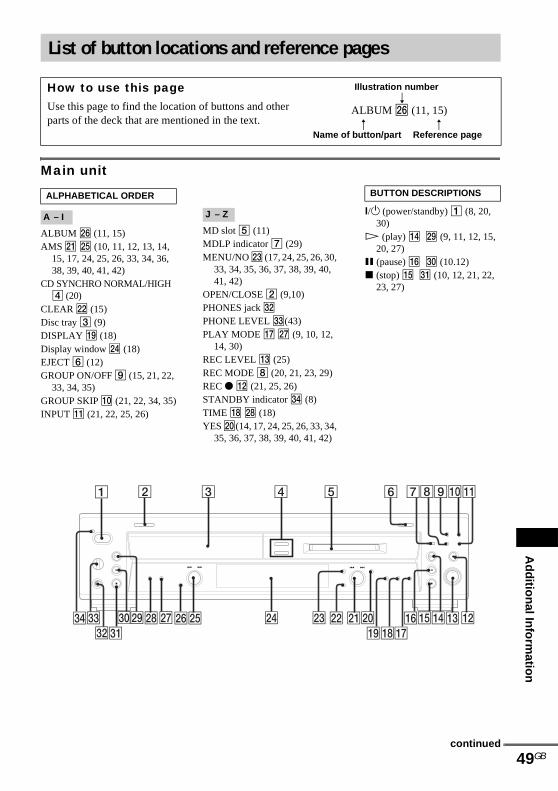
Main unit
ALBUM wh (11, 15)AMS wa wg (10, 11, 12, 1
15, 17, 24, 25, 26, 33, 338, 39, 40, 41, 42)
CD SYNCHRO NORMAL/4 (20)
CLEAR ws (15)Disc tray 3 (9)DISPLAY ql (18)Display window wf (18)EJECT 6 (12)GROUP ON/OFF 9 (15,
33, 34, 35)GROUP SKIP 0 (21, 22,INPUT qa (21, 22, 25, 26
List of button
How to use thisUse this page to find tparts of the deck that a
ALPHABETICAL ORDE
A – I
e;
eaes
ed wl
1 2
wef
Ad
diti
3, 14, 4, 36,
HIGH
21, 22,
34, 35))
MD slot 5 (11)MDLP indicator 7 (29)MENU/NO wd (17, 24, 25, 26, 30,
33, 34, 35, 36, 37, 38, 39, 40, 41, 42)
OPEN/CLOSE 2 (9,10)PHONES jack esPHONE LEVEL ed(43)PLAY MODE qj wj (9, 10, 12,
14, 30)REC LEVEL qd (25)REC MODE 8 (20, 21, 23, 29)REC z qs (21, 25, 26)STANDBY indicator ef (8)TIME qk wk (18)YES w;(14, 17, 24, 25, 26, 33, 34,
35, 36, 37, 38, 39, 40, 41, 42)
?/1 (power/standby) 1 (8, 20, 30)
H (play) qf wl (9, 11, 12, 15, 20, 27)
X (pause) qh e; (10.12)x (stop) qg ea (10, 12, 21, 22,
23, 27)
locations and reference pages
pagehe location of buttons and other re mentioned in the text.
Illustration numberr
ALBUM wh (11, 15)R R
Name of button/part Reference page
R
J – Z
BUTTON DESCRIPTIONS
3 4 5 6 7 90qa8
on
al Info
rmatio
n
49GB
qsqdqfqgqh
qjqkql
w;wawswdwfwhwjk wg
continued

50GB
Remote control
ALBUM/GROUP -/+ qf (15, 21, 22, 33, 34, 35)
CD MD select wk (9, 10, 12, 13, 14, 15, 17, 18, 24, 25, 27, 32, 35, 36, 37, 38, 39, 40, 41, 42)
CD SYNCHRO NORMAL/HIGH wa (20)
CLEAR 8 (15)DISPLAY wg (18)FADER ws (28)GROUP ON/OFF wd (15, 21, 22,
33, 34, 35)INPUT wj (21, 22, 25, 26)MENU/NO wf (17, 24, 25, 26, 30,
33, 34, 35, 36, 37, 38, 39, 40, 41, 42)
MUSIC SYNC 9 (27)
NAME EDIT/SELECT 6 (33)number buttons 7 (13, 15, 33)PLAY MODE 3 (9, 10, 12, 14,
30)REC MODE 2 (20, 21, 23, 29)REC-IT 0 (27)REPEAT qh (14)SCROLL wh (18, 34)SLEEP qg (16)T.REC qd (23)TIME 4 (18)YES 5 (14, 17, 24, 25, 26, 33,
34, 35, 36, 37, 38, 39, 40, 41, 42)
. / > (skip)qk (10, 11, 12, 13, 14, 15, 17, 24, 25, 26, 33, 34, 36, 37, 38, 39, 40, 41, 42)
?/1 (power/standby) 1 (8, 20, 30)
m / M (search) qj (10, 12, 33)H (play) w; (9, 11, 12, 15, 20,
27)X (pause) qa (10, 12)x (stop) qs (10, 12, 21, 22, 23,
27)z (record) ql (23)
ALPHABETICAL ORDER
A – M N – Z
BUTTON DESCRIPTIONS

Ad
ditio
nal In
form
ation
51GB

Sony Corporation Printed in Malaysia