Embed Size (px)
Citation preview

SP-FSX1 CA-FSX1 SP-FSX1
SP-FSX3 CA-FSX3 SP-FSX3
COMPACT COMPONENT SYSTEM
For Customer Use:Enter below the Model No. and Serial No.which are located either on the rear, bot-tom or side of the cabinet. Retain thisinformation for future reference.
Model No.
Serial No.
INSTRUCTIONS
LVT1040-001A[J]
FS-X1/FS-X3Consists of CA-FSX1 and SP-FSX1Consists of CA-FSX3 and SP-FSX3
FS-X1-3(J)_E.book Page 1 Friday, March 28, 2003 11:36 AM

G-1
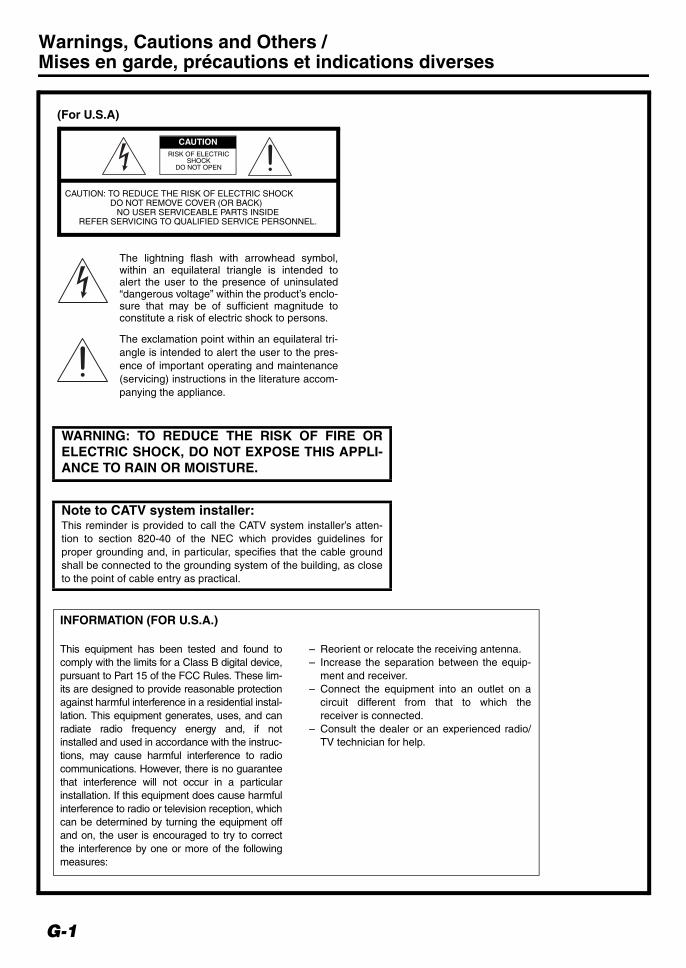
Warnings, Cautions and Others / Mises en garde, précautions et indications diverses
(For U.S.A)
WARNING: TO REDUCE THE RISK OF FIRE ORELECTRIC SHOCK, DO NOT EXPOSE THIS APPLI-ANCE TO RAIN OR MOISTURE.
Note to CATV system installer:This reminder is provided to call the CATV system installer’s atten-tion to section 820-40 of the NEC which provides guidelines forproper grounding and, in particular, specifies that the cable groundshall be connected to the grounding system of the building, as closeto the point of cable entry as practical.
INFORMATION (FOR U.S.A.)
This equipment has been tested and found tocomply with the limits for a Class B digital device,pursuant to Part 15 of the FCC Rules. These lim-its are designed to provide reasonable protectionagainst harmful interference in a residential instal-lation. This equipment generates, uses, and canradiate radio frequency energy and, if notinstalled and used in accordance with the instruc-tions, may cause harmful interference to radiocommunications. However, there is no guaranteethat interference will not occur in a particularinstallation. If this equipment does cause harmfulinterference to radio or television reception, whichcan be determined by turning the equipment offand on, the user is encouraged to try to correctthe interference by one or more of the followingmeasures:
– Reorient or relocate the receiving antenna.– Increase the separation between the equip-
ment and receiver.– Connect the equipment into an outlet on a
circuit different from that to which thereceiver is connected.
– Consult the dealer or an experienced radio/TV technician for help.
The lightning flash with arrowhead symbol,within an equilateral triangle is intended toalert the user to the presence of uninsulated“dangerous voltage” within the product’s enclo-sure that may be of sufficient magnitude toconstitute a risk of electric shock to persons.
The exclamation point within an equilateral tri-angle is intended to alert the user to the pres-ence of important operating and maintenance(servicing) instructions in the literature accom-panying the appliance.
CAUTIONRISK OF ELECTRIC
SHOCK DO NOT OPEN
CAUTION: TO REDUCE THE RISK OF ELECTRIC SHOCK DO NOT REMOVE COVER (OR BACK)
NO USER SERVICEABLE PARTS INSIDE REFER SERVICING TO QUALIFIED SERVICE PERSONNEL.
FS-X1-3(J)_E.book Page 1 Friday, March 28, 2003 11:36 AM

G-2
CAUTION1. Do not block the ventilation openings or holes.
(If the ventilation openings or holes are blocked bya newspaper or cloth, etc., the heat may not beable to get out.)
2. Do not place any naked flame sources, such aslighted candles, on the apparatus.
3. When discarding batteries, environmental prob-lems must be considered and local rules or lawsgoverning the disposal of these batteries must befollowed strictly.
4. Do not expose this apparatus to rain, moisture,dripping or splashing and that no objects filled withliquids, such as vases, shall be placed on theapparatus.
ATTENTION1. Ne bloquez pas les orifices ou les trous de ventila-
tion. (Si les orifices ou les trous de ventilation sontbloqués par un journal un tissu, etc., la chaleurpent ne pas être évacuée correctement de l’appa-reil.)
2. Ne placez aucune source de flamme nue, tellequ’une bougie, sur l’appareil.
3. Lors de la mise au rebut des piles, veuillez prendreen considération les problèmes de l’environnementet suivre strictement les règles et, les lois localessur la mise au rebut des piles.
4. N’exposez pas cet appareil à la pluie, à l’humidité,à un égouttement ou à des éclaboussures et neplacez pas des objets remplis de liquide, tels qu’unvase, sur l’appareil.
For Canada/pour le Canada
CAUTION: TO PREVENT ELECTRIC SHOCK, MATCHWIDE BLADE OF PLUG TO WIDE SLOT, FULLY INSERT.
PRECAUTION: POUR EVITER LES CHOCS ELEC-TRIQUES, INTRODUIRE LA LAME LA PLUS LARGE DELA FICHE DANS LA BORNE CORRESPONDANTE DE LAPRISE ET POUSSER JUSQUAU FOND
For Canada/pour Le Canada
THIS DIGITAL APPARATUS DOES NOT EXCEED THECLASS B LIMITS FOR RADIO NOISE EMISSIONS FROMDIGITAL APPARATUS AS SET OUT IN THE INTERFER-ENCE-CAUSING EQUIPMENT STANDARD ENTITLED “DIG-ITAL APPARATUS,” ICES-003 OF THE DEPARTMENT OFCOMMUNICATIONS.
CET APPAREIL NUMERIQUE RESPECTE LES LIMITES DEBRUITS RADIOELECTRIQUES APPLICABLES AUX APPAR-EILS NUMERIQUES DE CLASSE B PRESCRITES DANS LANORME SUR LE MATERIEL BROUILLEUR: “APPAREILSNUMERIQUES”, NMB-003 EDICTEE PAR LE MINISTREDES COMMUNICATIONS.
1. CLASS 1 LASER PRODUCT2. CAUTION: Invisible laser radiation when open and interlock
failed or defeated. Avoid direct exposure to beam.3. CAUTION: Do not open the top cover. There are no user ser-
viceable parts inside the unit; leave all servicing to qualitied service personnel.
1. PRODUIT LASER CLASSE 12. ATTENTION: Radiation laser invisible quand l’appareil est
ouvert ou que le verrouillage est en panne ou désactivé. Eviter une exposition directe au rayon.
3. ATTENTION: Ne pas ouvrir le couvercle du dessus. Iln’y a aucune pièce utilisable à l’intérier. Laisser à un personnel qualifié le soin de réparer votre appareil.
CAUTIONTo reduce the risk of electrical shocks, fire, etc.:1 Do not remove screws, covers or cabinet.2. Do not expose this appliance to rain or moisture.
ATTENTIONAfin d’èviter tout risque d’électrocution, d’lncendie. etc.:1. Ne pas enlever les vis ni les panneaux et ne pas ouvrir le
coffret de l’appareil.2. Ne pas exposer l’appareil à la pluie ni à l’humidité.
Caution —STANDBY/ON button!Disconnect the main plug to shut the power off completely. The STANDBY/ON button in any position does not dis-connect the main line. The power can be remote controlled.• When the unit is on standby, the STANDBY/ON indicator
lights red.• When the unit is turned on, the STANDBY/ON indicator
lights green.
Attention — Touche STANDBY/ON Déconnecter la fiche de secteur poru couper complètement le courant. La touche STANDBY/ON ne coupe jamais com-plètement la ligne de secteur, quelle que soit sa position. Le courant peut être télécommandé.• Quand l’appareil est en mode de veillle, le tèmoin
STANDBY/ON est allumè en rouge.• Quand l’appareil est sous tension, le tèmoin STANDBY/ON
est allumè en vert.
FS-X1-3(J)_E.book Page 2 Friday, March 28, 2003 11:36 AM

G-3
CAUTION About the Internal Cooling Fan
This unit includes an internal cooling fan, so as to allow forhigh-power operation within a small space. This fan comes on when the sound level is set high, and mayalso come on even at low sound levels if the internal temper-ature rises. To ensure effective fan operation, please leaveat least 15cm (5-15/16”) clearance between the rear of theunit and the wall, and at least 1cm (7/16”) clearance on eachside of the unit.
ATTENTION A propos du ventilateur de refroidissement interne
Cet appareil est équipé d’un ventilateur de refroidissementinterne afin de permettre un fonctionnement à haute puis-sance dans un espace limité.Ce ventilateur se met en marche quand le niveau sonore estélevé et peut aussi se déclencher même à un niveau bas sila température interne augmente. Pour garantir un fonction-nement effectif du ventilateur, veuillez laisser un espacelibre de 15 cm au moins entre l’arrière de l’appareil et le mur,et de 1 cm au moins de chaque côté de l’appareil.
Caution: Proper VentilationTo avoid risk of electric shock and fire, and to prevent damage,locate the apparatus as follows:1 Front:
No obstructions and open spacing.2 Sides/ Top/ Back:
No obstructions should be placed in the areas shown bythe dimensions below.
3 Bottom:Place on the level surface. Maintain an adequate air pathfor ventilation by placing on a stand with a height of 10 cm(3-15/16”) or more.
Attention: Aération correctePour prévenir tout risque de décharge électrique ou d’incendieet éviter toute détérioration, installez l’appareil de la manièresuivante:1 Avant:
Bien dégagé de tout objet.2 Côtés/dessus/dessous:
Assurez-vous que rien ne bloque les espaces indiqués surle schéma ci-dessous.
3 Dessous:Posez l’appareil sur une surface plane et horizontale.Veillez à ce que sa ventilation correcte puisse se faire en leplaçant sur un support d’au moins dix centimètres de hau-teur.
15cm(5 in)15
16/1cm( in)7
16/1cm( in)7
16/15cm(5 in)15
16/
10cm(3 in)15
16/
15cm(5 in)15
16/
15cm(5 in)15
16/15cm(5 in)15
16/
Front viewFace
Side viewCôté
CA-FSX1 CA-FSX1
SP-FSX3 CA-FSX3SP-FSX3CA-FSX3
SP-FSX1 SP-FSX1
FS-X1-3(J)_E.book Page 3 Friday, March 28, 2003 11:36 AM

1
Table of ContentsIntroduction ........................................................................................................ 3
Features ...................................................................................................................................... 3How This Manual Is Organized ................................................................................................. 3WARNINGS .............................................................................................................................. 3IMPORTANT CAUTIONS ....................................................................................................... 3
Getting Started ................................................................................................... 4Accessories................................................................................................................................. 4How To Put Batteries In the Remote Control ............................................................................ 4Using the Remote Control.......................................................................................................... 4Connecting the FM Antenna ...................................................................................................... 5Connecting the AM Antenna...................................................................................................... 6Connecting the Speakers (SP-FSX1/SP-FSX3) ......................................................................... 7Removing the Speaker Grills (SP-FSX1)................................................................................... 8Connecting a Powered Subwoofer ............................................................................................. 8Connecting an External Equipment............................................................................................ 8Connecting an MD Recorder, etc (Optical Digital Output) ....................................................... 9COMPU PLAY .......................................................................................................................... 9Automatic Power On.................................................................................................................. 9
Basic Operations ............................................................................................. 10Turning the Power On and Off................................................................................................. 10Changing the Source ................................................................................................................ 10Adjusting the Brightness (DIMMER - at Power On)............................................................... 11Power Saving Mode (DIMMER - at Power Off) ..................................................................... 11Adjusting the Volume .............................................................................................................. 11Fade-out Muting (FADE MUTING)........................................................................................ 11Reinforcing the Bass Sound (Active Hyper Bass Pro.)............................................................ 11Tone Control (BASS/TREBLE)............................................................................................... 12Auto Power Off (A.P.off)......................................................................................................... 12Entering the Number with the Remote Control (Numeric Keys)............................................. 12
Using the Tuner................................................................................................ 13Tuning In a Station................................................................................................................... 13Presetting Stations .................................................................................................................... 14To Change the FM Reception Mode ........................................................................................ 14Beat Cut (AM Reception) ........................................................................................................ 14
Using the CD Player......................................................................................... 15To Insert a CD.......................................................................................................................... 15To Unload a CD ....................................................................................................................... 16Basics of Using the CD Player – Normal Play......................................................................... 16Programming the Playing Order of the Tracks – Program Play .............................................. 16Random Play ............................................................................................................................ 17Repeating Tracks...................................................................................................................... 18CD DOOR LOCK .................................................................................................................... 18
Using External Equipments ............................................................................ 19Listening to External Equipment.............................................................................................. 19Changing the Equipment’s Name ............................................................................................ 19Recording the System’s Source to External Equipment .......................................................... 20Adjusting the Input Level......................................................................................................... 20
Using the Timers.............................................................................................. 21Setting the Clock ...................................................................................................................... 21Showing the Clock (DISPLAY)............................................................................................... 22Correcting the Clock ................................................................................................................ 22
FS-X1-3(J)_E.book Page 1 Friday, March 28, 2003 11:36 AM
Table of Contents
2
Setting the Daily Timer ............................................................................................................ 22Setting the SLEEP Timer ......................................................................................................... 25Timer Priority........................................................................................................................... 25
Troubleshooting............................................................................................... 26Care And Maintenance .................................................................................... 27Specifications....................................................................................Back cover
FS-X1-3(J)_E.book Page 2 Friday, March 28, 2003 11:36 AM
3
IntroductionThank you for purchasing the JVC Compact Component System.We hope it will be a valued addition to your home, giving you years of enjoyment.Be sure to read this instruction manual carefully before operating your new stereo system.In it you will find all the information you need to set up and use the system.If you have a query that is not answered by the manual, please contact your dealer.
Features
Here are some of the things that make your System both powerful and simple to use. The controls and operations have been redesigned to make them very easy to use, freeing you to
just enjoy the music.• With JVC’s COMPU PLAY you can turn on the System and automatically start the Radio or
CD Player with a single touch. The System incorporates AHB (Active Hyper Bass) PRO circuitry to faithfully reproduce low
frequency sound. A 45-station preset capability (30 FM and 15 AM) in addition to auto-seek and manual tuning. CD options that include repeat, random and program play. Timer functions; Daily Timer and Sleep Timer. The Daily Timer can select one of 10 melodies as a source, in addition to
CD, FM, AM and LINE. You can connect various external units, such as an MD recorder. The system can play CD-R and CD-RW after they have been finalized. You can play back your original CD-R or CD-RW recorded in Music CD format. (However they may not be played back
depending on their characteristics or recording conditions.)
How This Manual Is Organized
• Basic information that is the same for many different functions - e.g. setting the volume - is given in the section ‘Basic Operations’, and not repeated under each function.
• The names of buttons/controls and display messages are written in all capital letters: e.g. FM/AM, “CD NO DISC”.• System functions are written with an initial capital letter only: e.g. Normal Play.
Use the table of contents to look up specific information you require.We have enjoyed making this manual for you, and hope it serves you in enjoying the many features built into your System.
WARNINGS
• DO NOT PUT ANYTHING ON THE CD DOOR. IF THE SYSTEM IS OPERATED WITH SOMETHING PUT ON THE CD DOOR, IT WILL BE DAMAGED WHEN YOU TRY TO OPEN THE CD DOOR.
• NEVER REMOVE THE CD DOOR FROM THE UNIT. SERIOUS INJURY MAY OCCUR IF THE SYSTEM IS OPERATED WITHOUT THE CD DOOR.
IMPORTANT CAUTIONS
1 Installation of the System• Select a place which is level, dry and neither too hot nor too cold. (Between 5°C and 35°C or 41°F and 95°F.)• Leave sufficient distance between the System and a TV.• Do not use the System in a place subject to vibrations.
2 Power cord• Do not handle the power cord with wet hands!• Some power is always consumed as long as the power cord is connected to the wall outlet.• When unplugging the System from the wall outlet, always pull the plug, not the power cord.
3 Malfunctions, etc.• There are no users serviceable parts inside. In case of system failure, unplug the power cord and consult your dealer.• Do not insert any metallic object into the System.• Do not insert your hand between the CD door and the main body when the CD door is being closed.
FS-X1-3(J)_E.book Page 3 Friday, March 28, 2003 11:36 AM

4
Getting StartedAccessories
Make sure that you have all of the following items, which are supplied with the System.
FM Wire Antenna (1)AM Loop Antenna (1)Remote Control (1)Batteries (2)Speaker Cords (2)
If any of these items are missing, contact your dealer immediately.
How To Put Batteries In the Remote Control
Match the polarity (+ and –) on the batteries with the + and – markings in the battery compartment.
CAUTION:• Handle batteries properly.
To avoid battery leakage or explosion:• Remove batteries when the Remote Control will not be used for a long time.• When you need to replace the batteries, replace both batteries at the same time with new ones.• Do not use an old battery with a new one.• Do not use different types of batteries together.
Using the Remote Control
The Remote Control makes it easy to use many of the functions of the System from a distance of up to 7m (23 feet) away. You need to point the Remote Control at the remote sensor on the System’s front panel.
R6P(SUM-3)/AA(15F)
Remote Sensor
FS-X1-3(J)_E.book Page 4 Friday, March 28, 2003 11:36 AM

5
Getting Started
CAUTION:• Make all connections before plugging the System into an AC power outlet.
Connecting the FM Antenna
Rear Panel of the Center Unit (CA-FSX1/CA-FSX3)
Using the Supplied Wire Antenna
• Fasten it up in the position until you have the best reception.
If reception is poor, connect the outdoor antenna.
Using the Coaxial Type Connector (Not Supplied)A 75-ohm antenna with coaxial type connector should beconnected to the FM 75-ohm COAXIAL terminal.
• Before attaching a 75 ohm coaxial lead (the kind with a round wire going to an outdoor antenna), disconnect the supplied FM Wire Antenna.
(on the side panel)
FM wire antenna (supplied)
Coaxial cable
FM outdoor antenna (Not supplied)
FS-X1-3(J)_E.book Page 5 Friday, March 28, 2003 11:36 AM
6
Getting Started
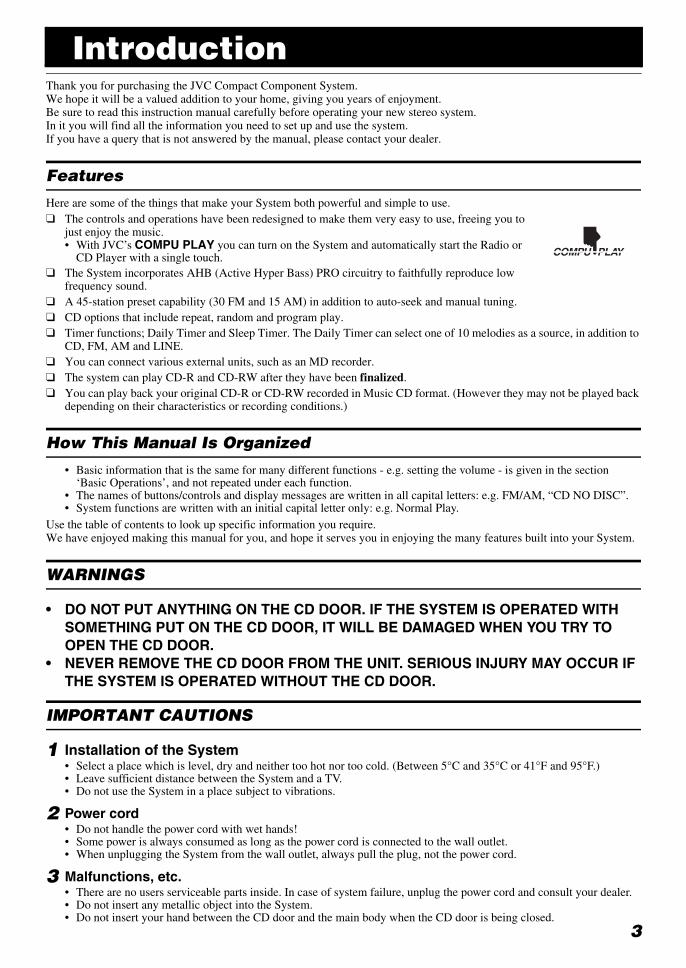
Connecting the AM Antenna
Rear Panel of the Center Unit (CA-FSX1/CA-FSX3)
• If the AM loop antenna wire is covered with vinyl, remove the vinyl by twisting it as shown in the diagram.• Make sure the antenna conductors do not touch any other terminals, connecting cords and power cord.
This could cause poor reception.• If reception is poor, connect an outdoor single vinyl-covered wire to the AM EXT terminal. (Keep the AM loop
antenna connected.)
Attach the AM loop to its base by snapping the tabs on the loop into the slot in the base.
AM loop antenna (Supplied)
Turn the loop until you have the best reception.
Outdoor single vinyl-covered wire (not supplied)
FS-X1-3(J)_E.book Page 6 Friday, March 28, 2003 11:36 AM
7
Getting Started
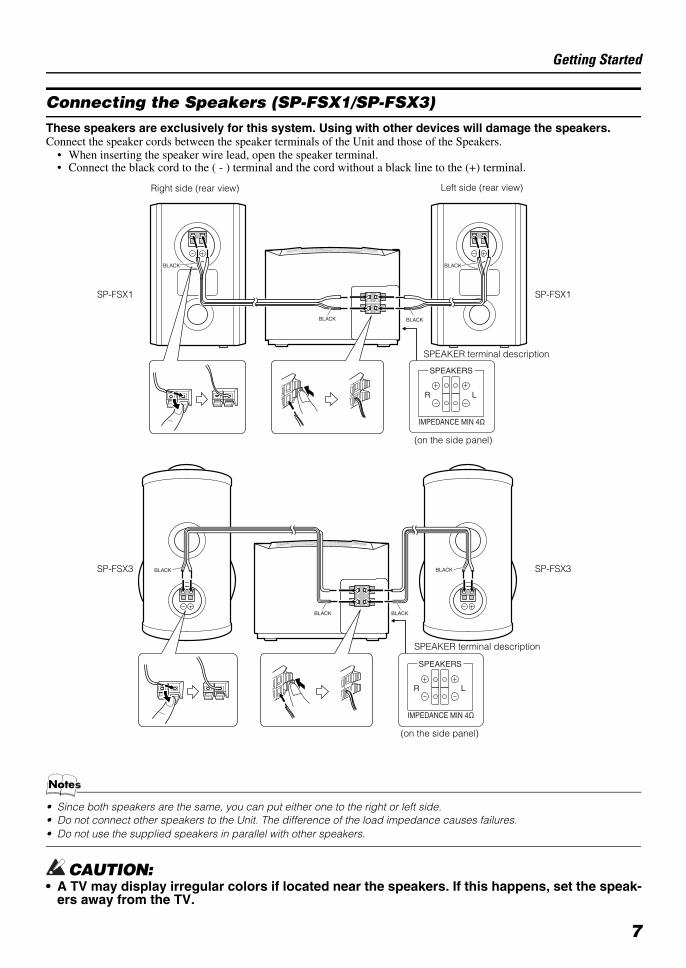
Connecting the Speakers (SP-FSX1/SP-FSX3)These speakers are exclusively for this system. Using with other devices will damage the speakers.Connect the speaker cords between the speaker terminals of the Unit and those of the Speakers.
• When inserting the speaker wire lead, open the speaker terminal.• Connect the black cord to the ( - ) terminal and the cord without a black line to the (+) terminal.
• Since both speakers are the same, you can put either one to the right or left side.• Do not connect other speakers to the Unit. The difference of the load impedance causes failures.• Do not use the supplied speakers in parallel with other speakers.
CAUTION:• A TV may display irregular colors if located near the speakers. If this happens, set the speak-
ers away from the TV.
BLACK
BLACKBLACK
BLACK
Right side (rear view) Left side (rear view)
BLACK
BLACK BLACK
BLACK
(on the side panel)
SPEAKER terminal description
(on the side panel)
SPEAKER terminal description
SP-FSX1
SP-FSX3
SP-FSX1
SP-FSX3
FS-X1-3(J)_E.book Page 7 Friday, March 28, 2003 11:36 AM

8
Getting Started
Removing the Speaker Grills (SP-FSX1)
The speaker grills can be removed.
When removing:1. Pull the bottom towards you with your fingers.2. Also pull the top towards you.
When attaching the speaker grills:Attach the speaker grills as shown in the diagram.
Connecting a Powered Subwoofer
Connect a signal cord (not supplied) between the System’s SUBWOOFER terminal and the input terminal of an external sub-woofer. (For the details of connection, please refer to the user’s manual of the external equipment.)
Connecting an External Equipment
Connect signal cords (not supplied) between the System’s LINE IN/OUT terminals and the output/input terminals of the ex-ternal MD recorder, tape deck, etc. (For the details of connection, please refer to the user’s manual of the external equipment.)You can then listen to the external source through the System or record the System’s CD player or tuner to the external unit.
Signal cord (not supplied)
Subwoofer (not supplied)
Signal cord (not supplied)
MD recorder or tape deck (not supplied)
Pin-plug x 2
Pin-plug x 2Signal cord (not supplied)
STEREO mini plug
STEREO mini plug
FS-X1-3(J)_E.book Page 8 Friday, March 28, 2003 11:36 AM
9
Getting Started
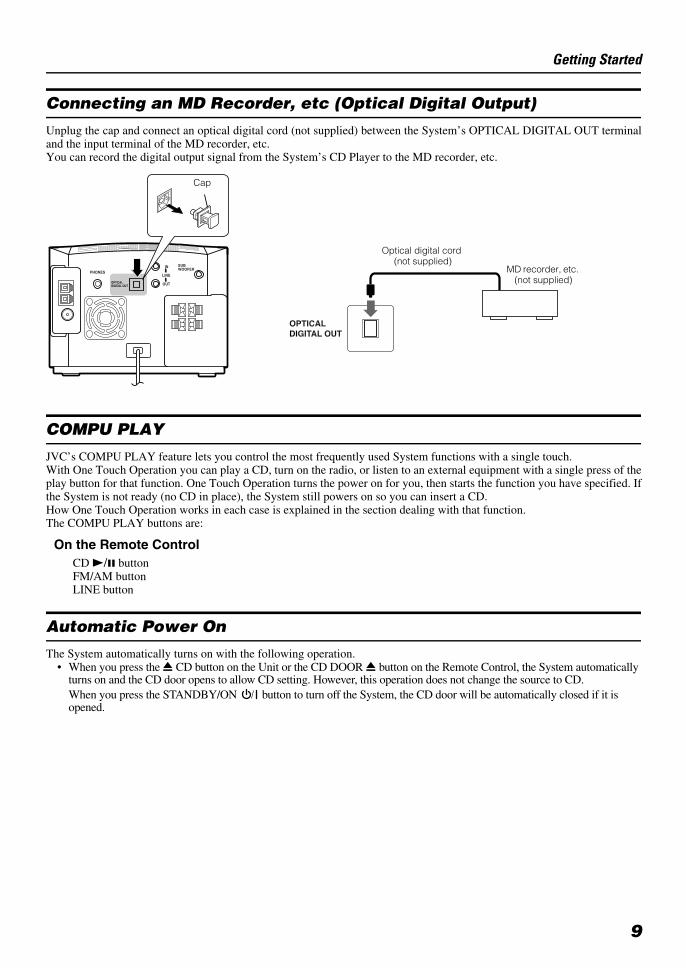
Connecting an MD Recorder, etc (Optical Digital Output)
Unplug the cap and connect an optical digital cord (not supplied) between the System’s OPTICAL DIGITAL OUT terminaland the input terminal of the MD recorder, etc.You can record the digital output signal from the System’s CD Player to the MD recorder, etc.
COMPU PLAY
JVC’s COMPU PLAY feature lets you control the most frequently used System functions with a single touch.With One Touch Operation you can play a CD, turn on the radio, or listen to an external equipment with a single press of theplay button for that function. One Touch Operation turns the power on for you, then starts the function you have specified. Ifthe System is not ready (no CD in place), the System still powers on so you can insert a CD.How One Touch Operation works in each case is explained in the section dealing with that function.The COMPU PLAY buttons are:
Automatic Power On
The System automatically turns on with the following operation.• When you press the 0 CD button on the Unit or the CD DOOR 0 button on the Remote Control, the System automatically
turns on and the CD door opens to allow CD setting. However, this operation does not change the source to CD.When you press the STANDBY/ON button to turn off the System, the CD door will be automatically closed if it is opened.
On the Remote ControlCD 3/8 buttonFM/AM buttonLINE button
MD recorder, etc. (not supplied)
Optical digital cord (not supplied)
Cap
FS-X1-3(J)_E.book Page 9 Friday, March 28, 2003 11:36 AM
10
Basic Operations
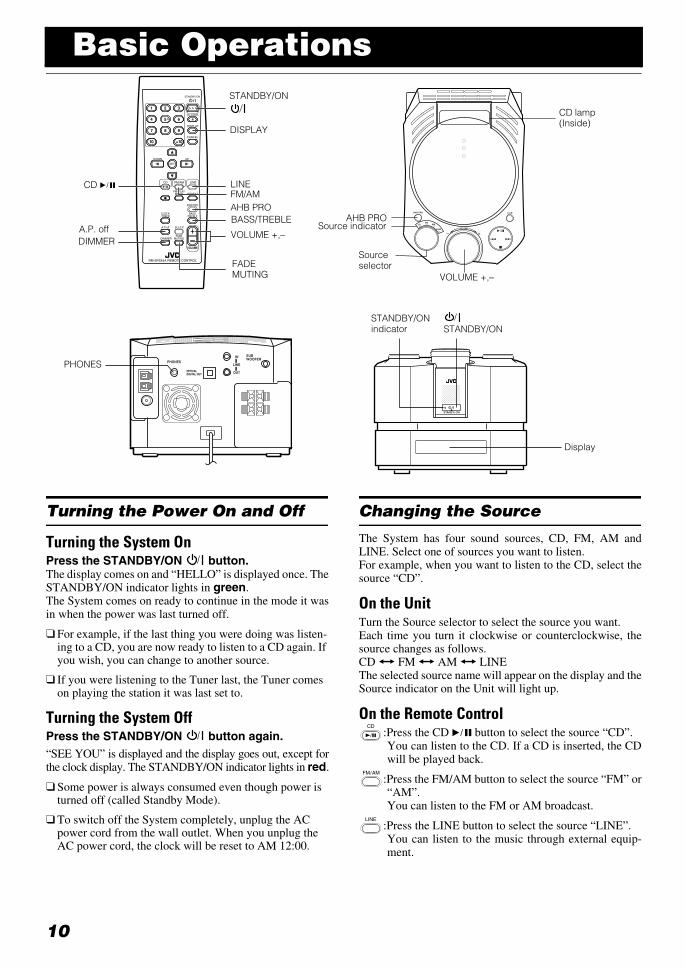
Turning the Power On and Off
Turning the System On Press the STANDBY/ON button.The display comes on and “HELLO” is displayed once. TheSTANDBY/ON indicator lights in green.The System comes on ready to continue in the mode it wasin when the power was last turned off.
For example, if the last thing you were doing was listen-ing to a CD, you are now ready to listen to a CD again. If you wish, you can change to another source.
If you were listening to the Tuner last, the Tuner comes on playing the station it was last set to.
Turning the System OffPress the STANDBY/ON button again.“SEE YOU” is displayed and the display goes out, except forthe clock display. The STANDBY/ON indicator lights in red.
Some power is always consumed even though power is turned off (called Standby Mode).
To switch off the System completely, unplug the AC power cord from the wall outlet. When you unplug the AC power cord, the clock will be reset to AM 12:00.
Changing the Source
The System has four sound sources, CD, FM, AM andLINE. Select one of sources you want to listen. For example, when you want to listen to the CD, select thesource “CD”.
On the UnitTurn the Source selector to select the source you want.Each time you turn it clockwise or counterclockwise, thesource changes as follows.CD Ô FM Ô AM Ô LINEThe selected source name will appear on the display and theSource indicator on the Unit will light up.
On the Remote Control:Press the CD 6 button to select the source “CD”.You can listen to the CD. If a CD is inserted, the CDwill be played back.
:Press the FM/AM button to select the source “FM” or“AM”.You can listen to the FM or AM broadcast.
:Press the LINE button to select the source “LINE”.You can listen to the music through external equip-ment.
DIMMERA.P. off
VOLUME +,_
STANDBY/ON
FADE MUTING
DISPLAY
STANDBY/ON indicator
PHONES
BASS/TREBLE
CD lamp(Inside)
AHB PRO
Display
STANDBY/ON
AHB PRO
VOLUME +,_
LINEFM/AM
CD 6
Source indicator
Source selector
CD
FM / AM
LINE
FS-X1-3(J)_E.book Page 10 Friday, March 28, 2003 11:36 AM
11
Basic Operations
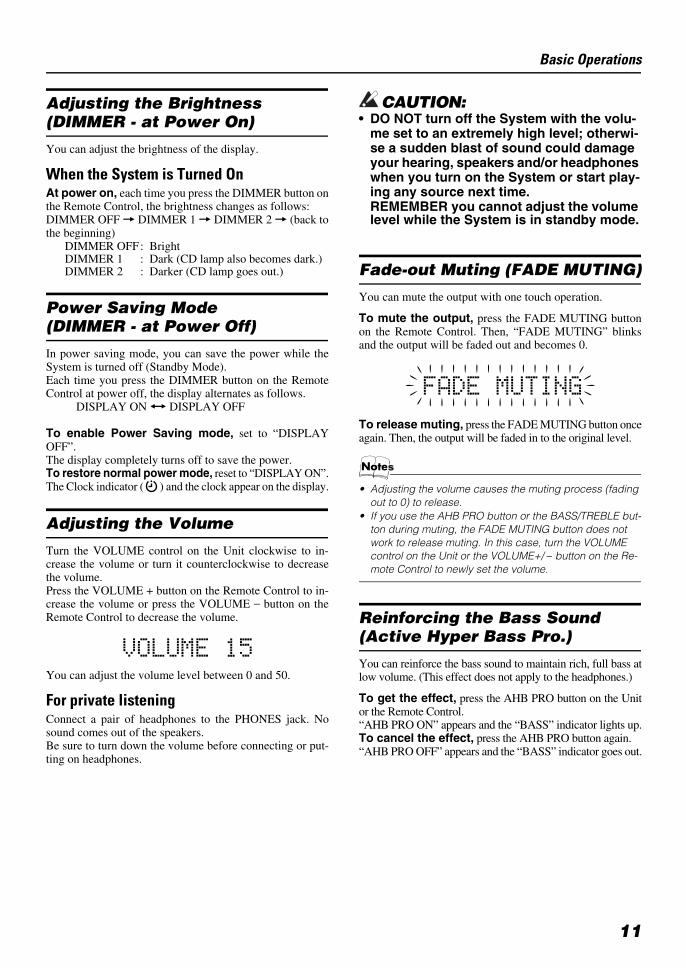
Adjusting the Brightness (DIMMER - at Power On)
You can adjust the brightness of the display.
When the System is Turned OnAt power on, each time you press the DIMMER button onthe Remote Control, the brightness changes as follows:DIMMER OFF = DIMMER 1 = DIMMER 2 = (back tothe beginning)
DIMMER OFF: BrightDIMMER 1 : Dark (CD lamp also becomes dark.)DIMMER 2 : Darker (CD lamp goes out.)
Power Saving Mode (DIMMER - at Power Off)
In power saving mode, you can save the power while theSystem is turned off (Standby Mode).Each time you press the DIMMER button on the RemoteControl at power off, the display alternates as follows.
DISPLAY ON Ô DISPLAY OFF
To enable Power Saving mode, set to “DISPLAYOFF”.The display completely turns off to save the power.To restore normal power mode, reset to “DISPLAY ON”.The Clock indicator ( ) and the clock appear on the display.
Adjusting the Volume
Turn the VOLUME control on the Unit clockwise to in-crease the volume or turn it counterclockwise to decreasethe volume.Press the VOLUME + button on the Remote Control to in-crease the volume or press the VOLUME _ button on theRemote Control to decrease the volume.
You can adjust the volume level between 0 and 50.
For private listeningConnect a pair of headphones to the PHONES jack. Nosound comes out of the speakers.Be sure to turn down the volume before connecting or put-ting on headphones.
CAUTION:• DO NOT turn off the System with the volu-
me set to an extremely high level; otherwi-se a sudden blast of sound could damage your hearing, speakers and/or headphones when you turn on the System or start play-ing any source next time.REMEMBER you cannot adjust the volume level while the System is in standby mode.
Fade-out Muting (FADE MUTING)
You can mute the output with one touch operation.
To mute the output, press the FADE MUTING buttonon the Remote Control. Then, “FADE MUTING” blinksand the output will be faded out and becomes 0.
To release muting, press the FADE MUTING button onceagain. Then, the output will be faded in to the original level.
• Adjusting the volume causes the muting process (fading out to 0) to release.
• If you use the AHB PRO button or the BASS/TREBLE but-ton during muting, the FADE MUTING button does not work to release muting. In this case, turn the VOLUME control on the Unit or the VOLUME+/ _ button on the Re-mote Control to newly set the volume.
Reinforcing the Bass Sound (Active Hyper Bass Pro.)
You can reinforce the bass sound to maintain rich, full bass atlow volume. (This effect does not apply to the headphones.)
To get the effect, press the AHB PRO button on the Unitor the Remote Control.“AHB PRO ON” appears and the “BASS” indicator lights up.To cancel the effect, press the AHB PRO button again.“AHB PRO OFF” appears and the “BASS” indicator goes out.
FS-X1-3(J)_E.book Page 11 Friday, March 28, 2003 11:36 AM
12
Basic Operations
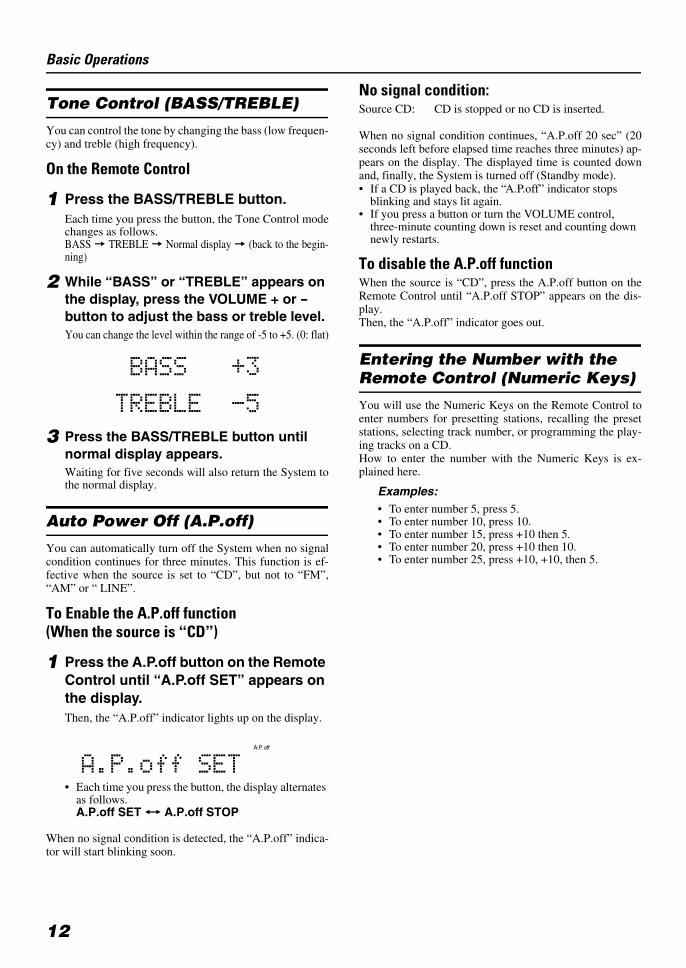
Tone Control (BASS/TREBLE)
You can control the tone by changing the bass (low frequen-cy) and treble (high frequency).
On the Remote Control
1 Press the BASS/TREBLE button.Each time you press the button, the Tone Control modechanges as follows.BASS = TREBLE = Normal display = (back to the begin-ning)
2 While “BASS” or “TREBLE” appears on the display, press the VOLUME + or - button to adjust the bass or treble level. You can change the level within the range of -5 to +5. (0: flat)
3 Press the BASS/TREBLE button until normal display appears.Waiting for five seconds will also return the System tothe normal display.
Auto Power Off (A.P.off)
You can automatically turn off the System when no signalcondition continues for three minutes. This function is ef-fective when the source is set to “CD”, but not to “FM”,“AM” or “ LINE”.
To Enable the A.P.off function (When the source is “CD”)
1 Press the A.P.off button on the Remote Control until “A.P.off SET” appears on the display.Then, the “A.P.off” indicator lights up on the display.
• Each time you press the button, the display alternates as follows.A.P.off SET Ô A.P.off STOP
When no signal condition is detected, the “A.P.off” indica-tor will start blinking soon.
No signal condition:Source CD: CD is stopped or no CD is inserted.
When no signal condition continues, “A.P.off 20 sec” (20seconds left before elapsed time reaches three minutes) ap-pears on the display. The displayed time is counted downand, finally, the System is turned off (Standby mode).• If a CD is played back, the “A.P.off” indicator stops
blinking and stays lit again.• If you press a button or turn the VOLUME control,
three-minute counting down is reset and counting down newly restarts.
To disable the A.P.off functionWhen the source is “CD”, press the A.P.off button on theRemote Control until “A.P.off STOP” appears on the dis-play.Then, the “A.P.off” indicator goes out.
Entering the Number with the Remote Control (Numeric Keys)
You will use the Numeric Keys on the Remote Control toenter numbers for presetting stations, recalling the presetstations, selecting track number, or programming the play-ing tracks on a CD.How to enter the number with the Numeric Keys is ex-plained here.
Examples:• To enter number 5, press 5.• To enter number 10, press 10.• To enter number 15, press +10 then 5.• To enter number 20, press +10 then 10.• To enter number 25, press +10, +10, then 5.
FS-X1-3(J)_E.book Page 12 Friday, March 28, 2003 11:36 AM

13
Using the Tuner
You can listen to FM and AM stations. Stations can betuned in manually, automatically, or from preset memorystorage.
Before listening to the radio:• Make sure that both the FM and AM antennas are cor-
rectly connected. (See pages 5 and 6).
One Touch Radio Just press the FM/AM button on the Remote Control to turnon the System and start playing the station you were lasttuned to.
You can switch from any other sound source to the radio by pressing the FM/AM button.
Tuning In a Station
1 Press the FM/AM button.The Band and Frequency you were last tuned to appearon the display.(If the last station was selected using the preset number,the preset number appears first.)Each time you press the button, the band alternates be-tween FM and AM.• You can also select the band by turning the Source
selector on the Unit.
2 Select a station using one of the follow-ing methods. Manual Tuning
Press the ¢ or 4 button on the Unit or the 5 or∞ button on the Remote Control repeatedly to movefrom frequency to frequency until you find the stationyou want.
OR Auto Tuning
If you press and hold the ¢ or 4 button on theUnit or the 5 or ∞ button on the Remote Controlfor one second or more, the frequency changes up, ordown, automatically until a station is found.
OR Preset Tuning using the Remote Control
(Possible only after presetting stations)Select the desired preset number using the 3 or 2button on the Remote Control. The display will showthe preset number’s band and frequency.• You can also select the desired preset number
using the Numeric Keys. See “Entering the Number with the Remote Control” on page 12. (e.g. Press +10, and then 2 for number 12.)
Example:Press the 3 button until the preset number “2” ap-pears.
5
2
FM/AM
Multi-control button
* When the System is in use, the display shows other items as well.For simplicity, we show here only the items described in this section.
SET
FM/PLAY MODE
3
∞
FM mode indicator
Band display, Preset channel, Frequency display
NumericKeys
Source selector ¢
4
(On the Remote Control) (On the Unit)
DOWNUP
3
3
Preset number
or
FS-X1-3(J)_E.book Page 13 Friday, March 28, 2003 11:36 AM
14
Using the Tuner
Presetting Stations
You can preset up to 30 FM stations and up to 15 AM sta-tions.
• Preset numbers may have been set to factory test fre-quencies prior to shipment. This is not a malfunction. You can preset the stations you want into memory by following one of the presetting methods below.
On the Remote Control
1 Select a band by pressing the FM/AM button.
2 Press the 5 or ∞ button to tune in a sta-tion.
3 Press the SET button.Preset number “1” will blink for 5 seconds.Within 5 seconds, proceed to the next step.When the display returns to the one set in step 2 after 5seconds, press the SET button again.
4 Press the Numeric Keys, or the 3 or 2 button within 5 seconds to select the preset number.
5 Press the SET button within 5 seconds.“STORED” appears and after 2 seconds, the display re-turns to the broadcast frequency display.
6 Repeat above steps 1 to 5 for each sta-tion you want to store in memory with a preset number.To change the preset stations, repeat the samesteps as above.
CAUTION:• Even if the system is unplugged or if the
power failure occurs, the preset stationswill be stored for about 24 hours. However,in case the preset stations are erased, youwill need to preset the stations again.
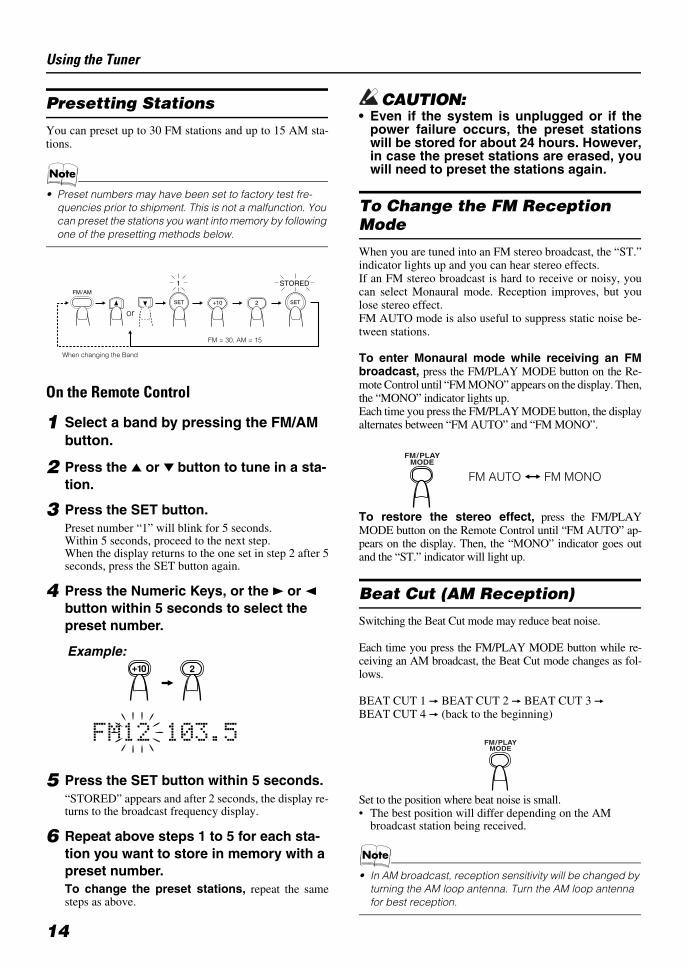
To Change the FM Reception Mode
When you are tuned into an FM stereo broadcast, the “ST.”indicator lights up and you can hear stereo effects.If an FM stereo broadcast is hard to receive or noisy, youcan select Monaural mode. Reception improves, but youlose stereo effect.FM AUTO mode is also useful to suppress static noise be-tween stations.
To enter Monaural mode while receiving an FMbroadcast, press the FM/PLAY MODE button on the Re-mote Control until “FM MONO” appears on the display. Then,the “MONO” indicator lights up.Each time you press the FM/PLAY MODE button, the displayalternates between “FM AUTO” and “FM MONO”.
To restore the stereo effect, press the FM/PLAYMODE button on the Remote Control until “FM AUTO” ap-pears on the display. Then, the “MONO” indicator goes outand the “ST.” indicator will light up.
Beat Cut (AM Reception)
Switching the Beat Cut mode may reduce beat noise.
Each time you press the FM/PLAY MODE button while re-ceiving an AM broadcast, the Beat Cut mode changes as fol-lows.
BEAT CUT 1 = BEAT CUT 2 = BEAT CUT 3 = BEAT CUT 4 = (back to the beginning)
Set to the position where beat noise is small.• The best position will differ depending on the AM
broadcast station being received.
• In AM broadcast, reception sensitivity will be changed by turning the AM loop antenna. Turn the AM loop antenna for best reception.
SET +10
1 STORED
2 SET
FM / AM
When changing the Band
FM = 30, AM = 15
or
FM/PLAYMODE
FM AUTO Ô FM MONO
FM/PLAYMODE
Example:
FS-X1-3(J)_E.book Page 14 Friday, March 28, 2003 11:36 AM
15
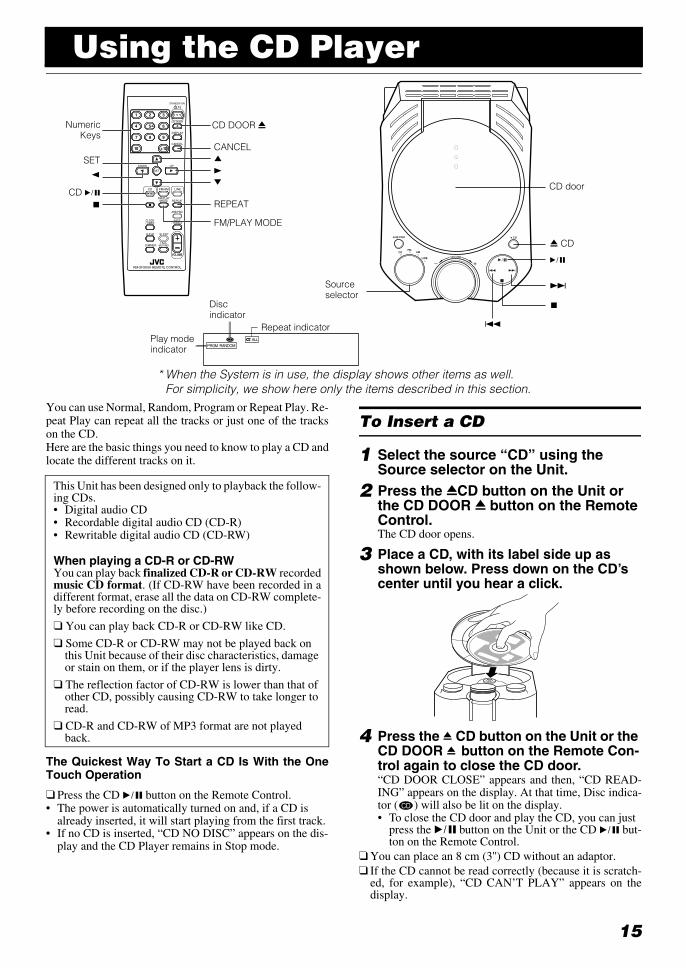
Using the CD Player
You can use Normal, Random, Program or Repeat Play. Re-peat Play can repeat all the tracks or just one of the trackson the CD.Here are the basic things you need to know to play a CD andlocate the different tracks on it.
This Unit has been designed only to playback the follow-ing CDs.• Digital audio CD• Recordable digital audio CD (CD-R)• Rewritable digital audio CD (CD-RW)
When playing a CD-R or CD-RWYou can play back finalized CD-R or CD-RW recordedmusic CD format. (If CD-RW have been recorded in adifferent format, erase all the data on CD-RW complete-ly before recording on the disc.)
You can play back CD-R or CD-RW like CD.
Some CD-R or CD-RW may not be played back on this Unit because of their disc characteristics, damage or stain on them, or if the player lens is dirty.
The reflection factor of CD-RW is lower than that of other CD, possibly causing CD-RW to take longer to read.
CD-R and CD-RW of MP3 format are not played back.
The Quickest Way To Start a CD Is With the OneTouch Operation
Press the CD 6 button on the Remote Control.• The power is automatically turned on and, if a CD is
already inserted, it will start playing from the first track. • If no CD is inserted, “CD NO DISC” appears on the dis-
play and the CD Player remains in Stop mode.
To Insert a CD
1 Select the source “CD” using the Source selector on the Unit.
2 Press the 0CD button on the Unit or the CD DOOR 0 button on the Remote Control.The CD door opens.
3 Place a CD, with its label side up as shown below. Press down on the CD’s center until you hear a click.
4 Press the 0 CD button on the Unit or the CD DOOR 0 button on the Remote Con-trol again to close the CD door.“CD DOOR CLOSE” appears and then, “CD READ-ING” appears on the display. At that time, Disc indica-tor ( ) will also be lit on the display.• To close the CD door and play the CD, you can just
press the 6 button on the Unit or the CD 6 but-ton on the Remote Control.
You can place an 8 cm (3'') CD without an adaptor. If the CD cannot be read correctly (because it is scratch-
ed, for example), “CD CAN’T PLAY” appears on thedisplay.
Sourceselector
0 CD
SET
2
NumericKeys
REPEAT
5
∞
CD 6
3
CD DOOR 0
* When the System is in use, the display shows other items as well.For simplicity, we show here only the items described in this section.
¢
7
6
CD door
CANCEL
Disc indicator
Play mode indicator
4
7
Repeat indicator
FM/PLAY MODE
FS-X1-3(J)_E.book Page 15 Friday, March 28, 2003 11:36 AM
16
Using the CD Player
You can insert a CD while listening to the other source.• However, while the CD door is operating (opening or
closing), the other source will be muted.
CAUTION:• DO NOT try to open or close the CD door by
hands as it will be damaged.
To Unload a CD
Take out the CD as shown below.
Basics of Using the CD Player – Normal Play
To Play a CD
1 Select the source “CD”.
2 Insert a CD.
3 Press the 6 button on the Unit or the CD 6 button on the Remote Control.The first track of the CD begins playing.
• The CD Player automatically stops when the last track of the CD has finished playing.
To stop playing the CD, press the 7 button.The following information for the CD is displayed.
To stop playing and remove the CD, press the 0CDbutton on the Unit or the CD DOOR 0 button on the Re-mote Control to open the CD door.To pause, press the 6 button on the Unit or the CD 6button on the Remote Control. The playback time blinks onthe display.To cancel pause, press the same button again. Play con-tinues from the point where it was paused.
To Select a Track or Passage within a Track During playbackPress the ¢ or 4 button on the Unit or the 3 or 2 but-ton on the Remote Control to select the track you want.
• The selected track starts playing.• Press the ¢ (or 3) button once to skip to the
beginning of the next track.• Press the 4 (or 2) button to skip to the beginning
of the track being played. Press twice quickly to skip to the beginning of the previous track.
• When the 3 or 2 button on the Remote Control is kept pressing, the track continuously skips.
• Press the Numeric Keys to select truck number (See page 12).
In Stop mode• Press the ¢ or 4 (or 3 or 2) button to skip the
track.• Hold down the ¢ or 4 (or 3 or 2 ) button to
continuously skip the tracks.
Search PlayHolding down the ¢ or 4 button on the Unit or the 5or ∞ button on the Remote Control, during playback, willfast forward/backwards the CD so you can quickly find aparticular passage in the track you are listening to.
Programming the Playing Order of the Tracks – Program Play
You can program up to 32 tracks in any desired order in-cluding the same tracks.
You can only make a program when the CD Player is stopped.
On the Remote Control
1 Insert a CD.
2 Press the CD 6 button.
3 Press the 7 button to stop the CD.
4 Press the FM/PLAY MODE button until “CD PROGRAM” appears.The System enters the Program Play mode and the“PRGM” indicator lights up.Each time you press the button, the play mode changesas follows.CD PROGRAM=CD RANDOM=CD NORMAL=(back to the beginning)
• If already programmed, the track number and preset number of the last programmed track will appear.
Track number Playback time
Total track number Total playback time
(After a few seconds)
FS-X1-3(J)_E.book Page 16 Friday, March 28, 2003 11:36 AM
17
Using the CD Player
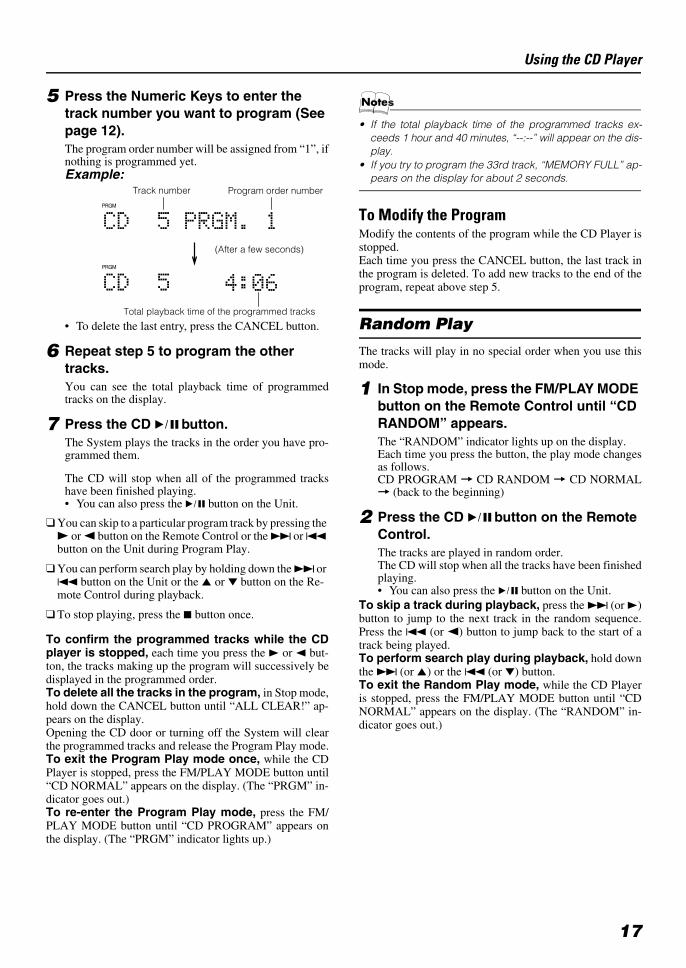
5 Press the Numeric Keys to enter the track number you want to program (See page 12).The program order number will be assigned from “1”, ifnothing is programmed yet.Example:
• To delete the last entry, press the CANCEL button.
6 Repeat step 5 to program the other tracks.You can see the total playback time of programmedtracks on the display.
7 Press the CD 6 button.The System plays the tracks in the order you have pro-grammed them.
The CD will stop when all of the programmed trackshave been finished playing.• You can also press the 6 button on the Unit.
You can skip to a particular program track by pressing the 3 or 2 button on the Remote Control or the ¢ or 4 button on the Unit during Program Play.
You can perform search play by holding down the ¢ or 4 button on the Unit or the 5 or ∞ button on the Re-mote Control during playback.
To stop playing, press the 7 button once.
To confirm the programmed tracks while the CDplayer is stopped, each time you press the 3 or 2 but-ton, the tracks making up the program will successively bedisplayed in the programmed order.To delete all the tracks in the program, in Stop mode,hold down the CANCEL button until “ALL CLEAR!” ap-pears on the display.Opening the CD door or turning off the System will clearthe programmed tracks and release the Program Play mode.To exit the Program Play mode once, while the CDPlayer is stopped, press the FM/PLAY MODE button until“CD NORMAL” appears on the display. (The “PRGM” in-dicator goes out.)To re-enter the Program Play mode, press the FM/PLAY MODE button until “CD PROGRAM” appears onthe display. (The “PRGM” indicator lights up.)
• If the total playback time of the programmed tracks ex-ceeds 1 hour and 40 minutes, “--:--” will appear on the dis-play.
• If you try to program the 33rd track, “MEMORY FULL” ap-pears on the display for about 2 seconds.
To Modify the ProgramModify the contents of the program while the CD Player isstopped.Each time you press the CANCEL button, the last track inthe program is deleted. To add new tracks to the end of theprogram, repeat above step 5.
Random Play
The tracks will play in no special order when you use thismode.
1 In Stop mode, press the FM/PLAY MODE button on the Remote Control until “CD RANDOM” appears.The “RANDOM” indicator lights up on the display.Each time you press the button, the play mode changesas follows.CD PROGRAM = CD RANDOM = CD NORMAL= (back to the beginning)
2 Press the CD 6 button on the Remote Control.The tracks are played in random order.The CD will stop when all the tracks have been finishedplaying.• You can also press the 6 button on the Unit.
To skip a track during playback, press the ¢ (or 3)button to jump to the next track in the random sequence.Press the 4 (or 2) button to jump back to the start of atrack being played.To perform search play during playback, hold downthe ¢ (or 5) or the 4 (or ∞) button.To exit the Random Play mode, while the CD Playeris stopped, press the FM/PLAY MODE button until “CDNORMAL” appears on the display. (The “RANDOM” in-dicator goes out.)
(After a few seconds)
Program order numberTrack number
Total playback time of the programmed tracks
FS-X1-3(J)_E.book Page 17 Friday, March 28, 2003 11:36 AM
18
Using the CD Player
Repeating Tracks
You can repeat all tracks or individual track, as many timesas you like.
During playback or in Stop mode, press the RE-PEAT button on the Remote Control.Each time you press the button, the Repeat mode and Re-peat indicator change as follows.
CD REPEAT ALL ( ALL) = CD REPEAT 1 ( ) = CD REPEAT OFF = (back to the beginning)
ALL: In Normal Play mode, repeats all the tracks.In Program Play mode, repeats all the tracksin the program.In Random Play mode, repeats all the tracksin random order.
: Repeats one track.
To exit the Repeat mode, press the REPEAT button un-til “CD REPEAT OFF” appears and the Repeat indicator onthe display goes out.
Repeat mode remains in effect even when you change the play mode.
CD DOOR LOCK
You can prevent unwanted CD ejection by locking the CDdoor. The CD Player works normally except CD ejectionoperation.
Locking the CD door
1 Turn off the system.
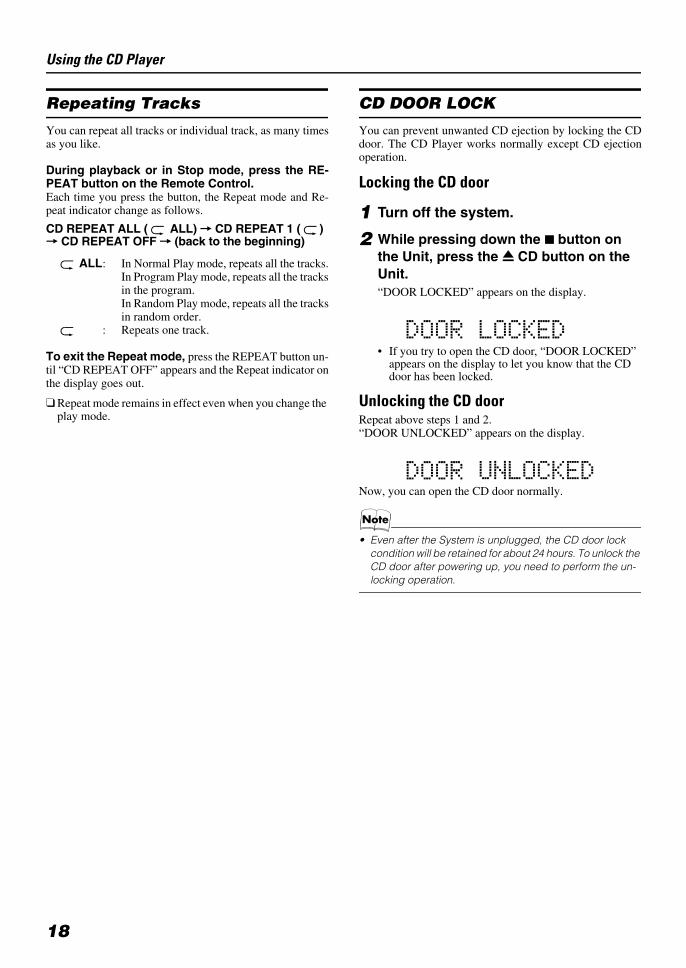
2 While pressing down the 7 button on the Unit, press the 0 CD button on the Unit. “DOOR LOCKED” appears on the display.
• If you try to open the CD door, “DOOR LOCKED” appears on the display to let you know that the CD door has been locked.
Unlocking the CD doorRepeat above steps 1 and 2. “DOOR UNLOCKED” appears on the display.
Now, you can open the CD door normally.
• Even after the System is unplugged, the CD door lock condition will be retained for about 24 hours. To unlock the CD door after powering up, you need to perform the un-locking operation.
FS-X1-3(J)_E.book Page 18 Friday, March 28, 2003 11:36 AM
19
Using External Equipments
Listening to External Equipment
You can listen to the external equipment such as MD re-corder, tape deck or other auxiliary.
First make sure that the external equipment is properly connected to the System. (See page 8).
1 Set the VOLUME control to the mini-mum position.
2 Press the LINE button on the Remote Control.“LINE” will appear on the display.
• You can also select “LINE” using the Source selector on the Unit.
3 Start playing the external equipment.
4 Adjust the VOLUME control to the desired listening level.
5 Apply the following sound effects, if you wish.• AHB PRO (See page 11.)• Tone (BASS/TREBLE) (See page 12.)
To exit the source “LINE”, select other source (e.g.CD).
• For operation of the external equipment, refer to its In-structions.
Changing the Equipment’s Name
You can change the equipment’s name according to theequipment to be used. (At purchase, “LINE” is selected.)
On the Remote Control
1 Press the LINE button to select the source “LINE”.
2 Press the LINE button for two seconds or more. “NAME CHANGE” blinks on the display.
3 While “NAME CHANGE” is blinking, press the SET button.
4 Press the 3 or 2 button repeatedly to select the desired name. Each time you press the button, the equipment name changes as follows.LINE Ô TAPE Ô DBS Ô VCR Ô TVÔ
GAME Ô (back to the beginning)DBS (Direct Broadcasting Satellite): For CS/BS
5 Press the SET buttonThe current name is replaced with new one.(When TAPE is selected)
• The selected name will appear on the display when you select the source “LINE”.
Source selector
SET
2 3
LINE
FS-X1-3(J)_E.book Page 19 Friday, March 28, 2003 11:36 AM

20
Using External Equipments
Recording the System’s Source to External Equipment
You can record the System’s source to external equipmentwhich is connected to the LINE OUT or OPTICAL DIGI-TAL OUT terminal of the System, such as tape deck or MDrecorder, etc.
First make sure that the external equipment is properly connected to the System. (See page 8 to 9).
When recording an FM or AM program, use the LINE OUT terminal (not the OPTICAL DIGITAL OUT termi-nal).
1 Play the System’s CD Player or tune in to a station.
The recording level is not affected by the VOLUME level set by the System. Also it is not affected by the sound ef-fects.
• For operation of the external equipment, refer to its In-structions.
Adjusting the Input Level
If the sound from the component connected to the LINE INjacks is too loud or is not loud enough when changing thesource to the external component (without adjusting thevolume level), you can change the input level through theLINE IN jacks.
On the Remote Control
1 When the source is “LINE”, press and hold the SET button.
• If you have changed the source name of the external component, the currently selected source will appear (see page 19).
2 Press the 3 or 2 button to select an appropriate input level.• Each time you press the button, the input level alter-
nate between “INPUT LEVEL1” and “INPUT LEVEL2”.
INPUT LEVEL1: Select this when the sound is not loudenough.
INPUT LEVEL2: Select this when the sound is too loud.
3 Press the SET button to finish the adjustment.
• “LEVEL2 STORED” appears on the display.• The selected input level will be kept in memory until
you change it.
The input level is too high.• Select “INPUT LEVEL2” if the current level is “INPUT
LEVEL1”.• If the current level is “INPUT LEVEL2”, adjust the output
level on the external component.
FS-X1-3(J)_E.book Page 20 Friday, March 28, 2003 11:36 AM
21
Using the Timers
The timers let you control listening functions automatically. Two types of timers are available:
DAILY Timer Use this timer to set wake up everyday to music fromany source, including melodies. SLEEP TimerFall asleep and have your System turn off automaticallyafter a certain length of time.
Setting the Clock
When you plug the AC power cord into the wall outlet, thetime indication “AM12:00” and the Clock indicator ( )blink on the display in standby (System off) mode.You can set the clock whether the System is on or off (butnot in power saving mode (See page 11)).
• The clock must be correctly set for the timers to work.• The clock may gain or lose one to two minutes per month.
On the Remote Control
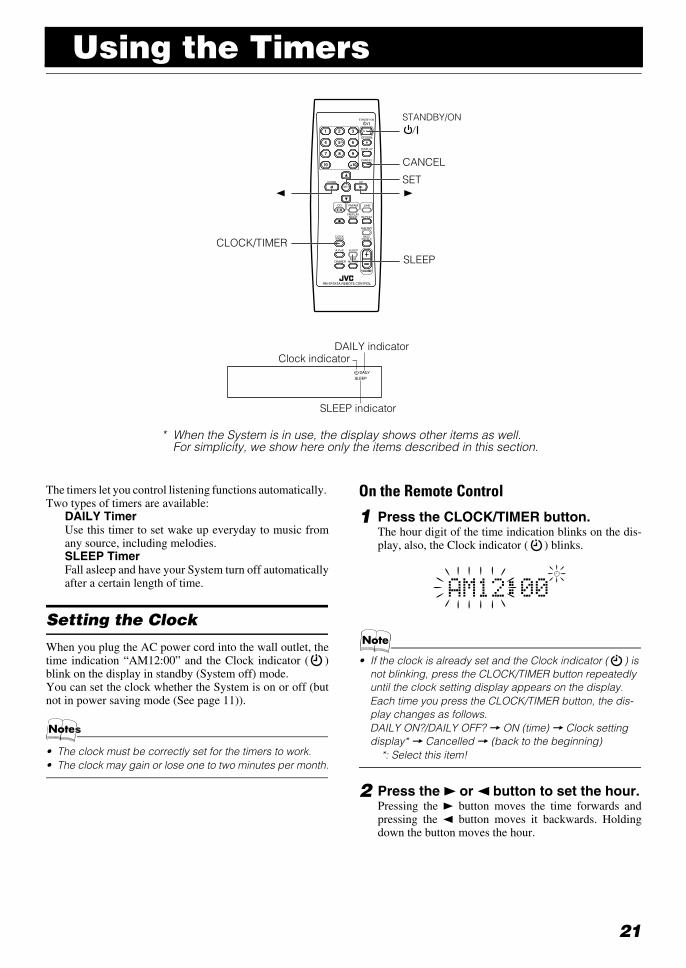
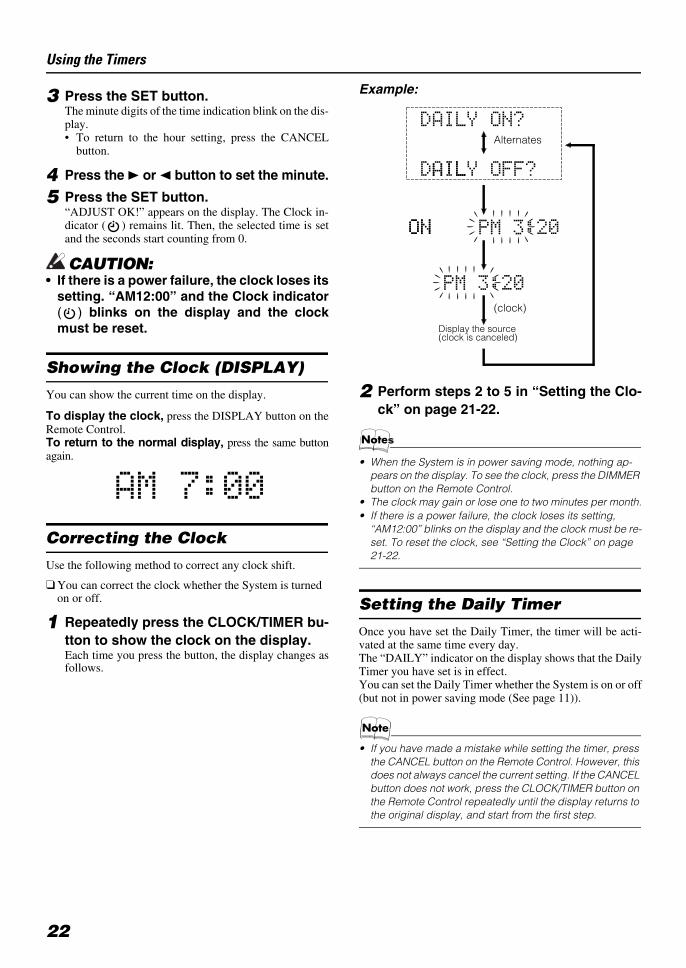
1 Press the CLOCK/TIMER button.The hour digit of the time indication blinks on the dis-play, also, the Clock indicator ( ) blinks.
• If the clock is already set and the Clock indicator ( ) is not blinking, press the CLOCK/TIMER button repeatedly until the clock setting display appears on the display.Each time you press the CLOCK/TIMER button, the dis-play changes as follows.DAILY ON?/DAILY OFF? = ON (time) = Clock setting display* = Cancelled = (back to the beginning)
*: Select this item!
2 Press the 3 or 2 button to set the hour.Pressing the 3 button moves the time forwards andpressing the 2 button moves it backwards. Holdingdown the button moves the hour.
* When the System is in use, the display shows other items as well.For simplicity, we show here only the items described in this section.
SLEEP
SET
SLEEP indicator
CLOCK/TIMER
DAILY indicatorClock indicator
32
CANCEL
STANDBY/ON
FS-X1-3(J)_E.book Page 21 Friday, March 28, 2003 11:36 AM
22
Using the Timers
3 Press the SET button.The minute digits of the time indication blink on the dis-play.• To return to the hour setting, press the CANCEL
button.
4 Press the 3 or 2 button to set the minute.
5 Press the SET button.“ADJUST OK!” appears on the display. The Clock in-dicator ( ) remains lit. Then, the selected time is setand the seconds start counting from 0.
CAUTION:• If there is a power failure, the clock loses its
setting. “AM12:00” and the Clock indicator( ) blinks on the display and the clockmust be reset.
Showing the Clock (DISPLAY)
You can show the current time on the display.
To display the clock, press the DISPLAY button on theRemote Control.To return to the normal display, press the same buttonagain.
Correcting the Clock
Use the following method to correct any clock shift.
You can correct the clock whether the System is turned on or off.
1 Repeatedly press the CLOCK/TIMER bu-tton to show the clock on the display.Each time you press the button, the display changes asfollows.
Example:
2 Perform steps 2 to 5 in “Setting the Clo-ck” on page 21-22.
• When the System is in power saving mode, nothing ap-pears on the display. To see the clock, press the DIMMER button on the Remote Control.
• The clock may gain or lose one to two minutes per month.• If there is a power failure, the clock loses its setting,
“AM12:00” blinks on the display and the clock must be re-set. To reset the clock, see “Setting the Clock” on page 21-22.
Setting the Daily Timer
Once you have set the Daily Timer, the timer will be acti-vated at the same time every day. The “DAILY” indicator on the display shows that the DailyTimer you have set is in effect.You can set the Daily Timer whether the System is on or off(but not in power saving mode (See page 11)).
• If you have made a mistake while setting the timer, press the CANCEL button on the Remote Control. However, this does not always cancel the current setting. If the CANCEL button does not work, press the CLOCK/TIMER button on the Remote Control repeatedly until the display returns to the original display, and start from the first step.
Alternates
(clock)
Display the source(clock is canceled)
FS-X1-3(J)_E.book Page 22 Friday, March 28, 2003 11:36 AM
23
Using the Timers
On the Remote Control
1 Press the CLOCK/TIMER button repeat-edly until “ON (time)” appears on the display.At this time, “DAILY” indicator blinks on the display.Each time you press the button, the display changes asfollows.DAILY ON?/DAILY OFF? = ON (time)* = Clocksetting display = Cancelled = (back to the beginning)
*: Select this item!The System enters ON-time setting mode, and the cur-rent ON time appears on the display and the hour digitsblink.
2 Setting the ON time (Example: AM 10:15).1. Press the 3 or 2 button to set the hour you want the
System to come on, then press the SET button. The minute digits of the ON time blink on the display.Pressing the 3 button moves the time forwards andpressing the 2 button moves it backwards. Holding down the button moves the time.
2. Press the 3 or 2 button to set the minute, then pressthe SET button.
The System enters OFF-time setting mode, and thehour digits blink.
3 Setting the OFF time (Example: PM 1:30).Note that the same time as the ON time cannot be set.1. Press the 3 or 2 button to set the hour you want the
System to be turned off, then press the SET button. The minute digits of the OFF time blink on the dis-play.
2. Press the 3 or 2 button to set the minute, then pressthe SET button.
The System enter the Music Source Selecting modeand “FM?” appears on the display.
4 Selecting the music source.Press the 3 or 2 button to select the music source youwant to listen to, then press the SET button.Each time you press the 3 or 2 button, the displaychanges as shown below:FM? Ô AM? Ô CD? Ô LINE?* Ô MELODY?Ô (back to the beginning)*: If the name has been changed, that name (e.g.“TAPE”) will appear. (See page 19.)According to the music source you have selected, thenext operation differs.
Preparation for each music source:Perform the following operation according to the musicsource you have selected. Then, the System enters Vol-ume Setting mode. When selecting “FM?” or “AM?”
Press the 3 or 2 button to select the preset stationnumber, then press the SET button.• If you select the display “- -”, the current broad-
cast station is selected. When selecting “CD?”
Press the 3 or 2 button to select the track numberyou want to start playback, then press the SET button.• If you select the display “- -”, playback will start
from the first track. When selecting “LINE?”
Prepare the external equipment so that it will turn onat the ON time set by the System.To allow this, the equipment should have the timerfunction.
When selecting “MELODY?”Press the 3 or 2 button to select one of melodies(MELODY 1-10). Then, the selected melody isplayed back.
FM? : Tunes in to the specified preset FM sta-tion.
AM? : Tunes in to the specified preset AM sta-tion.
CD? : Plays the specified track on the speci-fied CD.
LINE? : Plays an external source.MELODY? : Select one of 10 melodies.
FS-X1-3(J)_E.book Page 23 Friday, March 28, 2003 11:36 AM
24
Using the Timers
5 Setting the volume level.Press the 3 or 2 button to select the volume level(VOLUME 1-50), then press the SET button.
6 Select the FADE function.Press the 3 or 2 button to select either “FADE” (fadesin at power on) or “NoFADE” (does not fade in).
7 Press the SET button.The timer setting is completed, and the “DAILY” indi-cator stops blinking and remains lit. Each setting youhave made appears on the display in the order of ONtime, OFF time, music source, volume and fading.Then, the display returns to the display before you setthe timer.
8 Press the STANDBY/ON button toturn off the System.The Clock indicator ( ) and “DAILY” indicator are liton the display, showing that the Daily Timer is set to on.
To change the timer setting, repeat the setting proce-dure from the beginning.
When the timer ON-time comes:The following operation will be automatically repeated every-day.• When the timer ON-time comes, the System automati-
cally turns on. The “DAILY” indicator blinks, and then “DAILY TIMER” and “TIMER STANDBY” alternate for a while. After that, the music source you have set is played. The “DAILY” indicator blinks during timer operation. In the case of MELODY, it’s title scrolls on the display.
• When the timer OFF-time comes, “DAILY TIMER” and “OFF” alternate for a while. Then, the System automati-cally turns off and the “DAILY” indicator remains lit.
Selectable MelodiesWhen you select the melody as the source in step 4, you canuse one of the following melodies.MELODY 1:Twinkle Twinkle Little Star (by W.A.Mozart)MELODY 2:Grandfather’s Clock (by H.C.Work)MELODY 3:Csikos Post (by H.Necke)MELODY 4:Farewell Song (by La chambre de Chopin)MELODY 5:Canon (by J.Pachelbel)MELODY 6:Menuett (by J.S.Bach)MELODY 7:Humoresk (by A.Dvorak)MELODY 8:Serenade (by J.Haydn)MELODY 9:Jesus,Joy Of Man’s Desiring (by J.S.Bach)MELODY10:Ravel’s Bolero (by Ravel)• When you select the melody as the source, only the title
of the selected melody will appear on the display.
• When a melody is set for the Daily Timer while playing back the CD, the CD will stop playing.
• In step 4, the selected melody will be played back for your reference. However, if the melody is selected with the Sys-tem turned off, no melody will be heard.
• During setting the melody, the source cannot be selected with the Source selector on the Unit or the source select button on the Remote Control.
• If the system is already on when the timer ON-time comes, the Daily Timer does not work.
Turning the Daily Timer On and Off Once you have set the Daily Timer, it is stored in memory.So, the Daily Timer will be activated at the same time everyday until it is canceled.
To cancel the Daily Timer temporarily:
On the Remote Control
1 Press the CLOCK/TIMER button repeat-edly until the “DAILY ON?/DAILY OFF?”appears on the display.The “DAILY” indicator blinks on the display.
2 Press the CANCEL button.“DAILY OFF” appears and the “DAILY” indicator goesout.
To activate the canceled Daily Timer:
On the Remote Control
1 Press the CLOCK/TIMER button repeat-edly until the “DAILY ON?/DAILY OFF?”appears on the display.The “DAILY” indicator blinks on the display.
2 Press the SET button.The “DAILY” indicator remains lit. Each setting al-ready made appears on the display in the order of ONtime, OFF time, music source, volume, and fading.Then the display returns to the original display.• “DAILY TIMER/NO SET” appears on the display
before you enter the timer setting.
CAUTION:• If the System is unplugged, or a power fail-
ure occurs, the timer setting will be lost.You will need to reset the clock first, thenthe timer.
FS-X1-3(J)_E.book Page 24 Friday, March 28, 2003 11:36 AM
25
Using the Timers
Setting the SLEEP Timer
Use the Sleep Timer to turn the System off after a certainnumber of minutes when it is playing. By setting the SleepTimer, you can fall asleep to music and know that your Sys-tem will turn off by itself rather than play all night.• You can only set the Sleep Timer when the System is on.
On the Remote Control
1 During playback a source, press theSLEEP button.The “SLEEP” indicator lights up on the display.
2 Set the length of time you want thesource to play before shutting off.Each time you press the SLEEP button, the time lengthchanges as follows:10 = 20 = 30 = 60 = 90 = 120 = OFF = (back tothe beginning)
3 Wait for a few seconds.The display returns to the original one. The display isdimmed (DIMMER 2 mode) and the CD lamp goes out.The System is now set to turn off after the number ofminutes you have set.
To Confirm the Sleep Time:When the SLEEP button is pressed, the remaining sleep time is displayed. Wait until the display returns to the orig-inal display.To Cancel the SLEEP Timer Setting:Press the SLEEP button on the Remote Control until “SLEEP OFF” appears and the “SLEEP” indicator goes out on the display.• Pressing the CLOCK/TIMER button or turning off the
System also cancels the SLEEP Timer.
• When the SLEEP button is used without setting the clock, “CLOCK ADJUST!” appears on the display. You need to set the clock beforehand.
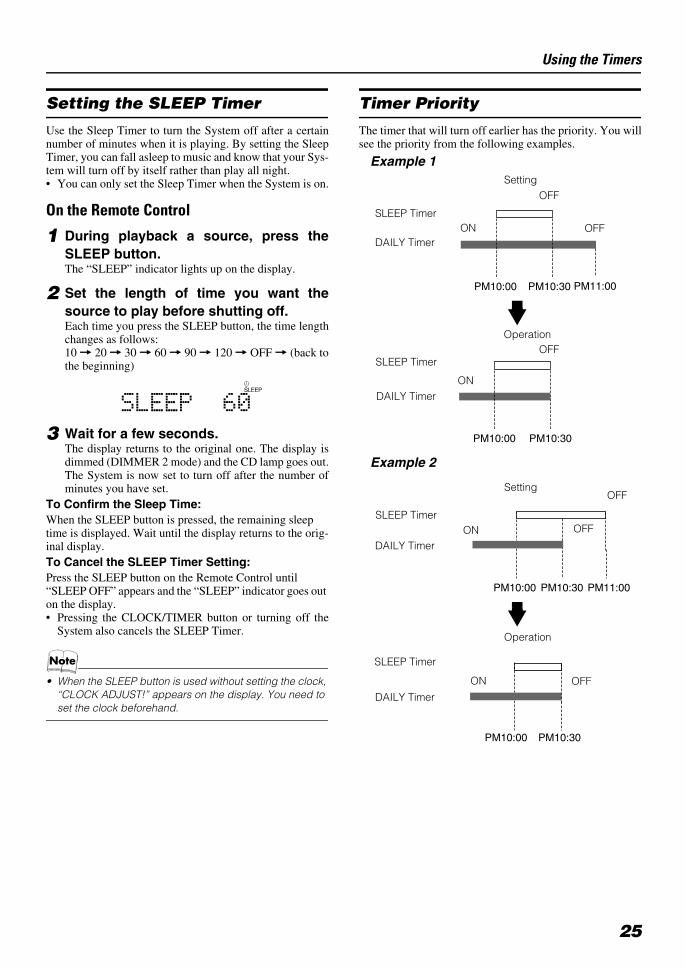
Timer Priority
The timer that will turn off earlier has the priority. You willsee the priority from the following examples.
Example 1
Example 2
PM10:00 PM10:30
PM10:00 PM10:30 PM11:00
SLEEP Timer
DAILY Timer
Setting
ON
OFF
OFF
ON
OFFOperation
SLEEP Timer
DAILY Timer
PM10:00 PM10:30
PM10:00 PM10:30 PM11:00
DAILY Timer
Setting
OFF
OFF
ON OFF
Operation
DAILY Timer
ONSLEEP Timer
SLEEP Timer
FS-X1-3(J)_E.book Page 25 Friday, March 28, 2003 11:36 AM
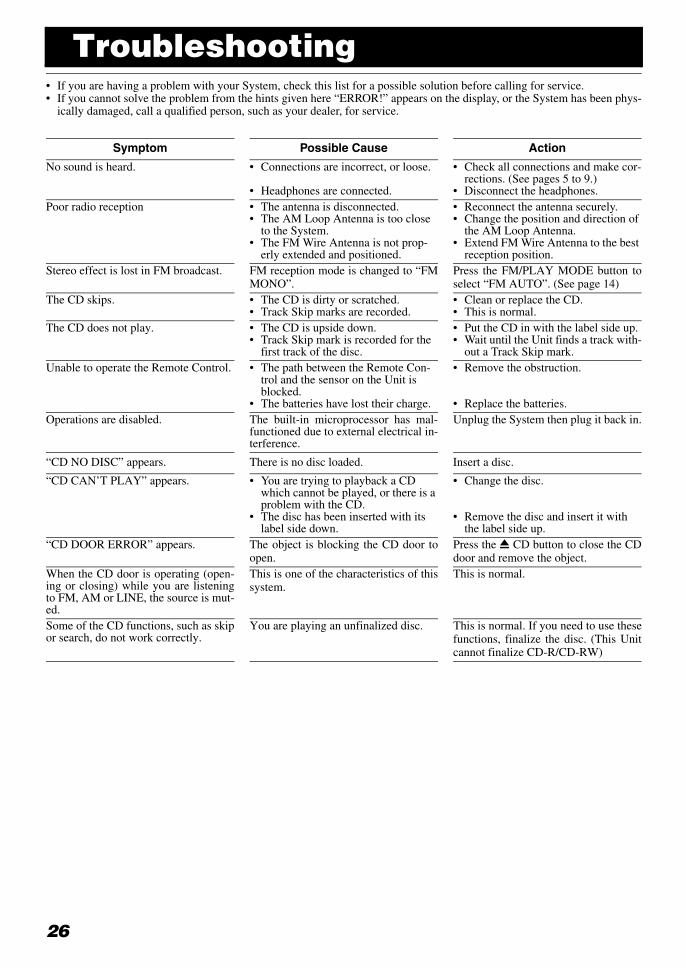
26
Troubleshooting• If you are having a problem with your System, check this list for a possible solution before calling for service.• If you cannot solve the problem from the hints given here “ERROR!” appears on the display, or the System has been phys-
ically damaged, call a qualified person, such as your dealer, for service.
Symptom Possible Cause Action
No sound is heard. • Connections are incorrect, or loose.
• Headphones are connected.
• Check all connections and make cor-rections. (See pages 5 to 9.)
• Disconnect the headphones.Poor radio reception • The antenna is disconnected.
• The AM Loop Antenna is too close to the System.
• The FM Wire Antenna is not prop-erly extended and positioned.
• Reconnect the antenna securely.• Change the position and direction of
the AM Loop Antenna.• Extend FM Wire Antenna to the best
reception position.Stereo effect is lost in FM broadcast. FM reception mode is changed to “FM
MONO”.Press the FM/PLAY MODE button toselect “FM AUTO”. (See page 14)
The CD skips. • The CD is dirty or scratched.• Track Skip marks are recorded.
• Clean or replace the CD.• This is normal.
The CD does not play. • The CD is upside down.• Track Skip mark is recorded for the
first track of the disc.
• Put the CD in with the label side up.• Wait until the Unit finds a track with-
out a Track Skip mark.Unable to operate the Remote Control. • The path between the Remote Con-
trol and the sensor on the Unit is blocked.
• The batteries have lost their charge.
• Remove the obstruction.
• Replace the batteries.Operations are disabled. The built-in microprocessor has mal-
functioned due to external electrical in-terference.
Unplug the System then plug it back in.
“CD NO DISC” appears. There is no disc loaded. Insert a disc.
“CD CAN’T PLAY” appears. • You are trying to playback a CD which cannot be played, or there is a problem with the CD.
• The disc has been inserted with its label side down.
• Change the disc.
• Remove the disc and insert it with the label side up.
“CD DOOR ERROR” appears. The object is blocking the CD door toopen.
Press the 0 CD button to close the CDdoor and remove the object.
When the CD door is operating (open-ing or closing) while you are listeningto FM, AM or LINE, the source is mut-ed.
This is one of the characteristics of thissystem.
This is normal.
Some of the CD functions, such as skipor search, do not work correctly.
You are playing an unfinalized disc. This is normal. If you need to use thesefunctions, finalize the disc. (This Unitcannot finalize CD-R/CD-RW)
FS-X1-3(J)_E.book Page 26 Friday, March 28, 2003 11:36 AM

27
Care And MaintenanceHandle your CDs carefully, and they will last a long time.
Compact Discs
CAUTION:• Do not use any solvent (for example, con-
ventional record cleaner, spray thinner,benzine, etc.) to clean a CD.
General Notes
In general, you will have the best performance by keepingyour CDs and the mechanism clean.• Store CDs in their cases, and keep them in cabinets or on
shelves.• Keep the System’s CD door closed when not in use.
Cleaning the Unit• Stains on the Unit
Should be wiped off with a soft cloth. If the Unit is heavilystained, wipe it with a cloth soaked in water-diluted neutraldetergent and wrung well, then wipe clean with a dry cloth.
• Since the Unit may deteriorate in quality, become damaged or get its paint peeled off, be careful about the followings.
- DO NOT wipe it with a hard cloth.- DO NOT wipe it strong.- DO NOT wipe it with thinner or benzine.- DO NOT apply any volatile substance such as insecti-
cides to it.- DO NOT allow any rubber or plastic to remain in con-
tact with it for a long time.
Cleaning the Lens
If the lens in the CD pickup is dirty, dropout, etc., could de-grade sound.Open the CD door and clean the lens as shown.• Use a blower (available from a camera store) to blow
dust off the lens.
• If there are fingerprints, etc. on the lens, gently wipe clean with a cotton swab.
Moisture Condensation
• Only CDs bearing these marks can be used with this System. However, continued use of irregu-lar shape CDs (heart-shape, octagonal, etc.) can damage the System.
• Remove the CD from its case by holding it at the edges while press-ing the case’s center hole lightly.
• Do not touch the shiny surface of the CD, or bend the CD.
• Put the CD back in its case after use to prevent warping.
• Be careful not to scratch the sur-face of the CD when placing it back in the case.
• Avoid exposure to direct sunlight, temperature extremes, and moisture.
• A dirty CD may not play cor-rectly. If a CD does become dirty, wipe it with a soft cloth in a straight line from center to edge.
Moisture may condense on the lensinside the System in the followingcases:• After turning on heating in the
room.• In a damp room.• If the System is brought directly
from a cold to a warm place.Should this occur, the System maymalfunction. In this case, leave theSystem turned on for a few hours un-til the moisture evaporates, unplugthe AC power cord, and then plug itin again.
Blower
Lens
FS-X1-3(J)_E.book Page 27 Friday, March 28, 2003 11:36 AM
28
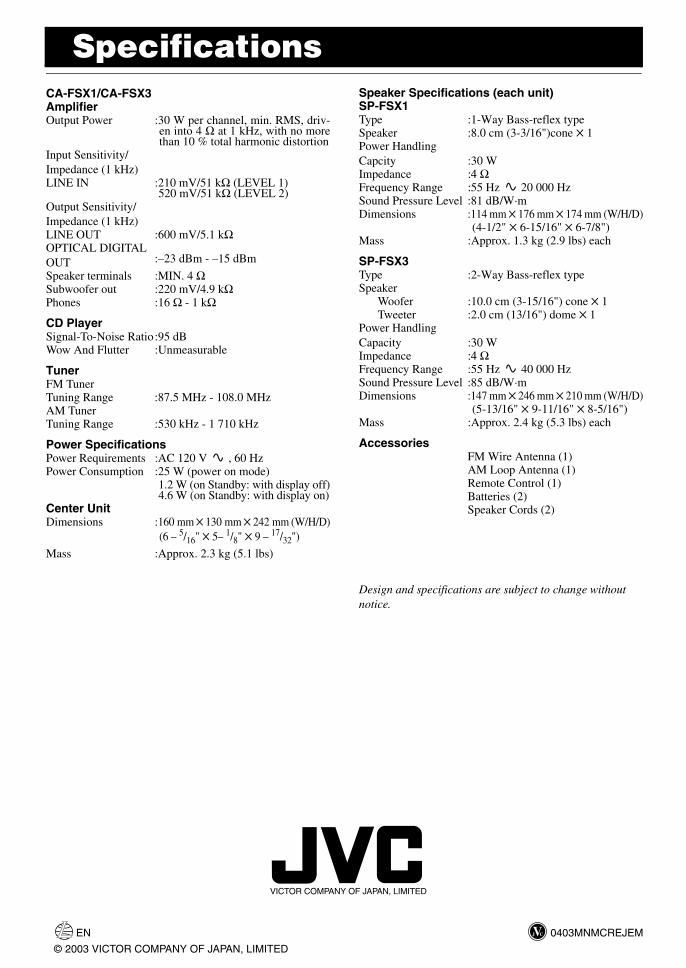
SpecificationsCA-FSX1/CA-FSX3AmplifierOutput Power :30 W per channel, min. RMS, driv-
en into 4 Ω at 1 kHz, with no morethan 10 % total harmonic distortion
Input Sensitivity/Impedance (1 kHz)LINE IN :210 mV/51 kΩ (LEVEL 1)
520 mV/51 kΩ (LEVEL 2)Output Sensitivity/Impedance (1 kHz)LINE OUT :600 mV/5.1 kΩOPTICAL DIGITAL OUT :–23 dBm - –15 dBm
Speaker terminals :MIN. 4 ΩSubwoofer out :220 mV/4.9 kΩPhones :16 Ω - 1 kΩ
CD PlayerSignal-To-Noise Ratio:95 dBWow And Flutter :Unmeasurable
TunerFM TunerTuning Range :87.5 MHz - 108.0 MHzAM TunerTuning Range :530 kHz - 1 710 kHz
Power SpecificationsPower Requirements :AC 120 V , 60 Hz Power Consumption :25 W (power on mode)
1.2 W (on Standby: with display off)4.6 W (on Standby: with display on)
Center UnitDimensions :160 mm 130 mm 242 mm (W/H/D)
(6 – 5/16" 5– 1/8" 9 – 17/32")
Mass :Approx. 2.3 kg (5.1 lbs)
Speaker Specifications (each unit)SP-FSX1Type :1-Way Bass-reflex typeSpeaker :8.0 cm (3-3/16")cone 1Power Handling Capcity :30 WImpedance :4 ΩFrequency Range :55 Hz 20 000 HzSound Pressure Level :81 dB/W·mDimensions :114 mm 176 mm 174 mm (W/H/D)
(4-1/2" 6-15/16" 6-7/8")Mass :Approx. 1.3 kg (2.9 lbs) each
SP-FSX3Type :2-Way Bass-reflex typeSpeaker
Woofer :10.0 cm (3-15/16") cone 1Tweeter :2.0 cm (13/16") dome 1
Power Handling Capacity :30 WImpedance :4 ΩFrequency Range :55 Hz 40 000 HzSound Pressure Level :85 dB/W·mDimensions :147 mm 246 mm 210 mm (W/H/D)
(5-13/16" 9-11/16" 8-5/16")Mass :Approx. 2.4 kg (5.3 lbs) each
AccessoriesFM Wire Antenna (1)AM Loop Antenna (1)Remote Control (1)Batteries (2)Speaker Cords (2)
Design and specifications are subject to change without notice.
EN 0403MNMCREJEM
© 2003 VICTOR COMPANY OF JAPAN, LIMITED
VICTOR COMPANY OF JAPAN, LIMITED
FS-X1-3(J)_E.book Page 28 Friday, March 28, 2003 11:36 AM

SP-FSX1 CA-FSX1 SP-FSX1
SP-FSX3 CA-FSX3 SP-FSX3
COMPACT COMPONENT SYSTEMSYSTEME DE COMPOSANTS COMPACT
FS-X1/FS-X3Consists of CA-FSX1 and SP-FSX1 Consists of CA-FSX1 and SP-FSX1Se compose de CA-FSX3 et SP-FSX3 Se compose de CA-FSX3 et SP-FSX3
For Customer Use:Enter below the Model No. and Serial No.which are located either on the rear, bot-tom or side of the cabinet. Retain thisinformation for future reference.
Model No.
Serial No.
INSTRUCTIONSMANUEL D’INSTRUCTIONS
LVT1040-002A[C]
FS-X1-3(C)_E.book Page 1 Thursday, March 27, 2003 1:43 PM
G-1
Warnings, Cautions and Others / Mises en garde, précautions et indications diverses
(For U.S.A)
WARNING: TO REDUCE THE RISK OF FIRE ORELECTRIC SHOCK, DO NOT EXPOSE THIS APPLI-ANCE TO RAIN OR MOISTURE.
Note to CATV system installer:This reminder is provided to call the CATV system installer’s atten-tion to section 820-40 of the NEC which provides guidelines forproper grounding and, in particular, specifies that the cable groundshall be connected to the grounding system of the building, as closeto the point of cable entry as practical.
INFORMATION (FOR U.S.A.)
This equipment has been tested and found tocomply with the limits for a Class B digital device,pursuant to Part 15 of the FCC Rules. These lim-its are designed to provide reasonable protectionagainst harmful interference in a residential instal-lation. This equipment generates, uses, and canradiate radio frequency energy and, if notinstalled and used in accordance with the instruc-tions, may cause harmful interference to radiocommunications. However, there is no guaranteethat interference will not occur in a particularinstallation. If this equipment does cause harmfulinterference to radio or television reception, whichcan be determined by turning the equipment offand on, the user is encouraged to try to correctthe interference by one or more of the followingmeasures:
– Reorient or relocate the receiving antenna.– Increase the separation between the equip-
ment and receiver.– Connect the equipment into an outlet on a
circuit different from that to which thereceiver is connected.
– Consult the dealer or an experienced radio/TV technician for help.
The lightning flash with arrowhead symbol,within an equilateral triangle is intended toalert the user to the presence of uninsulated“dangerous voltage” within the product’s enclo-sure that may be of sufficient magnitude toconstitute a risk of electric shock to persons.
The exclamation point within an equilateral tri-angle is intended to alert the user to the pres-ence of important operating and maintenance(servicing) instructions in the literature accom-panying the appliance.
CAUTIONRISK OF ELECTRIC
SHOCK DO NOT OPEN
CAUTION: TO REDUCE THE RISK OF ELECTRIC SHOCK DO NOT REMOVE COVER (OR BACK)
NO USER SERVICEABLE PARTS INSIDE REFER SERVICING TO QUALIFIED SERVICE PERSONNEL.
FS-X1-3(C)_E.book Page 1 Thursday, March 27, 2003 1:43 PM

G-2
CAUTION1. Do not block the ventilation openings or holes.
(If the ventilation openings or holes are blocked bya newspaper or cloth, etc., the heat may not beable to get out.)
2. Do not place any naked flame sources, such aslighted candles, on the apparatus.
3. When discarding batteries, environmental prob-lems must be considered and local rules or lawsgoverning the disposal of these batteries must befollowed strictly.
4. Do not expose this apparatus to rain, moisture,dripping or splashing and that no objects filled withliquids, such as vases, shall be placed on theapparatus.
ATTENTION1. Ne bloquez pas les orifices ou les trous de ventila-
tion. (Si les orifices ou les trous de ventilation sontbloqués par un journal un tissu, etc., la chaleurpent ne pas être évacuée correctement de l’appa-reil.)
2. Ne placez aucune source de flamme nue, tellequ’une bougie, sur l’appareil.
3. Lors de la mise au rebut des piles, veuillez prendreen considération les problèmes de l’environnementet suivre strictement les règles et, les lois localessur la mise au rebut des piles.
4. N’exposez pas cet appareil à la pluie, à l’humidité,à un égouttement ou à des éclaboussures et neplacez pas des objets remplis de liquide, tels qu’unvase, sur l’appareil.
For Canada/pour le Canada
CAUTION: TO PREVENT ELECTRIC SHOCK, MATCHWIDE BLADE OF PLUG TO WIDE SLOT, FULLY INSERT.
PRECAUTION: POUR EVITER LES CHOCS ELEC-TRIQUES, INTRODUIRE LA LAME LA PLUS LARGE DELA FICHE DANS LA BORNE CORRESPONDANTE DE LAPRISE ET POUSSER JUSQUAU FOND
For Canada/pour Le Canada
THIS DIGITAL APPARATUS DOES NOT EXCEED THECLASS B LIMITS FOR RADIO NOISE EMISSIONS FROMDIGITAL APPARATUS AS SET OUT IN THE INTERFER-ENCE-CAUSING EQUIPMENT STANDARD ENTITLED “DIG-ITAL APPARATUS,” ICES-003 OF THE DEPARTMENT OFCOMMUNICATIONS.
CET APPAREIL NUMERIQUE RESPECTE LES LIMITES DEBRUITS RADIOELECTRIQUES APPLICABLES AUX APPAR-EILS NUMERIQUES DE CLASSE B PRESCRITES DANS LANORME SUR LE MATERIEL BROUILLEUR: “APPAREILSNUMERIQUES”, NMB-003 EDICTEE PAR LE MINISTREDES COMMUNICATIONS.
1. CLASS 1 LASER PRODUCT2. CAUTION: Invisible laser radiation when open and interlock
failed or defeated. Avoid direct exposure to beam.3. CAUTION: Do not open the top cover. There are no user ser-
viceable parts inside the unit; leave all servicing to qualitied service personnel.
1. PRODUIT LASER CLASSE 12. ATTENTION: Radiation laser invisible quand l’appareil est
ouvert ou que le verrouillage est en panne ou désactivé. Eviter une exposition directe au rayon.
3. ATTENTION: Ne pas ouvrir le couvercle du dessus. Iln’y a aucune pièce utilisable à l’intérier. Laisser à un personnel qualifié le soin de réparer votre appareil.
CAUTIONTo reduce the risk of electrical shocks, fire, etc.:1 Do not remove screws, covers or cabinet.2. Do not expose this appliance to rain or moisture.
ATTENTIONAfin d’èviter tout risque d’électrocution, d’lncendie. etc.:1. Ne pas enlever les vis ni les panneaux et ne pas ouvrir le
coffret de l’appareil.2. Ne pas exposer l’appareil à la pluie ni à l’humidité.
Caution —STANDBY/ON button!Disconnect the main plug to shut the power off completely. The STANDBY/ON button in any position does not dis-connect the main line. The power can be remote controlled.• When the unit is on standby, the STANDBY/ON indicator
lights red.• When the unit is turned on, the STANDBY/ON indicator
lights green.
Attention — Touche STANDBY/ON Déconnecter la fiche de secteur poru couper complètement le courant. La touche STANDBY/ON ne coupe jamais com-plètement la ligne de secteur, quelle que soit sa position. Le courant peut être télécommandé.• Quand l’appareil est en mode de veillle, le tèmoin
STANDBY/ON est allumè en rouge.• Quand l’appareil est sous tension, le tèmoin STANDBY/ON
est allumè en vert.
FS-X1-3(C)_E.book Page 2 Thursday, March 27, 2003 1:43 PM
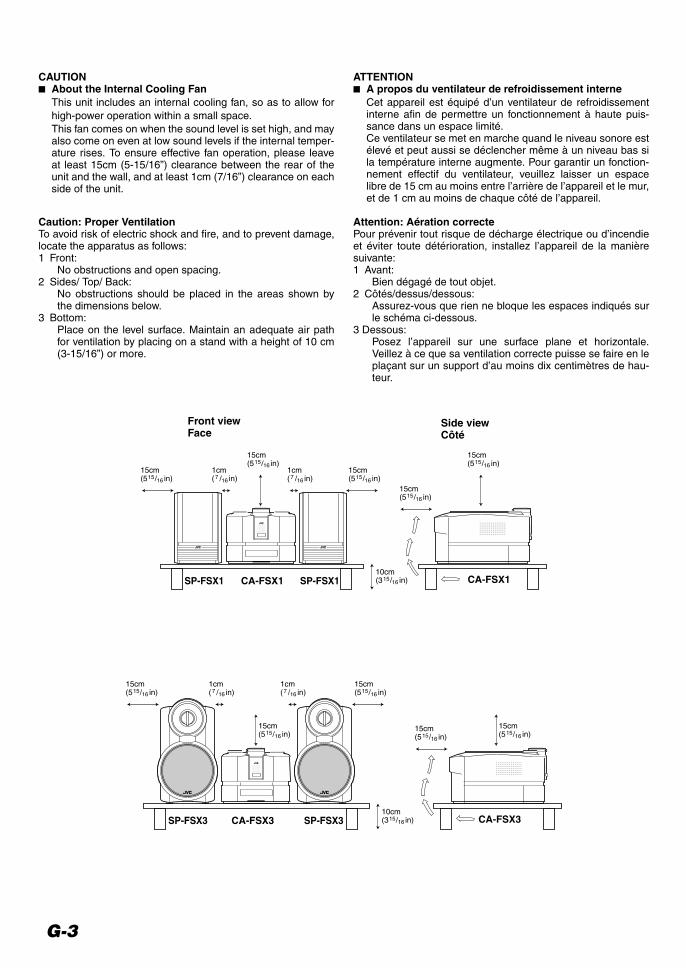
G-3
CAUTION About the Internal Cooling Fan
This unit includes an internal cooling fan, so as to allow forhigh-power operation within a small space. This fan comes on when the sound level is set high, and mayalso come on even at low sound levels if the internal temper-ature rises. To ensure effective fan operation, please leaveat least 15cm (5-15/16”) clearance between the rear of theunit and the wall, and at least 1cm (7/16”) clearance on eachside of the unit.
ATTENTION A propos du ventilateur de refroidissement interne
Cet appareil est équipé d’un ventilateur de refroidissementinterne afin de permettre un fonctionnement à haute puis-sance dans un espace limité.Ce ventilateur se met en marche quand le niveau sonore estélevé et peut aussi se déclencher même à un niveau bas sila température interne augmente. Pour garantir un fonction-nement effectif du ventilateur, veuillez laisser un espacelibre de 15 cm au moins entre l’arrière de l’appareil et le mur,et de 1 cm au moins de chaque côté de l’appareil.
Caution: Proper VentilationTo avoid risk of electric shock and fire, and to prevent damage,locate the apparatus as follows:1 Front:
No obstructions and open spacing.2 Sides/ Top/ Back:
No obstructions should be placed in the areas shown bythe dimensions below.
3 Bottom:Place on the level surface. Maintain an adequate air pathfor ventilation by placing on a stand with a height of 10 cm(3-15/16”) or more.
Attention: Aération correctePour prévenir tout risque de décharge électrique ou d’incendieet éviter toute détérioration, installez l’appareil de la manièresuivante:1 Avant:
Bien dégagé de tout objet.2 Côtés/dessus/dessous:
Assurez-vous que rien ne bloque les espaces indiqués surle schéma ci-dessous.
3 Dessous:Posez l’appareil sur une surface plane et horizontale.Veillez à ce que sa ventilation correcte puisse se faire en leplaçant sur un support d’au moins dix centimètres de hau-teur.
15cm(5 in)15
16/1cm( in)7
16/1cm( in)7
16/15cm(5 in)15
16/
10cm(3 in)15
16/
15cm(5 in)15
16/
15cm(5 in)15
16/15cm(5 in)15
16/
Front viewFace
Side viewCôté
CA-FSX1 CA-FSX1
SP-FSX3 CA-FSX3SP-FSX3CA-FSX3
SP-FSX1 SP-FSX1
FS-X1-3(C)_E.book Page 3 Thursday, March 27, 2003 1:43 PM
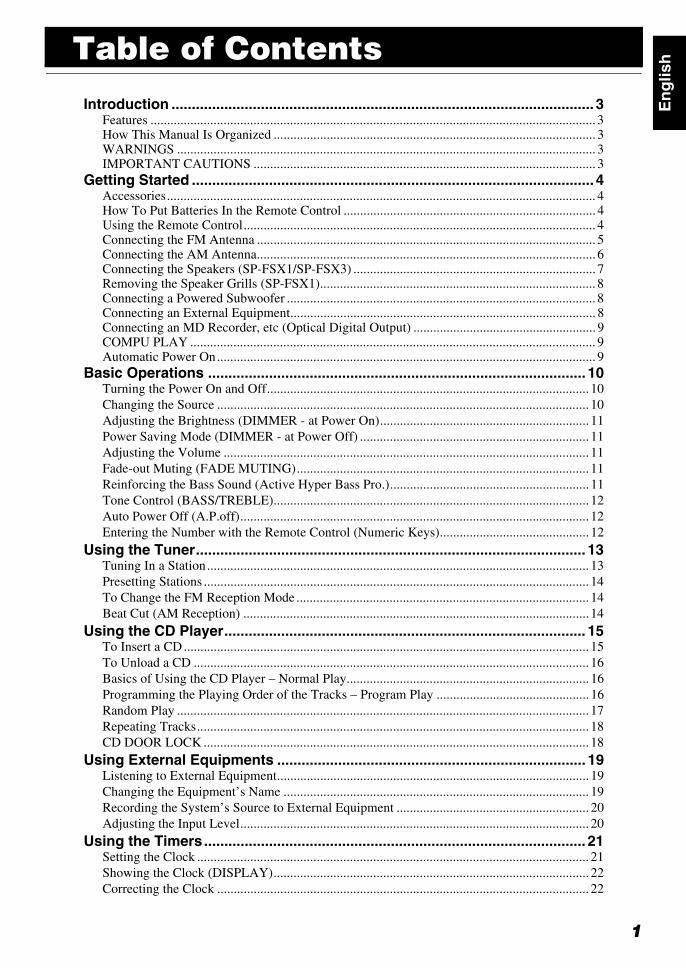
1
Table of Contents
En
glis
h
Introduction ........................................................................................................ 3Features ...................................................................................................................................... 3How This Manual Is Organized ................................................................................................. 3WARNINGS .............................................................................................................................. 3IMPORTANT CAUTIONS ....................................................................................................... 3
Getting Started ................................................................................................... 4Accessories................................................................................................................................. 4How To Put Batteries In the Remote Control ............................................................................ 4Using the Remote Control.......................................................................................................... 4Connecting the FM Antenna ...................................................................................................... 5Connecting the AM Antenna...................................................................................................... 6Connecting the Speakers (SP-FSX1/SP-FSX3) ......................................................................... 7Removing the Speaker Grills (SP-FSX1)................................................................................... 8Connecting a Powered Subwoofer ............................................................................................. 8Connecting an External Equipment............................................................................................ 8Connecting an MD Recorder, etc (Optical Digital Output) ....................................................... 9COMPU PLAY .......................................................................................................................... 9Automatic Power On.................................................................................................................. 9
Basic Operations ............................................................................................. 10Turning the Power On and Off................................................................................................. 10Changing the Source ................................................................................................................ 10Adjusting the Brightness (DIMMER - at Power On)............................................................... 11Power Saving Mode (DIMMER - at Power Off) ..................................................................... 11Adjusting the Volume .............................................................................................................. 11Fade-out Muting (FADE MUTING)........................................................................................ 11Reinforcing the Bass Sound (Active Hyper Bass Pro.)............................................................ 11Tone Control (BASS/TREBLE)............................................................................................... 12Auto Power Off (A.P.off)......................................................................................................... 12Entering the Number with the Remote Control (Numeric Keys)............................................. 12
Using the Tuner................................................................................................ 13Tuning In a Station................................................................................................................... 13Presetting Stations .................................................................................................................... 14To Change the FM Reception Mode ........................................................................................ 14Beat Cut (AM Reception) ........................................................................................................ 14
Using the CD Player......................................................................................... 15To Insert a CD.......................................................................................................................... 15To Unload a CD ....................................................................................................................... 16Basics of Using the CD Player – Normal Play......................................................................... 16Programming the Playing Order of the Tracks – Program Play .............................................. 16Random Play ............................................................................................................................ 17Repeating Tracks...................................................................................................................... 18CD DOOR LOCK .................................................................................................................... 18
Using External Equipments ............................................................................ 19Listening to External Equipment.............................................................................................. 19Changing the Equipment’s Name ............................................................................................ 19Recording the System’s Source to External Equipment .......................................................... 20Adjusting the Input Level......................................................................................................... 20
Using the Timers.............................................................................................. 21Setting the Clock ...................................................................................................................... 21Showing the Clock (DISPLAY)............................................................................................... 22Correcting the Clock ................................................................................................................ 22
FS-X1-3(C)_E.book Page 1 Thursday, March 27, 2003 1:43 PM

Table of Contents
2
En
glis
h
Setting the Daily Timer ............................................................................................................ 22Setting the SLEEP Timer ......................................................................................................... 25Timer Priority........................................................................................................................... 25
Troubleshooting............................................................................................... 26Care And Maintenance .................................................................................... 27Specifications................................................................................................... 28
FS-X1-3(C)_E.book Page 2 Thursday, March 27, 2003 1:43 PM
3
En
glis
hIntroductionThank you for purchasing the JVC Compact Component System.We hope it will be a valued addition to your home, giving you years of enjoyment.Be sure to read this instruction manual carefully before operating your new stereo system.In it you will find all the information you need to set up and use the system.If you have a query that is not answered by the manual, please contact your dealer.
Features
Here are some of the things that make your System both powerful and simple to use. The controls and operations have been redesigned to make them very easy to use, freeing you to
just enjoy the music.• With JVC’s COMPU PLAY you can turn on the System and automatically start the Radio or
CD Player with a single touch. The System incorporates AHB (Active Hyper Bass) PRO circuitry to faithfully reproduce low
frequency sound. A 45-station preset capability (30 FM and 15 AM) in addition to auto-seek and manual tuning. CD options that include repeat, random and program play. Timer functions; Daily Timer and Sleep Timer. The Daily Timer can select one of 10 melodies as a source, in addition to
CD, FM, AM and LINE. You can connect various external units, such as an MD recorder. The system can play CD-R and CD-RW after they have been finalized. You can play back your original CD-R or CD-RW recorded in Music CD format. (However they may not be played back
depending on their characteristics or recording conditions.)
How This Manual Is Organized
• Basic information that is the same for many different functions - e.g. setting the volume - is given in the section ‘Basic Operations’, and not repeated under each function.
• The names of buttons/controls and display messages are written in all capital letters: e.g. FM/AM, “CD NO DISC”.• System functions are written with an initial capital letter only: e.g. Normal Play.
Use the table of contents to look up specific information you require.We have enjoyed making this manual for you, and hope it serves you in enjoying the many features built into your System.
WARNINGS
• DO NOT PUT ANYTHING ON THE CD DOOR. IF THE SYSTEM IS OPERATED WITH SOMETHING PUT ON THE CD DOOR, IT WILL BE DAMAGED WHEN YOU TRY TO OPEN THE CD DOOR.
• NEVER REMOVE THE CD DOOR FROM THE UNIT. SERIOUS INJURY MAY OCCUR IF THE SYSTEM IS OPERATED WITHOUT THE CD DOOR.
IMPORTANT CAUTIONS
1 Installation of the System• Select a place which is level, dry and neither too hot nor too cold. (Between 5°C and 35°C or 41°F and 95°F.)• Leave sufficient distance between the System and a TV.• Do not use the System in a place subject to vibrations.
2 Power cord• Do not handle the power cord with wet hands!• Some power is always consumed as long as the power cord is connected to the wall outlet.• When unplugging the System from the wall outlet, always pull the plug, not the power cord.
3 Malfunctions, etc.• There are no users serviceable parts inside. In case of system failure, unplug the power cord and consult your dealer.• Do not insert any metallic object into the System.• Do not insert your hand between the CD door and the main body when the CD door is being closed.
FS-X1-3(C)_E.book Page 3 Thursday, March 27, 2003 1:43 PM

4
En
glis
h Getting StartedAccessories
Make sure that you have all of the following items, which are supplied with the System.
FM Wire Antenna (1)AM Loop Antenna (1)Remote Control (1)Batteries (2)Speaker Cords (2)
If any of these items are missing, contact your dealer immediately.
How To Put Batteries In the Remote Control
Match the polarity (+ and –) on the batteries with the + and – markings in the battery compartment.
CAUTION:• Handle batteries properly.
To avoid battery leakage or explosion:• Remove batteries when the Remote Control will not be used for a long time.• When you need to replace the batteries, replace both batteries at the same time with new ones.• Do not use an old battery with a new one.• Do not use different types of batteries together.
Using the Remote Control
The Remote Control makes it easy to use many of the functions of the System from a distance of up to 7m away. You need to point the Remote Control at the remote sensor on the System’s front panel.
R6P(SUM-3)/AA(15F)
Remote Sensor
FS-X1-3(C)_E.book Page 4 Thursday, March 27, 2003 1:43 PM
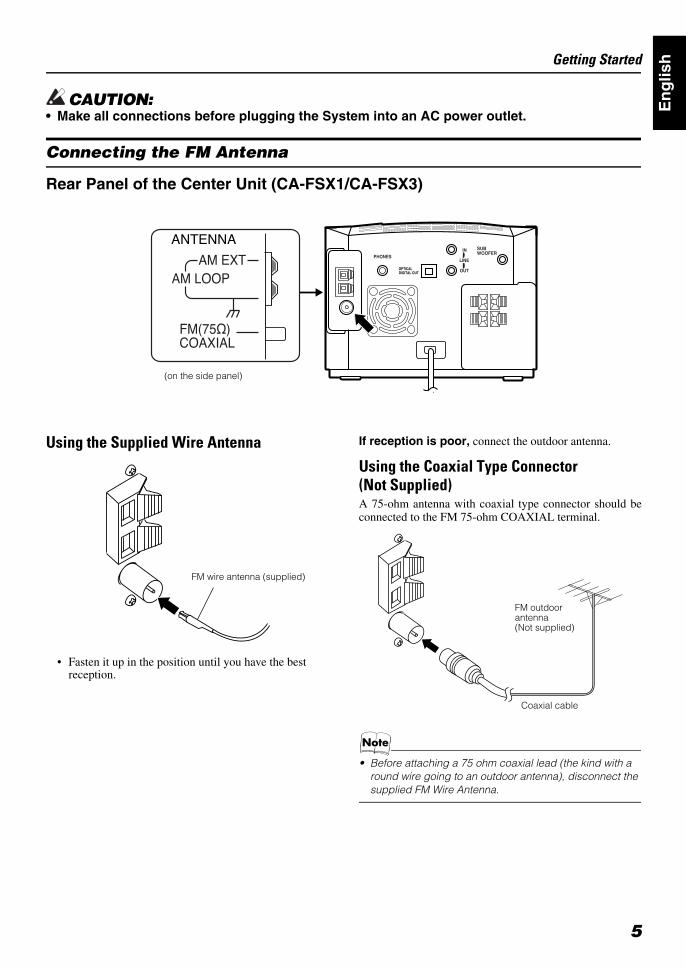
5
Getting Started
En
glis
h
CAUTION:• Make all connections before plugging the System into an AC power outlet.
Connecting the FM Antenna
Rear Panel of the Center Unit (CA-FSX1/CA-FSX3)
Using the Supplied Wire Antenna
• Fasten it up in the position until you have the best reception.
If reception is poor, connect the outdoor antenna.
Using the Coaxial Type Connector (Not Supplied)A 75-ohm antenna with coaxial type connector should beconnected to the FM 75-ohm COAXIAL terminal.
• Before attaching a 75 ohm coaxial lead (the kind with a round wire going to an outdoor antenna), disconnect the supplied FM Wire Antenna.
(on the side panel)
FM wire antenna (supplied)
Coaxial cable
FM outdoor antenna (Not supplied)
FS-X1-3(C)_E.book Page 5 Thursday, March 27, 2003 1:43 PM
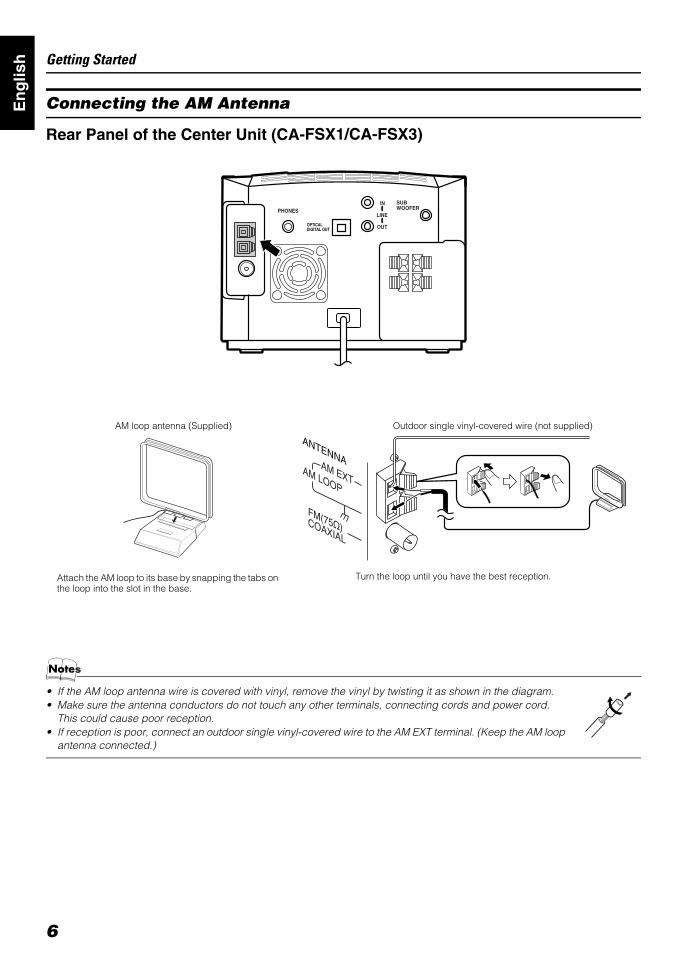
6
Getting Started
En
glis
h
Connecting the AM Antenna
Rear Panel of the Center Unit (CA-FSX1/CA-FSX3)
• If the AM loop antenna wire is covered with vinyl, remove the vinyl by twisting it as shown in the diagram.• Make sure the antenna conductors do not touch any other terminals, connecting cords and power cord.
This could cause poor reception.• If reception is poor, connect an outdoor single vinyl-covered wire to the AM EXT terminal. (Keep the AM loop
antenna connected.)
Attach the AM loop to its base by snapping the tabs on the loop into the slot in the base.
AM loop antenna (Supplied)
Turn the loop until you have the best reception.
Outdoor single vinyl-covered wire (not supplied)
FS-X1-3(C)_E.book Page 6 Thursday, March 27, 2003 1:43 PM

7
Getting Started
En
glis
h
Connecting the Speakers (SP-FSX1/SP-FSX3)These speakers are exclusively for this system. Using with other devices will damage the speakers.Connect the speaker cords between the speaker terminals of the Unit and those of the Speakers.
• When inserting the speaker wire lead, open the speaker terminal.• Connect the black cord to the ( - ) terminal and the cord without a black line to the (+) terminal.
• Since both speakers are the same, you can put either one to the right or left side.• Do not connect other speakers to the Unit. The difference of the load impedance causes failures.• Do not use the supplied speakers in parallel with other speakers.
CAUTION:• A TV may display irregular colors if located near the speakers. If this happens, set the speak-
ers away from the TV.
BLACK
BLACKBLACK
BLACK
Right side (rear view) Left side (rear view)
BLACK
BLACK BLACK
BLACK
(on the side panel)
SPEAKER terminal description
(on the side panel)
SPEAKER terminal description
SP-FSX1
SP-FSX3
SP-FSX1
SP-FSX3
FS-X1-3(C)_E.book Page 7 Thursday, March 27, 2003 1:43 PM

8
Getting Started
En
glis
h
Removing the Speaker Grills (SP-FSX1)
The speaker grills can be removed.
When removing:1. Pull the bottom towards you with your fingers.2. Also pull the top towards you.
When attaching the speaker grills:Attach the speaker grills as shown in the diagram.
Connecting a Powered Subwoofer
Connect a signal cord (not supplied) between the System’s SUBWOOFER terminal and the input terminal of an external sub-woofer. (For the details of connection, please refer to the user’s manual of the external equipment.)
Connecting an External Equipment
Connect signal cords (not supplied) between the System’s LINE IN/OUT terminals and the output/input terminals of the ex-ternal MD recorder, tape deck, etc. (For the details of connection, please refer to the user’s manual of the external equipment.)You can then listen to the external source through the System or record the System’s CD player or tuner to the external unit.
Signal cord (not supplied)
Subwoofer (not supplied)
Signal cord (not supplied)
MD recorder or tape deck (not supplied)
Pin-plug x 2
Pin-plug x 2Signal cord (not supplied)
STEREO mini plug
STEREO mini plug
FS-X1-3(C)_E.book Page 8 Thursday, March 27, 2003 1:43 PM
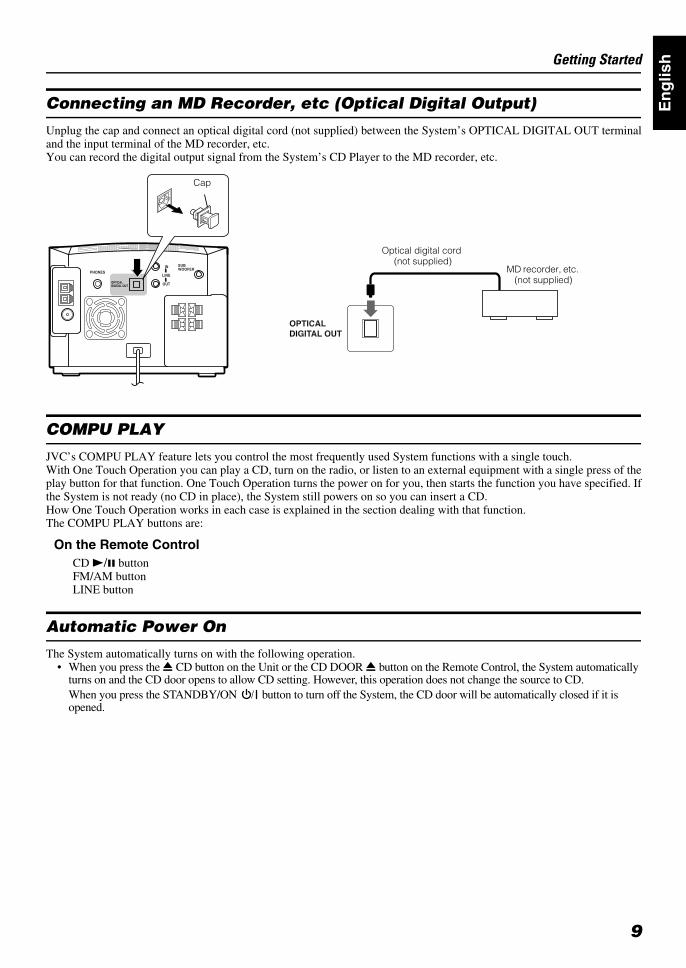
9
Getting Started
En
glis
h
Connecting an MD Recorder, etc (Optical Digital Output)
Unplug the cap and connect an optical digital cord (not supplied) between the System’s OPTICAL DIGITAL OUT terminaland the input terminal of the MD recorder, etc.You can record the digital output signal from the System’s CD Player to the MD recorder, etc.
COMPU PLAY
JVC’s COMPU PLAY feature lets you control the most frequently used System functions with a single touch.With One Touch Operation you can play a CD, turn on the radio, or listen to an external equipment with a single press of theplay button for that function. One Touch Operation turns the power on for you, then starts the function you have specified. Ifthe System is not ready (no CD in place), the System still powers on so you can insert a CD.How One Touch Operation works in each case is explained in the section dealing with that function.The COMPU PLAY buttons are:
Automatic Power On
The System automatically turns on with the following operation.• When you press the 0 CD button on the Unit or the CD DOOR 0 button on the Remote Control, the System automatically
turns on and the CD door opens to allow CD setting. However, this operation does not change the source to CD.When you press the STANDBY/ON button to turn off the System, the CD door will be automatically closed if it is opened.
On the Remote ControlCD 3/8 buttonFM/AM buttonLINE button
MD recorder, etc. (not supplied)
Optical digital cord (not supplied)
Cap
FS-X1-3(C)_E.book Page 9 Thursday, March 27, 2003 1:43 PM

10
En
glis
h Basic Operations
Turning the Power On and Off
Turning the System On Press the STANDBY/ON button.The display comes on and “HELLO” is displayed once. TheSTANDBY/ON indicator lights in green.The System comes on ready to continue in the mode it wasin when the power was last turned off.
For example, if the last thing you were doing was listen-ing to a CD, you are now ready to listen to a CD again. If you wish, you can change to another source.
If you were listening to the Tuner last, the Tuner comes on playing the station it was last set to.
Turning the System OffPress the STANDBY/ON button again.“SEE YOU” is displayed and the display goes out, except forthe clock display. The STANDBY/ON indicator lights in red.
Some power is always consumed even though power is turned off (called Standby Mode).
To switch off the System completely, unplug the AC power cord from the wall outlet. When you unplug the AC power cord, the clock will be reset to AM 12:00.
Changing the Source
The System has four sound sources, CD, FM, AM andLINE. Select one of sources you want to listen. For example, when you want to listen to the CD, select thesource “CD”.
On the UnitTurn the Source selector to select the source you want.Each time you turn it clockwise or counterclockwise, thesource changes as follows.CD Ô FM Ô AM Ô LINEThe selected source name will appear on the display and theSource indicator on the Unit will light up.
On the Remote Control:Press the CD 6 button to select the source “CD”.You can listen to the CD. If a CD is inserted, the CDwill be played back.
:Press the FM/AM button to select the source “FM” or“AM”.You can listen to the FM or AM broadcast.
:Press the LINE button to select the source “LINE”.You can listen to the music through external equip-ment.
DIMMERA.P. off
VOLUME +,_
STANDBY/ON
FADE MUTING
DISPLAY
STANDBY/ON indicator
PHONES
BASS/TREBLE
CD lamp(Inside)
AHB PRO
Display
STANDBY/ON
AHB PRO
VOLUME +,_
LINEFM/AM
CD 6
Source indicator
Source selector
CD
FM / AM
LINE
FS-X1-3(C)_E.book Page 10 Thursday, March 27, 2003 1:43 PM

11
Basic Operations
En
glis
h
Adjusting the Brightness (DIMMER - at Power On)
You can adjust the brightness of the display.
When the System is Turned OnAt power on, each time you press the DIMMER button onthe Remote Control, the brightness changes as follows:DIMMER OFF = DIMMER 1 = DIMMER 2 = (back tothe beginning)
DIMMER OFF: BrightDIMMER 1 : Dark (CD lamp also becomes dark.)DIMMER 2 : Darker (CD lamp goes out.)
Power Saving Mode (DIMMER - at Power Off)
In power saving mode, you can save the power while theSystem is turned off (Standby Mode).Each time you press the DIMMER button on the RemoteControl at power off, the display alternates as follows.
DISPLAY ON Ô DISPLAY OFF
To enable Power Saving mode, set to “DISPLAYOFF”.The display completely turns off to save the power.To restore normal power mode, reset to “DISPLAY ON”.The Clock indicator ( ) and the clock appear on the display.
Adjusting the Volume
Turn the VOLUME control on the Unit clockwise to in-crease the volume or turn it counterclockwise to decreasethe volume.Press the VOLUME + button on the Remote Control to in-crease the volume or press the VOLUME _ button on theRemote Control to decrease the volume.
You can adjust the volume level between 0 and 50.
For private listeningConnect a pair of headphones to the PHONES jack. Nosound comes out of the speakers.Be sure to turn down the volume before connecting or put-ting on headphones.
CAUTION:• DO NOT turn off the System with the volu-
me set to an extremely high level; otherwi-se a sudden blast of sound could damage your hearing, speakers and/or headphones when you turn on the System or start play-ing any source next time.REMEMBER you cannot adjust the volume level while the System is in standby mode.
Fade-out Muting (FADE MUTING)
You can mute the output with one touch operation.
To mute the output, press the FADE MUTING buttonon the Remote Control. Then, “FADE MUTING” blinksand the output will be faded out and becomes 0.
To release muting, press the FADE MUTING button onceagain. Then, the output will be faded in to the original level.
• Adjusting the volume causes the muting process (fading out to 0) to release.
• If you use the AHB PRO button or the BASS/TREBLE but-ton during muting, the FADE MUTING button does not work to release muting. In this case, turn the VOLUME control on the Unit or the VOLUME+/ _ button on the Re-mote Control to newly set the volume.
Reinforcing the Bass Sound (Active Hyper Bass Pro.)
You can reinforce the bass sound to maintain rich, full bass atlow volume. (This effect does not apply to the headphones.)
To get the effect, press the AHB PRO button on the Unitor the Remote Control.“AHB PRO ON” appears and the “BASS” indicator lights up.To cancel the effect, press the AHB PRO button again.“AHB PRO OFF” appears and the “BASS” indicator goes out.
FS-X1-3(C)_E.book Page 11 Thursday, March 27, 2003 1:43 PM
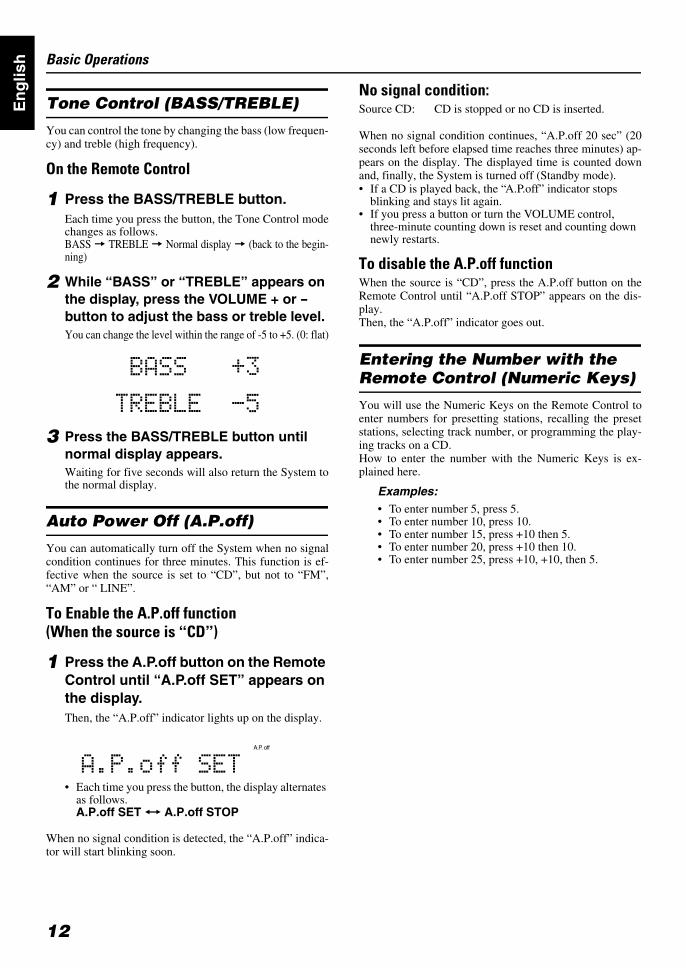
12
Basic Operations
En
glis
h
Tone Control (BASS/TREBLE)
You can control the tone by changing the bass (low frequen-cy) and treble (high frequency).
On the Remote Control
1 Press the BASS/TREBLE button.Each time you press the button, the Tone Control modechanges as follows.BASS = TREBLE = Normal display = (back to the begin-ning)
2 While “BASS” or “TREBLE” appears on the display, press the VOLUME + or - button to adjust the bass or treble level. You can change the level within the range of -5 to +5. (0: flat)
3 Press the BASS/TREBLE button until normal display appears.Waiting for five seconds will also return the System tothe normal display.
Auto Power Off (A.P.off)
You can automatically turn off the System when no signalcondition continues for three minutes. This function is ef-fective when the source is set to “CD”, but not to “FM”,“AM” or “ LINE”.
To Enable the A.P.off function (When the source is “CD”)
1 Press the A.P.off button on the Remote Control until “A.P.off SET” appears on the display.Then, the “A.P.off” indicator lights up on the display.
• Each time you press the button, the display alternates as follows.A.P.off SET Ô A.P.off STOP
When no signal condition is detected, the “A.P.off” indica-tor will start blinking soon.
No signal condition:Source CD: CD is stopped or no CD is inserted.
When no signal condition continues, “A.P.off 20 sec” (20seconds left before elapsed time reaches three minutes) ap-pears on the display. The displayed time is counted downand, finally, the System is turned off (Standby mode).• If a CD is played back, the “A.P.off” indicator stops
blinking and stays lit again.• If you press a button or turn the VOLUME control,
three-minute counting down is reset and counting down newly restarts.
To disable the A.P.off functionWhen the source is “CD”, press the A.P.off button on theRemote Control until “A.P.off STOP” appears on the dis-play.Then, the “A.P.off” indicator goes out.
Entering the Number with the Remote Control (Numeric Keys)
You will use the Numeric Keys on the Remote Control toenter numbers for presetting stations, recalling the presetstations, selecting track number, or programming the play-ing tracks on a CD.How to enter the number with the Numeric Keys is ex-plained here.
Examples:• To enter number 5, press 5.• To enter number 10, press 10.• To enter number 15, press +10 then 5.• To enter number 20, press +10 then 10.• To enter number 25, press +10, +10, then 5.
FS-X1-3(C)_E.book Page 12 Thursday, March 27, 2003 1:43 PM
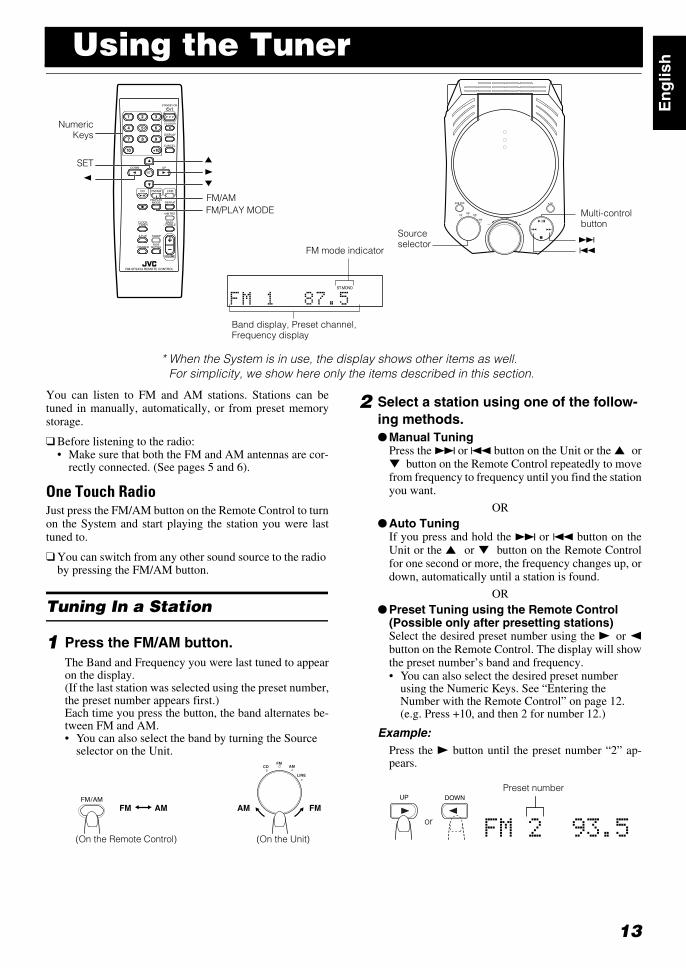
13
En
glis
hUsing the Tuner
You can listen to FM and AM stations. Stations can betuned in manually, automatically, or from preset memorystorage.
Before listening to the radio:• Make sure that both the FM and AM antennas are cor-
rectly connected. (See pages 5 and 6).
One Touch Radio Just press the FM/AM button on the Remote Control to turnon the System and start playing the station you were lasttuned to.
You can switch from any other sound source to the radio by pressing the FM/AM button.
Tuning In a Station
1 Press the FM/AM button.The Band and Frequency you were last tuned to appearon the display.(If the last station was selected using the preset number,the preset number appears first.)Each time you press the button, the band alternates be-tween FM and AM.• You can also select the band by turning the Source
selector on the Unit.
2 Select a station using one of the follow-ing methods. Manual Tuning
Press the ¢ or 4 button on the Unit or the 5 or∞ button on the Remote Control repeatedly to movefrom frequency to frequency until you find the stationyou want.
OR Auto Tuning
If you press and hold the ¢ or 4 button on theUnit or the 5 or ∞ button on the Remote Controlfor one second or more, the frequency changes up, ordown, automatically until a station is found.
OR Preset Tuning using the Remote Control
(Possible only after presetting stations)Select the desired preset number using the 3 or 2button on the Remote Control. The display will showthe preset number’s band and frequency.• You can also select the desired preset number
using the Numeric Keys. See “Entering the Number with the Remote Control” on page 12. (e.g. Press +10, and then 2 for number 12.)
Example:Press the 3 button until the preset number “2” ap-pears.
5
2
FM/AM
Multi-control button
* When the System is in use, the display shows other items as well.For simplicity, we show here only the items described in this section.
SET
FM/PLAY MODE
3
∞
FM mode indicator
Band display, Preset channel, Frequency display
NumericKeys
Source selector ¢
4
(On the Remote Control) (On the Unit)
DOWNUP
3
3
Preset number
or
FS-X1-3(C)_E.book Page 13 Thursday, March 27, 2003 1:43 PM
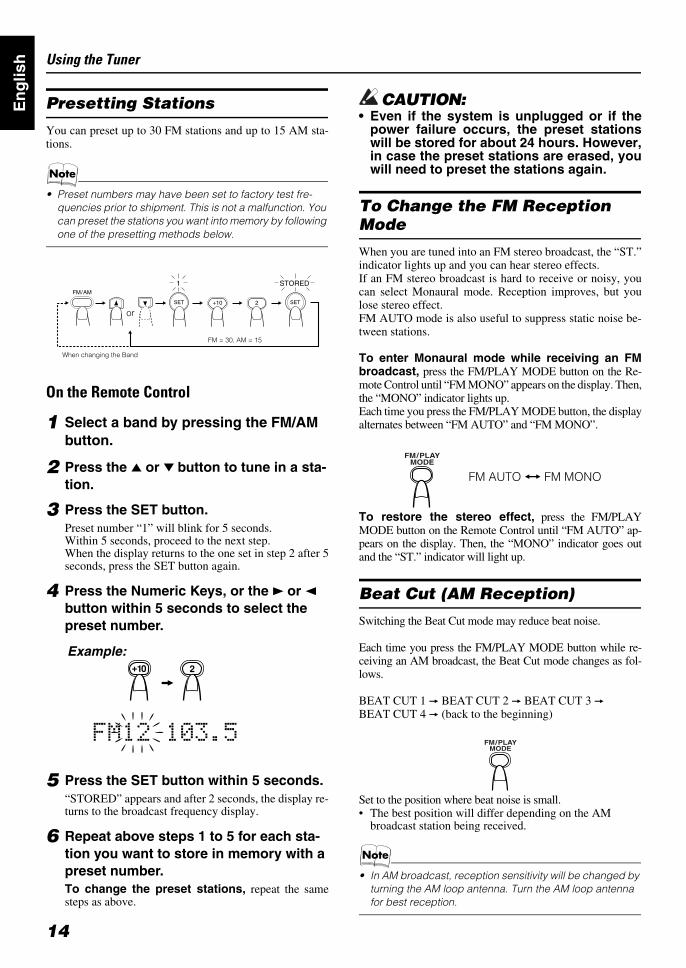
14
Using the Tuner
En
glis
h
Presetting Stations
You can preset up to 30 FM stations and up to 15 AM sta-tions.
• Preset numbers may have been set to factory test fre-quencies prior to shipment. This is not a malfunction. You can preset the stations you want into memory by following one of the presetting methods below.
On the Remote Control
1 Select a band by pressing the FM/AM button.
2 Press the 5 or ∞ button to tune in a sta-tion.
3 Press the SET button.Preset number “1” will blink for 5 seconds.Within 5 seconds, proceed to the next step.When the display returns to the one set in step 2 after 5seconds, press the SET button again.
4 Press the Numeric Keys, or the 3 or 2 button within 5 seconds to select the preset number.
5 Press the SET button within 5 seconds.“STORED” appears and after 2 seconds, the display re-turns to the broadcast frequency display.
6 Repeat above steps 1 to 5 for each sta-tion you want to store in memory with a preset number.To change the preset stations, repeat the samesteps as above.
CAUTION:• Even if the system is unplugged or if the
power failure occurs, the preset stationswill be stored for about 24 hours. However,in case the preset stations are erased, youwill need to preset the stations again.
To Change the FM Reception Mode
When you are tuned into an FM stereo broadcast, the “ST.”indicator lights up and you can hear stereo effects.If an FM stereo broadcast is hard to receive or noisy, youcan select Monaural mode. Reception improves, but youlose stereo effect.FM AUTO mode is also useful to suppress static noise be-tween stations.
To enter Monaural mode while receiving an FMbroadcast, press the FM/PLAY MODE button on the Re-mote Control until “FM MONO” appears on the display. Then,the “MONO” indicator lights up.Each time you press the FM/PLAY MODE button, the displayalternates between “FM AUTO” and “FM MONO”.
To restore the stereo effect, press the FM/PLAYMODE button on the Remote Control until “FM AUTO” ap-pears on the display. Then, the “MONO” indicator goes outand the “ST.” indicator will light up.
Beat Cut (AM Reception)
Switching the Beat Cut mode may reduce beat noise.
Each time you press the FM/PLAY MODE button while re-ceiving an AM broadcast, the Beat Cut mode changes as fol-lows.
BEAT CUT 1 = BEAT CUT 2 = BEAT CUT 3 = BEAT CUT 4 = (back to the beginning)
Set to the position where beat noise is small.• The best position will differ depending on the AM
broadcast station being received.
• In AM broadcast, reception sensitivity will be changed by turning the AM loop antenna. Turn the AM loop antenna for best reception.
SET +10
1 STORED
2 SET
FM / AM
When changing the Band
FM = 30, AM = 15
or
FM/PLAYMODE
FM AUTO Ô FM MONO
FM/PLAYMODE
Example:
FS-X1-3(C)_E.book Page 14 Thursday, March 27, 2003 1:43 PM
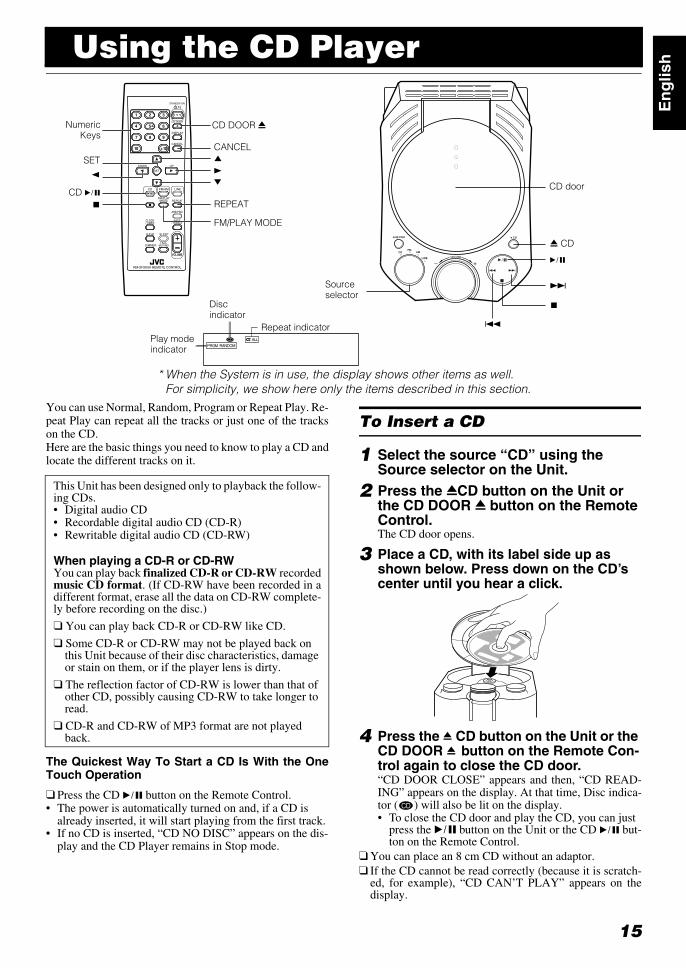
15
En
glis
hUsing the CD Player
You can use Normal, Random, Program or Repeat Play. Re-peat Play can repeat all the tracks or just one of the trackson the CD.Here are the basic things you need to know to play a CD andlocate the different tracks on it.
This Unit has been designed only to playback the follow-ing CDs.• Digital audio CD• Recordable digital audio CD (CD-R)• Rewritable digital audio CD (CD-RW)
When playing a CD-R or CD-RWYou can play back finalized CD-R or CD-RW recordedmusic CD format. (If CD-RW have been recorded in adifferent format, erase all the data on CD-RW complete-ly before recording on the disc.)
You can play back CD-R or CD-RW like CD.
Some CD-R or CD-RW may not be played back on this Unit because of their disc characteristics, damage or stain on them, or if the player lens is dirty.
The reflection factor of CD-RW is lower than that of other CD, possibly causing CD-RW to take longer to read.
CD-R and CD-RW of MP3 format are not played back.
The Quickest Way To Start a CD Is With the OneTouch Operation
Press the CD 6 button on the Remote Control.• The power is automatically turned on and, if a CD is
already inserted, it will start playing from the first track. • If no CD is inserted, “CD NO DISC” appears on the dis-
play and the CD Player remains in Stop mode.
To Insert a CD
1 Select the source “CD” using the Source selector on the Unit.
2 Press the 0CD button on the Unit or the CD DOOR 0 button on the Remote Control.The CD door opens.
3 Place a CD, with its label side up as shown below. Press down on the CD’s center until you hear a click.
4 Press the 0 CD button on the Unit or the CD DOOR 0 button on the Remote Con-trol again to close the CD door.“CD DOOR CLOSE” appears and then, “CD READ-ING” appears on the display. At that time, Disc indica-tor ( ) will also be lit on the display.• To close the CD door and play the CD, you can just
press the 6 button on the Unit or the CD 6 but-ton on the Remote Control.
You can place an 8 cm CD without an adaptor. If the CD cannot be read correctly (because it is scratch-
ed, for example), “CD CAN’T PLAY” appears on thedisplay.
Sourceselector
0 CD
SET
2
NumericKeys
REPEAT
5
∞
CD 6
3
CD DOOR 0
* When the System is in use, the display shows other items as well.For simplicity, we show here only the items described in this section.
¢
7
6
CD door
CANCEL
Disc indicator
Play mode indicator
4
7
Repeat indicator
FM/PLAY MODE
FS-X1-3(C)_E.book Page 15 Thursday, March 27, 2003 1:43 PM

16
Using the CD Player
En
glis
h
You can insert a CD while listening to the other source.• However, while the CD door is operating (opening or
closing), the other source will be muted.
CAUTION:• DO NOT try to open or close the CD door by
hands as it will be damaged.
To Unload a CD
Take out the CD as shown below.
Basics of Using the CD Player – Normal Play
To Play a CD
1 Select the source “CD”.
2 Insert a CD.
3 Press the 6 button on the Unit or the CD 6 button on the Remote Control.The first track of the CD begins playing.
• The CD Player automatically stops when the last track of the CD has finished playing.
To stop playing the CD, press the 7 button.The following information for the CD is displayed.
To stop playing and remove the CD, press the 0CDbutton on the Unit or the CD DOOR 0 button on the Re-mote Control to open the CD door.To pause, press the 6 button on the Unit or the CD 6button on the Remote Control. The playback time blinks onthe display.To cancel pause, press the same button again. Play con-tinues from the point where it was paused.
To Select a Track or Passage within a Track During playbackPress the 4 or ¢ button on the Unit or the 3 or 2 but-ton on the Remote Control to select the track you want.
• The selected track starts playing.• Press the ¢ (or 3) button once to skip to the
beginning of the next track.• Press the 4 (or 2) button to skip to the beginning
of the track being played. Press twice quickly to skip to the beginning of the previous track.
• When the 3 or 2 button on the Remote Control is kept pressing, the track continuously skips.
• Press the Numeric Keys to select truck number (See page 12).
In Stop mode• Press the ¢ or 4 (or 3 or 2) button to skip the
track.• Hold down the ¢ or 4 (or 3 or 2 ) button to
continuously skip the tracks.
Search PlayHolding down the ¢ or 4 button on the Unit or the 5or ∞ button on the Remote Control, during playback, willfast forward/backwards the CD so you can quickly find aparticular passage in the track you are listening to.
Programming the Playing Order of the Tracks – Program Play
You can program up to 32 tracks in any desired order in-cluding the same tracks.
You can only make a program when the CD Player is stopped.
On the Remote Control
1 Insert a CD.
2 Press the CD 6 button.
3 Press the 7 button to stop the CD.
4 Press the FM/PLAY MODE button until “CD PROGRAM” appears.The System enters the Program Play mode and the“PRGM” indicator lights up.Each time you press the button, the play mode changesas follows.CD PROGRAM=CD RANDOM=CD NORMAL=(back to the beginning)
• If already programmed, the track number and preset number of the last programmed track will appear.
Track number Playback time
Total track number Total playback time
(After a few seconds)
FS-X1-3(C)_E.book Page 16 Thursday, March 27, 2003 1:43 PM
17
Using the CD Player
En
glis
h
5 Press the Numeric Keys to enter the track number you want to program (See page 12).The program order number will be assigned from “1”, ifnothing is programmed yet.Example:
• To delete the last entry, press the CANCEL button.
6 Repeat step 5 to program the other tracks.You can see the total playback time of programmedtracks on the display.
7 Press the CD 6 button.The System plays the tracks in the order you have pro-grammed them.
The CD will stop when all of the programmed trackshave been finished playing.• You can also press the 6 button on the Unit.
You can skip to a particular program track by pressing the 3 or 2 button on the Remote Control or the ¢ or 4 button on the Unit during Program Play.
You can perform search play by holding down the ¢ or 4 button on the Unit or the 5 or ∞ button on the Re-mote Control during playback.
To stop playing, press the 7 button once.
To confirm the programmed tracks while the CDplayer is stopped, each time you press the 3 or 2 but-ton, the tracks making up the program will successively bedisplayed in the programmed order.To delete all the tracks in the program, in Stop mode,hold down the CANCEL button until “ALL CLEAR!” ap-pears on the display.Opening the CD door or turning off the System will clearthe programmed tracks and release the Program Play mode.To exit the Program Play mode once, while the CDPlayer is stopped, press the FM/PLAY MODE button until“CD NORMAL” appears on the display. (The “PRGM” in-dicator goes out.)To re-enter the Program Play mode, press the FM/PLAY MODE button until “CD PROGRAM” appears onthe display. (The “PRGM” indicator lights up.)
• If the total playback time of the programmed tracks ex-ceeds 1 hour and 40 minutes, “--:--” will appear on the dis-play.
• If you try to program the 33rd track, “MEMORY FULL” ap-pears on the display for about 2 seconds.
To Modify the ProgramModify the contents of the program while the CD Player isstopped.Each time you press the CANCEL button, the last track inthe program is deleted. To add new tracks to the end of theprogram, repeat above step 5.
Random Play
The tracks will play in no special order when you use thismode.
1 In Stop mode, press the FM/PLAY MODE button on the Remote Control until “CD RANDOM” appears.The “RANDOM” indicator lights up on the display.Each time you press the button, the play mode changesas follows.CD PROGRAM = CD RANDOM = CD NORMAL= (back to the beginning)
2 Press the CD 6 button on the Remote Control.The tracks are played in random order.The CD will stop when all the tracks have been finishedplaying.• You can also press the 6 button on the Unit.
To skip a track during playback, press the ¢ (or 3)button to jump to the next track in the random sequence.Press the 4 (or 2) button to jump back to the start of atrack being played.To perform search play during playback, hold downthe ¢ (or 5) or the 4 (or ∞) button.To exit the Random Play mode, while the CD Playeris stopped, press the FM/PLAY MODE button until “CDNORMAL” appears on the display. (The “RANDOM” in-dicator goes out.)
(After a few seconds)
Program order numberTrack number
Total playback time of the programmed tracks
FS-X1-3(C)_E.book Page 17 Thursday, March 27, 2003 1:43 PM
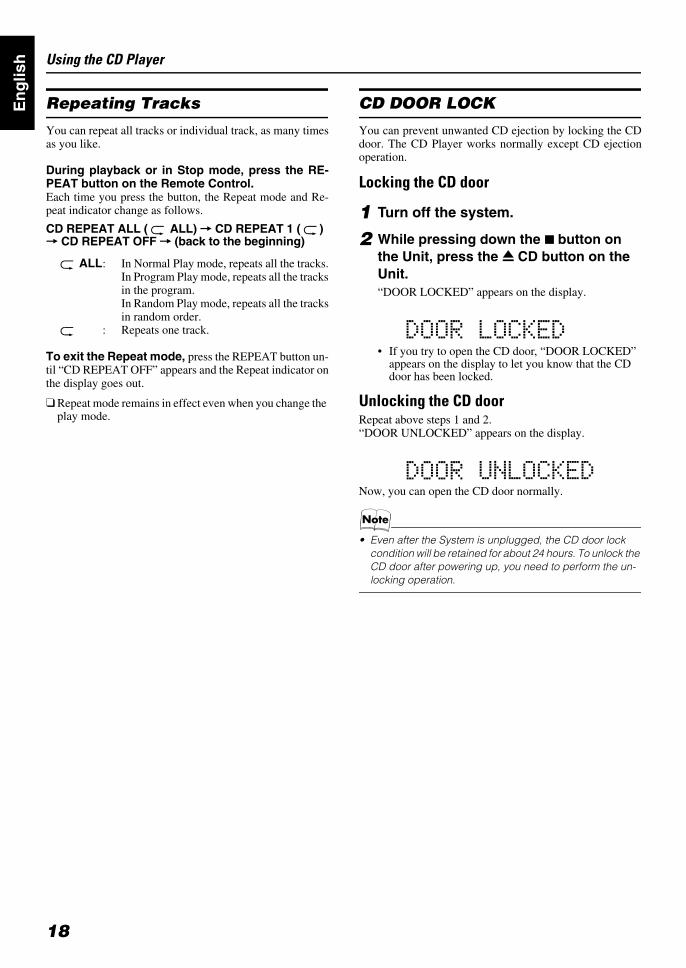
18
Using the CD Player
En
glis
h
Repeating Tracks
You can repeat all tracks or individual track, as many timesas you like.
During playback or in Stop mode, press the RE-PEAT button on the Remote Control.Each time you press the button, the Repeat mode and Re-peat indicator change as follows.
CD REPEAT ALL ( ALL) = CD REPEAT 1 ( ) = CD REPEAT OFF = (back to the beginning)
ALL: In Normal Play mode, repeats all the tracks.In Program Play mode, repeats all the tracksin the program.In Random Play mode, repeats all the tracksin random order.
: Repeats one track.
To exit the Repeat mode, press the REPEAT button un-til “CD REPEAT OFF” appears and the Repeat indicator onthe display goes out.
Repeat mode remains in effect even when you change the play mode.
CD DOOR LOCK
You can prevent unwanted CD ejection by locking the CDdoor. The CD Player works normally except CD ejectionoperation.
Locking the CD door
1 Turn off the system.
2 While pressing down the 7 button on the Unit, press the 0 CD button on the Unit. “DOOR LOCKED” appears on the display.
• If you try to open the CD door, “DOOR LOCKED” appears on the display to let you know that the CD door has been locked.
Unlocking the CD doorRepeat above steps 1 and 2. “DOOR UNLOCKED” appears on the display.
Now, you can open the CD door normally.
• Even after the System is unplugged, the CD door lock condition will be retained for about 24 hours. To unlock the CD door after powering up, you need to perform the un-locking operation.
FS-X1-3(C)_E.book Page 18 Thursday, March 27, 2003 1:43 PM
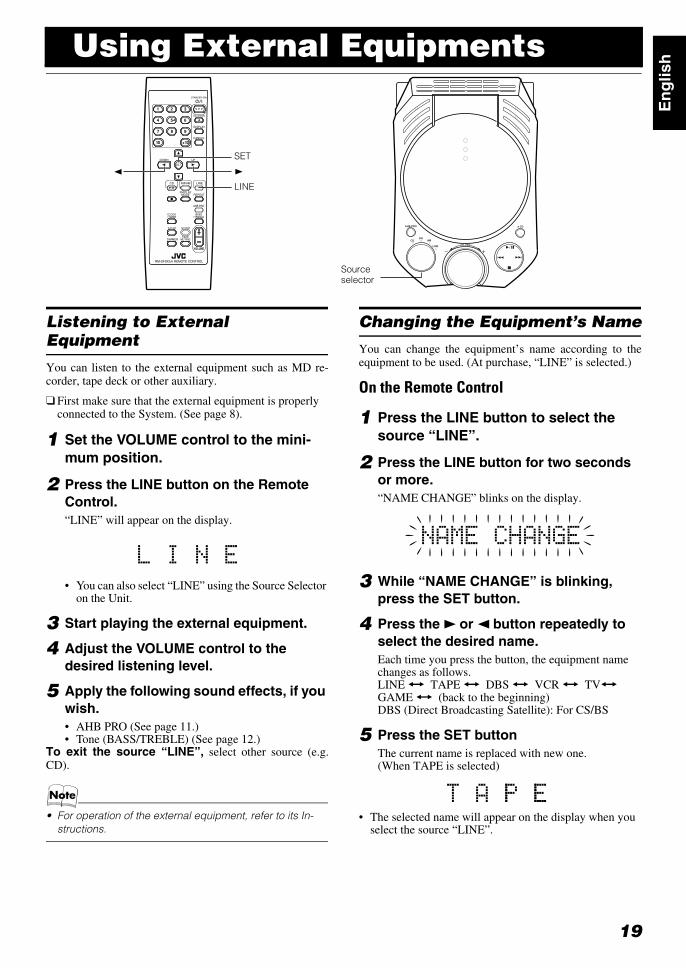
19
En
glis
hUsing External Equipments
Listening to External Equipment
You can listen to the external equipment such as MD re-corder, tape deck or other auxiliary.
First make sure that the external equipment is properly connected to the System. (See page 8).
1 Set the VOLUME control to the mini-mum position.
2 Press the LINE button on the Remote Control.“LINE” will appear on the display.
• You can also select “LINE” using the Source Selector on the Unit.
3 Start playing the external equipment.
4 Adjust the VOLUME control to the desired listening level.
5 Apply the following sound effects, if you wish.• AHB PRO (See page 11.)• Tone (BASS/TREBLE) (See page 12.)
To exit the source “LINE”, select other source (e.g.CD).
• For operation of the external equipment, refer to its In-structions.
Changing the Equipment’s Name
You can change the equipment’s name according to theequipment to be used. (At purchase, “LINE” is selected.)
On the Remote Control
1 Press the LINE button to select the source “LINE”.
2 Press the LINE button for two seconds or more. “NAME CHANGE” blinks on the display.
3 While “NAME CHANGE” is blinking, press the SET button.
4 Press the 3 or 2 button repeatedly to select the desired name. Each time you press the button, the equipment name changes as follows.LINE Ô TAPE Ô DBS Ô VCR Ô TVÔ
GAME Ô (back to the beginning)DBS (Direct Broadcasting Satellite): For CS/BS
5 Press the SET buttonThe current name is replaced with new one.(When TAPE is selected)
• The selected name will appear on the display when you select the source “LINE”.
Source selector
SET
2 3
LINE
FS-X1-3(C)_E.book Page 19 Thursday, March 27, 2003 1:43 PM
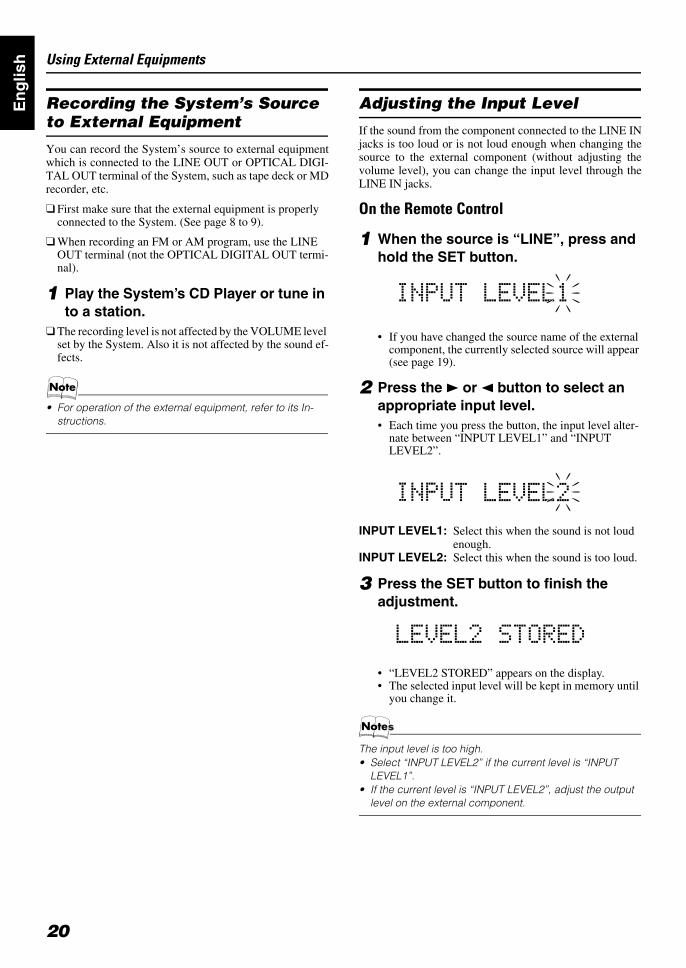
20
Using External Equipments
En
glis
h
Recording the System’s Source to External Equipment
You can record the System’s source to external equipmentwhich is connected to the LINE OUT or OPTICAL DIGI-TAL OUT terminal of the System, such as tape deck or MDrecorder, etc.
First make sure that the external equipment is properly connected to the System. (See page 8 to 9).
When recording an FM or AM program, use the LINE OUT terminal (not the OPTICAL DIGITAL OUT termi-nal).
1 Play the System’s CD Player or tune in to a station.
The recording level is not affected by the VOLUME level set by the System. Also it is not affected by the sound ef-fects.
• For operation of the external equipment, refer to its In-structions.
Adjusting the Input Level
If the sound from the component connected to the LINE INjacks is too loud or is not loud enough when changing thesource to the external component (without adjusting thevolume level), you can change the input level through theLINE IN jacks.
On the Remote Control
1 When the source is “LINE”, press and hold the SET button.
• If you have changed the source name of the external component, the currently selected source will appear (see page 19).
2 Press the 3 or 2 button to select an appropriate input level.• Each time you press the button, the input level alter-
nate between “INPUT LEVEL1” and “INPUT LEVEL2”.
INPUT LEVEL1: Select this when the sound is not loudenough.
INPUT LEVEL2: Select this when the sound is too loud.
3 Press the SET button to finish the adjustment.
• “LEVEL2 STORED” appears on the display.• The selected input level will be kept in memory until
you change it.
The input level is too high.• Select “INPUT LEVEL2” if the current level is “INPUT
LEVEL1”.• If the current level is “INPUT LEVEL2”, adjust the output
level on the external component.
FS-X1-3(C)_E.book Page 20 Thursday, March 27, 2003 1:43 PM

21
En
glis
hUsing the Timers
The timers let you control listening functions automatically. Two types of timers are available:
DAILY Timer Use this timer to set wake up everyday to music fromany source, including melodies. SLEEP TimerFall asleep and have your System turn off automaticallyafter a certain length of time.
Setting the Clock
When you plug the AC power cord into the wall outlet, thetime indication “AM12:00” and the Clock indicator ( )blink on the display in standby (System off) mode.You can set the clock whether the System is on or off (butnot in power saving mode (See page 11)).
• The clock must be correctly set for the timers to work.• The clock may gain or lose one to two minutes per month.
On the Remote Control
1 Press the CLOCK/TIMER button.The hour digit of the time indication blinks on the dis-play, also, the Clock indicator ( ) blinks.
• If the clock is already set and the Clock indicator ( ) is not blinking, press the CLOCK/TIMER button repeatedly until the clock setting display appears on the display.Each time you press the CLOCK/TIMER button, the dis-play changes as follows.DAILY ON?/DAILY OFF? = ON (time) = Clock setting display* = Cancelled = (back to the beginning)
*: Select this item!
2 Press the 3 or 2 button to set the hour.Pressing the 3 button moves the time forwards andpressing the 2 button moves it backwards. Holdingdown the button moves the hour.
* When the System is in use, the display shows other items as well.For simplicity, we show here only the items described in this section.
SLEEP
SET
SLEEP indicator
CLOCK/TIMER
DAILY indicatorClock indicator
32
CANCEL
STANDBY/ON
FS-X1-3(C)_E.book Page 21 Thursday, March 27, 2003 1:43 PM

22
Using the Timers
En
glis
h
3 Press the SET button.The minute digits of the time indication blink on the dis-play.• To return to the hour setting, press the CANCEL
button.
4 Press the 3 or 2 button to set the minute.
5 Press the SET button.“ADJUST OK!” appears on the display. The Clock in-dicator ( ) remains lit. Then, the selected time is setand the seconds start counting from 0.
CAUTION:• If there is a power failure, the clock loses its
setting. “AM12:00” and the Clock indicator( ) blinks on the display and the clockmust be reset.
Showing the Clock (DISPLAY)
You can show the current time on the display.
To display the clock, press the DISPLAY button on theRemote Control.To return to the normal display, press the same buttonagain.
Correcting the Clock
Use the following method to correct any clock shift.
You can correct the clock whether the System is turned on or off.
1 Repeatedly press the CLOCK/TIMER bu-tton to show the clock on the display.Each time you press the button, the display changes asfollows.
Example:
2 Perform steps 2 to 5 in “Setting the Clo-ck” on page 21-22.
• When the System is in power saving mode, nothing ap-pears on the display. To see the clock, press the DIMMER button on the Remote Control.
• The clock may gain or lose one to two minutes per month.• If there is a power failure, the clock loses its setting,
“AM12:00” blinks on the display and the clock must be re-set. To reset the clock, see “Setting the Clock” on page 21-22.
Setting the Daily Timer
Once you have set the Daily Timer, the timer will be acti-vated at the same time every day. The “DAILY” indicator on the display shows that the DailyTimer you have set is in effect.You can set the Daily Timer whether the System is on or off(but not in power saving mode (See page 11)).
• If you have made a mistake while setting the timer, press the CANCEL button on the Remote Control. However, this does not always cancel the current setting. If the CANCEL button does not work, press the CLOCK/TIMER button on the Remote Control repeatedly until the display returns to the original display, and start from the first step.
Alternates
(clock)
Display the source(clock is canceled)
FS-X1-3(C)_E.book Page 22 Thursday, March 27, 2003 1:43 PM
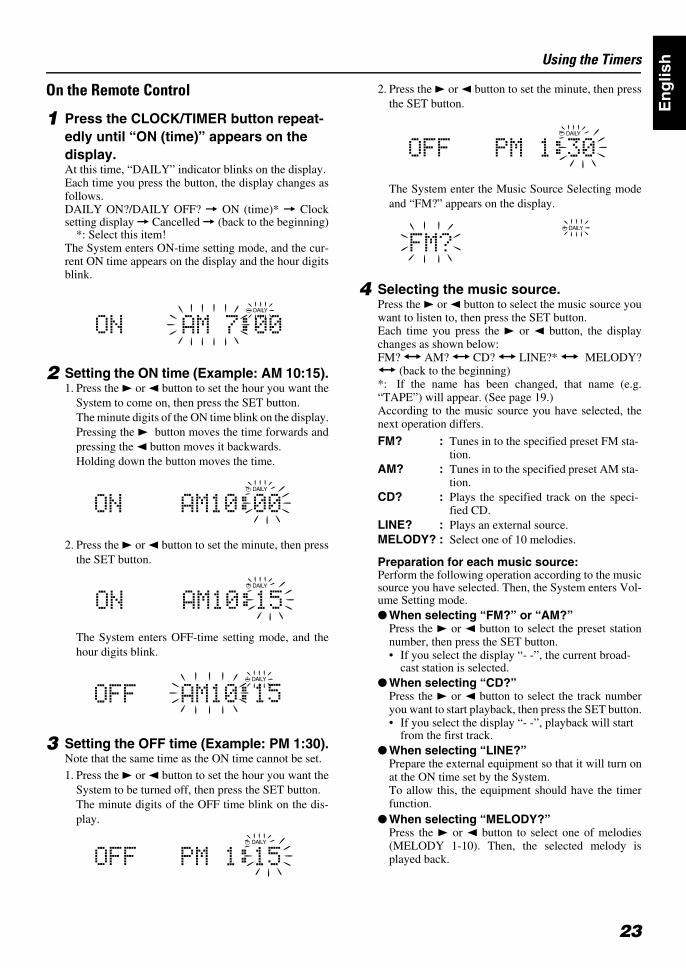
23
Using the Timers
En
glis
h
On the Remote Control
1 Press the CLOCK/TIMER button repeat-edly until “ON (time)” appears on the display.At this time, “DAILY” indicator blinks on the display.Each time you press the button, the display changes asfollows.DAILY ON?/DAILY OFF? = ON (time)* = Clocksetting display = Cancelled = (back to the beginning)
*: Select this item!The System enters ON-time setting mode, and the cur-rent ON time appears on the display and the hour digitsblink.
2 Setting the ON time (Example: AM 10:15).1. Press the 3 or 2 button to set the hour you want the
System to come on, then press the SET button. The minute digits of the ON time blink on the display.Pressing the 3 button moves the time forwards andpressing the 2 button moves it backwards. Holding down the button moves the time.
2. Press the 3 or 2 button to set the minute, then pressthe SET button.
The System enters OFF-time setting mode, and thehour digits blink.
3 Setting the OFF time (Example: PM 1:30).Note that the same time as the ON time cannot be set.1. Press the 3 or 2 button to set the hour you want the
System to be turned off, then press the SET button. The minute digits of the OFF time blink on the dis-play.
2. Press the 3 or 2 button to set the minute, then pressthe SET button.
The System enter the Music Source Selecting modeand “FM?” appears on the display.
4 Selecting the music source.Press the 3 or 2 button to select the music source youwant to listen to, then press the SET button.Each time you press the 3 or 2 button, the displaychanges as shown below:FM? Ô AM? Ô CD? Ô LINE?* Ô MELODY?Ô (back to the beginning)*: If the name has been changed, that name (e.g.“TAPE”) will appear. (See page 19.)According to the music source you have selected, thenext operation differs.
Preparation for each music source:Perform the following operation according to the musicsource you have selected. Then, the System enters Vol-ume Setting mode. When selecting “FM?” or “AM?”
Press the 3 or 2 button to select the preset stationnumber, then press the SET button.• If you select the display “- -”, the current broad-
cast station is selected. When selecting “CD?”
Press the 3 or 2 button to select the track numberyou want to start playback, then press the SET button.• If you select the display “- -”, playback will start
from the first track. When selecting “LINE?”
Prepare the external equipment so that it will turn onat the ON time set by the System.To allow this, the equipment should have the timerfunction.
When selecting “MELODY?”Press the 3 or 2 button to select one of melodies(MELODY 1-10). Then, the selected melody isplayed back.
FM? : Tunes in to the specified preset FM sta-tion.
AM? : Tunes in to the specified preset AM sta-tion.
CD? : Plays the specified track on the speci-fied CD.
LINE? : Plays an external source.MELODY? : Select one of 10 melodies.
FS-X1-3(C)_E.book Page 23 Thursday, March 27, 2003 1:43 PM
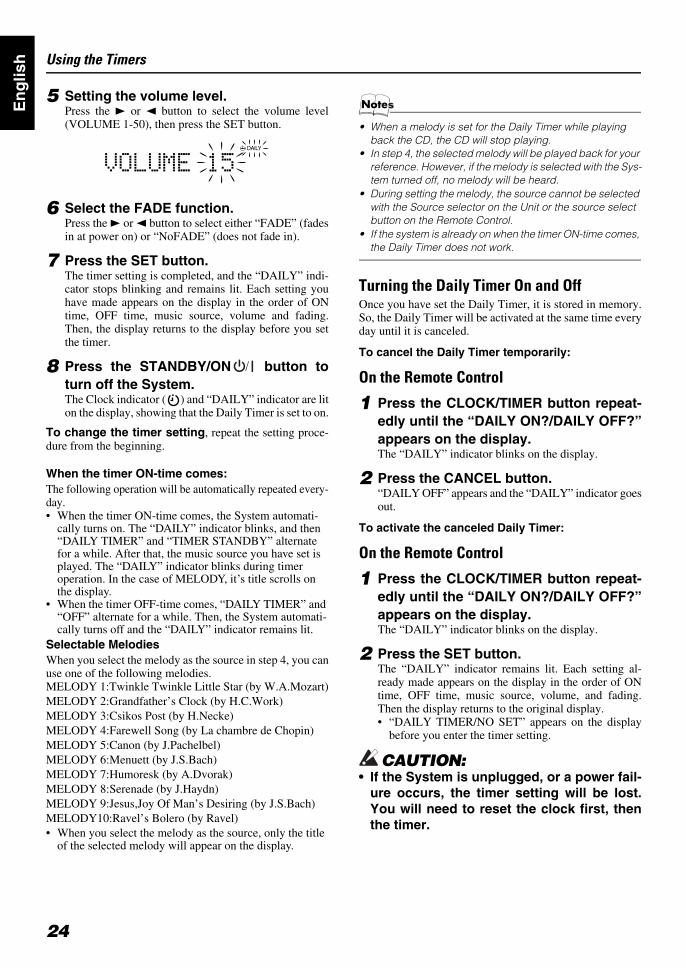
24
Using the Timers
En
glis
h
5 Setting the volume level.Press the 3 or 2 button to select the volume level(VOLUME 1-50), then press the SET button.
6 Select the FADE function.Press the 3 or 2 button to select either “FADE” (fadesin at power on) or “NoFADE” (does not fade in).
7 Press the SET button.The timer setting is completed, and the “DAILY” indi-cator stops blinking and remains lit. Each setting youhave made appears on the display in the order of ONtime, OFF time, music source, volume and fading.Then, the display returns to the display before you setthe timer.
8 Press the STANDBY/ON button toturn off the System.The Clock indicator ( ) and “DAILY” indicator are liton the display, showing that the Daily Timer is set to on.
To change the timer setting, repeat the setting proce-dure from the beginning.
When the timer ON-time comes:The following operation will be automatically repeated every-day.• When the timer ON-time comes, the System automati-
cally turns on. The “DAILY” indicator blinks, and then “DAILY TIMER” and “TIMER STANDBY” alternate for a while. After that, the music source you have set is played. The “DAILY” indicator blinks during timer operation. In the case of MELODY, it’s title scrolls on the display.
• When the timer OFF-time comes, “DAILY TIMER” and “OFF” alternate for a while. Then, the System automati-cally turns off and the “DAILY” indicator remains lit.
Selectable MelodiesWhen you select the melody as the source in step 4, you canuse one of the following melodies.MELODY 1:Twinkle Twinkle Little Star (by W.A.Mozart)MELODY 2:Grandfather’s Clock (by H.C.Work)MELODY 3:Csikos Post (by H.Necke)MELODY 4:Farewell Song (by La chambre de Chopin)MELODY 5:Canon (by J.Pachelbel)MELODY 6:Menuett (by J.S.Bach)MELODY 7:Humoresk (by A.Dvorak)MELODY 8:Serenade (by J.Haydn)MELODY 9:Jesus,Joy Of Man’s Desiring (by J.S.Bach)MELODY10:Ravel’s Bolero (by Ravel)• When you select the melody as the source, only the title
of the selected melody will appear on the display.
• When a melody is set for the Daily Timer while playing back the CD, the CD will stop playing.
• In step 4, the selected melody will be played back for your reference. However, if the melody is selected with the Sys-tem turned off, no melody will be heard.
• During setting the melody, the source cannot be selected with the Source selector on the Unit or the source select button on the Remote Control.
• If the system is already on when the timer ON-time comes, the Daily Timer does not work.
Turning the Daily Timer On and Off Once you have set the Daily Timer, it is stored in memory.So, the Daily Timer will be activated at the same time everyday until it is canceled.
To cancel the Daily Timer temporarily:
On the Remote Control
1 Press the CLOCK/TIMER button repeat-edly until the “DAILY ON?/DAILY OFF?”appears on the display.The “DAILY” indicator blinks on the display.
2 Press the CANCEL button.“DAILY OFF” appears and the “DAILY” indicator goesout.
To activate the canceled Daily Timer:
On the Remote Control
1 Press the CLOCK/TIMER button repeat-edly until the “DAILY ON?/DAILY OFF?”appears on the display.The “DAILY” indicator blinks on the display.
2 Press the SET button.The “DAILY” indicator remains lit. Each setting al-ready made appears on the display in the order of ONtime, OFF time, music source, volume, and fading.Then the display returns to the original display.• “DAILY TIMER/NO SET” appears on the display
before you enter the timer setting.
CAUTION:• If the System is unplugged, or a power fail-
ure occurs, the timer setting will be lost.You will need to reset the clock first, thenthe timer.
FS-X1-3(C)_E.book Page 24 Thursday, March 27, 2003 1:43 PM
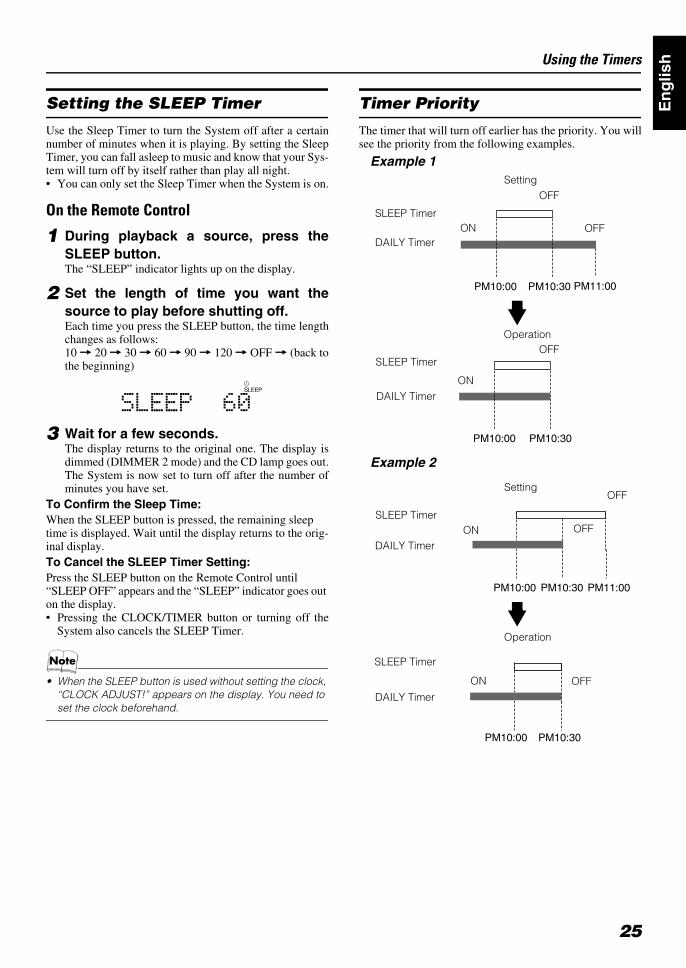
25
Using the Timers
En
glis
h
Setting the SLEEP Timer
Use the Sleep Timer to turn the System off after a certainnumber of minutes when it is playing. By setting the SleepTimer, you can fall asleep to music and know that your Sys-tem will turn off by itself rather than play all night.• You can only set the Sleep Timer when the System is on.
On the Remote Control
1 During playback a source, press theSLEEP button.The “SLEEP” indicator lights up on the display.
2 Set the length of time you want thesource to play before shutting off.Each time you press the SLEEP button, the time lengthchanges as follows:10 = 20 = 30 = 60 = 90 = 120 = OFF = (back tothe beginning)
3 Wait for a few seconds.The display returns to the original one. The display isdimmed (DIMMER 2 mode) and the CD lamp goes out.The System is now set to turn off after the number ofminutes you have set.
To Confirm the Sleep Time:When the SLEEP button is pressed, the remaining sleep time is displayed. Wait until the display returns to the orig-inal display.To Cancel the SLEEP Timer Setting:Press the SLEEP button on the Remote Control until “SLEEP OFF” appears and the “SLEEP” indicator goes out on the display.• Pressing the CLOCK/TIMER button or turning off the
System also cancels the SLEEP Timer.
• When the SLEEP button is used without setting the clock, “CLOCK ADJUST!” appears on the display. You need to set the clock beforehand.
Timer Priority
The timer that will turn off earlier has the priority. You willsee the priority from the following examples.
Example 1
Example 2
PM10:00 PM10:30
PM10:00 PM10:30 PM11:00
SLEEP Timer
DAILY Timer
Setting
ON
OFF
OFF
ON
OFFOperation
SLEEP Timer
DAILY Timer
PM10:00 PM10:30
PM10:00 PM10:30 PM11:00
DAILY Timer
Setting
OFF
OFF
ON OFF
Operation
DAILY Timer
ONSLEEP Timer
SLEEP Timer
FS-X1-3(C)_E.book Page 25 Thursday, March 27, 2003 1:43 PM

26
En
glis
h Troubleshooting• If you are having a problem with your System, check this list for a possible solution before calling for service.• If you cannot solve the problem from the hints given here “ERROR!” appears on the display, or the System has been phys-
ically damaged, call a qualified person, such as your dealer, for service.
Symptom Possible Cause Action
No sound is heard. • Connections are incorrect, or loose.
• Headphones are connected.
• Check all connections and make cor-rections. (See pages 5 to 9.)
• Disconnect the headphones.Poor radio reception • The antenna is disconnected.
• The AM Loop Antenna is too close to the System.
• The FM Wire Antenna is not prop-erly extended and positioned.
• Reconnect the antenna securely.• Change the position and direction of
the AM Loop Antenna.• Extend FM Wire Antenna to the best
reception position.Stereo effect is lost in FM broadcast. FM reception mode is changed to “FM
MONO”.Press the FM/PLAY MODE button toselect “FM AUTO”. (See page 14)
The CD skips. • The CD is dirty or scratched.• Track Skip marks are recorded.
• Clean or replace the CD.• This is normal.
The CD does not play. • The CD is upside down.• Track Skip mark is recorded for the
first track of the disc.
• Put the CD in with the label side up.• Wait until the Unit finds a track with-
out a Track Skip mark.Unable to operate the Remote Control. • The path between the Remote Con-
trol and the sensor on the Unit is blocked.
• The batteries have lost their charge.
• Remove the obstruction.
• Replace the batteries.Operations are disabled. The built-in microprocessor has mal-
functioned due to external electrical in-terference.
Unplug the System then plug it back in.
“CD NO DISC” appears. There is no disc loaded. Insert a disc.
“CD CAN’T PLAY” appears. • You are trying to playback a CD which cannot be played, or there is a problem with the CD.
• The disc has been inserted with its label side down.
• Change the disc.
• Remove the disc and insert it with the label side up.
“CD DOOR ERROR” appears. The object is blocking the CD door toopen.
Press the 0 CD button to close the CDdoor and remove the object.
When the CD door is operating (open-ing or closing) while you are listeningto FM, AM or LINE, the source is mut-ed.
This is one of the characteristics of thissystem.
This is normal.
Some of the CD functions, such as skipor search, do not work correctly.
You are playing an unfinalized disc. This is normal. If you need to use thesefunctions, finalize the disc. (This Unitcannot finalize CD-R/CD-RW)
FS-X1-3(C)_E.book Page 26 Thursday, March 27, 2003 1:43 PM

27
En
glis
hCare And MaintenanceHandle your CDs carefully, and they will last a long time.
Compact Discs
CAUTION:• Do not use any solvent (for example, con-
ventional record cleaner, spray thinner,benzine, etc.) to clean a CD.
General Notes
In general, you will have the best performance by keepingyour CDs and the mechanism clean.• Store CDs in their cases, and keep them in cabinets or on
shelves.• Keep the System’s CD door closed when not in use.
Cleaning the Unit• Stains on the Unit
Should be wiped off with a soft cloth. If the Unit is heavilystained, wipe it with a cloth soaked in water-diluted neutraldetergent and wrung well, then wipe clean with a dry cloth.
• Since the Unit may deteriorate in quality, become damaged or get its paint peeled off, be careful about the followings.
- DO NOT wipe it with a hard cloth.- DO NOT wipe it strong.- DO NOT wipe it with thinner or benzine.- DO NOT apply any volatile substance such as insecti-
cides to it.- DO NOT allow any rubber or plastic to remain in con-
tact with it for a long time.
Cleaning the Lens
If the lens in the CD pickup is dirty, dropout, etc., could de-grade sound.Open the CD door and clean the lens as shown.• Use a blower (available from a camera store) to blow
dust off the lens.
• If there are fingerprints, etc. on the lens, gently wipe clean with a cotton swab.
Moisture Condensation
• Only CDs bearing these marks can be used with this System. However, continued use of irregu-lar shape CDs (heart-shape, octagonal, etc.) can damage the System.
• Remove the CD from its case by holding it at the edges while press-ing the case’s center hole lightly.
• Do not touch the shiny surface of the CD, or bend the CD.
• Put the CD back in its case after use to prevent warping.
• Be careful not to scratch the sur-face of the CD when placing it back in the case.
• Avoid exposure to direct sunlight, temperature extremes, and moisture.
• A dirty CD may not play cor-rectly. If a CD does become dirty, wipe it with a soft cloth in a straight line from center to edge.
Moisture may condense on the lensinside the System in the followingcases:• After turning on heating in the
room.• In a damp room.• If the System is brought directly
from a cold to a warm place.Should this occur, the System maymalfunction. In this case, leave theSystem turned on for a few hours un-til the moisture evaporates, unplugthe AC power cord, and then plug itin again.
Blower
Lens
FS-X1-3(C)_E.book Page 27 Thursday, March 27, 2003 1:43 PM
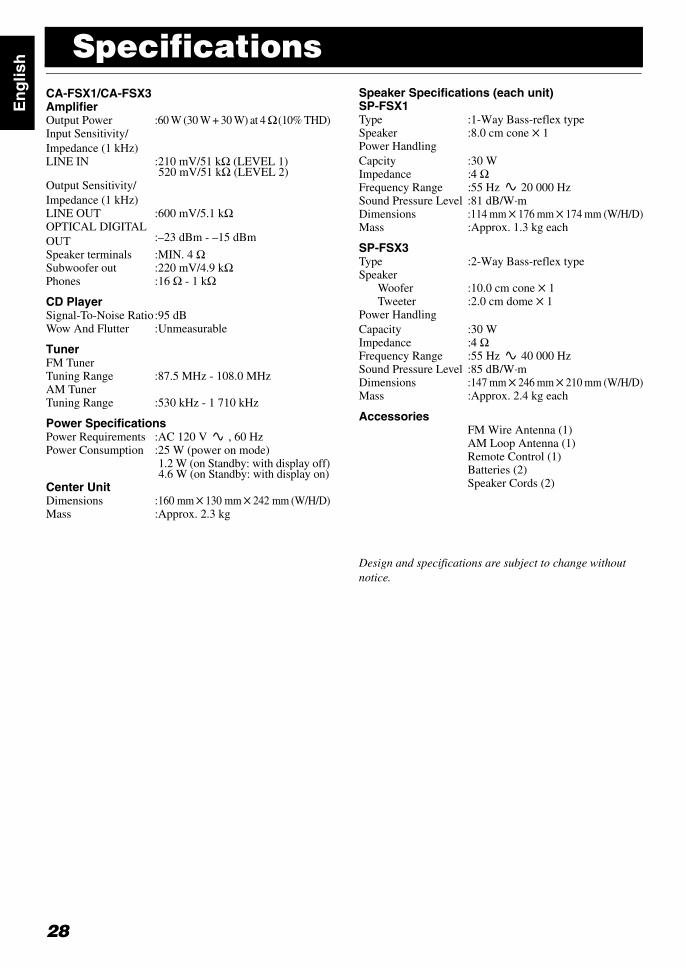
28
En
glis
h SpecificationsCA-FSX1/CA-FSX3AmplifierOutput Power :60 W (30 W + 30 W) at 4 Ω (10% THD)Input Sensitivity/Impedance (1 kHz)LINE IN :210 mV/51 kΩ (LEVEL 1)
520 mV/51 kΩ (LEVEL 2)Output Sensitivity/Impedance (1 kHz)LINE OUT :600 mV/5.1 kΩOPTICAL DIGITAL OUT :–23 dBm - –15 dBm
Speaker terminals :MIN. 4 ΩSubwoofer out :220 mV/4.9 kΩPhones :16 Ω - 1 kΩ
CD PlayerSignal-To-Noise Ratio:95 dBWow And Flutter :Unmeasurable
TunerFM TunerTuning Range :87.5 MHz - 108.0 MHzAM TunerTuning Range :530 kHz - 1 710 kHz
Power SpecificationsPower Requirements :AC 120 V , 60 Hz Power Consumption :25 W (power on mode)
1.2 W (on Standby: with display off)4.6 W (on Standby: with display on)
Center UnitDimensions :160 mm 130 mm 242 mm (W/H/D)Mass :Approx. 2.3 kg
Speaker Specifications (each unit)SP-FSX1Type :1-Way Bass-reflex typeSpeaker :8.0 cm cone 1Power Handling Capcity :30 WImpedance :4 ΩFrequency Range :55 Hz 20 000 HzSound Pressure Level :81 dB/W·mDimensions :114 mm 176 mm 174 mm (W/H/D)Mass :Approx. 1.3 kg each
SP-FSX3Type :2-Way Bass-reflex typeSpeaker
Woofer :10.0 cm cone 1Tweeter :2.0 cm dome 1
Power Handling Capacity :30 WImpedance :4 ΩFrequency Range :55 Hz 40 000 HzSound Pressure Level :85 dB/W·mDimensions :147 mm 246 mm 210 mm (W/H/D)Mass :Approx. 2.4 kg each
AccessoriesFM Wire Antenna (1)AM Loop Antenna (1)Remote Control (1)Batteries (2)Speaker Cords (2)
Design and specifications are subject to change without notice.
FS-X1-3(C)_E.book Page 28 Thursday, March 27, 2003 1:43 PM
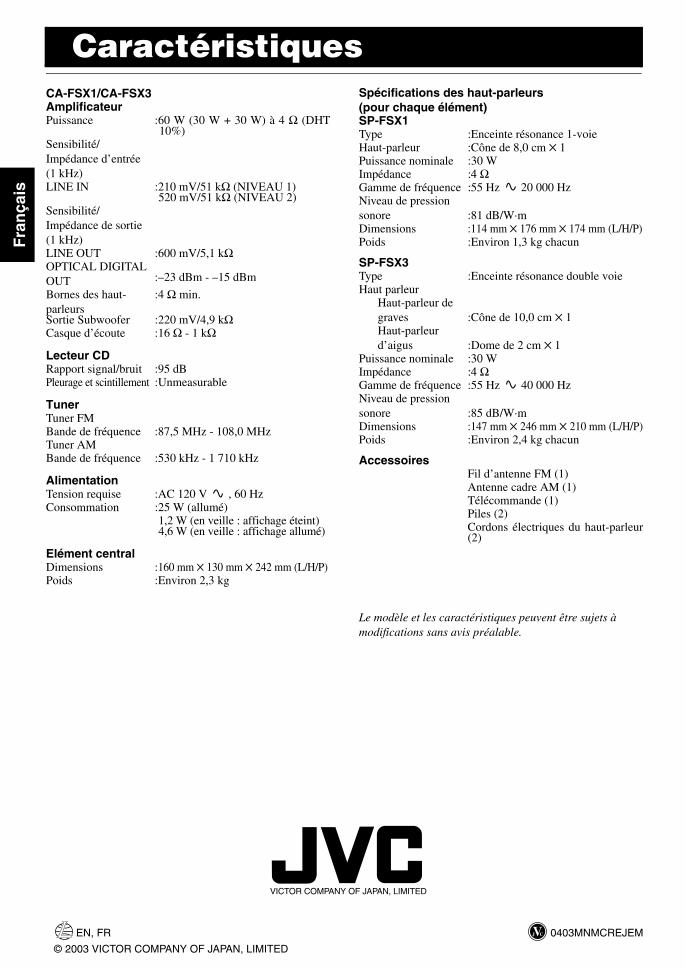
28
Fra
nça
is
CaractéristiquesCA-FSX1/CA-FSX3AmplificateurPuissance :60 W (30 W + 30 W) à 4 Ω (DHT
10%)Sensibilité/Impédance d’entrée (1 kHz)LINE IN :210 mV/51 kΩ (NIVEAU 1)
520 mV/51 kΩ (NIVEAU 2)Sensibilité/Impédance de sortie (1 kHz)LINE OUT :600 mV/5,1 kΩOPTICAL DIGITAL OUT :–23 dBm - –15 dBm
Bornes des haut-parleurs
:4 Ω min.
Sortie Subwoofer :220 mV/4,9 kΩCasque d’écoute :16 Ω - 1 kΩ
Lecteur CDRapport signal/bruit :95 dBPleurage et scintillement :Unmeasurable
TunerTuner FMBande de fréquence :87,5 MHz - 108,0 MHzTuner AMBande de fréquence :530 kHz - 1 710 kHz
AlimentationTension requise :AC 120 V , 60 Hz Consommation :25 W (allumé)
1,2 W (en veille : affichage éteint)4,6 W (en veille : affichage allumé)
Elément centralDimensions :160 mm 130 mm 242 mm (L/H/P)Poids :Environ 2,3 kg
Spécifications des haut-parleurs (pour chaque élément)SP-FSX1Type :Enceinte résonance 1-voieHaut-parleur :Cône de 8,0 cm 1Puissance nominale :30 WImpédance :4 ΩGamme de fréquence :55 Hz 20 000 HzNiveau de pression sonore :81 dB/W·mDimensions :114 mm 176 mm 174 mm (L/H/P)Poids :Environ 1,3 kg chacun
SP-FSX3Type :Enceinte résonance double voieHaut parleur
Haut-parleur de graves :Cône de 10,0 cm 1Haut-parleur d’aigus :Dome de 2 cm 1
Puissance nominale :30 WImpédance :4 ΩGamme de fréquence :55 Hz 40 000 HzNiveau de pression sonore :85 dB/W·mDimensions :147 mm 246 mm 210 mm (L/H/P)Poids :Environ 2,4 kg chacun
AccessoiresFil d’antenne FM (1)Antenne cadre AM (1)Télécommande (1)Piles (2)Cordons électriques du haut-parleur(2)
Le modèle et les caractéristiques peuvent être sujets à modifications sans avis préalable.
EN, FR 0403MNMCREJEM
© 2003 VICTOR COMPANY OF JAPAN, LIMITED
VICTOR COMPANY OF JAPAN, LIMITED
FS-X1-3(C)_F.book Page 28 Friday, March 28, 2003 11:51 AM


![COMPACT COMPONENT SYSTEM DX-J21 - JVC USA - Products -resources.jvc.com/Resources/00/01/13/GVT0244-008A.pdf · COMPACT COMPONENT SYSTEM INSTRUCTIONS GVT0244-008A [J] ... How to Read](https://img.pdfslide.us/doc/110x75/5be35b2709d3f23e6c8cf8ea/compact-component-system-dx-j21-jvc-usa-products-compact-component-system.jpg)