Embed Size (px)
Citation preview
ICT Services Herts for Learning Ltd SROB202, Robertson House, Six Hills Way, Stevenage, Herts, SG1 2FQ
Doc Ref S1095
Published May 2017
© ICT Services Herts for Learning Ltd, 2017
Fully accredited by Capita SIMS for proven quality of SIMS support
Common Transfer Files Sims
Please keep for future reference

CONTENTS
INTRODUCTION ............................................................................................................. 1
PROCEDURES FOR LOCATING MISSING PUPILS ...................................................... 2
SETTING UP DESTINATION SCHOOLS ....................................................................... 4
Destination Schools .............................................................................................. 4
Setting up Alternative Destinations ....................................................................... 5
EXPORTING CTFS ......................................................................................................... 6
Viewing the CTF Export History Log ..................................................................... 8
LOGGING ONTO THE SECURE ACCESS (S2S) WEBSITE ....................................... 10
UPLOADING A COMMON TRANSFER FILE ............................................................... 12
DOWNLOADING FILES FROM THE SECURE ACCESS (S2S) WEBSITE .................. 13
RECEIVING COMMON TRANSFER FILES .................................................................. 16
IMPORTING COMMON TRANSFER FILES ................................................................. 17
USING THE IMPORT CTF MATCHING SCREEN ........................................................ 19
Importing a CTF .................................................................................................. 19
Matching Screen Indicator Colours ..................................................................... 24
SOME EXAMPLES OF CTF IMPORTS & ERRORS ..................................................... 25
1) GREEN – Positive Match................................................................................ 26
2) GREEN/YELLOW – Valid CTF with Positive Match & Potential Matches ....... 26
3) BLUE – Valid CTF Record for a New Student ................................................ 27
4) BLUE/RED – Valid CTF record (no matches, conflicts with existing data) ..... 27
5) RED – CTF Record Contains Invalid Data...................................................... 28
6) RED/YELLOW – Valid CTF Record (potential match(es)) with Errors ............ 28
Sibling Links ........................................................................................................ 29
FREQUENTLY ASKED QUESTIONS ........................................................................... 30

Herts for Learning
Doc Ref S1095 1 of 31
INTRODUCTION
A Common Transfer File (CTF) is to be used to transfer pupil data from school to school when pupils move: not only mid-year, but also when transferring at the end of phase. This means that destination schools will not need to re-key the data; they will have data immediately available about pupils, including their prior performance. CTFs are also commonly used to transfer data into other programs and for returning assessment data to county and the DfE.
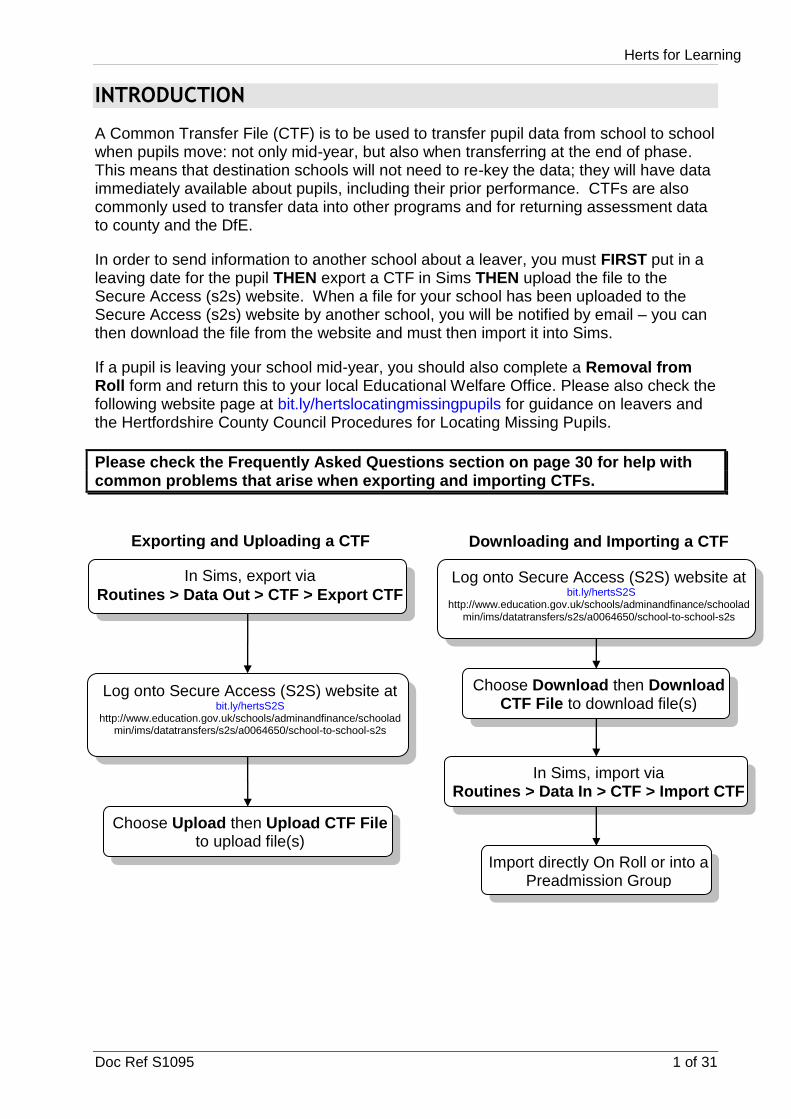
In order to send information to another school about a leaver, you must FIRST put in a leaving date for the pupil THEN export a CTF in Sims THEN upload the file to the Secure Access (s2s) website. When a file for your school has been uploaded to the Secure Access (s2s) website by another school, you will be notified by email – you can then download the file from the website and must then import it into Sims.
If a pupil is leaving your school mid-year, you should also complete a Removal from Roll form and return this to your local Educational Welfare Office. Please also check the following website page at bit.ly/hertslocatingmissingpupils for guidance on leavers and the Hertfordshire County Council Procedures for Locating Missing Pupils.
Please check the Frequently Asked Questions section on page 30 for help with common problems that arise when exporting and importing CTFs.
Log onto Secure Access (S2S) website at bit.ly/hertsS2S
http://www.education.gov.uk/schools/adminandfinance/schooladmin/ims/datatransfers/s2s/a0064650/school-to-school-s2s
Choose Download then Download CTF File to download file(s)
In Sims, import via Routines > Data In > CTF > Import CTF
Import directly On Roll or into a Preadmission Group
Downloading and Importing a CTF
In Sims, export via
Routines > Data Out > CTF > Export CTF
Log onto Secure Access (S2S) website at bit.ly/hertsS2S
http://www.education.gov.uk/schools/adminandfinance/schooladmin/ims/datatransfers/s2s/a0064650/school-to-school-s2s
Choose Upload then Upload CTF File to upload file(s)
Exporting and Uploading a CTF
Herts for Learning
2 of 31 Doc Ref S1095
Procedures for Locating Missing Pupils
Hertfordshire County Council - Children, Schools and Families Procedures for locating missing pupils
Hertfordshire County Council is committed to ensuring that:
Pupils who go missing from schools in Hertfordshire and move to other areas are located as soon as possible.
Support is provided to other Local Authorities to locate pupils who are missing and may have moved to Hertfordshire.
The LA believes that it can best achieve this if the procedures are underpinned by the relevant statutory requirements in relation to missing pupils and interconnect with the DfE central Secure Access (s2s) (school to school) Lost Pupil Database. Procedures in Hertfordshire
1. Should a child leave a Hertfordshire school without notice being given by the parent or without the school being advised by the parent of the new address and/or school the child is to attend, the school should notify their allocated Attendance Improvement Officer as soon as possible.
a. The Attendance Improvement Officer will work with the school to make
reasonable enquiries to try to identify the child’s whereabouts.
b. If after four weeks enquiries have failed to locate the child, the school should remove the child’s name from its roll and create a “lost” common transfer file (CTF). XXX should be used as the destination Local Authority and XXXX as the destination school number. Each file should hold information on only one pupil. This lost CTF should be immediately up loaded onto the DfE Secure Access (s2s) site where it will be held in the Lost Pupil Database.
Please Note: There are different procedures when a pupil’s whereabouts is known e.g. moved outside UK. See paragraph 2 below. XXX XXXX should only be used when the school has no knowledge of the pupil’s destination.
2. When a pupil moves to a non-maintained school or one outside England and
Wales then the school should use MMMMMMM as the destination code. This enables the CTF to be stored securely and to be available if the pupil returns to a maintained school.
3. Should a pupil leave a Hertfordshire school to be home educated, on
receiving written confirmation from the parent(s) the school should remove the pupil’s name from the school roll and send the CTF to the Secure Access (s2s) Database using MMMMMMM, so that the CTF goes into the database of pupils who have moved outside the maintained system. This does not apply to special schools.
Herts for Learning
Doc Ref S1095 3 of 31
4. Should a pupil join a Hertfordshire school without that school receiving a CTF from the child’s previous school then the receiving school should contact the Lost Pupil Coordinator at [email protected] and request that a search be made of the Lost Pupil Database for a matching record using gender, names or former names and date of birth. Schools cannot search the lost pupil database.
5. Should a Hertfordshire school which has previously sent a lost child’s CTF to
the Lost Pupil Database be subsequently contacted by a school at which the lost child has subsequently registered then:
a. the school which sent the CTF to the Lost Pupil Database should create a
new CTF file and send this to the receiving school and request the Lost Pupil Coordinator to download the original CTF from the Lost Pupils database and delete it:
And b. the receiving school should request its own LA to download the original CTF
from the Lost Pupils Database. These procedures will only be effective if all schools adhere to the principle that:
Whenever a pupil joins or leaves a school then a common transfer file MUST accompany him or her.
Further information on the transfer of a CTF can be found on bit.ly/hertsS2S or http://www.education.gov.uk/schools/adminandfinance/schooladmin/ims/datatransfers/s2s/a0064650/school-to-school-s2s
Secure Access (s2s) - (as access to s2s through Teachernet is now no longer available). Procedures for locating missing pupils and the CTF user manual can be found at bit.ly/hertsctf
Herts for Learning
4 of 31 Doc Ref S1095
Setting up Destination Schools
You will need to set up the details of all the schools to which your students will be going. The minimum details required for each school include the school name, the LA Code and the DfE Number for the school. The code and DfE Number will be used to identify the destination school. If you do not know their destination, you should use one of the alternative destinations as described on page 2.
You can look up a school’s number by accessing www.education.gov.uk/edubase then:
Type the school name in Establishment Name or type the town e.g. Watford into the Enter a town, Locality or Postcode and click Search (Forces schools can now be found by entering an LA number of either 702 or 703)
Destination Schools
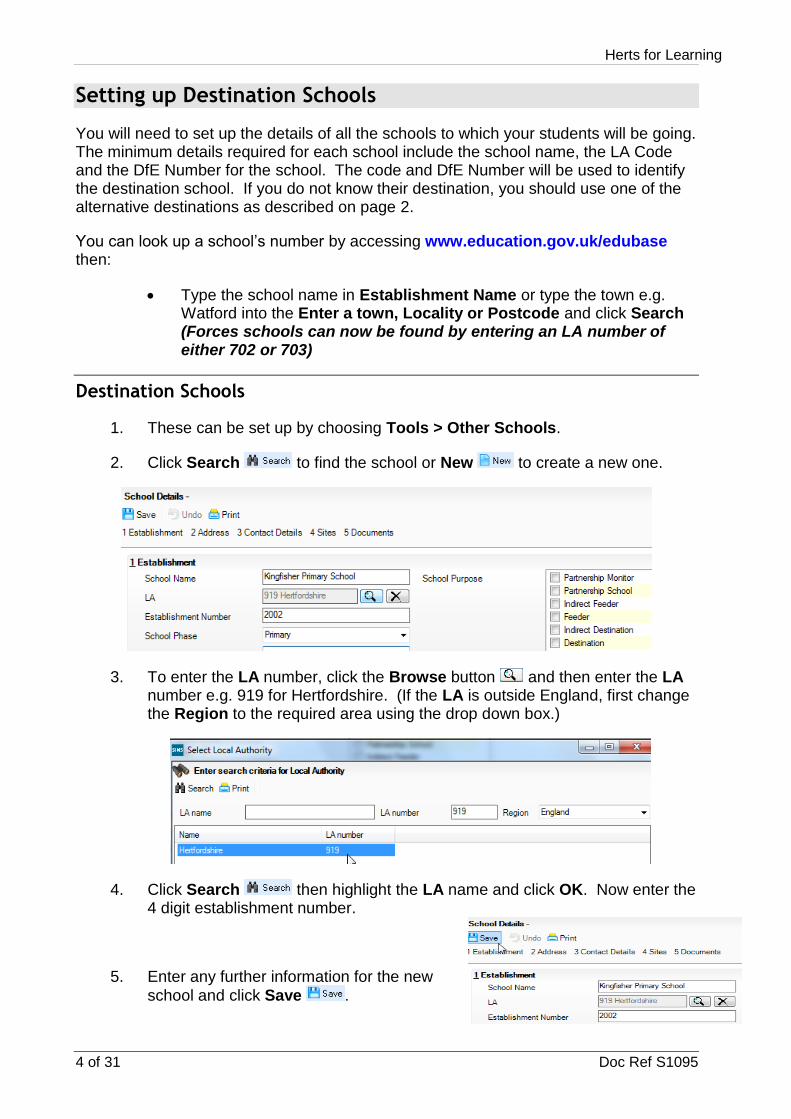
1. These can be set up by choosing Tools > Other Schools.
2. Click Search to find the school or New to create a new one.
3. To enter the LA number, click the Browse button and then enter the LA number e.g. 919 for Hertfordshire. (If the LA is outside England, first change the Region to the required area using the drop down box.)
4. Click Search then highlight the LA name and click OK. Now enter the 4 digit establishment number.
5. Enter any further information for the new
school and click Save .
Herts for Learning
Doc Ref S1095 5 of 31
Setting up Alternative Destinations
You MUST set up alternative destinations for LA & School Unknown and for Outside Maintained Sector (this includes independent schools and home schooling), if these have not already been set up.
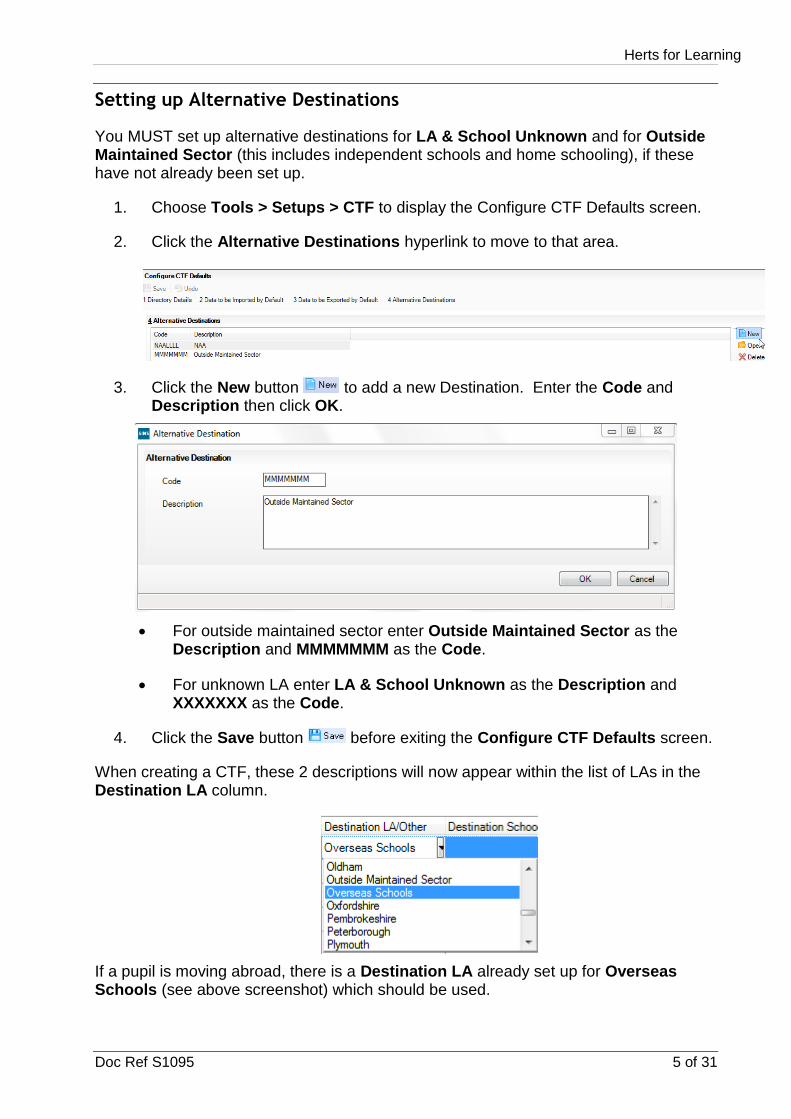
1. Choose Tools > Setups > CTF to display the Configure CTF Defaults screen.
2. Click the Alternative Destinations hyperlink to move to that area.
3. Click the New button to add a new Destination. Enter the Code and Description then click OK.
For outside maintained sector enter Outside Maintained Sector as the Description and MMMMMMM as the Code.
For unknown LA enter LA & School Unknown as the Description and XXXXXXX as the Code.
4. Click the Save button before exiting the Configure CTF Defaults screen.
When creating a CTF, these 2 descriptions will now appear within the list of LAs in the Destination LA column.
If a pupil is moving abroad, there is a Destination LA already set up for Overseas Schools (see above screenshot) which should be used.
Herts for Learning
6 of 31 Doc Ref S1095
Exporting CTFs
1. If you are creating a CTF for a leaver, or leavers, you should have already entered their leaving date on their record. If a child is leaving your school mid-year, you will also need to complete a Removal from Roll form for them. This form is available as a hard copy, or as a Sims report (to be downloaded from the grid).
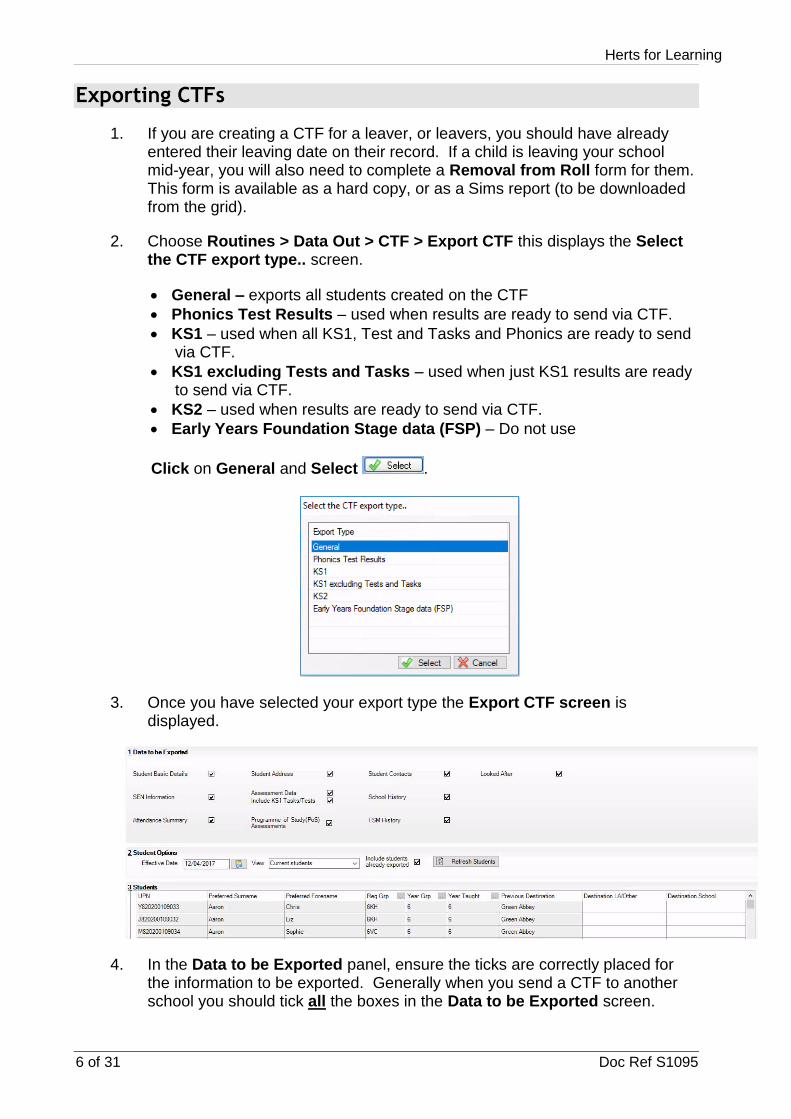
2. Choose Routines > Data Out > CTF > Export CTF this displays the Select the CTF export type.. screen.
General – exports all students created on the CTF
Phonics Test Results – used when results are ready to send via CTF.
KS1 – used when all KS1, Test and Tasks and Phonics are ready to send via CTF.
KS1 excluding Tests and Tasks – used when just KS1 results are ready to send via CTF.
KS2 – used when results are ready to send via CTF.
Early Years Foundation Stage data (FSP) – Do not use
Click on General and Select .
3. Once you have selected your export type the Export CTF screen is displayed.
4. In the Data to be Exported panel, ensure the ticks are correctly placed for the information to be exported. Generally when you send a CTF to another school you should tick all the boxes in the Data to be Exported screen.
Herts for Learning
Doc Ref S1095 7 of 31
5. Under Student Options, choose the View drop down to select Current students or Leavers this year or Leavers previous years or Current and Leavers this year as required. The tick box for Include students already exported will already be populated with a tick (we would recommend you un-tick this box only when looking at leavers). If these options are changed, click the Refresh Students button to view the new results.
6. The list of Students can be sorted by any of the columns by clicking on the headings at the top of the column. Click the heading a second time to sort in reverse order.
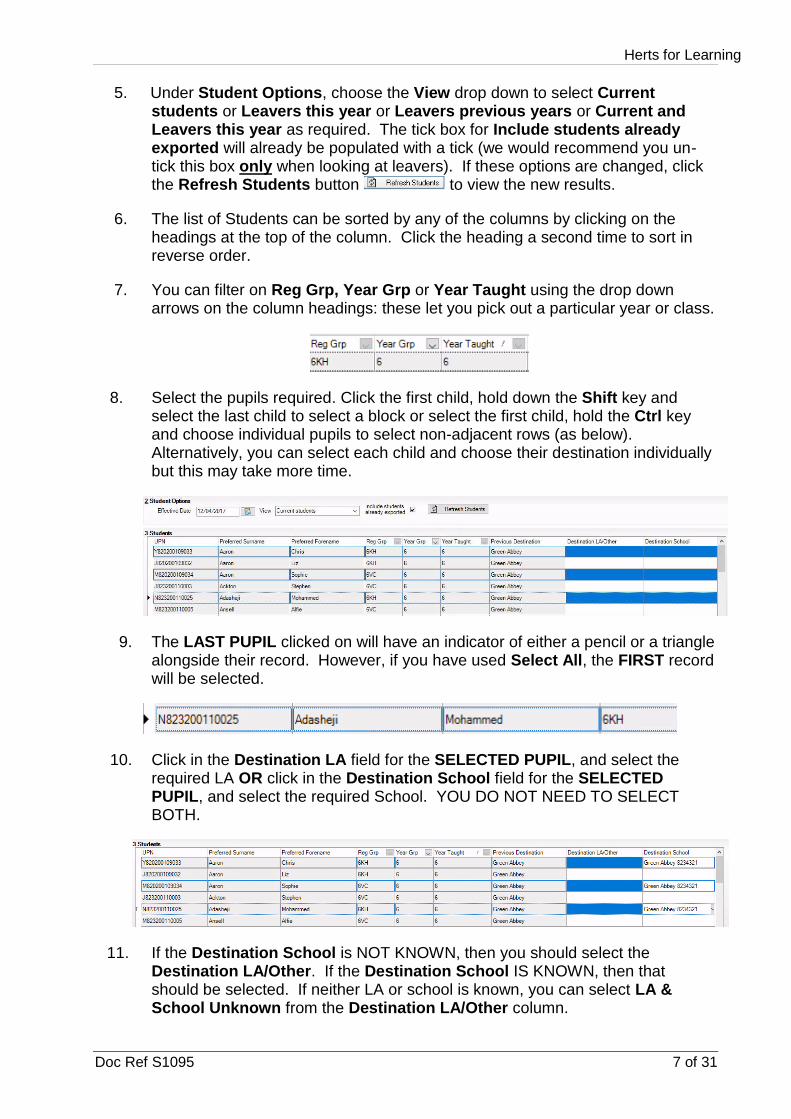
7. You can filter on Reg Grp, Year Grp or Year Taught using the drop down arrows on the column headings: these let you pick out a particular year or class.
8. Select the pupils required. Click the first child, hold down the Shift key and select the last child to select a block or select the first child, hold the Ctrl key and choose individual pupils to select non-adjacent rows (as below). Alternatively, you can select each child and choose their destination individually but this may take more time.
9. The LAST PUPIL clicked on will have an indicator of either a pencil or a triangle alongside their record. However, if you have used Select All, the FIRST record will be selected.
10. Click in the Destination LA field for the SELECTED PUPIL, and select the required LA OR click in the Destination School field for the SELECTED PUPIL, and select the required School. YOU DO NOT NEED TO SELECT BOTH.
11. If the Destination School is NOT KNOWN, then you should select the Destination LA/Other. If the Destination School IS KNOWN, then that should be selected. If neither LA or school is known, you can select LA & School Unknown from the Destination LA/Other column.
Herts for Learning
8 of 31 Doc Ref S1095
12. This will then populate all the selected records with the selected Destination LA or School.
13. If you wish, you can then select all pupils going to further destinations and assign those destinations – when you then export, each individual CTF file will be created at the same time.
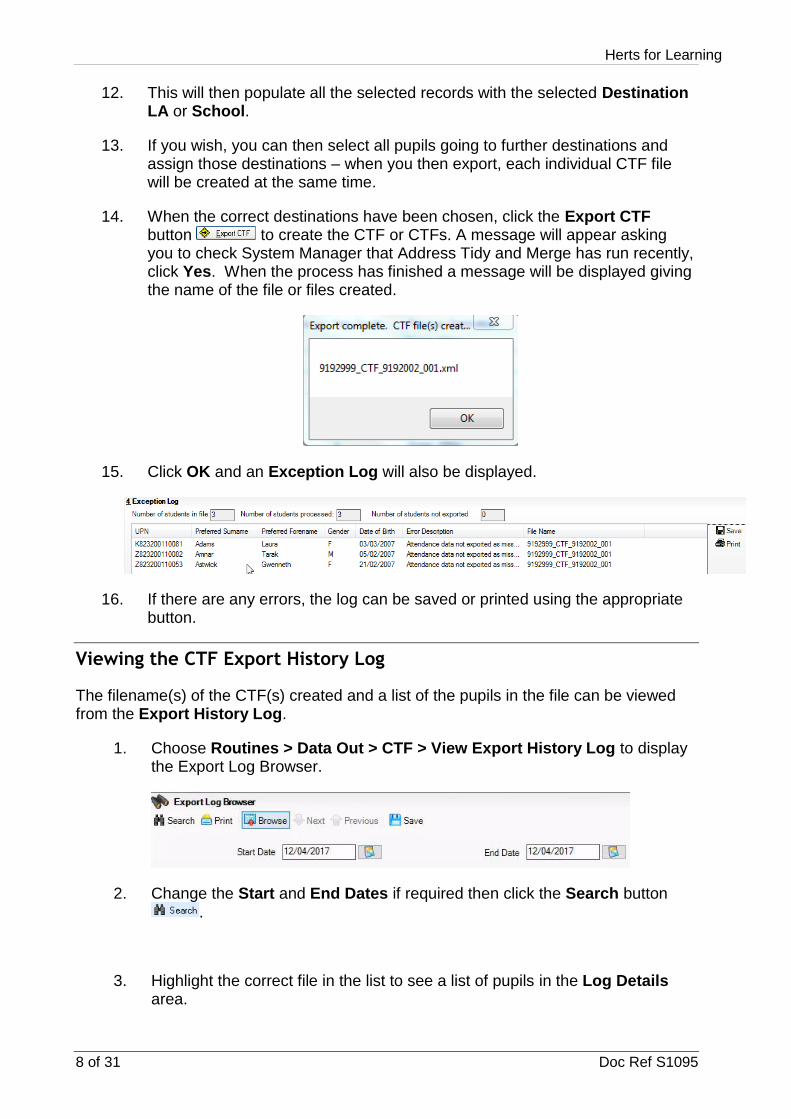
14. When the correct destinations have been chosen, click the Export CTF button to create the CTF or CTFs. A message will appear asking you to check System Manager that Address Tidy and Merge has run recently, click Yes. When the process has finished a message will be displayed giving the name of the file or files created.
15. Click OK and an Exception Log will also be displayed.
16. If there are any errors, the log can be saved or printed using the appropriate button.
Viewing the CTF Export History Log
The filename(s) of the CTF(s) created and a list of the pupils in the file can be viewed from the Export History Log.
1. Choose Routines > Data Out > CTF > View Export History Log to display the Export Log Browser.
2. Change the Start and End Dates if required then click the Search button
.
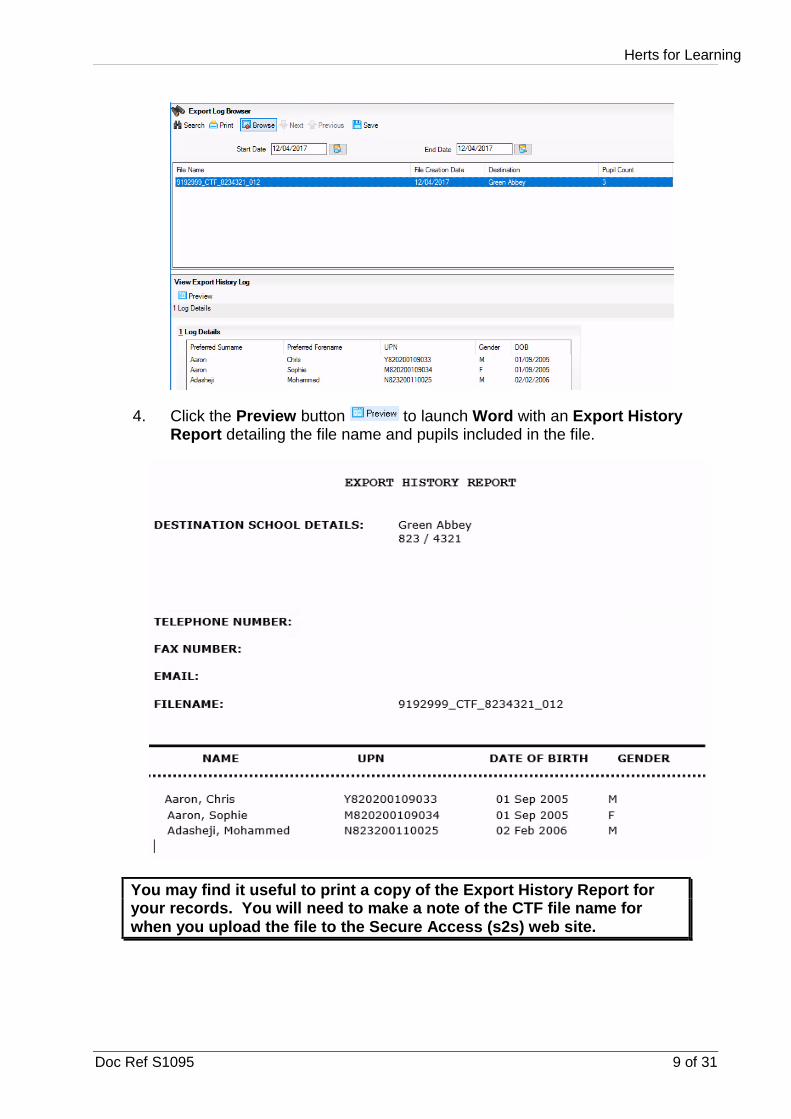
3. Highlight the correct file in the list to see a list of pupils in the Log Details area.
Herts for Learning
Doc Ref S1095 9 of 31
4. Click the Preview button to launch Word with an Export History Report detailing the file name and pupils included in the file.
You may find it useful to print a copy of the Export History Report for your records. You will need to make a note of the CTF file name for when you upload the file to the Secure Access (s2s) web site.
Herts for Learning
10 of 31 Doc Ref S1095
Logging onto the Secure Access (s2s) Website
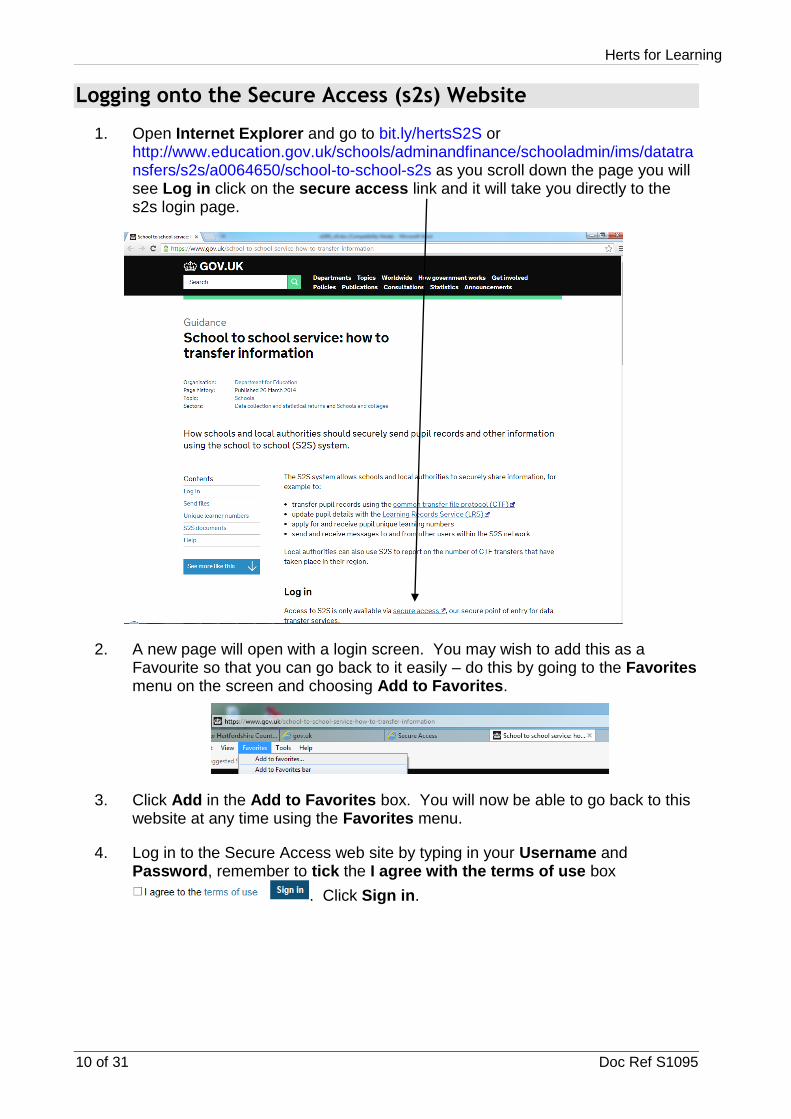
1. Open Internet Explorer and go to bit.ly/hertsS2S or http://www.education.gov.uk/schools/adminandfinance/schooladmin/ims/datatransfers/s2s/a0064650/school-to-school-s2s as you scroll down the page you will see Log in click on the secure access link and it will take you directly to the s2s login page.
2. A new page will open with a login screen. You may wish to add this as a Favourite so that you can go back to it easily – do this by going to the Favorites menu on the screen and choosing Add to Favorites.
3. Click Add in the Add to Favorites box. You will now be able to go back to this website at any time using the Favorites menu.
4. Log in to the Secure Access web site by typing in your Username and Password, remember to tick the I agree with the terms of use box
. Click Sign in.
Herts for Learning
Doc Ref S1095 11 of 31
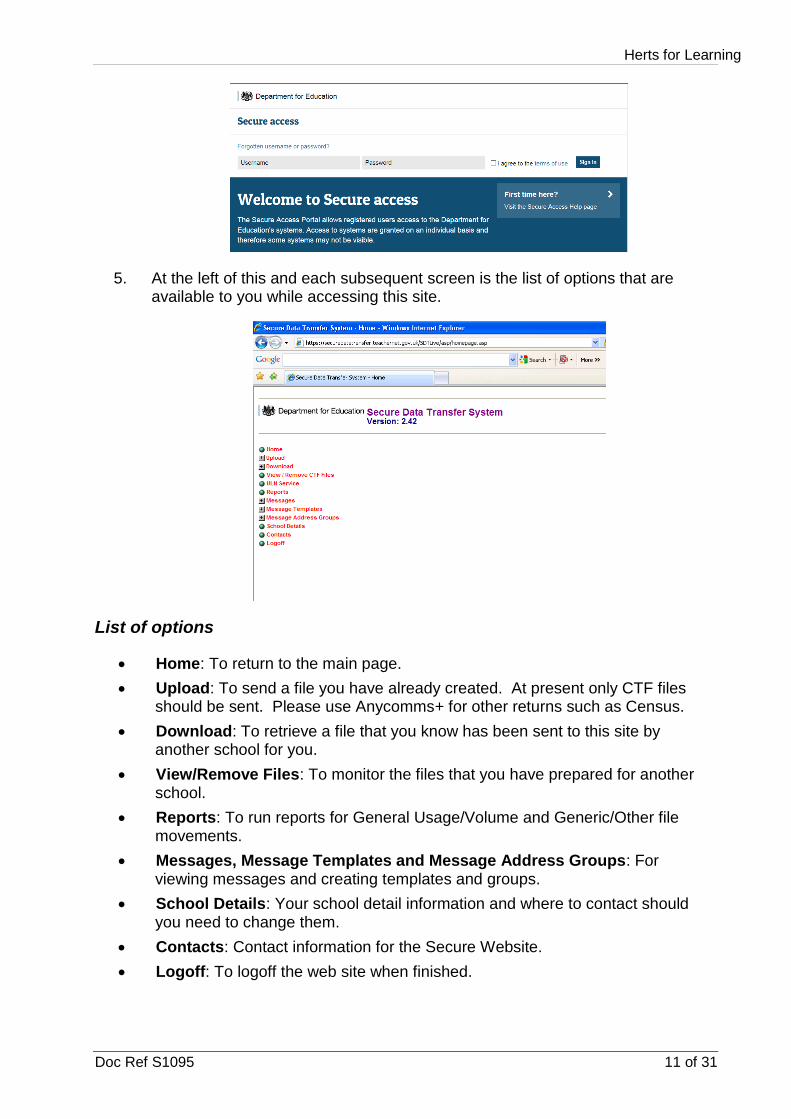
5. At the left of this and each subsequent screen is the list of options that are available to you while accessing this site.
List of options
Home: To return to the main page.
Upload: To send a file you have already created. At present only CTF files should be sent. Please use Anycomms+ for other returns such as Census.
Download: To retrieve a file that you know has been sent to this site by another school for you.
View/Remove Files: To monitor the files that you have prepared for another school.
Reports: To run reports for General Usage/Volume and Generic/Other file movements.
Messages, Message Templates and Message Address Groups: For viewing messages and creating templates and groups.
School Details: Your school detail information and where to contact should you need to change them.
Contacts: Contact information for the Secure Website.
Logoff: To logoff the web site when finished.
Herts for Learning
12 of 31 Doc Ref S1095
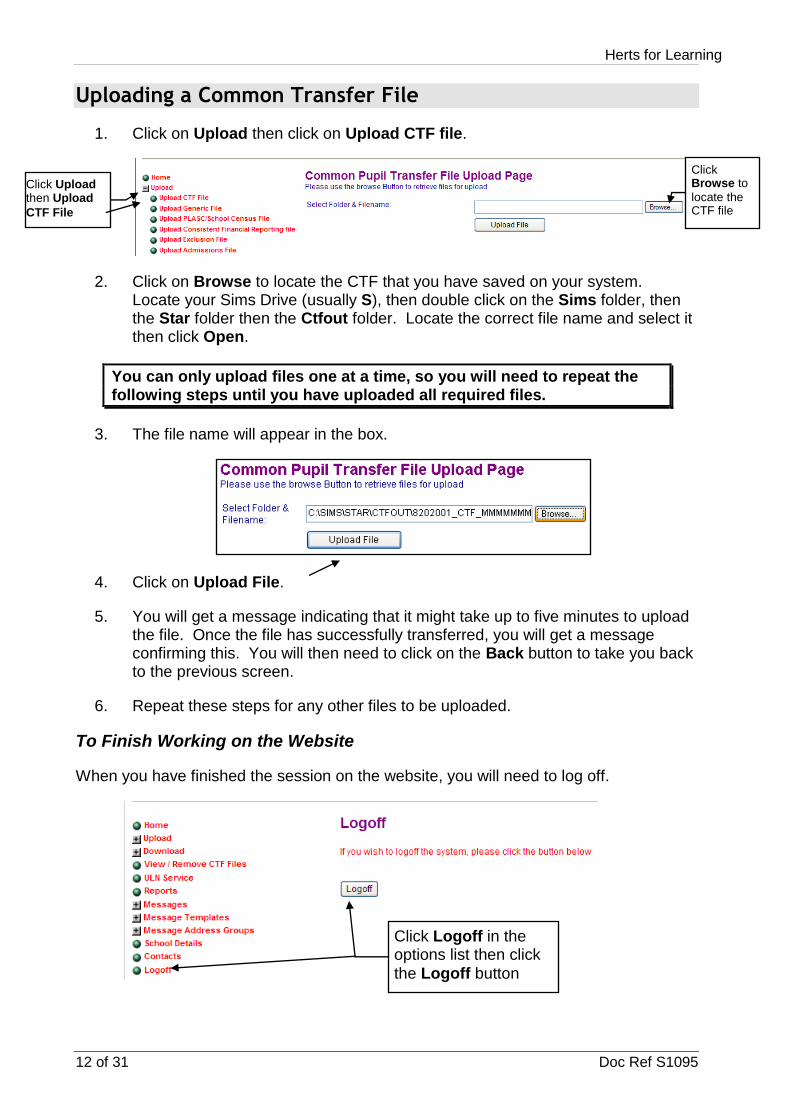
Uploading a Common Transfer File
1. Click on Upload then click on Upload CTF file.
2. Click on Browse to locate the CTF that you have saved on your system. Locate your Sims Drive (usually S), then double click on the Sims folder, then the Star folder then the Ctfout folder. Locate the correct file name and select it then click Open.
You can only upload files one at a time, so you will need to repeat the following steps until you have uploaded all required files.
3. The file name will appear in the box.
4. Click on Upload File.
5. You will get a message indicating that it might take up to five minutes to upload the file. Once the file has successfully transferred, you will get a message confirming this. You will then need to click on the Back button to take you back to the previous screen.
6. Repeat these steps for any other files to be uploaded.
To Finish Working on the Website
When you have finished the session on the website, you will need to log off.
Click Browse to
locate the CTF file
Click Upload then Upload
CTF File
Click Logoff in the options list then click
the Logoff button
Herts for Learning
Doc Ref S1095 13 of 31
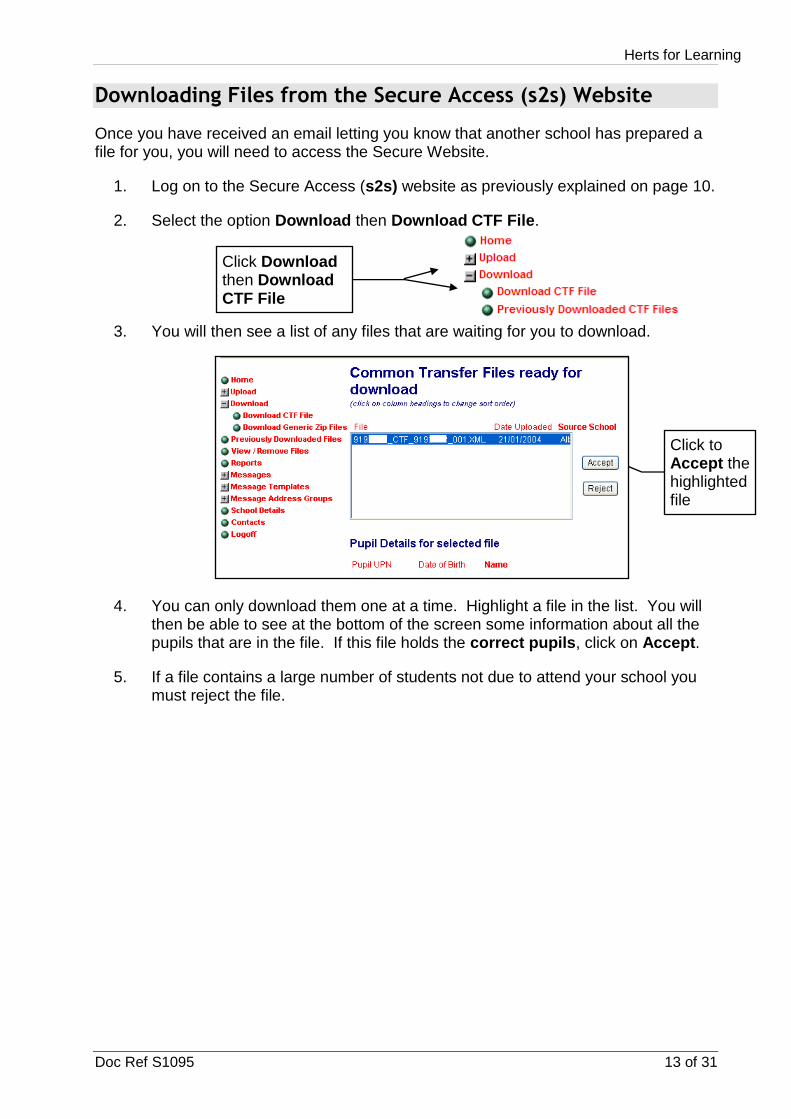
Downloading Files from the Secure Access (s2s) Website
Once you have received an email letting you know that another school has prepared a file for you, you will need to access the Secure Website.
1. Log on to the Secure Access (s2s) website as previously explained on page 10.
2. Select the option Download then Download CTF File.
3. You will then see a list of any files that are waiting for you to download.
4. You can only download them one at a time. Highlight a file in the list. You will
then be able to see at the bottom of the screen some information about all the pupils that are in the file. If this file holds the correct pupils, click on Accept.
5. If a file contains a large number of students not due to attend your school you must reject the file.
Click Download then Download CTF File
Click to Accept the highlighted file
Herts for Learning
14 of 31 Doc Ref S1095
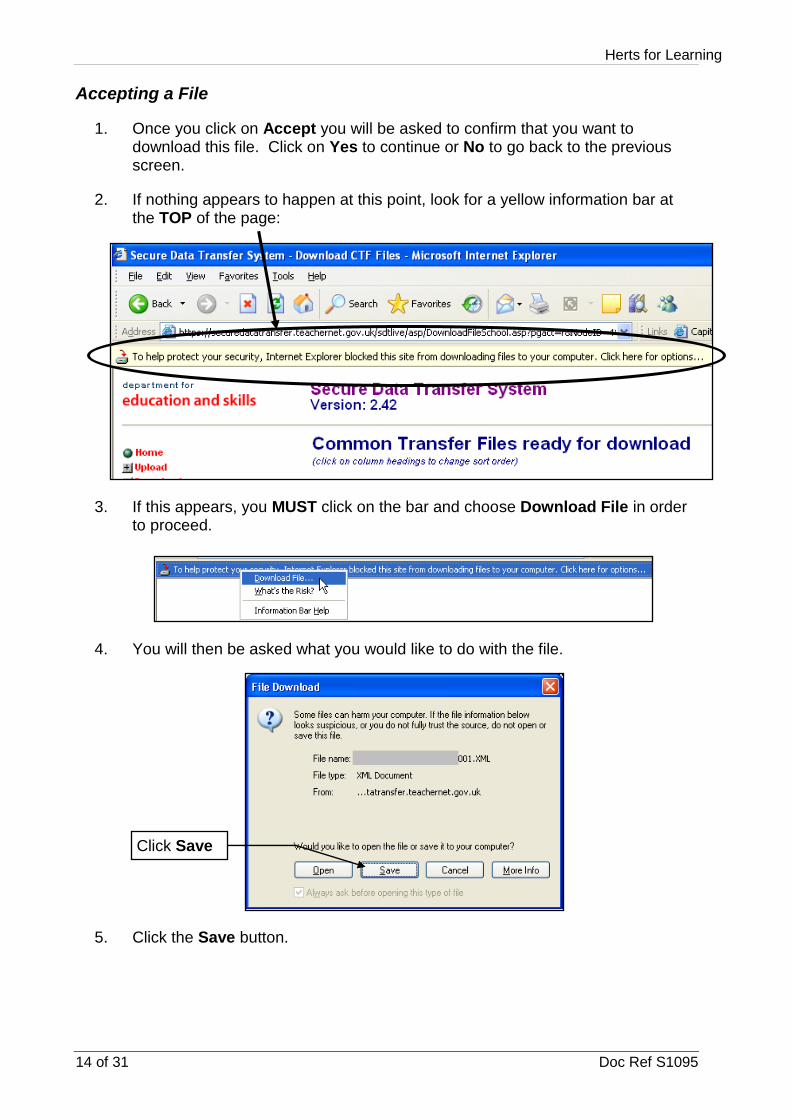
Accepting a File
1. Once you click on Accept you will be asked to confirm that you want to download this file. Click on Yes to continue or No to go back to the previous screen.
2. If nothing appears to happen at this point, look for a yellow information bar at the TOP of the page:
3. If this appears, you MUST click on the bar and choose Download File in order to proceed.
4. You will then be asked what you would like to do with the file.
5. Click the Save button.
Click Save

Herts for Learning
Doc Ref S1095 15 of 31
6. Alternatively you may get a message at the BOTTOM of the page:
7. If this appears you will need to click on the drop down next to Save click on Save as and follow the instructions in item 8 below.
8. You will need to select the folder where you want the file to be saved. First, choose the S drive from the drop down list in the Save In box. Then double click on the Sims folder, Star folder then the CTFIN folder. Your screen may look slightly different depending on your version of windows.
9. Click Save to save the file to this location.
10. When the download has finished, you may be left with a Download Complete
box. If so, click Close to close this.
11. You may then be asked if the file was downloaded successfully. Click Yes and
you will be taken back to the Download File page. The file you have just downloaded will no longer appear on the list. If the download was cancelled, click No which will take you back to the Download File page. The file will still be there.
12. Repeat downloading files until you have cleared the list.
Select the folder using the drop down
Click Save
Herts for Learning
16 of 31 Doc Ref S1095
Rejecting a File
1. If you clicked on Reject on the Download File screen, you will be asked to confirm.
2. Click Yes if you are sure.
3. An email will be sent to the school that posted the file for you. You should contact the school to let them know why you rejected the file and to ask them to send you a file with the correct data. The file will no longer be available for download.
4. Click No if you do not wish to continue.
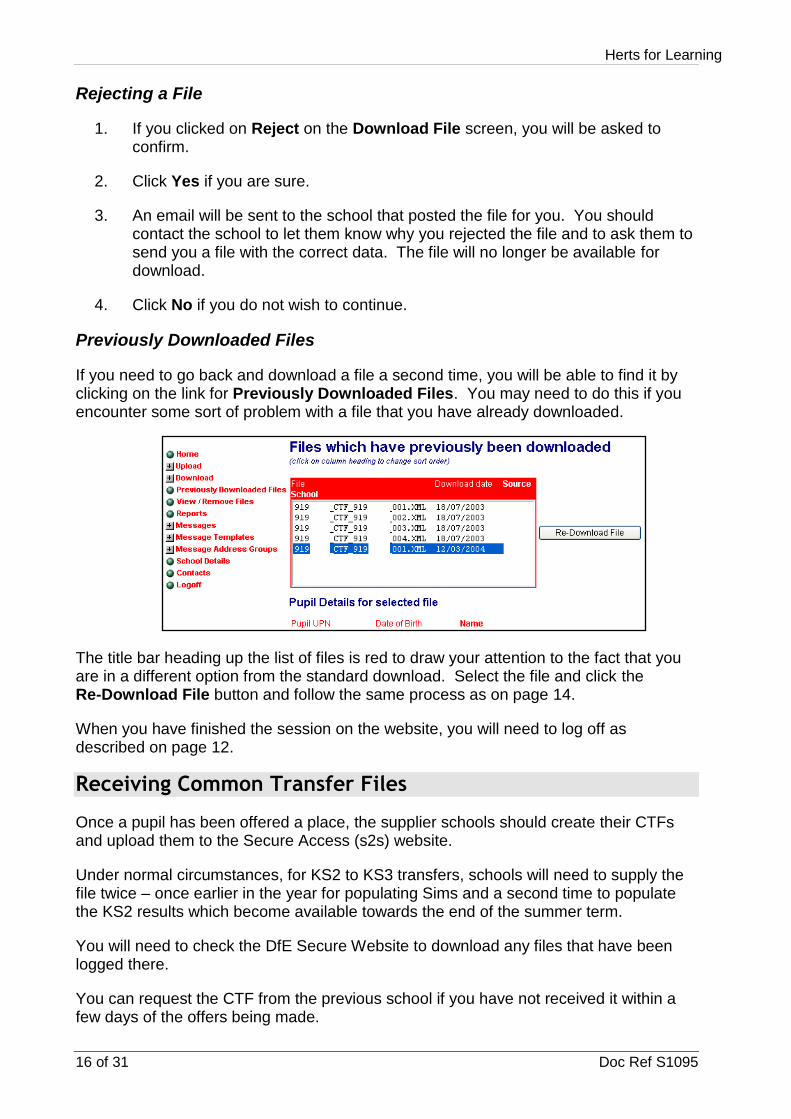
Previously Downloaded Files
If you need to go back and download a file a second time, you will be able to find it by clicking on the link for Previously Downloaded Files. You may need to do this if you encounter some sort of problem with a file that you have already downloaded.
The title bar heading up the list of files is red to draw your attention to the fact that you are in a different option from the standard download. Select the file and click the Re-Download File button and follow the same process as on page 14.
When you have finished the session on the website, you will need to log off as described on page 12.
Receiving Common Transfer Files
Once a pupil has been offered a place, the supplier schools should create their CTFs and upload them to the Secure Access (s2s) website.
Under normal circumstances, for KS2 to KS3 transfers, schools will need to supply the file twice – once earlier in the year for populating Sims and a second time to populate the KS2 results which become available towards the end of the summer term.
You will need to check the DfE Secure Website to download any files that have been logged there.
You can request the CTF from the previous school if you have not received it within a few days of the offers being made.
Herts for Learning
Doc Ref S1095 17 of 31
Importing Common Transfer Files
A new CTF Matching routine is available for use when importing CTF’s into SIMS. The routine enables you to detect potential duplicate records giving you the opportunity to choose not to import them.
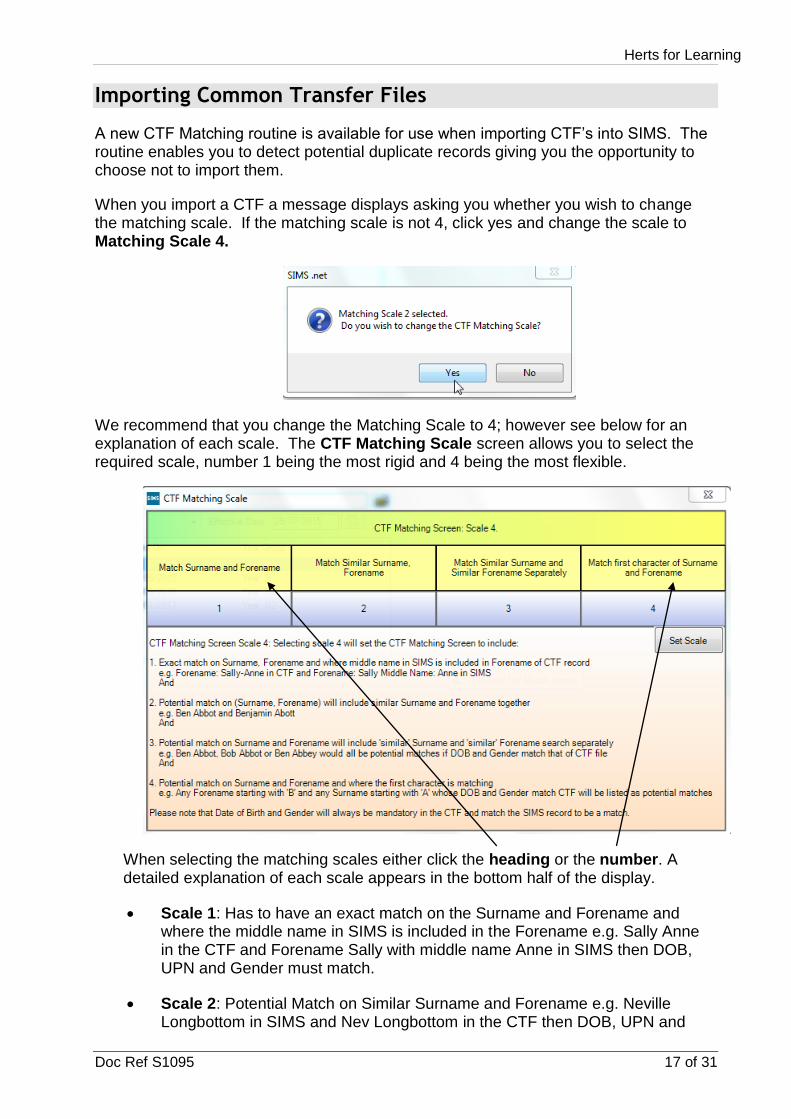
When you import a CTF a message displays asking you whether you wish to change the matching scale. If the matching scale is not 4, click yes and change the scale to Matching Scale 4.
We recommend that you change the Matching Scale to 4; however see below for an explanation of each scale. The CTF Matching Scale screen allows you to select the required scale, number 1 being the most rigid and 4 being the most flexible.
When selecting the matching scales either click the heading or the number. A detailed explanation of each scale appears in the bottom half of the display.
Scale 1: Has to have an exact match on the Surname and Forename and where the middle name in SIMS is included in the Forename e.g. Sally Anne in the CTF and Forename Sally with middle name Anne in SIMS then DOB, UPN and Gender must match.
Scale 2: Potential Match on Similar Surname and Forename e.g. Neville Longbottom in SIMS and Nev Longbottom in the CTF then DOB, UPN and
Herts for Learning
18 of 31 Doc Ref S1095
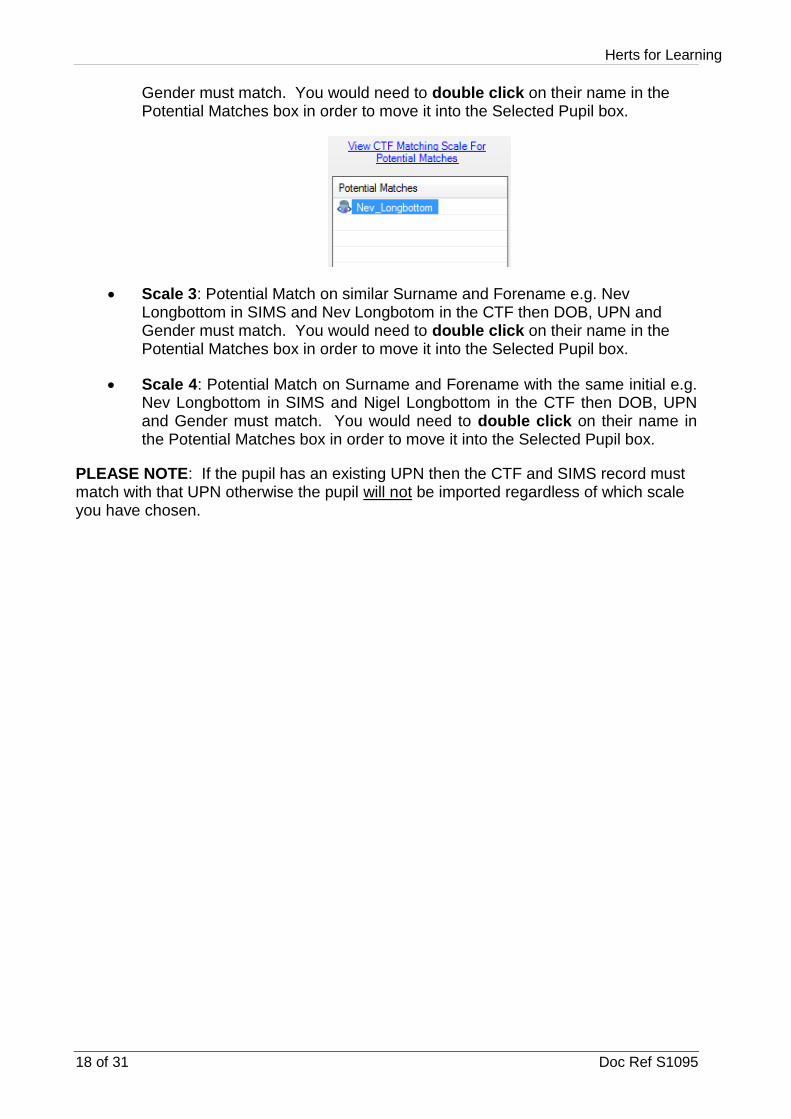
Gender must match. You would need to double click on their name in the Potential Matches box in order to move it into the Selected Pupil box.
Scale 3: Potential Match on similar Surname and Forename e.g. Nev Longbottom in SIMS and Nev Longbotom in the CTF then DOB, UPN and Gender must match. You would need to double click on their name in the Potential Matches box in order to move it into the Selected Pupil box.
Scale 4: Potential Match on Surname and Forename with the same initial e.g. Nev Longbottom in SIMS and Nigel Longbottom in the CTF then DOB, UPN and Gender must match. You would need to double click on their name in the Potential Matches box in order to move it into the Selected Pupil box.
PLEASE NOTE: If the pupil has an existing UPN then the CTF and SIMS record must match with that UPN otherwise the pupil will not be imported regardless of which scale you have chosen.
Herts for Learning
Doc Ref S1095 19 of 31
Using the Import CTF Matching Screen
The CTF Matching routine helps you decide how a CTF is imported into SIMS.
Importing a CTF
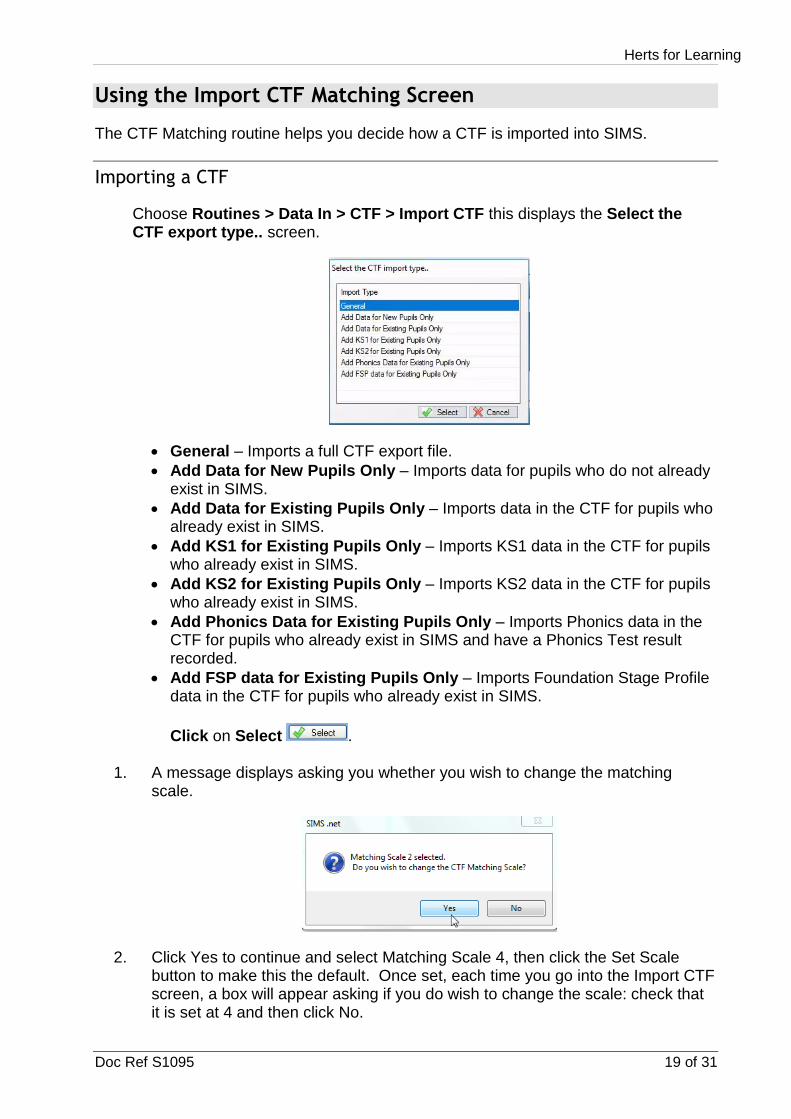
Choose Routines > Data In > CTF > Import CTF this displays the Select the CTF export type.. screen.
General – Imports a full CTF export file.
Add Data for New Pupils Only – Imports data for pupils who do not already exist in SIMS.
Add Data for Existing Pupils Only – Imports data in the CTF for pupils who already exist in SIMS.
Add KS1 for Existing Pupils Only – Imports KS1 data in the CTF for pupils who already exist in SIMS.
Add KS2 for Existing Pupils Only – Imports KS2 data in the CTF for pupils who already exist in SIMS.
Add Phonics Data for Existing Pupils Only – Imports Phonics data in the CTF for pupils who already exist in SIMS and have a Phonics Test result recorded.
Add FSP data for Existing Pupils Only – Imports Foundation Stage Profile data in the CTF for pupils who already exist in SIMS.
Click on Select .
1. A message displays asking you whether you wish to change the matching scale.
2. Click Yes to continue and select Matching Scale 4, then click the Set Scale button to make this the default. Once set, each time you go into the Import CTF screen, a box will appear asking if you do wish to change the scale: check that it is set at 4 and then click No.
Herts for Learning
20 of 31 Doc Ref S1095
3. If you have already added the pupils into your database prior to receiving the CTF you should remove ticks from areas such as Student Contacts and Student Address to avoid any details you have manually entered being overridden.
4. If the pupils to be imported are to be put straight into the database, choose to Place new pupils in On-Roll, otherwise select Pre-Admission from the drop down and select an Admission Group from the list.
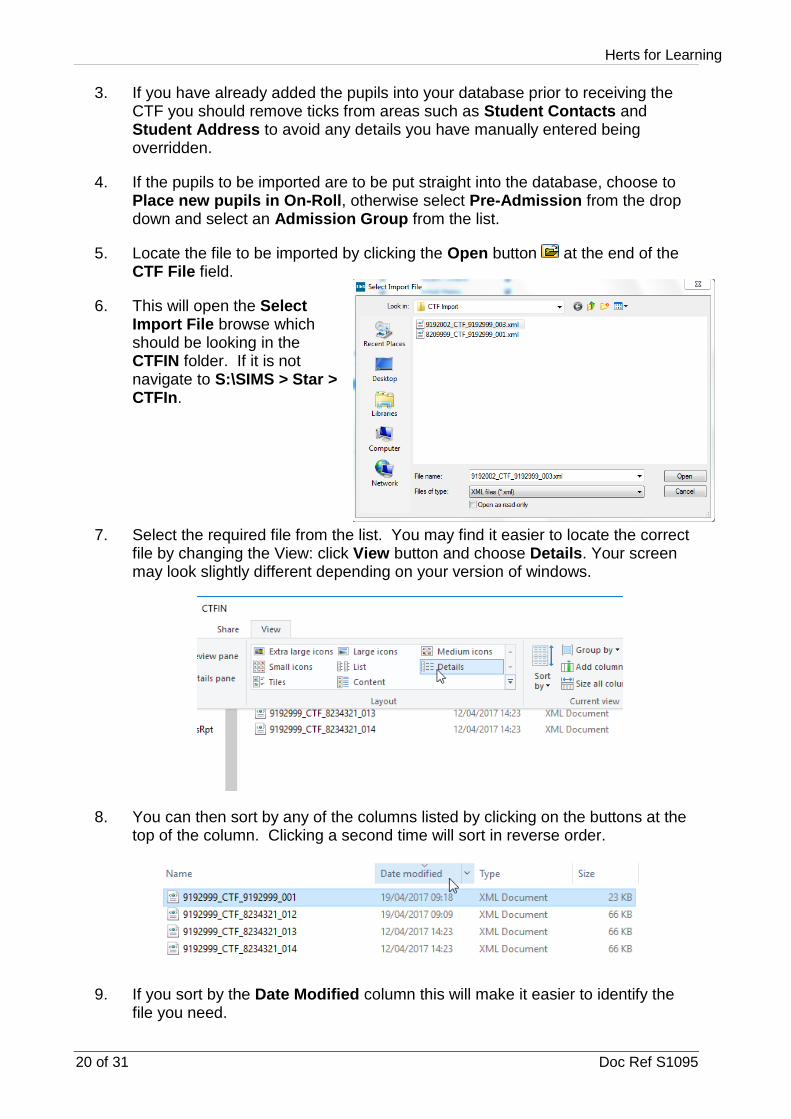
5. Locate the file to be imported by clicking the Open button at the end of the CTF File field.
6. This will open the Select Import File browse which should be looking in the CTFIN folder. If it is not navigate to S:\SIMS > Star > CTFIn.
7. Select the required file from the list. You may find it easier to locate the correct file by changing the View: click View button and choose Details. Your screen may look slightly different depending on your version of windows.
8. You can then sort by any of the columns listed by clicking on the buttons at the top of the column. Clicking a second time will sort in reverse order.
9. If you sort by the Date Modified column this will make it easier to identify the file you need.
Herts for Learning
Doc Ref S1095 21 of 31
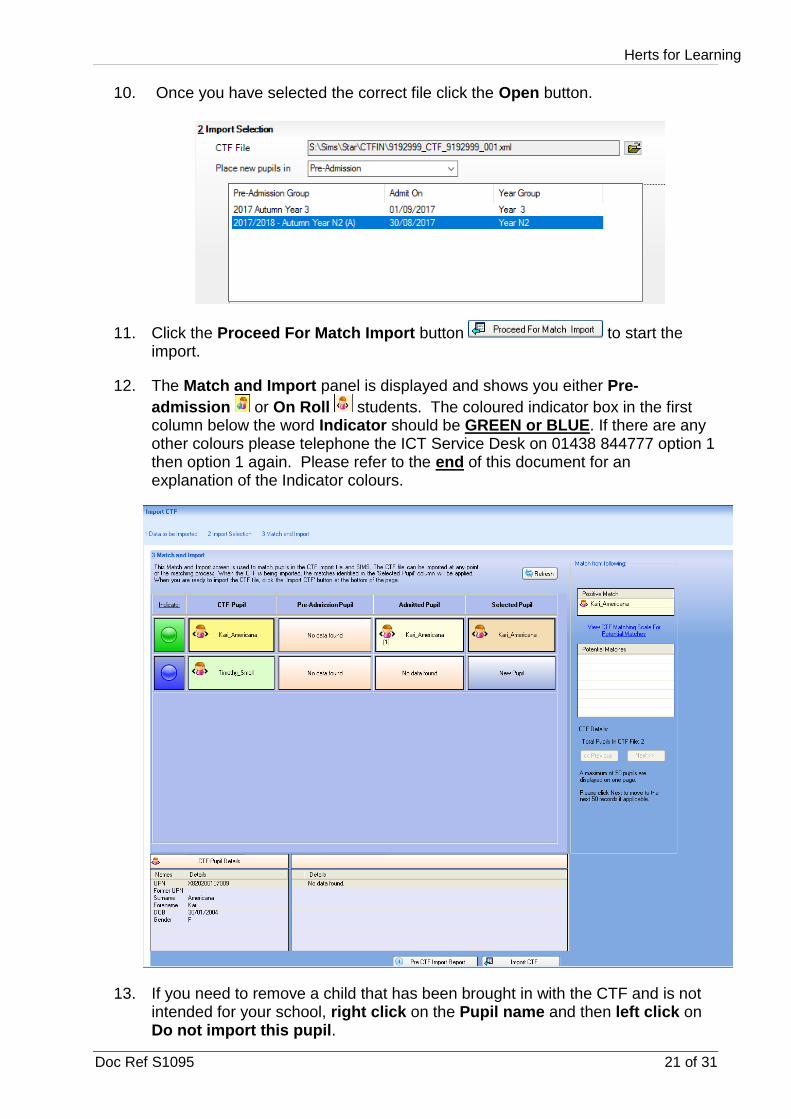
10. Once you have selected the correct file click the Open button.
11. Click the Proceed For Match Import button to start the import.
12. The Match and Import panel is displayed and shows you either Pre-
admission or On Roll students. The coloured indicator box in the first column below the word Indicator should be GREEN or BLUE. If there are any other colours please telephone the ICT Service Desk on 01438 844777 option 1 then option 1 again. Please refer to the end of this document for an explanation of the Indicator colours.
13. If you need to remove a child that has been brought in with the CTF and is not intended for your school, right click on the Pupil name and then left click on Do not import this pupil.
Herts for Learning
22 of 31 Doc Ref S1095
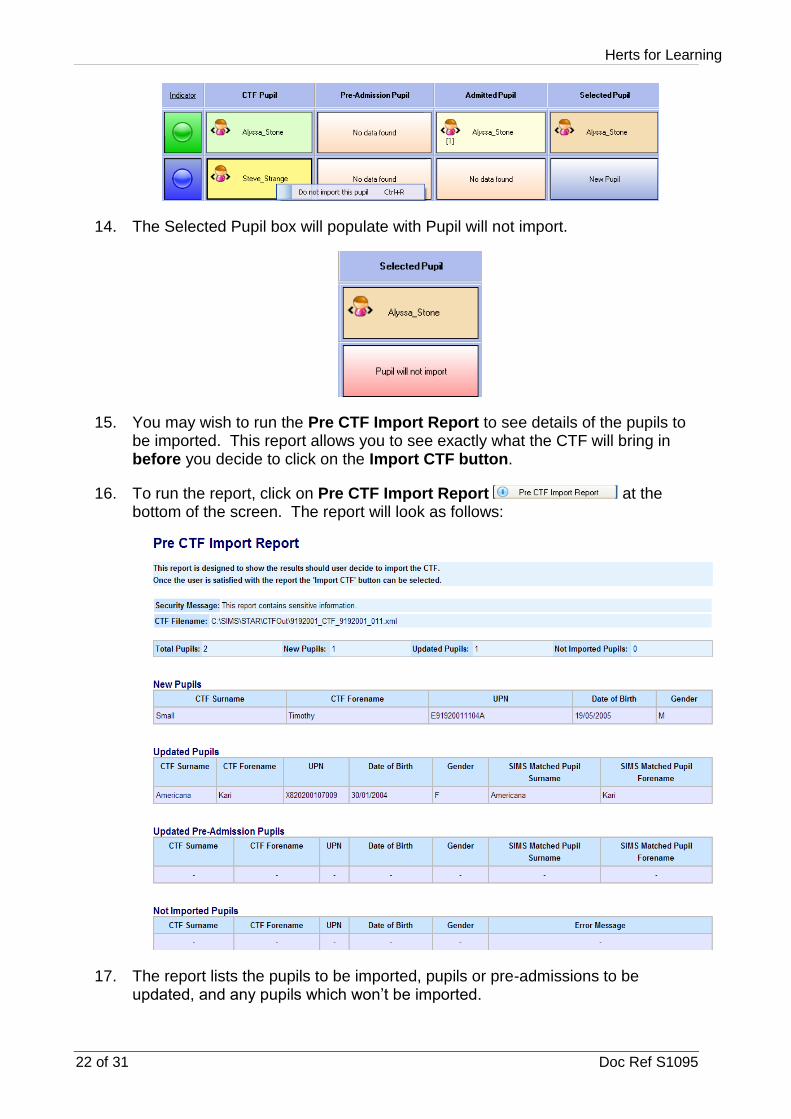
14. The Selected Pupil box will populate with Pupil will not import.
15. You may wish to run the Pre CTF Import Report to see details of the pupils to be imported. This report allows you to see exactly what the CTF will bring in before you decide to click on the Import CTF button.
16. To run the report, click on Pre CTF Import Report at the bottom of the screen. The report will look as follows:
17. The report lists the pupils to be imported, pupils or pre-admissions to be updated, and any pupils which won’t be imported.
Herts for Learning
Doc Ref S1095 23 of 31
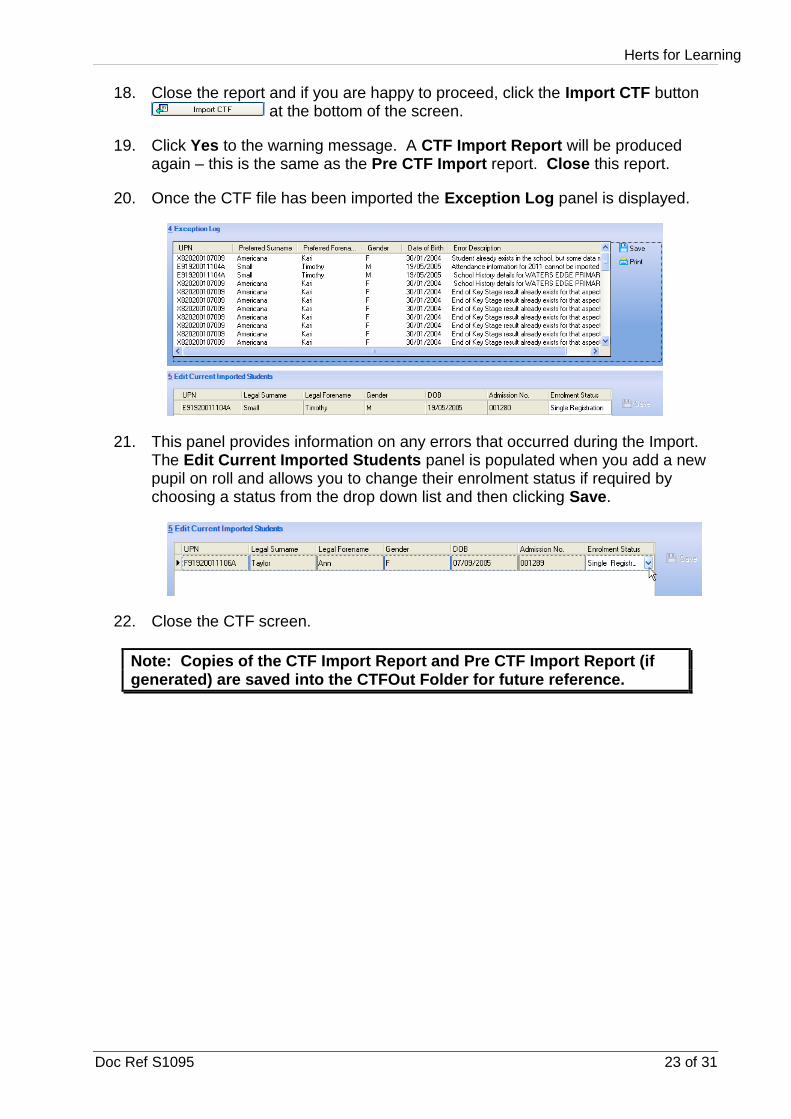
18. Close the report and if you are happy to proceed, click the Import CTF button at the bottom of the screen.
19. Click Yes to the warning message. A CTF Import Report will be produced again – this is the same as the Pre CTF Import report. Close this report.
20. Once the CTF file has been imported the Exception Log panel is displayed.
21. This panel provides information on any errors that occurred during the Import. The Edit Current Imported Students panel is populated when you add a new pupil on roll and allows you to change their enrolment status if required by choosing a status from the drop down list and then clicking Save.
22. Close the CTF screen.
Note: Copies of the CTF Import Report and Pre CTF Import Report (if generated) are saved into the CTFOut Folder for future reference.
Herts for Learning
24 of 31 Doc Ref S1095
Matching Screen Indicator Colours
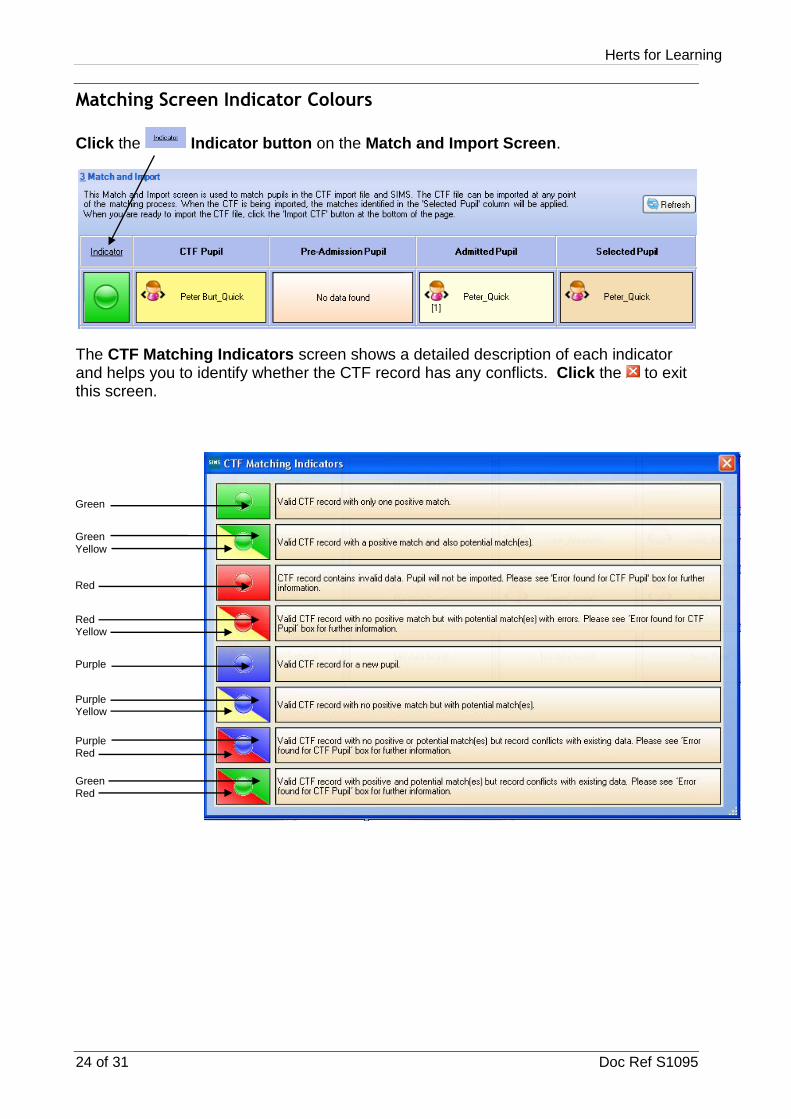
Click the Indicator button on the Match and Import Screen.
The CTF Matching Indicators screen shows a detailed description of each indicator and helps you to identify whether the CTF record has any conflicts. Click the to exit this screen.
Green Yellow
Purple
Red
Green
Red Yellow
Purple Yellow
Green Red
Purple Red
Herts for Learning
Doc Ref S1095 25 of 31
Some Examples of CTF Imports & Errors
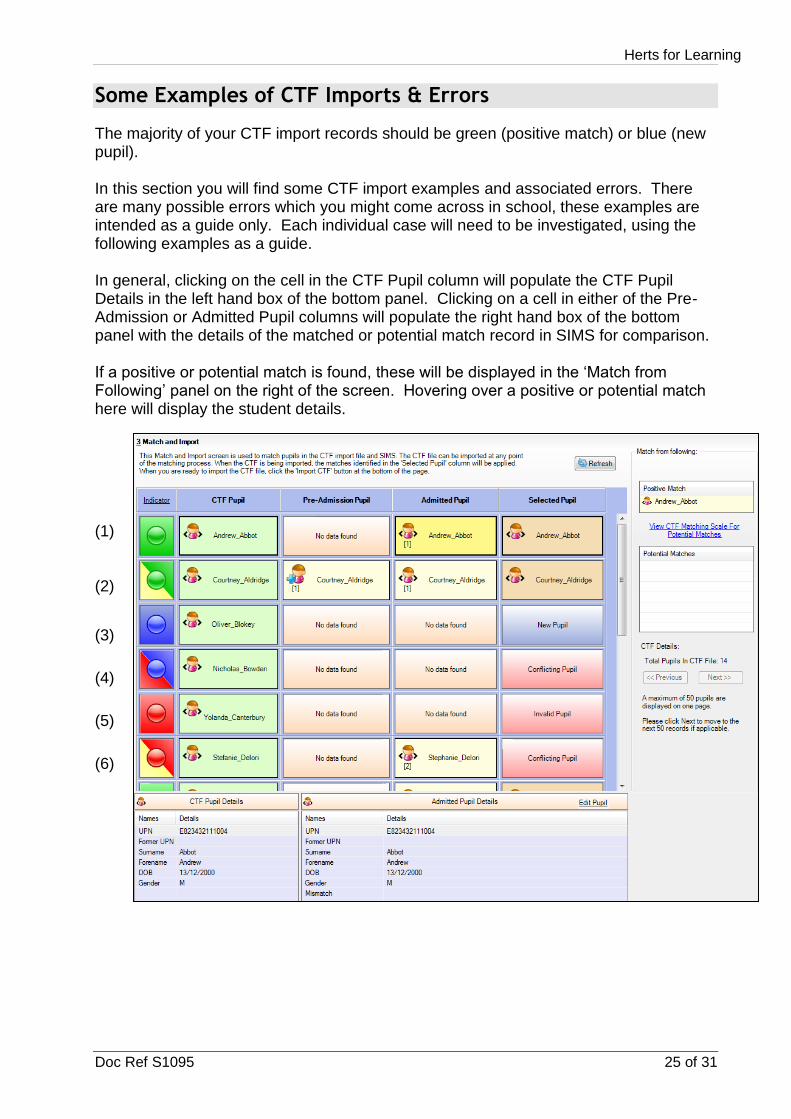
The majority of your CTF import records should be green (positive match) or blue (new pupil). In this section you will find some CTF import examples and associated errors. There are many possible errors which you might come across in school, these examples are intended as a guide only. Each individual case will need to be investigated, using the following examples as a guide. In general, clicking on the cell in the CTF Pupil column will populate the CTF Pupil Details in the left hand box of the bottom panel. Clicking on a cell in either of the Pre-Admission or Admitted Pupil columns will populate the right hand box of the bottom panel with the details of the matched or potential match record in SIMS for comparison.
If a positive or potential match is found, these will be displayed in the ‘Match from Following’ panel on the right of the screen. Hovering over a positive or potential match here will display the student details.
(1) (2)
(3)
(4)
(5)
(6)
Herts for Learning
26 of 31 Doc Ref S1095
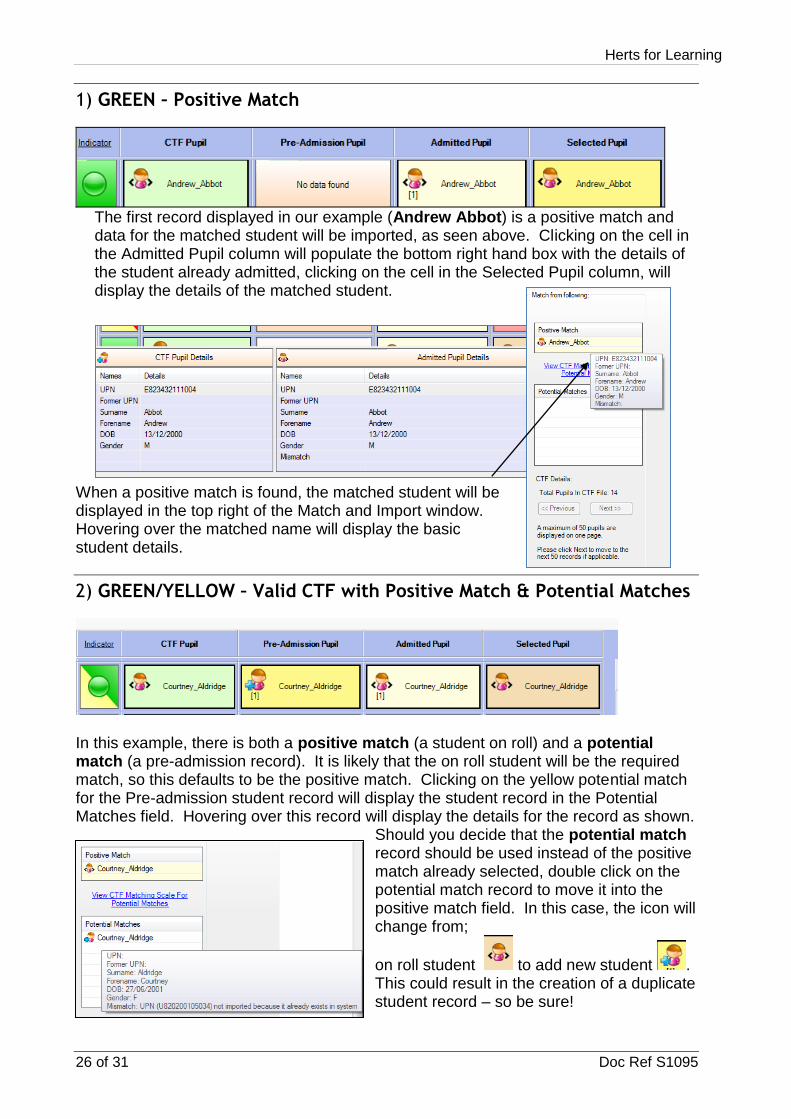
1) GREEN – Positive Match
The first record displayed in our example (Andrew Abbot) is a positive match and data for the matched student will be imported, as seen above. Clicking on the cell in the Admitted Pupil column will populate the bottom right hand box with the details of the student already admitted, clicking on the cell in the Selected Pupil column, will display the details of the matched student.
When a positive match is found, the matched student will be displayed in the top right of the Match and Import window. Hovering over the matched name will display the basic student details.
2) GREEN/YELLOW – Valid CTF with Positive Match & Potential Matches
In this example, there is both a positive match (a student on roll) and a potential match (a pre-admission record). It is likely that the on roll student will be the required match, so this defaults to be the positive match. Clicking on the yellow potential match for the Pre-admission student record will display the student record in the Potential Matches field. Hovering over this record will display the details for the record as shown.
Should you decide that the potential match record should be used instead of the positive match already selected, double click on the potential match record to move it into the positive match field. In this case, the icon will change from;
on roll student to add new student . This could result in the creation of a duplicate student record – so be sure!
Herts for Learning
Doc Ref S1095 27 of 31
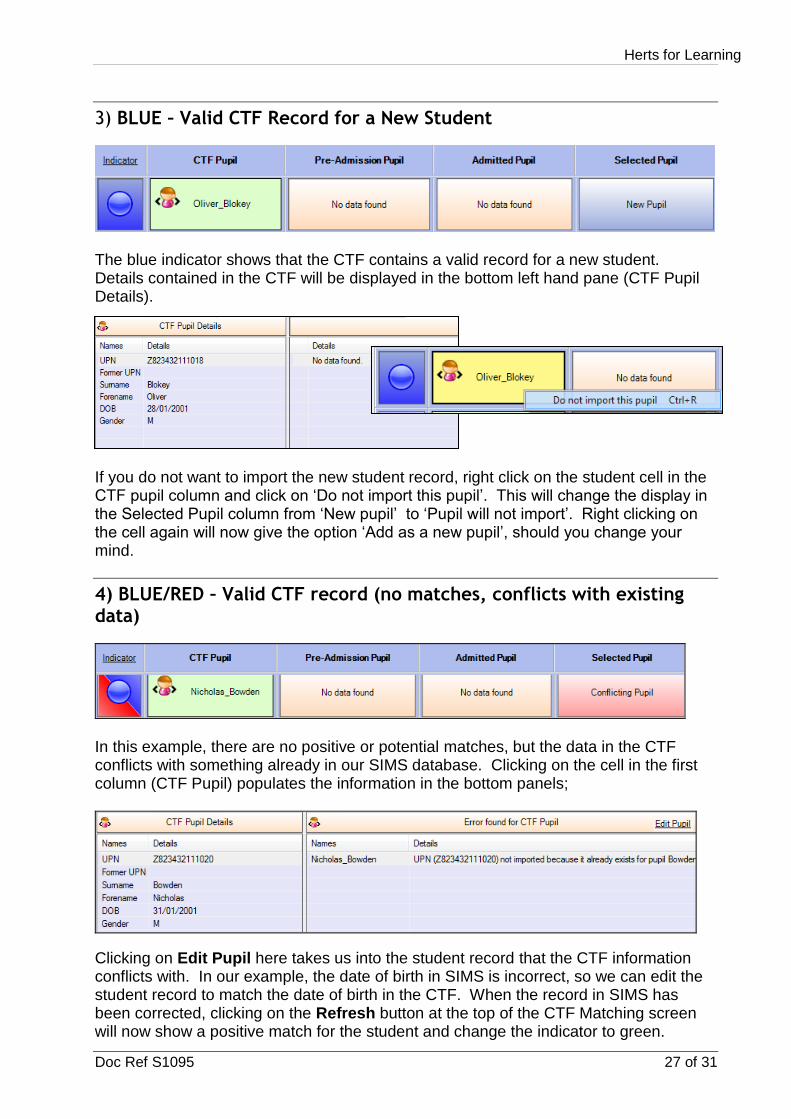
3) BLUE – Valid CTF Record for a New Student
The blue indicator shows that the CTF contains a valid record for a new student. Details contained in the CTF will be displayed in the bottom left hand pane (CTF Pupil Details).
If you do not want to import the new student record, right click on the student cell in the CTF pupil column and click on ‘Do not import this pupil’. This will change the display in the Selected Pupil column from ‘New pupil’ to ‘Pupil will not import’. Right clicking on the cell again will now give the option ‘Add as a new pupil’, should you change your mind.
4) BLUE/RED – Valid CTF record (no matches, conflicts with existing data)
In this example, there are no positive or potential matches, but the data in the CTF conflicts with something already in our SIMS database. Clicking on the cell in the first column (CTF Pupil) populates the information in the bottom panels;
Clicking on Edit Pupil here takes us into the student record that the CTF information conflicts with. In our example, the date of birth in SIMS is incorrect, so we can edit the student record to match the date of birth in the CTF. When the record in SIMS has been corrected, clicking on the Refresh button at the top of the CTF Matching screen will now show a positive match for the student and change the indicator to green.

Herts for Learning
28 of 31 Doc Ref S1095
5) RED – CTF Record Contains Invalid Data
In our example for student Yolanda Canterbury, clicking on the name of the invalid student displays the Pupil details contained in the CTF in the bottom left window and details of the error found in the bottom right window. In this example, the UPN for the student in the CTF file is invalid and the record will not be imported.
6) RED/YELLOW – Valid CTF Record (potential match(es)) with Errors
In our final example, there are two Admitted Pupil records in SIMS for Stephanie Delori, both of which are potential matches for the information contained in the CTF. Hovering over each of the potential matches will show the data in a pop up box, or clicking each one in turn will display the details in the right hand box of the bottom panel. We would need to resolve the duplicate records in SIMS and click on the Refresh button at the top of the CTF Matching page to see if a positive match can be made.
Herts for Learning
Doc Ref S1095 29 of 31
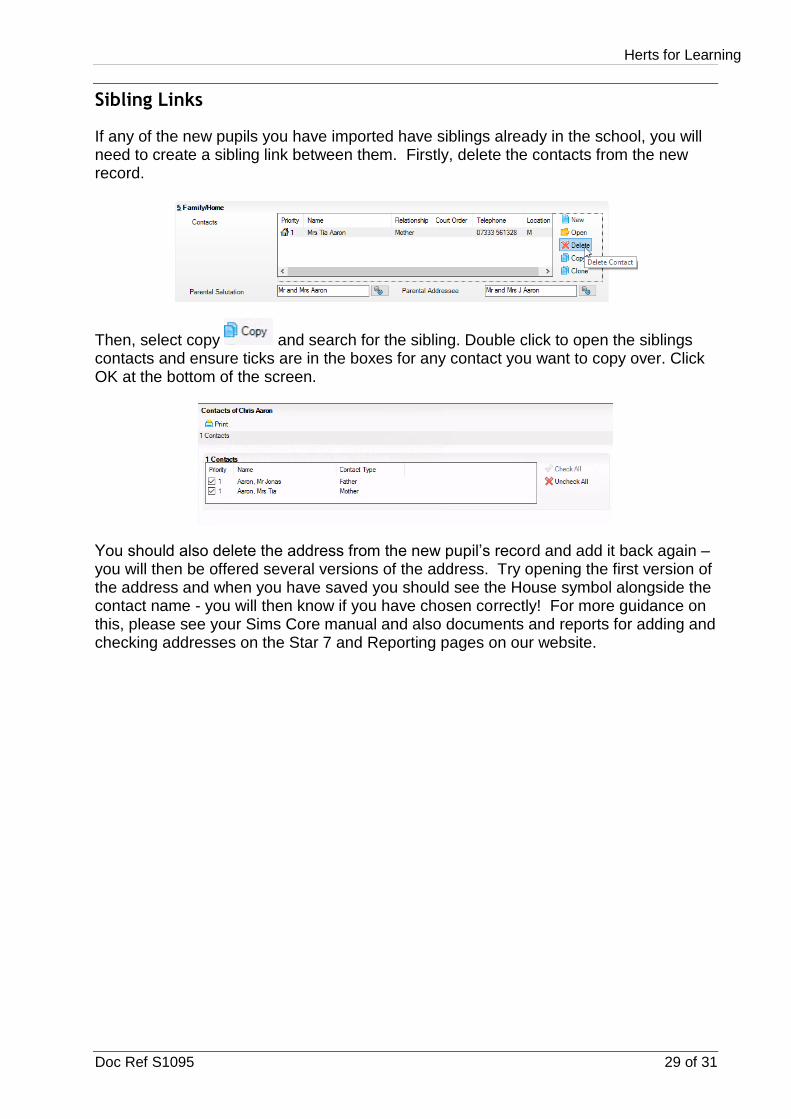
Sibling Links
If any of the new pupils you have imported have siblings already in the school, you will need to create a sibling link between them. Firstly, delete the contacts from the new record.
Then, select copy and search for the sibling. Double click to open the siblings contacts and ensure ticks are in the boxes for any contact you want to copy over. Click OK at the bottom of the screen.
You should also delete the address from the new pupil’s record and add it back again – you will then be offered several versions of the address. Try opening the first version of the address and when you have saved you should see the House symbol alongside the contact name - you will then know if you have chosen correctly! For more guidance on this, please see your Sims Core manual and also documents and reports for adding and checking addresses on the Star 7 and Reporting pages on our website.
Herts for Learning
30 of 31 Doc Ref S1095
Frequently Asked Questions
1 When I go into the CTF Export Screen why can’t I see the pupil I am looking for?
Ensure that you have selected the correct View – Current students, Leavers this year or Leavers previous years also Current and Leavers this year and have also clicked the Refresh Students button (see page 7).
2 Why can’t I see the school I need from the drop down list for Destination School?
You must ensure the school is set up under Tools > Other Schools, with an LA and DfE number (page 4) BEFORE going into the CTF Export screen. The school will then appear in the list for Destination School. If you do not know the school, you can choose the LA from the Destination LA/Other column. You DO NOT need to select an item from both columns.
3 If I have more than one pupil selected and try to assign a destination to all of them, it only works for one.
When more than one pupil is selected, you must assign the destination to the LAST one you clicked on (page 7).
4 I cannot find the CTF I have just created.
The location for exported CTFs is S:\Sims\Star\CTFout (or C:\Sims\Star\CTFout for standalone machines). If you are not sure of the filename, check the Export History Log (page 8). When uploading a CTF to the Secure Access (s2s) website, change the view to Details in order to see the most recent files (page 12).
5 When I try to download a CTF from the Secure Access (s2s) website, it ‘disappears’.
Internet Explorer may be blocking the download of the file – look for a message at the top of the web page window (page 14). If you can no longer see the file in the list, look at Previously Downloaded files (page 16).
6 I’ve imported a CTF and now I have duplicate contacts and addresses.
If you are importing a CTF for a pupil already in school and you have already entered contact and address details, you can choose to import the CTF WITHOUT those details. You can do this by removing the ticks on the Data to be imported (page 17).
7 I’ve imported a CTF for a pupil with a sibling in school but the Family Link has not been created.
You will need to delete the contacts from the new pupil and then copy the contacts from the sibling in order to create the Family Link (page 29).
8 I’ve pressed the export CTF button and a message appears about checking with your System Manager that Address Tidy and Merge has been run.
This message can be ignored. Click Yes to continue exporting.
Herts for Learning
Doc Ref S1095 31 of 31
9 I cannot log onto the S2S website.
ICT Services cannot reset this password for you, you will need to click on the ‘forgotten user name and password’ on the S2S website https://sa.education.gov.uk/idp/Authn/UserPassword
10 When importing a CTF I am asked if I wish to change the matching scale. What scale should I use?
We recommend that you use the matching scale of 4. This is the most flexible and finds potential matches already entered into SIMS. Once the ‘proceed for match import’ has been selected, only continue if the coloured indicator is Blue (New student not already on role) or Green (student already on role, and is a positive match) If it is a different colour this indicates that there is a potential problem and continuing to import can duplicate the child (page 25).
11 The CTF and does not match with the pupil I have already created.
The CTF pupil’s details and the admitted pupil details showing at the bottom of the screen must match to avoid duplications. It may be necessary to amend the details in the student record in SIMS (even if you know they are correct) to import the CTF. This can be changed back once the CTF has been successfully imported.