Embed Size (px)
Citation preview
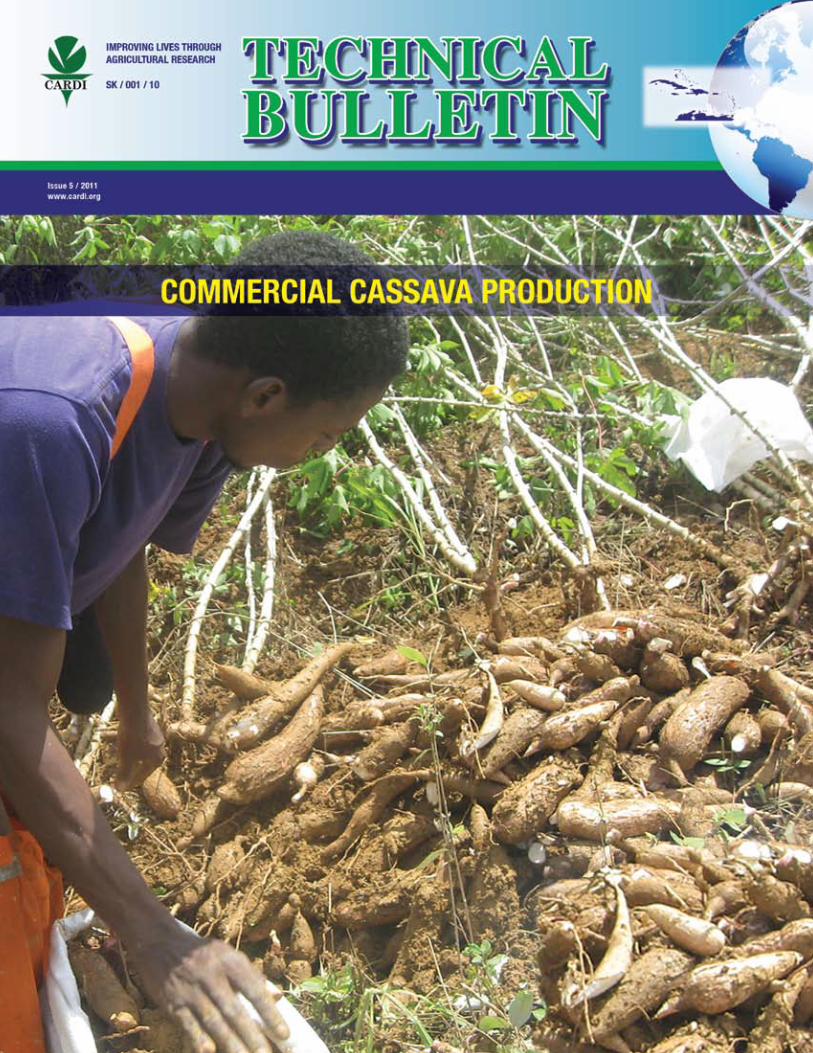
Commercial Cassava Production Technical Bulletin
2
PREFACE 3
INTRODUCTION 3
THE CASSAVA PLANT 4 Plant Parts 4 Growth and Development 4
GROWING CONDITIONS 4
SOIL 4
LAND PREPARATION 5
SELECTING CUTTINGS FOR PLANTING 5
TREATING PLANTING MATERIAL 5
STORING PLANTING MATERIAL 5
PRODUCING HIGH-QUALITY CASSAVA PLANTING MATERIAL 5-6 Mini-stem technique 5 Tissue cultured planting material 6
RECOMMENDED VARIETIES 6
PLANTING 7
APPLYING FERTILIZERS 7-8
WEEDS 8
PESTS 8-11 Major Pests and their Management 9-11 Insects and Mites 9-10 Bacteria 10-11 Fungi 11
HARVESTING 11 Hand harvesting 11 Levers 11 Mechanized harvesting 11
STORAGE 12
PROCESSING 12-13
CASSAVA CHECKLIST 14
BIBLIOGRAPHY 15
Contents
Commercial Cassava Production Technical Bulletin
3
PathleenTitus,JanetLawrenceandAnthonySeesahai
PREFACEThis technical bulletin is a new guide to cassava production in the Caribbean following varietal evaluations conducted at the field station of the Caribbean Agricultural Research and Development Institute (CARDI) in Saint Vincent and the Grenadines. The bulletin updates a CARDI factsheet produced by Frances Chandler in 1992 entitled, ‘Commercial Cassava Production’. Information from the International Centre for Tropical Agriculture (CIAT) in Columbia and the Latin America and Caribbean Consortium to support Cassava Research and Development (CLAYUCA) provided additional agronomic data.
INTRODUCTIONCassava (Manihot esculenta Crantz) also known as Yuca or Manioc, is a high-energy starchy root crop. It is popular in parts of Africa, in South America, where it is thought to have originated, and in the Caribbean.
Within the Region, cassava has been eaten for centuries by indigenous people and continues to be a staple in local diets. Cassava is consumed in various ways throughout the Region, as a savoury and as a sweet. The freshly harvested boiled tubers are eaten as the main starch at a meal, added to soups, used as base for other dishes or fried as chips or snack crisp. Grated cassava is used in sweet desert items.
In the Caribbean, subsistence farmers with small agricultural holdings (less than 0.5 ha) traditionally grow just a few varieties of cassava. Their tillage operations are minimal, mainly restricted to hand hoes and forks, and there is little or no mechanization. Fertilizer inputs are small and there is minimal pesticide use. Yields from this type of farming system are generally poor and provide meagre returns to the farmer.
The global supplies of staples such as wheat, rice and corn has been reduced due to a number of factors such as alternative uses for the crop and decreased production resulting from dramatic climatic changes and inadequate water management – either from a lack of irrigation or flooding. This has focused attention on cassava as a locally-produced substitute for these imports. Many Caribbean countries have identified the crop as important to their food and nutrition security goals, and are making efforts to expand current acreages, increase yields and reduce the cost of production using recommended agronomic practices.
This growing interest in the crop has lead CARDI to seeks to provide producers and other key stakeholders along value chain with relevant information needed for the efficient and sustainable production of cassava. This bulletin therefore provides information on the production, harvesting and post harvest handling of cassava as well as the usages that add value to the raw product.

4
Commercial Cassava Production Technical BulletinCommercial Cassava Production Technical Bulletin
THE CASSAVA PLANTCassava is a member of the Euphorbiaceae family of flowering plants. It is a perennial and can grow to a height of 4.5 m (15 feet). The entire plant may be viewed as a food production factory with the end products being tubers for human and animal consumption. High tuber yields depend on the varieties cultivated and on the proper growth, development and functioning of the leaves, stem and roots supported by optimal growing conditions provided by climatic conditions and the soil.
Plant Parts
Leaves: The leaves produce starches and protein, which are the building blocks for cell growth and development. Hence, the amount and health of leaves on a cassava plant during the growth of the crop are important factors affecting yield.
Stems: The stems act as the transport organs for the food produced in the leaves, sending it to different parts of the plant for its growth and development. Stems also provide planting material for subsequent crops.
Roots: The cassava plant has three types of roots: fine, white roots, which absorb water and nutrients; thick roots, which
anchor the plant to the ground; and tuberous roots, which store carbohydrates.
Growth and Development
The cassava plant has two distinct growth phases. 1. The first growth phase (from planting to 8 weeks) involves the
production of stems and leaves and the thin and thick root systems. During this phase, the cassava tuber begins to form.
2. The second growth phase (8–72 weeks) involves the rapid growth of the stems and leaves, as well as the swelling or bulking of the cassava tuber formed in the first phase.
GROWING CONDITIONSCassava thrives best when rainfall is well distributed throughout the growing period. Maximum root production occurs within a temperature range of 25°C to 32°C. At higher temperatures, starch production in the leaves is slow. As such, the amount of cassava produced is reduced. Shade will also produce low yields, so the crop should be cultivated in areas where there is full sunlight.
SOILA good soil is one of the most important factors required for high cassava yields. The crop requires adequate root room to expand, so the best soil is loose (friable) with an abundance of available nutrients for healthy plant growth.
Soils can be acid with a pH less than 7 or alkaline with a pH greater than 7. Cassava can tolerate soils within a wide range, from pH 4.0 to pH 8.0. However, the best pH range for growing cassava is 5.5–6.5. Limestone should be incorporated into more acidic soils at 3 to 4 months before planting, using a rate of 2 to 4 tons per hectare, depending on the level of acidity. Liming acid soils has many benefits. It reduces the uptake of aluminium and iron, which are toxic to cassava plants; provides calcium for proper cell wall formation; and enables good bacteria to decompose soil organic matter making nutrients available for plant growth.
Avoid fields that are prone to flooding, since most cassava varieties cannot withstand prolonged waterlogged conditions. Excessive water will cause the tubers to rot, producing unmarketable tubers that deteriorate rapidly. Always choose sites that can shelter the plants from fierce winds.
Cassava plant (Manihot esculenta Crantz)

Commercial Cassava Production Technical Bulletin Commercial Cassava Production Technical BulletinCommercial Cassava Production Technical Bulletin
5
LAND PREPARATION The land should be well prepared to allow optimal tuber development. Clear the site of all grass, brush and trees. Plough, rotavate and ridge the soil using tractor drawn implements. Form the ridges 1–1.5 m [approx. 3–4.5 ft] apart and 45 cm to 60 cm [approx.18–24 in] high. In hilly areas, plough along the contour. Perform subsoiling (deep tilling) to break up the soil below the top soil. This will ensure good drainage. A good farming practice is to allow the ploughed soil to remain exposed to the sun for 2 weeks to a month. This helps to kill deeply embedded weed seeds. A second ploughing is then done in preparation for planting.
The addition of manures or composted material helps in maintaining a good soil structure; they provide nutrients for the six to nine months that the crop is in the ground.
SELECTING CUTTINGS FOR PLANTINGUse cuttings from strong, healthy cassava plants between 8 and 18 months old. Younger material tends to be soft and susceptible to dehydration. Older material lacks the food reserves necessary for the growth and development of the plant. Select cuttings from the middle portion of the stems. Using a handsaw or clean, sharp cutlass, cut stakes 20–30 cm [8–12 in] long with an average of 9–12 nodes. Sterilize cuttings in a 1% bleach solution.
Examples of types of planting material from left to right - too young, too old, correct
TREATING PLANTING MATERIALPlanting material should be dipped in a fungicide / insecticide / nutrient solution for 5 minutes to protect the crop from pests. A possible solution is copper hydroxide (e.g. Kocide 606®, Manzate® or Tri-Miltox forte®), a broad spectrum insecticide (e.g.
Diazinon® or Basudin®) and a foliar fertilizer (e.g. Nutrex®). All of these should be used at the manufacturer’s recommended rates.
STORING PLANTING MATERIALIdeally, cuttings should be planted immediately after they are cut and treated. The pieces dehydrate quickly when stored under high temperatures (32ºC–36ºC) and lose their ability to germinate. If the cuttings must be stored, select long pieces, preferably 30–50 cm [12–20 in], dip them in a fungicide / insecticide / nutrient solution, allow the solution to dry then place them in a shaded and well-ventilated area. Use a watering can or hose to wet the stored cuttings periodically.
PRODUCING HIGH-QUALITY CASSAVA PLANTING MATERIALThere are two systems for producing high-quality cassava planting material, the mini-stem technique and tissue culture. Farmers can perform the mini-stem technique themselves, while the tissue culture method is normally done in a tissue culture laboratory.
Mini-stem Technique The mini-stem technique uses small stem pieces, which means that a single cassava stem will yield more planting material than the conventional method. A three-foot [90 cm] single stem with 80–100 intact nodes will normally produce 3 plants, each 30 cm long with the conventional method. The same stem will produce 40–50 two-node cuttings or 20–25 four-node cuttings using the mini-stem technique.
Cut as many 2–4 node stem pieces, or mini-stems, from healthy cassava plants between 8 and 18 months old. Sprout the selected stem pieces in seedling trays, propagation bins, nursery beds or polythene bags. This will take 2–4 weeks. Use a foliar spray like Nutrex® to provide major and minor nutrients and so enhance plant vigour. Periodically examine the young leaves for pests and diseases, identify any infestation or damage, and use appropriate control measures.
Examples of suitable material [left],which will be cut into two-node cuttings
[right]
Commercial Cassava Production Technical BulletinCommercial Cassava Production Technical Bulletin
6
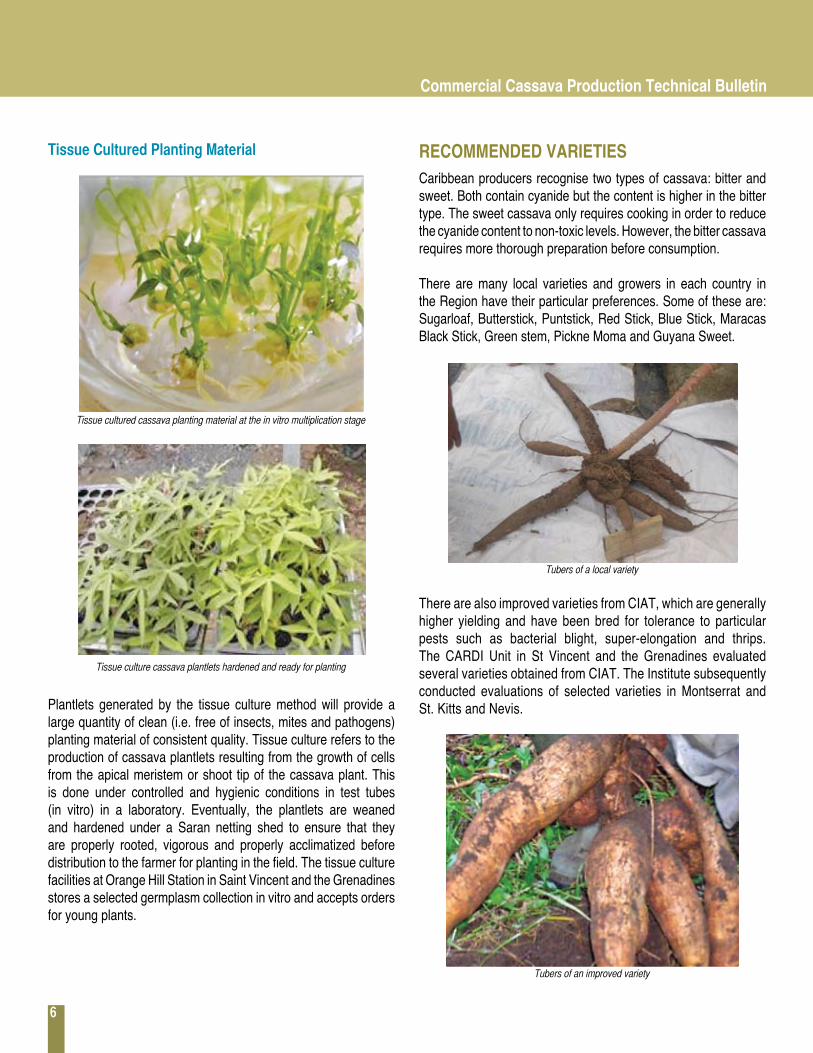
Tissue Cultured Planting Material
Tissue cultured cassava planting material at the in vitro multiplication stage
Tissue culture cassava plantlets hardened and ready for planting
Plantlets generated by the tissue culture method will provide a large quantity of clean (i.e. free of insects, mites and pathogens) planting material of consistent quality. Tissue culture refers to the production of cassava plantlets resulting from the growth of cells from the apical meristem or shoot tip of the cassava plant. This is done under controlled and hygienic conditions in test tubes (in vitro) in a laboratory. Eventually, the plantlets are weaned and hardened under a Saran netting shed to ensure that they are properly rooted, vigorous and properly acclimatized before distribution to the farmer for planting in the field. The tissue culture facilities at Orange Hill Station in Saint Vincent and the Grenadines stores a selected germplasm collection in vitro and accepts orders for young plants.
RECOMMENDED VARIETIESCaribbean producers recognise two types of cassava: bitter and sweet. Both contain cyanide but the content is higher in the bitter type. The sweet cassava only requires cooking in order to reduce the cyanide content to non-toxic levels. However, the bitter cassava requires more thorough preparation before consumption.
There are many local varieties and growers in each country in the Region have their particular preferences. Some of these are: Sugarloaf, Butterstick, Puntstick, Red Stick, Blue Stick, Maracas Black Stick, Green stem, Pickne Moma and Guyana Sweet.
Tubers of a local variety
There are also improved varieties from CIAT, which are generally higher yielding and have been bred for tolerance to particular pests such as bacterial blight, super-elongation and thrips. The CARDI Unit in St Vincent and the Grenadines evaluated several varieties obtained from CIAT. The Institute subsequently conducted evaluations of selected varieties in Montserrat and St. Kitts and Nevis.
Tubers of an improved variety
Commercial Cassava Production Technical Bulletin Commercial Cassava Production Technical BulletinCommercial Cassava Production Technical Bulletin
7
PLANTINGCassava stakes can be planted slanted, vertically or horizontally. For wet areas, it is better to plant vertically or slanted, as horizontal planting may cause the stakes to rot. In dry areas, place the stakes horizontally. Stakes should be planted 5–10 cm [2–4 in] deep. For stakes that are planted slanted or vertically, only one node should be visible above ground.
Establish single rows on each prepared bed. Space plants 50 cm [20 in] between each other for those varieties with a compact habit and 75 cm [30 in) for those plants with a spreading habit.
Where the terrain allows, use mechanical planters to ensure more uniform spacing and depth of planting. Mechanized planting buries the stake horizontally from 5 to 20 cm [2 to 8in] deep. Two rows can be planted at the same time and some planters also deliver chemical fertilizers during planting.
Cassava Planter
Cassava stake placed horizontally by the mechanical planter (circled)
APPLYING FERTILIZERS Cassava plants have a long growth period, requiring adequate amounts of the major nutrients—nitrogen, phosphorus, potassium and magnesium—as well as other nutrients particularly, boron, manganese, zinc and calcium at specific times in the life cycle of the crop. Remember that the cassava plant grows best at a pH of 5.5 to 6.5 because it is at this pH that nutrients become available for plant growth. Fertilizer use is closely associated with the growth phases of cassava. Fertilization is critical during the first phase at 6-8 weeks after planting. This is when the thin and thick roots are being rapidly produced and can absorb the nutrients from the soil. Fertilization is also important during the second phase, at 16 weeks after planting, when the tubers begin to bulk up and there is a high demand for sucrose, which is stored in the tubers. Potassium is the most important fertilizer to apply at this time because its helps in mobilizing the sucrose produced in the leaves and translocating it to the tubers where it is converted to starch.
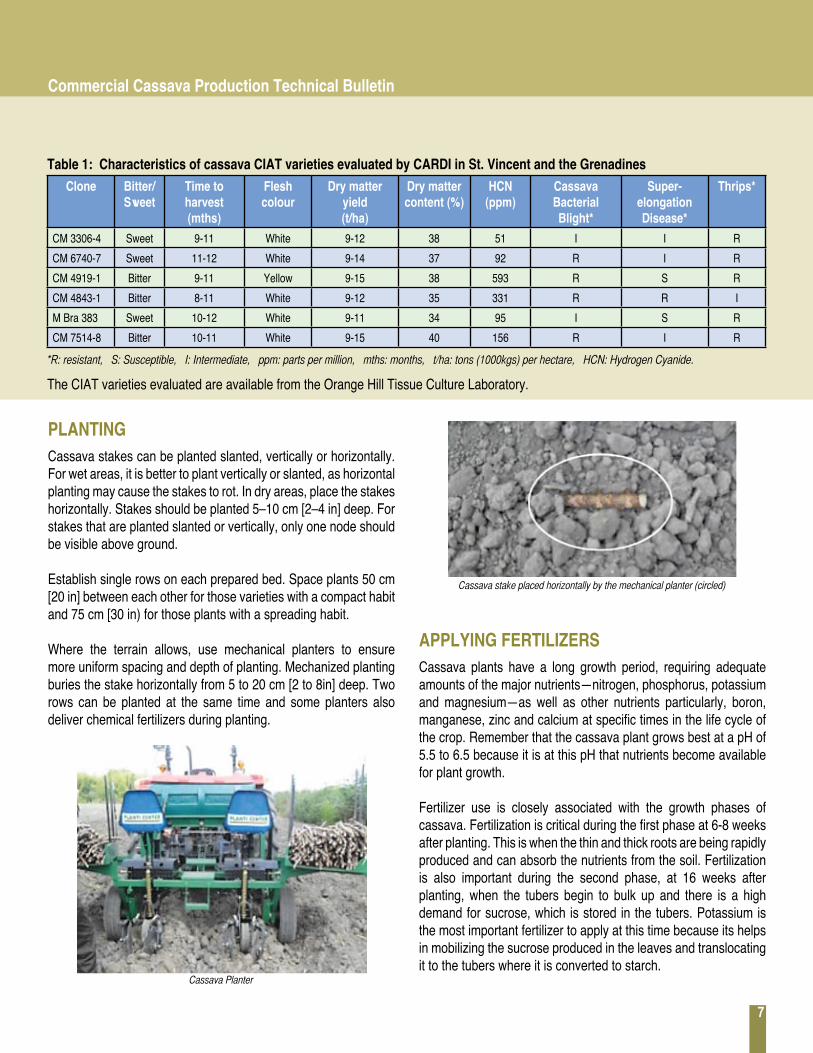
Table 1: Characteristics of cassava CIAT varieties evaluated by CARDI in St. Vincent and the GrenadinesClone Bitter/
SweetTime to harvest (mths)
Flesh colour
Dry matter yield (t/ha)
Dry matter content (%)
HCN (ppm)
Cassava Bacterial Blight*
Super-elongation Disease*
Thrips*
CM 3306-4 Sweet 9-11 White 9-12 38 51 I I R
CM 6740-7 Sweet 11-12 White 9-14 37 92 R I R
CM 4919-1 Bitter 9-11 Yellow 9-15 38 593 R S R
CM 4843-1 Bitter 8-11 White 9-12 35 331 R R I
M Bra 383 Sweet 10-12 White 9-11 34 95 I S R
CM 7514-8 Bitter 10-11 White 9-15 40 156 R I R
*R: resistant, S: Susceptible, I: Intermediate, ppm: parts per million, mths: months, t/ha: tons (1000kgs) per hectare, HCN: Hydrogen Cyanide. The CIAT varieties evaluated are available from the Orange Hill Tissue Culture Laboratory.

8
Commercial Cassava Production Technical BulletinCommercial Cassava Production Technical Bulletin
Fertilizer decisions should be made using the following guidelines:
• Determine the nutrient content and pH of the soil by having a soil test conducted.
• Determine the amount of nutrients the cassava crop requires to produce high yields.
• Calculate the amount and type of fertilizer to add to the soil.
The crop extracts large quantities of nitrogen (N) and potassium (K) from the soil as well as considerable quantities of phosphorus (P), calcium (Ca) and magnesium (Mg). On soils that are moderately deficient in P and K, a general recommendation would be to use a fertilizer with an N: P: K ratio of roughly 1:1:2, e.g. 40–80 kg N, 40–80 kg P and 80–160 kg K per ha.
Do not fertilize the crop with extra nitrogen, as this can cause excessive vegetative or leafy growth. A leafy plant will produce smaller tubers. Excessive N application may also lead to high cyanide content, which will cause bitter tubers. Inadequate K will lead to excessive vegetative production at the expense of the tuber growth. Some key factors to remember in fertilizing cassava are:
• Fertilizers can be incorporated when planting mechanically or alternatively it can be placed 15–20 cm [6–8 in] from the stem base in drill holes 10–15 cm [4–6 in] deep about 6–8 weeks after planting. An additional amount of potassium fertilizers should be used at 16 weeks after planting when the tuber begins to swell.
• The choice of fertilizer type e.g. 12:12:17:2 NPK or 12:24:12 NPK and amount must be calculated.
Well fertilized, improved cassava variety showing uniform stand
WEEDSWeeds can have a negative impact on the growth of the cassava plant, therefore, they must be managed even before the crop is planted. Weeds can be controlled using cultural, manual, mechanical or chemical methods. Deeply embedded weed seeds can be controlled by ploughing the soil about 2 weeks to a month before planting, and allowing the heat of the sun to kill the weed seeds.
The time to manage weeds is during the first few months, before the leaf canopy closes over the soil surface. Use a combination of manual and mechanical methods together with a pre-emergent herbicide application (e.g. Pendimethalin [Herbadox®], Diuron [Karmex®], Alachlor [Lasso®] or Glufosinate [Basta®]).
During the cropping cycle, herbicides such as glyphosate [Round up®] and paraquat [Grammoxone®] can be used in the inter rows. Be careful, use a shield to avoid damage to the crop, especially during the early growth stages.
PESTSA pest can be anything that negatively affects a crop and includes, insects, mites, fungi, bacteria, viruses, weeds and rodents. Pests from all of these categories cause significant damage to cassava, affecting its growth, development and productivity.
Before pests can be managed, it is important to make a proper diagnosis so that the most appropriate and effective strategies can be implemented. Therefore, it is necessary to inspect the crop to determine the presence and identity of pests, their numbers, and the level of damage done. Once the diagnosis has been completed, an integrated management strategy can be selected that will reduce the pest numbers and the damage to the crop.
Integrated Pest Management (IPM) refers to the management of pests by using a suitable combination of compatible methods and practices. These include cultural practices, biological control, physical and mechanical methods, chemical applications as well as legislation to prevent the importation or movement of plant material that could threaten the industry. IPM emphasizes the use of non-chemical methods and only relies on chemical control when all other methods are ineffective in reducing crop
Commercial Cassava Production Technical Bulletin Commercial Cassava Production Technical BulletinCommercial Cassava Production Technical Bulletin
9
damage. The choice of options relies on making an informed decision taking into account the information collected on the pest as well as details on the crop, production practices, prices, and available inputs and tools.
IPM aims at ensuring that the farmer gets the best possible returns and the environment is protected. It is critical for the sustained management of the pest and hence the achievement of optimal production for the long term.
Major Pests And Their Management
Insects and MitesShootfliesDamage: Shoot flies damage the tips (growing area) of the young plant causing growth to be stunted. The young stage of the shoot fly lives inside the stem tissue, where it feeds. Sticky material (frass) may be seen at the tip of the stem. Mature plants do not suffer as much as the younger ones. Heavy infestations occur in the beginning of the rainy season.
Damaged to cassava plantcaused by Shoot fly
Management: Typically shoot flies are managed by natural enemies present in the field. As such, management practices should seek to preserve these agents through the careful selection and application of pesticides and enhancing the area with flowering crops that are necessary for the survival of the natural enemy. Roguing of plants that are infested with the fly is also recommended.
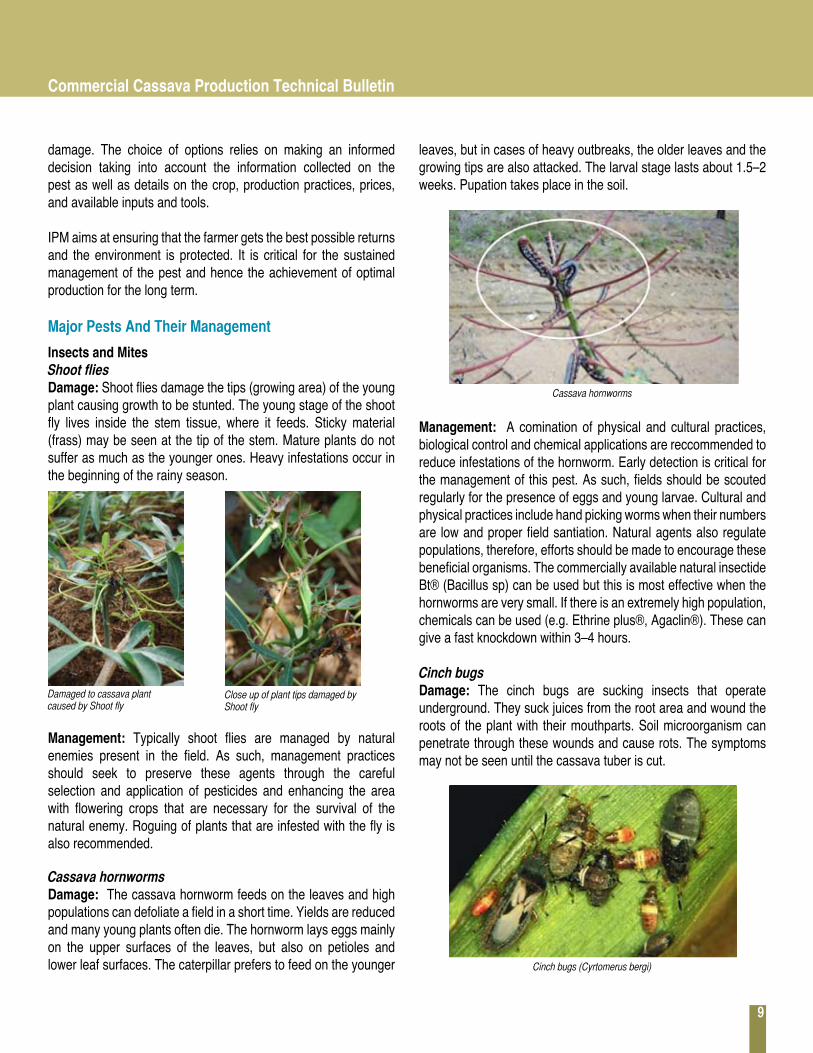
CassavahornwormsDamage: The cassava hornworm feeds on the leaves and high populations can defoliate a field in a short time. Yields are reduced and many young plants often die. The hornworm lays eggs mainly on the upper surfaces of the leaves, but also on petioles and lower leaf surfaces. The caterpillar prefers to feed on the younger
leaves, but in cases of heavy outbreaks, the older leaves and the growing tips are also attacked. The larval stage lasts about 1.5–2 weeks. Pupation takes place in the soil.
Cassava hornworms
Management: A comination of physical and cultural practices, biological control and chemical applications are reccommended to reduce infestations of the hornworm. Early detection is critical for the management of this pest. As such, fields should be scouted regularly for the presence of eggs and young larvae. Cultural and physical practices include hand picking worms when their numbers are low and proper field santiation. Natural agents also regulate populations, therefore, efforts should be made to encourage these beneficial organisms. The commercially available natural insectide Bt® (Bacillus sp) can be used but this is most effective when the hornworms are very small. If there is an extremely high population, chemicals can be used (e.g. Ethrine plus®, Agaclin®). These can give a fast knockdown within 3–4 hours.
CinchbugsDamage: The cinch bugs are sucking insects that operate underground. They suck juices from the root area and wound the roots of the plant with their mouthparts. Soil microorganism can penetrate through these wounds and cause rots. The symptoms may not be seen until the cassava tuber is cut.
Cinch bugs (Cyrtomerus bergi)
Close up of plant tips damaged by Shoot fly
10
Commercial Cassava Production Technical BulletinCommercial Cassava Production Technical Bulletin
Management: Cinch bugs are best managed through the use of cultural practices. The use of trap crops, such as Crotalaria spp and sunflowers, interplanted in affected cassava fields can reduce infestations. However, the best control method is crop rotation, which breaks the life cycle of the pest.
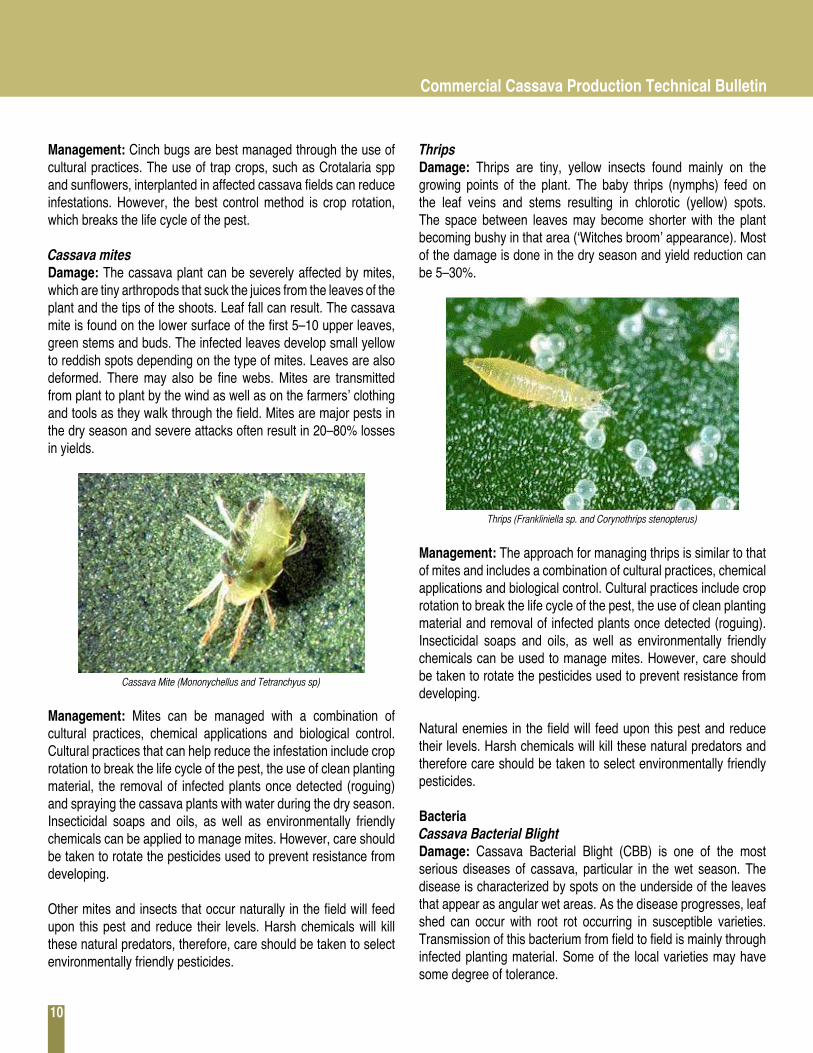
CassavamitesDamage: The cassava plant can be severely affected by mites, which are tiny arthropods that suck the juices from the leaves of the plant and the tips of the shoots. Leaf fall can result. The cassava mite is found on the lower surface of the first 5–10 upper leaves, green stems and buds. The infected leaves develop small yellow to reddish spots depending on the type of mites. Leaves are also deformed. There may also be fine webs. Mites are transmitted from plant to plant by the wind as well as on the farmers’ clothing and tools as they walk through the field. Mites are major pests in the dry season and severe attacks often result in 20–80% losses in yields.
Cassava Mite (Mononychellus and Tetranchyus sp)
Management: Mites can be managed with a combination of cultural practices, chemical applications and biological control. Cultural practices that can help reduce the infestation include crop rotation to break the life cycle of the pest, the use of clean planting material, the removal of infected plants once detected (roguing) and spraying the cassava plants with water during the dry season. Insecticidal soaps and oils, as well as environmentally friendly chemicals can be applied to manage mites. However, care should be taken to rotate the pesticides used to prevent resistance from developing.
Other mites and insects that occur naturally in the field will feed upon this pest and reduce their levels. Harsh chemicals will kill these natural predators, therefore, care should be taken to select environmentally friendly pesticides.
ThripsDamage: Thrips are tiny, yellow insects found mainly on the growing points of the plant. The baby thrips (nymphs) feed on the leaf veins and stems resulting in chlorotic (yellow) spots. The space between leaves may become shorter with the plant becoming bushy in that area (‘Witches broom’ appearance). Most of the damage is done in the dry season and yield reduction can be 5–30%.
Thrips (Frankliniella sp. and Corynothrips stenopterus)
Management: The approach for managing thrips is similar to that of mites and includes a combination of cultural practices, chemical applications and biological control. Cultural practices include crop rotation to break the life cycle of the pest, the use of clean planting material and removal of infected plants once detected (roguing). Insecticidal soaps and oils, as well as environmentally friendly chemicals can be used to manage mites. However, care should be taken to rotate the pesticides used to prevent resistance from developing.
Natural enemies in the field will feed upon this pest and reduce their levels. Harsh chemicals will kill these natural predators and therefore care should be taken to select environmentally friendly pesticides.
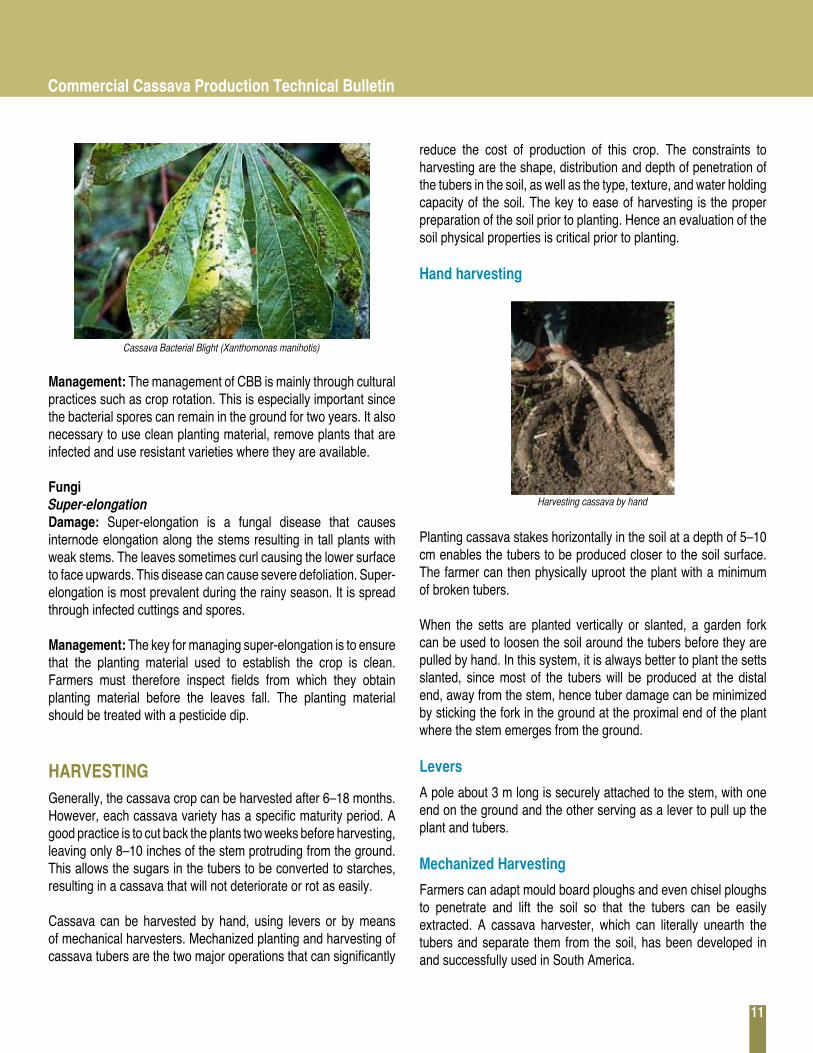
BacteriaCassavaBacterialBlightDamage: Cassava Bacterial Blight (CBB) is one of the most serious diseases of cassava, particular in the wet season. The disease is characterized by spots on the underside of the leaves that appear as angular wet areas. As the disease progresses, leaf shed can occur with root rot occurring in susceptible varieties. Transmission of this bacterium from field to field is mainly through infected planting material. Some of the local varieties may have some degree of tolerance.
Commercial Cassava Production Technical Bulletin Commercial Cassava Production Technical BulletinCommercial Cassava Production Technical Bulletin
11
Cassava Bacterial Blight (Xanthomonas manihotis)
Management: The management of CBB is mainly through cultural practices such as crop rotation. This is especially important since the bacterial spores can remain in the ground for two years. It also necessary to use clean planting material, remove plants that are infected and use resistant varieties where they are available.
FungiSuper-elongationDamage: Super-elongation is a fungal disease that causes internode elongation along the stems resulting in tall plants with weak stems. The leaves sometimes curl causing the lower surface to face upwards. This disease can cause severe defoliation. Super-elongation is most prevalent during the rainy season. It is spread through infected cuttings and spores.
Management: The key for managing super-elongation is to ensure that the planting material used to establish the crop is clean. Farmers must therefore inspect fields from which they obtain planting material before the leaves fall. The planting material should be treated with a pesticide dip.
HARVESTINGGenerally, the cassava crop can be harvested after 6–18 months. However, each cassava variety has a specific maturity period. A good practice is to cut back the plants two weeks before harvesting, leaving only 8–10 inches of the stem protruding from the ground. This allows the sugars in the tubers to be converted to starches, resulting in a cassava that will not deteriorate or rot as easily.
Cassava can be harvested by hand, using levers or by means of mechanical harvesters. Mechanized planting and harvesting of cassava tubers are the two major operations that can significantly
reduce the cost of production of this crop. The constraints to harvesting are the shape, distribution and depth of penetration of the tubers in the soil, as well as the type, texture, and water holding capacity of the soil. The key to ease of harvesting is the proper preparation of the soil prior to planting. Hence an evaluation of the soil physical properties is critical prior to planting.
Hand harvesting
Harvesting cassava by hand
Planting cassava stakes horizontally in the soil at a depth of 5–10 cm enables the tubers to be produced closer to the soil surface. The farmer can then physically uproot the plant with a minimum of broken tubers.
When the setts are planted vertically or slanted, a garden fork can be used to loosen the soil around the tubers before they are pulled by hand. In this system, it is always better to plant the setts slanted, since most of the tubers will be produced at the distal end, away from the stem, hence tuber damage can be minimized by sticking the fork in the ground at the proximal end of the plant where the stem emerges from the ground.
Levers
A pole about 3 m long is securely attached to the stem, with one end on the ground and the other serving as a lever to pull up the plant and tubers.
Mechanized Harvesting
Farmers can adapt mould board ploughs and even chisel ploughs to penetrate and lift the soil so that the tubers can be easily extracted. A cassava harvester, which can literally unearth the tubers and separate them from the soil, has been developed in and successfully used in South America.
12
Commercial Cassava Production Technical BulletinCommercial Cassava Production Technical Bulletin
STORAGE
Tubers can deteriorate rapidly after harvesting due to mechanical damage or to a physiological deterioration that causes blue-black vascular streaking.
Example of Vascular Streaking
This disorder renders the roots unpalatable and unmarketable within 2–4 days of harvest. The two conditions that can cause and accelerate vascular streaking are dehydration of the tubers and the presence of high levels of oxygen.
To help prevent tubers from deteriorating, sort the damaged from the undamaged tubers, store undamaged tubers in crates (rather than feed bags) covered with moist crocus bags. Clean and sanitize the tubers to destroy soil borne pathogens using a chlorine dip (100 ppm for 10 minutes).
PROCESSING The emerging interest in encouraging cassava use as a replacement for imported staples in the Region has led to greater focus on appropriate post harvest technologies and processing techniques.
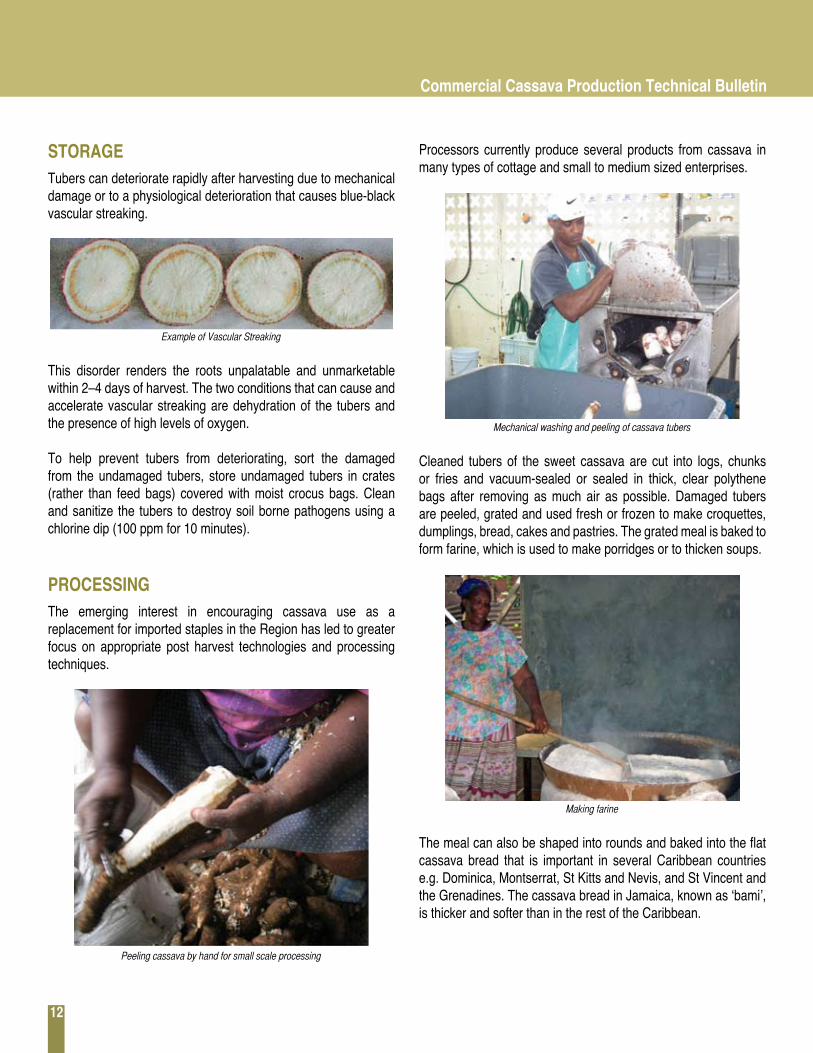
Peeling cassava by hand for small scale processing
Processors currently produce several products from cassava in many types of cottage and small to medium sized enterprises.
Mechanical washing and peeling of cassava tubers
Cleaned tubers of the sweet cassava are cut into logs, chunks or fries and vacuum-sealed or sealed in thick, clear polythene bags after removing as much air as possible. Damaged tubers are peeled, grated and used fresh or frozen to make croquettes, dumplings, bread, cakes and pastries. The grated meal is baked to form farine, which is used to make porridges or to thicken soups.
Making farine
The meal can also be shaped into rounds and baked into the flat cassava bread that is important in several Caribbean countries e.g. Dominica, Montserrat, St Kitts and Nevis, and St Vincent and the Grenadines. The cassava bread in Jamaica, known as ‘bami’, is thicker and softer than in the rest of the Caribbean.
Commercial Cassava Production Technical Bulletin Commercial Cassava Production Technical BulletinCommercial Cassava Production Technical Bulletin
13
Picking out rejected cassava fries to maintain a high quality product
Cassava tubers can be further processed into flour and starch. Some processors also make chips for animal feed.
The bitter cassava must be processed to reduce cyanide content to non-toxic levels. The tubers are grated and the juice squeezed out, either mechanically (new method) or by leaving it overnight between weights (traditional method). The grated portion can then be used similarly to the sweet type. In Guyana, the juice extracted is boiled to make cassareep, a cooking sauce with preservative properties.
The increase in the processing and consumption of cassava means that there are increased marketing opportunities for farmers. In some countries, there are already contractual arrangements between producers and processors for the supply of the crop.
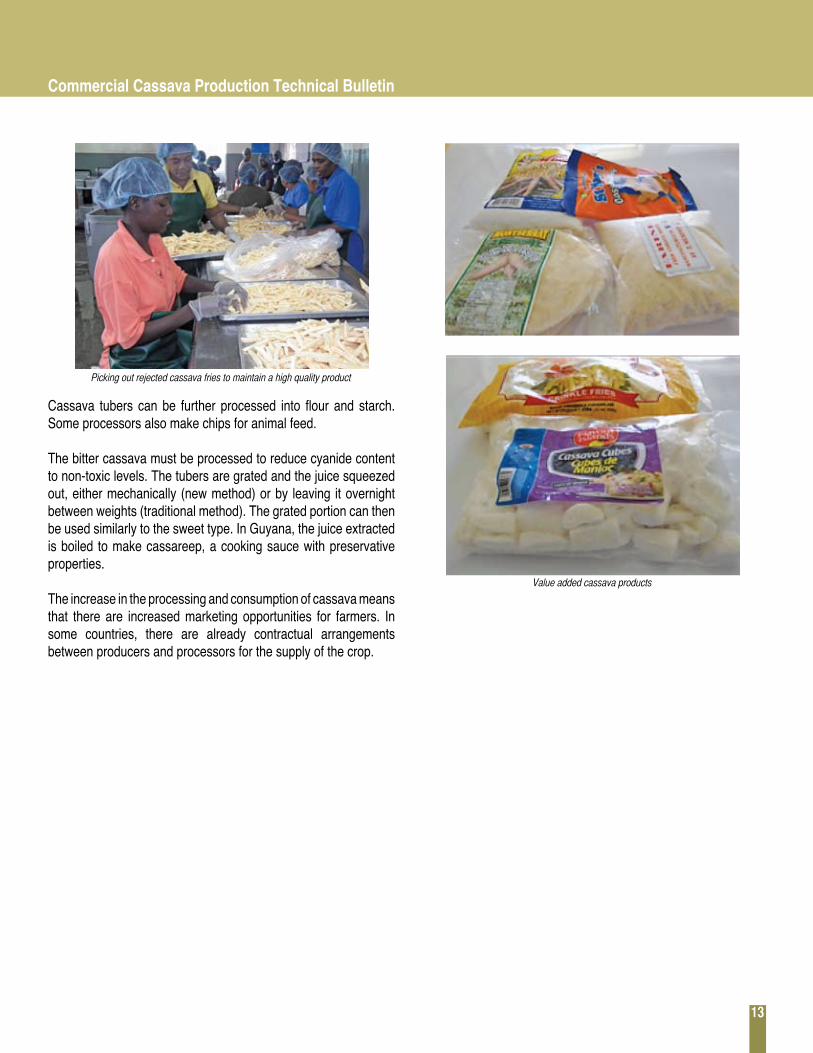
Value added cassava products
14
Commercial Cassava Production Technical BulletinCommercial Cassava Production Technical Bulletin
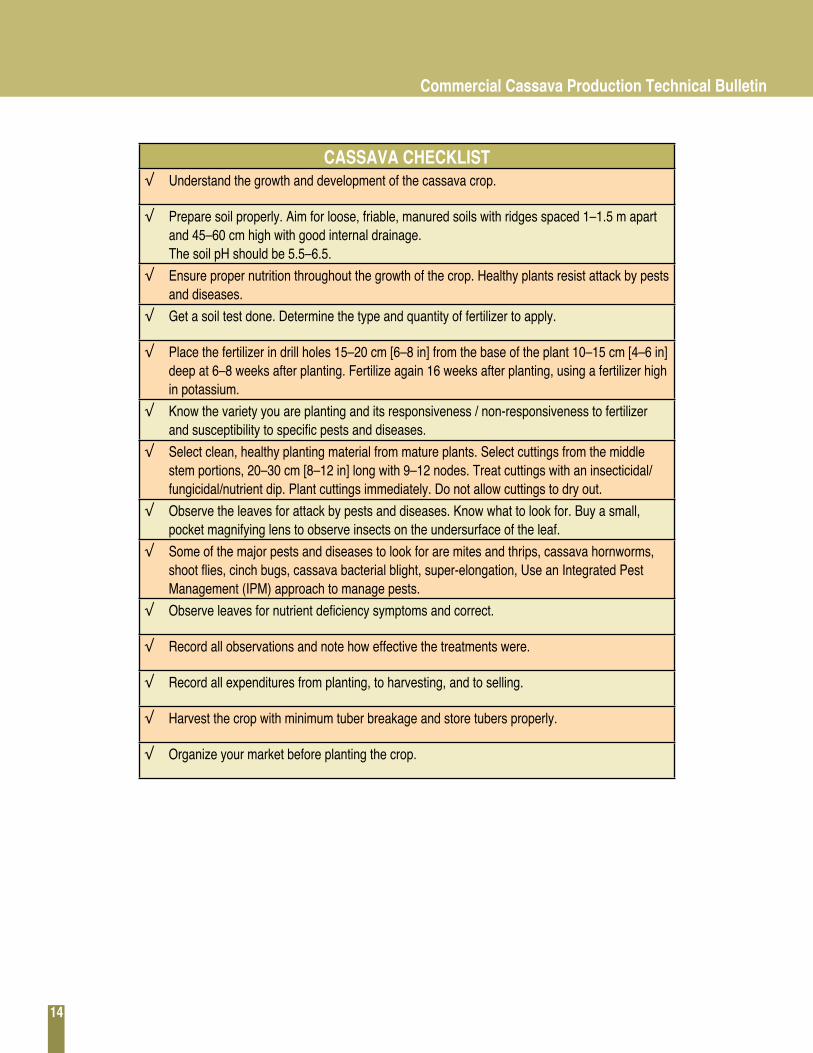
CASSAVA CHECKLISTUnderstand the growth and development of the cassava crop. √
Prepare soil properly. Aim for loose, friable, manured soils with ridges spaced 1–1.5 m apart √and 45–60 cm high with good internal drainage. The soil pH should be 5.5–6.5.Ensure proper nutrition throughout the growth of the crop. Healthy plants resist attack by pests √and diseases. Get a soil test done. Determine the type and quantity of fertilizer to apply. √
Place the fertilizer in drill holes 15–20 cm [6–8 in] from the base of the plant 10–15 cm [4–6 in] √deep at 6–8 weeks after planting. Fertilize again 16 weeks after planting, using a fertilizer high in potassium.Know the variety you are planting and its responsiveness / non-responsiveness to fertilizer √and susceptibility to specific pests and diseases.Select clean, healthy planting material from mature plants. Select cuttings from the middle √stem portions, 20–30 cm [8–12 in] long with 9–12 nodes. Treat cuttings with an insecticidal/fungicidal/nutrient dip. Plant cuttings immediately. Do not allow cuttings to dry out.Observe the leaves for attack by pests and diseases. Know what to look for. Buy a small, √pocket magnifying lens to observe insects on the undersurface of the leaf.Some of the major pests and diseases to look for are mites and thrips, cassava hornworms, √shoot flies, cinch bugs, cassava bacterial blight, super-elongation, Use an Integrated Pest Management (IPM) approach to manage pests.Observe leaves for nutrient deficiency symptoms and correct. √
Record all observations and note how effective the treatments were. √
Record all expenditures from planting, to harvesting, and to selling. √
Harvest the crop with minimum tuber breakage and store tubers properly. √
Organize your market before planting the crop. √
Commercial Cassava Production Technical Bulletin Commercial Cassava Production Technical BulletinCommercial Cassava Production Technical Bulletin
15
BIBLIOGRAPHYBissdorf, J. 2009. Field guide to non-chemical pest management in cassava production. Ed. Weber, C. Germany: Pesticide Action Network (PAN).
Cock, J. H. 1985. Cassava: New potential for a neglected crop. Boulder Colorado: Westview Press.
Fernandez, F. O. et al. 1983. Morphology of the cassava plant. Cali, Colombia: CIAT. Series No. 04EC-02.03
Howeler, H. 1981. Mineral nutrition and fertilization of cassava. Cali, Colombia: CIAT. Series No. 09EC-4
Neuenschwander, P., Cudjoe, A.; Mudder, W.; Echendu, N.; and Toka, M. 2000. Pest control in cassava farms: A field guide for extension agents. Institute of Tropical Agriculture. Lagos, Nigeria: Wordsmithes Printers.
Sessahai, A.; Ramlal-Ousman, M.; and Vine, M.L. 2008. A guide to growing cassava successfully. Root Crop Bulletin #1. Trinidad and Tobago: Ministry of Agriculture Land and Marine Resources.
Photograph Credits The following photographs have been provided by Mr Anthony Seesahai
Page 5: Examples of types of planting material • Examples of suitable material [left], which will be cut into two-node cuttingsPage 6: Tissue cultured cassava planting material at the in vitro multiplication stage • Tissue culture cassava plantlets hardened and ready for plantingPage 9: Damaged to cassava plant caused by Shoot fly • Close up of plant tips damaged by Shoot fly • Cassava hornworms • Cinch bugs (Cyrtomerus bergi)Page 10: Cassava Mite (Mononychellus and Tetranchyus sp) • Thrips (Frankliniella sp. and Corynothrips stenopterus)Page 11: Cassava Bacterial Blight (Xanthomonas manihotis)
All other photos provided by CARDI

16
Commercial Cassava Production Technical Bulletin
DisclaimerMention of specific products by registered name does not constitute endorsement or
recommendation. It is for the purpose of illustration only.
Where possible, metric and non-metric equivalent measurements are provided.This bulletin advises that producers carefully read labels for instructions before applying
pesticides, herbicides and fertilisers.
Website: www.cardi.org
This document has been produced with the financial assistance of CTA.The views expressed herein are those of CARDI and can therefore in no way
be taken to reflect the official opinion of CTA.