Embed Size (px)
Citation preview
CommBox Joey Micro
User ManualRevision: 23
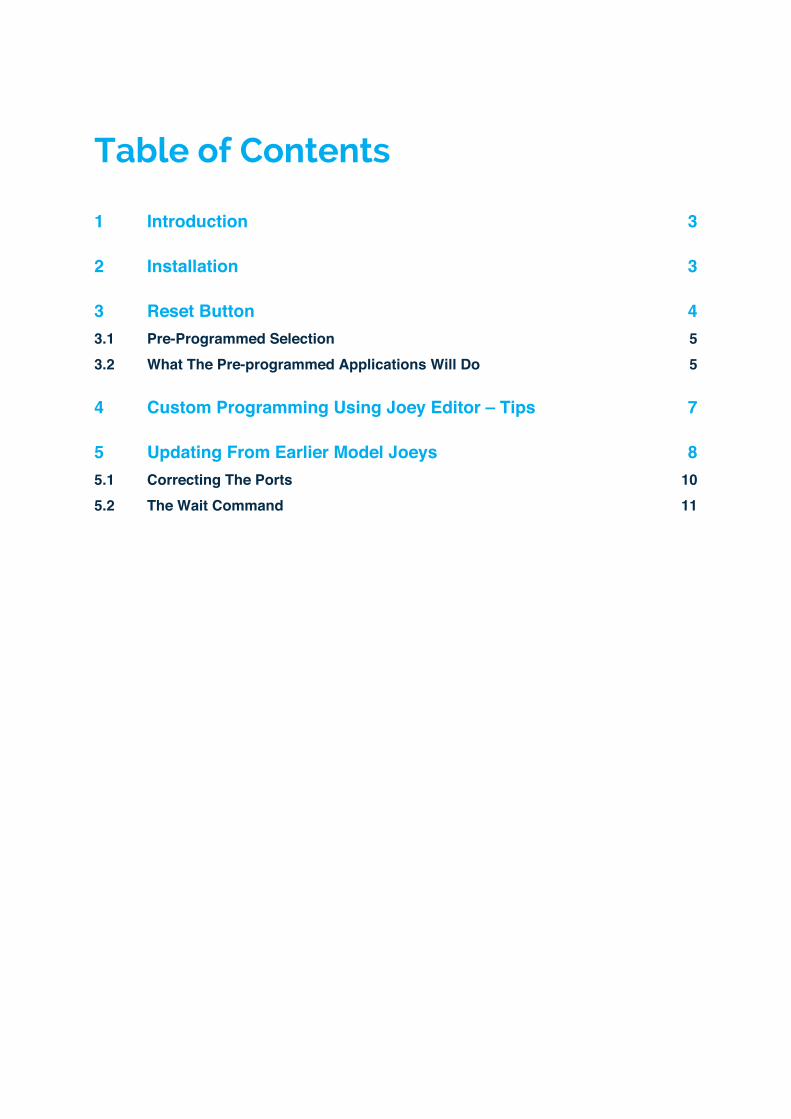
Table of Contents
1 Introduction 3
2 Installation 3
3 Reset Button 43.1 Pre-Programmed Selection 53.2 What The Pre-programmed Applications Will Do 5
4 Custom Programming Using Joey Editor – Tips 7
5 Updating From Earlier Model Joeys 85.1 Correcting The Ports 105.2 The Wait Command 11
+61 2 9975 60013
1 Introduction
The Joey Micro is a range of small programmable control panels that is available in six and nine button versions. They can be easily programmed for a wide range of AV-related control tasks using the Windows-based Joey Editor software. Additionally, they come pre-loaded with a number of commonly-used control programs that may be selected by the installer without needing a laptop or PC.
2 Installation
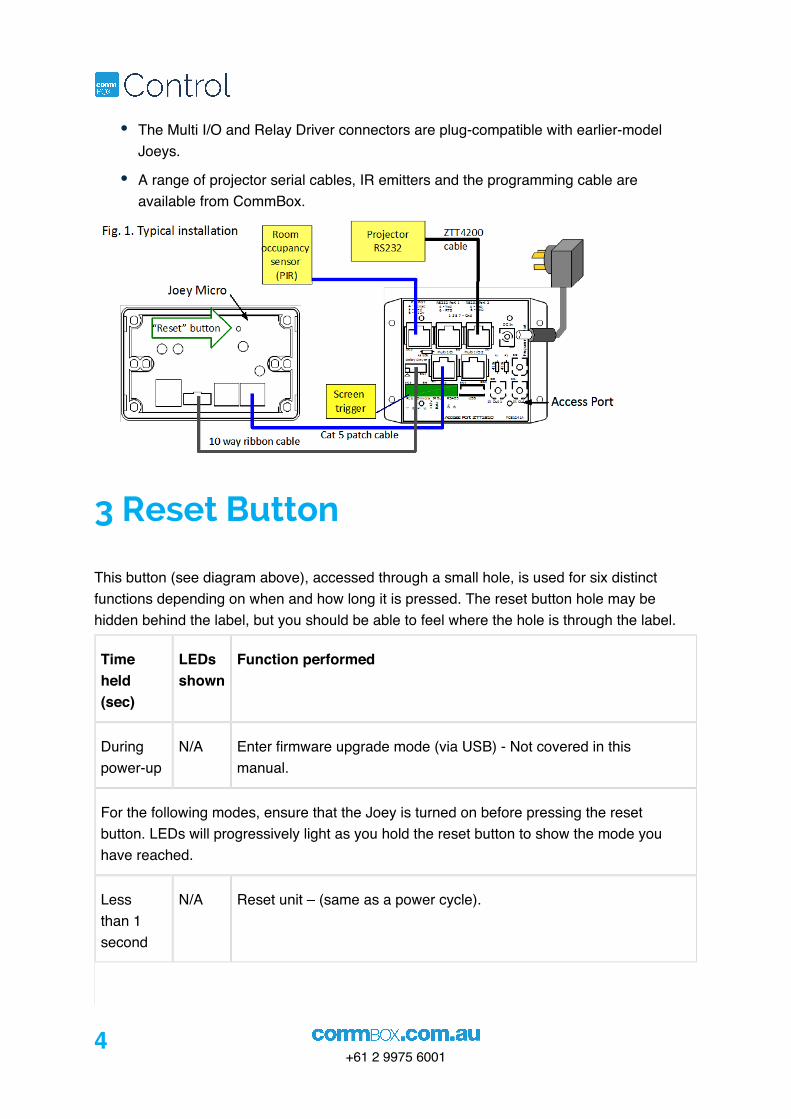
The Joey Micro can be fitted to a single-gang mounting block in portrait or landscape orientation. It can be customised by replacing an underlay sheet that is generated by the Joey Editor software.
The Joey Micro comes with an Access Port that breaks out its ports to suitable connectors. The Access Port is connected to the Joey Micro by up to three cables. If your installation does not need any of the ports served by a specific cable, you do not need to connect that cable.
Multi I/O 1 (RJ45 patch cable) Multi I/O 2 (RJ45 patch cable) Relay Driver (IDC10)
DC power RS232 2 (bi-directional) Active low 1
IRBus RS485 Active low 4
RS232 port 1 (programming) USB (for firmware upgrade) Active low 5
RS232 port 2 (projector etc.) Active low 6
IR ports +12v
PIR sensor
The Access Port is normally installed in a location convenient to the equipment being controlled.
Patch cables are not included with the Micro.
4+61 2 9975 6001
The Multi I/O and Relay Driver connectors are plug-compatible with earlier-model Joeys.
A range of projector serial cables, IR emitters and the programming cable are available from CommBox.
3 Reset Button
This button (see diagram above), accessed through a small hole, is used for six distinct functions depending on when and how long it is pressed. The reset button hole may be hidden behind the label, but you should be able to feel where the hole is through the label.
Time held (sec)
LEDs shown
Function performed
During power-up
N/A Enter firmware upgrade mode (via USB) - Not covered in this manual.
For the following modes, ensure that the Joey is turned on before pressing the reset button. LEDs will progressively light as you hold the reset button to show the mode you have reached.
Less than 1 second
N/A Reset unit – (same as a power cycle).
+61 2 9975 60015
1.
2.
3.
2 seconds
1 Enter Pre-Programmed Selection mode. See following section.
4 seconds
2 Invoke touch calibration mode - Not covered in this manual. If entered inadvertently, power cycle the Joey to cancel.
6 seconds
3 Reset to factory defaults.
8 seconds
4 Cancel operation. If you miss your chosen mode, keep holding the reset button until 4 lights show to avoid doing a factory reset.
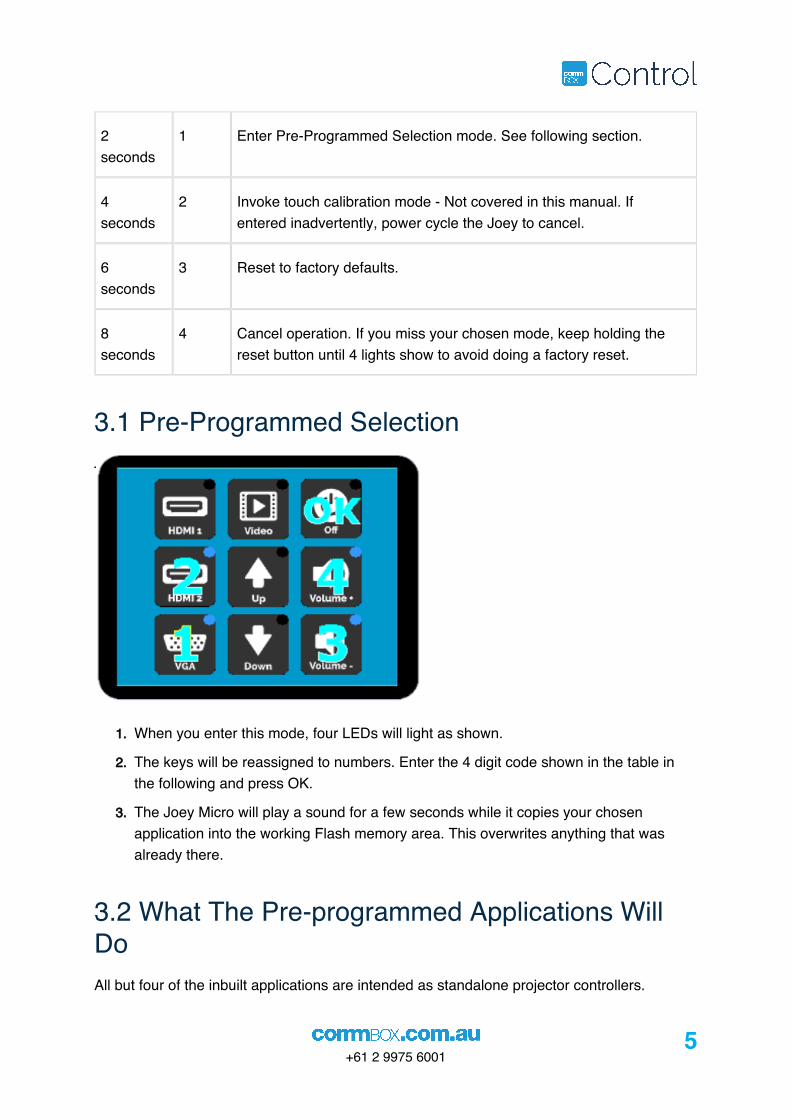
3.1 Pre-Programmed Selection
When you enter this mode, four LEDs will light as shown.
The keys will be reassigned to numbers. Enter the 4 digit code shown in the table in the following and press OK.
The Joey Micro will play a sound for a few seconds while it copies your chosen application into the working Flash memory area. This overwrites anything that was already there.
3.2 What The Pre-programmed Applications Will DoAll but four of the inbuilt applications are intended as standalone projector controllers.
6+61 2 9975 6001
When a Source key is pressed, the associated LED is lit and the following happens:
Source is selected (for fast response when the projector is already on)
Screen control DC trigger (Relay 1) is turned on
Projector is turned on (if it's already on, this will be ignored)
Following a lamp warmup delay of 45 seconds, the Source is re-selected.
When OFF is pressed, the following happens:
Projector is picture muted
Screen trigger is released
Following a “grace” delay of 15 seconds, the projector is turned off. (You have 15 seconds to cancel Projector Off by pressing a Source key if the OFF key was pressed accidentally)
No keypress or PIR activity timeout is 2 hours. The same functions as the OFF key are executed.
All the pre-programmed applications are available in the Examples folder in the Joey Editor under the filenames listed in the following table.
Code Filename Comments
1111 benq_1_u9.jy Later BenQ models
1112 dell_1_u9.jy Most Dell models
1113 Controller_u9.jy Compatible with Standard Template Controller
1114 epson_1_u9.jy Most Epson models
1121 Epson_Alt_HDMI_2_u9.jy Epsons with alternative HDMI 2 command.
1122 hitachi_1_u9.jy All except very early Hitachi models
1123 J_32_9_Tester.jy This program tests all keys and functions.
1124 mitsubishi_1_u9.jy All except very early Mitsubishi models
1131 nec_192_u9.jy NECs with baud rate set to 19.2k
1132 nec_384_u9.jy NECs with baud rate set to 38.4k
+61 2 9975 60017
1133 nec_192_Alt_Vol_u9.jy Same as above with alternative volume commands
1134 nec_384_Alt_Vol_u9.jy Same as above with alternative volume commands
1141 panasonic_1_u9.jy Non-Sanyo models
1142 promethean_1_u9.jy
1143 sanyo_1_u9.jy Universal Sanyo app
1144 sharp_1_u9.jy
1211 Touch_FHD+Gen1_USB_U9.jy CommBox 1 generation and FHD models st
prior to 2017
1212 Touch_4k_2017_USB_u9.jy CommBox 4k models dated 2017 and until advised.
1213 Touch_4k_USB_U9.jy CommBox 4k models dated prior to 2017.
1214 Touch_NextGen+Gen1_USB_u9.jy
FHD models dated 2017 and later. Also 1 st
gen. models
Note: this table matches the binaries loaded into the product at the time this manual was packed. The list is subject to change at any time as new models are introduced and may be incorrect for later or earlier binary sets. So, do not lose this manual!
4 Custom Programming Using Joey Editor – Tips
Unless there is a very good reason not to, set all keys to Hot Keys (yellow circle). This saves you time and helps avoid oversights.
Use Timer for delays, not Wait. Wait is a blocking delay and is there mainly for compatibility with early firmware, i.e. 1.04 and older..
8+61 2 9975 6001
Use the examples supplied with the Joey editor as a guide for any changes you need to make.
The Joey graphic library is supplied with the Joey editor. The Codeset library is installed with Code Manager.
You can export resources (codesets and graphics) from existing .JY files if there is something you cannot see in the library.
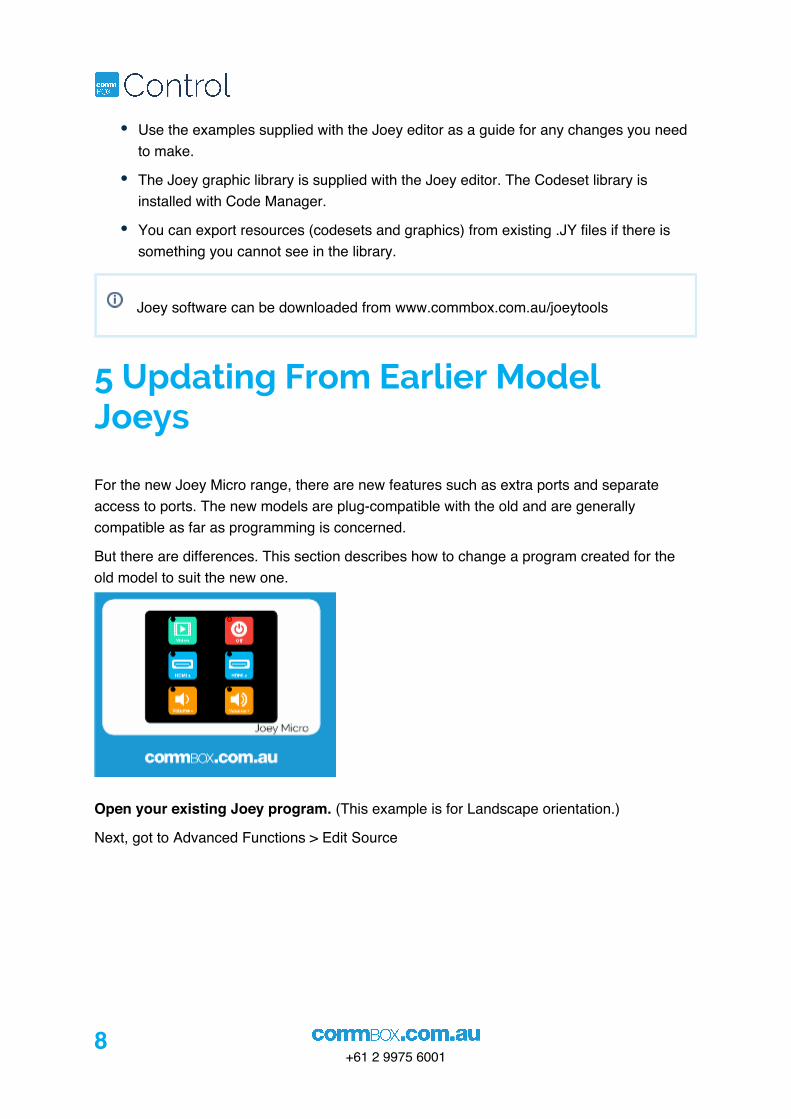
Joey software can be downloaded from www.commbox.com.au/joeytools
5 Updating From Earlier Model Joeys
For the new Joey Micro range, there are new features such as extra ports and separate access to ports. The new models are plug-compatible with the old and are generally compatible as far as programming is concerned.
But there are differences. This section describes how to change a program created for the old model to suit the new one.
Open your existing Joey program. (This example is for Landscape orientation.)
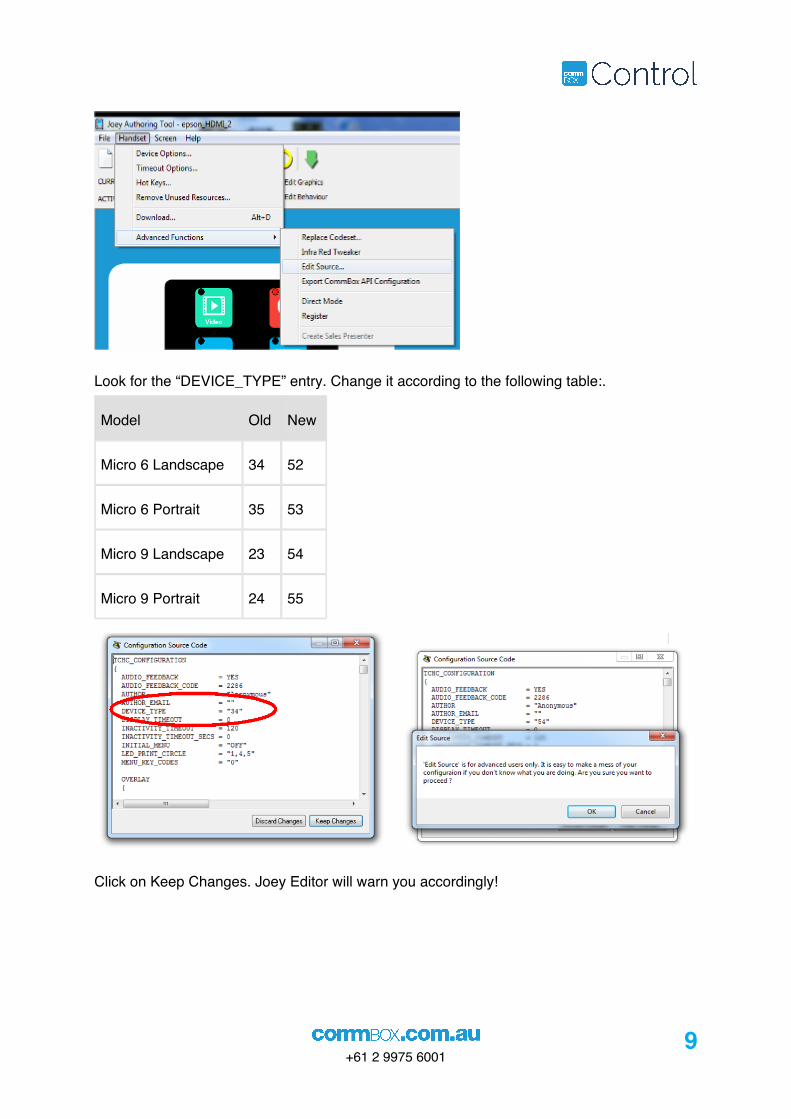
Next, got to Advanced Functions > Edit Source
+61 2 9975 60019
Look for the “DEVICE_TYPE” entry. Change it according to the following table:.
Model Old New
Micro 6 Landscape 34 52
Micro 6 Portrait 35 53
Micro 9 Landscape 23 54
Micro 9 Portrait 24 55
Click on Keep Changes. Joey Editor will warn you accordingly!
10+61 2 9975 6001
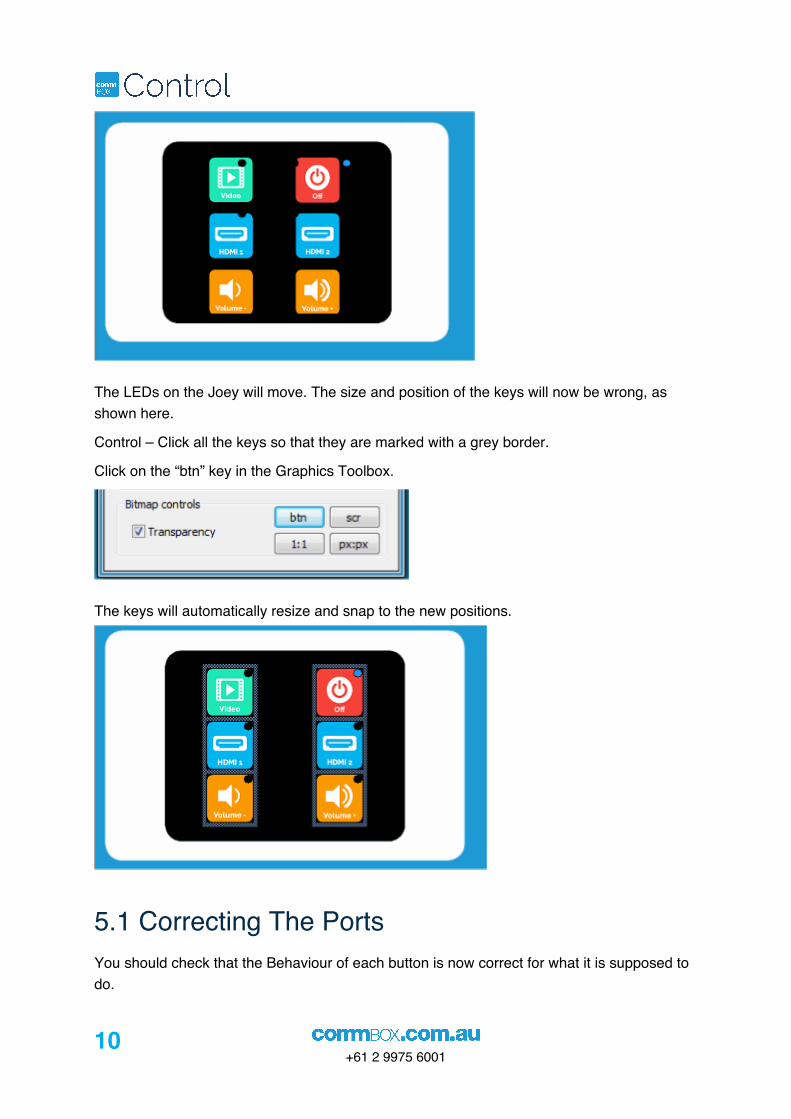
The LEDs on the Joey will move. The size and position of the keys will now be wrong, as shown here.
Control – Click all the keys so that they are marked with a grey border.
Click on the “btn” key in the Graphics Toolbox.
The keys will automatically resize and snap to the new positions.
5.1 Correcting The PortsYou should check that the Behaviour of each button is now correct for what it is supposed to do.
+61 2 9975 600111
Click the “Edit Behaviour” radio button on the toolbar and double-click each button in turn.
On the new Joeys you should specify the port you are using for each RS232 command. If you don't, Port 2 is assumed. The old Joey Micros did not have addressable ports and so would transmit on both ports simultaneously.
Save your file (with a new name) and download it to the Joey.
5.2 The Wait CommandIn firmware version 1.0.5 (circa 2005), the Wait command was superseded by the non-blocking Timer command.
You can still use Wait but its use is discouraged because longer delays will cause the Joey to appear as though it has locked up.
Replace any Wait commands with Timer commands.