Embed Size (px)
Citation preview
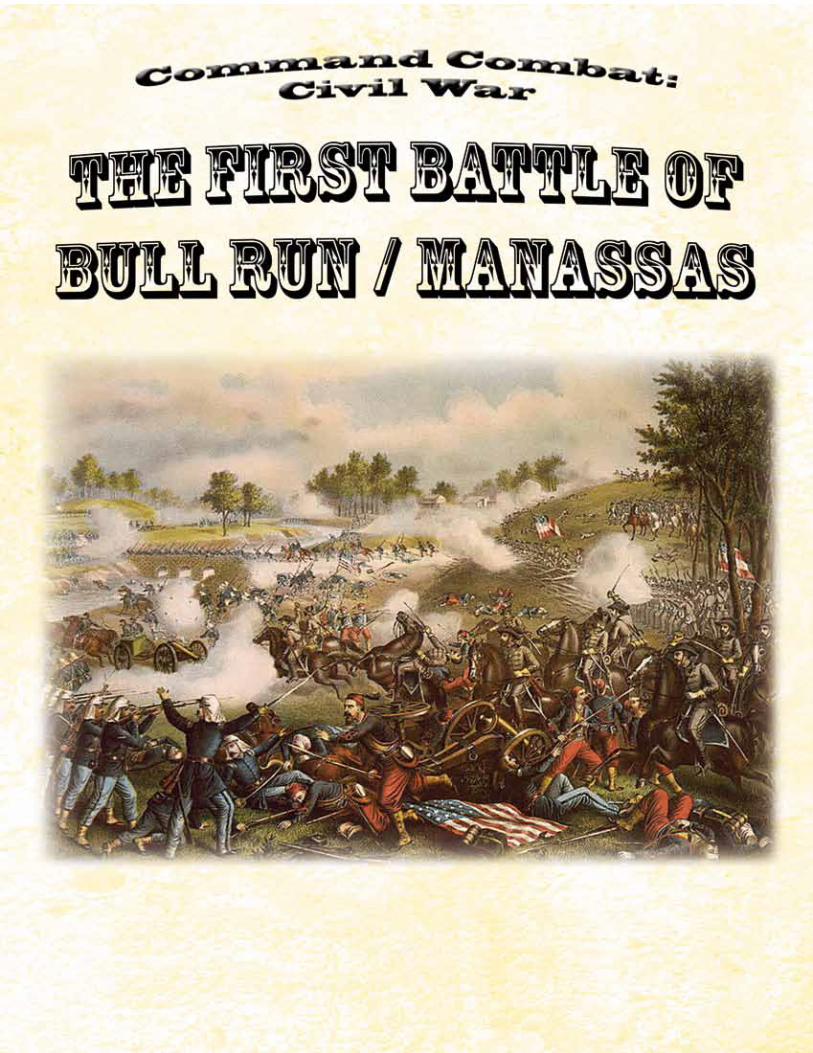
Command Combat:Civil War
The Battle of Bull Run / ManassasJuly 21, 1861
Game Design byJeff McArthur
This scenario is from the Command Combat: Civil War series. To learn more about it, or to order the primary game book and accessories, go to:
www.commandcombat.com
(c) Bandwagon Books, 2011
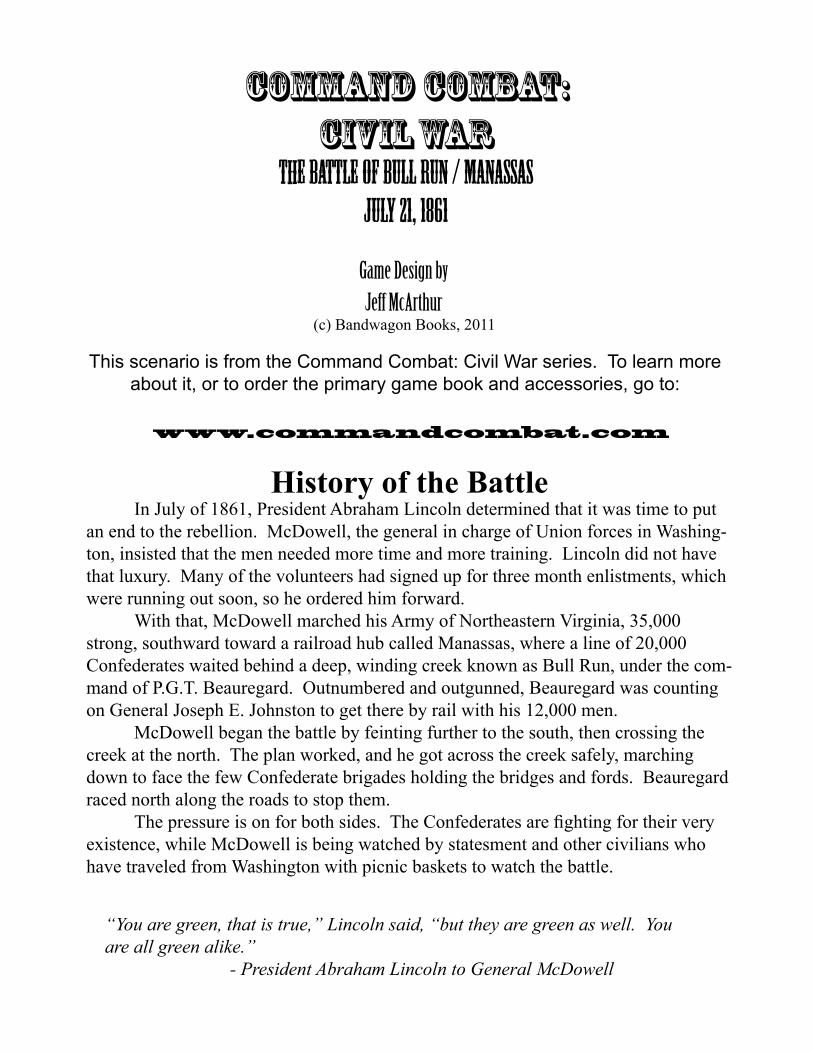
History of the Battle In July of 1861, President Abraham Lincoln determined that it was time to put an end to the rebellion. McDowell, the general in charge of Union forces in Washing-ton, insisted that the men needed more time and more training. Lincoln did not have that luxury. Many of the volunteers had signed up for three month enlistments, which were running out soon, so he ordered him forward. With that, McDowell marched his Army of Northeastern Virginia, 35,000 strong, southward toward a railroad hub called Manassas, where a line of 20,000 Confederates waited behind a deep, winding creek known as Bull Run, under the com-mand of P.G.T. Beauregard. Outnumbered and outgunned, Beauregard was counting on General Joseph E. Johnston to get there by rail with his 12,000 men. McDowell began the battle by feinting further to the south, then crossing the creek at the north. The plan worked, and he got across the creek safely, marching down to face the few Confederate brigades holding the bridges and fords. Beauregard raced north along the roads to stop them. Thepressureisonforbothsides.TheConfederatesarefightingfortheirveryexistence, while McDowell is being watched by statesment and other civilians who have traveled from Washington with picnic baskets to watch the battle.
“You are green, that is true,” Lincoln said, “but they are green as well. You are all green alike.” - President Abraham Lincoln to General McDowell

Welcome to Command Combat: Civil War - The Battle of Bull Run / Manassas, the game where players take on the roles of generals and lead their armies against one another tofightoutthemightiestbattlesoftheCivilWar. PlayersfirstchoosewhethertheywillplayastheUnitedStates,ortheConfeder-ateStates.(Theremustbeatleastoneplayeroneachside.)Normally,therecanbe2-6players in this scenario, each player taking a general. However, if you have more players, some of them can take partial commands. Each player chooses which divisions they will command by choosing them out of the following pages, then runs them throughout the scenario. Command Combat: Civil War is a brigade level game, meaning that the smallest unit to maneuver is a brigade. 3-7 stands make up a brigade, and they must be kept to-gether in one of two formations, as explained later. To mount your miniatures, use the base sizes listed below as a guide to mounting your units. The best size of miniatures for this are 15 mm. It is not critical that the units be exactly this size, so if you already have units based at a different height, it is okay. You will simply want units that are approximately this size and shape. You will also want paper cut-outs that resemble dead soldiers to mark where the deadhavefallen.Youcanmakesomeofyourown,oryoucanfindsomepicturedattheback of this book. Finally, you will want a bunch of 10 sided dice, or a lot of markers numbered 0-9, and a bunch of markers that say “Ammo”, “Low ammo”, and markers that are red, mark-ers that are white, and markers that are blue. You will also need index cards that have the generals’ names on them, one card for each point of each general’s initiative. All units needed for this scenario are pictured in the back of this book for your reference. You can also copy the page and use the cut-outs until you have the proper sized miniatures.
Infantry1” X 1”
Divisiongenerals1” X 1”
Dismountedcavalry1” X 1”
Horse stand1.5” X 1.5”
Limbered artillery1.5” X 1.5”
Artillery1.5” X 1.5”
Corps general2” X 2.5”
Supplywagon2” X 2.5”
Cavalry1” X 1.5”
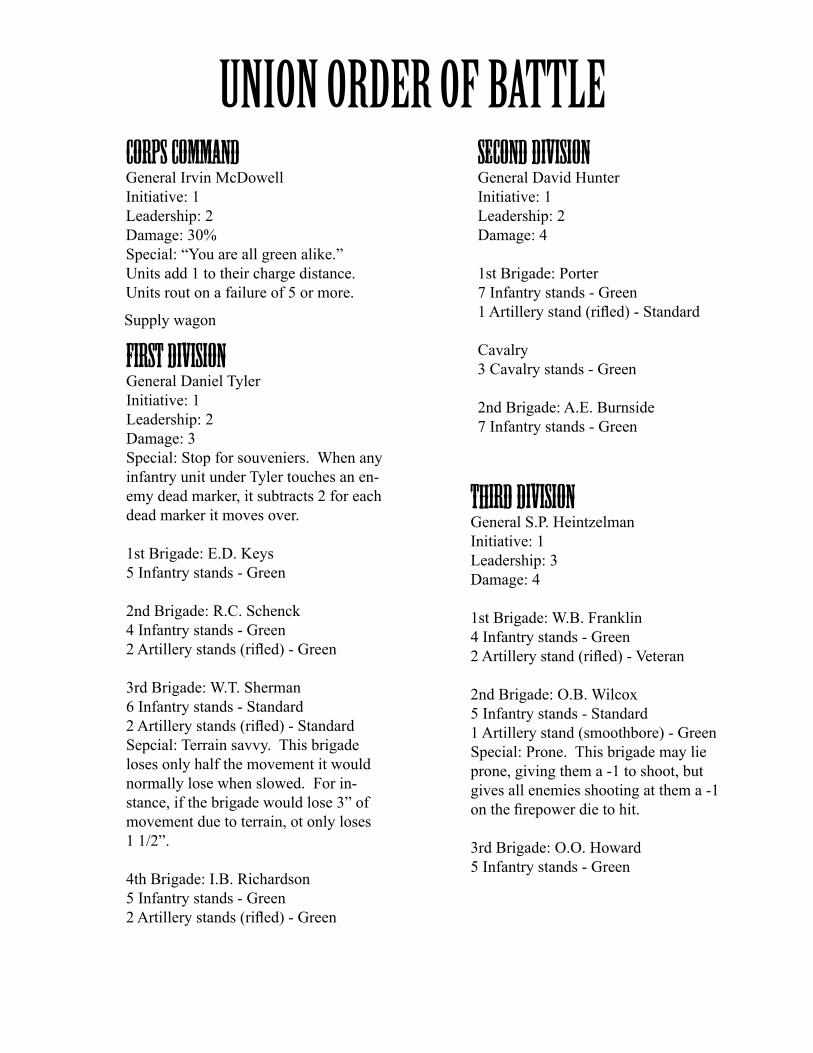
UNION ORDER OF BATTLECORPS COMMANDGeneral Irvin McDowellInitiative: 1Leadership: 2Damage: 30%Special:“Youareallgreenalike.”Units add 1 to their charge distance. Units rout on a failure of 5 or more.
First DivisionGeneral Daniel TylerInitiative: 1Leadership: 2Damage: 3Special:Stopforsouveniers.Whenanyinfantry unit under Tyler touches an en-emy dead marker, it subtracts 2 for each dead marker it moves over.
1st Brigade: E.D. Keys5 Infantry stands - Green
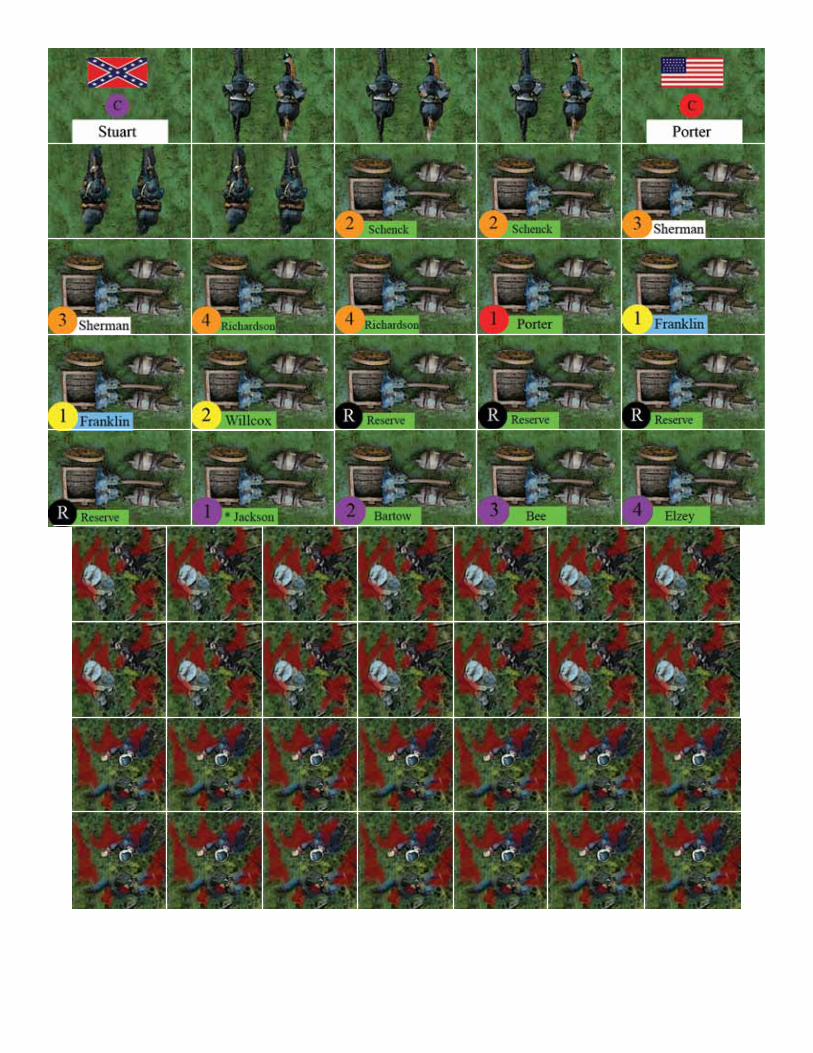
2ndBrigade:R.C.Schenck4 Infantry stands - Green2Artillerystands(rifled)-Green
3rdBrigade:W.T.Sherman6Infantrystands-Standard2Artillerystands(rifled)-StandardSepcial:Terrainsavvy.Thisbrigadeloses only half the movement it would normally lose when slowed. For in-stance, if the brigade would lose 3” of movement due to terrain, ot only loses 1 1/2”.
4th Brigade: I.B. Richardson5 Infantry stands - Green2Artillerystands(rifled)-Green
Second DivisionGeneral David HunterInitiative: 1Leadership: 2Damage: 4
1st Brigade: Porter7 Infantry stands - Green1Artillerystand(rifled)-Standard
Cavalry3 Cavalry stands - Green
2nd Brigade: A.E. Burnside7 Infantry stands - Green
Third DivisionGeneralS.P.HeintzelmanInitiative: 1Leadership: 3Damage: 4
1st Brigade: W.B. Franklin4 Infantry stands - Green2Artillerystand(rifled)-Veteran
2nd Brigade: O.B. Wilcox5Infantrystands-Standard1 Artillery stand (smoothbore) - GreenSpecial:Prone.Thisbrigademaylieprone, giving them a -1 to shoot, but gives all enemies shooting at them a -1 onthefirepowerdietohit.
3rd Brigade: O.O. Howard5 Infantry stands - Green
Supplywagon

CONFEDERATE ORDER OF BATTLEFirst DivisionGeneral PGT BeauregardInitiative: 2Leadership: 3Damage: 8Special:Masterofartillery.Allartillerycansupport any brigade without being attached to them.
1st Brigade: Bonham5 Infantry stands - GreenSpecial:Bluecoats.Onceduringthebattle,thisunitcanelecttonotbefireduponforasingleturn.Theunitmustnothavefireddur-ingthefirephasetodothis.Ifthisisdone,removethefirepowerdiefrominfrontofthisunit.
2nd Brigade: Ewell3Infantrystands-Standard
3rd Brigade: D.R. Jones4 Infantry stands - Green
4th Brigade: James Longstreet4Infantrystands-StandardSpecial:(Blueorder)Cautious.Moves-1inch.Reducethefirepowerby1beforetak-ing damage.
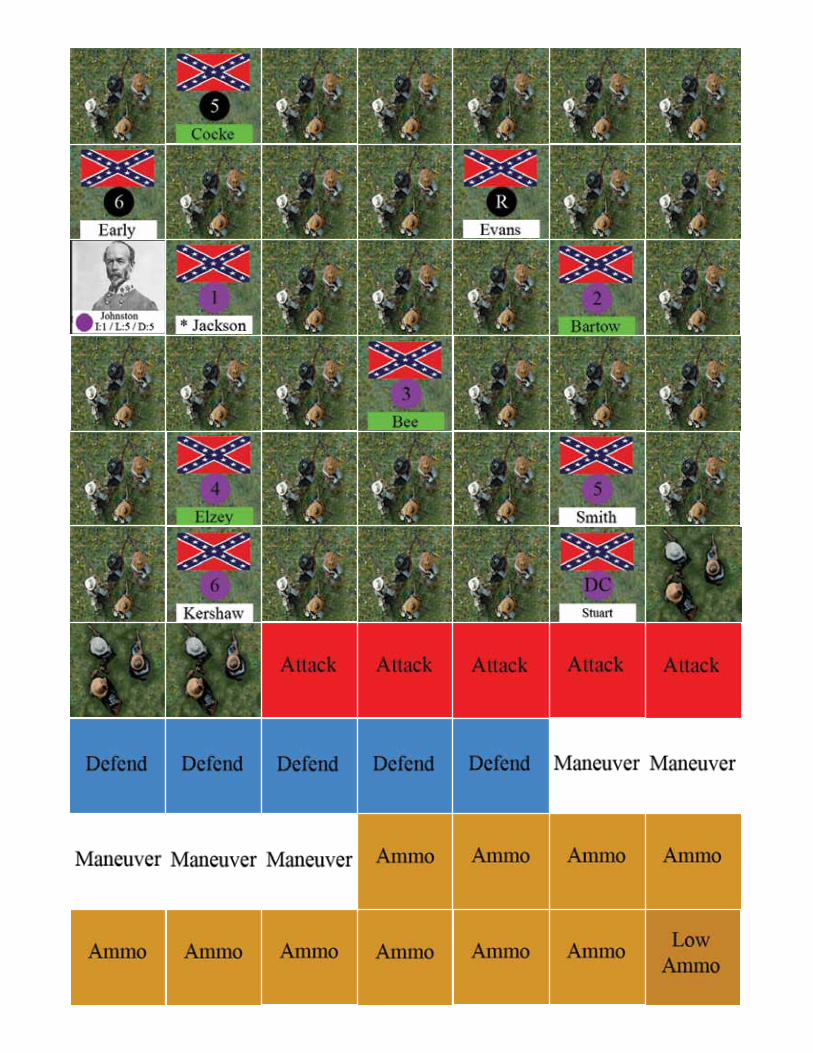
5thBrigade:P.St.GeorgeCocke6 Infantry stands - Green
6th Brigade: J.A. Early4Infantrystands-Standard
Reserve Brigade: Evans3Infantrystands-Standard
Reserve Artillery:2 Artillery stands (smoothbore) - Green2Artillerystands(rifled)-GreenSpecial:Placetogether,orspreadoutamonginfantry brigades.
Second DivisionGeneral Joseph E. JohnstonInitiative: 1Leadership: 5Damage: 5Special:Redorder-Rebelyell.Anyunitchargedbyabrigade using the rebel yell has 1 added to their morale marker.
1st Brigade: T.J. Jackson4Infantrystands-Standard1 Artillery stand (smoothbore) - GreenSpecial:Blueorder-Stonewall.Reducethemoralemarker by half (rounded down) every turn after all other morale alterations have been made, and before rolling for the brigade’s morale.
2ndBrigade:F.S.Bartow5 Infantry stands - Green1 Artillery stand (smoothbore) - Green
3rd Brigade: B.E. Bee5 Infantry stands - Green1 Artillery stand (smoothbore) - Green
4th Brigade: A. Elzey4 Infantry stands - Green1 Artillery stand (smoothboare) - Green
5thBrigade:KirbySmith3Infantrystands-Standard
6th Brigade: Joseph Kershaw4 Infantry stands - Green
Cavalry:JEBStuart4Cavalrystands-StandardSpecial:“Laydownyerweapons.”Duringthecommandphase,Stuartmayforce1enemystandtosurrenderifStuartdidnotfire,andnoenemycommanderiswithin2”of the unit. Roll the die. On a 1-4, the enemy loses 1 half stand, but does not leave a death marker behind.
Supplywagon

Set-up Use the map on the following page to set up the table using your terrain. Place the listed bri-gades where they are pictured. They are all in line formation, (see below.) Onturn2,Unionunitsofthefirstdivisionmaymakeafullmovementfromtheentranceoftheroadinmarchcolumnformation.Anyunitsthatdonotfit,orthattheplayerdoesnotwishtohaveenter, will be left off board until they can enter. If at any time an enemy unit is within 2” of this point, no units may enter. Each turn, a new division enters along the road it is listed. All units enter in march column formation.Again,anyunitthatdoesnotfitontheturnitissupposedtoentermayenteronasubse-quent turn.
Infantry and cavalry units are always in one of these formations:
Line:Nochangetomovementorfiring.
March column:+1”movement.Unitfiresamaximumof1firepower.
Disorder:-1 to everything, including shooting, morale,movement, etc.
Artillery units are never in a formation. Each individual artillery stand is in one of these for-mations:
Limbered:Moves5”.Cannotfire.
Unlimbered:Moves2”.Mayfire.
Generals and supply wagons have no formation, nor fac-ing. They move freely, and are considered facing in every direction. Orders that come from generals are uneffected by terrain except when it is impassible. Ammo that comes from supply wagons are effected by terrain. 4 Ammo markers are placed on the Confederate supply wagon, and 6 ammo markers are placed on the Union supply wagon.
Civilians:Dozens of civilians came out with picnic paskets to watch the battle. Place two civilian markers where shown to signify this.
Jefferson Davis:Jefferson Davis actually showed up to this battle just as it was ending. In this game, he ar-rives on turn 15 as a corps commander for the Confederate side. The division commanders can still change their orders at will. His initiative is 1, and his leadership is 4.

= Creek. -1 to movement.
= River. Impassable except at bridges & fords.
= Road. +1 to movement.
= Building. Worth points.
= Hill. -1 to movement going uphill.
= 2nd level hill. -1 to move-ment going uphill.
= Woods. Half movement. -1 firinginto.2”visualinwoods.
= Bridge. Brigades can move over in march column.
Jefferson Davis(Turn 15)
Civilian
Civilian
Smith&Kershaw’sbrigades(Turn 7)

Every division general has one of three color coded commands. Each one represents a stance that everyone in his division is in. Place a marker of the appropriate color next to the division general to show that everyone under his command is under that color coded order. Each color has its own rules associated with it. They are:
Red (Attack): Brigades may charge. Brigades may counter charge when charged. Artillery may support the charge of a brigade it is attached to.
White (Maneuver): Units may move at +1 speed. Units must move away from the enemy when it comes within 4”. Units may do forced marches.
Blue (Defend): Brigadesmayignorethefirstinchofpullingbackwhenforcedtodoso. Artillerymayconductdefensivefirewithabrigadeitisattachedto. Brigadesthatarechargedget+1totheirdefensivefire. Units may not move closer than 4” toward enemy units, but may remain if the enemy moves closer than 4” toward it.
A division general remains under the color coded order until changed by a corps commander, or he changes it himself. In the Bull Run scenario, Confederate division generals can change their orders at will, even after Jefferson Davis comes onto the table. On the Union side, the orders must be sent by the corps commander, (McDowell.) They travel 15” per turn, so they may immediately change if the division general is within 15”. The movement of orders are unaffected by terrain. All units within 15” of their division general are under his color coded order, and are subject to those rules. Any unit that moves more than 15” away from its division general receives a marker with the same color of its last order. It keeps this marker and is subject to those rules until it returns to within 15” of its division general, at which time its marker is removed and it comes under the order of the division general.
Commands
Order of PlayAftersettingupthebattlefield,thegamebeginswiththefirstturn.Eachturnis
handled in the following order:
Draw a cardMovement / Charges
Determine targetsFiringMorale
Command Phase
Draw a cardThegeneralcardsareshuffled,andthetop one is drawn. If the general who was drawn has a second card, (due to a higher initiative,) the player controling him may hold his turn until that gener-al’s card comes up again. If the general has no more cards in the stack, or if the player wishes to activate him, he does so now. When a general is activated, all units under his command are also activated.
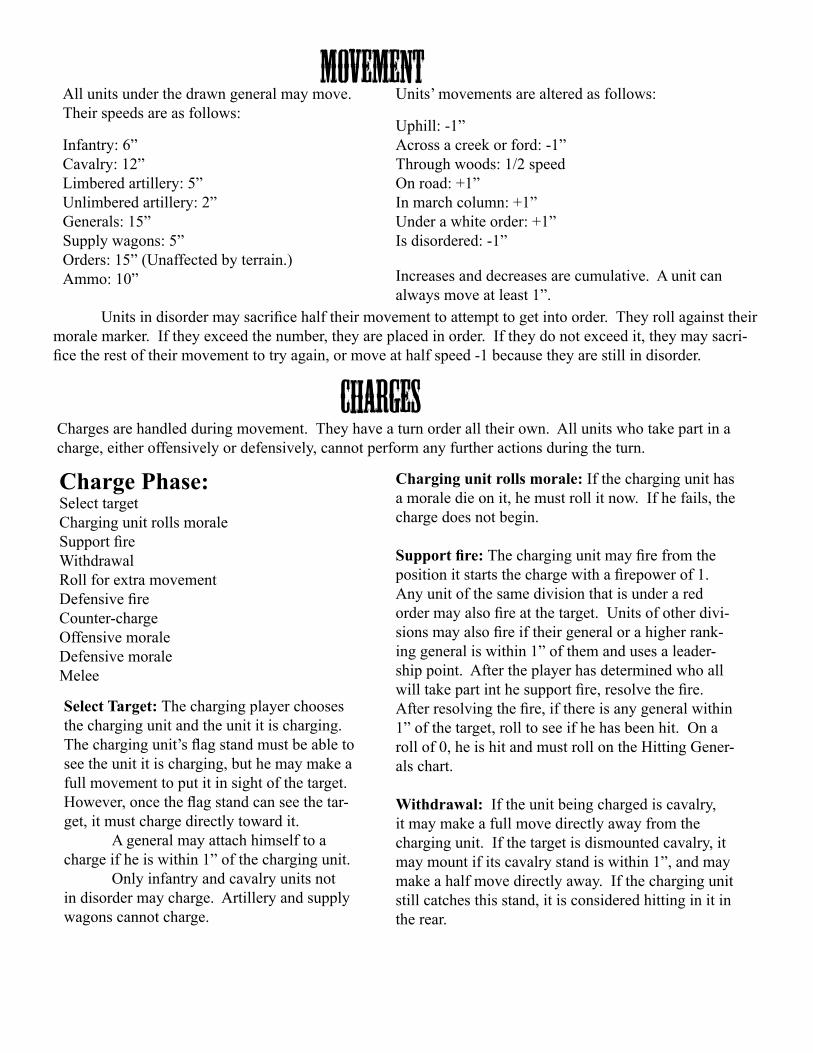
MovementAll units under the drawn general may move.Their speeds are as follows:
Infantry: 6”Cavalry: 12”Limbered artillery: 5”Unlimbered artillery: 2”Generals: 15”Supplywagons:5”Orders: 15” (Unaffected by terrain.)Ammo: 10”
Units’ movements are altered as follows:
Uphill: -1”Across a creek or ford: -1”Through woods: 1/2 speedOn road: +1”In march column: +1”Under a white order: +1”Is disordered: -1”
Increases and decreases are cumulative. A unit can always move at least 1”.
ChargesCharges are handled during movement. They have a turn order all their own. All units who take part in a charge, either offensively or defensively, cannot perform any further actions during the turn.
Charge Phase:SelecttargetCharging unit rolls moraleSupportfireWithdrawalRoll for extra movementDefensivefireCounter-chargeOffensive moraleDefensive moraleMelee
Select Target: The charging player chooses the charging unit and the unit it is charging. Thechargingunit’sflagstandmustbeabletosee the unit it is charging, but he may make a full movement to put it in sight of the target. However,oncetheflagstandcanseethetar-get, it must charge directly toward it. A general may attach himself to a charge if he is within 1” of the charging unit. Only infantry and cavalry units not in disorder may charge. Artillery and supply wagons cannot charge.
Charging unit rolls morale: If the charging unit has a morale die on it, he must roll it now. If he fails, the charge does not begin.
Support fire: Thechargingunitmayfirefromthepositionitstartsthechargewithafirepowerof1.Any unit of the same division that is under a red ordermayalsofireatthetarget.Unitsofotherdivi-sionsmayalsofireiftheirgeneralorahigherrank-ing general is within 1” of them and uses a leader-ship point. After the player has determined who all willtakepartinthesupportfire,resolvethefire.Afterresolvingthefire,ifthereisanygeneralwithin1” of the target, roll to see if he has been hit. On a roll of 0, he is hit and must roll on the Hitting Gener-als chart.
Withdrawal: If the unit being charged is cavalry, it may make a full move directly away from the charging unit. If the target is dismounted cavalry, it may mount if its cavalry stand is within 1”, and may make a half move directly away. If the charging unit still catches this stand, it is considered hitting in it in the rear.
Unitsindisordermaysacrificehalftheirmovementtoattempttogetintoorder.Theyrollagainsttheirmorale marker. If they exceed the number, they are placed in order. If they do not exceed it, they may sacri-ficetherestoftheirmovementtotryagain,ormoveathalfspeed-1becausetheyarestillindisorder.
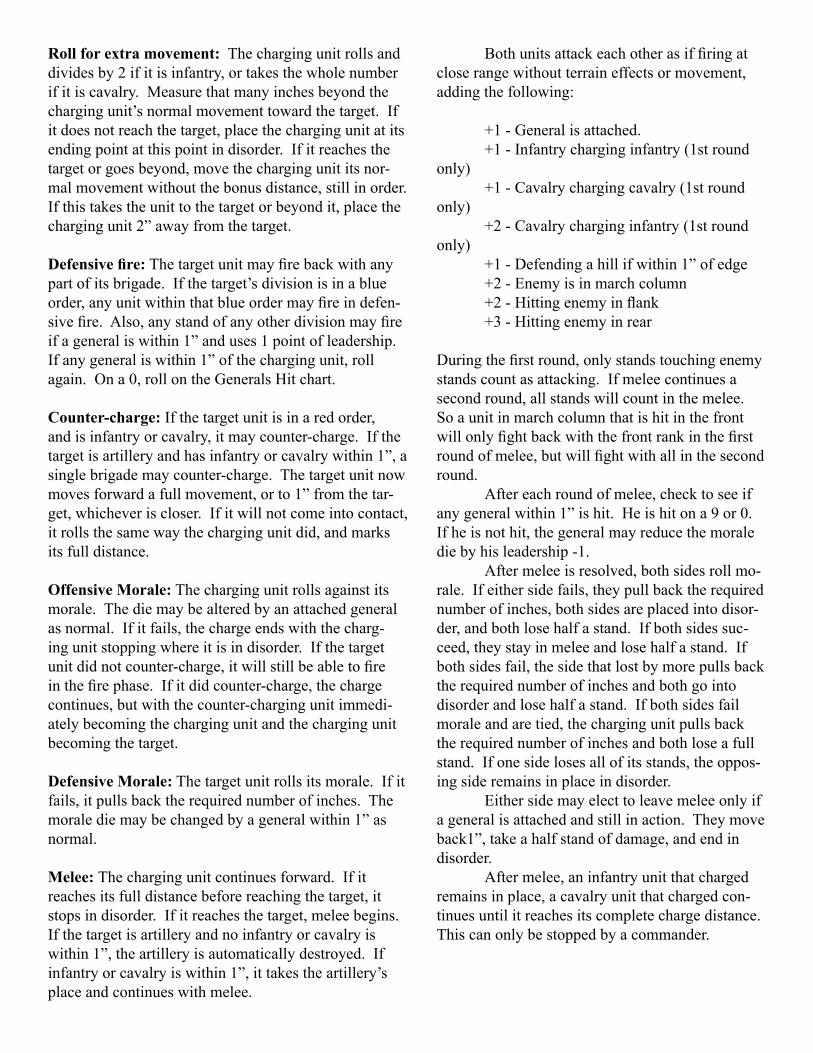
Roll for extra movement: The charging unit rolls and divides by 2 if it is infantry, or takes the whole number if it is cavalry. Measure that many inches beyond the charging unit’s normal movement toward the target. If it does not reach the target, place the charging unit at its ending point at this point in disorder. If it reaches the target or goes beyond, move the charging unit its nor-mal movement without the bonus distance, still in order. If this takes the unit to the target or beyond it, place the charging unit 2” away from the target.
Defensive fire:Thetargetunitmayfirebackwithanypart of its brigade. If the target’s division is in a blue order,anyunitwithinthatblueordermayfireindefen-sivefire.Also,anystandofanyotherdivisionmayfireif a general is within 1” and uses 1 point of leadership. If any general is within 1” of the charging unit, roll again. On a 0, roll on the Generals Hit chart.
Counter-charge: If the target unit is in a red order, and is infantry or cavalry, it may counter-charge. If the target is artillery and has infantry or cavalry within 1”, a single brigade may counter-charge. The target unit now moves forward a full movement, or to 1” from the tar-get, whichever is closer. If it will not come into contact, it rolls the same way the charging unit did, and marks its full distance.
Offensive Morale: The charging unit rolls against its morale. The die may be altered by an attached general as normal. If it fails, the charge ends with the charg-ing unit stopping where it is in disorder. If the target unitdidnotcounter-charge,itwillstillbeabletofireinthefirephase.Ifitdidcounter-charge,thechargecontinues, but with the counter-charging unit immedi-ately becoming the charging unit and the charging unit becoming the target.
Defensive Morale: The target unit rolls its morale. If it fails, it pulls back the required number of inches. The morale die may be changed by a general within 1” as normal.
Melee: The charging unit continues forward. If it reaches its full distance before reaching the target, it stops in disorder. If it reaches the target, melee begins. If the target is artillery and no infantry or cavalry is within 1”, the artillery is automatically destroyed. If infantry or cavalry is within 1”, it takes the artillery’s place and continues with melee.
Bothunitsattackeachotherasiffiringatclose range without terrain effects or movement, adding the following:
+1 - General is attached. +1 - Infantry charging infantry (1st round only) +1 - Cavalry charging cavalry (1st round only) +2 - Cavalry charging infantry (1st round only) +1 - Defending a hill if within 1” of edge +2 - Enemy is in march column +2-Hittingenemyinflank +3 - Hitting enemy in rear
Duringthefirstround,onlystandstouchingenemystands count as attacking. If melee continues a second round, all stands will count in the melee. Soaunitinmarchcolumnthatishitinthefrontwillonlyfightbackwiththefrontrankinthefirstroundofmelee,butwillfightwithallinthesecondround. After each round of melee, check to see if any general within 1” is hit. He is hit on a 9 or 0. If he is not hit, the general may reduce the morale die by his leadership -1. After melee is resolved, both sides roll mo-rale. If either side fails, they pull back the required number of inches, both sides are placed into disor-der, and both lose half a stand. If both sides suc-ceed, they stay in melee and lose half a stand. If both sides fail, the side that lost by more pulls back the required number of inches and both go into disorder and lose half a stand. If both sides fail morale and are tied, the charging unit pulls back the required number of inches and both lose a full stand. If one side loses all of its stands, the oppos-ing side remains in place in disorder. Either side may elect to leave melee only if a general is attached and still in action. They move back1”, take a half stand of damage, and end in disorder. After melee, an infantry unit that charged remains in place, a cavalry unit that charged con-tinues until it reaches its complete charge distance. This can only be stopped by a commander.
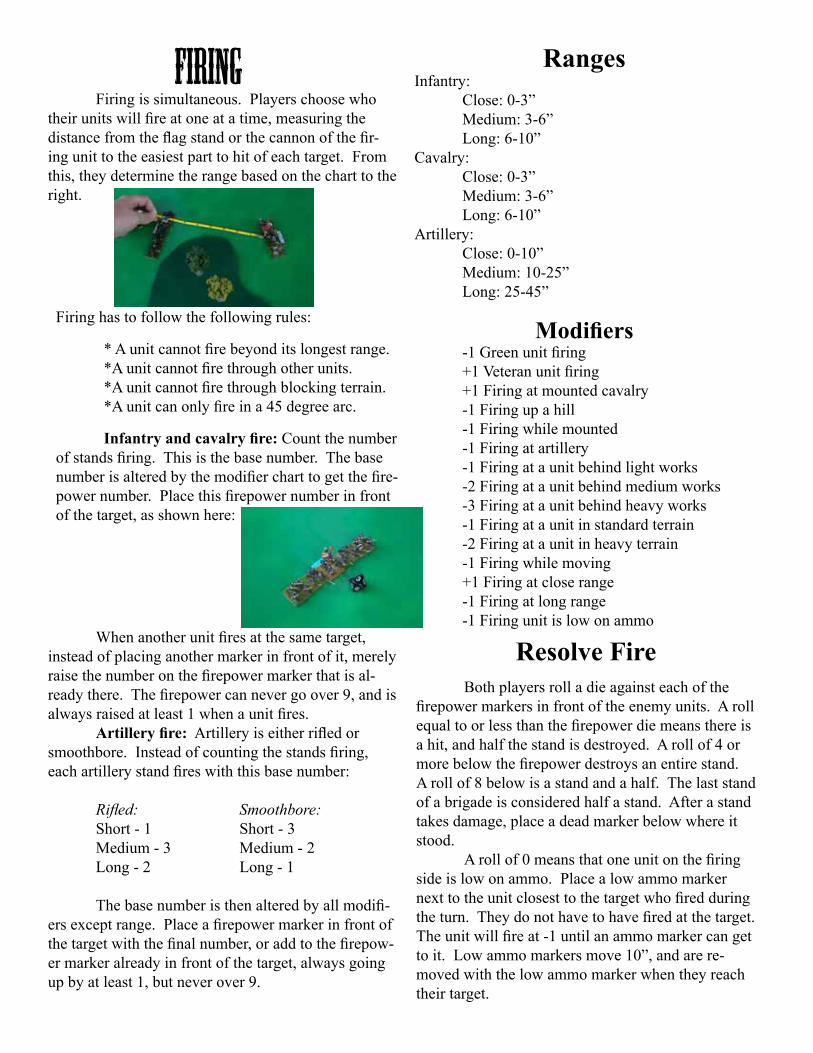
Firing Firing is simultaneous. Players choose who theirunitswillfireatoneatatime,measuringthedistancefromtheflagstandorthecannonofthefir-ing unit to the easiest part to hit of each target. From this, they determine the range based on the chart to the right.
Whenanotherunitfiresatthesametarget,instead of placing another marker in front of it, merely raisethenumberonthefirepowermarkerthatisal-readythere.Thefirepowercannevergoover9,andisalwaysraisedatleast1whenaunitfires. Artillery fire:Artilleryiseitherrifledorsmoothbore.Insteadofcountingthestandsfiring,eachartillerystandfireswiththisbasenumber:
Rifled: Smoothbore: Short-1 Short-3 Medium - 3 Medium - 2 Long - 2 Long - 1
Thebasenumberisthenalteredbyallmodifi-ersexceptrange.Placeafirepowermarkerinfrontofthetargetwiththefinalnumber,oraddtothefirepow-er marker already in front of the target, always going up by at least 1, but never over 9.
Firing has to follow the following rules:
*Aunitcannotfirebeyonditslongestrange. *Aunitcannotfirethroughotherunits. *Aunitcannotfirethroughblockingterrain. *Aunitcanonlyfireina45degreearc.
Infantry and cavalry fire: Count the number ofstandsfiring.Thisisthebasenumber.Thebasenumberisalteredbythemodifiercharttogetthefire-powernumber.Placethisfirepowernumberinfrontof the target, as shown here:
RangesInfantry: Close: 0-3” Medium: 3-6” Long: 6-10”Cavalry: Close: 0-3” Medium: 3-6” Long: 6-10”Artillery: Close: 0-10” Medium: 10-25” Long: 25-45”
Modifiers -1Greenunitfiring +1Veteranunitfiring +1 Firing at mounted cavalry -1 Firing up a hill -1 Firing while mounted -1 Firing at artillery -1 Firing at a unit behind light works -2 Firing at a unit behind medium works -3 Firing at a unit behind heavy works -1 Firing at a unit in standard terrain -2 Firing at a unit in heavy terrain -1 Firing while moving +1 Firing at close range -1 Firing at long range -1 Firing unit is low on ammo
Resolve Fire Both players roll a die against each of the firepowermarkersinfrontoftheenemyunits.Arollequaltoorlessthanthefirepowerdiemeansthereisa hit, and half the stand is destroyed. A roll of 4 or morebelowthefirepowerdestroysanentirestand.A roll of 8 below is a stand and a half. The last stand of a brigade is considered half a stand. After a stand takes damage, place a dead marker below where it stood. Arollof0meansthatoneunitonthefiringside is low on ammo. Place a low ammo marker nexttotheunitclosesttothetargetwhofiredduringtheturn.Theydonothavetohavefiredatthetarget.Theunitwillfireat-1untilanammomarkercangetto it. Low ammo markers move 10”, and are re-moved with the low ammo marker when they reach their target.

Hitting Generals Afterallfireisresolved,allgeneralswithin1” of a unit that was targeted must roll to be hit. On a roll of 0, they are hit, and must roll on the following chart:
1-Bravelyshrugsitoff.Subtract1frommorale.2-Merefleshwound.Remainsonthefield.3 - Dazed. Cannot do anything for 2 turns.4 - Unonscious. Remove from the game.5 - Panics. Orders his men to pull back 1d10 inches. If more than 6, all rout.6 - Runs away. Runs 2d10 inches away. Brigades within 1” raise 1 extra on their morale die.7 - Heroic death. Removed from the game, but all brigades within command distance that can see him lower their morale dice by 2.8 - Terrible death. Removed from the game and all units within 2” raise their morale die by 2.9 - KIA. The general is simply killed.10 - Death seen by all. General removed from the game and everyone under his command that can see him adds 2 to their morale die.
When a division general is taken out of the game, the division remains under its current order for one turn, then, during the command phase of the fol-lowing turn, the player chooses a brigade within the division to be the new division commander, and all orders are placed next to it. It has no leadership, and its initiative is down to 1. Whena corps general is taken out of the game, the player has to wait until the command phase of the following turn to replace him with one of his division commanders. That division commander is then replaced by a brigade as above.
Morale Modifiers Unit is green: +1 Unit is veteran: -1 Unitwasfiredonfromflank:+1 Unitwasfiredonfromrear:+2 Unit is in disorder: +1 Unit is behind a fence or wall: -1 Unit is in or behind military cover: -2 Unit has 2 friendly units within 1”: -1 *Unitsthatwerenotfireduponandarenotinrout decrease their morale die to 1 automatically.
Generals Rally Generals who are within 1” of units may lower the unit’s morale die by the amount of the general’s leadership. If the general has used leadership through-out the turn for other purposes, he only has the amount remaining that has been unused. If a general is within 1” of more than one unit, he may spread out his leadership however he likes, but he only has a total of his leadership points to spread out among them.
Roll Morale Players roll for each unit that has a morale die. If they roll equal to the number, the unit goes into disor-der. If they roll below the morale number, the unit goes into disorder and pulls back a number of inches equal to the amount he failed the morale roll by. If the unit rolls 6 or more below the morale die number, the unit routs a number of inches equal to the amount he rolled below the morale number. After each roll, reduce the morale die by 1 if they are in disorder, 2 if they are in order, and 3 if they are more than 15” away from the enemy. Artillery that fails its morale roll does not move back,butinsteadturnsaround.Itcannotfireuntilitre-orders itself. If artillery routs, replace the piece with a marker indicating abandoned cannons which can be captured for points by the opponent.
Routs Units that are routing move when they fail their morale, and move their full distance during the move-ment phase. They always move directly away from all visible enemies and ignore all terrain except impassable. If they are forced into impassable terrain, they lose 1/2 a stand for every inch they are forced into it. When they succeed at morale, they face the enemy in disorder.
MoraleSwitch to Morale Markers
Thefirepowerdicearenowplacedbehindthe target units to become the morale dice. If a unit alreadyhasamoralemarker,simplyaddthefire-power number to the morale marker, never going over 9. These numbers are further effected by the following:
Command Phase Players may now change their orders, sending out new orders from their corps commanders, or hav-ing their division generals change them. In the Battle of Bull Run, the Confederate division generals may change their own orders at will, but the Union division generals have to roll to see if they are able to. For a division general to change his own order, he must roll equal to or less than his initiative. If he succeeds, he rolls again. On a 1-5 it is the order he wants. If it’s a 6-0 it’s the other order. Corps generals send out the new order markers 15” toward the division general. These markers ignoreterrainmodificationsexceptimpassableterrain.Theymaymodifytheirroutsupto10”ineitherdirection in order to use roads or to avoid the enemy, but otherwise must go as quickly toward their targets aspossible.Ifanorderdoesnotreachitstargetthefirstturnitissentout,itstayswhereitisthroughouttheturn and moves 15” further during the next command phase. An order can be shot at and moved over. If it is touched in any way by an enemy, it is removed. If it is hit, it is removed. Command markers have no morale. Any division general that loses a brigade either due to complete destruction or from being routed off the table must roll against his damage number. If he rolls above the damage number, his entire division switches to the blue defensive order, which cannot be switched until the following command phase. He must continue to roll against his damage number every turn during the command phase until he passes it. If both Confederate division generals fail this test in the same turn, they lose the game. Players check to see if there is a winner, or if the game ends due to number of turns. If there is no winner and the maximum turns have not been reached, the next turn begins with the draw card phase.
Ending the Game During the command phase, the game is checked for one of four conditions to end it:
One side has no more units on the table that are not in rout. That side has lost the game. One side has captured all of the objectives. This means that this player has units within 10” of each objective, and the opponent has no units within 10” of any objectives. The game ends with the side that has the objectives as the winner. One side has reached its maximum damage. This happens either when both Confederate generals failtheirdamagerolls,orwhentheUnionplayerlosesfivebrigades. 20 turns have been reached. Both sides add up the points below to see who has won.
5/10 points: Each objective for which the player has a unit within 10” but the enemy has no unit within 10”. 5 points: For capturing the enemy supply wagon. 2 points: Each enemy general killed. 2 points: Each brigade completely destroyed or routed off the table. 1 point: Each artillery battery destroyed. 1 point: Each artillery battery captured. 1 point: Each enemy dead marker that is at or behind friendly lines.
“Thewarlikescenewasfascinatinglygrandbeyonddescription.Thebattlefieldpresentedascenicviewtahttheloftiestthoughtofmymindisfartoolowandinsignificanttodelineate,
describe, or portray.” - Corporal George M. Neese