Embed Size (px)
Citation preview
1
Alabama Woodturners Association
A member of the American Association of Woodturners
April 2016
Location: Homewood Senior Center at 816 Oak Grove Road, Homewood, AL 35209 Web Site: www.alabamawoodturners.com
2016 Officers of AWA
President-John Sowell
Vice President-Carl
Cummins
Treasurer-Jennifer Smith
Secretary-Amy
Benefield/Jean Cline
Directors-Maurice
Clabaugh, Bruce Gibson,
Dwight Hostetter, Michael
Malinconico, Richard
Serviss, Staten Tate, Gary
Hales
Webmaster-Carl Cummins
Newsletter Editors-Jean
Cline, Amy Benefield
Inside This Issue:
March Demonstrator-Charles Jen-
nings~Page 2
Beads of Courage Boxes~Page 3
Turn and Tell~Page 2 and 4
Raffle/Birthday News~Page 5
President’s Challenge-Page 6
Polygon Box Instructions-Page 7
Easy Epoxy Inlays-Page 9
Make Refrigerator Magnets~Pages 11
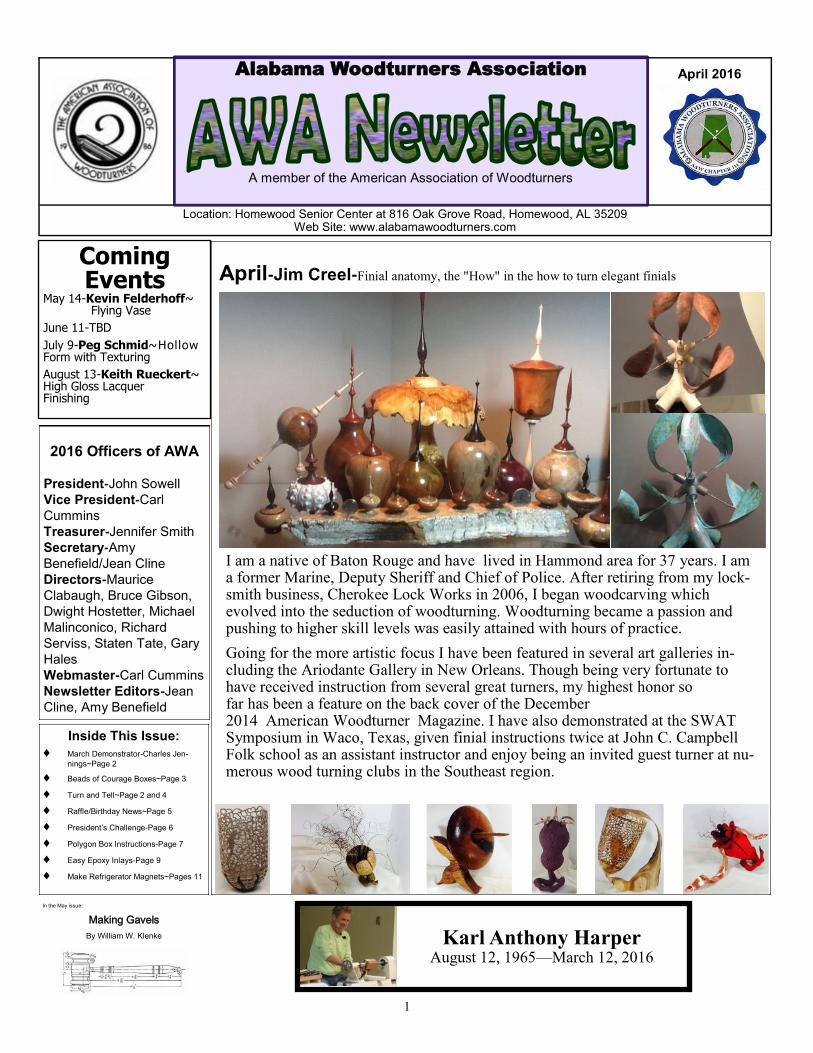
April-Jim Creel-Finial anatomy, the "How" in the how to turn elegant finials
Coming Events
May 14-Kevin Felderhoff~ Flying Vase
June 11-TBD
July 9-Peg Schmid~Hollow Form with Texturing
August 13-Keith Rueckert~ High Gloss Lacquer Finishing
In the May issue:
Making Gavels
By William W. Klenke
I am a native of Baton Rouge and have lived in Hammond area for 37 years. I am a former Marine, Deputy Sheriff and Chief of Police. After retiring from my lock-smith business, Cherokee Lock Works in 2006, I began woodcarving which evolved into the seduction of woodturning. Woodturning became a passion and pushing to higher skill levels was easily attained with hours of practice.
Going for the more artistic focus I have been featured in several art galleries in-cluding the Ariodante Gallery in New Orleans. Though being very fortunate to have received instruction from several great turners, my highest honor so far has been a feature on the back cover of the December 2014 American Woodturner Magazine. I have also demonstrated at the SWAT Symposium in Waco, Texas, given finial instructions twice at John C. Campbell Folk school as an assistant instructor and enjoy being an invited guest turner at nu-merous wood turning clubs in the Southeast region.
Karl Anthony Harper August 12, 1965—March 12, 2016
2
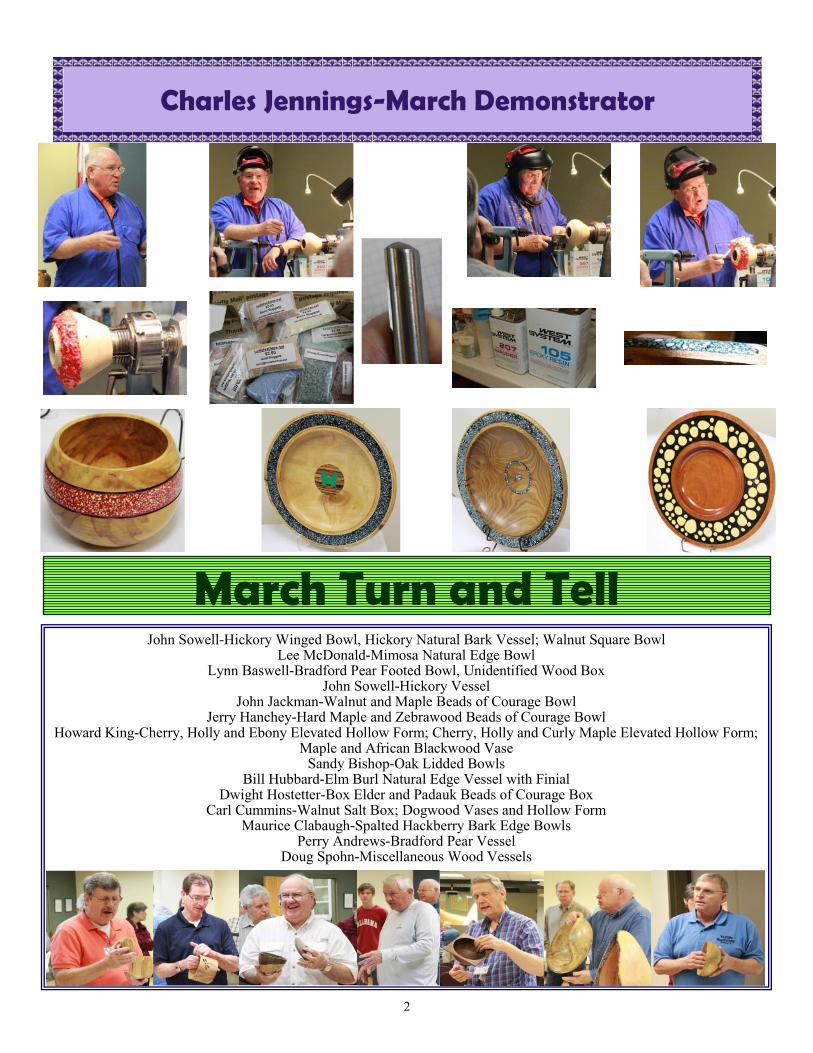
Charles Jennings-March Demonstrator
March Turn and Tell John Sowell-Hickory Winged Bowl, Hickory Natural Bark Vessel; Walnut Square Bowl
Lee McDonald-Mimosa Natural Edge Bowl Lynn Baswell-Bradford Pear Footed Bowl, Unidentified Wood Box
John Sowell-Hickory Vessel John Jackman-Walnut and Maple Beads of Courage Bowl
Jerry Hanchey-Hard Maple and Zebrawood Beads of Courage Bowl Howard King-Cherry, Holly and Ebony Elevated Hollow Form; Cherry, Holly and Curly Maple Elevated Hollow Form;
Maple and African Blackwood Vase Sandy Bishop-Oak Lidded Bowls
Bill Hubbard-Elm Burl Natural Edge Vessel with Finial Dwight Hostetter-Box Elder and Padauk Beads of Courage Box
Carl Cummins-Walnut Salt Box; Dogwood Vases and Hollow Form Maurice Clabaugh-Spalted Hackberry Bark Edge Bowls
Perry Andrews-Bradford Pear Vessel Doug Spohn-Miscellaneous Wood Vessels

3
What is the Beads of Courage Program? The program is a resilience-based intervention de-signed to support and strengthen children and fami-lies coping with serious illness. Through the pro-gram, children tell their stories using colorful beads as meaningful symbols of courage that commemo-rate milestones they have achieved along their unique treatment path.
How it works Upon enrollment, each child is given the Beads of Courage bead color guide/tally sheet. Their Beads of Courage journey begins when each child is first given a length of string and beads that spell out their first name. Then, colorful beads, each representing a different treatment milestone are given to the child by their professional health care provider to add to their Beads of Courage collection throughout their treatment.
So-o-o, Where Do We, As Woodturners, Fit In?
Beads of Courage gratefully thanks all woodturners who donate their one-of-a-kind, handmade bowls, and boxes to a child in treatment for a serious illness.
Guidelines In order to hold the beads, turned boxes for the Beads of Courage program need to be about 6 inches in diameter (5 inches minimum), rectangular lidded boxes about 4 x 6 x 4 inches or round lids. If possible, engrave or burn "Beads of Cour-age" in the lid or side of container. Sign your name and write "American Association of Woodturners" on the bottom. Make sure the lids are easily removable. Any finials should be easy for a small child to grasp and not too elaborate (may break). We ask that you refrain from painting the boxes or bowls. Instead, highlight the beauty of the wood with clear varnish, a stain, and/ or burning on the bowl.
4
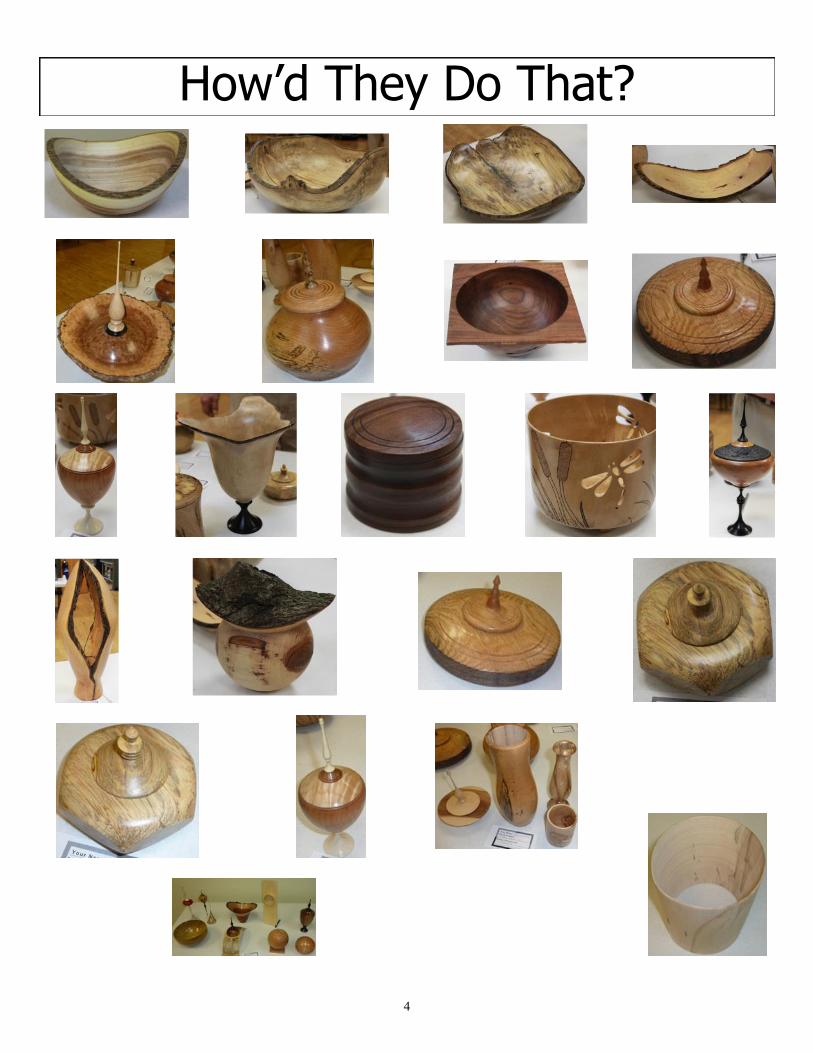
How’d They Do That?
5
Michael Maliconico, whose bir thday is March 12, won a piece Red Mallee.
Who will take home the April birthday prize?
Check out the list of April contenders below.
Saturday Afternoon Mentoring (Starts about 1 hour after the morning session ends or about 1:00)
WA owns lathes, chucks and tools necessary to use in classes but you may also bring your own tools. Training is held in the Craft Room at the Homewood Senior Center.
If you are interested in participating either as a student or a mentor, Phil would love to talk to you and sign you up! Phil Fortmeyer-(205) 612-7496.
Happy Birthday to AWA’s
Members with April Birthdays!
Wayne Bagwell-April 4
‘Doc Phil’ Fortmeyer-April 6
Brian Edwards-April 9
Greg Dobbs-April 10
Jack Capps-April 13
Laura Reder-April 23
John Taylor-April 25
Larry Hicks-April 27
Raffle Prize News We’re changing the raffle once again!
Bring an item to donate and buy raffle tickets.
We’ll raffle the items donated but the last ticket
drawn will split the pot 50/50! Needless to say,
you have to be there to win!
So-o-o-o, what do you donate? How about a
tool, jig, turned item, wood blank etc. If
you’ve been to any of the meetings since No-
vember, you probably saw some of the items
that were donated for the AAW Symposium
ticket raffle. That should give you a pretty
good idea. Use your imagination …within rea-
son, of course! As a bonus, if you bring dona-
tions, you’ll get an additional raffle ticket!
$1 each~~~~~~$5 for 6 tickets~~~~~$10 for 13 tickets. Ask Amy for ticket numbers for higher dollar amounts! The success of this raffle and the amount of the final prize will depend on your willingness to donate nice items and also to buy raffle tickets. $1 each~~~~~~~$5 for 6 tickets~~~~~~$10 for 13 tickets If you don’t think you are an expert turner, look at any of the newsletters from other clubs. You will see that your turnings are equal to anything out there. Your turned items probably ARE ‘good enough’.
If you’ve been to the meetings for the last few months or
actually read the newsletter, you’ve noticed that the AWA
has been giving a birthday gift door prize to a turner who
has a birthday during the month of that meeting.
Here are the ‘rules’ for 2016 as they stand now: 1) This is a door prize so, yes, you need to be at the meeting and stay for
the drawing to win.
2) You need to make sure Jean and/or Amy have your correct
birthdate. No fair changing your birthdate in the middle of the
year! You’re stuck with the one they originally gave you!
As most of you know by now, the AAW Symposium
for 2016 (June 9-12) will be held in Atlanta! We have
collected enough money from the last few months’ raffles to pay for 2 scholarships to the Symposium! The lucky tickets will be drawn at the April meeting. Be sure to attend so you’ll hear the news, first hand, that you won!
6
February-Done! Tops
March-Done! Jigs, Tools and Contraptions you have made
April Square Bowl-7” x 7” x 2” or larger
May A natural edge piece incorporating a major flaw in
the wood
June Matched or complimentary pair of candle sticks,
one at least 6” high
July Gavel or shop mallet that you wouldn’t want to use
because it is so nice!
August Pepper mill in honor of Karl’s Harper’s birthday
September Thin-walled bowl-4” or more in diameter by 1/8” or
less thick
October Christmas Ornaments
November Lidded box with ‘pop’ top-1” or more in diameter
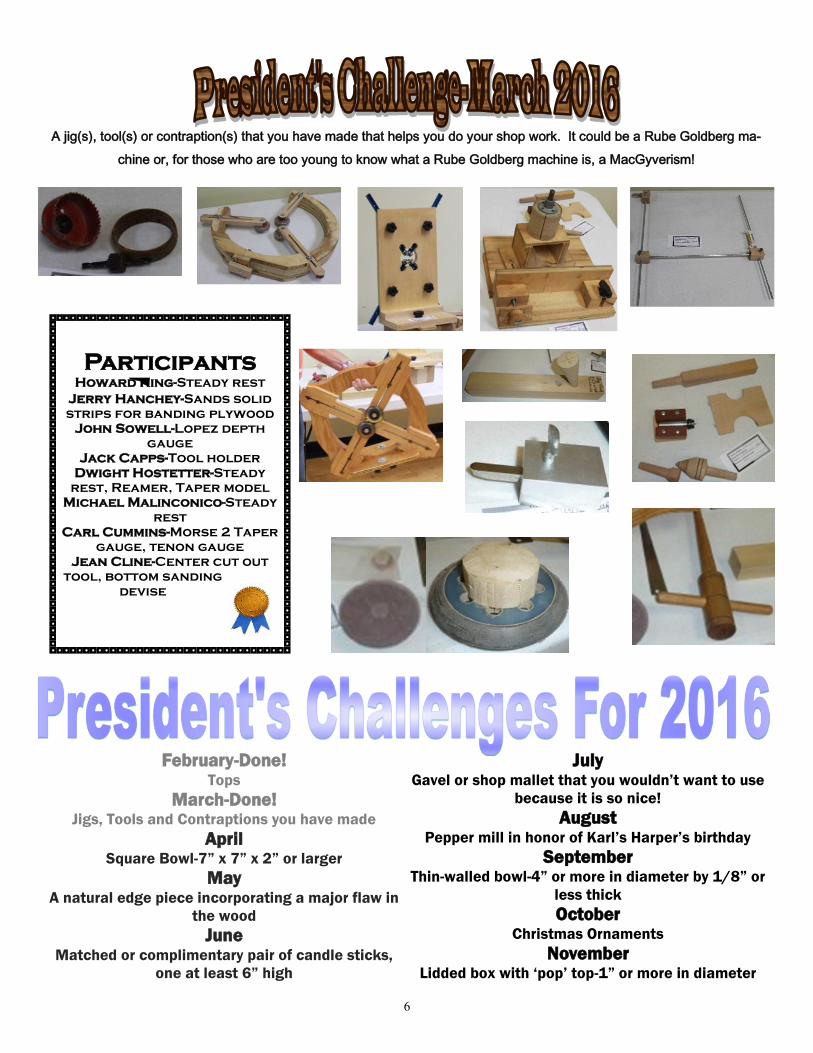
Participants Howard King-Steady rest
Jerry Hanchey-Sands solid
strips for banding plywood
John Sowell-Lopez depth
gauge
Jack Capps-Tool holder
Dwight Hostetter-Steady
rest, Reamer, Taper model
Michael Malinconico-Steady
rest
Carl Cummins-Morse 2 Taper
gauge, tenon gauge
Jean Cline-Center cut out
tool, bottom sanding
devise
A jig(s), tool(s) or contraption(s) that you have made that helps you do your shop work. It could be a Rube Goldberg ma-
chine or, for those who are too young to know what a Rube Goldberg machine is, a MacGyverism!
7
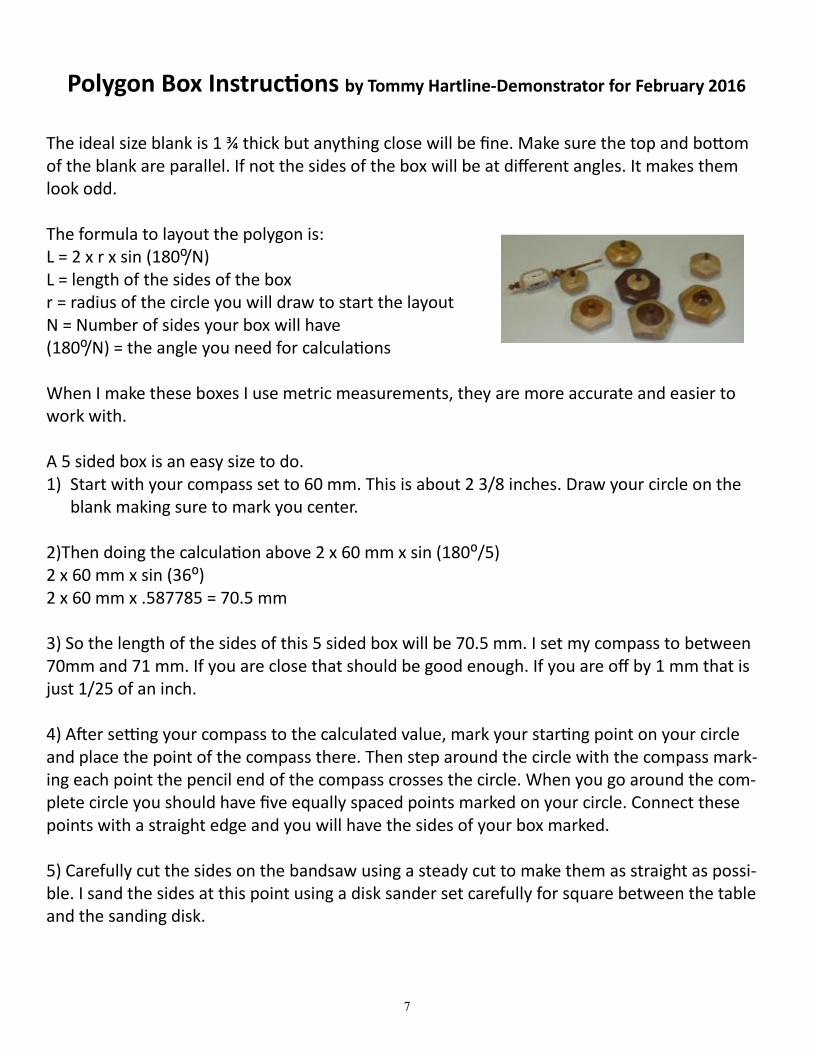
Polygon Box Instructions by Tommy Hartline-Demonstrator for February 2016
The ideal size blank is 1 ¾ thick but anything close will be fine. Make sure the top and bottom of the blank are parallel. If not the sides of the box will be at different angles. It makes them look odd. The formula to layout the polygon is: L = 2 x r x sin (180⁰/N) L = length of the sides of the box r = radius of the circle you will draw to start the layout N = Number of sides your box will have (180⁰/N) = the angle you need for calculations When I make these boxes I use metric measurements, they are more accurate and easier to work with. A 5 sided box is an easy size to do. 1) Start with your compass set to 60 mm. This is about 2 3/8 inches. Draw your circle on the
blank making sure to mark you center. 2)Then doing the calculation above 2 x 60 mm x sin (180⁰/5) 2 x 60 mm x sin (36⁰) 2 x 60 mm x .587785 = 70.5 mm 3) So the length of the sides of this 5 sided box will be 70.5 mm. I set my compass to between 70mm and 71 mm. If you are close that should be good enough. If you are off by 1 mm that is just 1/25 of an inch. 4) After setting your compass to the calculated value, mark your starting point on your circle and place the point of the compass there. Then step around the circle with the compass mark-ing each point the pencil end of the compass crosses the circle. When you go around the com-plete circle you should have five equally spaced points marked on your circle. Connect these points with a straight edge and you will have the sides of your box marked. 5) Carefully cut the sides on the bandsaw using a steady cut to make them as straight as possi-ble. I sand the sides at this point using a disk sander set carefully for square between the table and the sanding disk.
8
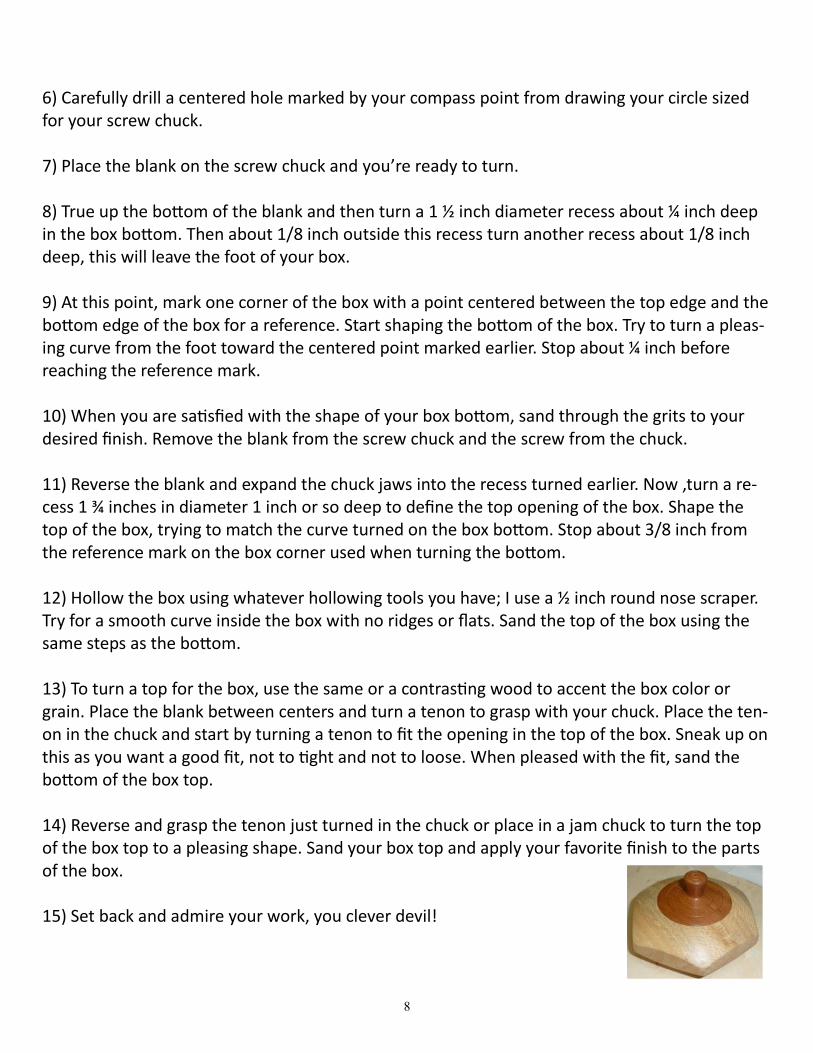
6) Carefully drill a centered hole marked by your compass point from drawing your circle sized for your screw chuck. 7) Place the blank on the screw chuck and you’re ready to turn. 8) True up the bottom of the blank and then turn a 1 ½ inch diameter recess about ¼ inch deep in the box bottom. Then about 1/8 inch outside this recess turn another recess about 1/8 inch deep, this will leave the foot of your box. 9) At this point, mark one corner of the box with a point centered between the top edge and the bottom edge of the box for a reference. Start shaping the bottom of the box. Try to turn a pleas-ing curve from the foot toward the centered point marked earlier. Stop about ¼ inch before reaching the reference mark. 10) When you are satisfied with the shape of your box bottom, sand through the grits to your desired finish. Remove the blank from the screw chuck and the screw from the chuck. 11) Reverse the blank and expand the chuck jaws into the recess turned earlier. Now ,turn a re-cess 1 ¾ inches in diameter 1 inch or so deep to define the top opening of the box. Shape the top of the box, trying to match the curve turned on the box bottom. Stop about 3/8 inch from the reference mark on the box corner used when turning the bottom. 12) Hollow the box using whatever hollowing tools you have; I use a ½ inch round nose scraper. Try for a smooth curve inside the box with no ridges or flats. Sand the top of the box using the same steps as the bottom. 13) To turn a top for the box, use the same or a contrasting wood to accent the box color or grain. Place the blank between centers and turn a tenon to grasp with your chuck. Place the ten-on in the chuck and start by turning a tenon to fit the opening in the top of the box. Sneak up on this as you want a good fit, not to tight and not to loose. When pleased with the fit, sand the bottom of the box top. 14) Reverse and grasp the tenon just turned in the chuck or place in a jam chuck to turn the top of the box top to a pleasing shape. Sand your box top and apply your favorite finish to the parts of the box. 15) Set back and admire your work, you clever devil!
9
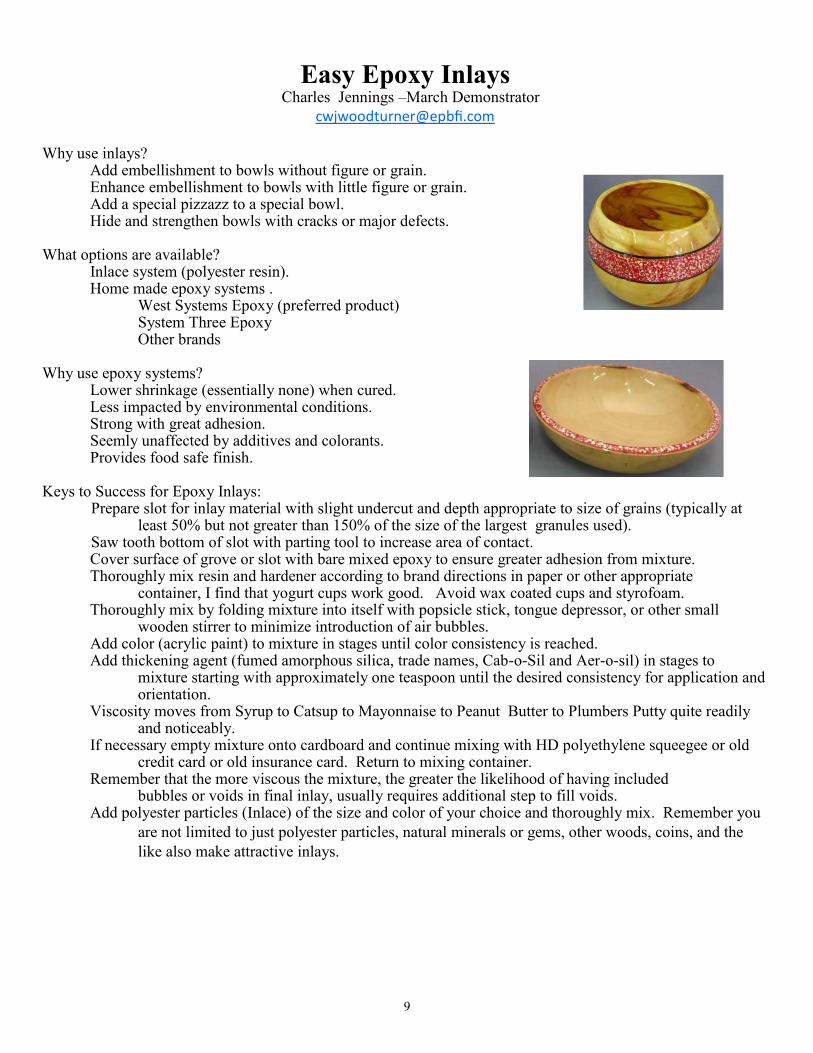
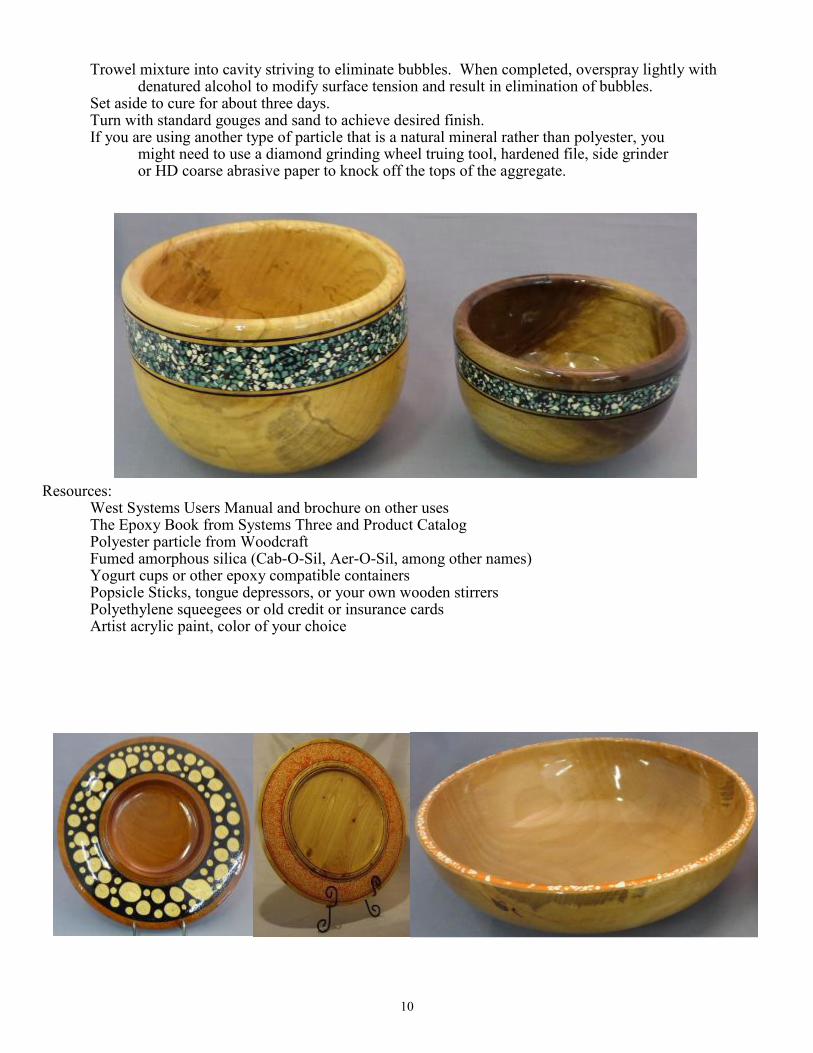
Easy Epoxy Inlays Charles Jennings –March Demonstrator
Why use inlays? Add embellishment to bowls without figure or grain. Enhance embellishment to bowls with little figure or grain. Add a special pizzazz to a special bowl. Hide and strengthen bowls with cracks or major defects. What options are available? Inlace system (polyester resin). Home made epoxy systems . West Systems Epoxy (preferred product) System Three Epoxy Other brands Why use epoxy systems? Lower shrinkage (essentially none) when cured. Less impacted by environmental conditions. Strong with great adhesion. Seemly unaffected by additives and colorants. Provides food safe finish. Keys to Success for Epoxy Inlays:
Prepare slot for inlay material with slight undercut and depth appropriate to size of grains (typically at least 50% but not greater than 150% of the size of the largest granules used). Saw tooth bottom of slot with parting tool to increase area of contact.
Cover surface of grove or slot with bare mixed epoxy to ensure greater adhesion from mixture. Thoroughly mix resin and hardener according to brand directions in paper or other appropriate container, I find that yogurt cups work good. Avoid wax coated cups and styrofoam.
Thoroughly mix by folding mixture into itself with popsicle stick, tongue depressor, or other small wooden stirrer to minimize introduction of air bubbles.
Add color (acrylic paint) to mixture in stages until color consistency is reached. Add thickening agent (fumed amorphous silica, trade names, Cab-o-Sil and Aer-o-sil) in stages to mixture starting with approximately one teaspoon until the desired consistency for application and orientation. Viscosity moves from Syrup to Catsup to Mayonnaise to Peanut Butter to Plumbers Putty quite readily and noticeably. If necessary empty mixture onto cardboard and continue mixing with HD polyethylene squeegee or old credit card or old insurance card. Return to mixing container. Remember that the more viscous the mixture, the greater the likelihood of having included
bubbles or voids in final inlay, usually requires additional step to fill voids. Add polyester particles (Inlace) of the size and color of your choice and thoroughly mix. Remember you
are not limited to just polyester particles, natural minerals or gems, other woods, coins, and the
like also make attractive inlays.
10
Trowel mixture into cavity striving to eliminate bubbles. When completed, overspray lightly with denatured alcohol to modify surface tension and result in elimination of bubbles.
Set aside to cure for about three days. Turn with standard gouges and sand to achieve desired finish. If you are using another type of particle that is a natural mineral rather than polyester, you might need to use a diamond grinding wheel truing tool, hardened file, side grinder or HD coarse abrasive paper to knock off the tops of the aggregate.
Resources: West Systems Users Manual and brochure on other uses The Epoxy Book from Systems Three and Product Catalog Polyester particle from Woodcraft Fumed amorphous silica (Cab-O-Sil, Aer-O-Sil, among other names) Yogurt cups or other epoxy compatible containers Popsicle Sticks, tongue depressors, or your own wooden stirrers Polyethylene squeegees or old credit or insurance cards Artist acrylic paint, color of your choice
11
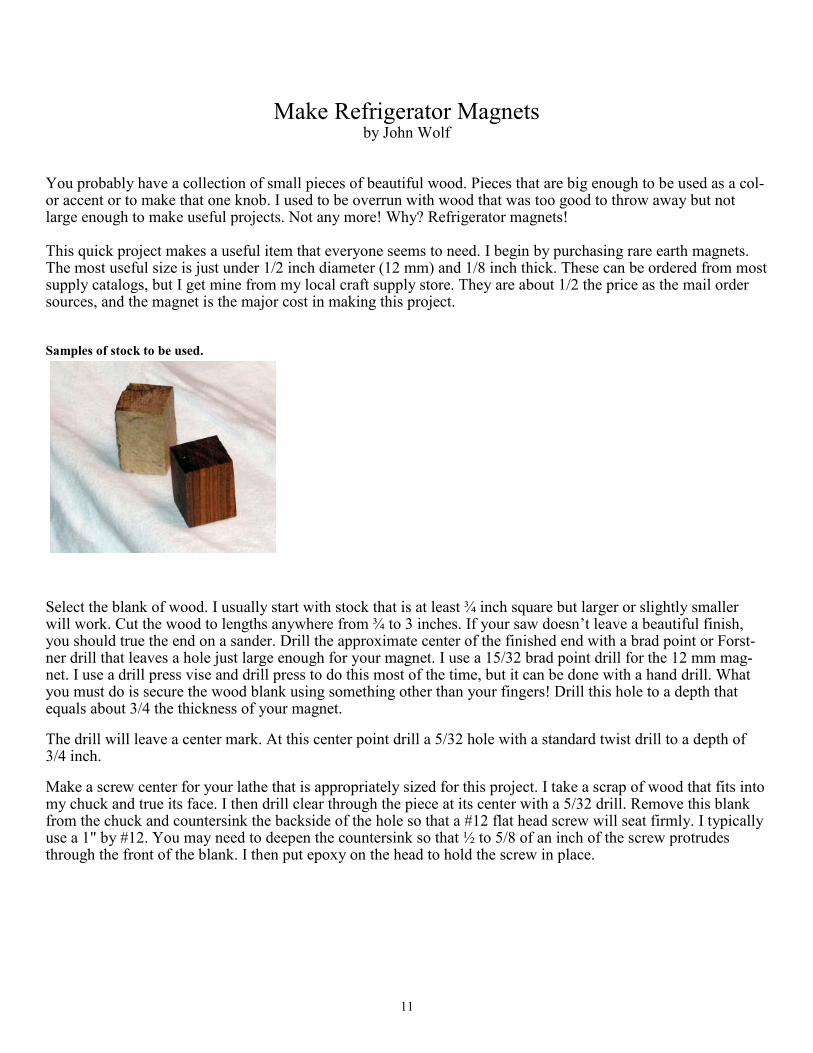
Make Refrigerator Magnets
by John Wolf You probably have a collection of small pieces of beautiful wood. Pieces that are big enough to be used as a col-or accent or to make that one knob. I used to be overrun with wood that was too good to throw away but not large enough to make useful projects. Not any more! Why? Refrigerator magnets! This quick project makes a useful item that everyone seems to need. I begin by purchasing rare earth magnets. The most useful size is just under 1/2 inch diameter (12 mm) and 1/8 inch thick. These can be ordered from most supply catalogs, but I get mine from my local craft supply store. They are about 1/2 the price as the mail order sources, and the magnet is the major cost in making this project. Samples of stock to be used.
Select the blank of wood. I usually start with stock that is at least ¾ inch square but larger or slightly smaller will work. Cut the wood to lengths anywhere from ¾ to 3 inches. If your saw doesn’t leave a beautiful finish, you should true the end on a sander. Drill the approximate center of the finished end with a brad point or Forst-ner drill that leaves a hole just large enough for your magnet. I use a 15/32 brad point drill for the 12 mm mag-net. I use a drill press vise and drill press to do this most of the time, but it can be done with a hand drill. What you must do is secure the wood blank using something other than your fingers! Drill this hole to a depth that equals about 3/4 the thickness of your magnet.
The drill will leave a center mark. At this center point drill a 5/32 hole with a standard twist drill to a depth of 3/4 inch.
Make a screw center for your lathe that is appropriately sized for this project. I take a scrap of wood that fits into my chuck and true its face. I then drill clear through the piece at its center with a 5/32 drill. Remove this blank from the chuck and countersink the backside of the hole so that a #12 flat head screw will seat firmly. I typically use a 1" by #12. You may need to deepen the countersink so that ½ to 5/8 of an inch of the screw protrudes through the front of the blank. I then put epoxy on the head to hold the screw in place.
12
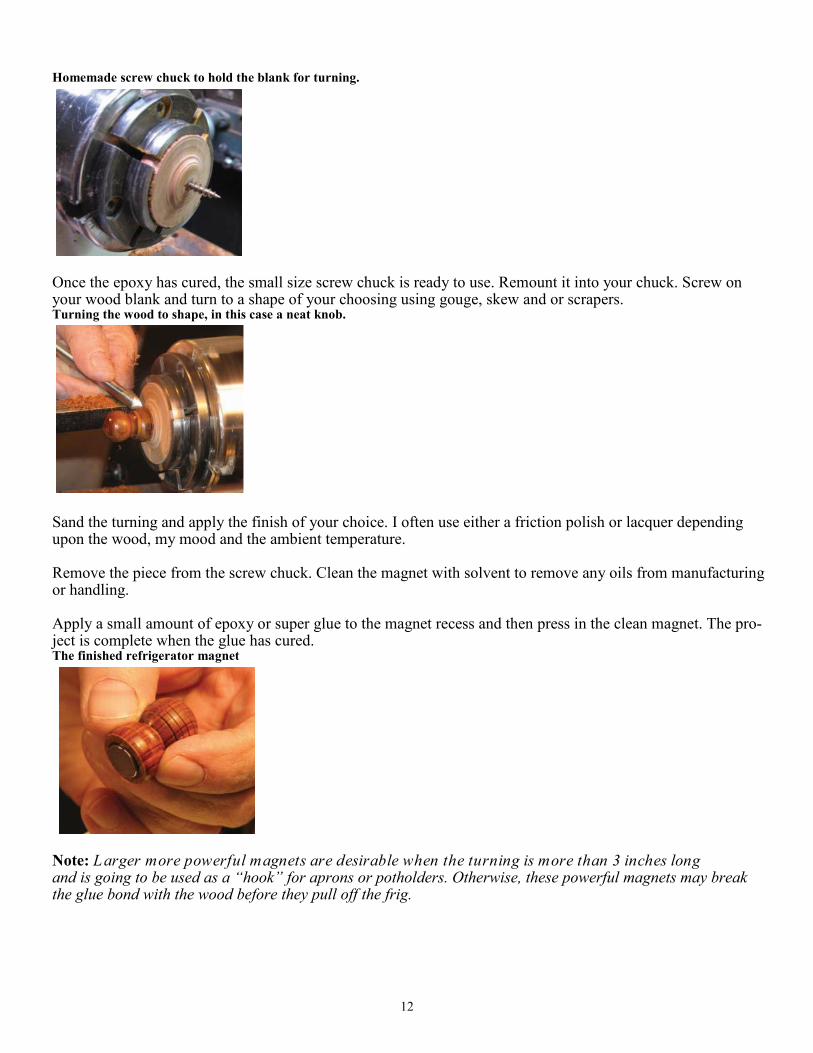
Homemade screw chuck to hold the blank for turning.
Once the epoxy has cured, the small size screw chuck is ready to use. Remount it into your chuck. Screw on your wood blank and turn to a shape of your choosing using gouge, skew and or scrapers. Turning the wood to shape, in this case a neat knob.
Sand the turning and apply the finish of your choice. I often use either a friction polish or lacquer depending upon the wood, my mood and the ambient temperature. Remove the piece from the screw chuck. Clean the magnet with solvent to remove any oils from manufacturing or handling. Apply a small amount of epoxy or super glue to the magnet recess and then press in the clean magnet. The pro-ject is complete when the glue has cured. The finished refrigerator magnet
Note: Larger more powerful magnets are desirable when the turning is more than 3 inches long and is going to be used as a “hook” for aprons or potholders. Otherwise, these powerful magnets may break the glue bond with the wood before they pull off the frig.