Embed Size (px)
Citation preview

ComCenter
User’s Guide
Release 040706
ComCenter User’s Guide (release 040706) Page 1

Table of Contents
Table of Contents
Table of Contents........................................................................................................................................................ ........2
Precautions............................................................................................................................................................................9
Safety Information........................................................................ .......................................................................................9
Exposure to Radio Frequency Signals...................................................................................................... ..................9
Antenna Care............................................................................................................ ......................................................9
Unit Operation............................................................................................................................................................ ...9
Driving...........................................................................................................................................................................10
Electronic Devices.......................................................................................................................................................10
Pacemakers.................................................................... ...............................................................................................10
Other Medical Devices...............................................................................................................................................10
Vehicles...................................................................................... ...................................................................................11
Posted Facilities............................................................................................................................................................11
Blasting Areas........................................................................................................................ .......................................11
Potentially Explosive Atmospheres................................................................................................................ ..........11
For Vehicles Equipped With Airbags.......................................................................................................................11
Important Notes for PBX System Users...................................................................................................................... .11
ASE Limited Warranty.....................................................................................................................................................12
ComCenter User’s Guide (release 040706) Page 2

1. Coverage and Duration..........................................................................................................................................12
2. Conditions Not Covered By This Warranty.......................................................................................................12
3. Obtaining Warranty Service...................................................................................................................................14
4. General Provisions.............................................................................................................................................. ....14
5. State Law and Other Jurisdiction Rights; Software Copyrights.......................................................................14
6. Contact.......................................................................................................................................... ............................15
Part I: Setup.................................................................................................................................... ....................................16
Installation.....................................................................................................................................................................16
Power On Messages.............................................................. ......................................................................................16
Accessing ComCenter Settings.......................................................................................................................... ........17
1 Contrast......................................................................................................................................................................18
2 Volume................................................................................................ .......................................................................18
3 Identity............................................................................................................................ ...........................................18
4 Ontec.............................................................................................................................. ............................................18
5 Options...................................................................................... ................................................................................19
6 Diagnostics.................................................................................................................... ............................................19
7 Phone Book...............................................................................................................................................................19
# Exit.............................................................................................................................................................................20
Part II: Calling............................................................................................................................................................ ........21
Making a Call........................................................................ ........................................................................................21
What You Will Hear....................................................................................................................................................21
ComCenter User’s Guide (release 040706) Page 3

Calling With SmartDial.......................................................................................................................................... .....21
911 Emergency Calls With SmartDial.................................................................................................................. ....21
Calling Without SmartDial................................................................................................................ .........................22
911 Emergency Calls Without SmartDial...................................................................................... ..........................22
Answering a Call.............................................................................................................. ............................................22
Making a Data Call.......................................................................................... ............................................................23
Hardware Connection.................................................................................... .............................................................23
Software Connection...................................................................................................................................................23
Appendix I: Iridium Handset..........................................................................................................................................24
What Is a SIM Card?.............................................................................................................................. .....................24
Using additional SIM Card (Other than SIM card already in Iridium satellite phone)....................................25
Powering Up the ComCenter.................................................................................... ................................................26
Power-On Messages................................................................................................ ....................................................27
Placing a Call................................................................................................................................................................28
What’s My SIM Card Phone Number?................................................................ ....................................................32
Receiving a Call...................................................................................................................................................... ......33
Using In-Call Features.................................................................................................................................................36
Muting a Call................................................................................................................................................................36
Using the Menus...................................................................................... ....................................................................37
Using the Options Menus..........................................................................................................................................38
Customize the Options Menu...................................................................................................................................40
ComCenter User’s Guide (release 040706) Page 4

Using The In-Call Menu........................................................................................................................ .....................43
Entering the In-Call Menu........................................................................................ .................................................43
Managing the Phone Book.............................................................................................................................. ...........44
What’s on the Phone Book Menu?.................................................................................................................. .........47
Organizing Your Phone Book.................................................................................... ...............................................48
Storing Names and Numbers....................................................................................................................................50
Entering Names.............................................................................................................................................. .............52
Locating Entries.......................................................................................... .................................................................57
Find an Entry by Location.......................................................................................................... ...............................58
Calling, Modifying, or Erasing an Entry..................................................................................................................59
Checking Phone Book Capacity............................................................................................................ ....................61
Preventing Access to the Phone Book.................................................................................... .................................62
Restricting Phone Use.................................................................................................................................................64
Add an Entry................................................................................................................................................ ................66
Erase an Entry.................................................................. ............................................................................................67
Edit an Entry...................................................................................................................................................... ..........68
View Your Fixed Dialing List.............................................................................................................................. ......69
Viewing the Last Ten Numbers Dialed...................................................................................................................70
Viewing and Modifying Your Phone Numbers.......................................................................................... ............71
One-Touch Dialing................................................................ .....................................................................................73
Using Calling Features.................................................................................................................................................75
ComCenter User’s Guide (release 040706) Page 5

What’s on the Call Related Features Menu?.................................................................................... ........................77
Forward Calls When Unavailable.................................................................................... ..........................................78
Forward All Your Calls................................................................................................ ...............................................80
Detailed Call Forwarding............................................................................................................................................81
Cancel All Forwarding.................................................................................... ............................................................83
Showing Signal Strength........................................................................................................................ .....................84
Deactivating Pending Call Drop Signal....................................................................................................................86
Restricting Calls with Call Barring............................................................................................................................87
Change Bar Password.................................................................................................................................................89
Using Message Services...............................................................................................................................................90
What’s on the Messages menu?.............................................................................................................................. ...92
Checking Your Voicemail..........................................................................................................................................93
Storing Your Voicemail Number...................................................................................................... ........................93
Managing Your Messages (This is only accessible when using the Iridium handset).......................................94
Accessing Messages.......................................................................................................................................... ...........96
Go to the Next Message.......................................................................................... ...................................................99
Managing Outgoing Messages (SMS-MO)(only accessible with Iridium handset).........................................100
Create a New Message (SMS-MO).............................................................. ...........................................................101
Edit a Message (SMS-MO).......................................................................................................................................102
Send a Message (SMS-MO)......................................................................................................................................103
Store a Message (SMS-MO).............................................................................................................................. .......105
ComCenter User’s Guide (release 040706) Page 6

Enter Service Center Number (SMS-MO)............................................................................................................109
Set Expiry period (SMS-MO).................................................................... ..............................................................111
Customizing Phone Features...................................................................................................................... .............113
What’s on the Phone Setup Menu?........................................................................................................................115
Adjusting the Ringer Volume.................................................................................................. ................................116
Setting the Ringer Tone........................................................................ ....................................................................117
Setting the Keypad Tones............................................................................................ ............................................118
Locking and Unlocking Your Phone......................................................................................................................119
Change the Unlock Code...................................................................... ...................................................................121
Protecting the SIM Card...........................................................................................................................................123
Managing Other Security Settings...........................................................................................................................127
Activating Extended Menus.....................................................................................................................................130
Selecting the Display Language........................................................................................................ .......................131
Review the Phone’s Settings.......................................................................................... ..........................................132
Accessing the Network.......................................................................................................................................... ...135
What’s on the Network Selection Menu?............................................................................ ..................................136
Registering With the Satellite Network............................................................................................................ ......137
Timing Your Calls......................................................................................................................................................138
What’s on the Call Meters Menu?...................................................................................................... .....................140
Showing Call Timers.................................................................................................................... .............................141
Setting Audible Call Timers...................................................................................... ...............................................143
ComCenter User’s Guide (release 040706) Page 7

Showing the In-Call Timer.......................................................................................................................................146
Showing the Lifetime Timer.................................................................................................................. ..................146
Customizing the Menu System............................................................................................................................ ....148
Personalizing the Options Menu............................................................................................................................148
Personalizing the Quick Access Menu............................................................................................................ .......151
Menu Quick Reference.................................................................................................................. ...........................152
Phone Book Menu....................................................................................................................................................153
Call Related Features Menu.....................................................................................................................................154
Messages Menu................................................................................................................................ ..........................155
Phone Setup Menu................................................................................................................................................ ....156
Network Selection Menu..........................................................................................................................................157
Call Meters Menu.......................................................................................................................................................158
Troubleshooting.........................................................................................................................................................159
Appendix II: Basic AT Command Set.................................................................... .....................................................163
ComCenter User’s Guide (release 040706) Page 8

PrecautionsPlease read and understand this User's Manual before installing your ComCenter. Careless or
incorrect installation can degrade performance, damage both new and existing equipment, and
incur unexpected network airtime charges.
Safety Information
Exposure to Radio Frequency Signals
Your Iridium-designed satellite unit is a low power radio transmitter and receiver. When it is ON, it receives
and sends out radio frequency (RF) signals.
International agencies have set standards and recommendations for the protection of public exposure to RF
electromagnetic energy:
• International Commission on Non-Ionizing Radiation Protection (ICNIRP) 1996
• Verband Deutscher Elektrotechniker (VDE) DIN-0848
• United States Federal Commission, Radio Frequency Exposure Guidelines (1996)
• National Radiological Protection Board of the United Kingdom, GS 11, 1988
• American National Standards Institute (ANSI) IEEE C95, 1-1992
• National Council on Radiation Protection and Measurements (NCRP) Report 86
• Department of Health and Welfare Canada, Safety Code 6
These standards are based on extensive scientific review. For example, over 120 scientists, engineers, and
physicians from universities, government health agencies, and industry reviewed the available body of
research to develop the updated ANSI standard.
The design of your phone complies with these standards when used as described under "Unit Operation."
Antenna Care
Use only the supplied or an approved replacement antenna. Unauthorized antennas, modifications, or
attachments could damage the phone and may violate local agency regulations.
Unit Operation
Do not operate the unit when a person is within 4 inches (10 centimeters) of the antenna.
ComCenter User’s Guide (release 040706) Page 9

A person or object within 4 inches (10 centimeters) of the antenna could impair call quality and may cause the
unit to operate at a higher power level than necessary and expose that person to RF energy in excess of that
established by the FCC RF Exposure Guidelines.
Driving
Check the laws and regulations on the use of wireless telephones in the areas where you drive. Always obey
them. Observe the following guidelines when using your phone while driving:
• Give full attention to driving–driving safely is your first responsibility.
• Use hands-free phone operation, if available.
• Pull off the road and park before making or answering a call if driving conditions so require.
Electronic Devices
Most modern electronic equipment is shielded from RF signals. However, certain equipment may not be
shielded against RF signals from your Iridium-designed satellite unit.
Pacemakers
The Health Industry Manufacturers Association recommends that a minimum separation of 6 inches be
maintained between a wireless phone's antenna and a pacemaker to avoid potential interference with the
pacemaker. These recommendations are consistent with the independent research by and recommendations
of Wireless Technology Research.
Persons with pacemakers:
• Should ALWAYS keep the Iridium-designed satellite unit more than six inches from their pacemaker
when the unit is turned ON.
• Should turn the unit OFF immediately if you have any reason to suspect that interference is taking
place.
Other Medical Devices
If you use any other personal medical device, consult the manufacturer of your device to determine if it is
adequately shielded from external RF energy. Your physician may be able to assist you in obtaining this
information.
Turn your unit OFF in health care facilities when any regulations posted in these areas instruct you to do so.
Hospitals or health care facilities may be using equipment that could be sensitive to external RF energy.
ComCenter User’s Guide (release 040706) Page 10

Vehicles
RF signals may affect improperly installed or inadequately shielded electronic systems in motor vehicles.
Check with the manufacturer or its representative regarding your vehicle. You should also consult the
manufacturer of any equipment that has been added to your vehicle.
Posted Facilities
Turn your unit OFF in any facilities where posted notices so require.
Blasting Areas
To avoid interfering with blasting operations, turn your unit OFF when in a "blasting area" or in areas posted
"Turn off two-way radio." Obey all signs and instructions.
Potentially Explosive Atmospheres
Turn your unit OFF and disconnect the power supply when you are in any area with a potentially explosive
atmosphere. Obey all signs and instructions. Sparks from your battery or power source in such areas could
cause an explosion or fire resulting in bodily injury or even death.
Areas with a potentially explosive atmosphere are not always clearly marked. They include, but are not limited
to: fueling areas such as gasoline stations; below deck on boats; fuel or chemical transfer or storage facilities;
areas where fuel odors are present (for example, if a gas/propane leak occurs in a car or home); areas where
the air contains chemicals or particles, such as grain, dust, or metal powders; and any other area where you
normally would be advised to turn off your vehicle engine.
For Vehicles Equipped With Airbags
An air bag inflates with great force. Do NOT place objects, including both installed or portable wireless
equipment, in the area over the air bag or in the air bag deployment area. If in-vehicle wireless equipment is
improperly installed and the air bag inflates, serious injury could result.
Important Notes for PBX System UsersIf using the ComCenter with a PBX system, three precautions must be followed to prevent damage to your
unit.
1. The ComCenter functions as a central office (i.e., the ComCenter emulates the wall jack). Do not
connect the ComCenter as an extension.
2. When connecting the ComCenter to the PBX, it need to be connected as analog only. Connecting
ComCenter User’s Guide (release 040706) Page 11

the ComCenter as other than analog may result in damage to the RJ11 interface.
3. Do not try to ring the ComCenter as if it were an extension on the PBX system. The ComCenter has
a built-in ringer so that when a call is received, the unit will ring to alarm that a call is coming in.
Trying to ring the ComCenter unit from the PBX system could result in damage to the RJ11
interface.
ASE Limited Warranty
1. Coverage and Duration
Applied Satellite Engineering, Inc. (ASE) warrants that its new satellite subscriber radiotelephone products
and accessories (the "Product") shall be free from defects in materials and workmanship for a period of
twelve (12) months from the date such Product is delivered to the first end-user purchaser or first lessee (the
"Purchaser"), or the date such Products are first placed into satellite subscriber service, whichever occurs
earliest. ASE, at its option, shall at no charge to Purchaser, either repair or replace the Product, or refund the
purchase price of a Product that does not conform to this warranty, provided the Product is returned in
accordance with the instructions set out below and within the warranty period. These remedies are
Purchaser's exclusive remedies under this warranty. Repair may include the replacement of parts or boards
with functionally equivalent reconditioned or new parts or boards. A Product that has been repaired or
replaced is warranted for the balance of the original warranty period. A Product for which a replacement has
been provided shall become ASE's property.
This warranty is made by ASE to the Purchaser of the Products only, and it is not assignable or transferable
by the Purchaser. This is ASE's sole and complete warranty for the Products. ASE assumes no obligation or
liability for additions or modifications to this warranty unless made in writing and signed by an officer of
ASE. ASE does not warrant any installation, maintenance, or service of the Products not performed by ASE.
This product is covered by a U.S.A. warranty. If the Product has been sold outside of the U.S.A., ASE will
honor the U.S.A. warranty terms and conditions only. Outside of the U.S.A., any different warranty terms,
liabilities, and/or legal requirements of the country in which the Product is sold are specifically disclaimed by
ASE.
2. Conditions Not Covered By This Warranty
a. Products that are integrated, installed, maintained, or serviced in any manner other than in
accordance with the ASE user documentation furnished with or applicable to the Product.
b. Product damage caused by the use of ancillary equipment not furnished by ASE, including
ComCenter User’s Guide (release 040706) Page 12

accessories and peripherals.
c. Problems where the Product is used in a combination with ancillary equipment not furnished by ASE
and it is determined by ASE there is no fault with the Product.
d. Ancillary equipment not furnished by ASE that is attached to or used in connection with the
Products is not the responsibility of ASE, and all such equipment is expressly excluded from this warranty.
Furthermore, ASE does not warrant the integrated operation of the combination of the Products with any
ancillary equipment not furnished by ASE.
e. Defects or damage resulting from: use of the Product in any manner not normal or customary;
misuse, accident, or neglect, including but not limited to dropping the Product onto hard surfaces, immersion
in or exposure to water, rain or extreme humidity, immersion in or exposure to sand, dirt, or other
particulates, exposure to extreme heat, spills of food or liquid; improper testing, operation, maintenance,
installation, adjustment; or any alteration or modification of any kind.
f. Batteries manufactured by ASE and sold with Products whose capacity exceeds 80% of rated
capacity are not covered. Batteries whose capacity falls below 80% of rated capacity, or that develop leakage,
shall be considered non-conforming. This warranty is voided for batteries if: i) such batteries are charged by
other than the ASE-approved battery charger specified for charging such batteries; ii) any seals on such
batteries are broken or show evidence of tampering; iii) such batteries are used in equipment other than the
Product for which they are specified; or iv) such batteries are charged and stored at temperatures greater than
60 degrees Celsius.
g. Breakage or damage to antennas, or scratches or other damage to plastic surfaces or other externally
exposed parts caused by Purchaser's use.
h. Products disassembled or repaired in such a manner as to adversely affect performance or prevent
adequate inspection and testing to verify any warranty claim.
i. Products on which serial numbers or date tags have been removed, altered, or obliterated.
j. Coil cords that are stretched or on which the modular tab is broken; leather cases, which are covered
under separate manufacturer's warranties.
k. Products rented on a month-to-month basis.
l. Normal wear and tear.
ComCenter User’s Guide (release 040706) Page 13

3. Obtaining Warranty Service
For warranty questions, repairs, or for the return of Product, please call your Service Provider or Point-of-
Sale, not ASE. Equipment needing service should be returned to your Service Provider or Point-of-Sale, not
ASE. SERVICE WORK PERFORMED BY SERVICE CENTERS NOT AUTHORIZED BY ASE TO
PERFORM SUCH WORK WILL VOID THIS WARRANTY.
All products shipped to ASE's authorized Warranty Service Center must be shipped with freight and
insurance prepaid. Purchaser must include with the Product a bill of sale, a lease, or some other comparable
proof of purchase, the name and location of the installation facility, if any, and most importantly, the
Purchaser's name, address, and telephone number and a written description of the problem. Product that is
repaired or replaced under this warranty shall be returned to Purchaser at ASE's expense for the freight and
insurance, and at Purchaser's expense for any applicable duties or other charges. If additional information is
needed, please contact ASE at the address and phone number listed in Paragraph 6 below.
4. General Provisions
THIS WARRANTY IS GIVEN IN LIEU OF ALL OTHER WARRANTIES EXPRESS OR IMPLIED,
INCLUDING BUT NOT LIMITED TO THE IMPLIED WARRANTIES OF MERCHANTABILITY
AND FITNESS FOR A PARTICULAR PURPOSE. FURTHER, THIS WARRANTY COVERS THE
PRODUCTS ONLY, AND NO WARRANTY IS MADE AS TO COVERAGE, AVAILABILITY, OR
GRADE OF SERVICE PROVIDED BY ASE SEPARATELY FOR ASE SATELLITE SERVICES. IN
NO EVENT SHALL ASE BE LIABLE FOR DAMAGES IN EXCESS OF THE PURCHASE PRICE OF
THE PRODUCT IN QUESTION, OR FOR ANY LOSS OF USE, LOSS OF TIME,
INCONVENIENCE, COMMERCIAL LOSS, LOST PROFITS OR SAVINGS OR OTHER
INCIDENTAL, SPECIAL, OR CONSEQUENTIAL DAMAGES ARISING OUT OF THE USE OR
INABILITY TO USE SUCH PRODUCT, TO THE FULL EXTENT SUCH MAY BE DISCLAIMED BY
LAW.
5. State Law and Other Jurisdiction Rights; Software Copyrights
Some states and other jurisdictions do not allow the exclusion or limitation of incidental or consequential
damages, or limitation on how long an implied warranty lasts, so the above limitations or exclusions may not
apply to Purchaser.
This warranty gives Purchaser specific legal rights, and Purchaser may also have other rights that vary from
jurisdiction to jurisdiction.
Laws in the United States and other countries preserve for ASE certain exclusive rights for copyrighted
ComCenter User’s Guide (release 040706) Page 14

Product software such as the exclusive rights to reproduce in copies and distribute copies of such Product
software. Product software may be copied into, used in, and redistributed with only the Product associated
with such Product software. No other use, including without limitation disassembly, of such Product software
or exercise of exclusive rights in such Product software is permitted.
6. Contact
For additional information about this Product warranty, please contact your Service Provider or Point-of-
Sale. For additional information about ASE products and services, please contact ASE as follows:
Telephone: 480.443.1424
Facsimile: 480.452.0971
E-mail: [email protected]
Mail: Applied Satellite Engineering, Inc.
15875 N. Greenway-Hayden Loop, Suite 113
Scottsdale, AZ 85260 USA
ComCenter User’s Guide (release 040706) Page 15

Part I: Setup
InstallationRefer to the instructions provided with your Iridium antenna to ensure proper placement. Clear line of sight
to the Iridium satellites is fundamental to satellite phone connectivity. Be sure the antenna will reach your
desired installation point inside your building. The ComCenter must be kept in a dry, climate-controlled
space.
After the antenna is installed, simply connect the ComCenter to the antenna, attach an analog handset to the
ComCenter, and connect the power source to the ComCenter. Your unit automatically starts when power is
applied.
Power On MessagesBefore turning on your ComCenter, be sure that you have attached the antenna and all peripherals you wish
to use—telephone handset, modem, etc. Connecting all peripherals first will ensure that the ComCenter
recognizes them during boot-up.
The ComCenter does not have a power switch. Instead, simply plug or unplug the power adapter to turn the
unit on or off.
We recommend you watch the ComCenter screen closely during boot-up. The messages displayed will help
you troubleshoot your system should it not provide a clear signal (or any signal at all). Following are the boot
messages, in sequence:
1. REGISTERING ...
This step usually flashes by in less than a second. The ComCenter is performing a self-check.
Troubleshooting: If your system fails during this step, contact your reseller. Your ComCenter may
have a hardware problem.
2. sEARCHING ...
This step can take 20 to 30 seconds. The ComCenter is locating and connecting to the Iridium
satellites.
Troubleshooting: If your system fails during this step, check your antenna. Your ComCenter
cannot find the Iridium satellites at all.
3. fOUND HOME network
This step can take 10 to 20 seconds. The ComCenter is communicating with the Iridium network to
ComCenter User’s Guide (release 040706) Page 16

establish its availability to send and receive calls.
Troubleshooting: If your system fails during this step, contact your reseller. Your ComCenter may
have a software problem.
4. registered ...
ACQUIRING SYS INFO
This step can take another 10 to 20 seconds. The ComCenter has established a network connection
to Iridium and is downloading and synchronizing settings like time and date.
Troubleshooting: If your system fails during this step, contact your reseller. Your Iridium service
may have been interrupted.
5. If the boot process is successful, the ready screen will appear.
Lift your handset and you should hear dialtone. Your ComCenter is in Ready Mode and you may
now make and receive calls.
Accessing ComCenter SettingsIn Ready Mode, take the handset off hook and press * to access the Settings menu. The following options are
available:
1 Contrast
2 Volume
3 Identity
# Exit
4 Ontec
5 Options
6 Diagnostics
7 Phone Book
If you enter the Settings menu and do not press a key for 45 seconds, the ComCenter will automatically
return to Ready Mode. (The phone line will still be open but may have gone to fast busy signal. Hang up the
ComCenter User’s Guide (release 040706) Page 17

receiver on the attached phone.) Read on for detailed descriptions of the Settings options.
1 Contrast
The Contrast option controls the ComCenter LED display. Press 1 to make the screen lighter; press 2 to
make the screen darker. The range is 20 steps from darkest to lightest. The ComCenter is shipped by default
at the midpoint of brightness. Your customized contrast settings are retained after reboots. There is no
graphical display of the LED setting other than the appearance of the display screen itself.
Press # to return to the Settings menu.
2 Volume
The Volume option controls the audio level sent to the handset. Press 1 to make the sound louder; press 2 to
make the sound softer. The range is four steps from softest to loudest. By default the ComCenter is at the
midpoint of volume. A graphical display bar shows the current level.
Press # to return to the Settings menu.
3 Identity
The Identity option provides important information about your ComCenter. You may need this information
for technical support or Iridium network issues. Three lines appear in the display:
The first line is firmware. This number indicates the current software in the ComCenter.
The second line is SN. This number identifies your ComCenter unit by ASE serial number.
The third line is IMEI. This number identifies your ComCenter network connection to Iridium.
Press # to return to the Settings menu (note this command is not displayed on the screen).
4 Ontec
The Ontec option is only for subscribers to Ontec Web Services. (Ontec Web Services are provided by
subscription and must be purchased with your ComCenter. Ask your service provider for more details.) As
soon as you press 4 for this option, you will see this message:
RUDICS CALL IN PROGRESS
This message indicates the ComCenter is attempting to connect to Ontec Web services. If you are not an
Ontec subscriber and you choose this option, you must wait until the connection times out and returns you
to the main Settings menu. This may take from 10 to 60 seconds. If you are too impatient, you can reboot
ComCenter User’s Guide (release 040706) Page 18

your ComCenter.
Press # to return to the Settings menu.
5 Options
The Options screen contains three pages of options.
From the first page:
Press 2 to turn crew log on or off.
Press 3 to toggle SmartDial on or off. (We strongly recommend you leave SmartDial on.)
Press 4 for the next screen.
From the second page:
Press 1 to toggle USA 911 dialing on or off. This setting partially overrides SmartDial recognition of country
codes and allows United States callers to simply type 911 to access the emergency system. (If this setting is
off, then calls starting with “91” are recognized as dialing the country code for India.)
Press 4 for the next screen.
From the third page:
Press 1 to clear the call log.
Press # to return to the previous screen.
Press # repeatedly to return to the Settings menu.
6 Diagnostics
The Diagnostics option helps ASE technical support understand what your ComCenter is doing.
Press # to return to the Settings menu.
7 Phone Book
The Phone Book option lists the telephone numbers stored in your ComCenter. The ComCenter can store
200 phone numbers, but you must add and delete numbers using a separate Iridium handset. (See the
appendix for more details about this equipment.) If you have numbers in your phone book, you can page
through them using the 1 and 2 keys.
Press # to return to the Settings menu.
ComCenter User’s Guide (release 040706) Page 19

# Exit
Press # to return to Ready Mode.
ComCenter User’s Guide (release 040706) Page 20

Part II: Calling
Making a Call
What You Will Hear
The first thing you hear is dialtone. You may notice that the tone is a slightly higher pitch than the dialtone
you are used to. While you are connecting, you will not hear a ring, but instead a short beep. If the call fails
during connection, you will hear a rapid beeping—try your call again. If the line you are calling is busy, you
will hear a normal busy signal.
Calling With SmartDial
SmartDial is special technology to remove the hassles of international dialing. Instead of trying to remember
to dial operators, then sequences of numbers, the ComCenter’s SmartDial function enables direct dialing to
any country. Only three steps are required:
1. Lift the phone to go off-hook. You will see the prompt ENTER PHONE NUMBER:.
2. Enter the country code. (For example, the United States is 1, Great Britain is 44.) As soon as you
enter the country code, you will see that country name at the bottom of the LED.
3. Enter the area code and number. The ComCenter automatically starts dialing the connection after
the last digit.
SmartDial knows how many digits to expect based on the country code. (In the United States it is ten digits.)
Now, whenever you see an international number that you want to dial, you can enter it verbatim into the
ComCenter and easily reach your party.
911 Emergency Calls With SmartDial
With SmartDial turned on and USA 911 turned on in the Options settings (see above), dialing 911 will call
emergency services. Because 91 is the country code for India, the ComCenter must be programmed to ignore
the country code if 911 is dialed. For United States users, this is the best setting, even if calls to India are
frequent (it is safer to use SmartDial Override and keep 911 functionality).
Warning: If you turn off USA 911 in the Options settings, all 911 emergency calls will be ignored. To
reiterate: with USA 911 turned off, you cannot dial 911 in any way. All calls starting with 91 will be
recognized as calls to India. Even entering 1 for the United States country code will not allow 911 to be
dialed.
ComCenter User’s Guide (release 040706) Page 21

Calling Without SmartDial
Without SmartDial, you must follow a different dialing sequence:
1. Lift the receiver to go off-hook.
2. Enter 0 0 (zero zero). You will see the prompt PRESS # TO SEND at the bottom of the
screen indicating that you are not in SmartDial mode.
3. Enter the country code.
4. Enter the area code and telephone number.
5. Enter # to connect.
The ComCenter does not recognize country codes or number string lengths with SmartDial off. You must
enter all digits correctly and press # to initiate the call—the ComCenter does not automatically dial with
SmartDial off.
Temporarily Overriding SmartDial
If you are using SmartDial and want to override it temporarily, simply dial 0 and your ComCenter will go to
manual mode. Again, you will see the prompt PRESS # TO SEND at the bottom of the screen
indicating that you are not in SmartDial. At this point, follow the instructions above for dialing without
SmartDial.
911 Emergency Calls Without SmartDial
With SmartDial off, dialing United States 911 is not disabled, but you must still enter # to send the number
and make the connection. To clarify: without SmartDial, you must enter 911# to reach emergency services.
Answering a CallThe ComCenter has a built-in ringer to alert you to an incoming call. Your handset probably also has a ringer,
so you may wish to turn it off. (The ComCenter cannot be silenced.) An exception could be if you are using a
cordless handset away from your ComCenter and cannot hear distant ringing.
When a call comes in, simply use your handset like you normally would. Speak in a regular tone of voice. You
should find most of your calls are at least as clear as a cellular phone call and often as clear as a standard wire-
line phone call. The only minor difference in receiving a ComCenter call is this: when the caller at the other
end disconnects, if you continue to hold your receiver off-hook you will get a dial tone. Be sure to hang up
your handset normally.
ComCenter User’s Guide (release 040706) Page 22

Making a Data CallThe serial port on the ComCenter provides data connectivity, using the ComCenter as a modem. Although
software applications are similar at the hardware command level, the precise operation of individual packages
is beyond the scope of this manual. Following are instructions for connecting your computer to the
ComCenter.
Hardware Connection
The ComCenter provides a standard 9-pin male serial port. If your computer has a 9-pin or 25-pin serial port
available, you should attach to the ComCenter data port with a standard DB9 cable. Connect the cable to the
ComCenter first, then to your computer. You likely will have to reboot your computer for the operating
system to correctly recognize and initialize the serial port and communicate with the ComCenter.
Many current computers (especially laptops) no longer provide 9-pin serial ports and instead offer USB ports.
(This makes sense because USB stands for Universal Serial Bus and is intended to be the next generation of
the old serial connections.) Although the ComCenter does not have USB ports built in, you can use a USB-
to-DB9 adapter cable. Connect the cable to the ComCenter first, then plug the USB connector in to your
computer. Your operating system should now be able to address the ComCenter.
Software Connection
The ComCenter is configured to recognize the standard Hayes AT modem command set. The AT
compatibility means virtually any terminal software program you may wish to use will be able to dial out and
negotiate a data session.
To test your ComCenter in data mode using Windows XP, start the HyperTerminal program. Then enter the
command “ATDTxxxxxx” where xxxxxxx is a known phone number to a computer or fax machine. Hit the
Enter key and watch the screen for response messages from the modem, such as “DIALING” or
“CONNECT.”
See Appendix II for a reference to the basic AT commands.
ComCenter User’s Guide (release 040706) Page 23

Appendix I: Iridium HandsetRead this section to learn how to get up and running with your new Iridium designed satellite unit. Many
features listed under this section are only available with use of an optional Iridium handset.
What You Will Learn
• what is a SIM card?
• inserting your SIM card
• turning the power on and off
• placing and receiving calls
• using hands-free features
• determining your own phone number
What Is a SIM Card?
Your SIM card (Subscriber Identity Module) contains your phone number, service details, and memory for
storing Phone Book entries and messages. This means you can use your SIM card with any Iridium product
for the Iridium satellite system, and all calls go on your account.
Note: Your phone has limited functionality without the SIM card.
ComCenter User’s Guide (release 040706) Page 24

SIM Card Protection
Keep your SIM card in your wallet or purse when you are not using it. This helps keep your personal
information secure and gives you access to your service even if your phone is not available.
Note: The SIM card should have already been installed in your ComCenter by your service provider.
Caution: Avoid bending, scratching, or exposing your card to static electricity, water, or dirt.
Using additional SIM Card (Other than SIM card already in Iridium satellite phone)
Insert the SIM Card in the SIM card reader of the Car Kit. Make sure your phone is powered off before
inserting or removing the SIM card. If you don’t, you may damage the memory on your SIM card. Use of an
additional SIM card would require the use of an optional SIM Card Reader/ Hang-up cup. For more
information on the SIM Card Reader/ Hang-up Cup, please see section ‘Use of an External SIM Card Reader/
Hang-up Cup’ on page 18.
Insert the SIM Card (For use with SIM Card Reader/Hang-up cup)
1. Turn your unit off by pressing and holding the key.
2. Make sure that the gold plate on the SIM card faces down and away from you,
and then insert the SIM card into the slot in the hang-up cup as far as it will go.
Tip: Hold the SIM card so that the back (or blank) side of the card is facing you.
The gold plate should be facing down. Insert the end with the gold plate first.
ComCenter User’s Guide (release 040706) Page 25

Remove the SIM Card (For use with SIM Card Reader/Hang-up cup)
1. Turn your unit off by pressing and holding the key.
2. Pull the SIM card out of the slot in the hang-up cup.
Powering Up the ComCenter
Turn the Power On and Off
To turn your unit’s power on:
1. Insert your SIM card. (See “Installing the SIM Card” on page 24.)
2. Press and hold to turn the phone on and off.
Note: The SIM card should have already been installed in your ComCenter by your service provider.
When you turn your unit’s power on, it performs a self-test to let you know it is operational. You may see a
number of other power-on messages (see below).
When the (no service) indicator disappears and the (home system) indicator appears, you are
ready to start calling.
ComCenter User’s Guide (release 040706) Page 26

Power-On Messages
Once your ComCenter is powered on, you may see on the Iridium handset:
Message Description
Searching...The unit is attempting to establish communications with the satellite network. See
“Accessing the Network” on page 90 for more information.
Registering...Your unit is registering with the network. When the process is complete, you will see
Registered. See “Accessing the Network” on page 90 for more information.
Enter Phone
Unlock Code
Your unit was locked after the last use. Enter your four-digit unlock code and press
to proceed. See “Locking and Unlocking Your Phone” on page 82 for more
information.
Enter PINEnter the four- to eight-digit SIM card PIN code provided by your service provider
and press to proceed. See “Protecting the SIM Card” on page 83 for more
information.
Insert CardPower off your unit; make sure your SIM card is inserted completely; and then
power your unit on again.
Check Card This message indicates that the SIM card is damaged or inserted the wrong way.
BlockedIf the SIM card PIN code is incorrectly entered three times in a row, your SIM Card
becomes blocked. See “Unblock the PIN Code” on page 84 for instructions on how
to unblock it.
ComCenter User’s Guide (release 040706) Page 27

BlockedIf the SIM card PIN2 code is incorrectly entered three times in a row, your SIM Card
becomes blocked. See “Unblock the PIN2 Code” on page 86 for instructions on how
to unblock it.
Bad Card
See Supplier
Your SIM card has been damaged or incorrectly issued. Contact your service
provider for information.
Placing a Call
To place a call, your ComCenter must be powered on, have a SIM card inserted, be unlocked, and be in
contact with the satellite network. See “Accessing the Network” on page 90 for network information.
Dial a Number
1. Enter the number using the digit keys. As you begin entering digits, you will see Call? You must enter
the phone number in international format: [international access code, 00, or +] [country code or Iridium
country code] [phone number]
Note: If you are calling another Iridium satellite subscriber, use the Iridium code instead of the country
code.
If you make a mistake, press once to delete the last digit, or press and hold to clear all digits.
2. Press . You will see Calling followed by the number you dialed.
ComCenter User’s Guide (release 040706) Page 28

With the ComCenter, the Smart Dial feature removes the need to enter in the ‘+’ or ‘00’ before the country
code. For information on this, please see section on ‘Smart Dial Feature’ on page 20.
You will see either the flashing message Calling or the flashing messages Calling, Registering..., and the
phone will play a series of setup tones.
If the call connects and is answered, Connected appears on the display for a few seconds, followed by End
Call?. If the call does not connect, you may see one of the following messages:
Message Description
Call Failed
System Busy
Weak Signal
The phone is unable to access the network. Try
again in a few minutes.
Restricted AreaYou are in an area where you cannot make a call.
Redial?See “Automatic Redial” on page 27.
Automatic Redial
If the number or your network is busy, you will see Redial? for five seconds.
Press to redial the number automatically.
Note: The maximum number of redial attempts is set by your service provider. If the call cannot be connected
within this maximum, you will see the message Redial Failed.
ComCenter User’s Guide (release 040706) Page 29

Redial Last Number Called
Whenever your unit is on standby, you can redial the last number called:
1. Press to display the last number dialed.
2. Press again to place the call.
Dial Special Characters
You can insert special characters in your numbers:
To enter... Then...
0Press .
*Press .
+ (for international calls)Press and hold .
(for pause dialing)
Press and hold .
ComCenter User’s Guide (release 040706) Page 30

Dial a Number With Pauses
Refer to “Using Pauses in Numbers” on page 41 for information on dialing numbers with pauses.
Dial a Number from the Phone Book
Your phone contains a phone book that you can use to store names and telephone numbers. Once you
have stored information in your phone book, you can save dialing steps by using:
• one-touch dialing
• an entry from a location
• an entry of a name
• one of the last ten numbers called
Refer to “Managing the Phone Book” on page 36.
Ending a Call
To end a call, perform one of the following tasks:
• Press .
ComCenter User’s Guide (release 040706) Page 31

• Replace the handset in the hang-up cup if one is being used.
• Press .
What’s My SIM Card Phone Number?
You can retrieve and display your phone number from your SIM card.
1. Press until you see Phone Book, and then press to select.
2. Press until you see My Phone Number(s), and then press to select. You will see your phone
number.
3. Press and hold to exit the menu.
Tip: Pressing also brings up your phone number.
Note: If you do not see your number(s), they have not been programmed onto your SIM card. You just need
to enter your phone number in for future reference. This can be done by following steps 1 and 2, and then
pressing OK when the display shows “modify?”. Then enter in your phone number.
ComCenter User’s Guide (release 040706) Page 32

Receiving a Call
Receive a Phone Call
To receive a call, your ComCenter must be powered on, have a SIM card inserted, be unlocked, and be in
contact with the satellite network. See “Accessing the Network” on page 90 for network information.
When you receive a call:
• Your unit rings.
• The handset displays Call, followed by Answer? on the next line.
To answer the call:
Remove the handset from the hang-up cup (if one is being used) by
pressing in the release buttons.
Pick up the handset and Press or any digit key
or . You will see
Connected.
If the call does not connect properly, you may see Call Failed. This indicates that the network signal is
not strong enough.
ComCenter User’s Guide (release 040706) Page 33

Unanswered Calls
If you are away from your unit or choose not to answer a call, your handset displays the message
Unanswered Call.
Personal Mailbox
Callers who are unable to reach you can leave numeric, text, and voice messages. The next time you register
with the satellite network, you will receive these messages. Then you will have the option of returning the call
or saving the message for later viewing.
For information on retrieving messages, see “Accessing Messages” on page 67.
Adjusting Earpiece Volume
To adjust earpiece volume:
• Increase the volume by pressing the upper volume key.
• Decrease the volume by pressing the lower volume key.
As you press the keys, the phone’s speaker demonstrates the new volume
level. The bar graph in the display represents the volume level. The higher
the graph, the louder the volume.
Tip: The volume keys are located on the side of the phone.
ComCenter User’s Guide (release 040706) Page 34

Adjusting Ringer Volume
Use this feature to adjust the volume of the ringer. The phone sounds the new volume level as you adjust it.
To adjust the ringer volume:
1. Press until you see Phone Setup, and then press .
2. Press until you see Adjust Ring Volume, and then press to select.
3. Increase the volume by pressing the upper volume key.
Or
Decrease the volume by pressing the lower volume key.
4. Press and hold to exit the menu.
Tip: You can also press and then the up or down volume key to adjust ringer volume.
ComCenter User’s Guide (release 040706) Page 35

Using In-Call Features
Read this section to learn how to use In-Call menu features. The In-Call menu is displayed when you press
during a call. See “Using The In-Call Menu” on page 35 for more information.
What You Will Learn
• using call muting
Muting a Call
For privacy during a call, try muting the phone. You hear the party on the other end, but the other party does
not hear you.
While in a call:
1. Press .
Or
ComCenter User’s Guide (release 040706) Page 36

2. Press until you see Turn Mute on or off. Then press to select.
or
3. Press the up arrow and then scroll until you get to option 4 – Mute Phone?
To unmute a call:
1. Press again.
or
2. Press until you see Turn Mute on or off. Then press to select.
or
3. Press and then scroll (using either or ) until you get to option 4 – Mute Phone?
Using the Menus
Many of your ComCenter’s features are organized into lists of options called menus. There are three menus:
the Options menu, the Quick Access menu, and the In-Call menu. Some of these options give you access to
additional lists of options called submenus.
ComCenter User’s Guide (release 040706) Page 37

Learn how to navigate through your phone’s three main menus. Once you become familiar with these menus
and their features, go to “Customizing the Menu System” on page 97 for instructions on how you can
personalize your menus.
What You Will Learn
• using the Options menu
• using the Quick Access menu
• using the In-Call menu
Using the Options Menus
The Options menu gives you access to the features and options included with your Iridium designed satellite
unit.
Navigate the Options Menus
Learning how to use just a few keys enables you to move freely through the entire menu system.
If you want to... Then...
enter the Options menuPress to access the Options menu. You will see
the first available submenu.
ComCenter User’s Guide (release 040706) Page 38

scroll through the Options menu• Press to scroll forward.
• Press or to scroll backward or forward.
select options and submenus Press to select a menu option or submenu when
that option or submenu name is displayed.
exit features and menus• Press to exit the feature or submenu.
• Press and hold to exit the Options menu.
Note: If you press during a call, you will see the In-Call menu that is described on page 35.
How the Handset Responds
As you scroll through the Options menu, you will see one of three questions on the bottom line of the display.
If your phone asks... Then...
View Options?Press to enter the submenu.
Select? Press to select the displayed feature.
Quit? Press to exit the feature.
ComCenter User’s Guide (release 040706) Page 39

CompletedThis indicates a feature has been activated.
FailedThe display returns to the menu in a few seconds.
Enter PIN
or
Enter Name
Enter requested information. Then press .
Busy Try Later
You may have requested information while your phone was completing
another task.
This indicates where you are in a menu.
Your unit may take a few seconds to request settings from the network.
Customize the Options Menu
To personalize the Options menu—to hide and move features—see “Move Menu Features” on page 97.
Using the Quick Access Menu
The Quick Access menu is a way to keep your favorite menu options readily accessible. Each digit key,
to , has a Quick Access feature assigned to it. See the chart on page 34 for the default setup.
If you know the number of the feature, activating that option takes only two button pushes! If you do not know
the number or want to review your options, just scroll through the icon menu and read the tag attached to
ComCenter User’s Guide (release 040706) Page 40

each option.
Activate the Feature Directly
To access the feature directly:
Press , and then press the digit key of the feature.
Scroll to the Feature
To scroll to the feature:
1. Press .
2. Press to scroll through the available features.
or
Press or to scroll backward and forward.
3. Press to select a feature.
ComCenter User’s Guide (release 040706) Page 41

Default Quick Access Settings
The following features (and associated icons) are the default settings for the Quick Access menu.
Key Icon Quick Access Feature
Find Name searches your Unit. Book by the full name.
Check Signal checks the strength of the signal from the satellite network.
Call Voicemail calls your Voicemail number to check your Voicemail.
Mute Phone mutes the phone.
Lock Now locks your phone immediately.
Adjust Ring displays and sets the incoming call ring tone volume.
Read Messages displays the newest message received
Register Now initiates a systematic manual search for a network on which
to register. You must wait three minutes between registration attempts.
Forward On/Off activates or deactivates unconditional call forwarding
depending on the current setting.
Customize the Quick Access Menu
See “Personalizing the Quick Access Menu” on page 92 for instructions on how to customize the menu.
ComCenter User’s Guide (release 040706) Page 42

Using The In-Call Menu
This menu lets you access specific features while you are in a call. Because this menu is not available until
you are actually in a call, you cannot review it off-line.
Entering the In-Call Menu
While you are in a call:
Press to view the In-Call menu features.
In-Call Menu Features
The In-Call menu provides access to placing a call on Mute.
single active call Turn Mute on or off
ComCenter User’s Guide (release 040706) Page 43

Managing the Phone Book
Your satellite phone can store up to 100 names and numbers, and your SIM card expands memory capacity
even more.
Use the dedicated keys or the Options menu to access the same functions. With the Options menu you can
also access Phone Book maintenance and security features.
What You Will Learn
• recalling and storing phone numbers
• organizing the Phone Book
• accessing automated calling systems
• storing phone number prefixes
• restricting calls with fixed dialing
• editing the memory information
• viewing your own phone number
ComCenter User’s Guide (release 040706) Page 44

Entering the Phone Book Menu
To enter the Phone Book menu:
1. Press to open the Options menu.
2. Press to scroll forward.
or
Press or to scroll backward or forward.
3. Press when you see:
4. Press to scroll through the submenu.
or
Press or to scroll backward or forward through the submenu.
ComCenter User’s Guide (release 040706) Page 45

ComCenter User’s Guide (release 040706) Page 46

What’s on the Phone Book Menu?
ComCenter User’s Guide (release 040706) Page 47

Organizing Your Phone Book
Each name and phone number in your Phone Book is stored in a numbered memory location. The satellite
phone has two types of memory—phone memory and SIM card memory.
Phone Memory SIM Card Memory1
Personal Numbers 100 entries 155 entries
Fixed Dial Numbers No entries 40 entries
Phone Number Digits 32 20
Name Characters 16 16
Location Numbers 1-100 101-255
1 SIM card capacity varies depending upon the card issued by your service provider.
Your phone’s memory can seem overwhelming if you do not have a strategy for organizing your Phone Book.
Begin setting up your Phone Book by asking yourself three questions:
Which numbers do I call most?
Make a list of the numbers you call most frequently. You will probably want to store these numbers in the first
nine memory locations of your Phone Book. You can then dial them with a single keystroke by using One-
Touch dialing.
ComCenter User’s Guide (release 040706) Page 48

When do I use these numbers?
Group the numbers on the list according to when you use them. Most people call a different set of numbers
during the day than they do in the evening and on weekends. You can switch one-touch dialing to your
phone’s memory (locations 1–9), your SIM card’s memory (locations 101–109), or to your fixed dial list
(locations 1–9). Store your evening and weekend numbers on one type of memory and your daytime numbers
on another.
Which numbers do I need to keep secure?
Use your SIM card to store the numbers you need to keep secure, like the numbers of friends and family
members. Because your SIM card is the size of a credit card, you can easily keep it securely in your wallet
when you are not using it. If you wish, you can even require a PIN code every time your SIM card is inserted
into any phone. (To deactivate your PIN code, see “Activate and Deactivate the SIM Card PIN Code” on page
83.) Store more public numbers, like business associates and travel agents in your phone’s memory.
Tip: If you have many entries, group them in blocks of ten to make them easier to find.
ComCenter User’s Guide (release 040706) Page 49

Storing Names and Numbers
Add an Entry
Use the Options Menu
1. Follow the steps in “Getting to Personal Numbers...” to get to Add Entry, and then press .
2. Press to scroll to Add to Phone Memory or Add to SIM Memory.
3. Press to select. You will see Enter Number.
4. Enter a number, and then press . You will see Enter Name.
5. Enter a name (see “Entering Names” on page 40), and then press . You will see Enter Location.
ComCenter User’s Guide (release 040706) Page 50

6. Enter a location number, 1-100 for phone memory or 101-255 for SIM memory*, and then press .
You will see Stored XXX.
or
Press to select the next available location. You will see Stored XXX.
7. Press and hold to exit the menu.
Tip: Numbers must be entered in international format.
* SIM memory is dependent on your SIM card.
Use the Dedicated Keys
1. Enter the phone number you want to store.
2. Press to begin storing.
3. Press to scroll to the desired memory type Add to SIM Card Memory or Add to Phone Memory,
and then press . You will see Enter Number, followed by the number you entered.
4. Press to accept the number. You will see Enter Name.
5. Enter a name (see “Entering Names” on page 40), and then press . You will see Enter Location.
6. Enter a three-digit location number, and then press . You will see Stored XXX.
ComCenter User’s Guide (release 040706) Page 51

or
Press to store the entry in the next empty memory location. You will see Stored XXX.
Tip: If you have more than one number for the same person, try attaching a descriptive tag to the name,
like Home, Office, or Mobile.
Adding Entry Messages
When you enter the location number for your entry, you may see one of these messages:
Message Description
Stored XXX You have stored the entry.
Range XXX-XXYou have chosen a memory location outside the appropriate range.
Enter a new number within the range listed on the display.
Overwrite?You have chosen an occupied location. Press to overwrite the
location or press any other key to try another location.
Entering Names
You can use the keypad to produce any letter in the alphabet. For example, press to enter the letters A,
B, or C, as shown:
ComCenter User’s Guide (release 040706) Page 52

Enter Characters
1. Enter a letter by pressing a key as many times as necessary.
2. Press or to advance the cursor.
3. Repeat steps 1 and 2 as many times as necessary, and then press .
Tip: Press and hold any numeric key to toggle between uppercase and lowercase characters.
Correct an Entry
To make a change:
1. Press or to scroll to the character you want to delete.
2. Press to delete one character at a time.
or
Press and hold to clear the display.
ComCenter User’s Guide (release 040706) Page 53

ComCenter User’s Guide (release 040706) Page 54

The upper line for each key shows the uppercase characters. The lower line for each key shows the
lowercase characters.
Using Pauses in Numbers
When you call automated systems, a recorded message prompts you for numbers such as PIN numbers and
account numbers. You can store these numbers in the same memory location as the automated system’s
access number. Separate the numbers with “pauses”—special characters that tell your phone to wait a few
seconds before sending additional numbers—and store the string in the same way you would other numbers.
Enter Pauses in Numbers
1. Enter the phone number you use to access the automated system.
2. Press and hold . You will see a pause character (Ü) inserted into the number entry.
3. Enter the next group of numbers. For example, enter your PIN number. If the automated system
requires a * or #, enter those symbols, too.
4. Repeat steps 2 to 3 as many times as necessary.
5. To store the entry follow the procedures in “Add an Entry” on page 48.
ComCenter User’s Guide (release 040706) Page 55

Tip: You can store 33 characters in a phone memory location, or 20 characters in a SIM card memory
location. A pause is equal to one character.
Dial Numbers With Pauses
To dial a number with pauses:
1. Recall the entry. (See “Locating Entries” on page 43.)
2. Press to place the call. The first pause in the number waits until the call is answered. When the
automated system answers, your phone waits a few seconds and then automatically sends the next set of
numbers, then the next, until all numbers are sent.
Using Phone Number Prefixes
You can save time when you dial by storing the prefixes that you often use. This is sometimes called “post
scripting.” Your satellite phone allows you to change or add to Phone Book entries without overwriting them.
Store a prefix in your Phone Book just as you would any other number. See “Storing Names and Numbers” on
page 39.
Use a Stored Prefix
To use a stored prefix:
1. Recall the prefix from your Phone Book. (See “Locating Entries” on page 43.)
ComCenter User’s Guide (release 040706) Page 56

2. Add the remaining numbers.
3. Press to place the call.
Tip: Try naming the prefix by area, like Downtown, Suburbs, or Germany.
Change Entry to a Similar Number
To change an entry to a similar number:
1. Recall the number from your Phone Book. (See “Locating Entries” on page 43.)
2. Press to delete the unwanted digits.
3. Enter the replacement digits.
4. Press to place the call.
Locating Entries
Find an Entry by Name
Search your Phone Book by the first few letters of the entry.
Note: If you have restricted access to either SIM card or phone memory, those entries will not be available.
For more information, see “Preventing Access to the Phone Book” on page 46.
ComCenter User’s Guide (release 040706) Page 57

1. Follow the steps in “Getting to Personal Numbers...” to get to Find Entry By Name, and then press
to select. You will see Enter Name.
2. Enter one to three characters of the entry, and then press . If necessary, scroll to the entry you are
looking for.
3. Press to access options for that entry, and then proceed to “Calling, Modifying, or Erasing an
Entry” on page 44.
Tip: Your phone sorts SIM card memory and phone memory together alphabetically.
Find an Entry by Location
If you know the location number of the entry, here is an easy way to recall it.
Use the Options Menu
1. Follow the steps in “Getting to Personal Numbers...” to get to Find Entry By Location, and then press
to select. You will see Enter Location.
2. Enter the location number, and then press . You will see the entry displayed. If you enter an empty
location number, you will see Location XXX is Empty. Your phone then selects the next largest available
location. If there are no numbers stored, you will see No Numbers Stored.
3. Press to access options for that entry, and then proceed to “Calling, Modifying, or Erasing an
Entry” on page 44.
ComCenter User’s Guide (release 040706) Page 58

Use the Dedicated Keys
1. Press .
2. Enter the three-digit location number of the entry, and then press . If you enter an empty location
number, you will see Location XXX is Empty. Your phone then selects the next largest available location.
If there are no numbers stored, you will see No Numbers Stored.
3. Press to call the displayed entry. You will see the number followed by Calling.
Calling, Modifying, or Erasing an Entry
Once you have selected a Phone Book entry, you can call, change, or erase that entry.
Call a Selected Entry
1. Find an entry, and then press . See “Locating Entries” on page 43.
2. Press until you see Call Number, and then press . You will see Calling followed by the number
you dialed.
Modify a Name or Number
1. Find an entry, and then press . See “Locating Entries” on page 43.
2. Press M until you see Modify Name or Number, and then press . You will see Edit Number,
followed by the phone number stored in that entry.
ComCenter User’s Guide (release 040706) Page 59

3. Enter changes to the number, and then press . You will see the name stored in that entry.
4. Enter changes to the name, and then press . You will see Modified XXX.
Tip: For help entering letters or changing entries, see “Entering Names” on page 43.
Erase a Name and Number
1. Find an entry, and then press . See “Locating Entries” on page 43.
2. Press until you see Erase Name and Number, and then press . You will see Erased xxx.
ComCenter User’s Guide (release 040706) Page 60

Checking Phone Book Capacity
Use this feature to see how many available memory locations you have in either SIM card memory or phone
memory.
1. Follow the steps in “Getting to Personal Numbers...” to get to Check Capacity, and then press to
select.
2. Press until you see Check Phone Capacity or Check SIM Capacity, and then press . You will
see XXX Unused Locations.
3. Press and hold to exit the menu.
ComCenter User’s Guide (release 040706) Page 61

Preventing Access to the Phone Book
You may want to restrict memory access when loaning your phone to others. You can choose to prevent
access to the phone memory, SIM memory, or both.
1. Follow the steps in “Getting to Personal Numbers...” to get to Prevent Access, and then press to
select.
2. Press until you see the restriction type you desire: No Memory Restrictions, To SIM Card
Memory, To Phone Memory, or To Phone & SIM Memory.
3. Press to select the displayed option. You will see Enter Security Code.
4. Enter security code. Enter your six-digit security code. You will see Completed.
5. Press and hold to exit the menu.
ComCenter User’s Guide (release 040706) Page 62

Tip: The factory default security code is: 000000.
Notes:
• If you prevent access to both your phone memory and SIM memory and then try to access an entry, you
will see Restricted.
• If you restrict access to either your phone memory or SIM memory and try to access an entry stored in
that type of memory, you will see a list of the entries that are not restricted.
ComCenter User’s Guide (release 040706) Page 63

Restricting Phone Use
With the fixed dialing feature, you can restrict calling on your phone to a list of numbers that you create. When
this feature is active, you can only call numbers or use prefixes (for example, country codes or area codes)
that exactly match those that are stored in your list. You can store up to 40 entries on your fixed dial list.
These entries are stored on your SIM card.
Activate Fixed Dialing
Use this option to activate fixed dialing.
Note: The fixed dialing feature restricts access to your SIM memory.
1. Follow the steps in “Getting to Fixed Dialing...” to get to Setup Fixed Dialing, and then press to
select. You will see Enter PIN2.
ComCenter User’s Guide (release 040706) Page 64

2. Enter code. Enter your SIM card PIN2 code, and then press .
3. Press until you see On or Off, and then press . You will see Completed.
4. Press and hold to exit the menu.
Tip: You should have received your SIM card PIN2 code from your service provider.
ComCenter User’s Guide (release 040706) Page 65

Add an Entry
To add an entry:
1. Follow the steps in “Getting to Fixed Dialing...” to get to Setup Fixed Dialing, and then press to
select. You will see Enter PIN2.
2. Enter code. Enter your SIM card PIN2 code, and then press .
3. Press until you see Add Entry, and then press . You will see Enter Number.
4. Enter the number, and then press . You will see Enter Name.
5. Enter the name, and then press . You will see Enter Location.
6. Enter a location number, and then press . You will see Completed.
7. Press and hold to exit the menu.
ComCenter User’s Guide (release 040706) Page 66

Tip: Phone numbers must be in international format.
Tip: See “Entering Names” on page 40 for help entering letters.
Erase an Entry
To erase an entry:
1. Follow the steps in “Getting to Fixed Dialing...” to get to Setup Fixed Dialing, and then press to
select. You will see Enter PIN2.
2. Enter code. Enter your SIM card PIN2 code, and then press .
3. Press until you see Erase Entry, and then press to select. You will see the first entry in your
fixed dial list.
4. Press to scroll to the number you wish to erase. You will see Erase?.
5. Press to confirm. You will see Completed.
6. Press and hold to exit the menu.
ComCenter User’s Guide (release 040706) Page 67

Edit an Entry
To edit an entry:
1. Follow the steps in “Getting to Fixed Dialing...” to get to Setup Fixed Dialing, and then press to
select. You will see Enter PIN2.
2. Enter code. Enter your SIM card PIN2 code, and then press .
3. Press until you see Edit Entry, and then press to select. You will see the first entry in your
fixed dial list.
4. Press to scroll to the entry you want to change, and then press . You will see the current
number for that location.
5. Enter changes to the number, and then press . You will see the current name for that location.
6. Enter changes to the name, and then press . You will see the current location.
ComCenter User’s Guide (release 040706) Page 68

7. Enter a new location, and then press . You will see Completed.
8. Press and hold to exit the menu.
View Your Fixed Dialing List
This feature enables you to review, but not change, your fixed dial list.
1. Follow the steps in “Getting to Fixed Dialing...” to get to View Fixed Dial List, and then press to
select. You will see the first number on your fixed dial list.
2. Press to scroll through the numbers on your fixed dial list.
3. Press and hold to exit the menu.
ComCenter User’s Guide (release 040706) Page 69

Viewing the Last Ten Numbers Dialed
Don’t worry about forgetting the number you dialed earlier. The last ten numbers you dialed are saved.
1. Follow the steps in “Getting to Phone Book Features...” to get to Last Ten Calls, and then press
to select.
2. Press to scroll to Last Calls Made or Erase All Numbers, and then press to select.
3. If you select Last Calls Made, press to scroll to the number you are looking for, and then press
to place a call to that number.
or
If you select Erase All Numbers, you will see Completed.
4. Press and hold to exit the menu.
ComCenter User’s Guide (release 040706) Page 70

Tip: If you want to add a number from Last Ten Calls to your Phone Book, press when the number is
displayed, then follow the steps in “Storing Names and Numbers” on page 39.
Viewing and Modifying Your Phone Numbers
View Your SIM Phone Number(s)
You can program fax, data, and other types of phone numbers into your SIM card in addition to your voice
phone number. Use this feature to view your phone number(s). You can have up to five phone numbers.
1. Follow the steps in “Getting to Phone Book Features...” to get to My Phone Number(s).
2. Press to select. You will see your phone’s voice number followed by Modify?.
3. Press to scroll through your numbers.
4. Press and hold to exit the menu.
Tip: Pressing also brings up your phone number.
Note: If you do not see your number(s), they have
not been programmed onto your SIM card. Contact
your service provider for more information.
ComCenter User’s Guide (release 040706) Page 71

Modify Your Phone Numbers
If you have recently switched your phone number, use this feature to quickly store recent information.
1. Complete the steps in “View Your SIM Phone Number(s)” on page 50 to get to the number you want
to modify.
2. Press to modify the number. You will see Edit Number followed by the number for the selected
entry.
3. Enter changes to the number, and then press . You will see Edit Name followed by the name for
the entry selected.
4. Enter changes to the name (see “Entering Names” on page 40) and then press . You will see
Stored.
5. Press and hold to exit the menu.
ComCenter User’s Guide (release 040706) Page 72

One-Touch Dialing
One-touch dialing enables you to place calls instantly. You can choose to dial the phone numbers in the first
nine memory locations in either your SIM memory, phone memory, or your fixed dial list. You choose which
type of memory you want to be active with this feature.
Set Up One-Touch Dialing
1. Follow the steps in “Getting to Phone Book Features...” to get to One-Touch Dial Setting, and then
press to select.
2. Press to scroll through To Phone Memory, To SIM Card Memory, or To Fixed Dial List, and then
press to select the displayed option. You will see Completed.
3. Press and hold to exit the menu.
ComCenter User’s Guide (release 040706) Page 73

Use One-Touch Dialing
Using one-touch dial is easy—just press and hold a keypad digit! To use one-touch dialing:
Press and hold the appropriate digit key.
For example, press and hold to dial the number stored in location 2 of your phone memory, location
2 of your fixed dial list, or 102 of your SIM memory, depending on your setting.
Tip: You do not need to press to call the number when you are using one-touch dialing.
ComCenter User’s Guide (release 040706) Page 74

Using Calling Features
This chapter describes call-related features. Many of these features are network features that you must
subscribe to in order to access.
What You Will Learn
• showing the strength of the signal your phone is receiving
• activating/deactivating the Pending Call Drop signal
• forwarding calls when you are not available
• restricting use of your phone
Entering the Call Related Features Menu
To enter the Call Related Features menu:
1. Press to open the Options menu.
2. Press to scroll forward.
ComCenter User’s Guide (release 040706) Page 75

or
Press or to scroll backward or forward.
3. Press when you see:
4. Press to scroll through the submenu.
or
Press or to scroll backward or forward through the submenu.
ComCenter User’s Guide (release 040706) Page 76

What’s on the Call Related Features Menu?
1 This feature is network and subscription dependent.
2 This feature is network and subscription dependent. It is available only when the extended menu is
activated.
ComCenter User’s Guide (release 040706) Page 77

Forward Calls When Unavailable
Use this feature when you can’t answer a call. You must subscribe to this network feature through your
service provider(s).
To activate this feature:
1. Follow the steps in “Getting to Call Forwarding...” to get to Forward When Unavailable, and then
press to select.
2. Press to scroll to On or Off, and then press to select.
• If you select On, continue with step 3.
ComCenter User’s Guide (release 040706) Page 78

• If you select Off, continue with step 5.
3. Press to scroll to Voicemail or Other Number, and then press to select.
• If you select Voicemail, continue with step 5.
• If you select Other Number, then you will see Enter Number. Continue with step 4.
4. Enter the number you want calls forwarded to, and then press . Your phone takes a moment to
request the setting from the network, and then you will see Call Forward On.
5. Press and hold to exit the menu.
Tip: If you have not yet stored a voicemail number, go to page 65 to learn how.
ComCenter User’s Guide (release 040706) Page 79

Forward All Your Calls
When you select this option, all your calls are forwarded to the number you choose. Your phone does not
ring. You must subscribe to this network feature through your service provider(s).
To activate this feature:
1. Follow the steps in “Getting to Call Forwarding...” to get to Forward All Calls, and then press to
select.
2. Press to scroll to either On or Off, and then press to select.
• If you select On, continue with step 3.
• If you select Off, continue with step 5.
3. Press to scroll to Voicemail or Other Number, and then press to select.
• If you select Voicemail, continue with step 5.
• If you select Other Number, then you will see Enter Number. Continue with step 4.
4. Enter the number you want all your calls forwarded to, and then press . Your phone takes a
moment to request the setting from the network, and then you will see Call Forward On.
5. Press and hold to exit the menu.
Tip: If you have not yet stored a voicemail number, go to page 65 to learn how. step 5.
ComCenter User’s Guide (release 040706) Page 80

Detailed Call Forwarding
Detailed Call Forwarding lets you select the specific situations when you want your calls forwarded. The
settings you select in Forward When Unavailable and Forward All Calls override the settings you select here.
You must subscribe to this network feature through your service provider(s).
Note: This feature is available only when the extended menus are activated. See “Activating Extended
Menus” on page 87 for more information.
1. Follow the steps in “Getting to Call Forwarding...” to get to Detailed Forwarding, and then press
to select.
2. Press to scroll to Forward Voice Calls, then press to select.
ComCenter User’s Guide (release 040706) Page 81

3. Press to scroll to the option you desire Forward All Voice Calls, If Busy, If No Answer, or If Not
Reachable.
4. Press to select the displayed option.
5. Press to scroll to either Voicemail or Other Number, and then press .
• If you select Voicemail, continue with step 7.
• If you select Other Number, then you will see Enter Number. Continue with step 6.
6. Enter the number you want calls forwarded to, then press . Your phone takes a moment to
request the setting from the network, then displays Call Forward On.
7. Press and hold to exit the menu.
Tip: For information on retrieving messages, see “Accessing Messages” on page 67.
Tip: If you have not yet stored a voicemail number, go to page 65 to learn how.
ComCenter User’s Guide (release 040706) Page 82

Cancel All Forwarding
Use this option to clear all Call Forwarding settings.
To cancel Call Forwarding settings:
1. Follow the steps in “Getting to Call Forwarding...” to get to Cancel All Forwarding, and then press
to select.
You will see Call Forward Off. All Call Forwarding settings are now set to Off.
2. Press and hold to exit the menu.
ComCenter User’s Guide (release 040706) Page 83

Showing Signal Strength
Use this feature to check the strength of the signal that your phone is receiving from the Iridium satellite
network.
1. Follow the steps in “Getting to Call Related Features...” to get to Show Signal Strength.
2. Press to select. You will see:
After a few seconds, if the phone is able to locate a signal, the signal strength indicator appears in the
upper left corner of the display.
ComCenter User’s Guide (release 040706) Page 84

The signal strength meter remains on the display for several seconds. If the phone cannot locate a
signal, you will see Weak Signal.
3. Press and hold to exit the menu.
ComCenter User’s Guide (release 040706) Page 85

Deactivating Pending Call Drop Signal
Under rare circumstances, due to system overcapacity or a satellite outage, a satellite may not be available to
take your call. When this happens, your phone notifies you with a series of three consecutive tones and
displays Pending Call Drop. The tones continue periodically until a new satellite moves into range or the call
is dropped.
To deactivate the alert tones:
1. Follow the steps in the “Getting to Call Related Features...” to get to Pending Call Drop, and then
press to select.
2. Press to scroll to either On or Off, and then press to select.
3. Press and hold to exit the menu.
ComCenter User’s Guide (release 040706) Page 86

Restricting Calls with Call Barring
You can use call barring to restrict both incoming and outgoing calls. Call barring is useful if you are loaning
your phone to others or when you wish to control incoming calls. When you change one of your call barring
settings, your phone takes a few seconds to request the setting from the network.
Note: This feature is available only when the extended menus are activated. See “Activating Extended
Menus” on page 87 for more information.
Bar Outgoing Calls
This setting enables you to receive incoming calls but prevents outgoing calls.
ComCenter User’s Guide (release 040706) Page 87

To activate this feature:
1. Follow the steps in “Getting to Call Barring...” to get to Bar Outgoing Calls, and then press to
select.
2. Press to scroll to On or Off, and then press to select. You will see Enter Password.
3. Enter your bar password, and then press . You will see Completed.
4. Press and hold to exit the menu.
Tip: Your service provider gives you a bar password.
Bar Incoming Calls
This setting allows you to place calls, but refuses incoming calls. Callers hear a recording telling them you
are unavailable. To be sure not to miss a call see “Detailed Call Forwarding” on page 57.
To activate this feature:
1. Follow the steps “Getting to Call Barring..” to get to Bar Incoming Calls, and then press to select.
2. Press to scroll to On or Off, and then press to select.
3. Enter your bar password, and then press . You will see Completed.
4. Press and hold to exit the menu.
Tip: Your service provider gives you a bar password. You will see Enter Password.
ComCenter User’s Guide (release 040706) Page 88

Change Bar Password
When you subscribe to call barring, your service provider gives you a four-digit bar password. Use this
feature to change it to something easy to remember.
1. Follow the steps in “Getting to Call Barring...” to get to Change Bar Password, and then press to
select. You will see Enter Password.
2. Enter bar password, and then press . You will see Enter New Password.
3. Enter the new bar password, and then press .
4. Enter the new bar password again to confirm, and then press .
5. Press and hold to exit the menu.
Tip: If you are changing the password for the first time, use the password supplied by your service
provider.
ComCenter User’s Guide (release 040706) Page 89

Using Message Services
Did you know that you can receive voicemail and fax notification messages and numeric and text messages
through your Personal Mailbox service—wherever in the world you may be? You can also send text
messages to other phones as well as e-mail addresses. Wherever you are, you will have instant reference to
all your communication.
What You Will Learn
• checking your voicemail messages
• reading, saving and deleting messages
how to use Short Message Service – Mobile Originated (SMS-MO)
Entering the Messages Menu
To enter the Messages menu:
1. Press to access the Messages submenu directly, and then go on to step 4.
or
Press to open the Options menu and then go on to step 2.
2. Press to scroll forward.
ComCenter User’s Guide (release 040706) Page 90

or
Press or to scroll backward or forward.
3. Press when you see:
4. Press to scroll through the submenu.
or
Press or to scroll backward or forward through the submenu.
ComCenter User’s Guide (release 040706) Page 91

What’s on the Messages menu?
ComCenter User’s Guide (release 040706) Page 92

Checking Your Voicemail
Important: This feature makes checking your voicemail simple.
1. Follow the steps in “Getting to Message Features...” to get to Call Voicemail.
2. Press to select. You will see your voicemail number followed by Calling. If you have not
previously stored a voicemail number, then you will see No Number Available. See “Storing Your
Voicemail Number” on page 65 for instructions on how to enter a number.
Storing Your Voicemail Number
To store a voicemail number:
1. Follow the steps “Getting to Message Features.” to get to Message Settings, then press to select.
2. Press to select Voicemail Number. You will see Enter Voicemail Number followed by your current
voicemail number. If this is the first time you have stored a number, continue with to step 4.
ComCenter User’s Guide (release 040706) Page 93

3. Press to clear one digit at a time, or press and hold to erase the entire number.
4. Enter the new number, and then press . You will see Completed.
5. Press and hold to exit the menu.
Tip: Use pause dialing to store your voicemail access and PIN numbers together. See “Using Pauses in
Numbers” on page 41.
Managing Your Messages (This is only accessible when using the Iridium handset)
How Your Phone Notifies You of Messages
If your phone is powered on, it notifies you of received messages in the following ways:
• An alert sounds.
• Your phone beeps three times to inform you of an incoming message.
• The (message) indicator is displayed.
• The message is displayed immediately if the message is a fax or voicemail notification message. The
message remains on the display for several seconds.
or
ComCenter User’s Guide (release 040706) Page 94

Message Read Now? is displayed if the message is an alphanumeric, text message of up to 160
characters. For more information see “Read a New Message” on page 67.
How Messages Are Stored
Your phone stores all messages on your SIM card. The total number of messages that you can store depends
on your service provider.
If the message indicator is flashing, your SIM card is full. See “Delete Messages” on page 68 to make room
for the new message.
What Messages Contain
You can receive short text or numeric messages in your Personal Mailbox. Text messages may contain up to
160 characters. Numeric messages— typically phone numbers—may contain up to 20 digits.
Your personal mailbox works along with Call Forwarding. For more information see “Personal Mailbox” on
page 30, and the Call Forwarding feature descriptions on pages 53-58. Messages contain multiple screens
with the following information:
• the message
• the date and time the message was sent
• the phone number (if available) from which the message was sent
ComCenter User’s Guide (release 040706) Page 95

Accessing Messages
Read a New Message
Notification Messages
When you receive an incoming fax or voicemail notification message, it automatically scrolls across your
screen. You can:
• Press to store it on your SIM card.
• Press to delete it.
ComCenter User’s Guide (release 040706) Page 96

Text Messages
When you receive a new alphanumeric message, you will see Message Read Now? To read it:
1. Press and continue with step 2.
or
Press to read the message later. See “Read a Stored Message” on page 68.
2. Press to move forward through a message one screen at a time.
3. Press to access options for that entry, then proceed to page 69.
Notes:
• If the message storage space on your SIM card is full, you will not be able to store a message for later
retrieval. Use the delete message feature to make room for new messages on your SIM card.
Read a Stored Message
To read a stored message:
1. Follow the steps in “Accessing Your Messages...” to enter the message center. If you have messages
you will see the number of messages stored. If you do not have any messages, you will see No
Messages.
ComCenter User’s Guide (release 040706) Page 97

2. Press to move forward through a message one screen at a time.
3. Press to access options for that entry, and then proceed to page 69.
or
Press and hold to exit the menu.
Delete Messages
Use this option to make room for new messages:
1. Follow the steps in “Go to the Next Message” on page 69 until you see the message you want to
delete, and then press .
2. Press until you see Delete Message, and then press . You will see Message Deleted.
3. Press and hold to exit the menu.
ComCenter User’s Guide (release 040706) Page 98

Go to the Next Message
To go to the next message:
1. Follow the steps in “Read a Stored Message” on page 68.
2. Press until you see Go To Next Message and then press .
You will see the next message. If you are at the end of your message list you will see the first message
again.
3. Press to move forward through a message one screen at a time.
4. Repeat steps 2 to 3 until you have read all your messages.
5. Press and hold to exit the menu.
ComCenter User’s Guide (release 040706) Page 99

Managing Outgoing Messages (SMS-MO)(only accessible with Iridium handset)
You can create a new message and send it immediately, or store it in an outgoing messages list for later use.
You can also edit a message that you have received, then send and/or save the modified message.
Messages are created and edited in the message editor.
Message Editor
The message editor lets you create a new message or modify a stored message (received or outgoing). You
use the keypad to create or edit a message. You can produce any letter in the alphabet by pressing the
appropriate key. For example, press to enter the letters A, B, or C, as shown:
For a complete list of the characters you can enter from the keypad, see page 41.
ComCenter User’s Guide (release 040706) Page 100

Create a New Message (SMS-MO)
To create a new message in the message editor:
1. Follow the steps in “Getting to Message Features...” to get to Message Editor, and then
press to select.
The message editor displays the contents of the last message entered. If there are no previous
messages, the cursor is placed in the upper left corner of the editing area.
2. Press and hold to clear the entire message editor contents, if necessary.
3. Begin composing your message. Enter a letter by pressing a key as many times as necessary.
4. Press to advance the cursor.
5. Repeat steps 3 and 4 as many times as necessary to complete your message.
6. If message is being sent to an e-mail address, enter e-mail address in beginning of e-mail message
and enter in a space followed by message.
Lines of text are automatically formatted in the display. When you reach the bottom of the editing area, the
top lines of text scroll up and off the display in order to keep the cursor and the last few lines of text in view.
You can enter in up to 160 characters maximum including the e-mail address.
ComCenter User’s Guide (release 040706) Page 101

When you have finished composing your message:
7. Press to access options for that entry.
Message editor menu options let you send the message immediately or store it for later use. These options are
described on pages 70-71.
Tip: Press and hold any numeric key to toggle between uppercase and lowercase characters.
Edit a Message (SMS-MO)
You can edit a new message at any time while you are creating it.
You can also edit received messages or messages stored in the outgoing messages list. See “Edit a Stored
Message” on page 72 for instructions on how to copy a received message into the message editor. See “Edit a
Stored Message” on page 72 for instructions on how to copy an outgoing message into the message editor.
To delete text in a message:
1. Press to scroll the cursor to the right of the text you want to delete.
2. Press to delete one character at a time.
Or
Press and hold to clear the display.
To add text to a message:
ComCenter User’s Guide (release 040706) Page 102

1. Press to scroll the cursor to the location where you want to add new text.
2. Enter a letter by pressing a key as many times as necessary.
Edit a Stored Message (SMS-MO)
You can edit a message that you have received, then send the modified message and/or store it in the
outgoing messages list.
1. Follow the steps in “Go to the Next Message” on page 73 until you see the message you want to
edit, and then press .
2. Press until you see Edit Message and then press .
The message is copied to the message editor. You will see the final portion of the message displayed in the
editing area. The cursor is placed at the end of the message.
For instructions on how to edit a message, see “Message Editor” on page 70.
Send a Message (SMS-MO)
To send a message from the message editor:
1. Press to access message editor menu options.
ComCenter User’s Guide (release 040706) Page 103

2. Press until you see Send Message and then press . You will be prompted to enter the
destination address (phone number) for the message.
3. Enter the destination address and then press to send the message.
Note: Destination number should be entered in standard dialing format. For example, destination is another
Iridium phone, destination number is 00 8816 629 00005 or + 8816 629 00005.
If message is being sent to an e-mail address, enter 00*2 or +*2 and press .
The message is sent to your message service center, which forwards the message to its final destination. You
will see Message Sent when the message arrives at the service center.
If the message cannot be delivered to the service center, you will see Message Failed, followed by Resend?
on the next line. You can:
Press to resend the message.
Or
Press to abandon the attempt to send the message at this time. See “Store a Message” on page 63 for
instructions on how to store the message for later mailing.
If you have not previously stored a service center number, then you will see No Service Center. See “Enter
Service Center Number” on page 75 for instructions on how to enter a service center number.
ComCenter User’s Guide (release 040706) Page 104

Store a Message (SMS-MO)
To store the contents of the message editor to the outgoing messages list:
1. Press to access message editor menu options.
2. Press until you see Store Message and then press . You will see Stored to Outgoing.
Outgoing messages are stored on your SIM card. When the SIM card is full (indicated by a flashing message
indicator), you will not be able to store a message for later retrieval. Use the delete message feature (page
74) to make room for new messages on your SIM card.
ComCenter User’s Guide (release 040706) Page 105

Read a Stored Message (SMS-MO)
This feature displays the first message stored in the outgoing messages list.
To read a stored message in satellite mode:
1. Follow the steps in “Getting to Outgoing Messages...” to enter the message center. You will see the
number of messages stored, followed by the first message. If you do not have any messages, you will see
No Messages.
2. Press to scroll through the message one screen at a time.
3. Press to access menu options for the message.
Or
Press and hold to exit the menu.
ComCenter User’s Guide (release 040706) Page 106

Go to the Next Message (SMS-MO)
This feature takes you to the next message in the outgoing messages list.
To go to the next message in satellite mode:
1. Follow the steps in “Read a Stored Message” on page 73.
2. Press until you see Go To Next Message and then press . You will see the next message.
3. Press to scroll through the message one screen at a time.
4. Repeat steps 2 to 3 to read all of your messages.
5. Press and hold to exit the menu.
Send a Stored Message (SMS-MO)
This feature sends a message stored in the outgoing messages list.
To send a stored message in satellite mode:
1. Follow the steps in “Read a Stored Message” on page 73.
2. Press until you see Send Message and then press . You will be prompted to enter the
destination address (phone number) for the message.
ComCenter User’s Guide (release 040706) Page 107

3. Enter the destination address and then press to send the message.
The message is sent to your message service center, which forwards the message to its final destination. You
will see Message Sent when the message arrives at the service center.
If the message cannot be delivered to the service center, you will see Message Failed, followed by Resend?
on the next line. You can:
Press to resend the message.
Or
Press to abandon the attempt to send the message at this time.
If you have not previously stored a service center number, then you will see No Service Center. See “Enter
Service Center Number” on page 75 for instructions on how to enter a service center number.
Edit a Stored Message (SMS-MO)
You can edit a message that you have stored in the outgoing messages list.
To edit a stored message in satellite mode:
1. Follow the steps in “Go to the Next Message” on page 73 until you see the message you want to edit,
and then press .
ComCenter User’s Guide (release 040706) Page 108

2. Press until you see Edit Message and then press .
The message is copied to the message editor. You will see the final portion of the message displayed in the
editing area. The cursor is placed at the end of the message.
For instructions on how to edit a message, see “Message Editor” on page 70.
Delete a Stored Message (SMS-MO)
Use this feature to make room for new messages on your SIM card.
To delete a stored message in satellite mode:
1. Follow the steps in “Go to the Next Message” on page 73 until you see the message you want to
delete, and then press .
2. Press until you see Delete Message, and then press . You will see Message Deleted.
3. Press and hold to exit the menu. This feature is not available in cellular mode.
Enter Service Center Number (SMS-MO)
Use this feature to enter the number for the service center that forwards your outgoing messages. You
must specify a service number before you can send any messages.
To enter the service center number in satellite mode:
ComCenter User’s Guide (release 040706) Page 109

1. Follow the steps in “Getting to Message Settings...” to get to Service Centre, and then press to
select. You will see Enter Service Number followed by your current service center number. If this is the
first time you have stored a number, continue with step 3.
2. Press to clear one digit at a time, or press and hold to erase the entire number.
3. Enter the new number, and then press . You will see Completed.
4. Press and hold to exit the menu.
Tip: The service center number is: 00 8816 629 00005 or + 8816 629 00005.
ComCenter User’s Guide (release 040706) Page 110

Set Expiry period (SMS-MO)
This feature specifies the maximum amount of time, in hours, that an unforwarded outgoing message
will remain at the service center before it is deleted.
To set the message expiration period in satellite mode:
1. Follow the steps in “Getting to Message Settings...” to get to Expiry Period, and then press to
select. You will see Enter Hours followed by the current setting.
2. Press to clear one digit at a time, or press and hold to erase the entire number.
3. Enter the new number, and then press . You will see Hours followed by the number you entered.
ComCenter User’s Guide (release 040706) Page 111

4. Press and hold to exit the menu.
Tip: The default expiration period setting is 192 hours (8 days).
Specify Outgoing Message Type
You can send messages to a device which interprets them in a format other than text. Your service center
converts the messages before forwarding them to the destination address.
Note: This feature is not available.
To specify the outgoing message type in satellite mode:
1. Follow the steps in “Getting to Message Settings...” to get to Outgoing Message Type, and then
press to select.
2. Press to scroll to the desired type (Text is the only available option and is set by default), and then
press to select it.
3. Press and hold to exit the menu.
ComCenter User’s Guide (release 040706) Page 112

Customizing Phone Features
Once you are comfortable with the basic features of your new phone, use this chapter to set up your phone
the way you like it.
What You Will Learn
• adjusting your phone’s ringer volume
• choosing from ten different ringer styles
• choosing your phone’s keypad tones
• locking and unlocking your phone
• changing and setting codes for security
• resetting or clearing your phone’s settings
• selecting the language displayed by your phone
Entering the Phone Setup Menu
To enter the Phone Setup menu:
ComCenter User’s Guide (release 040706) Page 113

1. Press to open the Options menu.
2. Press to scroll forward.
or
Press or to scroll backward or forward.
3. Press when you see:
4. Press to scroll through the submenu.
or
Press or to scroll backward or forward through the submenu.
ComCenter User’s Guide (release 040706) Page 114

What’s on the Phone Setup Menu?
1 This feature is available only when the extended menu is activated.
ComCenter User’s Guide (release 040706) Page 115

Adjusting the Ringer Volume
Use this feature to adjust the volume of the ringer. The phone sounds the new volume level as you adjust it.
1. Follow the steps in “Getting to Phone Setup...” to get to Adjust Ring Volume, and then press to
select.
2. Increase the volume by pressing the upper volume key.
or
Decrease the volume by pressing the lower volume key.
3. Press and hold to exit the menu.
Tip: You can also press , and then the up or down volume key.
ComCenter User’s Guide (release 040706) Page 116

Setting the Ringer Tone
Select your favorite tone from 10 different options.
1. Follow the steps in “Getting to Phone Setup...” to get to Set Ringer Tone, and then press to
select.
2. Press to scroll through the following options:
• Standard Tone • Single Ring Tone
• British Tone • French Tone
• German Tone • Bravo Tone
• Three Ring Tone • Siren Tone
• Quick Tone • High Tone
You will hear a one-ring-cycle demonstration.
3. Press to select the desired option.
4. Press and hold to exit the menu.
ComCenter User’s Guide (release 040706) Page 117

Setting the Keypad Tones
Choose the sounds your phone makes when its keys are pressed.
Note: This feature is available only when the extended menus are activated. See “Activating Extended
Menus” on page 87 for more information.
1. Follow the steps in “Getting to Phone Setup...” to get to Select Keypad Tones, and then press
to select.
2. Press to choose Normal Tones, Single Tone, or No Tones, and then press .
3. Press and hold to exit the menu.
ComCenter User’s Guide (release 040706) Page 118

Locking and Unlocking Your Phone
These features can help you prevent unwanted use of your phone.
Lock the Phone Automatically
Use this feature to set your phone to lock itself every time it is powered on.
1. Follow the steps in “Getting to Phone Lock...” to get to Automatic Lock, and then press to
select.
2. Press to choose On or Off, and then press to select. You will see Completed.
3. Press and hold to exit the menu.
ComCenter User’s Guide (release 040706) Page 119

Lock the Phone Instantly
Use this feature to lock your phone immediately.
1. Follow the steps in “Getting to Phone Lock...” to get to Lock Now.
2. Press to select. You will see: Locked.
Note: Once you unlock your phone, it remains unlocked until you lock it again.
ComCenter User’s Guide (release 040706) Page 120

Unlock the Phone
1. Enter unlock code. Enter your four-digit phone unlock code.
2. Press .
Tip: The factory default unlock code is 1234.
Change the Unlock Code
The unlock code is originally set to 1234. You should change it as soon as possible.
1. Follow the steps in “Getting to Phone Lock...” to get to Change Unlock Code, and then press to
select. You will see Enter Security Code.
ComCenter User’s Guide (release 040706) Page 121

2. Enter security code. Enter your six-digit security code. You will see your current lock code and Enter
Phone Unlock Code.
3. Press to clear one digit at a time, or press and hold to clear all the digits.
4. Enter new code. Enter a new four-digit unlock code, and then press . You will see Phone Lock
and the new lock code.
5. Press and hold to exit the menu.
Tip: The factory default security code is 000000.
ComCenter User’s Guide (release 040706) Page 122

Protecting the SIM Card
You can use a Personal Identification Number (PIN) code to protect the information stored on your SIM card
even when it is inserted into someone else’s phone.
Activate and Deactivate the SIM Card PIN Code
When you activate the SIM card PIN code, your phone requests the code whenever the phone is powered on.
To change this setting, you need to enter the PIN code that your service provider gave you.
1. Follow the steps in “Getting to Require SIM Card PIN...”.
2. Press to scroll to On or Off, and then press . You will see Enter PIN.
ComCenter User’s Guide (release 040706) Page 123

3. Enter PIN code. Enter the four- to eight-digit PIN code your service provider gave you, and then press
. You will see Completed.
4. Press and hold to exit the menu.
ComCenter User’s Guide (release 040706) Page 124

Change the SIM Card PIN Code
To choose your own PIN code:
1. Follow the steps in “Getting to Require SIM Card PIN...” to get to Change SIM Card PIN, and then
press to select. You will see Enter Old PIN.
2. Enter the current PIN code, and then press . You will see Enter New PIN.
3. Enter a new PIN code, and then press . You will see Repeat New PIN.
4. Re-enter the new PIN code, and then press again. You will see Completed.
5. Press and hold to exit the menu.
ComCenter User’s Guide (release 040706) Page 125

Unblock the PIN Code
If your PIN code is entered incorrectly three times in a row, Blocked appears in the display. You need to enter
a PIN unblocking key (PUK1), which you can obtain from your service provider.
1. Press .
2. Enter unblocking key. Enter the eight-digit PUK1 unblocking key, and then press . Your service
provider supplies this code.
3. Enter a new PIN code, and then press .
4. Re-enter the new PIN code, and then press .
Tip: The message Blocked indicates that an incorrect PIN code was entered. The message Blocked
indicates that an incorrect PIN2 code was entered.
ComCenter User’s Guide (release 040706) Page 126

Managing Other Security Settings
Your phone includes other security features:
• a SIM card PIN2 code for accessing Fixed Dialing settings and other subscription-dependent features
• a security code controls access to security and other menu options
Change the SIM PIN2 Code
Your SIM card PIN2 code is used to access Fixed Dialing settings. This four- to eight-digit code is issued to
you when you subscribe to the feature. Use this feature to choose a new code.
ComCenter User’s Guide (release 040706) Page 127

1. Follow the steps in “Getting to Phone Setup...” to get to Change SIM Card PIN2 Code, and then
press to select. You will see Enter Old PIN2.
2. Enter the current PIN2 code, and then press . You will see Enter New PIN2.
3. Enter new PIN2 code, and then press . You will see Repeat New PIN.
4. Re-enter the new PIN2 code, and then press again. You will see Completed.
5. Press and hold to exit the menu.
ComCenter User’s Guide (release 040706) Page 128

Unblock the PIN2 Code
If your PIN2 code is entered incorrectly three times in a row, Blocked appears in the display. You need
to enter a PIN2 unblocking key (PUK2), which you can obtain from your service provider.
1. Press .
2. Enter unblocking key. Enter the eight-digit PUK2 unblocking key, and then press . Your service
provider supplies this code.
3. Enter a new PIN2 code, and then press .
4. Re-enter the new PIN2 code, and then press .
Tip: The message Blocked indicates that an incorrect PIN code was entered. The message Blocked
indicates that an incorrect PIN2 code was entered.
ComCenter User’s Guide (release 040706) Page 129

Change the Security Code
The security code is your phone’s primary security number. You use it to reset your phone to its default
settings and prevent access to your phone book. It is originally set to 000000.
1. Follow the steps in “Getting to Phone Setup...” to get to New Security Code, and then press to
select. You will see Enter Security Code.
2. Enter the current security code, and then press . You will see Enter New Security Code.
3. Enter a new security code, then press . You will see Security Code and six-digit number
selected.
4. Press and hold to exit the menu.
Activating Extended Menus
This feature activates and deactivates the extended menus. See page 97 to learn how extended menus can
make your phone even simpler to use.
1. Follow the steps in “Getting to Phone Setup.” to get to Extended Menus, then press to select.
2. Press to choose On or Off, and then press .
3. Press and hold to exit the menu.
Press and hold to activate the extended menus temporarily. This shortcut displays all extended menus
features until you exit the Options menu.
ComCenter User’s Guide (release 040706) Page 130

Selecting the Display Language
Use this feature to select the language in which your phone displays messages.
Note: This feature is available only when the extended menus are activated.
1. Follow the steps in “Getting to Phone Setup...” to get to Language Selection, and then press to
select.
2. Press to scroll through the choices, and then press to select the displayed option.
3. Press and hold to exit the menu.
If you accidentally change the language of your phone’s display message, press to
return to the language selection menu.
ComCenter User’s Guide (release 040706) Page 131

Review the Phone’s Settings
View all your phone’s settings that have changed from their defaults, and reset them to their original
settings if you like. Use this feature to review but not change your phone’s settings.
1. Follow the steps in “Getting to Phone Status...” to get to Status Review, and then press .
2. Press to scroll through the list of all the menu items you have changed.
3. Press and hold to exit the menu.
ComCenter User’s Guide (release 040706) Page 132
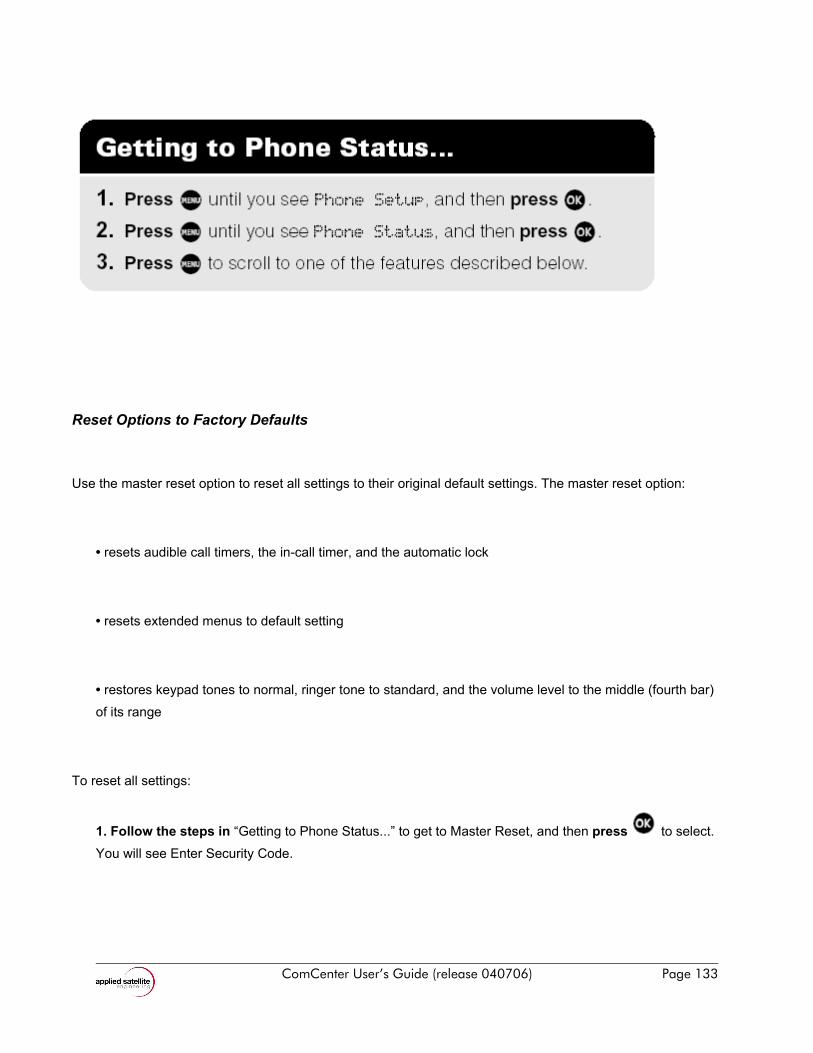
Reset Options to Factory Defaults
Use the master reset option to reset all settings to their original default settings. The master reset option:
• resets audible call timers, the in-call timer, and the automatic lock
• resets extended menus to default setting
• restores keypad tones to normal, ringer tone to standard, and the volume level to the middle (fourth bar)
of its range
To reset all settings:
1. Follow the steps in “Getting to Phone Status...” to get to Master Reset, and then press to select.
You will see Enter Security Code.
ComCenter User’s Guide (release 040706) Page 133

2. Enter your six-digit security code. You will see Reset Complete.
3. Press and hold to exit the menu.
Tip: The factory default security code is 000000.
Clear All Stored Information
The Master Clear option resets the same items as Master Reset, plus the following:
• clear phone book entries from phone memory (not from SIM memory)
• clear last calls made list • reset resettable call timers
Master Clear does not clear the:
• fixed dial list • my number(s) list • received messages list
To clear the settings:
1. Follow the steps in “Getting to Phone Status...” to get to Master Clear, and then press to select.
You will see Enter Security Code.
2. Enter your six-digit security code. You will see Reset Complete.
3. Press and hold to exit the menu.
Tip: The factory default security code is 000000.
ComCenter User’s Guide (release 040706) Page 134

Accessing the Network
This section shows you how to register with the Iridium® satellite network.
Entering the Network Selection Menu
To enter the Network Selection menu:
1. Press to open the Options menu.
2. Press to scroll forward.
or
Press or to scroll backward or forward.
3. Press when you see:
4. Press to scroll through the submenu.
or
ComCenter User’s Guide (release 040706) Page 135

Press or to scroll backward or forward through the submenu.
What’s on the Network Selection Menu?
ComCenter User’s Guide (release 040706) Page 136

Registering With the Satellite Network
Your phone searches for the Iridium satellite network.
1. Follow the steps in “Getting to Network Selection...” to get to Register Now.
2. Press to select. You will see Registering.... This may take a few seconds.
If the phone finds the signal, you will see Registered and the signal strength indicator:
The (home system) indicator also appears.
If the phone is unsuccessful you may see one of these messages: System Busy, Restricted Area, or
Weak Signal.
Note: You must wait three minutes between registration attempts.
ComCenter User’s Guide (release 040706) Page 137

Timing Your Calls
Your phone’s call meters give you a variety of options for tracking the time you spend on the phone. You can
monitor the length of individual calls, set a timer to track monthly usage, or have the phone alert you with
tones at specific intervals.
What You Will Learn
• viewing your phone’s call timers to monitor your airtime
• setting your phone’s audible alerts to sound at intervals you specify
• activating an in-call display of the elapsed time of your current call
• checking the total airtime of your phone since it was manufactured
Entering the Call Meters Menu
To enter the Call Meters menu:
1. Press to open the Options menu.
2. Press to scroll forward.
or
ComCenter User’s Guide (release 040706) Page 138

Press or to scroll backward or forward.
3. Press when you see:
4. Press to scroll through the submenu.
or
Press or to scroll backward or forward through the submenu.
ComCenter User’s Guide (release 040706) Page 139

What’s on the Call Meters Menu?
1 This feature is available when the extended menu is active.
ComCenter User’s Guide (release 040706) Page 140

Showing Call Timers
This submenu helps you track your airtime. Keep a running tab of your monthly usage or view the airtime of
your most recent call.
Show the Time of the Last Call
Use this feature to display the elapsed time of your most recent call.
1. Follow the steps in “Getting to Show Call Timers...” to get to Show Last Call, and then press to
select. You will see the airtime of the most recent call in hours, minutes, and seconds. After several
seconds, the display returns to Show Last Call.
2. Press and hold to exit the menu.
ComCenter User’s Guide (release 040706) Page 141

Show Total Time for All Calls
Use this feature to display your total airtime since you last reset the Call Timer.
1. Follow the steps in “Getting to Show Call Timers...” to get to Total For All Calls, and then press
to select. You will see the airtime accumulated since the timer was last reset. The airtime is displayed in
hours, minutes, and seconds. After several seconds, the display returns to Total For All Calls.
2. Press and hold to exit the menu.
Reset All Timers
Reset your timers at the beginning of each billing cycle to keep track of your spending.
1. Follow the steps in “Getting to Show Call Timers...” to get to Reset All Timers, and then press to
select. You will see Completed. The display then returns to Reset All Timers.
2. Press and hold to exit the menu.
Note: This does not reset the Lifetime Timer described on page 96.
ComCenter User’s Guide (release 040706) Page 142

Setting Audible Call Timers
Let your phone watch the clock for you. The call timers signal at a set time or interval with beeps only you can
hear.
Set the Single Alert Timer
Use this feature to set your phone to alert you after an elapsed time.
1. Follow the steps in “Getting to Audible Call Timers...” to get to Single Alert Timer, and then press
to select.
2. Press to scroll to On or Off, and then press to select.
• If you select On, you will see Enter Seconds. Continue with step 3.
ComCenter User’s Guide (release 040706) Page 143

• If you select Off, you will see Completed. Continue with step 4.
3. Press to accept the current setting. You will see Seconds XXX.
or
Enter a number from 11 to 999, and then press . You will see Seconds XXX.
4. Press and hold to exit the menu.
Set the Repetitive Timer
Use this feature to set your phone to alert you at specific intervals, for example every 45 seconds.
1. Follow the steps in “Getting to Audible Call Timers...” to get to Repetitive Timer, and then press
to select.
2. Press to scroll to On or Off, then press to select.
• If you select On, you will see Enter Seconds. Continue with step 3.
• If you select Off, you will see Completed. Continue with step 4.
3. Press to accept the current setting. You will see Seconds XXX.
ComCenter User’s Guide (release 040706) Page 144

or
Enter a number from 11 to 999, and then press . You will see Seconds XXX.
4. Press and hold to exit the menu.
ComCenter User’s Guide (release 040706) Page 145

Showing the In-Call Timer
Use this feature to display a running clock of the airtime elapsed while on a call.
1. Follow the steps in “Getting to Call Meters...” to get to Set In-Call Display, and then press to
select.
2. Press to scroll to Show Time Per Call or No In-Call Display, and then press to select.
3. Press and hold to exit the menu.
Showing the Lifetime Timer
Use this feature to show the total time of all calls for the life of your phone.
Note: This feature is available only when the extended menus are activated. See “Activating Extended
Menus” on page 78 for more information.
ComCenter User’s Guide (release 040706) Page 146

1. Follow the steps in “Getting to Call Meters...” to get to Lifetime Timer, and then press to select.
You will see the total airtime of your phone since it was manufactured.
2. Press and hold to exit the menu.
Tip: The lifetime timer cannot be reset. The Reset All Timers feature has no effect on this timer.
ComCenter User’s Guide (release 040706) Page 147

Customizing the Menu System
Do you think your ComCenter has too many features for everyday use? You can do something about it by
hiding the features you don’t always need. Is your favorite feature not on the Quick Access menu? It’s easy to
change the defaults to your favorite features. By customizing your menus, your favorite features are always
quick and easy to find! This chapter shows you how.
What You Will Learn
• personalizing the Options menu
• personalizing the Quick Access menu
Personalizing the Options Menu
You can customize the Options menu by moving features in and out of the extended menu.
Move Menu Features
To move menu features:
1. Find the feature you want to move.
2. Press and hold . You will see one of two responses depending on where that menu feature is
currently located. If you see:
ComCenter User’s Guide (release 040706) Page 148

Remove From Short Menus
(the feature is in the short menu)
Press to move the feature to the extended
menu. You will see Menu Item Moved.
or
Press to scroll to Leave in Short Menus, and then
press to select. You will see Move Cancelled.
Add To Short Menus
(the feature is in the
extended menu)
Press to move the feature to the short menu. You
will see Menu Item Moved.
Or
Press to scroll to Leave in Long Menus, and then
press to select. You will see Move Cancelled.
Note: Some features and submenus cannot be moved. You will see Cannot Move Menu Item.
ComCenter User’s Guide (release 040706) Page 149

Activate/Deactivate Extended Menus
Use the Options menu to activate and deactivate extended menus. Activate them when you need access to
every feature. Deactivate them for everyday use.
1. Press until you see Phone Setup, and then press to select.
2. Press until you see Extended Menus, and then press to select.
3. Press to scroll to either On or Off, and then press to select.
All hidden features are accessible when you activate the extended menus.
Access Hidden Features
If you want to access a feature hidden in the extended menus, but don’t want to leave the extended menus
active, you can use this shortcut:
Press and hold for a few seconds.
All extended menus features remain accessible until you exit the Options menu.
ComCenter User’s Guide (release 040706) Page 150

Personalizing the Quick Access Menu
You can replace the default Quick Access menu features described on page 34 with any of the following
features.
Icon Quick Access Feature
Find by Location recalls Phone Book entries by
memory location numbers.
Add Entry to Phone stores entered numbers in the
next available phone memory location.
Add Entry to SIM stores entered numbers in the next
available SIM card location.
Switch Memory switches One-Touch dialing between
the phone and SIM memories depending on the
current setting.
Last Call Timer displays the duration of your last call.
To change a default quick access feature to one of the features listed above, you must choose the feature
you want to replace and then choose the replacement.
1. Press and then press to scroll to the feature you wish to change.
2. Press and hold to access the list of features available.
3. Press to scroll through the list until you find the desired feature.
4. Press to store the displayed feature in the new location.
You will see Completed.
ComCenter User’s Guide (release 040706) Page 151

Menu Quick Reference
This section provides a quick reference guide to menu structures and features.
ComCenter User’s Guide (release 040706) Page 152

Phone Book Menu
ComCenter User’s Guide (release 040706) Page 153

Call Related Features Menu
1 This feature is network and subscription dependent.
2 This feature is network and subscription dependent. It is available only when the extended menu is
activated.
ComCenter User’s Guide (release 040706) Page 154

Messages Menu
ComCenter User’s Guide (release 040706) Page 155

Phone Setup Menu
1 This feature is available only when the extended menu is activated.
ComCenter User’s Guide (release 040706) Page 156

Network Selection Menu
ComCenter User’s Guide (release 040706) Page 157

Call Meters Menu
1 This feature is available only when the extended menu is activated.
ComCenter User’s Guide (release 040706) Page 158

Troubleshooting
This chapter tells you what to do if you experience one of the following problems:
Problem Solution
You can’t make calls.
• Check that the antenna is properly mounted. Do you have a clear
view of the sky?
• Did you enter the number in international format? All calls made
from the Iridium satellite system must be in international format.
• Check the signal strength meter. If the signal is weak, move the
vehicle to a more open area.
• Check the Network Selection settings.
• Check your Operator coverage map.
• Is Restricted displayed? Check the Call Barring setting.
• Has a new SIM card been inserted? Check that no new restrictions
have been imposed.
You can’t receive calls.
• Check to see that your phone is powered on.
• Check the antenna. Is it properly mounted? Do you have a clear
view of the sky?
• Check the signal strength. If the signal is weak, move the vehicle
ComCenter User’s Guide (release 040706) Page 159

to a more open area.
• Check the Call Forwarding and Call Barring settings.
• Check the Ringer setting. If it is off, there is no audible ringer
You can’t make
International calls.
Have you included the relevant codes? Press and hold the
key to display the international dialing prefix (+) and then enter the
appropriate country code followed by the phone number.
Your phone will
not unlock.
• Have you inserted a new SIM card? Enter the new PIN code.
• Do you have a replacement phone? Enter the default phone
unlock code —1234.
• Have you forgotten the unlock code? Press to change the
unlock code (you need your security code).
Your PIN is blocked.
Enter the PIN unblocking key (PUK1) or contact your
service provider. See “Unblock the PIN Code” on
page 84 for additional information.
Your PIN2 is blocked.
Enter the PIN2 unblocking key (PUK2) or contact your
service provider. See “Unblock the PIN2 Code” on
page 86 for additional information.
ComCenter User’s Guide (release 040706) Page 160

Your SIM card will not work.
• Is the card inserted the correct way?
• Is the gold chip visibly damaged or scratched? Return the card to
your service provider.
• Check the SIM and phone contacts. If they are dirty, clean them
with an antistatic cloth.
You can’t cancel Call
Forwarding or Call Barring.
Wait until you are in an area with good network coverage
and try again.
The (message)
indicator is flashing.
There is not enough memory available to store another
message. Use the Messages menu to delete one or
more messages.
You find your phone becoming
warm during use..
You may notice this during long calls or during charging.
The heat is produced by the electronic components
within your phone and is quite normal
Your SIM card is inserted in the
phone but the display says:
• Check Card or Insert Card.
Check that the SIM card has been inserted correctly. The contacts
of the SIM card may be dirty. Turn the phone off, remove the SIM
card and rub the gold chip on the card with a clean cloth. Replace
the card in the phone.
• Blocked or Blocked
ComCenter User’s Guide (release 040706) Page 161

Enter the PIN unblocking key (PUK1) or the PIN2 unblocking key
(PUK2) respectively, or contact your service provider. See “Unblock
the PIN Code” on page 84 and “Unblock the PIN2 Code” on page 86
for additional information.
• Bad Card See Supplier.
Please contact your service provider.
You find your phone’s prompts
in a language other than your
own.
Press . This routes you directly to the
language selection submenu. Press until you see your
preferred language. Press to select.
ComCenter User’s Guide (release 040706) Page 162

Appendix II: Basic AT Command Set(This information courtesy KDE.org.)
Command Description Comments
A0 or A Answer incoming call
A/ Repeat last command Don't preface with AT. Enter usually aborts.
B0 or B Call negotiation V32 Mode/CCITT Answer Seq.
B1 Call negotiation Bell 212A Answer Seq.
B2 Call negotiation Verbose/Quiet On Answer
D Dial
Dial the following number and then handshake in originate mode.
P Pulse Dial
T Touch Tone Dial
W Wait for the second dial tone
, Pause for the time held in register S8 (usually 2 seconds)
; Remain in command mode after dialing.
! Flash switch-hook (Hang up for a half second, as in
transferring a call.
L Dial last number
E0 or E No Echo Will not echo commands to the computer
E1 EchoWill echo commands to the computer (so one can see what one
types)
H0 Hook Status On hook - Hang up
H1 Hook status Off hook - phone picked up
I0 or IInquiry, Information, or
Interrogation
This command is very model specific. I0 usually returns a number
or code, while higher numbers often provide much more useful
information.
L0 or L Speaker Loudness. Modems Off or low volume
ComCenter User’s Guide (release 040706) Page 163

Command Description Comments
with volume control knobs
will not have these options.
L1, L2, L3 Volume control Low, medium, and high volume, respectively
M0 or M Speaker off M3 is also common, but different on many brands
M1 Speaker on until remote carrier detected (i.e. until the other
modem is heard)
M2 Speaker is always on (data sounds are heard after CONNECT)
N0 or N Handshake Speed Handshake only at speed in S37
N1 Handshake at highest speed larger than S37
O0 or O Return Online See also X1 as dial tone detection may be active.
O1 Return Online after an equalizer retrain sequence
Q0 or Q1 Quiet ModeOff - Displays result codes, user sees command responses (e.g.
OK)
Q1 Quiet Mode On - Result codes are suppressed, user does not see responses.
Sn? Query the contents of S-register n
Sn=r Store Store the value of r in S-register n
V0 or V Verbose Numeric result codes
V1 English result codes (e.g. CONNECT, BUSY, NO CARRIER etc.)
X0 or X Smartmodem Hayes Smartmodem 300 compatible result codes
X1 Usually adds connection speed to basic result codes (e.g.
CONNECT 1200
X2 Usually adds dial tone detection (preventing blind dial, and
sometimes preventing AT0)
X3 Usually adds busy signal detection
X4 Usually adds both busy signal and dial tone detection
Z0 or Z Reset Reset modem to stored configuration. Use Z0, Z1 etc. for
ComCenter User’s Guide (release 040706) Page 164

Command Description Comments
multiple profiles. This is the same as &F for factory default on
modems without NVRAM (non-volatile memory)
ComCenter User’s Guide (release 040706) Page 165