Embed Size (px)
Citation preview

1
1
2
3
4
5
6
7
8
11
2
12
3
13
4
14
5
15
6
16
7
17
8
18
9
19
10
20
cm
inches
c o l o u r s o f c h r i s t m a s
BY CHRISTINE P. BISHOP
For colour photos and full details, see pages 60–69.
PRINTING GUIDELINES / PAGE SCALING
Print all pages at 100% (actual size). Choose “none”, not “shrink to fit” or “reduce to fit”,
in the print dialogue box. Refer to the measurements along each edge to ensure you
have printed correctly.
www.inspirationsstudios.comInspirations issue 112 · Copyright reserved ©2021 Inspirations Studios
This design is for private use only.
Permission to reproduce or copy any of the contents for any other purposes must be obtained from the publisher in writing. Inspiratons Publications has taken
reasonable steps to secure the copyright for the items reproduced in this publication. Articles are published in reliance upon the representations and warranties of the
contributors and without our knowledge of any infringement of any third party. Information and instructions given are presented in good faith. As we have no control
over physical conditions surrounding application of information contained in this project, the contributors and publisher disclaim any liability for untoward results.
THE WORLD'S MOST BEAUTIFUL NEEDLEWORK MAGAZINE ISSUE 112
EMBROIDERY DESIGNS · INSTRUCTIONS · PATTERNS
— 2 —
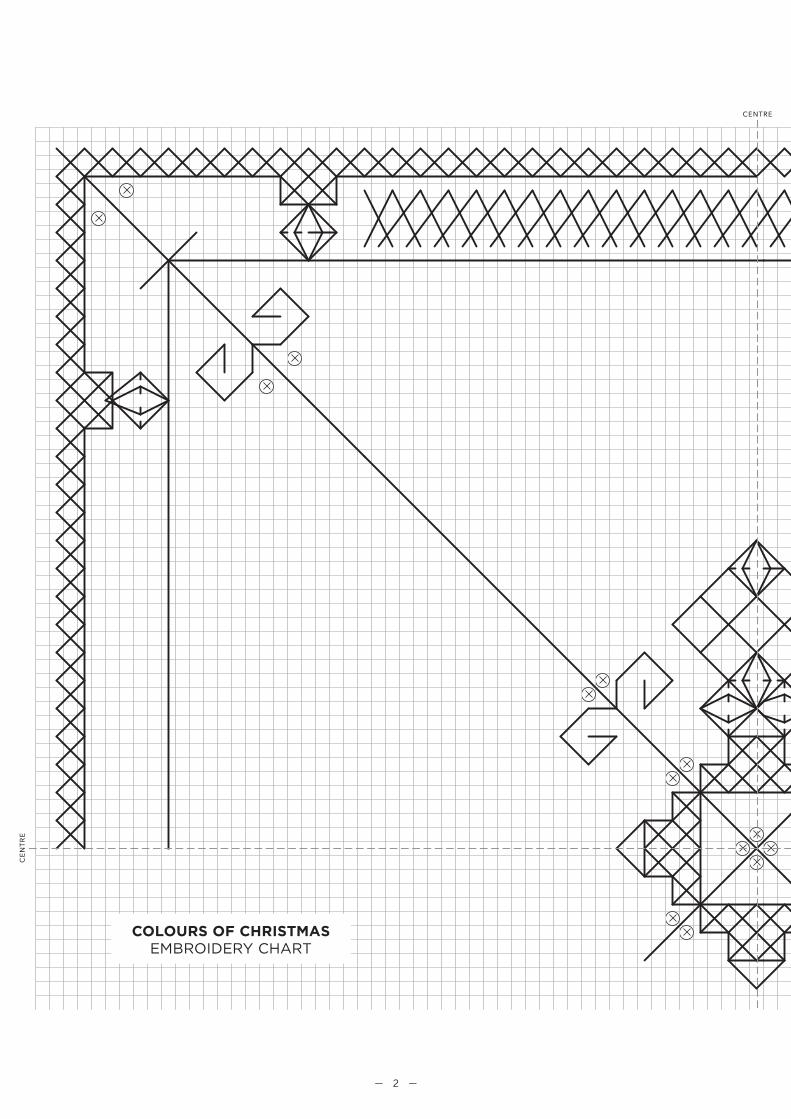
COLOURS OF CHRISTMASEMBROIDERY CHART
centre
centre
— 3 —
centre
— 4 —
I S S U E 1 1 2 · S H E E T 2
I S S U E 1 1 2 · S H E E T 2
COLOURS OF CHRISTMASBY CHR I ST INE P. B I SHOP O F AUSTRAL IA For colour photos and full details, see pages 58–67.
ROSE AND HONEYBEEBY MERR ILYN WHITTLE O F AUSTRAL IA For colour photos and full details, see pages 68–75.
BRIGHT BUTTERFLYBY NATAL IE DUPU I S O F CANADA For colour photos and full details, see pages 76–83.
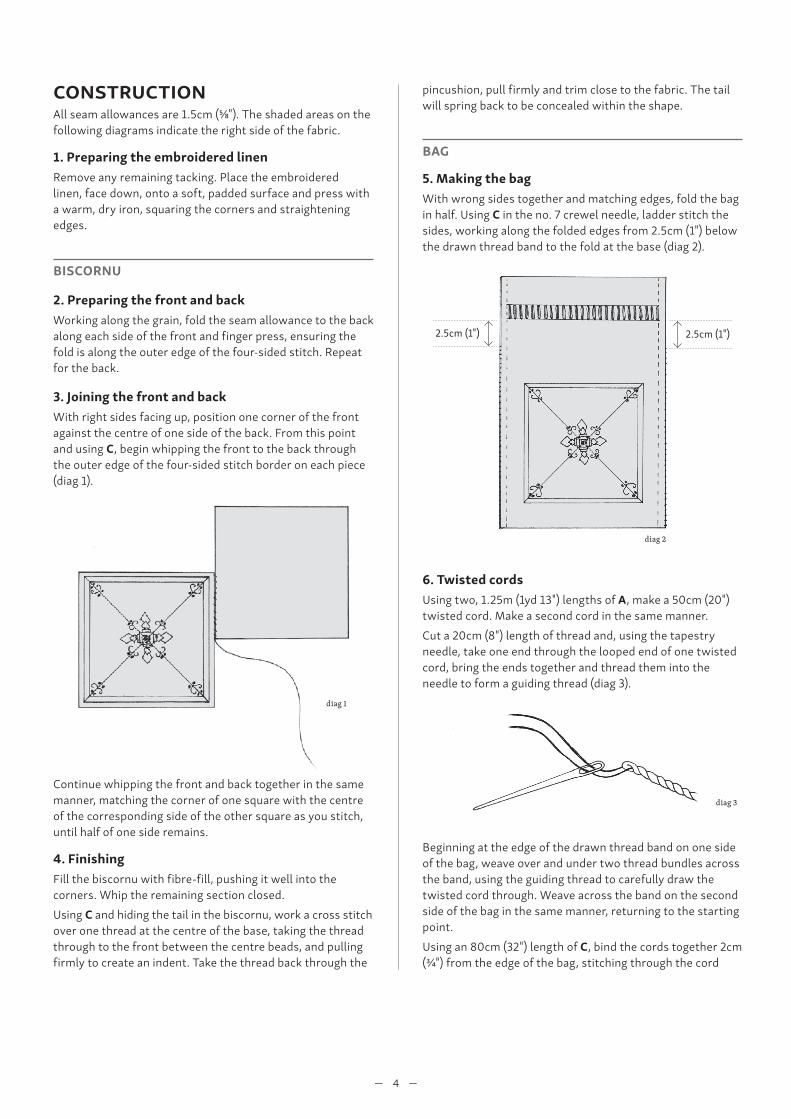
CONSTRUCTIONAll seam allowances are 1.5cm (⅝"). The shaded areas on the following diagrams indicate the right side of the fabric.
1. Preparing the embroidered linenRemove any remaining tacking. Place the embroidered linen, face down, onto a soft, padded surface and press with a warm, dry iron, squaring the corners and straightening edges.
BISCORNU
2. Preparing the front and backWorking along the grain, fold the seam allowance to the back along each side of the front and finger press, ensuring the fold is along the outer edge of the four-sided stitch. Repeat for the back.
3. Joining the front and backWith right sides facing up, position one corner of the front against the centre of one side of the back. From this point and using C, begin whipping the front to the back through the outer edge of the four-sided stitch border on each piece (diag 1).
diag 1
Continue whipping the front and back together in the same manner, matching the corner of one square with the centre of the corresponding side of the other square as you stitch, until half of one side remains.
4. FinishingFill the biscornu with fibre-fill, pushing it well into the corners. Whip the remaining section closed.Using C and hiding the tail in the biscornu, work a cross stitch over one thread at the centre of the base, taking the thread through to the front between the centre beads, and pulling firmly to create an indent. Take the thread back through the
CUTTING OUTWhere pattern pieces are not provided, cut the pieces according to the measurements below.MOTTLED CREAM COTTONNeedlebook lining: cut one, 10cm x 17cm wide (4" x 6 ¾")Scissor fob back: cut one, 6cm (2 ⅜") squareFUSIBLE INTERFACINGNeedlebook: cut two, each 8cm x 15cm wide (3 ⅛" x 5 ⅞")THIN FUSIBLE WADDINGNeedlebook: cut one, 8cm x 15cm wide (3 ⅛" x 5 ⅞")
CONSTRUCTIONAll seam allowances are 1cm (⅜") unless otherwise specified. The shaded areas on the following diagrams indicate the right side of the fabric.
1. Preparing the completed bead embroideryDo not remove the fabric from the hoop. Spray the wrong side of the bead embroidery with water and rub with your fingers to ensure that the moisture has penetrated all threads. Place, wrong side uppermost, in a sunny position or near a heater to dry. This will help settle the threads and fabric.
NEEDLEBOOK
2. Preparing the coverWorking from the wrong side, measure the beaded area. If necessary, trim the pieces of fusible interfacing and fusible wadding to fit. Put one piece of interfacing aside for the lining. Centre the remaining piece of interfacing over the wrong side of the beading and fuse in place. Fuse the wadding over the interfacing in the same manner (diag 1).
W A D D I N G
I N T E R F A C I N G
diag 1
CUTTING OUTCut the pieces according to the measurements below.MINERAL LINENHandles: cut two, each 12.5cm x 50cm wide (5" x 20")
CONSTRUCTIONAll seam allowances are 1cm (⅜"). The shaded areas on the following diagrams indicate the right side of the fabric.
1. Preparing the embroidered fabricRemove the embroidered linen and backing from the frame. Cut out along the tacked cutting lines. The layered fabrics are treated as one.
2. Preparing the bag and liningWith right sides together and matching edges, fold the embroidered fabric in half along the tacked centre line. Pin and stitch the side seams. Remove the tacking. Finger press the seams open and turn to the right side.With right sides together and matching raw edges, fold the lining fabric in half. Pin and stitch the side seams, leaving a 15cm (6") opening from the base along one side (diag 1).
diag 1
15cm (6")
Do not turn to the right side.
3. Preparing the handlesWith wrong sides together and matching raw edges, fold one handle strip in half along the length. Pin and stitch along the long edge only. Press the seam open and turn to the right side. Reposition the seam to the centre of one side and press (diag 2).
diag 2
Repeat with the remaining handle strip.
4. Attaching the handlesMeasure in 1cm (⅜") from the seam at each side of the bag back and mark with a pin. With right sides together and matching raw edges, pin each end of one handle in place so that the outer edge of the strap is aligned with the pin at each side (diag 3).
1cm (⅜")
1cm (⅜")
diag 3
Ensuring the strap is not twisted, tack each end in place just inside the stitchline and remove the pins.Repeat with the remaining handle on the bag front.
5. Assembling the bagWith right sides together, matching side seams and upper raw edges, slide the lining up over the bag, sandwiching the handles between the bag and lining. Pin and stitch the bag and lining together around the upper edge (diag 4).
diag 4
Turn the lining to the right side through the opening. Hand stitch the opening closed and push the lining down inside the bag until the seam is 5mm (3/16") below the upper edge. Press the upper edge carefully. Machine top stitch the upper edge 5mm (3/16") from the fold, stitching along the edge of the lining and through the bag handles.
and straightening edges. With wrong sides together, fold in half and weight with a book to set the shape. After a short while, remove the weight and leave the needlebook to dry.
SCISSOR FOB
6. Preparing the frontTrace the circle shaping onto tracing paper and cut out. Check the template against the wrong side of the beaded area and, if necessary, trim to fit. Using the template, cut two pieces of fusible interfacing and two pieces of fusible wadding. Set aside one piece of each for the back.Centre the front interfacing piece over the wrong side of the bead embroidery and fuse in place. Fuse the front wadding piece over the interfacing in the same manner. Leaving a 6mm (¼") seam allowance from the beaded outline, cut out the front (diag 3).
6mm (¼") seam allowance
diag 3
Using a doubled length of antique white sewing thread, work a line of gathering 2mm (1/16") from the beaded outline. Pull up the gathering threads, gathering the seam allowance over the wadding, and tie off securely (diag 4).
W A D D I N G
diag 4
7. Preparing the backCentre and fuse the back interfacing piece to the wrong side of the mottled cotton, followed by the back wadding piece. Leaving a 6mm (¼") seam allowance, cut out the back. Gather the seam allowance over the wadding in the same manner as the front.
8. Twisted cordUsing twelve, 78cm (31") lengths of A, make a 26cm (10¼") twisted cord. Fold the cord in half and, using A, bind the ends together above the knot, stitching through the cords several times to secure. Trim away the knot.
9. Attaching the front to the backUsing the antique white sewing thread, position 13mm (½") of the bound end of the twisted cord over the seam allowance of the front, checking it is aligned with the head of the bee. Hand stitch the cord in place.With wrong sides together, centre the back over the front. Using the antique white sewing thread, ladder stitch the back to the front as close as possible the beaded outline, ensuring the stitches are very small and leaving a 3cm (1 ½") opening. Do not finish the thread. Fill the fob with fibre-fill, taking care not to overfill, and insert the washer into the centre. Ladder stitch the opening closed.
10. FinishingUsing kitchen tongs, hold the scissor fob with the beading facing down over a pot of boiling water, keeping the beading in the steam for two to three minutes. Leave to dry. Using the twisted cord loop, attach the scissor fob to a pair of embroidery scissors.
CIRCLETEMPLATE
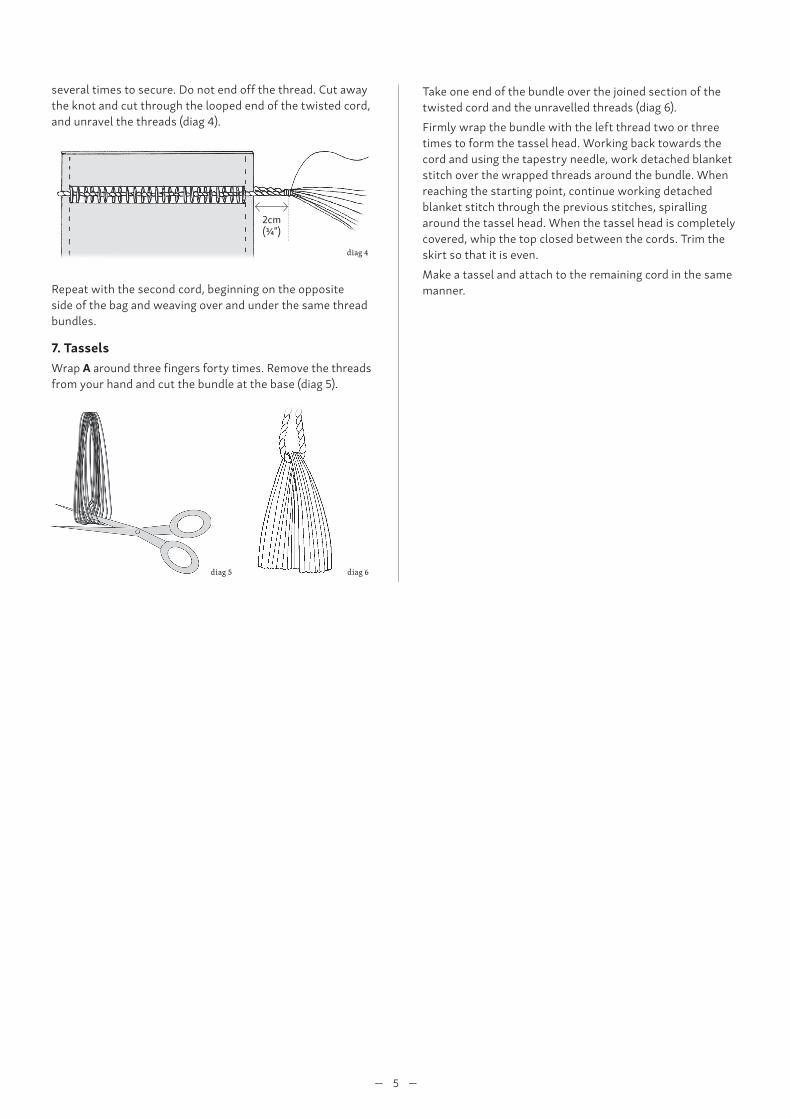
several times to secure. Do not end off the thread. Cut away the knot and cut through the looped end of the twisted cord, and unravel the threads (diag 4).
diag 4
2cm (¾")
Repeat with the second cord, beginning on the opposite side of the bag and weaving over and under the same thread bundles.
7. TasselsWrap A around three fingers forty times. Remove the threads from your hand and cut the bundle at the base (diag 5).
diag 5 diag 6
Take one end of the bundle over the joined section of the twisted cord and the unravelled threads (diag 6).Firmly wrap the bundle with the left thread two or three times to form the tassel head. Working back towards the cord and using the tapestry needle, work detached blanket stitch over the wrapped threads around the bundle. When reaching the starting point, continue working detached blanket stitch through the previous stitches, spiralling around the tassel head. When the tassel head is completely covered, whip the top closed between the cords. Trim the skirt so that it is even.Make a tassel and attach to the remaining cord in the same manner.
ISSUE 112MASTER COPYDO NOT CUT
Copyright Reserved © 2021Inspirations Studios
pincushion, pull firmly and trim close to the fabric. The tail will spring back to be concealed within the shape.
BAG
5. Making the bagWith wrong sides together and matching edges, fold the bag in half. Using C in the no. 7 crewel needle, ladder stitch the sides, working along the folded edges from 2.5cm (1") below the drawn thread band to the fold at the base (diag 2).
diag 2
2.5cm (1")2.5cm (1")
6. Twisted cordsUsing two, 1.25m (1yd 13") lengths of A, make a 50cm (20") twisted cord. Make a second cord in the same manner.Cut a 20cm (8") length of thread and, using the tapestry needle, take one end through the looped end of one twisted cord, bring the ends together and thread them into the needle to form a guiding thread (diag 3).
diag 3
Beginning at the edge of the drawn thread band on one side of the bag, weave over and under two thread bundles across the band, using the guiding thread to carefully draw the twisted cord through. Weave across the band on the second side of the bag in the same manner, returning to the starting point. Using an 80cm (32") length of C, bind the cords together 2cm (¾") from the edge of the bag, stitching through the cord
Prepare the scissor fob front in a similar manner following the instructions.Leaving a 1cm (⅜") seam allowance from the outline, cut out the beading. Fold in the seam allowance so that the beaded outline is along the fold and pin and tack in place. Remove the pins.
3. Preparing the liningTrim 1mm (1/32") from each long side and 2mm (1/16") from each short side of the lining interfacing. Using the piece of interfacing as a template, cut a rectangle from the wool flannel. Using the pinking shears, trim a further 2mm (1/16") from each long edge of the flannel, and a further 3mm (⅛") from each short edge.Centre the interfacing over the wrong side of the lining and fuse in place. Trim the seam allowance to 1cm (⅜"). Fold the seam allowances over the interfacing and tack in place.Centre the wool flannel over the right side of the lining. Pin and hand stitch in place along the centre with double running stitch or back stitch (diag 2).
W O O L F L A N N E L
diag 2
Remove the pins.
4. Attaching the cover to the liningWith wrong sides together and matching corners, centre the lining over the cover and pin place. Using a doubled length of antique white sewing thread and very short stitches, ladder stitch the short ends of the lining to the cover, working as close as possible to the beaded outline.On each long side, pin the centre of the lining to the centre of the cover. Divide each half in half again and pin, easing the cover to fit. Ladder stitch the long edges together in the same manner as the short edges. Remove the pins.
5. FinishingRemove any visible tacking. Using kitchen tongs, hold the needlebook with the beading facing down over a pot of boiling water, keeping the beading in the steam for four to five minutes. Allow to cool and adjust the shape if necessary, squaring corners
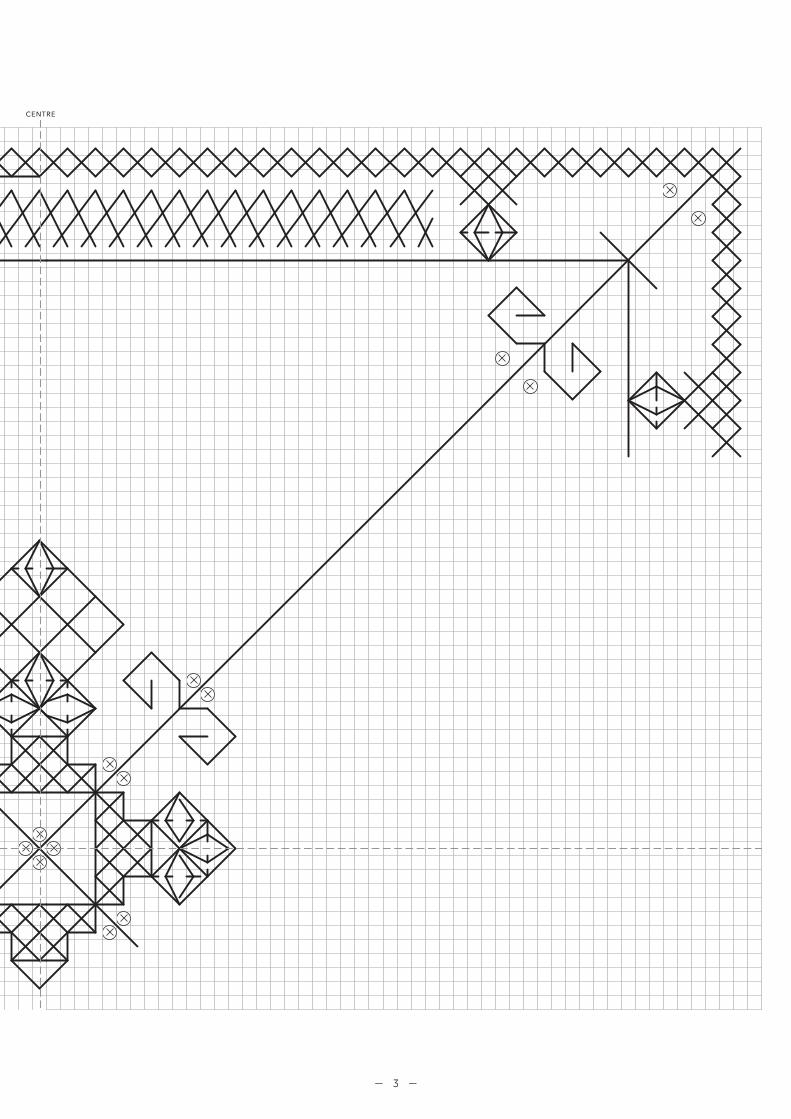
COLOURS OF CHRISTMASEMBROIDERY CHART
INVERMAY WILDFLOWERSBY AL I SON COLE O F AUSTRAL IA For colour photos and full details, see pages 40–49.
placement mark
placement mark
placement mark
placement mark
INVERMAY WILDFLOWERSEMBROIDERY DESIGN
INVERMAY WILDFLOWERSTEMPLATES
Hardenbergia Leaves
Dillwynia Petals Goodenia Leaves
Hardenbergia Petals
Goodenia Petals
upper
lower
centre
centre
— 5 —
I S S U E 1 1 2 · S H E E T 2
I S S U E 1 1 2 · S H E E T 2
COLOURS OF CHRISTMASBY CHR I ST INE P. B I SHOP O F AUSTRAL IA For colour photos and full details, see pages 58–67.
ROSE AND HONEYBEEBY MERR ILYN WHITTLE O F AUSTRAL IA For colour photos and full details, see pages 68–75.
BRIGHT BUTTERFLYBY NATAL IE DUPU I S O F CANADA For colour photos and full details, see pages 76–83.
CONSTRUCTIONAll seam allowances are 1.5cm (⅝"). The shaded areas on the following diagrams indicate the right side of the fabric.
1. Preparing the embroidered linenRemove any remaining tacking. Place the embroidered linen, face down, onto a soft, padded surface and press with a warm, dry iron, squaring the corners and straightening edges.
BISCORNU
2. Preparing the front and backWorking along the grain, fold the seam allowance to the back along each side of the front and finger press, ensuring the fold is along the outer edge of the four-sided stitch. Repeat for the back.
3. Joining the front and backWith right sides facing up, position one corner of the front against the centre of one side of the back. From this point and using C, begin whipping the front to the back through the outer edge of the four-sided stitch border on each piece (diag 1).
diag 1
Continue whipping the front and back together in the same manner, matching the corner of one square with the centre of the corresponding side of the other square as you stitch, until half of one side remains.
4. FinishingFill the biscornu with fibre-fill, pushing it well into the corners. Whip the remaining section closed.Using C and hiding the tail in the biscornu, work a cross stitch over one thread at the centre of the base, taking the thread through to the front between the centre beads, and pulling firmly to create an indent. Take the thread back through the
CUTTING OUTWhere pattern pieces are not provided, cut the pieces according to the measurements below.MOTTLED CREAM COTTONNeedlebook lining: cut one, 10cm x 17cm wide (4" x 6 ¾")Scissor fob back: cut one, 6cm (2 ⅜") squareFUSIBLE INTERFACINGNeedlebook: cut two, each 8cm x 15cm wide (3 ⅛" x 5 ⅞")THIN FUSIBLE WADDINGNeedlebook: cut one, 8cm x 15cm wide (3 ⅛" x 5 ⅞")
CONSTRUCTIONAll seam allowances are 1cm (⅜") unless otherwise specified. The shaded areas on the following diagrams indicate the right side of the fabric.
1. Preparing the completed bead embroideryDo not remove the fabric from the hoop. Spray the wrong side of the bead embroidery with water and rub with your fingers to ensure that the moisture has penetrated all threads. Place, wrong side uppermost, in a sunny position or near a heater to dry. This will help settle the threads and fabric.
NEEDLEBOOK
2. Preparing the coverWorking from the wrong side, measure the beaded area. If necessary, trim the pieces of fusible interfacing and fusible wadding to fit. Put one piece of interfacing aside for the lining. Centre the remaining piece of interfacing over the wrong side of the beading and fuse in place. Fuse the wadding over the interfacing in the same manner (diag 1).
W A D D I N G
I N T E R F A C I N G
diag 1
CUTTING OUTCut the pieces according to the measurements below.MINERAL LINENHandles: cut two, each 12.5cm x 50cm wide (5" x 20")
CONSTRUCTIONAll seam allowances are 1cm (⅜"). The shaded areas on the following diagrams indicate the right side of the fabric.
1. Preparing the embroidered fabricRemove the embroidered linen and backing from the frame. Cut out along the tacked cutting lines. The layered fabrics are treated as one.
2. Preparing the bag and liningWith right sides together and matching edges, fold the embroidered fabric in half along the tacked centre line. Pin and stitch the side seams. Remove the tacking. Finger press the seams open and turn to the right side.With right sides together and matching raw edges, fold the lining fabric in half. Pin and stitch the side seams, leaving a 15cm (6") opening from the base along one side (diag 1).
diag 1
15cm (6")
Do not turn to the right side.
3. Preparing the handlesWith wrong sides together and matching raw edges, fold one handle strip in half along the length. Pin and stitch along the long edge only. Press the seam open and turn to the right side. Reposition the seam to the centre of one side and press (diag 2).
diag 2
Repeat with the remaining handle strip.
4. Attaching the handlesMeasure in 1cm (⅜") from the seam at each side of the bag back and mark with a pin. With right sides together and matching raw edges, pin each end of one handle in place so that the outer edge of the strap is aligned with the pin at each side (diag 3).
1cm (⅜")
1cm (⅜")
diag 3
Ensuring the strap is not twisted, tack each end in place just inside the stitchline and remove the pins.Repeat with the remaining handle on the bag front.
5. Assembling the bagWith right sides together, matching side seams and upper raw edges, slide the lining up over the bag, sandwiching the handles between the bag and lining. Pin and stitch the bag and lining together around the upper edge (diag 4).
diag 4
Turn the lining to the right side through the opening. Hand stitch the opening closed and push the lining down inside the bag until the seam is 5mm (3/16") below the upper edge. Press the upper edge carefully. Machine top stitch the upper edge 5mm (3/16") from the fold, stitching along the edge of the lining and through the bag handles.
and straightening edges. With wrong sides together, fold in half and weight with a book to set the shape. After a short while, remove the weight and leave the needlebook to dry.
SCISSOR FOB
6. Preparing the frontTrace the circle shaping onto tracing paper and cut out. Check the template against the wrong side of the beaded area and, if necessary, trim to fit. Using the template, cut two pieces of fusible interfacing and two pieces of fusible wadding. Set aside one piece of each for the back.Centre the front interfacing piece over the wrong side of the bead embroidery and fuse in place. Fuse the front wadding piece over the interfacing in the same manner. Leaving a 6mm (¼") seam allowance from the beaded outline, cut out the front (diag 3).
6mm (¼") seam allowance
diag 3
Using a doubled length of antique white sewing thread, work a line of gathering 2mm (1/16") from the beaded outline. Pull up the gathering threads, gathering the seam allowance over the wadding, and tie off securely (diag 4).
W A D D I N G
diag 4
7. Preparing the backCentre and fuse the back interfacing piece to the wrong side of the mottled cotton, followed by the back wadding piece. Leaving a 6mm (¼") seam allowance, cut out the back. Gather the seam allowance over the wadding in the same manner as the front.
8. Twisted cordUsing twelve, 78cm (31") lengths of A, make a 26cm (10¼") twisted cord. Fold the cord in half and, using A, bind the ends together above the knot, stitching through the cords several times to secure. Trim away the knot.
9. Attaching the front to the backUsing the antique white sewing thread, position 13mm (½") of the bound end of the twisted cord over the seam allowance of the front, checking it is aligned with the head of the bee. Hand stitch the cord in place.With wrong sides together, centre the back over the front. Using the antique white sewing thread, ladder stitch the back to the front as close as possible the beaded outline, ensuring the stitches are very small and leaving a 3cm (1 ½") opening. Do not finish the thread. Fill the fob with fibre-fill, taking care not to overfill, and insert the washer into the centre. Ladder stitch the opening closed.
10. FinishingUsing kitchen tongs, hold the scissor fob with the beading facing down over a pot of boiling water, keeping the beading in the steam for two to three minutes. Leave to dry. Using the twisted cord loop, attach the scissor fob to a pair of embroidery scissors.
CIRCLETEMPLATE
several times to secure. Do not end off the thread. Cut away the knot and cut through the looped end of the twisted cord, and unravel the threads (diag 4).
diag 4
2cm (¾")
Repeat with the second cord, beginning on the opposite side of the bag and weaving over and under the same thread bundles.
7. TasselsWrap A around three fingers forty times. Remove the threads from your hand and cut the bundle at the base (diag 5).
diag 5 diag 6
Take one end of the bundle over the joined section of the twisted cord and the unravelled threads (diag 6).Firmly wrap the bundle with the left thread two or three times to form the tassel head. Working back towards the cord and using the tapestry needle, work detached blanket stitch over the wrapped threads around the bundle. When reaching the starting point, continue working detached blanket stitch through the previous stitches, spiralling around the tassel head. When the tassel head is completely covered, whip the top closed between the cords. Trim the skirt so that it is even.Make a tassel and attach to the remaining cord in the same manner.
ISSUE 112MASTER COPYDO NOT CUT
Copyright Reserved © 2021Inspirations Studios
pincushion, pull firmly and trim close to the fabric. The tail will spring back to be concealed within the shape.
BAG
5. Making the bagWith wrong sides together and matching edges, fold the bag in half. Using C in the no. 7 crewel needle, ladder stitch the sides, working along the folded edges from 2.5cm (1") below the drawn thread band to the fold at the base (diag 2).
diag 2
2.5cm (1")2.5cm (1")
6. Twisted cordsUsing two, 1.25m (1yd 13") lengths of A, make a 50cm (20") twisted cord. Make a second cord in the same manner.Cut a 20cm (8") length of thread and, using the tapestry needle, take one end through the looped end of one twisted cord, bring the ends together and thread them into the needle to form a guiding thread (diag 3).
diag 3
Beginning at the edge of the drawn thread band on one side of the bag, weave over and under two thread bundles across the band, using the guiding thread to carefully draw the twisted cord through. Weave across the band on the second side of the bag in the same manner, returning to the starting point. Using an 80cm (32") length of C, bind the cords together 2cm (¾") from the edge of the bag, stitching through the cord
Prepare the scissor fob front in a similar manner following the instructions.Leaving a 1cm (⅜") seam allowance from the outline, cut out the beading. Fold in the seam allowance so that the beaded outline is along the fold and pin and tack in place. Remove the pins.
3. Preparing the liningTrim 1mm (1/32") from each long side and 2mm (1/16") from each short side of the lining interfacing. Using the piece of interfacing as a template, cut a rectangle from the wool flannel. Using the pinking shears, trim a further 2mm (1/16") from each long edge of the flannel, and a further 3mm (⅛") from each short edge.Centre the interfacing over the wrong side of the lining and fuse in place. Trim the seam allowance to 1cm (⅜"). Fold the seam allowances over the interfacing and tack in place.Centre the wool flannel over the right side of the lining. Pin and hand stitch in place along the centre with double running stitch or back stitch (diag 2).
W O O L F L A N N E L
diag 2
Remove the pins.
4. Attaching the cover to the liningWith wrong sides together and matching corners, centre the lining over the cover and pin place. Using a doubled length of antique white sewing thread and very short stitches, ladder stitch the short ends of the lining to the cover, working as close as possible to the beaded outline.On each long side, pin the centre of the lining to the centre of the cover. Divide each half in half again and pin, easing the cover to fit. Ladder stitch the long edges together in the same manner as the short edges. Remove the pins.
5. FinishingRemove any visible tacking. Using kitchen tongs, hold the needlebook with the beading facing down over a pot of boiling water, keeping the beading in the steam for four to five minutes. Allow to cool and adjust the shape if necessary, squaring corners
COLOURS OF CHRISTMASEMBROIDERY CHART
INVERMAY WILDFLOWERSBY AL I SON COLE O F AUSTRAL IA For colour photos and full details, see pages 40–49.
placement mark
placement mark
placement mark
placement mark
INVERMAY WILDFLOWERSEMBROIDERY DESIGN
INVERMAY WILDFLOWERSTEMPLATES
Hardenbergia Leaves
Dillwynia Petals Goodenia Leaves
Hardenbergia Petals
Goodenia Petals
upper
lower
centre
centre
I S S U E 1 1 2 · S H E E T 2
I S S U E 1 1 2 · S H E E T 2
COLOURS OF CHRISTMASBY CHR I ST INE P. B I SHOP O F AUSTRAL IA For colour photos and full details, see pages 58–67.
ROSE AND HONEYBEEBY MERR ILYN WHITTLE O F AUSTRAL IA For colour photos and full details, see pages 68–75.
BRIGHT BUTTERFLYBY NATAL IE DUPU I S O F CANADA For colour photos and full details, see pages 76–83.
CONSTRUCTIONAll seam allowances are 1.5cm (⅝"). The shaded areas on the following diagrams indicate the right side of the fabric.
1. Preparing the embroidered linenRemove any remaining tacking. Place the embroidered linen, face down, onto a soft, padded surface and press with a warm, dry iron, squaring the corners and straightening edges.
BISCORNU
2. Preparing the front and backWorking along the grain, fold the seam allowance to the back along each side of the front and finger press, ensuring the fold is along the outer edge of the four-sided stitch. Repeat for the back.
3. Joining the front and backWith right sides facing up, position one corner of the front against the centre of one side of the back. From this point and using C, begin whipping the front to the back through the outer edge of the four-sided stitch border on each piece (diag 1).
diag 1
Continue whipping the front and back together in the same manner, matching the corner of one square with the centre of the corresponding side of the other square as you stitch, until half of one side remains.
4. FinishingFill the biscornu with fibre-fill, pushing it well into the corners. Whip the remaining section closed.Using C and hiding the tail in the biscornu, work a cross stitch over one thread at the centre of the base, taking the thread through to the front between the centre beads, and pulling firmly to create an indent. Take the thread back through the
CUTTING OUTWhere pattern pieces are not provided, cut the pieces according to the measurements below.MOTTLED CREAM COTTONNeedlebook lining: cut one, 10cm x 17cm wide (4" x 6 ¾")Scissor fob back: cut one, 6cm (2 ⅜") squareFUSIBLE INTERFACINGNeedlebook: cut two, each 8cm x 15cm wide (3 ⅛" x 5 ⅞")THIN FUSIBLE WADDINGNeedlebook: cut one, 8cm x 15cm wide (3 ⅛" x 5 ⅞")
CONSTRUCTIONAll seam allowances are 1cm (⅜") unless otherwise specified. The shaded areas on the following diagrams indicate the right side of the fabric.
1. Preparing the completed bead embroideryDo not remove the fabric from the hoop. Spray the wrong side of the bead embroidery with water and rub with your fingers to ensure that the moisture has penetrated all threads. Place, wrong side uppermost, in a sunny position or near a heater to dry. This will help settle the threads and fabric.
NEEDLEBOOK
2. Preparing the coverWorking from the wrong side, measure the beaded area. If necessary, trim the pieces of fusible interfacing and fusible wadding to fit. Put one piece of interfacing aside for the lining. Centre the remaining piece of interfacing over the wrong side of the beading and fuse in place. Fuse the wadding over the interfacing in the same manner (diag 1).
W A D D I N G
I N T E R F A C I N G
diag 1
CUTTING OUTCut the pieces according to the measurements below.MINERAL LINENHandles: cut two, each 12.5cm x 50cm wide (5" x 20")
CONSTRUCTIONAll seam allowances are 1cm (⅜"). The shaded areas on the following diagrams indicate the right side of the fabric.
1. Preparing the embroidered fabricRemove the embroidered linen and backing from the frame. Cut out along the tacked cutting lines. The layered fabrics are treated as one.
2. Preparing the bag and liningWith right sides together and matching edges, fold the embroidered fabric in half along the tacked centre line. Pin and stitch the side seams. Remove the tacking. Finger press the seams open and turn to the right side.With right sides together and matching raw edges, fold the lining fabric in half. Pin and stitch the side seams, leaving a 15cm (6") opening from the base along one side (diag 1).
diag 1
15cm (6")
Do not turn to the right side.
3. Preparing the handlesWith wrong sides together and matching raw edges, fold one handle strip in half along the length. Pin and stitch along the long edge only. Press the seam open and turn to the right side. Reposition the seam to the centre of one side and press (diag 2).
diag 2
Repeat with the remaining handle strip.
4. Attaching the handlesMeasure in 1cm (⅜") from the seam at each side of the bag back and mark with a pin. With right sides together and matching raw edges, pin each end of one handle in place so that the outer edge of the strap is aligned with the pin at each side (diag 3).
1cm (⅜")
1cm (⅜")
diag 3
Ensuring the strap is not twisted, tack each end in place just inside the stitchline and remove the pins.Repeat with the remaining handle on the bag front.
5. Assembling the bagWith right sides together, matching side seams and upper raw edges, slide the lining up over the bag, sandwiching the handles between the bag and lining. Pin and stitch the bag and lining together around the upper edge (diag 4).
diag 4
Turn the lining to the right side through the opening. Hand stitch the opening closed and push the lining down inside the bag until the seam is 5mm (3/16") below the upper edge. Press the upper edge carefully. Machine top stitch the upper edge 5mm (3/16") from the fold, stitching along the edge of the lining and through the bag handles.
and straightening edges. With wrong sides together, fold in half and weight with a book to set the shape. After a short while, remove the weight and leave the needlebook to dry.
SCISSOR FOB
6. Preparing the frontTrace the circle shaping onto tracing paper and cut out. Check the template against the wrong side of the beaded area and, if necessary, trim to fit. Using the template, cut two pieces of fusible interfacing and two pieces of fusible wadding. Set aside one piece of each for the back.Centre the front interfacing piece over the wrong side of the bead embroidery and fuse in place. Fuse the front wadding piece over the interfacing in the same manner. Leaving a 6mm (¼") seam allowance from the beaded outline, cut out the front (diag 3).
6mm (¼") seam allowance
diag 3
Using a doubled length of antique white sewing thread, work a line of gathering 2mm (1/16") from the beaded outline. Pull up the gathering threads, gathering the seam allowance over the wadding, and tie off securely (diag 4).
W A D D I N G
diag 4
7. Preparing the backCentre and fuse the back interfacing piece to the wrong side of the mottled cotton, followed by the back wadding piece. Leaving a 6mm (¼") seam allowance, cut out the back. Gather the seam allowance over the wadding in the same manner as the front.
8. Twisted cordUsing twelve, 78cm (31") lengths of A, make a 26cm (10¼") twisted cord. Fold the cord in half and, using A, bind the ends together above the knot, stitching through the cords several times to secure. Trim away the knot.
9. Attaching the front to the backUsing the antique white sewing thread, position 13mm (½") of the bound end of the twisted cord over the seam allowance of the front, checking it is aligned with the head of the bee. Hand stitch the cord in place.With wrong sides together, centre the back over the front. Using the antique white sewing thread, ladder stitch the back to the front as close as possible the beaded outline, ensuring the stitches are very small and leaving a 3cm (1 ½") opening. Do not finish the thread. Fill the fob with fibre-fill, taking care not to overfill, and insert the washer into the centre. Ladder stitch the opening closed.
10. FinishingUsing kitchen tongs, hold the scissor fob with the beading facing down over a pot of boiling water, keeping the beading in the steam for two to three minutes. Leave to dry. Using the twisted cord loop, attach the scissor fob to a pair of embroidery scissors.
CIRCLETEMPLATE
several times to secure. Do not end off the thread. Cut away the knot and cut through the looped end of the twisted cord, and unravel the threads (diag 4).
diag 4
2cm (¾")
Repeat with the second cord, beginning on the opposite side of the bag and weaving over and under the same thread bundles.
7. TasselsWrap A around three fingers forty times. Remove the threads from your hand and cut the bundle at the base (diag 5).
diag 5 diag 6
Take one end of the bundle over the joined section of the twisted cord and the unravelled threads (diag 6).Firmly wrap the bundle with the left thread two or three times to form the tassel head. Working back towards the cord and using the tapestry needle, work detached blanket stitch over the wrapped threads around the bundle. When reaching the starting point, continue working detached blanket stitch through the previous stitches, spiralling around the tassel head. When the tassel head is completely covered, whip the top closed between the cords. Trim the skirt so that it is even.Make a tassel and attach to the remaining cord in the same manner.
ISSUE 112MASTER COPYDO NOT CUT
Copyright Reserved © 2021Inspirations Studios
pincushion, pull firmly and trim close to the fabric. The tail will spring back to be concealed within the shape.
BAG
5. Making the bagWith wrong sides together and matching edges, fold the bag in half. Using C in the no. 7 crewel needle, ladder stitch the sides, working along the folded edges from 2.5cm (1") below the drawn thread band to the fold at the base (diag 2).
diag 2
2.5cm (1")2.5cm (1")
6. Twisted cordsUsing two, 1.25m (1yd 13") lengths of A, make a 50cm (20") twisted cord. Make a second cord in the same manner.Cut a 20cm (8") length of thread and, using the tapestry needle, take one end through the looped end of one twisted cord, bring the ends together and thread them into the needle to form a guiding thread (diag 3).
diag 3
Beginning at the edge of the drawn thread band on one side of the bag, weave over and under two thread bundles across the band, using the guiding thread to carefully draw the twisted cord through. Weave across the band on the second side of the bag in the same manner, returning to the starting point. Using an 80cm (32") length of C, bind the cords together 2cm (¾") from the edge of the bag, stitching through the cord
Prepare the scissor fob front in a similar manner following the instructions.Leaving a 1cm (⅜") seam allowance from the outline, cut out the beading. Fold in the seam allowance so that the beaded outline is along the fold and pin and tack in place. Remove the pins.
3. Preparing the liningTrim 1mm (1/32") from each long side and 2mm (1/16") from each short side of the lining interfacing. Using the piece of interfacing as a template, cut a rectangle from the wool flannel. Using the pinking shears, trim a further 2mm (1/16") from each long edge of the flannel, and a further 3mm (⅛") from each short edge.Centre the interfacing over the wrong side of the lining and fuse in place. Trim the seam allowance to 1cm (⅜"). Fold the seam allowances over the interfacing and tack in place.Centre the wool flannel over the right side of the lining. Pin and hand stitch in place along the centre with double running stitch or back stitch (diag 2).
W O O L F L A N N E L
diag 2
Remove the pins.
4. Attaching the cover to the liningWith wrong sides together and matching corners, centre the lining over the cover and pin place. Using a doubled length of antique white sewing thread and very short stitches, ladder stitch the short ends of the lining to the cover, working as close as possible to the beaded outline.On each long side, pin the centre of the lining to the centre of the cover. Divide each half in half again and pin, easing the cover to fit. Ladder stitch the long edges together in the same manner as the short edges. Remove the pins.
5. FinishingRemove any visible tacking. Using kitchen tongs, hold the needlebook with the beading facing down over a pot of boiling water, keeping the beading in the steam for four to five minutes. Allow to cool and adjust the shape if necessary, squaring corners
COLOURS OF CHRISTMASEMBROIDERY CHART
INVERMAY WILDFLOWERSBY AL I SON COLE O F AUSTRAL IA For colour photos and full details, see pages 40–49.
placement mark
placement mark
placement mark
placement mark
INVERMAY WILDFLOWERSEMBROIDERY DESIGN
INVERMAY WILDFLOWERSTEMPLATES
Hardenbergia Leaves
Dillwynia Petals Goodenia Leaves
Hardenbergia Petals
Goodenia Petals
upper
lower
centre
centre


![Les couleurs [Colours] *All the wonderful colours of our country !!!* =>](https://img.pdfslide.us/doc/110x75/56649d775503460f94a595e6/les-couleurs-colours-all-the-wonderful-colours-of-our-country-.jpg)