Embed Size (px)
Citation preview
Quick ReferenceMicrosoft® Windows® 7
© 2013 Digital Content Factory Ltd. for UCSF Medical Center. Microsoft® and Windows® are registered trademarks of Microsoft Corporation. 1
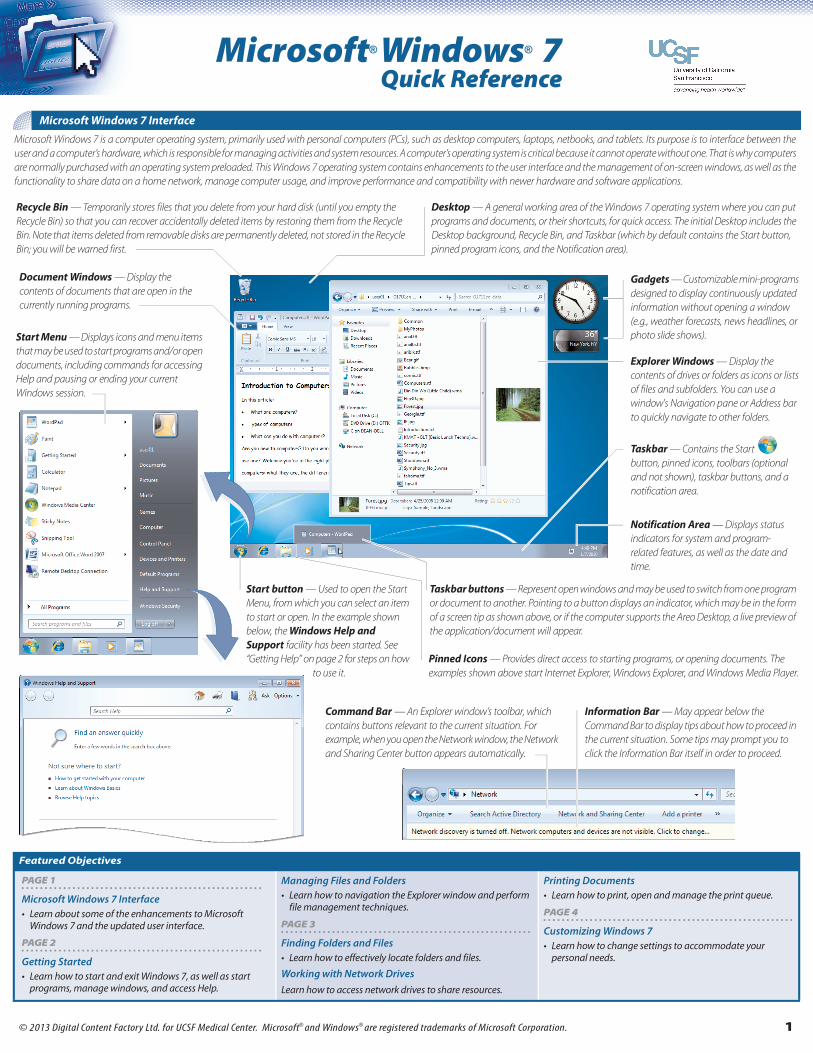
Microsoft Windows 7 Interface
Desktop — A general working area of the Windows 7 operating system where you can put programs and documents, or their shortcuts, for quick access. The initial Desktop includes the Desktop background, Recycle Bin, and Taskbar (which by default contains the Start button, pinned program icons, and the Notification area).
Start Menu — Displays icons and menu items that may be used to start programs and/or open documents, including commands for accessing Help and pausing or ending your current Windows session.
Explorer Windows — Display the contents of drives or folders as icons or lists of files and subfolders. You can use a window's Navigation pane or Address bar to quickly navigate to other folders.
Gadgets — Customizable mini-programs designed to display continuously updated information without opening a window (e.g., weather forecasts, news headlines, or photo slide shows).
Taskbar buttons — Represent open windows and may be used to switch from one program or document to another. Pointing to a button displays an indicator, which may be in the form of a screen tip as shown above, or if the computer supports the Areo Desktop, a live preview of the application/document will appear.
Document Windows — Display the contents of documents that are open in the currently running programs.
Recycle Bin — Temporarily stores files that you delete from your hard disk (until you empty the Recycle Bin) so that you can recover accidentally deleted items by restoring them from the Recycle Bin. Note that items deleted from removable disks are permanently deleted, not stored in the Recycle Bin; you will be warned first.
Pinned Icons — Provides direct access to starting programs, or opening documents. The examples shown above start Internet Explorer, Windows Explorer, and Windows Media Player.
Notification Area — Displays status indicators for system and program-related features, as well as the date and time.
Command Bar — An Explorer window’s toolbar, which contains buttons relevant to the current situation. For example, when you open the Network window, the Network and Sharing Center button appears automatically.
Information Bar — May appear below the Command Bar to display tips about how to proceed in the current situation. Some tips may prompt you to click the Information Bar itself in order to proceed.
Taskbar — Contains the Start button, pinned icons, toolbars (optional and not shown), taskbar buttons, and a notification area.
Start button — Used to open the Start Menu, from which you can select an item to start or open. In the example shown below, the Windows Help and Support facility has been started. See “Getting Help” on page 2 for steps on how
to use it.
Microsoft Windows 7 is a computer operating system, primarily used with personal computers (PCs), such as desktop computers, laptops, netbooks, and tablets. Its purpose is to interface between the user and a computer’s hardware, which is responsible for managing activities and system resources. A computer’s operating system is critical because it cannot operate without one. That is why computers are normally purchased with an operating system preloaded. This Windows 7 operating system contains enhancements to the user interface and the management of on-screen windows, as well as the functionality to share data on a home network, manage computer usage, and improve performance and compatibility with newer hardware and software applications.
Featured Objectives
PAGE 1
Microsoft Windows 7 Interface• Learn about some of the enhancements to Microsoft
Windows 7 and the updated user interface.
PAGE 2
Getting Started• Learn how to start and exit Windows 7, as well as start
programs, manage windows, and access Help.
Managing Files and Folders• Learn how to navigation the Explorer window and perform
file management techniques.
PAGE 3
Finding Folders and Files• Learn how to effectively locate folders and files.
Working with Network DrivesLearn how to access network drives to share resources.
Printing Documents• Learn how to print, open and manage the print queue.
PAGE 4
Customizing Windows 7• Learn how to change settings to accommodate your
personal needs.
Microsoft® Windows® 7 – Quick Reference
® ®
Starting and Ending Windows 7 Sessions1.Turn your computer on.2.Click the user name associated with the account to
which you wish to log in. – OR –
If the user name you wish to use is not listed, click Other User and type the user name.Note: If your computer is part of a domain, and you wish to log on to a local user account, you must type the name of your computer, followed by a backslash (\), prior to the user name. For example: computer name\user name. To obtain the computer name, click the Start button, right-click Computer, and then select Properties.
3.Type the password, and press ENTER.• To end your Windows
session, click the Start button, and then click Shut down. Click the button to access other options that are available depending on system configuration:– Switch User switches users without closing
programs.– Log Off closes programs and logs off.– Lock suspends the use of the computer with
password protection (the user’s or administrator’s password.)
– Restart closes programs, shuts down Windows, then starts Windows again.
– Sleep keeps the session in memory and puts the computer in a low-power state to allow you to quickly resume working.
– Hibernate saves the session to disk and turns off the computer to allow you to resume working where you left off.
Starting Programs1.Click the Start button and select the desired
program icon.2. If the program icon is not located directly in the
Start Menu, point to the required group to locate the desired program icon and click it.
– OR –Click the Start button and begin typing the name of the program in the Search box until the desired program appears in the results list. Then click the desired program.
Arranging Windows1.Right-click an empty area of the Taskbar (next to
the Start button if the Taskbar is full) and select the desired arrangement.– Cascade windows overlaps open windows
starting at the top-left corner of the screen, with each window the same size.
– Show windows stacked resizes and arranges open windows to fill the screen, with each window as wide as possible without overlapping or being too narrow.
– Show windows side by side resizes and arranges open windows to fill the screen, with each window as tall as possible without overlapping or being too narrow.
– Show the desktop minimizes open windows.Note: Once one of the above has been selected, the Undo command becomes available to return the windows to the previous arrangement.
– OR –To compare two windows only side by side using the
Snap feature, drag the title bar of one of the windows to one side of the screen until you see an outline appear that indicates the window shape, and release the mouse button. Repeat this step with the other window, on the opposite side of the screen.
Switching Windows Using the Keyboard1.Hold down the ALT key and press TAB repeatedly to
cycle through a list of open windows. Release the ALT key to switch to the highlighted window.
– OR –Press ALT+ESC to activate the next window. If the window is currently minimized, press ENTER to restore it.
Opening Documents Using Jump Lists1.Click the Start button, and then point to the icon of
the program that was used to create the document to be opened.
2.Click the name of the document to be opened.– OR –
1.Right-click the icon of the program used to create the document to be opened from the Taskbar.Note: This step will work if the application is open, or if the application has been pinned to the Taskbar.
2.Click the name of the document to be opened.• To pin an item to a Jump List, point to the
desired item, and then click the Pin to this list icon.
• To unpin an item from a Jump List, point to the desired item, and then click the Unpin from this list icon.
Getting Help1.Select Start >Help and Support.
– OR –Press F1.
2.Type a word or phrase describing the desired topic in the Search Help box and press ENTER.
– OR –Click the Browse Help button, then click a desired item in the subject heading list.
Folders and Libraries OverviewComputer data is stored and organized in folders on a computer drive(s). Windows 7 also includes Libraries, which are virtual locations where the files from multiple folders may be displayed together in one place. For example, the Pictures library may be used to display picture and image files from different folders on the drive. Specifically, the My Pictures folder and the Public Pictures folder are included by default in the Pictures library, but other folders can be added as desired.Opening Explorer Windows1.Click the Start button.2.Select the desired folder or library from the list
below:• Name (where name is the user name logged in)
to open the personal folder for that user.• Documents to open the Document library from
which Word, Excel, PowerPoint, and other documents may be displayed. The My Documents folder and the Public Documents folder are included by default.
• Pictures to open the Pictures library from which various picture and image files may be displayed.
• Music to open the Music library from which various music and audio files may be displayed. The My Music folder and the Public Music folder are included by default.Note: Other libraries may be available.
• Computer to display the hard disk drives, and removable storage devices available.
3. If required, to display the contents of a subfolder or a disk drive listed in an Explorer Window, double-click its name or icon.
Selecting Files and Folders1.Open the desired Explorer window.2.To select an individual file or folder, click on the file
or folder. – OR –
To select a consecutive group of files or folders, click on the first file or folder in the group to select it. Then hold down the SHIFT key and click the last item in the group that you want to select.
– OR –To select nonconsecutive files or folders, click on any file or folder in the group to select it, then hold down the CTRL key and click each additional item you want to select.
Changing Views 1.With an Explorer window open, click the Change your
view - More options button on the Command Bar and select the desired view.
• Extra Large, Large, Medium, and Small Icons (specified icon with file name)
• List (small icon with file name)• Details (small icon with information)
To change which details are displayed, right-click the heading area and select/deselect the desired columns.
• Tiles (medium icon with information)• Content (small icon with a sample of content)
Using the Navigation Pane• To toggle the display of the Navigation pane,
select Organize >Layout >Navigation Pane in the Command Bar.Note: The Navigation pane consists of four sections: Favorites, Libraries, Computer, and Network.
• To expand a folder or library in the Navigation pane to show subfolders, double-click the folder or click the folder's triangular Expand button.
• To collapse a folder or library in the Navigation pane to hide subfolders, double-click the folder or click the folder's triangular Collapse button.
• To open a folder or library in the Navigation pane, click its icon.
Managing Navigation Pane Favorites• To create a link in Favorites, drag the desired
folder into the Favorites section where you want it to appear, then release the mouse button when you see Create link in Favorites.
• To rearrange the Favorite Links list, drag the links to the desired position.
– OR –To sort the list alphabetically, right-click Favorites and select Sort by name.
• To rename links in the Favorites section, right-click the item and click Rename. Type the new name and press ENTER.
• To remove a link from the Favorites section, right-click the link and select Remove.
Managing Files and Folders
Getting Started Getting Started... cont’d Managing Files and Folders... cont’d
2 © 2013 Digital Content Factory Ltd. for UCSF Medical Center. Microsoft and Windows are registered trademarks of Microsoft Corporation.
Microsoft® Windows® 7 – Quick Reference
All r
ight
s res
erve
d. N
o pa
rt of
this
prod
uct m
ay b
e rep
rodu
ced,
stor
ed in
, intro
duce
d in
to a
retri
eval
syst
em, o
r tra
nsm
itted
, in a
ny fo
rm o
r by a
ny m
eans
with
out t
he p
rior w
ritte
n pe
rmiss
ion
of D
igita
l Con
tent
Fact
ory L
td. T
he in
form
atio
n in
this
prod
uct i
s dist
ribut
ed w
ithou
t war
rant
ies.
Whi
le ev
ery p
reca
utio
n ha
s bee
n ta
ken
in th
e pre
para
tion
of th
is pr
oduc
t, D
igita
l Con
tent
® ®
Fact
ory L
td. s
hall n
ot h
ave
any l
iabi
lity t
o an
y per
son
or en
tity w
ith re
spec
t to
liabi
lity,
loss
, or d
amag
e cau
sed
or a
llege
d to
be
caus
ed d
irect
ly o
r ind
irect
ly b
y the
inst
ruct
ions
cont
aine
d in
this
prod
uct.
All n
ames
of p
eopl
e or
com
pani
es u
sed
in th
is pr
oduc
t are
fict
itiou
s unl
ess o
ther
wise
not
ed. A
ny si
mila
ritie
s to
real
per
sons
or c
ompa
nies
are
pur
ely c
oinc
iden
tal. Navigating Using the Address Bar
1.With an Explorer Window open, click a triangle to the right of a folder or library name, and click a subfolder name in the resulting drop-down list to open that subfolder.
– OR –Click in the empty area of the Address Bar, type the name of a folder, and press ENTER to open that folder.
– OR –Click the Back or Forward button to the left of the Address Bar to retrace your path.
Creating Folders and Libraries1.Navigate to the location where the folder or library
is to be created.2.To create a new folder, click the New folder button
on the Command Bar. – OR –
To create a new library, click the New library button on the Command Bar.
3.Type the desired name and press ENTER.
Adding and Removing Library Folders1.With the library to which a folder is to be added or
removed open, click the # locations link in the Library pane, where # is the current number of folders included.
2.To add a folder, click the Add button, navigate to and select the desired folder, and then click the Include folder button.
– OR –3.To remove a folder, select the desired folder, and
then click the Remove button.4.Click OK.
Changing the Sort Order in Explorer Windows1.To change the sort order of folders, libraries, and
files in an Explorer window, click the desired file list heading to sort by that property
• Clicking the heading again reverses the order.
Renaming Folders, Libraries, and Files1.Click a folder, library, or file, pause for a second or
two, then click the name. – OR –
Right-click a folder, library, or file, and select Rename.
2.Type the new name and press ENTER.
Copying/Moving Folders and Files1.Select one or more folders or files.2.Select Edit >Copy to copy the selected item(s).
– OR –Select Edit >Cut to move the selected item(s).
3.Open the destination folder and select Edit >Paste to paste the item(s) in the new location.Note: You can also copy or move folders or files by dragging and dropping. If you press and hold the right mouse button while dragging, a menu appears that lets you choose a specific action, such as copying or moving.
Deleting Folders, Libraries, and Files1.Select one or more of the items to be deleted.2.Select Organize >Delete on the Command Bar.
– OR –Press DELETE.
3.Select Yes to confirm moving the item(s) to the Recycle Bin.
Restoring Folders, Libraries, and Files1.Double-click the Recycle Bin on the Desktop to
open it.2.Right-click desired items in the Recycle Bin and
select Restore.Note: Windows recreates missing folders when restoring files.
Emptying the Recycle Bin1.Right-click the Recycle Bin and select Empty
Recycle Bin. 2.Click Yes to confirm deleting the contents of the
Recycle Bin, if prompted.Note: To change Recycle Bin options, right-click the Recycle Bin and select Properties.
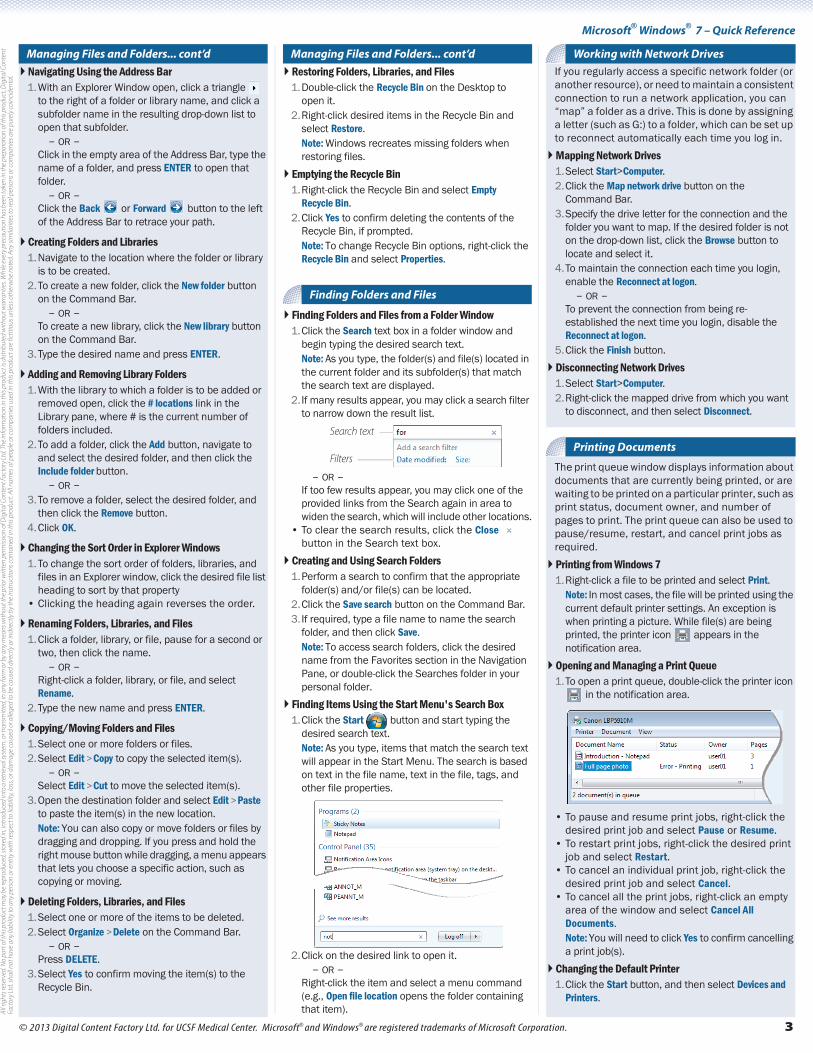
Finding Folders and Files from a Folder Window1.Click the Search text box in a folder window and
begin typing the desired search text.Note: As you type, the folder(s) and file(s) located in the current folder and its subfolder(s) that match the search text are displayed.
2. If many results appear, you may click a search filter to narrow down the result list.
– OR –If too few results appear, you may click one of the provided links from the Search again in area to widen the search, which will include other locations.
• To clear the search results, click the Close button in the Search text box.
Creating and Using Search Folders1.Perform a search to confirm that the appropriate
folder(s) and/or file(s) can be located.2.Click the Save search button on the Command Bar.3. If required, type a file name to name the search
folder, and then click Save.Note: To access search folders, click the desired name from the Favorites section in the Navigation Pane, or double-click the Searches folder in your personal folder.
Finding Items Using the Start Menu's Search Box1.Click the Start button and start typing the
desired search text. Note: As you type, items that match the search text will appear in the Start Menu. The search is based on text in the file name, text in the file, tags, and other file properties.
2.Click on the desired link to open it. – OR –
Right-click the item and select a menu command (e.g., Open file location opens the folder containing that item).
If you regularly access a specific network folder (or another resource), or need to maintain a consistent connection to run a network application, you can “map” a folder as a drive. This is done by assigning a letter (such as G:) to a folder, which can be set up to reconnect automatically each time you log in.Mapping Network Drives1.Select Start>Computer.2.Click the Map network drive button on the
Command Bar.3.Specify the drive letter for the connection and the
folder you want to map. If the desired folder is not on the drop-down list, click the Browse button to locate and select it.
4.To maintain the connection each time you login, enable the Reconnect at logon.
– OR –To prevent the connection from being re-established the next time you login, disable the Reconnect at logon.
5.Click the Finish button.Disconnecting Network Drives1.Select Start>Computer.2.Right-click the mapped drive from which you want
to disconnect, and then select Disconnect.
The print queue window displays information about documents that are currently being printed, or are waiting to be printed on a particular printer, such as print status, document owner, and number of pages to print. The print queue can also be used to pause/resume, restart, and cancel print jobs as required.Printing from Windows 71.Right-click a file to be printed and select Print.
Note: In most cases, the file will be printed using the current default printer settings. An exception is when printing a picture. While file(s) are being printed, the printer icon appears in the notification area.
Opening and Managing a Print Queue1.To open a print queue, double-click the printer icon
in the notification area.
• To pause and resume print jobs, right-click the desired print job and select Pause or Resume.
• To restart print jobs, right-click the desired print job and select Restart.
• To cancel an individual print job, right-click the desired print job and select Cancel.
• To cancel all the print jobs, right-click an empty area of the window and select Cancel All Documents.Note: You will need to click Yes to confirm cancelling a print job(s).
Changing the Default Printer1.Click the Start button, and then select Devices and
Printers.
Finding Folders and Files
Search text
FiltersPrinting Documents
Managing Files and Folders... cont’d Managing Files and Folders... cont’d Working with Network Drives
© 2013 Digital Content Factory Ltd. for UCSF Medical Center. Microsoft and Windows are registered trademarks of Microsoft Corporation. 3
Microsoft® Windows® 7 – Quick Reference
® ®
For technical assistance, please call:UCSF IT Service Desk(415) 514-4100https://help.ucsf.edu/
Rev. 1.0
2.Right-click the desired printer and click Set as default printer.
Note: A check mark on the printer icon indicates it is the default printer.
Adding and Removing Local PrintersWindows will automatically try to install USB printers when you plug them in and turn them on. To add a printer that Windows does not install automatically:1.Click the Start button, and then select Devices and
Printers.2.Click Add a printer on the Command Bar.3.Click Add a local printer.4.Specify a port (typically LPT1: (Printer Port)) and
click Next. 5.Select the manufacturer and model of your printer
and click Next.Note: Alternatively, if your printer came with an installation disk, click Have Disk and follow the prompts to install the desired printer driver software.
6.Accept the default printer name or change as desired, and then click Next.
7. If File and Printer Sharing is enabled, you can select whether or not you want to share the printer, and then click Next.
8.Leave the Set as the default printer check box enabled to set the new printer as the default.
9. If desired, click Print a test page, and then click Finish.Note: When a printer is no longer required, it may be removed by selecting it in the Devices and Printers window, and then clicking Remove device on the Command Bar.
Sharing and Unsharing Local Printers1.Click the Start button, and then select Devices and
Printers.2.Right-click the printer that is to be shared, and then
select Printer Properties.3.Activate the Sharing tab, and then enable the Share
this printer check box.4. If required, change the printer name as desired,
and then click OK.Note: Users with network access can now connect to and use the printer. To stop sharing a local printer, follow the steps as indicated above, but in step 3, disable the Share this printer check box.
Connecting to Shared Printers1.Select Network in the Navigation Pane.
Note: You will see the computers and devices from which printers are shared.
2.Double-click the computer's icon that is associated with the shared printer.
3.Double-click the shared printer to which you want to connect.
4.Click Next when the process is complete.
Applying and Creating Themes1.Right-click the Desktop and select Personalize.2.Select the desired theme from the list of available
themes to apply it.3.To create a custom theme, individually click the
links as listed below and change the settings as desired.
• Desktop Background• Window Color• Sounds• Screen Saver
Note: Upon making a change to the current theme, you will see an unsaved theme in the My Themes area.
4.With the unsaved theme selected, click the Save theme link to assign a name to it.
Managing Gadgets• To add a gadget to the Desktop, right-click the
Desktop, select Gadgets, and then double-click the gadget to be added to the Desktop.
• To move a gadget, position the mouse pointer over the gadget to be moved and drag it to a new location.
• To close a gadget, position the mouse pointer over the gadget to be closed and click the Close button.
• To change the properties of a gadget, position the mouse pointer over the gadget whose properties are to be changed and click the Options button, and then change the options as desired.
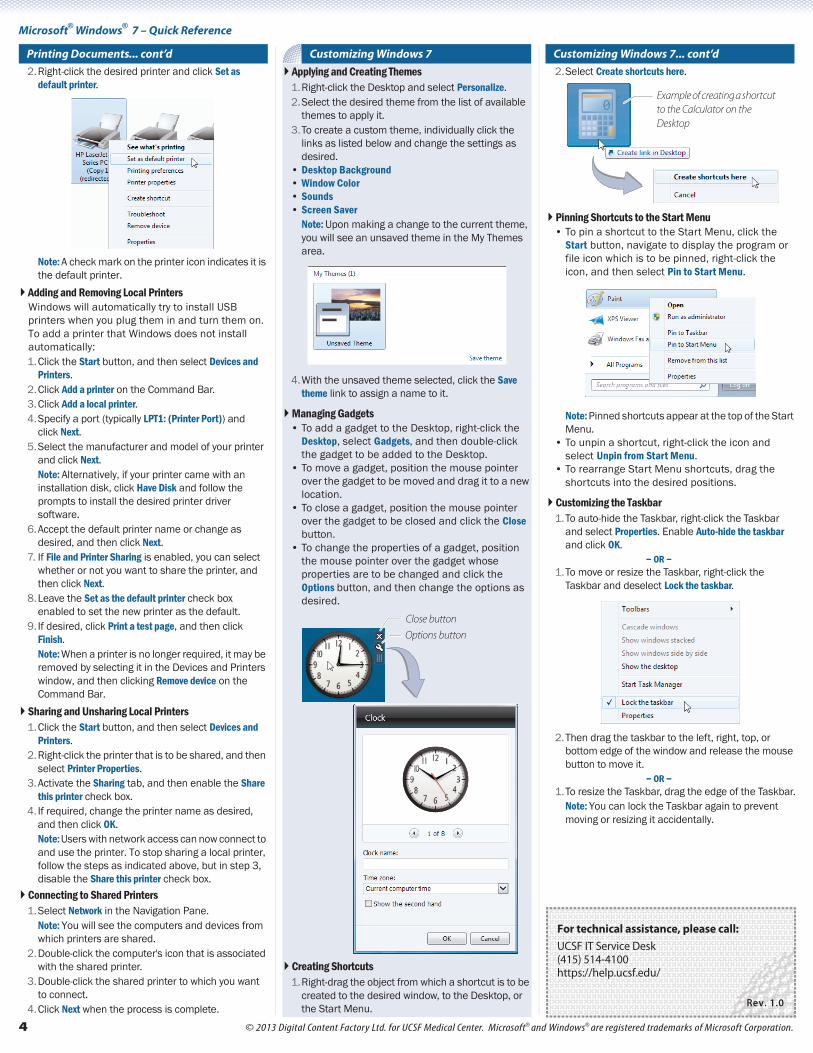
Creating Shortcuts1.Right-drag the object from which a shortcut is to be
created to the desired window, to the Desktop, or the Start Menu.
2.Select Create shortcuts here.
Pinning Shortcuts to the Start Menu• To pin a shortcut to the Start Menu, click the
Start button, navigate to display the program or file icon which is to be pinned, right-click the icon, and then select Pin to Start Menu.
Note: Pinned shortcuts appear at the top of the Start Menu.
• To unpin a shortcut, right-click the icon and select Unpin from Start Menu.
• To rearrange Start Menu shortcuts, drag the shortcuts into the desired positions.
Customizing the Taskbar1.To auto-hide the Taskbar, right-click the Taskbar
and select Properties. Enable Auto-hide the taskbar and click OK.
– OR –1.To move or resize the Taskbar, right-click the
Taskbar and deselect Lock the taskbar.
2.Then drag the taskbar to the left, right, top, or bottom edge of the window and release the mouse button to move it.
– OR –1.To resize the Taskbar, drag the edge of the Taskbar.
Note: You can lock the Taskbar again to prevent moving or resizing it accidentally.
Close buttonOptions button
Example of creating a shortcut to the Calculator on the Desktop
Printing Documents... cont’d Customizing Windows 7 Customizing Windows 7... cont’d
4 © 2013 Digital Content Factory Ltd. for UCSF Medical Center. Microsoft and Windows are registered trademarks of Microsoft Corporation.