Embed Size (px)
Citation preview
Delta Gamma e-Ops+
Collegiate User Guide
About e-Ops+
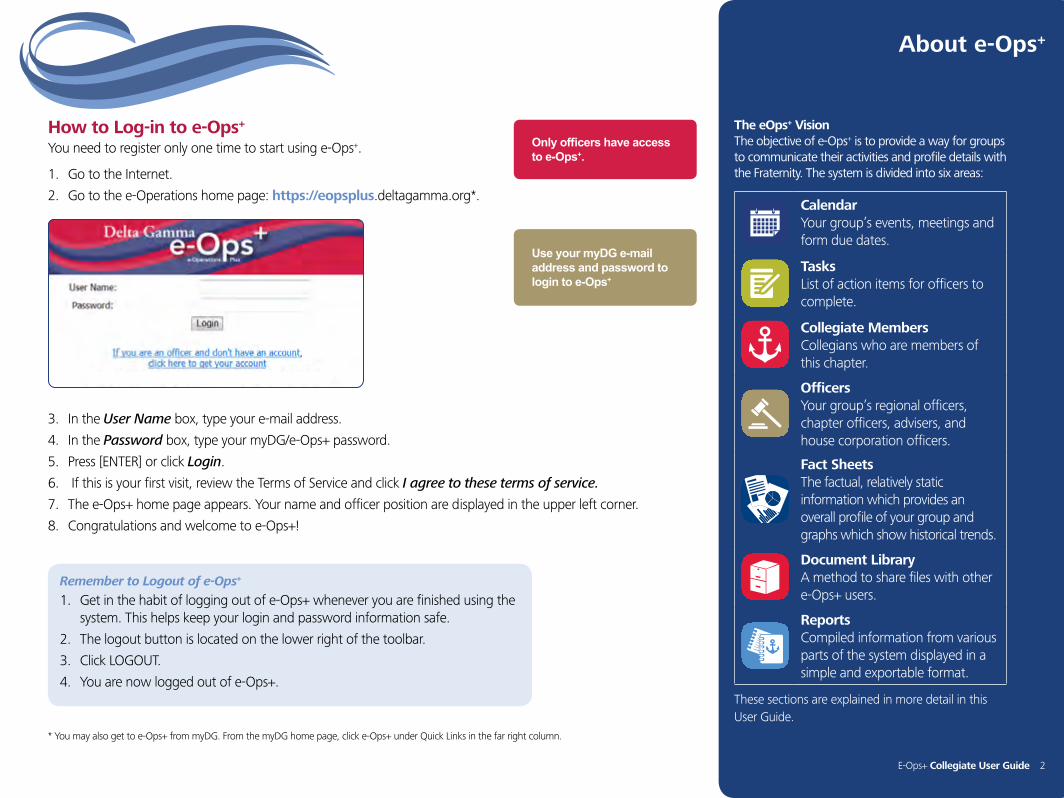
How to Log-in to e-Ops+
You need to register only one time to start using e-Ops+.
1. Go to the Internet.
2. Go to the e-Operations home page: https://eopsplus.deltagamma.org*.
3. In the User Name box, type your e-mail address.
4. In the Password box, type your myDG/e-Ops+ password.
5. Press [ENTER] or click Login.
6. If this is your first visit, review the Terms of Service and click I agree to these terms of service.
7. The e-Ops+ home page appears. Your name and officer position are displayed in the upper left corner.
8. Congratulations and welcome to e-Ops+!
* You may also get to e-Ops+ from myDG. From the myDG home page, click e-Ops+ under Quick Links in the far right column.
E-Ops+ Collegiate User Guide 2
Remember to Logout of e-Ops+
1. Get in the habit of logging out of e-Ops+ whenever you are finished using the system. This helps keep your login and password information safe.
2. The logout button is located on the lower right of the toolbar.
3. Click LOGOUT.
4. You are now logged out of e-Ops+.
The eOps+ Vision The objective of e-Ops+ is to provide a way for groups to communicate their activities and profile details with the Fraternity. The system is divided into six areas:
Calendar Your group’s events, meetings and form due dates.
Tasks List of action items for officers to complete.
Collegiate Members Collegians who are members of this chapter.
Officers Your group’s regional officers, chapter officers, advisers, and house corporation officers.
Fact Sheets The factual, relatively static information which provides an overall profile of your group and graphs which show historical trends.
Document Library A method to share files with other e-Ops+ users.
Reports Compiled information from various parts of the system displayed in a simple and exportable format.
These sections are explained in more detail in this User Guide.
Only officers have access to e-Ops+.
Use your myDG e-mail address and password to login to e-Ops+
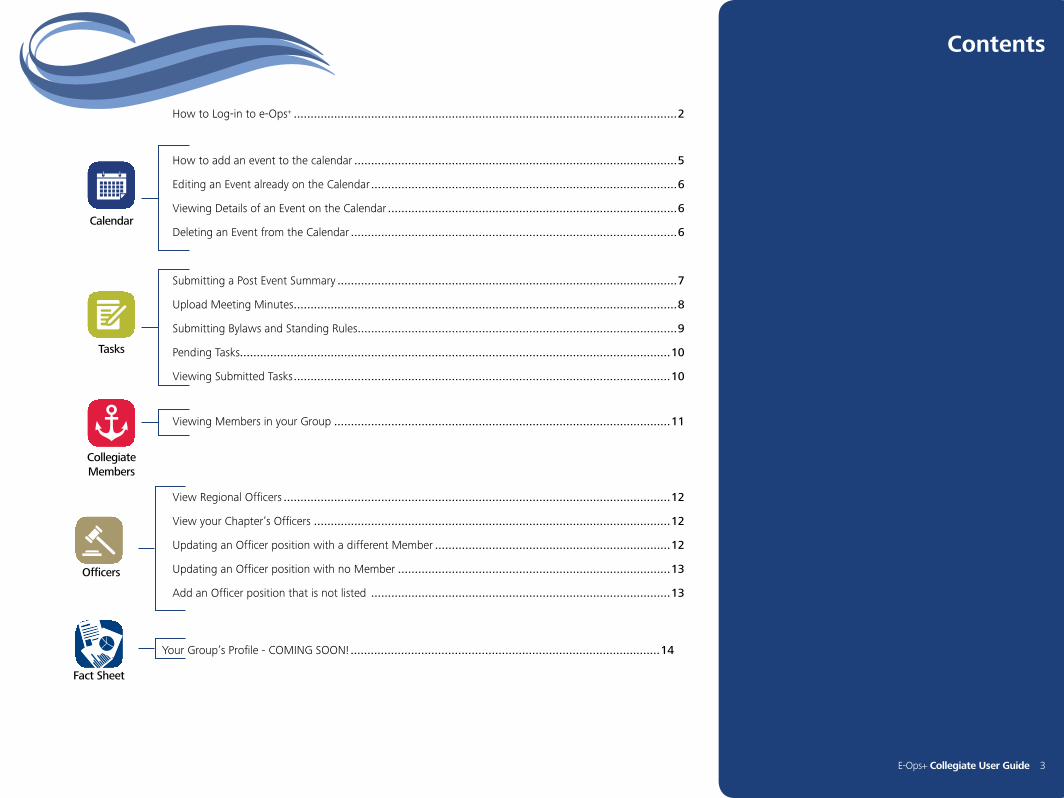
Contents
E-Ops+ Collegiate User Guide 3
How to Log-in to e-Ops+ ..................................................................................................................2
Tasks
Collegiate Members
Calendar
Officers
How to add an event to the calendar ................................................................................................5
Editing an Event already on the Calendar ...........................................................................................6
Viewing Details of an Event on the Calendar ......................................................................................6
Deleting an Event from the Calendar .................................................................................................6
Submitting a Post Event Summary .....................................................................................................7
Upload Meeting Minutes ..................................................................................................................8
Submitting Bylaws and Standing Rules ...............................................................................................9
Pending Tasks................................................................................................................................10
Viewing Submitted Tasks ................................................................................................................10
Viewing Members in your Group ....................................................................................................11
View Regional Officers ...................................................................................................................12
View your Chapter’s Officers ..........................................................................................................12
Updating an Officer position with a different Member ......................................................................12
Updating an Officer position with no Member .................................................................................13
Add an Officer position that is not listed .........................................................................................13
Your Group’s Profile - COMING SOON! ............................................................................................14
Fact Sheet
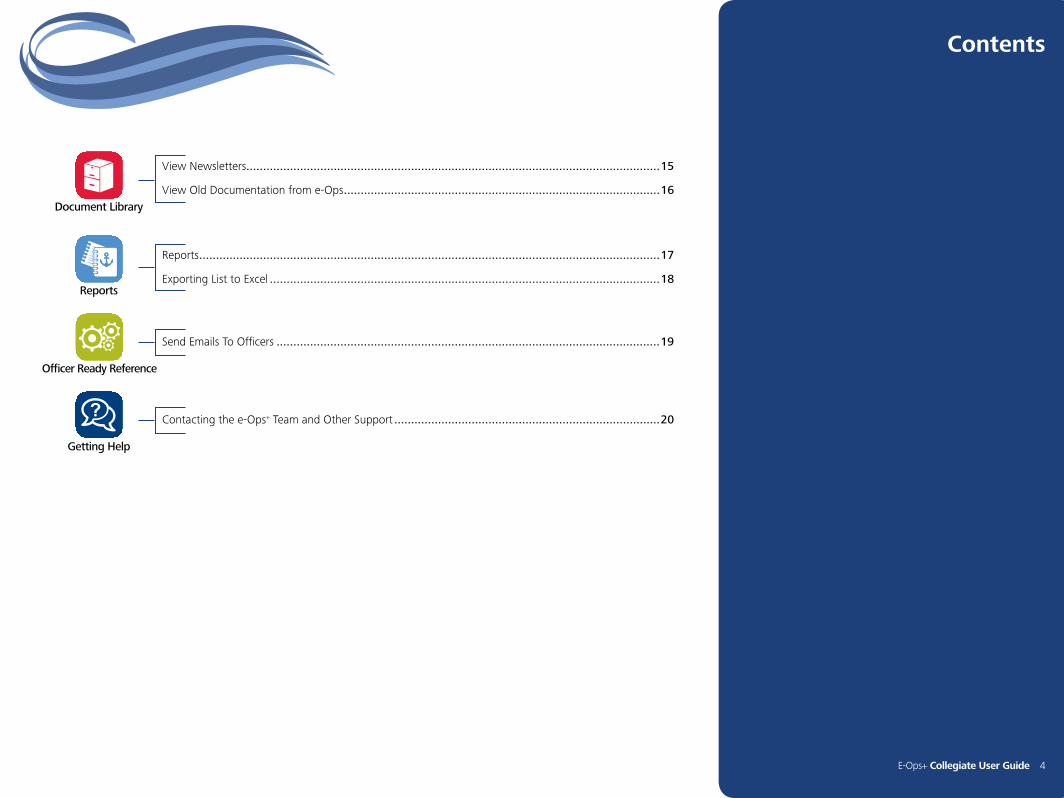
Contents
E-Ops+ Collegiate User Guide 4
Document Library
Reports
Officer Ready Reference
Getting Help
?
View Newsletters...........................................................................................................................15
View Old Documentation from e-Ops ..............................................................................................16
Reports .........................................................................................................................................17
Exporting List to Excel ....................................................................................................................18
Send Emails To Officers ..................................................................................................................19
Contacting the e-Ops+ Team and Other Support ...............................................................................20
?
E-Ops+ Collegiate User Guide 5
Calendar
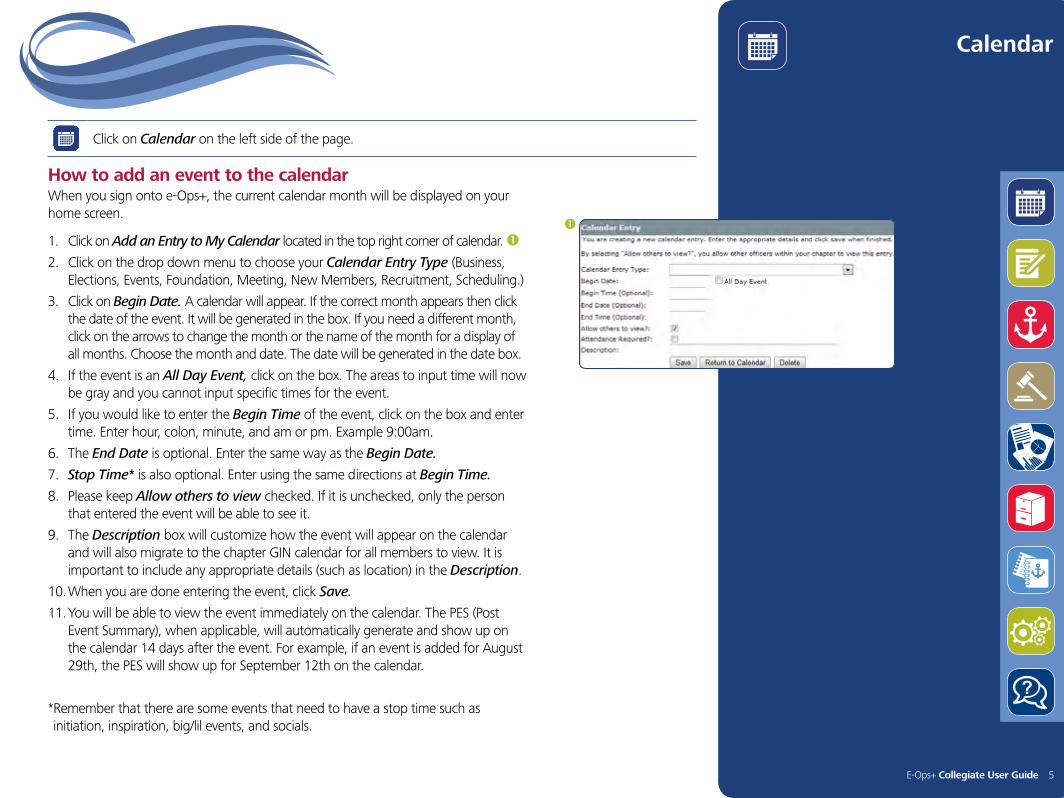
Click on Calendar on the left side of the page.
How to add an event to the calendarWhen you sign onto e-Ops+, the current calendar month will be displayed on your home screen.
1. Click on Add an Entry to My Calendar located in the top right corner of calendar. 2. Click on the drop down menu to choose your Calendar Entry Type (Business,
Elections, Events, Foundation, Meeting, New Members, Recruitment, Scheduling.)
3. Click on Begin Date. A calendar will appear. If the correct month appears then click the date of the event. It will be generated in the box. If you need a different month, click on the arrows to change the month or the name of the month for a display of all months. Choose the month and date. The date will be generated in the date box.
4. If the event is an All Day Event, click on the box. The areas to input time will now be gray and you cannot input specific times for the event.
5. If you would like to enter the Begin Time of the event, click on the box and enter time. Enter hour, colon, minute, and am or pm. Example 9:00am.
6. The End Date is optional. Enter the same way as the Begin Date.
7. Stop Time* is also optional. Enter using the same directions at Begin Time.
8. Please keep Allow others to view checked. If it is unchecked, only the person that entered the event will be able to see it.
9. The Description box will customize how the event will appear on the calendar and will also migrate to the chapter GIN calendar for all members to view. It is important to include any appropriate details (such as location) in the Description.
10. When you are done entering the event, click Save.
11. You will be able to view the event immediately on the calendar. The PES (Post Event Summary), when applicable, will automatically generate and show up on the calendar 14 days after the event. For example, if an event is added for August 29th, the PES will show up for September 12th on the calendar.
* Remember that there are some events that need to have a stop time such as initiation, inspiration, big/lil events, and socials.

?
E-Ops+ Collegiate User Guide 6
Calendar
Click on Calendar on the left side of the page.
Editing an Event already on the CalendarOn the calendar, click the event you wish to edit. Change the date/meeting times or description. If you need to change the event type, you will have to delete the original event and add a new event so that the Post Event Summary/Post Event Confirmation will be correct. Note: You cannot edit an event or meeting after the Post Event Summary or Post Event Confirmation has been submitted.
Viewing Details of an Event on the CalendarTo view the details (date, time, description and who created the event) of any event on the calendar, simply click the event.
Deleting an Event from the CalendarOn the calendar, click on the event you wish to delete. Click the delete button and confirm the deletion. This will delete the event and the associated forms from your calendar.
Note: You cannot delete an event after the associated forms have been submitted.
?
E-Ops+ Collegiate User Guide 7
Click on Tasks on the left side of the page.
Tasks
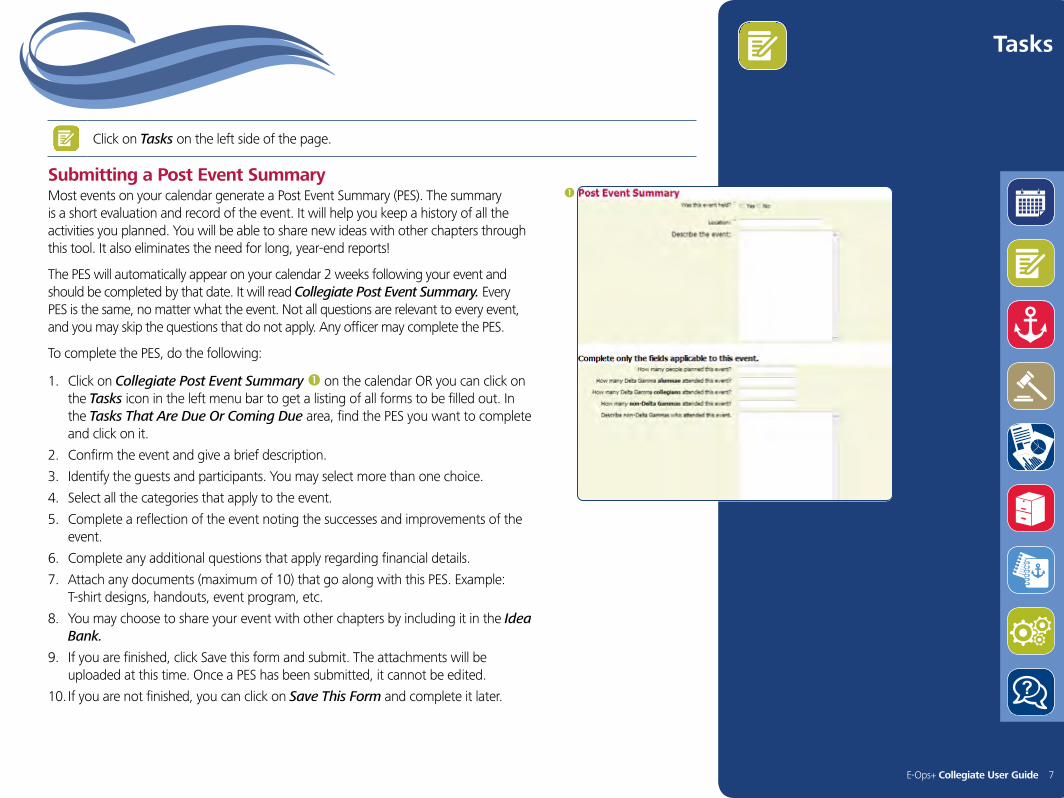
Submitting a Post Event SummaryMost events on your calendar generate a Post Event Summary (PES). The summary is a short evaluation and record of the event. It will help you keep a history of all the activities you planned. You will be able to share new ideas with other chapters through this tool. It also eliminates the need for long, year-end reports!
The PES will automatically appear on your calendar 2 weeks following your event and should be completed by that date. It will read Collegiate Post Event Summary. Every PES is the same, no matter what the event. Not all questions are relevant to every event, and you may skip the questions that do not apply. Any officer may complete the PES.
To complete the PES, do the following:
1. Click on Collegiate Post Event Summary on the calendar OR you can click on the Tasks icon in the left menu bar to get a listing of all forms to be filled out. In the Tasks That Are Due Or Coming Due area, find the PES you want to complete and click on it.
2. Confirm the event and give a brief description.
3. Identify the guests and participants. You may select more than one choice.
4. Select all the categories that apply to the event.
5. Complete a reflection of the event noting the successes and improvements of the event.
6. Complete any additional questions that apply regarding financial details.
7. Attach any documents (maximum of 10) that go along with this PES. Example: T-shirt designs, handouts, event program, etc.
8. You may choose to share your event with other chapters by including it in the Idea Bank.
9. If you are finished, click Save this form and submit. The attachments will be uploaded at this time. Once a PES has been submitted, it cannot be edited.
10. If you are not finished, you can click on Save This Form and complete it later.
?
E-Ops+ Collegiate User Guide 8
Tasks
Upload Meeting MinutesMeeting Minutes can be uploaded two ways:
•Visit Task icon on the left menu bar and find the Task titled Upload Meeting Minutes with the description in the Calendar Entry column that matches the meeting.
•OR you can find the task on the Calendar one week after the chapter meeting. Click on the link to Upload Meeting Minutes.
•Attach files and click on Save this form and submit.
•If you are not finished, you can click on Save this form and complete later.
Idea Bank - Coming Soon to e-Ops+One of the most powerful tools in e-Operations is the ability to search for programming ideas in the Idea Bank. Officers can query the system for ideas from every other alumnae group and collegiate chapter. An officer is just a few clicks away from learning about new efforts going on around the Fraternity!
Click on Tasks on the left side of the page.

?
E-Ops+ Collegiate User Guide 9
Tasks
Submitting Bylaws and Standing Rules•In the Forms That May be Completed Any Time area, select Submit Bylaws
and Standing Rules
•Browse your computer to locate your document. The title will appear next to the choose file button.
•Click the Save This Form and Submit button. Your bylaws will be sent to your ATC for review. She will either approve them and this will trigger the form to be sent to the RCS or she will deny the bylaws and standing rules and send them back to you with modification suggestions. The president will be able to make the adjustments and resubmit for approval.*
•The president will see a thank you screen that tells you it has been submitted to your ATC.
•Once the RCS receives your bylaws and standing rules, she will either approve them or she will deny the bylaws and standing rules and send them back to the collegiate president with modification suggestions. The president will be able to make the adjustments and/or resubmit for approval.
•If your bylaws were not approved by your ATC, the Bylaws Submission form will appear back on your forms list at the top of the page.
•The president can reopen the form by clicking on either the form itself or the rejection comments.
•If your bylaws were not approved, you will see a yellow highlighted section that shows who rejected the bylaws and why.
•Open your saved bylaws file (outside of e-Ops+) and make the appropriate corrections. Go to e-Ops+ and re-upload and submit your Bylaws and Standing Rules task. The file is re-routed to your ATC and subsequently to your RCS.
•Once approved, your General Information Fact Sheet will show the approved date with a link to the BLSR file and the form will no longer appear in your Tasks Due list.
* Note: The vice president: social standards or the vice president: communications may also submit the BLSRs, however only the officer originally submitting the BLSR will receive notification of denial from the ATC/RCS.
Click on Tasks on the left side of the page.
?
E-Ops+ Collegiate User Guide 10
Tasks
Pending Tasks1. To view tasks that are awaiting approval by another officer, click on the Tasks icon
on the left menu bar.
2. Click on the My Pending Tasks tab across the top.
3. An example of a task that would be awaiting approval would be Calendar Checklist.
Viewing Submitted Tasks1. To view forms that have already been submitted, click on the Tasks icon on the
left menu bar.
2. Click on the Completed Tasks tab across the top.
3. Click the Show All Tasks button to display all completed tasks.
4. Find the task you want to view. Click on any column for that entry.
Note: the date displayed is the date the form was submitted. Not the date of the event or the date the form was due.
Click on Tasks on the left side of the page.
?
E-Ops+ Collegiate User Guide 11
Click on Collegians on the left side of the page.
Collegians
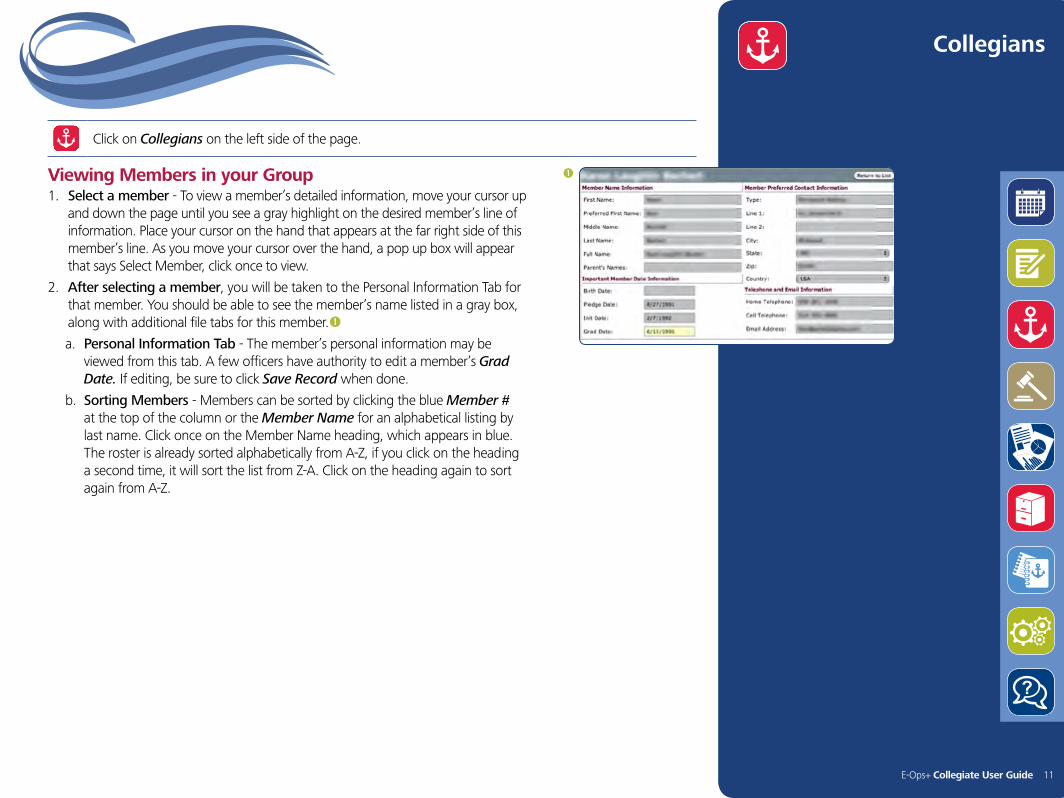
Viewing Members in your Group1. Select a member - To view a member’s detailed information, move your cursor up
and down the page until you see a gray highlight on the desired member’s line of information. Place your cursor on the hand that appears at the far right side of this member’s line. As you move your cursor over the hand, a pop up box will appear that says Select Member, click once to view.
2. After selecting a member, you will be taken to the Personal Information Tab for that member. You should be able to see the member’s name listed in a gray box, along with additional file tabs for this member.
a. Personal Information Tab - The member’s personal information may be viewed from this tab. A few officers have authority to edit a member’s Grad Date. If editing, be sure to click Save Record when done.
b. Sorting Members - Members can be sorted by clicking the blue Member # at the top of the column or the Member Name for an alphabetical listing by last name. Click once on the Member Name heading, which appears in blue. The roster is already sorted alphabetically from A-Z, if you click on the heading a second time, it will sort the list from Z-A. Click on the heading again to sort again from A-Z.
?
E-Ops+ Collegiate User Guide 12
Click on Officers on the left side of the page.
Officers
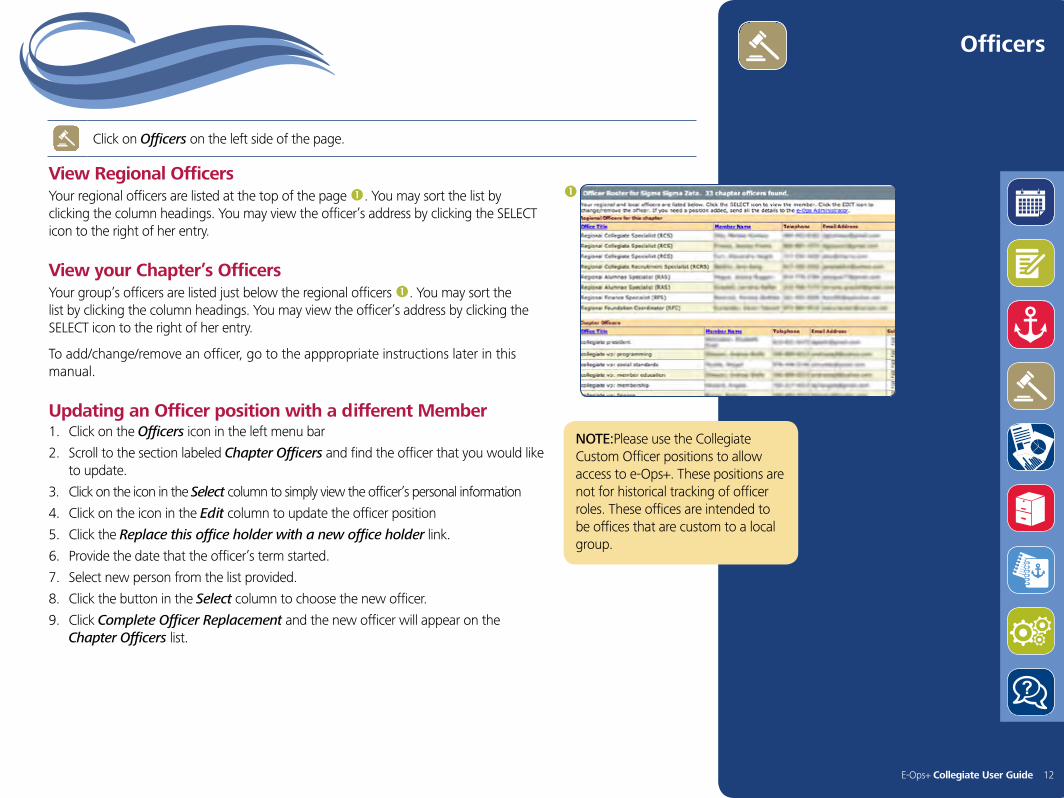
View Regional OfficersYour regional officers are listed at the top of the page . You may sort the list by clicking the column headings. You may view the officer’s address by clicking the SELECT icon to the right of her entry.
View your Chapter’s OfficersYour group’s officers are listed just below the regional officers . You may sort the list by clicking the column headings. You may view the officer’s address by clicking the SELECT icon to the right of her entry.
To add/change/remove an officer, go to the apppropriate instructions later in this manual.
Updating an Officer position with a different Member1. Click on the Officers icon in the left menu bar
2. Scroll to the section labeled Chapter Officers and find the officer that you would like to update.
3. Click on the icon in the Select column to simply view the officer’s personal information
4. Click on the icon in the Edit column to update the officer position
5. Click the Replace this office holder with a new office holder link.
6. Provide the date that the officer’s term started.
7. Select new person from the list provided.
8. Click the button in the Select column to choose the new officer.
9. Click Complete Officer Replacement and the new officer will appear on the Chapter Officers list.
NOTE:Please use the Collegiate Custom Officer positions to allow access to e-Ops+. These positions are not for historical tracking of officer roles. These offices are intended to be offices that are custom to a local group.
?
E-Ops+ Collegiate User Guide 13
Officers
Click on Officers on the left side of the page.
Updating an Officer position with no Member1. Click on the Officers icon in the left menu bar
2. Scroll to the section labeled Chapter Officers and find the officer that you would like to update.
3. Click on the icon in the Select column to simply view the officer’s personal information
4. Click on the icon in the Edit column to update the officer position
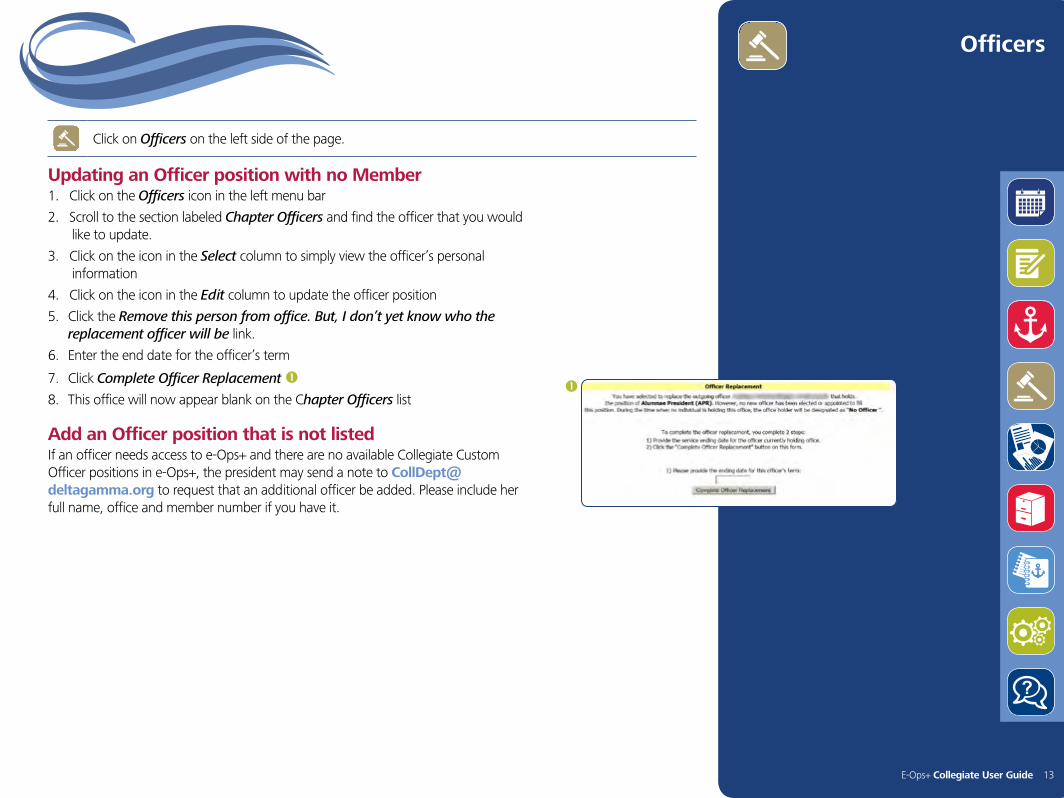
5. Click the Remove this person from office. But, I don’t yet know who the replacement officer will be link.
6. Enter the end date for the officer’s term
7. Click Complete Officer Replacement 8. This office will now appear blank on the Chapter Officers list
Add an Officer position that is not listed If an officer needs access to e-Ops+ and there are no available Collegiate Custom Officer positions in e-Ops+, the president may send a note to [email protected] to request that an additional officer be added. Please include her full name, office and member number if you have it.

?
E-Ops+ Collegiate User Guide 14
Click on Fact Sheets on the left side of the page.
Your Group’s Profile - COMING SOON!
Fact Sheets
?
E-Ops+ Collegiate User Guide 15
Click on Document Library on the left side of the page.
Document Library
View NewslettersAlumnae groups have the option of sharing their printed and electronic newsletters with each other and with collegiate chapters. Take a look and see what is going on with the alumnae group in your area or one across the country.
•Click on Document Library on the left menu bar.
•To view newsletters, click on the plus sign in front of Alumnae Newsletters. This will expand the list.
•Click on the desired newsletter to open.

?
E-Ops+ Collegiate User Guide 16
Document Library
View Old Documentation from e-Ops1. Click on Document Library on the left menu bar.
2. Click on the plus sign in front of Documents Archived from Old e-Ops. This will expand the list.
3. Click on the file you wish to view
4. Click OPEN.
Click on Document Library on the left side of the page.
?
E-Ops+ Collegiate User Guide 17
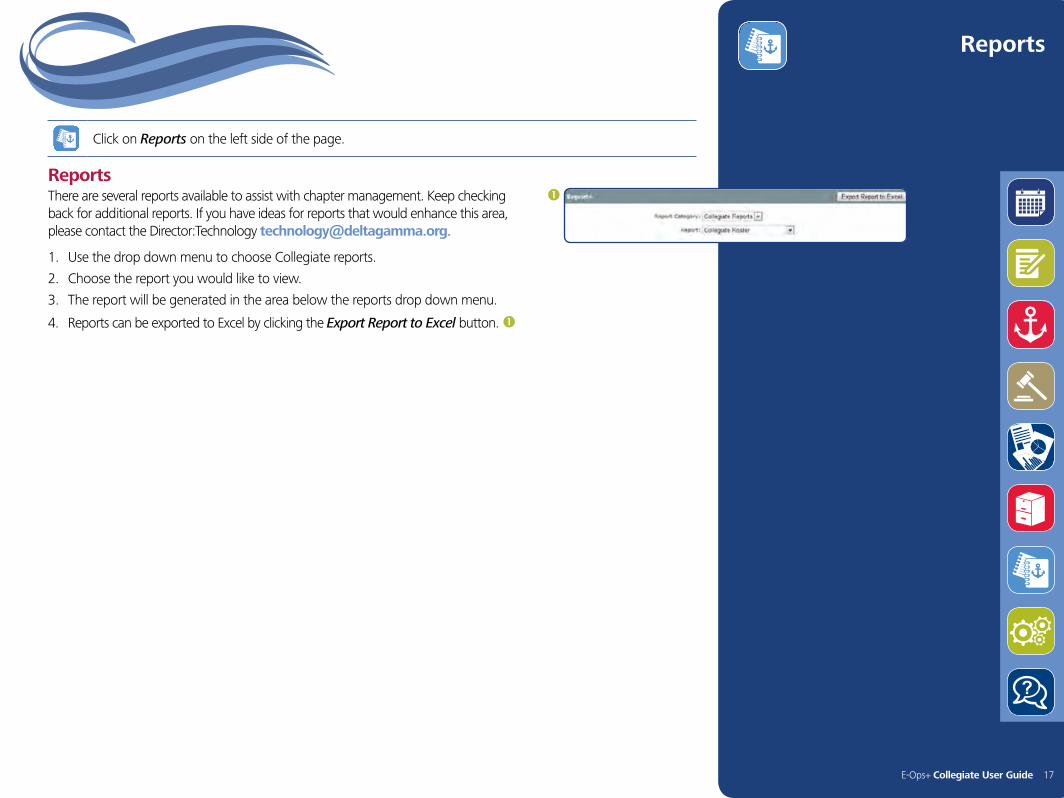
Click on Reports on the left side of the page.
Reports
ReportsThere are several reports available to assist with chapter management. Keep checking back for additional reports. If you have ideas for reports that would enhance this area, please contact the Director:Technology [email protected].
1. Use the drop down menu to choose Collegiate reports.
2. Choose the report you would like to view.
3. The report will be generated in the area below the reports drop down menu.
4. Reports can be exported to Excel by clicking the Export Report to Excel button.
?
E-Ops+ Collegiate User Guide 18
Reports
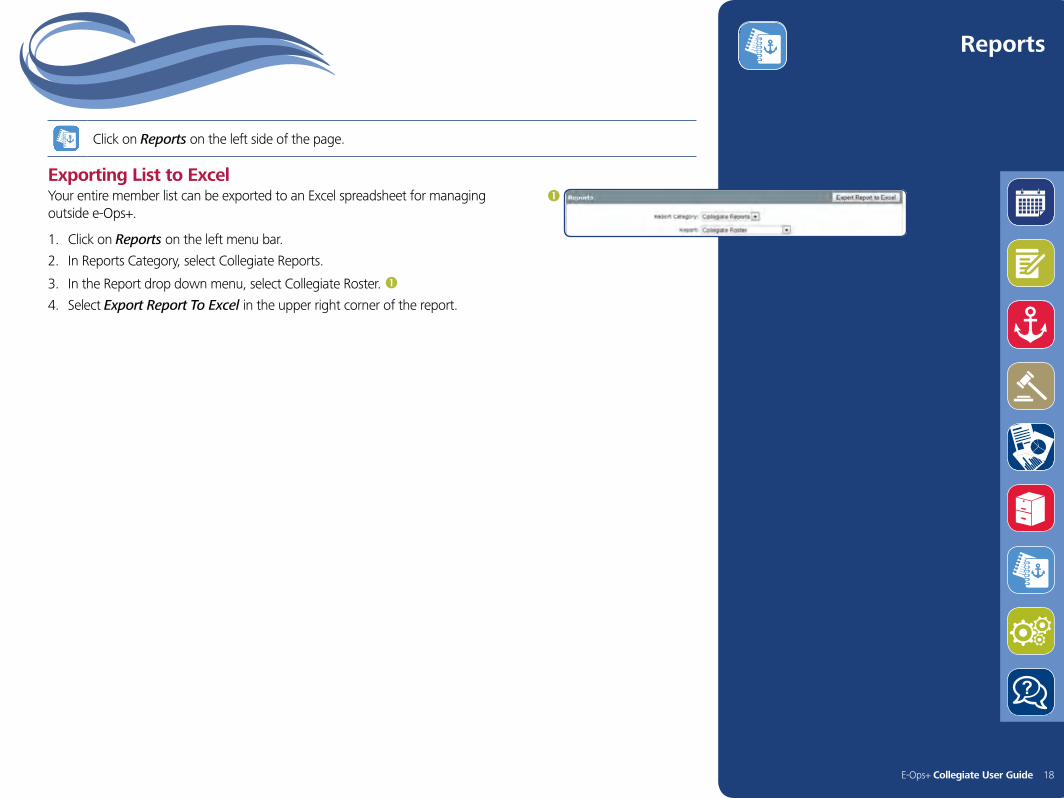
Exporting List to ExcelYour entire member list can be exported to an Excel spreadsheet for managing outside e-Ops+.
1. Click on Reports on the left menu bar.
2. In Reports Category, select Collegiate Reports.
3. In the Report drop down menu, select Collegiate Roster. 4. Select Export Report To Excel in the upper right corner of the report.
Click on Reports on the left side of the page.

?
E-Ops+ Collegiate User Guide 19
Send Emails To Officers1. Emails can be sent to officers, advisers, and House Corporation through Officer
Ready Reference on the left side of the page.
2. Click in the To box and then select the recipients from the list. Save Recipients.
3. Compose the message as you would a typical email, with Subject, Body, and formatting as desired.
4. Once the email is complete, select the Send Email button.
Click on Officer Ready Reference on the left side of the page.
Officer Ready Reference
?
E-Ops+ Collegiate User Guide 20
?
? Click on Getting Help on the left side of the page.
Getting Help
Contacting the e-Ops+ Team and Other SupportThere are many e-Operations resources to provide you with assistance:
1. Your Regional Team — Contact your regional team for help first. If you can’t figure out a challenge together, use the other resources listed here.
2. e-Ops+ User Guide Click on Getting Help on the bottom of the left menu bar Under Help Documents, click the + icon to the left of GENERAL Click the Collegiate User Guide Click OPEN
3. e-Ops+ Lessons (short exercises on specific e-Ops topics) – Click on Help on the left menu bar
– Under Help Documents, click the + icon to the left of COLLEGIATE LESSONS
– Click the lesson you wish to view
– Click OPEN
4. The e-Operations Team– Send e-mail questions to specialists throughout the country who are dedicated to helping chapters and groups become familiar with e-Operations. E-mail your questions to [email protected].
5. The Collegiate Department at Executive Offices – Contact theCollegiate Development Specialists who are thoroughly trained and a wonderful resource for your special collegiate needs: [email protected].
6. Patience! — The e-Operations system is a powerful tool. It may take some getting used to. You will become more confident using the system every time you log on.