Embed Size (px)
Citation preview

SYNOPSIS
The system COLLEGE MANAGEMENT SYSTEM can be used to
manage the data of all type of educational institutes. It will support both
stand alone and also networking environment. The system uses VB. Net
Technology. The main modules involved in this system are:
1. Login
2. Forms
3. Reports
4. Window
Module wise description
Login
Login module is used to check whether the user is an authorized person to
use the system or not. For this the user should give the correct user name
and password.
The different types of users are
1. Admin
2. Student
3. Employee
Forms
This module consists of the following sub modules
1. Student Registration Form
2. Student Fee Form
3. Student Marks Form
4. Student ID Form
5. Employee Detail Form
6. Employee Salary Form
7. Employee ID Form
8. Course Detail Form
9. Library Form
The Student Registration Form is designed for registering the new
students details and course details.
The Student Fee Form is used to enter the student’s fee details.
The Student Marks Form is designed for submitting the semester or exam
marks of the students for a particular course or an individual student.
The Student Id Form is used to create the identity number for each
student for different course.
The Employee details form is designed for entering the staff details and
other relevant details .
The Employee Id used to create the identity number for each student for
different course.
The salary form is used to derive the salary for employees
The Course details form is designed for entering the different course
available in the campus and other relevant details .
The Library module is used for the data process of library and book
accessing for students and staffs.
Reports
All the above mentioned data are stored in the back end and can be
retrieved as reports with filtering options. The Following are the reports

can be taken from this system
1. Student Report
2. Employee Report
3. Course Detail Report
4. Book Detail Report
5. Issued Book Report
6. Fee Detail Report
7. Marks Detail Report
8. Generate Pay Slip

1. INTRODUCTION
1.1 ABOUT THE ORGANIZATION
Speed up Networks Software College was actually established in the year
2002 March 17th on Hope College near Mani’s Theatre. The official address was No
126, Thulasiammal layout, Opp to Mani’s theatre with only two systems as a home
based application development centre. Later it developed as the student project centre
with lot of MBA’s and Polytechnic students were migrated by the internal marketing
of the three staff who becomes the directors of the speed up networks.
Aim
To provide quality education of information technology and IT enabled
services to shine as leading business promoters on real time and
submission of application and system software.
To develop the efficient candidates as per the requirements of major IT
sectors.
To serve the society by releasing free wares.
To provide a wide range of ideas and thoroughly to the environment about
the development of information technology and it’s enabled fields.
Motto
Quality IT Education at affordable cost for all.
Out motto explains that even a middle class student can learn the booming
technology which is highly costlier for them.
Logo Symbolizes
Our logo symbolizes the horse, which means the power to ride through our
own vision.
The symbol of speed.
The symbol of resistance and getting up quick as thunder even if it falls.
Speed up is coming up speedily.
Objective Of The Project
Main aim in developing campus management system is to provide an easy way not
only to automate all functionalities of a college, but also to provide full functional
reports to top management of college with the finest of details about any aspect of
college.
We are committed to bring the best way of management in the various forms of
campus management system. We understand that campus management system in
not a product to be sold, it is a bridge between the College and Students.
So we can say the Core purpose of designing “ College Management System ” is to
manage the task related to the college students/employees and to reduce time to
searching of appropriate candidates in college view.
Scope Of The System
This system provides the detail structure of the college campus and its departments.
CMS synchronizes the working of all the departments. It looks on all aspects of a
college, its students, faculties, Departments, marks and other co – curricular activities.
CMS is the easiest way to manage all functionalities of a college, which facilitates
colleges to maintain the functionality related to college employees and their students.
Benefits
Following are the benefits for using College Management System :
For Employees:
• Easy to create any kind of certificate.
• Easy to query all related details of student and employee.
• Easy to generate payroll of individual employee.
For College:
• Collective records of students of all the branches.
• Collective records of employees of all departments.
• Easy approach to find the detail information for any student/employee.

• Easy to handle all functionality of college.
• Easy to manage all actions (generating attendance report, fee report etc).
• All information can be synchronized in one place. And distribute to a particular
department to manage
properly.
• CMS is beneficial for both students/employees only in the way that they Can get all
previous or current
information's when they need.
• It is helpful to maintain the students record (admission record, fees record, Marks
records etc).
• Teacher does not maintain the file, documentation, reports (class Wise, section
wise)
Advantages :
• By using this s/w, you can learn how you prepare your records in standard manner
• Also you can find the previous session papers and current news related to any
student or employees.
• By using this s/w, administrator can manage all records in standard manner.
• Also it can help to get all or a particular student attendance information by
attendance master
• Also it can help to maintain the fees and accounting reports of college in proper
way.
• It helps to generate mark sheets of current year or previous year's students.
2. SYSTEM STUDY
A detailed study of the existing system is necessary. The
functions of the system, requirements for the users, structure of the
current system is made through the system study. The problems faced in
the current system are found and solution pertaining to it is done in the
system study.
2.1 EXISTING SYSTEM:
In the existing system, the manual process, receiving data’s from students and staff
details are done through manual records. These records are entered in manual process.
in this process will take long time,separet workers need to maintaining the databases.
All the college details are stored via separate databases. It will take long time due to
this process time waste, money waste etc...
In this process very difficult to maintain the fees and accounting reports of college in
proper way. Teacher does not maintain the file, documentation, reports (class Wise,
section wise) etc…
2.3 NEED FOR PROPOSED SYSTEM
The main objective of the existing system is to provide a user-friendly
interface. The system, which is proposed, now computerizes all the details that are
maintained manually. Once the details are fed into the computer there is no need for
various persons to deal with separate sections. Only a single person is enough to
maintain all the reports. The security can also be given as per the requirement of the
user
Large volumes of data can be stored with case.
Maintenance of file is flexible.
Records stored are updated now and then.
Stored data and procedures can be easily edited.
Reports can be generated with case.
Accurate calculations are made.
Less manpower required.
3. SYSTEM SPECIFICATION
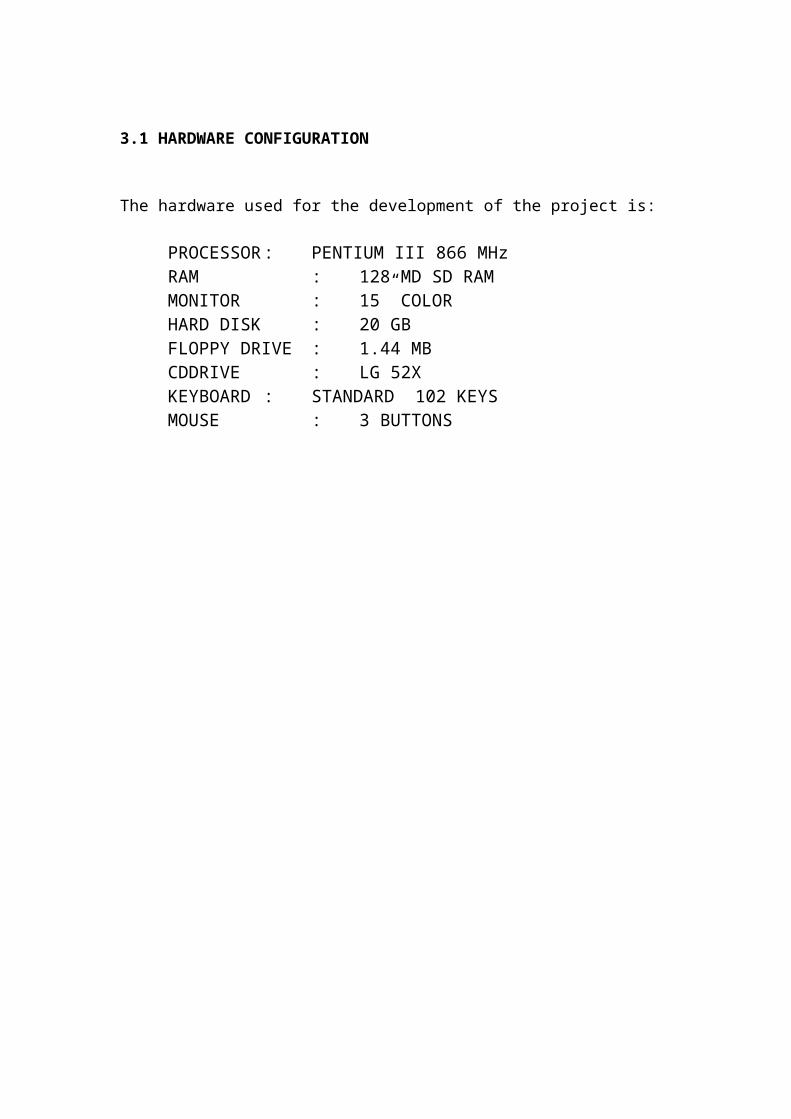
3.1 HARDWARE CONFIGURATION
The hardware used for the development of the project is:
PROCESSOR : PENTIUM III 866 MHz
RAM : 128 MD SD RAM
MONITOR : 15” COLOR
HARD DISK : 20 GB
FLOPPY DRIVE : 1.44 MB
CDDRIVE : LG 52X
KEYBOARD : STANDARD 102 KEYS
MOUSE : 3 BUTTONS
3.2 SOFTWARE CONFIGURATION
The software used for the development of the project is:
OPERATING SYSTEM : Windows XP Professional
ENVIRONMENT : Visual Studio .NET 2005
.NET FRAMEWORK : Version 1.0
LANGUAGE : Visual Basic.NET
BACKEND : Sql
4. LANGAUGE SPECIFICATION
4.1 FEATURES OF VISUAL BASIC. NET
Visual Basic. NET, the latest version of visual basic, includes many new
features. The Visual Basic supports interfaces but not implementation
inheritance.
Visual basic.net supports implementation inheritance, interfaces and
overloading. In addition, Visual Basic .NET supports multithreading concept.
COMMON LANGUAGE SPECIFICATION (CLS):
Visual Basic.NET is also compliant with CLS (Common Language
Specification) and supports structured exception handling. CLS is set of rules
and constructs that are supported by the CLR (Common Language Runtime).
CLR is the runtime environment provided by the .NET Framework; it manages
the execution of the code and also makes the development process easier by
providing services.
Visual Basic.NET is a CLS-compliant language. Any objects, classes, or
components that created in Visual Basic.NET can be used in any other CLS-
compliant language. In addition, we can use objects, classes, and components
created in other CLS-compliant languages in Visual Basic.NET .The use of
CLS ensures complete interoperability among applications, regardless of the
languages used to create the application.
IMPLEMENTATION INHERITANCE:
Visual Basic.NET supports implementation inheritance. This means
that, while creating applications in Visual Basic.NET, we can drive from
another class, which is know as the base class that derived class inherits all the
methods and properties of the base class. In the derived class, we can either use
the existing code of the base class or override the existing code. Therefore,
with help of the implementation inheritance, code can be reused.

CONSTRUCTORS AND DESTRUCTORS:
Constructors are used to initialize objects, whereas destructors are used
to destroy them. In other words, destructors are used to release the resources
allocated to the object. In Visual Basic.NET the sub finalize procedure is
available. The sub finalize procedure is used to complete the tasks that must be
performed when an object is destroyed. The sub finalize procedure is called
automatically when an object is destroyed. In addition, the sub finalize
procedure can be called only from the class it belongs to or from derived
classes.
GARBAGE COLLECTION:
Garbage Collection is another new feature in Visual Basic.NET.
The .NET Framework monitors allocated resources, such as objects and
variables. In addition, the .NET Framework automatically releases memory for
reuse by destroying objects that are no longer in use. In Visual Basic.NET, the
garbage collector checks for the objects that are not currently in use by
applications. When the garbage collector comes across an object that is marked
for garbage collection, it releases the memory occupied by the object.
OVERLOADING:
Overloading is another feature in Visual Basic.NET. Overloading
enables us to define multiple procedures with the same name, where each
procedure has a different set of arguments. Besides using overloading for
procedures, we can use it for constructors and properties in a class.
MULTITHREADING:
Visual Basic.NET also supports multithreading. An application that
supports multithreading can handle multiple tasks simultaneously, we can use
multithreading to decrease the time taken by an application to respond to user
interaction. To decrease the time taken by an application to respond to user
interaction, we must ensure that a separate thread in the application handles
user interaction.

STRUCTURED EXCEPTION HANDLING:
Visual Basic.NET supports structured handling, which enables us to
detect and remove errors at runtime. In Visual Basic.NET, we need to use
Try…Catch…Finally statements to create exception handlers. Using Try…
Catch…Finally statements, we can create robust and effective exception
handlers to improve the performance of our application.
THE .NET FRAMEWORK
The .NET Framework is a new computing platform that simplifies
application development in the highly distributed environment of the Internet.
OBJECTIVES OF. NET FRAMEWORK:
1.To provide a consistent object-oriented programming environment whether
object codes is stored and executed locally on Internet-distributed, or executed
remotely.
2.To provide a code-execution environment to minimizes software deployment
and guarantees safe execution of code.
3. Eliminates the performance problems.
There are different types of application, such as Windows-based applications
and Web-based applications.
To make communication on distributed environment to ensure that code be
accessed by the .NET Framework can integrate with any other code.
VISUAL STUDIO .NET
Visual Studio .NET is a complete set of development tools for building
ASP Web applications, XML Web services, desktop applications, and mobile
applications In addition to building high-performing desktop applications, you
can use Visual Studio's powerful component-based development tools and
other technologies to simplify team-based design, development, and
deployment of Enterprise solutions.
Visual Basic .NET, Visual C++ .NET, and Visual C# .NET all use the
same integrated development environment (IDE), which allows them to share
tools and facilitates in the creation of mixed-language solutions. In addition,
these languages leverage the functionality of the .NET Framework and simplify
the development of ASP Web applications and XML Web services.
Visual Studio supports the .NET Framework, which provides a common
language runtime and unified programming classes; ASP.NET uses these
components to create ASP Web applications and XML Web services. Also it
includes MSDN Library, which contains all the documentation for these
development tools.
4.2 FEATURES OF SQL DATA BASE
INTRODUCTION TO SQL Server
Sql Server is comprehensive operating environment that
packs h power of mainframe relation database management system
into user’s microcomputer. It provides a set of functional program
that user can use as tools to build structures and perform tasks.
Because applications are developed on Sql Server are completely
portable to the other versions of the programmer can create a
complex application in a single user, environment and then move it
to a multi-user platform. Users do not have to be an expert to
appreciate Sql Server but the better user understands the program,
the more productively and creatively he can use the tools it
provides.
Relational Database Management System
Sql Server the right tool
Sql Server gives you High Capacity
Database management tools
Structure of Sql Server Database
Sql Server database can be describe at two different levels
Physical Structure
Logical Structure
Physical Structure:
a) One or more data files
b) Two or more log files
c) One control file
Logical Structure
a) Table spaces
b) Segments
c) Extents
d) Data Blocks
The data files contain all user data in terms of tables, index
and views. The log files contain the information to open and be
recovered, of undone after a transaction (Rollback).
The control file physical data, media information to open and
manage data files. If the control file is damaged the server will not
be able to open or use the database even if the database is
undamaged.
DATABASE
The conventional data processing approach is to develop a
program (or many programs) for each application. This result in one
or more data files for each application. Some of the data may be
common between files. However one application may require the
file to be organized on a particular field, while other application may
require the file to be organized on another field. A major drawback

of the conventional method is that the storage access methods are
built in to the program. Therefore, though the same data may be
required by two applications, the data will have to be sorted in two
different places because each application depends on the way that
the data stored.
There are various drawbacks of conventional data file processing
environment. Some of them are listed below:
Data Redundancy:
Some data elements like name, address, identification code,
are used in various applications. Since data is required by
multiple applications, it is stored in multiple data files. In most
cases, there is a repetition of data. This is referred to as data
redundancy, and leads to various other problems.
Data Integrity Problems:
Data redundancy is one reason for the problem of data
integrity. Since the same data is stored in different places, it is
inevitable that some inconsistency will creep in.
Data Availability Constraints:When data is scattered in different files, the availability of information from a combination of files is constrained to some extent.
Database Management System
A database management system (DBMS) consists of a collection of
interrelated data and a set of programs to access the data. The
collection of data is usually referred to as the database. A Database
system is designed to maintain large volumes of data. Management
of data involves:
Defining the structures for the storage of data
Providing the mechanisms for the manipulation of the data
Providing for the security of the data against unauthorized
access
Users of the DBMS:
Broadly, there are three types of DBMS users:
The application programmer
The end user
The database administrator (DBA)
The application programmer writes application programs that
use the database. These programs operate on the data in the
database. These operations include retrieving information, inserting
data, deleting or changing data.
The end user interacts with the system either by invoking an
application program or by writing their queries in a database query
language. The database query language allows the end user to
perform all the basic operations (retrieval, deletion, insertion and
updating) on the data.
The DBA has to coordinate the functions of collecting information
about the data to be stored, designing and maintaining the
database and its security. The database must be designed and
maintained to provide the right information at the right time to
authorized people. These responsibilities belong to the DBA and his
staff.
ADVANTAGES OF A DBMS
The major advantage that the database approach has over the
conventional approach is that a database system provides
centralized control of data. Most benefits accrue from this notion of
centralized control.
REDUNDANCY CAN BE CONTROLLED
Unlike the conventional approach, each application does not
have to maintain its own data files. Centralized control of data
by the DBA avoids unnecessary duplication of data and
effectively reduces the total amount of data storage required.
It also eliminates the extra processing necessary to trace the
required data in a large mass of data present. Any
redundancies that exist in the DBMS are controlled and the

system ensures that these multiple copies are consistent.
INCONSISTENCY CAN BE AVOIDEDSince redundancy is reduced, inconsistency can also be avoided to some extent. The DBMS guarantee and that the database is never inconsistent, by ensuring that a change made to any entry automatically applies to the other entries as well. The process is known as propagating update.
THE DATA CAN BE SHARED
A database allows the sharing of data under its control by any
number of application program or users. Sharing of data does
not merely imply that existing applications can share the data
in the database, it also means that new applications can be
developed to operate using the same database.
STANDARDS CAN BE ENFORCEDSince there is centralized control of data, the database administrator can ensure that standards are maintained in the representation of the stored data formats. This is particularly useful for data interchange, or migration of data between two systems.
SECURITY RESTRICTIONS CAN BE APPLIED
The DBMS guarantees that only authorized persons can
access the database. The DBA defines the security checks to
be carried out. Different checks can be applied to different
operations on the same data. For instance, a person may have
the access rights to query on a file, but may not have the right
to delete or update that file. The DBMS allows such security
checks to be established for each piece of data in the
database.
INTEGRITY CAN BE MAINTAINED
Centralized control can also ensure that adequate checks are
incorporated in the DBMS to provide data integrity. Data
integrity means that the data contain in the database is both
accurate and consistent. Inconsistency between two entries
can lead to integrity problems. However, even if there is no
redundancy, the data can still be inconsistent. For example a
student may have enrolled in 10 courses in a semester when
the maximum number of courses one can enroll in is 7.
Another example could be that of a student enrolling in a
course that is not being offered that semester. Such problems
can be avoided in a DBMS by establishing certain integrity
checks to be carried out whenever any update operation is
done. These checks can be specified at the database level,
besides the application programs.
DATA INDEPENDENCEIn non-database systems, the requirement of the application dictates the way in which the data is stored and the access techniques. Besides, the knowledge of the organization of the data, the access techniques are built into the logic and code of the application. These systems are data dependent. Consider this example, suppose the university has an application that processes the student file. For performance reason, the file is indexed on the roll number. The application would be aware of the existing index, and the internal structure of the application would be built around this knowledge. Now consider that the some reason, the file is to index on the registration data. In this case it is impossible to change the structure of the stored data without affecting the application too. Such an application is a data dependent one.
It is desirable to have data independent applications. Suppose two
applications X and Y need to access the same file. However both the
applications require a particular field to be stored in different
formats. Application X requires the field “customer balance” to be
stored in decimal format, while the application Y requires it to be
stored in binary format. This would pose a problem in an old system.
In a DBMS differences may exist in the way that data is actually
stored, and the way that it is seen and used by a given application.
FEATURES OF RDBMS:
The ability to create multiple relations and enter data into
them
An interactive query language
Retrieval of information stored in more than one table
NORMALIZATION
Normalization is a process of simplifying the relationship between
data elements in a record. It is the transformation of complex data
stores to a set of smaller, stable data structures.
Normalized data structures are simpler, more stable and are easier
to maintain. Normalization can therefore be defined as a process of
simplifying the relationship between data elements in a record.
Purpose For Normalization:
Normalization is carried out for the following four reasons:
To structure the data so that there is no repetition of data, this
helps in saving space.
To permit simple retrieval of data in response to query and
report requests.
To simplify the maintenance of the data through updates,
insertions and deletions.
To reduce the need to restructure or reorganize data when
new application requirements arise.
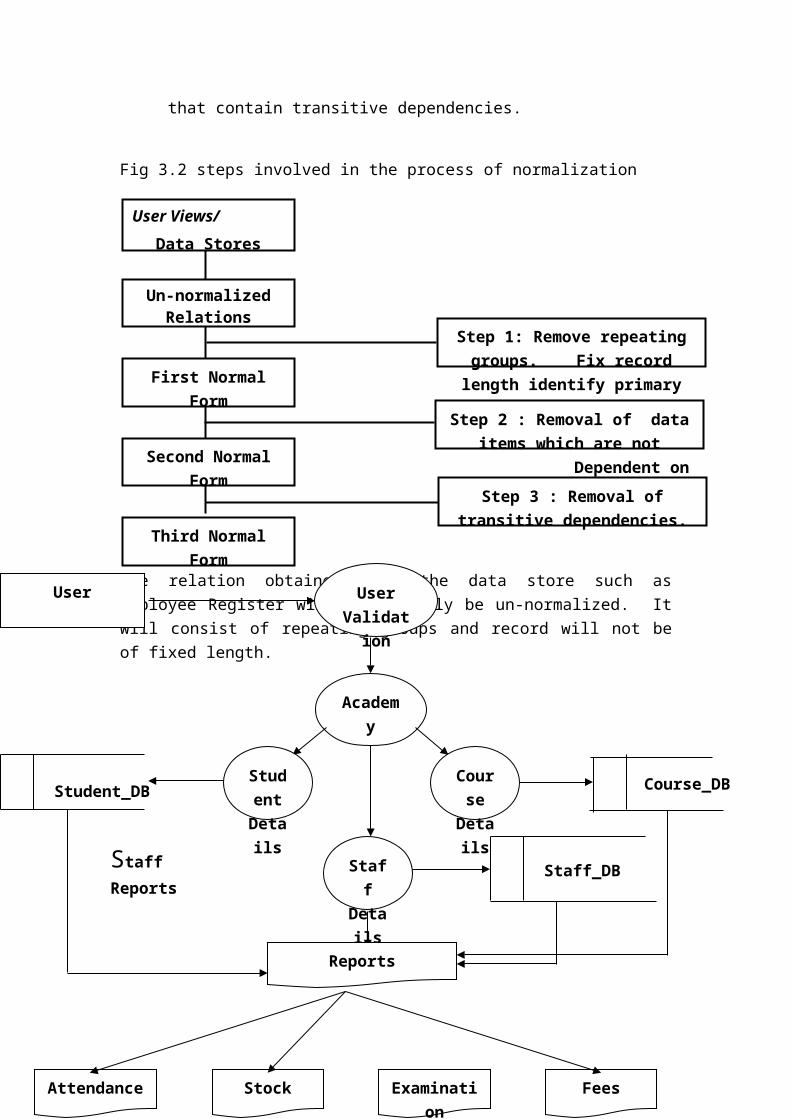
STEPS OF NORMALIZATION:
Systems analysts should be familiar with the steps in normalization,
since the process can improve the quality of design for an
application. Starting with a data store developed for a data
dictionary the analyst normalized a data structure in three steps.
Each step involves an important procedure to simplify the data
structure.
It consists of basic three steps.
1. First Normal Form, which decomposes all data groups into
two-dimensional records.
2. Second Normal form, which eliminates any relationships in
which data elements do not fully depend on the primary key
of the record.
3. Third Normal Form which eliminates any relationships that

contain transitive dependencies.
Fig 3.2 steps involved in the process of normalization
The relation obtained from the data store such as Employee
Register will most likely be un-normalized. It will consist of
repeating groups and record will not be of fixed length.
User Views/
Data Stores
Un-normalized Relations
First Normal
Form
Second Normal
Form
Third Normal
Form
Step 1: Remove repeating
groups. Fix record
length identify primary
key.Step 2 : Removal of data
items which are not
Dependent on
primary key.Step 3 : Removal of
transitive dependencies.
Academ
y
User
Validatio
n
Cours
e
Detail
s
Stude
nt
Detail
sStaff
Detail
s
User
Reports
Attendance Stock Examination Fees
Student_DB Course_DB
Staff_DBStaff
Reports

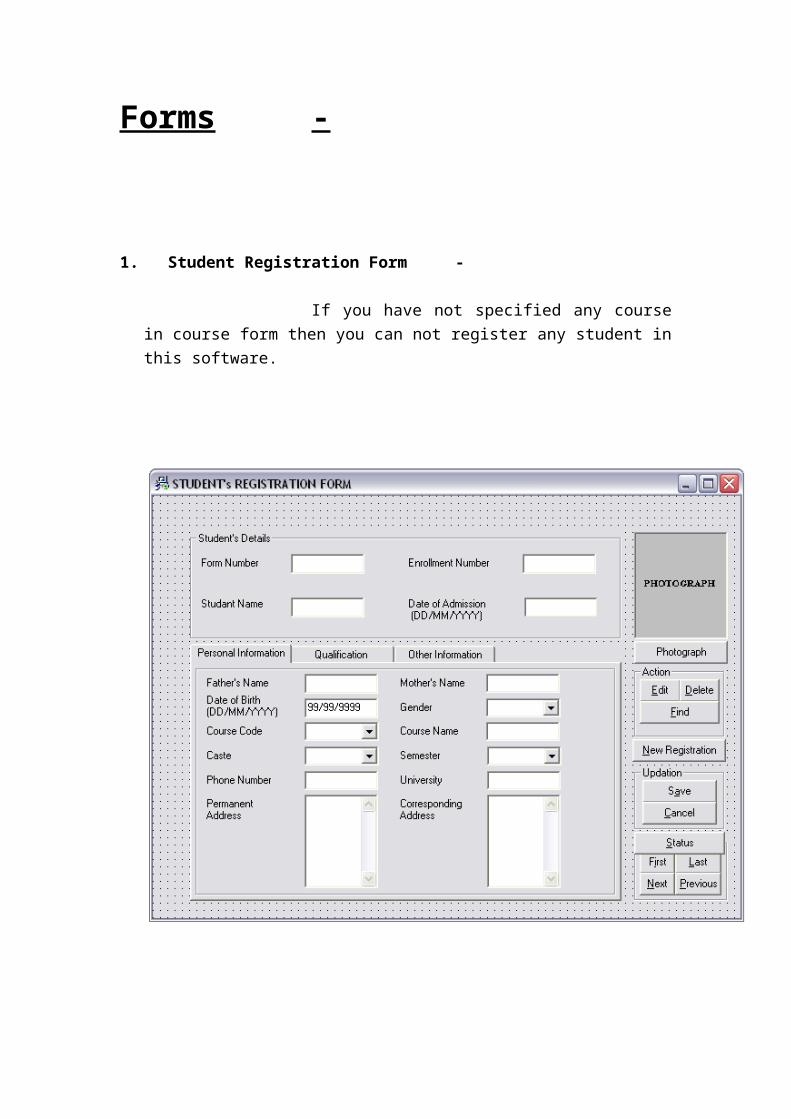
Forms -

1. Student Registration Form -
If you have not specified any course in course form then
you can not register any student in this software.

There are many buttons in this form
1. New
Registration - This button is used for Registration of new Student.
2. Save - This button is used to save new registration in data.
3. Cancel - This button is used to cancel new registration.
4. Status - This button is used for performing various tasks.
- Edit
- Delete
- Find
- First
- Last
- Next
- Previous
5. Edit - For editing the detail of any Student, to find the
Student’s data by
Find button and click on Edit button
6. Delete - For deleting the detail of any Student, to find the
Student’s data by
Find button and click on Delete button
7. Find - This button is used for finding the data of any Student.
8. First - This button is used to show the details of first Student.
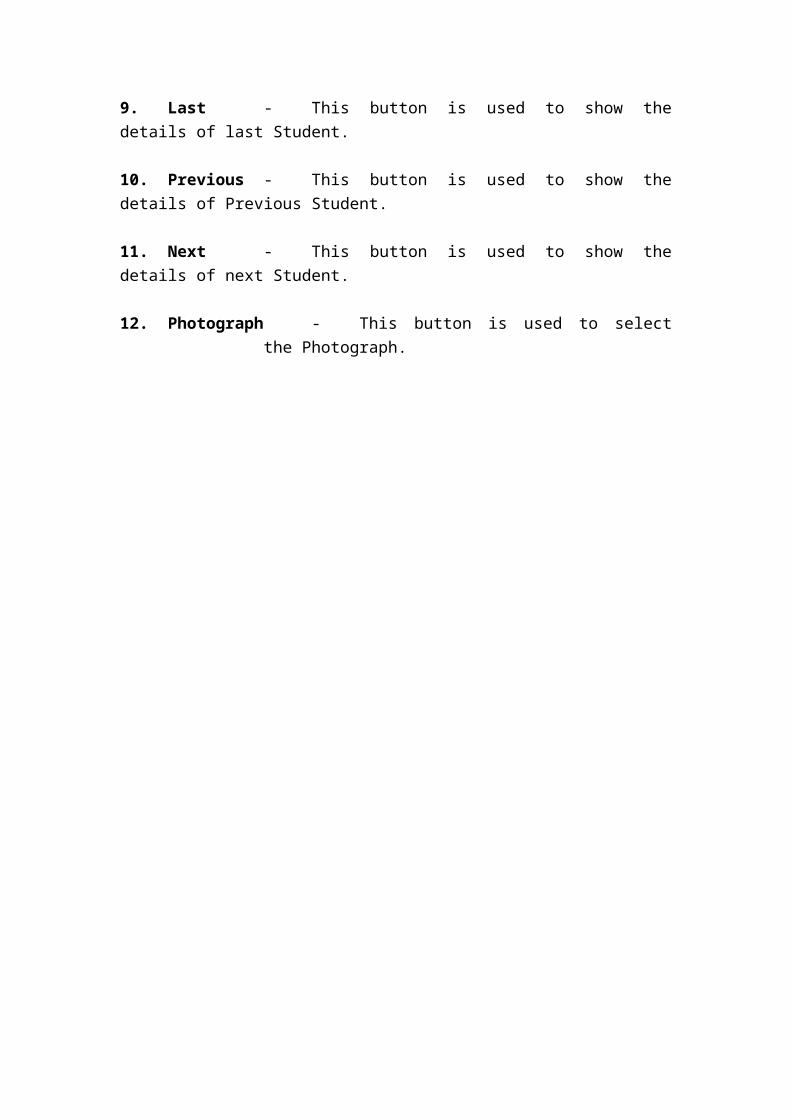
9. Last - This button is used to show the details of last Student.
10. Previous - This button is used to show the details of Previous
Student.
11. Next - This button is used to show the details of next Student.
12. Photograph - This button is used to select the Photograph.

There are many input fields in this Form -
1. Student Code - This field is automatically generated by the
system.
2. Enrollment Number - You have to enter the Enrollment Number of
Student.
3. Student Name - You have to enter the Name of Student.
4. Date of Admission - Automatically Generated as today date
Personal Information -
5. Father’ Name - You have to enter the Name of father of Student.
6. Mother’s Name - You have to enter the Name of mother of
Student.
7. Date of Birth - You have to enter the Date of Birth of Student in
“DD/MMM/YYYY” format.
8. Gender - You have to enter the Sex of Student.
9. Course Code - You have to select the Course code of Specific
Course.
10. Course Name - Automatically generated in reference of Course
Code.
11. Caste - You have to enter the Caste of Student.
12. Semester - You have to select the Semester in which the
Student is
eligible for admission
13. Phone Number - Optional, you have to enter the Phone Number
of Student.
14. University - Automatically generated in reference of Course
Code.
15. Permanent Address - You have to enter the Permanent Address of
Student.
16. Corresponding
Address - You have to enter the Corresponding Address of
Student.
In Total Fee field, it display the fee of Course, you can modify it, you can feed
donation & concession in Donation & Concession field respectively, then the fee for
this student will be saved as Total fee + Donation - Concession
Qualification -
It has 5-5 fields for each of following fields for High school, Intermediate,
Graduation, Post Graduation and other in 5 rows. It is not necessary to fill all 5
rows.
17. Course Name - You have to enter the Course Name of every
qualification.
18. Board / University - You have to enter the Board or university of
filled courses.
19. Year - You have to enter the Year of filled courses.
20. Roll no. - You have to enter the Roll No. of filled courses.
21. Maximum Marks - You have to enter the Maximum Marks of filled
courses.
22. Obtained Marks - You have to enter the Minimum Marks of filled
courses.
23. Percentage - Automatically generated.

Other Information -
24. Email ID - Optional, You have to enter the Email Address
of Student.
25. Lateral Entry - You have to select the Semester, in which he is
admitted.
26. Number - You have to enter the Number of the Draft.
27. Bank Name - You have to enter the Bank Name.
28. Amount - You have to enter the Amount of Draft.
29. Date - You have to enter the Date of Draft.
30. Attached
Documents - You have to enter the Name of attached
documents
2. Student Fee Form -
This form is used to submit the fee of enrolled student.
There are many buttons in this form
1. Fee payment - This button is used for making the Fee Payment
of enrolled
Student.
2. Save - This button is used for saving the Fee Payment.

3. Cancel - This button is used for canceling the fee
payment.
4. Edit - This feature is not available
5. Find - This button is used for finding the data of any
Student.
There are many input fields in this Form -
1. Enrollment Number - You have to select the Enrollment Number of
Student.
2. Student Name - Automatically generated in reference of
Enrollment No.
3. Course Code - Automatically generated in reference of
Enrollment No.
4. Course Name - Automatically generated in reference of
Enrollment No.
5. Semester - You have to select the Semester of which he will
submit
the Fee.
6. Date - Automatically generated as today date.
7. Paid Fee - Enter the Amount of Fee Payment.
8. Total Fee - Automatically generated, it displays the total fee
of this
student
9. Balance Fee - Automatically generated, it will displays the
remaining fee
after submission

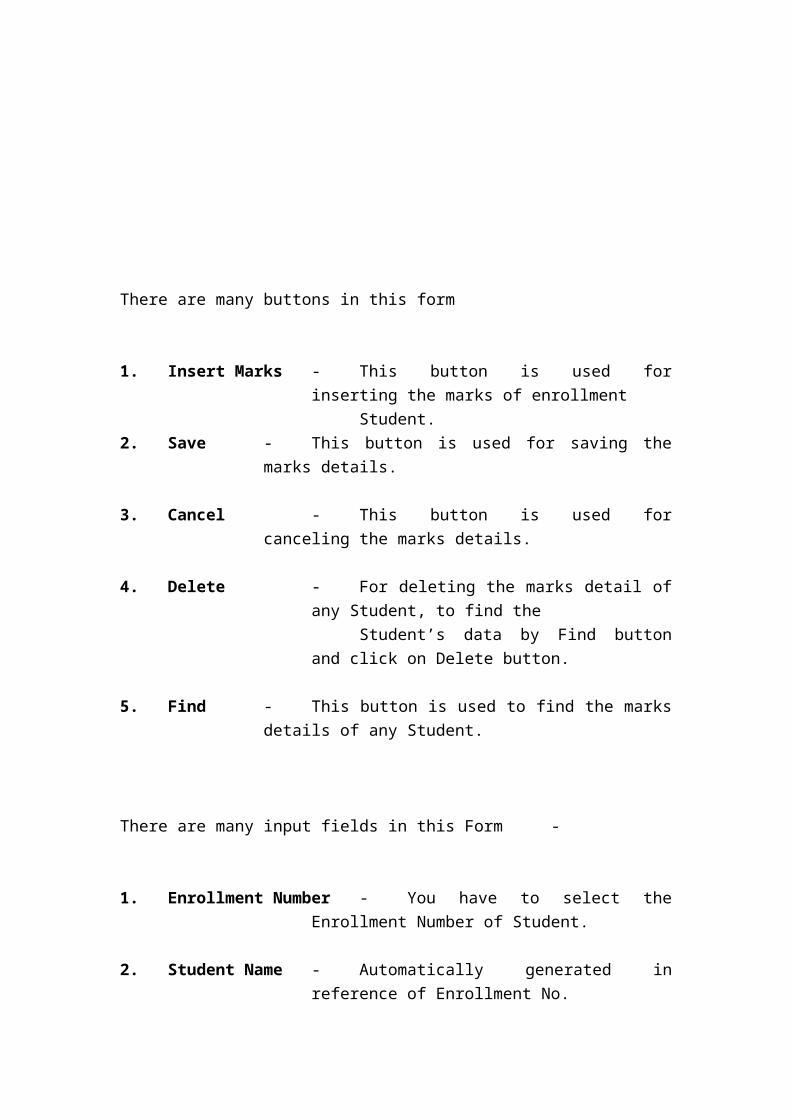
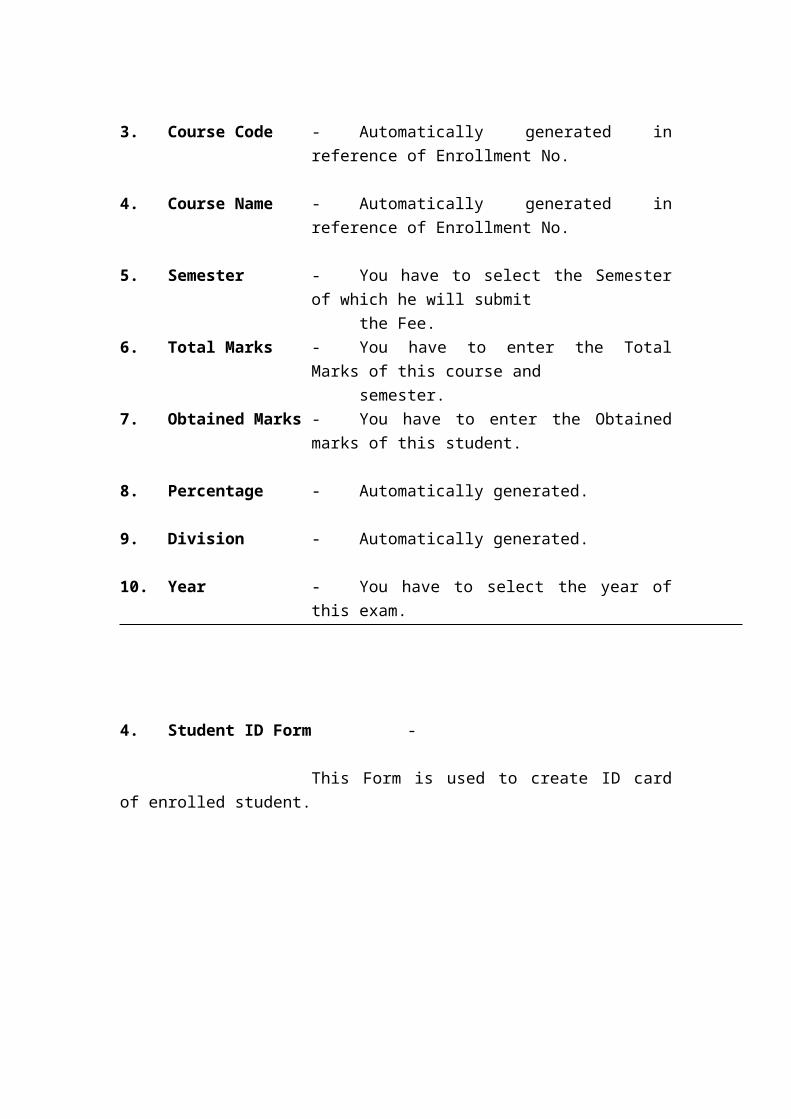
3. Student Marks Form -
This form is used to save the marks of exam of enrolled
student.

There are many buttons in this form
1. Insert Marks - This button is used for inserting the marks of
enrollment
Student.
2. Save - This button is used for saving the marks details.
3. Cancel - This button is used for canceling the marks details.
4. Delete - For deleting the marks detail of any Student, to find the
Student’s data by Find button and click on
Delete button.
5. Find - This button is used to find the marks details of any
Student.
There are many input fields in this Form -
1. Enrollment Number - You have to select the Enrollment Number of
Student.
2. Student Name - Automatically generated in reference of
Enrollment No.
3. Course Code - Automatically generated in reference of
Enrollment No.
4. Course Name - Automatically generated in reference of
Enrollment No.
5. Semester - You have to select the Semester of which he will
submit

the Fee.
6. Total Marks - You have to enter the Total Marks of this course
and
semester.
7. Obtained Marks - You have to enter the Obtained marks of this
student.
8. Percentage - Automatically generated.
9. Division - Automatically generated.
10. Year - You have to select the year of this exam.
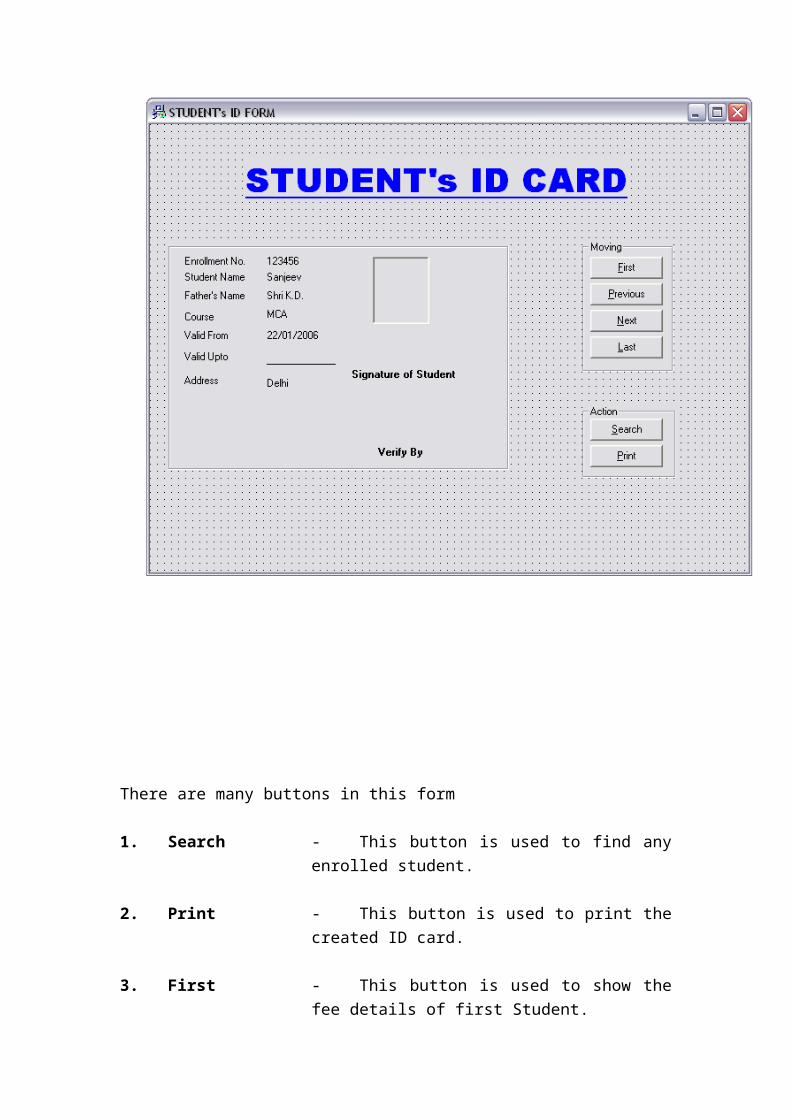
4. Student ID Form -
This Form is used to create ID card of enrolled student.

There are many buttons in this form
1. Search - This button is used to find any enrolled student.
2. Print - This button is used to print the created ID card.
3. First - This button is used to show the fee details of
first Student.
4. Last - This button is used to show the fee details of last

Student.
5. Previous - This button is used to show the fee details of
Previous
Student.
6. Next - This button is used to show the fee details of
next Student.
5. Employee Detail Form -
This form is used to save new appointment of an
employee.
There are many buttons in this form
1. New
Appointment - This button is used for new appointment.
2. Save - This button is used to save new appointment in data.
3. Cancel - This button is used to cancel new appointment.
4. Status - This button is used for performing various tasks.
- Edit
- Delete
- Find
- First
- Last
- Next
- Previous
5. Edit - For editing the detail of any Employee, to find the
Student’s data
by Find button and click on Edit button
6. Delete - For deleting the detail of any Employee, to find the
Student’s data
by Find button and click on Delete button
7. Find - This button is used to find the details of any Employee.
8. First - This button is used to show the details of first
Employee.
9. Last - This button is used to show the details of last Employee.
10. Previous - This button is used to show the details of Previous
Employee.
11. Next - This button is used to show the details of next
Employee.
12. Photograph - This button is used to select the Photograph. If the
photo is not in
Select Photo window then locate it by Browse button in
Select Photo window.

There are many input fields in this Form -
1. Staff Number - This field is automatically generated by the
system.
2. Staff Member Name - You have to enter the Name of Employee.
Personal Information -
1. Father’ Name - You have to enter the Name of father of
Employee.
2. Mother’s Name - You have to enter the Name of mother of
Employee.
3. Date of Birth - You have to enter the Date of Birth of Employee
in
“DD/MMM/YYYY” format.
4. Gender - You have to enter the Sex of Employee.
5. Caste - You have to enter the Caste of Employee.
6. Phone Number - Optional, you have to enter the Ph. Number of
Employee.
7. Email ID - Optional, You have to enter the Email ID of
Employee.
8. Date of Joining - You have to enter the Date of Joining of
Employee.
9. Permanent Address - You have to enter the Permanent Address of
Employee.
10. Corresponding
Address - You have to enter the Corresponding Address of
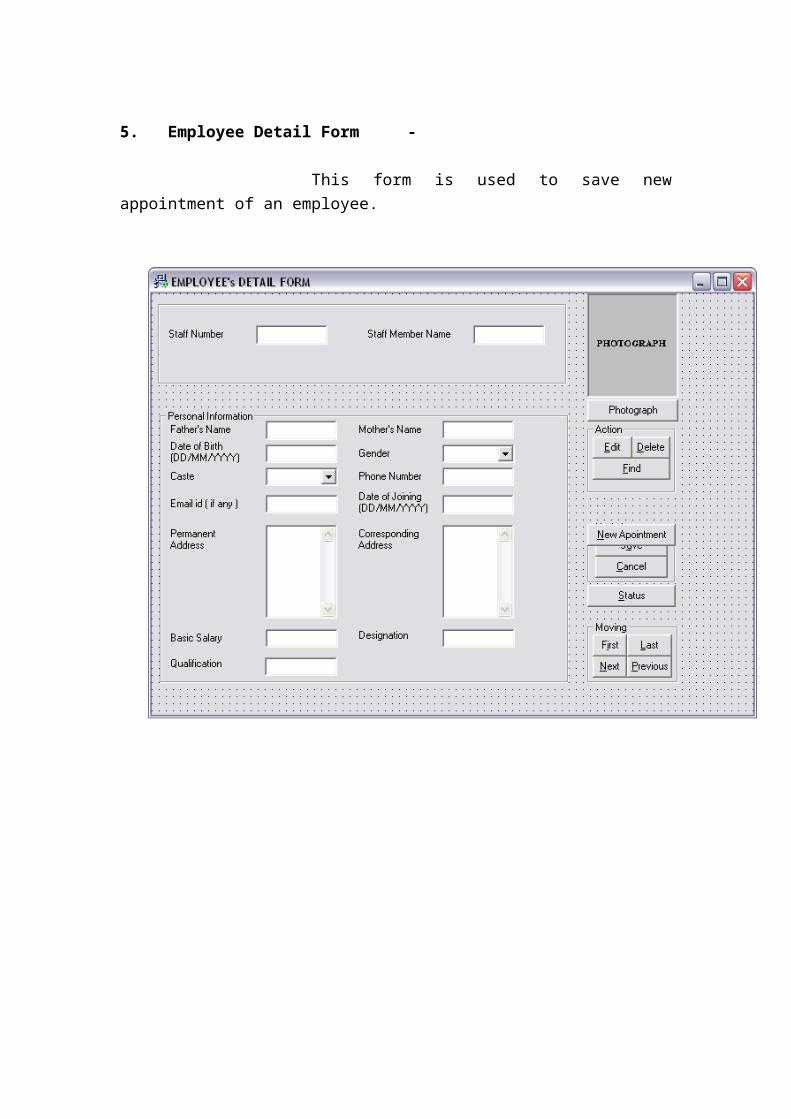
Employee.
11. Basic Salary - You have to enter the basic salary of this
employee in only
number.
12. Designation - You have to enter the Designation/Post of this
employee.
13. Qualification - You have to enter the qualification of employee.

6. Employee Salary Form -
This form is used to save and view the salary of
employee.
There are many buttons in this form

1. Insert Salary - This button is used for inserting the salary
details of this month of an employee.
2. Save - This button is used for saving the salary details.
3. Cancel - This button is used for canceling the salary
details.
4. Salary Payment - As Payment Given, If salary is given, then this
button is
used and the pay slip will not be generated again
until the next salary will be inserted
5. Find - This button is used for finding the data of any
Employee.
There are many input fields in this Form -
1. Staff Number - You have to select the Staff No. of the employee
for
inserting salary and system will ask the
percentage for HRA, DA, TA, and PF.
2. Member Name - Automatically generated in reference of Staff
No.
3. Designation - Automatically generated in reference of Staff
No.
4. Month - You have to select the month, of which the
salary is
inserted.
5. Basic Salary - Automatically generated. If you will change it,
then it will
ask again for percentage for HRA, DA, TA, and
PF.
6. HRA - Automatically generated.
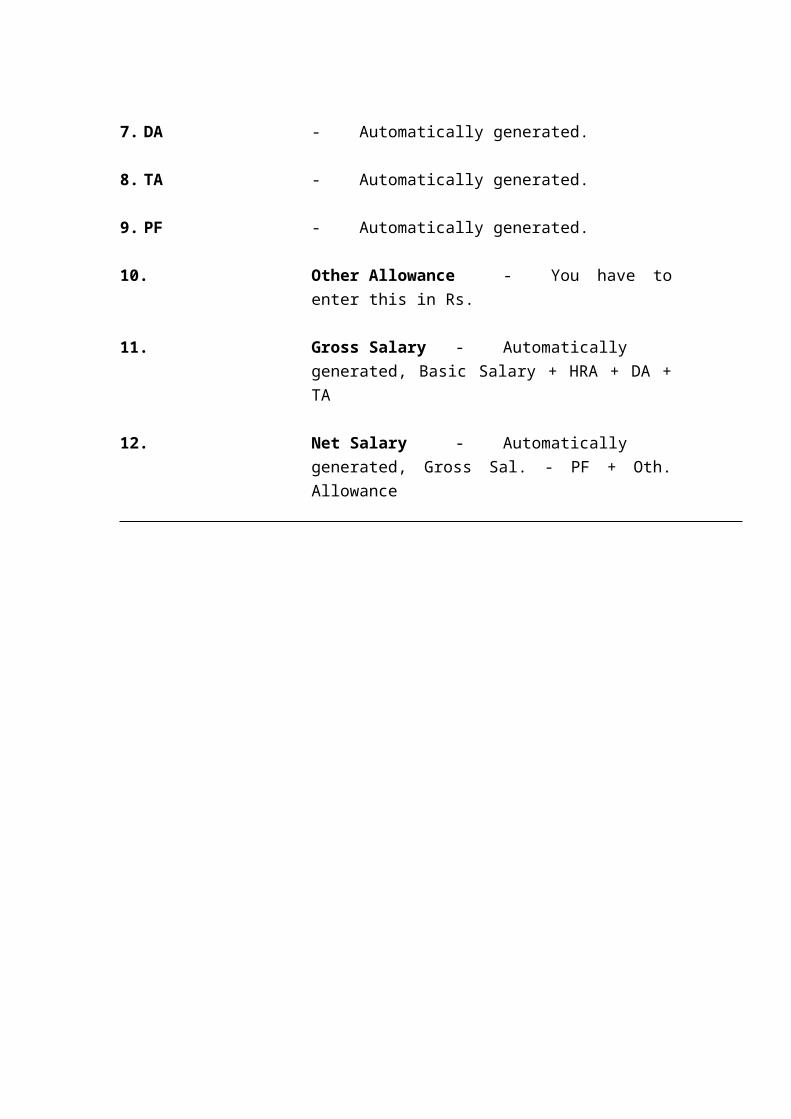
7. DA - Automatically generated.
8. TA - Automatically generated.
9. PF - Automatically generated.
10. Other Allowance - You have to enter this in Rs.
11. Gross Salary - Automatically generated, Basic Salary + HRA +
DA + TA
12. Net Salary - Automatically generated, Gross Sal. - PF + Oth.
Allowance

7. Employee ID Form -
This Form is used to create ID card of employees.

There are many buttons in this form
7. Search - This button is used to find any employee.
8. Print - This button is used to print the created ID card.
9. First - This button is used to show the details of first
employee.
10. Last - This button is used to show the details of last
employee.
11. Previous - This button is used to show the details of
previous
employee.
12. Next - This button is used to show the details of next
employee.

8. Course Detail Form -
This Form is used to add, view, and edit the course
details.
There are many buttons in this form -
1. New Course - This button is used to enter new course.
2. Save - This button is used to save the course detail.
3. Cancel - This button is used to cancel the saving action.
4. Edit - For editing any existing course, to find it by
clicking on
Find button and click on Edit button.
5. Delete - For deleting any existing course, to find it by
clicking on
Find button and click on Delete button.
6. Find - This button is used to find any existing course.
7. First - This button is used to show the details of first
course.
8. Last - This button is used to show the details of last
course.
9. Previous - This button is used to show the details of
previous course.
10. Next - This button is used to show the details of next
course.
There are many input fields in this form -
1. Course Code - You have to enter the course code.
2. Course Name - You have to enter the course name.

3. Duration - You have to enter the duration i.e. 3, 3.5 (.5 for
half year)
4. University - You have to enter the name of university from
which this
course is affiliated.
5. Total Fee - You have to enter total fee of this course in Rs.
Only
numeric
6. Eligibility - You have to enter the eligibility of this course
i.e. Intermediate or Graduation.

9. Library Form -
This Form is used to add or update new book collection
and used for library action.

There are many buttons in this form -
1. New Collection - This button is used to enter new Collection of
book.
2. Save - This button is used to save the Collection.
3. Cancel - This button is used to cancel the saving action.
4. Edit - For editing any existing Collection, to find it by
clicking on
Find button and click on Edit button.
5. Delete - For deleting any existing Collection, to find it by
clicking
on Find button and click on Delete button.
6. Find - This button is used to find any existing
Collection.
7. First - This button is used to show the details of first
Collection.
8. Last - This button is used to show the details of last
Collection.
9. Previous - This button is used to show the details of
previous
Collection.

10. Next - This button is used to show the details of next
Collection.
11. Book Exchange - This Button is used to take library action i.e.
issue the book,
return the book. For issue the book, click on
Book Exchange button then click on Issue
button, fill the form and click on Save button.
For return the book, click on Book Exchange
button then click on Return button and follow
the instruction.
There are many input fields in this form -
1. Group Number - Automatically generated, a group number for the
books of
same title and same time and same author.
2. Book Title - To enter the title of book.
3. Book Author - To enter the author name of book.
4. Book Publisher - To enter the publisher name of book
5. Book Price - To enter the price of book in Rs. i.e. 299.99

6. Date of Purchasing - To enter the date in “DD/MMM/YYYY”
format.
7. Available Copy - To enter the No. of copy.
8. Issued Copy - Automatically generated.
9. Remaining Copy - Automatically generated.
Reports - There are many reports in this system.
1. Student Report - This report is used to generate the report of
enrolled student
between two dates. Select the first date and
second date and click on Generate button.
2. Employee Report - This report is used to generate the report of
appointed
employee between two dates. Select the first
date and second date and click on Generate
button.
3. Course Report - This report is used to generate the report of the
selected
course name. Select the course name and click
on Generate button.
4. Book Detail Report - This report is used to generate the report of
selected

Accession No. (Group No.). Select the
Accession No. and click on Generate button.
5. Issued Book Report - This report is used to generate the report of
issued book of
selected Student Code. Select the Student Code.
and click on Generate button.
6. Fee Detail Report - This report is used to generate the report of fee
submission
of selected Month. Select the Month and click
on Generate button.
7. Marks Detail Report - This report is used to generate the report of
marks of exam
of selected Year. Select the Year and click on
Generate button.
8. Generate Pay Slip - This report is used to generate the Pay Slip of
the selected
Month .
Every reports are exported into excel, by clicking on Export to Excel Button, this
button is disabled, this button is enabled when you click on Generate button and
report is generated.
Screens -
1. About School… - This screen is help screen.
Additional Features - These features are used only by

Administrator.
1. Backup - This feature is used to create the backup of your data.
This
feature is accessed by the Administrator in the
full version only.
2. Restore - This feature is used to restore the backup files. This
feature
is accessed by the Administrator in the full
version. But, the Administrator may use this
feature in Trial version one time only. So that
you may restore your full version backup file in
new same installed system
3. User Management - This feature is used to create the limited user, to
delete the
limited user or change the password of the
Administrator. But this feature is accessed by
only the Administrator and you must have only
one Administrator. Don’t delete the
Administrator. If you delete the Administrator
then you can’t use these feature. (In this case
you can restore the previous Backup files in new
software)
4. Enter a Serial Key - This feature is used to enter the Serial key,
which is
received after purchasing. This feature may also
be used by Administrator.

5. Purchase - This feature is used to show the method of purchasing.