Embed Size (px)
Citation preview

NURSING 121
College Laboratory Guide
Spring 2014
Student Name___________________________

2
College Lab – Week 1
Objectives – Unit I – Inflammation and Infection
related to alterations in the concepts
WEEKLY COURSE OBJECTIVES: Appendicitis, PUD, Gallbladder Disease,
Cellulitis
Exemplars used this week are
1. Identify factors and/or co-morbidities affecting and/or contributing to
inflammation and/or infection.
2. Explain commonly used treatments, identified by standards of care, for patients
with conditions that affect inflammation and/or infection.
3. Explain common physical assessment procedures used to assess inflammation
and/or infection for patients across the life span.
4. Outline diagnostic and laboratory test to determine the patient’s inflammation
and/or infection status as it relates to the exemplars taught this week.
5. Explain the management of inflammation and/or infection as it relates to
health/wellness and prevention.
6. Demonstrate the nursing process in providing culturally competent and caring
interventions across the life span for individuals with conditions that affect
inflammation and/or infection. 7. Identify pharmacologic and non-pharmacologic interventions when caring for a
patient with conditions that affect inflammation and/or infection.
Skills/Demonstration
Skills/Assessment:
Nursing responsibilities as it relates to the operative patient:
- Perioperative
- Intra-operative
- Post-operative
Math
- Review medication calculation.
- Metric system conversions
- PO medication
- IV medication drawn up into a syringe
- IV fluid in drops per minutes.
Concept Book Nursing skills: 4.1, 4.2, 4.3, 4.13, 4.14, 4.15, 4.17,
Critical Thinking – Medication Administration Pickar, G.D., Abernethy, A.P. (2008) Dosage Calculations. (8th ed.) Clifton Park: Thompson
Delmar Learning
Math
- Review medication calculation.
- Metric system conversions
- PO medication
- IV medication drawn up into a syringe
- IV fluid in drip per minutes.

3
Critical Thinking – Medication Administration: Pickar, G.D., Abernethy, A.P. (2008) Dosage Calculations. (8th ed.) Clifton Park: Thompson
Delmar Learning
Math:
- Weight based Heparin infusion. Bolus of medication and use of a protocol.
- Weight based Medication mcg/kg/hour
mL/kg/hour
mg/kg/hour
- IV medication delivered using a Pump.
Medical Asepsis Worksheet
1. Explain the procedure for hand washing in medical asepsis.
2. Identify when clean gloves need to be utilized.
3. How are latex allergies managed?
4. Describe the infectious chain and how infection can be controlled by breaking the
chain.

4
5. Describe standard precautions.
Surgical Asepsis Worksheet
1. Identify a synonym for surgical asepsis __________________________.
2. List at least three occasions when surgical asepsis is used.
a.
b.
c.
3. True or false:
a. Before donning sterile gloves you need to wash and dry your hands ______.
b. Place the glove package on a dry, clean surface, preferably above the waist _____.
c. Once a sterile glove package is opened only the outside of the wrapper is to be
touched _____.
d. Only the inside edge of the cuff of the sterile glove can be touched _____.
e. Sterile gloves are disposable _____.
f. The fingers of the gloves are considered sterile _____.
g. The cuffs of the gloves are considered contaminated _____.
h. Once gloves are in place, solutions can be placed on the sterile field _____.

5
4. Describe the steps involved in a dressing change (Refer to Smith, Duell and Martin).
When removing a dressing _________ gloves are used.
If a dressing adheres to a suture line use ________ __________ to wet the dressing.
A wound is assessed for ________________, ____________, ______________ and
_________________.
Before cleansing a wound ___________ gloves are donned.
Identify the direction to follow when cleansing an incision _____________________
____________________________________________________________________.
Rationale ____________________________________________________________
____________________________________________________________________
____________________________________________________________________.
5. What antimicrobial agents used in wound care are ____________ and ____________.
6. When caring for a wound that has a drain, cleansing the drain site proceeds from the
____________ to the ______________ of the wound using a ___________ motion.
7. Describe the steps involved with applying an abdominal binder.
8. How is a closed wound drainage system such as a Jackson-Pratt and a hemovac
maintained?
Perioperative Worksheet
1. Describe the nursing activities implemented during the preoperative phase of
client care.
2. Identify the purpose of a surgical shave and when it should be completed?

6
3. Identify the rationale for surgical scrub.
4. What other ways may the skin be cleansed and prepped for the OR?
5. Discuss the importance of preoperative teaching.
6. Describe the use of antiembolic stockings or sequential stockings to prevent
venous stasis.
7. During a surgical scrub water runs by gravity in the direction
a. from the fingertips to the elbows
b. the elbow to the fingers
c. downward toward the hand
d. direction doesn’t matter only length of the scrub time.
8. If during a surgical scrub the hand or arm is contaminated, the nurse needs to
a. start the scrub over from the beginning.
b. repeat the wash of the area considered contaminated for 10 strokes.
c. rinse the area for 20 seconds which renders the skin clean.
d. open a new scrub brush and continue to scrub for 30 seconds.
9. Identify four basic guidelines that the nurse incorporates in preoperative teaching.
a.
b.
c.
d.
10. Explain the purpose of antiembolitic stockings and elastic wraps.

7
11. How often should stockings or wraps be removed?
12. How is a pneumatic compression device helpful to the circulation?

8
PROVIDING POSTOPERATIVE CARE
Performed
Procedure
Yes No Mastered
1. Perform hand hygiene prior to each
patient contact.
2. Checked two forms of patient ID and
introduced self to patient.
3. Oriented patient to time, person, and
place. Reoriented as needed.
4. Assessed for patent airway and level of
consciousness; administered oxygen if
ordered. Attached pulse oximeter if
ordered.
5. Assessed for effects of anesthesia
including general, regional, or local.
6. Took vital signs, including pain
assessment: usual orders are every 15
minutes until stable; then every
half hour for 2 hours; every hour for 4
hours; then every 4 hours for 24–48 hours.
7. Checked pulse oximetry every hour for
4 hours, then every 4 hours
8. Checked for nausea and vomiting.
9. Checked IV site and patency frequently.
10. Observed, and recorded urine output,
amount, and color.
11. Measured intake and output.
12. Observed skin color and moisture, and
nail beds.
13. Positioned patient for comfort and
maximum airway ventilation according to
orders.
14. Turned every 2 hours and PRN.
15. Gave back care at least every 4 hours.
16. Encouraged coughing and deep
breathing every 2 hours (may use
spirometer or Triflow if ordered).
17. Kept client comfortable with
medications.
18. Monitored for side effects of
medications.
9
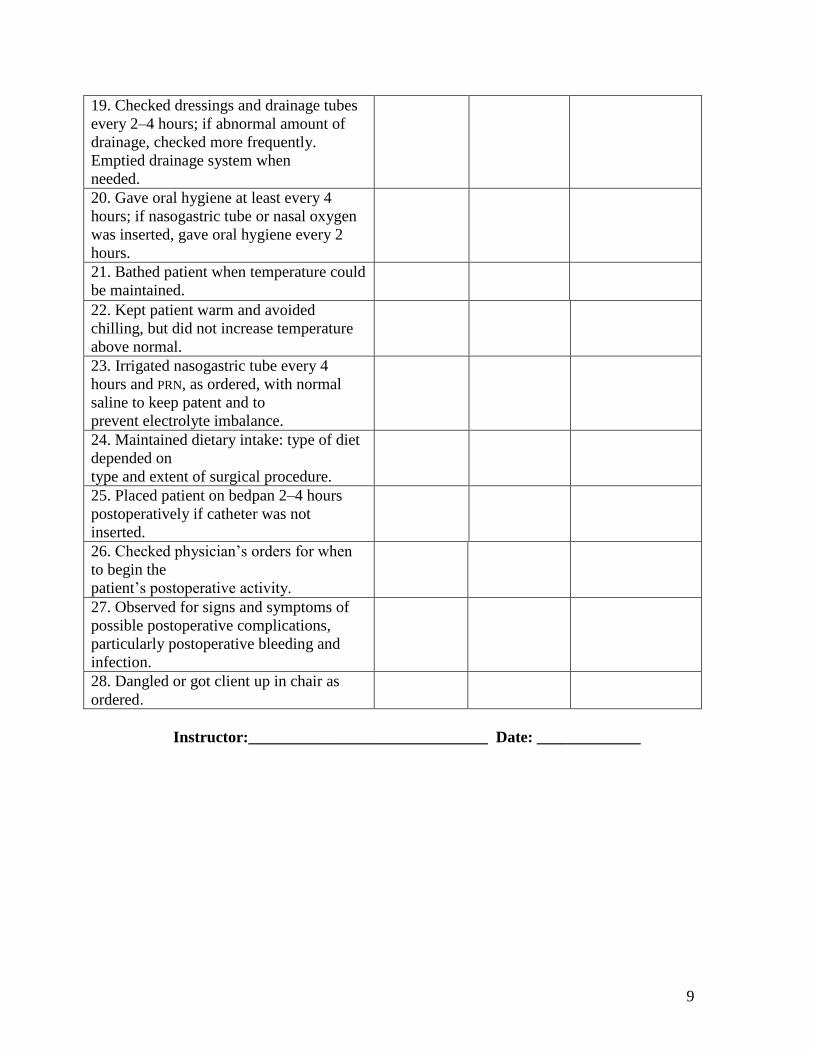
19. Checked dressings and drainage tubes
every 2–4 hours; if abnormal amount of
drainage, checked more frequently.
Emptied drainage system when
needed.
20. Gave oral hygiene at least every 4
hours; if nasogastric tube or nasal oxygen
was inserted, gave oral hygiene every 2
hours.
21. Bathed patient when temperature could
be maintained.
22. Kept patient warm and avoided
chilling, but did not increase temperature
above normal.
23. Irrigated nasogastric tube every 4
hours and PRN, as ordered, with normal
saline to keep patent and to
prevent electrolyte imbalance.
24. Maintained dietary intake: type of diet
depended on
type and extent of surgical procedure.
25. Placed patient on bedpan 2–4 hours
postoperatively if catheter was not
inserted.
26. Checked physician’s orders for when
to begin the
patient’s postoperative activity.
27. Observed for signs and symptoms of
possible postoperative complications,
particularly postoperative bleeding and
infection.
28. Dangled or got client up in chair as
ordered.
Instructor:______________________________ Date: _____________

10
College Lab – Week 2
Objectives – Unit 2 Inflammation and Immunity
related to alterations in the concepts
WEEKLY COURSE OBJECTIVES:
Exemplars used this week are Gout, Rheumatoid Arthritis and HIV ONLY
1. Identify factors and/or co-morbidities affecting and/or contributing to alterations
in inflammation/immunity.
2. Explain commonly used treatments, identified by standards of care, for patients
with conditions that affect inflammation/ immunity.
3. Explain common physical assessment procedures used to assess
inflammation/immunity for patients across the life span.
4. Outline diagnostic and laboratory test to determine the patient’s
inflammation/immunity status as it relates to the exemplars taught this week.
5. Explain the management of inflammation/immunity as it relates to
health/wellness and prevention.
6. Demonstrate the nursing process in providing culturally competent and caring
interventions across the life span for individuals with conditions that affect
inflammation/immunity.
7. Identify pharmacologic and non-pharmacologic interventions when caring for a
patient with conditions that affect inflammation/immunity.
Skills/Demonstration:
Learning activities for above exemplars.
Review case study on page 755 in Pearson Concept based book. Answer questions 1 and
2. Question 3. Please develop a plan of care using the nursing diagnosis of knowledge
deficit. What education does Mrs. James require based on her new diagnosis and life style
changes that will need to occur. What medications do you anticipate Mrs. Jones will be
started on and what education and resource would you give the patient.
Answer all 5 questions on page 756 under “link the concepts”
Name that Drug
NCLEX style questions
Critical Thinking – Medication Administration Pickar, G.D., Abernethy, A.P. (2008) Dosage Calculations. (8th ed.) Clifton Park: Thompson
Delmar Learning
Math:
- Weight based Medication mcg/kg/hour
mL/kg/hour
mg/kg/hour
IV medication delivered using a Pump.

11
College Lab – Week 3
Objectives – Unit 3 – Mobility
related to alterations in the concept
WEEKLY COURSE OBJECTIVES:
Exemplars used this week are Osteoporosis
1. Identify factors and/or co-morbidities affecting and/or contributing to alterations
in metabolism.
2. Explain commonly used treatments, identified by standards of care, for patients
with conditions that affect metabolism.
3. Explain common physical assessment procedures used to assess metabolism for
patients across the life span.
4. Outline diagnostic and laboratory test to determine the patient’s metabolic status
as it relates to the exemplars taught this week.
5. Explain the management of metabolism as it relates to health/wellness and
prevention.
6. Demonstrate the nursing process in providing culturally competent and caring
interventions across the life span for individuals with conditions that affect
metabolism.
7. Identify pharmacologic and non-pharmacologic interventions when caring for a
patient with conditions that affect metabolism.
Skills/Demonstration:
Assess and maintain body alignment and turning of patients after hip/knee replacements.
Setting up and maintaining a sterile field.
- Preparing and maintain a sterile field.
- Donning sterile gloves
- Urinary Catheter assessment, insertion, and maintenance.
Assessment: Elimination and Mobility
Concept Book Nursing skills- 2.10, 2.11, 4.13, 6.14
HESI Case Study: DVT
Critical Thinking – Medication Administration Pickar, G.D., Abernethy, A.P. (2008) Dosage Calculations. (8th ed.) Clifton Park: Thompson
Delmar Learning
Math:
- Weight based Medication mcg/kg/hour
mL/kg/hour
mg/kg/hour
IV medication delivered using a Pump.
12
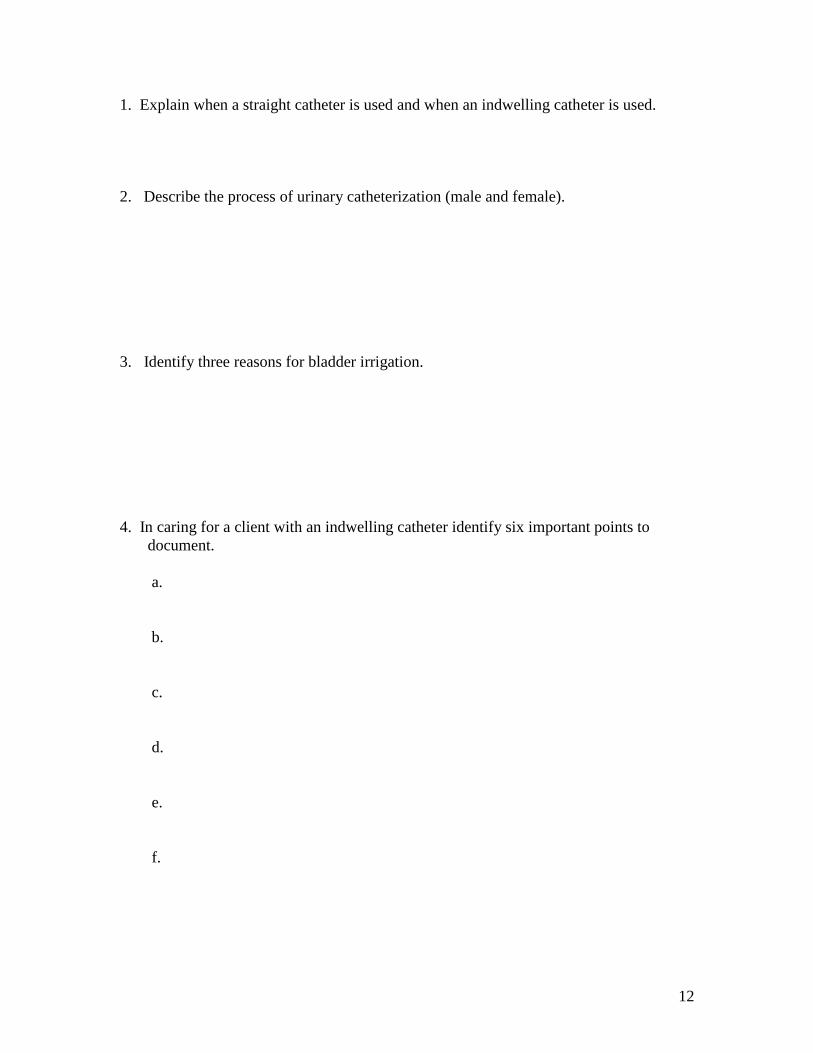
1. Explain when a straight catheter is used and when an indwelling catheter is used.
2. Describe the process of urinary catheterization (male and female).
3. Identify three reasons for bladder irrigation.
4. In caring for a client with an indwelling catheter identify six important points to
document.
a.
b.
c.
d.
e.
f.

13
DRAPING A FEMALE CLIENT
Performed
Procedure
Yes No Mastered
1. Brought bath blanket to bedside.
2. Identified patient, and explained procedure.
3. Provided privacy.
4. Performed hand hygiene.
5. Placed bed in HIGH position, and lowered side
rail nearest you.
6. Placed bath blanket over patient’s top linen so
that one corner of the blanket was pointed toward
the patient’s head to form a diamond shape over
the patient.
7. Instructed patient to hold onto bath blanket.
Fanfolded linen to foot of bed and placed on
chair.
8. Requested that patient flex knees and keep
them apart with feet firmly on bed.
9. Wrapped lateral corners of bath blanket around
feet in a spiral fashion until they were completely
covered.
10. Allowed for corner of the blanket between
knees and extending over perineum to later be
folded back over the abdomen.
Instructor:______________________________ Date: _____________
INSERTING A RETENTION CATHETER (FEMALE)
Performed
Procedure
Yes No Mastered
1. Opened sterile package by tearing the package
on the lined edge of plastic wrap. Placed plastic
wrap at foot of bed for waste disposal.
2. Placed catheter kit on bed between patient’s
legs.
3. Opened closed drainage set bag and placed on
bed near patient.
4. Folded back corner of bath blanket to expose
perineum.
5. Opened white outer wrap away from package
with last turn toward client.

14
6. Removed sterile absorbent pad, and positioned
under patient’s buttocks plastic side down. Had
patient lift buttocks if able. Positioned pad by
holding corners of pad only.
7. Donned sterile gloves.
8. Positioned fenestrated drape over the patient to
expose the genitalia (optional).
9. Separated prep tray from container, placing
prep tray with cotton balls, antiseptic solution
packet and lubricant onto sterile field toward
patient.
10. Tested catheter balloon.
11. Opened package and poured antiseptic
solution over cotton balls.
12. Uncapped syringe filled with lubricant and
ejected onto prep tray to lubricate catheter tip at
time of catheter insertion, or opened lubricant
packet and inserted catheter tip into lubricate,
keeping catheter in tray.
13. Removed cap from specimen cup if indicated.
14. Prepped patient’s meatus:
15. Discarded forceps in plastic bag at foot of bed.
16. With uncontaminated hand, took catheter from
container, lubricated tip, and inserted gently into
meatus 2 inches or until urine started to flow.
17. Guided the catheter gently just beyond the
point at which urine began to flow.
18. Injected entire contents of prefilled (10–30mL
sterile water) syringe into the side arm of the
catheter used for balloon inflation.
19. If patient complained of pain on balloon
inflation, immediately aspirated the sterile water.
20. Retracted the catheter until you felt resistance.
21. Obtained urine specimen before attaching
catheter to drainage tubing, if indicated.
22. Removed protective cap from drainage tubing
and attached securely to catheter, if indicated.
23. Applied catheter holder or tape catheter to
patient’s thigh. Placed one piece of tape on leg.
Took second piece of tape and encircled catheter
leaving two “tails” on tape. Secured “tails” from
tape on catheter to tape on leg.
24. Attached drainage bag to bed frame (not side
rails); coiled tubing to allow free gravity flow of
urine.

15
25. Removed drapes.
26. Repositioned client for comfort; put bed in
LOW position with upper side rails up.
27. Removed equipment, including gloves, and
discarded disposable trash in appropriate
container.
28. Recorded urine output on I&O.
29. Performed hand hygiene.
30. Labeled specimen and placed cup in biohazard
transport bag.
31. Sent urine specimen to lab and documented
procedure.
Instructor:______________________________ Date: _____________
INSERTING A RETENTION CATHETER (MALE)
Performed
Procedure
Yes No Mastered
1. Opened sterile package by tearing
package on lined edge of plastic wrap.
Placed plastic wrap at foot of bed for waste
disposal.
2. Placed sterile kit on bed at client’s side
near thigh.
3. Opened closed drainage set and placed
on bed near work area.
4. Opened outer white wrap away from
sterile package.
5. Placed sterile drape over thighs and
under penis.
6. Donned sterile gloves and set fenestrated
drape aside on sterile field.
7. Separated prep tray from container,
placed prep tray with cotton balls,
antiseptic solution packet, and
lubricant onto sterile field toward patient.
8. Tested catheter balloon.
9. Opened package, and poured antiseptic
solution over cotton balls.
10. Removed cap from specimen cup if

16
indicated.
11. Uncapped syringe filled with lubricant
and ejected onto rolling prep tray, or
opened lubricant package.
12. Lubricated catheter generously about
3–4 inches keeping catheter in tray or, if
using alternate method, inserted lubricant
directly into the urethra using a prefilled
syringe.
13. Positioned fenestrated drape over the
penis.
14. Held penis upright with your
nondominant hand. Held sides of penis to
prevent closing of urethra.
15. With your dominant hand, used forceps
to pick up cotton ball saturated
with antiseptic solution or pick up swab.
16. Cleansed meatus first with one circular
stroke using the forceps or Betadine swab.
17. Discarded swab into plastic wrap at foot
of bed.
18. Repeated circular prep around head of
penis. Cleansed three times using a new
cotton ball or Betadine swab each time.
19. Continued to hold penis with your
nondominant hand.
20. Discarded forceps into plastic bag.
21. Picked up catheter with sterile hand
about 8–10 cm (3–4 inches) from tip of
catheter.
22. Lifted penis to a 90° angle
(perpendicular to body)
and exerted slight traction by pulling
upward.
23. Inserted catheter about 10–12 inches
until urine began to flow.
24. If resistance was met, lowered angle of
penis to 45°and asked client to take a deep
breath.
25. Guided catheter gently 1–2 inches
beyond point at which urine began to flow.
26. Injected entire contents of prefilled
sterile water syringe into side arm of
catheter for balloon inflation.

17
27. Gently retracted catheter until you felt
resistance.
28. Obtained urine specimen if indicated.
29. Removed protective cap from drainage
tubing and
attached securely to catheter if indicated.
30. Taped catheter to abdomen with 1-inch
tape. Alternative taping to upper thigh.
31. Attached drainage bag to bed frame (not
side rails).
32. Repositioned client for comfort; put bed
in LOW positioned with upper side rails
raised.
33. Removed all equipment, including
gloves, and discarded disposable trash in the
appropriate container.
34. Measured and recorded urine output in
I&O bedside record.
35. Performed hand hygiene.
36. Labeled specimen cap, placed in
biohazard transport bag, and sent to lab.
37. Documented procedure.
Instructor:______________________________ Date: _____________
INSERTING A STRAIGHT CATHETER (FEMALE)
Performed
Procedure
Yes No Mastered
1. Opened sterile catheter set package by
tearing the package on the lined edge of
plastic wrap. Placed plastic wrap at foot of
bed for waste disposal.
2. Placed catheter set on bed between
patient’s legs.
3. Folded back drape to expose perineum.
4. Opened white outer wrap away from
sterile package with last turn toward client.
5. Removed sterile absorbent pad, and
positioned plastic side down under client’s
buttocks. Had patient lift buttocks if able.
Positioned pad by holding corners of pad
only.

18
6. Put on sterile gloves.
7. Placed fenestrated drape over patient’s
perineum, exposing meatus (optional).
8. Removed sterile articles from tray, and
arranged conveniently on sterile field or
placed tray onto field.
9. Opened package, and poured antiseptic
solution over cotton balls or opened
package of antisepticsoaked swabs with
stick end up.
10. Uncapped syringe filled with lubricant,
or tore open lubricant package, picked up
catheter tip, and lubricated the tip of the
catheter generously.
11. If specimen was required, uncapped
sterile specimen container.
12. Moved catheter tray close to client on
sterile field.
13. Prepped client’s meatus:
14. Using sterile gloved hand, picked up
lubricated catheter keeping drainage end in
collectioncontainer, and inserted 2 inches or
until urine began to flow.
15. Moved nondominant hand from holding
labia open to hold catheter in place.
16. Placed sterile specimen container under
drainage end of catheter if specimen was
needed, and filled container with
approximately 30 mL of urine.
17. Replaced catheter drainage end into
collection container, and allowed urine to
flow until it ceases.
18. Pinched catheter closed when urine
ceased to flow, and removed gently and
slowly.
19. Removed drapes and dried the
perineum.
20. Positioned client for comfort, put the
bed in LOW position with the upper side
rails raised.
21. Measured and recorded urine output on
the I&O bedside record.
22. Discarded gloves and equipment
appropriately.
23. Performed hand hygiene.

19
24. Labeled specimen, placed in transport
bag, and sent to lab.
25. Documented procedure.
Instructor:______________________________ Date: _____________
INSERTING A STRAIGHT CATHETER (MALE)
Performed
Procedure
Yes No Mastered
1. Opened sterile package by tearing the
package on the lined edge of plastic wrap.
Placed plastic wrap at foot of bed for
waste disposal.
2. Placed sterile kit at client’s side near
thigh.
3. Opened outer wrap away from sterile
package.
4. Donned sterile gloves.
5. Placed first drape over thighs and under
penis.
6. Placed fenestrated drape over penis.
7. Opened antiseptic package and poured
solution over cotton balls or opened
package of antiseptic-soaked
swabs with stick end up.
8. Opened lubricant packet or syringe—
ejected onto prep tray.
9. If specimen was required, uncapped the
specimen container.
10. Held penis upright with your
nondominant hand.
11. With your dominant hand, used
forceps to pick up
cotton ball saturated with antiseptic
solution or picked up Betadine swab.
12. Cleansed meatus with circular stroke
using cotton ball or swab. Discarded
cotton ball or swab into plastic bag at foot
of bed.

20
13. Repeated circular cleansing motion
prep around tip of penis. Cleansed three
times using a new cotton ball or swab
each time.
14. Continued to hold penis with your
nondominant hand.
15. Discarded forceps into plastic bag.
16. Lubricated catheter about 3–4 inches
using generous amount of lubricant.
17. Alternate Method: Inserted tip of
lubricant syringe at urethral opening and
instilled lubricant (or 2% lidocaine gel if
ordered) directly into urethra.
18. Picked up catheter with sterile gloved
hand about 8–10 cm (3–4 inches) from tip
of catheter.
19. Lifted penis to a 90° angle
(perpendicular to body) and exerted slight
traction by pulling upward.
20. Inserted catheter about 24.5 cm (10–
12 inches) until urine began to flow.
21. If catheter met resistance, decreased
angle of penis
to 45° or less, and asked client to take a
deep breath.
22. Filled sterile specimen container from
drainage end of catheter if specimen was
needed.
23. Pinched tubing, and transferred end of
catheter into collection container.
24. Allowed urine to drain into collection
container until flow stopped.
25. Removed catheter, placed lid on
specimen bottle.
26. Dried penis and removed drapes.
27. Made client comfortable. Placed bed
in LOW position with upper side rails
raised.
28. Discarded equipment in appropriate
container.
29. Removed gloves and performed hand
hygiene.

21
30. Sent specimen to lab and documented
procedure.
Instructor:______________________________ Date: _____________
PROVIDING CATHETER CARE
Performed
Procedure
Yes No Mastered
1. Placed patient in supine position, and
exposed perineal area to easily visualize
the meatus.
2. Removed catheter securing tape.
3. Put on clean gloves.
for Female
a. Cleansed urinary meatus using circular
motion moving outward with washcloth,
soap and water.
b. Dried area with towel.
c. Resecured retention catheter with tape
or commercial holder.
for Circumcised Male
a. With mitten washcloth, soap, and
water, cleansed around urinary meatus.
b. Dried area with towel.
c. Using separate washcloth, cleaned area
between scrotum and rectal area, then
dried.
d. Placed soiled linen in hamper.
for Uncircumcised Male
a. Retracted foreskin back away from
catheter.
b. With mitten washcloth, soap, and
water, cleansed around urinary meatus.
c. Dried penis with towel.
d. After drying, pulled foreskin back
around the catheter.
e. Placed soiled linen in hamper.
4. Removed gloves and discard. Retaped
catheter.
5. Positioned patient for comfort.
6. Lowered bed, and raised upper side

22
rail.
7. Performed hand hygiene.
Instructor:______________________________ Date: _____________
REMOVING A RETENTION CATHETER
Performed
Procedure
Yes No Mastered
1. Removed tape attaching catheter to
patient.
2. Inserted syringe into balloon port of
catheter. Did not cut port with scissors.
3. Withdrew fluid from balloon (usually
10 mL water in balloon).
4. Pulled gently on catheter to ensure
balloon was deflated before attempting to
remove.
5. Held paper towel under catheter with
your nondominant hand.
6. If resistance was not met, slowly
withdraw catheter allowing it to fall into
paper towel.
7. Disconnected urine drainage bag from
bed frame.
8. Emptied drainage bag into graduate
and measure.
9. Recorded output on I&O bedside
record.
10. Disposed of catheter in appropriate
receptacle.
11. Positioned patient for comfort.
12. Removed gloves and performed hand
hygiene.
13. Instructed client to drink oral fluids
as tolerated and observed for symptoms
of urinary tract infection (burning,
frequency, urgency).
14. Offered bedpan or urinal after
removing catheter, until voiding
occurred. Kept accurate I&O record of
time and amount of postcatheterization
voidings.

23
15. Reported to physician if patient had
not urinated in 8 hours.
Instructor:______________________________ Date: _____________
IRRIGATING A CLOSED SYSTEM
Performed
Procedure
Yes No Mastered
1. Open sterile container. Maintained
sterility on inside of the container.
2. Placed absorbent pad under end of
catheter to form a working field.
3. Poured irrigant into solution container.
4. Clamped tubing just distal to injection
port.
5. Swabbed tubing injection port with
antiseptic swab.
6. Inserted the needleless cannula into
tubing injection port.
7. Attempted to aspirate obstructing clot
or debris.
8. Withdrew irrigating solution into
syringe.
9. Swabbed injection port again.
10. Injected solution slowly into port.
11. Removed syringe from injection port.
12. Unclamped drainage tube, and
lowered catheter to allow solution to
drain.
13. Repeated irrigation steps until return
was free of clots and debris.
14. Lowered bed and raised side rail.
15. Disposed of equipment and removed
gloves.
16. Performed hand hygiene.
17. Measured amount of return.
Subtracted amount of irrigating solution
to determine urine output.
18. Recorded net urine output on clients
I&O record.

24
Instructor:______________________________ Date: _____________
COLLECTING SPECIMEN FROM A CLOSED SYSTEM
Performed
Procedure
Yes No Mastered
1. Gathered equipment.
2. Identified patient.
3. Explained the procedure and rationale
to the patient.
4. Clamped (or crimp and bind)
retention catheter drainage tubing a few
inches distal to sample access port
(approximately 15 minutes to allow
urine to collect in tube).
5. Performed hand hygiene and donned
gloves.
6. Wiped the sample access port of the
drainage tubing with the antimicrobial
swab.
7. Inserted cannula of specimen trap
syringe into port. Alternately, inserted
blunt cannula of syringe, or engaged
uncapped Luer-Lok syringe with port.
8. Aspirated urine sample (at least 2 mL)
by gently pulling back on syringe
plunger, then removed syringe.
9. For Kova specimen syringe, capped
syringe, completely retracted plunger,
snapped it off from end of syringe
barrel, and discarded.
10. Applied identifying label to
specimen syringe.
11. For syringe with blunt cannula,
Luer-Lok syringe, transfered urine
sample into specimen container and
applied client label.
12. Removed drainage tubing clamp.
13. Removed gloves and performed
hand hygiene.
14. Sent specimen syringe or container
in biohazard bag to laboratory as soon as
possible, or placed in unit refrigerator.

25
Instructor:______________________________ Date: _____________

26
College Lab -- Week 4
Objectives – Unit 4 – Mobility
related to alterations in the concept
Exemplars used this week are Osteoarthritis and fractures and care of the client
with joint replacement
WEEKLY COURSE OBJECTIVES:
1. Identify factors and/or co-morbidities affecting and/or contributing to alterations
in mobility.
2. Explain commonly used treatments, identified by standards of care, for patients
with conditions that affect mobility.
3. Explain common physical assessment procedures used to assess mobility for
patients across the life span.
4. Outline diagnostic and laboratory test to determine the patient’s mobility status as
it relates to the exemplars taught this week.
5. Explain the management of mobility as it relates to health/wellness and
prevention.
6. Demonstrate the nursing process in providing culturally competent and caring
interventions across the life span for individuals with conditions that affect
mobility.
7. Identify pharmacologic and non-pharmacologic interventions when caring for a
patient with conditions that affect mobility.
Skills/Demonstration/Return Demonstration:
Assess and maintain body alignment and turning of patients after hip/knee replacements.
Cont.
Setting up and maintaining a sterile field.
- Preparing and maintain a sterile field.
- Donning sterile gloves
- Urinary Catheter assessment, insertion, and maintenance.
Concept Book Nursing skills- 2.10, 2.11, 4.13, 6.14
Critical Thinking –
Medication Administration: Can review any math that was not finished from week 3

27
College Lab – Week 5
Objectives – Unit 5 – Mobility-
related to alterations in concepts Exemplars used this week are amputations and back injuries
WEEKLY COURSE OBJECTIVES:
1. Identify factors and/or co-morbidities affecting and/or contributing to alterations
in mobility.
2. Explain commonly used treatments, identified by standards of care, for patients
with conditions that affect mobility.
3. Explain common physical assessment procedures used to assess mobility for
patients across the life span.
4. Outline diagnostic and laboratory test to determine the patient’s mobility status as
it relates to the exemplars taught this week.
5. Explain the management of mobility as it relates to health/wellness and
prevention.
6. Demonstrate the nursing process in providing culturally competent and caring
interventions across the life span for individuals with conditions that affect
mobility.
7. Identify pharmacologic and non-pharmacologic interventions when caring for a
patient with conditions that affect mobility.
Skills/Demonstration Safety Group presentations are presented in lab