Embed Size (px)
Citation preview

SANTOS: User and maintenance manual
98163 US 1.1 - 07 2013 1 / 19 www.santos.fr
USER AND MAINTENANCE MANUAL
IMPORTANT: documents included in this manual to be kept: • "CE" COMPLIANCE DECLARATION • WARRANTY CERTIFICATE
Translation of the original version
Coffee grinders - Fruit juicers - Mixers - Blenders - Drinks dispensers - Planetary mixers Cheese graters - Ice crushers - Mincers - Vegetable slicers – Dough mixer Moulins à café - Presse-fruits - Mixers - Blenders - Distributeurs de boissons - Batteurs mélangeurs - Pétrin - Râpes à fromage - Broyeurs à glaçons - Hache-viande - Coupe-légumes
MODELES DEPOSES FRANCE ET INTERNATIONAL INTERNATIONALLY PATENTED MODELS
SANTOS SAS : 140-150 AVENUE ROGER SALENGRO 69120 VAULX-EN-VELIN (LYON) - FRANCE TEL. 33 (0) 472 37 35 29 - FAX 33 (0) 478 26 58 21 E-Mail:[email protected] www.santos.frTO
COFFEE SHOP GRINDER # 63
!
SANTOS: User and maintenance manual
98163 US 1.1 - 07 2013 2 / 19 www.santos.fr
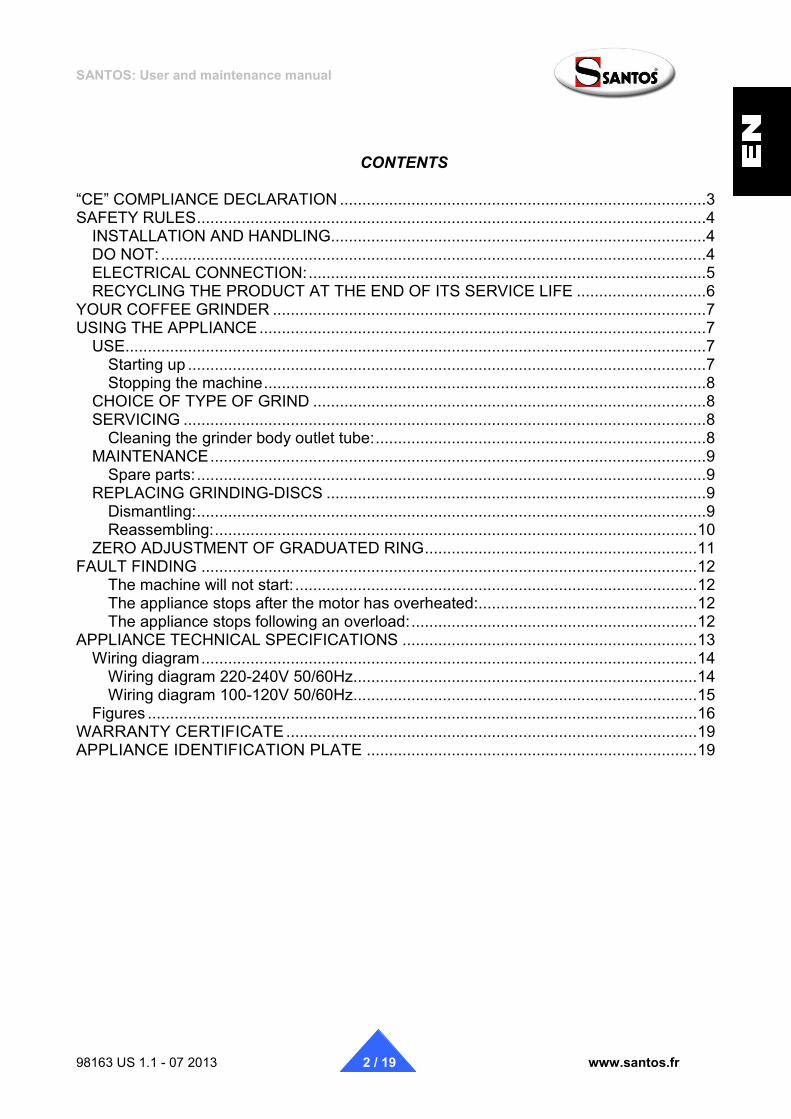
CONTENTS “CE” COMPLIANCE DECLARATION .................................................................................. 3 SAFETY RULES .................................................................................................................. 4
INSTALLATION AND HANDLING.................................................................................... 4 DO NOT: .......................................................................................................................... 4 ELECTRICAL CONNECTION: ......................................................................................... 5 RECYCLING THE PRODUCT AT THE END OF ITS SERVICE LIFE ............................. 6
YOUR COFFEE GRINDER ................................................................................................. 7 USING THE APPLIANCE .................................................................................................... 7
USE .................................................................................................................................. 7 Starting up .................................................................................................................... 7 Stopping the machine ................................................................................................... 8
CHOICE OF TYPE OF GRIND ........................................................................................ 8 SERVICING ..................................................................................................................... 8
Cleaning the grinder body outlet tube: .......................................................................... 8 MAINTENANCE ............................................................................................................... 9
Spare parts: .................................................................................................................. 9 REPLACING GRINDING-DISCS ..................................................................................... 9
Dismantling: .................................................................................................................. 9 Reassembling: ............................................................................................................ 10
ZERO ADJUSTMENT OF GRADUATED RING ............................................................. 11 FAULT FINDING ............................................................................................................... 12
The machine will not start: .......................................................................................... 12 The appliance stops after the motor has overheated: ................................................. 12 The appliance stops following an overload: ................................................................ 12
APPLIANCE TECHNICAL SPECIFICATIONS .................................................................. 13 Wiring diagram ............................................................................................................... 14
Wiring diagram 220-240V 50/60Hz ............................................................................. 14 Wiring diagram 100-120V 50/60Hz ............................................................................. 15
Figures ........................................................................................................................... 16 WARRANTY CERTIFICATE ............................................................................................ 19 APPLIANCE IDENTIFICATION PLATE .......................................................................... 19

SANTOS: User and maintenance manual
98163 US 1.1 - 07 2013 3 / 19 www.santos.fr
“CE” COMPLIANCE DECLARATION
THE MANUFACTURER:
SANTOS SAS - 140-150, Av. Roger SALENGRO 69120 VAULX-EN-VELIN (LYON) FRANCE Declares that the appliance to be released on to the professional market, described below: Description: Coffee shop grinder Type number: 63 complies:
• with the statutory provisions laid down in appendix 1 of the European "machines" directive n°2006/42/EC and the national laws transposing the directive.
• with the statutory provisions of the following directives and regulations: o No. 2006/95/EC (Low voltage directive) o No. 2004/108/CEE (EMC directive) o No. 2002/95/EC (RoHS directive) o No. 2002/96/EC (WEEE directive) o N° 1935/2004/EC (Regulation) on materials and articles intended to come into
contact with food
Harmonised European standards used for giving presumption of conformity to the essential requirements of the above-mentioned directives:
• NF EN ISO 12100 -1 and 2:2004: Machine safety devices - General design principles • NF EN 60204-1: 2006 : Machine safety devices - Machine electrical equipment -General
regulations • NF EN 1672-2: 2005, Food processing machinery – Basic concepts - Hygiene requirements. • NF EN 60335-1: 2003: Household and similar electrical appliances. Safety. • NF EN 60335-2-64 :2004: Particular requirements for commercial electric kitchen machines
Drawn up in VAULX-EN-VELIN on: 01/07/2012 Title of signatory: CHIEF EXECUTIVE OFFICER Name signatory: Aurélien FOUQUET Signature:

SANTOS: User and maintenance manual
98163 US 1.1 - 07 2013 4 / 19 www.santos.fr
SAFETY RULES At the time of use, maintenance or scrapping of the appliance, always ensure that the following elementary precautions are adhered to.
Read the explanatory instructions in full
Keep this user manual
INSTALLATION AND HANDLING
TAKE CARE: for all handling operations including unpacking the machine, the coffee bean hopper or its cover must not be used to hold or lift the appliance.
You are advised to have 2 people to handle the machine to avoid any risk of back injury. For ease of use, it is recommended that the machine is placed on a table or work surface so as to have the bag grip (13) in front of you (recommended height: 90 cm, to be adapted as required to the user).
DO NOT:
1. Never operate the machine with no coffee beans in the bean hopper. 2. Never use this machine to grind anything other than roasted coffee beans. 3. Remove from the coffee beans any foreign bodies which may damage the
grindstones (metal staples, stones, etc.). 4. Turn the On/Off switch (8) to "0" when the appliance is not in operation. 5. Cleaning in a jet of water or a high pressure spray is prohibited. 6. The base must not be immersed in water. 7. Never use the appliance if the power cord is damaged. It must be replaced by
a special unit available from an approved SANTOS dealer or from SANTOS itself.
8. The appliance must be unplugged before any intervention on it: cleaning, general care, maintenance.
9. It is forbidden to operate the appliance on a surface with a slope in excess of 10° with respect to the horizontal plane. The feet of the machine must always be resting on this surface. The machine motor centre line must always be vertical with respect to the surface on which it is placed.
Note: for easier understanding of the sections below, please refer to the diagrams at the end of the manual.
!
!

SANTOS: User and maintenance manual
98163 US 1.1 - 07 2013 5 / 19 www.santos.fr
10. The use of spare parts other than certified original SANTOS parts is
prohibited 11. Never connect several appliances to the same power socket. 12. Never use the machine outdoors. 13. Never place the appliance close to or on a source of heat. 14. This appliance is a professional machine designed exclusively for
professional use. It is not designed for household use. 15. This appliance is not designed for use by people (including children) whose
physical, sensorial or mental capacities are impaired or by people with no experience or knowledge, unless they have been supervised or given training in the use of the appliance beforehand by a person responsible for their safety. Supervise children to ensure they do not play with the appliance.
ELECTRICAL CONNECTION: • The appliance's power supply is available in two single-phase voltages:
- 110-120 V 50/60 Hz: - 220-240 V 50/60 Hz:
Line protection: the appliance must be connected to a standard 2 pole + earth socket. The set-up must be fitted with a differential circuit breaker and a 16A fuse. Earthing of the appliance is compulsory. TAKE CARE:
• Before connecting the appliance, check that the mains electrical voltage is the same as the voltage for your appliance. Its value is shown:
either on the identification plate under the appliance. or on the identification plate on the last page of this manual.
• If the power cord is damaged, it should be replaced with a special unit available from SANTOS or a SANTOS-approved dealer.
TAKE CARE: Check that the on / off switch (8) is in position 0 before plugging the power
cord in to the mains power socket. (fig. B)
!
!

SANTOS: User and maintenance manual
98163 US 1.1 - 07 2013 6 / 19 www.santos.fr
RECYCLING THE PRODUCT AT THE END OF ITS SERVICE LIFE
This appliance is marked with the symbol of the selective waste sorting system relating to waste electrical and electronic equipment. This means that this product should be disposed of as per the selective sorting system in compliance with the 2002/96/EC directive (WEEE) – Professional Appliances section – so as to be either recycled or dismantled with a view to reducing any impact on the environment.
For further information, you can contact SANTOS or your local dealer. For the disposal or recycling of the appliance components, please refer to a specialist company or contact SANTOS. Electronic products not covered by a selective sorting system are potentially dangerous for the environment. The packaging material should be disposed of or recycled in accordance with the regulations in force. Table showing the proportions of materials making up the appliance (percentage of weight)
Total steel Total aluminum Total plastic Total copper
Weight of miscellaneous
materials* 78,5 % 11,1% 4,8% 5,1% 0,5 %
* Weight of miscellaneous materials, e.g.: switches, electronic boards, capacitors, electric cables, etc

SANTOS: User and maintenance manual
98163 US 1.1 - 07 2013 7 / 19 www.santos.fr
YOUR COFFEE GRINDER • The coffee grinder is particularly suitable for coffee shops, communal kitchens,
roasting shops, • The robust frame of the appliance is made of cast aluminum and painted metal. The
transparent plastic coffee bean hopper has a capacity of 1.2 kg: • The appliance is fitted with the "bag grip" system (maximum bag height: 400 mm). • A button for adjusting the size of the grind caters for all types of coffee grind (Turkish,
fine, espresso, filter coffee, medium or coarse grind). • The special hardened steel grinding-discs (Ø 120 mm) guarantee an even and fine
grind.
USING THE APPLIANCE USE This coffee grinder can be used to grind and dispense the pre-dosed coffee into the bag corresponding to the desired quantity (250, 500g and 1kg).
Starting up
1. With the hopper (2) empty and push button (10) not pressed, start up the appliance by putting the main ON/Off switch (8) to position 1. (fig. A) (fig. B)
2. Turn the adjusting button (6) to select the type of grind desired.
IMPORTANT: It is prohibited to select a grind finer than the current setting if the hopper is not fully emptied by running the motor (the grinder body must be empty in order to perform this operation). If not, there is a risk of blocking the motor. The adjusting button must be set to position "9" in order to release the motor.
3. Place the coffee beans in the hopper (2). 4. Pull the hopper shutter (3) to open the tube 5. Push the lever of the bag grip (13) and position the bag so that the tube of the bag
grip is inside the bag. 6. Press the On/Off button (10) to start the motor 7. When the hopper is empty, press the On/Off push button (10) to stop the motor 8. Hold the bag with one hand and lift up the bag grip with the other and release it
quickly in order for the remaining grind contained in the tube of the bag grip to fall inside the bag.
!
SANTOS: User and maintenance manual
98163 US 1.1 - 07 2013 8 / 19 www.santos.fr
Stopping the machine
The machine will stop either:
• By pressing the On/Off push button (10) (fig. A) (fig. B) • Or putting the main O/Off switch (8) to position 0
CHOICE OF TYPE OF GRIND
Turn the grind adjusting button (6) clockwise for a finer grind and anticlockwise for a coarser grind. The factory setting is for the finest grind with the grinding-discs nearly touching each other.
SERVICING
Clean the coffee bean hopper (2), the grinder body tube (23) and the inside of the bag grip (13) from time to time. Always turn the appliance off (switch (8) in position "0") and unplug it.
Cleaning the grinder body outlet tube:
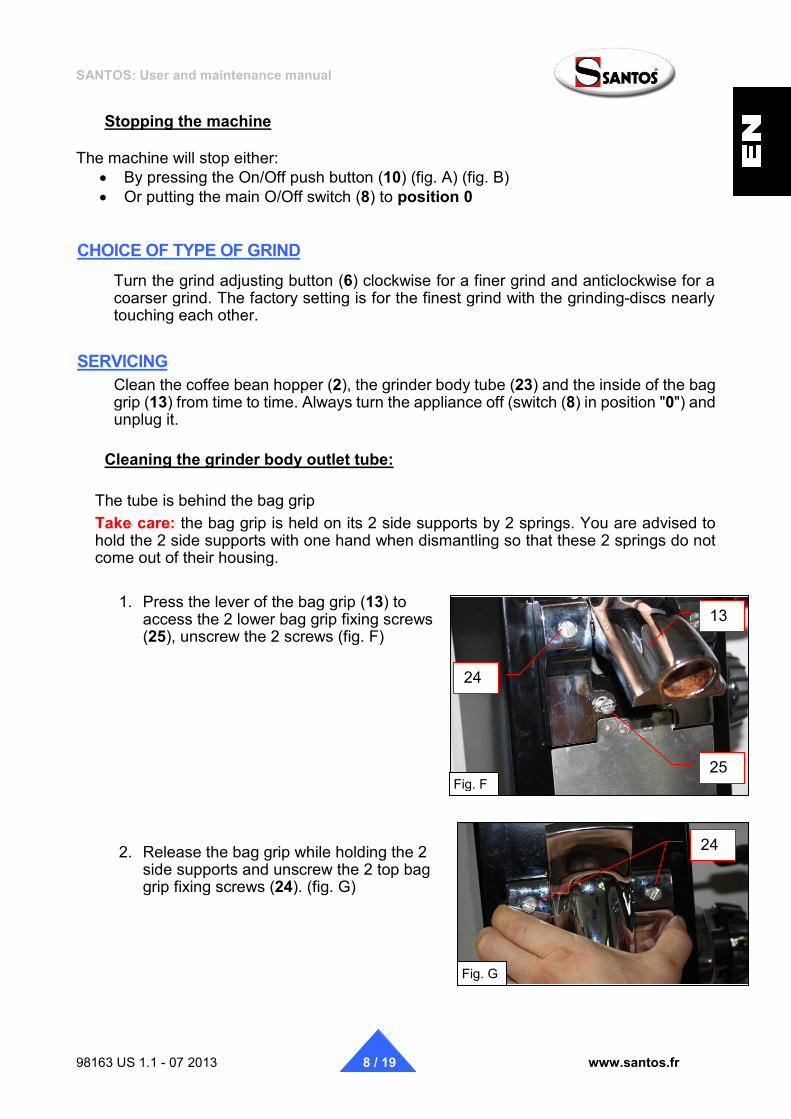
The tube is behind the bag grip Take care: the bag grip is held on its 2 side supports by 2 springs. You are advised to hold the 2 side supports with one hand when dismantling so that these 2 springs do not come out of their housing.
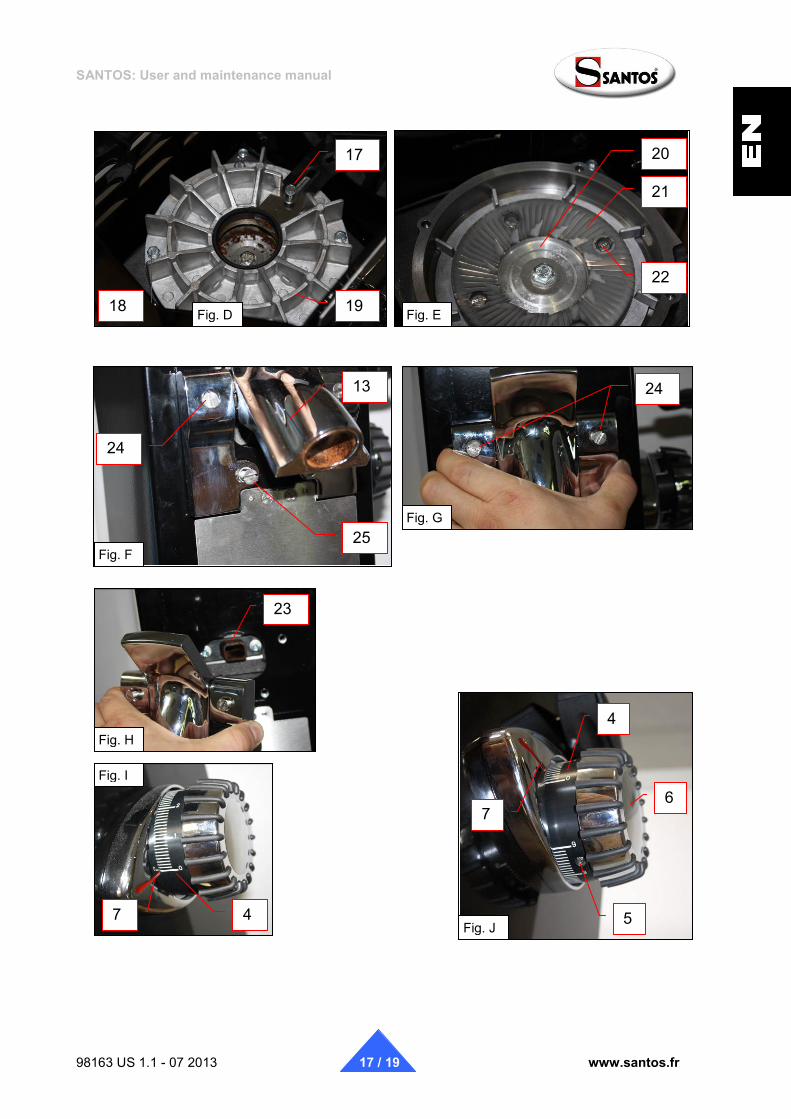
1. Press the lever of the bag grip (13) to access the 2 lower bag grip fixing screws (25), unscrew the 2 screws (fig. F)
2. Release the bag grip while holding the 2 side supports and unscrew the 2 top bag grip fixing screws (24). (fig. G)
25
13
24
24
Fig. F
Fig. G
SANTOS: User and maintenance manual
98163 US 1.1 - 07 2013 9 / 19 www.santos.fr
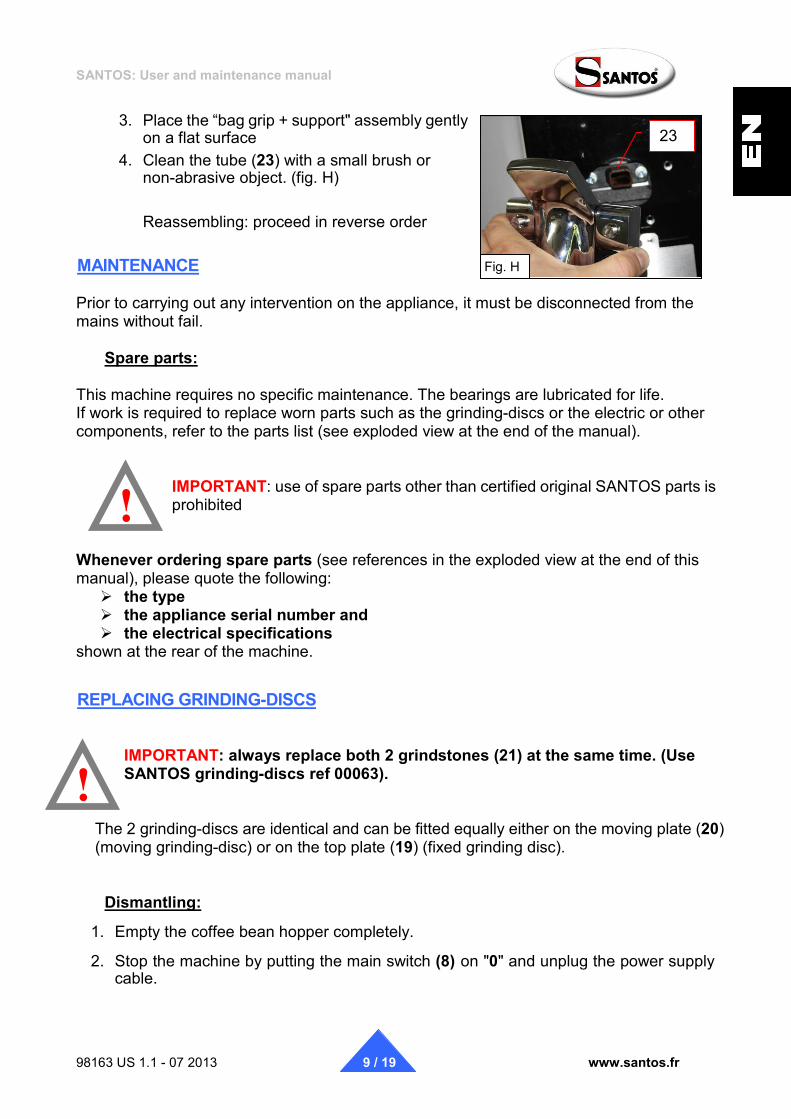
3. Place the “bag grip + support" assembly gently
on a flat surface 4. Clean the tube (23) with a small brush or
non-abrasive object. (fig. H) Reassembling: proceed in reverse order
MAINTENANCE Prior to carrying out any intervention on the appliance, it must be disconnected from the mains without fail.
Spare parts: This machine requires no specific maintenance. The bearings are lubricated for life. If work is required to replace worn parts such as the grinding-discs or the electric or other components, refer to the parts list (see exploded view at the end of the manual).
IMPORTANT: use of spare parts other than certified original SANTOS parts is prohibited
Whenever ordering spare parts (see references in the exploded view at the end of this manual), please quote the following: the type the appliance serial number and the electrical specifications
shown at the rear of the machine.
REPLACING GRINDING-DISCS
IMPORTANT: always replace both 2 grindstones (21) at the same time. (Use SANTOS grinding-discs ref 00063).
The 2 grinding-discs are identical and can be fitted equally either on the moving plate (20) (moving grinding-disc) or on the top plate (19) (fixed grinding disc).
Dismantling:
1. Empty the coffee bean hopper completely.
2. Stop the machine by putting the main switch (8) on "0" and unplug the power supply cable.
!
!
23
Fig. H

SANTOS: User and maintenance manual
98163 US 1.1 - 07 2013 10 / 19 www.santos.fr
15
16
17
18 19
Fig. C
Fig. D
20
22
21
Fig. E
3. Turn the grinding-disc adjusting button (6) as far as it will go to position "9".
4. Lift up the magnetic operating indication plate (14),
5. Unscrew and remove the 2 front (15) and 2 rear (16) screws, then remove the hopper (2) by pulling it upwards, (fig. C)
6. Unscrew and remove the retaining screw (17) of the shutter of the coffee bean hopper (2), being careful not to drop the spring and washer inside the machine. (fig. D)
7. Unscrew and remove the 4 fixing screws of the top plate (18).
8. Remove the top plate (19). to access the grinding-discs.
9. Change the two grinding-discs (21) (four screws (22)) after carefully cleaning the bearing surfaces. (fig. E) BE CAREFUL: The slightest small coffee particle under the grinding-disc may prevent the machine from operating correctly. You are advised to clean the grinder body with a compressed air jet or a dry brush.
Reassembling:
TAKE CARE
Operation n° 1 below must be performed before tightening the 4 fixing screws (18) of the top plate (19). This precaution is essential to prevent any risk of the grinding-discs being brought too close to each other, which could deform to grinder body. !
SANTOS: User and maintenance manual
98163 US 1.1 - 07 2013 11 / 19 www.santos.fr
5
6
4
7
7 4
Fig. J
Fig. I
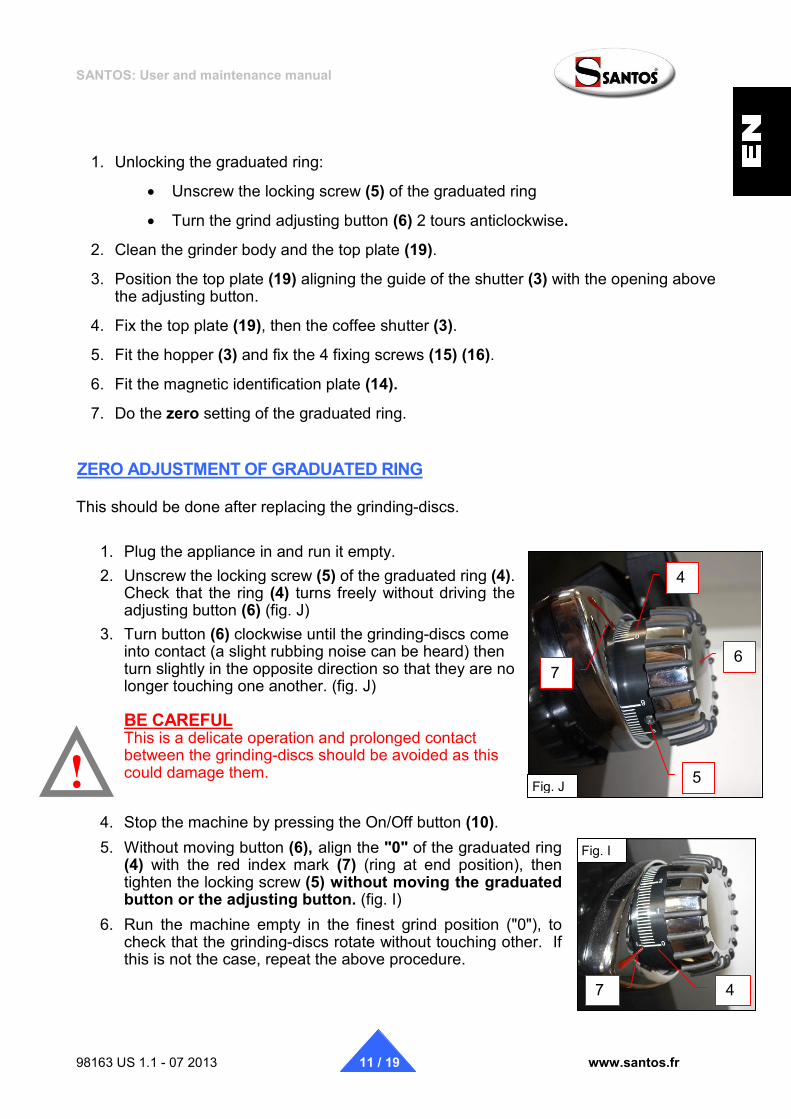
1. Unlocking the graduated ring:
• Unscrew the locking screw (5) of the graduated ring
• Turn the grind adjusting button (6) 2 tours anticlockwise.
2. Clean the grinder body and the top plate (19).
3. Position the top plate (19) aligning the guide of the shutter (3) with the opening above the adjusting button.
4. Fix the top plate (19), then the coffee shutter (3).
5. Fit the hopper (3) and fix the 4 fixing screws (15) (16).
6. Fit the magnetic identification plate (14).
7. Do the zero setting of the graduated ring.
ZERO ADJUSTMENT OF GRADUATED RING This should be done after replacing the grinding-discs.
1. Plug the appliance in and run it empty. 2. Unscrew the locking screw (5) of the graduated ring (4).
Check that the ring (4) turns freely without driving the adjusting button (6) (fig. J)
3. Turn button (6) clockwise until the grinding-discs come into contact (a slight rubbing noise can be heard) then turn slightly in the opposite direction so that they are no longer touching one another. (fig. J) BE CAREFUL This is a delicate operation and prolonged contact between the grinding-discs should be avoided as this could damage them.
4. Stop the machine by pressing the On/Off button (10). 5. Without moving button (6), align the "0" of the graduated ring
(4) with the red index mark (7) (ring at end position), then tighten the locking screw (5) without moving the graduated button or the adjusting button. (fig. I)
6. Run the machine empty in the finest grind position ("0"), to check that the grinding-discs rotate without touching other. If this is not the case, repeat the above procedure.
!
SANTOS: User and maintenance manual
98163 US 1.1 - 07 2013 12 / 19 www.santos.fr
FAULT FINDING
Carefully determine the reason for the appliance stopping.
In all cases: If the problem persists, switch off the power supply to the machine (unplug the cord from the mains socket) and call in the maintenance service or contact a SANTOS approved dealer.
The machine will not start: • Check: the mains power supply and the condition of the power supply cord, • The main switch (8) should be in position "1" • Press the thermal circuit breaker (9) once. • Note: the On/Off push button (10) must be lit up in the "pressed" position. • Check that there is no foreign body stuck between the grinding-discs. • Check the electric components, replacing them one by one
The appliance stops after the motor has overheated:
(the metal casing around the motor unit is hot) In the event of the motor overheating, the appliance stops automatically. The cutout built-in to the motor is reset automatically. Wait until the motor cools down (15 to 30 minutes) before starting the machine back up.
The appliance stops following an overload: Should the motor become blocked (foreign body, object that is too hard), the overload cutout (9) at the rear of the appliance triggers automatically and cuts out the power supply to the appliance
• Deactivate the On/Off push button (10) • Put the main switch (8) to position "0" and unplug the appliance. • Correct the fault and actuate the button of the overload cutout (9)
If the problem persists, check the following points:
• Check that the grinding-discs are not touching one another. • Check for wear on the grinding-discs (too fine a grind with worn grinding-discs may
result in a motor overload).

SANTOS: User and maintenance manual
98163 US 1.1 - 07 2013 13 / 19 www.santos.fr
APPLIANCE TECHNICAL SPECIFICATIONS ELECTRICAL SPECIFICATIONS (1) Model
n° 63 Supply voltage
(V)
220-240 100-120 Frequency
(Hz)
50/60 50/60 Motor
Input power
(W)
1500 Speed
(rpm)
1500 / 1800
Average output (3)
(kg/h)
30 - 100 SANTOS grinding-discs (mm) Ø120, ref: 00063
Hopper capacity
(kg)
1.2 Max. bag height
(mm)
400 Motor overload safety device Yes
Motor overheating safety device Yes Intermittent operation 1 hour of operation and 30 min stop
Dimensions: Height
(mm)
677 Width
(mm)
279 Depth
(mm)
329 Weight: Net weight
(kg)
40 Weight including packing
(kg)
42 Noise: (2) LpA
uncertainty K pA = 2.5dB
(dBA)
65
(1) These ratings are given for your guidance. The exact electrical specifications of your appliance can be found on the identification plate.
(2) Noise level measured in acoustic pressure of appliance loaded as per the standard ISO 11201:1995 and ISO 4871:1996. Appliance placed on a work surface at 75cm from the floor. Microphone turned towards the appliance at 1.6m from the floor and 1m from the appliance.
(3) the output depends on the type of grind, type of coffee, type of roasting and wear of the grinding-discs

SANTOS: User and maintenance manual
98163 US 1.1 - 07 2013 14 / 19 www.santos.fr
Wiring diagram
Wiring diagram 220-240V 50/60Hz
M
Bro
wn
Orange
~ White
0 / 1
0
Capacitor
Brown
Blue
A2
A1 1 3 5 13
2 6 14 4
Overload cutout
White White
Red
Green/Yellow
Off
On
White
Blue
White
White
Blue
Blue
Orange
Blue
Bro
wn
Bla
ck
Bla
ck
1
2
3
4
SANTOS: User and maintenance manual
98163 US 1.1 - 07 2013 15 / 19 www.santos.fr
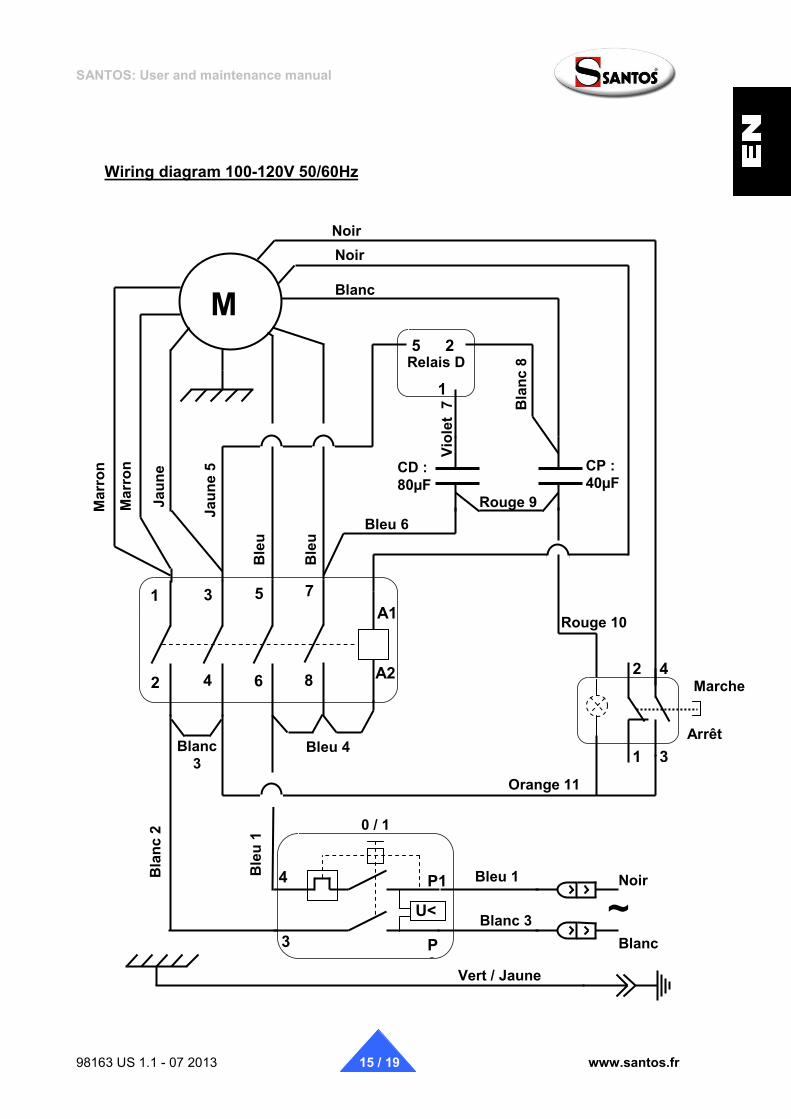
Wiring diagram 100-120V 50/60Hz
M
Mar
ron
Noir
~ Bleu 1
CP : 40µF
Noir
Blanc
A2
A1 1 3 5 7
2 6 8 4
Rouge 10
Vert / Jaune
Arrêt
Marche
Blanc
Noir
Orange 11
Mar
ron
Jaun
e 5
Ble
u
1
2
3
4
CD : 80µF
2 5
1
Ble
u
Jaun
e B
lanc
2
Rouge 9 Bleu 6
Viol
et 7
Bla
nc 8
Bleu 4 Blanc 3
Relais D
P2
3
P1 4
U< Blanc 3
Ble
u 1
0 / 1

SANTOS: User and maintenance manual
98163 US 1.1 - 07 2013 16 / 19 www.santos.fr
Figures
1
2
3
4
7
6
5 12
14
13
8
9
10
11
8 9
16
15
Fig. B
Fig. A
Fig. C
SANTOS: User and maintenance manual
98163 US 1.1 - 07 2013 17 / 19 www.santos.fr
17
18 19
20
22
21
25
13
24
24
23
5
6
4
7
7 4
Fig. D Fig. E
Fig. F
Fig. G
Fig. H
Fig. J
Fig. I
SANTOS: User and maintenance manual
98163 US 1.1 - 07 2013 18 / 19 www.santos.fr
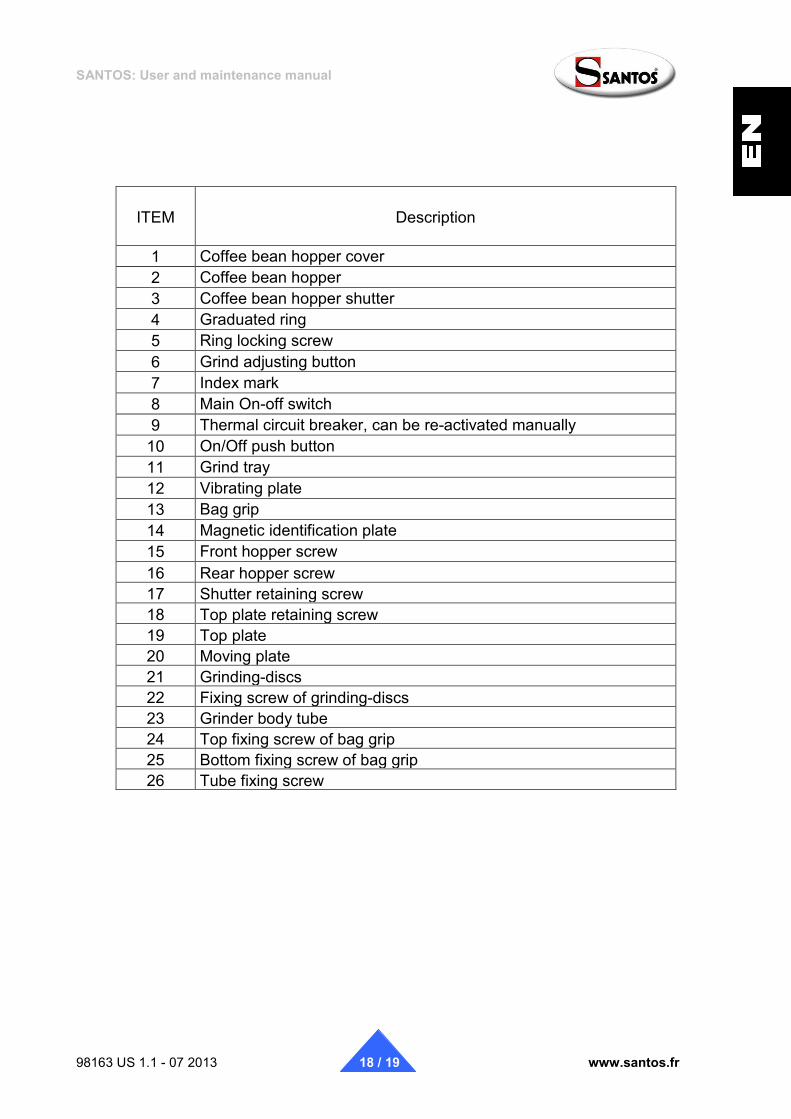
ITEM Description
1 Coffee bean hopper cover 2 Coffee bean hopper 3 Coffee bean hopper shutter 4 Graduated ring 5 Ring locking screw 6 Grind adjusting button 7 Index mark 8 Main On-off switch 9 Thermal circuit breaker, can be re-activated manually
10 On/Off push button 11 Grind tray 12 Vibrating plate 13 Bag grip 14 Magnetic identification plate 15 Front hopper screw 16 Rear hopper screw 17 Shutter retaining screw 18 Top plate retaining screw 19 Top plate 20 Moving plate 21 Grinding-discs 22 Fixing screw of grinding-discs 23 Grinder body tube 24 Top fixing screw of bag grip 25 Bottom fixing screw of bag grip 26 Tube fixing screw
SANTOS: User and maintenance manual
98163 US 1.1 - 07 2013 19 / 19 www.santos.fr
WARRANTY CERTIFICATE WARRANTY Since 01.01.95, all are appliances comply with the EC standards and bear the CE label. Our warranty is for twenty-four months from the date of manufacture shown on the identification plate except for asynchronous motors (made up of a rotor and a stator) which are guaranteed for 5 years from the date of manufacture. The warranty is strictly limited to the free replacement of any original part acknowledged by us as being defective as a result of a fault or a manufacturing defect and identified as belonging to the appliance in question. It does nor apply to damage resulting from an installation or use which does not comply with the instructions supplied with each appliance (user manual) or in the event of an obvious lack of maintenance or non-observance of basic electrical safety rules. The warranty does not apply to normal wear. All part replacements under warranty are made after return of the defective part to our workshops carriage paid, accompanied by a copy of the Compliance Declaration on which the serial number of the appliance is shown. All appliances have a CE compliant identification plate a copy of which is shown in the Compliance Declaration (serial n°, date of manufacture, electrical specifications, etc). In the event of serious damage which is deemed only to be repairable in our workshops, and after agreement from our services, all appliances under warranty are to be dispatched by the Distributor carriage paid. If the appliance is repaired or repackaged outside the warranty, the forwarding and return transport is the responsibility of the Distributor. Parts and labor are invoiced at the prices in force (spare parts price - hourly labor cost). A prior estimate can be provided. Coffee grinders without original SANTOS grinding-discs are not covered by the warranty. The warranty, repair and repackaging conditions of espresso coffee grinders are covered by special instructions. Our warranty does not include the payment of penalties, making good of direct or indirect damage and in particular shortfall in earnings resulting from the non-compliance or defect of products as SANTOS’s global responsibility is limited to the sales price of the product supplied and the repair of defective products, if any. In the event where a defect is revealed during the warranty period, the Distributor must, unless otherwise agreed in writing by SANTOS, inform its customer to discontinue any use of the defective product. Such use would waive SANTOS of any responsibility.
APPLIANCE IDENTIFICATION PLATE
SPECIMEN For all documents not supplied with
the appliance.
Printed, Fax and Downloaded