Embed Size (px)
Citation preview
CODESYS beginner Tutorial II
Visualising with CODESYS
Version: 1.2
Last updated: 15/05/2017
Author: Noor Mufti
CODESYS
beginner
Tutorial II
Version: 1.2
Index
CODESYS beginner Tutorial II index Heading 1 .......................................................................................... Error! Bookmark not defined.
Heading 2 ...................................................................................... Error! Bookmark not defined.
Heading 3 .................................................................................. Error! Bookmark not defined.
CODESYS
beginner
Tutorial II
Version: 1.2
Page 1 of
11
Introduction These tutorials are designed for aspiring programmers who wish to learn more about
industrial and physical computing using the open source platform; CODESYS®.
Each tutorial follows on from the last, with the list of planned and produced tutorials so
far being:
• Beginner Tutorial: Getting started with CODESYS
• Beginner tutorial II: Visualising with CODESYS
• Beginner Tutorial III: Sequential actions and Timers 1
• Beginner Tutorial IV: Resets and Interrupts 2
More information about CODESYS can be gained from the Smart Software Solutions (3S)
website www.codesys.com.
Objectives In the course of this tutorial you will learn how to:
• Update and save new CODESYS projects
• Visualise inputs and outputs in a virtual environment
• Run virtual simulations to test your programme
• Have the confidence to further explore the programming environment
Prerequisites There is no need for previously proven software development skills in order to
successfully complete this tutorial. All that is required is a licenced (including a Demo
licence) copy of CODESYS version 3.5 or higher, and basic computer literacy.
In addition, as this tutorial follows on from the previous Getting Started with CODESYS
tutorial
1 Planned for release in October 2017 2 Planned for release in November 2017
CODESYS
beginner
Tutorial II
Version: 1.2
Page 2 of 11
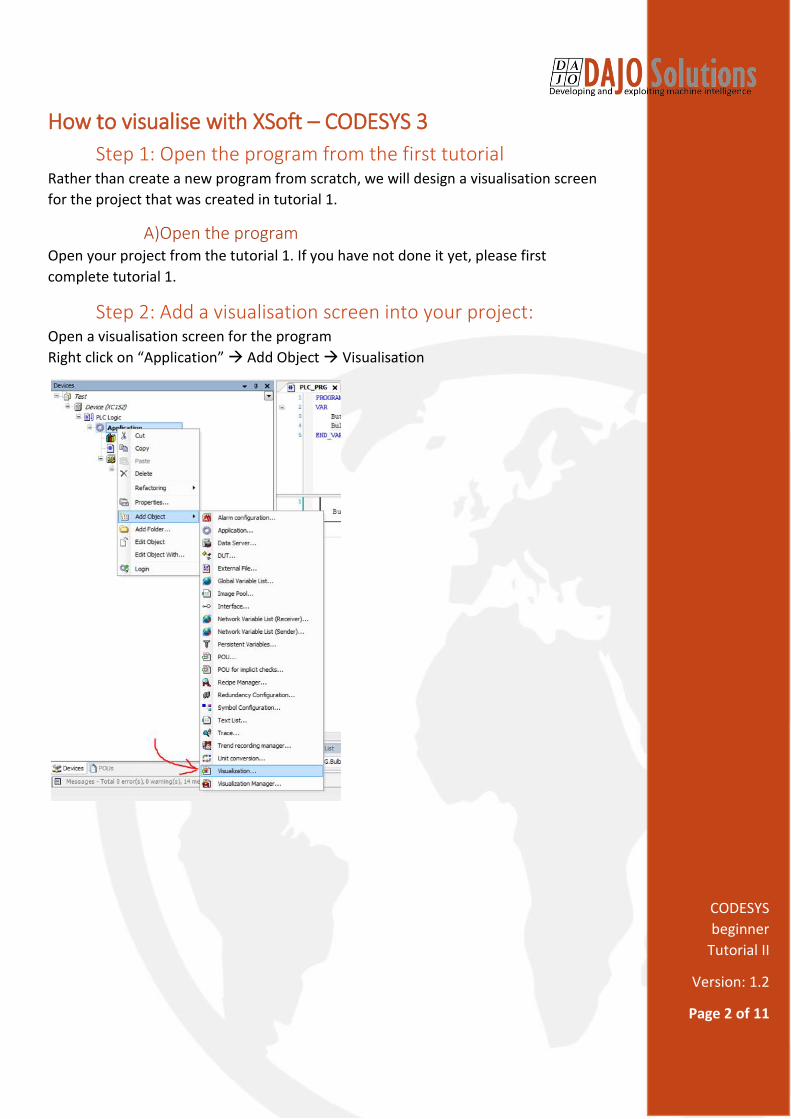
How to visualise with XSoft – CODESYS 3
Step 1: Open the program from the first tutorial Rather than create a new program from scratch, we will design a visualisation screen
for the project that was created in tutorial 1.
A)Open the program Open your project from the tutorial 1. If you have not done it yet, please first
complete tutorial 1.
Step 2: Add a visualisation screen into your project: Open a visualisation screen for the program
Right click on “Application” Add Object Visualisation
CODESYS
beginner
Tutorial II
Version: 1.2
Page 3 of 11
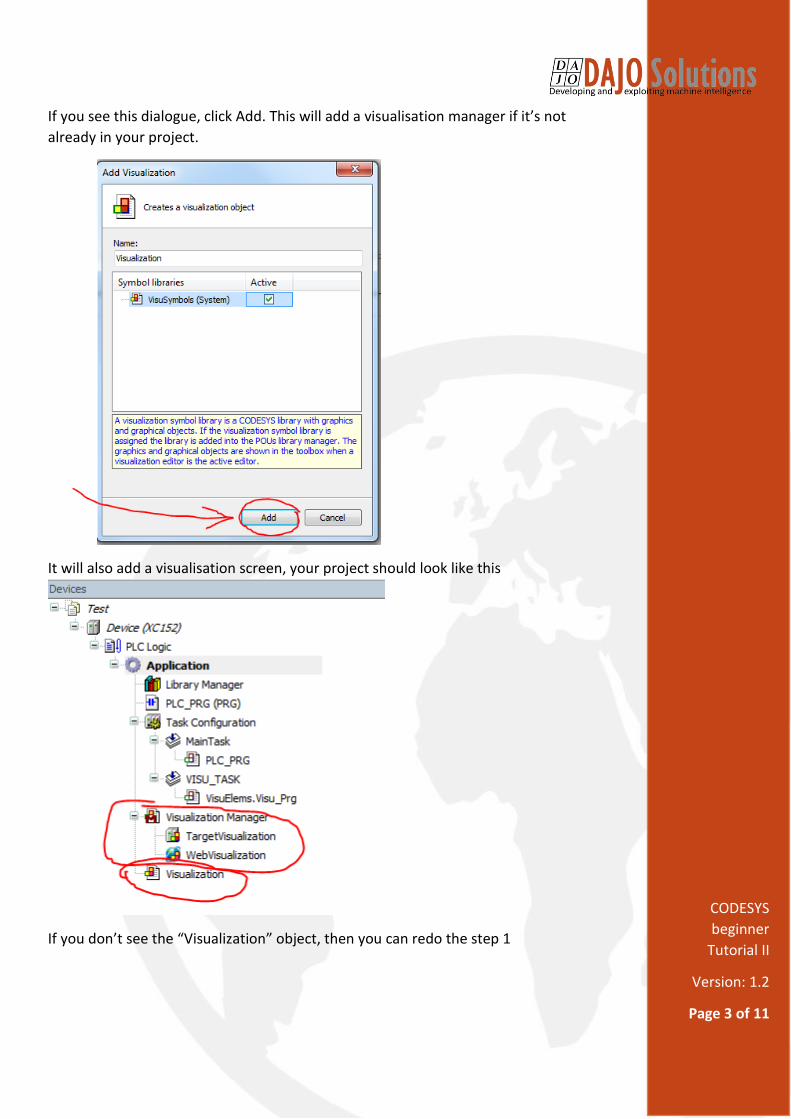
If you see this dialogue, click Add. This will add a visualisation manager if it’s not
already in your project.
It will also add a visualisation screen, your project should look like this
If you don’t see the “Visualization” object, then you can redo the step 1
CODESYS
beginner
Tutorial II
Version: 1.2
Page 4 of 11
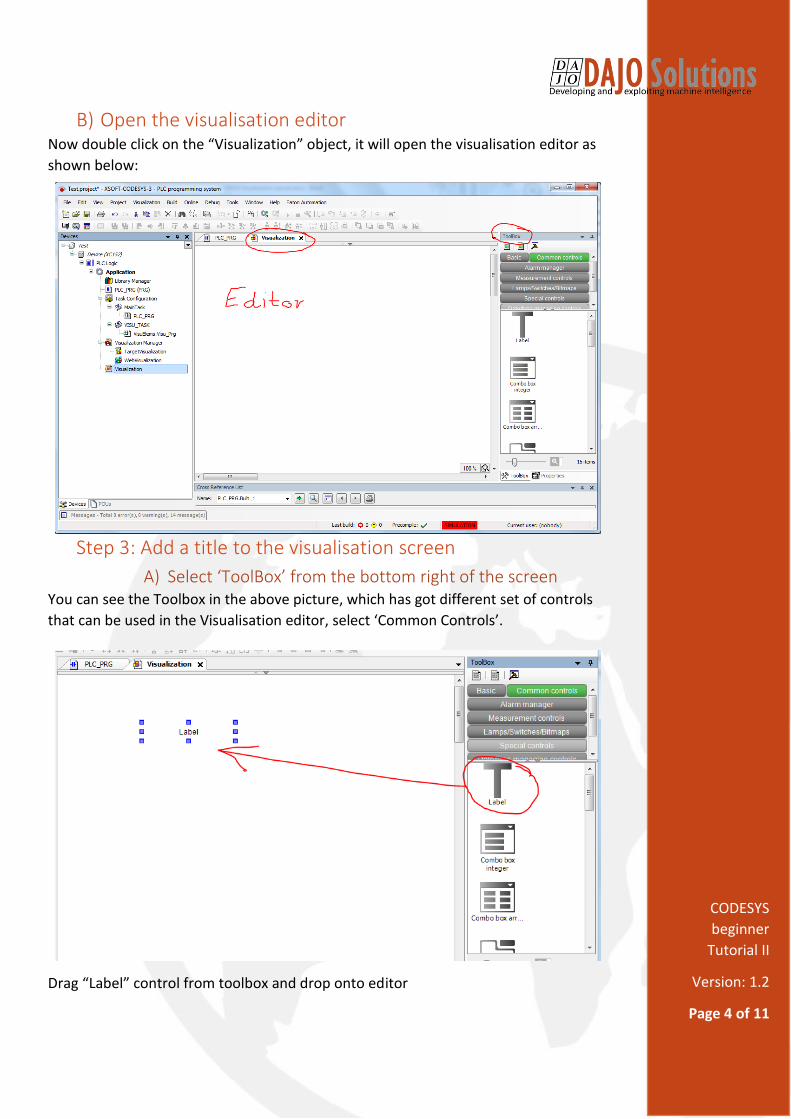
B) Open the visualisation editor Now double click on the “Visualization” object, it will open the visualisation editor as
shown below:
Step 3: Add a title to the visualisation screen
A) Select ‘ToolBox’ from the bottom right of the screen You can see the Toolbox in the above picture, which has got different set of controls
that can be used in the Visualisation editor, select ‘Common Controls’.
Drag “Label” control from toolbox and drop onto editor
CODESYS
beginner
Tutorial II
Version: 1.2
Page 5 of 11
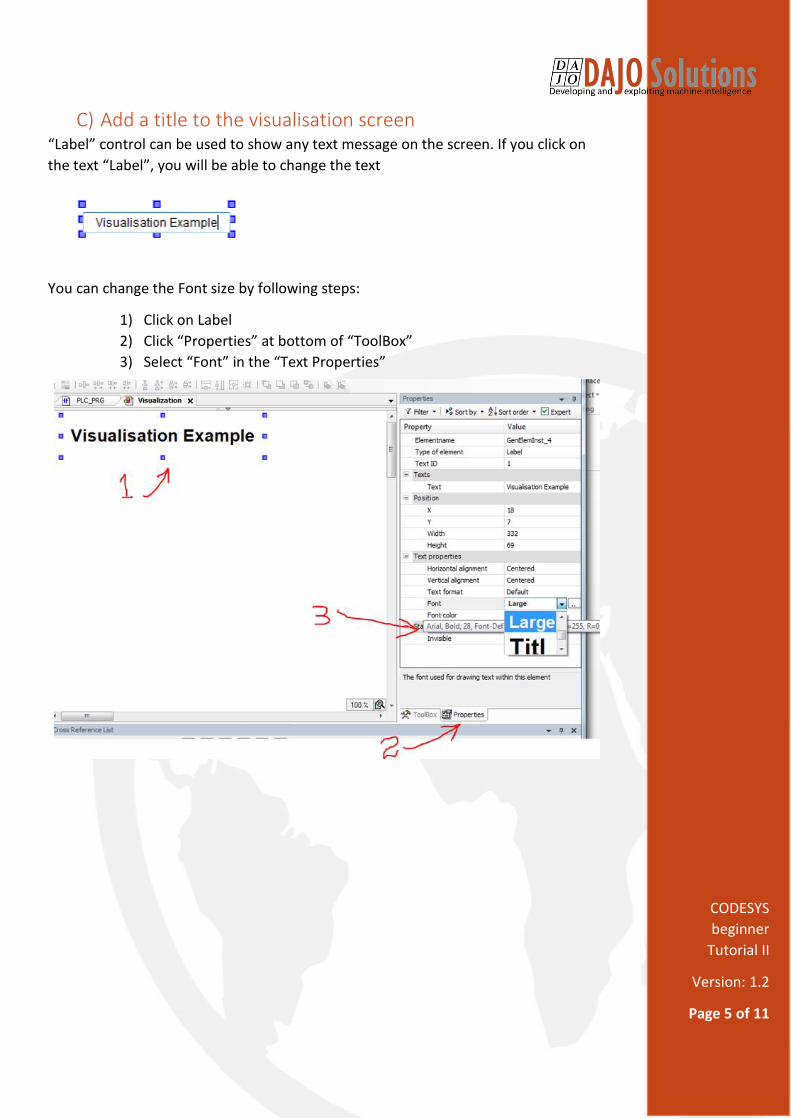
C) Add a title to the visualisation screen “Label” control can be used to show any text message on the screen. If you click on
the text “Label”, you will be able to change the text
You can change the Font size by following steps:
1) Click on Label
2) Click “Properties” at bottom of “ToolBox”
3) Select “Font” in the “Text Properties”
CODESYS
beginner
Tutorial II
Version: 1.2
Page 6 of 11
Step 3: Add visualisation elements
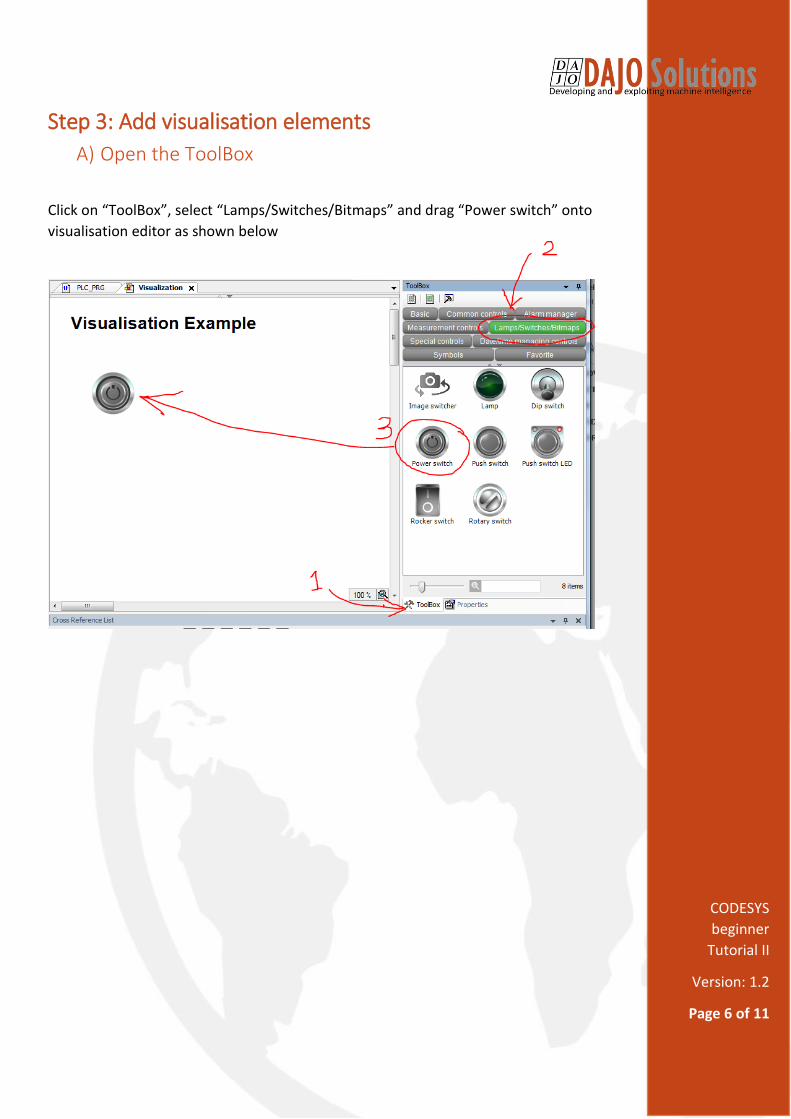
A) Open the ToolBox
Click on “ToolBox”, select “Lamps/Switches/Bitmaps” and drag “Power switch” onto
visualisation editor as shown below
CODESYS
beginner
Tutorial II
Version: 1.2
Page 7 of 11
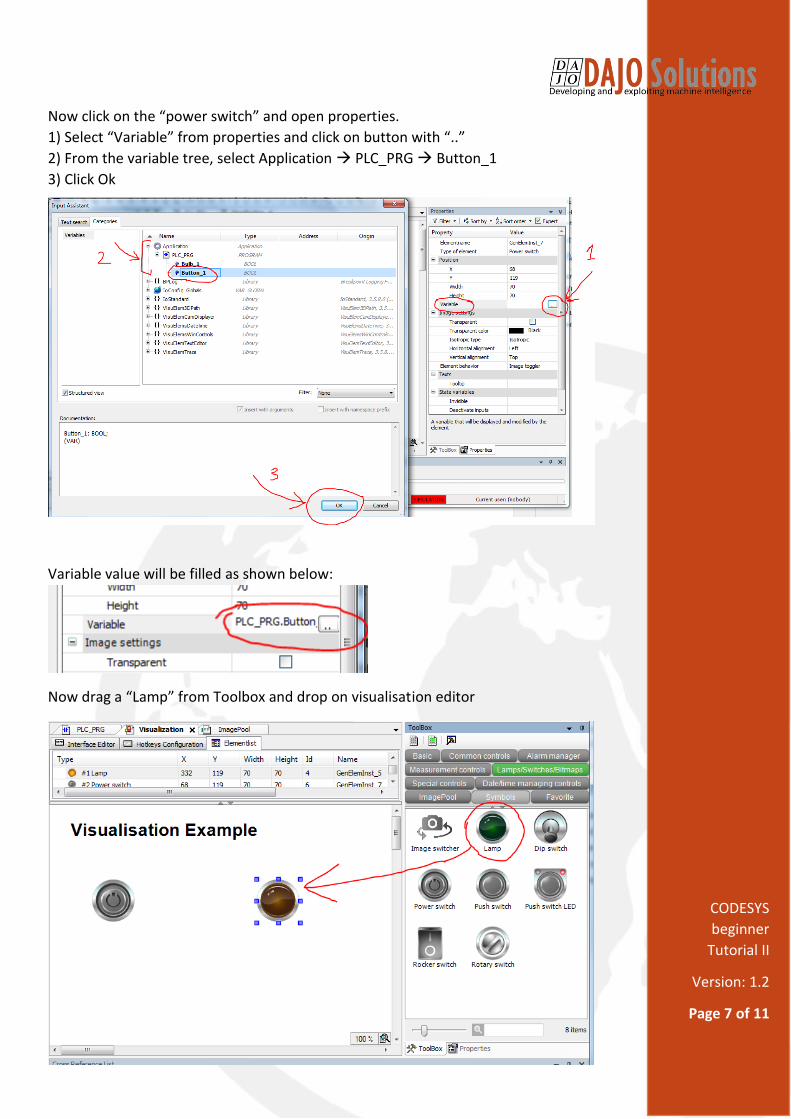
Now click on the “power switch” and open properties.
1) Select “Variable” from properties and click on button with “..”
2) From the variable tree, select Application PLC_PRG Button_1
3) Click Ok
Variable value will be filled as shown below:
Now drag a “Lamp” from Toolbox and drop on visualisation editor
CODESYS
beginner
Tutorial II
Version: 1.2
Page 8 of 11
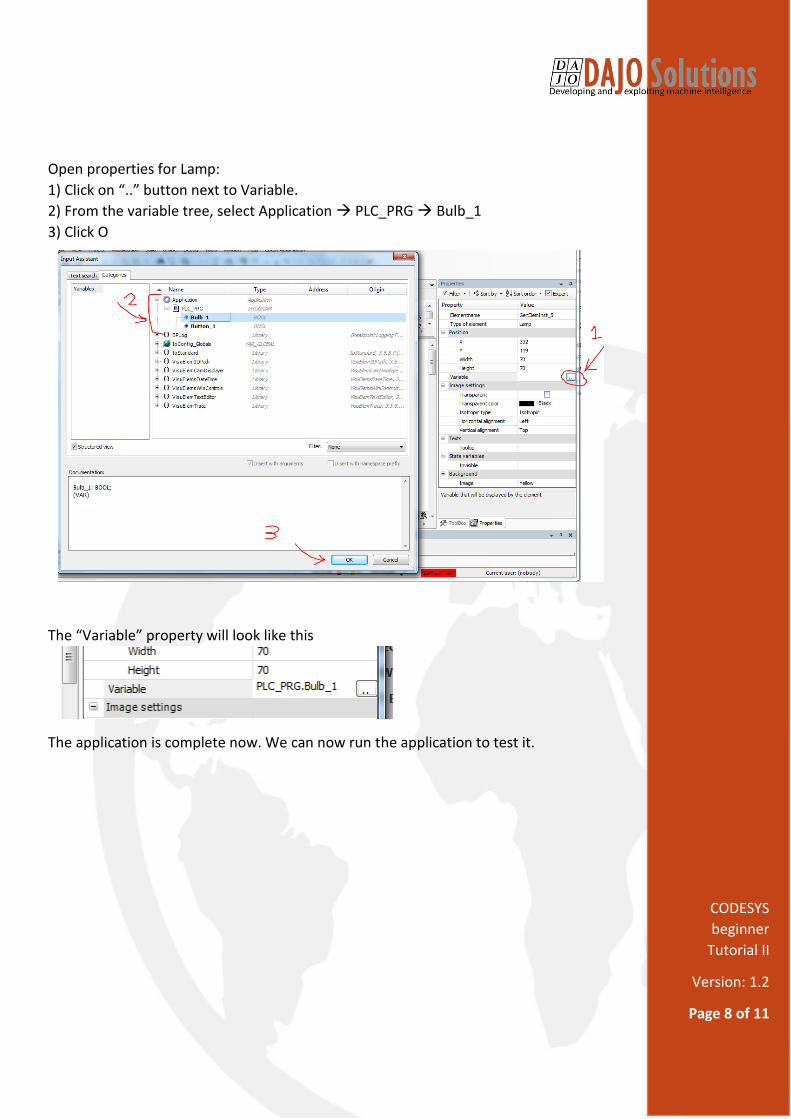
Open properties for Lamp:
1) Click on “..” button next to Variable.
2) From the variable tree, select Application PLC_PRG Bulb_1
3) Click O
The “Variable” property will look like this
The application is complete now. We can now run the application to test it.
CODESYS
beginner
Tutorial II
Version: 1.2
Page 9 of 11
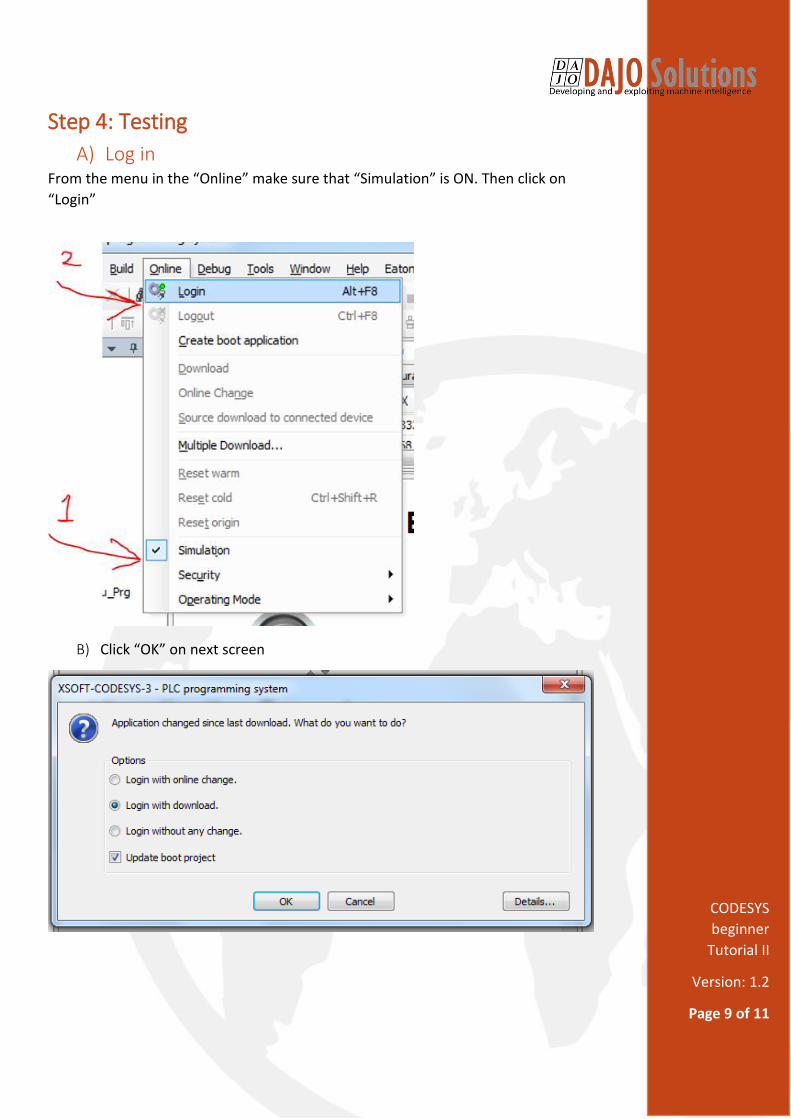
Step 4: Testing
A) Log in From the menu in the “Online” make sure that “Simulation” is ON. Then click on
“Login”
B) Click “OK” on next screen
CODESYS
beginner
Tutorial II
Version: 1.2
Page 10 of 11
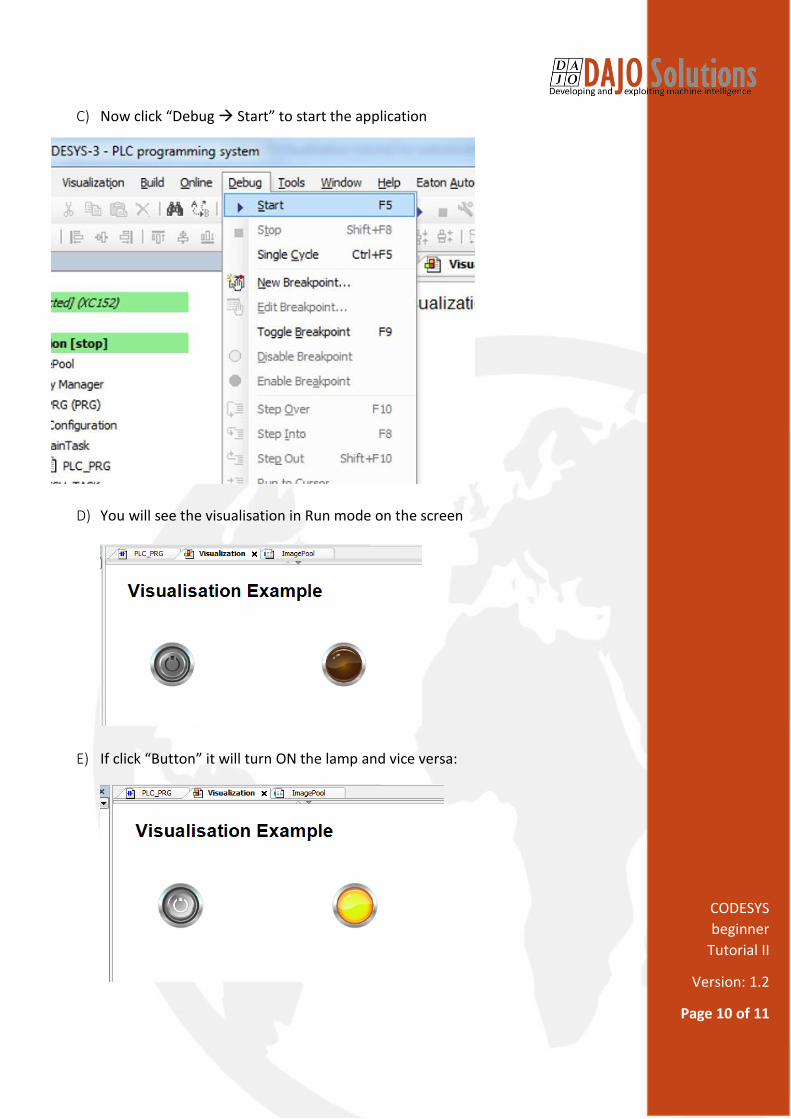
C) Now click “Debug Start” to start the application
D) You will see the visualisation in Run mode on the screen
E) If click “Button” it will turn ON the lamp and vice versa:
CODESYS
beginner
Tutorial II
Version: 1.2
Page 11 of 11
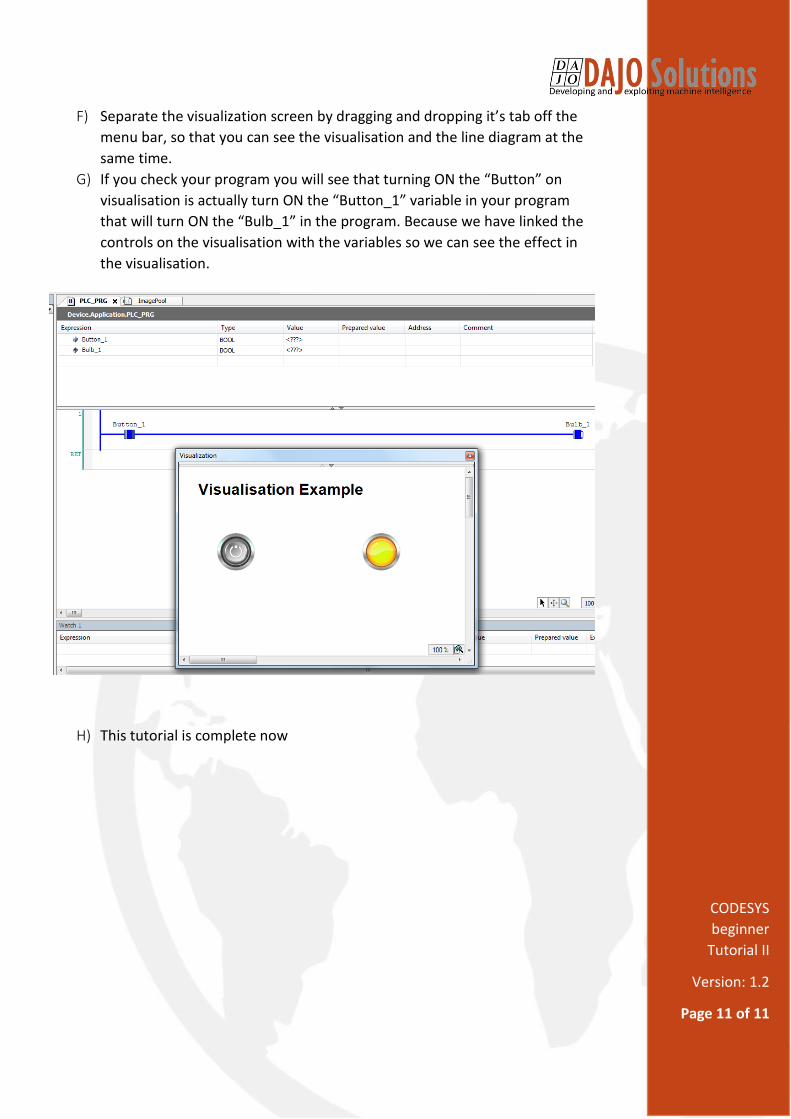
F) Separate the visualization screen by dragging and dropping it’s tab off the
menu bar, so that you can see the visualisation and the line diagram at the
same time.
G) If you check your program you will see that turning ON the “Button” on
visualisation is actually turn ON the “Button_1” variable in your program
that will turn ON the “Bulb_1” in the program. Because we have linked the
controls on the visualisation with the variables so we can see the effect in
the visualisation.
H) This tutorial is complete now