Embed Size (px)
Citation preview
TRUCK DRIVERS
GUIDE
TRUCK DRIVERS
GUIDE

2
Coates Hire Mission
To be recognised by our customers, peers and ourselves as the leader in the markets we serve and to operate injury and incident free without harming the environment.
3
Introduction 4
PART 1: CONTRACTOR SAFETY CHARTER 6
1. What does the Contractor Safety Charter mean to Coates Hire? 7
PART 2: WORKING WITH COATES HIRE 10
1. Your Roles and Responsibilities 11
2. Your Safety 13
3. Maintenance and Vehicle Presentation 14
4. Safety Alerts 15
5. Truck Drivers Videos 15
6. Load and Unload Plant Public Training Course 16
7. High Risk Work Licences 16
8. Transport Orange Book 16
9. Service Tags 17
10 Loading and Unloading Equipment 18
11. Safe Parking 19
12. Completing a Transport JSEA (or Risk Assessment) 19
13 Pickup and Delivering Equipment 20
PART 3: THE COATES HIRE LOADING AND UNLOADING GUIDE 24
1. Safe Transport Principles for Coates Hire Heavy Plant Equipment 25
2. Why Loads Shift 26
3. Choose a Vehicle Suitable for the Size and Type of Load 27
4. Position the Load Correctly on the Vehicle 28
5. Use Restraint Equipment that is Suitable, Strong, and Appropriately Applied 29
6. Restraining Mobile Plant 32
7. Steel Plates 35
8. Working with Trailers 35
9. When to Winch 36
10. Understanding Gradeability 37
11. Truck Mounted Cranes 37
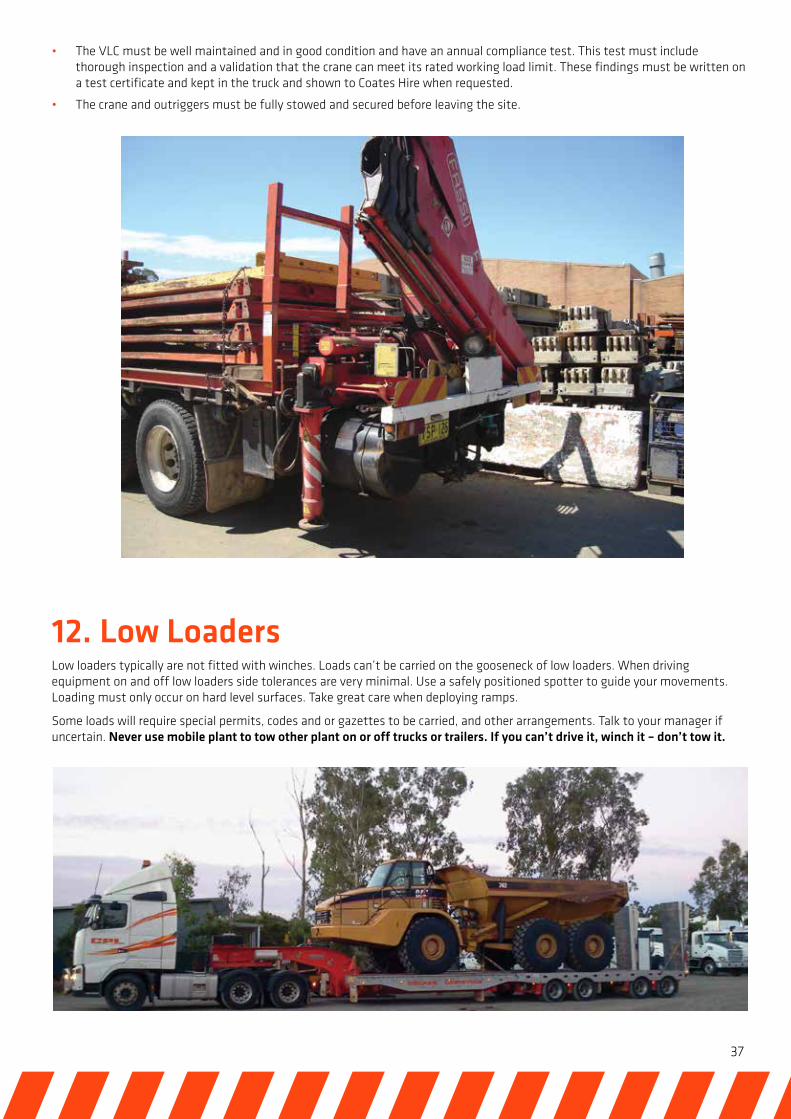
12. Low Loaders 38
13. Dangerous Goods 39
14. Portable Buildings 40
PART 4: APPENDICES 42
Safe Work Method Statements 43
Safety Alert Summaries 56
Transport Contractors General Site Rules 63
Safe Zones for truck Loading/Unloading 64
contents
4
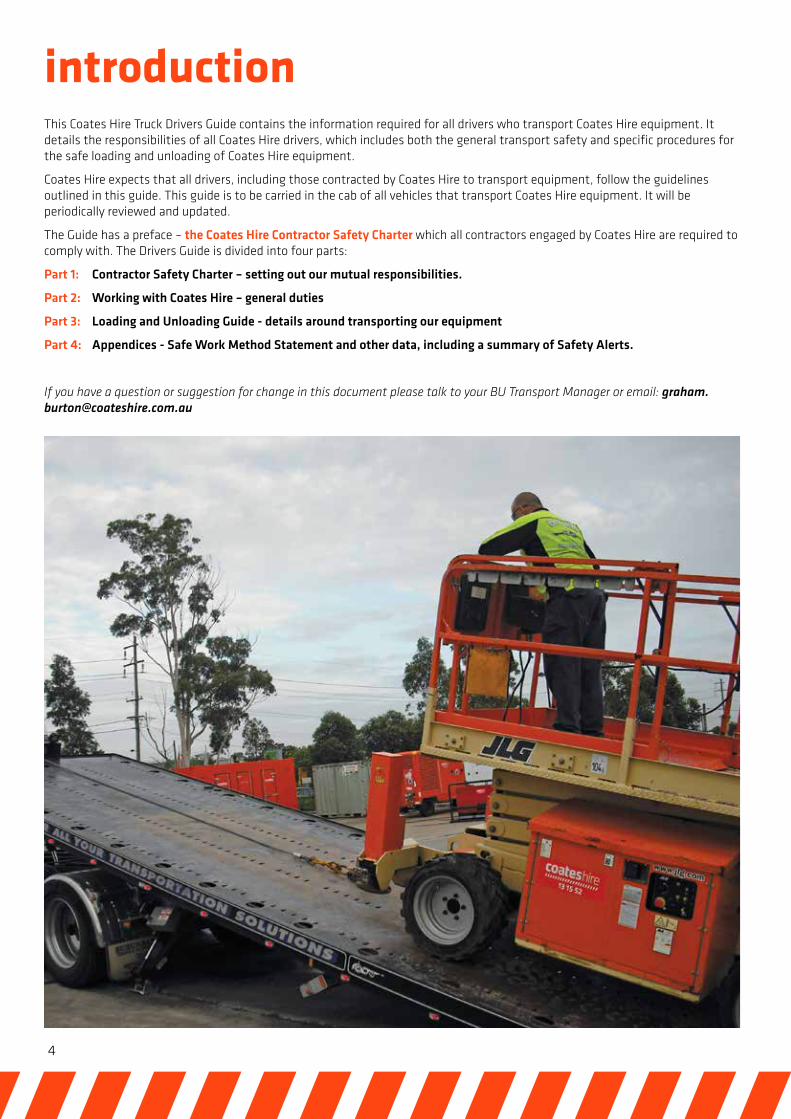
introductionThis Coates Hire Truck Drivers Guide contains the information required for all drivers who transport Coates Hire equipment. It details the responsibilities of all Coates Hire drivers, which includes both the general transport safety and specific procedures for the safe loading and unloading of Coates Hire equipment.
Coates Hire expects that all drivers, including those contracted by Coates Hire to transport equipment, follow the guidelines outlined in this guide. This guide is to be carried in the cab of all vehicles that transport Coates Hire equipment. It will be periodically reviewed and updated.
The Guide has a preface – the Coates Hire Contractor Safety Charter which all contractors engaged by Coates Hire are required to comply with. The Drivers Guide is divided into four parts:
Part 1: Contractor Safety Charter – setting out our mutual responsibilities.
Part 2: Working with Coates Hire – general duties
Part 3: Loading and Unloading Guide - details around transporting our equipment
Part 4: Appendices - Safe Work Method Statement and other data, including a summary of Safety Alerts.
If you have a question or suggestion for change in this document please talk to your BU Transport Manager or email: [email protected]
5
PART 1 CONTRACTOR SAFETY CHARTER
6
Contractor Safety Charter1. We recognise and accept our obligations to maintain and promote safe systems of work and safe transport operations.
2. We undertake to comply with all WHS, environment and road transport laws applicable to our operations. All contract workers and drivers will be trained and verified as competent operators and understand the following issues:
• Being fit for duty – alert, healthy and prepared for the driving task
• Observing speed limits & seat belt laws
• Observing fatigue regulations
• Not being under the influence of drugs or alcohol
• Not tailgating other vehicles
• Applying reliable and effective load restraint practices
• Being considerate of other road users
• Not using noisy engine brakes at inappropriate times and places
• Travelling in left lanes unless overtaking
• Obeying all other laws.
3. We will not knowingly make or meet any demand or requirement that would cause us to breach road transport laws applying to our operations.
4. We will actively support the development of appropriate industry codes of conduct, charters of practice and safety guidelines for the purpose of promoting compliance with road transport and WHS laws. Coates Hire joined the National Logistics Safety Code in 2012 and we encourage our major supply chain partners to do the same.
5. We will also ensure that we have in place suitable and adequate processes, programs, policies and training so that we comply with all relevant laws.
6. We recognise and accept that our obligations include:
• Managing waiting and scheduling requirements to minimise the risk of driver fatigue and speeding.
• Provide safe loading and unloading areas at our branches
• Ensuring we use safe and fit for purpose vehicles that are appropriately designed, equipped and maintained
• A commitment to driver health and safety.
7. We recognise and accept that the safety of our employees and the public are key elements for meeting our obligations under this Charter.
8. We undertake to consult with our employees and customers to meet our obligations under chain of responsibility, road laws and WHS legislation to provide and maintain transport operations that are safe for all parties.
9. Coates Hire cares about the environment and has its management system and a growing number of sites accredited to ISO14001. We expect our partners to share similar concern by taking steps to prevent pollution and minimise emissions, waste and adverse impacts arising from your operations.
1. What does the Contractor Safety Charter mean to Coates Hire?
Our duty under Work Health and Safety (WHS) legislation and Road Transport legislation requires appropriate systems to be in place to manage risks associated with contractors, particularly in the transport of heavy plant and equipment. We believe that the best outcomes are achieved through a partnership where each party accepts and shares the following responsibilities:

7
1.1 How will we achieve this partnership?Coates Hire has a set of minimum safety standards across all divisions of Coates Hire and associated entities with which Coates Hire’s contractors are expected to comply. Branches and some customers may have additional expectations and requirements, over and above these, that address specific operational risks.
Issue Minimum Safety Standard
Safe Systems of Work • Competent – only licensed, trained, qualified and authorised personnel to conduct work
• Risk Assessments and JSEA’s - are regularly conducted to identify, assess and control risks and hazards
• Safe Work Method Statements (SWMS) – tasks must have a suitable SWMS that is readily available on site. In some cases Coates Hire will specify how equipment is to be operated or loaded. Work must be conducted in compliance with the SWMS requirements
• Incidents and Injuries – incidents and injuries sustained must be reported to the site manager and to your Coates Hire Contract Manager. Incidents must be investigated and findings reported to Coates Hire, where required
• Contractor Evaluation Processes – Apart from the pre-qualification process these activities include direct observation, random checks and formal audits.
Safe and Healthy People • Safety and Health Requirements – do not override or interfere with safety and health features or provisions and caution others not to override or interfere with safety devices or practices
• Substance Abuse – no person may work if under the influence of alcohol or drugs. This includes illicit drugs and prescription medicine that may compromise safety
• Personal Protective Equipment (PPE) – PPE requirements applicable to a given task must be adhered to
• Fatigue Management – manage the risks associated with fatigue in the workplace. Identify factors that contribute to fatigue and discuss with your personnel, make changes as required (including sleep patterns, workload, roster and lifestyle factors), and seek professional help if necessary
• Authorised Use – only licensed, trained, qualified and authorised personnel are to use plant and equipment.
Safe Plant and Equipment • Safe Plant and Equipment – plant and equipment must be fit for purpose and comply with applicable Standards and legislative requirements
• Test/Tag – portable power tools must be tested and tagged
Environmental Responsibility
• Take steps to prevent spills and pollution or immediately remedy any releases, and control waste
• Maintain & Operate equipment efficiently to minimise greenhouse gas emissions
1.2 The following obligations exist in the application of our Minimum Standards:
• When implementing and maintaining the Minimum Standards, consult applicable legal and other requirements (including Acts, Regulations, Codes of Practice, Standards and Guidelines etc.)
• There must be appropriate information, instruction, training, risk assesment and supervision provided when implementing the Minimum Standards.
• All contractor workers need to complete the Coates Hire Online Induction(s). Transport workers (who operate vehicles with a GVM greater than 4.5 tonnes) must also complete the Transport Induction. Medium to large employers should provide suitable resources to facilitate their workers completion of these inductions, this includes having a suitable computer available.
• The minimum standards are complemented by the Site Safety Rules near the end of this publication.
8
The Minimum Safety Standards have been developed around those activities that have historically contributed to incidents and injuries at Coates Hire. The following table outlines the responses that will apply for non-conformance. These are applicable to both the Head Contractor and/or the individual worker. The management of non-conformance is in part based on a just culture philosophy.
Non-Conformance Response Level
The issuing of a Warning Notice for a violation to individual(s) and/or the contracting company(s).
Warnings are verbal or written notices placing an individual(s) and/ or the contracting company(s) on notice for a violation. Two warnings given in a three month period may result in the automatic escalation of consequences to a suspension or breach.
4
Suspended from attending a nominated Coates Hire workplace(s) for a defined period of time.
Suspension is the temporary measure of not allowing an individual(s) and/or contracting company(s) the right to conduct work for Coates Hire or the non-issuing of future jobs to an individual(s) and/or contracting company(s) for a defined period of time. After remedial action (retraining or other action) the suspension may be lifted.
3
Excluded from attending a nominated Coates Hire workplace(s) indefinitely.
Exclusion is the permanent measure of not allowing an individual(s) and/or contracting company(s) the right to conduct work at a Coates Hire workplace(s) or the non-issuing of future jobs to an individual and/or contracting company(s) for the life of the contract.
2
Contract termination with the possibility of future restrictions on tendering work for Coates Hire.
1
1.3 FeedbackIf you have any suggestions to improve this Charter, or how safety can be improved please contact your Coates Hire contract manager. We all have the responsibility to comply with this Charter and make it our way of doing business. If you feel Coates Hire is not meeting its safety obligations please talk to your Coates Hire contract manager, i.e. the person who engaged your services.
9
PART 2 WORKING WITH COATES HIRE
10
1. Your Roles and ResponsibilitiesDrivers are essential to Coates Hire and are often our most frequent contact with customers. It is important that you have a safe work environment and that Coates Hire’ equipment is transported:
• Safely• Economically• Professionally• With minimal risk to the Environment
Note: If you are a Coates Hire contractor you are required to comply with our Contractor Management Procedure which among other things requires you to:
• Have passed our two online Contractor training modules*
• Have a site safety induction at each branch you visit.
• Report to front office (or Transport Office) every time you attend a Coates Hire Branch
• Present your Coates Hire Contractor Induction Card and or Transport Orange Book if requested
• Follow Coates Hire safety procedures
* The link to the online training modules is: www.coateshire.com.au/contractor-induction/ Drivers must complete the General Contractor Induction as well as the Truck Drivers Induction
1.1 Health, Safety, Environment & Road LegislationYou are required to abide by all relevant Health, Safety, Environment and Road legislation. Accordingly you must among other things:
• Hold a valid Drivers Licence covering the class of the heavy vehicle you drive
• Take care for the health and safety of yourself and others
• Co-operate with Coates Hire in the approach taken to protect the health and safety of employees, visitors and other workers
• Abide by the relevant Work Health and Safety legislation
• Follow directions given with regards to safe working practices/procedure
• Take care of the environment and prevent pollution and spills
• Drive to reduce greenhouse gas emissions
• Follow road traffic regulations
• Carry all required records, permits and gazettes
1.2 Dress RequirementsYou are expected to wear as required or have available appropriate Personal Protective Equipment (PPE) at all times, which meet the corresponding Australian Standard. The minimum requirements are:
• Safety boots
• A neatly presented uniform - with high visibility yellow (or yellow safety vest) is required. Our safety standards and also many of our major customers require long trousers and long sleeved shirts buttoned at the cuffs. (Some customer sites may have differing special requirements)
• Safety glasses to be worn at all times within Coates Hire yards, and as required by task demands
• Work gloves for physical tasks
• A safety helmet to be worn when conducting nominated tasks such as in crane operations, or as required by some customers
11
1.3 Relationships and Customer ServiceCustomer service is an essential aspect of our business. Coates Hire drivers are the face of Coates Hire for many of our customers. Your role in providing professional customer service is essential to our business. In order to provide good customer service you are responsible for:
• Ensuring that you are fit for duty (which includes being well rested and not impaired by alcohol or drugs)
• Obeying all customer site rules
• Wearing safety equipment that is appropriate to the customer site and the equipment involved
• When you arrive at a Coates Hire Branch or a customer site you must report to the site office or site manager
• It is also important that you act in a friendly, courteous and helpful manner to staff and customers and that you pass on any customer feedback to your manager/supervisor or Coates Hire branch.
1.4 Motor Vehicle IncidentsCarry your insurance and contact details in your glove box. In case of an accident be courteous and exchange information with drivers of other vehicles. Do not admit to being at fault. If you are involved in an accident or a safety incident, call the emergency services if they are required (Dial 000) then call your manager and inform them of what has happened. If persons are injured, offer them first aid or other assistance to the extent of your ability and if safe to do so.
Collect the details of other party(s)
• Other drivers name
• Other owner (if different)
• License number
• Address
• Phone
• Insurer
• Registration number
• Date, time and location of incident
• Consider witness contact details and photographs.
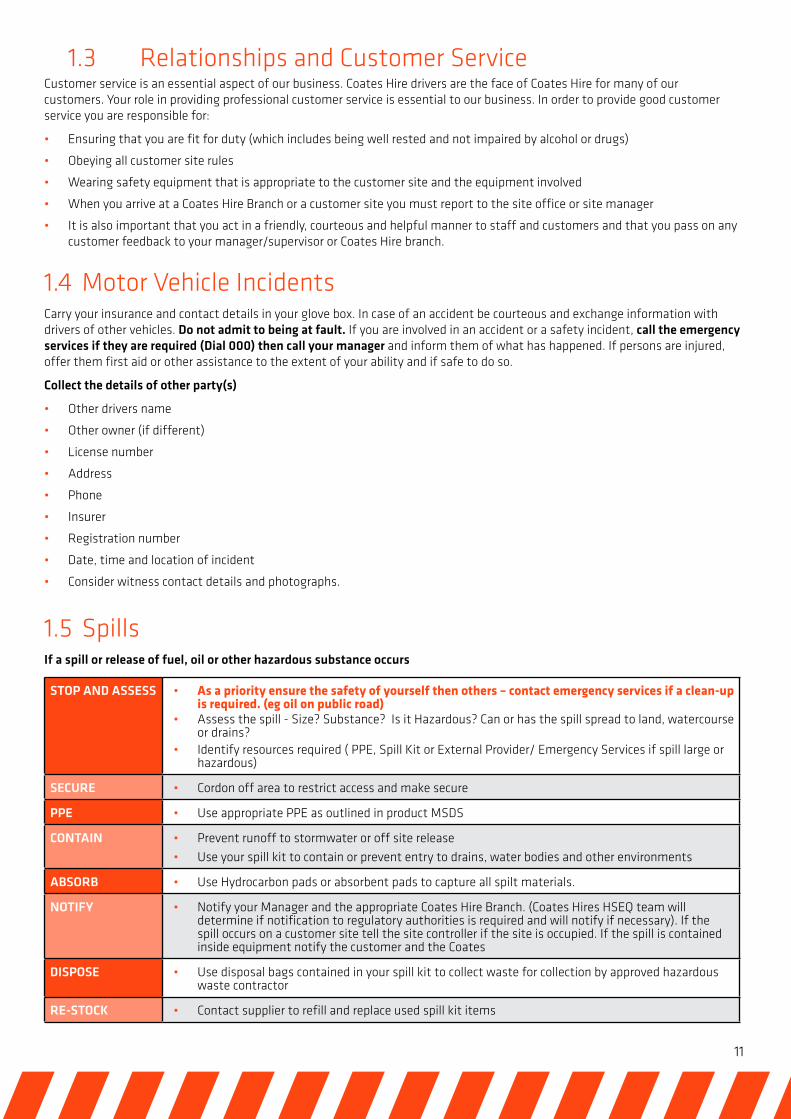
1.5 SpillsIf a spill or release of fuel, oil or other hazardous substance occurs
STOP AND ASSESS • As a priority ensure the safety of yourself then others – contact emergency services if a clean-up is required. (eg oil on public road)
• Assess the spill - Size? Substance? Is it Hazardous? Can or has the spill spread to land, watercourse or drains?
• Identify resources required ( PPE, Spill Kit or External Provider/ Emergency Services if spill large or hazardous)
SECURE • Cordon off area to restrict access and make secure
PPE • Use appropriate PPE as outlined in product MSDS
CONTAIN • Prevent runoff to stormwater or off site release
• Use your spill kit to contain or prevent entry to drains, water bodies and other environments
ABSORB • Use Hydrocarbon pads or absorbent pads to capture all spilt materials.
NOTIFY • Notify your Manager and the appropriate Coates Hire Branch. (Coates Hires HSEQ team will determine if notification to regulatory authorities is required and will notify if necessary). If the spill occurs on a customer site tell the site controller if the site is occupied. If the spill is contained inside equipment notify the customer and the Coates
DISPOSE • Use disposal bags contained in your spill kit to collect waste for collection by approved hazardous waste contractor
RE-STOCK • Contact supplier to refill and replace used spill kit items
12
2. Your Safety
2.1 Fatigue and SpeedExcessive time at the wheel and insufficient rest breaks can contribute to fatigue, speeding and accidents.
Coates Hire managers typically allocate jobs to drivers on a case-by-case, one-off manner, thus we have no ready knowledge of what you will do that day, or what you have done over the previous day or week. No Coates Hire job is so urgent that you need to break the law or work unsafely.
Therefore we expect that you DO NOT:
• exceed your legal work hours
• commence a Coates Hire job unless you are fit and rested
• take on a job for Coates Hire that would put you in jeopardy of exceeding driving hours or speed legislation
• attempt to carry loads beyond the safe and legal capacity of your vehicle or equipment
If you feel pressured or unable to complete a job as requested please ring your manager who should then negotiate a safe alternative with Coates Hire.
Coates Hire has a random drug and alcohol testing program which could include testing of Drivers on our sites. Compliance with this program is a condition of your engagement with Coates Hire.
The top five causes of road fatalities in Australia are speeding, drink driving, not wearing seatbelts, fatigue and driver distraction. Too many drivers are being distracted by things such as mobile phones, sound systems, on-board DVDs and satellite navigation. Using a handheld mobile while driving a heavy vehicle through a Coates Hire site, public road or customer site is illegal and totally unacceptable. The use of hands-free mobile phones and navigation devices should be kept to an absolute minimum when driving.
2.2 Falls and Body StressingOther potential causes of injuries are falls from trucks and those associated with manual handling activities. Whilst it is not reasonably practical to eliminate these risks, we can minimise them.
Manual handling risks can be minimised by using mechanical lifting aids or dividing the load, or asking for help.
Fall risks are more difficult and beyond using 3 points of contact when climbing and/or fall restraints. It becomes very challenging to eliminate the need to climb onto a truck in all circumstances. However, at no time shall any person under Coates Hire’s control or direction, climb onto plant and equipment loaded on the rear of truck unless it has purpose designed access points.
In respect to accessing the tray of a truck/trailer, due to the variety of equipment carried nationally and the mix of contractors and owned fleet it is not possible to provide trucks with handrails and other fall prevention measures in all cases. However, some solutions are available and should be used whenever possible, such as pre-slinging loads to eliminate the need to climb.
Some customers demand that persons must not climb onto trucks – if that is their position drivers are entitled to ask for their assistance by providing appropriate docks or other access equipment.
Seatbelts save truckies too! Always wear a seatbelt when travelling on the road. If you are driving mobile plant equipment and it is fitted with a seatbelt then it must be worn when operating it.
13
3. Maintenance and Vehicle PresentationMake sure that your vehicle is:
• Clean and tidy, both inside and outside
• Road worthy and in good mechanical condition
• Serviced regularly
• Pre-trip inspections should be done each day or week depending on truck type and intensity of use.
• All liquids in containers are well secured with well-sealed lids.
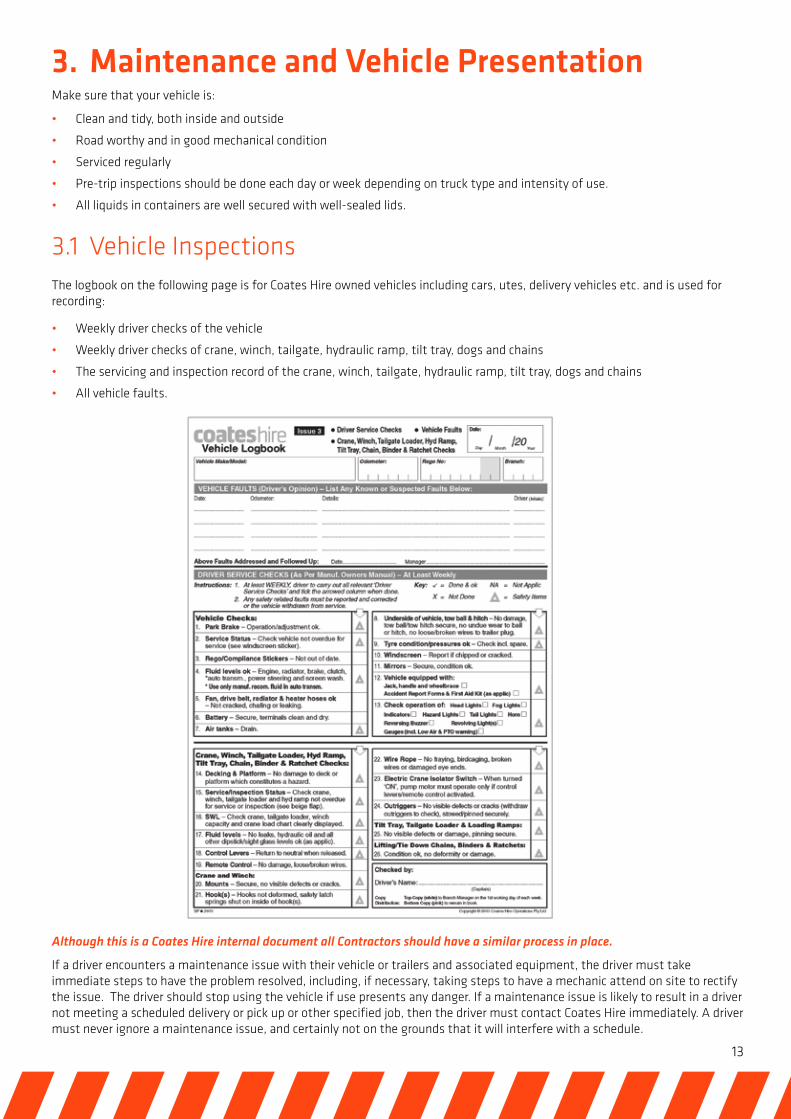
3.1 Vehicle InspectionsThe logbook on the following page is for Coates Hire owned vehicles including cars, utes, delivery vehicles etc. and is used for recording:
• Weekly driver checks of the vehicle
• Weekly driver checks of crane, winch, tailgate, hydraulic ramp, tilt tray, dogs and chains
• The servicing and inspection record of the crane, winch, tailgate, hydraulic ramp, tilt tray, dogs and chains
• All vehicle faults.
Although this is a Coates Hire internal document all Contractors should have a similar process in place.
If a driver encounters a maintenance issue with their vehicle or trailers and associated equipment, the driver must take immediate steps to have the problem resolved, including, if necessary, taking steps to have a mechanic attend on site to rectify the issue. The driver should stop using the vehicle if use presents any danger. If a maintenance issue is likely to result in a driver not meeting a scheduled delivery or pick up or other specified job, then the driver must contact Coates Hire immediately. A driver must never ignore a maintenance issue, and certainly not on the grounds that it will interfere with a schedule.
14
3.2 Maintaining Your AccessoriesYou are required to ensure that your vehicle is appropriately equipped to transport Coates Hire equipment and this includes carrying a range of vehicle accessories. Many of these accessories help you do your job every day. It is in your best interests to keep all of these items in good condition.
The following is a standard list of accessories (Note that some items on the list will not apply to every vehicle or driver):
• Fire extinguisher
• First aid kit
• 3 breakdown triangles (trucks >4T)
• Appropriate restraint equipment (chains/ slings/ ropes/dogs – non recoil type)
• Tape measure – to check dimension limits.
• Trailer leads and adaptors, and coupling safety clips
• Torch
• Spill kit capable of absorbing 40 litres of oil or diesel etc. (e.g. Medium Truck Spill Kit by Global Spill Control or Enretech ENR091 or similar)
• Accident/insurance information details
• Out of Service Tags
• Spare fuses and globes
• Flashing amber light if required
• Oversize sign if required
• Chocks/timber
• Clipboard, note pad and pen
• Equipment receipt book
• Maps, street directory or GPS
• PPE - (hard hat, safety glasses, yellow vest, gloves, safety footwear, ear muffs / plugs, wet weather gear)
• Safety cones to keep pedestrians and traffic out of loading zones
It is your responsibility to ensure that all vehicle accessories are checked on a regular basis and that any used, damaged or lost items are replaced.
In some instances where we service major projects additional vehicle specification requirements are imposed by the customer. Discuss this with your Coates Hire business unit Transport Manager if use of additional specification equipped vehicles is required.
4. Safety AlertsSafety alerts are issued periodically by Coates Hire to communicate safety issues and incidents which may be associated with an item, activity or range of equipment. They may be displayed in the Coates Hire Branches and may be distributed to drivers or contractors as required. Transport related safety alerts are summarised at the end of this guide.
5. Truck Drivers VideosVideos are available on our website and limited editions have been circulated to contractors. These videos are a rich source of information on how to safely load, secure and unload a wide variety of hire equipment. You must watch the videos that are relevant to the type of transport work you do for us. Refer to our Contractor webpage to view these videos: : http://www.coateshire.com.au/contractor-induction/
Have you checked that your vehicle contains the accessories you will need and that they are in good working order?
Note for Drivers
From time to time a Coates Hire representative might observe your practices to ensure you are up to date with Coates Hire safety standards. This is for your benefit, so please co-operate with them at all times.
15
6. Load and Unload Plant Training CourseCoates Hire Training Services offer a vocationally recognised training course for truck drivers. This covers the safe loading, securing and unloading of a variety of mobile plant and equipment. This 1 day course is available to public and Coates Hire employees and delivers nationally recognised units of competency. Application of the Load Restraint Guide and other legislative requirements are also included. The unit of competency is RIIHAN308A – Load and Unload Plant.
Note that this course does not provide licences (high risk certificates of competency) to operate high risk plant – such as large boom lifts; forklifts and telehandlers.
During 2014 a new Plant and Equipment Awareness course will be provided which provides drivers access to a range of mobile plant equipment. This provides practical operating skills for plant that does not require high risk work licences.
Phone 1300 657 867 Email: [email protected] Web: www.coateshire.com.au/training
7. High Risk Work LicencesWHS Regulations requiring Truck Drivers to hold the relevant high risk work licence (HRL) to drive high risk mobile plant on and off a truck vary between states and territories. In the Coates Hire environment High Risk Mobile Plant includes forklifts, boomlifts over 11 meters and telehandlers.
In addition to state legal requirements Coates Hire requires:
• Successful completion of the Coates Hire one day Plant and Equipment Awareness training course, or
• Be evaluated by a qualified Coates Hire Driver Evaluator [note: currently only available in WA]
Within Coates Hire we record HRL details of contractor drivers in b-safe, and Coates Hire employees HRL details are our recorded in our Academy.
Until the course/evaluation has been completed, a driver who considers themself competent to load or unload such high risk equipment can sign the “Mobile Plant Competency Declaration” in the “Transport Orange Book”. They will be ‘spotted’ during each load/unload until two “Random Safety Transport Checks” are conducted on that equipment (and recorded in the “Transport Orange Book”).
At customer sites where drivers don’t meet the above criteria, the driver must seek assistance from a customer or other suitably trained or HRL holder to load/unload the equipment; and conduct a Transport JSEA. If in doubt don’t load/unload and seek guidance from their Coates Hire Manager
Coates Hire Training Services also provide training in these licence classes, as well as the Advanced Loading/Unloading Course.
Phone 1300 657 867 Email: [email protected] Web: www.coateshire.com.au/training
8. Transport Orange BookDuring 2014 Coates Hire will provide all truck drivers a Transport Orange Book. Its purpose is for truck drivers to hold records of Customer Site Inductions; Coates Hire Branch Inductions; your emergency contact details; Random Transport Safety Checks and other useful information.
16
9. Service TagsVarious tags are used by Coates Hire to indicate the status of our equipment. These tags are important so take care that they remain securely attached and never remove them unless authorised.
Pre-Hire Check Tag
Out of Service Tag
Do Not Operate Tag
Pre-hire Check Tag
The pre-hire check tag tells you that the item has been cleaned, serviced and checked for safety and reliability.
If the tag is completed and the bottom section is intact the equipment is ready to hire.
If the tag is missing or torn, the equipment must be checked and serviced before it is hired out again.
The reverse side of the tag is also used when electrical equipment is inspected or tested.
Drivers picking up equipment for delivery should remove the bottom section and attach it to the Hire schedule. If returning equipment to the branch, remove the pre-hire tag.
Out of Service Tag
This tag tells you that the equipment or part is not ready for use.
This tag should be fitted:
• By the driver when the customer complains about a problem at pick-up or there is a fault with the equipment
• By the hire-controller/yardman if a customer complains about a problem when returning the equipment
You must record the nature of the problem so it can be addressed before the next hire.
Do Not Operate Tag
DO NOT attempt to start or use a machine that has this tag attached.
This is a personal protection tag that prevents you using a machine that is being repaired or serviced. It is designed to prevent accident or injury.
It also helps to avoid the machine being further damaged.
17
10. Loading and Unloading Equipment10.1 Your responsibilities
• Determine if your need a HRL to operate the item.
• Walk around the machine before accessing.
• Check that nothing is in your way
• Find a safe point to gain access - many trucks and trailers have steps or other safe access.
• Always face ladders, and maintain three points of contact
• Check the Spotting Poster to see if you are supposed to be spotting during loading or unloading
• Do a quick check of the machine and make sure the Pre-Hire Check tag is present.
• Ensure controls are set for start-up and park brake is applied.
• Never mount or dismount a moving machine
• Ensure operating and shut down controls are functional
• Check for Hazards and watch for people around you
• If seatbelts are fitted they must be worn
• Report faults and hazards and ensure the equipment is tagged out if unsafe
10.2 Safe operation of machineryWhen starting work at a new site, check with the site controller for specific safety instructions. NEVER operate a machine which is new to you without first being instructed in its proper operation.
Know the rules. It is essential that you:
• Know the positions and understand the functions of all controls before attempting to operate a machine
• Know the meaning of all identification symbols on the controls and gauges
• Know the location of the emergency shutdown control if the machine is so equipped
• Know the capabilities, characteristics and limitations of the machine including:
speed
braking
steering
weight
gradability
• Know the operational and transport dimensions of the machine to avoid inadvertently hitting something during operation or transporting
• Know the rules and procedures used at the workplace
• Know where to get correct assistance when required
Assess the site conditions before moving (Conduct a risk assessment or JSEA). Watch for:
• Unstable ground
• People in the area
• Trenches or underground services
• Overhead structures and power lines.
Climbing onto trucks & plant
Before Operating Hire Plant
During Operation
Loading and transporting mobile plant involves significant hazards. Don’t attempt this unless you have been trained and you are confident you can operate safely.CAUTION
18
11. Safe ParkingAlways park in a safe place:
• Park in designated heavy vehicle parking areas on flat level ground. Place the machine in neutral, release all brakes to test if the machine is stable and not moving, lower any implements and then firmly apply the parking brake
• If parking in a non-designated area chose as level ground as possible, in a non-operational, non-thoroughfare area or as instructed
• On roadsides face the traffic rather than working with your back to it (see diagram below)
• Use the appropriate flags, barriers, flares, lights and warning signals if you do have to park in a thoroughfare
• Provide advance warning signals in the traffic lane to warn approaching traffic
• Park on level ground whenever possible
When you have to park on a slope follow the above steps and:
• Position the truck across the slope, rather than facing downhill, (provided there is no rollover risk due to excessive slope). Steering wheels should be positioned to reduce the likelihood of rolling away
• Make sure the truck is on a firm footing, and that there is no danger of sliding
• Consider chocking wheels in both directions before leaving the immediate vicinity of the vehicle.
• Loading can only take place on hard level ground.
Never jump out of a vehicle
If you have to step on a tyre to get on or off a truck tray, be careful if the tyre is wet. Tyres can get very slippery. You might fall and hurt yourself or fall into the path of moving vehicles. Trailers and truck trays should have safe climbing access points permanently fitted.
Changing wheels
If you are able to, change wheels well off the road. Be very careful changing a wheel on the right side of the vehicle if you are near to traffic on the road. Use hazard warning lights and warning triangles if there is any risk to you or to other road users.
12. Completing a Transport JSEA (or Risk Assessment)The Coates Hire Transport Job Safety Environment Analysis (JSEA) helps you recognise hazards you may encounter when transporting Coates Hire equipment. Some transport companies may have their own JSEA, Take 5 or similar process. Please use the Coates Hire form and process unless your alternative has been approved by the BU Transport Manager or BU HSEQ Manager.
A Transport JSEA to be completed for every delivery/pick up at customer sites but exemptions can be made for sites where there are multiple deliveries a day or where there are fixed load and unload zones. Area Managers and Transport Managers have the authority to make exemptions for specific sites. In these exempt sites, the first delivery/pickup of the day requires a Transport JSEA; and if the weather turns inclement or operational conditions change a Transport JSEA should be completed.
Approach your vehicle from the front so that you are facing oncoming traffic From The Victorian Bus & Truck Drivers’ Handbook; Vic Roads 2009; 24.
19
Exempt sites will be listed on the Branch Safety and Environmental Board.
When you return to the branch hand the Transport JSEA to your Branch Manager with the Hire Schedule and any other documents. Some customers may request a copy of the Transport JSEA or perhaps a Safe Work Method Statement (SWMS). Part 3 of this guide contains a detailed SWMS. Coates Hire customers generally accept this as evidence of safe systems of work.
13. Pickup and Delivering EquipmentWhen you are loading and unloading our equipment both on customer sites and in our branches, you must remain safety conscious at all times and be vigilant for hazards that may arise.
You are responsible for:
• Briefly checking the machine on pick-up at a Branch and reporting to the Manager if the equipment is unsafe or not functioning correctly
• Properly securing your load / equipment
• The safety of the public and other persons while loading, transporting and unloading equipment.
• Ensuring the bottom portion of the “Ready for Hire” tag is removed and attached to the Hire Schedule / Hire Delivery Docket when collecting a machine from a Branch
• Ensuring completion of necessary documentation after delivery or pick up as requested, including the Transport JSEA
• Starting the machine once it has been unloaded with the customer present. This is to occur irrespective of whether the customer requires a demonstration or not. It is our final quality check
• Showing the customer the location of machine logbooks and manuals (if applicable)
• Recording any damage, missing accessories or malfunctioning equipment as seen by you or reported by our customer on pick-up. This is done on the Hire Schedule, Pickup/Return Docket or Equipment Receipt. Take photos if possible.
• Placing returned equipment in the designated equipment return area (separated from ready to hire equipment). Ensure Pre-Hire Tag is removed
• Being aware of and adhering to relevant procedures and instructions required by the particular site you are working on. If in doubt, check with the site manager
• Informing the site contact on delivery of equipment that high risk equipment “can only be operated by the holder of a certificate of competency issued under WHS legislation”
• You must also obtain the customer’s signature on the Hire Schedule, Hire Delivery Docket or equipment receipt in the space provided for this purpose.
13.1 SpottingCoates Hire expects certain loading/unloading operations to be “Spotted”. This means we assist by watching the load or unload to add a layer of safety and warn the operator if something appears to be going wrong.
Always spot loading or unloading at Coates Hire sites during business hours:
• Boomlifts
• Scissor lift
• Telehandlers
• Multi tyred rollers
• Double drum rollers (unless being winched)
• Excavators ≥ 11 tonne
• Front end loaders/back hoe
• Graders
• Tip trucks ≥ 4 tonne
20
In addition if the driver is not inducted and does not have at least two Random Transport Safety checks we will spot the following:
• Rollers – Single drum
• Excavators <11 tonne
• Skid steer
• Skid mounted (inc portable buildings and shipping containers)
• Barriers
• Wheeled equipment
• Tip trucks <4 tonne
If the loading or unloading occurs at a customer site or Coates Hire Branch out of business hours try to have someone spot the equipment if the above lists applies. A transport JSEA must be completed. If there is any doubt seek guidance from your manager. (A few large sites may be exempted from Spotting due to other arrangements)
If you lose sight of the Spotter stop until you see the Spotter again, and the Spotter signals you to move.
If there anyone in the loading or exclusion area who should not be there, the driver must ask the person to move and stay clear while the driver is loading and unloading equipment, or using heavy machinery generally. Refer also to the Safe Zones explained at the end of this booklet.
13.2 Loading Equipment in a BranchWhen you are loading equipment in a branch you must:
• Check the Spotting Poster to see if you are required to be Spotted during loading or unloading
• Check the paperwork for what is to be loaded. Be sure to include any consumables listed
• Locate the equipment and ensure that it has a completed Pre-Hire Check tag attached
• Start equipment before loading to test its operation
• Load in a safe area
• Use a lifting device (e.g. Forklift) or ask for assistance if required to reduce manual handling risks
• Secure your load
• Record the details such as the asset number and hour metre reading on the Hire Schedule, Hire Delivery Docket or Equipment Receipt
• Note any substantial damage on the Hire Schedule, Hire Delivery Docket or Equipment Receipt.
13.3 Unloading Equipment in a BranchWhen you are unloading equipment in a branch you must:
• Unload in the designated safe area
• Refuel the equipment (if applicable) – take care not to over fill.
• Place the equipment in the designated area (equipment returns bay)
• Record details such as the hour metre reading and fuel usage on the Hire Schedule, Pick Up/Return Docket or Equipment Receipt
• Affix an “Out Of Service” tag if applicable. This must be done if you notice a fault or problem or one is pointed out by customer (if you do not have an Out of Service Tag available, notify Coates Hire management of the problem)
• Remove Pre-Hire Check tag; check that paperwork is complete and hand it in.
13.4 Loading Equipment on Other SitesWhen you are loading equipment on a site you must:
• Check with customer/site contact before loading
• Locate the equipment and check that the customer was happy with the equipment
21
• Advise the branch by phone if equipment is not ready for pick up (e.g. Equipment still in use or pump & hoses still connected and working).
• Complete a Transport JSEA
• Load in safe area
• Secure the load
• Note all damages on the Pickup/Return Docket or Equipment Receipt
• Obtain the customer signature and issue pick-up paperwork.
13.5 Unloading Equipment on Other Sites and Road Side Work When you are unloading equipment on a site you must:
• Check with customer / site contact before unloading
• Complete a Transport JSEA
• Unload in safe area
• Use manual or materials handling device (e.g. Forklift) or ask for assistance if required
• Start the equipment in front of the customer
• Demonstrate operation (where possible)
• Obtain the customer signature and issue the delivery paperwork
• Bring any existing damages to the attention of the customer so they are aware that only charges for new damages apply to them.
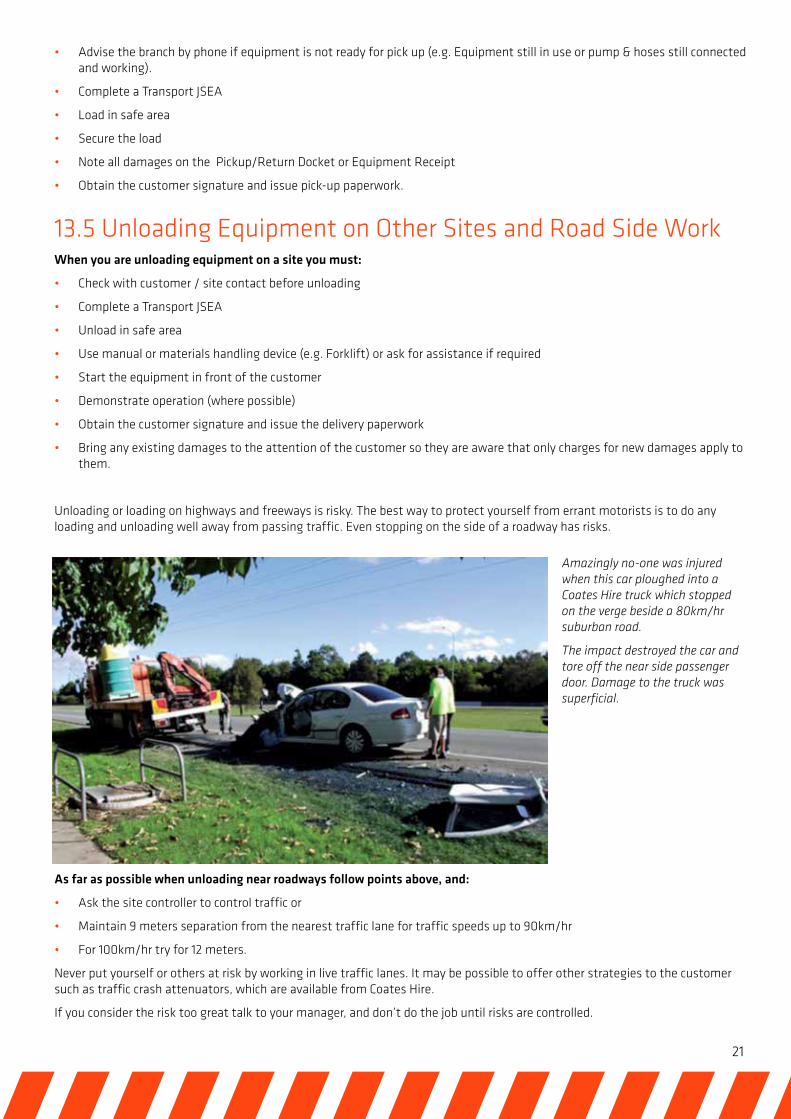
Unloading or loading on highways and freeways is risky. The best way to protect yourself from errant motorists is to do any loading and unloading well away from passing traffic. Even stopping on the side of a roadway has risks.
As far as possible when unloading near roadways follow points above, and:
• Ask the site controller to control traffic or
• Maintain 9 meters separation from the nearest traffic lane for traffic speeds up to 90km/hr
• For 100km/hr try for 12 meters.
Never put yourself or others at risk by working in live traffic lanes. It may be possible to offer other strategies to the customer such as traffic crash attenuators, which are available from Coates Hire.
If you consider the risk too great talk to your manager, and don’t do the job until risks are controlled.
Amazingly no-one was injured when this car ploughed into a Coates Hire truck which stopped on the verge beside a 80km/hr suburban road.
The impact destroyed the car and tore off the near side passenger door. Damage to the truck was superficial.

22
13.6 Look up and Live! Power-lines Keep clear of overhead power-lines. The basic rule of thumb is never allow any part of equipment to get within 6.4 metres of live conductors on a power pole and if the power-line is on a transmission tower never get any part of the equipment within 10 metres.
Boomlifts and other equipment should never pass above a power-line – regardless of clearance distance above the line.
A Coates Hire Spotter can only guide within the Green Zone.
If equipment needs to enter Yellow Zone then a formally qualified Electrical Spotter needs to be used.
23
PART 3 THE COATES HIRE LOADING AND UNLOADING GUIDE
24
1. Safe Transport Principles for Coates Hire Heavy Plant Equipment
This section contains a series of factsheets to assist you in managing the risks you will face when transporting Coates Hire plant and equipment. When you are reviewing a process for loading or unloading it is recommended that you also review the Safe Work Method Statement (SWMS) provided as an additional reference material. This SWMS is attached and listed within the Part 4 of this guide.
It is important to remember this information is a guide to assist with loading and unloading and should not be considered as the only safe method. This is because trucks and transport equipment and the vast range of Coates Hires Rental fleet introduce many variables. This makes it impossible to foresee every situation. The operator of the vehicle is responsible for understanding their own vehicle’s hazards and features.
If you are not confident about operating or loading any Coates Hire equipment, stop and ask for help.
Other information sources are:
• The Coates Hire Truck Drivers Videos
• Coates Hire Safety Alerts
• The manufacture’s operating instructions - usually found attached to major plant items
25
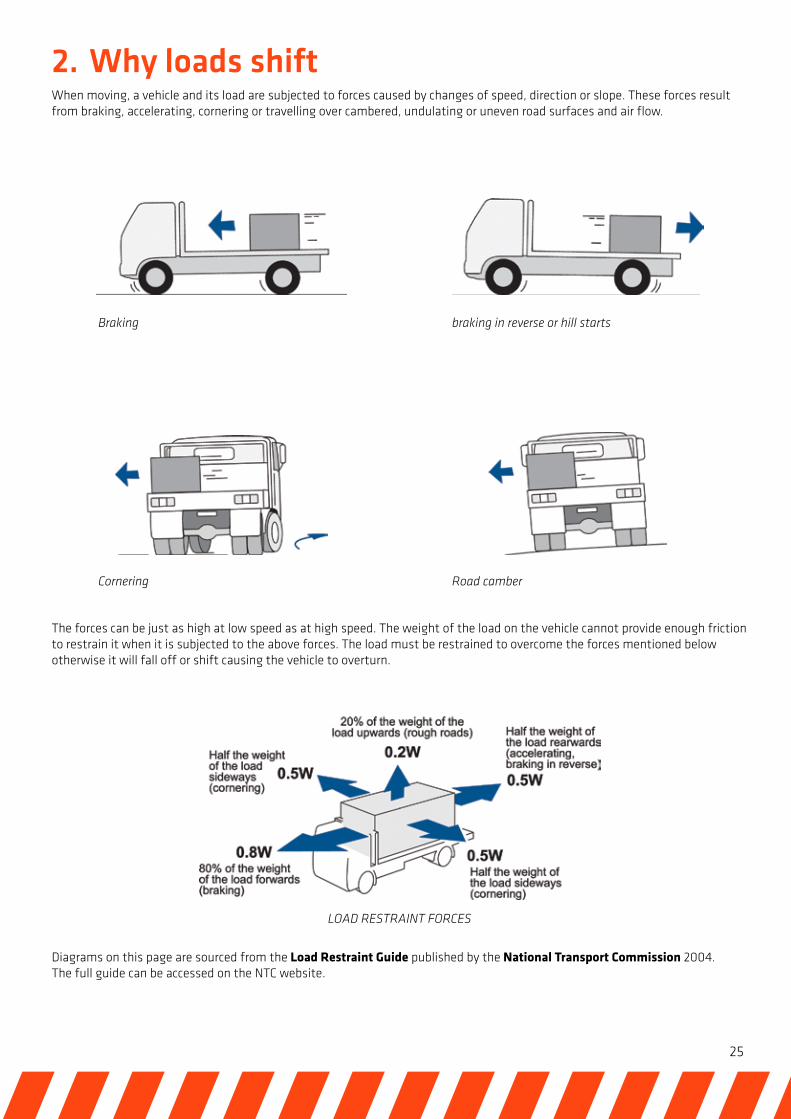
2. Why loads shiftWhen moving, a vehicle and its load are subjected to forces caused by changes of speed, direction or slope. These forces result from braking, accelerating, cornering or travelling over cambered, undulating or uneven road surfaces and air flow.
Braking braking in reverse or hill starts
Cornering Road camber
The forces can be just as high at low speed as at high speed. The weight of the load on the vehicle cannot provide enough friction to restrain it when it is subjected to the above forces. The load must be restrained to overcome the forces mentioned below otherwise it will fall off or shift causing the vehicle to overturn.
LOAD RESTRAINT FORCES
Diagrams on this page are sourced from the Load Restraint Guide published by the National Transport Commission 2004. The full guide can be accessed on the NTC website.
26
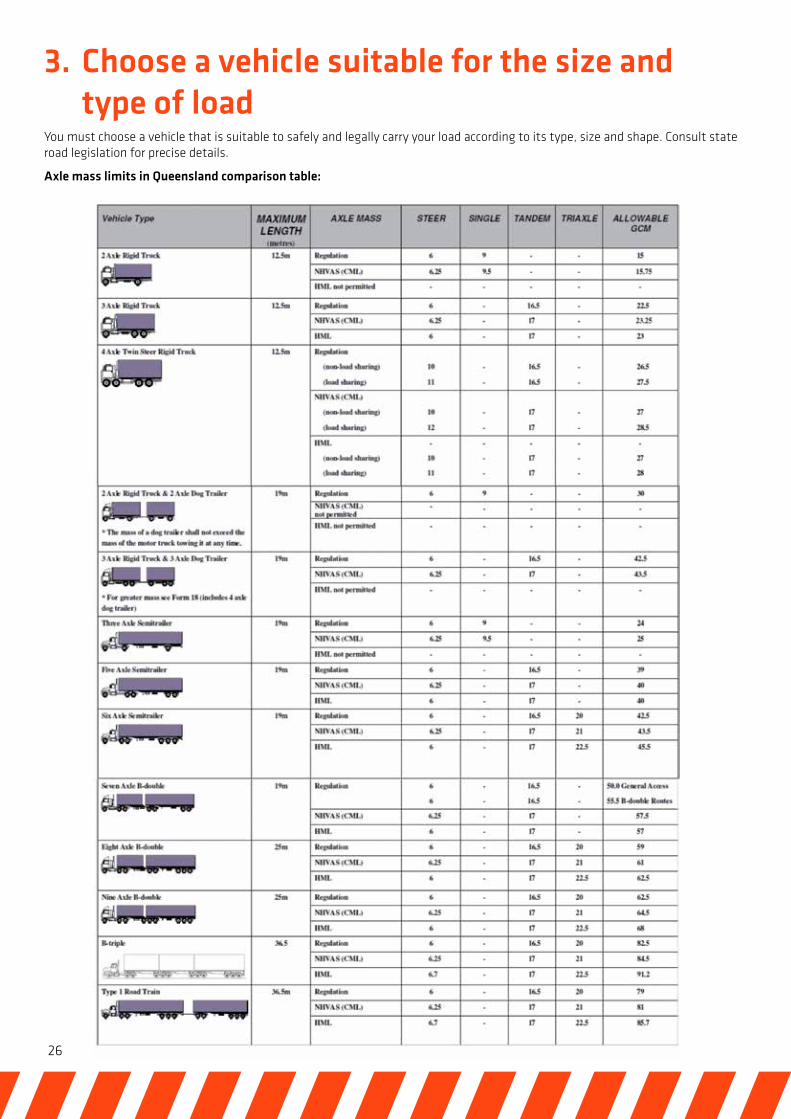
3. Choose a vehicle suitable for the size and type of load
You must choose a vehicle that is suitable to safely and legally carry your load according to its type, size and shape. Consult state road legislation for precise details.
Axle mass limits in Queensland comparison table:
27
• A long load should be carried on a vehicle with a suitable length body so there is no excessive overhang.
• The load should not project from the front, sides or rear of a vehicle in such a manner that could cause danger to any person, or damage to any property.
• If a load projects beyond the rear of a vehicle it should be made conspicuous by fixing a warning flag
• A load with a high centre of mass should be carried on a vehicle with a low platform height (e.g. drop frame trailer or low loader).
• The overall height of general access vehicles should not exceed 4.3 metres but must also comply with over-height restrictions on local structures encountered en route.
• Loose bulk material should be covered so that no part of the load can become dislodged from the vehicle or container on the vehicle.
• You must not exceed any of the following:
The vehicle manufacturer’s rated axle load capacity
The vehicle manufacturer’s rated Gross Vehicle Mass (GVM)
The vehicle manufacturer’s rated Gross Combination Mass (GCM) where applicable
The requirements for Mass (varies according to truck configurations shown above)
The maximum dimensions truck (and load) height is 4.3 metres
The maximum dimensions truck (and load) width 2.5 metres
Maximum length rigid truck is 12.5 metres
Maximum length semi-trailer combination is 19 metres
B-Doubles must keep to approved routes and may be 25 (or occasionally 26 metres long).
Be careful of drawbars across trailers and other protrusions which may breach these limits resulting in fines. These penalties may also be applied to Drivers as well as Branch Managers, Loaders and Consigners.
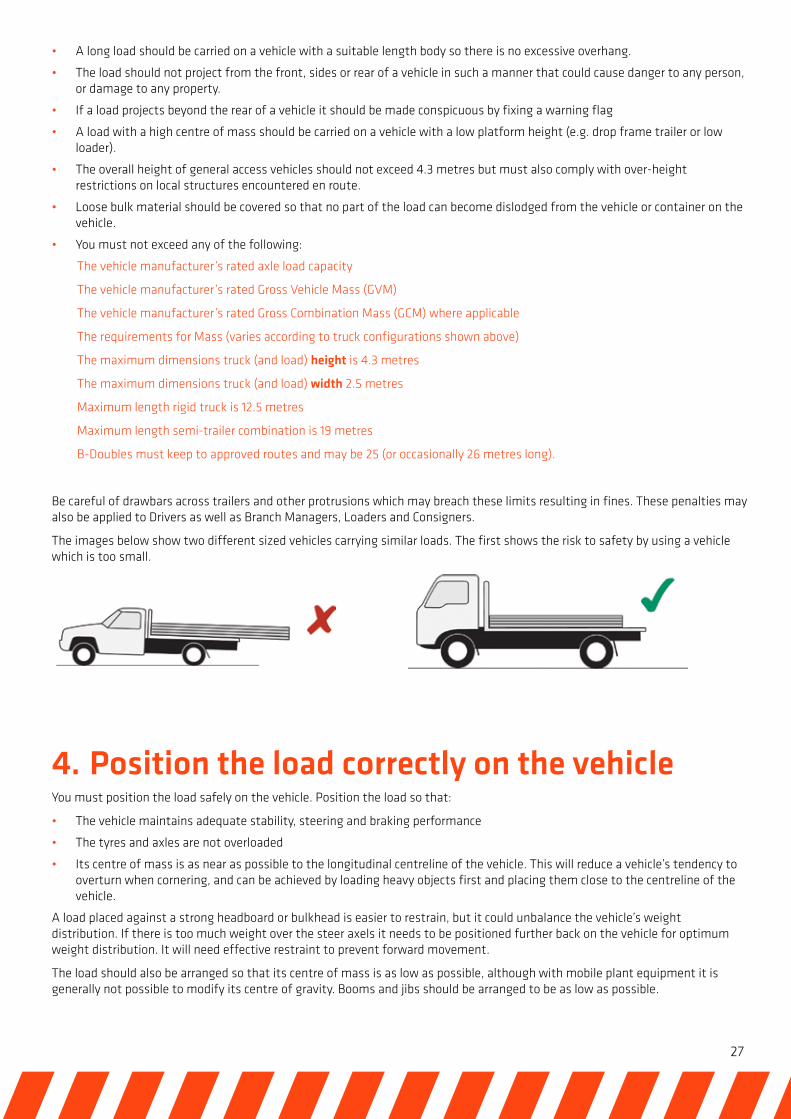
The images below show two different sized vehicles carrying similar loads. The first shows the risk to safety by using a vehicle which is too small.
4. Position the load correctly on the vehicleYou must position the load safely on the vehicle. Position the load so that:
• The vehicle maintains adequate stability, steering and braking performance
• The tyres and axles are not overloaded
• Its centre of mass is as near as possible to the longitudinal centreline of the vehicle. This will reduce a vehicle’s tendency to overturn when cornering, and can be achieved by loading heavy objects first and placing them close to the centreline of the vehicle.
A load placed against a strong headboard or bulkhead is easier to restrain, but it could unbalance the vehicle’s weight distribution. If there is too much weight over the steer axels it needs to be positioned further back on the vehicle for optimum weight distribution. It will need effective restraint to prevent forward movement.
The load should also be arranged so that its centre of mass is as low as possible, although with mobile plant equipment it is generally not possible to modify its centre of gravity. Booms and jibs should be arranged to be as low as possible.
28
5. Use restraint equipment that is suitable, strong, and appropriately applied
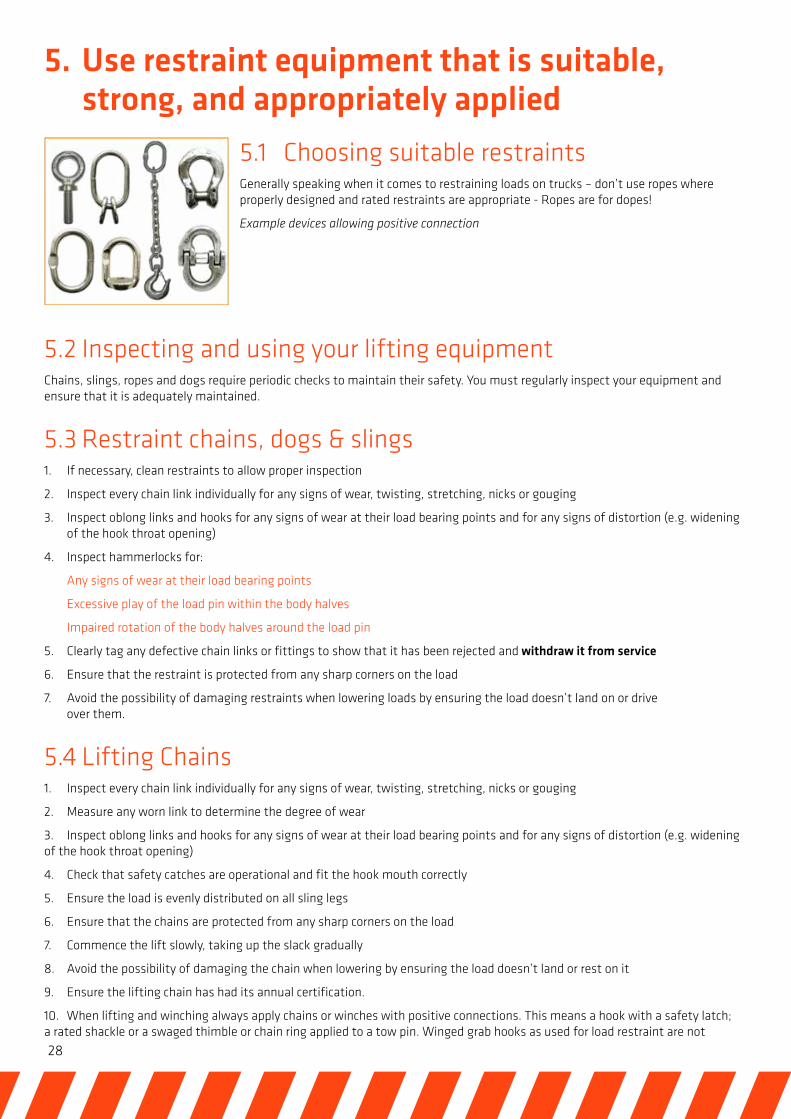
5.1 Choosing suitable restraintsGenerally speaking when it comes to restraining loads on trucks – don’t use ropes where properly designed and rated restraints are appropriate - Ropes are for dopes!
Example devices allowing positive connection
5.2 Inspecting and using your lifting equipmentChains, slings, ropes and dogs require periodic checks to maintain their safety. You must regularly inspect your equipment and ensure that it is adequately maintained.
5.3 Restraint chains, dogs & slings1. If necessary, clean restraints to allow proper inspection
2. Inspect every chain link individually for any signs of wear, twisting, stretching, nicks or gouging
3. Inspect oblong links and hooks for any signs of wear at their load bearing points and for any signs of distortion (e.g. widening of the hook throat opening)
4. Inspect hammerlocks for:
Any signs of wear at their load bearing points
Excessive play of the load pin within the body halves
Impaired rotation of the body halves around the load pin
5. Clearly tag any defective chain links or fittings to show that it has been rejected and withdraw it from service
6. Ensure that the restraint is protected from any sharp corners on the load
7. Avoid the possibility of damaging restraints when lowering loads by ensuring the load doesn’t land on or drive over them.
5.4 Lifting Chains1. Inspect every chain link individually for any signs of wear, twisting, stretching, nicks or gouging
2. Measure any worn link to determine the degree of wear
3. Inspect oblong links and hooks for any signs of wear at their load bearing points and for any signs of distortion (e.g. widening of the hook throat opening)
4. Check that safety catches are operational and fit the hook mouth correctly
5. Ensure the load is evenly distributed on all sling legs
6. Ensure that the chains are protected from any sharp corners on the load
7. Commence the lift slowly, taking up the slack gradually
8. Avoid the possibility of damaging the chain when lowering by ensuring the load doesn’t land or rest on it
9. Ensure the lifting chain has had its annual certification.
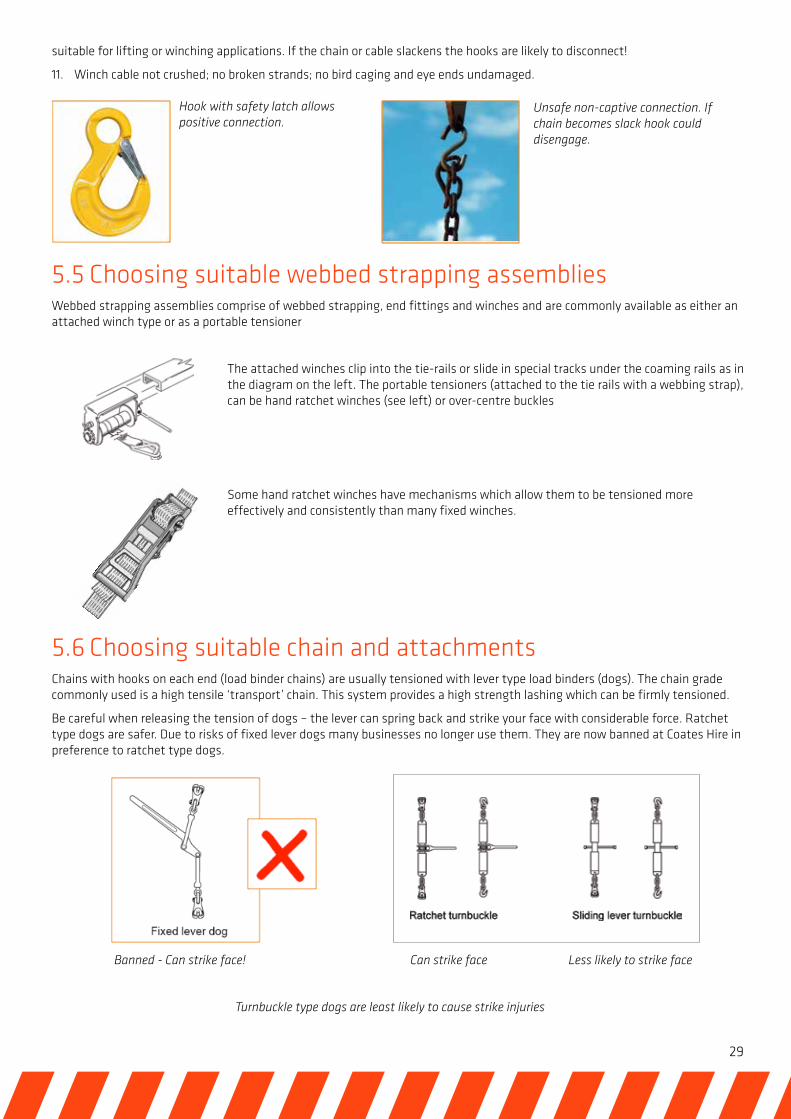
10. When lifting and winching always apply chains or winches with positive connections. This means a hook with a safety latch; a rated shackle or a swaged thimble or chain ring applied to a tow pin. Winged grab hooks as used for load restraint are not
29
suitable for lifting or winching applications. If the chain or cable slackens the hooks are likely to disconnect!
11. Winch cable not crushed; no broken strands; no bird caging and eye ends undamaged.
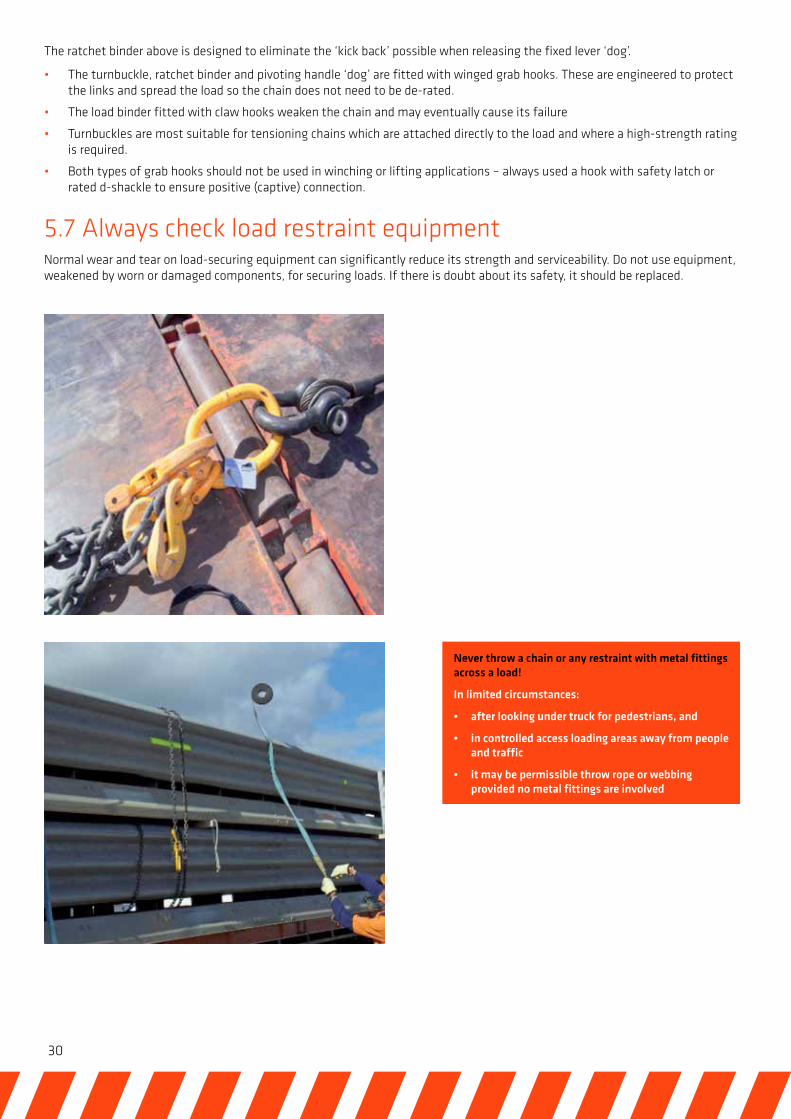
5.5 Choosing suitable webbed strapping assembliesWebbed strapping assemblies comprise of webbed strapping, end fittings and winches and are commonly available as either an attached winch type or as a portable tensioner
The attached winches clip into the tie-rails or slide in special tracks under the coaming rails as in the diagram on the left. The portable tensioners (attached to the tie rails with a webbing strap), can be hand ratchet winches (see left) or over-centre buckles
Some hand ratchet winches have mechanisms which allow them to be tensioned more effectively and consistently than many fixed winches.
5.6 Choosing suitable chain and attachmentsChains with hooks on each end (load binder chains) are usually tensioned with lever type load binders (dogs). The chain grade commonly used is a high tensile ‘transport’ chain. This system provides a high strength lashing which can be firmly tensioned.
Be careful when releasing the tension of dogs – the lever can spring back and strike your face with considerable force. Ratchet type dogs are safer. Due to risks of fixed lever dogs many businesses no longer use them. They are now banned at Coates Hire in preference to ratchet type dogs.
Banned - Can strike face! Can strike face Less likely to strike face
Turnbuckle type dogs are least likely to cause strike injuries
Hook with safety latch allows positive connection.
Unsafe non-captive connection. If chain becomes slack hook could disengage.
30
The ratchet binder above is designed to eliminate the ‘kick back’ possible when releasing the fixed lever ‘dog’.
• The turnbuckle, ratchet binder and pivoting handle ‘dog’ are fitted with winged grab hooks. These are engineered to protect the links and spread the load so the chain does not need to be de-rated.
• The load binder fitted with claw hooks weaken the chain and may eventually cause its failure
• Turnbuckles are most suitable for tensioning chains which are attached directly to the load and where a high-strength rating is required.
• Both types of grab hooks should not be used in winching or lifting applications – always used a hook with safety latch or rated d-shackle to ensure positive (captive) connection.
5.7 Always check load restraint equipmentNormal wear and tear on load-securing equipment can significantly reduce its strength and serviceability. Do not use equipment, weakened by worn or damaged components, for securing loads. If there is doubt about its safety, it should be replaced.
Never throw a chain or any restraint with metal fittings across a load!
In limited circumstances:
• after looking under truck for pedestrians, and
• in controlled access loading areas away from people and traffic
• it may be permissible throw rope or webbing provided no metal fittings are involved

31
6. Restraining Mobile Plant Large dynamic forces can be generated in lashings by heavy vehicles or equipment ‘bouncing’ on their tyres or suspension during a journey. You can reduce bouncing by:
• Applying additional vertical lashings at each wheel. The lashings should have a manufacturer’s rating of at least half the weight of the load and should be fully tensioned
• Locking suspension units
• Tying the machine down onto blocks
• Removing wheels where appropriate (this will also prevent blocking timbers becoming dislodged from flexing of the transport vehicle).
Where the mobile equipment is wider than 2.5 metres, use a widening-deck low loader, outriggers or extensions for maximum support. The vehicle’s loading deck must support at least 75% of the normal contact area of equipment, tyres or tracks. Any unsupported tyre or track should not project more than 150mm beyond the vehicle deck or extension.
Use the lugs or lashings points provided by manufacturers on vehicles and equipment to secure them for transport. Avoid using a single chain passed through a single lashing point – as explained in the following diagrams.
Poor: Unit can slide sideways along chain. Best: Separate anchor points using hook with safety catch
All equipment should be secured by at least 4 independent tie down points. In the tracked equipment diagrams above a single shared anchorage point (tow-pin) is used. If the pin fails this dozer would be lost.
The main body of this excavator has 4 independent tie downs attached to 4 independent tie down points. Ancillary equipment is also secured.
In the excavator photo we have 4 completely independent tie downs and this should apply to all large equipment, including portable buildings. Be diligent about ensuring attachments such as the excavator bucket are properly attached, i.e. no quick-hitch pins missing. Note the restraint of the secondary blade and other buckets. The boom/main bucket in this example was also tied down. More information on restraining tracked vehicles can be found in Section E of the Load Restraint Guide.
32
6.1 How Much Restraint is Enough?
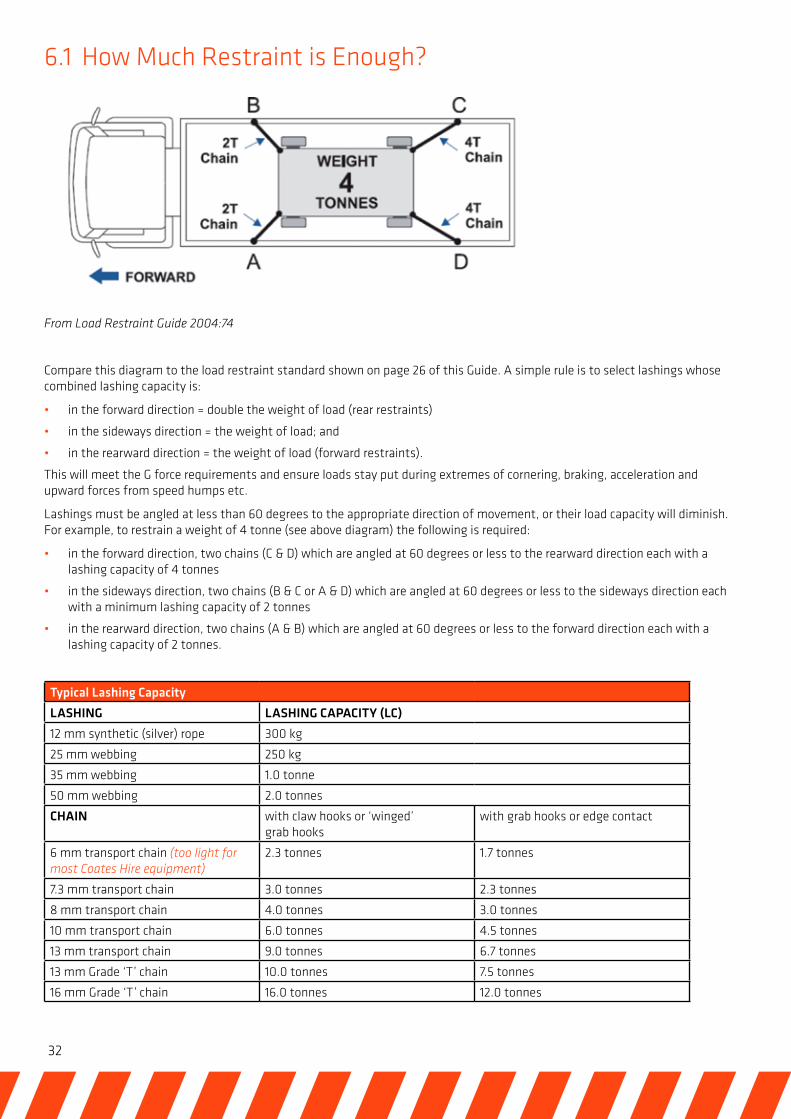
From Load Restraint Guide 2004:74
Compare this diagram to the load restraint standard shown on page 26 of this Guide. A simple rule is to select lashings whose combined lashing capacity is:
• in the forward direction = double the weight of load (rear restraints)
• in the sideways direction = the weight of load; and
• in the rearward direction = the weight of load (forward restraints).
This will meet the G force requirements and ensure loads stay put during extremes of cornering, braking, acceleration and upward forces from speed humps etc.
Lashings must be angled at less than 60 degrees to the appropriate direction of movement, or their load capacity will diminish. For example, to restrain a weight of 4 tonne (see above diagram) the following is required:
• in the forward direction, two chains (C & D) which are angled at 60 degrees or less to the rearward direction each with a lashing capacity of 4 tonnes
• in the sideways direction, two chains (B & C or A & D) which are angled at 60 degrees or less to the sideways direction each with a minimum lashing capacity of 2 tonnes
• in the rearward direction, two chains (A & B) which are angled at 60 degrees or less to the forward direction each with a lashing capacity of 2 tonnes.
Typical Lashing Capacity
LASHING LASHING CAPACITY (LC)
12 mm synthetic (silver) rope 300 kg
25 mm webbing 250 kg
35 mm webbing 1.0 tonne
50 mm webbing 2.0 tonnes
CHAIN with claw hooks or ‘winged’ grab hooks
with grab hooks or edge contact
6 mm transport chain (too light for most Coates Hire equipment)
2.3 tonnes 1.7 tonnes
7.3 mm transport chain 3.0 tonnes 2.3 tonnes
8 mm transport chain 4.0 tonnes 3.0 tonnes
10 mm transport chain 6.0 tonnes 4.5 tonnes
13 mm transport chain 9.0 tonnes 6.7 tonnes
13 mm Grade ‘T’ chain 10.0 tonnes 7.5 tonnes
16 mm Grade ‘T’ chain 16.0 tonnes 12.0 tonnes
33
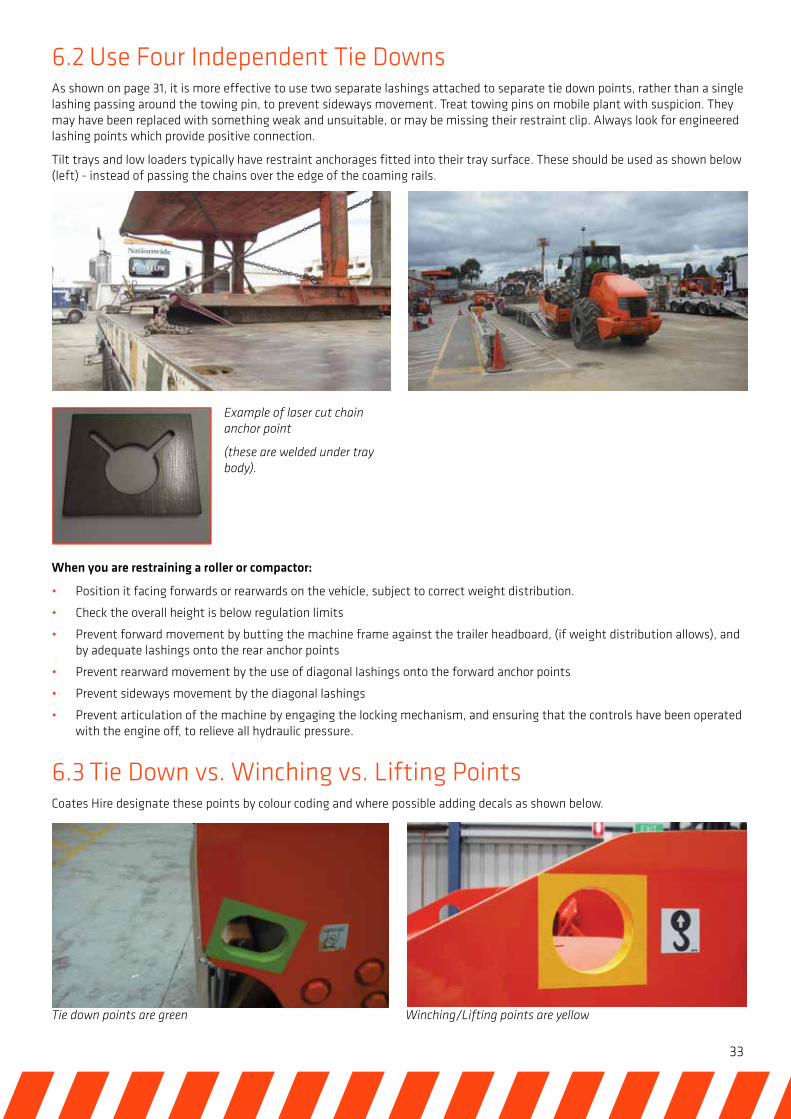
6.2 Use Four Independent Tie DownsAs shown on page 31, it is more effective to use two separate lashings attached to separate tie down points, rather than a single lashing passing around the towing pin, to prevent sideways movement. Treat towing pins on mobile plant with suspicion. They may have been replaced with something weak and unsuitable, or may be missing their restraint clip. Always look for engineered lashing points which provide positive connection.
Tilt trays and low loaders typically have restraint anchorages fitted into their tray surface. These should be used as shown below (left) - instead of passing the chains over the edge of the coaming rails.
When you are restraining a roller or compactor:
• Position it facing forwards or rearwards on the vehicle, subject to correct weight distribution.
• Check the overall height is below regulation limits
• Prevent forward movement by butting the machine frame against the trailer headboard, (if weight distribution allows), and by adequate lashings onto the rear anchor points
• Prevent rearward movement by the use of diagonal lashings onto the forward anchor points
• Prevent sideways movement by the diagonal lashings
• Prevent articulation of the machine by engaging the locking mechanism, and ensuring that the controls have been operated with the engine off, to relieve all hydraulic pressure.
6.3 Tie Down vs. Winching vs. Lifting PointsCoates Hire designate these points by colour coding and where possible adding decals as shown below.
Tie down points are green Winching/Lifting points are yellow
Example of laser cut chain anchor point
(these are welded under tray body).
34
In addition:
• Winching only points (not lifting) are white – you might find these on some scissor lifts
• Combination winching, lifting and tie down points are green and yellow
• Never apply a winch to any point labelled no winching.
7. Steel PlatesSteel plates are tricky to load and transport. Single plates must always be placed on dunnage to increase friction and also to provide better bite for more effective load restraint. Multiple sheets must have interleaved dunnage.
DUNNAGE DO’S & DON’TS from Load Restraint Guide
8. Working with TrailersVarious types of coupling are used on Coates Hire light trailers.
Coupling light-vehicle type trailers
Start by inspecting all components – make sure they are compatible only 50mm tow balls are used.
1. Reverse up as close as possible - if you have a reversing camera you can do this with great precision, otherwise you might need to get out; look and then have a second go
2. Avoid manually handling very heavy trailers – reposition the tow vehicle and use jockey wheel to raise and lower drawbar
3. The first thing you should connect are the safety chains using rated D shackles. When uncoupling the last thing to disconnect are the safety chains
4. Position the coupling over the tow ball, then use the jockey wheel to lower the trailer coupling onto the tow ball
5. Engage the coupling handle then close the safety latch and insert the safety retaining clip (pictured below)
6. Now you can connect the electrics and any other connections and check the lights are working
7. When carrying trailers avoid applying excessive tie down force to draw bars – apply restraints to trailer chassis if possible, excessive force might damage jockey wheels or drawbars.
35
9. When to WinchWhere mobile equipment is being loaded onto tilt-tray trucks we expect a winch to be used during loading and unloading in most circumstances. This is an essential requirement for all Coates Hire sites and must also be followed on customer sites and other places when picking up or delivering our equipment.
There are five variations on this technique:
Technique Application
Winch and Drive Only suitable if the mobile equipment is self-powered, and has a driving station e.g. forklift, scissor lift (providing handrails in place); wheel loader, pad foot roller etc. If the plant is fitted with seatbelts they must be worn. Boom lifts require harnesses to be worn. Powered plant must have gradeability to climb slope.
Winch and Freewheel Suitable for trailer mounted equipment and other equipment which has no driving position and no self-power. Large scissor lifts where erected handrails would exceed legal load heights – collapse handrails and engage freewheel mechanism. Other scissor lifts or equipment which does not have gradeability to match tray slope need to be freewheeled and winched. Narrow deck scissor lifts(<1.8M) should winched and freewheeled due to risk of tipping) Don’t forget to disengage freewheel upon delivery.
No winch – drive on and use catcher chain This only applies to skid steer equipment such as bobcats as some skid steer equipment can incur transmission damage if winched. Refer to the Coates Hire Transport Videos for details and the final page of SWMS on the following section. Again machine must have gradeability for tilt tray in question.
Drive Only (no winch) Large low-loaders are typically not fitted with winches and on a long trailer body a winch would not prevent an item going over the edge. Ramps should not be steep and machine must have gradeability for their slope.
Crane Only Some customers (particularly large mining sites) will only allow loads to be removed from trucks by crane. They do not allow mobile plant items to be driven on and off tilt trays or low loaders. Portable buildings may be moved by crane or tilt tray depending on building type and also the nature of available transport equipment.
These various approaches are shown in the Coates Hire Transport Video series. The various techniques are only suitable if:
• The driver has a radio remote operated winch and is highly proficient in its operation
• The winch and associated equipment are rated for the task – this means if you have an 8 tonne rated winch the slings must also be rated to 8 tonnes and the load mass does not exceed the winches working load limit.
• Winch ropes need to be checked regularly. Refer to Silver Service help sheet 104.

36
10. Understanding GradeabilityThe gradeability rating of an elevated work platform (EWP) indicates the maximum gradient it can safely be driven up, when not elevated. It is measured in a number of different ways, shown in the graph:
• This is of particular importance when “slab” EWP’s are being used
• Whilst safe to use on a level surface these style of EWP’s are not necessarily designed to be driven up or down steep slopes such as ramps or steep driveways
• The operator must be aware of the relevance of gradeability at all times
• For example 100% gradeability is a 45° slope but 20% gradeability is a 5:1 gradient or 11°angle
• Max Extended Operation on incline in this example is 3° due to stability being compromised by slope
11. Truck Mounted CranesVehicle Loading Cranes (VLC’s) with a capacity of 10-meter/tonnes or more require a CV class high risk work licence (or C0, C1, C2, C6 Slewing Cranes class licence). Operators of smaller VLC’s still need to be trained and competent.
• Never operate unless outriggers are fully extended – short legging is dangerous!
• Never drive with jib extended
• Check ground surface is stable before using outriggers
• Except on concrete or very hard sealed surfaces packing should be placed under outriggers to distribute load
• Look for signs of underground services or recent back filling which could affect stability
• Wear a helmet during crane use
• Look up and live! Look for overhead power lines and other hazards – refer page 23
• Use three points of contact and take great care when climbing onto trucks to attach slings or load restraints
• People should not get within 3 metres of any load suspended on a crane and for each metre of lift add one metre to the separation distance. Drivers can increase their separation from suspended loads by using a tag line.
• The crane and associated equipment must be rated for the load and task.
• If the truck has to be frequently relocated during a delivery or pickup, the crane outriggers must be fully stowed away and the crane Jib lowered to a height no greater than the normal stowed height of the crane and placed within the dimensions of the truck.
37
• The VLC must be well maintained and in good condition and have an annual compliance test. This test must include thorough inspection and a validation that the crane can meet its rated working load limit. These findings must be written on a test certificate and kept in the truck and shown to Coates Hire when requested.
• The crane and outriggers must be fully stowed and secured before leaving the site.
12. Low LoadersLow loaders typically are not fitted with winches. Loads can’t be carried on the gooseneck of low loaders. When driving equipment on and off low loaders side tolerances are very minimal. Use a safely positioned spotter to guide your movements. Loading must only occur on hard level surfaces. Take great care when deploying ramps.
Some loads will require special permits, codes and or gazettes to be carried, and other arrangements. Talk to your manager if uncertain. Never use mobile plant to tow other plant on or off trucks or trailers. If you can’t drive it, winch it – don’t tow it.

38
13. Dangerous GoodsOccasionally minor quantities of dangerous goods will be carried by Coates Hire. Care must be taken not to exceed minimum quantity thresholds to control risks and meet legislative requirements.
PLACARD LOAD LIMITS
DG Class Maximum load before placarding is required
Class 1 Explosive
Limits vary by type but it is Coates Hire policy is not to carry explosives in our vehicles. However up to 5kg of class 1.4S (such as Ramset cartridges) may be carried.
Class 2 Gasses
If any quantity of Flammable (2.1) or toxic (2.3) gases or any Packing Group I products are carried the aggregate quantity of DG’s can’t exceed 250Kg(L).
Packing Groups are another way of classifying DG risks they range from higher risk PG1, to lower risk PG3.
Any quantity of Class 6.2 Cat A (Infectious Substance)
It is unlikely ever to be encountered by Coates Hire. Raw sewerage is not a Class 6.2 Cat A (Infectious Substance). Up to 10Kg(L) of other Categories of Class 6 may be carried.
Any dangerous goods in individual bulk containers:
Limit of 500Kg(L) per container.
Total aggregate of all DG classes: Vehicle limit of 1000Kg (L)
Note: Compatibility and segregation issues arise when different classes of DG’s are carried in the same load.
39
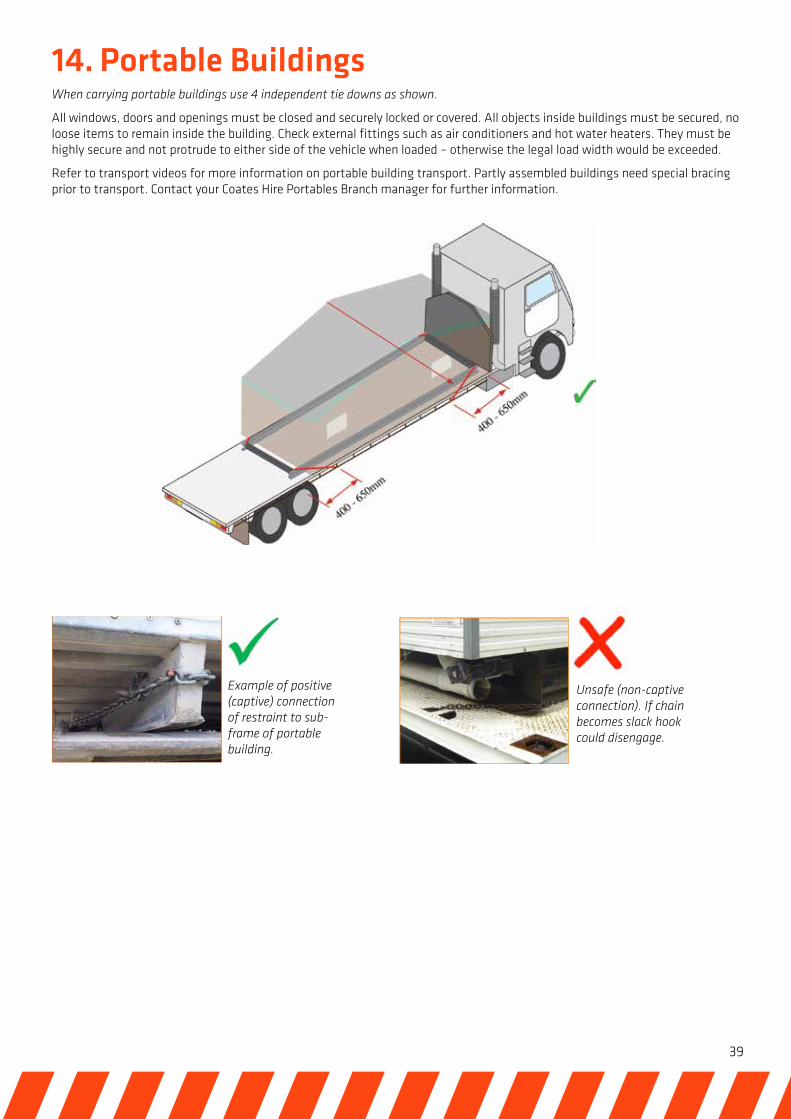
14. Portable BuildingsWhen carrying portable buildings use 4 independent tie downs as shown.
All windows, doors and openings must be closed and securely locked or covered. All objects inside buildings must be secured, no loose items to remain inside the building. Check external fittings such as air conditioners and hot water heaters. They must be highly secure and not protrude to either side of the vehicle when loaded – otherwise the legal load width would be exceeded.
Refer to transport videos for more information on portable building transport. Partly assembled buildings need special bracing prior to transport. Contact your Coates Hire Portables Branch manager for further information.
Example of positive (captive) connection of restraint to sub-frame of portable building.
Unsafe (non-captive connection). If chain becomes slack hook could disengage.

40
14.1 Shipping ContainersOnly transport containers if 4 fully functional twist locks are engaged. Check all doors are well secured. Watch for fuel leaks in large container mounted compressors and generators. If items are not tightly packed into containers they must be securely braced or internally secured to prevent damage, load movement or instability and or loss of load.
Shipping containers must only be transported by trucks/trailers fitted with twist locks
When carrying shipping containers Branches (as the consignor) should complete and provide a Container Weight Declaration. Road traffic authorities may intercept movements and demand to see these - so it’s essential to carry the declaration. The weight declaration is aimed at keeping transporters safe by providing an accurate statement of the container and its load.
Note that some specialised Coates Hire equipment is permanently mounted in enclosures that look like a shipping container but if the equipment is permanently mounted and the container significantly modified then it is NOT classed as a shipping container and a Container Weight Declaration is not required. Irrespective of these matters legal weight restrictions must be complied with at all times.
Large containerised generators like this may weigh up to 14.5 tonnes.
41
PART 4 APPENDICES
42
Safe Work Method Statement (SWMS)Work Task: Loading, Unloading & Delivery of Plant & Equipment - Including Supplement for Loading & Unloading Skid Steer Loaders & Mini Excavators on Tilt Trays.
Qualifications & Training Requirements: 1. Hold relevant class of drivers licence including crane operators ticket if applicable.
2. Be trained and competent in correct loading and unloading techniques, load restraint selection and tie down methods.
PPE (Personal Protective Equipment):
Protective Eye Wear Gloves Hard Hat Long Safety Footwear Sleeves Vest
About Safe Work Method Statements:
Safe Work Method Statements show how to perform different types of work safely by listing the possible hazards that may be encountered and the safety controls to be employed for each step of the work. They are a joint effort in consultation with the management and employees responsible for carrying out the work described and must be read in conjunction with the relevant safe work instructions as found in the Coates and/or Manufacturers Work Instructions, Schedules, Bulletins, Alerts, Operating Instructions and Manuals etc.
Safe Work Method Statements are subject to change so employees/contractors must always be conversant with the current latest versions before they conduct the work.
If we’ve missed anything or if there are any incidents or near misses (however long ago) that we need to “cover off on” and “add to the list”, you need to let your HSEQ Manager know about it and/or bring it up at your next toolbox meeting as this knowledge needs to be documented for the sake of others who may not be as experienced as you...and who also want to go home safely tonight!
Procedures (in steps):
Red italic text: Highlights accidents, near misses or incidents which have either happened to us or contractors.
Possible Hazards – Safety Controls
Blue text:
i. Denotes changes from previous issue.
ii. Shows intranet linked documents.
Denotes a fatality as a result of the hazard.
0.Before Proceeding 0.1 You must be fully conversant with all current information on the safe use and operation of the delivery vehicle you drive and the plant and equipment you are required to operate (e.g. vehicle winch, vehicle crane, tilt tray etc. as well as and any plant and equipment that you are loading or unloading which you may be required to start and operate). This information is contained in:
(i) The Coates Hire Truck Driver’s Guide. (ii) The truck driver loading videos (on our website) (iii) The Operating and Safety Instructions for the vehicle you are driving. (iv) The Operating and Safety Instructions for the equipment being transported. (v) Any Safety Alerts, Bulletins, Directives and Hazard Information which have been issued for the delivery vehicle or model or type of equipment being transported. (vi) Any Other Supplementary Information that may be issued from time to time.
0.2 Ensure that the destination you are to load/unload plant and equipment is appropriate for the task including:
(i) Suitably firm ground to suit the vehicle and load, especially tilt trays. (ii) Suitable means of loading/unloading plant and equipment e.g. availability of a crane or a forklift, or a purpose built unloading bay, ramp or dock when loading/unloading flatbed vehicles etc.
43
Safe Work Method Statement (SWMS)Work Task: Loading, Unloading & Delivery of Plant & Equipment - Including Supplement for Loading & Unloading Skid Steer Loaders & Mini Excavators on Tilt Trays.
Procedures (in steps):
Red italic text: Highlights accidents, near misses or incidents which have either happened to us or contractors.
Possible Hazards – Safety Controls
Blue text: Shows intranet linked documents.
Denotes a fatality as a result of the hazard.
1. Position Vehicle for Loading or Unloading
General Hazards When Positioning Vehicle for Loading or Unloading:
1.1 Vehicle faulty or vehicle tampered with overnight:
Before starting or operating the vehicle walk around it and do a quick VISUAL CHECK for anything unsafe (i.e. a problem could have become evident or vehicle could have been tampered with overnight or between shifts).
Include the following checks:
(i) Damage – No damage to the vehicle since last used. (ii) Leaks – No water, fuel or oil leaks, including hydraulic rams and hoses. (iii) Guards, Doors & Vandal Covers – Guards and covers in place and secure, doors closed/secured. (iv) Fire Extinguisher (if fitted) – Check charged ok and fitment secure. (v) Tyres & Wheels – Tyre, wheel and rim condition, wheel nut tightness and tyre inflation ok. (vi) Grab Rails, Footholds, Steps – Check clean and secure, not damaged, loose, slippery (from grease or mud).
1.2 Vehicle faulty or service checks overdue:
At the beginning and end of each work shift and prior to driving or operating the vehicle, refer to the Coates Vehicle Logbook. Ensure Driver Checks are up to date and any known or suspected faults recorded and reported. Any safety related faults must be corrected or the vehicle withdrawn from service.
1.3 Entrapment, being run over, or vehicle rolling away out of control:
(i) Ensure vehicle is parked on firm level ground as far as practicable and apply handbrake.(ii) Do not crawl under vehicle with the engine running, or if there is a risk of the vehicle rolling away.(iii) Avoid walking between parked vehicles or the front/rear of a vehicle parked close to a wall.
2. Loading & Unloading General Hazards Prior to Loading/Unloading:
2.1 Equipment or goods to be loaded, unloaded or transported found to be faulty or dangerous to driver or other personnel:
(i) If Faulty: Driver to attach an ‘Out Service’ tag with details of the problem(s) identified by the driver or reported by the customer (or other person). (ii) If Dangerous to Use or Operate: As fitted, driver to turn the main switch and battery isolator ‘off’ and securely attach a ‘Danger Do Not Operate’ tag to the control panel before the equipment or goods leave your control. In the absence of a control panel, driver must attach tag to a prominent location.
N.B. Do not tie ‘Out of Service’ or ‘Danger Do Not Operate’ tags to the ‘start’ or ‘ignition’ keys as the tag can flap around in the wind and pull the key out of the start or ignition switch and get lost in transit.(iii) If you cannot load, unload or transport the equipment or goods safely you must report this to your supervisor before proceeding with the work task and develop a safe work method (approved by your supervisor) before continuing.
44
Safe Work Method Statement (SWMS)Work Task: Loading, Unloading & Delivery of Plant & Equipment - Including Supplement for Loading & Unloading Skid Steer Loaders & Mini Excavators on Tilt Trays.
Procedures (in steps):
Red italic text: Highlights accidents, near misses or incidents which have either happened to us or contractors.
Possible Hazards – Safety Controls
Blue text: Shows intranet linked documents.
Denotes a fatality as a result of the hazard.
2. Loading & Unloading cont’d Hazards Prior to Loading/After Unloading Generating Sets:
2.2 Risk of Electric Shock or Electrocution:
If it is necessary to start or run a generator prior to loading it (or after unloading it) and it has not been pre-hire checked you must ensure the following before you start the genset:
(i) Any old cables, cable off-cuts and all foreign matter has been removed from the genset.(ii) That the genset has not had its output leads chopped off leaving exposed uninsulated tails.
Link: See also Coates Hire Safety Alert No. 35.
N.B.
• Only authorised, trained and competent persons are to disconnect the output leads.
• Gensets found to have output leads with exposed uninsulated tails must not be started. As fitted, driver to turn the main switch (circuit breaker) and battery isolator “OFF“ and securely attach a ‘Danger Do Not Operate’ tag to the generator control panel before the genset leaves your control.
• Do not tie ‘Out of Service’ or ‘Danger Do Not Operate’ tags to the ‘start’ or ‘ignition’ keys as the tag can flap around in the wind and pull the key out of the start or ignition switch and get lost in transit.
General Hazards when Loading/Unloading:
2.3 Slipping, tripping and falling from vehicle:
(i) Be very aware of oil and liquid spills, dirt, gravel, other debris, chains, slings and tie-downs and other obstacles when walking on tray. Remove/clean up oil and liquid spills, dirt gravel and other debris as necessary.(ii) Where possible always try and maintain a firm hand hold on the railings/hand holds of the vehicle, plant or equipment being transported.(iii) When climbing into or out of cabs, or climbing on or off plant or equipment or the vehicles tray, try to maintain 3-point contact.
2.4 Equipment or goods falling from vehicle, forklift, crane etc. during loading and loading:
(i) All personnel should stand clear forklifts, cranes, moving loads and equipment or goods.(ii) ‘Safe Zones’ & ‘No Go Zones’ must be established around the vehicle when loading and unloading.Link: See on Coates Hire intranet: Safe Zones & Exclusion Zones inside back cover. (iii) Personnel are only allowed in ‘No Go’ Zones while conducting essential tasks e.g. connecting/disconnecting chain slings etc., and these tasks must only be conducted when all load and/or vehicular movement (forklift/crane movement etc.) has stopped and it is safe to enter the ‘No Go Zone’
45
Safe Work Method Statement (SWMS)Work Task: Loading, Unloading & Delivery of Plant & Equipment - Including Supplement for Loading & Unloading Skid Steer Loaders & Mini Excavators on Tilt Trays.
Procedures (in steps):
Red italic text: Highlights accidents, near misses or incidents which have either happened to us or contractors.
Possible Hazards – Safety Controls
Blue text: Shows intranet linked documents.
Denotes a fatality as a result of the hazard.
2. Loading & Unloading cont’d
(iv) When loading/unloading plant and equipment, the following is not permitted: a. Driving or winching plant from one truck or trailer to another via ramps. Link: Coates Hire Safety Alert No. 57 : Fatality caused by an EWP falling off ramps b. Driving or winching plant between a truck and an unhitched trailer (or vice versa). c. Driving or winching plant from one truck or trailer to another of unequal tray height. (v) Loading and unloading plant between one truck or trailer and another is not permitted
2.5 Ice on road and the changing weight distribution when loading/unloading causing vehicle to slide out of control downhill into a ditch, other parked vehicles etc:
Check weather forecast/road conditions and exercise caution during inclement weather.
Hazards when driving MEWP’s over unfamiliar terrain:
2.6 The ‘wheel load’ of an MEWP can cause the sudden collapse of underground services and/or the wheels to drop into hidden voids resulting in the MEWP tipping over and/or catapulting or ejecting the operator from the platform. Ref. WA Incident, Dec 2010
(i) Prior to driving an MEWP, ensure that the terrain to be driven on is stable and capable of supporting the wheel load of the MEWP in question. Note that because of the extremely heavy counterweight on boom type MEWP’s, they tend to have very high wheel loads! (ii) Closely inspect the ground to be driven over, including consultation with the relevant site authority to ascertain the location of “no go areas” especially soft uncompacted ground and areas with underground voids, drains, pits and services etc. (view site plans/drawings etc.). (iii) Never drive slab terrain MEWP’s on rough terrain ground. (iv) Restrain yourself by wearing a safety harness in Boom type MEWP’s. (v) When travelling in a boom type MEWP, try to keep the boom retracted and the basket low to the ground – this reduces the boom leverage and minimises any catapulting effect.
Link: Coates Safety Alert No. 64: Wheel of Boom type MEWP which dropped suddenly into an unseen void causing a fatality.
Hazards when Loading/Unloading Rollers:
2.7 Roller drum can lose traction and slip sideways when loading up a wet ramp or slippery surface causing the roller to slip off the ramp and the roller to roll over.
Take care when driving up a wet ramp or slippery surface. Keep personnel clear.

46
Safe Work Method Statement (SWMS)Work Task: Loading, Unloading & Delivery of Plant & Equipment - Including Supplement for Loading & Unloading Skid Steer Loaders & Mini Excavators on Tilt Trays.
Procedures (in steps):
Red italic text: Highlights accidents, near misses or incidents which have either happened to us or contractors.
Possible Hazards – Safety Controls
Blue text: Shows intranet linked documents
Denotes a fatality as a result of the hazard.
2. Loading & Unloading cont’d
Hazards when Loading/Unloading Semi Trailers:
2.8 Unhitched semi trailer counter balancing, catapulting or collapsing when being loaded:
(i) Management authorisation must be sought BEFORE loading onto unhitched semi trailers. (ii) Mobile plant MUST NOT be driven or loaded onto an unhitched trailer.
2.9 Uncontrolled fall of hinged loading ramps:
Ensure all personnel are clear of the loading ramp ‘swing arc’ area when the ramps are being lowered or raised, or when the ramps are raised and not secured.
Hazards when using the Vehicle Crane, Tilting Tray or Tip Truck when Loading/Unloading:
2.10 Electrocution from overhead power lines when elevating crane, tilt tray or tipper:
Ensure recommended distances from power lines are maintained when operating crane or raising the tilt tray or tipper. Remember the motto “Look Up & Live”.
Hazards when using a Tilting Tray when Loading/Unloading:
2.11 Equipment sliding down or off an inclined tray in an uncontrolled manner:
(i) The winch cable must always be connected to the equipment when loading/unloading any skid mounted, trailed or self-propelled equipment on or off a tilting tray.(ii) When the equipment has been winched onto the truck, you must fully lower the tray: a. Before you manoeuvre or adjust the position of any item of plant or equipment on the tray. Note: When loading boom lifts, the final positioning of the basket must be done via the ground controls – the ‘tucking under’ of baskets must NOT occur with an operator in the basket b. Before you correctly secure the load using appropriate load restraints on the designated tie down points. Note that winching points may be “winching points only” i.e. not designed to be used as a “winch” and a “tie” down point. (iii) Winch rope(s) and chains must only be connected to winching points (not tie down or lifting points). (iv) Where possible the winch cable should be connected to the equipment by way of chains fitted with safety latches or rated d shackles. Link: Coates Safety Alert Nos. 19, 27 & 38.
47
Safe Work Method Statement (SWMS)Work Task: Loading, Unloading & Delivery of Plant & Equipment - Including Supplement for Loading & Unloading Skid Steer Loaders & Mini Excavators on Tilt Trays.
Procedures (in steps):
Red italic text: Highlights accidents, near misses or incidents which have either happened to us or contractors.
Possible Hazards – Safety Controls
Blue text: Shows intranet linked documents
Denotes a fatality as a result of the hazard.
2. Loading & Unloading cont’d Hazards when winching plant and equipment on or off a Tilting Tray:
2.12 Winch failure and/or equipment sliding down an inclined tray or falling off the side of vehicle
(i) Correctly position plant and equipment to be winched squarely behind tray.(ii) If winching steered plant, (in a winch and free-wheel situation) before winching commences, ensure the wheels of the steered plant are free-wheeled, have had their brakes released (as applicable), and are pointing straight ahead and aligned parallel to side of tray.(iii) During the winching process ensure machine stays parallel to side of tray.(iv) When using remote or radio controlled winches always operate the winch from the ground. At no time stand behind the inclined tray of truck.
2.13 Towed equipment can disconnect from the winch cable and slide down an inclined tray if not ‘positively connected’:
Winch cables must be connected to the equipment in a ‘positive’ way that prevents disconnection of the chain should the chain be knocked or become slack.
Examples of ‘positive’ ways of connection are
• Chain hooks fitted with safety latches
• Suitably rated bow or D-shackles
Link: See Coates Safety Alert No. 59: Positive Connection of Winch Cables to ‘Towed’ Equipment.
2.14 Square or rectangular section wheel chocks can become lethal projectiles when winching mobile or trailer mounted equipment: NSW Incident, June 2009
When using wheel chocks, use only chocks which are contoured to the tyre diameter.
When winching DO NOT place square or rectangular blocks made from timber, composite or steel etc. in front of or behind the wheels of the equipment being winched e.g. to align steering etc. or to take the weight of the machine.
The force applied to the corners of the block(s) can cause the block(s) to suddenly and explosively eject and become extremely dangerous and potentially lethal projectile(s) and cause serious head or body injury, death or property damage.
Link: See also diagram on the ‘Air Compressors, Diesel, Trailer Mounted’ Hazard Information Sheet on Coates Hire intranet.
3. Loading Hazards when Loading Flat Steel, Shoring Box panels and Steel Road Plates:
3.1 Steel shifting and sliding off vehicle:
Place thin strips of timber between flat steel panels.
Link: See also Coates Safety Alert No. 17.
48
Safe Work Method Statement (SWMS)Work Task: Loading, Unloading & Delivery of Plant & Equipment - Including Supplement for Loading & Unloading Skid Steer Loaders & Mini Excavators on Tilt Trays.
Procedures (in steps):
Red italic text: Highlights accidents, near misses or incidents which have either happened to us or contractors.
Possible Hazards – Safety Controls
Blue text: Shows intranet linked documents.
Denotes a fatality as a result of the hazard.
4. Manual Handling General Hazards when Loading/Unloading:
4.1 Handling Items with sharp edges:
Wear sturdy work gloves and any other appropriate PPE including Hi Vis clothing
4.2 Spider and insect bites:
Wear appropriate PPE i.e. protective gloves, long pants, long sleeves shirt, covered footwear etc. when handling materials plant and equipment which may harbour spiders and insects i.e. under ledges, near hand holds etc
Link: Third Party Safety Alert No. 29’ on intranet re Snake Precautions and Snake Identification – on Coates Hire intranet
Manual Handling of Heavy Items:
4.3 Damage to back, muscle strain, hernia etc:
All personnel must be appropriately trained in manual handling techniques. Team lifting and/or mechanical lifting devices should be used for loads in excess of 20kgs.
4.4 Dropping or losing control of materials, plant and equipment on the ground:
Personnel must wear steel capped protective footwear when handling these items.
Trailer Manual Handling:
4.5 Damage to back, muscle strain, hernia etc.:
When hitching/unhitching trailers set and use jockey wheel to lift/lower trailer drawbar from tow-hitch.
4.6 Drawbar kicking up when unhitching trailers:
(i) Ensure load balanced on trailer before unhitching.(ii) If tray overhangs hitch keep fingers and limbs out of the way so they don’t get crushed if drawbar kicks up.(iii) Keep trailer hitched until it has been unloaded.
5. Driving to Destination General Hazards when Driving to Destination:
5.1 Colliding with low bridges, overhangs structures, building entrances etc.:
Driver must: (i) Be aware of exact load height before driving to destination; (ii) Ensure sufficient clearance before driving under bridges, overhangs, building entrances; and (iii) If possible, study route and bridge clearances before departure.
See also the following links in the Coates Hire intranet - Safe Work Method Statement Index: -Equipment Specifications re Load Heights. -Incident No. 1 (Incident Picture Gallery) re Collision with Low Bridge (third party incident).
5.2 Cabinet doors, roll out battery drawers, outriggers of transportation vehicle etc. extending beyond the width of the vehicle during transit and colliding with other vehicles, structures, personnel:
Ensure doors, drawers, outriggers etc. are properly locked in place before driving vehicle.
49
Safe Work Method Statement (SWMS)Work Task: Loading, Unloading & Delivery of Plant & Equipment - Including Supplement for Loading & Unloading Skid Steer Loaders & Mini Excavators on Tilt Trays.
Procedures (in steps):
Red italic text: Highlights accidents, near misses or incidents which have either happened to us or contractors.
Possible Hazards – Safety Controls
Blue text: Shows intranet linked documents
Denotes a fatality as a result of the hazard.
5. Driving to Destination cont’d Never driver with Crane Jibs extended. Check roofs of portable buildings and shipping containers for foreign objects/lengths of timber etc.
Hazards when Transporting Elevating Work Platforms:
5.3 Plant elevating while being transported and colliding with bridges, overhangs, structures etc:
Ignition/master switch and battery isolator (if fitted) for the plant being transported to be in the “off” position when loaded.
5.4 Booms – Breakage of turret slew ring teeth, slew motor teeth and slew motor mounting bolts:
Prior to transporting the boom, fit the turntable lock pin or turntable latching device to prevent the boom turret from moving (and stressing/breaking these components) during transport. UPON DELIVERY, REMEMBER TO REMOVE THE SLEW LOCKPIN OR LATCHING DEVICE so the turntable can slew. If you do not remove the slew lock pin, the boom turret cannot slew and may cause operators unfamiliar with the machine to incorrectly think the boom is faulty and has broken down and result in an unnecessary breakdown call-out. Link: See also Help Sheet No.21 on Coates Hire intranet.
Hazards when Towing Trailers:
5.5 Trailer fish-tailing and rolling over:
(i) Drive vehicle at appropriate speed (max 80 km/hr) to prevent trailer fish-tailing. (ii) Reduce speed when cornering especially on gravel roads.
6. Arrival On-Site General On-Site Hazards:
6.1 Collision with personnel, vehicles, structures and protrusions, or collapse of ground, embankments, trenches, underground services when driving on site or unloading equipment:
Note: Driving off embankments or the collapse of embankments has resulted in several roller operator fatalities when the roller has rolled over. (i) Follow the relevant site speed limits at all times. (ii) Driver to report to Site Office/Management for instructions re authorised loading/unloading areas. (iii) On unmanaged sites driver to assess site for hazards prior to loading/unloading.
6.2 Head/other injuries from falling objects when on a construction site:
Wear appropriate PPE i.e. hard hat at all times when on construction sites.
6.3 Not being visible to other drivers/operators on site and being run over:
Look, listen and wear appropriate PPE i.e. reflective safety vest on any site with mobile equipment.
7. Other Other Hazards:
7.1 Driver fatigue, microsleeps:
If tired, driver to pull over and recover. Remember the motto “Drive, Revive, Survive”.
50
Safe Work Method Statement (SWMS)Work Task: Supplement for Loading & Unloading Skid Steer Loaders & Mini Excavators on Tilt Trays.
Procedures (in steps):
Red italic text: Highlights accidents, near misses or incidents which have either happened to us or contractors.
Possible Hazards – Safety Controls
Blue text: Shows intranet linked documents
Denotes a fatality as a result of the hazard.
7. Other cont’d 7.2 Snakes nesting in cabinets or under plant, equipment or buildings:
Be aware when opening cabinet doors, moving or operating equipment, or entering buildings that have been dormant for a period of time
1. Hazards when winching S2.1 Winch failure causing equipment to slide down or off an inclined tray, loading ramps or the bed of the truck in an uncontrolled manner:
(i) Prior to loading equipment and before winching commences, correctly position plant and equipment to be winched squarely behind the tray or loading ramps.(ii) Winching must not commence unless the operator is satisfied that the equipment can be winched safely taking into consideration: • The width of the equipment (is there a risk of it falling off the side of the tray
or the bed of the truck while being loaded etc.).
• The weight and weight distribution of the equipment to be loaded.
• The weather (is it about to rain, will a wet tray affect traction etc?).
• The ground conditions (is the tilt tray on solid firm level ground, is surface slippery, gravel etc?).
(iii) Winch ropes and chains must only be connected to the equipment’s designated winching points, not tie down or lifting points (unless the tie down and lifting points have also been specifically designed for winching purposes).Note: Some winching points may be “winching points only” i.e. not designed to be used as a “winch” and a “tie” down point e.g. some Genie Telehandlers etc.(iv) Where possible the winch cable should be connected to the equipment by way of chains fitted with safety latches.(v) The equipment must be aligned parallel to the tilting tray prior to the equipment being winched on or off the tilting tray.(vi) Unless otherwise stated on this SWMS always operate the winch from the ground when using a remote controlled or radio controlled winch. (vii) There MUST be zero slack in the ropes/chains during the winching process.(viii) The winch cable and chains must not be disconnected:• while the tray is inclined.
• while the equipment being loaded or unloaded is in free-wheel mode.
• without the handbrake applied (if fitted).
• without chocking the wheels or positively restraining the equipment (if not equipped with a handbrake).
(ix) When winching steered plant, ensure all wheels are pointing straight ahead and the side of the equipment being winched is aligned parallel with the side of the tray.
(x) Do not join equipment together and winch more than one item of equipment at a time either in parallel or in series (daisy chain). Note: that winching points are designed to carry the weight of the equipment being winched – not one or more items of equipment trailing behind.
(xi) Where the control measures of this SWMS allow you to drive and winch the equipment at the same time you must not exit the equipment while it is being winched.
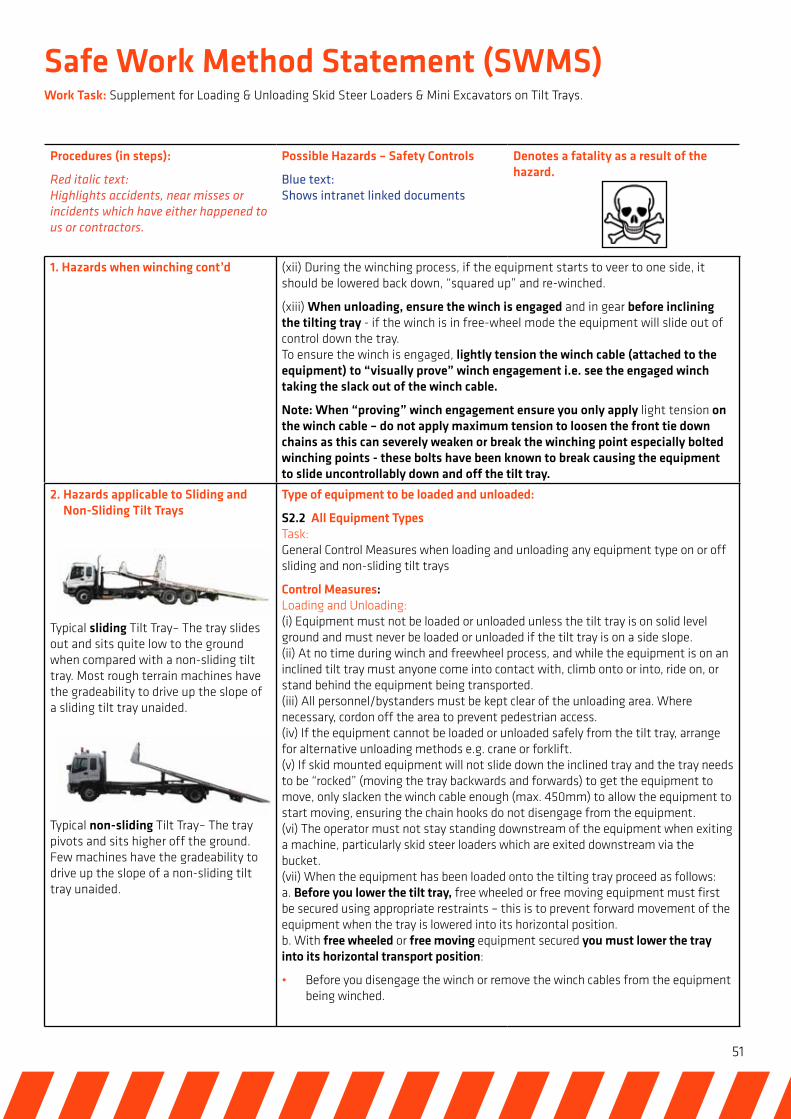
51
Safe Work Method Statement (SWMS)Work Task: Supplement for Loading & Unloading Skid Steer Loaders & Mini Excavators on Tilt Trays.
Procedures (in steps):
Red italic text: Highlights accidents, near misses or incidents which have either happened to us or contractors.
Possible Hazards – Safety Controls
Blue text: Shows intranet linked documents
Denotes a fatality as a result of the hazard.
1. Hazards when winching cont’d (xii) During the winching process, if the equipment starts to veer to one side, it should be lowered back down, “squared up” and re-winched.
(xiii) When unloading, ensure the winch is engaged and in gear before inclining the tilting tray - if the winch is in free-wheel mode the equipment will slide out of control down the tray. To ensure the winch is engaged, lightly tension the winch cable (attached to the equipment) to “visually prove” winch engagement i.e. see the engaged winch taking the slack out of the winch cable.
Note: When “proving” winch engagement ensure you only apply light tension on the winch cable – do not apply maximum tension to loosen the front tie down chains as this can severely weaken or break the winching point especially bolted winching points - these bolts have been known to break causing the equipment to slide uncontrollably down and off the tilt tray.
2. Hazards applicable to Sliding and Non-Sliding Tilt Trays
Typical sliding Tilt Tray– The tray slides out and sits quite low to the ground when compared with a non-sliding tilt tray. Most rough terrain machines have the gradeability to drive up the slope of a sliding tilt tray unaided.
Typical non-sliding Tilt Tray– The tray pivots and sits higher off the ground. Few machines have the gradeability to drive up the slope of a non-sliding tilt tray unaided.
Type of equipment to be loaded and unloaded:
S2.2 All Equipment Types Task: General Control Measures when loading and unloading any equipment type on or off sliding and non-sliding tilt trays
Control Measures: Loading and Unloading: (i) Equipment must not be loaded or unloaded unless the tilt tray is on solid level ground and must never be loaded or unloaded if the tilt tray is on a side slope. (ii) At no time during winch and freewheel process, and while the equipment is on an inclined tilt tray must anyone come into contact with, climb onto or into, ride on, or stand behind the equipment being transported. (iii) All personnel/bystanders must be kept clear of the unloading area. Where necessary, cordon off the area to prevent pedestrian access. (iv) If the equipment cannot be loaded or unloaded safely from the tilt tray, arrange for alternative unloading methods e.g. crane or forklift. (v) If skid mounted equipment will not slide down the inclined tray and the tray needs to be “rocked” (moving the tray backwards and forwards) to get the equipment to move, only slacken the winch cable enough (max. 450mm) to allow the equipment to start moving, ensuring the chain hooks do not disengage from the equipment. (vi) The operator must not stay standing downstream of the equipment when exiting a machine, particularly skid steer loaders which are exited downstream via the bucket. (vii) When the equipment has been loaded onto the tilting tray proceed as follows: a. Before you lower the tilt tray, free wheeled or free moving equipment must first be secured using appropriate restraints – this is to prevent forward movement of the equipment when the tray is lowered into its horizontal position. b. With free wheeled or free moving equipment secured you must lower the tray into its horizontal transport position:
• Before you disengage the winch or remove the winch cables from the equipment being winched.
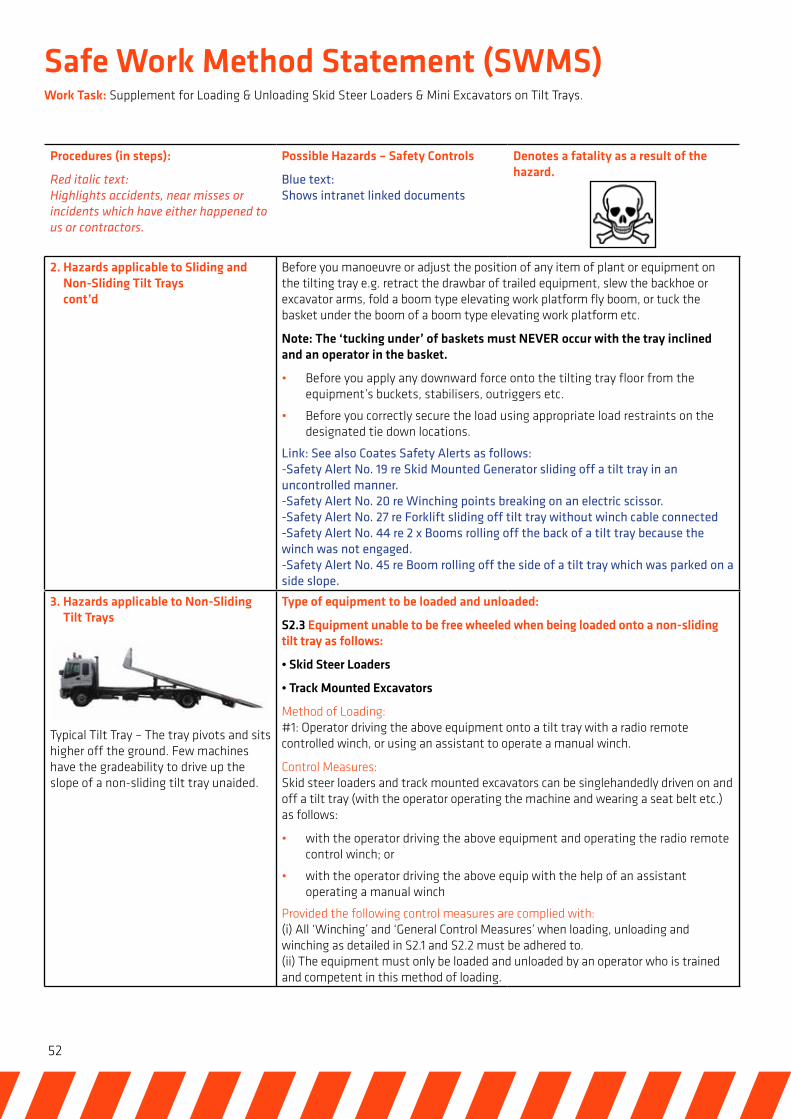
52
Safe Work Method Statement (SWMS)Work Task: Supplement for Loading & Unloading Skid Steer Loaders & Mini Excavators on Tilt Trays.
Procedures (in steps):
Red italic text: Highlights accidents, near misses or incidents which have either happened to us or contractors.
Possible Hazards – Safety Controls
Blue text: Shows intranet linked documents
Denotes a fatality as a result of the hazard.
2. Hazards applicable to Sliding and Non-Sliding Tilt Trays cont’d
Before you manoeuvre or adjust the position of any item of plant or equipment on the tilting tray e.g. retract the drawbar of trailed equipment, slew the backhoe or excavator arms, fold a boom type elevating work platform fly boom, or tuck the basket under the boom of a boom type elevating work platform etc.
Note: The ‘tucking under’ of baskets must NEVER occur with the tray inclined and an operator in the basket.
• Before you apply any downward force onto the tilting tray floor from the equipment’s buckets, stabilisers, outriggers etc.
• Before you correctly secure the load using appropriate load restraints on the designated tie down locations.
Link: See also Coates Safety Alerts as follows: -Safety Alert No. 19 re Skid Mounted Generator sliding off a tilt tray in an uncontrolled manner. -Safety Alert No. 20 re Winching points breaking on an electric scissor. -Safety Alert No. 27 re Forklift sliding off tilt tray without winch cable connected -Safety Alert No. 44 re 2 x Booms rolling off the back of a tilt tray because the winch was not engaged. -Safety Alert No. 45 re Boom rolling off the side of a tilt tray which was parked on a side slope.
3. Hazards applicable to Non-Sliding Tilt Trays
Typical Tilt Tray – The tray pivots and sits higher off the ground. Few machines have the gradeability to drive up the slope of a non-sliding tilt tray unaided.
Type of equipment to be loaded and unloaded:
S2.3 Equipment unable to be free wheeled when being loaded onto a non-sliding tilt tray as follows:
• Skid Steer Loaders
• Track Mounted Excavators
Method of Loading: #1: Operator driving the above equipment onto a tilt tray with a radio remote controlled winch, or using an assistant to operate a manual winch.
Control Measures: Skid steer loaders and track mounted excavators can be singlehandedly driven on and off a tilt tray (with the operator operating the machine and wearing a seat belt etc.) as follows:
• with the operator driving the above equipment and operating the radio remote control winch; or
• with the operator driving the above equip with the help of an assistant operating a manual winch
Provided the following control measures are complied with: (i) All ‘Winching’ and ‘General Control Measures’ when loading, unloading and winching as detailed in S2.1 and S2.2 must be adhered to. (ii) The equipment must only be loaded and unloaded by an operator who is trained and competent in this method of loading.
53
Safe Work Method Statement (SWMS)Work Task: Loading, Unloading & Delivery of Plant & Equipment - Including Supplement for Loading & Unloading Skid Steer Loaders & Mini Excavators on Tilt Trays.
Procedures (in steps):
Red italic text: Highlights accidents, near misses or incidents which have either happened to us or contractors.
Possible Hazards – Safety Controls
Blue text: Shows intranet linked documents
Denotes a fatality as a result of the hazard.
3. Hazards applicable to Non-Sliding Tilt Trays cont’d
Method of Loading: #2: Operator driving the above equipment onto a tilt tray without a radio remote controlled winch, and where an assistant is not available to operate the manual winch.
If the tilt tray is not fitted with a radio remote control winch and an assistant to operate a manual winch is not available, skid steer loaders and track mounted excavators can be singlehandedly driven on and off a tilt tray with the operator operating the machine and wearing a seat belt etc. without the use of a winch or an assistant provided the following control measures below are complied with.
Control Measures: (i) The equipment must have the gradeability to be driven up the incline of the tilting tray (without a winch) because, most importantly it must have the braking efficiency to hold itself on the inclined tray with zero creep or slippage should the winch fail. (ii) The equipment to be loaded must be in safe operational working order – in particular its braking ability. (iii) The operator must ascertain the use and operation of the brakes and the braking ability of the equipment before climbing onto or exiting the machine to drive it on or off the inclined tilting tray i.e. the machine must not show any signs of slip or creep. (iv) Both the surface of the tilting tray and the tyres/tracks of the equipment being driven on or off the tilting tray must be clean and dry so there is no risk of the machine slipping or loosing traction. (v) All ‘Winching’ and ‘General Control Measures’ when loading, unloading and winching as detailed in S2.1 and S2.2 must be adhered to. (vi) The equipment must only be loaded and unloaded by an operator who is trained and competent in this method of loading. (vii) In addition to the controls above, skid steer loaders must only be loaded onto non-sliding tilt trays if the following control measures are complied with:
• The loader must only be loaded and unloaded when fitted with its bucket;
• The inclined tilt tray must have a safety (catcher) chain in place with zero slack across the width of the tilt tray – this is a safety measure to “catch” the skid steer loader in the event of brake failure or the loader sliding uncontrollably down the inclined tray;
• The loader must be driven up the inclined tray in reverse (past the safety [catcher] chain) with the bottom of the bucket sitting flat against the tray of the tilt tray before the operator exits the loader - this is so the safety (catcher) chain can catch the machine in the event of loss of control or braking;
(viii) Skid steer loaders and track mounted excavators must only be loaded and unloaded by an operator who is trained and competent in this method of loading.
Link: See also Coates Hire Help Sheet No. 13: Use of a Safety Catcher Chain when loading skid steer loaders.
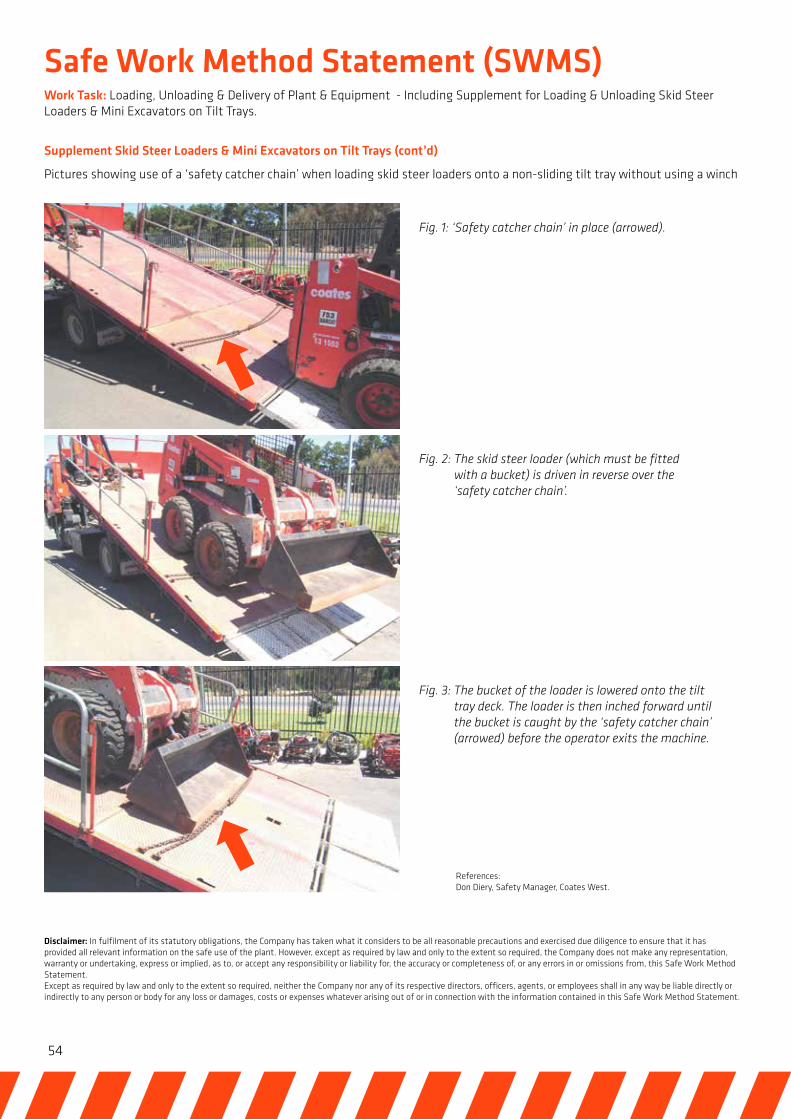
54
Safe Work Method Statement (SWMS)Work Task: Loading, Unloading & Delivery of Plant & Equipment - Including Supplement for Loading & Unloading Skid Steer Loaders & Mini Excavators on Tilt Trays.
Supplement Skid Steer Loaders & Mini Excavators on Tilt Trays (cont’d)
Pictures showing use of a ‘safety catcher chain’ when loading skid steer loaders onto a non-sliding tilt tray without using a winch
References:Don Diery, Safety Manager, Coates West.
Disclaimer: In fulfilment of its statutory obligations, the Company has taken what it considers to be all reasonable precautions and exercised due diligence to ensure that it has provided all relevant information on the safe use of the plant. However, except as required by law and only to the extent so required, the Company does not make any representation, warranty or undertaking, express or implied, as to, or accept any responsibility or liability for, the accuracy or completeness of, or any errors in or omissions from, this Safe Work Method Statement.Except as required by law and only to the extent so required, neither the Company nor any of its respective directors, officers, agents, or employees shall in any way be liable directly or indirectly to any person or body for any loss or damages, costs or expenses whatever arising out of or in connection with the information contained in this Safe Work Method Statement.
Fig. 1: ‘Safety catcher chain’ in place (arrowed).
Fig. 2: The skid steer loader (which must be fitted with a bucket) is driven in reverse over the ‘safety catcher chain’.
Fig. 3: The bucket of the loader is lowered onto the tilt tray deck. The loader is then inched forward until the bucket is caught by the ‘safety catcher chain’ (arrowed) before the operator exits the machine.
55
Safety Alert Summaries
These pages summarise some incidents we are aware of (not necessarily associated with Coates Hire). It emphasises why our procedures and instructions must be followed. For full details ask your Branch Manager to access them via the internal Service, Plant Safety & Technical Home Page.
Alert 77t
A portable toilet blew off a truck in transit due to poor restraint. Drivers are responsible to ensure the load is adequately restrained and cannot fall from the truck whilst in transit. An effective method is described.
Alert 74 & 75t
Reminder to drivers of previous instructions;
• Use winch when loading and unloading mobile plant on tilt trays.
• If seat belts are fitted to a machine they must be worn during loading/unloading. Full harnesses are required in boom type elevating work platforms.
Alert 2013-02-05t
Reminder on proper application of load restraints with common errors highlighted.
Alert 73t
Plastic road barriers fell from truck injuring driver. During loading and unloading always stay out of No-go zones, particularly when forklifts are involved, or other mobile plant.
Alert 72t
Some boom lifts and telehandlers are equipped with all wheel steer. There are three modes; conventional steering by 1 axle; crab where all wheels point in the same direction and finally reverse where front axle point in opposite direction to back axel. While this provides fantastic manoeuvrability in the field it is highly risky during unloading or loading if the non-conventional steering modes have been left on. On many machines the centre position of the steering mode selector is normal. If in doubt test before you travel the machine.
Alert 71t
A cleaner on a customer site was injured when she stepped into a trailer mounted toilet which tipped over onto her. It’s essential the stabiliser legs are deployed before they are used. Normally customers are responsible for final set up. However if Drivers are required to install portables ensure they are fully deployed. Clarify with customer if there is any uncertainty. Warning stickers have been added inform users.
56
Safety Alert Summaries
These pages summarise some incidents we are aware of (not necessarily associated with Coates Hire). It emphasises why our procedures and instructions must be followed. For full details ask your Branch Manager to access them via the internal Service, Plant Safety & Technical Home Page.
Alert 70
A combination tow hitch (pintle hook and towball) on the end of a removable drawbar failed. All four mounting bolts which bolted the tow hitch to the removable drawbar on the back of the tilt tray truck broke causing the tow hitch to “fall off”.
• With the removable drawbar/combination tow hitch in place, when the tilt tray is tilted the underside of the combination tow hitch contacts the ground, stressing the bolts.
Over time the four bolts attaching the combination tow hitch to the drawbar fatigued and eventually broke.
Alert 64
This EWP was travelling at full extension and one wheel broke through an underground void - one operator was killed.
• Understand wheel weights and enquire about underground services
• Lower and retract the basket when travelling long distances or over unfamiliar ground
Alert 63
A 50mm hose burst while attached to a 900CFM air compressor.
• Pre-hire checks to include inspection of hoses and all attachments.
• Damaged equipment to be tagged and returned for repair
Safety Notice SN002
A trailer mounted lighting tower tipped backward while being jacked up by a mechanic.
• Stabilise equipment with safety stand, outriggers or by leaving it attached to tow vehicle, and apply jack at appropriate location.
Safety Notice SN006
Transportation of portable buildings has been associated with loss of loads due to fittings such as hot water heater or air-conditions falling away due to inadequate mountings which are not suited for long distance transport. Also on occasions unseen loose materials have been left on the roof.
• Check all surfaces for items that could dislodge and either remove them or suitably restrain them.
Alert 61
A driver in Indonesia was burnt when he disconnected a hose from a large water pump. The inlet hose had been out of the water allowing residual water in the pump to overheat.
• Prior to disconnecting running or hot pumps allow water to run through pump to cool it.
• Ideally pump should automatically shut down when it runs out of water.
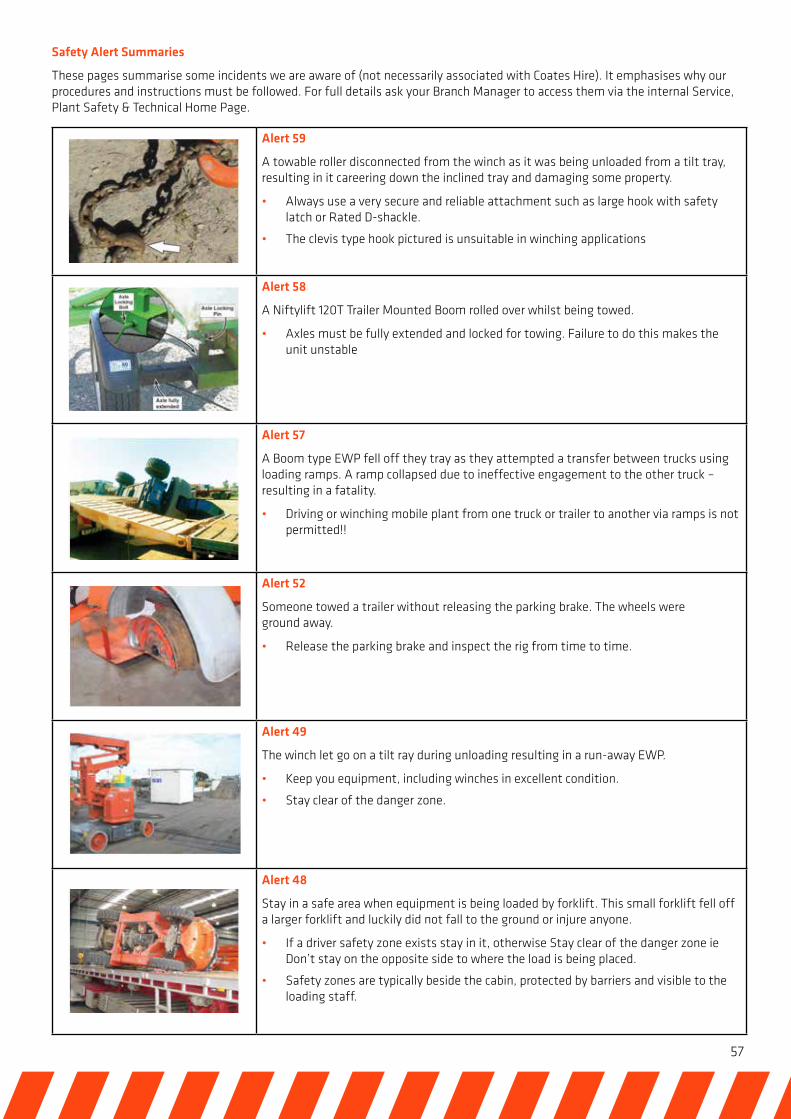
57
Safety Alert Summaries
These pages summarise some incidents we are aware of (not necessarily associated with Coates Hire). It emphasises why our procedures and instructions must be followed. For full details ask your Branch Manager to access them via the internal Service, Plant Safety & Technical Home Page.
Alert 59
A towable roller disconnected from the winch as it was being unloaded from a tilt tray, resulting in it careering down the inclined tray and damaging some property.
• Always use a very secure and reliable attachment such as large hook with safety latch or Rated D-shackle.
• The clevis type hook pictured is unsuitable in winching applications
Alert 58
A Niftylift 120T Trailer Mounted Boom rolled over whilst being towed.
• Axles must be fully extended and locked for towing. Failure to do this makes the unit unstable
Alert 57
A Boom type EWP fell off they tray as they attempted a transfer between trucks using loading ramps. A ramp collapsed due to ineffective engagement to the other truck – resulting in a fatality.
• Driving or winching mobile plant from one truck or trailer to another via ramps is not permitted!!
Alert 52
Someone towed a trailer without releasing the parking brake. The wheels were ground away.
• Release the parking brake and inspect the rig from time to time.
Alert 49
The winch let go on a tilt ray during unloading resulting in a run-away EWP.
• Keep you equipment, including winches in excellent condition.
• Stay clear of the danger zone.
Alert 48
Stay in a safe area when equipment is being loaded by forklift. This small forklift fell off a larger forklift and luckily did not fall to the ground or injure anyone.
• If a driver safety zone exists stay in it, otherwise Stay clear of the danger zone ie Don’t stay on the opposite side to where the load is being placed.
• Safety zones are typically beside the cabin, protected by barriers and visible to the loading staff.
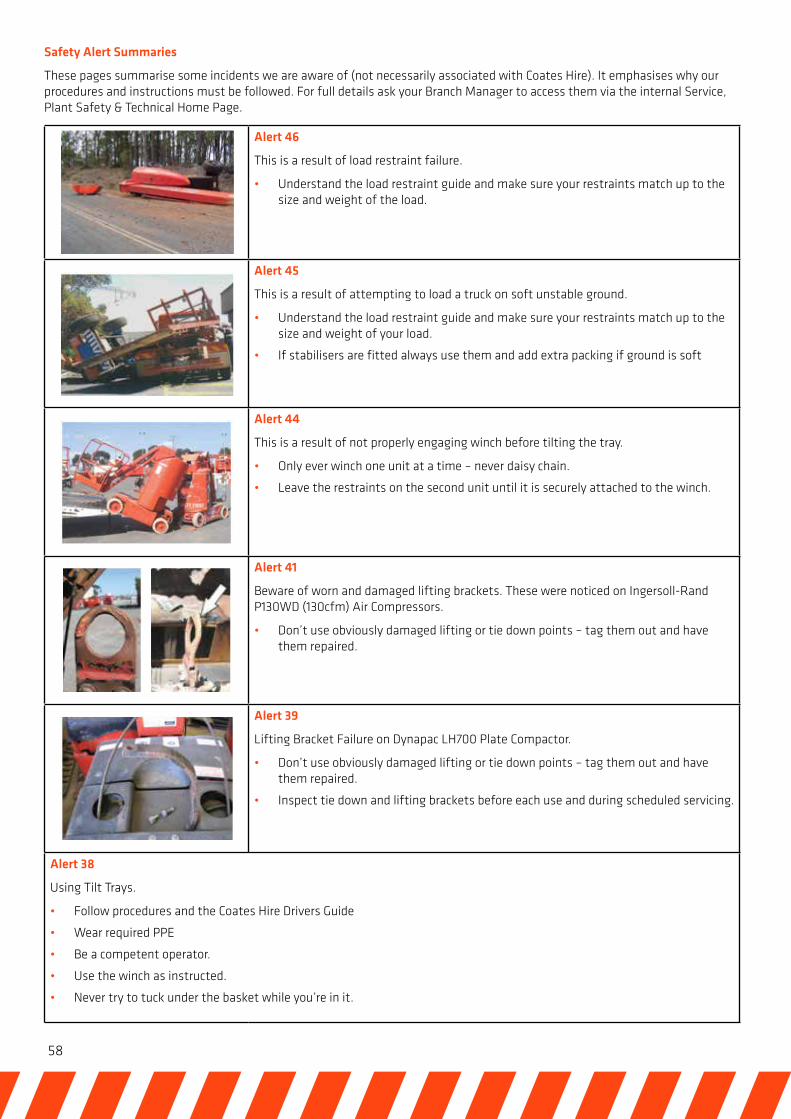
58
Safety Alert Summaries
These pages summarise some incidents we are aware of (not necessarily associated with Coates Hire). It emphasises why our procedures and instructions must be followed. For full details ask your Branch Manager to access them via the internal Service, Plant Safety & Technical Home Page.
Alert 46
This is a result of load restraint failure.
• Understand the load restraint guide and make sure your restraints match up to the size and weight of the load.
Alert 45
This is a result of attempting to load a truck on soft unstable ground.
• Understand the load restraint guide and make sure your restraints match up to the size and weight of your load.
• If stabilisers are fitted always use them and add extra packing if ground is soft
Alert 44
This is a result of not properly engaging winch before tilting the tray.
• Only ever winch one unit at a time – never daisy chain.
• Leave the restraints on the second unit until it is securely attached to the winch.
Alert 41
Beware of worn and damaged lifting brackets. These were noticed on Ingersoll-Rand P130WD (130cfm) Air Compressors.
• Don’t use obviously damaged lifting or tie down points – tag them out and have them repaired.
Alert 39
Lifting Bracket Failure on Dynapac LH700 Plate Compactor.
• Don’t use obviously damaged lifting or tie down points – tag them out and have them repaired.
• Inspect tie down and lifting brackets before each use and during scheduled servicing.
Alert 38
Using Tilt Trays.
• Follow procedures and the Coates Hire Drivers Guide
• Wear required PPE
• Be a competent operator.
• Use the winch as instructed.
• Never try to tuck under the basket while you’re in it.
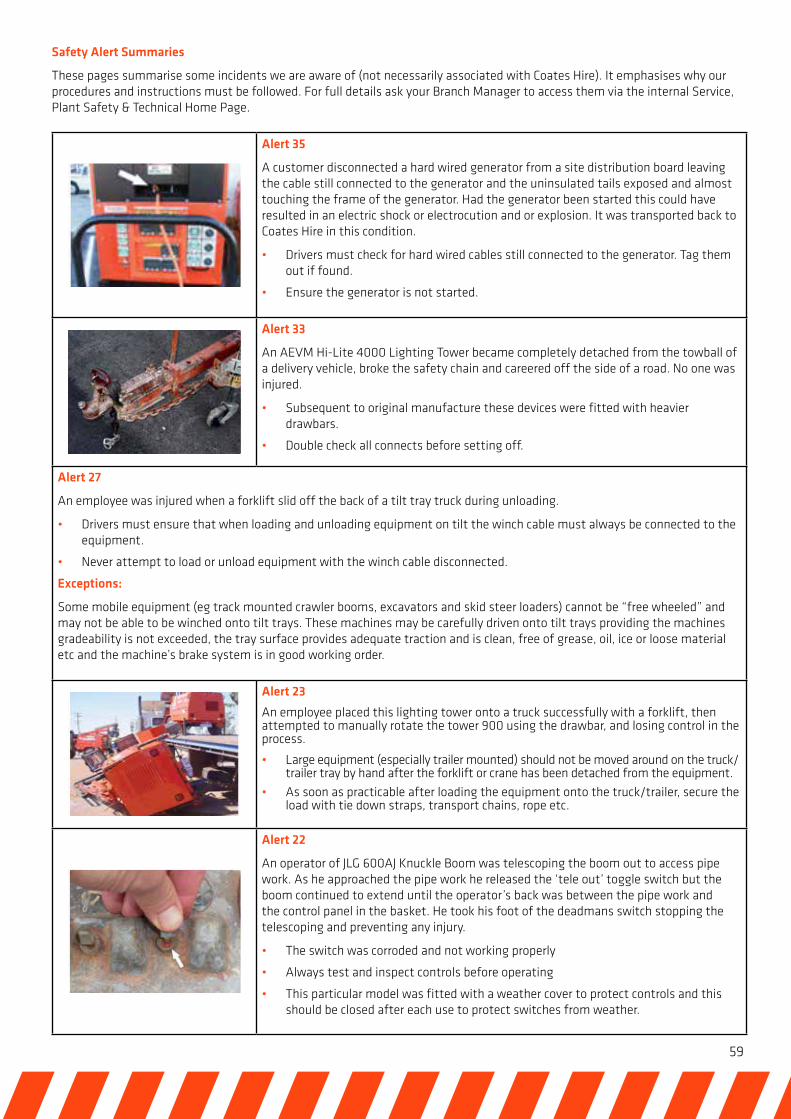
59
Alert 35
A customer disconnected a hard wired generator from a site distribution board leaving the cable still connected to the generator and the uninsulated tails exposed and almost touching the frame of the generator. Had the generator been started this could have resulted in an electric shock or electrocution and or explosion. It was transported back to Coates Hire in this condition.
• Drivers must check for hard wired cables still connected to the generator. Tag them out if found.
• Ensure the generator is not started.
Alert 33
An AEVM Hi-Lite 4000 Lighting Tower became completely detached from the towball of a delivery vehicle, broke the safety chain and careered off the side of a road. No one was injured.
• Subsequent to original manufacture these devices were fitted with heavier drawbars.
• Double check all connects before setting off.
Alert 27
An employee was injured when a forklift slid off the back of a tilt tray truck during unloading.
• Drivers must ensure that when loading and unloading equipment on tilt the winch cable must always be connected to the equipment.
• Never attempt to load or unload equipment with the winch cable disconnected.
Exceptions:
Some mobile equipment (eg track mounted crawler booms, excavators and skid steer loaders) cannot be “free wheeled” and may not be able to be winched onto tilt trays. These machines may be carefully driven onto tilt trays providing the machines gradeability is not exceeded, the tray surface provides adequate traction and is clean, free of grease, oil, ice or loose material etc and the machine’s brake system is in good working order.
Alert 23
An employee placed this lighting tower onto a truck successfully with a forklift, then attempted to manually rotate the tower 900 using the drawbar, and losing control in the process.
• Large equipment (especially trailer mounted) should not be moved around on the truck/ trailer tray by hand after the forklift or crane has been detached from the equipment.
• As soon as practicable after loading the equipment onto the truck/trailer, secure the load with tie down straps, transport chains, rope etc.
Alert 22
An operator of JLG 600AJ Knuckle Boom was telescoping the boom out to access pipe work. As he approached the pipe work he released the ‘tele out’ toggle switch but the boom continued to extend until the operator’s back was between the pipe work and the control panel in the basket. He took his foot of the deadmans switch stopping the telescoping and preventing any injury.
• The switch was corroded and not working properly
• Always test and inspect controls before operating
• This particular model was fitted with a weather cover to protect controls and this should be closed after each use to protect switches from weather.
Safety Alert Summaries
These pages summarise some incidents we are aware of (not necessarily associated with Coates Hire). It emphasises why our procedures and instructions must be followed. For full details ask your Branch Manager to access them via the internal Service, Plant Safety & Technical Home Page.
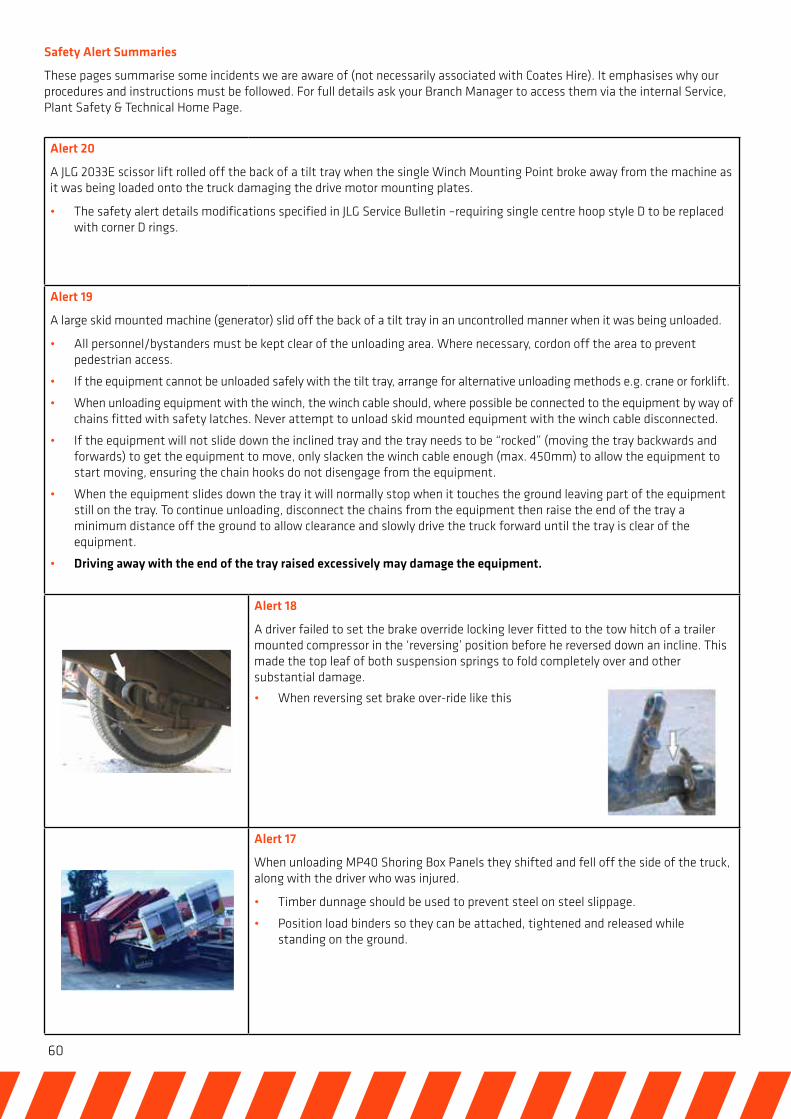
60
Safety Alert Summaries
These pages summarise some incidents we are aware of (not necessarily associated with Coates Hire). It emphasises why our procedures and instructions must be followed. For full details ask your Branch Manager to access them via the internal Service, Plant Safety & Technical Home Page.
Alert 20
A JLG 2033E scissor lift rolled off the back of a tilt tray when the single Winch Mounting Point broke away from the machine as it was being loaded onto the truck damaging the drive motor mounting plates.
• The safety alert details modifications specified in JLG Service Bulletin –requiring single centre hoop style D to be replaced with corner D rings.
Alert 19
A large skid mounted machine (generator) slid off the back of a tilt tray in an uncontrolled manner when it was being unloaded.
• All personnel/bystanders must be kept clear of the unloading area. Where necessary, cordon off the area to prevent pedestrian access.
• If the equipment cannot be unloaded safely with the tilt tray, arrange for alternative unloading methods e.g. crane or forklift.
• When unloading equipment with the winch, the winch cable should, where possible be connected to the equipment by way of chains fitted with safety latches. Never attempt to unload skid mounted equipment with the winch cable disconnected.
• If the equipment will not slide down the inclined tray and the tray needs to be “rocked” (moving the tray backwards and forwards) to get the equipment to move, only slacken the winch cable enough (max. 450mm) to allow the equipment to start moving, ensuring the chain hooks do not disengage from the equipment.
• When the equipment slides down the tray it will normally stop when it touches the ground leaving part of the equipment still on the tray. To continue unloading, disconnect the chains from the equipment then raise the end of the tray a minimum distance off the ground to allow clearance and slowly drive the truck forward until the tray is clear of the equipment.
• Driving away with the end of the tray raised excessively may damage the equipment.
Alert 18
A driver failed to set the brake override locking lever fitted to the tow hitch of a trailer mounted compressor in the ‘reversing’ position before he reversed down an incline. This made the top leaf of both suspension springs to fold completely over and other substantial damage.
• When reversing set brake over-ride like this
Alert 17
When unloading MP40 Shoring Box Panels they shifted and fell off the side of the truck, along with the driver who was injured.
• Timber dunnage should be used to prevent steel on steel slippage.
• Position load binders so they can be attached, tightened and released while standing on the ground.
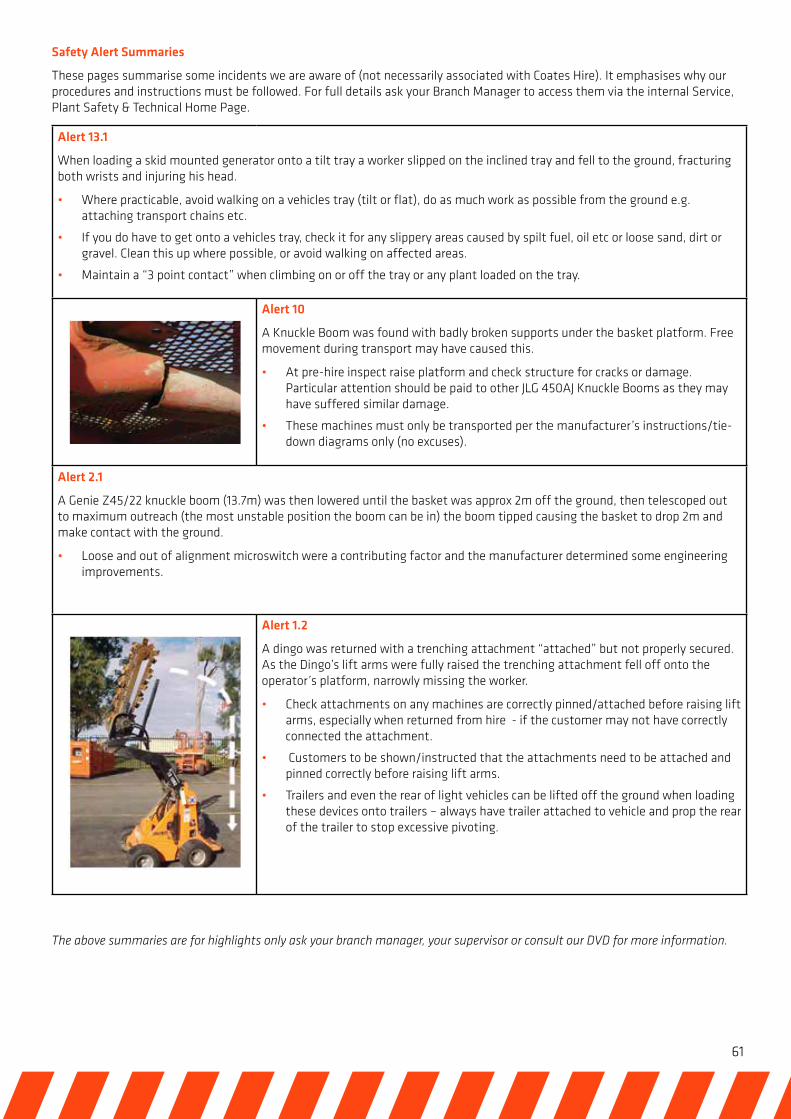
61
Safety Alert Summaries
These pages summarise some incidents we are aware of (not necessarily associated with Coates Hire). It emphasises why our procedures and instructions must be followed. For full details ask your Branch Manager to access them via the internal Service, Plant Safety & Technical Home Page.
Alert 13.1
When loading a skid mounted generator onto a tilt tray a worker slipped on the inclined tray and fell to the ground, fracturing both wrists and injuring his head.
• Where practicable, avoid walking on a vehicles tray (tilt or flat), do as much work as possible from the ground e.g. attaching transport chains etc.
• If you do have to get onto a vehicles tray, check it for any slippery areas caused by spilt fuel, oil etc or loose sand, dirt or gravel. Clean this up where possible, or avoid walking on affected areas.
• Maintain a “3 point contact” when climbing on or off the tray or any plant loaded on the tray.
Alert 10
A Knuckle Boom was found with badly broken supports under the basket platform. Free movement during transport may have caused this.
• At pre-hire inspect raise platform and check structure for cracks or damage. Particular attention should be paid to other JLG 450AJ Knuckle Booms as they may have suffered similar damage.
• These machines must only be transported per the manufacturer’s instructions/tie-down diagrams only (no excuses).
Alert 2.1
A Genie Z45/22 knuckle boom (13.7m) was then lowered until the basket was approx 2m off the ground, then telescoped out to maximum outreach (the most unstable position the boom can be in) the boom tipped causing the basket to drop 2m and make contact with the ground.
• Loose and out of alignment microswitch were a contributing factor and the manufacturer determined some engineering improvements.
Alert 1.2
A dingo was returned with a trenching attachment “attached” but not properly secured. As the Dingo’s lift arms were fully raised the trenching attachment fell off onto the operator’s platform, narrowly missing the worker.
• Check attachments on any machines are correctly pinned/attached before raising lift arms, especially when returned from hire - if the customer may not have correctly connected the attachment.
• Customers to be shown/instructed that the attachments need to be attached and pinned correctly before raising lift arms.
• Trailers and even the rear of light vehicles can be lifted off the ground when loading these devices onto trailers – always have trailer attached to vehicle and prop the rear of the trailer to stop excessive pivoting.
The above summaries are for highlights only ask your branch manager, your supervisor or consult our DVD for more information.
62
Transport Contractors General Site RulesIt is a condition of your engagement with Coates Hire that you adhere to the following rules whilst on any Coates Hire site, or performing work for Coates Hire. Failure to do so may result in your removal and/or the cancellation of your Transport Agreement.
You and your passengers MUST:
1. Ensure you are fit to drive (i.e. you have had adequate rest and are not affected by drugs or alcohol).
2. Not bring children, non-approved passengers or animals on site.
3. Not enter or exit a Coates Hire Site with an unsecured load.
4. Ensure you are wearing the following Australian Standards approved (where applicable), personal protective clothing & equipment (i.e. PPE) at all times;
• High visibility (yellow) vest or clothing.
• Long trousers and long sleeve shirts fastened at the cuffs.
• Safety glasses.
• Protective footwear
and as required for the task,
• Protective gloves
• Safety helmet (e.g. when using vehicle mounted cranes).
5. Report to the office (or your yard contact person) before commencing any loading/unloading activities or other work.
6. Advise a Coates Hire employee if you are transporting hazardous/dangerous materials.
7. Move around the site safely by:
• Travelling to the appropriate loading/unloading area as directed
• Observing site speed limits (a maximum of 10kph unless otherwise signposted).
• Exercising extreme caution when manoeuvring around equipment
• Keeping to marked walkways when on foot.
8. Only access areas that you have been directed/approved to enter.
9. Strictly observe all safety and traffic management signage on the site
10. Only operate plant and equipment you are competent and confident with and if applicable, hold an appropriate license.
11. Do not operate plant that has been tagged as “Out of Service” (or similar), unless prior authorisation is given.
12. Not use a mobile phone whilst driving vehicles or operating machinery and, if on foot, you must remain stationary and in a safe location when in an operational area.
13. Not smoke on site except in designated areas where provided.
14. Promptly report all injuries, safety or environmental incidents and/or concerns, including Near Hits, immediately to a Coates Hire manager/supervisor
15. Produce your Coates Hire Induction Card upon request at any time. (If you are not an approved contractor or not inducted you must be directly supervised by a Coates Hire employee, nominated by the branch manager, at all times whilst loading/unloading).
16. Report to Coates Hire staff before departing the site.
When loading or unloading a vehicle you MUST:
1. Ensure the load remains strapped/chained until you are in the designated unloading area
2. Stop and switch off the vehicle once in the loading/unloading area (except if needed to operate a tilt tray or crane etc.),
3. Use a nominated “Spotter” as per Coates Hire’s procedure, during normal hours when loading/unloading nominated plant (refer to your Pocket Guides) on a Coates Hire site.
4. Complete a Transport JSEA or use a customer supplied Spotter when attending a customer site or loading/unloading out of hours
5. Position the load correctly on the truck and ensure it is within the truck’s capacity
6 Check and note the height of your load before departing a site.
7. Not enter a forklift’s “NO GO Zone”, i.e. its pedestrian exclusion zone.
8. Whilst in a Safe Zone check that you remain in full view of the forklift operator.
9. Use the winch cable for all required plant (Refer to Transport Videos and Pocket Guides).
10. Use the designated winch and tie-down points.
11. Not winch from one vehicle to another
12. Not daisy chain your loads
13. Not use the winch as a restraint.
14. Use appropriate fall restraint/prevention when working at height.
15. Not throw chains.
Remember: Stop, Think, Act. If in any doubt, Stop!
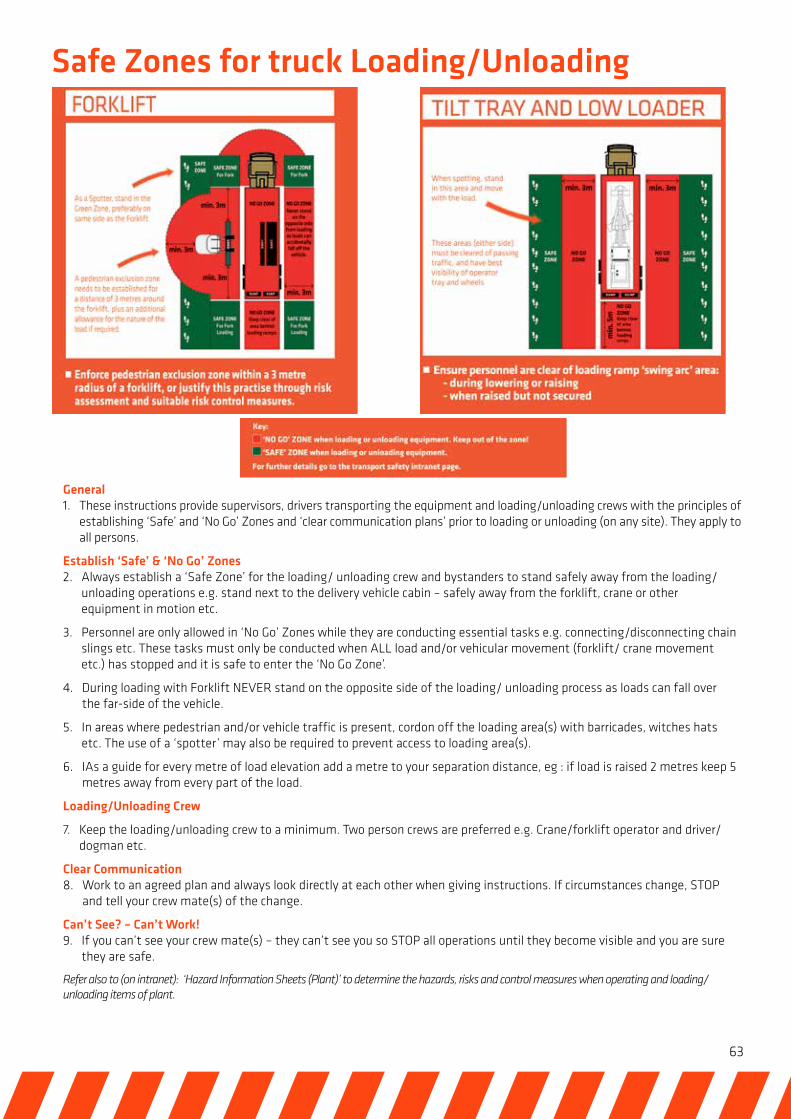
63
Safe Zones for truck Loading/Unloading
General1. These instructions provide supervisors, drivers transporting the equipment and loading/unloading crews with the principles of
establishing ‘Safe’ and ‘No Go’ Zones and ‘clear communication plans’ prior to loading or unloading (on any site). They apply to all persons.
Establish ‘Safe’ & ‘No Go’ Zones2. Always establish a ‘Safe Zone’ for the loading/ unloading crew and bystanders to stand safely away from the loading/
unloading operations e.g. stand next to the delivery vehicle cabin – safely away from the forklift, crane or other equipment in motion etc.
3. Personnel are only allowed in ‘No Go’ Zones while they are conducting essential tasks e.g. connecting/disconnecting chain slings etc. These tasks must only be conducted when ALL load and/or vehicular movement (forklift/ crane movement etc.) has stopped and it is safe to enter the ‘No Go Zone’.
4. During loading with Forklift NEVER stand on the opposite side of the loading/ unloading process as loads can fall over the far-side of the vehicle.
5. In areas where pedestrian and/or vehicle traffic is present, cordon off the loading area(s) with barricades, witches hats etc. The use of a ‘spotter’ may also be required to prevent access to loading area(s).
6. IAs a guide for every metre of load elevation add a metre to your separation distance, eg : if load is raised 2 metres keep 5 metres away from every part of the load.
Loading/Unloading Crew
7. Keep the loading/unloading crew to a minimum. Two person crews are preferred e.g. Crane/forklift operator and driver/dogman etc.
Clear Communication8. Work to an agreed plan and always look directly at each other when giving instructions. If circumstances change, STOP
and tell your crew mate(s) of the change.
Can’t See? – Can’t Work!9. If you can’t see your crew mate(s) – they can’t see you so STOP all operations until they become visible and you are sure
they are safe.
Refer also to (on intranet): ‘Hazard Information Sheets (Plant)’ to determine the hazards, risks and control measures when operating and loading/unloading items of plant.

coateshire.com.au 13 15 52
HSE
Q S
-GL-
046
©20
15