Embed Size (px)
Citation preview

INSTALLATION MANUAL
C/O INTERFACE UNIT N-8000CO
Thank you for purchasing TOA’s C/O Interface Unit. Please carefully follow the instructions in this manual to ensure long, trouble-free use of your equipment.
1. SAFETY PRECAUTIONS ............................. 22. GENERAL DESCRIPTION ........................... 63. FEATURES ................................................... 74. NOMENCLATURE AND FUNCTIONS ......... 7
Front .............................................................. 7Rear ............................................................... 7
5. INSTALLATION ............................................ 85.1. Equipment Rack Mounting ...................... 85.2. Desk-Top Installation ............................ 105.3. Wall Mounting ....................................... 10
6. WIRING ....................................................... 126.1. Connection Diagram ............................. 126.2. Type of Cable ....................................... 146.3. Connector Connection ......................... 14
7. ACCESSORIES .......................................... 158. OPTIONAL PRODUCTS ............................ 15
2
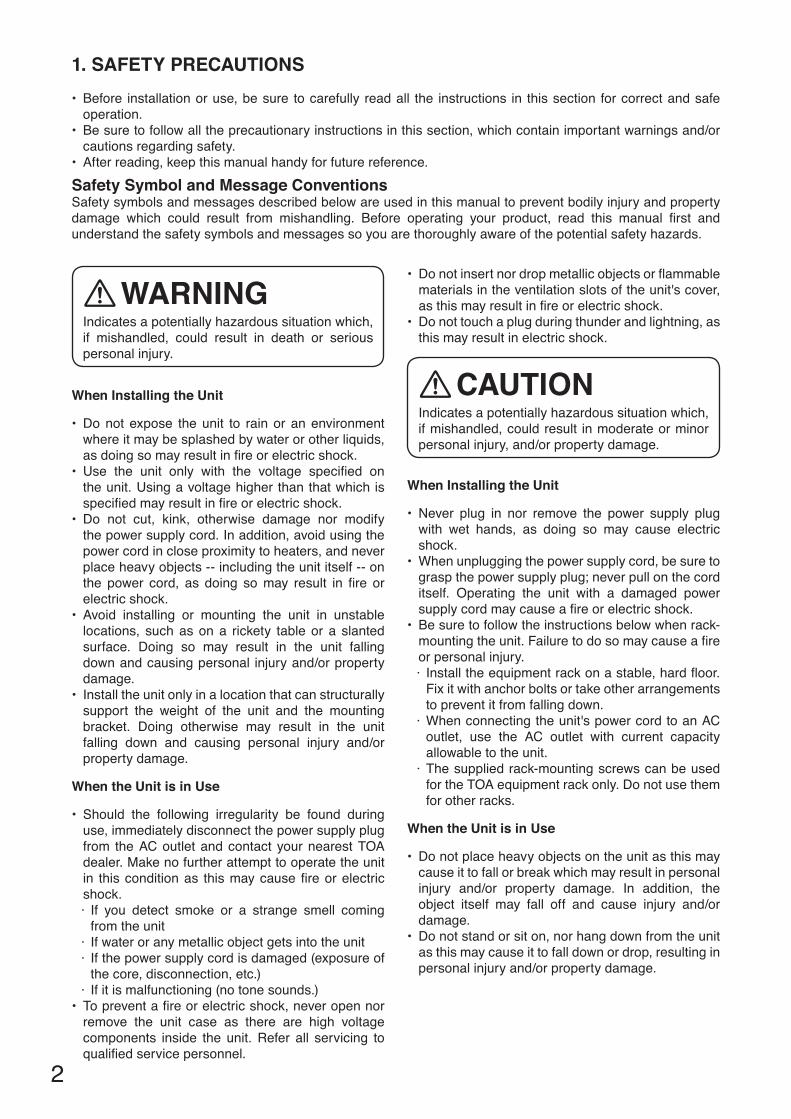
1. SAFETY PRECAUTIONS• Before installationoruse,besure tocarefully readall the instructions in thissection forcorrectandsafe
operation.• Besuretofollowalltheprecautionaryinstructionsinthissection,whichcontainimportantwarningsand/orcautionsregardingsafety.
• Afterreading,keepthismanualhandyforfuturereference.
Safety Symbol and Message Conventions Safetysymbolsandmessagesdescribedbelowareusedinthismanualtopreventbodilyinjuryandpropertydamage which could result from mishandling. Before operating your product, read this manual first andunderstandthesafetysymbolsandmessagessoyouarethoroughlyawareofthepotentialsafetyhazards.
Indicatesapotentiallyhazardoussituationwhich,if mishandled, could result in death or seriouspersonalinjury.
WARNING
When Installing the Unit
• Donotexpose theunit to rainor anenvironmentwhereitmaybesplashedbywaterorotherliquids,asdoingsomayresultinfireorelectricshock.
• Use the unit only with the voltage specified ontheunit.Usingavoltagehigherthanthatwhichisspecifiedmayresultinfireorelectricshock.
• Do not cut, kink, otherwise damage nor modifythepowersupplycord.Inaddition,avoidusingthepowercordincloseproximitytoheaters,andneverplaceheavyobjects--includingtheunititself--onthe power cord, as doing somay result in fire orelectric shock.
• Avoid installing or mounting the unit in unstablelocations, suchasona rickety tableor a slantedsurface. Doing so may result in the unit falling downandcausingpersonal injuryand/orpropertydamage.
• Installtheunitonlyinalocationthatcanstructurallysupport the weight of the unit and the mountingbracket. Doing otherwise may result in the unit falling down and causing personal injury and/orpropertydamage.
When the Unit is in Use
• Should the following irregularity be found duringuse,immediatelydisconnectthepowersupplyplugfrom theACoutletandcontactyournearestTOAdealer.Makenofurtherattempttooperatetheunitin thisconditionas thismaycausefireorelectricshock.· If you detect smoke or a strange smell coming
from the unit· Ifwateroranymetallicobjectgetsintotheunit· Ifthepowersupplycordisdamaged(exposureofthecore,disconnection,etc.)
· Ifitismalfunctioning(notonesounds.)• Topreventafireorelectricshock,neveropennorremove the unit case as there are high voltagecomponents inside the unit.Refer all servicing toqualifiedservicepersonnel.
• Donotinsertnordropmetallicobjectsorflammablematerialsintheventilationslotsoftheunit'scover,asthismayresultinfireorelectricshock.
• Donottouchaplugduringthunderandlightning,asthis may result in electric shock.
Indicatesapotentiallyhazardoussituationwhich,ifmishandled,couldresult inmoderateorminorpersonalinjury,and/orpropertydamage.
CAUTION
When Installing the Unit
• Never plug in nor remove the power supply plugwith wet hands, as doing so may cause electricshock.
• Whenunpluggingthepowersupplycord,besuretograspthepowersupplyplug;neverpullonthecorditself. Operating the unit with a damaged powersupplycordmaycauseafireorelectricshock.
• Besuretofollowtheinstructionsbelowwhenrack-mountingtheunit.Failuretodosomaycauseafireorpersonalinjury.· Installtheequipmentrackonastable,hardfloor.Fixitwithanchorboltsortakeotherarrangementstopreventitfromfallingdown.
·Whenconnectingtheunit'spowercordtoanACoutlet, use the AC outlet with current capacity allowable to the unit.
· Thesuppliedrack-mountingscrewscanbeusedfor the TOA equipment rack only. Do not use them for other racks.
When the Unit is in Use
• Donotplaceheavyobjectsontheunitasthismaycause it to fall or break which may result in personal injury and/or property damage. In addition, theobject itself may fall off and cause injury and/ordamage.
• Donotstandorsiton,norhangdownfromtheunitasthismaycauseittofalldownordrop,resultinginpersonalinjuryand/orpropertydamage.

3
CONSEILS DE SÉCURITÉ• Avant l’installation ou l’utilisation, lire attentivement l’ensemble des instructions de cette section pour un
fonctionnement correct et sûr.• Veilleràrespecterlesprécautionsrecommandéesdanscettesection,laquellecontientdesmisesengardeet/ouprécautionsimportantesenmatièredesécurité.
• Aprèslecture,conservercemanuelàportéedemainpourconsultationultérieure.
Symboles de sécurité et conventionsLessymbolesetmessagesdesécuritédécritsci-dessoussontutilisésdanscettenoticepourprévenir toutdommagecorporeloumatérielpouvantrésulterd’unemauvaiseutilisation.Lireattentivementcettenoticepourcomprendreparfaitementlessymbolesetmessagesdesécuritéafindeprévenirtoutrisqueéventuel.
Indique une situation risquant d’entraîner desblessures graves, voire la mort, en cas demauvaisemanipulation.
Lors de l’installation de l’appareil• Nepasexposerl’appareilàlapluieetleprotégerdetoutcontactavecdel’eauoud’autresliquidesafind’éviterunincendieouuneélectrocution.
• Utilisez l’appareil uniquement avec la tensionspécifiéesurlechargeur.L’utilisationd’unetensionsupérieure à celle spécifiée peut être à l’origined’unincendieoud’uneélectrocution.
• Nepascouper,entortiller,modifierouendommagerlecordond’alimentation.Enoutre,éviterd’utiliserlecordond’alimentationàproximitéd’unradiateuretnejamaisplacerd’objetslourds(ycomprisl’appareillui-même) sur le cordon d’alimentation, car ceciprésenteunrisqued’incendieoud’électrocution.
• Évitezd’installeroudemonterl’unitédansunendroitinstable, tel qu’une table bancale ou une surface inclinée pour prévenir toute chute susceptiblede provoquer une blessure corporelle et/ou unedégradationmatérielle.
• Installer l’unité dans un endroit structurellementcapabledesoutenir lepoidsde l’appareiletde lapattedemontage.
L’appareilpourraittomberetprovoquerdesblessurescorporelleset/oudesdommagesmatériels.
Pendant l’utilisation de l’appareil• En cas de survenue des irrégularités suivantespendant l’utilisation,débrancher immédiatement lafichedu cordond’alimentationde laprise secteuret contacter le représentant TOA le plus proche.Ne pas essayer pas d’utiliser l’appareil dans cesconditionssouspeinedeprovoquerunincendieouuneélectrocution.·Détection de fumée ou d’une odeur inhabituelleémanantdel’appareil.
· Pénétration d’eau ou d’un objetmétallique dansl’appareil
· Dégradation du cordon d’alimentation (âme ducâbledénudée,déconnexionetc.).
· Dysfonctionnement(absencedetonalité).• Pourempêcherun incendieouuneélectrocution,nejamaisouvrirnineretirerleboîtierdel’appareil,
enraisondelaprésencedepiècesàhautetension.Lamaintenancedel’appareildoitêtreconfiéeàuntechnicienaprès-ventequalifié.
• Nepasinsérernilaissertomberd’objetsmétalliquesoudematériaux inflammablesdans leséventsdeventilation du capot de l’appareil sous peine deprovoquerunincendieouuneélectrocution.
• Ne pas toucher la fiche du cordon d’alimentationpendantunorage-Risqued’électrocution.
ATTENTIONIndique une situation risquant d’entraîner desblessuresmoyennementgravesoumineures,et/oudesdommagesmatériels.
Lors de l’installation de l’appareil• Ne jamais brancher, ni débrancher la fiche ducordon d’alimentation avec les mains mouillées.Risqued’électrocution.
• Pour débrancher le cordon d’alimentation, veilleràletenirparsafiche;nejamaistirerdirectementle cordon. Utiliser l’appareil avec un cordond’alimentation endommagé peut présenter unrisqued’incendieoud’électrocution.
• Respecterlesinstructionsci-dessouspourmonterl’appareilenbâti.Risqued’incendieoudeblessurecorporelle.· Installerlebâtisurunsolstable.Lefixeràl’aidede boulons d’ancrage ou prendre des mesurespourempêcherqu’ilnechute.
· Pourbrancherlecordond’alimentationàunepriseCA,vérifierl’intensitémaximaledel’appareil.
· Les vis de montage en bâti fournies peuventseulementêtreutiliséespourlebâtidel’équipementTOA.Nepaslesutiliserpourd’autresbâtis.
Pendant l’utilisation de l’appareil• Ne pas placer d’objets lourds sur l’appareil souspeine de le faire tomber ou de le rompre, ce quiprésenteunrisquedeblessurescorporelleset/oude dommages matériels. Par ailleurs, l’objet lui-mêmepeuttomberetprovoquerdesblessureset/oudégâts.
• Ne pas placer d’objets lourds sur l’appareil souspeinedelefairetomber,cequiprésenteunrisquedeblessurescorporelleset/oudedommagesmatériels.
AVERTISSEMENT

4
[Notification for North America]
FCC REQUIREMENTS
General Requirements For All Equipment:1. ThisequipmentcomplieswithPart68oftheFCCrulesandtherequirementsadoptedbytheACTA.On
thetopcoverofthisequipmentisalabelthatcontains,amongotherinformation,aproductidentifierintheformat US: AAAEQ##TXXXX.
Ifrequested,thisnumbermustbeprovidedtothetelephonecompany.
2. USOC Jack RJ11C or RJ11W.
3. AplugandjackusedtoconnectthisequipmenttothepremiseswiringandtelephonenetworkmustcomplywiththeapplicableFCCPart68rulesandrequirementsadoptedbytheACTA.
Acomplianttelephonecordandmodularplugisprovidedwiththisproduct. Itisdesignedtobeconnectedtoacompatiblemodularjackthatisalsocompliant. Seeinstallationinstructionsfordetails.
4. TheRENisusedtodeterminethenumberofdevicesthatmaybeconnectedtoatelephoneline.ExcessiveRENsonatelephonelinemayresultinthedevicesnotringinginresponsetoanincomingcall.
Inmostbutnotallareas,thesumofRENsshouldnotexceedfive(5.0). Tobecertainofthenumberofdevicesthatmaybeconnectedtoaline,asdeterminedbythetotalRENs,
contact the local telephone company. ForproductsapprovedafterJuly23,2001,theRENforthisproductispartoftheproductidentifierthathas
the format US: AAAEQ##TXXXX. Thedigitsrepresentedby##aretheRENwithoutadecimalpoint(e.g.,03isaRENof0.3). Forearlierproducts,theRENisseparatelyshownonthelabel.
5. Ifthisequipment[N8KCOCU]causesharmtothetelephonenetwork,thetelephonecompanywillnotifyyouinadvancethattemporarydiscontinuanceofservicemayberequired.Butifadvancenoticeisn'tpractical,thetelephonecompanywillnotifythecustomerassoonaspossible.Also,youwillbeadvisedofyourrighttofileacomplaintwiththeFCCifyoubelieveitisnecessary.
6. Thetelephonecompanymaymakechangesinitsfacilities,equipment,operationsorproceduresthatcouldaffect the operation of the equipment.
If thishappens the telephonecompanywillprovideadvancenotice inorder foryou tomakenecessarymodificationstomaintainuninterruptedservice.
7. Iftroubleisexperiencedwiththisequipment[N8KCOCU],forrepairorwarrantyinformation,pleasecontactTOAElectronics,Inc.,1350BayshoreHighway,Suite270Burlingame,California94010,phone(650)452-1200.
Ifthetroubleiscausingharmtothetelephonenetwork,thetelephonecompanymayrequestyouremovetheequipmentfromthenetworkuntiltheproblemisresolved.
8. If there isasection inthegeneralcustomer instructionsthatprovidesdetailed informationonrepairs,areference to that section is acceptable.
If this equipment is of a type that is not intended to be repaired, state that fact in place of any repairinstructions.
9. Connectiontopartylineserviceissubjecttostatetariffs. Contact the state public utility commission, public service commission or corporation commission for
information.
10.Ifyourhomehasspeciallywiredalarmequipmentconnectedtothetelephoneline,ensuretheinstallationofthis[N8KCOCU]doesnotdisableyouralarmequipment.
If you have questions about what will disable alarm equipment, consult your telephone company or aqualifiedinstaller.
11. Customer Information 4 July 2003 Thisequipmentishearingaidcompatible.

5
WARNING (For U.S.A. only)Thisequipmentgenerates,uses,andcanradiateradiofrequencyenergyand,ifnotinstalledandusedinaccordancewiththeinstructionsmanual,maycauseinterferencetoradiocommunications.IthasbeentestedandfoundtocomplywiththelimitsforaClassAcomputingdevicepursuanttoSubjectJofPart15oftheFCCRules,whicharedesignedtoprovidereasonableprotectionsuchinterferencewhenoperatedinacommercialenvironment.Operationofthisequipmentinaresidentialareaislikelytocauseinterference,inwhichcasetheuserathisownexpensewillberequiredtotakewhatevermeasuresmayberequiredtocorrecttheinterference.ThisequipmentcomplieswithPart68oftheFCCrulesandtherequirementsadoptedbytheACTA.
12.CAUTION-Toreducetheriskoffire,useonlyNo.26AWGorlargertelecommunicationlinecord.
13.TheinterconnectedtelecommunicationterminalequipmentshouldbeULListedandtheconnectionsshallbemadeinaccordancewithArticle800oftheNEC.
Data Equipment: Forpermissive,programmableand(or)fixedlossloopoperationdataequipment,inadditiontothegeneral
requirementsforallequipment,informationmustbeprovidedexplainingwhichjackisassociatedwitheachoperation.
–Permissive,useRJ11C –Programmable,useRJ41SandRJ45S –FixedLossLoop,useRJ41S –RefertoATISTechnicalReportNo.5fordetailsontheseconnectors. ForPrivate(Leased)Line(AnalogDataFormat)equipment,thetypeJM8jackisrequired.RefertoATIS
TechnicalReportNo.5fordetailsonthisconnector. For Private (Leased) Line (Digital Format) equipment, in addition to the general requirements for all
equipment,certaindigitalconnectionsrequirethatanencodedanalogcontentandbillingprotectionaffidavitbeprovidedthetelephonecompany.Customerinstructionsmustcontaininformationonthepreparationandsubmissionoftheaffidavit.
Systems: Theconsumerinstructionsforsystemsmustcontaininformationonallconnectorstothenetwork(switched
and private line). This information includes the jack USOCs, FlCs, SOCs, the REN if applicable, thepremiseswiring information, andanyaffidavits orwrittenauthority authorizations.Furthermore, theUS:AAAEQ##TXXXnumberofthesystemmustbeprovidedsothetelephoneserviceprovidercanascertainintendedmodesofoperationandverificationofcertificationports.
Adjuncts - KX and PX Devices: Theconsumer informationmustcontainnotificationthatwhentheadjunct isusedwitha leasedsystem,
permission of the owner of the equipment must be obtained for connection of the adjunct becausemodificationofthehostsystemisoftenrequired.
CustomerinstructionsforKXtypetelephoneswithmediumimpedanceanalogmessagewaitinglightsand/orlinestatusindicatorsmustcontainstatementsthattheycanonlybeconnectedtohostequipmentandneverdirectly tothenetwork.Thereason isthat theydonotmeetthe5megohmrequirementandmostlikelywillcreateexcessiveleakagecurrentwhenpolledbythetelephonecompany'sdailyautomaticloopinsulationtestequipment.Sucheventstriggeramaintenanceactionbythetelephonecompanytodeterminethe location of such leakage currents.
INDUSTRIAL CANADA REQUIREMENTS
EQUIPMENT ATTACHMENT LIMITATIONS
NOTICE:TheIndustryCanadalabelidentifiescertifiedequipment. This certification means that the equipment meets telecommunications network protective,
operationalandsafetyrequirementsasprescribedintheappropriateTerminalEquipmentTechnicalRequirementsdocuments.
TheDepartmentdoesnotguaranteetheequipmentwilloperatetotheuser'ssatisfaction.

6
Before installingthisequipment,usersshouldensurethat it ispermissibletobeconnectedtothefacilities of the local telecommunications company.
Theequipmentmustalsobeinstalledusinganacceptablemethodofconnection. Thecustomershouldbeawarethatcompliancewiththeaboveconditionsmaynotpreventdegradation
ofserviceinsomesituations.
Repairtocertifiedequipmentshouldbecoordinatedbyarepresentativedesignatedbythesupplier. Anyrepairoralterationsmadebytheusertothisequipment,orequipmentmalfunctions,maygivethe
telecommunicationscompanycausetorequesttheusertodisconnecttheequipment.
Users shouldensure for their ownprotection that theelectrical groundconnectionsof thepowerutility,telephonelinesandinternalmetallicwaterpipesystem,ifpresent,areconnectedtogether.
This precaution may be particularly important in rural areas.
TheRingerEquivalenceNumber(0.4)assignedtoeachterminaldeviceprovidesanindicationofthemaximumnumberofterminalsallowedtobeconnectedtoatelephoneinterface.
The termination on an interface may consist of any combination of devices subject only to therequirementthatthesumoftheRingerEquivalenceNumbersofallthedevicesdoesnotexceed5.
TheinterconnectedtelecommunicationterminalequipmentshouldbeULListedandtheconnectionsshallbemadeinaccordancewithArticle800oftheNEC.
Caution: Usersshouldnotattempttomakesuchconnectionsthemselves,butshouldcontacttheappropriateelectric inspection authority, or electrician, as appropriate.
Toreducetheriskoffire,useonlyNo.26AWGorlargertelecommunicationlinecord.
[Notification for Europe]NOTICE: TheinterconnectedtelecommunicationterminalequipmentshouldcomplywithIEC60950-1.Caution: DonotdefeattheClassIproduct'searthedconnections.
2. GENERAL DESCRIPTIONTOA's N-8000CO is C/O interface unit used for the N-8000 Series Packet Intercom System (IP networkcompatibleintercom)employingpacketaudiotechnology*.Ithasananalogcentralofficelinecircuit,allowingtheintercomstationtomakeandreceivecallstoandfromthe telephone line.Connecting the unit to the LAN permits paging calls through analog subscriber line to be made and theequipmentconnectedtotheN-8000MIandN-8000DItobecontrolled.
* Technologyrelatedtoaudiotransmissionoveranetwork.
WarningThisisaclassAproduct.Inadomesticenvironmentthisproductmaycauseradiointerferenceinwhichcasetheusermayberequiredtotakeadequatemeasures.
DESCRIPTION GÉNÉRALEL'unitéN-8000COdeTOAest lecommutateurtéléphoniqueutilisépourlesystèmedepaquet intercomdessériesN-8000(intercomcompatibleavecunréseauIP)utilisantunetechnologiedepaquetaudio*.Ilestdotéd'uncircuitpourligneprofessionnellecentraleanalogique,quipermetàlastationintercomd'appeleretderecevoirdesappelsàpartirdelalignetéléphonique.Lebranchementdel'unitéauLANpermetd'envoyerdesnotificationsvialaligneanalogiquedel'abonnéetdecontrôlerl'équipementconnectéauxunitésN-8000MIetN-8000DI.
*Technologiedetransmissionaudiosurunréseau.
Avertissement CetéquipementestunproduitdeclasseA.Enenvironnementdomestique,ceproduitpeutprovoquerdesinterférencesradio.

7
4. NOMENCLATURE AND FUNCTIONS
1 2 3 4 5 6 7 8 9 10 11
1. Reset key [RESET]Pressingthiskeyreactivatesthisunit.
2. LNK/ACT indicator [LNK/ACT] (Green)Lightswhenconnectedtoanetwork,andflasheswhiletransmittingorreceivingdata.
3. Status indicator [STATUS] (Red)Continuously lights while data is written to aninternalstoragemedium(FlashMemory).Flashes if there is a failure.
4. Power indicator [POWER] (Green)Lightswhenpowerissuppliedtotheunit.
5. MAC addressThis is the address* used by the unit. Since therelationshipofeachexchangelocationtoitsMACaddress is establishedwhen setting the networkattributes, keep track of this relationship for later use.
*Theinherentaddressassignedtoeachnetworkcomponent, expressed in 12-digit hexadecimalnotation.
6. Subscriber line indicator [LINE] (Green)Remains lit while accessing the subscriber line.
7. Cord clampPassthepowercordthroughthisclamptoensurethat theplugdoesnot pull outwhen theunit ismountedtoawall.(Refertop.11.)
8. Functional earth terminal [SIGNAL GND]Groundthisterminal.Note: Thisterminalisnotforprotectiveearth.
9. AC inletConnectthesuppliedpowercord.NoteIfthereisadangeroflightningstrikes,insertanappropriate surge arrester into the power line.
10. Subscriber Line Connection Terminal [C/O LINE]
Connect the subscriber line to this terminal using apairoftwistedpaircables.Usethemini-clampconnector for connection of this terminal.
11. Network connection terminal [10/100M]Connects to a 10BASE-T- or 100BASE-TX-compatiblenetwork.(EthernetRJ-45jack)
[Front] [Rear]
3. FEATURES• Exchanges,IPstationsandvariouskindsofinterfaceunitscanbedistributedoveradatacommunications
network.• Canbeconnectedtoanexistinglocalareanetwork(LAN)orwide-areanetwork(WAN).• Thededicatedsoftwareprogramenablescentralizedcontrolwithapersonalcomputer.• Systemmaintenance(verifyingoperationlogandLinesupervision)canalsobeperformedwithapersonalcomputerandInternetbrowser.
CARACTÉRISTIQUES • Unréseaudecommunicationdedonnéespermetlaconnexiondecentraux,destationsIPetdedifférentstypesd’interfaces.
• Peutêtreconnectéàunréseaulocal(LAN)ouétendu(WAN)existant.• Logicieldédiépermettantuncontrôlecentraliséàpartird’unPC.• La maintenance du système (vérification du journal d’opérations et supervision des lignes) peut aussiintervenirviaunordinateurpersonneletunnavigateurInternet.

8
5. INSTALLATIONTheN-8000COcanbeinstalledinanyofthreeways:Equipmentrackmounting,Desk-topinstallation,andWallmounting.
5.1. Equipment Rack Mounting
A) ElevatedOperatingAmbient - If installed inaclosedormulti-unit rackassembly, theoperatingambienttemperatureoftherackenvironmentmaybegreaterthanroomambient.Therefore,considerationshouldbegiventoinstallingtheequipmentinanenvironmentcompatiblewiththemaximumambienttemperature(Tma)specifiedbythemanufacturer.
B) ReducedAirFlow-Installationoftheequipmentinarackshouldbesuchthattheamountofairflowrequiredforsafeoperationoftheequipmentisnotcompromised.
C)MechanicalLoading-Mountingoftheequipmentintherackshouldbesuchthatahazardousconditionisnotachievedduetounevenmechanicalloading.
D)Circuit Overloading - Consideration should be given to the connection of the equipment to the supplycircuitandtheeffectthatoverloadingofthecircuitsmighthaveonovercurrentprotectionandsupplywiring.Appropriateconsiderationofequipmentnameplateratingsshouldbeusedwhenaddressingthisconcern.
E)ReliableEarthing-Reliableearthingofrack-mountedequipmentshouldbemaintained.Particularattentionshouldbegiventosupplyconnectionsotherthandirectconnectionstothebranchcircuit(e.g.useofpowerstrips)."
A) Température ambiante élevée - si l’appareil est installé dans un bâti fermé ou en même temps qued’autresappareils,latempératureàl’intérieurrisquededevenirsupérieureàlatempératureambiante.Parconséquent,veilleràinstallerl’équipementdansunenvironnementcompatibleàlatempératureambiantemaximumspécifiéeparlefabricant.
B) Débitd’airréduit-L’installationdel’équipementenbâtinedoitpascompromettreledébitd’airnécessaireàuneutilisationsûredel’équipement.
C) Chargemécanique-Lemontagedel’équipementenbâtinedoitpasentraînerdedangerdûàunesurchargemécaniqueinégale.
D) Surcharge du circuit - rester vigilant lors de la connexion de l’équipement au circuit d’alimentation etaux conséquences d’une surcharge des circuits sur la protection contre les surintensités et les câblesd’alimentation.Tenircomptedesindicationsdelaplaquenominaledel’appareil.
E) Veiller à toujours garantir l’intégrité de la prise demise à la terre. Faire particulièrement attention auxconnexionsd’alimentationendehorsdesbranchementsdirectsaucircuitdedérivation(parexempleàl’aidedemultiprises).
TheN-8000COcanbemountedontheCR-273orCR-413orstandardEIA19"Equipmentrack.FortheCR-273andCR-413Equipmentrackassembly,readtheinstallationmanualsuppliedwiththerack.
NoteWheninstallingtheN-8000CO,laytheequipmentrackdownface-uptodoinstallationworksafely.
5.1.1. Setting space
Formaintenanceworks,allowmuchspacebetweenthewallandEquipment rack.
N-8000CO
50 cm 50 cm
1 m
50 cm

9
N-8000CO
Tapping screw 3 x 14*1
Tapping screw 3 x 8*1
Blank bracket*1
Tapping screw 3 x 8*1
Rack mounting bracket*1
Rack mounting screw 5 x 12*1
Fiber washer (for M5)*1
Vis-taraud 3 x 8*1
Vis-taraud 3 x 14*1
Vis-taraud 3 x 8*1
Patte de montage*1
Vis de montage en bâti 5 x 12*1
Rondelle en fibre (pour M5)*1
Patte vierge*1
N-8000CO
N-8000CO
Rack mounting screw 5 x 12*2
Fiber washer (for M5)*2
Tapping screw 3 x 14*2
Tapping screw 3 x 14*2
Rack mounting bracket*2
Coupler*2 Machine screw 3 x 12*2
Vis-taraud 3 x 14*2
Rondelle en fibre (pour M5)*2
Vis de montage en bâti 5 x 12*2
Vis de mécanique 3 x 12*2 Coupleur*2 Patte de montage*2
Vis-taraud 3 x 14*2
• Use the optional MB-15B-J hardware set when mounting 2 units.• Utilisez le matériel MB-15B-J en option pour le montage de 2 unités.
5.1.2. Mounting on the rackMontage en bâti
Usetheoptionalmountinghardwaresetwheninstallingtheunitinanequipmentrack.Utilisezlematérieldemontageenoptionpourinstallerl’unitéenbâti.
• Use the optional MB-15B-BK hardware set when mounting a single unit.• Utilisez le matériel MB-15B-BK en option pour le montage d’une seule unité.
*1 ComponentpartsofMB-15B-BK
*2 ComponentpartsofMB-15B-J
*1 ComposantsduMB-15B-BK
*2 ComposantsduMB-15B-J

10
5.3. Wall MountingMontage mural
TheN-8000COcanbemountedonawallusinganoptionalYC-850Wall-mountingbracket.
Step 1. InstalltheYC-850totheN-8000CO.
L’unitéN-8000COpeutêtremontéeaumuràl’aided’unepattedemontagemuralYC-850.
Étape 1. Installezl’unitéYC-850surl’unitéN-8000CO.
5.2. Desk-Top Installation
N-8000CO
Plastic foot (accessory)
Machine screw M3 x 8 (accessory)
Vis de mécanique M3 x 8(accessoire)
Pied en plastique(accessoire)
When installing the N-8000CO on a desk,secure thesuppliedplastic feet to theunit'sbottomusingthesuppliedmachinescrews.
Installation sur un bureau
Pourinstallerl’unitéN-8000COsurunbureau,installezlespiedsenplastiquefournissurlefonddel’appareilàl’aidedesvisfournies.
Wall mounting bracket (YC-850)
Machine screw M3 x 6(supplied with the YC-850)Vis de mécanique M3 x 6(fournie avec l'unité YC-850)
Pattes de montage mural(YC-850)

11
Step 2. MounttheN-8000COonthewall.Notes• Useappropriatescrewsfortheconstructionofwall.• Woodscrews3.5x20aresuppliedwiththeYC-850.• Thesocket-outletshallbeinstalledneartheequipmentandtheplug(disconnectingdevice)shallbe
easily accessible.
Cord clamp
Power supply cord
Protect against disconnection (Power supply plug)Unlock cord clamp and run the power supply cord through it.NoteKeep the cable length between a power supply plug and cord clamp as short as possible.
Remarque
Protection contre les ruptures d'alimentation (prise d'alimentation) Déverrouillez le collier à cordon et glissez-y le cordon d'alimentation.
Le câble entre la prise d'alimentation et le collier doit être aussi court que possible.
Cordon d'alimentation
Collier du cordon
Wood screw 3.5 x 20 (supplied with the YC-850)
Wall surface
Vis à bois 3,5 x 20 (fournie avec l'unité YC-850)
Surface murale
Étape 2. Montezl’unitéN-8000COaumur.Remarques • Utilisezdesvisadaptéesàlastructuredumur.• L’unitéYC-850estlivréeavecdesvisàbois3,5x20.• Laprisedoitêtreinstalléeàproximitédel’équipementetlafiche(dispositifdedéconnexion)doitêtrefacilementaccessible.

12
6. WIRING6.1. Connection Diagram
Be sure to ground.
To AC mains or a UPS (Uninterruptible power supply system)*1
NoteIf there is a danger of lightning strikes, insert an appropriate surge arrester into the power line.
RJ-45 connector
To network
A pair of twisted paid cables
U.S.O.C*RJ11C or W
Protector *2 3
Central office line (or PBX extension)
Mini-clamp connector232D-02S1B-DA5 (DDK)(supplied with the N-8000CO)
12 3
N-8000CO C/O interface unit
NoteTheInterfaceUnit’sDCresistanceis352Ω(maximum).Dependingonlineresistanceconditions,theunit might not be usable.
*1 Select an appropriate UPS taking into consideration the total power consumption of all systemcomponentsandtherequiredbackuptime,andalsotherequirementthattheUPSshouldemploytheon-line power system.
*2Installtheprotectorifthetelephonecompanyhasnotalreadyinstalledit. *3Thisterminalisinstalledbythetelephonecompany.
ReferenceC/Ointerfaceunit:6W(rated)forCEversion,6W(rated)forCUversion8-Port10M/100MSwitchingHub:10W(Differsdependingonproducts.)

13
[General description of connection]For cables, refer to p. 14.
1. Power supply connectionConnect the supplied power supply cord to ACMainsoraUPS(Uninterruptiblepowersupply).
About power supply cord handlingThe supplied power supply cord is designed forexclusiveusewiththeN-8000CO.UsethesuppliedpowersupplycordonlywiththeN-8000CO.
2. C/O line connectionConnecttheC/OlinetothePSTN(publicswitchedtelephonenetwork)usingthesuppliedmini-clampconnector.(Refertop.14,"ConnectorConnection.")
Toreducetherickoffire,useonlyNo.26AWGorlargertelecommunicationlinecord.
CAUTION
3. Network connectionCan be connected to a network of 10BASE-T/100BASE-TXinauto-sensing.Use a straight through cable of UTP category 5 or more for this connection.
ATTENTIONPour réduire le risque d’incendie, utilisezuniquement un cordon de ligne téléphoniqueAWGn°26ouplus.

14
6.3. Connector Connection
Connectthemini-clampconnectorsuppliedwiththeN-8000CO,toacableusingacommerciallyavailabletool(pliers).
Step 1. Cutofftwo-cableendsinequallength,andinsertthemsecurely to a cover section (transparent side) of themini-clamp connector.NoteInsertthecablewithoutstrippingthecablejacket.Forcables,refertoabove,"TypeofCable."
Step 2. Withapairofpliers,lightlypinchthemini-clampcoverand,afterensuringthatthecableissecurelyinserted,firmlysqueezeonthecover.NoteSqueeze on themini-clamp cover until it is correctlylocked.
Step 3.Insertthewiredconnector(plug)intotheC/Ointerfaceunit'sconnector(socket)untilitlocksintoplace.
Cover (transparent side)
Cable
Mini-clamp connector (accessory, model 232D-02S1B-DA5manufactured by DDK Ltd.)
Rear panel
6.2. Type of Cable
Thetypesofcablesaretobedeterminedaccordingtothefollowingconditions.
• UTPcategory5StraightthroughcableswithRJ45connectoraretobeusedforconnectingtoIPnetwork.• Thenumberofcablespairslaidshouldbedeterminedconsideringthepossibilityoffutureexpansionofthe
system.• Outdoorwiresshouldbeusedwherewiringpassesthrough inaccessibleareassuchasceilingsorunderfloorswherethemaintenanceisnotperformed.Indoorwiresmayalsobeused,however,incasewherethereisnoriskofdeteriorationduetoexposuretoheat,etc.
NoteSpecificationsrelatedtojunctionareasfollows.
Mini-clampconnector(N-8000COC/Olineconnectionterminal)Conductordiameter: ø0.4–0.65mm(AWG22–26),SolidwireOutsidediameter: ø1.05mmorbelow

15
7. ACCESSORIES
* Contains theN-8000 setting softwareprogramand theN-8000 series instructionmanual.TheSetupLauncherisautomaticallystartedwhenthesuppliedCD-ROMisinsertedintothePC'sdrive.NoteIfyourPC'sCDdriveisnotcompatiblewiththeAutoRunfunction,thesetupguideisnotautomaticallystartedevenwhentheCDisinserted.Useeither"Explorer"or"MyComputer"toexecutethefollowingfiles,oruse[Start Run]intheTaskBarandenterthefollowingcommand.<DrivewhereCDisplaced>\index.htmlForexample,whenplacingtheCDinthe"d"drive, d:\index.html
8. OPTIONAL PRODUCTS
ACpowercord(2m) ............................................... 1CD*(forPCsetting,maintenanceuse) .................. 1Mini-clampconnector(2P) ..................................... 2
Plastic foot .............................................................. 4MachinescrewM3x8............................................ 4
Rackmountingbracket: MB-15B-BK(forrackmountingoneN-8000COunit) MB-15B-J(forrackmountingtwoN-8000COunits)Wallmountingbracket: YC-850
• DownloadourTOAProductsData,website(http://www.toa-products.com/international/) togettheup-to-dateversionforN-8000software,firmware,andInstructionmanuals.
• ThesoftwareversionnumbercanbeconfirmedusingtheHelpmenu.• Thecurrentfirmwareversioncanbeconfirmedonthesystemmanagementscreendisplayedwhen
the browser establishes the connection to the C/O interface unit.• Theinstructionmanualversionnumbercanbeconfirmedbycheckingthepreparationdate(monthandyear)shownatthelowerrightcornerofthelastpage.
Example:PreparedinJanuary2010:201001
Version update information

Traceability Information for EuropeManufacturer:
TOA Corporation7-2-1,Minatojima-Nakamachi,Chuo-ku,Kobe,Hyogo,Japan
Authorizedrepresentative:TOAElectronicsEuropeGmbHSuederstrasse282,20537Hamburg,Germany
URL:http://www.toa.jp/133-06-00007-00