Embed Size (px)
Citation preview
CNH Infusion DocumentationDocumentation
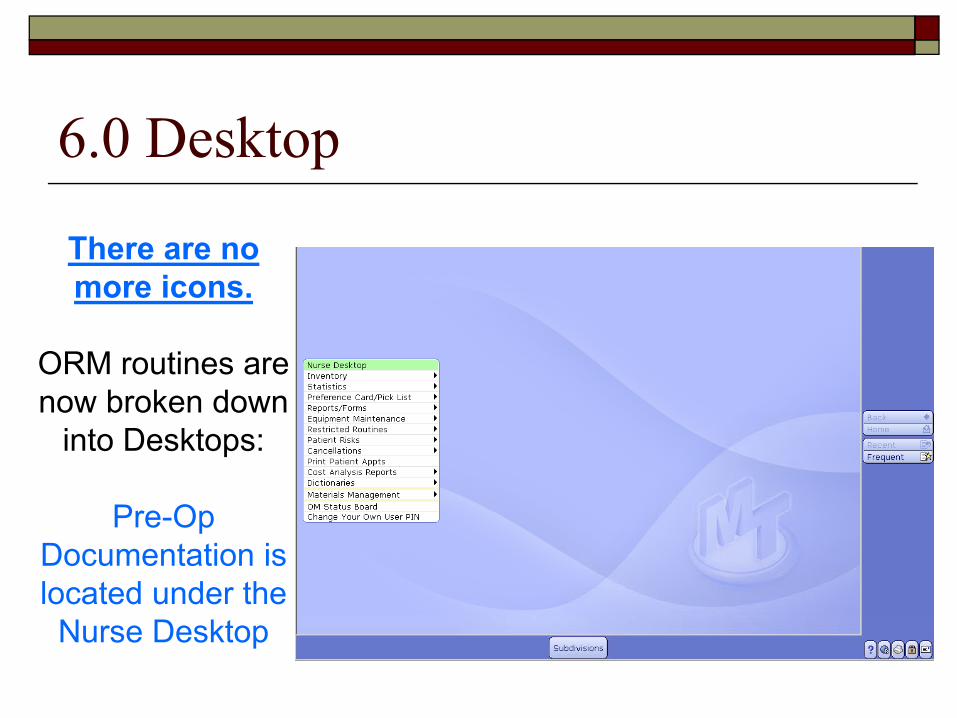
6.0 Desktop
There are no more icons.
ORM routines are now broken downnow broken down
into Desktops:
Pre OpPre-Op Documentation is located under the
Nurse Desktop

Nurse DesktopNurse Desktop
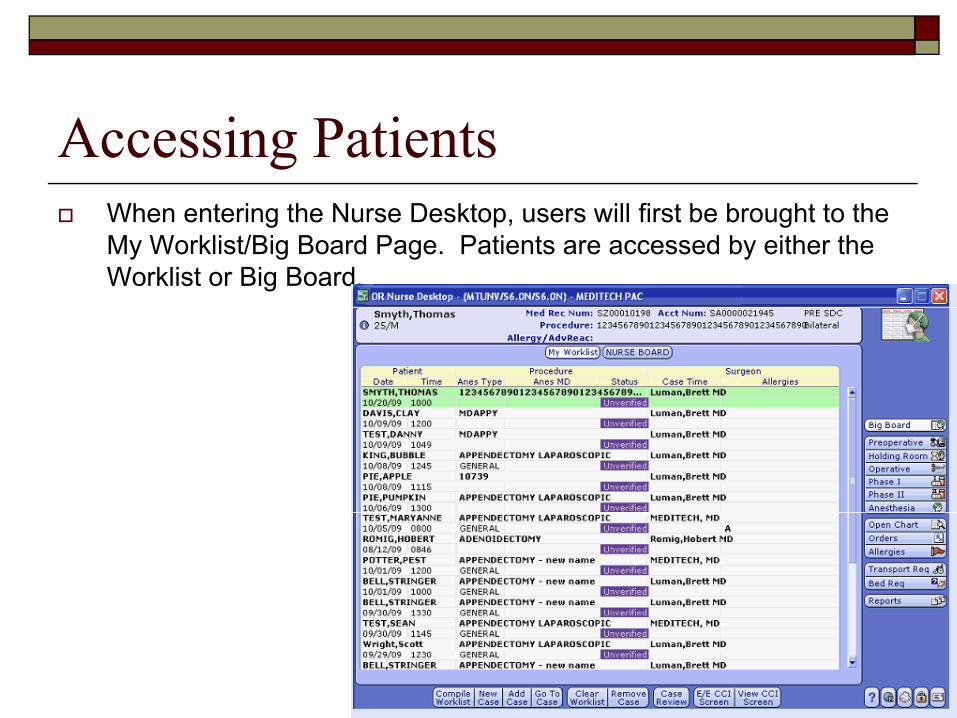
Accessing PatientsWh t i th N D kt ill fi t b b ht t thWhen entering the Nurse Desktop, users will first be brought to the My Worklist/Big Board Page. Patients are accessed by either the Worklist or Big Board.

WorklistWorklistList of surgical cases which the user compiles by selectingthe user compiles by selecting specific criteria
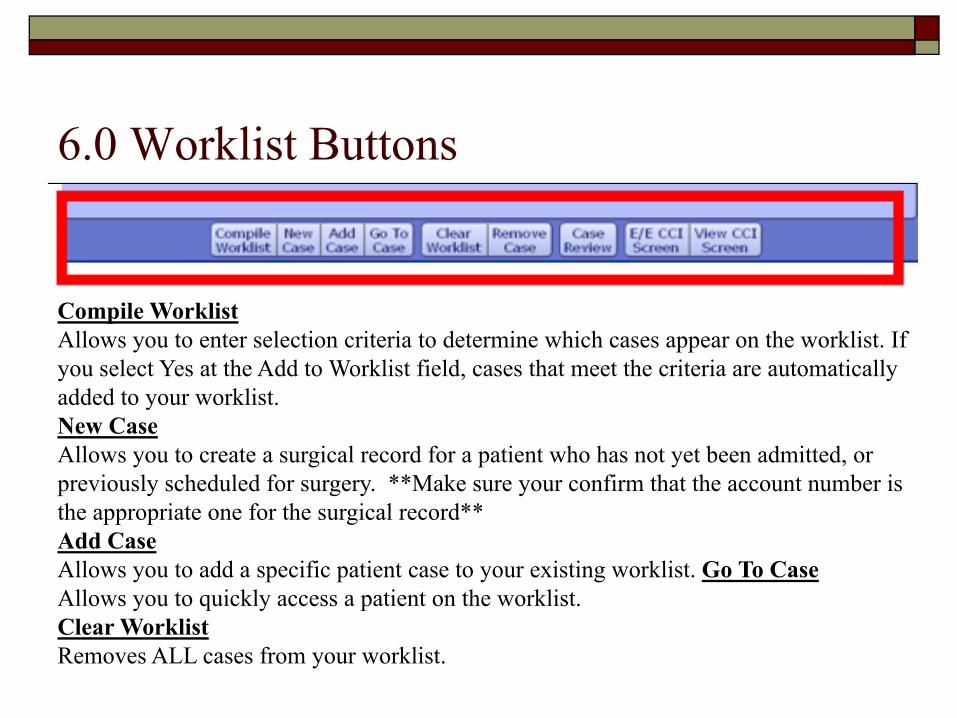
6.0 Worklist Buttons
Compile WorklistCompile WorklistAllows you to enter selection criteria to determine which cases appear on the worklist. If you select Yes at the Add to Worklist field, cases that meet the criteria are automatically added to your worklist.New CaseAllows you to create a surgical record for a patient who has not yet been admitted, or previously scheduled for surgery. **Make sure your confirm that the account number is the appropriate one for the surgical record**the appropriate one for the surgical record** Add CaseAllows you to add a specific patient case to your existing worklist. Go To CaseAllows you to quickly access a patient on the worklist. Clear WorklistRemoves ALL cases from your worklist.

6.0 Worklist Buttons
Remo e CaseRemove CaseRemoves a highlighted case from your worklist. Case ReviewCase review information automatically builds as data is saved on the surgical record. The following information is available to view: Medications; Intakes/Outputs; Times; Vital Signs; Notes; Procedures; Items/Implants
E/E CCI Screen FunctionE/E CCI Screen FunctionAllows you to enter/edit information on the Critical Care Indicator screen if site uses this function. View CCI Screen FunctionAllows you to view information on the Critical Care Indicator screen if site uses this function
Big BoardBig BoardAutomatically maintains a list of surgical cases for a day rangesurgical cases for a day range specified in the Access Dictionary.

6.0 Big Board
Change DisplayAllows you to change the date range to determine which cases appear on the Big Board
New CaseNew CaseAllows you to create a surgical record for a patient who has not yet been admitted, or previously scheduled for surgery. **Make sure your confirm that the account number is the appropriate one for the surgical record**
Add CaseAllows you to add a specific patient case from the Big Board to your existing worklist.
Go To CaseAllows you to quickly access a patient on the Big Board.
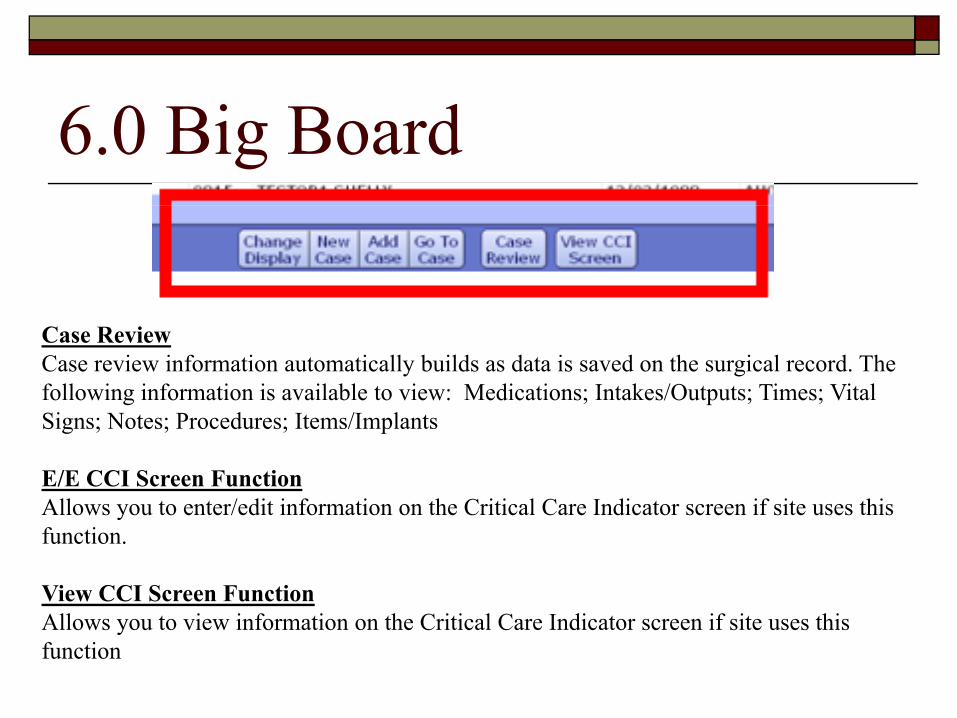
6.0 Big Board
Case ReviewCase review information automatically builds as data is saved on the surgical record. The following information is available to view: Medications; Intakes/Outputs; Times; Vital Signs; Notes; Procedures; Items/Implants
E/E CCI Screen FunctionAllows you to enter/edit information on the Critical Care Indicator screen if site uses thisAllows you to enter/edit information on the Critical Care Indicator screen if site uses this function.
View CCI Screen FunctionAll i i f i h C i i l C I di if i hiAllows you to view information on the Critical Care Indicator screen if site uses this function

6.0 Nursing Desktop Side Functions
Big BoardAllows you to be brought to the main Nursing Desktop Screen when
i f th ti f th S i l R dyou are in any of the sections of the Surgical Record.
Sections of the Surgical RecordThe Surgical Record is now comprised of pre-determined sections g p pwhich include: Preoperative/ Holding Room/ Operative/ Phase I/ Phase II/ Anesthesia
Clicking on the appropriate button will bring the user to theClicking on the appropriate button will bring the user to the documentation section. To exit the section, click the Big Board button. **Make sure work is saved prior to exiting a section.
Documentation sections may vary depending on site and access.
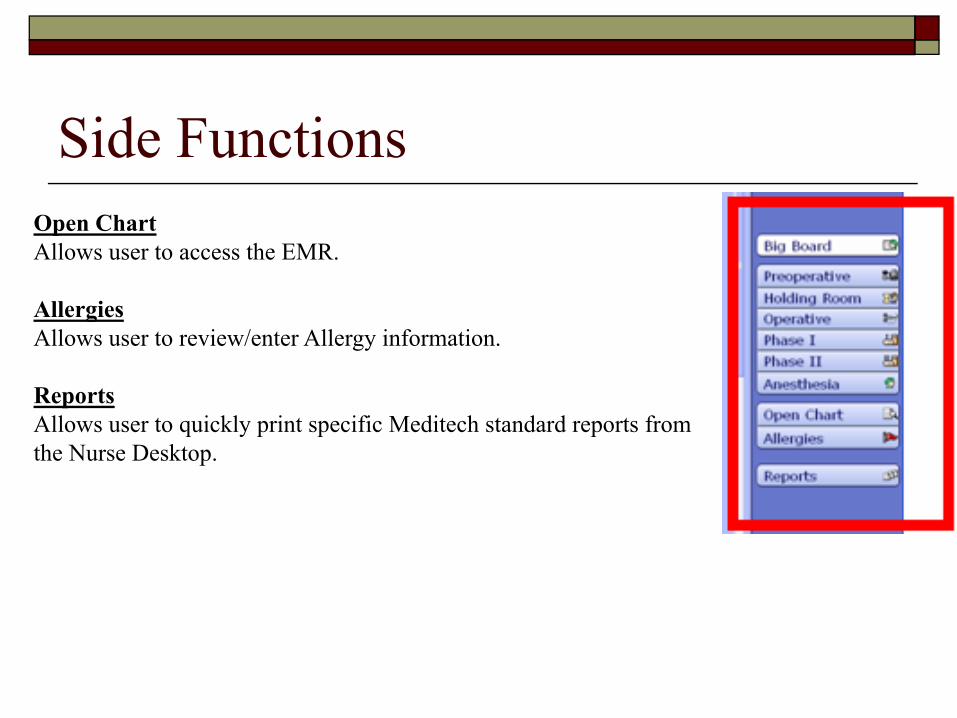
Side FunctionsOpen ChartAllows user to access the EMR.
AllergiesAllergiesAllows user to review/enter Allergy information.
ReportsAllows user to quickly print specific Meditech standard reports from the Nurse Desktop.
CNH I f iCNH Infusion DocumentationDocumentation

Infusion DocumentationIn the Nurse DesktopIn the Nurse Desktop
From Either the Worklist or Big Board, Highlight the Appropriate Patient
Click on “Operative” in the side buttons
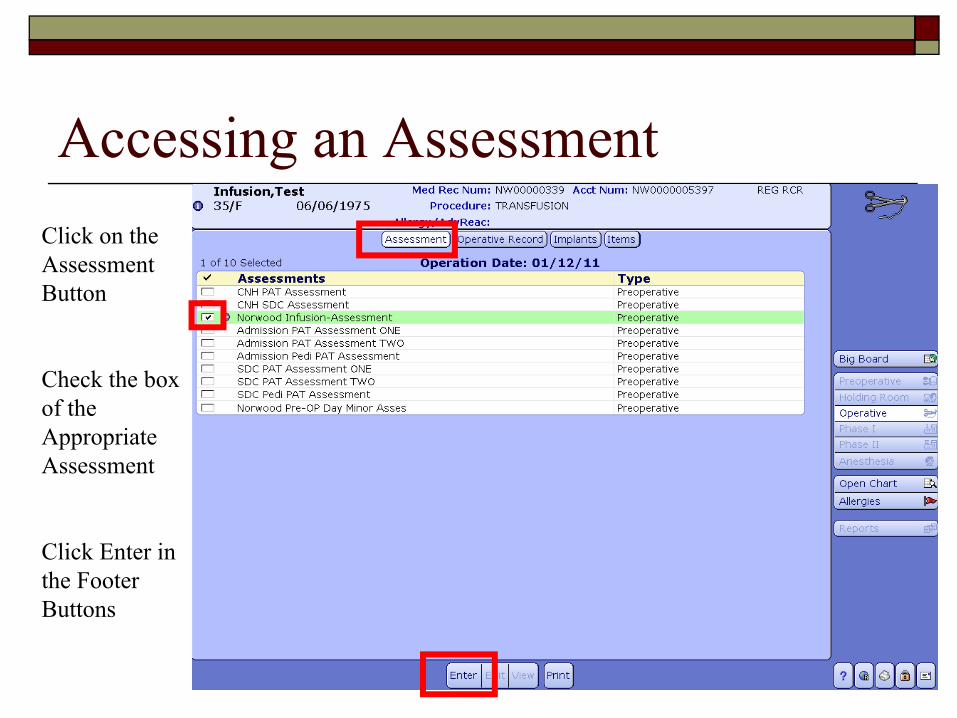
Accessing an AssessmentClick on the Assessment Button
Check the box of theof the Appropriate Assessment
Click Enter in the Footer ButtonsButtons
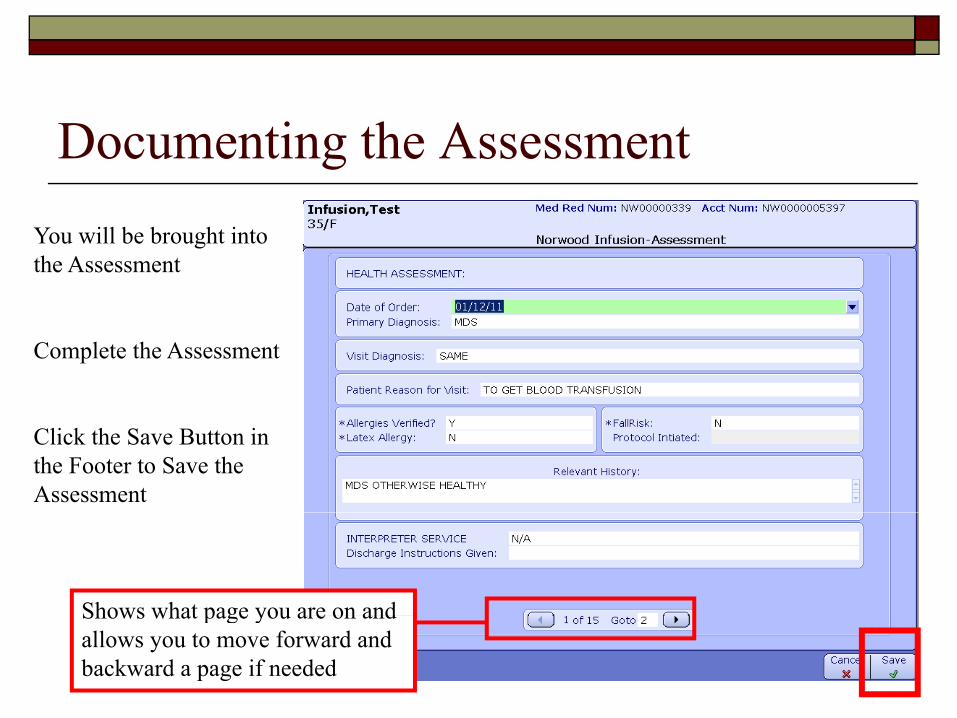
Documenting the AssessmentYou will be brought into the Assessment
Complete the Assessment
Click the Save Button in the Footer to Save the Assessment
Shows what page you are on andShows what page you are on and allows you to move forward and backward a page if needed
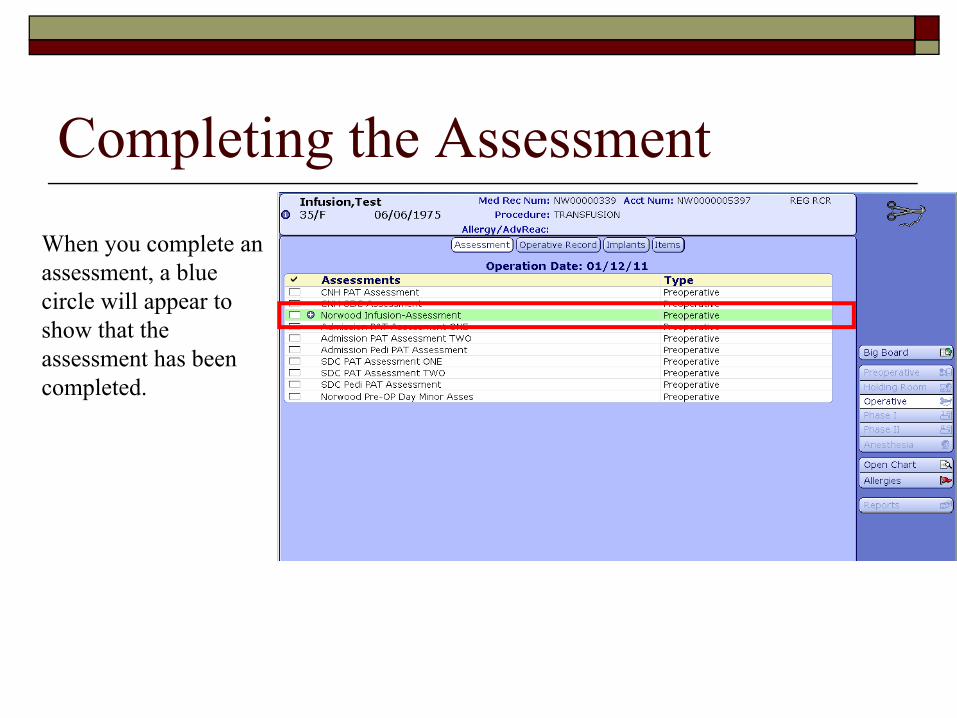
Completing the AssessmentWhen you complete an assessment, a blue circle will appear tocircle will appear to show that the assessment has been completed.
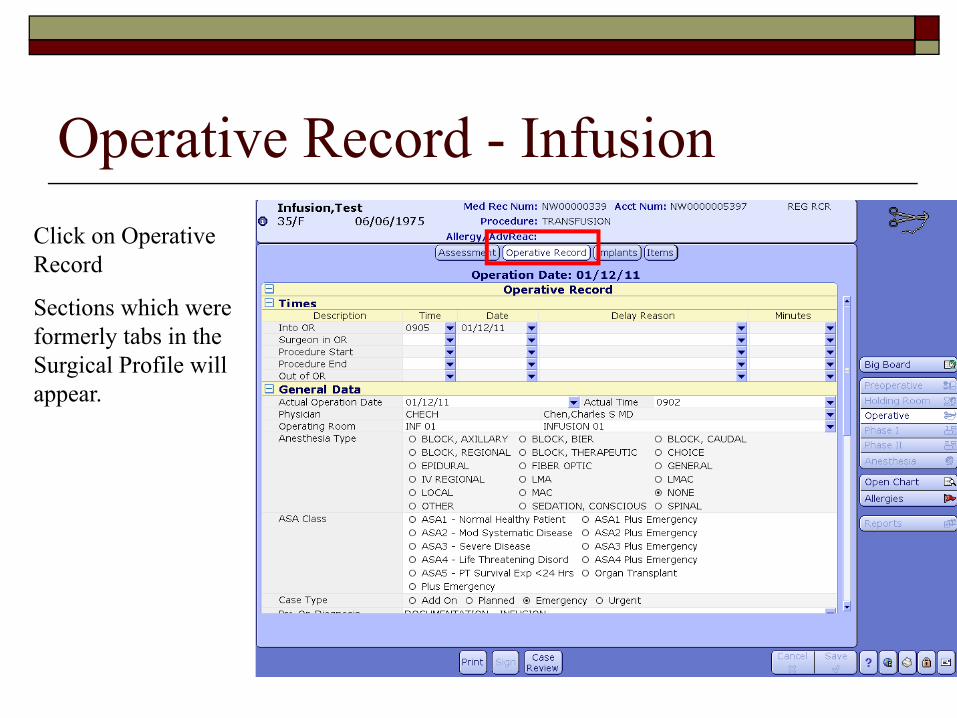
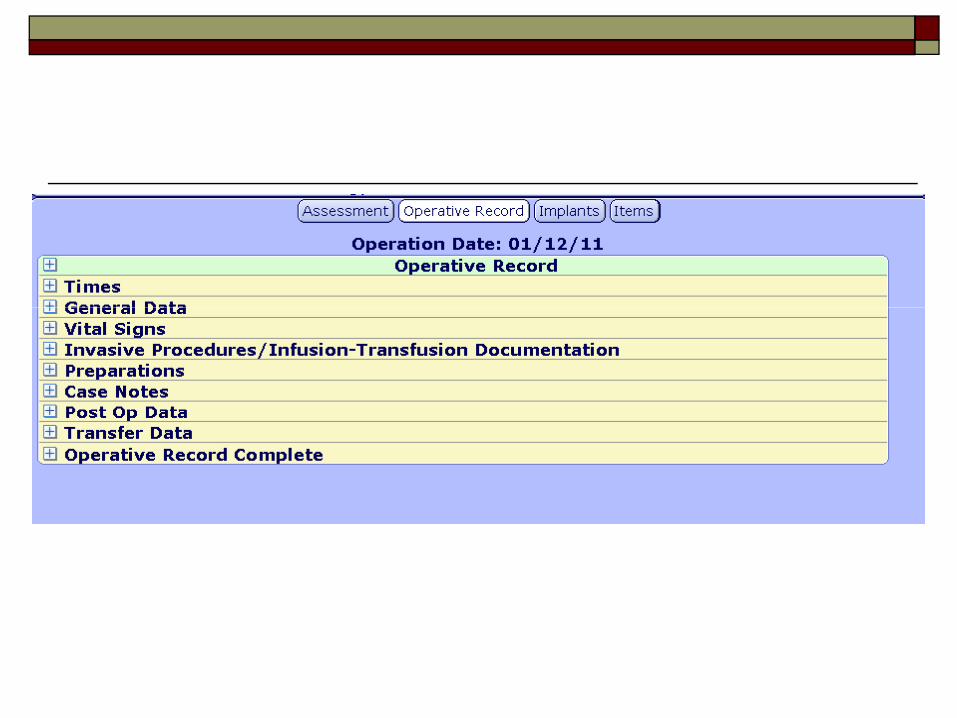
Operative Record - InfusionClick on Operative Record
Sections which wereSections which were formerly tabs in the Surgical Profile will appear.

Operative RecordTh S i E d bl d C ll iblThe Sections are Expandable and Collapsible
Click on the to expand
Click on the to collapse
Click on the top button to expand/collapse the entire record
CNH I f iCNH Infusion Nursing DocumentationNursing Documentation
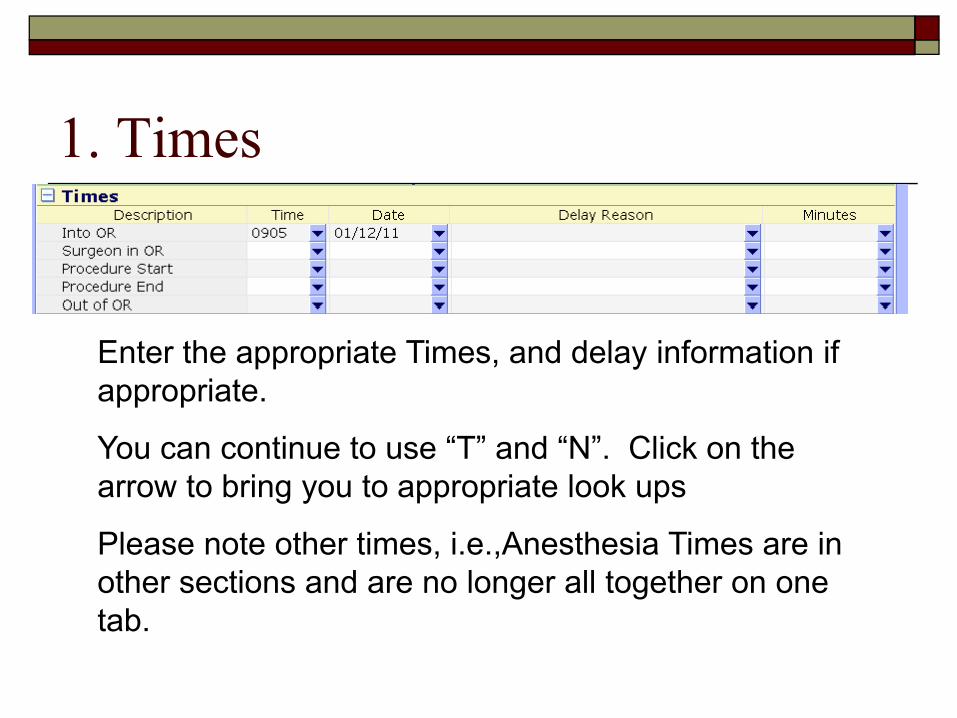
1. Times
Enter the appropriate Times, and delay information if appropriate.
You can continue to use “T” and “N”. Click on the arrow to bring you to appropriate look ups
Please note other times, i.e.,Anesthesia Times are in other sections and are no longer all together on one tabtab.
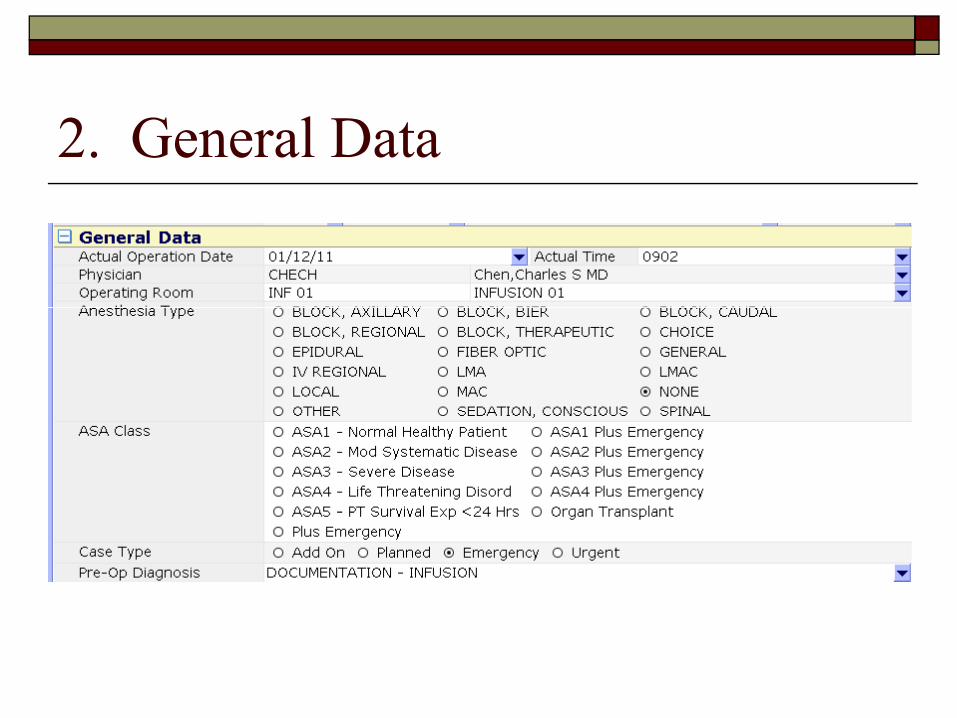
2. General Data
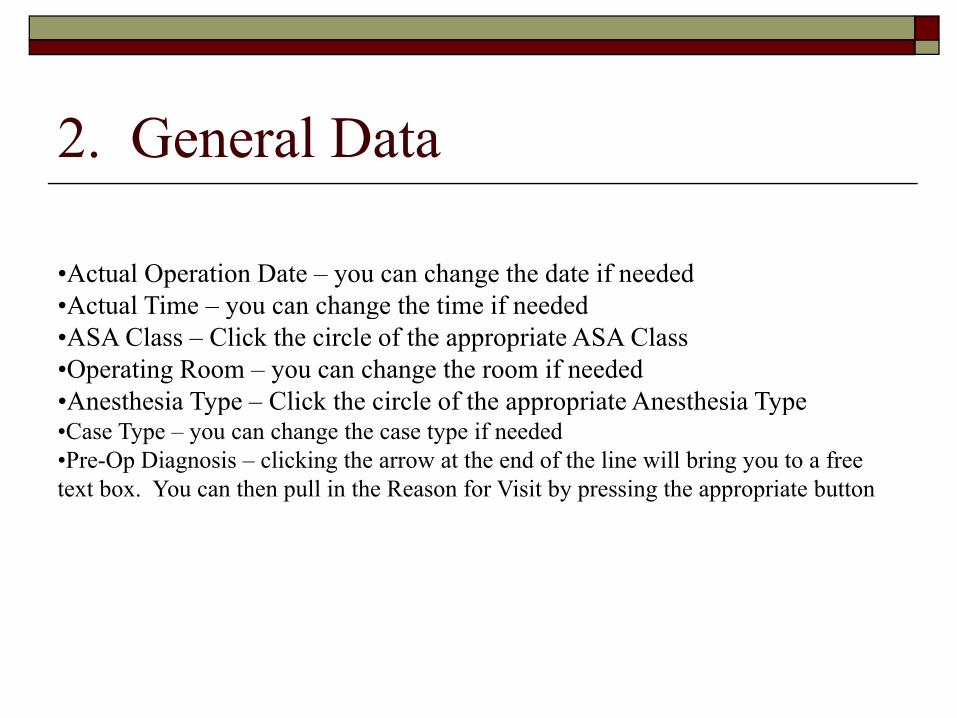
2. General Data
•Actual Operation Date – you can change the date if needed•Actual Time – you can change the time if needed•Actual Time – you can change the time if needed•ASA Class – Click the circle of the appropriate ASA Class•Operating Room – you can change the room if needed•Anesthesia Type – Click the circle of the appropriate Anesthesia Typeyp pp p yp•Case Type – you can change the case type if needed•Pre-Op Diagnosis – clicking the arrow at the end of the line will bring you to a free text box. You can then pull in the Reason for Visit by pressing the appropriate button

3. Vital Signs
Click on the arrow at the end of the line.
You will be brought to the Vital Sign Screen
Complete appropriately.
Cli k S t S thClick Save to Save the information.
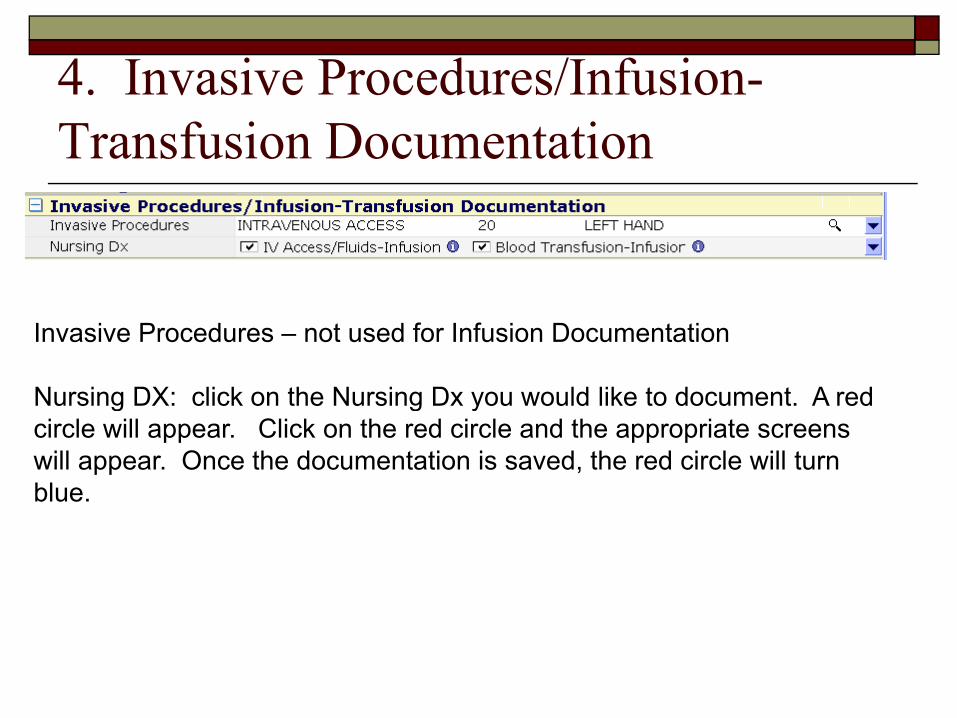
4. Invasive Procedures/Infusion-Transfusion Documentation
Invasive Procedures – not used for Infusion Documentation
Nursing DX: click on the Nursing Dx you would like to document. A red g g ycircle will appear. Click on the red circle and the appropriate screens will appear. Once the documentation is saved, the red circle will turn blue.
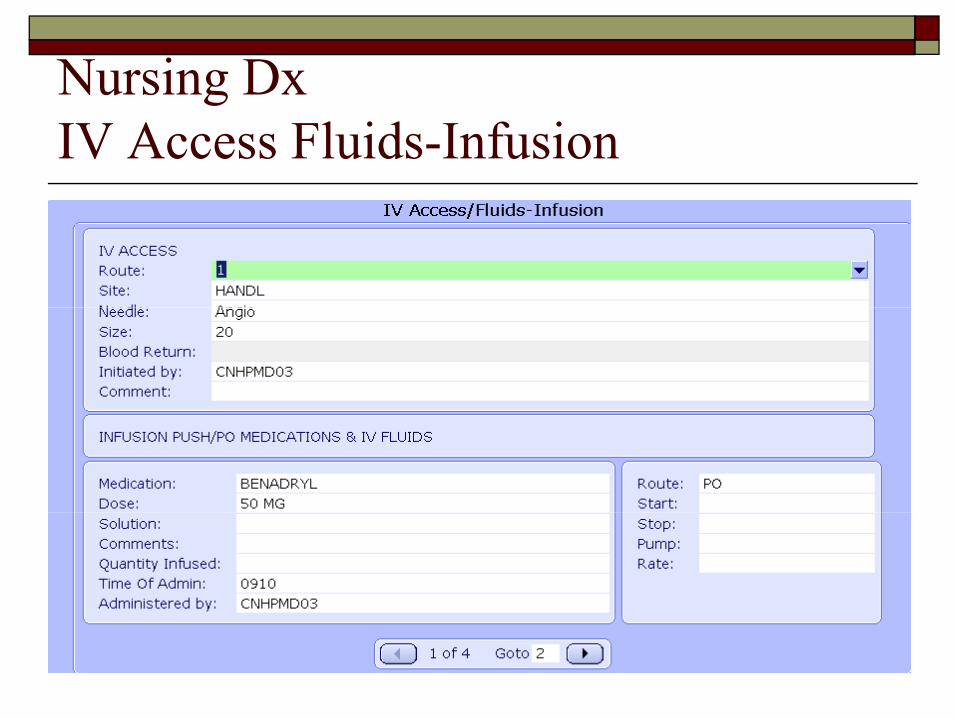
Nursing Dx gIV Access Fluids-Infusion
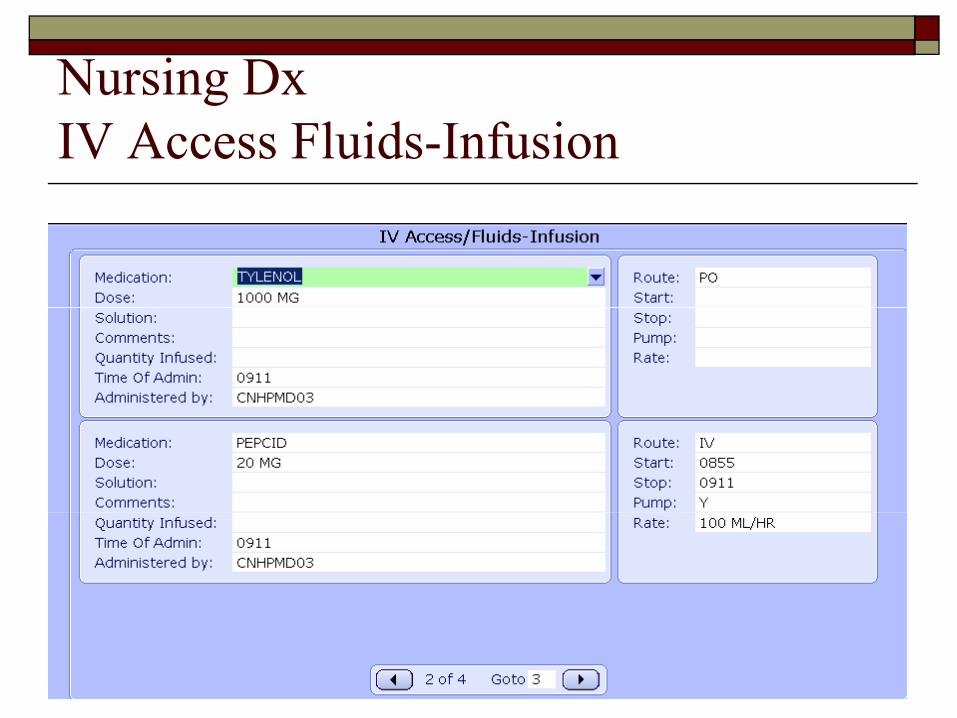
Nursing Dx gIV Access Fluids-Infusion
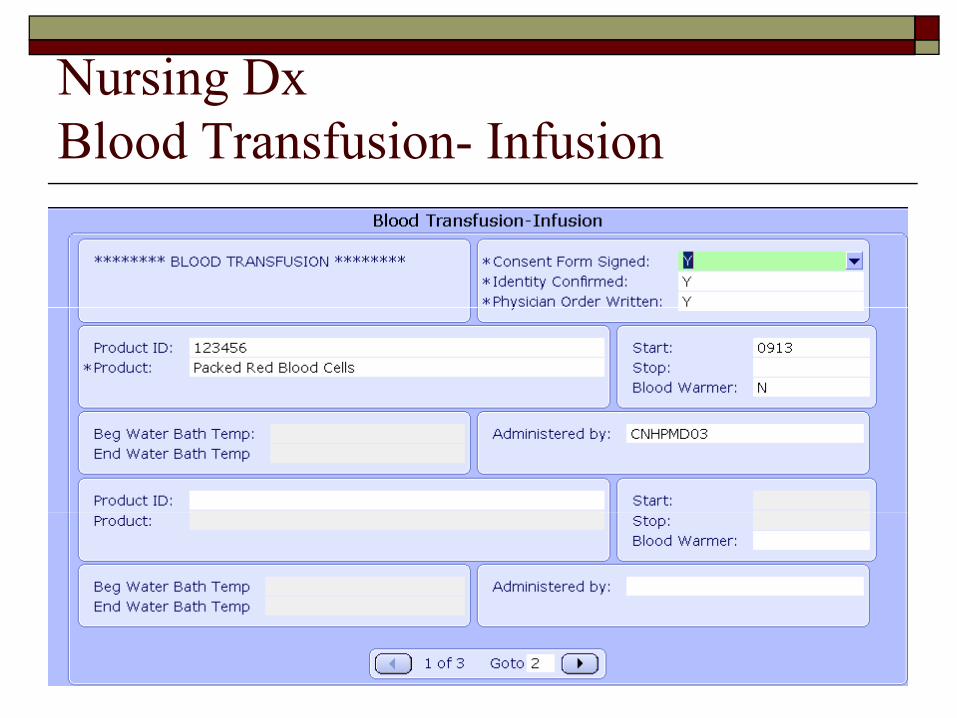
Nursing Dx gBlood Transfusion- Infusion
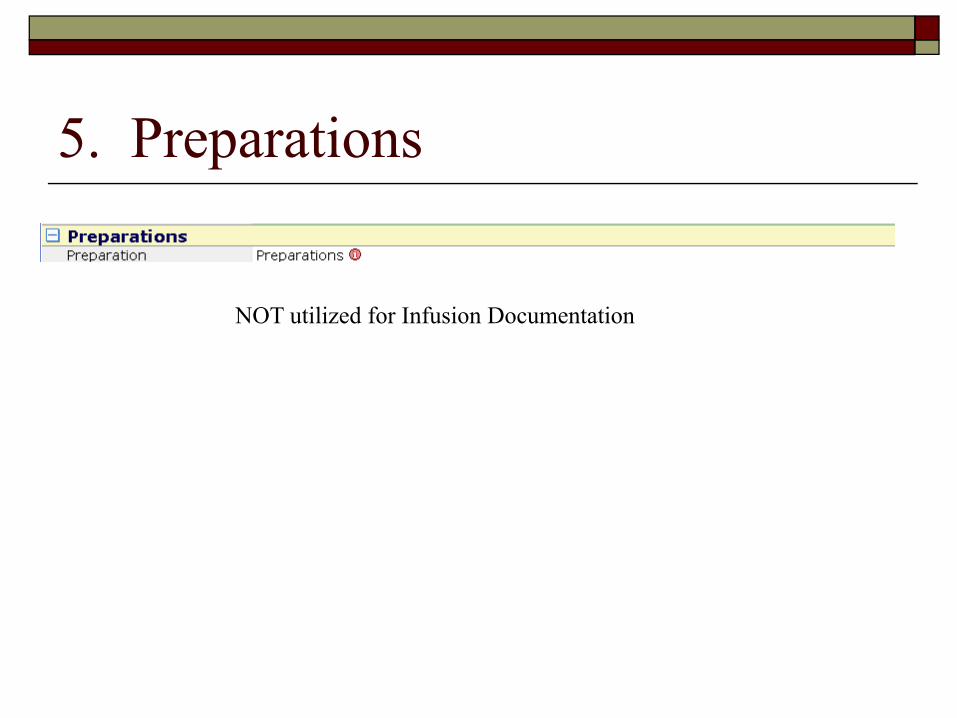
5. Preparations
NOT ili d f I f i D iNOT utilized for Infusion Documentation
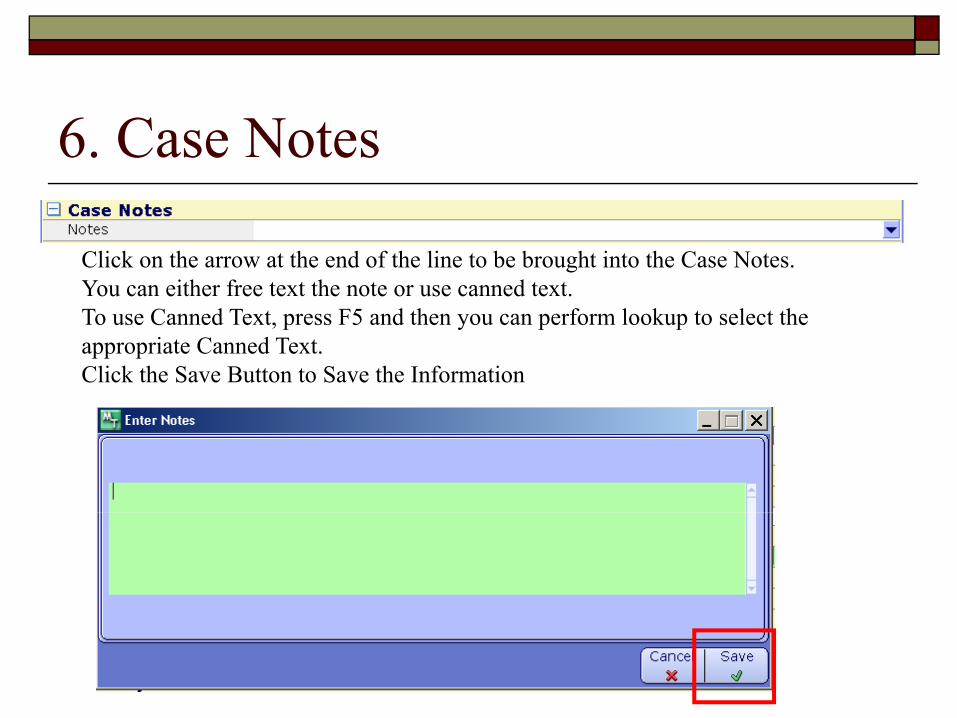
6. Case Notes
Click on the arrow at the end of the line to be brought into the Case Notes. You can either free text the note or use canned text. To use Canned Text, press F5 and then you can perform lookup to select the appropriate Canned Text.Click the Save Button to Save the Information
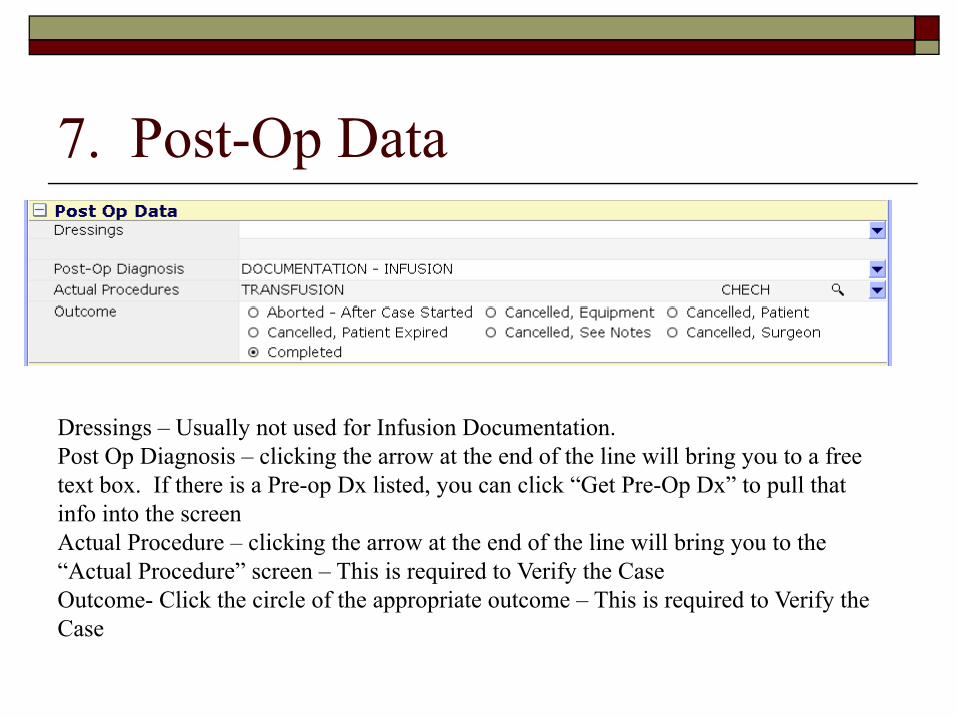
7. Post-Op Data
Dressings – Usually not used for Infusion Documentation.Post Op Diagnosis – clicking the arrow at the end of the line will bring you to a free text box. If there is a Pre-op Dx listed, you can click “Get Pre-Op Dx” to pull that info into the screeninfo into the screenActual Procedure – clicking the arrow at the end of the line will bring you to the “Actual Procedure” screen – This is required to Verify the CaseOutcome- Click the circle of the appropriate outcome – This is required to Verify the Case
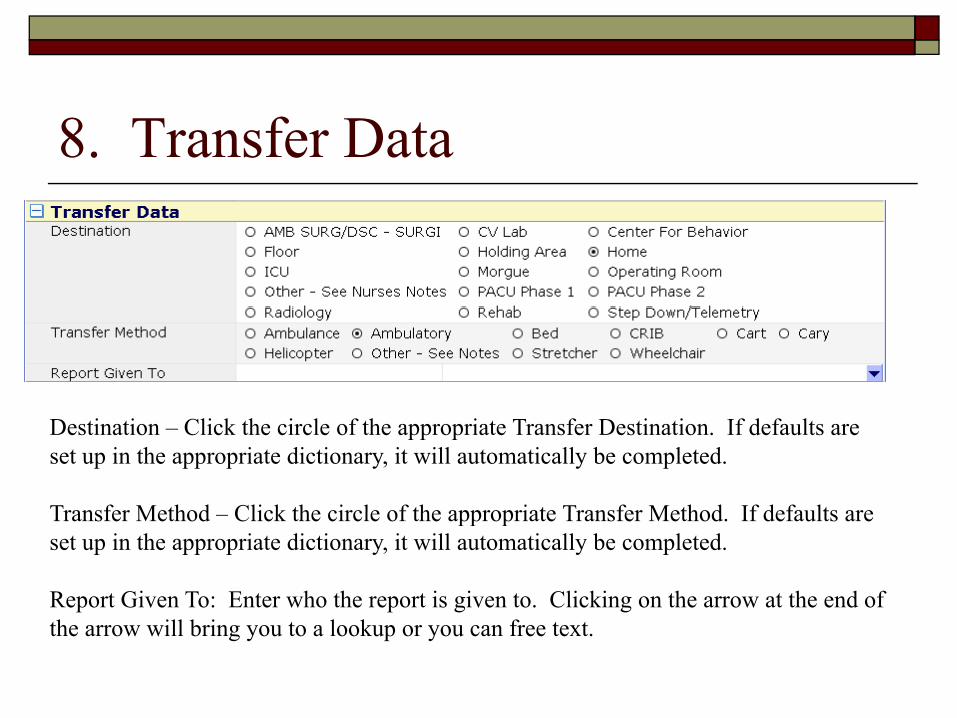
8. Transfer Data
Destination – Click the circle of the appropriate Transfer Destination. If defaults are set up in the appropriate dictionary, it will automatically be completed.
Transfer Method Click the circle of the appropriate Transfer Method If defaults areTransfer Method – Click the circle of the appropriate Transfer Method. If defaults are set up in the appropriate dictionary, it will automatically be completed.
Report Given To: Enter who the report is given to. Clicking on the arrow at the end of the arrow will bring you to a lookup or you can free text.
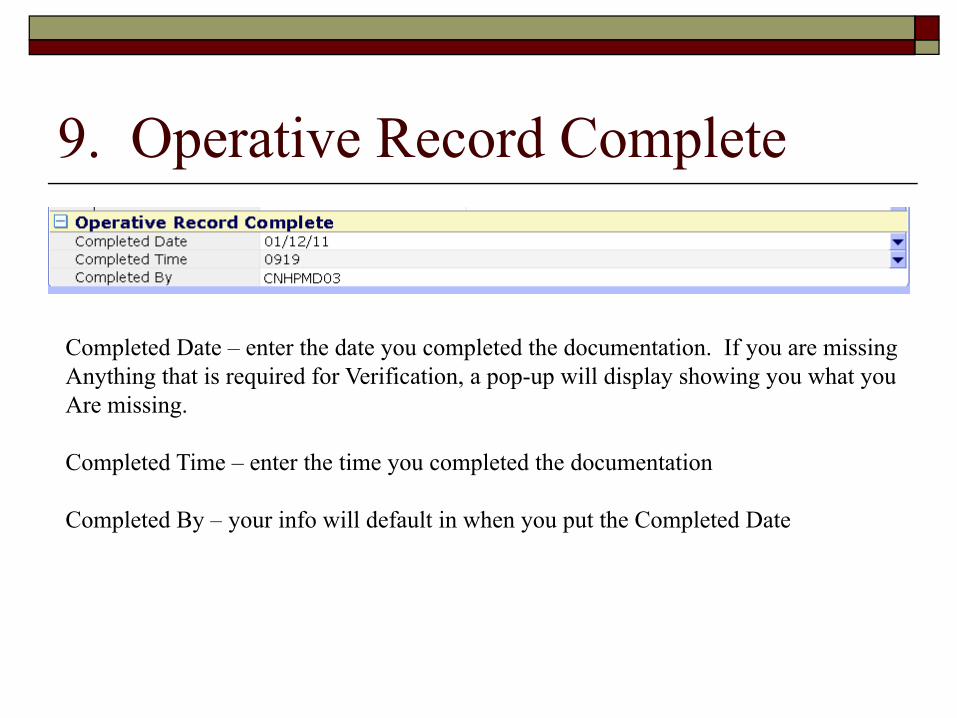
9. Operative Record Complete
Completed Date – enter the date you completed the documentation. If you are missingAnything that is required for Verification, a pop-up will display showing you what you Are missingAre missing.
Completed Time – enter the time you completed the documentation
C l d B i f ill d f l i h h C l d DCompleted By – your info will default in when you put the Completed Date
E i BilliEntering Billing Information InfusionInformation - Infusion
Entering Billing Information - Infusion
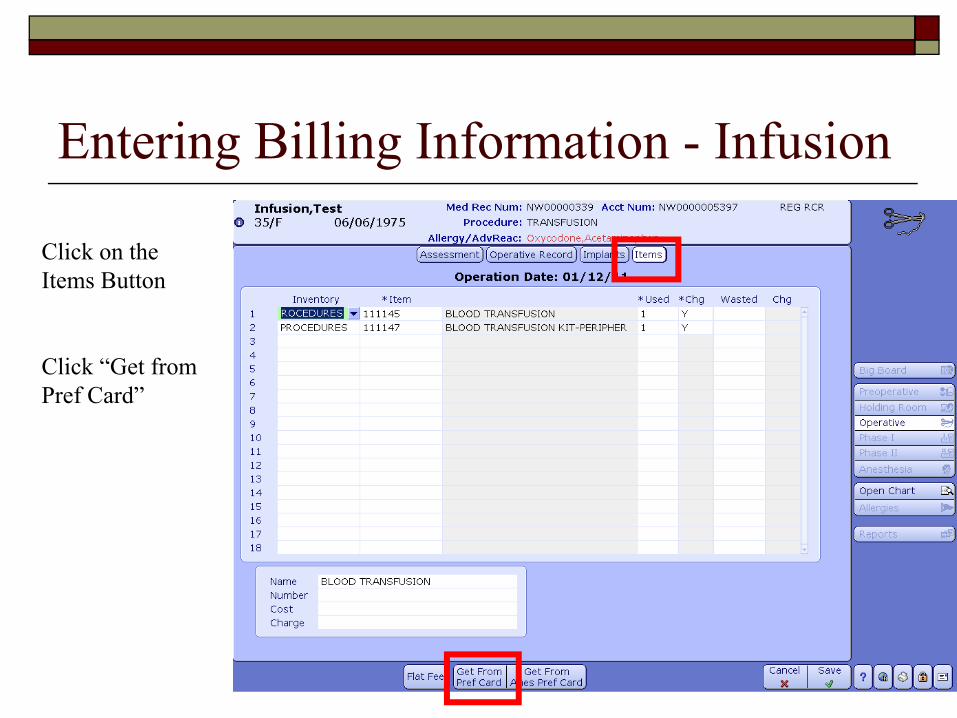
Click on the Items Button
Click “Get from Pref Card”
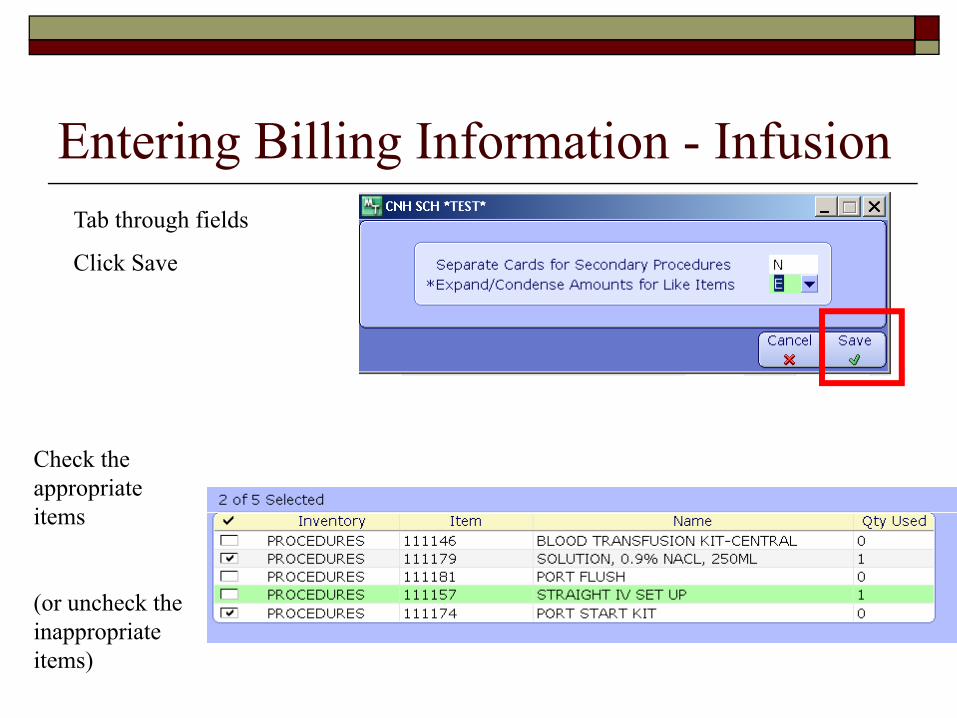
Entering Billing Information - InfusionTab through fields
Click Save
Check the appropriate ititems
(or uncheck the (inappropriate items)
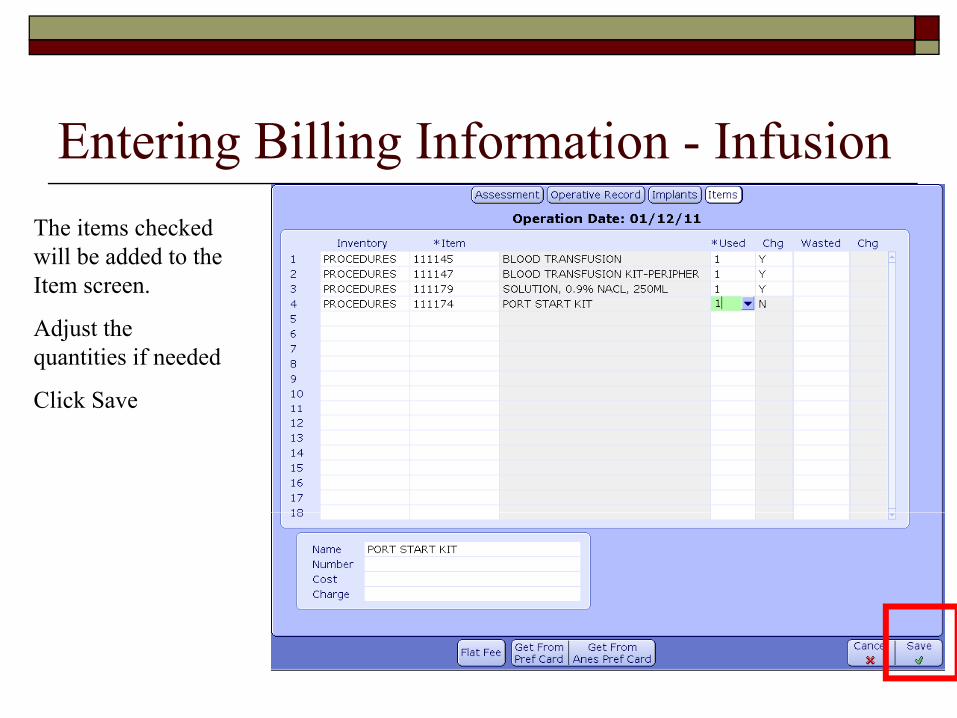
Entering Billing Information - InfusionThe items checked will be added to the Item screen.
Adjust the quantities if needed
Click Save
V if i C BilliVerifying Cases - Billing Maintenance DesktopMaintenance Desktop
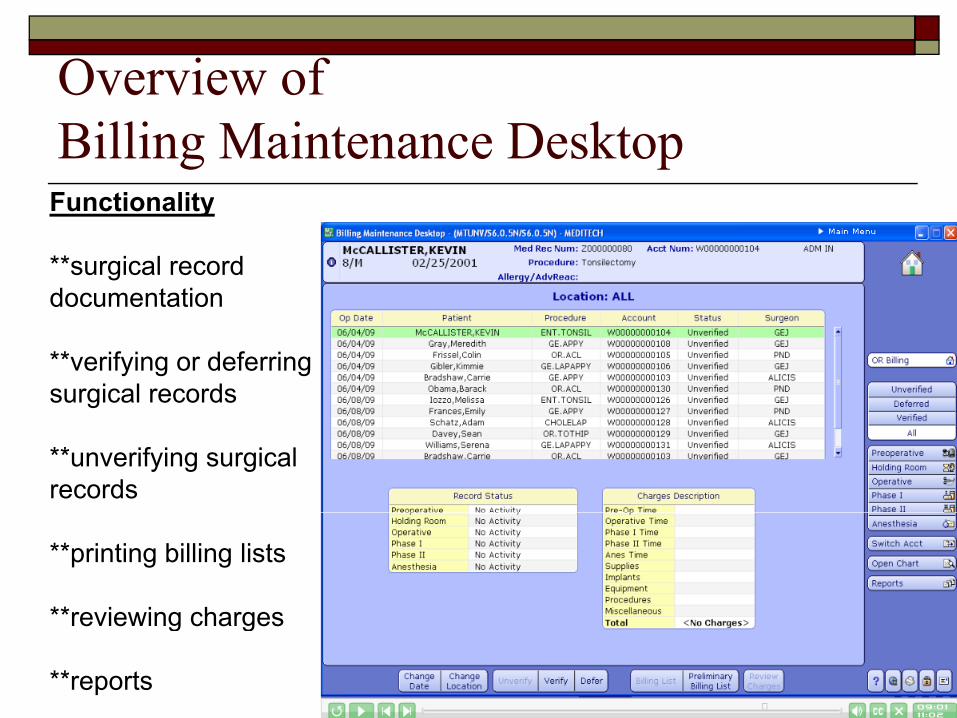
Overview of
Functionality
Billing Maintenance DesktopFunctionality
**surgical record documentation
**verifying or deferring surgical records
**unverifying surgical records
**printing billing lists
**reviewing chargesreviewing charges
**reports

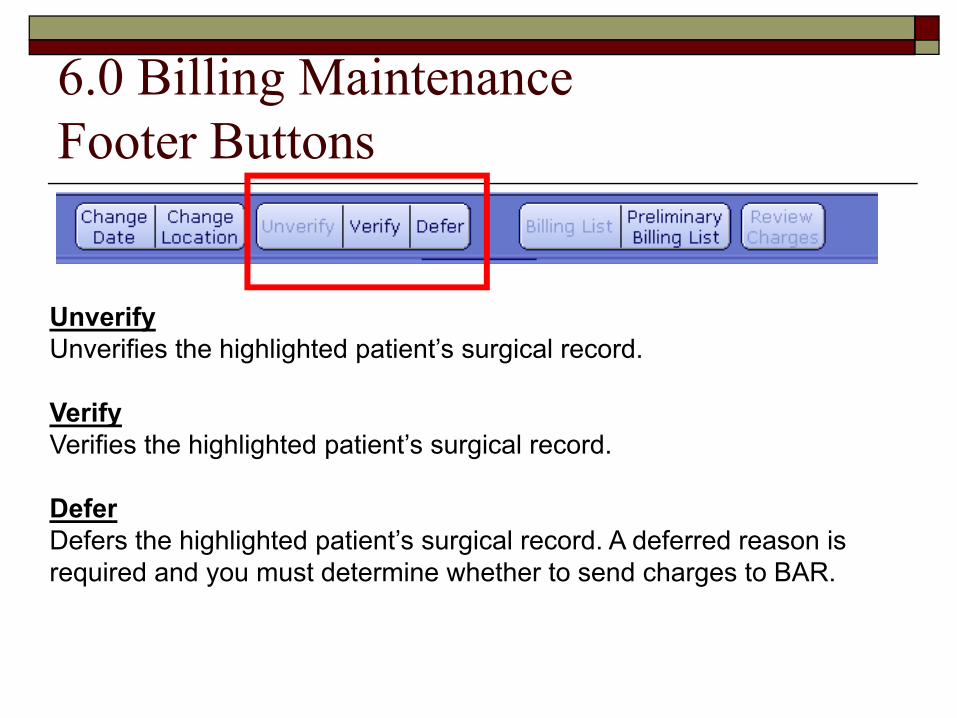
6.0 Billing MaintenancegFooter Buttons
Change DateAllows you to change the date range for displaying cases on the Billing Maintenance Desktop.
Change LocationAllows you to change the location for displaying cases on the Billing Maintenance DesktopMaintenance Desktop.
6.0 Billing MaintenancegFooter Buttons
U ifUnverifyUnverifies the highlighted patient’s surgical record.
VerifyVerifyVerifies the highlighted patient’s surgical record.
DeferDeferDefers the highlighted patient’s surgical record. A deferred reason is required and you must determine whether to send charges to BAR.

6.0 Billing MaintenancegFooter Buttons
Billing ListThis routine prints a list of actual charges that the patient accrued during the operative episode. Print this list after you verify the patient's surgical record.
Preliminary Billing ListThis routine prints a list of the preliminary charges associated with the patient’s surgical record. Print this list before you verify the patient's surgical recordrecord.
Review ChargesThis routine displays a list of actual charges that the patient accrued duringThis routine displays a list of actual charges that the patient accrued during the operative episode. You can view this for cases that are in a verified or deferred status.
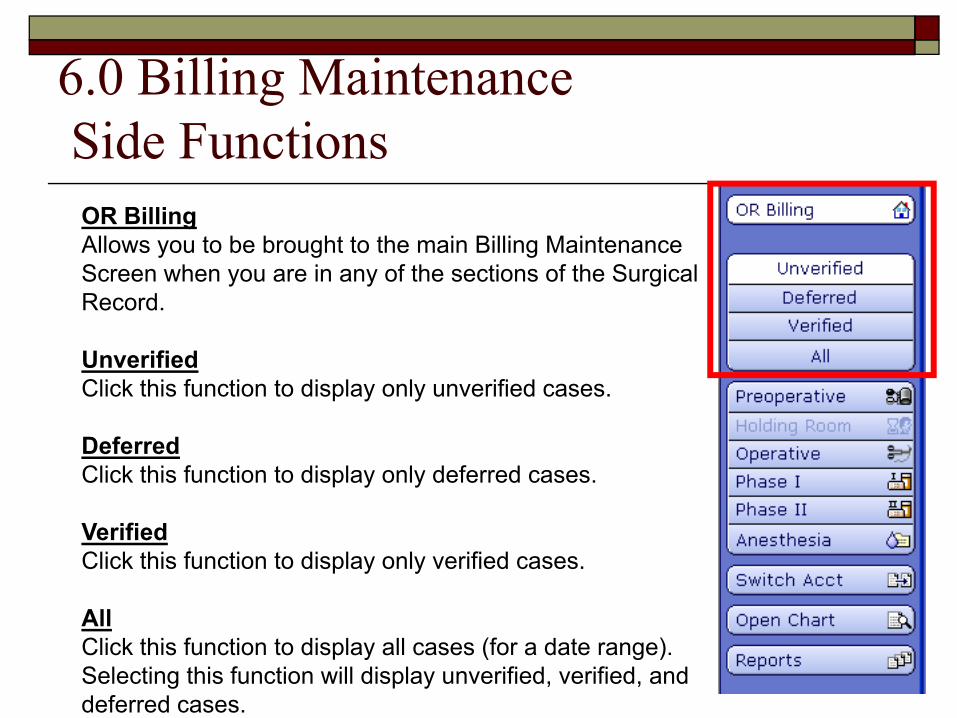
6.0 Billing MaintenancegSide FunctionsOR BillingAllows you to be brought to the main Billing Maintenance Screen when you are in any of the sections of the Surgical RecordRecord.
UnverifiedClick this function to display only unverified cases.
DeferredClick this function to display only deferred cases.
VerifiedClick this function to display only verified cases.
AllAllClick this function to display all cases (for a date range). Selecting this function will display unverified, verified, and deferred cases.
6.0 Billing MaintenancegSide Functions
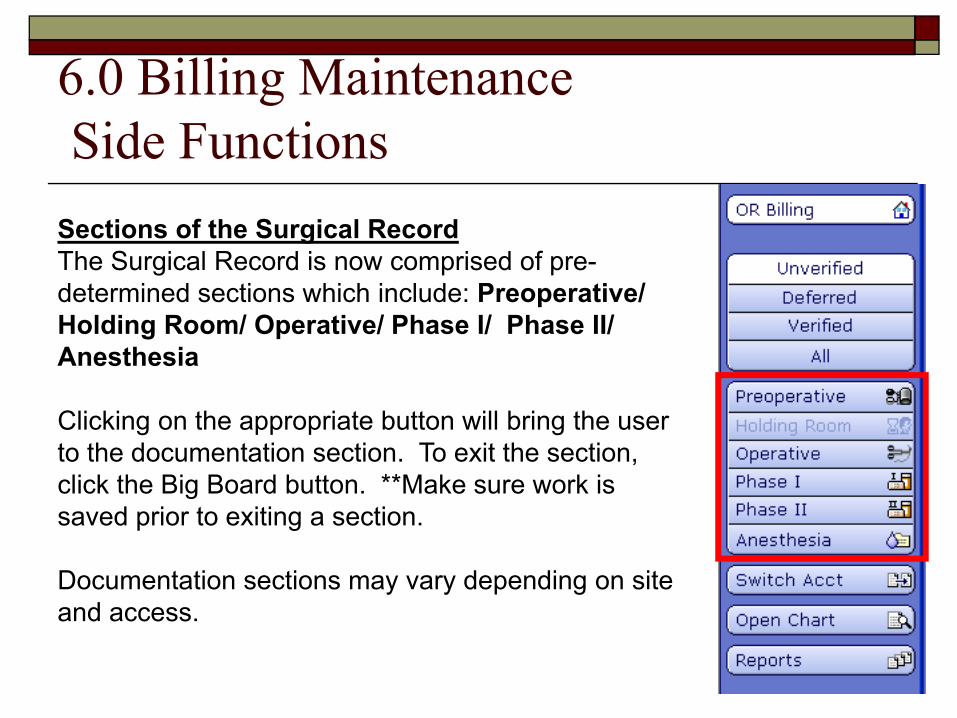
Sections of the Surgical RecordThe Surgical Record is now comprised of pre-determined sections which include: Preoperative/ Holding Room/ Operative/ Phase I/ Phase II/ Anesthesia
Clicking on the appropriate button will bring the user to the documentation section. To exit the section, click the Big Board button. **Make sure work is saved prior to exiting a sectionsaved prior to exiting a section.
Documentation sections may vary depending on site and accessand access.
6.0 Billing MaintenancegSide Functions
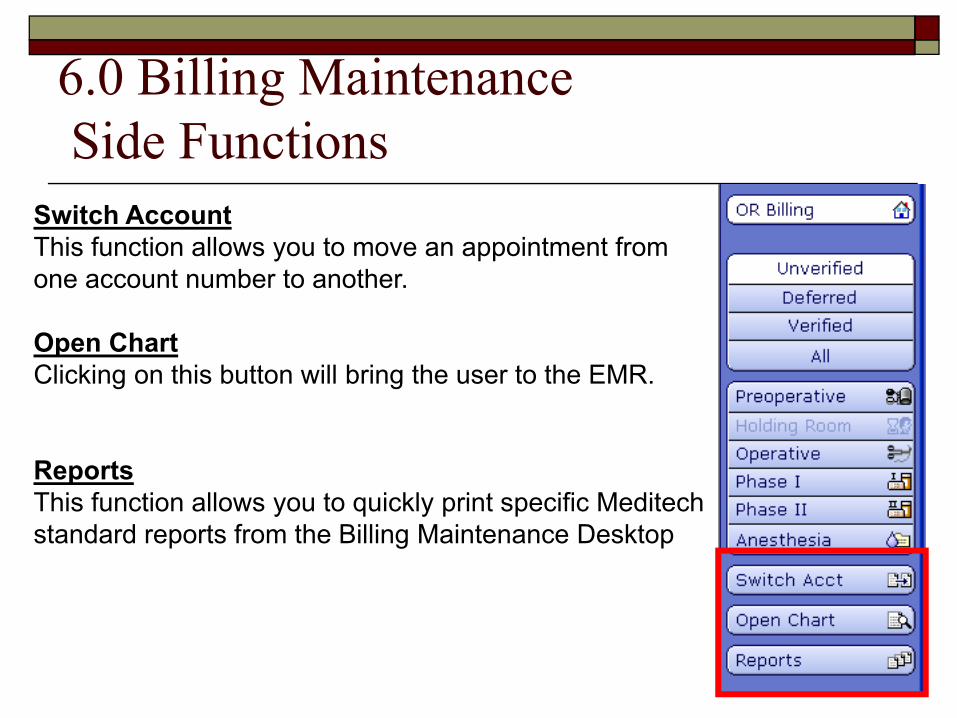
S i h ASwitch AccountThis function allows you to move an appointment from one account number to another.
Open ChartClicking on this button will bring the user to the EMR.
ReportsThis function allows you to quickly print specific Meditech y q y p pstandard reports from the Billing Maintenance Desktop

Verifying the Infusion Case - CNHHighlight the Case you want to Verify
Click the Verify Button –If you are missing any information, the report will come up with what is missing the same as 5 54
Snapshot of Charges
missing the same as 5.54
You can also look at the Preliminary Billing List by clicking on the appropriateclicking on the appropriate button in the Footer
Clicking on the Yellow Headers allows you to sort eade s a ows you to so tthe information in various ways.

Entering AllergiesEntering Allergies

Entering AllergiesFrom either My Worklist or Big Board, highlight a patient and click on the “Allergies’ button on the side tool bar
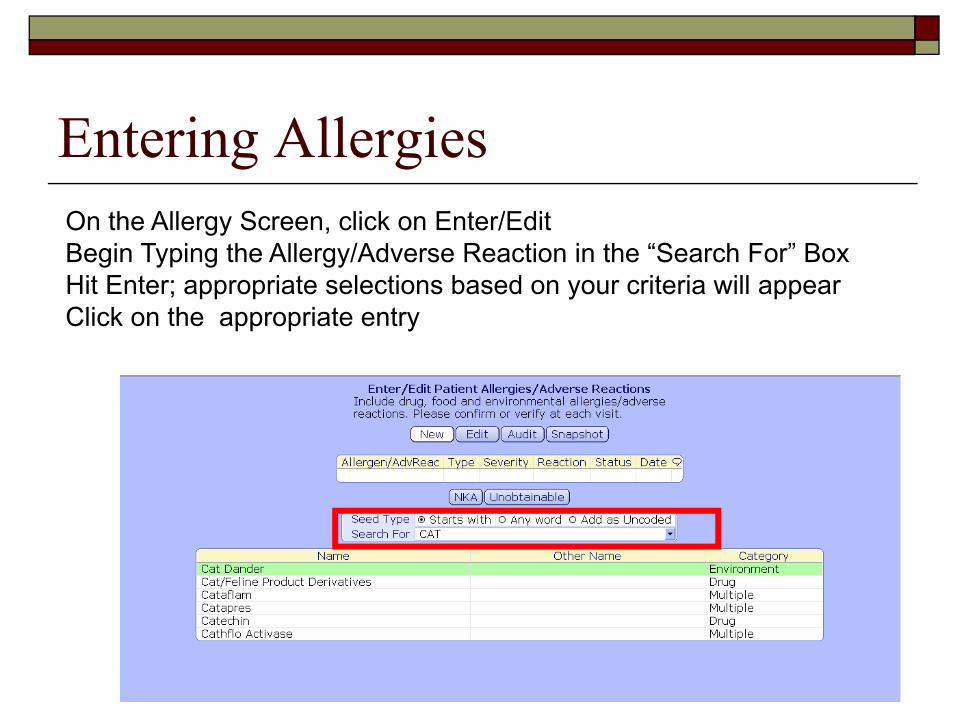
Entering AllergiesOn the Allergy Screen, click on Enter/EditBegin Typing the Allergy/Adverse Reaction in the “Search For” Box Hit Enter; appropriate selections based on your criteria will appearCli k th i t tClick on the appropriate entry

Entering AllergiesC l t th th t ith th All /Ad R ti i fComplete the screen that pops up with the Allergy/Adverse Reaction infoClick the “Save” button
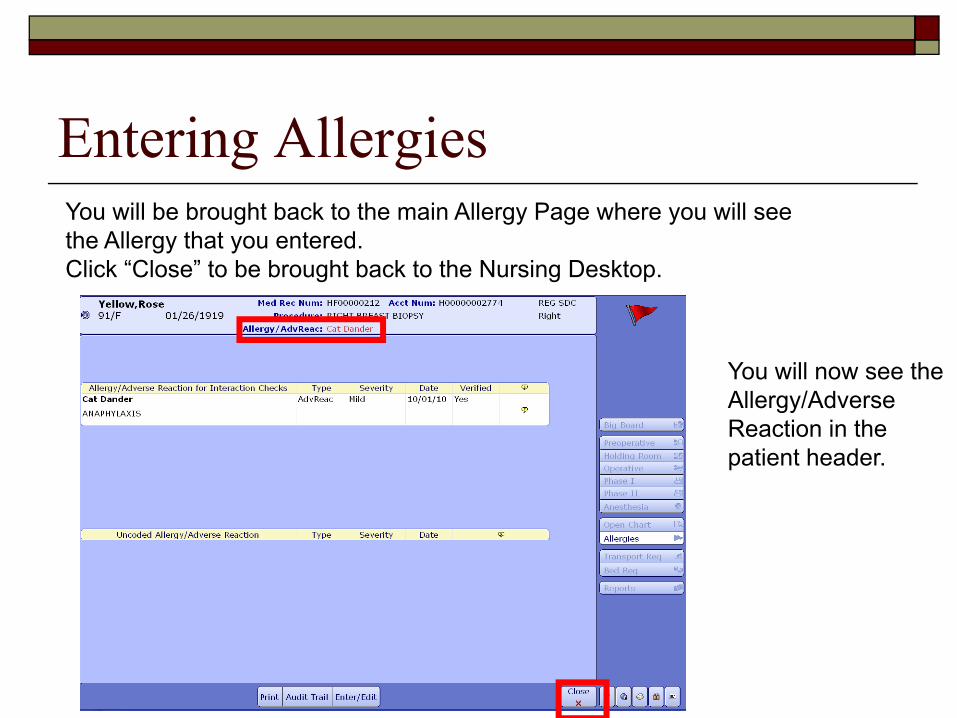
Entering AllergiesY ill b b ht b k t th i All P h illYou will be brought back to the main Allergy Page where you will see the Allergy that you entered.Click “Close” to be brought back to the Nursing Desktop.
You will now see the Allergy/Adverse gyReaction in the patient header.
Entering Height/WeightEntering Height/Weight***E t i H i ht/W i ht th h th***Entering Height/Weight goes through the OM Status Board. A more comprehensive training regarding this Status Board will betraining regarding this Status Board will be done by the OM Team**

Entering Height/WeightClick on OM Status Board from your main desktop
Click on Find Account
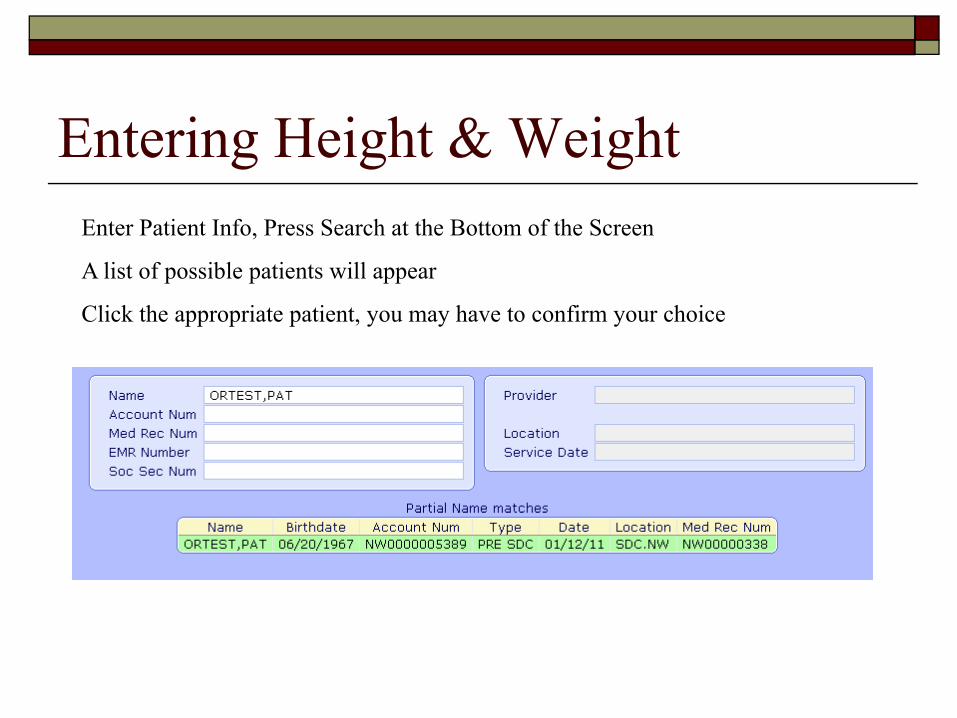
Entering Height & WeightEnter Patient Info, Press Search at the Bottom of the Screen
A list of possible patients will appear
Cli k th i t ti t h t fi h iClick the appropriate patient, you may have to confirm your choice

Entering Height & WeightClick on Clinical Data on the Side Buttons

Entering Height & WeightHeight and Weight are located under the Main Button.Main Button.
You can also enter Allergies under the Allergies button.g
Click Save to save the information.
Cli k St t B d tClick Status Board to return to the Status Board

How Do I Get Into 6.0
1) Site Lead – Louise can help you sign onto 6.0
2) Computer Based Training Presentation shows all the steps
The CBT can be found on My Caritas http://mycaritas/C14/C11/Training/default.aspx.

Confirming Access
As you get into 6.0, make sure you look at and confirm:
**That your 6.0 functionality contains all the functionality that you currently have in LIVEthat you currently have in LIVE
**That you have all the reports that you typically run for your joby j
**That reports are functioning appropriately

What To Do If Your Access Needs Adjusting?
Contact your Site Lead (Toni):
**If you are missing some access that you have in LIVEIf you are missing some access that you have in LIVE
**If you have access that you do not need
**If i i t th t d**If you are missing reports that you need
**If reports do not run appropriately
**If you want wording on the buttons to be revised.
Bonnie will contact IS to make the appropriate changes