Embed Size (px)
Citation preview
1
CloudVPS Backup Operation Manual
2
Index Cover 1 Index 2 Preface 3 Knowledge requirements 4 Software requirements 5 Upgrade requirements 7 Download / prepare the installation script 8 The main menu (prior to installation) 9 The easy installer 10 The advanced installer 12 The main menu (after installation) 15 The configuration editor 16 Uninstall the backupscript 18 Update the backupscript 19 The testing utility 20 The quota calculator 21 Clear backup logfiles 22 Show account quota 23 Data recovery 24 File/folder recovery 25 MySQL database recovery 27 Manually run the backupscript 29 Exchange SSH keyfile 30 Mail recipients list 31 Rsync excludes list 33 Backup explorer 35 Installer commandline options 37 Logging 39 Backup commandline options 40 Glossary 41 Bugs, issues and feature requests 42 Support 43 Errors and warnings 44 FAQ 45 Disclaimer 46

3
Preface The CloudVPS Backup tools are a set of user-friendly scripts that will allow you to install, create, manage and recover your backups. In this manual we will explain how to accomplish certain tasks and describe how the tools work and how they can be set-up for daily use.

4
Knowledge requirements Since our backup tools are written in Bash and all have to be executed via a terminal, some basic knowledge is needed to use the tools. We assume that you know:
− How to set up a SSH connection to your server − How to navigate within the terminal − How to work within the “nano” editor

5
Software requirements We have tested our set of scripts on various platforms and confirm that the following distributions are supported:
− CentOS 5 − CentOS 6 − Debian 5 − Debian 6 − Fedora 15 and higher − Ubuntu 10.04 − Ubuntu 10.10 − Ubuntu 11.04 − Ubuntu 11.10 − Ubuntu 12.04
The following operating systems are not supported (due to deprecated packages):
− CentOS 4 or lower − Debian 4 or lower − Ubuntu 9.10 or lower
The following operating systems are untested and unsupported:
− Gentoo − Minix − Solaris − Slackware − FreeBSD − (Open)Suse
The following control panels are supported (for MySQL dumps):
− DirectAdmin − cPanel / WHM − Plesk − OpenPanel − OpenApp − ISPConfig 3

6
The software requirements are:
− Rsync (at least version 3) − Curl − Mailx − Sendmail − Perl − Expect − Bc − Sshfs − Midnight Commander − Nano editor
The following firewall is supported:
− CSF (ConfigServer Security & Firewall)
7
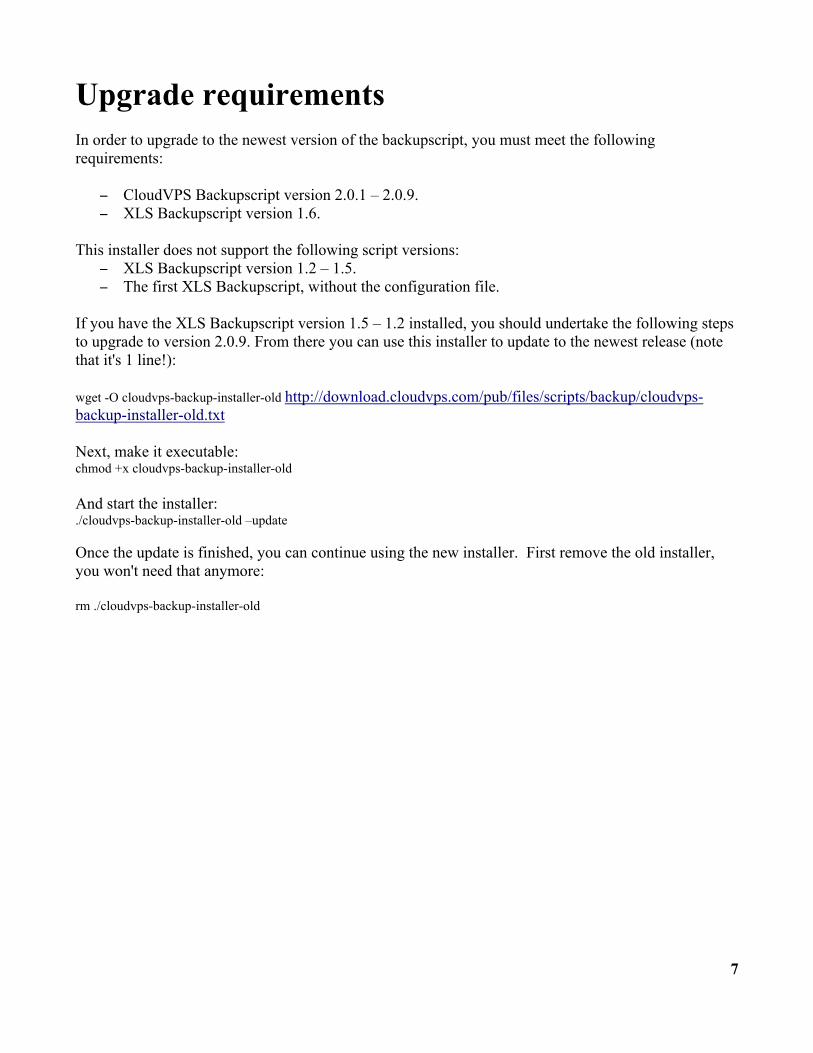
Upgrade requirements In order to upgrade to the newest version of the backupscript, you must meet the following requirements:
− CloudVPS Backupscript version 2.0.1 – 2.0.9. − XLS Backupscript version 1.6.
This installer does not support the following script versions:
− XLS Backupscript version 1.2 – 1.5. − The first XLS Backupscript, without the configuration file.
If you have the XLS Backupscript version 1.5 – 1.2 installed, you should undertake the following steps to upgrade to version 2.0.9. From there you can use this installer to update to the newest release (note that it's 1 line!): wget -O cloudvps-backup-installer-old http://download.cloudvps.com/pub/files/scripts/backup/cloudvps-backup-installer-old.txt Next, make it executable: chmod +x cloudvps-backup-installer-old And start the installer: ./cloudvps-backup-installer-old –update Once the update is finished, you can continue using the new installer. First remove the old installer, you won't need that anymore: rm ./cloudvps-backup-installer-old

8
Download / prepare the installation script All operations are based on the CloudVPS Backup installation script, therefore you need to download and prepare the script for usage: First download the script (note that it's 1 line!): curl -o cloudvps-backup-installer.sh http://download.cloudvps.com/pub/files/scripts/backup/cloudvps-backup-installer.txt Next, make it executable: chmod +x cloudvps-backup-installer.sh And start the installer: ./cloudvps-backup-installer.sh The installer will check to see if all required packages are present on the system or will install them for you: ============================================================ = CloudVPS Backup Installation Script V3.2.0 = ============================================================ Operating System detected: Debian / Ubuntu Checking if needed packages are present on the system: Update APT packagelist: OK Checking for dialog: Present Checking for curl: Present Checking for rsync: Present Checking for sendmail: Present Checking for mailx: Present Checking for bc: Present Checking for expect: Present Checking for Perl: Present Checking for mc: Present Checking for sshfs: Present Checking for nano: Present

9
The main menu (prior to installation) Once all requirements are met you are presented with the main menu:
As you can see there are some numbers missing from the menu, this is because the script has not been installed yet and therefore is not showing any unrelated options for now. We can now continue with the installation, it's up to you to decide whether you use the easy or the advanced installer. The easy installer will make almost all choices for you and only asks for the details it needs, like the backupserver, password and emailaddress. The other actions and decisions like logging and such are handled by the script. The easy installer is recommended for everyone and normally works in all cases. The advanced installer, however, leaves you with all options open for you to use. You can change the SSH port, SSH-key, remote path or the local path for example. The advanced installer is recommended for power users who need to fine-tune their backup installation.

10
The easy installer From the main menu, select option 1 and select “OK”, you will be presented with the following installation menu:
Login credentials: Please fill in the backup username/server and password in the appropriate fields. Root directory: This is the directory from which the backups are made and is defined as an absolute (full) path. By default / is sufficient, which will backup the whole filesystem. Note that if you change this, change the SQL backup directory as well, it has to be within the backup root directory, else the dumps will not be copied! Retention: For the retention, please take note of the calculation behind the input field! This defines the extra space that is used per retention option that you define. In this case, when setting this to 4 weeks, for example, would take at least 100 GB of extra space on the backupserver. MySQL dumps: If one of the supporting control panels is detected, this will be enabled by default, else it will default to “N” (also when MySQL is not installed on the system).

11
Scheduler: The script automatically generates a random schedule time between 0:00 and 09:00. Should you wish to run the script at a different time, change it in the appropriate fields. Email addresses: 2 addresses can be defined, where the “Backup report email” is the general report that the backupscript produces. The “Alerts email” is the address to which notifications, alerts and errors are sent, so this address may differ from the reports address. Once all fields are filled with their correct values, select “OK” and the script will prepare and install the backupscript for you and create a crontab entry. After the installation you can have a short installation report sent via email. This will be sent to the reports email address given during the installation. Extensive logging: This will enable the logging functionality of rsync, which will create backup logs per session and will be placed in /var/log/backups/. Enabling the logs will provide better insight when problems occur, but can become quite large, despite the gzip compression that will be used for the logs. Send reports: The script normally sets up the reports email address in the cronjob that will be created. If you wish not to receive the reports (and therefore only will receive warnings and errors when they occur) set this to “N”, else to “Y”. When set to “N”, you are asked to enter an email address nonetheless. This will be saved into the configuration file for future purposes. By default we have set this to “N”, therefore the script will only email on the alerts emailaddress when there are notifications, warnings or errors. This results in much less emails being sent by the script and will only receive emails when action is required! Commandline installation: Commandline installation is also possible, see page 37 for more information.
12
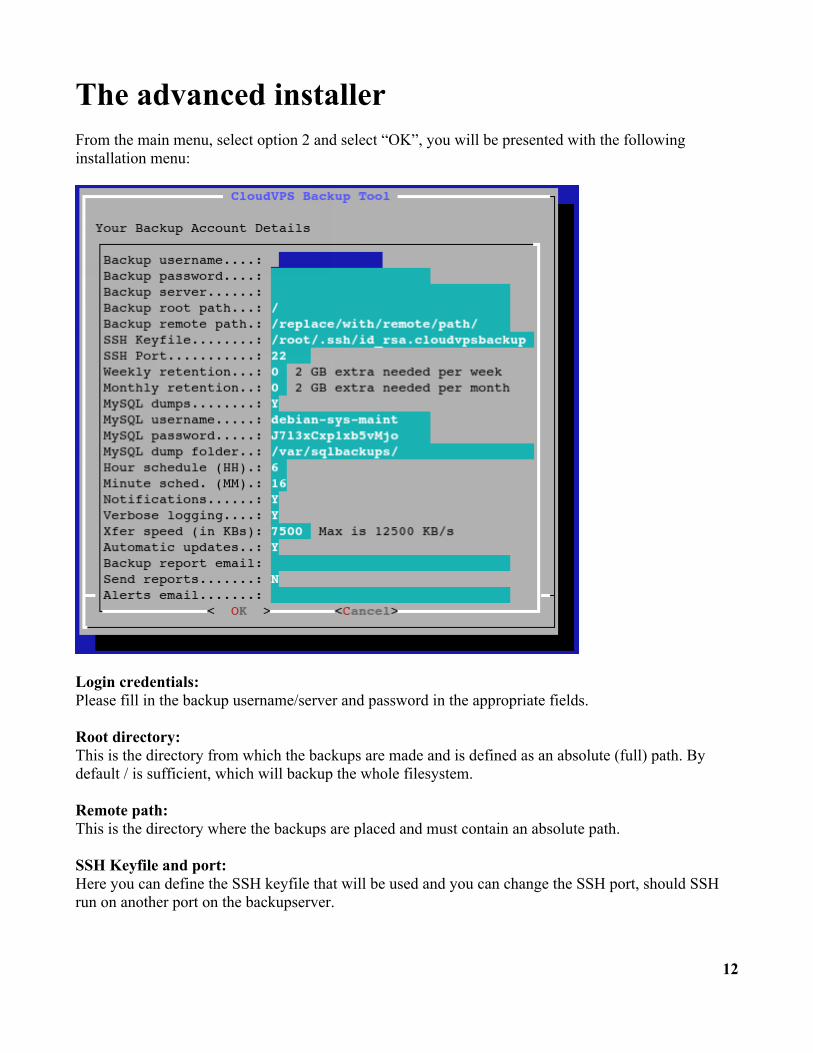
The advanced installer From the main menu, select option 2 and select “OK”, you will be presented with the following installation menu:
Login credentials: Please fill in the backup username/server and password in the appropriate fields. Root directory: This is the directory from which the backups are made and is defined as an absolute (full) path. By default / is sufficient, which will backup the whole filesystem. Remote path: This is the directory where the backups are placed and must contain an absolute path. SSH Keyfile and port: Here you can define the SSH keyfile that will be used and you can change the SSH port, should SSH run on another port on the backupserver.
13
Retention: For the retention, please take note of the calculation behind the input field. This calculates the extra space that is used per retention option that you define. For example, in this case, setting this to 4 weeks, would take at least 100 GB of extra space on the backup server. MySQL dumps: If one of the supporting control panels is detected, this will be enabled by default, otherwise it will default to “N” (also when MySQL is not installed). Scheduler: The script automatically generates a random schedule time between 0:00 and 09:00. If you wish to run the script at a different time, you can change it in the appropriate fields. Notifications: By default the notification system is active. This will send out alerts, warnings and error messages via email. if you don't want to see them, simply set this flag to “N”. Please note that disabling the notification system can cause severe damage to your backups in such a way that you won't be alerted if any critical errors occur during the backup. We strongly recommend to leave it at “Y”. Verbose logging: The script can save the output of the rsync transfer log in .gz format for reference. This may be useful if you doubt that all files are being copied to the backup server. Transfer speed: The transfer speed is adjustable to a max of 12,5 MB/sec (100 Mbps/sec). This is limited to make sure that the rsync process won't stress the system too much. By default the 3000 KB/sec setting is enough for regular backups; if you backup a large number of files or in size it can be helpful to increase this number. Automatic updates: We often push updates for our backup suite which solve bugs or include new features. By default this flag is set to “Y” to ensure that when an update is found this is automatically applied for you. Should you not wish to use the automatic update system, please set it to “N”. Please note that disabling the automatic update system will result in updates no longer being applied. In this case you have to update the backupscript manually. If you have made modifications to the backup script, do not use the updater as this will overwrite your changes. Email addresses: 2 addresses can be defined, where the “Backup report email” is the general report that the backup script produces. The “Alerts email” is the address to which notifications, alerts and errors are sent. This address may differ from the reports address. Send reports:

14
The script normally sets up the reports email address in the cronjob that is created. If you wish not to receive the reports (and therefore will receive only warnings and errors in case they occur) set this to “N”, otherwise to “Y”. When set to “N”, you are asked to enter an email address nonetheless. This will be saved into the configuration file for future purposes. By default we have set this to “N”. Therefore the script will only email on the alerts email address when there are notifications, warnings or errors. This results in much less emails being sent by the script and this way you will only receive emails when action is required. Once all fields are filled with their correct values, select “OK” and the script will prepare and install the backup script for you and create a crontab entry. After the installation you can have a short installation report sent via email. This will be sent to the reports email address.

15
The main menu (after installation) Once the backup script has been installed, the main menu will show all other options that were not available before the installation:
The options shown above will be explained in the next pages.

16
The configuration editor From the main menu, select option 3 and select “OK”, you will be presented with the following menu:
The window will show all current settings that are saved in the backup configuration file. As you can see it is possible to change the content of the fields and therefore let's you edit the configuration details regarding the backup. Retention: It's possible to lower or increase the retention, here you need to check the space warning as well, since adding retention takes up the amount of space that's besides that field. Please note that upon lowering the retention, this will not remove the old retention from the backupserver, you have to do this manually on the backupserver in the -weekly and -monthly folders! MySQL dumps: It's possible to enable or disable the MySQL dump functionality, when a supported controlpanel is found on the server, the correct details regarding username/password are automatically filled in the correct fields and MySQL dumps are enabled. You can disable then by setting the flag to “N”, you don't have to clear the username/password fields, the backupscript will simply ignore them when the dumps are disabled.

17
When no supported controlpanel or MySQL is found, the script puts the flag to “N” and places “none” as username/password, which can be left this way. Notifications: By default the notification system is active. This will send out alerts, warnings and error messages via email. If you don't want to see them, simply set this flag to “N”. Please note that disabling the notification system can cause severe damage to your backups in such a way that you won't be alerted if any critical errors occur during the backup We strongly recommend to leave it at “Y”. Verbose logging: The script can save the output of the rsync transfer log in .gz format for reference. This may be useful if you doubt that all files are being copied to the backup server. Transfer speed: The transfer speed is also adjustable to a max of 12,5 MB/sec (100 Mbps/sec). This is limited to make sure that the rsync process won't stress the system too much. By default the 3000 KB/sec setting is enough for regular backups; if you backup a large number of files or in size it can be useful to increase this number. Automatic updates: We often push updates for our backup suite which solve bugs or include new features. By default this flag is set to “Y” to ensure that when an update is found this is automatically applied for you. Should you not wish to use the automatic update system, please set it to “N”. Please note that disabling the automatic update system will result in updates no longer being applied. In this case you have to update the backupscript manually. If you have made modifications to the backupscript, do not use the updater as this will overwrite your changes. Alert email address: The alert notifications that are sent via email can be sent to multiple recipients. This can be managed from the “Mail recipients” option in the main menu.

18
Uninstall the backupscript If you don't want to use the backupscript anymore you can uninstall it with this option and you are asked to confirm the following question:
When you agree, all parts of the backupscript installation will be removed, including all files in /etc/cloudvps/ and the script itself with the cronjob. Cronjob: In earlier versions it was not possible to remove the cronjob automatically. This has been changed in this version: when uninstalling the script, the cron is now also removed. Command line uninstall: Command line uninstall is also possible, see page 37 for more information.

19
Update the backupscript Updates are being checked once a month, but should you wish to check manually for updates you can use this function. This will check with our download server to see if an update is available, if so, you can apply this update and the installer will patch everything needed to make sure the new script runs without problems. If any update is available, you will see a window like this:
If you wish, you can read the change log prior to upgrading. Command line update: Command line update is also possible, see page 37 for more information.

20
The testing utility In case you suspect that the backup operation is not functioning normally, you can use this simple utility to see what's working and what's not. The tool will check the following:
− SSH connection to the backupserver − Quota requirements fits (only for CloudVPS backupservers) − MySQL connectivity (if MySQL dumps are enabled)
Upon performing the test, the results should appear as below (in our test case everything was working as we expected):

21
The quota calculator The quota calculator can be used to calculate the total backup space needed based on the retention you entered in the 2 fields:
By default the script shows the current retention you have setup during the installation of the backup script (in our case that is 0 weeks/months). This tool is also available during the pre-installation; during installation all the fields are empty. You can change the content of the fields, which will calculate the backup space you need on the backup server:
Please note that the calculated retention is the absolute minimal space that is needed by the backup script should all weeks and months of retention have passed. The calculation you see here is a rough estimate of what you need, in general use this can be more or less depending on the file usage on your server.
22
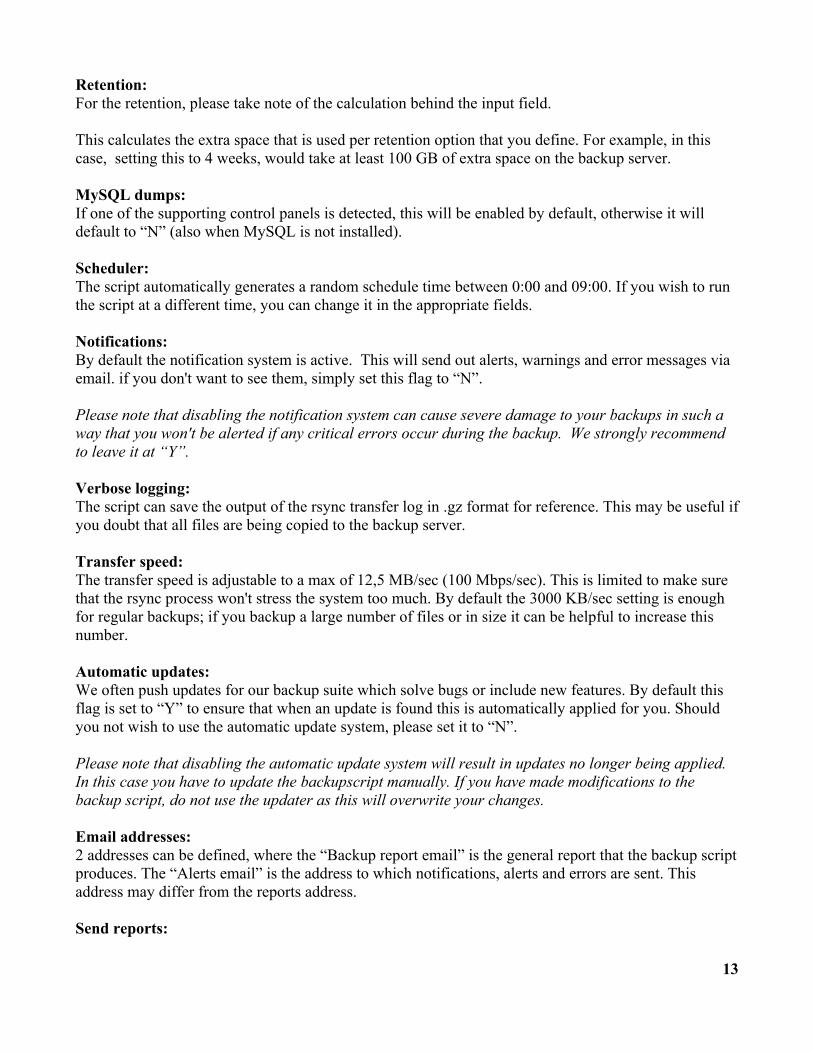
Clear backup log files With this tool you can clear all the available log files that are present in /var/log/backups/. The script will start asking for confirmation whether you are sure that you want to clear all the logs:
When you agree, the script will remove all log files that are present within the log directory /var/log/backups/. Command line cleanup: Commandline cleanup is also possible, see page 37 for more information.

23
Show account quota This option shows the current account quota with the used, free and total space. Selecting it will result in a window like this:
In this case we have used a 250 Gb account (because of the setup of the accounts around 1% less is shown) which has 189 GB left in space and we have used 58 GB (24%) so far. Command line quota report: Command line quota reporting is also possible, see page 37 for more information.
24
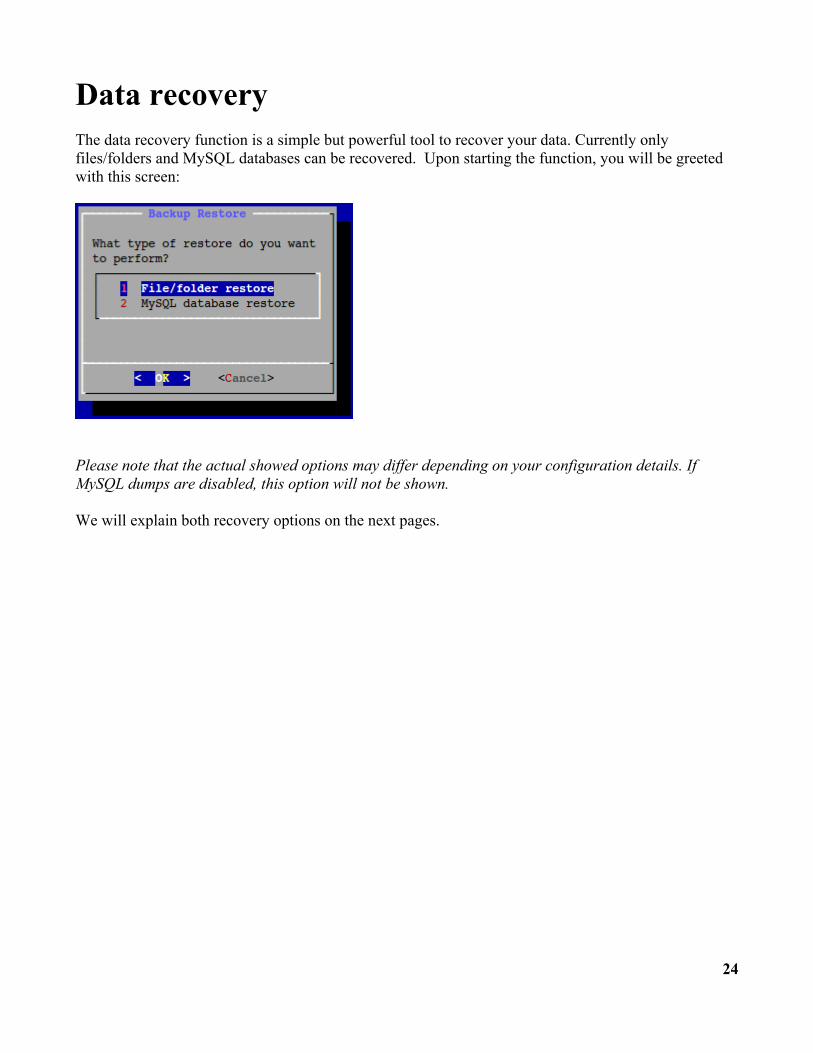
Data recovery The data recovery function is a simple but powerful tool to recover your data. Currently only files/folders and MySQL databases can be recovered. Upon starting the function, you will be greeted with this screen:
Please note that the actual showed options may differ depending on your configuration details. If MySQL dumps are disabled, this option will not be shown. We will explain both recovery options on the next pages.

25
File/folder recovery Select option 1 and select “OK”. You will be presented the following menu:
Please note that depending on your retention options, not all options are shown. In our case we only have the current week with no extra retention set up, therefore only the “daily pool” is shown. Choose the pool you want to restore your files/folders from, and select the day like seen below:
Next, enter the absolute location to the file or folder that you want to restore:
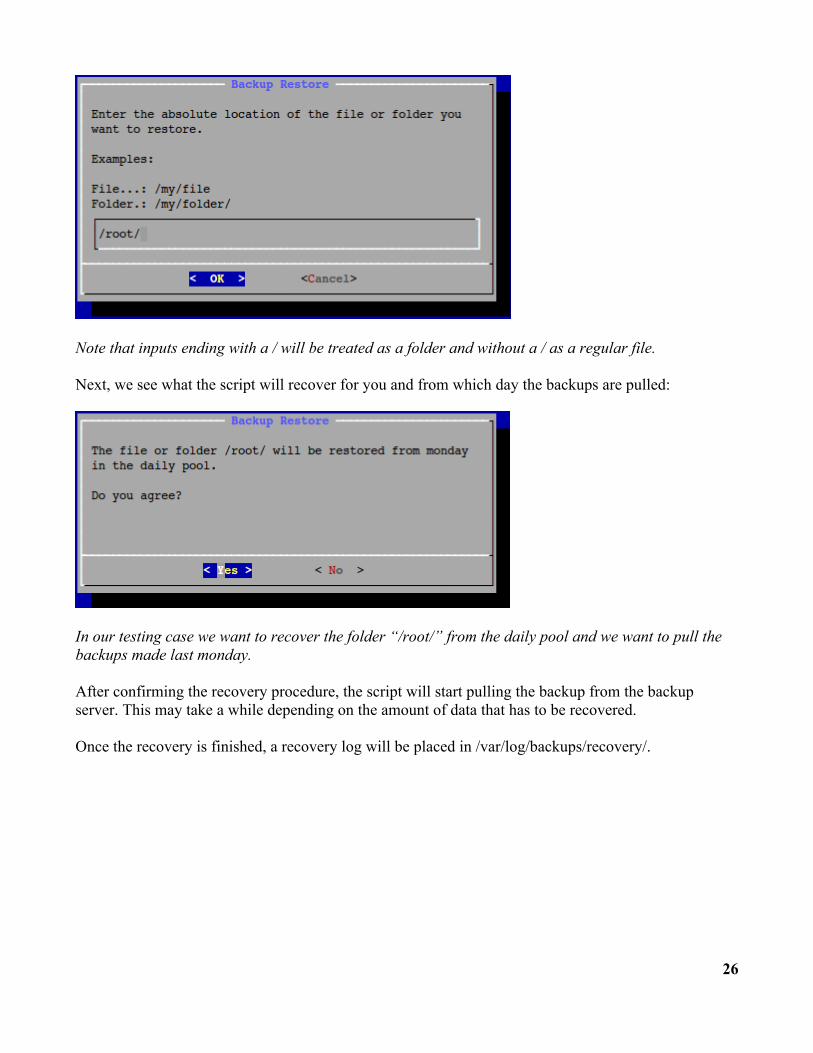
26
Note that inputs ending with a / will be treated as a folder and without a / as a regular file. Next, we see what the script will recover for you and from which day the backups are pulled:
In our testing case we want to recover the folder “/root/” from the daily pool and we want to pull the backups made last monday. After confirming the recovery procedure, the script will start pulling the backup from the backup server. This may take a while depending on the amount of data that has to be recovered. Once the recovery is finished, a recovery log will be placed in /var/log/backups/recovery/.

27
MySQL database recovery Select option 1 and select “OK”. You will be presented the following menu:
Please note that depending on your retention options, not all options are shown. In our case we only have the current week with no extra retention set up, therefore only the “daily pool” is shown. Choose the pool you want to restore your files/folders from, and select the day like seen below:
Next, enter the name of the database that you want to recover and select “OK”. On the next window you may choose to what database name it has to be recovered. You may decide if it has to be recovered to another database or the same database. Please note that when you want to recover to the same database, the local database will be dropped first and then the import will be put back into place. Make sure that you have a copy of the database before overwriting it! If the script detects this, you are asked to confirm this recovery.

28
Next, a confirmation window will be shown with a small overview of the selected and entered options like shown below:
In our testing case we are recovering the database “test” to itself and want it pulled from the daily pool from Monday. Confirm the recovery with “Yes” and let the script recover the database for you. This may take up some time depending on the size of the database. Once the database is recovered, the database should be working again.

29
Manually run the backupscript Normally, the backup script is being executed once a day. This should be sufficient for normal use. In case you want to run the backupscript manually this can be done using this option. The output will be exactly the same as shown in the report emails you receive (when enabled).

30
Exchange SSH keyfile In rare cases the keyfile on the backupserver or on the server itself may become damaged, unreadable or even be removed. If you want to have the keyfile exchanged again with the backupserver, use this option. A window like below will be shown:
Please enter your password (entry is masked with a *) and select “OK”. Now, the script will connect with the backup server and place the local public key into the authorized_keys file in the .ssh folder on the backup server. This can be tested using any of the functions that require communication with the backup server, like the quota calculator. If the backup server does not ask for a password and returns the quota, the exchange was successful.

31
Mail recipients list The script sends alerts, notifications and error messages via email to the address that has been set up during the installation. It is possible to extend this recipient list using this tool. You are presented with 2 options:
View list: This will show the list of recipients that are currently setup, like shown below:
Selecting “EXIT” will return you to the commandline. Edit list: This will open the embedded nano editor in which you can remove, change or add email addresses like shown below:

32
Navigation: In case you are not familiar with the nano editor, a small explanation of keys and shortcuts can be found below: Arrow keys = Navigate throughout the editor and move the cursor [CTRL] + [K] = Deletes the current line where the cursor is placed [CTRL] + [X] = Saves your changes to the file, confirm this change with “Y” or “N” and press enter upon filename selection to keep the filename the script has just edited.

33
Rsync excludes list Some files and/or folders don't have to be backupped. These include some system directories like /dev, /proc etcetera. These files and/or folders are excluded in the special exclude file: /etc/cloudvps/excludes.rsync It is possible to extend this excludes list using this tool. You are presented with 2 options:
View list: This will show the list of excludes that are currently setup, like shown below:
Please note the green arrow pointing downwards, this indicates that there is more to show than is currently being displayed (currently 83% of the excludes is shown as seen on the right). You can navigate in this window using the up and down arrows. Selecting “EXIT” will return you to the command line. Edit list: This will open the embedded nano editor in which you can remove, change or add files and/or directories like shown below:

34
Navigation: In case you are not familiar with the nano editor, a small explanation of keys and shortcuts are explained below: Arrow keys = Navigate throughout the editor and moves the cursor [CTRL] + [K] = Deletes the current line where the cursor is placed [CTRL] + [X] = Saves your changes to the file, confirm this change with “Y” or “N” and press enter upon filename selection to keep the filename the script has just edited. Note: When the backup root is not the default /, excludes should be based on directories within the current backup root. So if it is set to /home/ and you wish to exclude /home/user1/, you need to exclude /user1/ instead of /home/user1/, because /home/ is not found within the /home/ backup root. Tip: Paths can be absolute or relative; note that using relative paths, like “cache/”, will ignore all “cache” folders found within the backup root directory and is preferable when you want to exclude all cache folders on the server.
35
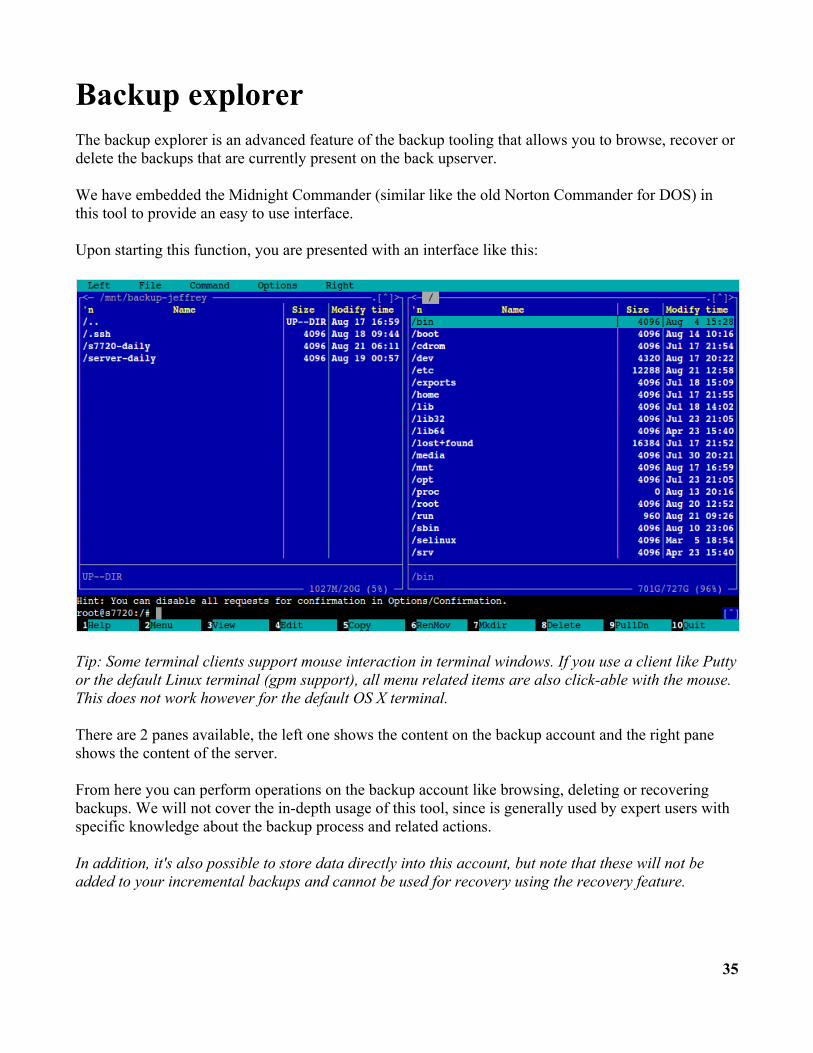
Backup explorer The backup explorer is an advanced feature of the backup tooling that allows you to browse, recover or delete the backups that are currently present on the back upserver. We have embedded the Midnight Commander (similar like the old Norton Commander for DOS) in this tool to provide an easy to use interface. Upon starting this function, you are presented with an interface like this:
Tip: Some terminal clients support mouse interaction in terminal windows. If you use a client like Putty or the default Linux terminal (gpm support), all menu related items are also click-able with the mouse. This does not work however for the default OS X terminal. There are 2 panes available, the left one shows the content on the backup account and the right pane shows the content of the server. From here you can perform operations on the backup account like browsing, deleting or recovering backups. We will not cover the in-depth usage of this tool, since is generally used by expert users with specific knowledge about the backup process and related actions. In addition, it's also possible to store data directly into this account, but note that these will not be added to your incremental backups and cannot be used for recovery using the recovery feature.

36
Navigation: Here are some handy keys and combinations which help you navigate through the Midnight Commander: [TAB] = Switch between the active pane, all actions that you start are run from the active pane. [F5] = Copy files or folders from the active pane to the other pane. [F6] = Move files or folders from the active pane to the other pane. [F8] = Delete the current file/folder which is selected in the active pane (note that removal is recursive for folders!). [F10] = Quit the Midnight Commander [+] = Opens window in which items can be marked using the pattern you provide here. Tips: In order to copy or move data from one to the other pane, make sure that the destination pane is already in the correct folder, or else the files will be placed in the directory that is currently active in the destination pane. When moving or copying folders that have subfolders make sure to check the checkbox “Dive into subdirs”. All directories below the selected one will be copied or moved as well. On some keyboards the function keys are mapped to other actions, like lowering the volume. In this case you have to press the “Fn” key on your keyboard together with the function key you wish to use, so for opening the copy dialog, issue <Fn> + <F5>.

37
Installer command line options The script is provided with some command line options This can be very useful for automation purposes. The installer currently accepts the following: --install This will install the backupscript using the same technique as the easy installer and will make all necessary decisions for you. This uses a predefined syntax and an example is found below: --install [account] [password] [server] [weekly ret.] [monthly ret.] [sql dumps] [reports email] [send reports] An example: --install myaccount mypassword mybackupserver 0 1 Y [email protected] N --update This will update the backup script on the given server; this will issue the same steps as with the graphical update, but shows less output. --uninstall This will completely uninstall the backup script from the server including the cronjob. --show-quota This will show the current quota usage statistics. The quota report function will only work for CloudVPS backup servers. --clear-logs This will clear all available logs that reside in /var/log/backups/ and can save some space if big logs reside within this directory. --edit-config This will open and embed the nano editor with the backup config file opened, making it editable. Please note that this option is for expert users only and requires understanding of the config file elements and their behavior. Inappropriate settings may result in unsuccessful backups.

38
Backup command line options The backup script itself also accepts certain command line options to manipulate it's working process: --no-dumps This starts the backup script and disables MySQL dumps for that session. This can be useful when you want to create or test the backup functionality where dumps are not needed. --debug This will start the script in debug mode showing all steps that are taken throughout the script. This is useful when you are having trouble using the backup script or when errors are present. Only one of the switches can be used with the script; if you use more than one, the first one given will be used. If you want to use both flags, then run bash in verbose mode by issuing: bash -x /usr/local/bin/cloudvpsbackup --no-dumps

39
Logging All provided backup scripts write all of their actions in the general syslog that can generally be found at the following 2 locations (depending on the OS): /var/log/messages /var/log/syslog The following names are used for the scripts: backup_script: the backupscript backup_installer: the backup installer / configuration tool backup_restore: the backup restore script backup_patcher: the backup patching script These names can be used to grep the whole backup log out of the syslog, see the example below for the backup script: root@networkspace2:~# grep backup_script /var/log/messages Feb 21 13:20:09 networkspace2 backup_script: Started the CloudVPS Backup Script version 2.1.0 Feb 21 13:20:09 networkspace2 backup_script: Loaded the backup configuration file Feb 21 13:20:09 networkspace2 backup_script: Created backup lockfile Feb 21 13:20:09 networkspace2 backup_script: Started MySQL dump procedure Feb 21 13:20:10 networkspace2 backup_script: MySQL connection successful Feb 21 13:20:10 networkspace2 backup_script: Cleared the MySQL dump directory: /var/sqlbackups/ Feb 21 13:20:11 networkspace2 backup_script: Database mysql dumped with a size of 136KB Feb 21 13:20:12 networkspace2 backup_script: Database performance_schema dumped with a size of 1.8KB Feb 21 13:20:13 networkspace2 backup_script: Database test dumped with a size of 444B Feb 21 13:20:13 networkspace2 backup_script: Database test2 dumped with a size of 444B Feb 21 13:20:13 networkspace2 backup_script: MySQL dump procedure completed, total size of the dumps is 152KB Feb 21 13:20:15 networkspace2 backup_script: Starting rsync backup procedure Feb 21 13:21:39 networkspace2 backup_script: There were no errors during the rsync backup procedure Feb 21 13:21:39 networkspace2 backup_script: Backup lockfile removed Feb 21 13:21:39 networkspace2 backup_script: The CloudVPS Backup Script has finished As you can see, all actions are logged in the syslog. When backups are made every day, this log will provide a great insight in the overall backup process.

40
Glossary Below is a list of common used terms and their explanation. Retention Retention is simply defined as how long the backup server will keep your data. In the backup script you have at least one whole week, with options to enable extra weekly and monthly retention for a maximum of 52 weeks and/or 12 months. Incremental / Differential backup The incremental style repository aims to make it more feasible to store backups from more points in time by organizing the data into increments of change between points in time. This eliminates the need to store duplicate copies of unchanged data. This starts out with a full backup (of all files) and after that, any number of incremental or differential backups are made for the current week and/or extra retention that is given. SSH (public) key SSH keys serve as a means of identifying oneself to an SSH server using public-key cryptography and challenge-response authentication. One immediate advantage this method has over traditional password authentication is that you can be authenticated by the server without ever having to send your password over the network. Anyone eavesdropping on your connection will not be able to intercept and crack your password because it is never actually transmitted. Additionally, using SSH keys for authentication virtually eliminates the risk posed by brute-force password attacks by drastically reducing the chances of the attacker correctly guessing the proper credentials. Crontab / cronjob Cron is a powerful job scheduler for GNU/Linux and many other operating systems. It automates recurring tasks by executing commands at a given time. It has a wide range of potential applications; most simple recurring tasks, from backups to e-mail retrieval, can be automated using cron, saving users time. Bash Bash is a Unix shell created as a free software replacement for the older Bourne shell (sh). With it's age of 24 years (released in 1989) it's widely available for almost every Unix/Linux platform including OS X. Rsync Rsync is a software application and network protocol for Unix-like systems with ports to Windows that synchronizes files and directories from one location to another while minimizing data transfer by using delta encoding when appropriate. Quoting the official website: “rsync is a file transfer program for Unix systems. rsync uses the 'rsync algorithm' which provides a very fast method for bringing remote files into sync.” An important feature of rsync not found in most similar programs/protocols is that the mirroring takes place with only one transmission in each direction. Rsync can copy or display directory contents and copy files, optionally using compression and recursion.

41
Midnight Commander (mc) The Midnight Commander is a clone of the well-known Norton Commander that was commonly used in the days where DOS was still used. It features 2 panes where in each pane a different directory can be set. From there it's possible to delete, copy or move data between panes. Midnight Commander is based on versatile text interfaces, such as Ncurses or S-Lang, which allow it to work on a regular console, inside an X Window terminal, over SSH connections, RS-232 interface (for embedded devices) and all kinds of remote shells.

42
Bugs, issues and feature requests Bugs and issues: Although we have spent a lot of time building and testing the installer and it's tools, it’s always possible that some bugs or uncovered errors are still present in the code. Should you have found an issue or bug on which you cannot use the script as expected, please let us know by sending an email to [email protected] with an explanation about when the error occurs. Please see to it that the system requirements have been checked before sending in your report to make sure all dependencies are met. When reporting errors, please supply the following items:
-‐ The actual error -‐ Your operating system -‐ What type of controlpanel you use (if any) -‐ Version of the backupscript
Feature requests: The tools can always be improved by expanding its usability and we always encourage users to send in their suggestions and tips. Please send them to [email protected] and we will put your suggestion on the wish list. Change logs: We provide change logs online which indicate fixed bugs, added new features etc. Before filing in a bug or feature request, make sure to check the appropriate change log first to see if it's not already addressed in a released update. The change logs can be found here: http://download.cloudvps.com/pub/files/scripts/backup/
43
Support CloudVPS Customers: If you are looking for support regarding the installation, maintenance or recovering your data, check this manual and the available help in the installer first. Should your question not be covered in these documents, please send an email to [email protected] regarding your issue. Also check page 42 for more information on filing issues/bugs to us. When emailing our support desk, please make sure that you explain in detail what the issue is regarding the backup, if it's possible to make a copy-paste or screenshot of the error that would be appreciated. Non CloudVPS Customers: We offer support for non CloudVPS customers, but is limited to the following:
-‐ Installation issues caused by our software. -‐ Any type of bugs found in the script (only applicable if used on a supported system, see the
software requirements). For these types you can send an email to [email protected] explaining your issue, see page 42 for more information on filing issues/bugs to us. What we do not support:
-‐ Installation support on non CloudVPS (backup)machines. -‐ Any misconfiguration errors caused by the user. For support in this area a fee will be asked.

44
Errors and warnings The script can produce several warnings and errors to state that some attention is required regarding the backup, although sometimes this is purely informational. Some of these warnings are explained below with their appropriate solution: rsync: failed to read xattr user.rsync.%stat for "<location>": Permission denied (13) This error is being produced when that given file could not be read during the transfer. Usually this is safe to ignore when this only occurs once or twice. Should this notice be given every day it might be worth having a look at that folder or file to see whether there is something wrong. If the file is not needed for the backup then it's a good decision to place it on the exclude list. --link-dest arg does not exist: <location> This warning will appear when the script is used for the first time. Basically it's saying that it cannot find the incremental backup directory from yesterday, which is correct during the first run. This also may occur for the extra monthly and weekly retention if this has not been backupped at that time. rsync: readlink_stat("<location>") failed: Permission denied (13) This will occur when certain files during the backup could not be read by rsync. The most common errors are:
− /etc/.shadow − /etc/.passwd − /home/<user>/.gvfs
If one of the above appears, please ignore it or place an exclude via the exclude management offered by the Installer. /usr/local/bin/cloudvpsbackup: line 630: host: command not found In this case you don't have the DNS utilities package installed, this can be fixed by installing the “bind-utils” for CentOS or “dnsutils” for Debian / Ubuntu.

45
FAQ Is the backupscript / installer IPv6 compatible? Yes, the script will connect using IPv6 if IPv6 is properly configured on the server where the script is used on. Also make sure that the used backup server is also capable of IPv6 connectivity. The CloudVPS backup servers are all configured with IPv6. Is it possible to only backup the SQL dumps? Yes, to arrange for this you can use the advanced installer and point the backup root directory to “/var/sqlbackups/”. Can I backup PostgreSQL databases? Currently, we do not support PGSQL dumps within the backup script, however, the script will backup the raw PGSQL files if that directory is within the backup root directory.

46
Disclaimer The scripts are provided as is and we cannot be held responsible for any data loss caused by improper usage of the scripts or a faulty configuration. You use these tools at your own risk. Modification of the scripts is allowed, but we cannot guarantee that any future updates we release for our scripts will not overwrite your modifications. If you rely on these, we strongly recommend disabling the automatic update function.


![Slackware Demystified [SELF 2011]](https://img.pdfslide.us/doc/110x75/558a28fed8b42a3e028b4594/slackware-demystified-self-2011.jpg)


![Slackware: Quickly and Easily Manage Your KDE SC Hacking [Camp KDE 2011]](https://img.pdfslide.us/doc/110x75/55a58aff1a28abc7138b46ec/slackware-quickly-and-easily-manage-your-kde-sc-hacking-camp-kde-2011.jpg)