Embed Size (px)
Citation preview
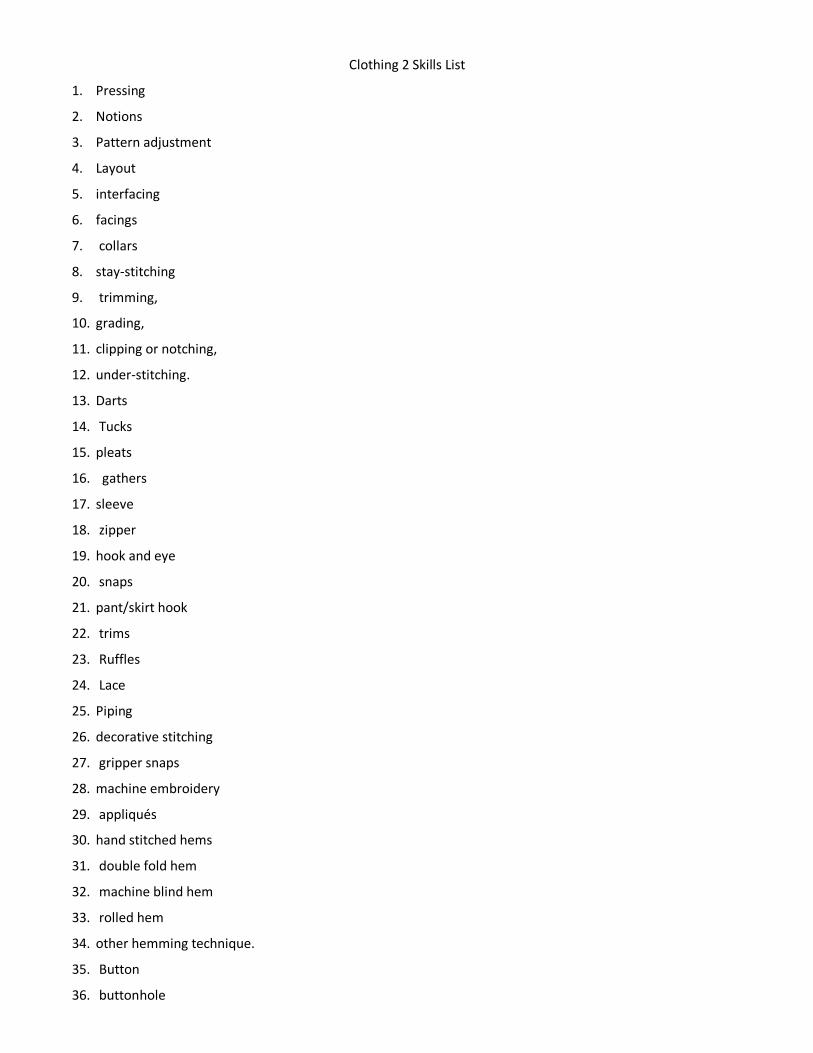
Clothing 2 Skills List
1. Pressing
2. Notions
3. Pattern adjustment
4. Layout
5. interfacing
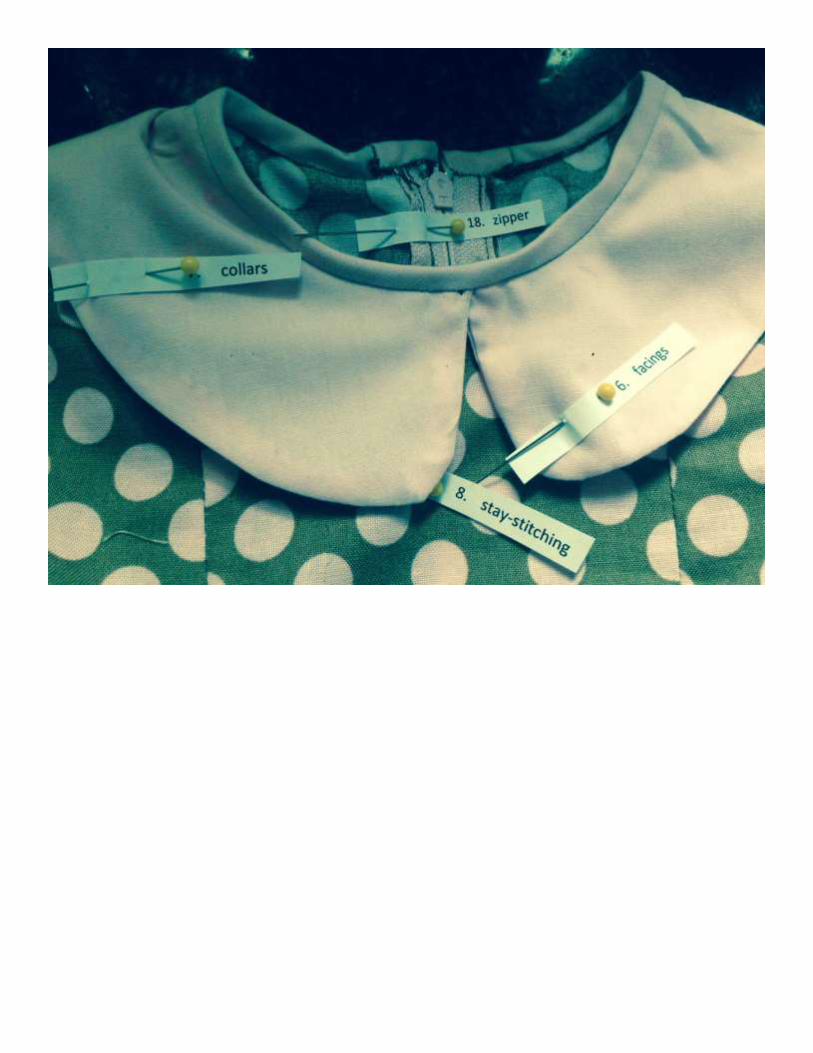
6. facings
7. collars
8. stay-stitching
9. trimming,
10. grading,
11. clipping or notching,
12. under-stitching.
13. Darts
14. Tucks
15. pleats
16. gathers
17. sleeve
18. zipper
19. hook and eye
20. snaps
21. pant/skirt hook
22. trims
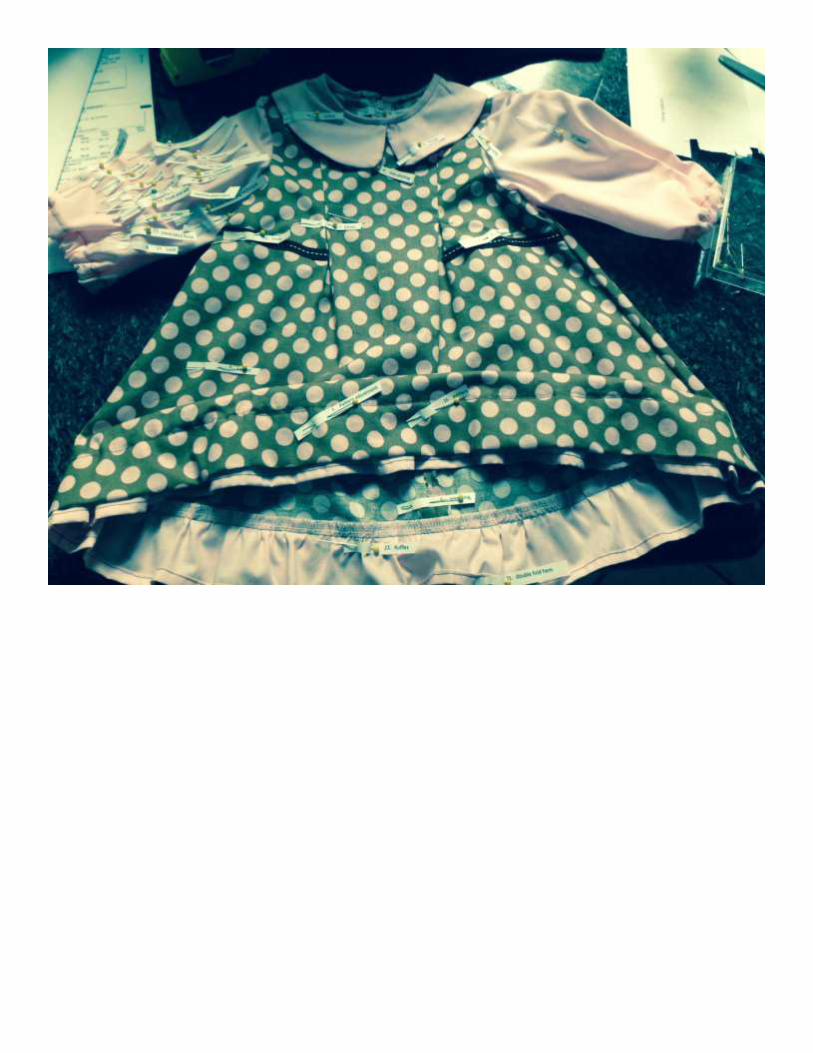
23. Ruffles
24. Lace
25. Piping
26. decorative stitching
27. gripper snaps
28. machine embroidery
29. appliqués
30. hand stitched hems
31. double fold hem
32. machine blind hem
33. rolled hem
34. other hemming technique.
35. Button
36. buttonhole
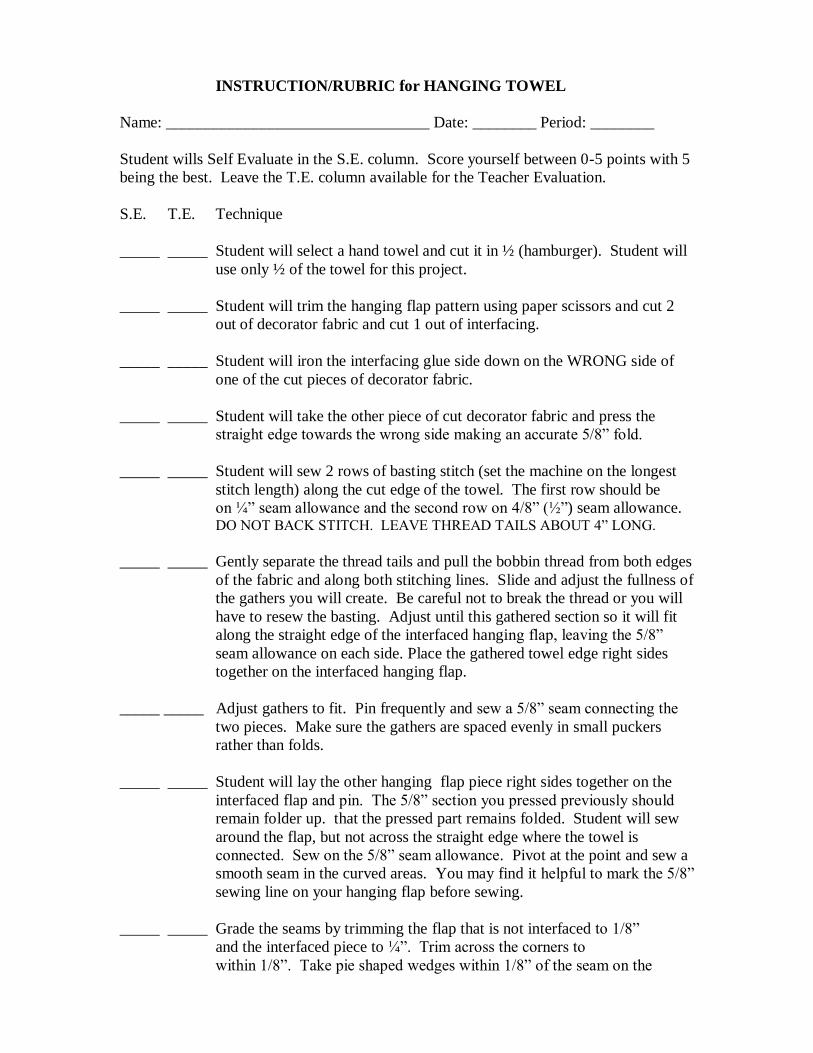
INSTRUCTION/RUBRIC for HANGING TOWEL
Name: _________________________________ Date: ________ Period: ________
Student wills Self Evaluate in the S.E. column. Score yourself between 0-5 points with 5
being the best. Leave the T.E. column available for the Teacher Evaluation.
S.E. T.E. Technique
_____ _____ Student will select a hand towel and cut it in ½ (hamburger). Student will
use only ½ of the towel for this project.
_____ _____ Student will trim the hanging flap pattern using paper scissors and cut 2
out of decorator fabric and cut 1 out of interfacing.
_____ _____ Student will iron the interfacing glue side down on the WRONG side of
one of the cut pieces of decorator fabric.
_____ _____ Student will take the other piece of cut decorator fabric and press the
straight edge towards the wrong side making an accurate 5/8” fold.
_____ _____ Student will sew 2 rows of basting stitch (set the machine on the longest
stitch length) along the cut edge of the towel. The first row should be
on ¼” seam allowance and the second row on 4/8” (½”) seam allowance. DO NOT BACK STITCH. LEAVE THREAD TAILS ABOUT 4” LONG.
_____ _____ Gently separate the thread tails and pull the bobbin thread from both edges
of the fabric and along both stitching lines. Slide and adjust the fullness of
the gathers you will create. Be careful not to break the thread or you will
have to resew the basting. Adjust until this gathered section so it will fit
along the straight edge of the interfaced hanging flap, leaving the 5/8”
seam allowance on each side. Place the gathered towel edge right sides
together on the interfaced hanging flap.
_____ _____ Adjust gathers to fit. Pin frequently and sew a 5/8” seam connecting the
two pieces. Make sure the gathers are spaced evenly in small puckers
rather than folds.
_____ _____ Student will lay the other hanging flap piece right sides together on the
interfaced flap and pin. The 5/8” section you pressed previously should
remain folder up. that the pressed part remains folded. Student will sew
around the flap, but not across the straight edge where the towel is
connected. Sew on the 5/8” seam allowance. Pivot at the point and sew a
smooth seam in the curved areas. You may find it helpful to mark the 5/8”
sewing line on your hanging flap before sewing.
_____ _____ Grade the seams by trimming the flap that is not interfaced to 1/8”
and the interfaced piece to ¼”. Trim across the corners to
within 1/8”. Take pie shaped wedges within 1/8” of the seam on the
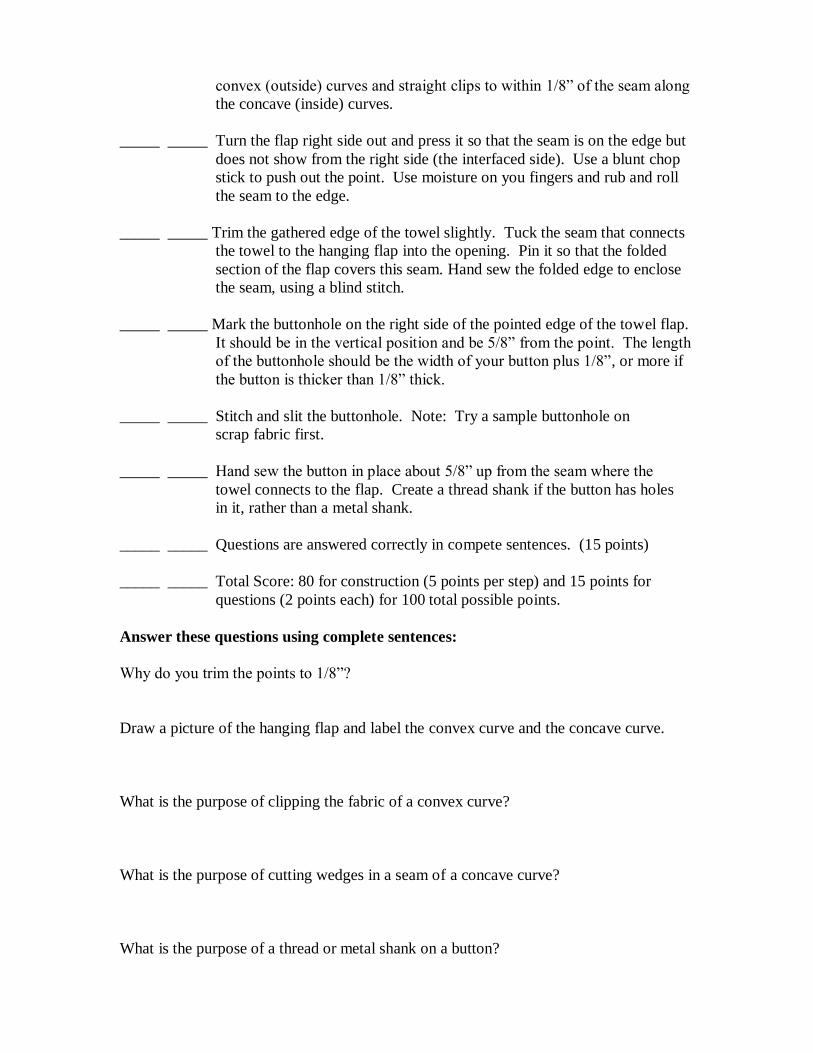
convex (outside) curves and straight clips to within 1/8” of the seam along
the concave (inside) curves.
_____ _____ Turn the flap right side out and press it so that the seam is on the edge but
does not show from the right side (the interfaced side). Use a blunt chop
stick to push out the point. Use moisture on you fingers and rub and roll
the seam to the edge.
_____ _____ Trim the gathered edge of the towel slightly. Tuck the seam that connects
the towel to the hanging flap into the opening. Pin it so that the folded
section of the flap covers this seam. Hand sew the folded edge to enclose
the seam, using a blind stitch.
_____ _____ Mark the buttonhole on the right side of the pointed edge of the towel flap.
It should be in the vertical position and be 5/8” from the point. The length
of the buttonhole should be the width of your button plus 1/8”, or more if
the button is thicker than 1/8” thick.
_____ _____ Stitch and slit the buttonhole. Note: Try a sample buttonhole on
scrap fabric first.
_____ _____ Hand sew the button in place about 5/8” up from the seam where the
towel connects to the flap. Create a thread shank if the button has holes
in it, rather than a metal shank.
_____ _____ Questions are answered correctly in compete sentences. (15 points)
_____ _____ Total Score: 80 for construction (5 points per step) and 15 points for
questions (2 points each) for 100 total possible points.
Answer these questions using complete sentences:
Why do you trim the points to 1/8”?
Draw a picture of the hanging flap and label the convex curve and the concave curve.
What is the purpose of clipping the fabric of a convex curve?
What is the purpose of cutting wedges in a seam of a concave curve?
What is the purpose of a thread or metal shank on a button?
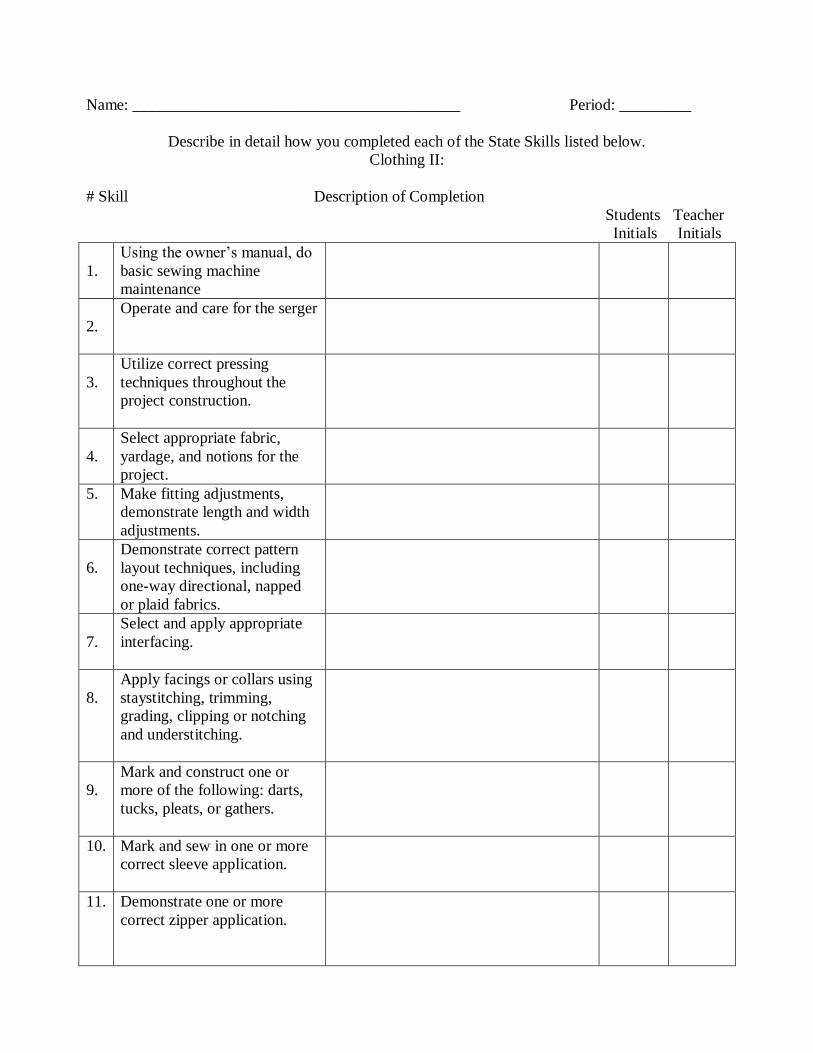
Name: _________________________________________ Period: _________
Describe in detail how you completed each of the State Skills listed below.
Clothing II:
# Skill Description of Completion
Students Teacher
Initials Initials
1.
Using the owner’s manual, do
basic sewing machine
maintenance
2.
Operate and care for the serger
3.
Utilize correct pressing
techniques throughout the
project construction.
4.
Select appropriate fabric,
yardage, and notions for the
project.
5.
Make fitting adjustments,
demonstrate length and width
adjustments.
6.
Demonstrate correct pattern
layout techniques, including
one-way directional, napped
or plaid fabrics.
7.
Select and apply appropriate
interfacing.
8.
Apply facings or collars using
staystitching, trimming,
grading, clipping or notching
and understitching.
9.
Mark and construct one or
more of the following: darts,
tucks, pleats, or gathers.
10.
Mark and sew in one or more
correct sleeve application.
11.
Demonstrate one or more
correct zipper application.
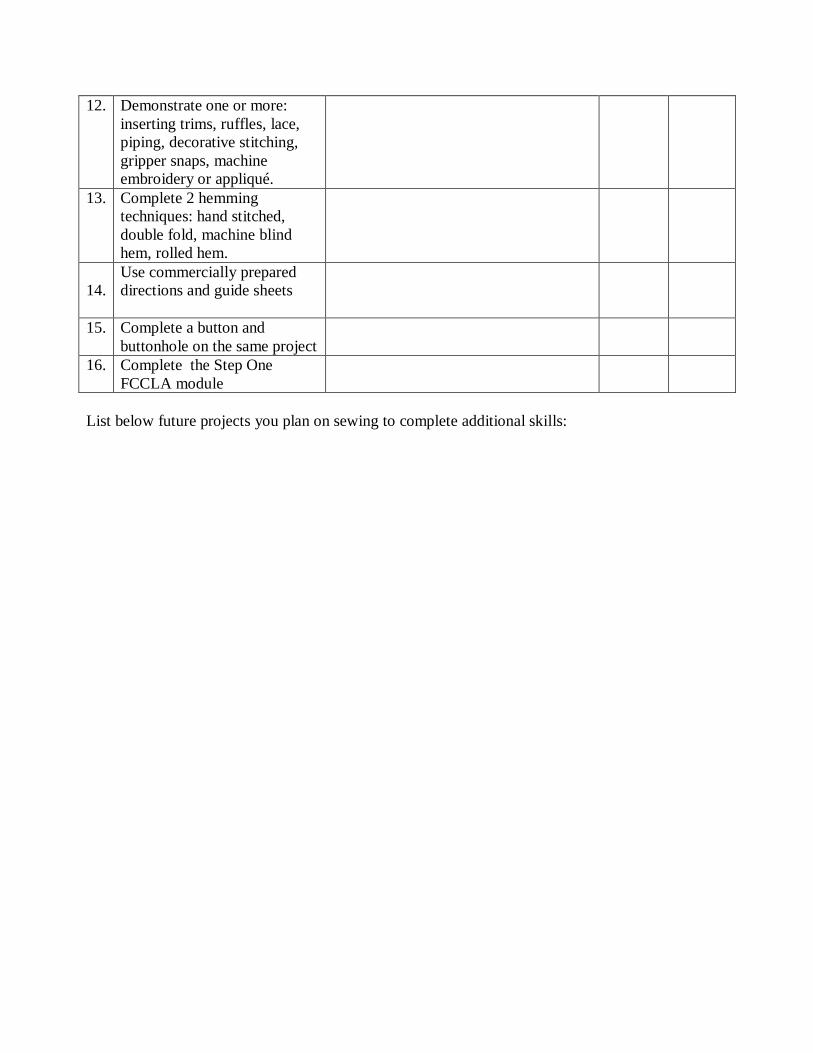
12.
Demonstrate one or more:
inserting trims, ruffles, lace,
piping, decorative stitching,
gripper snaps, machine
embroidery or appliqué.
13.
Complete 2 hemming
techniques: hand stitched,
double fold, machine blind
hem, rolled hem.
14.
Use commercially prepared
directions and guide sheets
15. Complete a button and
buttonhole on the same project
16. Complete the Step One
FCCLA module
List below future projects you plan on sewing to complete additional skills:
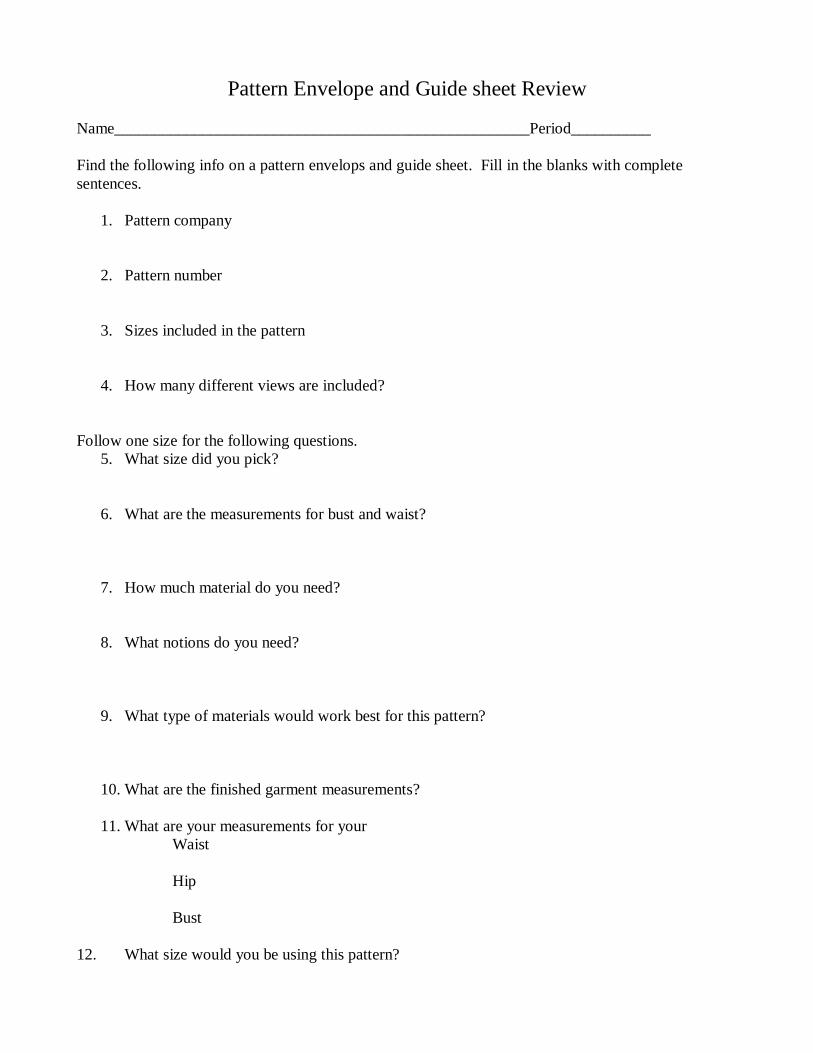
Pattern Envelope and Guide sheet Review
Name____________________________________________________Period__________
Find the following info on a pattern envelops and guide sheet. Fill in the blanks with complete
sentences.
1. Pattern company
2. Pattern number
3. Sizes included in the pattern
4. How many different views are included?
Follow one size for the following questions.
5. What size did you pick?
6. What are the measurements for bust and waist?
7. How much material do you need?
8. What notions do you need?
9. What type of materials would work best for this pattern?
10. What are the finished garment measurements?
11. What are your measurements for your
Waist
Hip
Bust
12. What size would you be using this pattern?
Name: Period:
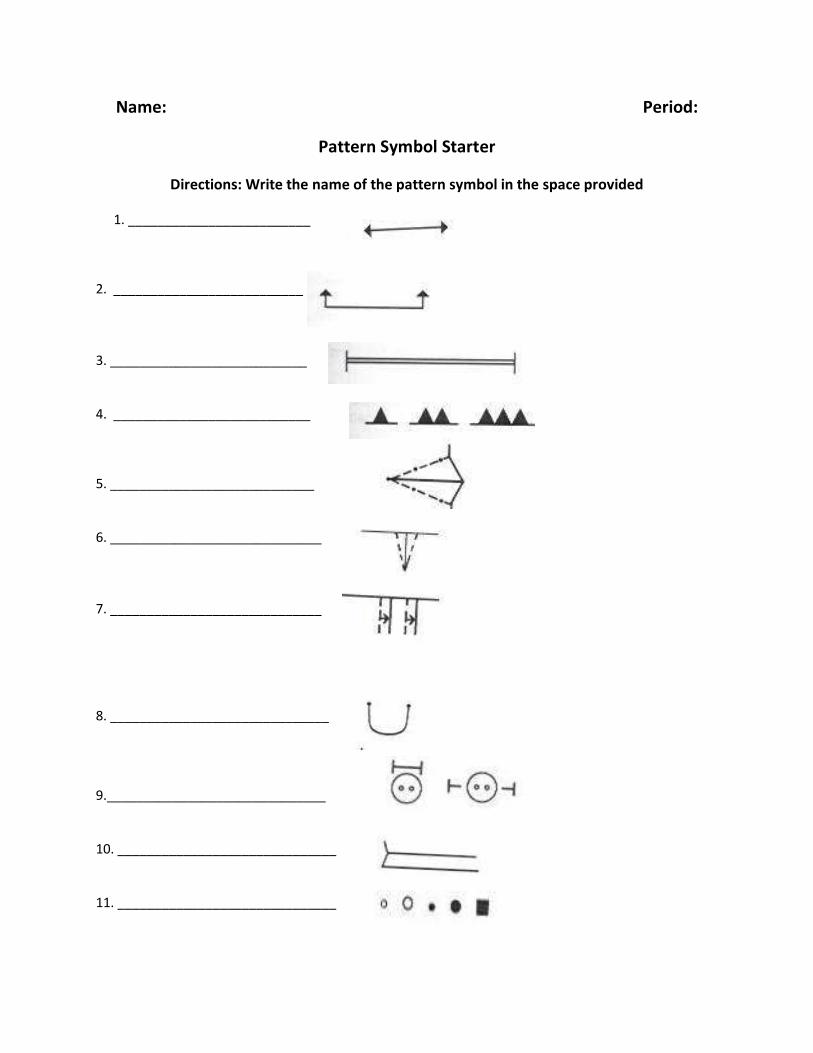
Pattern Symbol Starter
Directions: Write the name of the pattern symbol in the space provided
1. _________________________
2. __________________________ 3. ___________________________ 4. ___________________________
5. ____________________________ 6. _____________________________ 7. _____________________________ 8. ______________________________
9.______________________________ 10. ______________________________ 11. ______________________________
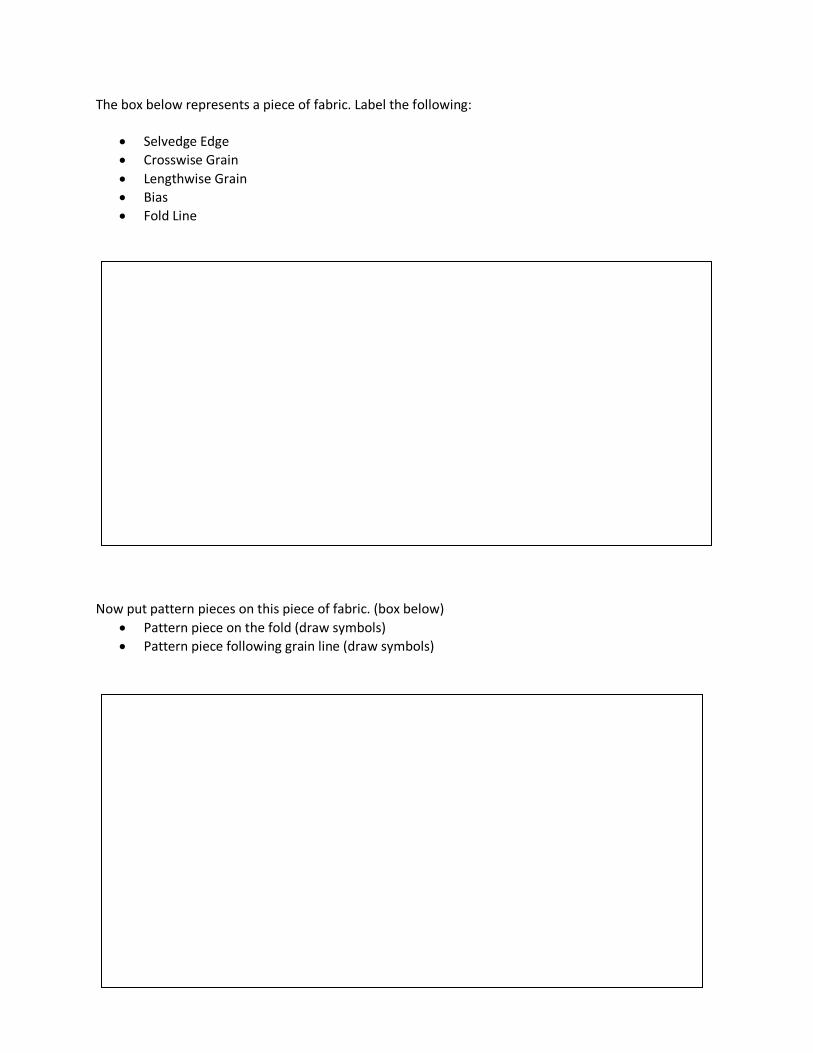
The box below represents a piece of fabric. Label the following:
Selvedge Edge
Crosswise Grain
Lengthwise Grain
Bias
Fold Line Now put pattern pieces on this piece of fabric. (box below)
Pattern piece on the fold (draw symbols)
Pattern piece following grain line (draw symbols)

Date:
Draw your sewing machine and label the following parts:
Needle, Stitch Plate, Presser Foot, Feed Dogs, Hand wheel, Stitch Length, Stitch Width, Pattern Selection,
Bobbin Winder, Spool Pin, Bobbin/Bobbin Case, Thread Take-up Lever, Backstitch/Reverse, Power
Switch, Upper Tension.
Sleeves
Name: Period:
1. What is the most common type of sleeve to sew?
2. Why is a Set-in sleeve the most difficult to sew?
3. What are the two methods of sewing a sleeve?
4. Explain the open-sleeve method?
5. Explain the closed-sleeve method
6. What is the purpose of interfacing?
7. What are the two main types of interfacing?
8. How do you know what weight of interfacing to buy?
9. Explain the process of sew-in interfacing.
10. Explain the process of fusible interfacing.
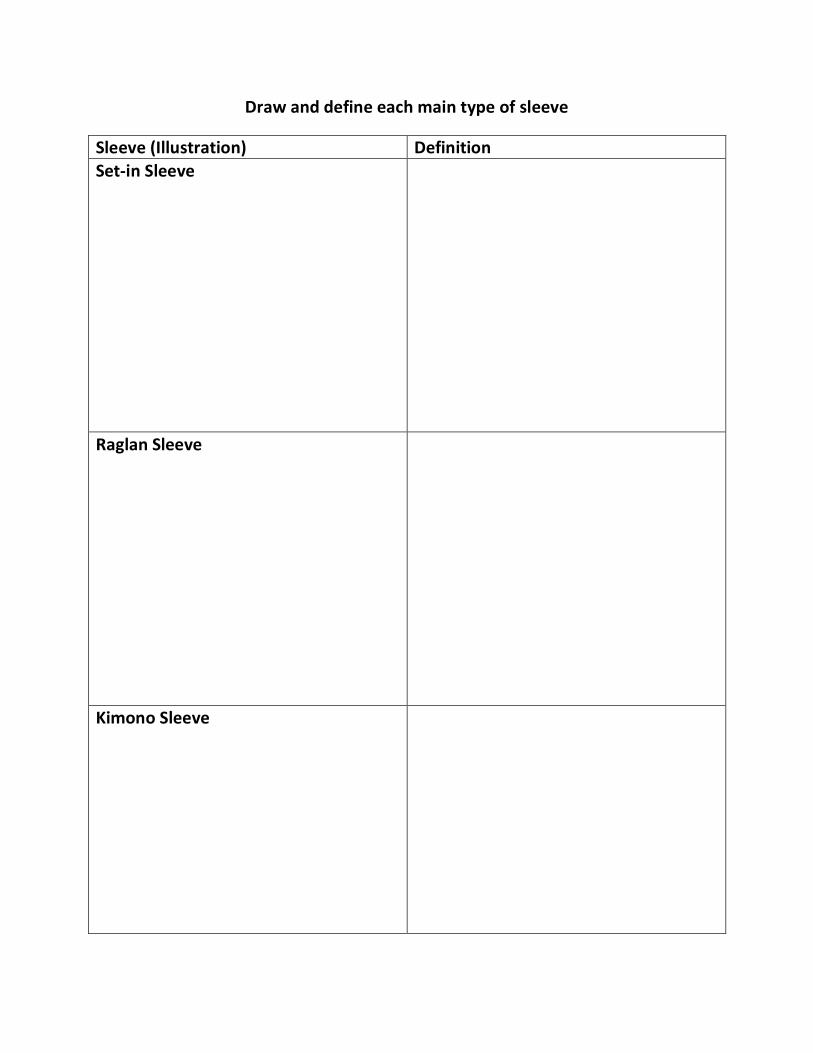
Draw and define each main type of sleeve
Sleeve (Illustration) Definition
Set-in Sleeve
Raglan Sleeve
Kimono Sleeve
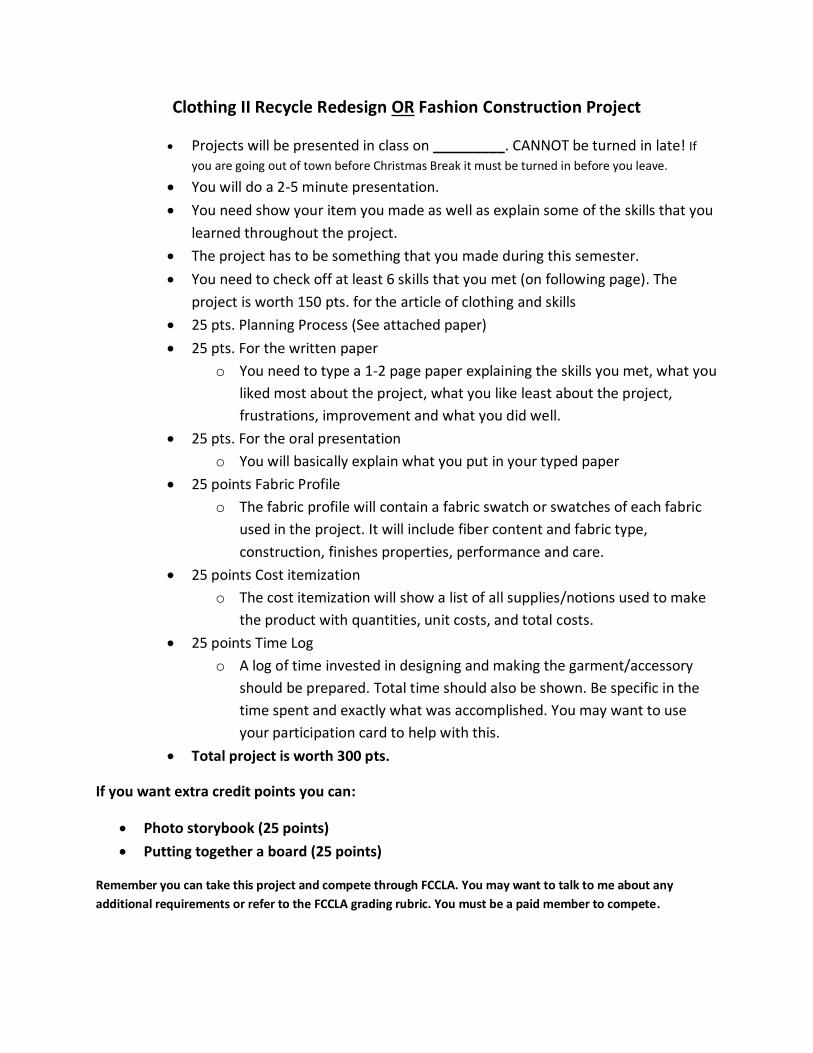
Clothing II Recycle Redesign OR Fashion Construction Project
Projects will be presented in class on _________. CANNOT be turned in late! If you are going out of town before Christmas Break it must be turned in before you leave.
You will do a 2-5 minute presentation.
You need show your item you made as well as explain some of the skills that you
learned throughout the project.
The project has to be something that you made during this semester.
You need to check off at least 6 skills that you met (on following page). The
project is worth 150 pts. for the article of clothing and skills
25 pts. Planning Process (See attached paper)
25 pts. For the written paper
o You need to type a 1-2 page paper explaining the skills you met, what you
liked most about the project, what you like least about the project,
frustrations, improvement and what you did well.
25 pts. For the oral presentation
o You will basically explain what you put in your typed paper
25 points Fabric Profile
o The fabric profile will contain a fabric swatch or swatches of each fabric
used in the project. It will include fiber content and fabric type,
construction, finishes properties, performance and care.
25 points Cost itemization
o The cost itemization will show a list of all supplies/notions used to make
the product with quantities, unit costs, and total costs.
25 points Time Log
o A log of time invested in designing and making the garment/accessory
should be prepared. Total time should also be shown. Be specific in the
time spent and exactly what was accomplished. You may want to use
your participation card to help with this.
Total project is worth 300 pts.
If you want extra credit points you can:
Photo storybook (25 points)
Putting together a board (25 points)
Remember you can take this project and compete through FCCLA. You may want to talk to me about any
additional requirements or refer to the FCCLA grading rubric. You must be a paid member to compete.
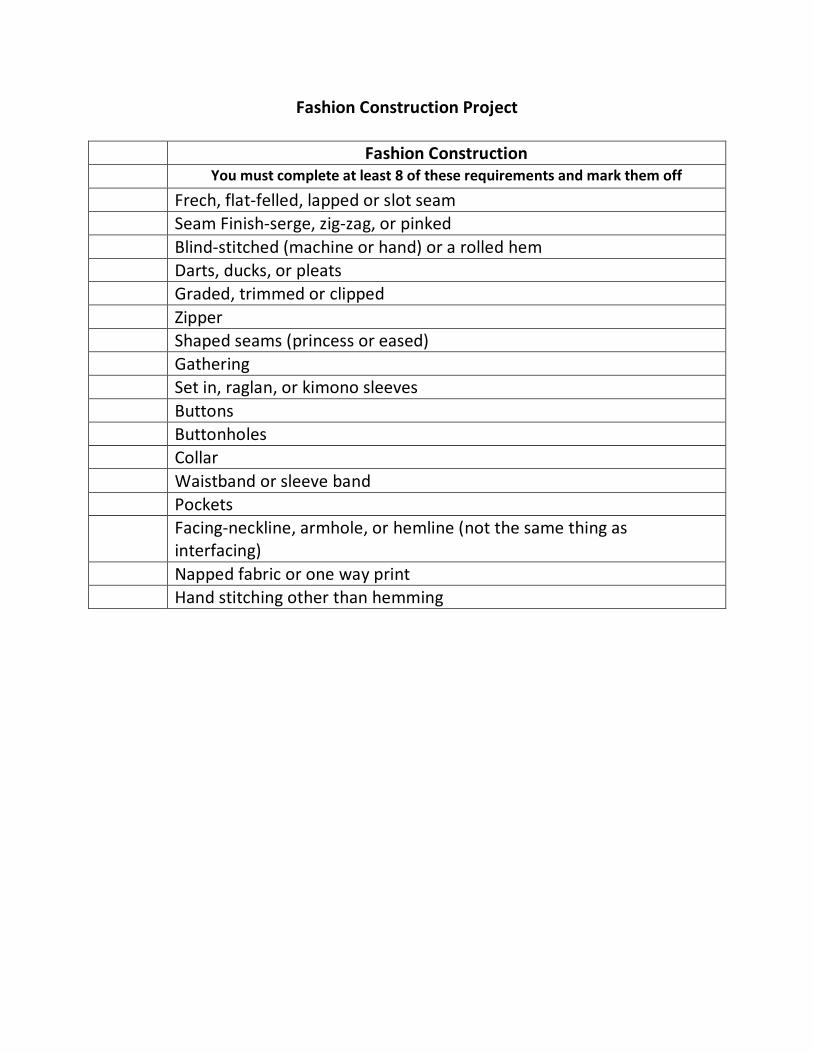
Fashion Construction Project
Fashion Construction
You must complete at least 8 of these requirements and mark them off
Frech, flat-felled, lapped or slot seam
Seam Finish-serge, zig-zag, or pinked
Blind-stitched (machine or hand) or a rolled hem
Darts, ducks, or pleats
Graded, trimmed or clipped
Zipper
Shaped seams (princess or eased)
Gathering
Set in, raglan, or kimono sleeves
Buttons
Buttonholes
Collar
Waistband or sleeve band
Pockets
Facing-neckline, armhole, or hemline (not the same thing as interfacing)
Napped fabric or one way print
Hand stitching other than hemming
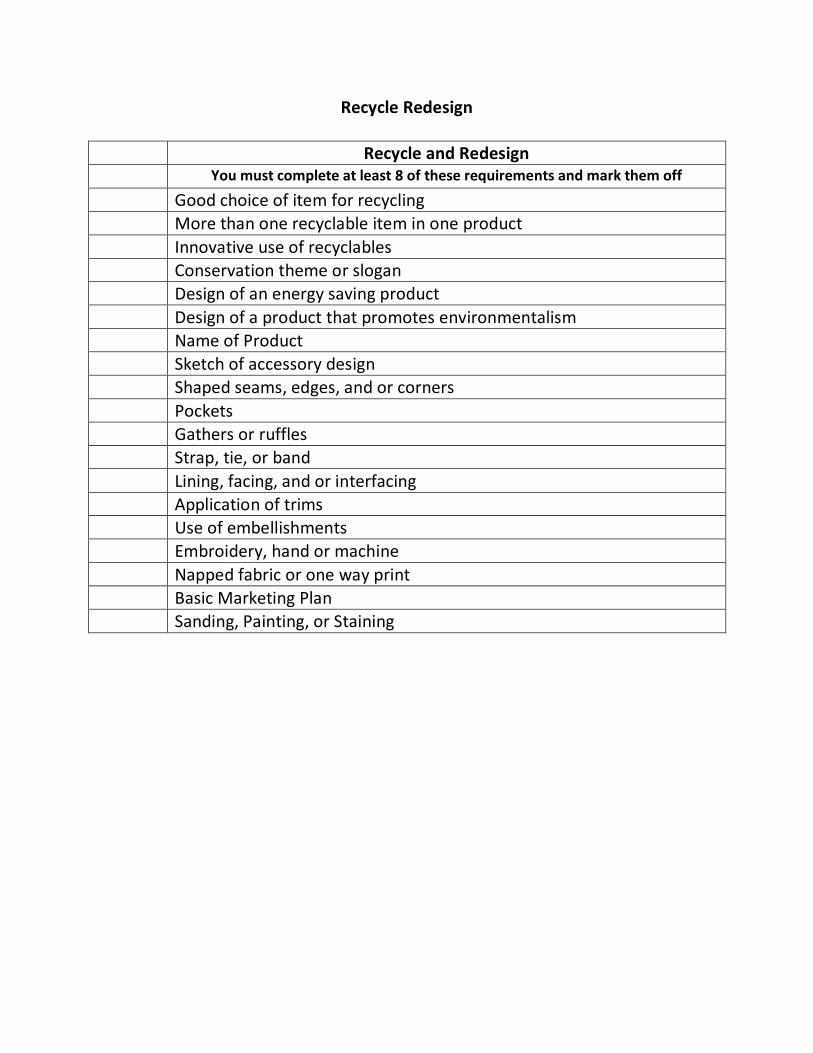
Recycle Redesign
Recycle and Redesign
You must complete at least 8 of these requirements and mark them off
Good choice of item for recycling
More than one recyclable item in one product
Innovative use of recyclables
Conservation theme or slogan
Design of an energy saving product
Design of a product that promotes environmentalism
Name of Product
Sketch of accessory design
Shaped seams, edges, and or corners
Pockets
Gathers or ruffles
Strap, tie, or band
Lining, facing, and or interfacing
Application of trims
Use of embellishments
Embroidery, hand or machine
Napped fabric or one way print
Basic Marketing Plan
Sanding, Painting, or Staining