Embed Size (px)
Citation preview

Cliquid® 3.2.1 Software
Installation Guide for Upgrades
CL
Release Date: October 2012
This document is provided to customers who have purchased AB Sciex equipment to use in the operation of such AB Sciex equipment. This document is copyright protected and any reproduction of this document or any part of this document is strictly prohibited, except as AB Sciex may authorize in writing.
Software that may be described in this document is furnished under a license agreement. It is against the law to copy, modify, or distribute the software on any medium, except as specifically allowed in the license agreement. Furthermore, the license agreement may prohibit the software from being disassembled, reverse engineered, or decompiled for any purpose.
Portions of this document may make reference to other manufacturers and/or their products, which may contain parts whose names are registered as trademarks and/or function as trademarks of their respective owners. Any such use is intended only to designate those manufacturers' products as supplied by AB Sciex for incorporation into its equipment and does not imply any right and/or license to use or permit others to use such manufacturers' and/or their product names as trademarks.
AB Sciex makes no warranties or representations as to the fitness of this equipment for any particular purpose and assumes no responsibility or contingent liability, including indirect or consequential damages, for any use to which the purchaser may put the equipment described herein, or for any adverse circumstances arising therefrom.
For research use only. Not for use in diagnostic procedures.
The trademarks mentioned herein are the property of AB Sciex Pte. Ltd. or their respective owners.AB SCIEX™ is being used under license.
AB SCIEX71 Four Valley Dr., Concord, Ontario, Canada. L4K 4V8.AB Sciex LP is ISO 9001 registered.© 2012 AB SCIEX.Printed in Canada.
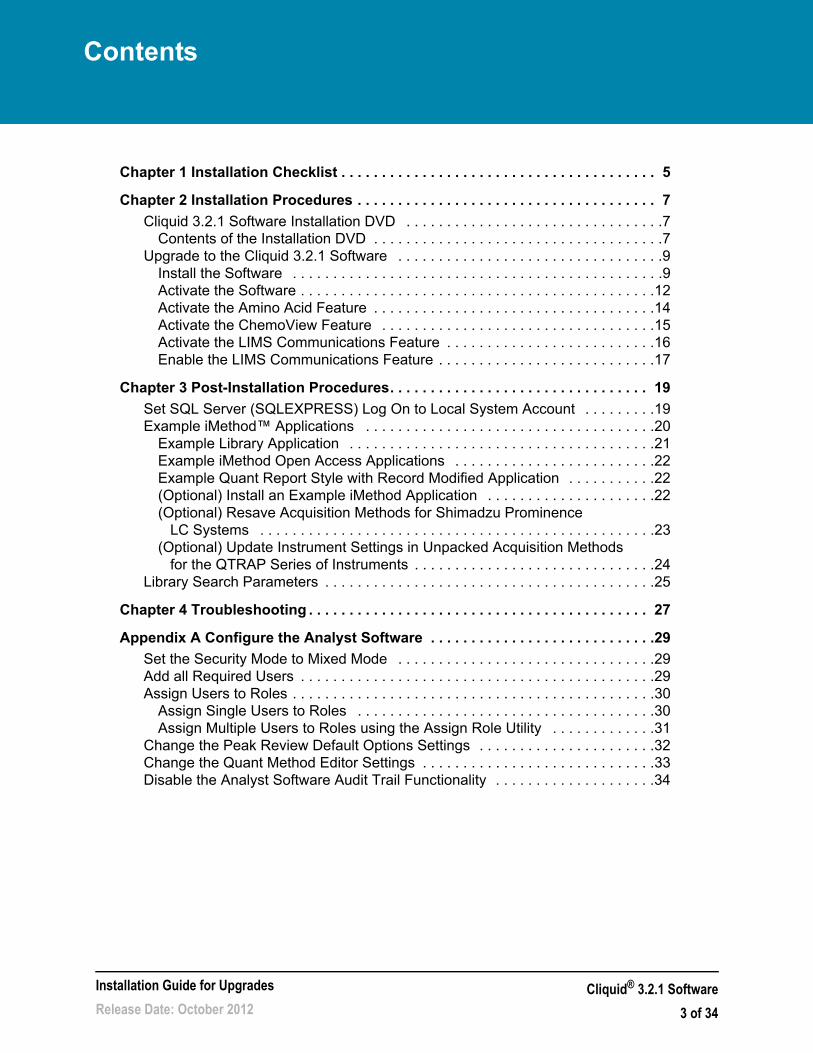
Contents
Chapter 1 Installation Checklist . . . . . . . . . . . . . . . . . . . . . . . . . . . . . . . . . . . . . . . 5
Chapter 2 Installation Procedures . . . . . . . . . . . . . . . . . . . . . . . . . . . . . . . . . . . . . 7
Cliquid 3.2.1 Software Installation DVD . . . . . . . . . . . . . . . . . . . . . . . . . . . . . . . .7Contents of the Installation DVD . . . . . . . . . . . . . . . . . . . . . . . . . . . . . . . . . . . .7
Upgrade to the Cliquid 3.2.1 Software . . . . . . . . . . . . . . . . . . . . . . . . . . . . . . . . .9Install the Software . . . . . . . . . . . . . . . . . . . . . . . . . . . . . . . . . . . . . . . . . . . . . .9Activate the Software . . . . . . . . . . . . . . . . . . . . . . . . . . . . . . . . . . . . . . . . . . . .12Activate the Amino Acid Feature . . . . . . . . . . . . . . . . . . . . . . . . . . . . . . . . . . .14Activate the ChemoView Feature . . . . . . . . . . . . . . . . . . . . . . . . . . . . . . . . . .15Activate the LIMS Communications Feature . . . . . . . . . . . . . . . . . . . . . . . . . .16Enable the LIMS Communications Feature . . . . . . . . . . . . . . . . . . . . . . . . . . .17
Chapter 3 Post-Installation Procedures. . . . . . . . . . . . . . . . . . . . . . . . . . . . . . . . 19
Set SQL Server (SQLEXPRESS) Log On to Local System Account . . . . . . . . .19Example iMethod™ Applications . . . . . . . . . . . . . . . . . . . . . . . . . . . . . . . . . . . .20
Example Library Application . . . . . . . . . . . . . . . . . . . . . . . . . . . . . . . . . . . . . .21Example iMethod Open Access Applications . . . . . . . . . . . . . . . . . . . . . . . . .22Example Quant Report Style with Record Modified Application . . . . . . . . . . .22(Optional) Install an Example iMethod Application . . . . . . . . . . . . . . . . . . . . .22(Optional) Resave Acquisition Methods for Shimadzu Prominence LC Systems . . . . . . . . . . . . . . . . . . . . . . . . . . . . . . . . . . . . . . . . . . . . . . . . .23(Optional) Update Instrument Settings in Unpacked Acquisition Methods for the QTRAP Series of Instruments . . . . . . . . . . . . . . . . . . . . . . . . . . . . . .24
Library Search Parameters . . . . . . . . . . . . . . . . . . . . . . . . . . . . . . . . . . . . . . . . .25
Chapter 4 Troubleshooting . . . . . . . . . . . . . . . . . . . . . . . . . . . . . . . . . . . . . . . . . . 27
Appendix A Configure the Analyst Software . . . . . . . . . . . . . . . . . . . . . . . . . . . .29
Set the Security Mode to Mixed Mode . . . . . . . . . . . . . . . . . . . . . . . . . . . . . . . .29Add all Required Users . . . . . . . . . . . . . . . . . . . . . . . . . . . . . . . . . . . . . . . . . . . .29Assign Users to Roles . . . . . . . . . . . . . . . . . . . . . . . . . . . . . . . . . . . . . . . . . . . . .30
Assign Single Users to Roles . . . . . . . . . . . . . . . . . . . . . . . . . . . . . . . . . . . . .30Assign Multiple Users to Roles using the Assign Role Utility . . . . . . . . . . . . .31
Change the Peak Review Default Options Settings . . . . . . . . . . . . . . . . . . . . . .32Change the Quant Method Editor Settings . . . . . . . . . . . . . . . . . . . . . . . . . . . . .33Disable the Analyst Software Audit Trail Functionality . . . . . . . . . . . . . . . . . . . .34
Installation Guide for Upgrades
Release Date: October 2012Cliquid® 3.2.1 Software
3 of 34

Contents
Cliquid® 3.2.1 Software
4 of 34
Installation Guide for Upgrades
Release Date: October 2012
1
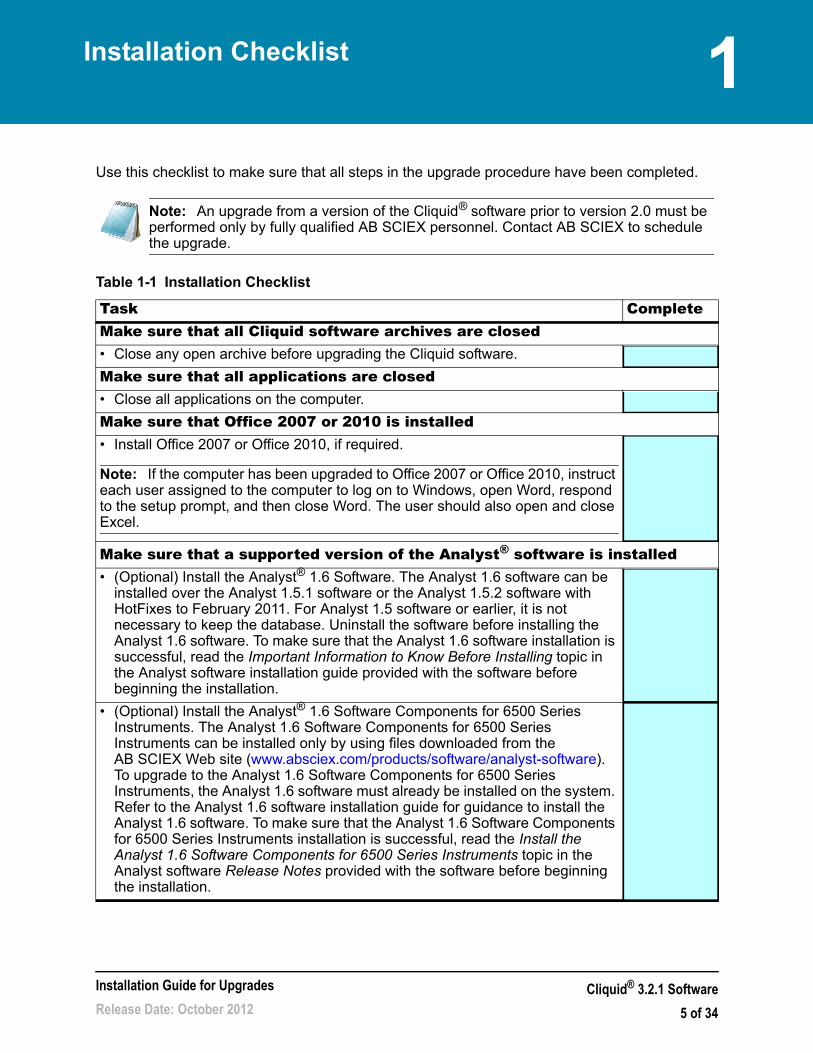
Installation ChecklistUse this checklist to make sure that all steps in the upgrade procedure have been completed.
Note: An upgrade from a version of the Cliquid® software prior to version 2.0 must be performed only by fully qualified AB SCIEX personnel. Contact AB SCIEX to schedule the upgrade.
Table 1-1 Installation Checklist
Task CompleteMake sure that all Cliquid software archives are closed• Close any open archive before upgrading the Cliquid software.
Make sure that all applications are closed• Close all applications on the computer.
Make sure that Office 2007 or 2010 is installed• Install Office 2007 or Office 2010, if required.
Note: If the computer has been upgraded to Office 2007 or Office 2010, instruct each user assigned to the computer to log on to Windows, open Word, respond to the setup prompt, and then close Word. The user should also open and close Excel.
Make sure that a supported version of the Analyst® software is installed• (Optional) Install the Analyst® 1.6 Software. The Analyst 1.6 software can be
installed over the Analyst 1.5.1 software or the Analyst 1.5.2 software with HotFixes to February 2011. For Analyst 1.5 software or earlier, it is not necessary to keep the database. Uninstall the software before installing the Analyst 1.6 software. To make sure that the Analyst 1.6 software installation is successful, read the Important Information to Know Before Installing topic in the Analyst software installation guide provided with the software before beginning the installation.
• (Optional) Install the Analyst® 1.6 Software Components for 6500 Series Instruments. The Analyst 1.6 Software Components for 6500 Series Instruments can be installed only by using files downloaded from the AB SCIEX Web site (www.absciex.com/products/software/analyst-software). To upgrade to the Analyst 1.6 Software Components for 6500 Series Instruments, the Analyst 1.6 software must already be installed on the system. Refer to the Analyst 1.6 software installation guide for guidance to install the Analyst 1.6 software. To make sure that the Analyst 1.6 Software Components for 6500 Series Instruments installation is successful, read the Install the Analyst 1.6 Software Components for 6500 Series Instruments topic in the Analyst software Release Notes provided with the software before beginning the installation.
Installation Guide for Upgrades
Release Date: October 2012Cliquid® 3.2.1 Software
5 of 34
Installation Checklist
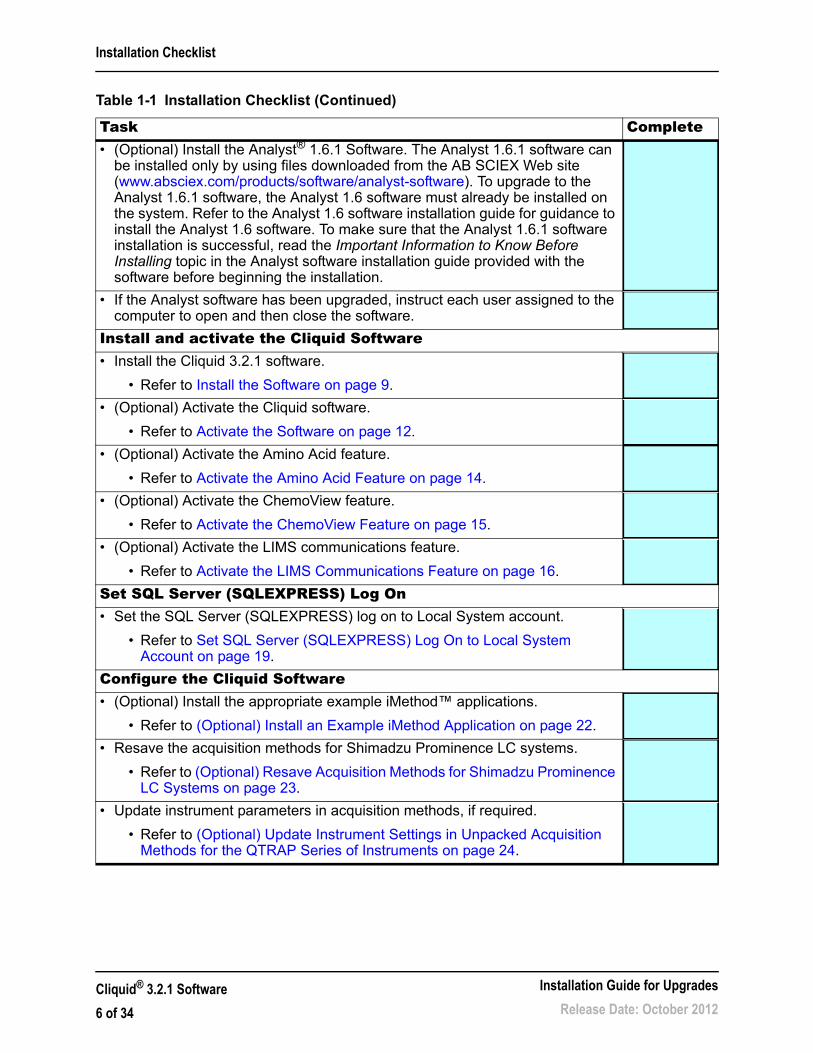
• (Optional) Install the Analyst® 1.6.1 Software. The Analyst 1.6.1 software can be installed only by using files downloaded from the AB SCIEX Web site (www.absciex.com/products/software/analyst-software). To upgrade to the Analyst 1.6.1 software, the Analyst 1.6 software must already be installed on the system. Refer to the Analyst 1.6 software installation guide for guidance to install the Analyst 1.6 software. To make sure that the Analyst 1.6.1 software installation is successful, read the Important Information to Know Before Installing topic in the Analyst software installation guide provided with the software before beginning the installation.
• If the Analyst software has been upgraded, instruct each user assigned to the computer to open and then close the software.
Install and activate the Cliquid Software• Install the Cliquid 3.2.1 software.
• Refer to Install the Software on page 9.
• (Optional) Activate the Cliquid software.
• Refer to Activate the Software on page 12.
• (Optional) Activate the Amino Acid feature.
• Refer to Activate the Amino Acid Feature on page 14.
• (Optional) Activate the ChemoView feature.
• Refer to Activate the ChemoView Feature on page 15.
• (Optional) Activate the LIMS communications feature.
• Refer to Activate the LIMS Communications Feature on page 16.
Set SQL Server (SQLEXPRESS) Log On• Set the SQL Server (SQLEXPRESS) log on to Local System account.
• Refer to Set SQL Server (SQLEXPRESS) Log On to Local System Account on page 19.
Configure the Cliquid Software• (Optional) Install the appropriate example iMethod™ applications.
• Refer to (Optional) Install an Example iMethod Application on page 22.
• Resave the acquisition methods for Shimadzu Prominence LC systems.
• Refer to (Optional) Resave Acquisition Methods for Shimadzu Prominence LC Systems on page 23.
• Update instrument parameters in acquisition methods, if required.
• Refer to (Optional) Update Instrument Settings in Unpacked Acquisition Methods for the QTRAP Series of Instruments on page 24.
Table 1-1 Installation Checklist (Continued)
Task Complete
Cliquid® 3.2.1 Software
6 of 34
Installation Guide for Upgrades
Release Date: October 2012
2
Installation ProceduresThis chapter describes the content of the Cliquid® software installation DVD and provides procedures for installing all required software.
This chapter contains the following sections:
• Cliquid 3.2.1 Software Installation DVD on page 7
• Upgrade to the Cliquid 3.2.1 Software on page 9
Cliquid 3.2.1 Software Installation DVD
Contents of the Installation DVDThe following software applications are included on the installation DVD:
• Microsoft Windows Installer 3.1 or greater
• MDAC 2.8 SP1
• SQL Express 2005 (SQL Server)
• Microsoft Save as PDF add-in for 2007 Microsoft Office Programs
• AB SCIEX Reporter Template Suite 3.2
• Adobe Reader 10.0.1
• Cliquid 3.2.1 software
The following documents are included on the installation DVD.
• Cliquid Software Reference Guide (.pdf file)
• Release Notes (.pdf file)
• Cliquid Software Installation Guide for Upgrades (.pdf file)
• License Agreement (.rtf file)
The following example iMethod™ applications are included in the iMethod Applications folder on the installation DVD:
• Example iMethod applications for each of the following instrument configurations (refer to Example iMethod™ Applications on page 20 for a complete list of the contents):
• API 2000™ system, with Agilent 1200 LC system or Shimadzu Prominence LC system.
• API 3000™ system, with Agilent 1200 LC system or Shimadzu Prominence LC system.
Note: The user must have local Administrator privileges on the computer to install the software.
Installation Guide for Upgrades
Release Date: October 2012Cliquid® 3.2.1 Software
7 of 34
Installation Procedures
• API 3200™ system, with Agilent 1200 LC system, Agilent 1260 LC system, ekspert™ ultraLC 100 system, ekspert™ ultraLC 100-XL system, Shimadzu Prominence LC system, or Shimadzu Prominence XR LC system.
• API 4000™ system, with Agilent 1200 LC system, Agilent 1260 LC system, ekspert ultraLC 100 system, ekspert ultraLC 100-XL system, Shimadzu Prominence LC system, or Shimadzu Prominence XR LC system.
• API 5000™ system, with Agilent 1200 LC system, Agilent 1260 LC system, ekspert ultraLC 100 system, ekspert ultraLC 100-XL system, Shimadzu Prominence LC system, or Shimadzu Prominence XR LC system.
• AB SCIEX Triple Quad™ 4500 system, with Agilent 1200 LC system, Agilent 1260 LC system, ekspert ultraLC 100 system, ekspert ultraLC 100-XL system, Shimadzu Prominence LC system, or Shimadzu Prominence XR LC system.
• AB SCIEX Triple Quad™ 5500 system, with Agilent 1200 LC system, Agilent 1260 LC system, ekspert ultraLC 100 system, ekspert ultraLC 100-XL system, Shimadzu Prominence LC system, or Shimadzu Prominence XR LC system.
• AB SCIEX Triple Quad™ 6500 system, with Agilent 1260 LC system, ekspert ultraLC 100 system, ekspert ultraLC 100-XL system, Shimadzu Prominence LC system, or Shimadzu Prominence XR LC system.
• QTRAP® system, with Agilent 1200 LC system or Shimadzu Prominence LC system.
• 3200 Q TRAP system, with Agilent 1200 LC system, Agilent 1260 LC system, ekspert ultraLC 100 system, ekspert ultraLC 100-XL system, Shimadzu Prominence LC system, or Shimadzu Prominence XR LC system.
• 4000 Q TRAP system, with Agilent 1200 LC system, Agilent 1260 LC system, ekspert ultraLC 100 system, ekspert ultraLC 100-XL system, Shimadzu Prominence LC system, or Shimadzu Prominence XR LC system.
• AB SCIEX QTRAP 4500 system, with Agilent 1200 LC system, Agilent 1260 LC system, ekspert ultraLC 100 system, ekspert ultraLC 100-XL system, Shimadzu Prominence LC system, or Shimadzu Prominence XR LC system.
• AB SCIEX QTRAP 5500 system, with Agilent 1200 LC system, Agilent 1260 LC system, ekspert ultraLC 100 system, ekspert ultraLC 100-XL system, Shimadzu Prominence LC system, or Shimadzu Prominence XR LC system.
• AB SCIEX QTRAP 6500 system, with Agilent 1260 LC system, ekspert ultraLC 100 system, ekspert ultraLC 100-XL system, Shimadzu Prominence LC system, or Shimadzu Prominence XR LC system.
• Example iMethod open access applications for each of the following instrument configurations (refer to Example iMethod Open Access Applications on page 22 for a complete list of the contents):
• API 2000 system, with Agilent 1200 LC system or Shimadzu Prominence LC system.
• API 3200 system, with Agilent 1200 LC system or Shimadzu Prominence LC system.
• API 4000 system, with Agilent 1200 LC system or Shimadzu Prominence LC system.
Cliquid® 3.2.1 Software
8 of 34
Installation Guide for Upgrades
Release Date: October 2012
Installation Procedures
• 3200 Q TRAP system, with Agilent 1200 LC system or Shimadzu Prominence LC system.
• 4000 Q TRAP system, with Agilent 1200 LC system or Shimadzu Prominence LC system.
• Example Library application, containing a spectrum for each of the seven example triazine compounds included in the example iMethod applications.
• Example Quant Report Style with Record Modified application, containing an example report style that contains an additional field (Record Modified) used to indicate that changes have been made to the Results Table.
Upgrade to the Cliquid 3.2.1 SoftwareAny of the following versions of the Cliquid software can be upgraded to this version of the software, version 3.2.1:
• Cliquid software version 2.0
• Cliquid Amino Acid software version 2.0
• Cliquid ChemoView™ software version 2.0
• Cliquid software version 3.0
• Cliquid software version 3.0.1
• Cliquid software version 3.2
I
Install the SoftwareAll of the prerequisite software and the Cliquid® 3.2.1 software must be installed on the acquisition workstation.
1. Log on to the computer as a user with Administrator privileges.
2. Make sure that the Analyst® software hardware profile is deactivated.
3. Make sure that all applications are closed.
4. Make sure that all Cliquid software archives are closed.
5. Insert the Cliquid software installation DVD into the DVD drive.
The Cliquid Software Installer dialog opens.
Note: An upgrade from any other version of the Cliquid software must be performed only by fully qualified AB SCIEX personnel. Contact AB SCIEX to schedule the upgrade.
Note: Before upgrading to the Cliquid 3.2.1 software, make sure that a supported version of the Analyst software and Microsoft Office 2007 or 2010 are installed on the acquisition workstation. If Microsoft Office has been upgraded, we recommend that each user assigned to the computer open Word, respond to the setup prompt, and then close Word. Users should also open and close Excel.
Installation Guide for Upgrades
Release Date: October 2012Cliquid® 3.2.1 Software
9 of 34
Installation Procedures
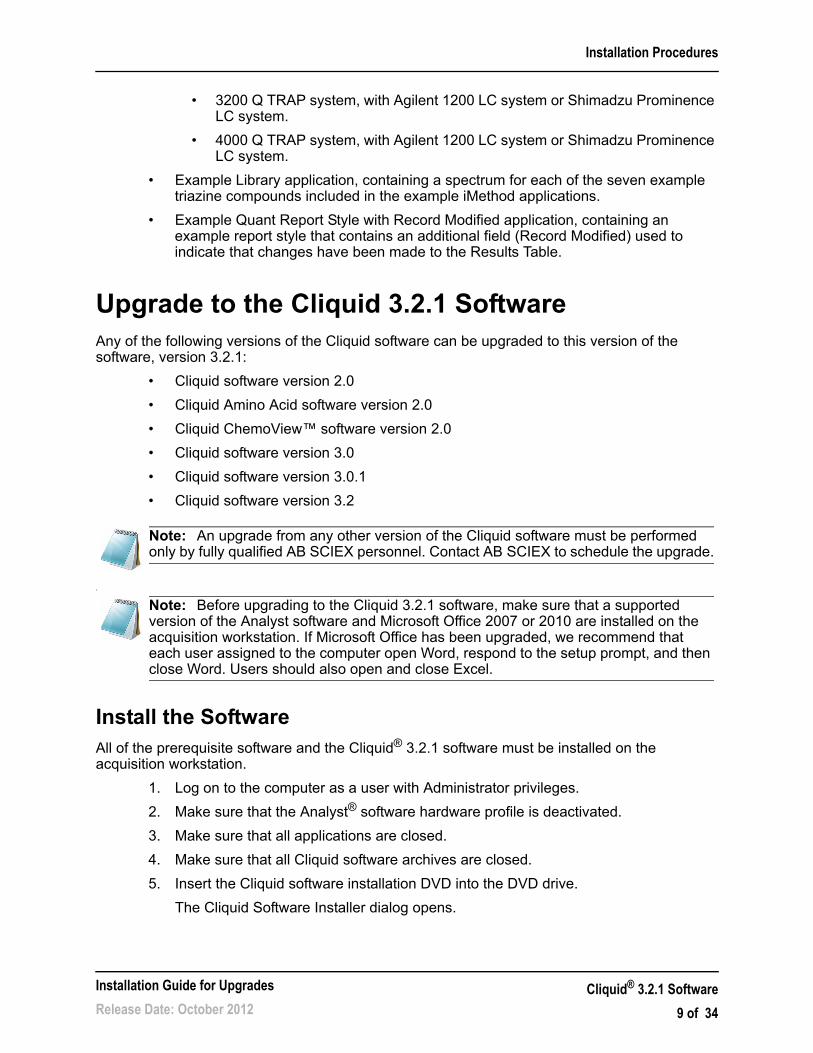
Figure 2-1 Cliquid Software Installer dialog
6. Click Install.
SQL Express 2005, the Microsoft Save as PDF add-in for 2007 Microsoft Office Programs, and Adobe Reader, if required, will install with no user intervention.
7. On the Software License Agreement dialog, click I accept the terms in the license agreement and then click Next.
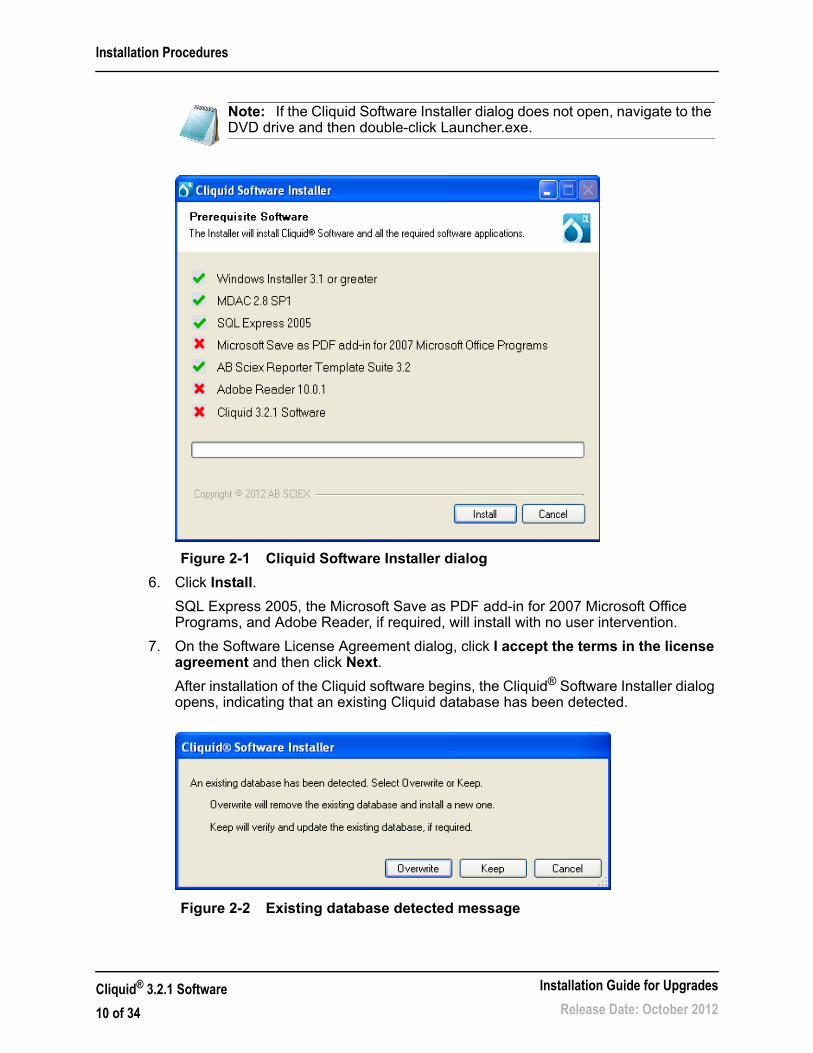
After installation of the Cliquid software begins, the Cliquid® Software Installer dialog opens, indicating that an existing Cliquid database has been detected.
Figure 2-2 Existing database detected message
Note: If the Cliquid Software Installer dialog does not open, navigate to the DVD drive and then double-click Launcher.exe.
Cliquid® 3.2.1 Software
10 of 34
Installation Guide for Upgrades
Release Date: October 2012

Installation Procedures
There are two options: overwrite the existing database or keep the existing database.
8. Click Keep.
All of the data, tests, compounds, and so on, are migrated. During the upgrade, all report templates are automatically copied from their original location to the <Drive>:/Analyst Data/Projects/Cliquid/Templates/ReportTemplates folder, and converted from .xml files to .docx files.
Query files required by the Cliquid software are automatically copied from their original location to the <Drive>:/Analyst Data/Projects/Cliquid/ Templates/Config folder.
After installation is complete, the following Cliquid Software Installer and Cliquid® Software dialogs open.
Figure 2-3 Cliquid Software Installer dialog
Note: If Overwrite is selected, all of the existing data, tests, reports, compounds, library, and so on, will be permanently removed.
Note: Some converted templates might not be editable. In addition, if a Reporter template was created using Microsoft Word 2003 and then modified using Microsoft Word 2007, when attempting to save the template, Word 2007 might stop responding. Use Word 2003 to modify templates that were originally created using Word 2003. Contact [email protected] to resolve issues with editing converted report templates.
Installation Guide for Upgrades
Release Date: October 2012Cliquid® 3.2.1 Software
11 of 34
Installation Procedures
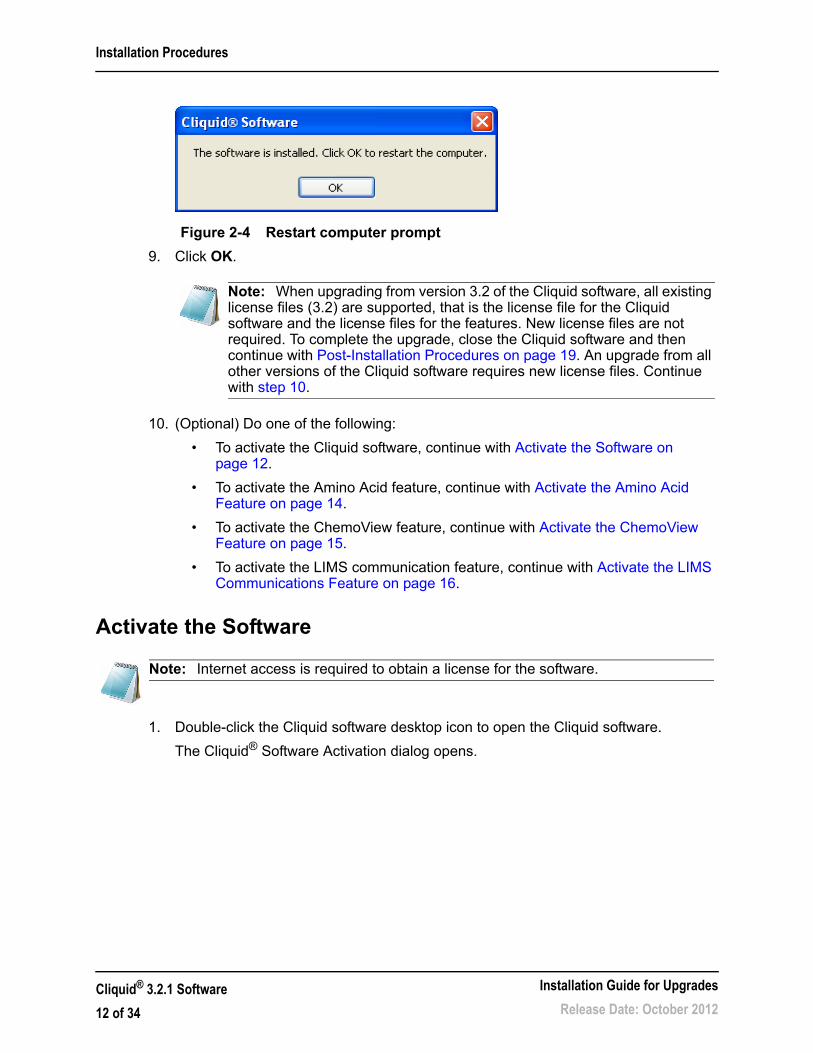
Figure 2-4 Restart computer prompt
9. Click OK.
10. (Optional) Do one of the following:
• To activate the Cliquid software, continue with Activate the Software on page 12.
• To activate the Amino Acid feature, continue with Activate the Amino Acid Feature on page 14.
• To activate the ChemoView feature, continue with Activate the ChemoView Feature on page 15.
• To activate the LIMS communication feature, continue with Activate the LIMS Communications Feature on page 16.
Activate the Software
1. Double-click the Cliquid software desktop icon to open the Cliquid software.
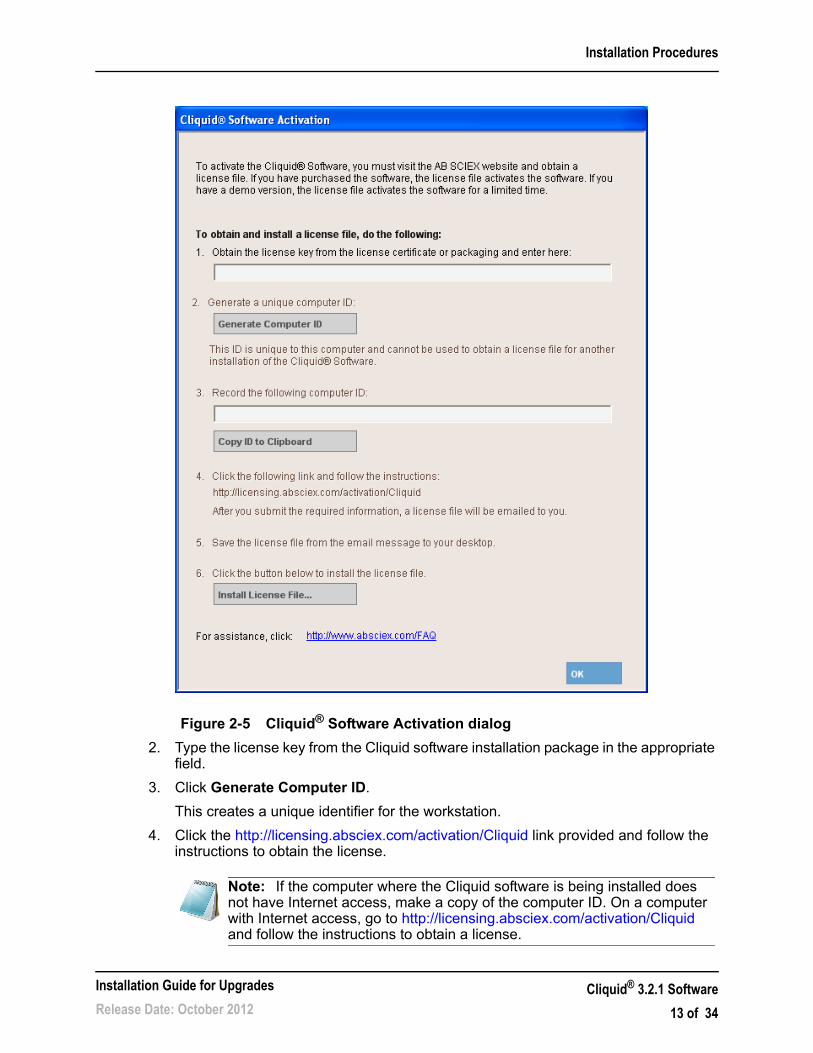
The Cliquid® Software Activation dialog opens.
Note: When upgrading from version 3.2 of the Cliquid software, all existing license files (3.2) are supported, that is the license file for the Cliquid software and the license files for the features. New license files are not required. To complete the upgrade, close the Cliquid software and then continue with Post-Installation Procedures on page 19. An upgrade from all other versions of the Cliquid software requires new license files. Continue with step 10.
Note: Internet access is required to obtain a license for the software.
Cliquid® 3.2.1 Software
12 of 34
Installation Guide for Upgrades
Release Date: October 2012
Installation Procedures
Figure 2-5 Cliquid® Software Activation dialog
2. Type the license key from the Cliquid software installation package in the appropriate field.
3. Click Generate Computer ID.
This creates a unique identifier for the workstation.
4. Click the http://licensing.absciex.com/activation/Cliquid link provided and follow the instructions to obtain the license.
Note: If the computer where the Cliquid software is being installed does not have Internet access, make a copy of the computer ID. On a computer with Internet access, go to http://licensing.absciex.com/activation/Cliquid and follow the instructions to obtain a license.
Installation Guide for Upgrades
Release Date: October 2012Cliquid® 3.2.1 Software
13 of 34

Installation Procedures
After the required information is submitted, a license file is sent to all e-mail addresses provided.
5. Close the browser window.
6. When the e-mail containing the license file is received, copy the license file to the workstation desktop.
7. On the Cliquid® Software Activation dialog, click Install License File.
The Select the new license file to be installed dialog opens.
8. Browse to and select the license file and then click Open.
Both the Select the new license file to be installed and the Cliquid® Software Activation dialogs close, and the Cliquid software splash screen opens.
9. Open the Analyst software.
10. Reactivate the hardware profile.
11. Close the Analyst software.
12. Do one of the following:
• To activate the Amino Acid feature, continue with Activate the Amino Acid Feature on page 14.
• To activate the ChemoView feature, continue with Activate the ChemoView Feature on page 15.
• To activate the LIMS communication feature, continue with Activate the LIMS Communications Feature on page 16.
• To complete the upgrade, close the Cliquid software and then continue with Post-Installation Procedures on page 19.
Activate the Amino Acid Feature
A license key is required to activate this feature. Contact the local sales representative or [email protected] to request this key.
1. Log on to the Cliquid software as a user with Administrator privileges.
2. From the list of tasks on the Home page, click Features.
3. On the Feature Settings page, click Activate features.
4. Click Activate beside Amino Acid.
The Cliquid® Software Activation dialog opens.
5. Type the license key for the Amino Acid feature in the appropriate field.
6. Click Generate Computer ID.
This creates a unique identifier for the computer.
7. Click the http://licensing.absciex.com/activation/Cliquid link provided and follow the instructions to obtain the license.
Note: Internet access is required to obtain a license for this feature.
Cliquid® 3.2.1 Software
14 of 34
Installation Guide for Upgrades
Release Date: October 2012
Installation Procedures
After the required information is submitted, a license file will be sent to all e-mail addresses provided.
8. Close the browser window.
9. When the e-mail containing the license file is received, copy the license file to the workstation desktop.
10. On the Cliquid® Software Activation dialog, click Install License File.
The Select the new license file to be installed dialog opens.
11. Browse to and select the license file and then click Open.
Both the Select the new license file to be installed and the Cliquid® Software Activation dialogs close. The Activate button beside Amino Acid is no longer active.
12. Click Finish.
The Feature Settings page opens. The status beside Amino Acid is set to Active.
13. Do one of the following:
• To activate the ChemoView feature, continue with Activate the ChemoView Feature on page 15.
• To activate the LIMS communications feature, continue with Activate the LIMS Communications Feature on page 16.
• To complete the upgrade, close the Cliquid software and then continue with Post-Installation Procedures on page 19.
Activate the ChemoView Feature
A license key is required to activate this feature. Contact the local sales representative or [email protected] to request this key.
1. Log on to the Cliquid software as a user with Administrator privileges.
2. From the list of tasks on the Home page, click Features.
3. On the Feature Settings page, click Activate features.
4. Click Activate beside ChemoView.
The Cliquid® Software Activation dialog opens.
5. Type the license key for the ChemoView feature in the appropriate field.
6. Click Generate Computer ID.
This creates a unique identifier for the computer.
Note: If the computer where the Cliquid software is being installed does not have Internet access, make a copy of the computer ID. On a computer with Internet access, go to http://licensing.absciex.com/activation/Cliquid and follow the instructions to obtain a license.
Note: Internet access is required to obtain a license for this feature.
Installation Guide for Upgrades
Release Date: October 2012Cliquid® 3.2.1 Software
15 of 34
Installation Procedures
7. Click the http://licensing.absciex.com/activation/Cliquid link provided and follow the instructions to obtain the license.
After the required information is submitted, a license file will be sent to all e-mail addresses provided.
8. Close the browser window.
9. When the e-mail containing the license file is received, copy the license file to the workstation desktop.
10. On the Cliquid® Software Activation dialog, click Install License File.
The Select the new license file to be installed dialog opens.
11. Browse to and select the license file and then click Open.
Both the Select the new license file to be installed and the Cliquid® Software Activation dialogs close. The Activate button beside ChemoView is no longer active.
12. Click Finish.
The Feature Settings page opens. The status beside ChemoView is set to Active.
13. Do one of the following:
• To activate the LIMS communications feature, continue with Activate the LIMS Communications Feature on page 16.
• To complete the upgrade, close the Cliquid software and then continue with Post-Installation Procedures on page 19.
Activate the LIMS Communications Feature
A license key is required to activate this feature. Contact the local sales representative or [email protected] to request this key.
1. Log on to the Cliquid software as a user with Administrator privileges.
2. From the list of tasks on the Home page, click Features.
3. On the Feature Settings page, click Activate features.
4. Click Activate beside LIMS communications.
The Cliquid® Software Activation dialog opens.
5. Type the license key for the LIMS communications feature in the appropriate field.
6. Click Generate Computer ID.
This creates a unique identifier for the computer.
Note: If the computer where the Cliquid software is being installed does not have Internet access, make a copy of the computer ID. On a computer with Internet access, go to http://licensing.absciex.com/activation/Cliquid and follow the instructions to obtain a license.
Note: Internet access is required to obtain a license for this feature.
Cliquid® 3.2.1 Software
16 of 34
Installation Guide for Upgrades
Release Date: October 2012
Installation Procedures
7. Click the http://licensing.absciex.com/activation/Cliquid link provided and follow the instructions to obtain the license.
After the required information is submitted, a license file will be sent to all e-mail addresses provided.
8. Close the browser window.
9. When the e-mail containing the license file is received, copy the license file to the workstation desktop.
10. On the Cliquid® Software Activation dialog, click Install License File.
The Select the new license file to be installed dialog opens.
11. Browse to and select the license file and then click Open.
Both the Select the new license file to be installed and the Cliquid® Software Activation dialogs close. The Activate button beside LIMS communications is no longer active.
12. Click Finish.
The Feature Settings page opens. The status beside LIMS communications is set to Active.
Enable the LIMS Communications Feature1. On the Feature Settings page, click Set up LIMS communications.
The Enter LIMS communications settings page opens.
2. To enable communications with the LIMS, click On.
3. Type the name of the LIMS/LIS server in the LIMS server field.
4. Click Finish.
The Feature Settings page opens. LIMS communications is set to On.
5. To complete the upgrade, close the Cliquid software and then continue with Post-Installation Procedures on page 19.
Note: If the computer where the Cliquid software is being installed does not have Internet access, make a copy of the computer ID. On a computer with Internet access, go to http://licensing.absciex.com/activation/Cliquid and follow the instructions to obtain a license.
Installation Guide for Upgrades
Release Date: October 2012Cliquid® 3.2.1 Software
17 of 34

Installation Procedures
Cliquid® 3.2.1 Software
18 of 34
Installation Guide for Upgrades
Release Date: October 2012
3
Post-Installation ProceduresIf Microsoft Office has been upgraded to version 2007 or 2010, instruct each user assigned to the computer to log on to Windows, open Word, respond to the setup prompt, and then close Word. Each user should also open and then close Excel.
All settings from the original version of the Analyst® software should persist in the Analyst 1.6 software, Analyst 1.6 Software Components for 6500 Series Instruments, or Analyst 1.6.1 software, that is, the hardware profile, the security mode setting, the users and their roles, the disabled audit trail, the peak review default options, and the quant method editor settings. If any of these items need to be reset, refer to Appendix A. We recommend that each user assigned to the computer open and close the Analyst software before working with the updated version of the Cliquid® software.
All settings from the original version of the Cliquid software should persist in the Cliquid 3.2.1 software, that is, all user profiles, autosampler settings, library search parameters, and isotope correction parameters, if applicable. If any of these items need to be reset, refer to the following Cliquid software Help topics, available through Start > All Programs > AB SCIEX > Cliquid > Help:
• User profiles, refer to Setup > User Profile > Creating a User Profile.
• Autosampler settings, refer to Setup > Autosampler.
• Library search parameters, refer to Setup > Processing Parameters > Library Search.
• Isotope correction parameters, refer to Setup > Processing Parameters > Isotope Correction.
• General unknown screening parameters, refer to Setup > Processing Parameters > General Unknown and Targeted & Unknown Screening.
This chapter outlines additional tasks to be performed after the upgrade is complete, and contains the following sections:
• Set SQL Server (SQLEXPRESS) Log On to Local System Account on page 19
• Example iMethod™ Applications on page 20
• Library Search Parameters on page 25
Set SQL Server (SQLEXPRESS) Log On to Local System AccountSet the log on for SQL Server (SQLEXPRESS) to Local System account to prevent unauthorized access to data stored in the Cliquid database, using the following steps:
1. Click Start > Control Panel.
2. On the Control Panel dialog, double-click Administrative Tools.
Note: Make sure the Cliquid software is closed before performing this procedure.
Installation Guide for Upgrades
Release Date: October 2012Cliquid® 3.2.1 Software
19 of 34
Post-Installation Procedures
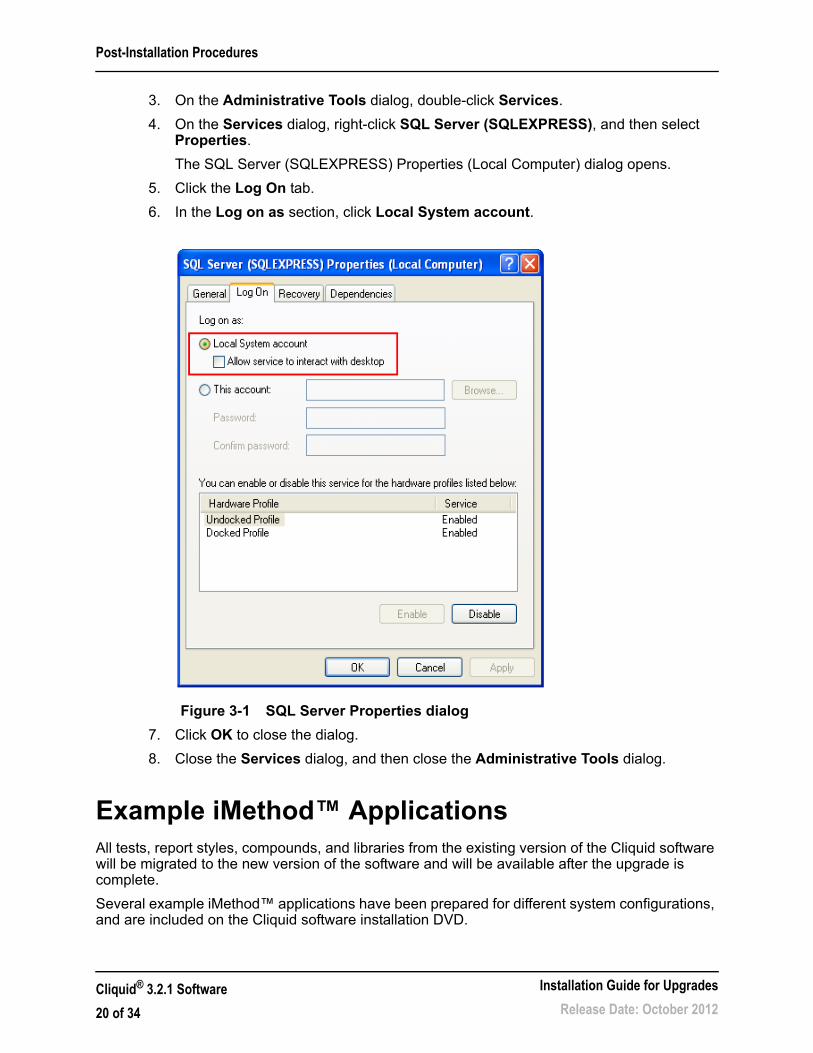
3. On the Administrative Tools dialog, double-click Services.
4. On the Services dialog, right-click SQL Server (SQLEXPRESS), and then select Properties.
The SQL Server (SQLEXPRESS) Properties (Local Computer) dialog opens.
5. Click the Log On tab.
6. In the Log on as section, click Local System account.
Figure 3-1 SQL Server Properties dialog
7. Click OK to close the dialog.
8. Close the Services dialog, and then close the Administrative Tools dialog.
Example iMethod™ ApplicationsAll tests, report styles, compounds, and libraries from the existing version of the Cliquid software will be migrated to the new version of the software and will be available after the upgrade is complete.
Several example iMethod™ applications have been prepared for different system configurations, and are included on the Cliquid software installation DVD.
Cliquid® 3.2.1 Software
20 of 34
Installation Guide for Upgrades
Release Date: October 2012

Post-Installation Procedures
All iMethod applications include the following tests and corresponding method documents:
• Example sMRM (Scheduled MRM™ algorithm) quantitation test.
• Example system suitability test.
iMethod applications for QTRAP® systems only (excluding the QTRAP® 6500 system) include the following additional tests and corresponding method documents:
• Example general unknown screening test (negative ion, CES).
• Example general unknown screening test (positive ion, CES).
• Example targeted and unknown screening test.
• Example screening test.
All iMethod applications include the following report styles:
• Samples with Chromatograms Report.
• Example System Suitability Test Report.
iMethod applications for QTRAP systems only (excluding the QTRAP 6500 system) include the following additional report styles:
• General Unknown Screening All Peaks (CES) Report.
• General Unknown Screening Matching Hits (CES) Report.
• CES Best Candidate Library Search Report.
• CES Confirmation Library Search - All Peaks Report.
• CES Confirmation Library Search - Matching Hits Report.
• CES Multi-Candidate Library Search Report.
• Targeted & Unknown Screening - Targets - All Peaks (CES) Report.
• Targeted & Unknown Screening - Targets - Matching Hits (CES) Report.
• Targeted & Unknown Screening - Unknowns - All Peaks (CES) Report.
• Targeted & Unknown Screening - Unknowns - Matching Hits (CES) Report.
All iMethod applications include the following compounds:
• Ametryn_E2.0
• Atrazine_E2.0
• Prometon_E2.0
• Prometryn_E2.0
• Propazine_E2.0
• Simazine_E2.0
• Terbutryn_E2.0
Example Library ApplicationAn example Library application, containing a spectrum for each of the seven triazine compounds included in the example iMethod applications, is included on the Cliquid software installation DVD.
Installation Guide for Upgrades
Release Date: October 2012Cliquid® 3.2.1 Software
21 of 34
Post-Installation Procedures
Example iMethod Open Access ApplicationsSeveral example iMethod Open Access applications have been prepared for different instrument configurations, and are included on the Cliquid software installation DVD.
Each iMethod application includes the following tests and corresponding method documents:
• Example open access test (EPI) (for QTRAP systems only)
• Example open access test (Q1 MS)
• Example open access test (MRM)
• Example open access test (MS/MS)
• Example open access test (Q1 MI)
• Example open access test (EMS IDA EPI) (for QTRAP systems only)
• Example open access test (EMS Scan) (for QTRAP systems only)
Each iMethod application includes the following report styles:
• Open Access MRM and Multiple Ion Report
• Open Access Full Scan Report
Example Quant Report Style with Record Modified ApplicationAn example report style containing an additional field (Record Modified) that is used to indicate that changes have been made to the Results Table is included in this application.
(Optional) Install an Example iMethod Application
1. Log on to the Cliquid software as a user with Administrator privileges.
2. From the list of tasks on the Home page, click Sharing.
3. On the Sharing page, click Unpack.
4. Browse to the iMethod Applications folder on the installation DVD.
5. Select the appropriate iMethod application (.clq file) from the list of available applications
Note: These files provide a starting point for deployment of a new test and they should be customized to meet the specific requirements of the laboratory. After the application is installed, users can run the tests using the Cliquid software and obtain results quickly.
Cliquid® 3.2.1 Software
22 of 34
Installation Guide for Upgrades
Release Date: October 2012
Post-Installation Procedures
After the application is selected, a contents summary page opens in the Cliquid software interface. If the LC/MS/MS system configuration of the application exactly matches the hardware profile, the word “Compatible” is shown in green lettering.
If the hardware profiles do not match, the word “Incompatible” is shown in red lettering. This indicates a mismatch between the hardware configuration used in the development of the test and the hardware configuration.
• If the mismatch is because of a different mass spectrometer, neither the tests nor the MRM catalogue entries (compounds) will be unpacked.
• If the mismatch is caused by a different LC configuration, the test can be unpacked. However, the acquisition and quantitation method files must be updated and tested in the Analyst software prior to use in the Cliquid software. In most cases, these modifications will involve adding a missing LC component to the method, entering the appropriate method parameters from the method document included with this test, and updating retention times.
6. Click Next.
A page where components to be unpacked can be selected opens. By default, all components are selected.
7. If there are items that are not required, clear the corresponding check box.
8. Click Finish to complete the unpack.
A confirmation message is shown after the unpack is completed.
9. Click Done to return to the Sharing page.
The unpacked tests are now available to be run using the Cliquid software.
10. Repeat step 3 through step 9 for each application to be unpacked.
(Optional) Resave Acquisition Methods for Shimadzu Prominence LC SystemsIf the LC/MS/MS system configuration includes a Shimadzu Prominence LC system, the acquisition methods unpacked from the iMethod applications must be opened in the Analyst software and then resaved.
1. Close the Cliquid software.
2. Open the Analyst software.
3. Make sure the Cliquid project is shown in the Project field.
If the Project field is not visible, click Tools > Restore Default Toolbars.
Note: The iMethod applications are identified by the MS and LC instrument type associated with the application. Select the application that most closely matches the LC/MS/MS system configuration being used. The mass spectrometer must match the instrument model being used. For example, if the configuration is a QTRAP 6500 MS/MS System with an Agilent 1260 LC System, select the application with “QTRAP6500+Agilent1260” in the file name. The example library file is not configuration-specific. It can be unpacked to any system configuration.
Installation Guide for Upgrades
Release Date: October 2012Cliquid® 3.2.1 Software
23 of 34
Post-Installation Procedures
4. Click File > Open.
5. In the Files of type list on the Open dialog, click Acquisition Method (.dam).
A list of acquisition methods is shown.
6. Select the first unpacked acquisition method, and then click OK.
7. When the acquisition method opens, click File > Save As, and then click the name of the open acquisition method from the list of methods.
The name of the selected acquisition method is shown in the File name field.
8. Click Save and then click Yes to replace the existing file.
9. Repeat step 4 through step 8, until all acquisition methods have been resaved.
10. Close the Analyst software.
(Optional) Update Instrument Settings in Unpacked Acquisition Methods for the QTRAP Series of InstrumentsIf tests containing acquisition methods with linear ion trap experiments (including example tests and tests purchased from the iMethod Store for any QTRAP® system) are unpacked, and the acquisition methods will be used in the Analyst software before the tests are used in the Cliquid software, the acquisition methods must be updated. If the acquisition methods are used in the Analyst software without updating them, compromised instrument performance might be observed as the methods will not contain the instrument settings specific for the system. If the tests will be submitted through the Cliquid software first, this procedure does not need to be performed.
1. Make sure the Cliquid software is closed.
2. Make sure the Analyst software is open.
3. Make sure the Cliquid project is shown in the Project field.
If the Project field is not visible, click Tools > Restore Default Toolbars.
4. Click File > Open.
5. In the Files of type list on the Open dialog, click Acquisition Method (*.dam).
A list of acquisition methods is shown.
6. Select the first unpacked acquisition method, and then click OK.
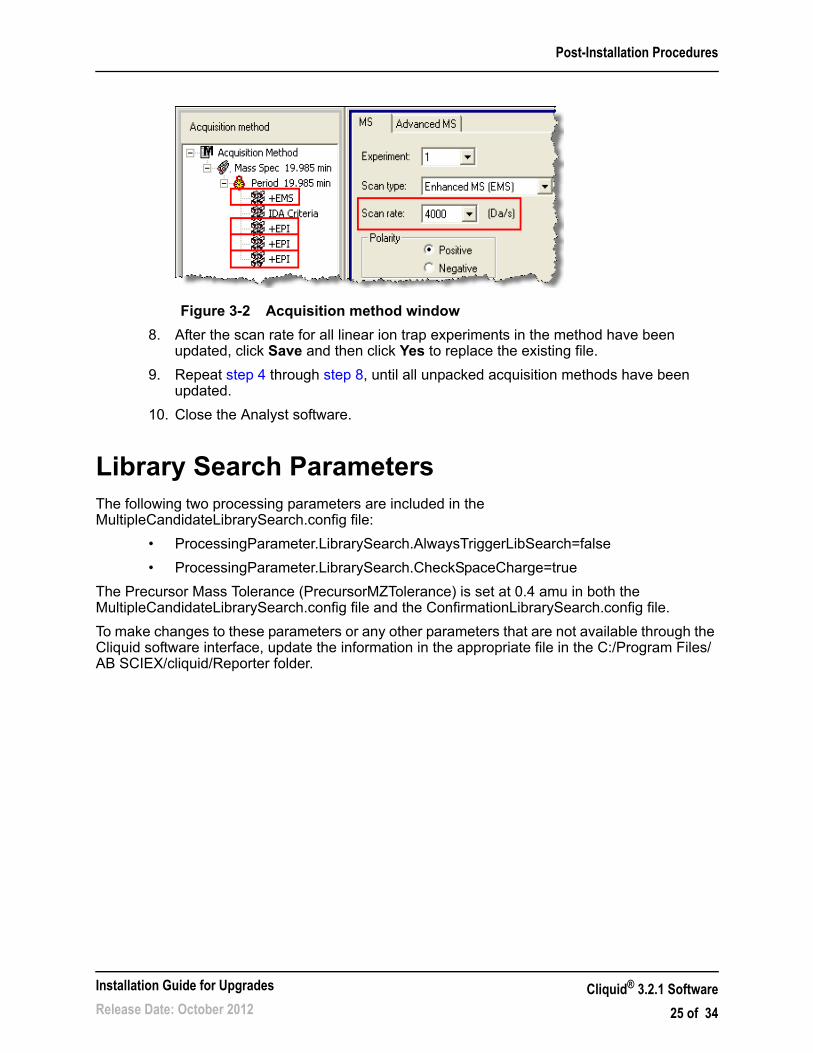
7. For each linear ion trap experiment, for example, EMS or EPI, listed in the Acquisition method pane, change the Scan rate in the right pane to any other available value and then change it back to the initial setting. Refer to Figure 3-2 on page 25.
Changing the scan rate updates the instrument settings for the acquisition method for the system.
Cliquid® 3.2.1 Software
24 of 34
Installation Guide for Upgrades
Release Date: October 2012
Post-Installation Procedures
Figure 3-2 Acquisition method window
8. After the scan rate for all linear ion trap experiments in the method have been updated, click Save and then click Yes to replace the existing file.
9. Repeat step 4 through step 8, until all unpacked acquisition methods have been updated.
10. Close the Analyst software.
Library Search ParametersThe following two processing parameters are included in the MultipleCandidateLibrarySearch.config file:
• ProcessingParameter.LibrarySearch.AlwaysTriggerLibSearch=false
• ProcessingParameter.LibrarySearch.CheckSpaceCharge=true
The Precursor Mass Tolerance (PrecursorMZTolerance) is set at 0.4 amu in both the MultipleCandidateLibrarySearch.config file and the ConfirmationLibrarySearch.config file.
To make changes to these parameters or any other parameters that are not available through the Cliquid software interface, update the information in the appropriate file in the C:/Program Files/AB SCIEX/cliquid/Reporter folder.
Installation Guide for Upgrades
Release Date: October 2012Cliquid® 3.2.1 Software
25 of 34

Post-Installation Procedures
Cliquid® 3.2.1 Software
26 of 34
Installation Guide for Upgrades
Release Date: October 2012
4
TroubleshootingThis chapter describes some issues that might be encountered while installing the prerequisite software and the Cliquid® software and suggests possible causes and potential solutions.
Table 4-1 Troubleshooting — Software Issues
Issue Possible Cause/SolutionA non-supported version of SQLExpress is installed and the Cliquid software installation cannot proceed.
SQL2005 is the only version of the Microsoft SQLExpress software supported by the Cliquid 3.2.1 software. If another version of SQLExpress exists on the computer where the Cliquid software is being installed, the installer will stop and notify the user that an unsupported version of SQL has been detected. The unsupported version of SQLExpress must be removed before installation can continue. Refer to “Unsupported Version of SQL Express” in the Release Notes for removal instructions.
In some cases, the WorkList Service (WorkListSvc) does not start automatically after the installation of the Cliquid software is complete and the user receives an error when starting the Cliquid software.
The following procedure resolves this issue:
1. Click Start and then do one of the following:• For Windows XP, click Run and then in the
Open field on the Run dialog, type services.msc. (including the .).
• For Windows 7, type services.msc. (including the .) in the search field.
2. In the Name column on the Services dialog, right-click WorkListSvc, and then click either Start or Restart.
3. After the Service Control dialog closes, close the Services dialog and the error message.
4. Start the Cliquid software again.
The Cliquid software might not function if the acquisition workstation has a data encryption application installed.
The application might encrypt files that the Cliquid software requires to operate. Installation should be completed on a computer that does not have a data encryption application installed.
The performance of the Cliquid software might be degraded on a system with an anti-virus application installed.
Anti-virus software scans each file for potential issues. This can impact reporting performance when numerous per sample reports are being generated. To optimize performance, the Cliquid software should be installed on a computer that does not have an anti-virus application installed. If anti-virus software is a requirement of the IT department, we recommend that automatic virus scans be disabled and a scan started manually when the system will be idle for an extended period of time.
Installation Guide for Upgrades
Release Date: October 2012Cliquid® 3.2.1 Software
27 of 34

Troubleshooting
Cliquid® 3.2.1 Software
28 of 34
Installation Guide for Upgrades
Release Date: October 2012
A
Configure the Analyst Software1. Open the Analyst® software.
2. Create and activate the appropriate hardware profile in the Analyst software. For more information, refer to the Getting Started Guide provided with the Analyst software.
3. Configure the Analyst software, using the steps outlined in the following procedures:
• Set the Security Mode to Mixed Mode on page 29
• Add all Required Users on page 29
• Assign Users to Roles on page 30
• Change the Peak Review Default Options Settings on page 32
• Change the Quant Method Editor Settings on page 33
• Disable the Analyst Software Audit Trail Functionality on page 34
Set the Security Mode to Mixed Mode1. On the Navigation bar under Configure, double-click Security Configuration.
2. On the Security Configuration dialog, click More.
3. Click the Security tab.
4. In the Security Mode section, click Mixed Mode.
5. Click OK.
6. Click OK to close the SecurityConfig message dialog.
Add all Required Users1. On the Navigation bar under Configure, double-click Security Configuration.
2. In the Security Configuration dialog, click the People tab.
3. Click New Person.
The Select Users or Groups dialog opens.
4. Type the user name in the field provided.
Note: For MS instruments with an integrated diverter valve, make sure it is not selected for inclusion in the hardware configuration for the system suitability test.
Note: User names must match the Windows accounts on the workstation
Installation Guide for Upgrades
Release Date: October 2012Cliquid® 3.2.1 Software
29 of 34

Configure the Analyst Software
5. Click Check Names to verify the names entered.
6. Click OK.
The Select Users or Groups dialog closes. The names of all users are shown in the left pane of the Security Configuration dialog.
7. Click OK to close the Security Configuration dialog.
8. Click OK to close the SecurityConfig message dialog.
Assign Users to RolesThe Cliquid® software requires two Analyst software roles: the Technician and the Administrator. When the Analyst software is installed, the Administrator role is automatically created. When the Cliquid software is installed, the Technician role is automatically created.
When new users are added to the computer they must be assigned to the Local Windows Administrators group, otherwise they might have difficulty working with the Cliquid software data files. When new users are added to the Analyst software, they must be assigned to one of the Cliquid software roles, the Technician or the Administrator role. Depending on the number of users to be assigned to a role in the Analyst software, each user can be assigned to a role manually, or the Assign Role utility can be used to assign multiple users to a role at one time. Refer to Assign Multiple Users to Roles using the Assign Role Utility on page 31.
The Cliquid software does not support user groups. Only an individual can be assigned to the Analyst software Administrator and Technician roles. In addition, the Cliquid software does not support multiple roles for one user. Only the first assigned role is recognized by the software and the user inherits the rights of that user role. All other roles are disregarded.
Assign Single Users to RolesAfter a new user has been added to the computer with Local Windows Administrator privileges:
1. Open the Analyst software as a user with Administrator privileges.
2. On the Navigation bar under Configure, double-click Security Configuration.
3. In the Security Configuration dialog, click the People tab.
4. In the left pane, click the name of the person to assign a role to.
5. In the Available Roles section, click the required role, for example, Administrator.
6. Click Add.
7. Repeat step 4 through step 6 for each user.
8. After all users have been assigned a role, click OK.
9. Click OK to close the SecurityConfig message dialog.
10. Close the Analyst software.
Tip! Multiple user names must be separated by a semicolon. Click Check Names
Cliquid® 3.2.1 Software
30 of 34
Installation Guide for Upgrades
Release Date: October 2012
Configure the Analyst Software
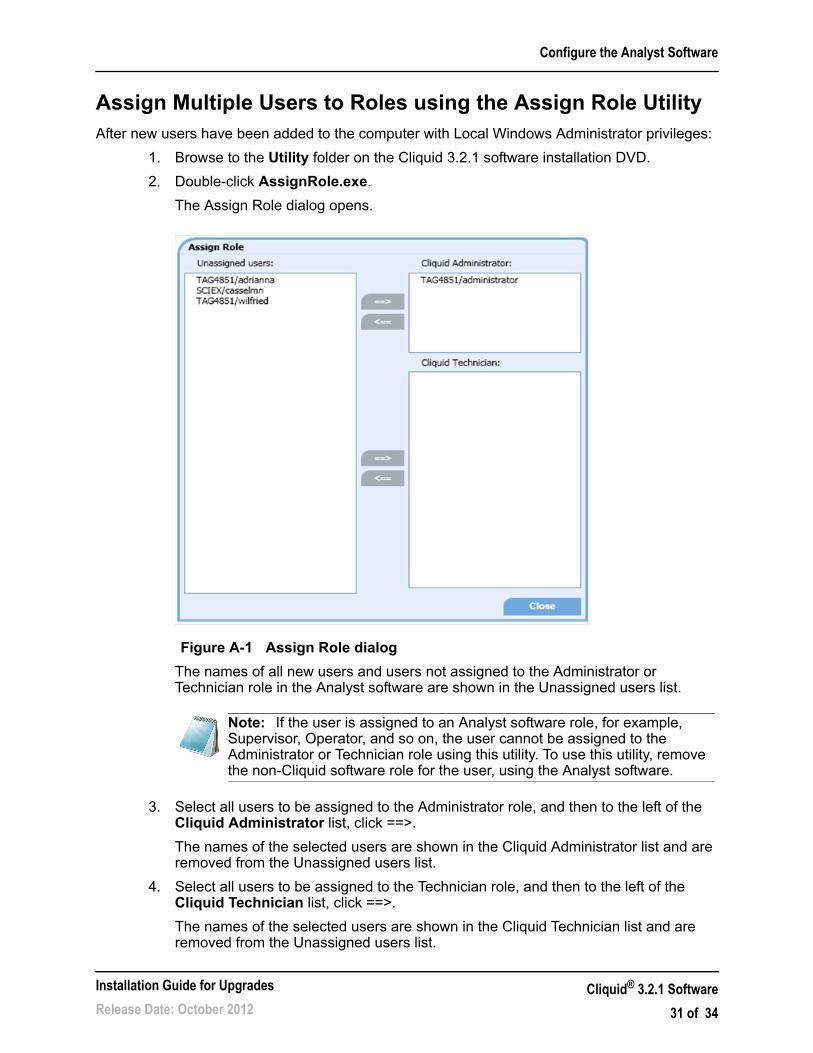
Assign Multiple Users to Roles using the Assign Role UtilityAfter new users have been added to the computer with Local Windows Administrator privileges:
1. Browse to the Utility folder on the Cliquid 3.2.1 software installation DVD.
2. Double-click AssignRole.exe.
The Assign Role dialog opens.
Figure A-1 Assign Role dialog
The names of all new users and users not assigned to the Administrator or Technician role in the Analyst software are shown in the Unassigned users list.
3. Select all users to be assigned to the Administrator role, and then to the left of the Cliquid Administrator list, click ==>.
The names of the selected users are shown in the Cliquid Administrator list and are removed from the Unassigned users list.
4. Select all users to be assigned to the Technician role, and then to the left of the Cliquid Technician list, click ==>.
The names of the selected users are shown in the Cliquid Technician list and are removed from the Unassigned users list.
Note: If the user is assigned to an Analyst software role, for example, Supervisor, Operator, and so on, the user cannot be assigned to the Administrator or Technician role using this utility. To use this utility, remove the non-Cliquid software role for the user, using the Analyst software.
Installation Guide for Upgrades
Release Date: October 2012Cliquid® 3.2.1 Software
31 of 34

Configure the Analyst Software
5. After all users are assigned to their appropriate role, click Close.
Change the Peak Review Default Options SettingsTo view a complete peak review based on the largest peak, change the Peak Review settings in the Analyst software for each user. Each user must log on to the Analyst software so that these settings can be changed.
1. Instruct the user to log on to the Analyst software.
2. Make sure the Default project is shown in the Project field.
If the Project field is not visible, click Tools > Restore Default Toolbars.
3. On the Navigation bar, click Quantitate.
4. Click Tools > Settings > Quantitation Peak Review Settings.
5. In the Peak Review Default Options dialog, change the settings, as required, to match the following:
Figure A-2 Peak Review Default Options dialog
6. After the settings have been changed, click OK.
The Peak Review Default Options dialog closes. All other Projects automatically inherit these Peak Review settings.
7. Repeat this procedure for each user.
Cliquid® 3.2.1 Software
32 of 34
Installation Guide for Upgrades
Release Date: October 2012

Configure the Analyst Software
Change the Quant Method Editor SettingsThe Quant Editor Method settings must also be changed in the Analyst software, using the Administrator user name and password.
1. Make sure the Default project is shown in the Project field.
If the Project field is not visible, click Tools > Restore Default Toolbars.
2. On the Navigation bar, click Quantitate.
3. Click Tools > Settings > Quantitation Integration Algorithm and make sure that IntelliQuan is selected.
4. Click Tools > Settings > Quantitation Integration Algorithm > Quant Method Editor Settings.
5. On the IntelliQuan dialog, change the settings, as required, to match the following:
Figure A-3 IntelliQuan dialog
6. Click OK.
The IntelliQuan dialog closes. All other projects automatically inherit these settings.
Installation Guide for Upgrades
Release Date: October 2012Cliquid® 3.2.1 Software
33 of 34

Configure the Analyst Software
Disable the Analyst Software Audit Trail Functionality
1. Click View > Audit Trail Manager.
The Audit Trail Data pane opens.
2. Expand the Audit Trail Data folder (left side of the pane).
3. Expand the Projects folder.
4. Under Projects, click Cliquid.
5. Click the Settings tab (right side of the pane).
A checkmark is visible beside the Default Audit Map setting.
6. Click the No Audit Map setting and then click Apply.
The checkmark moves from the Default Audit Map setting to the No Audit Map setting.
7. Under Projects, click Default.
A checkmark is visible beside the Default Audit Map setting.
8. Click the No Audit Map setting and then click Apply.
The checkmark moves from the Default Audit Map setting to the No Audit Map setting.
9. Under Projects, click Maintenance.
A checkmark is visible beside the Default Audit Map setting.
10. Click the No Audit Map setting and then click Apply.
The checkmark moves from the Default Audit Map setting to the No Audit Map setting.
11. Under Projects, click System Suitability Test.
A checkmark is visible beside the Default Audit Map setting.
12. Click the No Audit Map setting and then click Apply.
The checkmark moves from the Default Audit Map setting to the No Audit Map setting.
13. Close the Audit Trail Data pane.
14. Close the Analyst software.
Cliquid® 3.2.1 Software
34 of 34
Installation Guide for Upgrades
Release Date: October 2012