Embed Size (px)
DESCRIPTION
a
Citation preview
Bridging the Gap ~ Computer Component Samaritan House Page 135
Section Three: (Drawings, ClipArt and WordArt)
Draw Objects Using the Drawing Tools To Draw an Object In a Document: 1. Click the Drawing button on the toolbar to open the Drawing
toolbar. 2. Select the appropriate drawing tool from the Drawing toolbar.
Examples: Click button to draw a rectangle.
Click button to draw an oval.
Click button to draw a text box. (Into which you can type text.)
Click the AutoShapes button and then choose the auto shape you wish to draw.
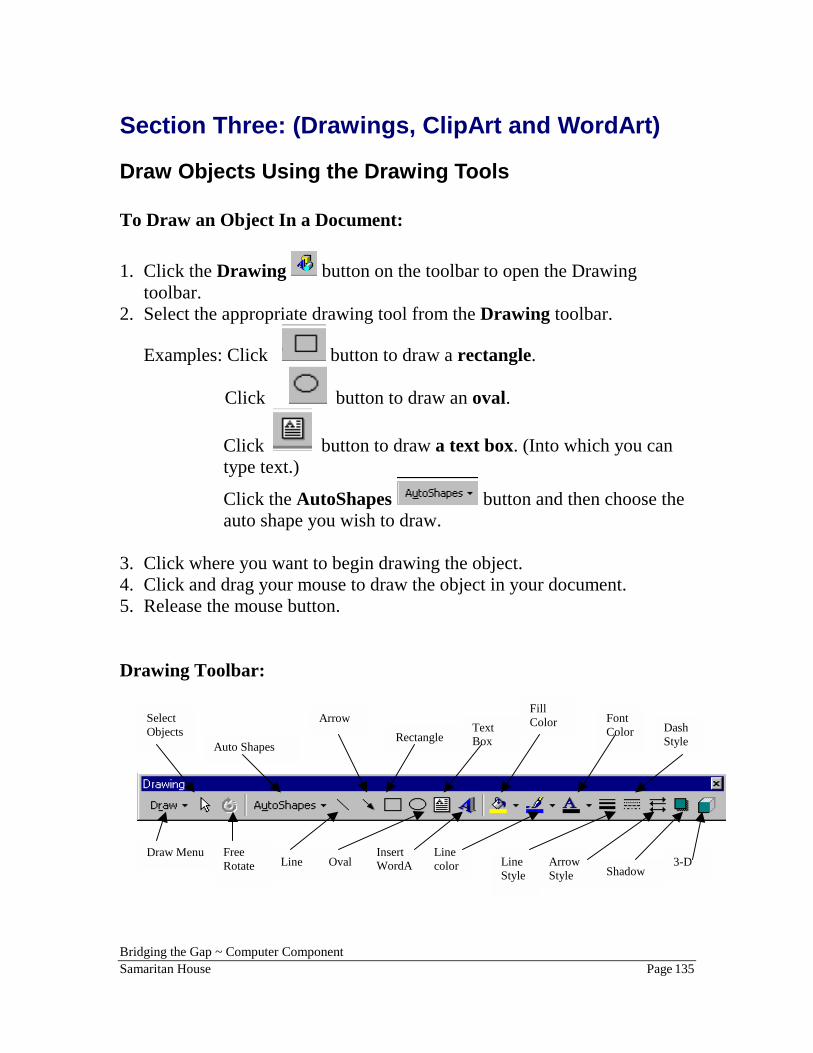
3. Click where you want to begin drawing the object. 4. Click and drag your mouse to draw the object in your document. 5. Release the mouse button. Drawing Toolbar:
Draw Menu
Select Objects
Free Rotate
Auto Shapes
Arrow
Line
Rectangle
Oval
Text Box
Insert WordA
Fill Color
Line color
Font Color
Line Style
Dash Style
Arrow Style
3-D Shadow

Bridging the Gap ~ Computer Component Samaritan House Page 136
Resize an Object ♦ Click to select the object. ♦ Click and drag the selection handle of the object to resize the object. (If you drag a side handle you will only resize that side. If you drag a
corner handle you will resize in two directions at once.) Or ♦ Right click on the object. Choose Format AutoShape.
Bridging the Gap ~ Computer Component Samaritan House Page 137
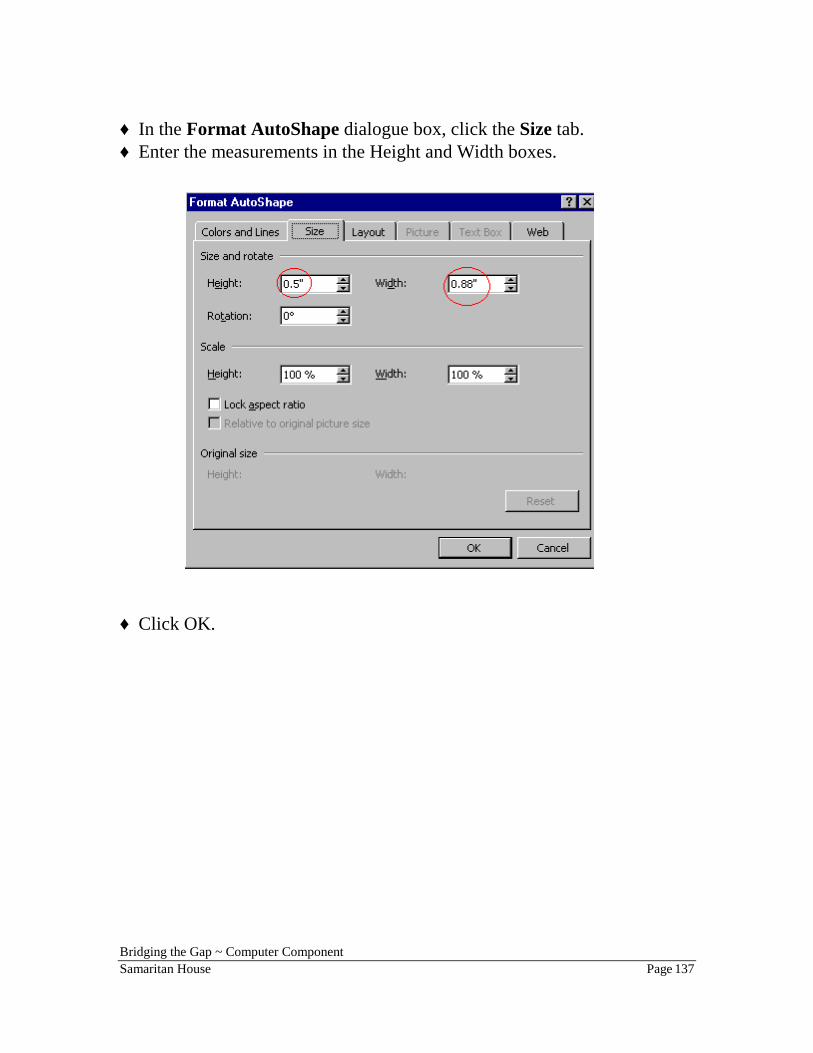
♦ In the Format AutoShape dialogue box, click the Size tab. ♦ Enter the measurements in the Height and Width boxes. ♦ Click OK.
Bridging the Gap ~ Computer Component Samaritan House Page 138
Move an Object ♦ Click to select the object.
♦ When the mouse pointer turns into a four-headed arrow, click and drag to move the object to the location you desired.
Delete an Object ♦ Select the object you want to delete. ♦ Hit the Delete key on your keyboard. Deselect an Object ♦ Click anywhere outside the object to deselect. Group Objects When objects are grouped, they are treated as one object. ♦ Click to select an object. ♦ Hold down the Shift key on your keyboard while you click and select
the next object. Repeat this step until all the objects you want to include in the group are selected.
♦ Click the Draw button on the Drawing toolbar. ♦ Select Group. Ungroup Objects ♦ Click to select the group of objects. ♦ Click the Draw button on the Drawing toolbar. ♦ Select Ungroup. Arrange the Order of the Objects ♦ Select the object. ♦ Click the Draw button on the Drawing toolbar. ♦ Select Order. ♦ Choose one of the six options.
Bridging the Gap ~ Computer Component Samaritan House Page 139
Exercise (Draw and Format Objects) ♦ Open a new document. ♦ Click View on the menu bar, choose Toolbars, select Drawing to
display the Drawing toolbar.
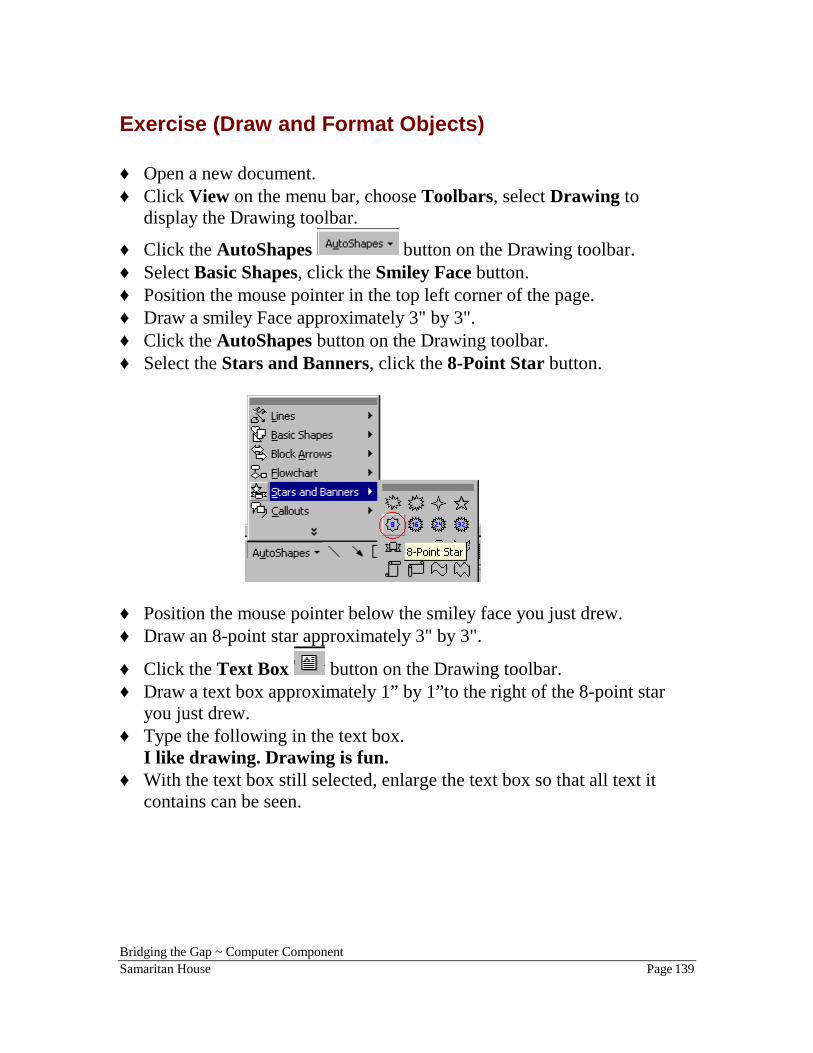
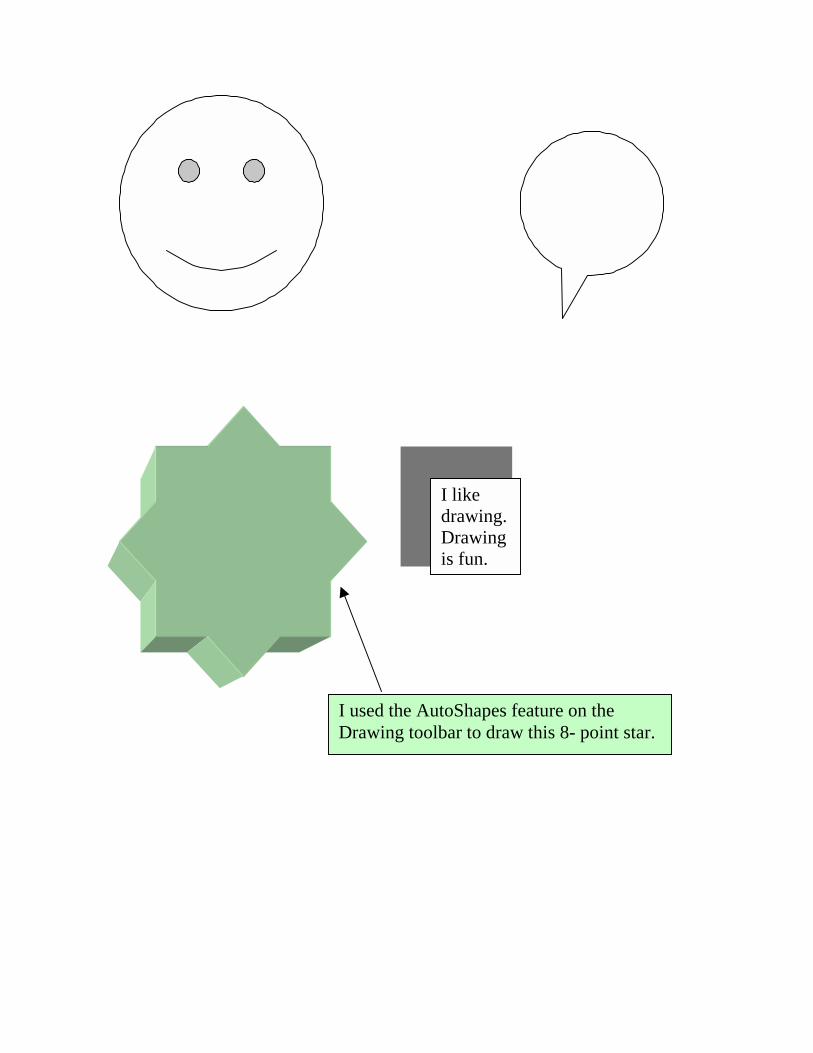
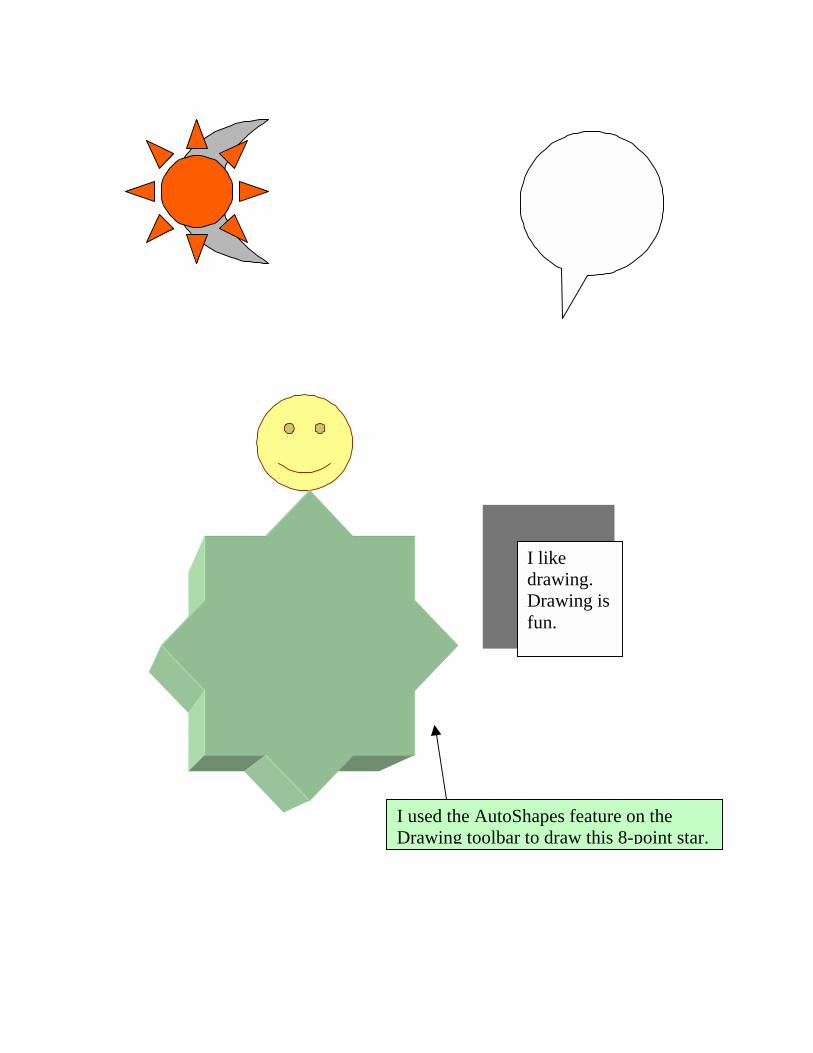
♦ Click the AutoShapes button on the Drawing toolbar. ♦ Select Basic Shapes, click the Smiley Face button. ♦ Position the mouse pointer in the top left corner of the page. ♦ Draw a smiley Face approximately 3" by 3". ♦ Click the AutoShapes button on the Drawing toolbar. ♦ Select the Stars and Banners, click the 8-Point Star button.
♦ Position the mouse pointer below the smiley face you just drew. ♦ Draw an 8-point star approximately 3" by 3".
♦ Click the Text Box button on the Drawing toolbar. ♦ Draw a text box approximately 1” by 1”to the right of the 8-point star
you just drew. ♦ Type the following in the text box.
I like drawing. Drawing is fun. ♦ With the text box still selected, enlarge the text box so that all text it
contains can be seen.
Bridging the Gap ~ Computer Component Samaritan House Page 140
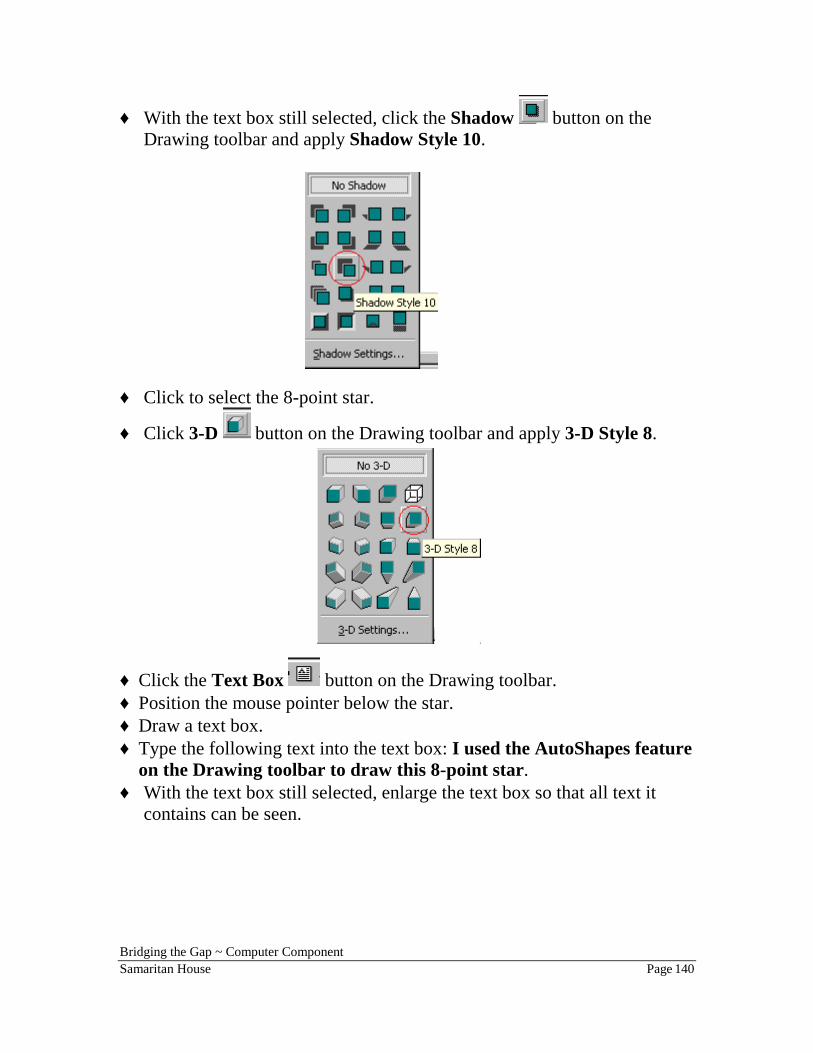
♦ With the text box still selected, click the Shadow button on the Drawing toolbar and apply Shadow Style 10.
♦ Click to select the 8-point star.
♦ Click 3-D button on the Drawing toolbar and apply 3-D Style 8.
♦ Click the Text Box button on the Drawing toolbar. ♦ Position the mouse pointer below the star. ♦ Draw a text box. ♦ Type the following text into the text box: I used the AutoShapes feature
on the Drawing toolbar to draw this 8-point star. ♦ With the text box still selected, enlarge the text box so that all text it
contains can be seen.
Bridging the Gap ~ Computer Component Samaritan House Page 141
♦ Click the Arrow button on the Drawing toolbar. ♦ Position your mouse pointer on the top border of the text box which you
have just created. ♦ Draw an arrow pointing to the star.
♦ Click the AutoShapes button on the Drawing toolbar. ♦ Select Callouts, click the Oval callout button. ♦ Position your mouse pointer in the top right corner of the page. ♦ Draw an oval callout approximately 2 inches by 2 inches. ♦ Save your file as “MyFirstDrawings”. ♦ Your drawings should look something like the next page. ♦ Close your document.

I used the AutoShDrawing toolbar
I like drawing. Drawing is fun.
apes feature on the to draw this 8- point star.
Bridging the Gap ~ Computer Component Samaritan House Page 143
Exercise (Group Objects) ♦ Open your file “MyFirstDrawings” if it is not already opened. ♦ Now, do the following 2 steps to select 3 objects. (The arrow, the star, and
the text box.) ♦ Click to select the arrow which is pointing to the 8-point star. Hold down
the Shift key on your keyboard while you click and select the textbox (contains the text: I used the AutoShapes…).
♦ Hold down the Shift key on your keyboard while you click and select the 8-point star.
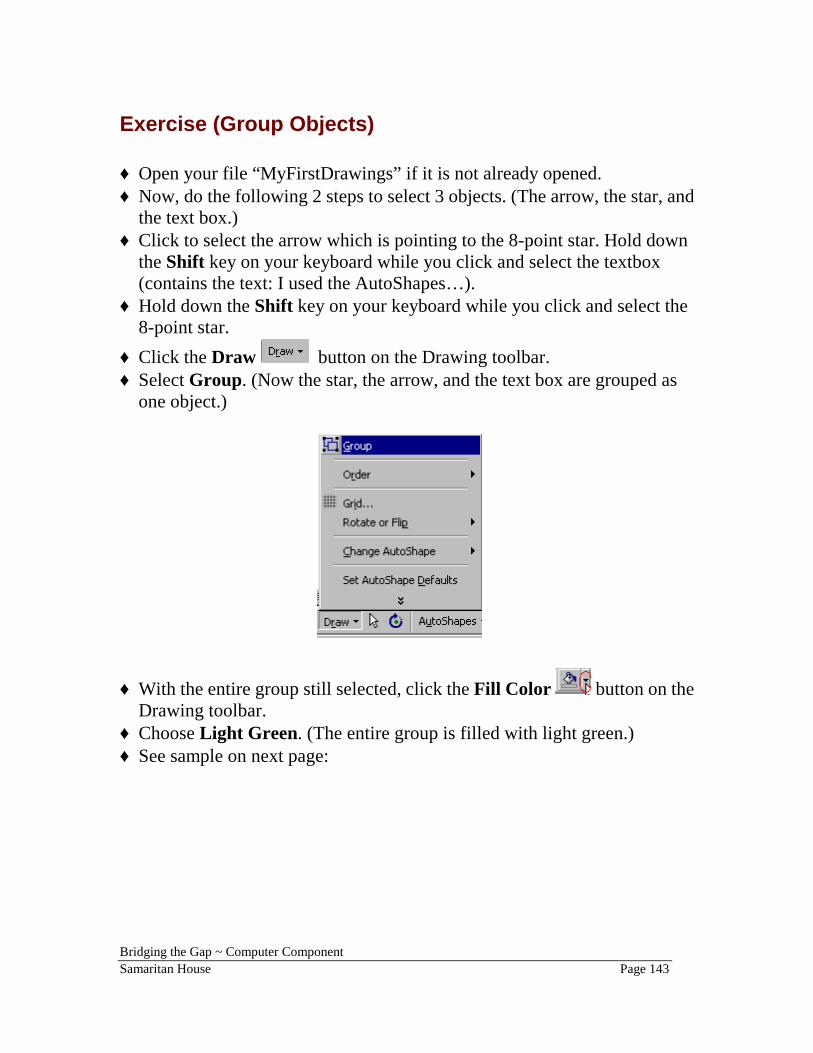
♦ Click the Draw button on the Drawing toolbar. ♦ Select Group. (Now the star, the arrow, and the text box are grouped as
one object.)
♦ With the entire group still selected, click the Fill Color button on the Drawing toolbar.
♦ Choose Light Green. (The entire group is filled with light green.) ♦ See sample on next page:
I used the AutDrawing toolb
I like drawing. Drawing is fun.
oShapes feature on the ar to draw this 8- point star.
Bridging the Gap ~ Computer Component Samaritan House Page 145
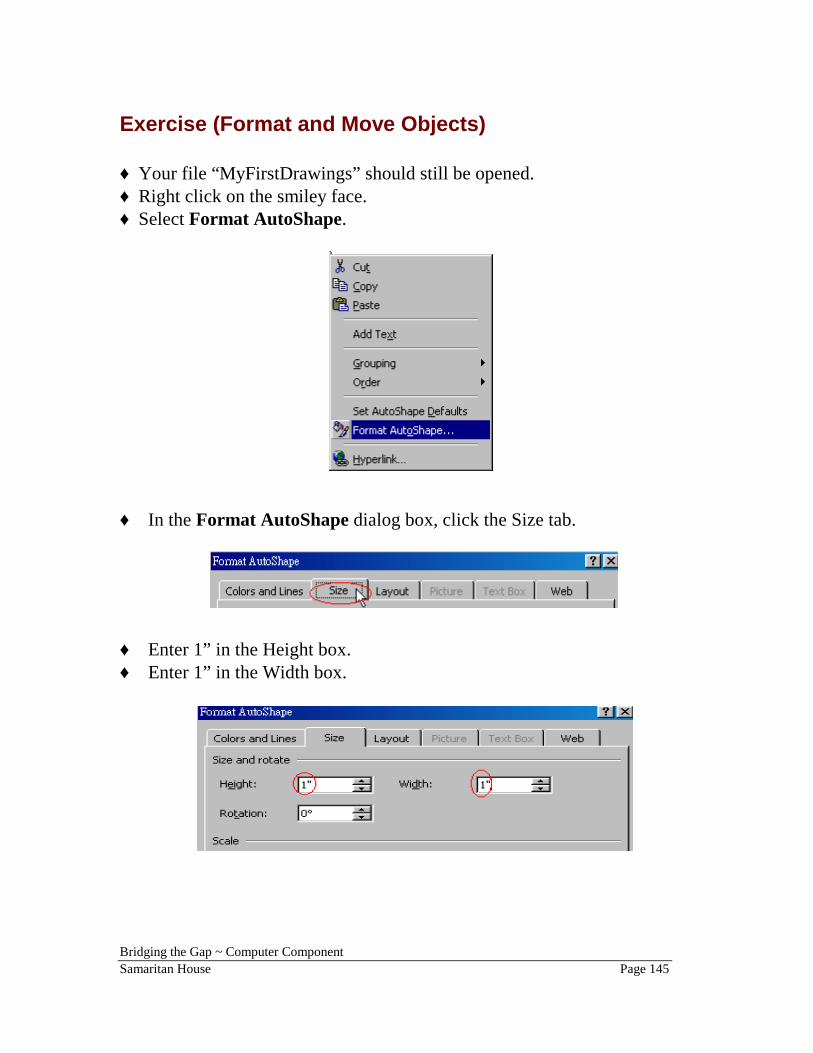
Exercise (Format and Move Objects) ♦ Your file “MyFirstDrawings” should still be opened. ♦ Right click on the smiley face. ♦ Select Format AutoShape.
♦ In the Format AutoShape dialog box, click the Size tab.
♦ Enter 1” in the Height box. ♦ Enter 1” in the Width box.
Bridging the Gap ~ Computer Component Samaritan House Page 146
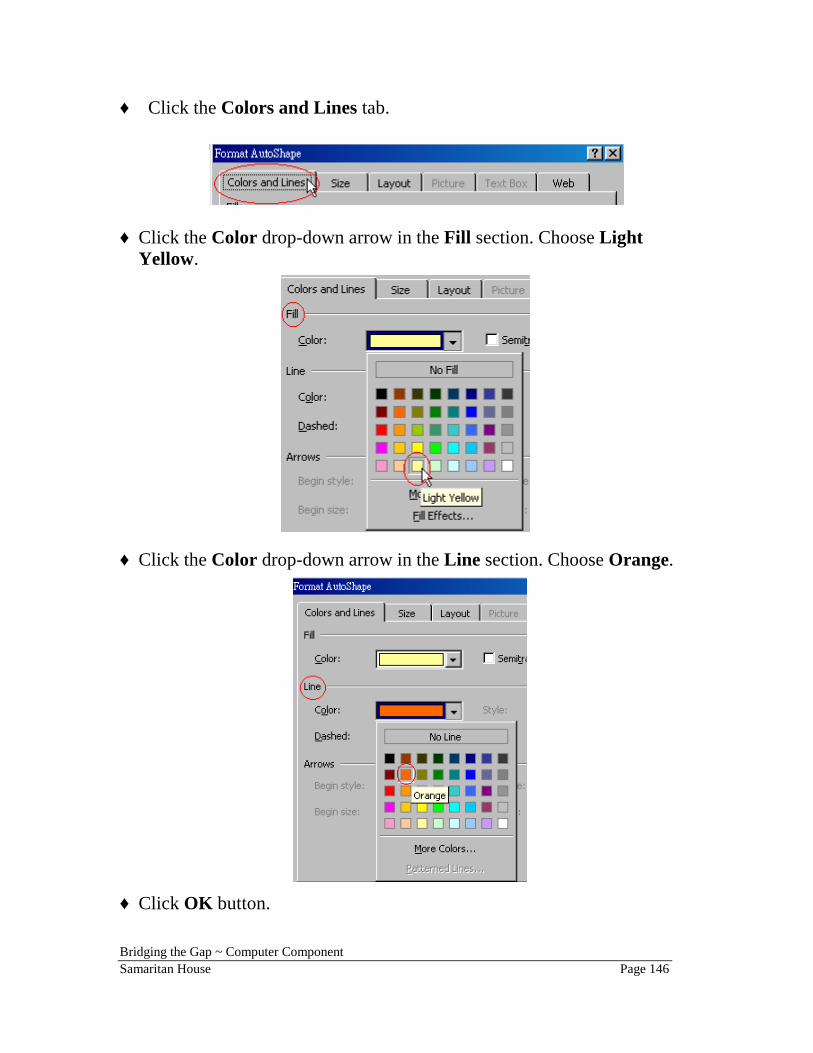
♦ Click the Colors and Lines tab.
♦ Click the Color drop-down arrow in the Fill section. Choose Light Yellow.
♦ Click the Color drop-down arrow in the Line section. Choose Orange.
♦ Click OK button.

Bridging the Gap ~ Computer Component Samaritan House Page 147
♦ With the smiley face still selected, click and move it, so that it is just right above the 8-point star, release your mouse button.
♦ See sample on next page:

I used the AutoDrawing toolba
I like drawing. Drawing is fun.
Shapes feature on the r to draw this 8- point star.
Bridging the Gap ~ Computer Component Samaritan House Page 149
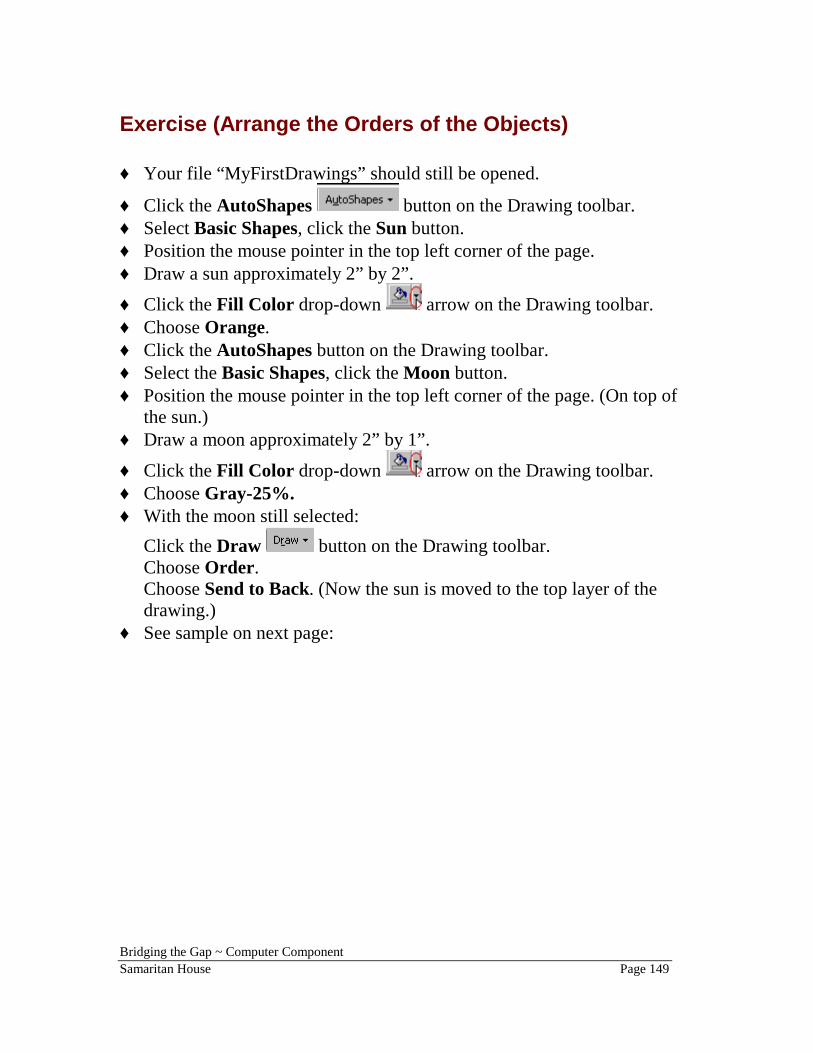
Exercise (Arrange the Orders of the Objects) ♦ Your file “MyFirstDrawings” should still be opened.
♦ Click the AutoShapes button on the Drawing toolbar. ♦ Select Basic Shapes, click the Sun button. ♦ Position the mouse pointer in the top left corner of the page. ♦ Draw a sun approximately 2” by 2”.
♦ Click the Fill Color drop-down arrow on the Drawing toolbar. ♦ Choose Orange. ♦ Click the AutoShapes button on the Drawing toolbar. ♦ Select the Basic Shapes, click the Moon button. ♦ Position the mouse pointer in the top left corner of the page. (On top of
the sun.) ♦ Draw a moon approximately 2” by 1”.
♦ Click the Fill Color drop-down arrow on the Drawing toolbar. ♦ Choose Gray-25%. ♦ With the moon still selected:
Click the Draw button on the Drawing toolbar. Choose Order. Choose Send to Back. (Now the sun is moved to the top layer of the drawing.)
♦ See sample on next page:
I like drawing. Drawing is fun.
I used the AutoShapes feature on the Drawing toolbar to draw this 8-point star.
Bridging the Gap ~ Computer Component Samaritan House Page 151
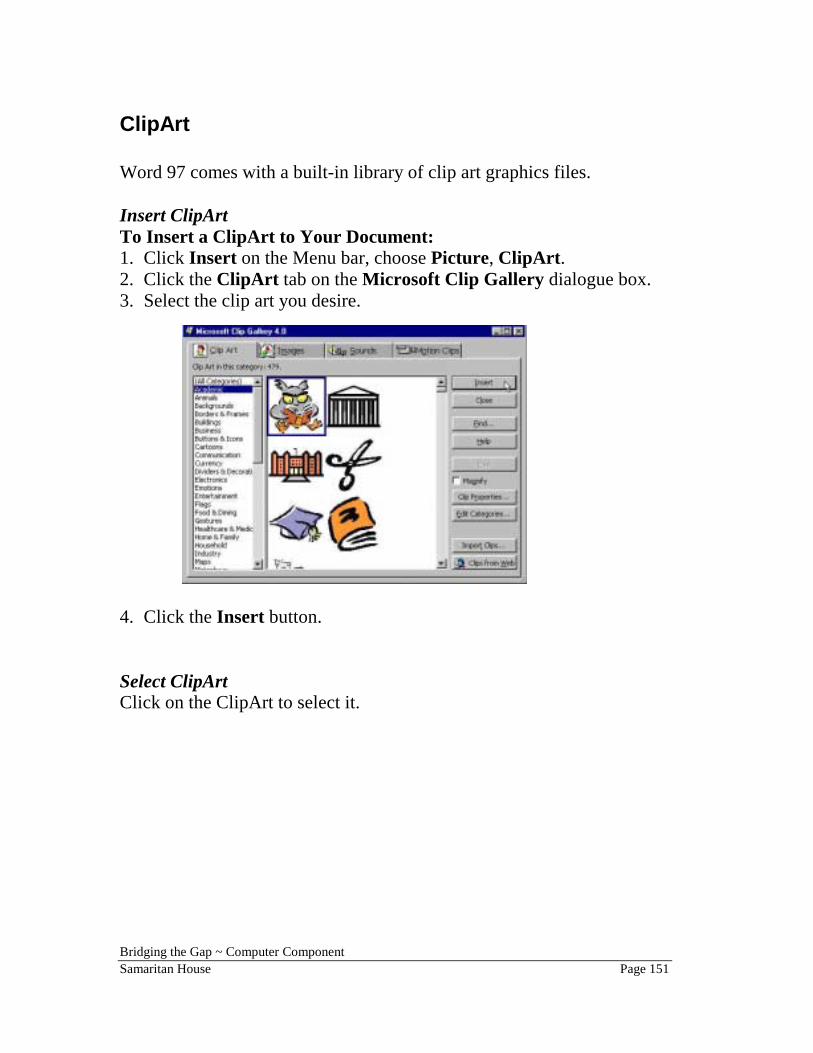
ClipArt Word 97 comes with a built-in library of clip art graphics files. Insert ClipArt To Insert a ClipArt to Your Document: 1. Click Insert on the Menu bar, choose Picture, ClipArt. 2. Click the ClipArt tab on the Microsoft Clip Gallery dialogue box. 3. Select the clip art you desire.
4. Click the Insert button. Select ClipArt Click on the ClipArt to select it.
Bridging the Gap ~ Computer Component Samaritan House Page 152
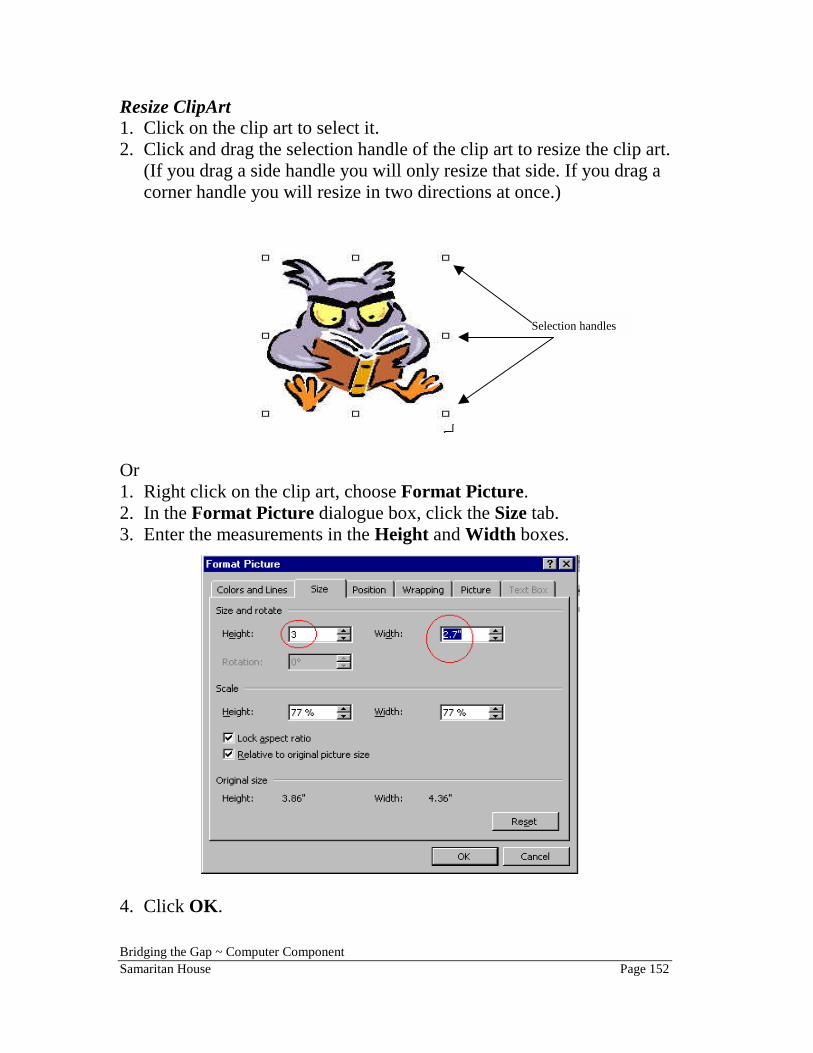
Resize ClipArt 1. Click on the clip art to select it. 2. Click and drag the selection handle of the clip art to resize the clip art.
(If you drag a side handle you will only resize that side. If you drag a corner handle you will resize in two directions at once.)
Or 1. Right click on the clip art, choose Format Picture. 2. In the Format Picture dialogue box, click the Size tab. 3. Enter the measurements in the Height and Width boxes.
4. Click OK.
Selection handles
Bridging the Gap ~ Computer Component Samaritan House Page 153
Move ClipArt ♦ Click to select the ClipArt.
♦ When the mouse pointer turns into a four-headed arrow, click and drag to move the ClipArt to the location you desired.
Delete ClipArt ♦ Select the ClipArt you want to delete. ♦ Hit the Delete key on your keyboard. Deselect ClipArt ♦ Click anywhere outside the ClipArt to deselect it.

Bridging the Gap ~ Computer Component Samaritan House Page 154
Watermark If you want to format a picture as Watermark: ♦ Click to select the picture which you want to format as watermark. If you
do not have a picture and want to insert one, click Insert on the Menu bar, choose Picture and then ClipArt.
♦ Your Picture toolbar should appear automatically. If it does not appear click View on the Menu bar. Choose Toolbars. Click to place a check mark beside Picture.
♦ Click Image Control button on your Picture toolbar.
♦ Choose Watermark. The following is a sample of a Watermark:
Bridging the Gap ~ Computer Component Samaritan House Page 155
Exercise (Format Text, Insert ClipArt, and Watermark) Open the file “Editfile” from your disk. (This file was created in Section Two ~ Pg. 74) Select the title Cut, Copy, and Paste. Click the Font size drop-down arrow and choose 22. Click the Font color drop-down arrow Dark Blue. Click Insert on the Menu bar. Choose Picture and then Clip Art. Select a clipart of your choice. Click Insert. With the clipart still selected, right click on the clipart. Select Format Picture. Click the Wrapping tab. Under Wrapping style, choose None. Click OK. With the clipart still selected, right click on the clipart. Select Order and then choose Send Behind Text. With the clipart still selected, click the Image Control button on the Picture toolbar. Select Watermark. Move and resize the watermark to your choice. Your document should look something like the next page:

Cut, Copy, and Paste *****
Cut, Copy, and Paste submenu items can be found under the Edit
menu. While they are usually greyed out, the moment the user highlights text, they become visible (black) and so usable. First, you must highlight a block of text: 1) Place the cursor at the beginning of the desired block of text you wish to
highlight. 2) Click the cursor once to establish the starting point for the block. 3) Then, press and hold the mouse button, dragging the cursor across the
text you wish to highlight. This may be one line, or many, one word or many.
Once the section is highlighted, release the mouse button and select the Edit menu. Now, as the computer student, you must choose which option you wish to employ – Cut (which will erase the highlighted section and store it in memory), or Copy (which makes a copy of the highlighted section and stores it memory).
The second step is to decide, if you want to Cut, do you wish to move the data elsewhere in the document. If so, place the cursor at the new point, select Edit, and then Paste. The result will be that the cut material will appear at this new location. Note that you can repeat this function as many times as you wish, creating several copies of the cut text. If you decide to Copy rather than Cut, you still place the cursor where you wish the copy to appear, then select Edit and Paste to create one or more copies of the desired material. Each time you select Paste, you will create a copy.
The power of a word processor lies in its ability to allow the computer user to make significant changes to the order of a document’s contents without having to retype the information each time a change in order is made. This is accomplished through the word processor’s Cut, Copy, and Paste functions.
*****

Bridging the Gap ~ Computer Component Samaritan House Page 157
WordArt By using WordArt you can turn your plain text into graphic object. Insert WordArt To Insert a WordArt into Your Document: 1. Click Insert on the Menu bar. Choose Picture, WordArt. 2. In the WordArt Gallery dialogue box, select a WordArt style.
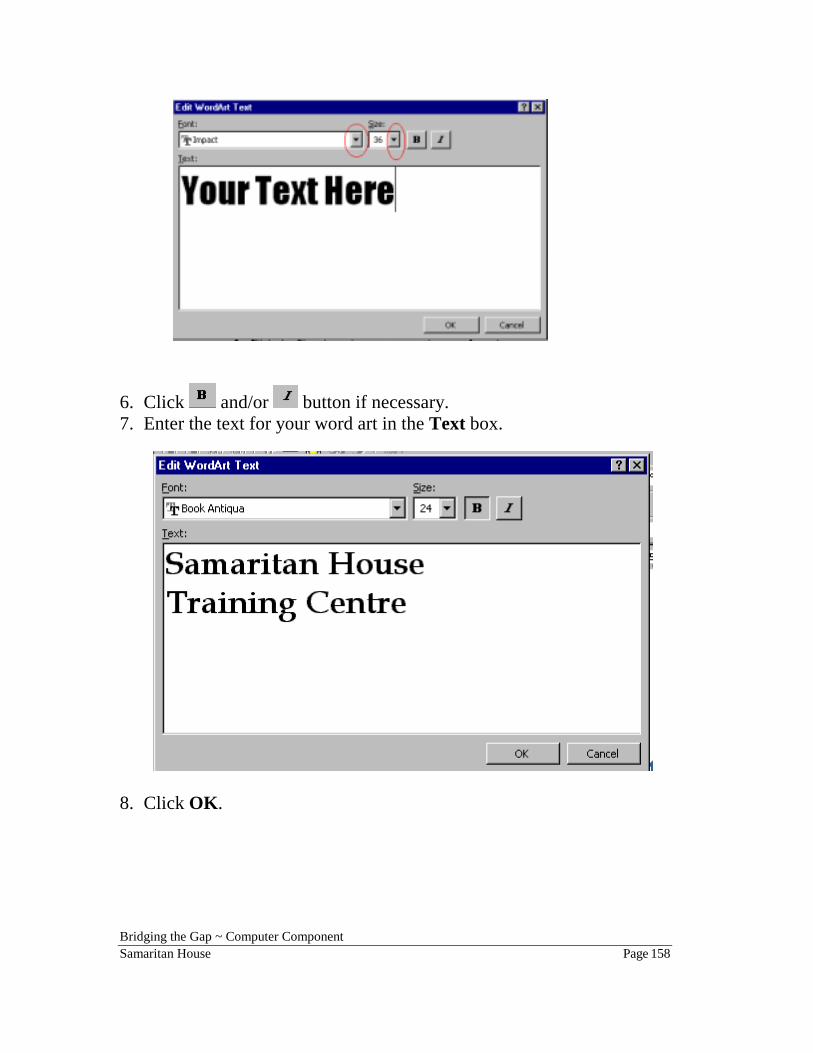
3. Click OK. 4. Click the Font drop-down arrow to choose a font style. 5. Click the Size drop-down arrow to choose a font size.
Bridging the Gap ~ Computer Component Samaritan House Page 158
6. Click and/or button if necessary. 7. Enter the text for your word art in the Text box.
8. Click OK.
BridgSama
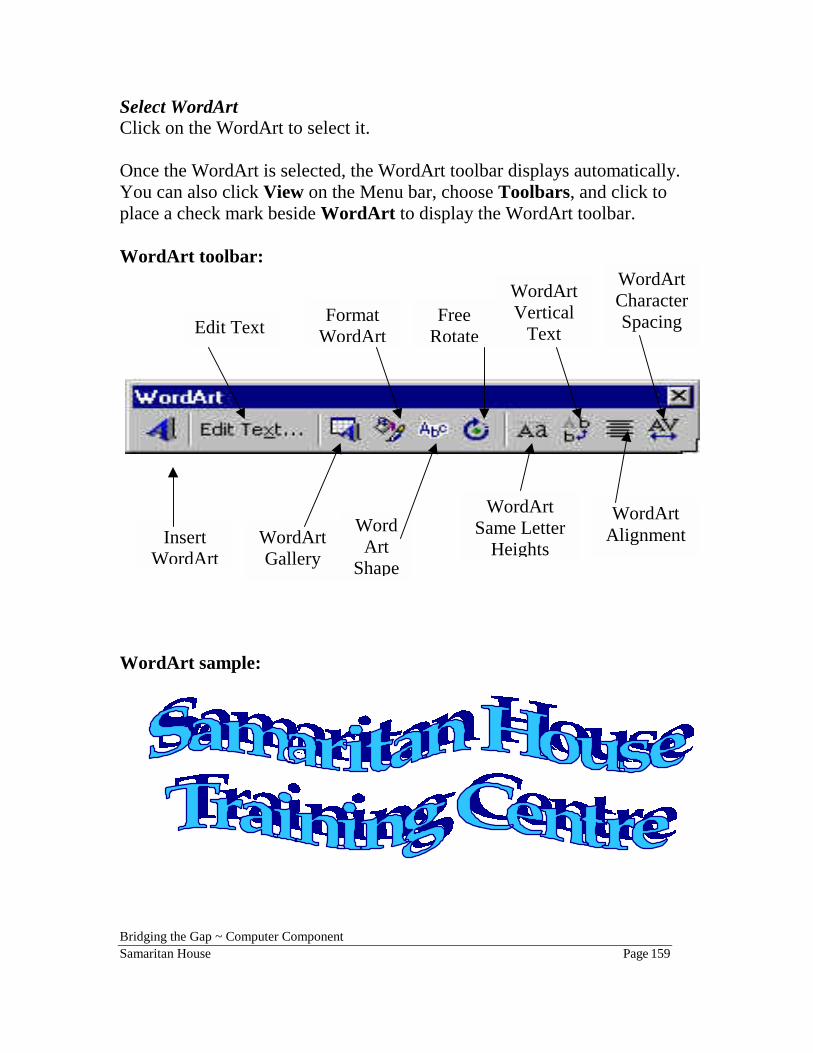
Select WordArt Click on the WordArt to select it. Once the WordArt is selected, the WordArt toolbar displays automatically. You can also click View on the Menu bar, choose Toolbars, and click to place a check mark beside WordArt to display the WordArt toolbar. WordArt toolbar:
Wo
Edit Text
S
e
S
WordArt Alignment
InsertWordArt
ing the Gap ~ Comritan House
rdArt sample
WordArtGallery
puter Compo
:
Format WordArt
nent
WordArt hape
FreeRotat
WordArt ame LetterHeights
WordArtVertical
Text
WordArt Character Spacing
Page 159
Bridging the Gap ~ Computer Component Samaritan House Page 160
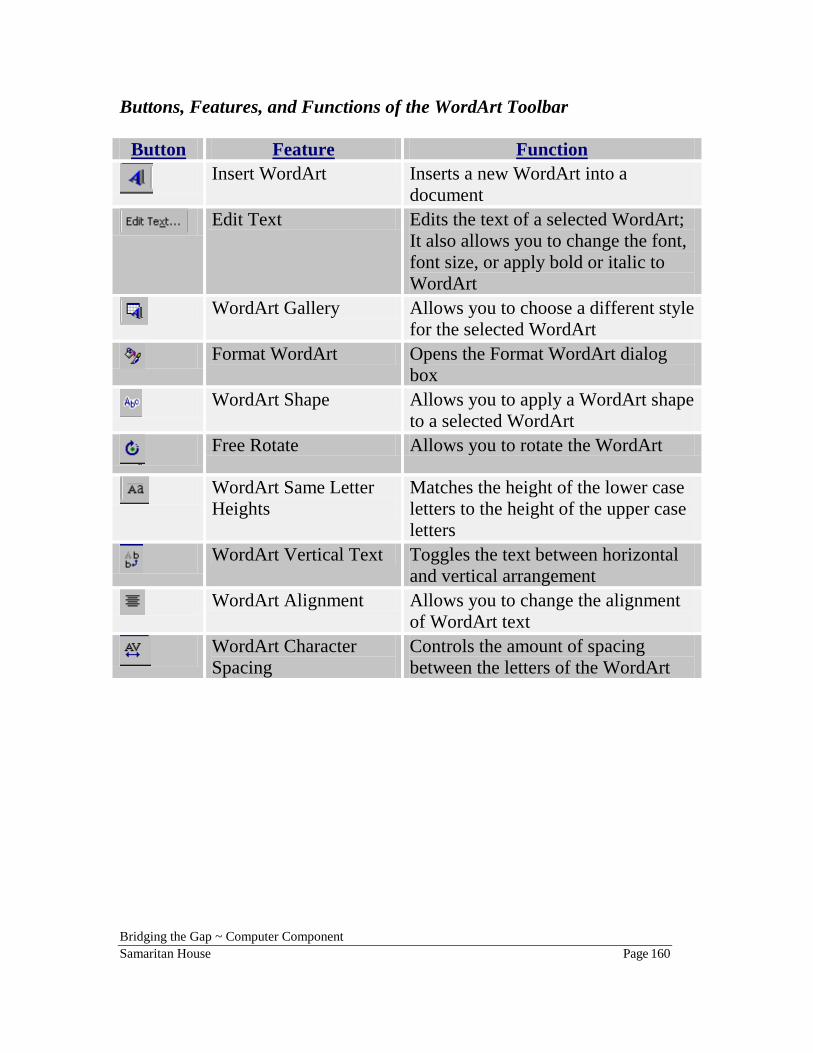
Buttons, Features, and Functions of the WordArt Toolbar
Button Feature Function
Insert WordArt Inserts a new WordArt into a
document
Edit Text Edits the text of a selected WordArt; It also allows you to change the font, font size, or apply bold or italic to WordArt
WordArt Gallery Allows you to choose a different style for the selected WordArt
Format WordArt Opens the Format WordArt dialog box
WordArt Shape Allows you to apply a WordArt shape to a selected WordArt
Free Rotate Allows you to rotate the WordArt
WordArt Same Letter Heights
Matches the height of the lower case letters to the height of the upper case letters
WordArt Vertical Text Toggles the text between horizontal
and vertical arrangement
WordArt Alignment Allows you to change the alignment of WordArt text
WordArt Character Spacing
Controls the amount of spacing between the letters of the WordArt

Bridging the Gap ~ Computer Component Samaritan House Page 161
Resize WordArt 1) Click on the WordArt to select it. 2) Click and drag the selection handle of the WordArt to resize the
WordArt. (If you drag a side handle you will only resize that side. If you drag a corner handle you will resize in two directions at once.)
Or 3) Right click on the word art. Choose Format WordArt. 4) In the Format WordArt dialogue box, click the Size tab. 5) Enter the measurements in the Height and Width boxes.
6) Click OK.
Bridging the Gap ~ Computer Component Samaritan House Page 162
Move WordArt ♦ Click to select the WordArt.
♦ When the mouse pointer turns into a four-headed arrow, click and drag to move the WordArt to the location you desire.
Delete WordArt ♦ Select the WordArt you want to delete. ♦ Hit the Delete key on your keyboard. Deselect WordArt ♦ Click anywhere outside the WordArt to deselect it.
Bridging the Gap ~ Computer Component Samaritan House Page 163
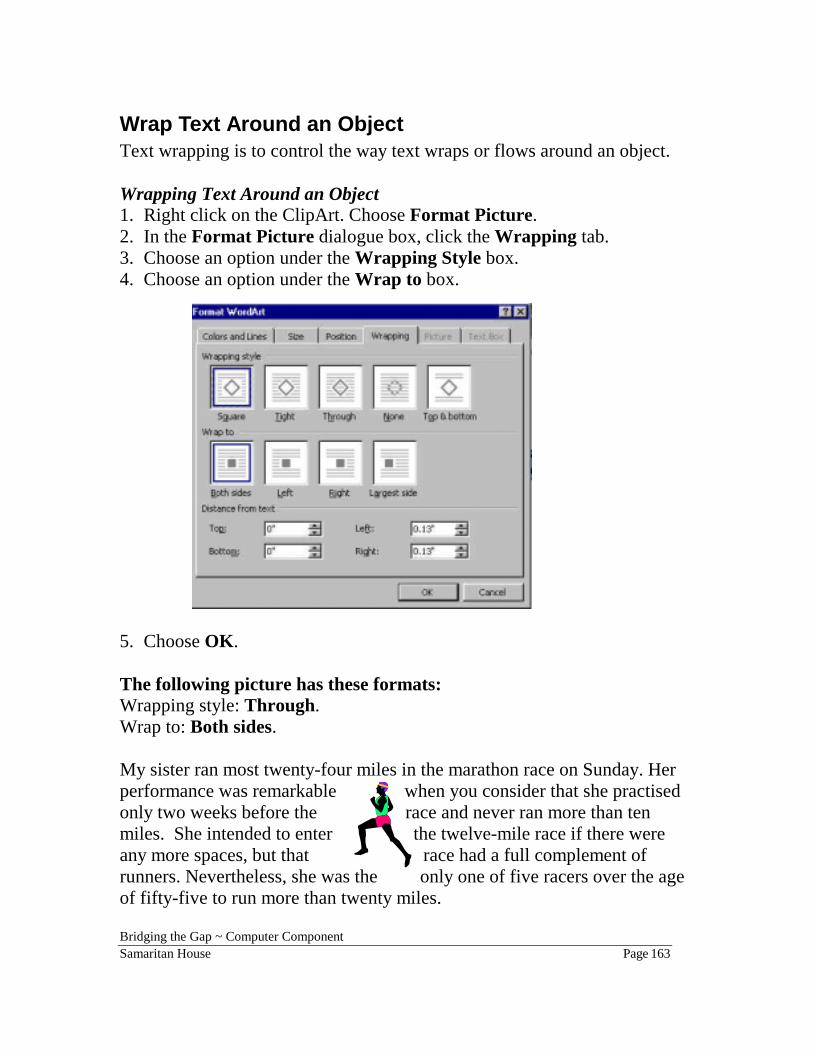
Wrap Text Around an Object Text wrapping is to control the way text wraps or flows around an object. Wrapping Text Around an Object 1. Right click on the ClipArt. Choose Format Picture. 2. In the Format Picture dialogue box, click the Wrapping tab. 3. Choose an option under the Wrapping Style box. 4. Choose an option under the Wrap to box.
5. Choose OK. The following picture has these formats: Wrapping style: Through. Wrap to: Both sides. My sister ran most twenty-four miles in the marathon race on Sunday. Her performance was remarkable when you consider that she practised only two weeks before the race and never ran more than ten miles. She intended to enter the twelve-mile race if there were any more spaces, but that race had a full complement of runners. Nevertheless, she was the only one of five racers over the age of fifty-five to run more than twenty miles.
Bridging the Gap ~ Computer Component Samaritan House Page 164
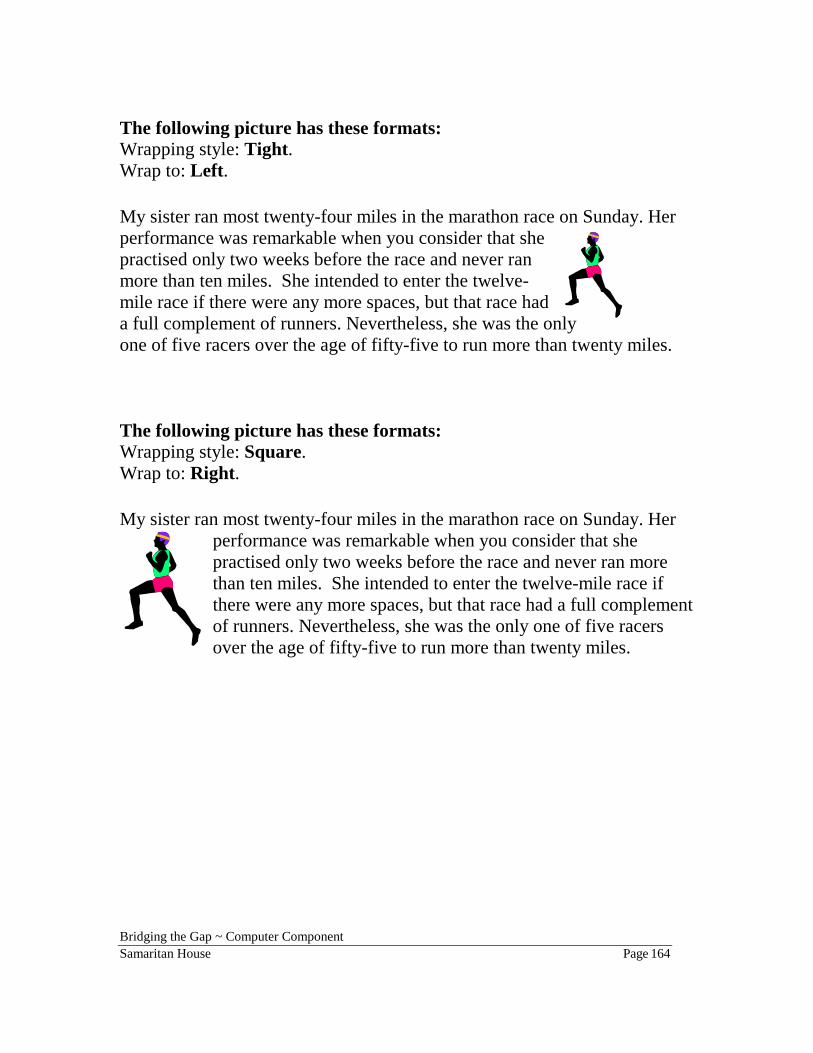
The following picture has these formats: Wrapping style: Tight. Wrap to: Left. My sister ran most twenty-four miles in the marathon race on Sunday. Her performance was remarkable when you consider that she practised only two weeks before the race and never ran more than ten miles. She intended to enter the twelve-mile race if there were any more spaces, but that race had a full complement of runners. Nevertheless, she was the only one of five racers over the age of fifty-five to run more than twenty miles. The following picture has these formats: Wrapping style: Square. Wrap to: Right. My sister ran most twenty-four miles in the marathon race on Sunday. Her
performance was remarkable when you consider that she practised only two weeks before the race and never ran more than ten miles. She intended to enter the twelve-mile race if there were any more spaces, but that race had a full complement of runners. Nevertheless, she was the only one of five racers over the age of fifty-five to run more than twenty miles.

Bridging the Gap ~ Computer Component Samaritan House Page 165
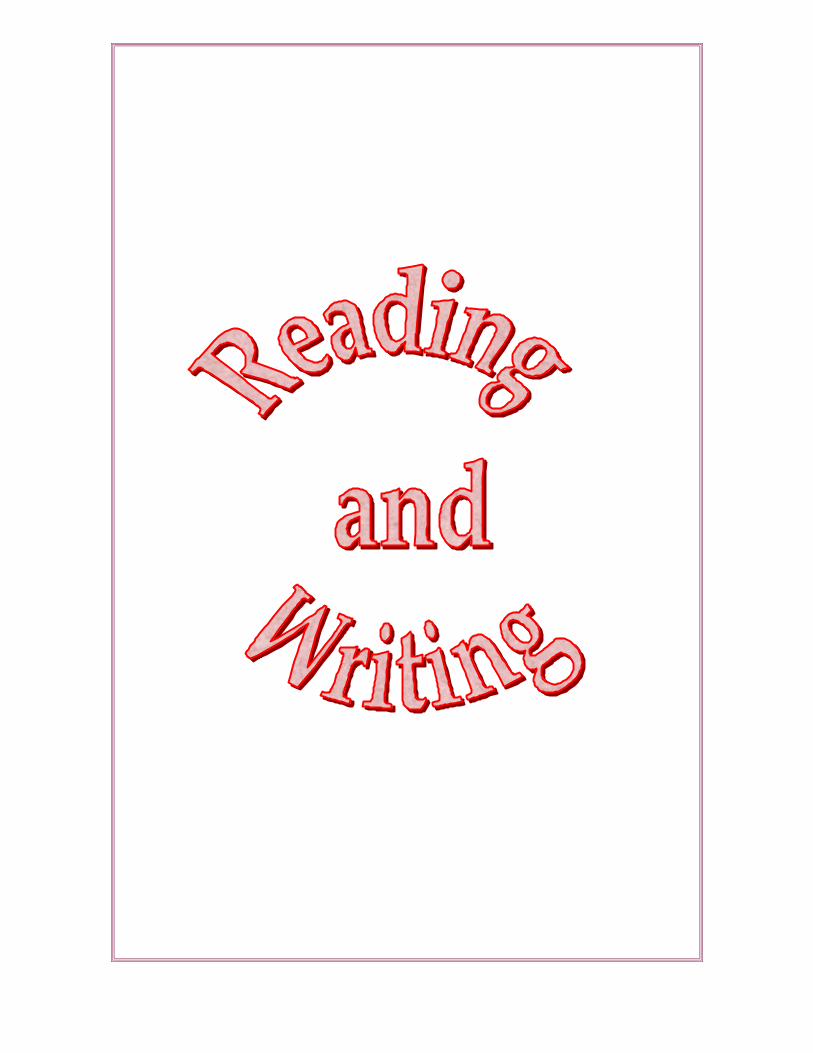
Exercise (Insert WordArt) ♦ Open a new document. ♦ Click Insert on the Menu bar. ♦ Choose Picture, WordArt. ♦ In the WordArt Gallery dialogue box, select the WordArt style as shown
below: (Second row, fifth column.) ♦ Click OK. ♦ Click the Font drop-down arrow and choose Book Antiqua. ♦ Click the Font size drop-down arrow and choose 60. ♦ Click the Bold button. ♦ Delete Your Text Here and type Reading. ♦ Press Enter key on your keyboard to bring your insertion point to next
line. ♦ Press Space bar on your keyboard twice. ♦ Type and. ♦ Press Enter key on your keyboard to bring your insertion point to next
line. ♦ Type Writing. ♦ Click OK.
♦ With the WordArt still selected, click the WordArt Shape button on the WordArt toolbar.
♦ Click Button (Pour) . ♦ With the WordArt still selected, click the Format WordArt
button on the WordArt toolbar. ♦ Click the Colors and Lines tab, if necessary. ♦ Click the Color drop-down arrow in the Fill section. Choose Fill Effects.

Bridging the Gap ~ Computer Component Samaritan House Page 166
♦ Click the Texture tab. ♦ Choose Pink tissue paper.
♦ Click OK. ♦ Click the Color drop-down arrow in the Line section. ♦ Choose Red. ♦ Click OK. ♦ Now you can move your WordArt to the desired location and/or change
to a desired size. ♦ Create a page border if you desired. ♦ Your WordArt should look something like the next page.
Bridging the Gap ~ Computer Component Samaritan House Page 168
Exercise (WordArt and Drawings) For this assignment, you are to use WordArt to create three different word graphics of your choosing, and use the tools in the Drawing toolbar to create three different drawings of your choosing. These are not to be overly simple word graphics or drawings ~ the completed graphics are to show thought, creativity, and a time investment on your part. You should use a variety of shapes, lines, and colours. The word graphics and drawings can be anything you choose ~ for example, as a drawing, you can create a picture of the Canadian flag, a bunch of colourful balloons, a building, a person, a symbol, … List what your WordArt items will be: WordArt #1~ WordArt #2~ WordArt #3~ List what your drawings will be: Drawing #1~ Drawing #2~ Drawing #3~ Put each of your six graphics into one document. Save and print your assignment. See sample document on the following pages.

Submitted By: Student's Name Submitted To: Teacher's Name


Bridging the Gap ~ Computer Component Samaritan House Page 176
Exercise (Write a Story, Format Text, WordArt, Spell Checks) Create a story that is at least three paragraphs in length. 1). At the top of your document, insert your name on one line, today's
date on the second line, and your class name on the third line. Right align these lines.
2). Using WordArt, type and centre the title of your story. 3). Type your story. This story can be about anything you would like.
Your story can be fiction or can be true. 4). Justify the paragraphs you have just written. Use tabs to indent each
paragraph. Leave a line between your paragraphs. 5). At the end of your story, type "The End" in italics. Centre this. 6). Use the spell check to make sure that all of your words are spelled
correctly. 7). Now, select a different font style and size for each paragraph. 8). Save your document with a file name of your own choosing. 9). Print a copy of your story.

Bridging the Gap ~ Computer Component Samaritan House Page 177
Exercise (Completion of Red Velvet) To instructors: Type and save the story on the following page in "C"
drive. Objective: Open file from "C" drive, Cut, Copy, Paste, Complete a
Story, Word Count, Format Text, Page Border, WordArt, ClipArt, Watermark, Thesaurus, Drop Cap, Drawing, Spell Checks, Save, and Print a document.
To students: ♦ Write approximately 300 words to add to the original 172.
♦ Choose another font style, size, and colour.
♦ Add a page border.
♦ Create a WordArt title.
♦ Indent all paragraphs with the tab key.
♦ Use the Thesaurus to replace 5 adjectives or adverbs.
♦ Insert a graphic using ClipArt. Format this ClipArt to a Watermark.
♦ Use 1.5 line spacing.
♦ Use the Drop Cap feature for the first letter of the first paragraph.
♦ Right align your name and the date at the bottom of the last page.
♦ Use the cut and paste features to place these (your name and the date)
under the title.
♦ Add another graphic using the Draw toolbar.
♦ Utilize Spellchecker to check your spelling.
♦ Print preview your story.
♦ Print the final product and prepare to read to the class.

Bridging the Gap ~ Computer Component Samaritan House Page 178
Red Velvet – The blabber
Once upon a time, there was a little girl named Red Velvet. She was a beautiful child loved by everyone, especially her grandmother. Sadly, her grandmother became ill and needed care. Red Velvet’s mother prepared a basket in which she placed a special cake and a bottle of wine and said, “Take this basket and go straight to your grandmother’s. She is sick and weak and this will be good for her.”
Red Velvet entered the woods near her home and started to skip and hop along a path, which she had often used to get to her grandmother’s house. Suddenly, she saw in front of her a friendly-looking animal which, on closer encounter she realized was a wolf. She was so happy to talk to someone that she told the wolf all about her sick grandmother – even exactly where she lived. The wolf continued on his way. Red Velvet continued on her way. What, do you think, the wolf will do? What, do you think, Red Velvet will do?


![Inserting clip art[1]](https://img.pdfslide.us/doc/110x75/554f7101b4c905bb178b51c0/inserting-clip-art1.jpg)