Embed Size (px)
Citation preview

June 2009
This distribution contains change pages for patch MD*1.0*11 of the Clinical Procedures 1.0
User Manual.
The change pages for CP Patch 2, CP Patch 10, CP Patch 4, and CP Patch 14 should be inserted
before the change pages for CP Patch 11:
File Name: Patch:
MD_1_P2_UM.PDF MD*1.0*2
MD_1_P10_UM.PDF MD*1.0*10
MD_1_P4_UM.PDF MD*1.0*4
MD_1_P14_UM.PDF MD*1.0*14
Patch MD*1.0*11 pages:
Replace Pages: With Pages:
Title page Title page
Revision History Revision History
Table of Contents Table of Contents
3-33 to 3-34 3-33 to 3-38
4-7 to 4-8 4-7 to 4-8


CLINICAL PROCEDURES
USER MANUAL
Version 1.0
April 2004
Revised June 2009
Department of Veterans Affairs Office of Information & Technology Office of Enterprise Development


Revision History
Description Date Technical Writer
Originally released. April 2004 1Patch MD*1.0*2 released. July 2004 2Patch MD*1.0*10 released. March 2005 3Patch MD*1.0*4 released. September 2006 Alfred Bustamante 4Patch MD*1.0*14 released. Added
new sections for Auto Study Check-
In to Ch. 3.
March 2008 Shirley Ackerman,
Alfred Bustamante
5Patch MD*1.0*11 released. Added
new section in Ch. 3 for handling
appointment no shows and
cancellation with the auto study
check-in. Replaced provider name
in Ch. 4 with generic name.
Updated product line on title page.
June 2009 Shirley Ackerman,
Alfred Bustamante
1 Patch MD*1.0*2 July 2004 Patch 2 release added.
2 Patch MD*1.0*10 March 2005 Patch 10 release added.
3 Patch MD*1.0*4 September 2006 Patch 4 release added.
4 Patch MD*1.0*14 March 2008 Patch release added.
5 Patch MD*1.0*11 June 2009 Patch release added.


April 2004 Clinical Procedures V. 1.0 i
User Manual
Table of Contents
1. Introduction .......................................................................................................................... 1-1
Intended Audience ......................................................................................................... 1-6
Related Manuals............................................................................................................. 1-6
Product Benefits ............................................................................................................. 1-6
2. Working with CP User ........................................................................................................ 2-1
Opening CP User............................................................................................................ 2-1
Defining CP User Icons ................................................................................................. 2-1
Selecting a Patient .......................................................................................................... 2-2
Defining the Parts of the Main CP User Window ....................................................... 2-3
3. Clinical Procedures Process, Part 1 ................................................................................... 3-1
Ordering a Consult Procedure in CPRS ...................................................................... 3-1
Auto Study Check-In ..................................................................................................... 3-9
Auto Check-In Without Appointment ....................................................................... 3-10 Setting Up the Procedure ......................................................................................... 3-10
Procedure Request in CPRS..................................................................................... 3-15
Confirm the Auto Study Check-In ........................................................................... 3-17
Auto Study Check-In With Appointment .................................................................. 3-17
Check-In a New Study ................................................................................................. 3-26
Updating Study Status to Correct Errors .................................................................. 3-32
Appointment No Shows and Cancellation ................................................................. 3-33
4. Clinical Procedures Process, Part 2 ................................................................................... 4-1
Completing the Procedure ............................................................................................ 4-1 Entering the interpretation into the TIU Note ............................................................ 4-1
Entering Encounter Information ................................................................................ 4-7
Signing Off............................................................................................................... 4-12
Viewing Clinical Procedures Results ......................................................................... 4-14
Linking Consent Forms and Images to CP Documents ........................................... 4-19
5. Viewing the Reports ............................................................................................................. 5-1 Abnormal ................................................................................................................... 5-3
Brief Report ............................................................................................................... 5-7
Full Captioned ............................................................................................................ 5-8
Full Report ............................................................................................................... 5-13
Procedures (local only) ............................................................................................ 5-18
Procedures ................................................................................................................ 5-21
Configuring the Medicine Report to Display in CPRS............................................. 5-23
6. Glossary ................................................................................................................................ 6-1
7. Index ...................................................................................................................................... 7-1

Table of Contents
ii Clinical Procedures V. 1.0 April 2004
User Manual

Clinical Procedures Process, Part 1
April 2004 Clinical Procedures V. 1.0 3-33
User Manual
Figure 3-28
1Appointment No Shows and Cancellation
When an appointment is scheduled for a future date/time, the appointment can later be cancelled
or the appointment can be changed to “No show” because the patient was a no show for the
appointment. With patch MD*1.0*11, an option called MD PROCESS NOSHOW/CANCEL
was introduced. Once scheduled to run daily, it will pick up the no show and cancelled
appointments and cancel the associated CP study that was created.
Figure 3-29 shows a study with the status of “New” created from an auto study check-in.
1 Patch MD*1.0*11 June 2009 Add new section on appointment no show and cancellation.

Clinical Procedures Process, Part 1
3-34 Clinical Procedures V. 1.0 April 2004
User Manual
Figure 3-29
The patient has an appointment scheduled shown in figure 3-30 for the procedure in figure 3-29.
Appt Mgt Module Jul 28, 2008@16:03:25 Page: 1 of 1
Patient: CP,PATIENTTWO (0343) Ward: 3AS
Total Appointment Profile * - New GAF Required 06/28/08 thru 04/23/11
Clinic Appt Date/Time Status
1 Gi Lab 07/28/2008@12:00 Inpatient/Act Req 12:00
Enter ?? for more actions
CI Check In CD Change Date Range DX Diagnosis Update
UN Unscheduled Visit EP Expand Entry DL Wait List Display
MA Make Appointment AE Add/Edit DE Delete Check Out
CA Cancel Appointment RT Record Tracking WD Wait List Disposition
NS No Show PD Patient Demographics CP Procedure Update
DC Discharge Clinic CO Check Out PC PCMM Assign or Unassign
AL Appointment Lists EC Edit Classification TI Display Team Information
PT Change Patient PR Provider Update
CL Change Clinic WE Wait List Entry
Select Action: Quit//
Figure 3-30

Clinical Procedures Process, Part 1
April 2004 Clinical Procedures V. 1.0 3-35
User Manual
The appointment was cancelled and re-booked in figure 3-31.
Appt Mgt Module Jul 28, 2008@16:09:29 Page: 1 of 1
Patient: CP,PATIENTTWO (0343) Ward: 3AS
Total Appointment Profile * - New GAF Required 06/28/08 thru 04/23/11
Clinic Appt Date/Time Status
1 Gi Lab 07/28/2008@12:00 Cancelled By Patient
2 Gi Lab 08/08/2008@08:00 Inpatient/Future
Enter ?? for more actions
CI Check In CD Change Date Range DX Diagnosis Update
UN Unscheduled Visit EP Expand Entry DL Wait List Display
MA Make Appointment AE Add/Edit DE Delete Check Out
CA Cancel Appointment RT Record Tracking WD Wait List Disposition
NS No Show PD Patient Demographics CP Procedure Update
DC Discharge Clinic CO Check Out PC PCMM Assign or Unassign
AL Appointment Lists EC Edit Classification TI Display Team Information
PT Change Patient PR Provider Update
CL Change Clinic WE Wait List Entry
Select Action: Quit//
Figure 3-31
Figure 3-32 shows the study cancelled by the task MD PROCESS NOSHOW/CANCEL and a
new study was generated for the re-booking of the new appointment.

Clinical Procedures Process, Part 1
3-36 Clinical Procedures V. 1.0 April 2004
User Manual
Figure 3-32
Note: If during appointment cancellation, no re-booking was selected, the user will need to
remove the new study created.

Clinical Procedures Process, Part 1
April 2004 Clinical Procedures V. 1.0 3-37
User Manual
Figure 3-33 shows an example of an appointment with a status of a “No Show” and no auto re-
booking of a future appointment.
Appt Mgt Module Jul 30, 2008@09:27:55 Page: 1 of 1
Patient: RAYMOND,LOUIS (2382) Outpatient
Total Appointment Profile * - New GAF Required 06/30/08 thru 04/25/11
Clinic Appt Date/Time Status
1 Gi Lab 07/30/2008@10:00 No-show
Enter ?? for more actions
CI Check In CD Change Date Range DX Diagnosis Update
UN Unscheduled Visit EP Expand Entry DL Wait List Display
MA Make Appointment AE Add/Edit DE Delete Check Out
CA Cancel Appointment RT Record Tracking WD Wait List Disposition
NS No Show PD Patient Demographics CP Procedure Update
DC Discharge Clinic CO Check Out PC PCMM Assign or Unassign
AL Appointment Lists EC Edit Classification TI Display Team Information
PT Change Patient PR Provider Update
CL Change Clinic WE Wait List Entry
Select Action: Quit//
Figure 3-33
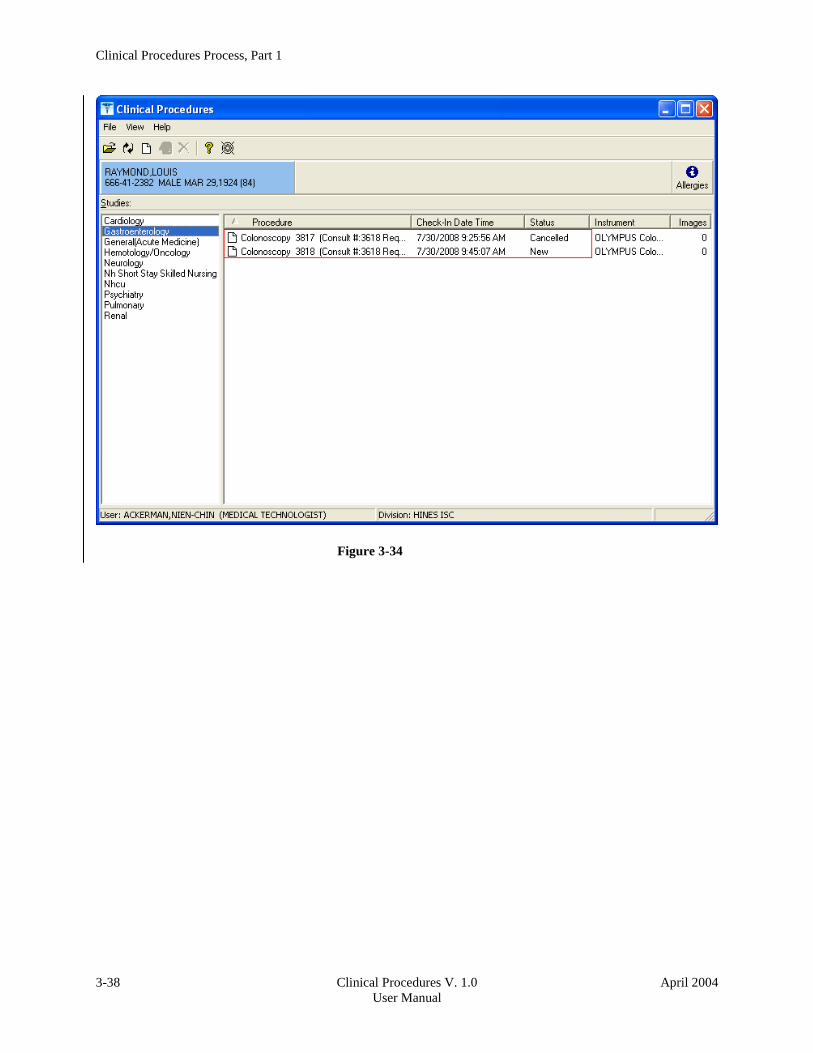
Figure 3-34 shows the study cancelled for the appointment with “No Show” and a new study is
created. The user can highlight the study with “New” status and click button to delete it or
select the File|| Delete Study to remove it.
Clinical Procedures Process, Part 1
3-38 Clinical Procedures V. 1.0 April 2004
User Manual
Figure 3-34

Clinical Procedures Process, Part 2
April 2004 Clinical Procedures V. 1.0 4-7
User Manual
Fig 4-6
7. Enter an interpretation in the space on the right side of the screen for the highlighted
(current) consult procedure (Fig. 4-6).
Entering Encounter Information
You can now enter encounter form information.
8. To enter the encounter information and complete the consult procedure, you must select
Action > Consult Results > Sign Note Now.
You can also select the Encounter drawer (Fig. 4-6) to directly enter encounter information.

Clinical Procedures Process, Part 2
4-8 Clinical Procedures V. 1.0 April 2004
User Manual
Fig. 4-7
This window (Fig. 4-7) asks if you want to enter encounter information now. (Fig. 4-7 is
displayed depending on how CPRS parameters are set. See the Implementation Guide for
information on defining CPRS parameters.)
9. Click Yes to enter encounter information, or click No to skip this step. If you choose No,
you can enter the information at a later time. In this example, the Yes button is clicked
and encounter information is entered.
Fig. 4-8
Figure 4-8 allows you to verify the primary provider for this encounter form.
10. Click Yes.
CPRS brings up the Encounter Form that was set up for the Hospital Location, where the
procedure was performed. The Visit Type tab is displayed.
11. Enter appropriate information for visit type. For example, in Figure 4-9, the following
information was entered:
Type of Visit. Established Patient
Section Name. Intermediate Exam 11-19 Min.
Visit Related to Service Connected Condition. Yes
Current providers for this encounter. 1CPUSER, ONE
1 Patch MD*1.0*11 June 2009 Replaced provider name with generic name.