Embed Size (px)
Citation preview
CLINICAL PHOTOGRAPHY FOR DENTISTS OF THE DIGITAL AGE Garyga Valentin, Dougnac-Galant ThomasGraduate students
Faculty of odontology, Lyon 1 University, Lyon, France
Correspondence: [email protected]_________________________________________________
INTRODUCTION
A 2010 study from Morse et. al1, states that only 48% of general dentists in the UK use clinical photography.
What are the advantages general dentists find in clinical photography and what concepts one has to master to deliver quality photographs?
ADDED-VALUE OF DENTAL PHOTOGRAPHY
Clinical photography brings major advantages to one’s practice.
First of all, photography is a wonderful tool for communication. The message delivered by the dentist is supported by the evidence of the photograph. In terms of oral health education, outcomes can be improved by showing the patient intra-oral views of plaque, calculus, gingivitis, etc. For treatment planning, clinical photography can be of great help thanks to digital manipulations of the images. Softwares such as Adobe Photoshop can help producing a virtual mock-up and provide patients with a pre-visualization of the expected outcomes.After sufficient training, informative and reproducible pictures can be sent to the dental technician by the dentist. The collaboration between the dental lab and the dental practice is strengthened, providing the patient with better clinical outcomes, especially in the fields of prosthodontics and cosmetic dentistry. This is critical, notably for shapes, translucency and colors.Clinical pictures can also help the practitioner assess his own work with post-op pictures. Such pictures can help him analyze his technique and improve his skills by discussing the case with fellow practitioners. Last but not least, pre-op and post-op pictures can be added to the medical and legal records of the patient.
Clinical dental photography has numerous applications for practitioners. It can be used in all fields of dentistry and brings added-value to one’s practice. However, it requires sufficient training to obtain reproducible and informative pictures.
DIFFICULTIES IN DENTAL PHOTOGRAPHY
The main challenge in clinical photography will be to provide the viewer with a sufficient amount of information to allow proper analysis of the situation. Such informations consist of volumes and shapes, translucency, colors, depth, gingival margin, teeth alignment, etc. However, major obstacles prevent novice photographers from obtaining such data.
Firstly, the anatomy itself will be one of the major obstacles to be faced. Soft tissues - especially cheeks and tongue - will often come in the line of sight. Clinicians will, therefore, use retractors to hold back the soft tissues.
� Illustration 1: Must-have accessories
Indirect vision, which dentists are used to, will be key for some situations, such as occlusal and lingual shots. Dedicated dental mirrors will be mandatory. Using mirrors require training because minor changes in the angulation will actually end up in major changes in the picture. When using a mirror, only a 45° angle between the line of sight of the camera and the mirror and a 45° angle between the mirror and the teeth will guarantee reproducibility and a deformation-free image.
� Illustration 2: The proper angulation with mirrors
To achieve good results, it is highly recommended to work together with the dental assistant. The dentist would use the camera and the assistant would use the mirror. Teamwork is far more efficient and more comfortable than working alone. The patient might also contribute and hold the retractors. This matter will be discussed thoroughly in the next issue.
More advanced informations can be pictured with accuracy such as volumes and colors. This requires
additional training and additional tools such as a monitor colorimeter, a set of contrastors and some light modifiers.
Clinical photographs can bring to light a wide variety of informations. While some (such as geometry) are easily depicted, some others (such as color) require additional training. In any case, a minimum understanding of the fundamentals of photography is needed.
FUNDAMENTALS OF PHOTOGRAPHY
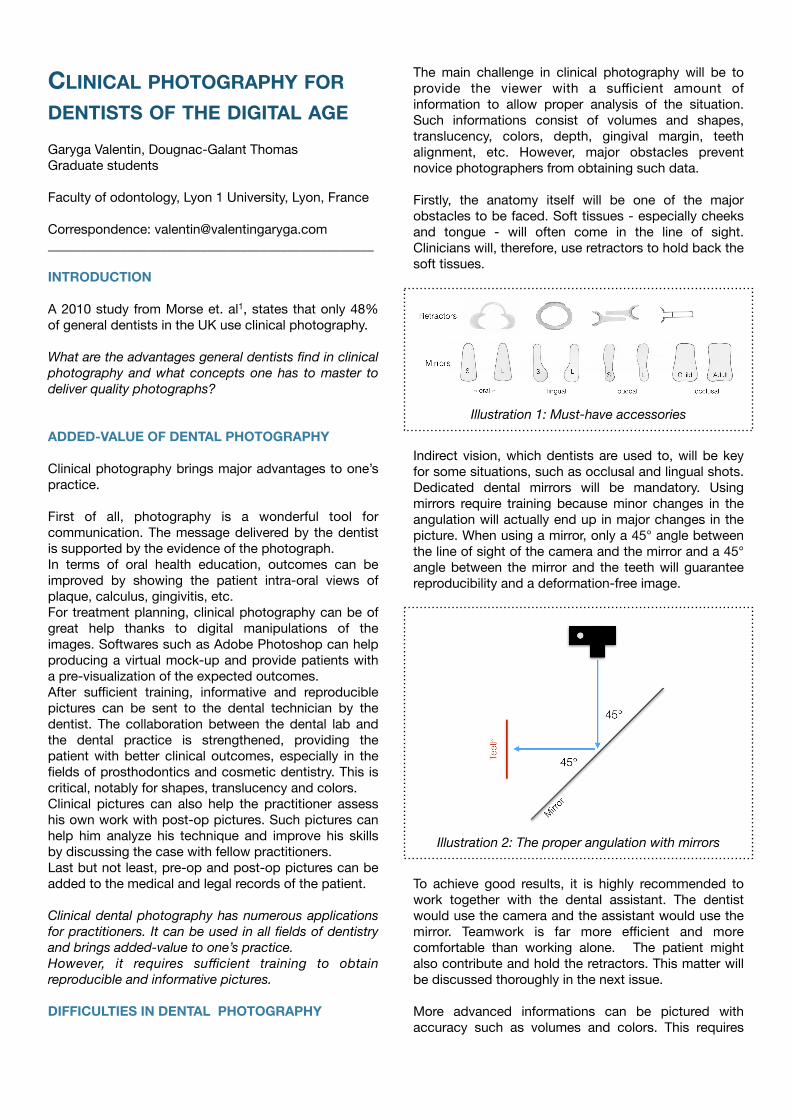
Photography literally means « writing with light ». Digital cameras use a light-sensitive sensor made of photodetectors. This sensor captures the impact of light photons for the camera to create the image. The photographical process relies on a trinity of settings : aperture, shutter speed and sensitivity.
� Illustration 3: A trinity of settings
Shutter speed (or exposure time) defines the duration for which the sensor of the camera is exposed to light. It it the time during which the photograph is taken. For most cameras, the settings range from 30s to 1/8000s. In a bright environment (eg. a glacier), less time is needed and the photographer will select a shorter exposure duration, that is to say a faster speed (eg. 1/2000s). In a dark environment, such as the oral cavity, more time is needed and the practitioner will select a slower, more adequate speed such as 1/100s.
The darker the environment, the longer the exposure time (= the slower the shutter speed). However, long exposure times result in blurred images because of angular momentum.
Sensitivity defines the ability of the sensor the detect photons. Its unit is the ISO unit (International Organization for Standardization). Values range from ISO 100 to over ISO 12800 in modern high-end cameras. The golden rule of ISO sensitivity is: Twice the sensitivity = Half the exposure time. For instance, if one selects 1/200s for ISO 100, the corresponding setting for ISO 200 would be 1/400s. Increasing the sensitivity of the image offers the possibility for shortened exposure time and therefore sharper images in regard to angular momentum.
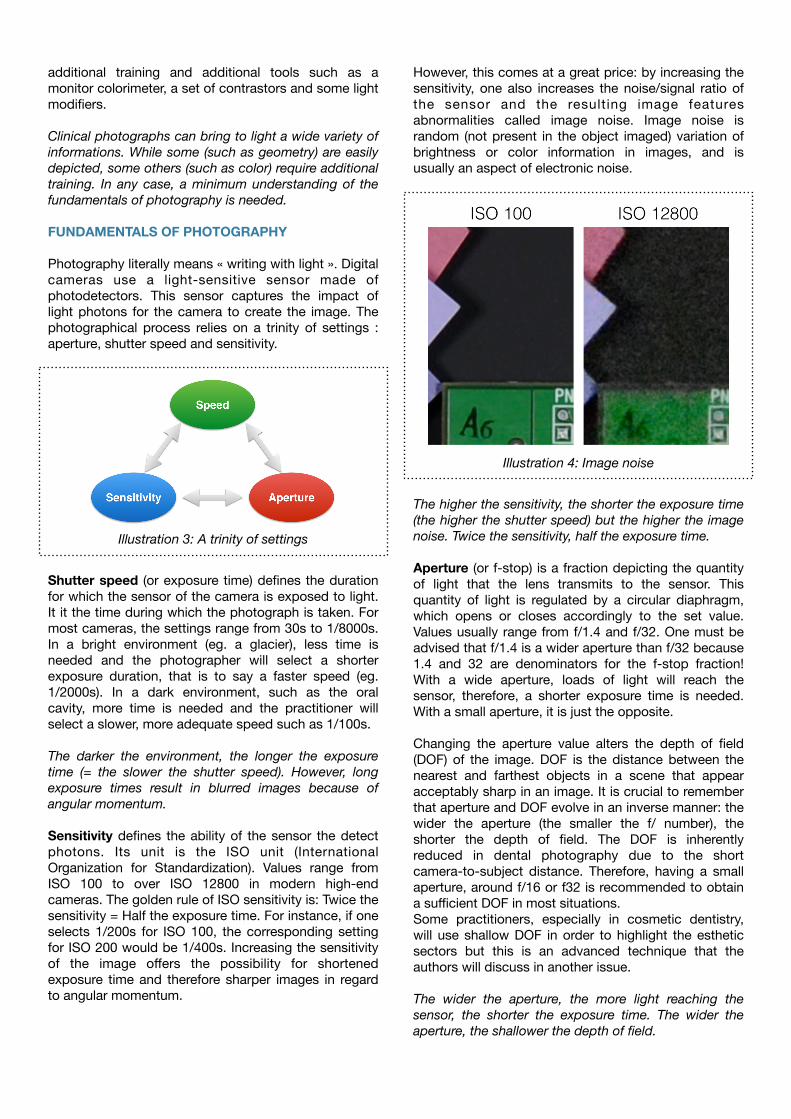
However, this comes at a great price: by increasing the sensitivity, one also increases the noise/signal ratio of the sensor and the resulting image features abnormalities called image noise. Image noise is random (not present in the object imaged) variation of brightness or color information in images, and is usually an aspect of electronic noise.
� Illustration 4: Image noise
The higher the sensitivity, the shorter the exposure time (the higher the shutter speed) but the higher the image noise. Twice the sensitivity, half the exposure time.
Aperture (or f-stop) is a fraction depicting the quantity of light that the lens transmits to the sensor. This quantity of light is regulated by a circular diaphragm, which opens or closes accordingly to the set value. Values usually range from f/1.4 and f/32. One must be advised that f/1.4 is a wider aperture than f/32 because 1.4 and 32 are denominators for the f-stop fraction! With a wide aperture, loads of light will reach the sensor, therefore, a shorter exposure time is needed. With a small aperture, it is just the opposite.
Changing the aperture value alters the depth of field (DOF) of the image. DOF is the distance between the nearest and farthest objects in a scene that appear acceptably sharp in an image. It is crucial to remember that aperture and DOF evolve in an inverse manner: the wider the aperture (the smaller the f/ number), the shorter the depth of field. The DOF is inherently reduced in dental photography due to the short camera-to-subject distance. Therefore, having a small aperture, around f/16 or f32 is recommended to obtain a sufficient DOF in most situations. Some practitioners, especially in cosmetic dentistry, will use shallow DOF in order to highlight the esthetic sectors but this is an advanced technique that the authors will discuss in another issue.
The wider the aperture, the more light reaching the sensor, the shorter the exposure time. The wider the aperture, the shallower the depth of field.
PROPOSITION OF SET-UP
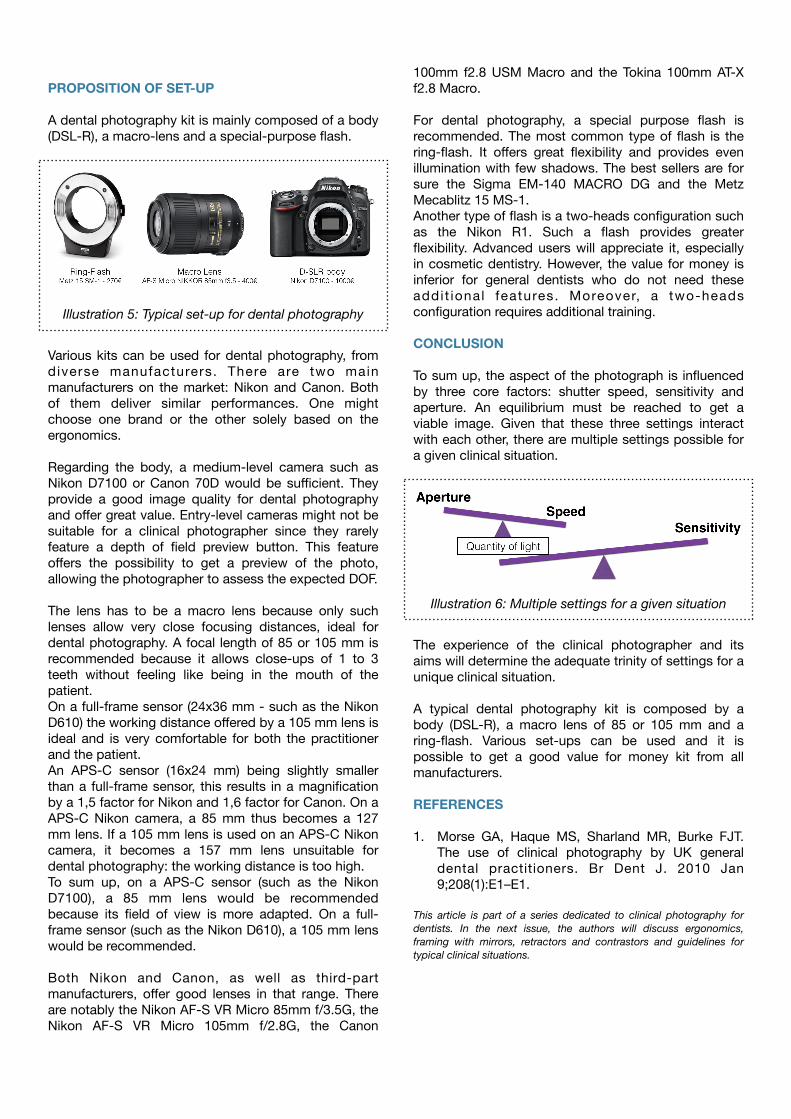
A dental photography kit is mainly composed of a body (DSL-R), a macro-lens and a special-purpose flash.
�
Illustration 5: Typical set-up for dental photography
Various kits can be used for dental photography, from diverse manufacturers. There are two main manufacturers on the market: Nikon and Canon. Both of them deliver similar performances. One might choose one brand or the other solely based on the ergonomics.
Regarding the body, a medium-level camera such as Nikon D7100 or Canon 70D would be sufficient. They provide a good image quality for dental photography and offer great value. Entry-level cameras might not be suitable for a clinical photographer since they rarely feature a depth of field preview button. This feature offers the possibility to get a preview of the photo, allowing the photographer to assess the expected DOF.
The lens has to be a macro lens because only such lenses allow very close focusing distances, ideal for dental photography. A focal length of 85 or 105 mm is recommended because it allows close-ups of 1 to 3 teeth without feeling like being in the mouth of the patient. On a full-frame sensor (24x36 mm - such as the Nikon D610) the working distance offered by a 105 mm lens is ideal and is very comfortable for both the practitioner and the patient.An APS-C sensor (16x24 mm) being slightly smaller than a full-frame sensor, this results in a magnification by a 1,5 factor for Nikon and 1,6 factor for Canon. On a APS-C Nikon camera, a 85 mm thus becomes a 127 mm lens. If a 105 mm lens is used on an APS-C Nikon camera, it becomes a 157 mm lens unsuitable for dental photography: the working distance is too high.To sum up, on a APS-C sensor (such as the Nikon D7100), a 85 mm lens would be recommended because its field of view is more adapted. On a full-frame sensor (such as the Nikon D610), a 105 mm lens would be recommended.
Both Nikon and Canon, as well as third-part manufacturers, offer good lenses in that range. There are notably the Nikon AF-S VR Micro 85mm f/3.5G, the Nikon AF-S VR Micro 105mm f/2.8G, the Canon
100mm f2.8 USM Macro and the Tokina 100mm AT-X f2.8 Macro.
For dental photography, a special purpose flash is recommended. The most common type of flash is the ring-flash. It offers great flexibility and provides even illumination with few shadows. The best sellers are for sure the Sigma EM-140 MACRO DG and the Metz Mecablitz 15 MS-1.Another type of flash is a two-heads configuration such as the Nikon R1. Such a flash provides greater flexibility. Advanced users will appreciate it, especially in cosmetic dentistry. However, the value for money is inferior for general dentists who do not need these addi t ional features. Moreover, a two-heads configuration requires additional training.
CONCLUSION
To sum up, the aspect of the photograph is influenced by three core factors: shutter speed, sensitivity and aperture. An equilibrium must be reached to get a viable image. Given that these three settings interact with each other, there are multiple settings possible for a given clinical situation.
�Illustration 6: Multiple settings for a given situation
The experience of the clinical photographer and its aims will determine the adequate trinity of settings for a unique clinical situation.
A typical dental photography kit is composed by a body (DSL-R), a macro lens of 85 or 105 mm and a ring-flash. Various set-ups can be used and it is possible to get a good value for money kit from all manufacturers.
REFERENCES
1. Morse GA, Haque MS, Sharland MR, Burke FJT. The use of clinical photography by UK general dental practitioners. Br Dent J. 2010 Jan 9;208(1):E1–E1.
This article is part of a series dedicated to clinical photography for dentists. In the next issue, the authors will discuss ergonomics, framing with mirrors, retractors and contrastors and guidelines for typical clinical situations.