Embed Size (px)
Citation preview
29
Dr. Pablo Echarri
CLINICAL PAPER
TRATAMIENTO CON DISTALIZACIÓN ®UTILIZANDO CA CLEAR ALIGNER
®Y CA DISTALIZER KIT(Parte 1)
TREATMENT WITH DISTALIZATION ® USING CA CLEAR ALIGNER
®Y CA DISTALIZER KIT(Part 1)
© 2016 Centro de Ortodoncia y ATM, Ladent, SLAll rights reserved
This book or any part thereof may not be reproduced, stored in retreival system or transmitted in any form or by any means electronic, mechanical, photocopying or otherwise, without prior written permission of the publishers.
© 2016 Centro de Ortodoncia y ATM, Ladent, SLTodos los derechos reservados.
Ninguna parte de esta publicación puede reproducirse o transmitirse por ningún medio electrónico o mecánico, incluyendo fotocopiado o g r a b a d o p o r c u a l q u i e r s i s t e m a d e almacenamiento de información sin el permiso escrito previo de los editores.
Los casos expuestos han sido realizados por el Dr. Pablo Echarri. El trabajo de laboratorio ha sido realizado por el laboratorio Ladent, y se han utilizado los materiales de Scheu Dental Technology.
All cases were carried out by Dr. Pablo Echarri. All the laboratory work was carried out by Ladent laboratory, and the Scheu Dental Technology materials were used.
Dr. Pablo EcharriDental Technology
CLINICAL PAPER
Dr. Pablo EcharriDental Technology
CLINICAL PAPER
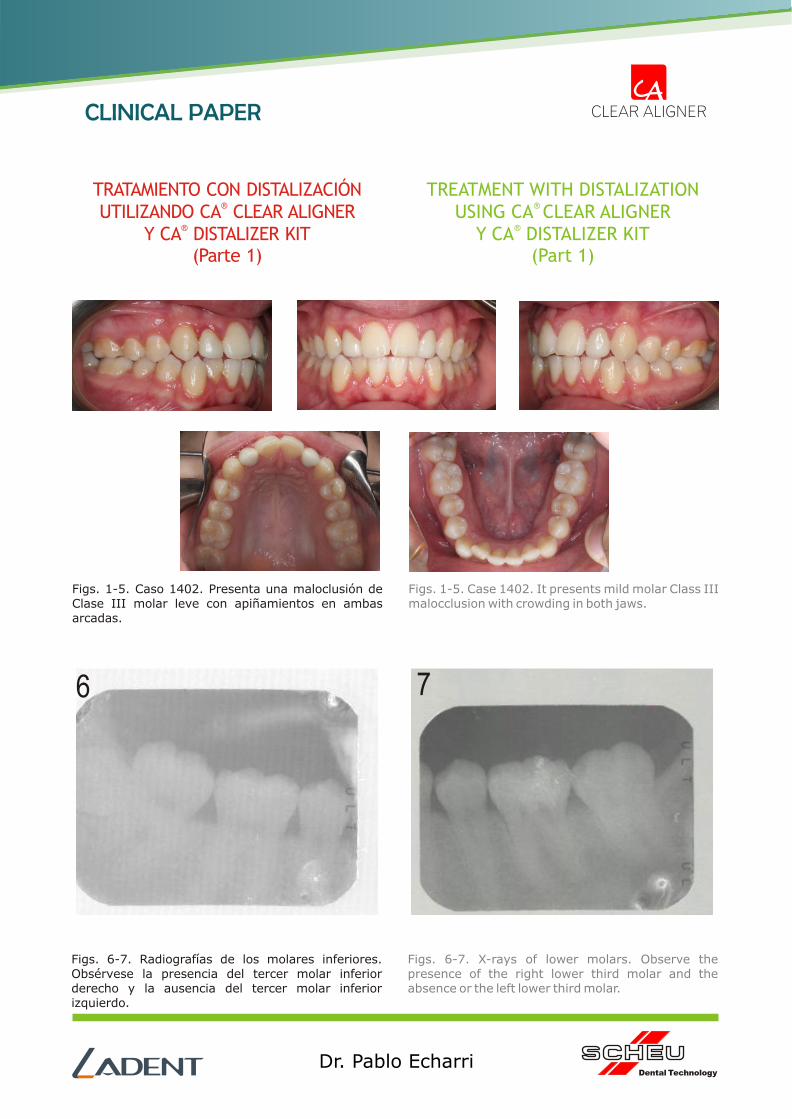
Figs. 1-5. Caso 1402. Presenta una maloclusión de Clase III molar leve con apiñamientos en ambas arcadas.
Figs. 1-5. Case 1402. It presents mild molar Class III malocclusion with crowding in both jaws.
TRATAMIENTO CON DISTALIZACIÓN ®UTILIZANDO CA CLEAR ALIGNER
®Y CA DISTALIZER KIT(Parte 1)
TREATMENT WITH DISTALIZATION ® USING CA CLEAR ALIGNER
®Y CA DISTALIZER KIT(Part 1)
Figs. 6-7. Radiografías de los molares inferiores. Obsérvese la presencia del tercer molar inferior derecho y la ausencia del tercer molar inferior izquierdo.
Figs. 6-7. X-rays of lower molars. Observe the presence of the right lower third molar and the absence or the left lower third molar.
6 7
Dr. Pablo EcharriDental Technology
CLINICAL PAPER
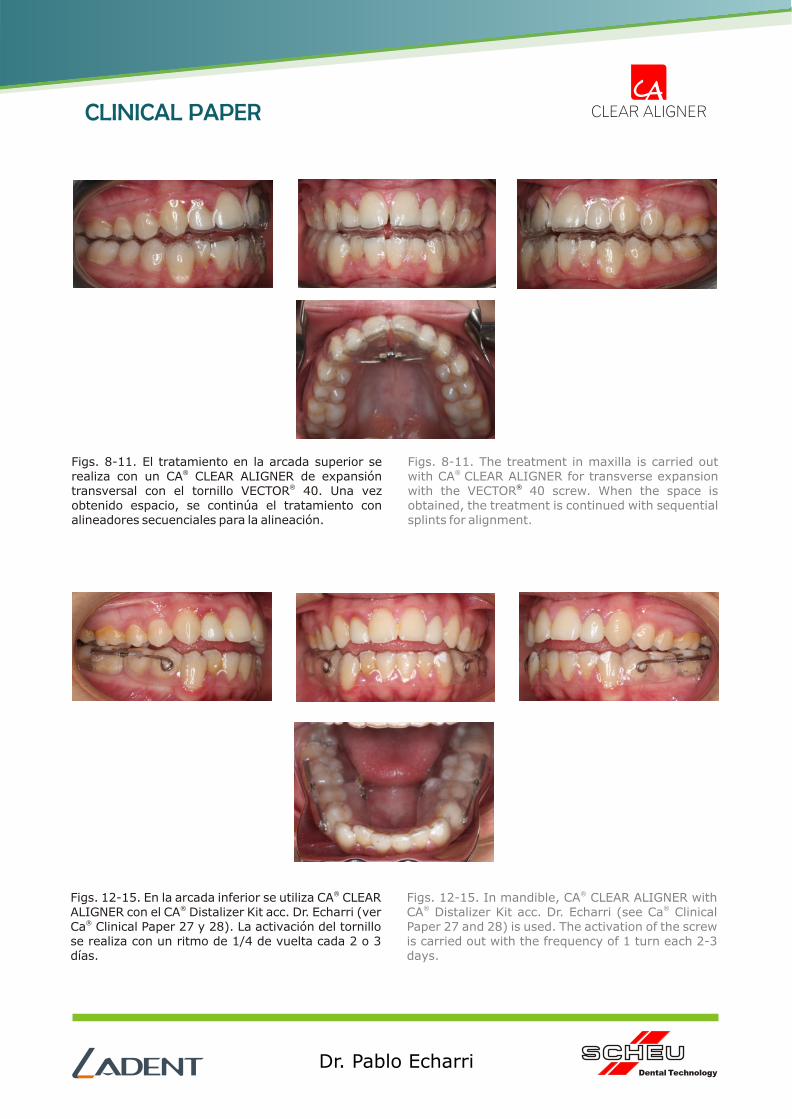
Figs. 8-11. El tratamiento en la arcada superior se ®realiza con un CA CLEAR ALIGNER de expansión
®transversal con el tornillo VECTOR 40. Una vez obtenido espacio, se continúa el tratamiento con alineadores secuenciales para la alineación.
Figs. 8-11. The treatment in maxilla is carried out ® with CA CLEAR ALIGNER for transverse expansion
with the VECTOR 40 screw. When the space is obtained, the treatment is continued with sequential splints for alignment.
®
®Figs. 12-15. En la arcada inferior se utiliza CA CLEAR ®ALIGNER con el CA Distalizer Kit acc. Dr. Echarri (ver
®Ca Clinical Paper 27 y 28). La activación del tornillo se realiza con un ritmo de 1/4 de vuelta cada 2 o 3 días.
®Figs. 12-15. In mandible, CA CLEAR ALIGNER with ® ®CA Distalizer Kit acc. Dr. Echarri (see Ca Clinical
Paper 27 and 28) is used. The activation of the screw is carried out with the frequency of 1 turn each 2-3 days.
Dr. Pablo EcharriDental Technology
CLINICAL PAPER
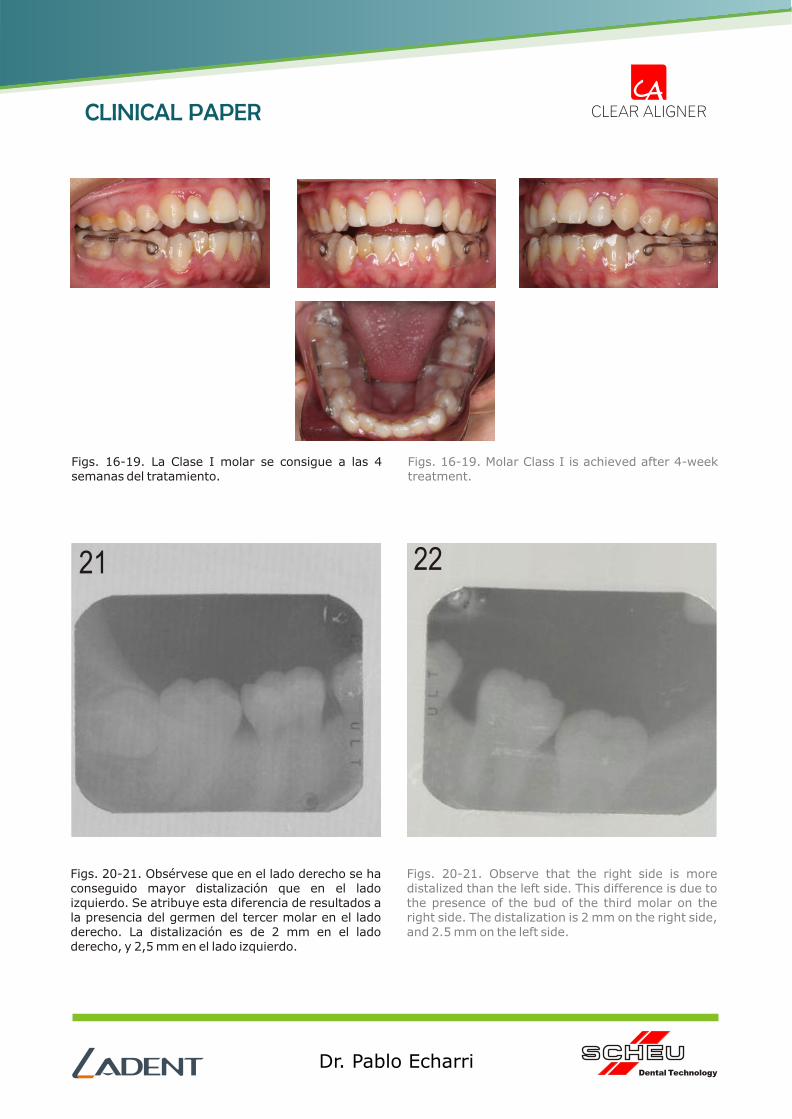
Figs. 16-19. La Clase I molar se consigue a las 4 semanas del tratamiento.
Figs. 16-19. Molar Class I is achieved after 4-week treatment.
Figs. 20-21. Obsérvese que en el lado derecho se ha conseguido mayor distalización que en el lado izquierdo. Se atribuye esta diferencia de resultados a la presencia del germen del tercer molar en el lado derecho. La distalización es de 2 mm en el lado derecho, y 2,5 mm en el lado izquierdo.
Figs. 20-21. Observe that the right side is more distalized than the left side. This difference is due to the presence of the bud of the third molar on the right side. The distalization is 2 mm on the right side, and 2.5 mm on the left side.
21 22
Dr. Pablo EcharriDental Technology
CLINICAL PAPER
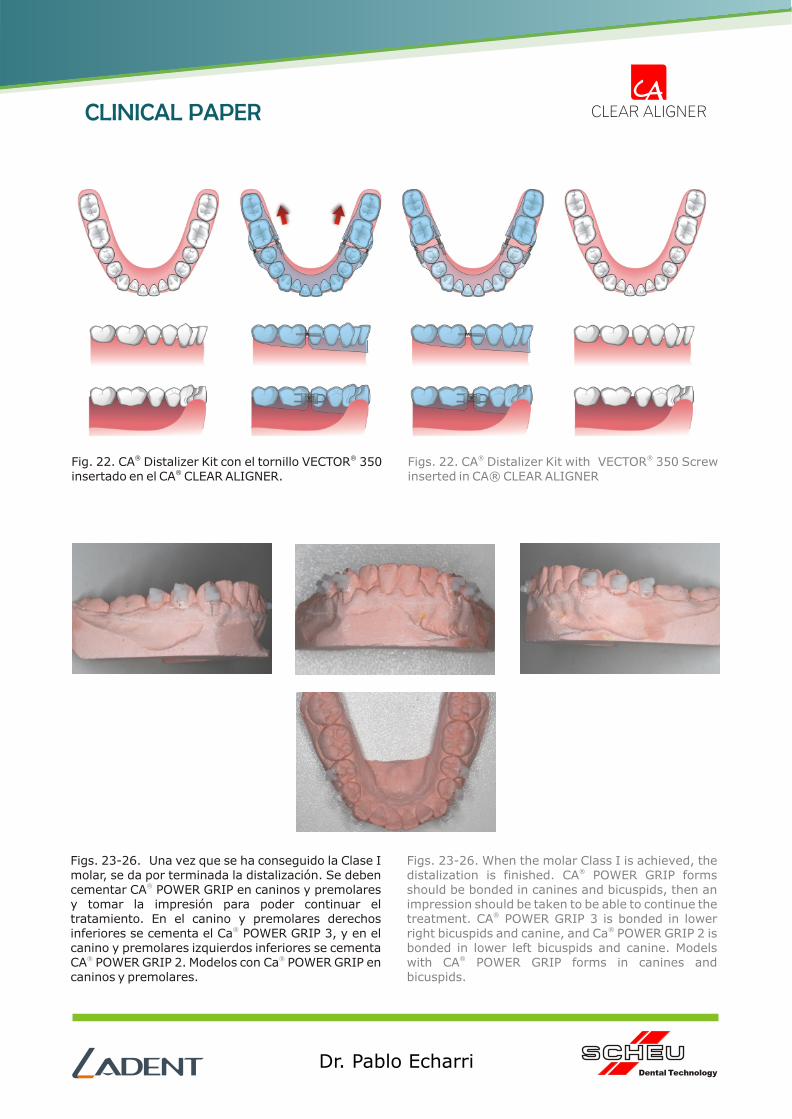
® ®Fig. 22. CA Distalizer Kit con el tornillo VECTOR 350 ®insertado en el CA CLEAR ALIGNER.
® ®Figs. 22. CA Distalizer Kit with VECTOR 350 Screw inserted in CA® CLEAR ALIGNER
Figs. 23-26. Una vez que se ha conseguido la Clase I molar, se da por terminada la distalización. Se deben cementar CA POWER GRIP en caninos y premolares y tomar la impresión para poder continuar el tratamiento. En el canino y premolares derechos inferiores se cementa el Ca POWER GRIP 3, y en el canino y premolares izquierdos inferiores se cementa CA POWER GRIP 2. Modelos con Ca POWER GRIP en caninos y premolares.
®
®
® ®
Figs. 23-26. When the molar Class I is achieved, the ®distalization is finished. CA POWER GRIP forms
should be bonded in canines and bicuspids, then an impression should be taken to be able to continue the
®treatment. CA POWER GRIP 3 is bonded in lower ®right bicuspids and canine, and Ca POWER GRIP 2 is
bonded in lower left bicuspids and canine. Models ®with CA POWER GRIP forms in canines and
bicuspids.

Dr. Pablo EcharriDental Technology
CLINICAL PAPER
Figs. 27-29. CA CLEAR ALIGNER durante la distalización de premolares.
Figs. 27-29. CA CLEAR ALIGNER during the distalization of bicuspids.
Fig. 30. Distalización de caninos y premolares se hace simultáneamente si no es necesario corregir la rotación, alinear o nivelar estos dientes. Si es necesario, estos dientes deberían distalizarse uno por uno y corregir mal posiciones si fuera necesario.
Fig. 30. Canine and bicuspids distalization is carried out simultaneously if it is not necessary to correct rotation, to align or to level these teeth. If it is necessary, they should be distalized one by one, and the malpositioned ones should be corrected

Dr. Pablo EcharriDental Technology
CLINICAL PAPER
Fig. 31. Continuación de distalización. Fig. 31. Continuation of distalization of canines and bicuspids.
Fig. 32. Una vez conseguida la clase I canina, se procede a la alineación de los incisivos con set-ups progresivos. A continuación se procede al detallado final.
Fig. 32. When the canine Class I is achieved, the incisors alignment is carried out with progressive set-ups. In continuation, the final detailing is carried out.
Figs. 33-36. Modelos después de la distalización de molares y con Ca POWER GRIP 2 y 3 en caninos y premolares.
®
Figs. 33-36. Models after the distalization of molars ®and with Ca POWER GRIP 2 and 3 in canines and
bicuspids.
Dr. Pablo EcharriDental Technology
CLINICAL PAPER
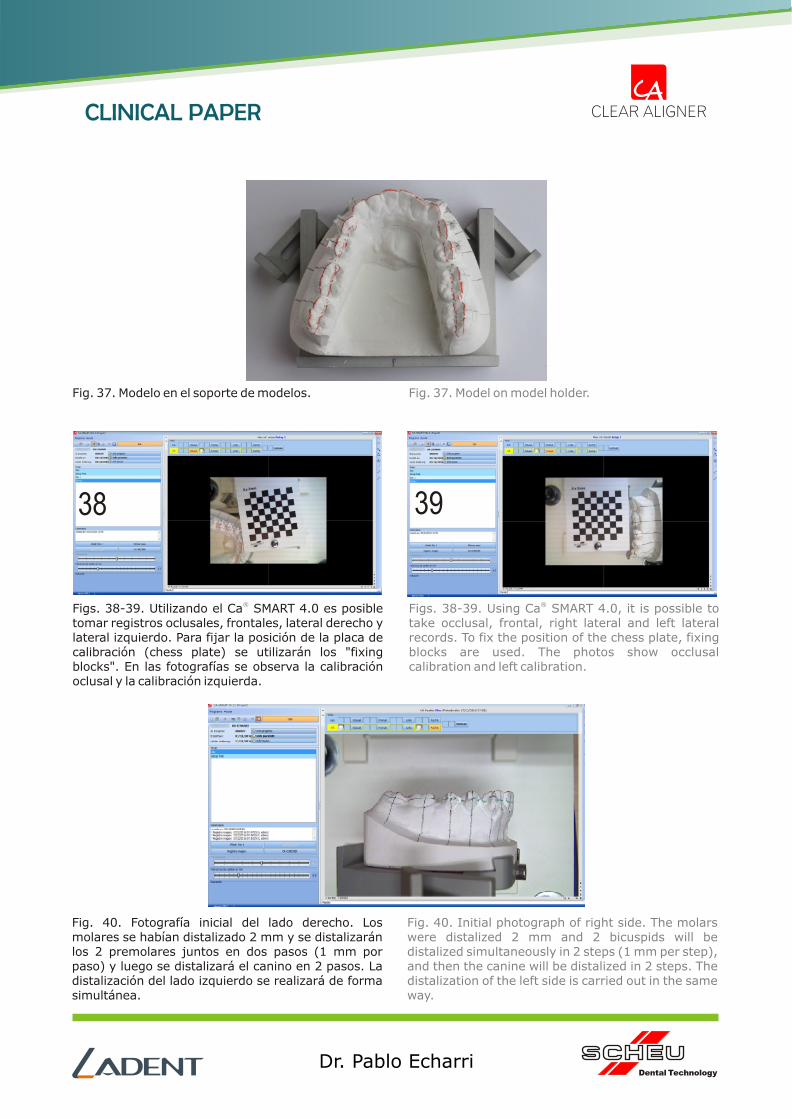
Fig. 37. Modelo en el soporte de modelos. Fig. 37. Model on model holder.
Figs. 38-39. Utilizando el Ca SMART 4.0 es posible tomar registros oclusales, frontales, lateral derecho y lateral izquierdo. Para fijar la posición de la placa de calibración (chess plate) se utilizarán los "fixing blocks". En las fotografías se observa la calibración oclusal y la calibración izquierda.
® ®Figs. 38-39. Using Ca SMART 4.0, it is possible to take occlusal, frontal, right lateral and left lateral records. To fix the position of the chess plate, fixing blocks are used. The photos show occlusal calibration and left calibration.
Fig. 40. Fotografía inicial del lado derecho. Los molares se habían distalizado 2 mm y se distalizarán los 2 premolares juntos en dos pasos (1 mm por paso) y luego se distalizará el canino en 2 pasos. La distalización del lado izquierdo se realizará de forma simultánea.
Fig. 40. Initial photograph of right side. The molars were distalized 2 mm and 2 bicuspids will be distalized simultaneously in 2 steps (1 mm per step), and then the canine will be distalized in 2 steps. The distalization of the left side is carried out in the same way.
38 39

Dr. Pablo EcharriDental Technology
CLINICAL PAPER
Figs. 41-43. Modelo en el soporte de modelos con el corte horizontal.
Figs. 41-43. Model on the model holder with horizontal cut.
Figs. 44-45. Primer set-up con la distalización de premolares derechos. Se han distalizado 1 mm y se ha sobrecorregido la angulación 5º.
Figs. 44-45. First set-up with distalization of right bicuspids. They were distalized 1 mm and the angulation was overcorrected 5º.
Fig. 46. Registro del primer set-up del lado derecho distalizando premolares.
Fig. 46. Record of the first set-up of the right side, distalizing the bicuspids.
44 45
Dr. Pablo EcharriDental Technology
CLINICAL PAPER
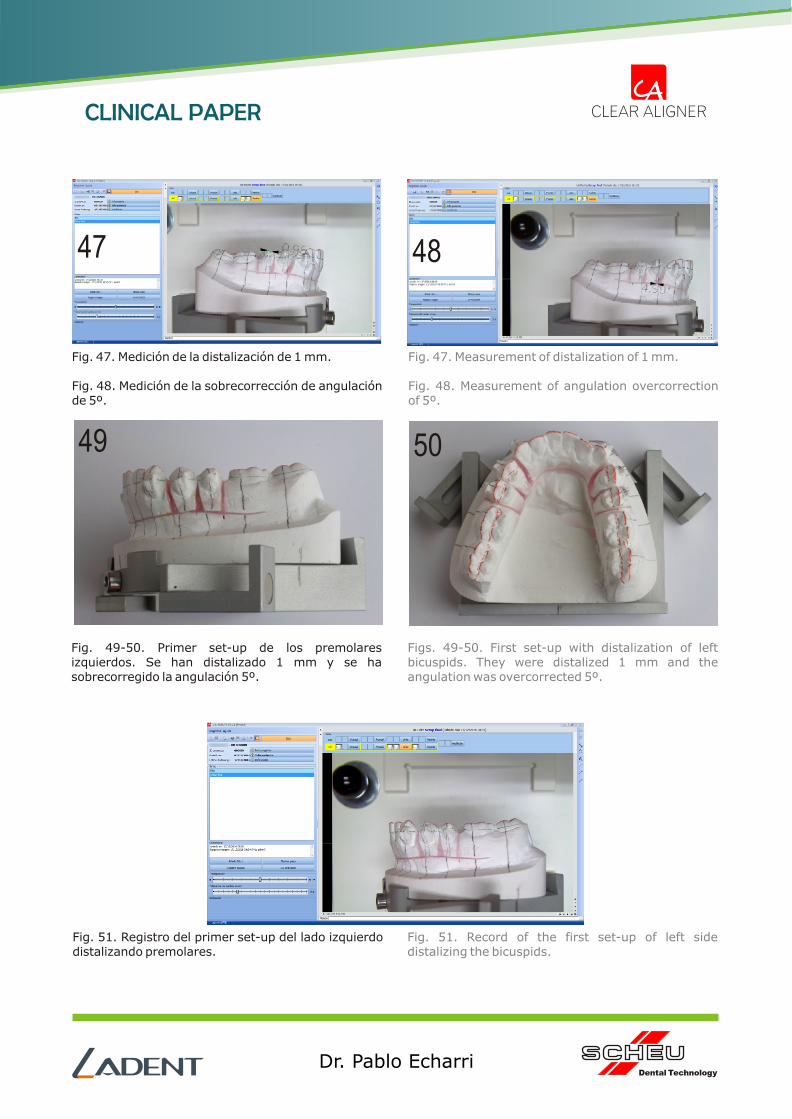
Fig. 47. Medición de la distalización de 1 mm.
Fig. 48. Medición de la sobrecorrección de angulación de 5º.
Fig. 47. Measurement of distalization of 1 mm.
Fig. 48. Measurement of angulation overcorrection of 5º.
47 48
Fig. 49-50. Primer set-up de los premolares izquierdos. Se han distalizado 1 mm y se ha sobrecorregido la angulación 5º.
Figs. 49-50. First set-up with distalization of left bicuspids. They were distalized 1 mm and the angulation was overcorrected 5º.
49 50
Fig. 51. Registro del primer set-up del lado izquierdo distalizando premolares.
Fig. 51. Record of the first set-up of left side distalizing the bicuspids.
Dr. Pablo EcharriDental Technology
CLINICAL PAPER
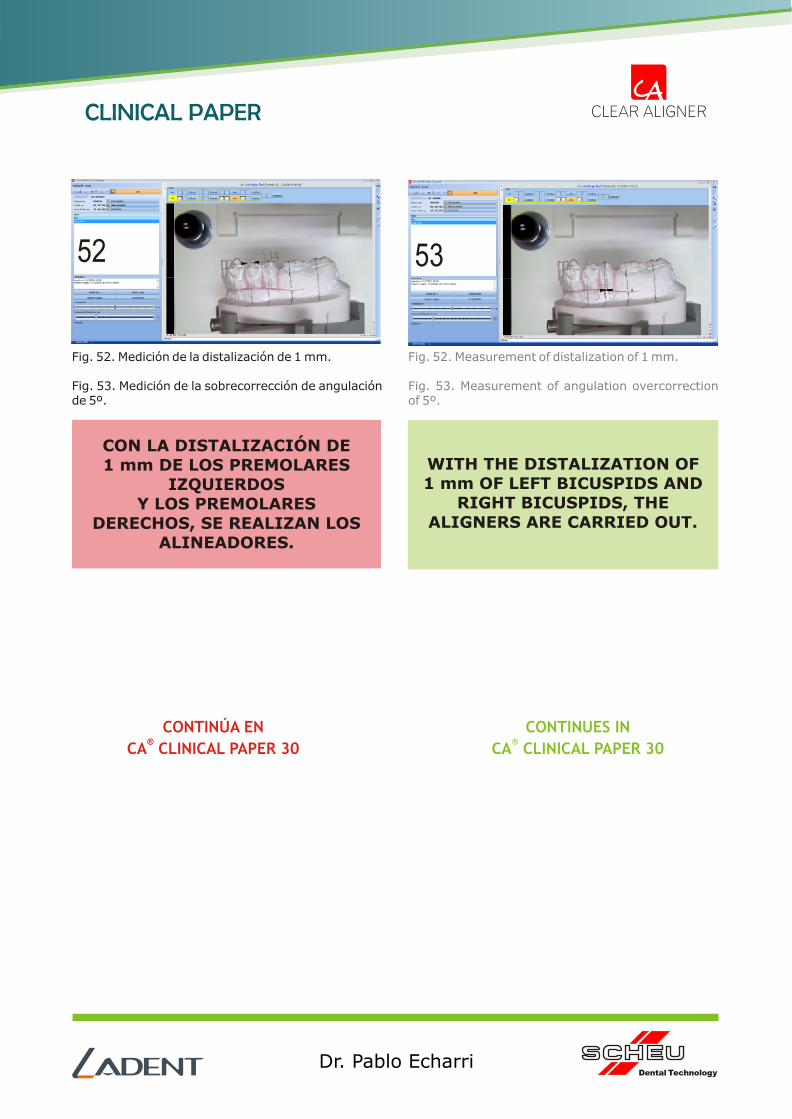
Fig. 52. Medición de la distalización de 1 mm.
Fig. 53. Medición de la sobrecorrección de angulación de 5º.
Fig. 52. Measurement of distalization of 1 mm.
Fig. 53. Measurement of angulation overcorrection of 5º.
52 53
CON LA DISTALIZACIÓN DE 1 mm DE LOS PREMOLARES
IZQUIERDOS Y LOS PREMOLARES
DERECHOS, SE REALIZAN LOS ALINEADORES.
WITH THE DISTALIZATION OF 1 mm OF LEFT BICUSPIDS AND
RIGHT BICUSPIDS, THE ALIGNERS ARE CARRIED OUT.
CONTINÚA EN ®
CA CLINICAL PAPER 30
CONTINUES IN
CA CLINICAL PAPER 30®

Dr. Pablo EcharriDental Technology
CLINICAL PAPER

Dr. Pablo Echarri
CLINICAL PAPER