Embed Size (px)
Citation preview

1 04/21
ClientBase Windows Overview for Users
This ClientBase Overview is designed to provide you with a quick reference to some of the most commonly used features
in ClientBase. This is not the ClientBase Manual. The ClientBase manual, which has been designed to provide detailed
instruction for the front-line agents and the agency management and marketing teams is accessible from every
ClientBase workstation via electronic help files that are updated automatically with every ClientBase release. By going to
File|Help in ClientBase, and selecting Contents, Index or Search, you get answers to your questions anytime while
working in the program.
In addition to our technical documentation, we offer Recorded Trainings that provides interactive training with the
convenience of working on your own computer at your own pace. These are located on our website under
Training|ClientBase|Recorded Trainings at http://www.trams.com .
We also offer a series of On-Line Training Courses (on our WebEx link under Training|ClientBase at
http://www.trams.com which breaks the program down into digestible bites and provides one-hour
live instruction within a small group. On-line daily Question and Answer sessions are available for interactive
question/answer forums with ClientBase support personnel and other ClientBase users.
We further offer unlimited technical support by calling our team of highly trained support personnel at 310-641-8726
Option 2, or emailing a question to [email protected] .
Everyone learns in different ways and at different paces. Here at Trams and ClientBase Products and Services, we
provide you with a multitude of ways to learn ClientBase because the sooner you begin reaping the benefits of
ClientBase, the sooner you’ll be SELLING MORE TRAVEL. We’re sure of it!
ClientBase Windows Overview for Users

2 04/21
TABLE OF CONTENTS ClientBase Windows Overview for Users ............................................................................................. 1
Getting to Know ClientBase .................................................................................................................. 3
Streamline Marketing with Point-and-Click Codes .............................................................................. 11
Quick Steps to Using Marketing Point-and-Click Codes ................................................................................................... 11
Be Prepared with Travel/Payment History .......................................................................................... 11
Quick Steps to View Trams Travel History ........................................................................................................................ 12
Quick Steps to View Trams Payment History ................................................................................................................... 13
Strengthen Client Relationships with Activity Manager ....................................................................... 13
Quick Steps to Using the Activity Manager ....................................................................................................................... 14
Generate Target Client Lists with Level 2 and 3 Queries .................................................................... 15
Quick Steps to Using the Level 2 Query ........................................................................................................................... 15
Quick Steps to Using the Level 3 Query ........................................................................................................................... 16
Save Query Folders with Date Formulas for Future Use .................................................................... 18
Quick Steps to Save Query Folders with Date Formulas for Future Use ......................................................................... 18
Run Labels fro Quick, Effective Marketing .......................................................................................... 19
Quick Steps to Print Labels ............................................................................................................................................... 19
Print Custom Letters Easily with Document Templates ...................................................................... 20
Quick Steps toi Print Custom Letters ................................................................................................................................ 20
Save Time & Duplication with Merge to PNR...................................................................................... 21
Quick Steps to Merging a Profile into a PNR .................................................................................................................... 21
Email Blast – 21st Century Communication ......................................................................................... 21
Quick Steps to Email Blast ................................................................................................................................................ 22
Understand Your Database with Reporting ........................................................................................ 23
Quick Steps to ClientBase Reporting ................................................................................................................................ 23
Manage the Trip Planning Process with Res Cards ............................................................................ 23
Quick Steps to Automate Res Cards ................................................................................................................................ 24
Quick Steps to Create Res Cards/Invoices ....................................................................................................................... 25
Using Live Connect ............................................................................................................................. 25
Quick Steps to Using Live Connect ................................................................................................................................... 26
Using Inventory in ClientBase ............................................................................................................. 26
Quick Steps to Using Inventory ......................................................................................................................................... 27
3 04/21
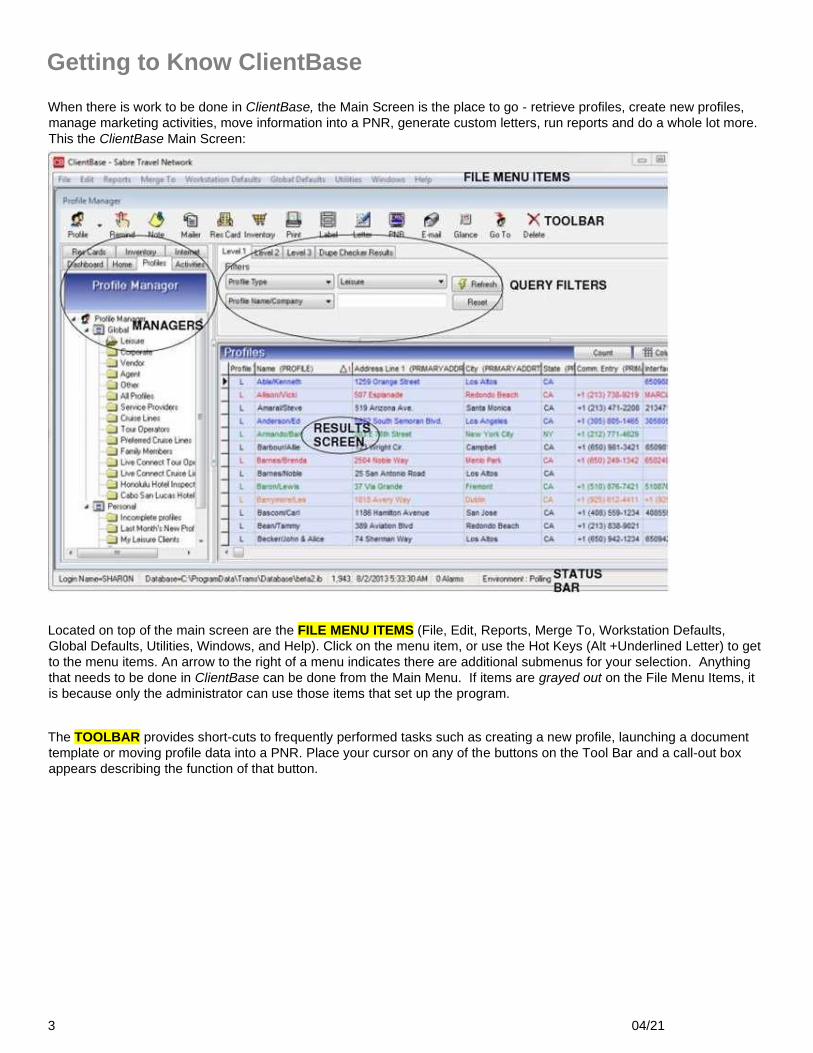
Getting to Know ClientBase
When there is work to be done in ClientBase, the Main Screen is the place to go - retrieve profiles, create new profiles,
manage marketing activities, move information into a PNR, generate custom letters, run reports and do a whole lot more.
This the ClientBase Main Screen:
t of the ClientBase Main Screen:
Located on top of the main screen are the FILE MENU ITEMS (File, Edit, Reports, Merge To, Workstation Defaults,
Global Defaults, Utilities, Windows, and Help). Click on the menu item, or use the Hot Keys (Alt +Underlined Letter) to get
to the menu items. An arrow to the right of a menu indicates there are additional submenus for your selection. Anything
that needs to be done in ClientBase can be done from the Main Menu. If items are grayed out on the File Menu Items, it
is because only the administrator can use those items that set up the program.
Meet the Menu Items: The TOOLBAR provides short-cuts to frequently performed tasks such as creating a new profile, launching a document
template or moving profile data into a PNR. Place your cursor on any of the buttons on the Tool Bar and a call-out box
appears describing the function of that button.

4 04/21
2. Meet the
Tool Bar:

5 04/21
Located to the left of the main screen are the ClientBase FILE MANAGERS.
Managers:
(1) The Profile Manager allows you to easily manage your profile data
(Leisure, Corporate, Vendor, Agent and Other) and provides query filters and
results listed by Profile.
(2) The Activity Manager allows you to easily manage your Activity data
(Notes, Reminders and Mailers) and provides query filters and results listed
by Activity.
(3) The Res Card Manager allows you to easily manage your Res Card data
and provides query filters and results listed by Res Card data.
(4) The Inventory Manager allows you to manage your database of
Inventory items.
(5) The Internet Manager allows you to launch a website right from within
ClientBase and to setup default Global and Personal Internet “favorite” sites
that can be accessed with a click of the mouse>.
(6) Use the Dashboard to view Agency Bulletins, Find a Profile, check out
your To-Do List and analyze sales data reports.
(7) Home. Agencies configured with a specific private labeled version of CB,
Home is where to go to access the booking site. For agencies without a
specific private label, Home takes you to the ClientBase Marketing Services
web site by default.
Query filters and column arrangements that have been saved and named as a folder. With a single mouse-click, these
folders automatically complete your Query Filters and display Query Results.
Although the system comes with a default set of folders within each File Manager, these folders are completely
userdefinable. Enter the desired query filters, arrange your columns as desired, then click on File and Save Query As to
save as a folder within the File Manager. Folders can be saved on a Global Level, meaning the folder is available to all
Users, or they can be saved on a Personal Level, which means the folder is only available for your unique User Login. To
select a folder from the File Manager, click on the folder and the system automatically completes the query filters, sift
through the data, and display the outcome in the Query Results Window to the right. To rename or delete a folder, right-
click on the folder name.
Do simple or complex query searches based on the selected QUERY FILTERS . Depending in which of the File
Managers you are working, the Query Filters vary, as do the type of results displayed. Since Activities and Res Cards are
actually part of a profile record, the Profile Manager allows you to search for profiles using any profile fields as search
criteria, including Activity and Res Card fields.
In the Activity Manager, search for activities using any activity fields as search criteria. The Res Card Manager as does
the Inventory Manager allows you to search for Res Cards or Inventory using any Res Card or Inventory fields as search
criteria.
Query Level 1

6 04/21
The Query 1 level allows you to quickly locate a profile or a group of profiles by simply completing one or two query filters.
The drop-down field to the left identifies what to search by, and the blank field to the right allows you to type in what to
search for. If both fields are used in this query, then the results will match both criteria, not either/or. This means the query
filters are strung together with an “and”, not an “or”.
For example, if you are looking for a Leisure Client named Harry Ford, then set the first field to Profile Type and select
Leisure from drop-down menu, and set the second field to Last Name and enter “for”. All Leisure Clients with the Last
Name starting with “for” appear in the Query results. Double-click on the Harry Ford’s entry to view his profile.
Query Level 2
The Query 2 level provides additional filters to more narrowly define your search. Search filters are selected by clicking on
Filter and then completing as many of the search criteria fields as desired. Each field selected is strung together with an
“and” which more narrowly defines the query.
For example, if you have just received a hot cruise special to Europe and want to send a mailing to all past and potential
cruise clients interested in Europe and living in the 90045 zip code, put the following filters in your query. Enter “90045” in
the Zip Code field; select “Cruise” under Marketing/What Interests; “Europe” under Marketing/Where. Now you have
selected the filters to query your database for all leisure clients in the 90045 zip code area who expressed an interest in
cruising and want to go to Europe. When you click OK, all clients in your database meeting the selection criteria are
displayed in the Results Screen. You are now ready to print your labels and send the mailing.

7 04/21
Query Level 3
The Query Level 3 provides users with an even greater ability to more narrowly define a search. As detailed above, Level
2 Query allows a search by any number of fields, stringing one statement of criteria together with an “and.” Query Level 3
strings multiple statements of criteria together with an “or,” using search method options (operators) to define how the
criteria should filter.
For example, you want to mail a promotion to all of Sharon’s clients who have traveled on Crystal Cruises. You select
Sharon as the primary agent and Leisure as the profile type; and under the travel history tab, select Does Have Travel
History Records with following criteria as the Filter Type, and enter Crystal Cruises in the vendor field. After clicking OK,
and then Refresh, the results screen filter out all of Sharon’s leisure clients who have traveled on Crystal Cruises. But you
may want also to call up all of Mary’s clients who have traveled on Carnival Cruises. Click Add Filter, select Mary as the
primary agent and Leisure as the profile type; under the travel history tab, select Does Have Travel History Records with
the following criteria, and set the vendor to Carnival. Click OK and then Refresh. Now not only do you have all of Sharon’s
Crystal Cruisers, but also (OR) Mary’s Carnival Cruisers as well.
The RESULTS SCREEN displays the results of a query based on the criteria entered into the query filters. Only those
records that meet the criteria of the query filters are included in the Query Results. While working in the Profile Manager,
all query results are displayed by profile (Leisure, Corporate, Vendor, Agent and Other). While working in the Activity
Manager, all query results are displayed by Activity (Notes, Reminders and Mailers). While working in the Res Card or
Inventory Manager, all query results are displayed by Res Cards or Inventory entries.
For example, set the Level 1 Query Filters to Profile Type of Leisure and Last Name starting with “smit”. The Query
Results displays all Leisure clients in the database whose last name begins with “smit”. To select a record appearing
within the results screen, double-click on it and the profile details appear.

8 04/21
STATUS BAR A glance at the status bar indicates the Login Name; Database: Memory, Date/Time; Alarms and more.
Quick Steps to Using the Profile Manager
The ClientBase program defaults to the Profile Manager screen when opening the program. You can also access the
Profile Manager by clicking Windows|Profile Manager from the Main Menu.
Step 1: Open the Profile a. Add a new profile: Be careful not to create duplicate profiles. Look first and verify that a profile does not exist before
deciding to add one. We recommend using only the first four/five/six letters of the last name when querying for a profile.
To add a new profile, click the ToolBar Icon, Profile; File|New; or right mouse click in the results screen, then select the
desired profile type.
b. Delete a profile: Are you sure? If so, highlight the profile you want to delete and click the Delete button on the tool bar.
Note: If the profile is attached to any invoice or payment records in Trams Back Office, it cannot be deleted without
deleting those records first. If you are not able to delete these records, but don’t want this profile to appear in the results of
any query because it is a duplicate, then set the field Status (found in the General Information folder of the profile) to
Inactive. This will disable the profile, excluding it from any database queries performed. If you want to delete any Activities
or Res Cards in ClientBase and there are no payment records or invoices in TBO attached to the profile, delete the
profile, but be aware that you also lose any record of Activities and Res Cards attached to that profile. c. Retrieve a
profile by using Level 1, Level 2 or Level 3 Query.
Step 2: Review, Add to, or Modify the Profile Double-click on the profile you want to retrieve to view the client’s details. The Profile window organizes all the vital
information pertaining to your client's needs. We designed this window to be a “dashboard” for travel professionals who
need quick access to key client data. Each Leisure profile represents one household. Whether you are retrieving
someone's passport number, a second address, or the cruise line last booked, this is the place to go.
BEST PROFILE PRACTICES
• For every client that calls, make sure you have a profile for that client with accurate name, address, phone and
email information. Interface ID and Salutation or some other fields may be required per your agency. (If there is
no profile create a new one.)
• Click on the Travelers tab, and enter any traveler with legal first, middle and last name. Birthdays, Passport
information, communication entries as well as any credit card, frequent flyer card, or other cards may be updated
in the Traveler tab.
• Always make sure to update the Marketing tab with any interests and demographics you learn about the client.
9 04/21
PROFILE KEY AREAS:
A client profile in ClientBase stores an unlimited amount of information about your customers. To organize all this
information and make it easily accessible, each profile is made up of six key areas. (Toolbar, Header, Arrows, Profile
Indicators, Control Buttons, and Folders).
TOOLBAR
Create a Reminder/Note/Mailer for Profile.
Create a Res Card: Click the Res Card icon to create a new reservation card for trips.
Create a Receipt: In cases where you are not yet ready to issue an invoice, but have received money from a client,
create a Receipt.
Print: Click the Print icon to print out details of the profile, or a customer survey.
Merge to Label: Click the Label icon to create a label that can be used on a letter, brochure, passport reminder and
more.
Merge to Document Template: Click the Letter icon to merge client name and address to any letter contained in the
document templates.
Merge to PNR: Click the CRS icon to merge profile and traveler details into your reservation system PNR, including
Apollo/Galileo, Amadeus, Sabre and Worldspan.
Merge to E-mail: Click the E-mail icon to merge client information into an e-mail message.
Q-View (Quick View): A single click provides you with a summary of key profile data across many tabs of information.
HEADER
The header conveniently displays pertinent information including the current mailing address, the first five communication
entries captured for this profile, number of Marketing Codes, Primary Traveler, Groups, Voucher Balance, Primary Agent,
Profile Create Date, Salutation, Interface ID, and Profile No. By confirming the accuracy of this information, and adding
any new details each time a customer calls, the agent ensures that the client’s information and therefore the agency
marketing data is always up-to-date.
SCROLLING ARROW
The four black arrows provide the ability to move among the profiles included within the current Query in the results
screen. Clicking the up arrow displays the profile preceding the one you are in, the down arrow displays the very next
profile in the Query. The double up arrow takes you to the first profile in the Query, and the double down arrow takes you
to the very last profile in the Query.
PROFILE INDICATORS
10 04/21
The top icon indicates the customer has an active Res Card indicating travel arrangements are in the works. The middle
icon indicates there is previous Travel History for this client has previously purchased travel. The bottom icon indicates
there’s an open reminder alert for this customer. None of the above icons appear in the profile if the client has no Res
Card, open reminder or past travel history with your agency.
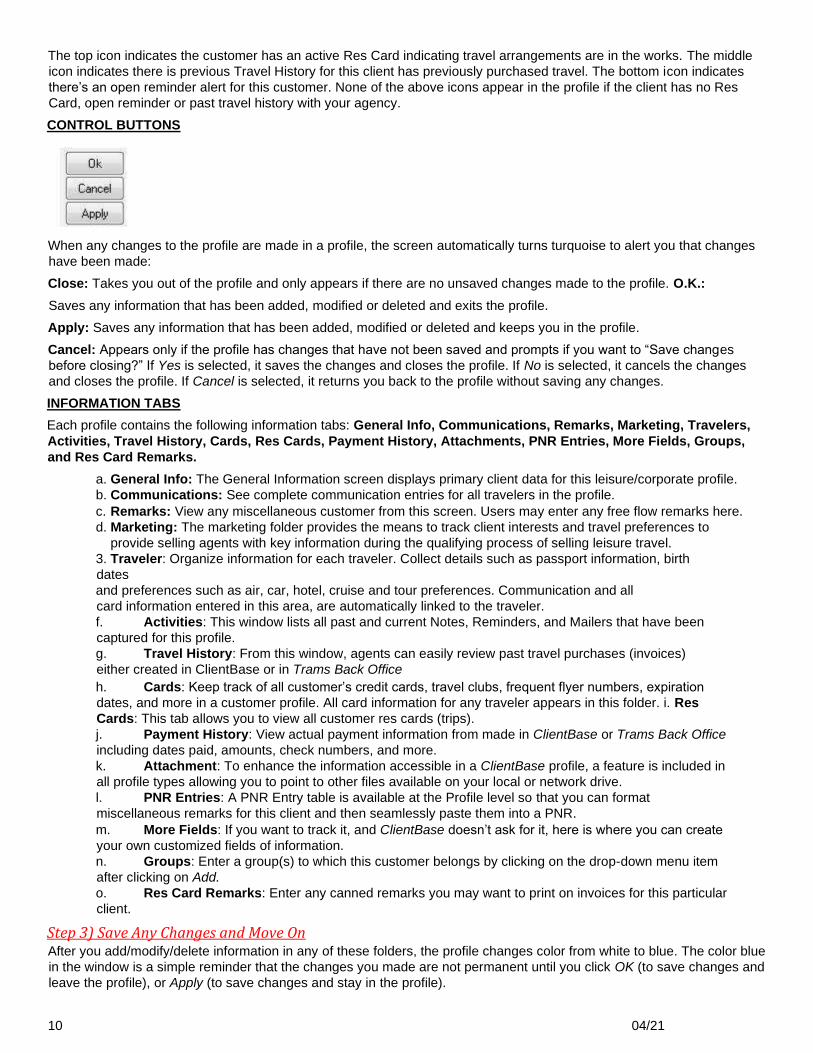
CONTROL BUTTONS
When any changes to the profile are made in a profile, the screen automatically turns turquoise to alert you that changes
have been made:
Close: Takes you out of the profile and only appears if there are no unsaved changes made to the profile. O.K.:
Saves any information that has been added, modified or deleted and exits the profile.
Apply: Saves any information that has been added, modified or deleted and keeps you in the profile.
Cancel: Appears only if the profile has changes that have not been saved and prompts if you want to “Save changes
before closing?” If Yes is selected, it saves the changes and closes the profile. If No is selected, it cancels the changes
and closes the profile. If Cancel is selected, it returns you back to the profile without saving any changes.
INFORMATION TABS
Each profile contains the following information tabs: General Info, Communications, Remarks, Marketing, Travelers,
Activities, Travel History, Cards, Res Cards, Payment History, Attachments, PNR Entries, More Fields, Groups,
and Res Card Remarks.
a. General Info: The General Information screen displays primary client data for this leisure/corporate profile.
b. Communications: See complete communication entries for all travelers in the profile.
c. Remarks: View any miscellaneous customer from this screen. Users may enter any free flow remarks here.
d. Marketing: The marketing folder provides the means to track client interests and travel preferences to
provide selling agents with key information during the qualifying process of selling leisure travel.
3. Traveler: Organize information for each traveler. Collect details such as passport information, birth
dates
and preferences such as air, car, hotel, cruise and tour preferences. Communication and all
card information entered in this area, are automatically linked to the traveler.
f. Activities: This window lists all past and current Notes, Reminders, and Mailers that have been
captured for this profile.
g. Travel History: From this window, agents can easily review past travel purchases (invoices)
either created in ClientBase or in Trams Back Office
h. Cards: Keep track of all customer’s credit cards, travel clubs, frequent flyer numbers, expiration
dates, and more in a customer profile. All card information for any traveler appears in this folder. i. Res
Cards: This tab allows you to view all customer res cards (trips).
j. Payment History: View actual payment information from made in ClientBase or Trams Back Office
including dates paid, amounts, check numbers, and more.
k. Attachment: To enhance the information accessible in a ClientBase profile, a feature is included in
all profile types allowing you to point to other files available on your local or network drive.
l. PNR Entries: A PNR Entry table is available at the Profile level so that you can format
miscellaneous remarks for this client and then seamlessly paste them into a PNR.
m. More Fields: If you want to track it, and ClientBase doesn’t ask for it, here is where you can create
your own customized fields of information.
n. Groups: Enter a group(s) to which this customer belongs by clicking on the drop-down menu item
after clicking on Add.
o. Res Card Remarks: Enter any canned remarks you may want to print on invoices for this particular
client.
Step 3) Save Any Changes and Move On After you add/modify/delete information in any of these folders, the profile changes color from white to blue. The color blue
in the window is a simple reminder that the changes you made are not permanent until you click OK (to save changes and
leave the profile), or Apply (to save changes and stay in the profile).

11 04/21
Streamline Marketing with Point-and-Click Codes The Marketing Tables in ClientBase helps you identify each of your customer’s unique travel preferences, interests and
demographics, while at the same time automatically grouping your clients with common codes. Since qualifying a
customer for a leisure vacation can be the toughest part of selling leisure travel, access to this valuable information might
just make the difference between closing a sale or losing it. These marketing codes make it possible to consistently put
the right product in front of the right client by both front-line agents and any marketing programs geared towards
generating travel interest.
A master set of marketing tables appears in every client's profile under the Marketing folder. With a simple point-and-click
with the mouse, every agent selects from the same list, and that means client consistency and agent simplicity.
Example: Greg Burdan calls in and requests some information on a trip to the Cayman Islands.
He read about the great destination in his favorite Scuba Weekly magazine and figures it would
be a great place for a honeymoon (may as well squeeze in some diving). By clicking on the
Marketing Tab in Greg’s profile, the agent easily places a checkmark in the box next to
Scuba/Snorkel under the What Interests Table. Now, when your agency has a scuba or
snorkeling-related itinerary to promote, rest assured that Greg will be included among the other
qualified clients you are tempting with the great deal!
Quick Steps to Using Marketing Point-and-Click Codes Step 1) In the client profile, click the Marketing tab. Query the client profile and double-click to enter. Click the Marketing tab to enter the Marketing tables.
Step 2) View and select Global Marketing Tables and Codes. Use the arrows to the right of each marketing table to scroll up or down and view additional entries. Use the two black
arrows located on the right margin of the screen to scroll up or down to see more than the first marketing tables. Check off
any appropriate marketing item.
Step 3) Tree View Summarizes Selected Client Marketing Codes. At a glance, match the traveler with an appropriate itinerary or marketing opportunity, by viewing the tree view summary to
the left of the Marketing Tables. This tree view summarizes selected client marketing codes.
Be Prepared with Travel/Payment History The Travel History tab is a read-only screen displaying a list of issued invoices (in Trams Back Office if you use that
program or ClientBase) for this client, providing easy access to past travel history, number of invoices issued, sum total of
bookings, average booking amount and the total commission.

12 04/21
View actual payment information from an invoice created either in Trams Back Office or ClientBase including dates paid,
amounts, check numbers, etc.
Agents cannot make any changes to the invoice or payment records displayed in the Travel History or Payment History
tabs. The combination of travel purchase data (History folder) and travel preference data (Marketing Info. folder) gives you
the ultimate capability to match your clients with offers for products they will enjoy and can afford.
Example: Nancy Schroeder, a long-time agency customer, is coming in this afternoon to talk about the possibility of
booking a cruise. She’s looking for some fresh ideas on an exciting new travel experience. You quickly access her profile
in ClientBase and checkout her Travel History. From here you determine if she has ever booked a cruise and, if so the
cruise line, the itinerary and how much was spent. Looking at other travel categories, itineraries and vendors booked also
gives you some insight on her past travel tendencies.
Next, you review her marketing preferences and by the time Nancy make it to your desk, you feel prepared and confident
in making a travel recommendation she can’t refuse.
Quick Steps to View Trams Travel History Step 1) Determine if a Customer Has Travel History. After retrieving a customer profile, quickly determine if a customer has Travel History by looking at the indicator symbol
found on top of the client profile. If Travel History exists, a Trams icon appears to the left of the OK, Close and Apply
buttons.
Step 2) Click on the Travel History Icon or Tab to Open the History Folder. By default all past Travel History is displayed in the tab, invoice by invoice, booking by booking. In addition to the listing of
past purchases, Sales and Commission Totals and Averages are displayed.
Step 3) Sort and Filter Results. The field Sort controls the way the query results are displayed on the screen. Sort on different fields by clicking on the
down arrow located to the right of the field and selecting from the list (Issue Date, Depart Date, Travel Category, Traveler
Name, Agent, Invoice #, Invoice Type, Invoice Status, and Ticket/Confirmation #). To narrow the search to a specific time
period, enter a From and To date in the Issue Date fields. The arrows to the right of the fields bring up a calendar to help
in your selection. Click Run Query to update your results. Tvl Cat. can also be used as search criteria (e.g. “show me only
cruise history”) by clicking on the down arrow located to the right of this field and selecting from the list. Click Run Query
to update your results.
Step 4) Use the Custom Query. The Custom Query screen in the Travel History folder gives you even further flexibility in locating specific travel history.

13 04/21
Included as search criteria are Sort by, Vendor, Travel Category, Total Fare Range, Agent Name, Traveler Name, Depart
Date Range, Client Payment Status, Vendor Payment Status, Invoice Client Name, Invoice No., Invoice Type, Invoice
Status, and Issue Dates Range.
Quick Steps to View Trams Payment History Step 1) Click the Payment History Tab. When you enter the Payment History tab, by default all past receipts and disbursements are displayed.
Step 2) Set Up the Selection Criteria. Set up the Selection Criteria in the Sort, Tvl. Cat., and Issue Date fields. Click Run Query button to display desired query.
Step 3) Choose a Custom Query. For more advanced queries, click on the Custom Query button and fill in selection criteria. Click OK to display desired
query.
Strengthen Client Relationships with Activity Manager Tired of the paper nightmare taking over your desk? So many post-it notes you can hardly find your computer? Through the use of Reminders, Notes, and Mailers, ClientBase makes tracking communication with your clients a paperless process. Best of all, this information can be shared among agents and used to manage the marketing activities going on in your agency.
Reminders act as “ticklers” to keep you on top of important activities like brochure follow-ups, final payments, welcome
home calls, birthdays and other marketing activities. Agents create Reminders to schedule future contacts and maintain
daily to-do lists.
Notes allow Agents to easily document contact your customers have with your agency such as Client Comments, Client
Inquiries, or Client Questions.
Mailers act like entries in a marketing “log.” They are a historical record created automatically whenever a label,
document template, E-mail, or mail merge file is created for a client or group of clients.
Example: The agency’s most productive agent, Sharon, works from a daily reminder and to-
do list in ClientBase. From this area, she tracks and completes all of the customer marketing
tasks that keep her valued clients loyal. ClientBase helps Sharon manage her schedule and
“to-do” list so she is efficient at 1) Following-up and closing just about any travel lead that
comes her way; 2) Managing all of the tasks involved in planning a trip, including checking on
payments, documents, waitlists, seating etc.; and 3)Welcoming her customers home from
their trips, as well as scheduling and managing ongoing communications with her valued
customers.
Studies have shown agents' productivity and sales increase dramatically when using an activities management system like ClientBase. Better agent productivity is an important ingredient of a happy and successful agency. Scheduling your day by making lists, following up on leads, and working in a way to finish what you start, is a gift you give yourself. This approach fosters good habits that enrich your client relationships. The Activity Manager opens the door to a greater understanding of our clients - and greater
profits for agents and agencies.
The way that Sharon begins her work day each morning tells you one of the reasons that she is a productive agent. The
first thing she does when she signs into ClientBase is click on the Activities tab. By default, ClientBase queries the
database for Sharon’s Open Reminders and the Results Screen immediately displays a list of the Reminders (or tasks)
she needs to complete today.
14 04/21
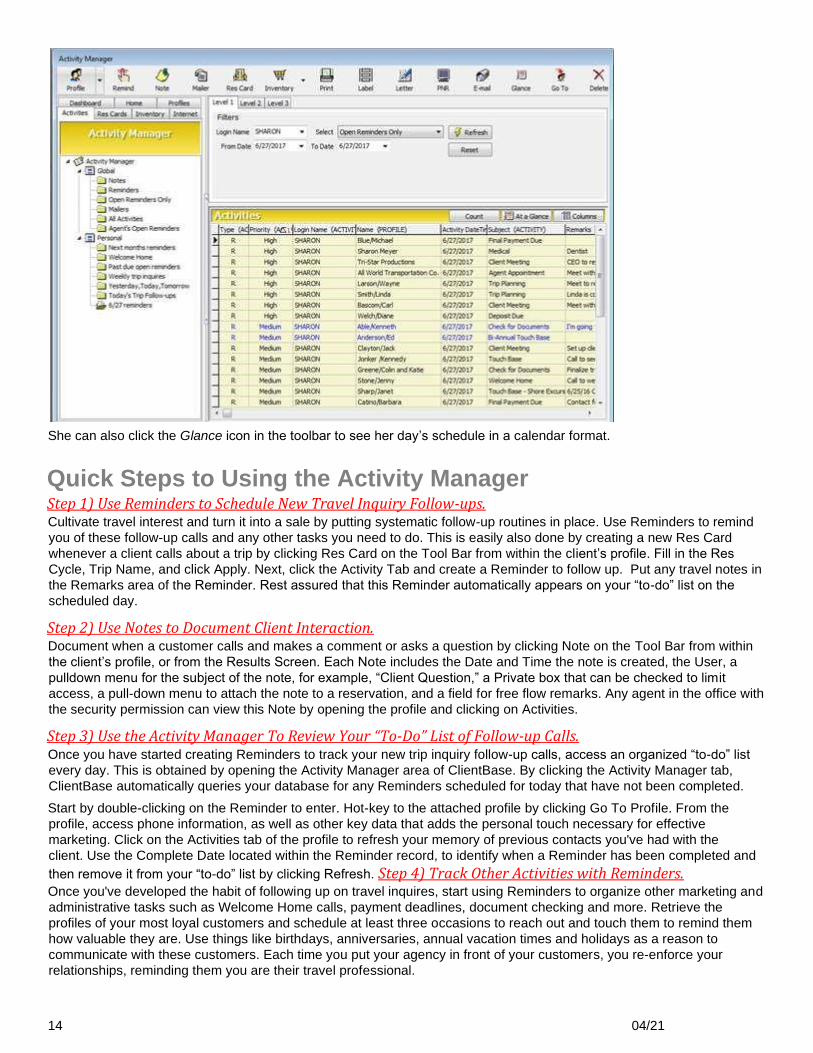
She can also click the Glance icon in the toolbar to see her day’s schedule in a calendar format.
Quick Steps to Using the Activity Manager Step 1) Use Reminders to Schedule New Travel Inquiry Follow-ups. Cultivate travel interest and turn it into a sale by putting systematic follow-up routines in place. Use Reminders to remind
you of these follow-up calls and any other tasks you need to do. This is easily also done by creating a new Res Card
whenever a client calls about a trip by clicking Res Card on the Tool Bar from within the client’s profile. Fill in the Res
Cycle, Trip Name, and click Apply. Next, click the Activity Tab and create a Reminder to follow up. Put any travel notes in
the Remarks area of the Reminder. Rest assured that this Reminder automatically appears on your “to-do” list on the
scheduled day.
Step 2) Use Notes to Document Client Interaction. Document when a customer calls and makes a comment or asks a question by clicking Note on the Tool Bar from within
the client’s profile, or from the Results Screen. Each Note includes the Date and Time the note is created, the User, a
pulldown menu for the subject of the note, for example, “Client Question,” a Private box that can be checked to limit
access, a pull-down menu to attach the note to a reservation, and a field for free flow remarks. Any agent in the office with
the security permission can view this Note by opening the profile and clicking on Activities.
Step 3) Use the Activity Manager To Review Your “To-Do” List of Follow-up Calls. Once you have started creating Reminders to track your new trip inquiry follow-up calls, access an organized “to-do” list
every day. This is obtained by opening the Activity Manager area of ClientBase. By clicking the Activity Manager tab,
ClientBase automatically queries your database for any Reminders scheduled for today that have not been completed.
Start by double-clicking on the Reminder to enter. Hot-key to the attached profile by clicking Go To Profile. From the
profile, access phone information, as well as other key data that adds the personal touch necessary for effective
marketing. Click on the Activities tab of the profile to refresh your memory of previous contacts you've had with the
client. Use the Complete Date located within the Reminder record, to identify when a Reminder has been completed and
then remove it from your “to-do” list by clicking Refresh. Step 4) Track Other Activities with Reminders. Once you've developed the habit of following up on travel inquires, start using Reminders to organize other marketing and
administrative tasks such as Welcome Home calls, payment deadlines, document checking and more. Retrieve the
profiles of your most loyal customers and schedule at least three occasions to reach out and touch them to remind them
how valuable they are. Use things like birthdays, anniversaries, annual vacation times and holidays as a reason to
communicate with these customers. Each time you put your agency in front of your customers, you re-enforce your
relationships, reminding them you are their travel professional.
15 04/21
Step 5) Use At a Glance to Help Manage Your Schedule for a Particular Day, Week or Month The Activity Manager not only provides a listing of Open Reminders, but also the ability to arrange your Reminders in an
At a Glance format. Click the Glance icon on the toolbar, and the system defaults to today’s schedule, listing Reminders
that have been scheduled for a particular time to the left in 15 minute intervals, and the Reminders that have been set as
“timeless” listed to the right under an area called To Do List.
On top retrieve a calendar for the current month that provides you with the ability to look at your schedule for any other
day of the month by clicking on the day; or you can look at your schedule for any day of other months by clicking on the
arrows to left and right of the month. In addition to viewing a schedule for a particular day, you can also view your
schedule for an entire week or an entire month by clicking on Week at a Glance and Month at a Glance.
Step 6) Set Time/Date Alarms for Important Events The Activity Manager area of ClientBase provides an organized list of your marketing tasks to complete for the day, but
what if you need a little help remembering to complete one of these tasks at a specific time of the day?
Reminders in ClientBase come with built-in Alarms that can be set, on a Reminder-by-Reminder basis. To turn on an
Alarm for a particular Reminder, place a check in the box, Alarm, and designate how many minutes prior to the time of the
Reminder the Alarm should be activated. Save your Reminder and as long as the ClientBase application is open,
regardless of the program in which you are currently working, an Alarm window appears on your screen at the designated
time. When an Alarm is activated, a window appears that includes the details of the Reminder along with three options:
Off (Turns off the Alarm but keeps the Reminder open and on your to-do list); Snooze (Reschedules the Alarm for a
future time); View (Allows you to work the Reminder as you would from the Activity Manager).
Generate Target Client Lists with Level 2 and 3 Queries When you need to identify a list of clients for analysis, follow-up, mailings or other promotions, run a query. Queries
enable you to make the most of the data you put into ClientBase by providing more ways of getting the data out of the
program. A query allows you to ask your database specific question(s) and the database answers with a list of clients who
have the right answers. Information from different fields can be combined in one query to generate very interesting lists.
Using the Level 2 Query
The Query Level 2 provides many filters to more narrowly define your search. Search filters are selected by clicking on
Filter and then completing as many of the search criteria fields as desired. Each field selected is strung together with an
“and” more narrowly defining the query.
Examples: Use Level 2 Query to review all the client profiles created this month and then merge
those results to a “Welcome to Our Agency Letter.” Or create a personal folder of all your VIP
clients where you are the primary agent, so you can access the list easily.
Quick Steps to Using the Level 2 Query Step 1) Click on the Level 2 Tab from the Profile Manager Make sure that your current Manager is the Profile Manager and click on the tab, Level 2. Next, click Filter to access the
screens of search criteria.

16 04/21
Step 2) Select Criteria for Search The window is divided into folders - General Info, Marketing, Activities, Travelers, Cards, ResCards, MoreFields and
Travel History - available for you to use as search criteria. Any combination of these fields can be used together as search
criteria. To begin, select a folder that contains the field(s) to search. Then enter criteria for every field that is relevant to
your search. Different combinations of fields and folders can be used. If multiple fields are used as search criteria, each
field is strung to the next with an “and,” meaning the results of the query only include the profiles the match all of the
criteria. Each marketing table is considered a separate field, so multiple items across the tables are connected with an
“and.” When selecting multiple items within one marketing table as search criteria, each item is strung together with an
“or,” meaning the results of the query include profiles that match any of the marketing items selected within that table.
Hint: Less is more when using selection criteria.
Step 3) Run the Query Click OK to run the query based on the criteria you selected. Remember, if you don't get the results you want, you can
always run the query a slightly different way. (A summary of all current selection criteria can be viewed in the Filters area
of the Results Screen.)
Step 4) Review Results The resulting profiles from the Level 2 Query window appear with a list of the profiles that match your search criteria.
Above the list is a total count of those profiles that matched your criteria. Run reports on these results, save the results in
a Global or Personal folder, or merge the results to Labels, Document Templates, Emails or files.
From this list modify profile information by double-clicking on the name, or by selecting the name and pressing Enter.
Once inside a profile record, the black Up and Down arrows page you through only those profiles included in this query.
Using the Level 3 Query
The Query Level 3 provides users with an even greater ability to more narrowly define a search. Query Level 3 strings
multiple statements of criteria together with an “or,” using search method options to define how the criteria should
filter. Examples: Use Level 3 Query to print a label for all of your customers coded as deluxe cruisers over 65 - who
have zip codes in the system. Or send an E-mail to Sharon’s Crystal cruisers, OR to Sharon’s Carnival cruisers.
Quick Steps to Using the Level 3 Query Step 1) Click on the Level 3 Tab from the Profile Manager Make sure that your current Manager is the Profile Manager and click the Level 3 tab. Click Reset All if any filters exist to
create a fresh query. Next, click Add Filter to access the screens of search criteria.
17 04/21
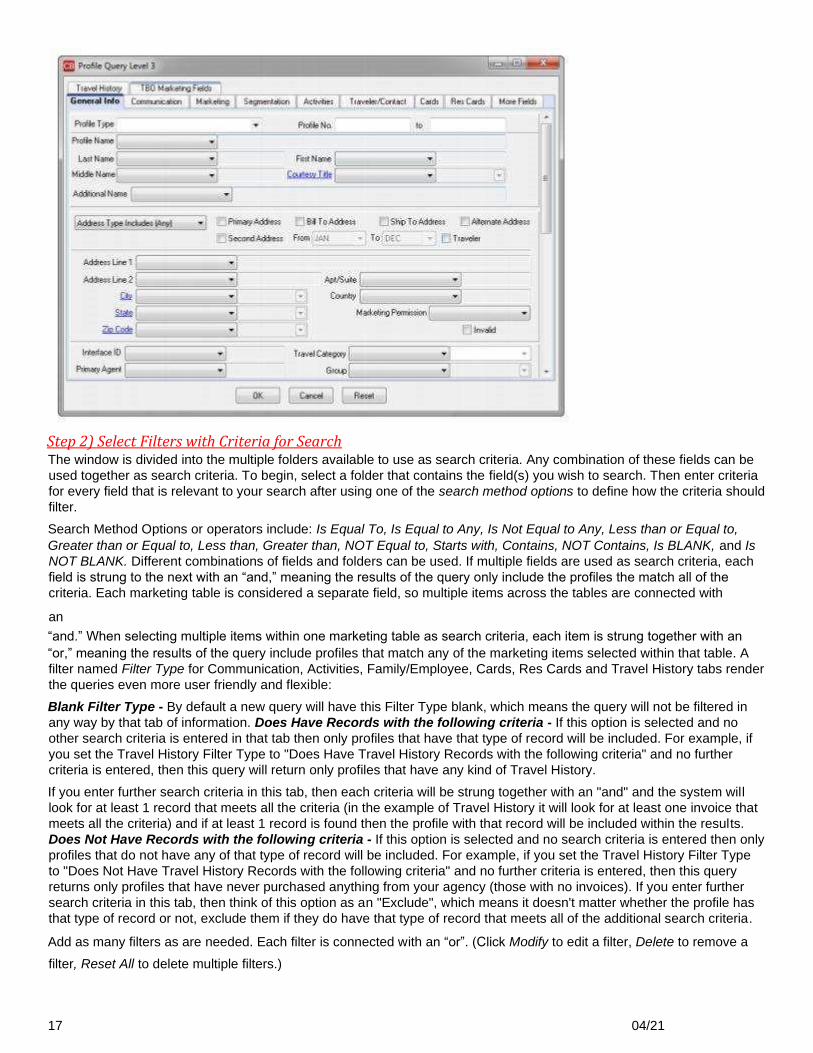
Step 2) Select Filters with Criteria for Search The window is divided into the multiple folders available to use as search criteria. Any combination of these fields can be
used together as search criteria. To begin, select a folder that contains the field(s) you wish to search. Then enter criteria
for every field that is relevant to your search after using one of the search method options to define how the criteria should
filter.
Search Method Options or operators include: Is Equal To, Is Equal to Any, Is Not Equal to Any, Less than or Equal to,
Greater than or Equal to, Less than, Greater than, NOT Equal to, Starts with, Contains, NOT Contains, Is BLANK, and Is
NOT BLANK. Different combinations of fields and folders can be used. If multiple fields are used as search criteria, each
field is strung to the next with an “and,” meaning the results of the query only include the profiles the match all of the
criteria. Each marketing table is considered a separate field, so multiple items across the tables are connected with
anck “and.” When selecting multiple items within one marketing table as search criteria, each item is strung together with an
“or,” meaning the results of the query include profiles that match any of the marketing items selected within that table. A
filter named Filter Type for Communication, Activities, Family/Employee, Cards, Res Cards and Travel History tabs render
the queries even more user friendly and flexible:
Blank Filter Type - By default a new query will have this Filter Type blank, which means the query will not be filtered in
any way by that tab of information. Does Have Records with the following criteria - If this option is selected and no
other search criteria is entered in that tab then only profiles that have that type of record will be included. For example, if
you set the Travel History Filter Type to "Does Have Travel History Records with the following criteria" and no further
criteria is entered, then this query will return only profiles that have any kind of Travel History.
If you enter further search criteria in this tab, then each criteria will be strung together with an "and" and the system will
look for at least 1 record that meets all the criteria (in the example of Travel History it will look for at least one invoice that
meets all the criteria) and if at least 1 record is found then the profile with that record will be included within the results.
Does Not Have Records with the following criteria - If this option is selected and no search criteria is entered then only
profiles that do not have any of that type of record will be included. For example, if you set the Travel History Filter Type
to "Does Not Have Travel History Records with the following criteria" and no further criteria is entered, then this query
returns only profiles that have never purchased anything from your agency (those with no invoices). If you enter further
search criteria in this tab, then think of this option as an "Exclude", which means it doesn't matter whether the profile has
that type of record or not, exclude them if they do have that type of record that meets all of the additional search criteria.
Add as many filters as are needed. Each filter is connected with an “or”. (Click Modify to edit a filter, Delete to remove a
filter, Reset All to delete multiple filters.)
18 04/21
Step 3) Run the Query Click Refresh to run the query based on the filters you selected. Remember, if you don't get the results you want, you can
always run the query a slightly different way. Click Summarize to see a listing of all selected filters.
Step 4) Review Results The resulting profiles from the Level 3 Query window appear with a list of the profiles that match your search criteria
filters. Above the list is a total count of those profiles that matched your criteria. Run reports on these results, save the
results in a Global or Personal folder, or merge the results to Labels, Document Templates, E-mails or files. From this list
you can modify profile information by double-clicking on the name or by selecting the name and pressing enter. Once
inside a profile record, the black up and down arrows page you through only those profiles included in this query.
Save Query Folders with Date Formulas for Future Use Queries run in the File Managers can become quite complex. With this in mind, if there are certain queries that you want
to run often, we suggest you save query filters. That way, the next time you want to run a query that you have already
setup, all you need to do is click on the folder you have saved it to.
Date fields in all queries allow for date formulas. This means any field that has a date, can also contain a formula for that
date. The date formula function allows you to create a query without identifying a specific month, day and year in the
From and To date fields. Instead, the query is processed with a formula for the month, day, day of the week, and year
based upon the date the report is processed.
Example: Sharon wants to see how many new trip inquiries she created this month so far.
Since she creates a new Res Card for each new trip inquiry, first she clicks the Res Card
Manager, Level 2 Query, and then Filter. She enters a date formula for the current month
in the Create Date To/From fields and clicks OK. After rearranging the columns and
sorting the query to her liking, she saves the query as a Personal folder entitled, This
Month’s New Trip Inquiries. At any time during any month, when she clicks the saved
folder, she views how many new Res Cards have been created so far that month.
Quick Steps to Save Query Folders with Date Formulas for
Future Use Step 1) Setup Query for the Desired Profile/s Using any of your File Managers, query your database to locate the desired profile/s using Level 1, 2, or 3 Query.
Step 2) Use Date Formulas if Applicable The following table contain sample formulas for specifying dates. You can mix and match the absolute and relative
parameters in the function. The first number specifies the day of the month, the second number specifies the month, and
the third number specifies the year. So if you only have the first number filled in, this means you want this report to
reoccur on this day every month, in every year.
1st day of this month: =1,0,0
Last day of this month: =31,0,0
1st day of this year: =1,1,0
Last day of this year: =31,12,0
Seven days from now: =+7,0,0
Last Monday (will show today if today is Monday) =Mon
STEP THREE:
Process the Query by clicking OK.
A week from last Monday =Mon-1
Next Monday =Mon+1
Three
months
from
now
=0,+3,
0
Six
months
ago:
=0,-6,0
One
year
from
now
=0,0,+1
Step 3) Customize the Look of the Query Results Screen Including Sort
19 04/21
On the Results Screen, click Columns to pick and choose columns you want included in the query. By using the up and
down arrows, put the columns in any order you want them to appear on your Results Screen. Click Sort by Columns to
select up to three columns to sort the results of the query in ascending or descending order. If you prefer to customize the
query from the Results Screen, use your mouse to move columns where you want, and hold down <Shift> while clicking
on a column heading to sort in ascending order, or click once again to sort in descending order.
Step 4) Save the Query Click File|Save Column As to save the customized query. Folders can be saved on a Global Level, meaning the folder is
available to all Users, or they can be saved on a Personal Level, which means the folder is only available for your unique
User Login. Name the folder and click OK to save. To select a folder from the File Manager, simply click on the folder and
the system will automatically complete the query filters, sift through the data, and display the outcome in the Query
Results window to the right. To replace an existing saved folder with a new one, to rename or delete a folder, right click on
the folder name.
Run Labels for Quick, Effective Marketing ClientBase puts the entire marketing process at your fingertips with the ability to easily print mailing labels from your
database. Print a single label while working within a client profile, or print numerous labels from the results of any of the
Profile, Activity, and Res Card Manager queries. ClientBase queries provide a powerful marketing tool by giving you the
ability to search your database using any one or any combination of client fields as search criteria. ClientBase makes
mailings easy and efficient.
Example: Your Princess DSM offers to cover postage for 250 brochures for a highend
itinerary, if you can provide the labels this week. Can you do it? With ClientBase, your
labels will be printing before you can say, YES! Query your database for your Deluxe
Cruisers and voila, the labels are ready.
Quick Steps to Print Labels Step 1) Query Database for Desired Profile/s Labels have to be set up first before you use them! This labels are set up under Global Defaults. Using any of your File
Managers, query your database to locate the profile/s for which you would like to generate a label. Click Label on the
toolbar within a profile or from the query results screen, or click File|Merge To|Label. If selected from the query results
screen, the system gives you choices on what specific results you want included: *Current Results, *Selected Results, or
*Re-query.
If you choose Current Results, then the system includes all of the profiles currently appearing in your query results screen.
If you choose Selected Results, the system includes only those profiles that have been selected, or highlighted in your
current query result screen. (Pick and choose specific profiles by highlighting the profiles you want to include. Do this by
holding down the Ctrl key and clicking on the desired profiles.) If you choose Re-query, the system will take you to the
Level 2 query screen for your current manager so that you can requery the desired results.
Once you have identified the appropriate results to include, click OK and preview the labels on your screen.
Step 2) Review Label Setup At the top of the label preview screen is a tool bar. The Tool Bar includes powerful icons for viewing and customizing your
printed labels. The first 5 icon buttons are for zooming in and out of the preview. The next 4 icons are for paging through
the labels. The next icon is the print setup, followed by the actual print icon button.
The next icon is the Label Setup button. Click here to review or modify your current label setup. From this area, you can
select one of several default label settings. The five tabs at the bottom are for even greater customizing of the label
design for this one mailing only (the master remains intact).
•1. Sheet Properties: Default label layout and dimensions.
•2. Label Properties: Default size of the label and number of copies.
•3. Text Properties: Font selection, color, style and size.
•4. Options: Special features such as zip code barcode, use of upper case and printing labels for the primary
or other address in a profile.
•5. Start Position: Easily select the position to start printing on a page of labels.

20 04/21
Step 3) Create a “Marketing Log” by Creating a Mailer for Each Profile Included Whether printing a single label from within a profile, or a large group of labels from the results of a query, ClientBase
makes it easy to track the fact that you have mailed something to your client. When you click Print, you are prompted to
create a Mailer. Also from the Print Preview screen, you can click Create Mailers to automatically create a Mailer record
for every customer included in your results. ALWAYS CREATE A MAILER! Whether it’s 1 result or 500 results, an
individual Mailer record is attached to each profile for historical purposes. The Mailers are viewed from within the client
profile by clicking on the Activities tab and can also be queried and printed from the Activities Manager by Date or
Subject.
Step 4) Print Labels From the label preview screen, a Print Setup button is available for selecting the desired printer settings and a Print button
is available for printing your labels.
Print Custom Letters Easily with Document Templates Sending personalized letters frequently helps build stronger relationships with clients. That's something ClientBase does
best. Document templates that come with the program and have been customized for your agency make it easy to print
personalized letters to clients. Your own custom agency templates to the database have created a central “library” of
documents that any agent can access. The speed and ease of this feature gives agents reason to be more pro-active in
their communication with their customers.
Example: In less than two minutes, an agent can print a custom “Welcome Home” letter
to send to a client returning from a cruise. Another example: Once a week you query for
all new customers to the agency, using profile Create Date as search criteria. From the
results of the query, you can instantaneously merge all client information into a “Welcome
to the Agency” letter and in seconds have all of the letters personalized and printed.
Quick Steps to Print Custom Letters Step 1) Query Database for the Desired Profile/s Document Templates need to be set up before you use them! This can be done under Global Defaults. Using any of your
File Managers, query your database to locate the profile/s to receive a letter. Click Letter for the Tool Bar within a profile
or from your query results screen, or click File|Merge to|Document Templates. If selected from the query results screen,
the system gives you specific choices on the results to be included -*Current Results, *Selected Results, and *Re-query.
If you choose Current Results, the system includes all of the profiles currently appearing in your query results screen. If
you choose Selected Results, the system includes only those profiles that have been selected, or highlighted in your
current query result screen. (Pick and choose specific profiles by highlighting the profiles you want to include and holding
down the Ctrl key and clicking on the desired profiles). If you choose Requery, the system takes you to the Level 2 query
screen for your current manager so that you can requery the desired results.
Step 2) Select a Template (the letter you want to print) Just above the area where you select what records to include is a field called Document Template. A drop-down list of
template choices appears here for selection. Browse the different templates and see a preview before you make your
selection. There's even a blank template if you want to write your own letter. This list of templates is shared with all the
agents using the system.
Step 3) Make Any Necessary Changes To make changes to just one of the documents, arrow to that document and make the desired changes from within the
Document tab. To make changes to all of the Documents, click on the Template tab, make your changes and click
Update. This updates all of the Documents included in this particular query, but does not permanently change the global
template.
Notice that other options on the Template tool-bar allow you to change the text color, alignment, style, size or even font.
You can add content in the Header or Footer of the Document. There is also a button called Insert Field that allows you to
place the contents of other profile fields into the Template. Go ahead and play with these settings if you like, but when you
are done, click Update Document.
21 04/21
Step 4) Create a “Marketing Log” by Creating a Mailer for Each Profile Whether printing a single letter from within a profile, or a large group of letters from the results of a query, ClientBase
makes it easy to track the fact that you have mailed something to your client. When you click Print, you will be asked if
you want to create a Mailer. Also from the Print Preview screen, you can click Create Mailers to automatically create a
Mailer record for every customer included in your results. Whether it’s 1 result or 500 results, an individual Mailer record is
attached to each profile for historical purposes. The Mailers are viewed from within the client profile by clicking on the
Activities tab and can also be queried and printed from the Activities Manager by Date or Subject.
Step 5) Print Document/s If you would like to alter your printer settings, click on the Print Setup button, capture your desired printer settings and
click OK. When you are ready to print, click on the Printer button to print the Document/s.
Important Note: Create emails that are used over and over again too. These can be accessed when sending out an
individual or a blast email to clients.
Save Time & Duplication with Merge to PNR No more multiple entries or databases! ClientBase provides your agents with the ability to move customer information (maintained in the ClientBase profile) to your reservation system's PNR. This feature works with Amadeus,
Apollo, Sabre, and Worldspan. Sit back and watch your database grow and watch yourself become more efficient by
using your marketing database to build PNRs. You'll be surprised at how quickly existing customer information gets
updated, and how quickly new customer information gets added to your marketing database, when agents use it as their
source for building PNRs. Also, watch your customer loyalty grow as agents access customer information when building
PNRs for your leisure clients, rather than repeatedly asking them for the same information.
Example: Ken Able calls your agency to book some flights to Paris. Your agent, Susan, first
locates Ken's profile in your marketing database (ClientBase) and verifies current address
and phone information. Once confirmed, she clicks the Merge to PNR button and within
moments has the PNR started with all of Ken's necessary information.
Quick Steps to Merging a Profile into a PNR Step 1) Retrieve the Customer Profile Use the Level 1 Query in the Profile Manager to retrieve your desired customer profile. Verify address and phone
information is current.
Step 2) Click the Merge to PNR Button Click PNR located on the profile toolbar.
Step 3) Select the Information to Include Place a check mark next to each item of information you would like to include in your current PNR. Click Next when items
are selected.
Step 4) Review Formatted Entries and Finish Review the information formatted for your GDS. Make any edits, and click Finish to transfer the data to your current PNR.
Step 5) Toggle to Your GDS to Display Your PNR Use Alt-Tab keys, or your Windows Task-Bar, to go back to your GDS and display your current record. All customer
information sent from ClientBase is displayed in a “live” PNR.
Email Blast – 21st Century Communication Your agency has built a valuable database by consistently collecting and recording client data. Now it is time to put that
data to work for you! Save valuable time by using the ClientBase E-mail “blast” which allows you to send one E-mail to
any number of profiles at the same time.
Example: Your agency has just received a hot, new, Bermuda cruise special at a great
price. You need to notify all your deluxe cruisers as soon as possible so that they can
22 04/21
take advantage of this terrific deal. Your agent, Michael, first locates all the deluxe
cruisers in your database by using the Level 2 Query in ClientBase. He checks the
results and clicks on the Merge to E-mail button on the toolbar. He types the details of the
cruise into the Email (or he can use a Document Template he has created for the
mailing). He clicks on the “Send All” button, and within minutes, each deluxe cruiser is
notified of the upcoming sailing.
Quick Steps to Email Blast Step 1) Set up your E-mail option as MAPI or SMTP There are two E-mail options available for using ClientBase’s Merge to E-mail feature: MAPI (Messaging Application
Protocol Interface) and SMTP (Simple Mail Text Protocol). MAPI requires use with compatible E-mail programs such as
Microsoft Outlook, Microsoft Express, Netscape and Eudora. E-mails sent with this option do not have text formatting
capabilities, although you can send Document Templates. The SMTP option offers 2 benefits: It does not require a MAPI
compatible E-mail program for the Merge to E-mail feature in ClientBase to work, and with this option, you can format
your text, even use HTML, as well as use Document Templates within your E-mail messages. The option for using either
MAPI or SMTP as your method for sending E-mails is located within each User Login, but can be overwritten at the
Workstation level.
Step 2) Retrieve the Desired Customer Profiles Use the Level 1, 2, or 3 Query in the Profile Manager to retrieve your desired customer profiles. Verify the profiles you
have queried are correct in the Results Screen, and that the profile E-mail addresses are valid. Only the E-mail entry
flagged Primary is used with the Merge to E-mail feature.
Step 3) Click the Merge to E-mail Button Click on the E-mail button located on the Toolbar of the Profile Manager or click File|Merge To|E-mail.
Step 4) Type the E-mail Message and Send to All Selected Profiles For the MAPI option, type the E-mail message you are sending to all selected profiles, or choose the appropriate
Document Template. Click Mailer to create a mailer for each person you are E-mailing to, and then on the “Send All” button to send
completed E-mails to all selected profiles.
For the SMTP option complete these fields:
Priority: Select a Priority label from the drop down menu of Highest, High, Normal, Low and Lowest.
Mode: Allows you to select how you want to format the body of your message. Your choices include:
Formatted Text: This allows you to free flow your message by typing the text and using the toolbar to format it as desired.
Please note if hyperlinks are included within your message, highlight the line and click the Hyperlink button on the tool bar
to format it properly.
Document Templates: This allows you to complete your message by using any of your Global Document Templates. Use
Load Doc Template to select from a listing of your global templates or use the Insert Fields to insert merge fields in
combination with free flow text.
Raw HTML: This allows you to paste RAW HTML into the body of your message. ClientBase does
not come with an HTML Editor so you either need to use a tool such as Front Page or
Dreamweaver to create your HTML, or you can right click on any HTML page and copy the
contents to clipboard and then paste into the RAW HTML tab.
Plain Text: Enter your E-mail message without any formatting. This message can then be viewed
by E-mail recipients, regardless of their E-mail service.
Preview is available for all E-mail modes and allows you to preview your message in its formatted
state before sending. Keep in mind that whether the recipient is able to view the HTML is
dependent on the E-mail service used by the recipient. If HTML cannot be viewed by any of the
recipients, then for just those recipients the message will be rendered to plain text.
Note: Want to test the e-mail you are sending? For SMTP, click SMTP Settings, and click Test. To keep a history of any
e-mails, be sure to create a mailer record. These mailers create a history within each profile whenever an e-mail is sent.

23 04/21
Understand Your Database with Reporting
Computer systems can only report on the data you enter into the system. The Reports Menu in ClientBase provides you
with a “bird’s eye view” of your database to measure whether the collected data is meaningful. Use reports to plan your
marketing activities, maintain quality control, and train agents to enter the information you need to meet your goals.
Example: Your agency has been using ClientBase for several months. You want to get an idea of the “niches” of your
leisure customers, so you can plan your marketing strategy. You perform a Level 1 Query in the Profile Manager and
select all leisure clients. Then click on Reports|Profile Reports|Statistics|Marketing Stats to get a report on the
Marketing Categories and Codes of your leisure clients. The Statistics report uncovers a niche of scuba divers. Armed
with this insight, you put together a fantastic scuba package and begin marketing to these clients.
Quick Steps to ClientBase Reporting Step 1) Retrieve the Profiles, Activities, Inventory Items, or Res Cards for Reporting Purposes Use the Level 1, 2 or 3 Query in the Profile, Activity, Inventory, and Res Card Managers to retrieve the desired list of
profiles, activities or res cards. Verify results in the Results Screen.
Step 2) Click the Report Menu Click on Reports in the File Menu and choose from Profile, Activity, Inventory, or Res Cards Reports. The system gives
you specific choices on the results to be included - *Current Results, *Selected Results, and *Requery.
*If you choose Current Results, the system includes all of the profiles currently appearing in your query results screen. If
you choose Selected Results, the system includes only those profiles that have been selected, or highlighted in your
current query result screen. (Pick and choose specific profiles by highlighting the profiles you want to include and holding
down the Ctrl key and clicking on the desired profiles). If you choose Requery, the system takes you to the Level 2 query
screen for your current manager so that you can requery the desired results.
Step 3) Select the Report and Run After clicking the report you want to run, the results appear for printing in a preview screen. Choose the appropriate printer
and number of copies in the Printer Setup, and then click Print.
Hint: The Current Query Results report prints out whatever is in the Results Screen (what you see is what you get). Click
Columns to pick and choose columns you want included in the report. By using the up and down arrows, put the columns
in any order you want them to appear on report. Click Sort by Columns to select up to three columns to sort the results of
the query in ascending or descending order. If you prefer to customize the query from the Results Screen, use your
mouse to move columns where you want, and hold down <Shift> while clicking on a column heading to sort in ascending
order, or click once again to sort in descending order.
There are dozens of extra ClientBase reports on our website. Click on the Trams Crystal Report link when you see it to
find directions on how to use these reports.
Manage the Trip Planning Process with Res Cards
The Res Card feature in ClientBase provides a perfect tool to integrate all processes in trip planning. By setting up a Res
Card, an agent can document the client’s first call by creating a new Res Card and scheduling a follow-up call (listed on
the daily to-do list) with a Reminder. Once the customer is considering the trip, the agent captures details of reservations
and prints out client quotes or itineraries. By using the Live Connect feature in ClientBase, agents have the ability to book
reservations via on-line booking engines and then pull all that reservation detail back into the Res Card.

24 04/21
When the client books the trip, the agent produces invoices and trip
statements, while tracking invoiced and uninvoiced balances. Additional
notes and reminders are created to remind an agent of a final payment
date or a document confirmation. When the customer returns home, the
agent documents his remarks and suggestions. Because all client trip
data is in one localized area, reports such as Final Payment, Vendor
Booking and Service Provider Activity are produced for Res Cards in all
stages of implementation of the trip planning process.
As ClientBase shares a database with Trams Back Office, the invoices
generated from the Res Card automatically become part of the invoices
shared with Trams Back Office. Invoices generated through the Res
Card maintain their own numbering system, separate from the
numbering system of invoices generated through Interface.
Each Res Card represents one trip; therefore, customers are likely to
have multiple Res Cards in their profiles at any one time. Depending on
your agency’s needs, enter as much or as little trip information on each
Res Card as desired. When talking with your clients and vendors, get in
the habit of entering the information directly into the Res Card rather
than jotting the notes on paper and then transferring the information into
the computer.
Example: Michael Blue inquires about Deluxe Crystal Sailings to the Bahamas. Instead of
documenting all contacts about this trip manually on paper, our agent, Sharon, starts a
Bahamas Res Card for Michael in ClientBase. Every time Sharon has contact with Michael
or any vendors/suppliers about this trip, she calls up Michael’s Bahamas Res Card and
adds information to it. She adds Reminders for first deposit, final deposit, to check for
documents, and to welcome home. These reminders show up in her daily To-Do List. At any
point she prints out an itinerary, generates an invoice or trip statement for Michael, or tracks
his uninvoiced balance due.
Quick Steps to Automate Res Cards Step 1) Start a Res Card with Each and Every New Trip Inquiry Use the Level 1 Query in the Profile Manager to retrieve your desired customer profile. Verify address and phone
information is current. Click Res Card on the Toolbar and fill in Reservation Cycle, Trip Name and Travelers to start the
tracking trip details. Click Apply and in the Activities Tab, enter a Reminder to schedule a follow-up.
Step 2) Enter Reservation Details When Learned As the trip progresses and vendors are on the phone with confirmation numbers, rooming details, or any other trip detail,
query up the Res Card under the Res Card tab in the Client Profile, or in the Res Card Manager, and modify the Res
Card.
Live Connect: Click on this button to access participating on-line booking engines (see section
below).
Inventory: Click on this button to access inventory items available with all details for use (see
section below).
Step 3) Organize and Schedule Administrative Tasks Once any reservations have been booked, use Batch Reminders to schedule and organize all the administrative tasks you
need to do such as checking deposit, final payment, waitlists and documents. Under the Activities Tab, or at top of the res
card, click Batch Reminders to select and launch appropriate new reminders all at once. These reminders can be viewed
either in the actual Res Card, or in the Activities Tab in the Profile.
Step 4) Generate Invoices, Itineraries or Trip Statements As Needed At any point in the trip planning process, generate client quotes, itineraries, invoices, or trip statements as needed. These
documents can be customized with an agency header or footer. Any invoice generated in ClientBase automatically enters
Trams Back Office, as these two programs share the same database.
25 04/21
Step 5) Welcome Your Customer Home Use a Reminder to schedule a Welcome Home Letter and Welcome Home Call. While talking with your customer, capture
feedback in the Client Feedback tab. Toggle into the customer profile to enter any new customer details, such as newly
learned travel preferences or other personal information. Enter any pertinent details about the vendor or service provider
into their profiles as well, so other agents can benefit from what you learn.
Hint: Don’t forget to use the “Cut and Paste” feature in Windows to save time during the entry process. Highlight text in
the Res Card, copy it, then paste it into the Client, Vendor, or Service Provider profile if desired.
Quick Steps to Create Res Cards/Invoices These are suggested steps which can be used as a foundation for your own invoicing process. These steps will create a
BASIC Res Card and invoice:
1) For every client trip, find the client profile. If no profile exists, create a new one.
2) In the client profile, make sure the profile contains the following info: Accurate address, phone and email. 3) Click
the Traveler tab and review traveler list. Add any missing travelers by entering the First/Last Name to start.
4) Click the Cards tab and review credit card (including valid expiration date) or other card information as needed for this
trip. Edit or Add Card.
5) Click the Res Card tab and check for an existing Res Card. If a Res Card does not exist, click Res Card icon on
toolbar at top of profile and create a new Res Card. All reservations and invoices are kept inside the Res Card. One
Res Card per trip.
6) In new Res Card, choose appropriate Reservation Cycle (always use drop-downs if available), enter a meaningful Trip
Name (used to find Res Card in profile or Res Card Manager), and select applicable Traveler Names. Click Apply.
7) From Reservation tab, add reservation to enter reservation details. For vendor, type in a few letters of vendor's name,
tab, and choose from drop-down. (If there is not profile in system, create one.) Make sure the Travel Category is
correct for this vendor.
8) Enter confirmation #, total pricing for this reservation, and in the Service Provider area Trip Start Date/End Date along
with any additional details. Click OK to save. (If this vendor is arranging more than one Service Provider for this
reservation; i.e., cruise, insurance, tour, etc., the details may be individually added by inserting each in the Service
Provider area.) Want to totally break out pricing line by line? Use the Itemize area.
9) From main screen, continue entering reservations for each new vendor.
10) Apply to save all Res Card changes. Click the Generate Invoice icon on toolbar at top of screen.
11) Click Remarks and select desired remarks (created in Utilities|Branch) which prints at the bottom of the invoice.
Enter a Trip Balance Due Date if applicable. Select Form of Payment area at top of generate invoice screen for one FOP.
If split forms of payments or multiple forms of payments are used, click the reservation and use the Booking Payment
button.
12) In the This Invoice area, enter the actual dollar amount paid at this time and the correct Travel Type and Submit To.
On a credit card sale, if the Submit to is CommTrack and the booking is actually being paid (as opposed to a hotel
guarantee), then make sure the Showed as Paid box is checked. Repeat process for each reservation being invoiced
at this time. Preview.
13) If the amounts or other information doesn't look correct in preview, return to reservation and correct. Otherwise click
Generate Invoice to issue the invoice. At this time, the invoice may be printed or e-mailed from this screen. The
invoice is now permanently available in the Invoices tab of the Res Card for reprint/e-mail at any time.
Using Live Connect One of the most innovative features in ClientBase is Live Connect in the Res Card. Save time and improve efficiency by
transmitting selected client information to a booking engine on-line. Then electronically transmit back reservation details
and automatically complete the reservation form with what’s been booked! Print out client quotes or itineraries, generate
invoices and trip statements. (As ClientBase shares a database with Trams Back Office, the invoices generated from the
Res Card automatically become part of the invoices shared with Trams Back Office.)
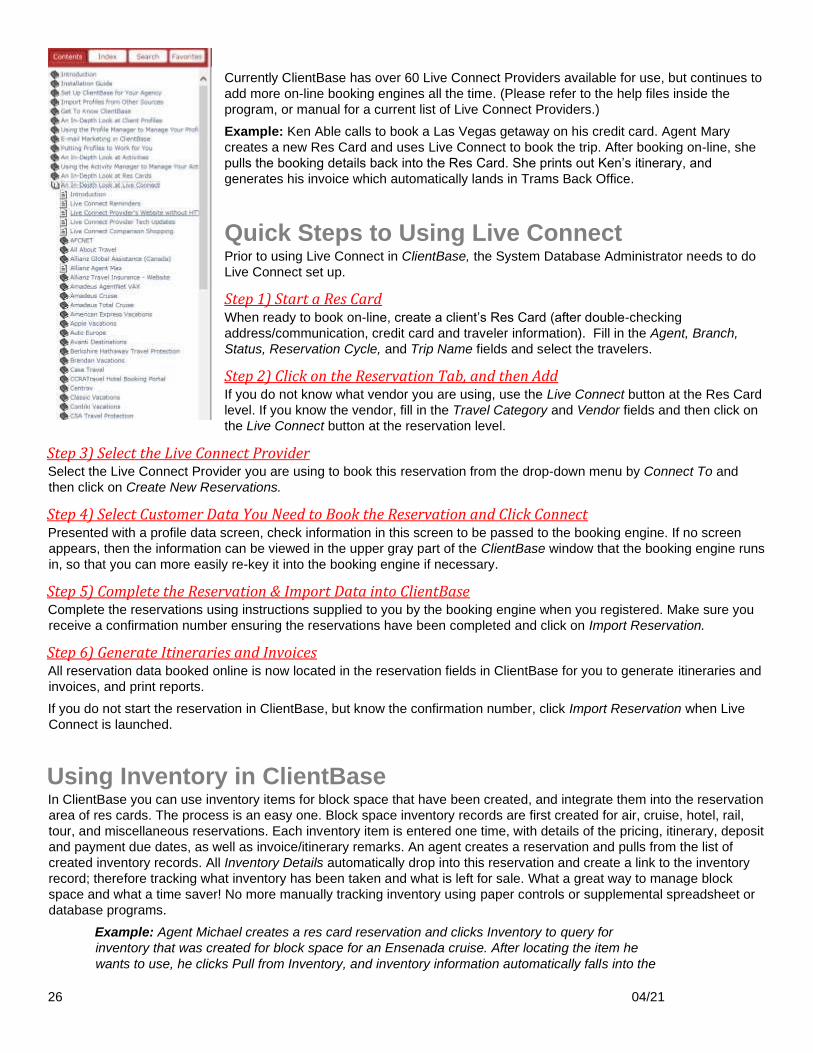
26 04/21
Currently ClientBase has over 60 Live Connect Providers available for use, but continues to
add more on-line booking engines all the time. (Please refer to the help files inside the
program, or manual for a current list of Live Connect Providers.)
Example: Ken Able calls to book a Las Vegas getaway on his credit card. Agent Mary
creates a new Res Card and uses Live Connect to book the trip. After booking on-line, she
pulls the booking details back into the Res Card. She prints out Ken’s itinerary, and
generates his invoice which automatically lands in Trams Back Office.
Quick Steps to Using Live Connect Prior to using Live Connect in ClientBase, the System Database Administrator needs to do
Live Connect set up.
Step 1) Start a Res Card When ready to book on-line, create a client’s Res Card (after double-checking
address/communication, credit card and traveler information). Fill in the Agent, Branch,
Status, Reservation Cycle, and Trip Name fields and select the travelers.
Step 2) Click on the Reservation Tab, and then Add If you do not know what vendor you are using, use the Live Connect button at the Res Card
level. If you know the vendor, fill in the Travel Category and Vendor fields and then click on
the Live Connect button at the reservation level.
Step 3) Select the Live Connect Provider Select the Live Connect Provider you are using to book this reservation from the drop-down menu by Connect To and
then click on Create New Reservations.
Step 4) Select Customer Data You Need to Book the Reservation and Click Connect Presented with a profile data screen, check information in this screen to be passed to the booking engine. If no screen
appears, then the information can be viewed in the upper gray part of the ClientBase window that the booking engine runs
in, so that you can more easily re-key it into the booking engine if necessary.
Step 5) Complete the Reservation & Import Data into ClientBase Complete the reservations using instructions supplied to you by the booking engine when you registered. Make sure you
receive a confirmation number ensuring the reservations have been completed and click on Import Reservation.
Step 6) Generate Itineraries and Invoices All reservation data booked online is now located in the reservation fields in ClientBase for you to generate itineraries and
invoices, and print reports.
If you do not start the reservation in ClientBase, but know the confirmation number, click Import Reservation when Live
Connect is launched.
Using Inventory in ClientBase In ClientBase you can use inventory items for block space that have been created, and integrate them into the reservation
area of res cards. The process is an easy one. Block space inventory records are first created for air, cruise, hotel, rail,
tour, and miscellaneous reservations. Each inventory item is entered one time, with details of the pricing, itinerary, deposit
and payment due dates, as well as invoice/itinerary remarks. An agent creates a reservation and pulls from the list of
created inventory records. All Inventory Details automatically drop into this reservation and create a link to the inventory
record; therefore tracking what inventory has been taken and what is left for sale. What a great way to manage block
space and what a time saver! No more manually tracking inventory using paper controls or supplemental spreadsheet or
database programs.
Example: Agent Michael creates a res card reservation and clicks Inventory to query for
inventory that was created for block space for an Ensenada cruise. After locating the item he
wants to use, he clicks Pull from Inventory, and inventory information automatically falls into the

27 04/21
reservation portion of a Res Card, which also links to update what inventory items are
remaining for sale.
Quick Steps to Using Inventory Prior to using Inventory in ClientBase, the inventory items need to be created.
Step 1) Start a Res Card and Reservation When ready to book a trip, create a client’s Res Card (after double-checking address and communication information),
and fill in the Agent, Status, Reservation Cycle, and Trip Name fields and select the travelers. Create a reservation and fill
in Travel Category.
Step 2) Click on Inventory to Query/View Inventory item/s you want to sell A Level 2 Inventory Query screen appears to query your database of inventory based upon the travel needs of the client.
Use any Inventory Header fields as filters (search criteria), as well as Itinerary/Flight/Address Info and Inventory Detail
information. Each filter entered into the Query fields is "anded" together with other filters, so any results match all filters.
The more filters entered, the narrower the search and generally fewer results. The fewer filters entered, the more general
the search and generally more results. Enter the criteria you know about your client's trip needs and click OK to view a
listing of the Inventory that matches your search criteria.
A one-line listing of each Inventory Detail that matches your criteria appears at the top of your screen, with a visual display
of the Inventory Detail currently highlighted at the bottom of the screen. Use the arrow key, or the mouse to highlight the
desired Inventory Detail and view the data stored within that Inventory Detail, including what's been Blocked, Sold and
Available. To view more information about that Inventory Detail, click View Inventory Record at the bottom right hand
corner.
Step 3) Pull From Inventory If you have located the desired Inventory and take one of the Available Seats/Cabins/Rooms, click Pull from Inventory
button, and the system returns you to the reservation record with all the inventory fields defaulting in your reservation
fields. This simultaneously links the reservation to the Inventory Detail, therefore allowing your agency to track what's
been taken or Sold, and therefore what's now Available. Any reservation that is linked to inventory displays the Inventory
ID and the Quantity taken in the upper right hand corner of the reservation record. The link to that Inventory Detail
remains permanent, unless the reservation is deleted, or the Reservation Status is changed to Cancelled or Quoted, at
which time you are prompted for confirmation and if accepted, the link removed and the inventory replaced back into
Available inventory.
Step 4) Proceed with Generating Itinerary and/or Invoice
Quick Steps to Using Inventory
STEP ONE:
STEP TWO:
STEP THREE:
STEP FOUR: