Embed Size (px)
Citation preview

Client Side JavaScript and AJAX
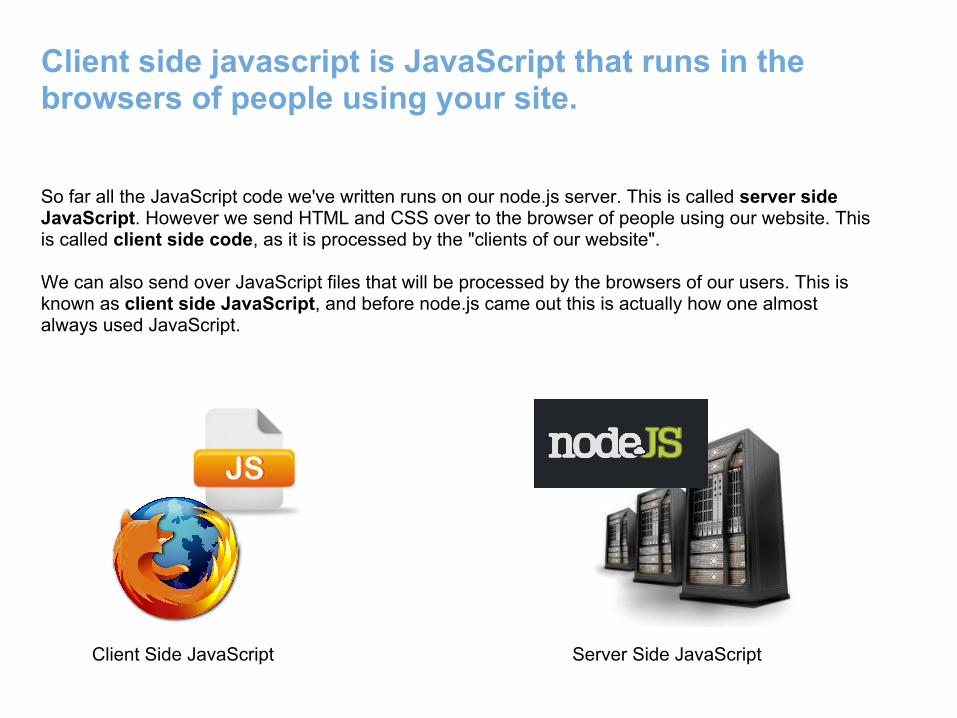
Client side javascript is JavaScript that runs in the browsers of people using your site.
So far all the JavaScript code we've written runs on our node.js server. This is called server side JavaScript. However we send HTML and CSS over to the browser of people using our website. This is called client side code, as it is processed by the "clients of our website".
We can also send over JavaScript files that will be processed by the browsers of our users. This is known as client side JavaScript, and before node.js came out this is actually how one almost always used JavaScript.
Client Side JavaScript Server Side JavaScript

JavaScript files are sent to the client just like other static assets such as CSS and Images
JavaScript files are sent as is (statically) to the client. Thus they are similar to CSS files and images. Since they are sent to the client, the code inside of them is visible to the whole world, so they are considered "public".
Lets make a folder for our JavaScript files. Since its public, it will go in the public folder under the root directory. Lets make a new folder called js, which is short for "JavaScript".
Now that we have a folder for JavaScript, lets put some in it! The first JavaScript we'll put in it won't be our own. Once again, we'll be smart programmers and leverage the work done by others. In this case, we are going to use a very popular JavaScript library called jQuery.
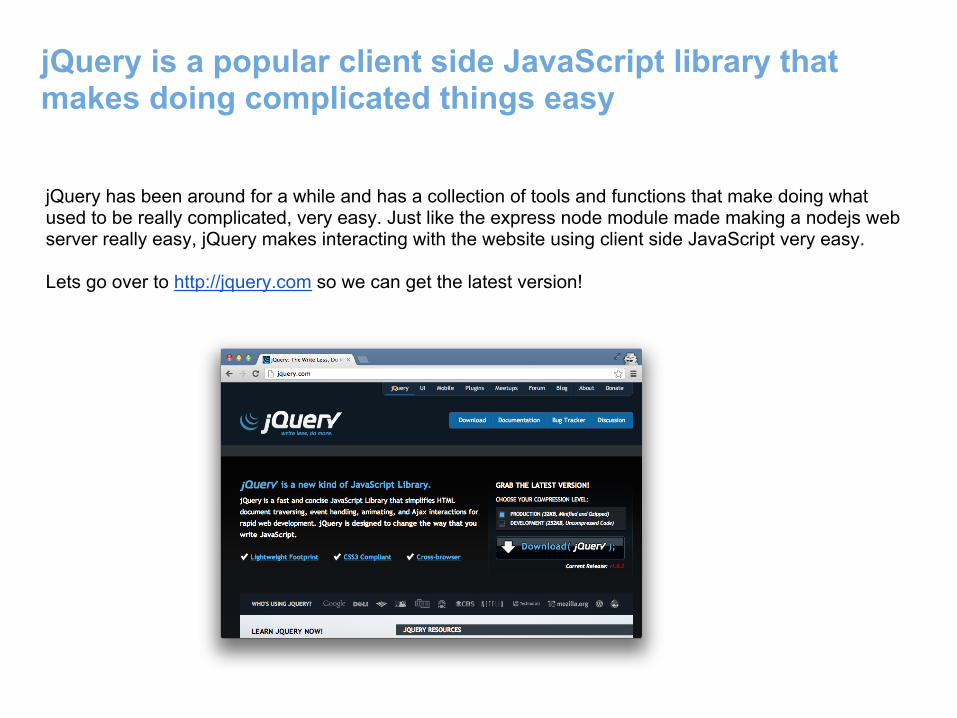
jQuery is a popular client side JavaScript library that makes doing complicated things easy
jQuery has been around for a while and has a collection of tools and functions that make doing what used to be really complicated, very easy. Just like the express node module made making a nodejs web server really easy, jQuery makes interacting with the website using client side JavaScript very easy.
Lets go over to http://jquery.com so we can get the latest version!

There are a couple of options here. The first is for "production", and this is minified and Gzipped. What this means is the JavaScript code has been compressed to use the least possible space and still work--although the code looks like gibberish to people.
Minifying and Gzipping are what most professional websites do as they have less to send over the internet when somebody visits their page, saving them server time and money.
We'll use the development version so that its friendlier for us humans as we develop. Its still relatively small and we are not too concerned about tweaking every element of performance for now.
Go ahead and select the DEVELOPMENT version, and then click the download button.

If it brings up a file download, go ahead and save it in your newly created js folder. If instead your browser just opens the file, go ahead and select all the JavaScript code (ctrl+A is one way to do it) and paste it into your text editor. Then save this file with the same filename as in the browser path.
Besides jQuery we will want our JavaScript file. Let's make a new file also in the js folder called site.js. For now, put the following contents in it:
$(function() {$('img').click(function() {
alert('Image Clicked!'); });});
While the syntax may look familiar, some of the functions may not. And what's up with the dollar sign? We'll cover that in a bit but for now trust me!
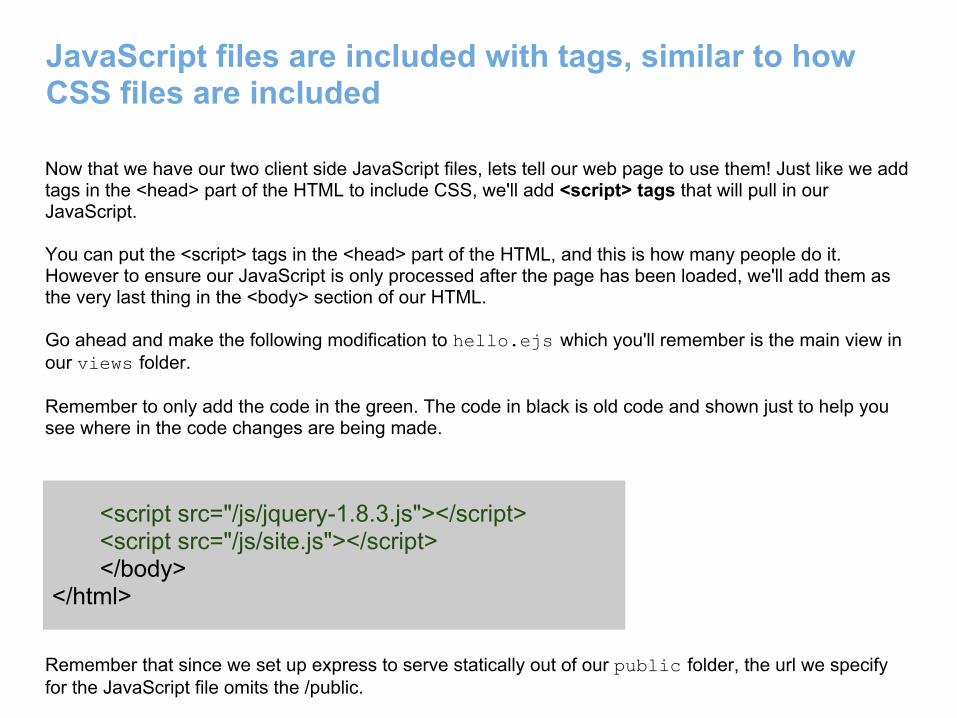
JavaScript files are included with tags, similar to how CSS files are included
Now that we have our two client side JavaScript files, lets tell our web page to use them! Just like we add tags in the <head> part of the HTML to include CSS, we'll add <script> tags that will pull in our JavaScript.
You can put the <script> tags in the <head> part of the HTML, and this is how many people do it. However to ensure our JavaScript is only processed after the page has been loaded, we'll add them as the very last thing in the <body> section of our HTML.
Go ahead and make the following modification to hello.ejs which you'll remember is the main view in our views folder.
Remember to only add the code in the green. The code in black is old code and shown just to help you see where in the code changes are being made.
<script src="/js/jquery-1.8.3.js"></script> <script src="/js/site.js"></script>
</body></html>
Remember that since we set up express to serve statically out of our public folder, the url we specify for the JavaScript file omits the /public.

So far we've only modified JavaScript and EJS files, both of which are part of views and not the server. So we don't need to restart our server. We can simply reload our page at http://localhost:1337.
You won't notice any changes right away, but if you did everything correctly and you click on an image, you should see an alert!
If things are not working correctly, you can use developer tools, such as Firefox's firebug, chrome developer tools, or Internet Explorer 9's developer tools to debug. The most helpful things to try are to bring up the network information and make sure your JavaScript files are being sent to the browser, and to bring up the JavaScript console and look for errors.

Ok let's dive into what we did here! Our first line started with a function call whose named seemed to just be the dollar sign. This is actually legal JavaScript and jQuery piggybacks off the dollar sign.
The $ is overloaded (repurposed) for jQuery. One use is to protect our code from interfering with other code
Here we pass a single argument to the dollar sign function, and that argument is a function we defined. For reasons I won't go into too deeply, we want all of our code to be within a function.
One important reason for this is JavaScript variable names outside of functions are what is known as globally scoped. So if two different JavaScript files use the same variable or function name, they could interfere with each other causing lots of headaches. By putting our stuff inside a function, its isolated from messing up other code.
By taking that function and passing it to jQuery, it will execute it after everything (including itself) has properly loaded.
$(function() {
});
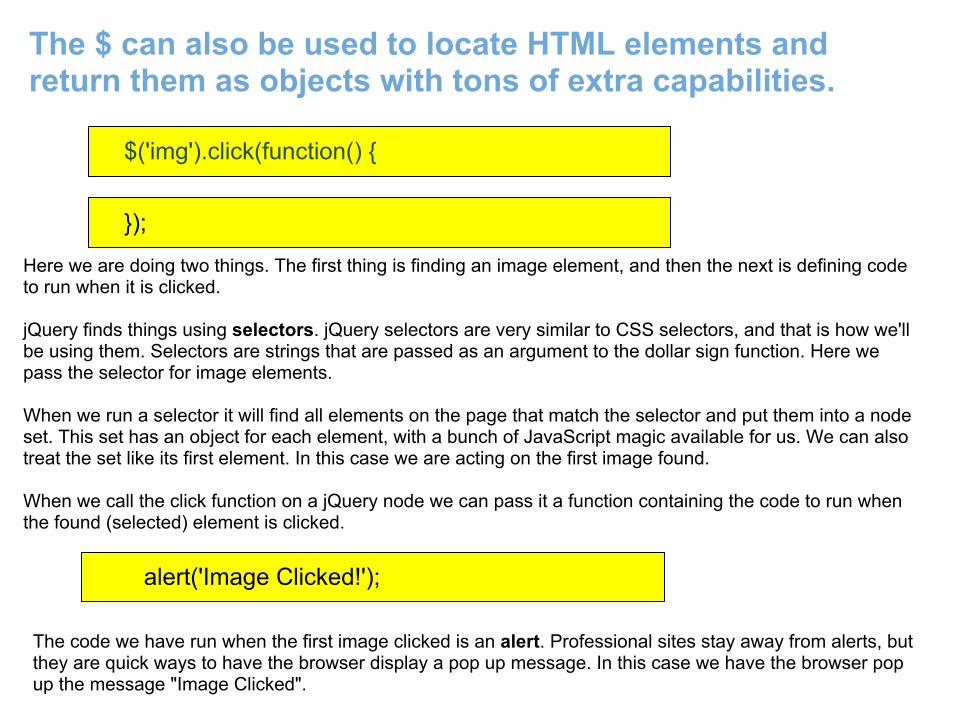
The $ can also be used to locate HTML elements and return them as objects with tons of extra capabilities.
Here we are doing two things. The first thing is finding an image element, and then the next is defining code to run when it is clicked.
jQuery finds things using selectors. jQuery selectors are very similar to CSS selectors, and that is how we'll be using them. Selectors are strings that are passed as an argument to the dollar sign function. Here we pass the selector for image elements.
When we run a selector it will find all elements on the page that match the selector and put them into a node set. This set has an object for each element, with a bunch of JavaScript magic available for us. We can also treat the set like its first element. In this case we are acting on the first image found.
When we call the click function on a jQuery node we can pass it a function containing the code to run when the found (selected) element is clicked.
$('img').click(function() {
});
alert('Image Clicked!');
The code we have run when the first image clicked is an alert. Professional sites stay away from alerts, but they are quick ways to have the browser display a pop up message. In this case we have the browser pop up the message "Image Clicked".

jQuery can also be used to add HTML on the fly
Popping up messages is ok, but what is really cool is when you use jQuery to adjust the actual HTML of the website. One thing we can do is append (add) html using jQuery's append method.
Let's replace the body of our image click code in our site.js file to append some html rather than show an alert:
$(function() {$('img').click(function() {
alert('Image Clicked!'); $(this).parent().append('<h3>You clicked on the image</h3>'); });});
Now refresh the page and try clicking on the image! Click it a few times! See what happens!

First we called the dollar sign function on this. "this" is a JavaScript keyword that refers to the currently executing scope. When used with the dollar sign inside a function being passed as an argument to click(), it refers to the element that was clicked. In this case, it will be the clicked image.
Then we call parent() to get the parent of the element clicked. We want the image's parent because when we append HTML it is added as the tag's contents, or conceptually between the opening and closing tags. However we don't want to add things inside the image tag, but rather along side it. So we get the images parent.
Lastly we use the append() function to add HTML. We passed to this function the HTML we wanted added.
$(this).parent().append('<h3>You clicked on the image</h3>');
See the HTML being added! Let's dive into what we did.
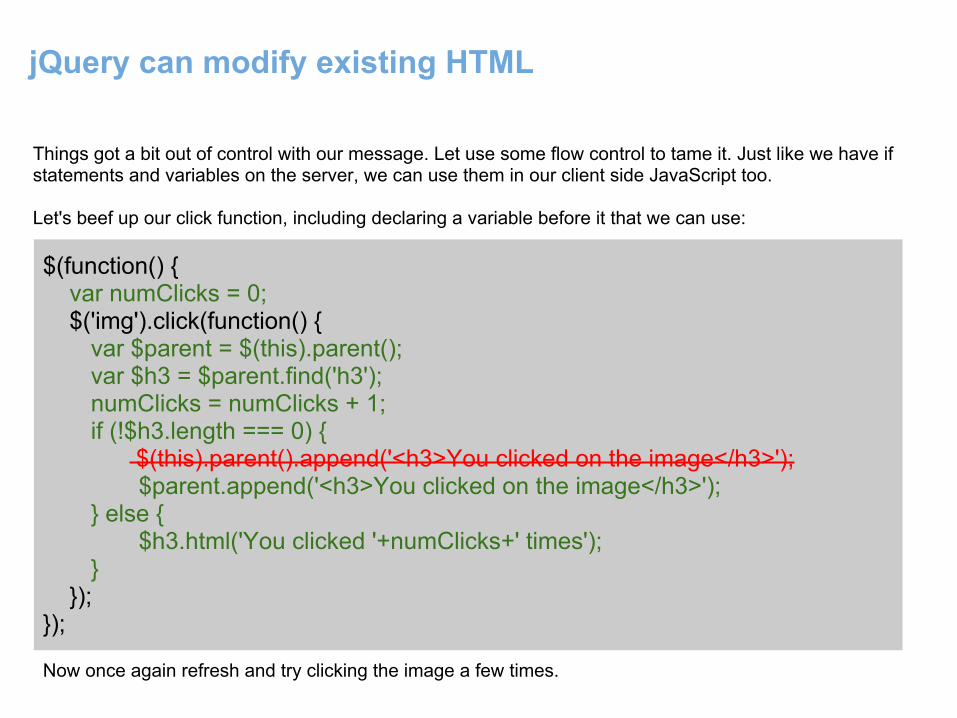
jQuery can modify existing HTML
Things got a bit out of control with our message. Let use some flow control to tame it. Just like we have if statements and variables on the server, we can use them in our client side JavaScript too.
Let's beef up our click function, including declaring a variable before it that we can use:
$(function() { var numClicks = 0; $('img').click(function() { var $parent = $(this).parent(); var $h3 = $parent.find('h3'); numClicks = numClicks + 1; if (!$h3.length === 0) { $(this).parent().append('<h3>You clicked on the image</h3>'); $parent.append('<h3>You clicked on the image</h3>'); } else { $h3.html('You clicked '+numClicks+' times'); } });});
Now once again refresh and try clicking the image a few times.

Look at that, the count keeps changing! We are modifying the HTML on the site. Let's dive into what we did.
var numClicks = 0;
Here we declared a variable to keep track of the number of times the image has been clicked. Since we declared it before the function we made for the click, it can be used inside that function.
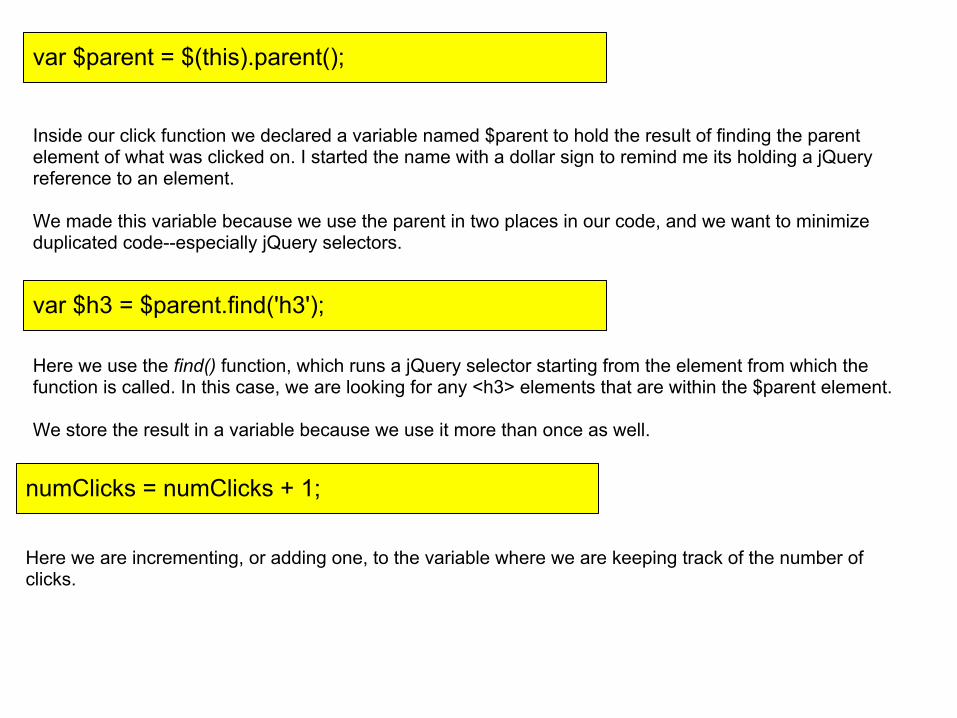
var $parent = $(this).parent();
Inside our click function we declared a variable named $parent to hold the result of finding the parent element of what was clicked on. I started the name with a dollar sign to remind me its holding a jQuery reference to an element.
We made this variable because we use the parent in two places in our code, and we want to minimize duplicated code--especially jQuery selectors.
var $h3 = $parent.find('h3');
Here we use the find() function, which runs a jQuery selector starting from the element from which the function is called. In this case, we are looking for any <h3> elements that are within the $parent element.
We store the result in a variable because we use it more than once as well.
numClicks = numClicks + 1;
Here we are incrementing, or adding one, to the variable where we are keeping track of the number of clicks.

if ($h3.length === 0) {
Here we are using the if statement for flow control, with the check being to see if the length of the result of looking for <h3> elements--which we've saved in the $h3 variable--is zero.
Remember that jQuery returns a set of all elements that match. If no match, it will return an empty set with a length property of zero. So here we are making sure we have at least one match. The way our code is written, we should only ever have zero or one matches.
$parent.append('<h3>You clicked on the image</h3>');
This is the code that will run if the check evaluates to true, meaning that no <h3> elements were found within $parent. This means we haven't added our h3 elements yet, so we go ahead and do that.
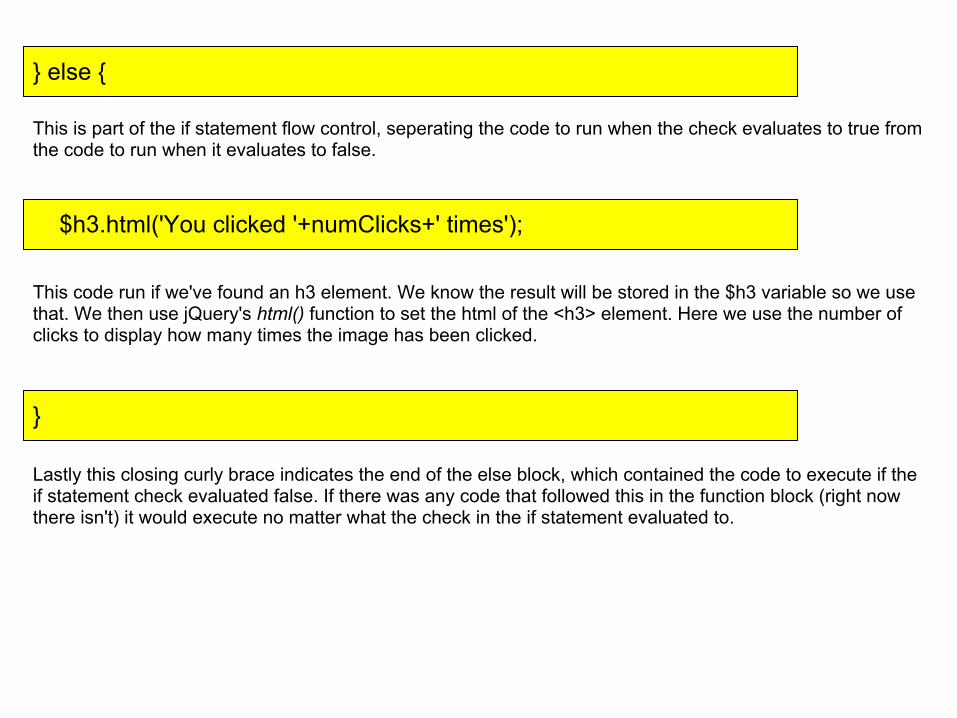
} else {
This is part of the if statement flow control, seperating the code to run when the check evaluates to true from the code to run when it evaluates to false.
$h3.html('You clicked '+numClicks+' times');
This code run if we've found an h3 element. We know the result will be stored in the $h3 variable so we use that. We then use jQuery's html() function to set the html of the <h3> element. Here we use the number of clicks to display how many times the image has been clicked.
}
Lastly this closing curly brace indicates the end of the else block, which contained the code to execute if the if statement check evaluated false. If there was any code that followed this in the function block (right now there isn't) it would execute no matter what the check in the if statement evaluated to.


AJAX lets you send information to and from the server can client
Go ahead and refresh the page. You'll see our message disappear. Click on the image and it will say it has been pressed 1 time. Lies! You've clicked it more than once!
Let's have our server keep track of the number of clicks. That way it will be unaffected if you refresh the page, use another browser window or other trickery.
To interact with our server we'll need a way for our client side JavaScript to talk to our server side javascript. We can do this using something called AJAX.
AJAX stands for asynchronous JavaScript and XML--but don't worry about it. These are just the technologies used to make AJAX possible.
Both jQuery and node.js make dealing with AJAX very easy. At its heart, AJAX sends a request to the server, and then the server optionally sends back a response. This response can be data in the form of JSON, or actual HTML to render.
Since we just need the number of clicks, we'll start by sending that back as JSON. We'll let the server know a click happened via an AJAX post request.
Client Side JavaScript Server Side JavaScript
AJAX

Server routes that handle AJAX requests are very similar to those that handle browser gets.
Let's start by creating a variable on server to keep track of the number of clicks, and adding a route that will process a click and send back the new total. We''ll add the new variable and route to our server.js file. We can put it at the end of the routes, just above the catch all.
Its very similar to other routes, but with two exceptions. First we use app.post() instead of app.get(). We'll be posting to the server which is a protocol generally used when the request will modify something on the server. Second, instead of res.render() to display a view we use res.json() to send back data as JSON.
var numClicks = 0;app.post('/api/processClick', function(req, res) {
numClicks = numClicks+1;var result = {numClicks: numClicks};res.json(result);
});
app.get('*', function(req, res) { res.send('I think you messed up the url!');});
Note we prefixed our route with "api", which stands for application programming interface, because a program's api is a way to interact with it using AJAX requests. This helps us organize things.

Let's make our lives easier by creating an HTML element in our view whose HTML we'll change with the result of AJAX calls. This way we don't have to check for it all the time and/or add it ourselves if its not there.
To make the element easy to find with jQuery, we'll give it a class.
Lets add an empty div with the class "clicks". Make the following change to the hello.ejs view:
<img class="cool" src="/images/icecream.jpg" /><div class="clicks"></div><br /><a href="/bye">Say Goodbye</a>

Now in our client side JavaScript, lets change our click function to send a POST request to the server as well as process the JSON response--with the number of clicks--received.
We'll do this with jQuery's post() function, which we can call right from the dollar sign. The first argument is the route to post to, there is an optional second argument of data to send that we'll ignore for now, and then the next argument is the function to execute if the post is successful and the response is received.
We want to post that a click happened, then get the total number of clicks sent back from the server, and put them in the div we added to our view.
Let's go ahead and modify our click handler in site.js. First lets delete the stuff we don't need.
$(function() { var numClicks = 0; $('img').click(function() { var $parent = $(this).parent(); var $h3 = $parent.find('h3'); numClicks = numClicks + 1; if (!$h3.length === 0) { $(this).parent().append('<h3>You clicked on the image</h3>'); $parent.append('<h3>You clicked on the image</h3>'); } else { $h3.html('You clicked '+numClicks+' times'); } });});

And now we'll add in our AJAX call and improved click handling!
$(function() {$('img').click(function() {
var $clicks = $('.clicks'); $.post('/api/processClick', function(response) { $clicks.html('Image has been clicked '+response.numClicks+' times'); });
});});
Great! Now since we changed the server (by modifying server.js) we'll need to restart our server
$node server.js
Refresh the page and click on the image a few times. Then close the window and reload the page and click some more. Then open a new browser tab and also go to http://localhost:1337 and click as well.

The clicks are being stored and sent back from the server without reloading the page! AJAX is working!


Let's go ahead and make our sentence generator use AJAX!
This time we'll have it send back the HTML to display when the form is processed. Since we want the form to be processed via AJAX, we want to remove its action.
We'll also want to add a place for the results to go that will be easy for jQuery to find.
Lastly, we'll want the sentence generator view to use some client side JavaScript we'll write. Let's plan on calling that file sentenceinput.js .
Go ahead and make the following changes to our sentence generator input view, which is sentenceinput.ejs . While we are in there, we'll also make the HTML officially valid with <!DOCTYPE>, <html>, <head>, and <body> tags.
<!DOCTYPE html><html>
<head></head><body>
<form action="/sentenceoutput"> Name: <input name="name" type="text" /> <br /> Place: <input name="place" type="text" /> <br /> <button type="submit">Submit</button> </form>
<div class="output"></div> <script src="/js/jquery-1.8.3.js"></script> <script src="/js/sentenceinput.js"></script>
</body></html>

We'll want a route for the AJAX to send the sentence generator parameters and retrieve the generated sentence HTML.
Since our old sentence output route did the work and rendered HTML, we can use it almost as is for an AJAX request that doesn't change anything on the server and returns HTML. We could even leave it exactly as it is, but for organization's sake lets change the route to start with api.
Go ahead and change the route name in server.js :
app.get('/sentenceoutput', function(req, res) {app.get('/api/sentence', function(req, res) {
Since we modified the server we'll need to restart it.
$node server.js
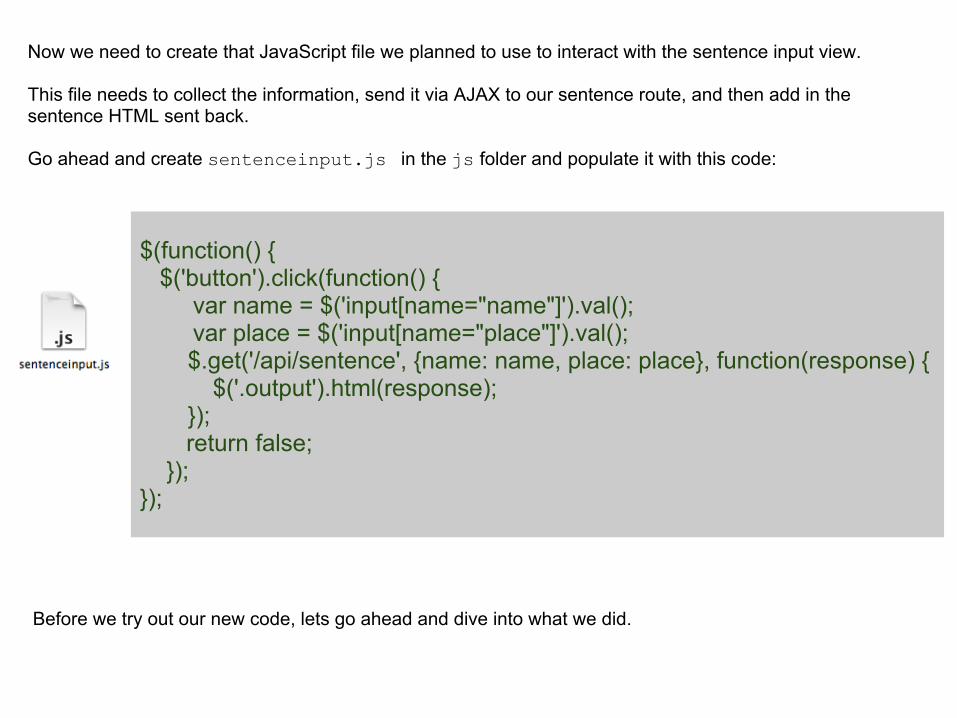
Now we need to create that JavaScript file we planned to use to interact with the sentence input view.
This file needs to collect the information, send it via AJAX to our sentence route, and then add in the sentence HTML sent back.
Go ahead and create sentenceinput.js in the js folder and populate it with this code:
$(function() { $('button').click(function() { var name = $('input[name="name"]').val(); var place = $('input[name="place"]').val(); $.get('/api/sentence', {name: name, place: place}, function(response) { $('.output').html(response); }); return false; });});
Before we try out our new code, lets go ahead and dive into what we did.

Once again we put all our code inside a function, this way it doesn't interact strangely with other JavaScript files.
$(function() {
});
$('button').click(function() {
And here we are searching for a <button> element using jquery, and then specifying code for to run using a function we create as an argument to the jquery click() function.
});
var name = $('input[name="name"]').val();
Here we are looking for an <input> element that has a name attribute with the value "name". When we find that element, we use the val() function to retrieve its current value--which since its a text box will be what is entered in the input. We store this value in a variable for easy use later.
var place = $('input[name="place"]').val();
And here we also save into a variable the value of the input with the name place.

Here we are using jQuery's AJAX get() function, and telling it to hit the route "/api/sentence". We also tell it to send some data: a parameter name with the value of the name variable that we set earlier from the value of the name input, and a parameter place with the value of the place variable we set earlier from the value of the place input. Lastly, we define the code to execute for the response sent when the AJAX call finishes.
$.get('/api/sentence', {name: name, place: place}, function(response) {
});
This is where we take the response--which since we are having our server do render() instead of json() will be pure HTML--and set it as the HTML contents of the element that has the class "output".
$('.output').html(response);
We put a "return false;" at the end of our click function to stop the browser from doing what clicking would normally do: submit the form. Its our way of saying "ignore normal html click stuff, and just do what we said".
return false;

Whew, that was a lot! But lets try it out. Now we should be able to use our sentence generator without the form submitting to and loading another page. Go ahead and fill out the inputs and click submit!
Now click submit again! No page reloading happening here. It talks to the server and updates the display using AJAX!

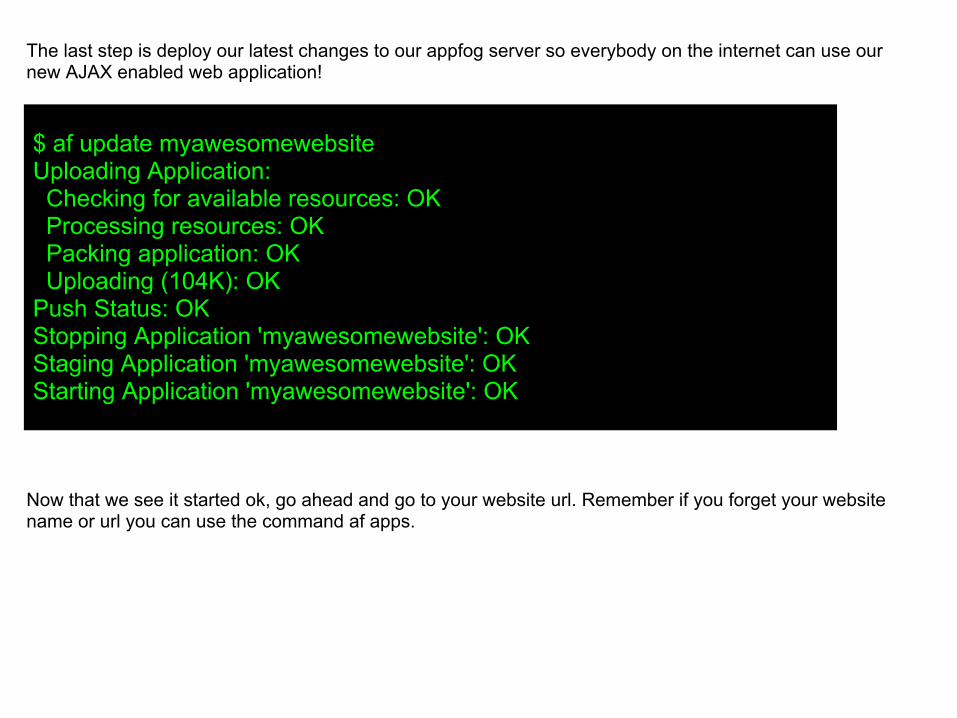
The last step is deploy our latest changes to our appfog server so everybody on the internet can use our new AJAX enabled web application!
$ af update myawesomewebsiteUploading Application: Checking for available resources: OK Processing resources: OK Packing application: OK Uploading (104K): OK Push Status: OKStopping Application 'myawesomewebsite': OKStaging Application 'myawesomewebsite': OK Starting Application 'myawesomewebsite': OK
Now that we see it started ok, go ahead and go to your website url. Remember if you forget your website name or url you can use the command af apps.

New code is running live!
Now everybody can enjoy our latest changes!