Embed Size (px)
Citation preview
Clever Design on a WWII Global Scale by Russ Lockwood
To create a global WWII wargame like Blitz! A
World in Conflict (Compass Games, $84, released November
2015) means you have to think big -- really big. That requires
some compromises in terms of physical components and
mechanics.
Space proved one concern. If you want to battle
across the world on a 3-foot by 2-foot map, you're not going
to model every scrap of terrain or every unit that took part.
Risk has a variety of global versions, although not a
WWII version that I'm aware of.
The most popular WWII wargame of a global type,
Axis and Allies, simplified all units into one-hit wonders (OK,
battleships are two-hit wonders). Forget the nuances we came
to expect from reading about WWII -- the game was
materialschlact and luck at its finest. It took a long afternoon
to play.
The successor A&A versions, where you butt the
Europe version up against the Pacific version, added a little
more nuance, but not much. It also took 12 to 14 hours to
fight the entire war.
The Europa system from GDW/GRD was probably the most ambitious game system from a size
perspective: If I recall rightly, 16 miles to the hex with division counters supplemented by regiments and
battalions; aircraft at group level (or is it squadrons?); Individual capital ships and smaller ship squadrons.
Although I played most of the European wargames individually, I saw all the European Europa maps
assembled into one giant map only once -- at Tom's Europafest in Eau Claire, Wisconsin back in the 90s.
I actually played in a Europa 1944 scenario at GenCon in the 90s that connected enough maps
together to stretch from London to Moscow to Rome (not Finland, Sweden, Norway, or Africa).
Gaming on the other end of the globe, I playtested a half-dozen times the Europa Japan vs. China
game War of Resistance, which was released in the late 90s or so. At the time, GRD was doing a Pacific
version called Glory that I have not played, although I recall seeing playtests, but not its release.
SPI did a game back in the 70s or 80s called Global War that was a two-map affair with a clever
production spiral. In our games, Germany did invent the atomic bomb and dropped one on London. The
Allies coated Axis cities with A-bombs.
World in Flames gained a devoted following by adding complexity and significant game length
into a corp-level mix. Indeed, the designer notes for Blitz! pointed out that Blitz! was a collaboration
between Compass Games and Australian Design Group -- trying to be a faster-playing, if less detailed,
version of World in Flames. Other globe-spanning WWII games are likely available, just nothing that I've
played.
Blitz! Scale
Blitz! uses areas, not hexes, on a Risk-like scale. Germany has three areas, France has two, Poland
has one, and so on. Yes, it's a big scale.
Blitz! ground units represent an army or army group, naval units are task forces of half dozen or
more ships, and air units are air forces. The map scale changes to fit in every major locale, with some
areas emphasized and others not.
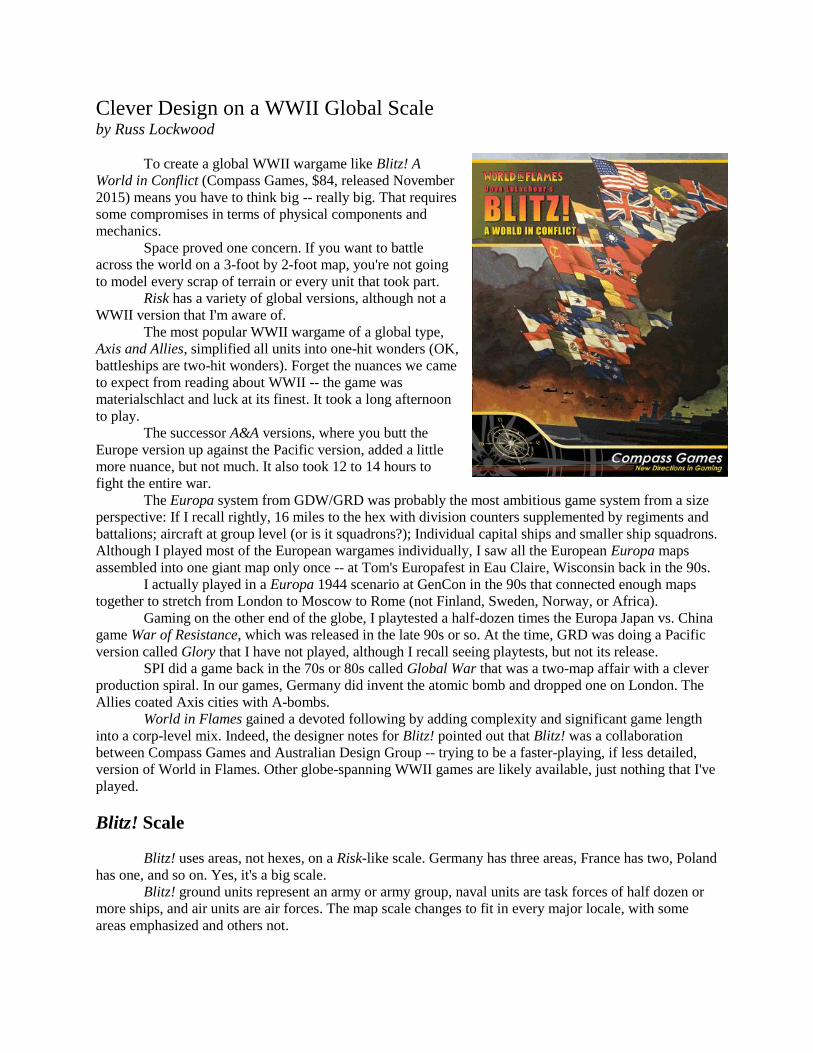
Game turns
change from nine months
at the beginning of the
war to four months at the
end. The idea here was to
get players into the game
quicker than with straight
quarterly turns.
The map.
Clever Mechanics
Designer Dave
LeLacheur came up with
a number of clever
mechanics for the game.
First and foremost was the idea of white triangles and red triangles attached to specific unit's
combat factors. White triangles add to the opponent's combat factors. Red triangles subtract from it.
Hence, each unit offers unique characteristics that may be (loosely) based on weapons, tactics, training,
leadership, and such above and beyond pure numbers of troops, tanks, ships, and so on. This takes some
of the sting out of the materialschlact nature of many games.
Second is the idea of pairing oil (a very precious resource) with 'blitz' moves in a turn.
Essentially, if you don't spend any oil and save it for a rainy day, you get a 'Free Blitz' -- shuffling a few
units around but no attacks. If you spend 1 oil, you get a second ground move and attack OR air move and
attack OR naval move and attack for the turn. If you spend 2 oil for a "Total Blitz," you get ground AND
air AND naval move and attacks.
Third is the combat chart's use of retreats/no advances
paired with Armor steps, which can really toss a monkey
wrench into your plans at times. Since combat is simultaneous,
it is possible that a losing defender can prevent enough
attacking units from advancing into a newly won area to create
a neat counter-attack opportunity. It's all a single die roll on a
CRT, but it's a nice twist.
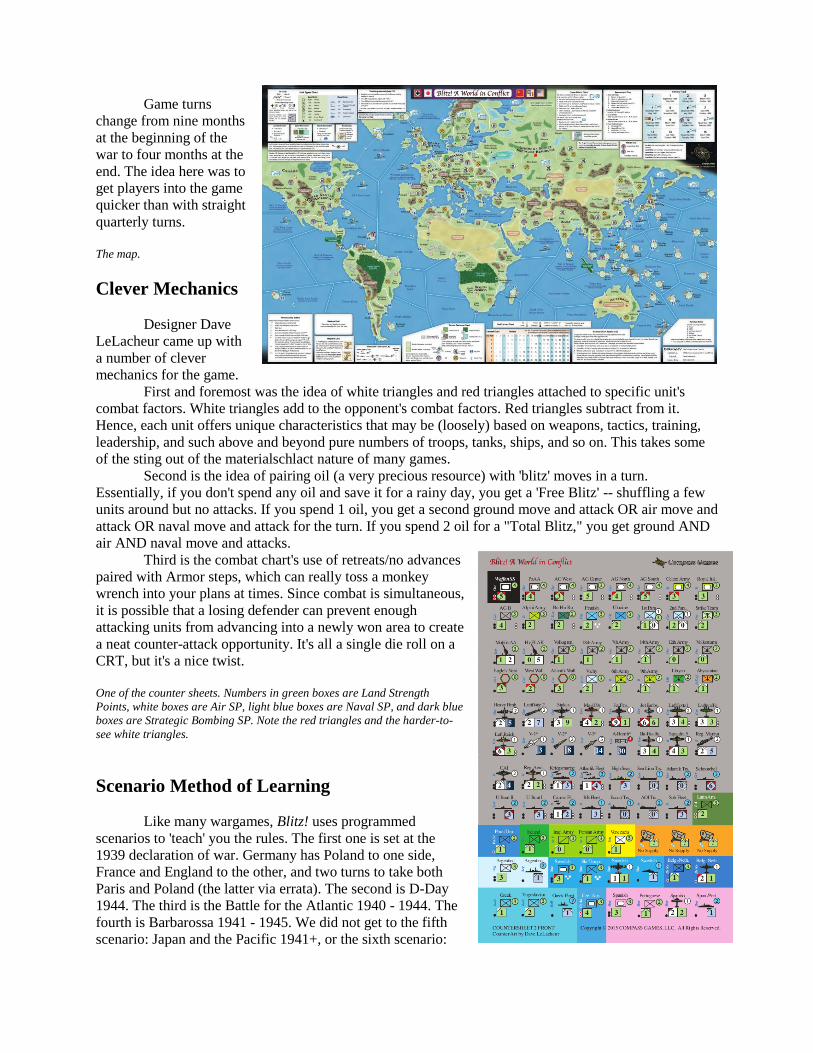
One of the counter sheets. Numbers in green boxes are Land Strength
Points, white boxes are Air SP, light blue boxes are Naval SP, and dark blue
boxes are Strategic Bombing SP. Note the red triangles and the harder-to-
see white triangles.
Scenario Method of Learning
Like many wargames, Blitz! uses programmed
scenarios to 'teach' you the rules. The first one is set at the
1939 declaration of war. Germany has Poland to one side,
France and England to the other, and two turns to take both
Paris and Poland (the latter via errata). The second is D-Day
1944. The third is the Battle for the Atlantic 1940 - 1944. The
fourth is Barbarossa 1941 - 1945. We did not get to the fifth
scenario: Japan and the Pacific 1941+, or the sixth scenario:
Germany and Europe 1939+.
Each of the scenarios provided more rules to learn and digest, with complexity ramping up
swiftly from the first scenario, which takes about 20 to 30 minutes -- once you learn the rules (an hour or
two for the first game).
Set up for scenario 1.
Sequence is: Axis return
naval and air units to base, then
naval move and attack, then
rebasing unused naval and air
units, and then land move and
attack (including supporting air &
naval units). Then the Allies do the
same. Then the Axis decide on any
'blitz' actions (weighing the cost of
using oil), the Allies decide on
'blitz' actions, and then the end of
turn wrap-up (partisans, builds, and
tally victory points).
Scenario the First: 1939
Unlike most area games, Blitz! ground attacks launch from adjacent areas, not move the units into
the area to be attacked. Air units are called in from adjacent areas, and so end up in the area being
attacked. In that way, it resembles a traditional hex-based wargame. We played this scenario twice -- the
first time requiring a couple hours to understand it all (and screwing up in the process) and the second
time after digesting all the rules.
Germany can almost (anything but a roll of 1 on a d6) guarantee Poland falls in Turn 1 by
sending just about all its ground and air forces against the Poles. The ground combat flowed OK after a
few false starts. Each side tallied up its ground and air combat factors, modified them using the enemy's
white and red triangles, and rolled a d6. Check the combat results chart and apply the steps lost and
retreats (defender) once you compared the number of Armor steps (modified by terrain) in the combat.
In Blitz!, only if the attacker has more Armor steps than the defender is the defender forced to
retreat out of the area. Also, depending on the CRT result, not all attackers may be allowed to advance
into the vacated terrain.
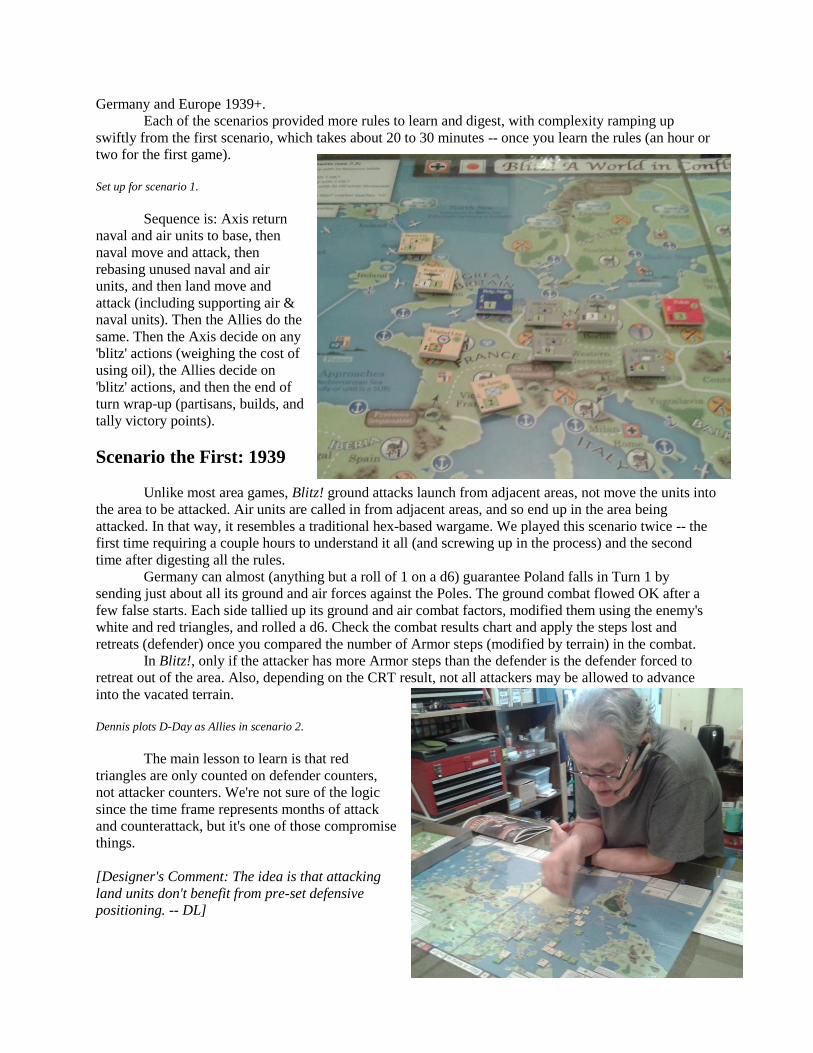
Dennis plots D-Day as Allies in scenario 2.
The main lesson to learn is that red
triangles are only counted on defender counters,
not attacker counters. We're not sure of the logic
since the time frame represents months of attack
and counterattack, but it's one of those compromise
things.
[Designer's Comment: The idea is that attacking
land units don't benefit from pre-set defensive
positioning. -- DL]
In the second game, we figured out why Germany should take the BENELUX area -- you
outflank the Maginot Line fortress counter so it does NOT use its four, count 'em four, red triangles
(ground units that have red triangles usually possess one, or, rarely, two).
Based on the first scenario, Dennis and I were eager to try the next.
Scenario the Second: 1944
This adds transports, begins with D-Day and ends with the fall of Berlin. Dennis stormed ashore
and I retreated behind the Rhine (the river conveys no advantages that I can see). Dennis stormed the
Rhine and I retreated to Berlin. Dennis stormed Berlin.
We played it twice and the same thing happened again. However, by this fourth playing of ground
forces, we were fairly confident we understood the ground-air combat system as well as the build system.
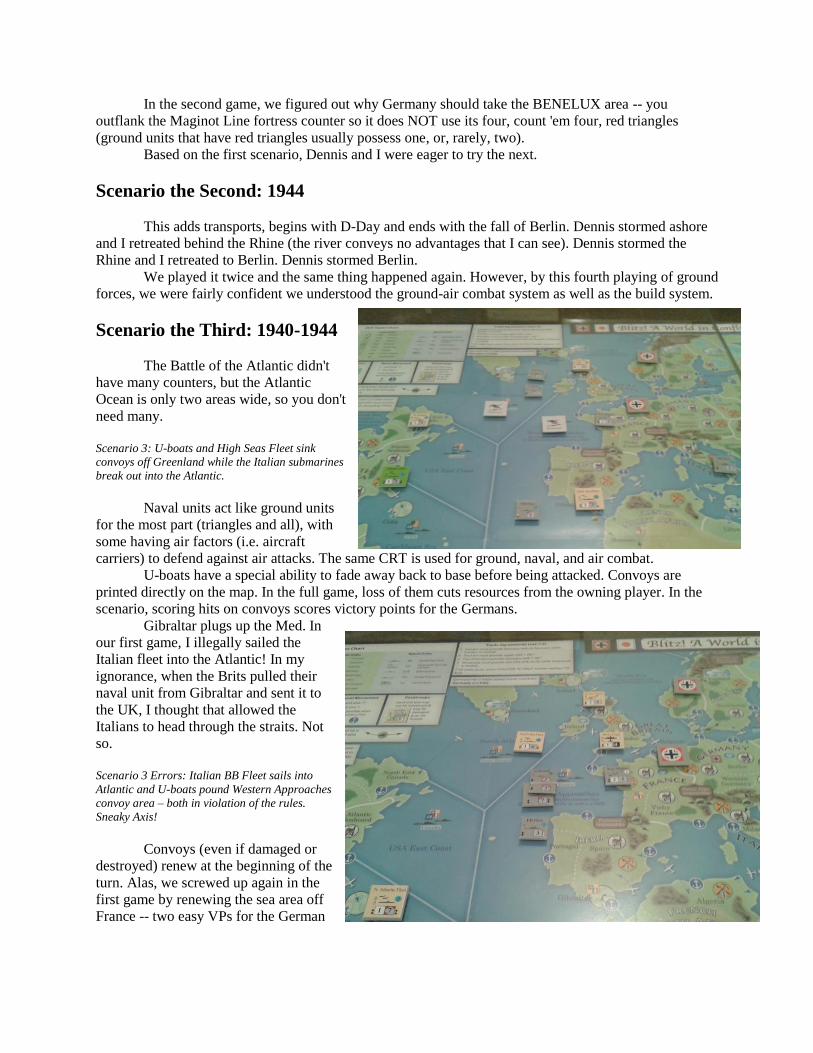
Scenario the Third: 1940-1944
The Battle of the Atlantic didn't
have many counters, but the Atlantic
Ocean is only two areas wide, so you don't
need many.
Scenario 3: U-boats and High Seas Fleet sink
convoys off Greenland while the Italian submarines
break out into the Atlantic.
Naval units act like ground units
for the most part (triangles and all), with
some having air factors (i.e. aircraft
carriers) to defend against air attacks. The same CRT is used for ground, naval, and air combat.
U-boats have a special ability to fade away back to base before being attacked. Convoys are
printed directly on the map. In the full game, loss of them cuts resources from the owning player. In the
scenario, scoring hits on convoys scores victory points for the Germans.
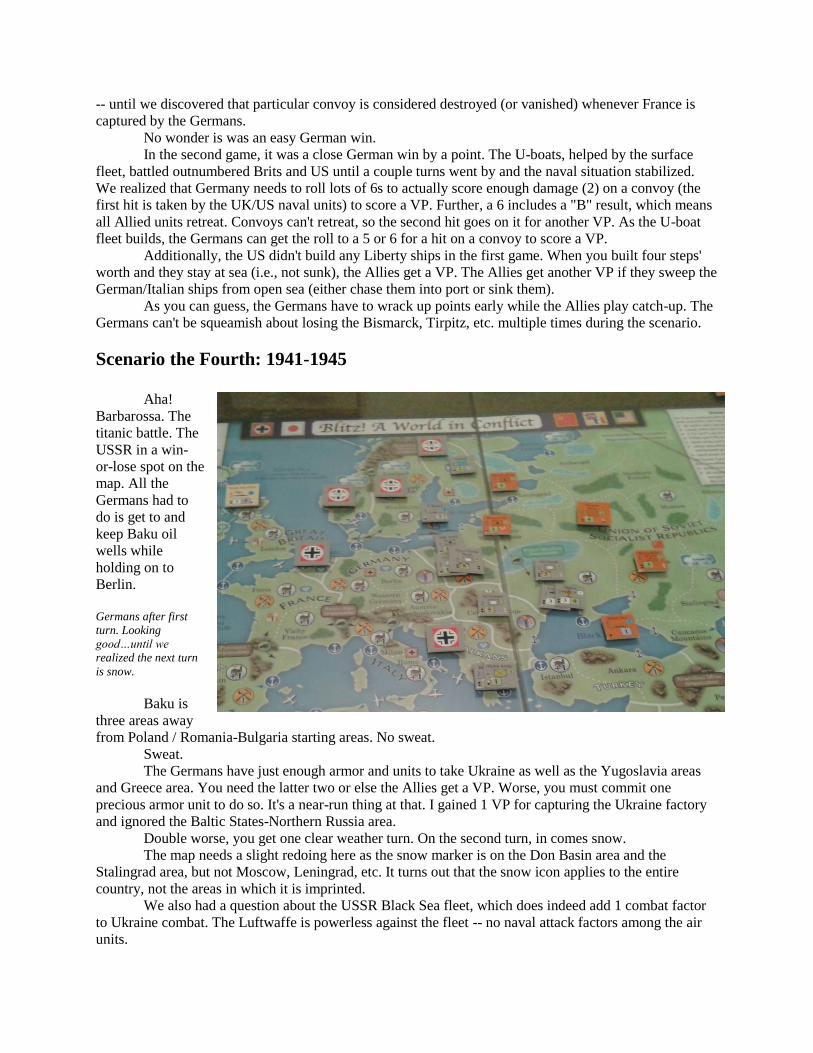
Gibraltar plugs up the Med. In
our first game, I illegally sailed the
Italian fleet into the Atlantic! In my
ignorance, when the Brits pulled their
naval unit from Gibraltar and sent it to
the UK, I thought that allowed the
Italians to head through the straits. Not
so.
Scenario 3 Errors: Italian BB Fleet sails into
Atlantic and U-boats pound Western Approaches
convoy area – both in violation of the rules.
Sneaky Axis!
Convoys (even if damaged or
destroyed) renew at the beginning of the
turn. Alas, we screwed up again in the
first game by renewing the sea area off
France -- two easy VPs for the German
-- until we discovered that particular convoy is considered destroyed (or vanished) whenever France is
captured by the Germans.
No wonder is was an easy German win.
In the second game, it was a close German win by a point. The U-boats, helped by the surface
fleet, battled outnumbered Brits and US until a couple turns went by and the naval situation stabilized.
We realized that Germany needs to roll lots of 6s to actually score enough damage (2) on a convoy (the
first hit is taken by the UK/US naval units) to score a VP. Further, a 6 includes a "B" result, which means
all Allied units retreat. Convoys can't retreat, so the second hit goes on it for another VP. As the U-boat
fleet builds, the Germans can get the roll to a 5 or 6 for a hit on a convoy to score a VP.
Additionally, the US didn't build any Liberty ships in the first game. When you built four steps'
worth and they stay at sea (i.e., not sunk), the Allies get a VP. The Allies get another VP if they sweep the
German/Italian ships from open sea (either chase them into port or sink them).
As you can guess, the Germans have to wrack up points early while the Allies play catch-up. The
Germans can't be squeamish about losing the Bismarck, Tirpitz, etc. multiple times during the scenario.
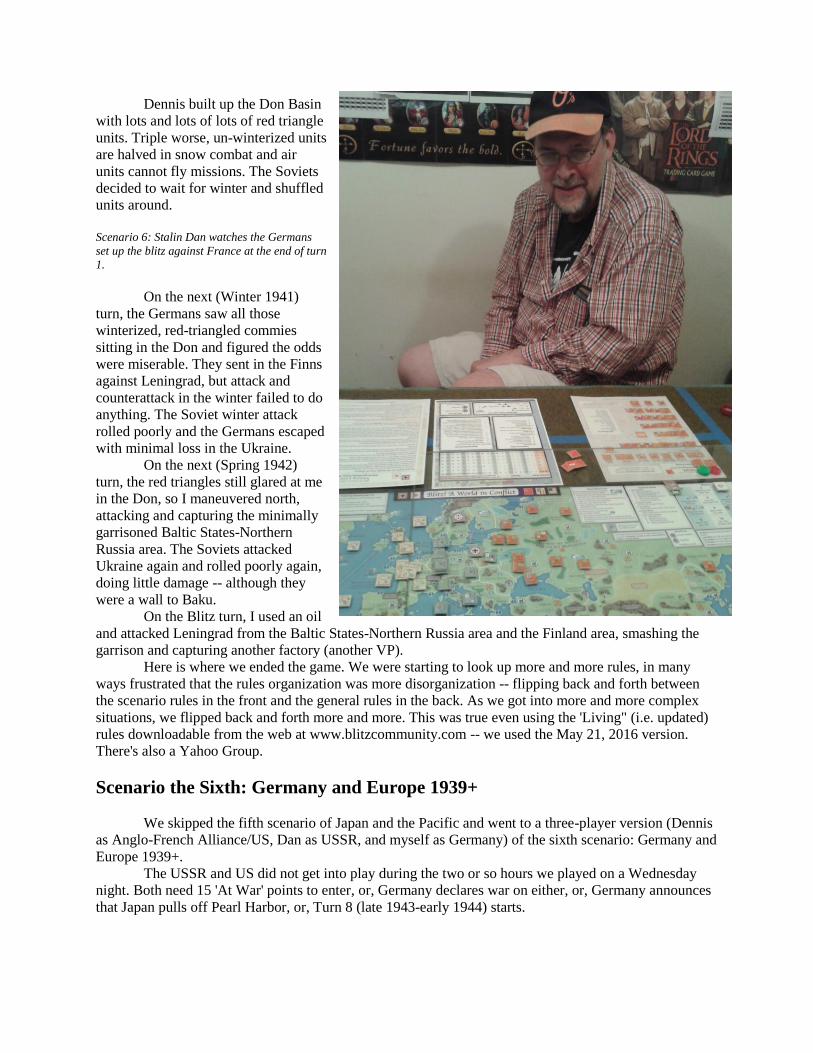
Scenario the Fourth: 1941-1945
Aha!
Barbarossa. The
titanic battle. The
USSR in a win-
or-lose spot on the
map. All the
Germans had to
do is get to and
keep Baku oil
wells while
holding on to
Berlin.
Germans after first
turn. Looking
good…until we
realized the next turn
is snow.
Baku is
three areas away
from Poland / Romania-Bulgaria starting areas. No sweat.
Sweat.
The Germans have just enough armor and units to take Ukraine as well as the Yugoslavia areas
and Greece area. You need the latter two or else the Allies get a VP. Worse, you must commit one
precious armor unit to do so. It's a near-run thing at that. I gained 1 VP for capturing the Ukraine factory
and ignored the Baltic States-Northern Russia area.
Double worse, you get one clear weather turn. On the second turn, in comes snow.
The map needs a slight redoing here as the snow marker is on the Don Basin area and the
Stalingrad area, but not Moscow, Leningrad, etc. It turns out that the snow icon applies to the entire
country, not the areas in which it is imprinted.
We also had a question about the USSR Black Sea fleet, which does indeed add 1 combat factor
to Ukraine combat. The Luftwaffe is powerless against the fleet -- no naval attack factors among the air
units.
Dennis built up the Don Basin
with lots and lots of lots of red triangle
units. Triple worse, un-winterized units
are halved in snow combat and air
units cannot fly missions. The Soviets
decided to wait for winter and shuffled
units around.
Scenario 6: Stalin Dan watches the Germans
set up the blitz against France at the end of turn
1.
On the next (Winter 1941)
turn, the Germans saw all those
winterized, red-triangled commies
sitting in the Don and figured the odds
were miserable. They sent in the Finns
against Leningrad, but attack and
counterattack in the winter failed to do
anything. The Soviet winter attack
rolled poorly and the Germans escaped
with minimal loss in the Ukraine.
On the next (Spring 1942)
turn, the red triangles still glared at me
in the Don, so I maneuvered north,
attacking and capturing the minimally
garrisoned Baltic States-Northern
Russia area. The Soviets attacked
Ukraine again and rolled poorly again,
doing little damage -- although they
were a wall to Baku.
On the Blitz turn, I used an oil
and attacked Leningrad from the Baltic States-Northern Russia area and the Finland area, smashing the
garrison and capturing another factory (another VP).
Here is where we ended the game. We were starting to look up more and more rules, in many
ways frustrated that the rules organization was more disorganization -- flipping back and forth between
the scenario rules in the front and the general rules in the back. As we got into more and more complex
situations, we flipped back and forth more and more. This was true even using the 'Living" (i.e. updated)
rules downloadable from the web at www.blitzcommunity.com -- we used the May 21, 2016 version.
There's also a Yahoo Group.
Scenario the Sixth: Germany and Europe 1939+
We skipped the fifth scenario of Japan and the Pacific and went to a three-player version (Dennis
as Anglo-French Alliance/US, Dan as USSR, and myself as Germany) of the sixth scenario: Germany and
Europe 1939+.
The USSR and US did not get into play during the two or so hours we played on a Wednesday
night. Both need 15 'At War' points to enter, or, Germany declares war on either, or, Germany announces
that Japan pulls off Pearl Harbor, or, Turn 8 (late 1943-early 1944) starts.
Germany did its usual attack of Poland on the regular phase of Turn 1, then redeployed on the
Blitz phase. Naval skirmishing yielded nothing much in terms of hits. The AFA sent UK units to Paris.
Germany and AFA built like crazy.
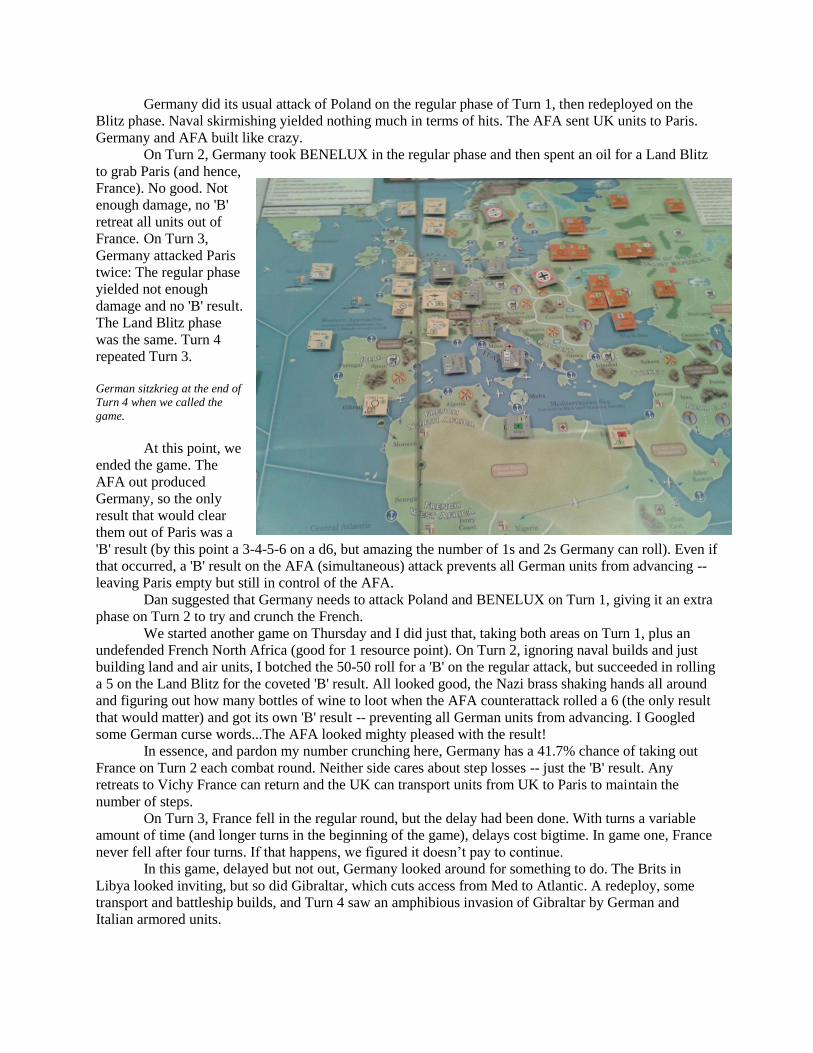
On Turn 2, Germany took BENELUX in the regular phase and then spent an oil for a Land Blitz
to grab Paris (and hence,
France). No good. Not
enough damage, no 'B'
retreat all units out of
France. On Turn 3,
Germany attacked Paris
twice: The regular phase
yielded not enough
damage and no 'B' result.
The Land Blitz phase
was the same. Turn 4
repeated Turn 3.
German sitzkrieg at the end of
Turn 4 when we called the
game.
At this point, we
ended the game. The
AFA out produced
Germany, so the only
result that would clear
them out of Paris was a
'B' result (by this point a 3-4-5-6 on a d6, but amazing the number of 1s and 2s Germany can roll). Even if
that occurred, a 'B' result on the AFA (simultaneous) attack prevents all German units from advancing --
leaving Paris empty but still in control of the AFA.
Dan suggested that Germany needs to attack Poland and BENELUX on Turn 1, giving it an extra
phase on Turn 2 to try and crunch the French.
We started another game on Thursday and I did just that, taking both areas on Turn 1, plus an
undefended French North Africa (good for 1 resource point). On Turn 2, ignoring naval builds and just
building land and air units, I botched the 50-50 roll for a 'B' on the regular attack, but succeeded in rolling
a 5 on the Land Blitz for the coveted 'B' result. All looked good, the Nazi brass shaking hands all around
and figuring out how many bottles of wine to loot when the AFA counterattack rolled a 6 (the only result
that would matter) and got its own 'B' result -- preventing all German units from advancing. I Googled
some German curse words...The AFA looked mighty pleased with the result!
In essence, and pardon my number crunching here, Germany has a 41.7% chance of taking out
France on Turn 2 each combat round. Neither side cares about step losses -- just the 'B' result. Any
retreats to Vichy France can return and the UK can transport units from UK to Paris to maintain the
number of steps.
On Turn 3, France fell in the regular round, but the delay had been done. With turns a variable
amount of time (and longer turns in the beginning of the game), delays cost bigtime. In game one, France
never fell after four turns. If that happens, we figured it doesn’t pay to continue.
In this game, delayed but not out, Germany looked around for something to do. The Brits in
Libya looked inviting, but so did Gibraltar, which cuts access from Med to Atlantic. A redeploy, some
transport and battleship builds, and Turn 4 saw an amphibious invasion of Gibraltar by German and
Italian armored units.
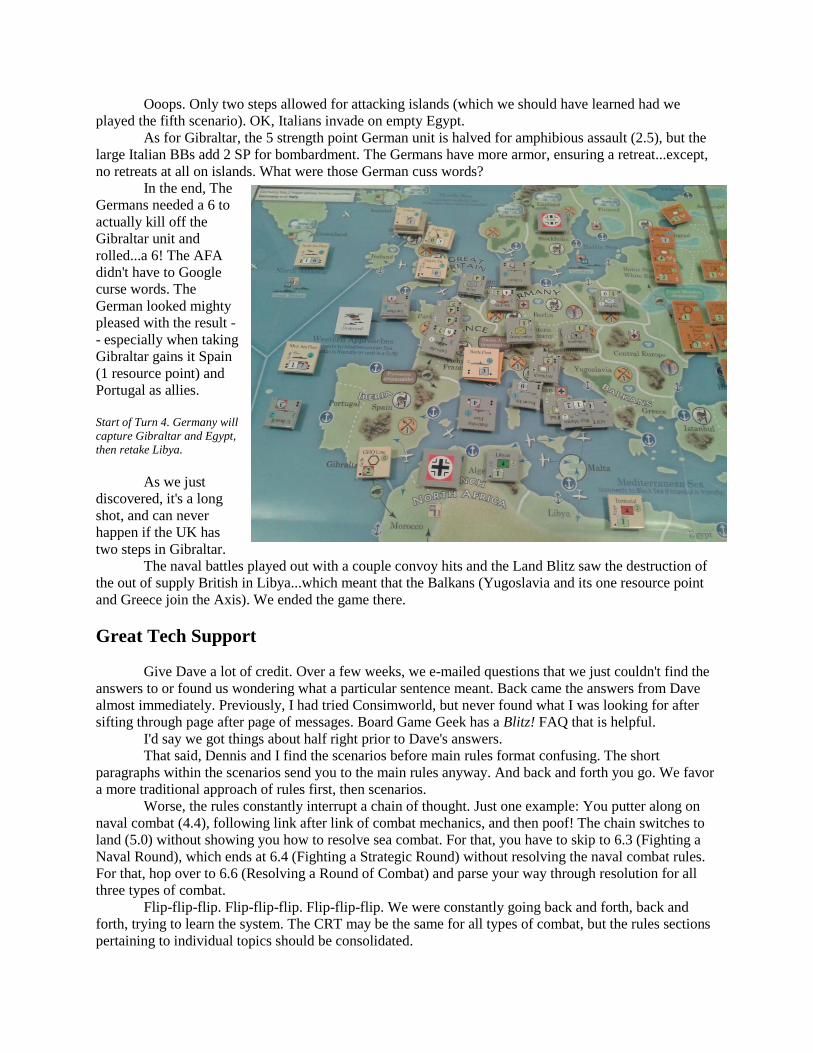
Ooops. Only two steps allowed for attacking islands (which we should have learned had we
played the fifth scenario). OK, Italians invade on empty Egypt.
As for Gibraltar, the 5 strength point German unit is halved for amphibious assault (2.5), but the
large Italian BBs add 2 SP for bombardment. The Germans have more armor, ensuring a retreat...except,
no retreats at all on islands. What were those German cuss words?
In the end, The
Germans needed a 6 to
actually kill off the
Gibraltar unit and
rolled...a 6! The AFA
didn't have to Google
curse words. The
German looked mighty
pleased with the result -
- especially when taking
Gibraltar gains it Spain
(1 resource point) and
Portugal as allies.
Start of Turn 4. Germany will
capture Gibraltar and Egypt,
then retake Libya.
As we just
discovered, it's a long
shot, and can never
happen if the UK has
two steps in Gibraltar.
The naval battles played out with a couple convoy hits and the Land Blitz saw the destruction of
the out of supply British in Libya...which meant that the Balkans (Yugoslavia and its one resource point
and Greece join the Axis). We ended the game there.
Great Tech Support
Give Dave a lot of credit. Over a few weeks, we e-mailed questions that we just couldn't find the
answers to or found us wondering what a particular sentence meant. Back came the answers from Dave
almost immediately. Previously, I had tried Consimworld, but never found what I was looking for after
sifting through page after page of messages. Board Game Geek has a Blitz! FAQ that is helpful.
I'd say we got things about half right prior to Dave's answers.
That said, Dennis and I find the scenarios before main rules format confusing. The short
paragraphs within the scenarios send you to the main rules anyway. And back and forth you go. We favor
a more traditional approach of rules first, then scenarios.
Worse, the rules constantly interrupt a chain of thought. Just one example: You putter along on
naval combat (4.4), following link after link of combat mechanics, and then poof! The chain switches to
land (5.0) without showing you how to resolve sea combat. For that, you have to skip to 6.3 (Fighting a
Naval Round), which ends at 6.4 (Fighting a Strategic Round) without resolving the naval combat rules.
For that, hop over to 6.6 (Resolving a Round of Combat) and parse your way through resolution for all
three types of combat.
Flip-flip-flip. Flip-flip-flip. Flip-flip-flip. We were constantly going back and forth, back and
forth, trying to learn the system. The CRT may be the same for all types of combat, but the rules sections
pertaining to individual topics should be consolidated.
It's frustrating at times because Blitz! has many clever mechanisms that need extra care to explain
-- organized to someone's way of thinking, perhaps, but not ours. Our only defense: we can't be the only
two knuckleheads who don't like flip-flip-flipping about.
Yes, I know rules are hard to write and don't survive contact with customers, but this game has
great ideas embedded within. That's why we nitpick so much.
Did we eventually find rules? We think so. Or close enough that we agreed on something so we
wouldn't be forced to dive back into the flippin' rules.
Did Dave give great customer support? Absolutely!
Snipe and Tripe
The German ME-109 counter (Luftflotte) has a twin-engine image (He-111H). Yes, I know the
counter represents many formations with a multitude of aircraft types, but it says ME-109.
[Designer's Comment: The Japanese Zeroes' image isn't a Zero, and the USA's Mustang unit icon isn't a
Mustang either. The wonderful artwork that the Australian Design Group allowed me to use for Blitz had
certain orientation to the aircraft based on its usage in World in Flames. For these units, the correct
silhouette had the wrong orientation for use in Blitz, so I substituted another silhouette with the proper
orientation.—DL]
Air movement from one land area to another is 1 movement point. Air movement into a sea area
is 2 MP. However, the map contains numerous 1 MP air-bridge paths: for example, from London,
England to Paris, France. Air-bridges are one of those compromises, but we chuckled that 1-movement
point aircraft counters can fly missions between England and France, but not in the English Channel
(admittedly, the sea area -- 2 MPs -- stretches from Lorient/Brest, France to Narvik, Norway).
The four-engine bombers of the UK Bomber Command counter can't bomb Berlin from England.
The four-engine bombers of the US Flying Fortress counter can.
Why can strategic aircraft counters bomb fleets (at half strength) but tactical aircraft counters
cannot attack fleets at all?
[Designer's Comment: They can, also at half strength, but few of them have the necessary range of 2 to
cover an entire sea area.]
With the patchwork format of rules, this needs an Index.
Global Praise
We liked the game. Through five scenarios we liked the game. That says a lot about the design.
We thought the various mechanics clever and worked well once we understood how they fit together.
Therein lies the rub. We made it through the first four scenarios, each one increasing in
complexity. If Barbarossa had been the end of the rules we needed to learn, we'd hop up and down with
fist pumps with global praise of Blitz!.
Alas, we looked over scenario 5 covering the Pacific and balked. We extrapolated that the
increased rules complexity would generate too much rules fatigue.
Still, the game had such pull that we started a three-player scenario 6 and just steeled ourselves.
Not too bad, but more Q&A (answered quickly by Dave -- just want to praise his customer support again)
helped. So, it's not quite hopping up and down with fist pumps as much as lurching around a bit with a
nodding head and a fist pump.
We agreed that Blitz! does NOT need new rules, because it really does hang together quite well,
but it DOES need a rules re-organization. For example, if I look up the sea combat section, I want to read
about sea combat from beginning to end without interruption. Ditto for the examples. Also, we suggest
putting the scenarios in the back of the book (or in a separate book as many companies do).
It also really needs an index for us folks whose brain-RAM seems to get smaller with each
passing year.
Obviously, rules never survive contact with gamers. Some rules clarifications will always need to
be included in any game. Alas, Blitz!'s haphazard organization needs help, but it's a deucedly clever
design. It's interesting enough to buy, fascinating enough to hold your attention, and clever enough to
make you think about strategic directions and alternatives. Rearrange the rules into a version 2.0 and
Blitz! will be a classic.
QUESTIONS AND ANSWERS
Dave’s Designer Response to this review is after this Q&A section.
Dennis and I worked out most rules conundrums over the few weeks we played Blitz! Alas, we
sent the following questions to Dave, who responded almost immediately.
Here's the condensed Q&A...
Q: Air Combat -- The Italian air unit attacks the British Med Fleet (which has an air combat value) and
both score 1 hit during the air combat phase. The Italian air unit takes one hit and flips over. Does the
Med Fleet also take a hit from the air combat? In a more general sense, do ships with air factors take hits
from air to air combat?
A: Yes, a CV Fleet that participates in an Air Round takes damage on itself. So the Med Fleet CV would
be reduced in Size by taking a point of damage. Note that at times a damaged CV Fleet may cease to be a
CV Fleet -- it may become only a BB Fleet -- in which case you may be supposed to have knocked the
CVs out of commission.
Q: What is the purpose of the Large Oil Counters for the Germans and Russians in this scenario?
A: For the scenario, on the set-up charts, these tell you have many saved Oil that major power has.
Germany and USSR with 1 each and the Western Allies none.
Q: Do the Pripet marshes count for defense in Ukraine or white Russia?
A: No. The Pripet Marshes are an impassable area on the map. You cannot put units there or fight there.
You can use the Land Route that passed through the marshes in order to move land (or air) units to &
from White Russia-Baltic States to the Ukraine.
Q: In a land combat with air support, if you receive a letter result, can you use the air units giving support
to meet the retreat/no advance CRT result? Same question for a sea battle?
A: The type of Round you are resolving determines everything. Air Round = only air units (and CVs or
Paratroop, if flying) can be affected, Naval Round = only naval units can be affected, and Land Round =
only land units can be affected. Other types of units may contribute Factors, e.g. an air unit with Land
Factors during a Land Round. But assigning damage must follow the above.
Q: In a Land Blitz (1 oil) do other units (i.e. air or naval) contribute their land bombardment factors to a
defender or attacker?
A: Yes they may. Air and naval units have movement restrictions (no moves to sea area, no rebasing, etc.)
during a Land Blitz. But if they are already "in position," then yes, they contribute Land Factors (and
participate in an Air Round beforehand if called for).
Q: The rules example seems to imply that an air unit with 2 movement points can attack Berlin from
Ukraine. Is this true?
A: If a land area combat is happening within 2 air movement, then an air unit with 2 movement points can
join that battle. Yes, an air unit in Berlin with range 2 could reach the Ukraine and thus join a land area
combat occurring there. This is true even if the land area combat is a Ground Attack occurring during a
Land Blitz.
Q: Can the US 8th AF and/or Bomber Command counters based in London conduct an Air Attack against
the Factory in Berlin? The counters have 2 movement points. The, um, air bridge allows for 1 MP from
London to Paris (or BENELUX) area and the second MP gets to Western Germany, one short of the
Berlin area.
A: You are essentially correct. The USA Flying Fortresses do have range 3, allowing them to visit Berlin,
if they dare!
Q: Is there a map typo? The following land areas have no snow icons: Smolensk, Moscow, Leningrad,
Northern Forests, Archangel, Ukraine...while the Don Basin and Stalingrad do. Shouldn’t all these areas
be under the snow icon during the winter turn?
A: Weather icons apply to the entire country. Please see the explanation on the map: "On Turns marked
with Snow, in sea areas and countries with the Snow marker..." and again "On Snow Turns in countries
with the Snowflake marker..."
Q: If the USA (not at war with Germany) has the Atlantic fleet in a sea zone and the German Subs attack
the convoy in that zone, does the American Fleet defend?
A: This is not a possible situation. If Japan declares war on the USA, the USA also immediately goes to
war on Germany and vice versa, first of all. While neutral, a major power may only move TRS and LL
units. So a neutral-with-Germany USA Atlantic Fleet would be in port and unable to move to a sea area.
Q. Argentina: An Axis power controls French West Africa which is 3 sea zones away. How do you
calculate "four or fewer aircraft moves?"
A: An "aircraft move" is how many moves it would take an air unit would get from point A to point B.
Keep in mind that it costs 2 for an air unit to move to a sea area, but 1 for an air unit to move to a land
area. Therefore, the most efficient air unit move from French West Africa to Argentina would take 6:
Central Atlantic (2) - Para (+1=3) - Sao Paulo (+1=4) - Paraguay-Uruguay (+1=5) - Argentina (+1=6).
For the Axis to ally with Paraguay-Uruguay or Argentina, they will need to take control of a land area in
the Americas itself. Trinidad is a fine example, which our German player did in his last game. He goofed,
though, by taking control of Trinidad initially with an allied (Italian) unit. It can't be a unit of an allied
country; it has to be German. He was able to sneak a German TRS with his German MAR into Trinidad
later, which allied Paraguay-Uruguay. Then he got a German ARM into Paraguay-Uruguay, and thus
aligned Argentina. All of which is quite rare, but also quite fun ;-). The battle for Brazil that followed was
legendary.
This occurred in an experimental 3-sided game, with the USSR being neither on the Allies nor on
the Axis. The Axis and Allies fought it out while Stalin bided his time ... and then pounced and grabbed
for Victory Points while the other major powers were locked into death matches with each other.
Q: Does the AFA get the Polish resource if still available at the end of Turn 1?
A: Yes, but they probably can't trace a supply line to it (possible, but unlikely). If they can't, it can only be
used to build/repair the Polish army.
Q: So, do you have to move the resources/oil from Canada, Fr. N Africa, S. Africa and Trinidad to the
UK or France?
A: There is no physical moving of Resources from overseas to your home country. That's not needed. All
you need to be able to do is trace a supply line from Great Britain to the Resource/Oil in order to use it.
Simple, right? That's the hope anyways. This is intended to be a game that is simple on the logistics end
of war. However, the AFA's overall production will also be lowered by any strategic warfare losses (by
enemy Factory Attacks, or successfully damaging the AFA Convoys).
Q: How many resources do the UK and France start with? From rules: "Until Japan goes to war with AFA
and USA, the AFA gets 2 resources and 1 oil from out of play areas in the Pacific." So the AFA has
6R/1O + 2R/1O for a total of 8 Resources and 2 Oil until Japan and USA go to war?
A: Yes, the AFA should have 6R/1O + 2R/1O on Turn 1 and until something changes (Japan joins the
war, France conquered, etc.).
Q: For Scenario F, do the AFA resources in Canada, India, and the out of play areas etc, need to be
transported to the UK or France or are they just made available?
A: These out-of-play areas are not in the scenario and you can't use those Resources / Oil. So no India, no
Australia, and no Western Canada for the AFA's production. These are considered devoted to the Pacific
theater (and in fact are available for the fifth scenario).
Q: When Allies roll Partisans, does the presence of German units negate placement of Partisans, or does
the Partisan unit automatically decrease resources by 1 no matter how many German units are in an area?
A: The presence of conquerors (German or otherwise; many or few) in the target area has no bearing. The
Partisan still shows up and does it work successfully.
Q: If the US is neutral, can it take a Free Blitz to move 4 steps worth of Lend Lease?
A: Yes. See 2.2; there are no special restrictions on Blitz choice for neutral powers. However the usual
neutral power movement restrictions apply of course.
Q: If the US is neutral, what can it transport on transports if non-LL, non-TRS US units are unable to
move?
A: GARs can move outside of your home country for neutral major powers. See 5.1 last paragraph, and
5.2, second to last.
Q: The BEF was in Vichy France when Paris (and thus France) fell. Does the BEF get 'teleported' to any
friendly area or to the home UK areas?
A: To Great Britain, immediately and without need of transportation. See 3.4, 4th bullet under special
French surrender rules: "Any on-map unit located in a country that is now neutral is immediately placed
in any land area (owner’s choice) in that unit’s home country."
Q: If so, does this 'teleportation' require a transport or even a naval unit or a contested sea area? (At the
time, the Med was an Italian lake with no UK naval units in Med or at any port adjacent to Med [i.e. no
naval in Gibraltar]
A: No.
Q: In attacking Gibraltar (island), is the most an attacker with TRS can bring to bear is 2 steps worth of
units?
A: Maximum Size for island-attacking land units is 2 steps. Support units (air, CV, BB) have no limit in
Size, but of course may only at most double your land units' Land Factors.
Q: Amphibious assaults are halved, so the two-step, 5 strength point unit that attacks Gibraltar is now 2.5
strength points (rounds to 3). How much naval bombardment/air attack points can you add: 2, 3, or 5?
A: Your support can double the modified (but not-yet-rounded) Land Factors. If the invading unit is 2.5,
you can add 2.5, for a total of 5.
Q: If a neutral country joins Germany (i.e. take Gibraltar and get Iberia [Spain and Portugal], or, no AFA
areas border Med and get Balkans [Yugoslavia and Greece]), do the Germans receive the resources? Do
the Germans receive a Victory Point for a factory?
A: Yes to the Resources. No VP award for the Factory however.
FURTHER RESOURCES
www.blitzcommunity.com
[email protected] (Dave LeLacheur) Board Game Geek has a number of files (some
duplicated from the blitz community website)
Consimworld has a Blitz! thread
DAVE LeLACHEUR DESIGNER RESPONSE
Thanks for the opportunity to respond guys (including Designer Comments in the above review).
I appreciate your tenacity to stick with learning the game. It was my design goal to make a global
World War II game that was realistic, intuitive, tense, and that emphasized the big decisions while still
honoring the operational and tactical strengths of the combatants ... and it had to be playable in under 10
hours for the complete war.
Not too much to ask, right? My goal was to make for a gaming experience that emphasized fun
decision-making and tried to eliminate nearly all of the "doing work" logistical elements.
In my zeal to simplify the game's rules, the rules ended up losing clarity and organization, which
is my biggest regret.
However, I do feel that primary goals were met: the game moves at a lightning pace, with every
player making critical decisions pretty much every turn. These decisions have both short- and long-term
consequences. And yet the Victory Point system that determines victory is flexible enough to allow
everyone to recover from the occasional bad outcome, keep fighting, and hope to drive your major
power(s) to a glorious victory in the end.
I'm very proud about the VP system. I'm also very pleased that the game has created a sense of
excitement among your group, and hopefully will for others as well. The BoardGameGeek ratings have
been very strong -- at 8.0, it's the highest rated global land area-based WWII game that I have found --
which is very rewarding.
As a player, I find Blitz! A World in Conflict to be is an immensely re-playable game. I still play it
nearly constantly, and am always learning new and clever ideas (alas, usually from my opponents).
As a practical matter, the game works great to play with my gaming friends who live far away,
using skype and the free VASSAL module. (There's nothing quite like beating up old friends at a new
game.)
As a designer, Blitz! still tempts me with many possibilities as yet untapped, and I'm hoarding
many exciting ideas I've come upon since publication. I'll also keep my fingers crossed for the chance to
publish a follow-up edition of Blitz!, which would also give me the chance to re-organize the rules into
more helpful format, as well as unleash those other new ideas and units that will make the game even
better.
To that end, I encourage and welcome all player questions, feedback, and etc. at the contact e-
mail noted above. I really believe in this game, and want to make sure that all players who take a crack at
it are fully supported.