Embed Size (px)
Citation preview

ClearPass Certificates 101 Tech Note: All you wanted to know about CPPM Certificates – V1 Copyright Copyright © 2013 Aruba Networks, Inc.
Aruba Networks trademarks include AirWave, Aruba Networks®, Aruba Wireless Networks®, the registered Aruba the Mobile Edge Company logo, Aruba Mobility Management System®, Mobile Edge Architecture®, People Move. Networks Must Follow®, RFProtect®, Green Island®. All rights reserved. All other trademarks are the property of their respective owners.
Open Source Code Certain Aruba products include Open Source software code developed by third parties, including software code subject to the GNU General Public License (GPL), GNU Lesser General Public License (LGPL), or other Open Source Licenses. The Open Source code used can be found at this site:
http://www.arubanetworks.com/open_source
Date Modified By Comments
December 2013 Danny Jump Initial version published.

ClearPass Version 6.x Tech Note: ClearPass Certificates 101 – V1
Aruba Networks 2
Table of Contents Overview ...................................................................................................................................................................... 6
Scope ......................................................................................................................................................................... 6
Document / LAB Consideration .................................................................................................................... 6
About Certificates – 1 Page Summary ............................................................................................................. 7
CA – Certificate Authority ........................................................................................................................... 7
Subordinate/Intermediate CA .................................................................................................................. 7
PKI – Public Key Infrastructure ................................................................................................................ 7
CSR – Certificate Signing Request ............................................................................................................ 7
Public Certificate ............................................................................................................................................. 7
Private Certificate (self-‐signed certificate) ......................................................................................... 7
SAN – Subject Alternate Name .................................................................................................................. 8
CN – Common Name ...................................................................................................................................... 8
SSL – Secure Sockets Layer ........................................................................................................................ 8
Client Authentication of a Sever certificate ................................................................................................... 9
PKI and how it relates to CPPM/Onboard .................................................................................................. 11
CPPM Certificates…. Do we have to start here? ........................................................................................ 13
Self-‐Signed Server Certificate ................................................................................................................. 13
Single CPPM Deployment ................................................................................................................................... 25
Under CPPM 6.2.0 ............................................................................................................................................. 25
Considerations .............................................................................................................................................. 25
Clustered CPPM Deployment -‐ Single Cert ................................................................................................. 26
Adding a VIP to the Configuration ............................................................................................................. 27
WARNING on the use of WILDCARD certificates ................................................................................ 29
What is a wildcard certificate? ............................................................................................................... 29
ClearPass Version 6.x Tech Note: ClearPass Certificates 101 – V1
Aruba Networks 3
Advantage ....................................................................................................................................................... 30
Dis-‐advantage ................................................................................................................................................ 30
CPPM 6.3.0 ................................................................................................................................................................ 31
CPPM 6.3.0 Enhancements for CSR and self-‐signed certificate creation ............................. 32
Other Certificate Bits… ........................................................................................................................................ 34
Converting Certificates between different Formats ..................................................................... 34
Extended Key Usage ........................................................................................................................................ 35
Appendix A -‐ Moving certs from Amigopod to CPPM ............................................................................ 36
Appendix B ............................................................................................................................................................... 37
PKI 50,000ft Overview of why we need PKI? ....................................................................................... 37
Private and Public Keys ................................................................................................................................. 37
Why Do Public Keys need PKI? ................................................................................................................... 38
An Example PKI ............................................................................................................................................ 40
Certificate Life Cycle ................................................................................................................................... 41
What is a Digital Certificate? ................................................................................................................... 42
What are Digital Certificates used for? ............................................................................................... 42
Certificate Purposes ................................................................................................................................... 43
Why do I need a Digital Certificate? ..................................................................................................... 43
What is authentication? ............................................................................................................................ 43
What is a digital signature? ..................................................................................................................... 44
How is a digital signature used for authentication? ..................................................................... 44
APPENDIX – C ......................................................................................................................................................... 45
How a Client validates a Server – more detail .......................................................................................... 45
How a Server validates a Client – more detail .......................................................................................... 46
ClearPass Version 6.x Tech Note: ClearPass Certificates 101 – V1
Aruba Networks 4
Table of Figures
Figure 1 -‐ HIGH Level Topology Overview for this TechNote ............................................................... 6
Figure 2 – Client authentication of Server certificate ............................................................................... 9
Figure 3 -‐ Browser validation error .............................................................................................................. 14
Figure 4 -‐ CPPM configured with a simple hostname ............................................................................ 16
Figure 5 – Self signed Server certificate derived from a simple hostname .................................. 16
Figure 6 – CPPM host renamed but not the self-‐signed certificate .................................................. 17
Figure 7 -‐ Create CSR ........................................................................................................................................... 17
Figure 8 -‐ Creating a new self-‐signed certificate ..................................................................................... 17
Figure 9 -‐ Importing new self-‐signed created certificate ..................................................................... 18
Figure 10 -‐ Viewing the new import self-‐signed certificate ................................................................ 18
Figure 11 -‐ Browser warning re self-‐signed certificate ........................................................................ 20
Figure 12 -‐ Creating a CSR ................................................................................................................................. 21
Figure 13 -‐ CSR Request output (CSR + Private Key File) .................................................................... 22
Figure 14 -‐ Binding cert's, keys, password into a PFX file ................................................................... 23
Figure 15 -‐ Using openssl to extract certificate and private key from PFX file .......................... 23
Figure 16 -‐ Importing certificate and private key into CPPM ............................................................ 24
Figure 17 -‐ Error showing missing CA from Trust list .......................................................................... 24
Figure 18 -‐ CPPM server certificate and trust-‐chain .............................................................................. 24
Figure 19 -‐ CPPM Single Box Deployment .................................................................................................. 25
Figure 20 -‐ CPPM Clustered Deployment .................................................................................................... 27
Figure 21 -‐ CPPM Clustered Deployment plus VIP ................................................................................. 28
Figure 22 -‐ Wildcard certs explanation ....................................................................................................... 29
Figure 23 -‐ CPPM 6.3.0 with dual-‐server certificates – Admin Service ......................................... 31

ClearPass Version 6.x Tech Note: ClearPass Certificates 101 – V1
Aruba Networks 5
Figure 24 -‐ CPPM 6.3.0 with dual-‐server certificates -‐ Backend Services .................................... 31
Figure 25 -‐ Additional Private Key Algorithms added in CPPM 6.3 ................................................ 32
Figure 26 – Additional Message Digest Algorithm added in CPPM 6.3 .......................................... 32
Figure 27 -‐ CPPM 6.3.x Dual Cert Scenario ................................................................................................. 33
Figure 28 -‐ End-‐to-‐End CA/cert chain .......................................................................................................... 39
Figure 29 -‐ CA/PKI complex structure..... .................................................................................................... 40

ClearPass Version 6.x Tech Note: ClearPass Certificates 101 – V1
Aruba Networks 6
Overview Scope
The following guide has been produced to help educate our customers and partners in the use of PKI and Certificates within ClearPass. This version of the guide was written to accompany the CPPM 6.2 and 6.3 releases. This guide will be updated and republished to reflect new and improved functionality we deliver in subsequent software releases. Please check back regularly for updates.
Document / LAB Consideration
In this document we are going to make the assumption that where there is a PUBLIC it will connect (map) to the DATA port on CPPM. The PRIVATE network will connect (map) to the MGMT port on CPPM.
The fully-‐qualified domain names (FQDN’s) used through this document are cppm-‐testing.com and danny-‐lab.com. The domain cppm-‐testing.com maps to the PUBLIC/DATA interface and the domain danny-‐lab.com maps to the PRIVATE/MGMT interface.
Figure 1 -‐ HIGH Level Topology Overview for this TechNote
Note: Where you see a red-‐chilli this is to signifies a ‘hot’ important point and highlights that this point is to be taken as a best-‐practice recommendation.

ClearPass Version 6.x Tech Note: ClearPass Certificates 101 – V1
Aruba Networks 7
About Certificates – 1 Page Summary We have provided a 1 and a bit page summary of the common terms/acronyms you will encounter in this document. Skip this section if you already know about certificates, PKI etc. If you require a deeper in depth read, please refer to Appendix B later in this document.
CA – Certificate Authority In cryptography, a certificate authority or certification authority (CA), is an entity that issues digital certificates. The digital certificate certifies the ownership of a public key by the named subject of the certificate. This allows others to rely upon signatures or assertions made by the private key that corresponds to the public key that is certified. There are two types of certificate authorities (CAs), root CAs and intermediate CAs.
Subordinate/Intermediate CA In a related but distinct usage of the phrase, "Intermediate CA" may refer to a certificate issuing organization that does not, or is unable to issue certificates directly from a Root CA that is owned by that organization (perhaps due to practical limitations, such as certificate ubiquity). Here the ambiguity comes from the use of the term "certificate authority", which can refer either to a certificate issuing organization or the certificates used by those organizations to issue end-‐user certificates.
PKI – Public Key Infrastructure A public-‐key infrastructure (PKI) is a set of hardware, software, people, policies, and procedures needed to create, manage, distribute, use, store, and revoke digital certificates.
CSR – Certificate Signing Request In public key infrastructure (PKI) systems, a certificate signing request (also CSR or certification request) is a message sent from an applicant to a certificate authority in order to apply for a digital identity certificate.
Public Certificate In cryptography, a public key certificate (also known as a digital certificate or identity certificate) is an electronic document that uses a digital signature to bind a public key with an identity — information such as the name of a person or an organization, their address, and so forth. The certificate can be used to verify that a public key belongs to an individual.
Private Certificate (self-‐signed certificate) In cryptography, a self-‐signed certificate is an identity certificate that is signed by the same identity whose identity it certifies. This term has nothing to do with the identity of the person or organization that actually performed the signing procedure. In technical terms a self-‐signed certificate is one signed with its own private key.
ClearPass Version 6.x Tech Note: ClearPass Certificates 101 – V1
Aruba Networks 8
SAN – Subject Alternate Name The subject alternative names (SubjectAltName) extension allows one SSL certificate to be used to secure one Web server with multiple names (such as a different DNS name, IP address or URI). Alternatively, the SubjectAltName extension can be used to secure up to two virtual Web servers using the same SSL certificate.
CN – Common Name The Common Name (CN) is the fully qualified domain name of the server that will receive the certificate. Do not include the protocol specifier (i.e., http:// or https://) or any port numbers or pathnames in the common name. Most Web browsers will display a warning message when connecting to your Web site if the Web server's fully qualified domain name does not match the common name in the certificate.
SSL – Secure Sockets Layer Secure Sockets Layer (SSL) technology is a security protocol that is today's de-‐facto standard for securing communications and transactions across the Internet. SSL has been implemented in all the major browsers and Web servers and as such, plays a major role in today's e-‐commerce and e-‐business activities on the Web. The SSL protocol uses digital certificates to create a secure, confidential communications "pipe" between two entities. Data transmitted over an SSL connection cannot be tampered with or forged without the two parties becoming immediately aware of the tampering. The newest version of the SSL standard has been renamed TLS (Transport Layer Security) but the term SSL is more commonly recognized and understood.

ClearPass Version 6.x Tech Note: ClearPass Certificates 101 – V1
Aruba Networks 9
Client Authentication of a Sever certificate SSL-‐enabled client software always requires server authentication, or cryptographic validation by a client of the server’s identity. The server sends the client a certificate to authenticate itself. The client uses the certificate to authenticate the identity the certificate claims to represent.
To authenticate the binding between a public key and the server identified by the certificate that contains the public key, an SSL-‐enabled client must receive a yes answer to the four questions shown in the following figure.
Figure 2 – Client authentication of Server certificate
An SSL-‐enabled client goes through the following steps to authenticate a server’s identity:
Step 1. Is today’s date within the validity period? The client checks the server certificate’s validity period. If the current date and time are outside of that range, the authentication process won’t go any further. If the current date and time are within the certificate’s validity period, the client goes on to the next step.

ClearPass Version 6.x Tech Note: ClearPass Certificates 101 – V1
Aruba Networks 10
Step 2. Is the issuing CA a trusted CA? Each SSL-‐enabled client maintains a list of trusted CA certificates, represented by the shaded area on the right—hand side of Figure 2 This list determines which server certificates the client accepts. If the distinguished name (DN) of the issuing CA matches the DN of a CA on the client’s list of trusted CAs, the answer to this question is yes, and the client goes on to the next step. If the issuing CA is not on the list, the server is not authenticated unless the client can verify a certificate chain ending in a CA that is on the list.
Step 3. Does the issuing CA’s public key validate the issuer’s digital signature? The client uses the public key from the CA’s certificate (which it found in its list of trusted CAs in step 2) to validate the CA’s digital signature on the server certificate being presented. If the information in the server certificate has changed since it was signed by the CA or if the CA certificate’s public key doesn’t correspond to the private key used by the CA to sign the server certificate, the client won’t authenticate the server’s identity. If the CA’s digital signature can be validated, the server treats the user’s certificate as a valid “letter of introduction” from that CA and proceeds. At this point, the client has determined that the server certificate is valid.
Step 4. Does the domain name in the server’s certificate (common-‐name or subject alternate name) match the domain name of the server itself? This step confirms that the server is actually located at the same network address specified by the domain name in the server certificate. Although step 4 is not technically part of the SSL protocol, it provides the only protection against a form of security attack known as man-‐in-‐the-‐middle. Clients must perform this step and must refuse to authenticate the server or establish a connection if the domain names don’t match. If the server’s actual domain name matches the domain name in the server certificate, the client goes on to the next step.
Step 5. The server is authenticated. The client proceeds with the SSL handshake. If the client doesn’t get to step 5 for any reason, the server identified by the certificate cannot be authenticated, and the user is warned of the problem and informed that an encrypted and authenticated connection cannot be established. If the server requires client authentication, the server performs the steps described in Client Authentication During SSL Handshake.
After the steps described here, the server must successfully use its private key to decrypt the pre-‐master secret sent by the client.

ClearPass Version 6.x Tech Note: ClearPass Certificates 101 – V1
Aruba Networks 11
PKI and how it relates to CPPM/Onboard Yes, CPPM includes a certificate authority. A CA has been included in CPPM for several releases, however with the more recent 6.x code versions several significant features have been added to enhance existing functionality and provide new support.
For example with the CPPM 6.2 code release we provide support for multiple CA’s (Root or Intermediate) within a single CPPM instance. Be it authenticating BYOD or Corporate Computers, ClearPass provides the most complete solution to allow businesses to securely authenticate, authorize and subsequently provision 802.1x credentials and certificates to endpoint devices.
A key part to the certificate provisioning capability of CPPM is the ability to act as a root (standalone) or subordinate (sometimes referred to as an intermediate) certificate-‐authority. When acting as a standalone CA we are able to self-‐sign our root certificates and subsequently sign 802.1x client certificates. If we ‘join’ an established PKI chain, then we are required to obtain a public signed certificate that allows us to issue client certificates that can be trusted within a full PKI eco-‐system.
Another method we have for the provisioning of client certificates is our integration with Microsoft Active Directory Certificate Services (ADCS). This allows CPPM to forward the request for certificate signing to ADCS which signs the client certificate, returns it to CPPM from where we deliver it to the client. There is another TechNote that specifically covers the configuration and integration of ADCS called ‘ADCS with ClearPass OnBoard’.
CPPM, uses certificates itself for a number of functions, specifically its use of a “server certificate” for 802.1x server validation and for SSL in its Web Server functionality. Prior to 6.3, CPPM leveraged only a single certificate for both functions. Within CPPM 6.3 we have provided the ability for CPPM to have separate server certificates for 802.1x and CPPM’s Web Server, more on this later in the document. Also, for client certificate authentication, a “trust list” that contains CA public keys is leveraged within CPPM.
So as you can see there is a lot to discuss on the subject of PKI and certificates. I have provided some additional agnostic PKI/certificate verbiage at the end of this document in Appendix B. This is meant as a ‘general’ learning section for you to read whilst enjoying your weekly Sunday afternoon chill-‐out session.
The following sections take you through the technology within our ClearPass Policy Manager CA ecosystem and provides examples of how to deploy and exploit the features we have developed.
We need to cover a lot of different topics/technologies; this document will likely go through multiple revision as we add more content and features. To get started we will go through a simple self-‐signing certificates configuration and then in more depth how we use, create, import, export, delete etc. for single and multi-‐system deployments.

ClearPass Version 6.x Tech Note: ClearPass Certificates 101 – V1
Aruba Networks 12
During the device provisioning process, one or more digital certificates are issued to the device. These certificates are used for different purposes; one provisioned certificate will be used for network authentication, other certificates may be provisioned to secure profile downloads. Some of these certificates are unique credentials for a device.
To issue the certificate, ClearPass Onboard must operate as a certificate authority, except in the case when ClearPass is an Intermediate or when ClearPass is using the services of Microsoft’s Active Directory Certificate Service. The following sections explain how the certificate authority works, and which certificates are used in this process.

ClearPass Version 6.x Tech Note: ClearPass Certificates 101 – V1
Aruba Networks 13
CPPM Certificates…. Do we have to start here? I’m not going to cover the why do we need them here? Read Appendix B over breakfast for that. Also remember that whilst certificates and a PKI based infrastructure is generally considered more secure than usernames and passwords, using certificate based authentication is also much better suited to mobile and tablet devices. These devices power down their WLAN to conserve battery power and are generating many more authentication requests in a day than the traditional desktop computers. Captive portal based authentication is cumbersome for users if it needs to be done multiple times a day (hour!) and MAC caching is okay for guests, but not ideal for corporate users. Certificates on the other hand, provide the optimal solution to deal with employee mobile devices (which are quickly becoming the most prevalent devices on customer networks).
But certificates essentially form the core of why we have a PKI. It’s the keys to the door and enables us to perform secure authenticated transactions. CPPM uses certificates to perform multiple secure functions, from CPPM to CPPM communications when replicating data over HTTPS channels, to issuing a client certificate when Onboarding an employee, to using a certificate to authenticate devices that have been provisioned with a client certificate using 802.1x.
Self-‐Signed Server Certificate The next couple of page takes us through a brief introduction to the subject of sever certificates and host names specific to self-‐signed certificates.
We have always been told that SSL certificates are only secure if they are issued and signed by a trusted signing authority, and that we should never use a self-‐signed certificate except for limited internal use and for testing purposes. SSL is about protecting data while assuring identity. A self-‐signed cert can cause you to lose both benefits.
Its essential to remember that when a client is presented with a certificate it checks the Common-‐Name to which the certificate is issued (www.example.com) with the url.
The following or similar warnings are presented when you access a website that has a security certificate installed that was issued to a domain other than the one you accessed.
Internet Explorer: "The security certificate presented by this website was issued for a different website's address."
Firefox: "www.example.com uses an invalid security certificate." or "The certificate is only valid for the following names: www.otherdomain.com , otherdomain.com"
This happens when the common name to which an SSL Certificate is issued (e.g., www.example.com) doesn't exactly match the name displayed in the URL bar. Any difference will cause the web browser to halt and display a name mismatch error. This error can happen even if the correct certificate is installed properly. For example, you

ClearPass Version 6.x Tech Note: ClearPass Certificates 101 – V1
Aruba Networks 14
connect to the website via the IP address or an internal name but the certificate was issued to the fully-‐qualified domain name (or vice versa).
Figure 3 -‐ Browser validation error It is also possible that a self-‐signed certificate could be installed instead of a server-‐specific security certificate issued by a Certificate Authority (like GoDaddy), or that the domain name was misspelled in the request.
If your website is secured by a certificate with the name www.example.com you will receive this error if you connect using any of the following names:
example.com example.local 208.77.188.166 10.1.1.7
Even though all of the above addresses could in theory get you to a site with a valid certificate, you could still get a name error if you are connecting to a name other than the one that the certificate was issued to, unless they were configured as SAN extentions.
You can use self-‐signed certificates to test a configuration before you create and install a signed certificate issued by a certificate authority. A self-‐signed certificate contains a public key, information about the owner of the certificate, and the owner's signature. It has an associated private key, but it does not verify the origin of the certificate through a trusted third-‐party certificate authority. If you want to negate browser warnings or just ensure that end-‐to-‐end SSL communication works, once you generate a self-‐signed certificate on CPPM, you must extract it and add it to the certificate registry on the client, not very practical.
ClearPass Version 6.x Tech Note: ClearPass Certificates 101 – V1
Aruba Networks 15
When a client e.g. the user and his Web browser, "accepts" a certificate which has not been issued by one of the CA that the client trusts (the CA for example that are embedded in Windows by Microsoft), then a potential risk is that the client is currently talking to a fake server, i.e. is under attack. Note that passive attacks (the attacker observes the data but does not alter it in any way) are thwarted by SSL regardless of whether the CA certificate was issued by a mainstream CA or not, this is generally referred to as Man-‐in-‐the-‐Middle attacks.
Note: If you have no interest in authenticating/Onboarding any iOS devices then you will be good to go with self-‐signed certificates.. However that will be quite unlikely. As a corner case, when authenticating or Onboarding iOS devices if you are using a self-‐signed server certificate you’re going to hit issues. There are two problems at play here
The first is where the iOS device won’t Onboard if the web server certificate is not from a trusted source.
The second one is where the Onboard process has to ensure the server certificate installed on the server for 802.1x termination is also provisioned to the device to complete the trust chain.
The optimum resolution is to use a public signed-‐certificate, become an intermediary CA to an existing customer PKI or you’ll have to export the CPPM self-‐signed server-‐cert and import that on to all your iOS devices (very unlikely). So the first or second options here would be the preferred solution. More on this later in our TechNote.
A way to bypass this restriction would be to Onboard iOS devices under port 80, basic HTTP but that then leaves passwords in cleartext and should be avoided in a production network.
In a similar way during the EAP-‐over-‐LAN (EAPoL) request/response stage (802.1x) Windows supplicant will refuse to connect to PEAP termination points that identify themselves with untrusted certificates and where the supplicant configuration does not match the presented CN or SAN in the server certificate.
During the initial EAPoL request and response stage of the pre-‐authentication process, the name of the user or device is sent by the supplicant to the authenticator. If the name isn’t in a format that the RADIUS server can resolve to a user or device account in Active Directory, the negotiation will fail. Because EAP-‐TLS uses certificates for authentication, the user name will be derived from the certificate by the authenticator.

ClearPass Version 6.x Tech Note: ClearPass Certificates 101 – V1
Aruba Networks 16
Looking at the system setup below where during installation we just provided a simple hostname, this will cause us problems; you must get into the habit of configuring CPPM systems with fully-‐qualified-‐domain-‐names (FQDN’s).
Figure 4 -‐ CPPM configured with a simple hostname
If we configure a system like above, the server certificate looks like the following in Figure 5, notice the common-‐name (CN) in the Subject field is set as cppm-‐6.2.0 (the same as the host name above in Figure 4). Also notice that the Issued by: CN is the same as the CN in the subject field. This shows you this is a self-‐signed certificate, i.e. this is me and I validate me as me, which is not very secure in terms of a trust relationship.
CPPM out of the box is ready and running as a Certificate Authority (CA). (Note: Our internal CA is not issuing this “self signed” cert, it is “self signed” by no CA, not even ours in this case). So lets get started and take a look at a certificate on CPPM that got ‘built’ based upon the configuration before. We see below the CN matches the hostname defined during installation.
Figure 5 – Self signed Server certificate derived from a simple hostname
Now for the process of education we will rename this CPPM to cppm-‐155.ns-‐tme.com. Be warned this process does NOT cater for the renaming of the server certificate as shown below, it still shows the server certificate as cppm-‐6.2.0.

ClearPass Version 6.x Tech Note: ClearPass Certificates 101 – V1
Aruba Networks 17
Figure 6 – CPPM host renamed but not the self-‐signed certificate
To complete the re-‐creation of the server certificate is a manual process, by clicking on the ‘Create Self-‐Signed Certificate’ option in the top-‐right-‐hand of the screen. From here you have the ability to create a self-‐signed certificate as shown below.
Figure 7 -‐ Create CSR
It is imperative that we configure the system with a Fully-‐Qualified-‐Domain-‐Name (FQDN). I’ve intentionally made an error to highlight that if you want to use a Subject Alternate Name (SAN) attribute in the certificate creation it must begin with uppercase DNS, IP or URI not lowercase letters. Multiple SAN’s entries can be entered comma delimited and there can be a mix of DNS and IP values.
Figure 8 -‐ Creating a new self-‐signed certificate

ClearPass Version 6.x Tech Note: ClearPass Certificates 101 – V1
Aruba Networks 18
After the new self-‐signed cert has been created you need to import it in to CPPM. As such Common Name (CN) and any DNS SAN entries configured are defined with a FQDN.
Figure 9 -‐ Importing new self-‐signed created certificate
This newly created self-‐signed certificate must then be installed into the system as shown above in Figure 9, click on Install to complete the process. Now we have the new and appropriately defined server certificate installed we can see all the appropriate values. Specifically the CN matches the hostname of the system.
Figure 10 -‐ Viewing the new import self-‐signed certificate
Note: As you see the Subject and Issued by are the same, this makes this a self-‐signed certificate. This certificate will now be used for all server SSL functions. This same certificate will also be used by the RADIUS server for EAP-‐PEAP/EAP-‐TLS authentication services across all interfaces. Note: This changes under CPPM 6.3, more on that later in the TechNote.

ClearPass Version 6.x Tech Note: ClearPass Certificates 101 – V1
Aruba Networks 19
The above is a basic introduction to creating a self-‐signed certificate on CPPM. This would/could be enough to use for evaluations, testing and Lab work but is not sufficient if you want to accommodate public facing users, clustered deployments or the use of Virtual IP (VIP) interfaces for high-‐availability. Lets dive into the some typical use cases and work through these. The following sections go through
• single system deployments with multiple interfaces • requirements for deployments where users will be authenticating from a public
domain clustered CPPM system and deployments • providing a Virtual IP to enable resiliency of the Guest Portal redirection from
wireless controllers
and more.
Note: It’s also an important step in this setup that the DNS configuration has been completed. Its outside the scope of this document to cover setting up DNS, but in brief the Zone, Domain, A-‐records, PTR-‐records need to have been created.

ClearPass Version 6.x Tech Note: ClearPass Certificates 101 – V1
Aruba Networks 20
Use of a Self-‐Signed Server Certificate Currently with CPPM 6.2.0 we are restricted to a single server certificate, be that self-‐signed or public. This means that this certificate will be used for authentications on both the DATA and the MGMT interfaces. This will likely throw up some browser warnings. There are ways to get around this by use of the Subject Alternate Name (SAN) for example when creating a CSR….more on this later. Note: This changes under CPPM 6.3, more on that later in the TechNote
Some ask: Why does this throw up a browser warning? Well, multiple issues are at play here. One is that the certificate is self-‐signed and the true identity of the server can not be verified, typically every browser will balk at that. The other issue stems from the fact that when you connect to the CPPM system the hostname in the URI needs to match the CN defined in the server certificate. So if we connect to say the actual IP address on the MGMT port assuming it was 172.16.0.10 (https://172.16.0.10/tips) the browser will assume the IP address is the hostname. You could cheat and set your internal DNS to use the same DNS hostname as the public DNS. However if you wanted to access CPPM on its public IP address you’d never be able to connect as you’d always resolve to the private IP address.
Going back quickly to the subject of using SAN extension of type DNS, if this is defined, then it MUST be used as the identity. Otherwise, the (most specific) Common Name field in the Subject field of the certificate MUST be used. Although the use of the CN is the current practice, it is has been deprecated and Certificate Authorities are encouraged to use the DNS Names instead, http://tools.ietf.org/html/rfc2818#section-‐3.1.
Here is an example of an error, in Figure 8 when I created my self-‐signed certificate, I also added several SAN entries but the error below shows that the self-‐signed certificate is not trusted by the browser as its unable to validate its authenticity, because its self-‐signed.
Figure 11 -‐ Browser warning re self-‐signed certificate

ClearPass Version 6.x Tech Note: ClearPass Certificates 101 – V1
Aruba Networks 21
So now we have our self-‐signed certificate installed as shown above. Be aware that whenever you connect to the system, certainly for the first connection, the browser will throw up a warning. This relates to the fact the true identity of the server cannot be verified and the server certificate is self-‐signed.
Public-‐Signed Server Certificate….how to? Now in the ‘real world’ certificates need to be signed to allow the host (CPPM) to prove to the public world (the users) who it is they are actually communicating with, so it can be verified and trusted.
This is where the whole PKI eco-‐system starts. To get to a point where you have a public signed certificate takes several steps and depends a little on level of SSL certificate you get and the signing authority. Remember this is a serious process, if it was so easy we’d have zero secure transaction happening over the public internet…every Tom, Dick or Harry would be out there spinning up Web sites pretending to be PayPal or Amazon.
The process starts with you creating a Certificate Signing Request (CSR). This basically put, is you documenting who you are…. Your company, department, location, country etc. The output from creating a CSR is two items….
1. A Private Key file – this is the keys to the treasure, protect this file, never share it ….!! 2. A file which holds the details of the CSR request– this is what you send to the CA.
What we do with this file is then send this off to a Certificate Authority (CA), the end game here is to have them ‘certify’ you, prove who you are. When you create your CSR as below, you enter a ‘Private Key Password’…this will be required later, do not forget this.
Note the option on the top-‐right to create the CSR Request. When creating the CSR, we support key-‐lengths of 512, 1024 and 2048 (the default). We suggest you leave this as a 2K key. Also, keep the Digest as SHA-‐1. Some CA’s do NOT support CSR request using MD5.
Figure 12 -‐ Creating a CSR

ClearPass Version 6.x Tech Note: ClearPass Certificates 101 – V1
Aruba Networks 22
After your click on Submit, CPPM will create a signing request….an example is below. Note the option to download the CSR and Private Key File. If you download this, don’t just leave it on your MAC/Laptop, ensure it’s stored in a secure and accessible location.
Figure 13 -‐ CSR Request output (CSR + Private Key File)
Different CA have different workflows to take your CSR request and turn it around. But in summary you will send/upload your file. It might also be as simple as pasting the output of the CSR creation into a portal screen. The CSR file you download can also be opened by a text-‐browser and the data copied. If you copy/paste the encrypted data into a portal screen, you must also include the “-‐-‐-‐BEGIN” & “-‐-‐-‐END…..” text as highlighted above.
Assuming the CA accepts your CSR file, it will have you ‘assign’ this to a domain. Your proof of ownership of this domain will likely have already happened, potentially via an email request typically sent to [email protected] So somebody needs to be able to monitor this email address and reply accordingly. The assumption here is if you own the domain, you’ll own the DNS MX record and the email will be directed to your email server.
Once your CSR has been approved/signed you then need to extract this certificate data and tie it all together. This typically involves you ‘binding’ the encrypted output from your private-‐key with the issued certificate PLUS you private password you used when creating your initial CSR. This can create different files, but a common output will be a PKCS#12 (PFX/P12) file. A PFX file is simply described as a container for storing multiple cryptography objects as a single file.

ClearPass Version 6.x Tech Note: ClearPass Certificates 101 – V1
Aruba Networks 23
An example of ‘binding’ the certs/keys together into a PFX/P12 file is shown below.
Figure 14 -‐ Binding cert's, keys, password into a PFX file
If you want to manipulate the PFX file and extract items (which you’ll need to do shortly) you can use the openssl tool kit. Its available on many platforms, (built into OSX) Windows can download it from sourceforge http://gnuwin32.sourceforge.net/packages/openssl.htm but we (Aruba Networks) provide no guarantee to its functionality or potential bugs. You can use following commands as an example to extract public/private keys from a PFX. openssl.exe pkcs12 -‐in yourP12File.pfx -‐nocerts -‐out privateKey.pem openssl.exe pkcs12 -‐in yourP12File.pfx -‐clcerts -‐nokeys -‐out publicCert.pem So now that we’ve got our signed certificate, we need to load these into CPPM. However, before we do our final step we need to split open the PFX file. CPPM wants the certificate file, the private-‐key file and your password all-‐separate to allow you to upload the new public-‐server certificate.
Taking my p12 file and running it through the openssl tools I extracted as shown below the files publicCert and privateKey. These will be required to be imported into CPPM.
Figure 15 -‐ Using openssl to extract certificate and private key from PFX file

ClearPass Version 6.x Tech Note: ClearPass Certificates 101 – V1
Aruba Networks 24
Once these files have been extracted were now in a position to upload these to CPPM.
Figure 16 -‐ Importing certificate and private key into CPPM
As an example, depending on the stature of the CA you are using to sign your CSR you may have to add Intermediate Server CA to ensure that the trust list is complete, as below.
Figure 17 -‐ Error showing missing CA from Trust list
For the purpose of this testing I’ve used an SSL provider startssl that gives free certs. The downside of this is that it requires I add a couple of certificates to the trust list. Some SSL providers will allow you to package the entire trust-‐chain up into a single PFX/P12 file. In my case I needed to manually download and install a Root CA and an Intermediate CA certificate into CPPM to make my startssl certificate chain complete, now we’re good to go.
Figure 18 -‐ CPPM server certificate and trust-‐chain
Root cert is always self -‐signed

ClearPass Version 6.x Tech Note: ClearPass Certificates 101 – V1
Aruba Networks 25
Single CPPM Deployment After covering above, self-‐signing and publically signed certificates we now need to think about how we design out implementations.
Under CPPM 6.2.0
Outside of the restrictions beyond routing where a single instance CPPM deployment has one interface, typically the DATA interface in a DMZ (Public facing) and the MGMT (Private Network) interface on an internal network, routing/firewalls will/may restrict access from the internal network to the Public interface, the next biggest challenge here is certificates.
Considerations For a single box deployment the major concern here is that your Public Interface, normally the DATA interface ideally needs to be secured with a public-‐signed certificate. This is to remove the common problem around certification validation for users who connect to this interface. We do not as users, expect to receive warning messages that the system we are connecting to is untrusted. This is particularly important if you are trying to Onboard iOS devices, they just won’t work if they see a self-‐signed server certificate being presented.
When we endeavor to authenticate users in/on a public network the use of a pubic-‐signed certificate is most desirable and almost should be mandated.
Figure 19 -‐ CPPM Single Box Deployment
The above single system, has a host-‐name of cppm155.cppm-‐testing.com. This should then be the CN so that when public facing users connect to this system, the CN will match the hostname in the url. To minimize other certificate validation problems we recommend that cppm155.cppm-‐testing.com, cppm155.danny-‐lab.com, 10.2.100.155, 10.2.101.155 in our example be configured in the SAN.
If you do not provide the ability of the certificate to validate the systems aliases then be prepared to bypass browser errors.

ClearPass Version 6.x Tech Note: ClearPass Certificates 101 – V1
Aruba Networks 26
Clustered CPPM Deployment -‐ Single Cert As we look at the options for deploying CPPM in a multi-‐instance scenario we have to consider multiple solutions, options and challenges. Firstly we will look at the option for multiple CPPM servers in a centralized deployment.
The challenges of a clustered deployment specific to PKI revolve around how we will ‘build’ our CSR. The CSR eventually becomes how the CPPM’s presents themselves to the users. We’ve covered the importance of using FQDN’s when configuring system names, and this becomes more important now in a clustered deployment. When we are ‘building’ our CSR we populate several fields but specifically we are going to cover the use of the following…
• Common Name (CN) • Subject Alternate Name (SAN)
The SAN can be populated with multiple variables such as URI, DNS and IP that can be used to represent a system, or if you like, give it an alias. The IP address used in the IP options can be in either IPv4 or IPv6 format however we do not support IPv6 as of CPPM 6.3.0.
So lets consider a two-‐system deployment….
cppm155.cppm-‐testing.com cppm156.cppm-‐testing.com
We have two major design scenarios, do we create an individual CSR’s per system, have these individual public-‐keys signed and then install these certificate’s on individual instances or do we create a single shared CSR, get this public-‐key signed, but then install this same single certificate across all systems. The first option is simple but does create additional work and administration, especially if you add more systems later. However you also need to consider the practicality and implications of ensuring when users are redirected to a CPPM system especially for Guest that the HOST we send/re-‐direct the users to must match the HOST name in the CN or SAN field. In a clustered environment where different system have different host names difficulties can arise, especially if there is any load-‐balancing, round-‐robin DNS or CPPM Publisher-‐Subscriber fail-‐over.
A much simpler solution is to use the same single certificate across all boxes in the cluster. Lets take a look at the network characteristics of our two-‐system cluster that we will use.
FQDN = CN name DNS NAMES IP
cppm155.cppm-‐testing.com cppm155.cppm-‐testing.com (DATA) cppm155.danny-‐lab.com (MGMT)
10.2.100.155 (DATA) 10.2.101.155 (MGMT)
cppm156.cppm-‐testing.com cppm156.cppm-‐testing.com (DATA) cppm156.danny-‐lab.com (MGMT)
10.2.100.156 (DATA) 10.2.101.156 (MGMT)

ClearPass Version 6.x Tech Note: ClearPass Certificates 101 – V1
Aruba Networks 27
Figure 20 -‐ CPPM Clustered Deployment
You might have noticed above we have left the CN field value to ‘not_really_needed_now’. For a deployment with two systems sharing the same certificate without a VIP we suggest you think ahead for the content of this field, our recommendation here is to configure the CN with some unique name assuming at a later date you will deploy a VIP across the two systems and then the CN becomes the VIP DNS name.
Based upon the above we would create a CSR request with the following SAN field:
CN: future-‐cppm-‐vip.cppm-‐testing.com, DNS: cppm155.cppm-‐testing.com, DNS: cppm156.cppm-‐testing.com, DNS: cppm155.danny-‐lab.com, DNS: cppm156.danny-‐lab.com, IP: 10.2.100.155, IP: 10.2.101.155, IP: 10.2.100.156, IP: 10.2.101.156
This covers the PUBLIC (DATA) and PRIVATE (MGMT) networks for DNS and IP addresses, so regardless of what interface you connect/authenticate to the above should never create any validation errors for the certificate CPPM presents to the users.
The value in the CN is initially checked to see if it matches the host name entered in the browser, however as we mentioned previously when a certificate has been created that uses the SAN extension, this field is check for a match before any value present in the CN is checked.
Adding a VIP to the Configuration
The obvious next enhancement to the clustered environment above is to add a Virtual IP interface to our two system. A VIP provides multiple advantages, not only does it allow for High-‐Availability of an IP address across multiple CPPM systems, but it provides a High-‐Availability captive portal-‐redirect for our Wireless Controllers. The Aruba wireless controllers configuration only supports a single IP address, url redirect, where as for RADIUS they can be configured to provide fall-‐through/group availability configuration.

ClearPass Version 6.x Tech Note: ClearPass Certificates 101 – V1
Aruba Networks 28
If we take the above configuration and add the requirements for a VIP to the DATA (Pubic) and MGMT (Private) interfaces accordingly. The process of adding just one additional interface to the cluster adds significantly to the number of parameters and perpetuations.
Note: We must ensure that all of the physical interfaces are available/reachable as some of our application, e.g. OnGuard will always try and bind to a physical interface, never a VIP.
FQDN of VIP = CN name
DNS NAMES IP
public.cppm-‐testing.com cppm155.cppm-‐testing.com (DATA) cppm155.danny-‐lab.com (MGMT) public.cppm-‐testing.com[VIP-‐DATA] private.danny-‐lab.com[VIP-‐MGMT]
10.2.100.155 (DATA) 10.2.100.150 [VIP-‐DATA] 10.2.101.155 (MGMT) 10.2.101.150 [VIP-‐MGMT]
public.cppm-‐testing.com cppm156.cppm-‐testing.com (DATA) cppm156.danny-‐lab.com (MGMT) public.cppm-‐testing.com[VIP-‐DATA] private.danny-‐lab.com[VIP-‐MGMT]
10.2.100.156 (DATA) 10.2.100.150 [VIP-‐DATA] 10.2.101.156 (MGMT) 10.2.101.150 [VIP-‐MGMT]
From the above networks configuration we can picture and assume a network similar to the below. Notice the addition of the VIP IP@.
Figure 21 -‐ CPPM Clustered Deployment plus VIP
We have now utilized a Common-‐Name in our CSR. You can only have a single common-‐name so we have chosen to use the public interface. Our recommendation here is that this CN/host-‐name is mapped to the IP address of the VIP on the public interface.
ClearPass Version 6.x Tech Note: ClearPass Certificates 101 – V1
Aruba Networks 29
WARNING on the use of WILDCARD certificates
As you can see the process of defining all of the permutations that a box can appear as can be confusing and complicated. One way to simplify the process is via the use of wildcard certificates. This can appear to significantly simplify the CSR creation where multiple SAN DNS entries could be replaced by a single SAN DNS entry.
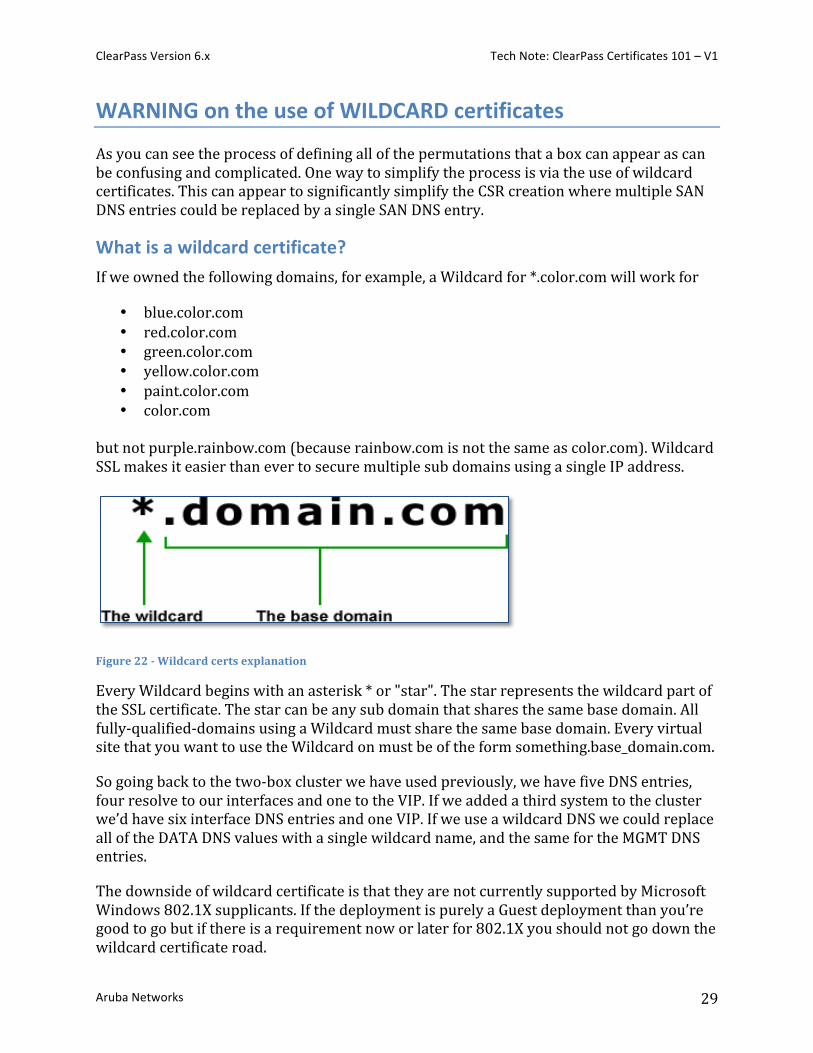
What is a wildcard certificate? If we owned the following domains, for example, a Wildcard for *.color.com will work for
• blue.color.com • red.color.com • green.color.com • yellow.color.com • paint.color.com • color.com
but not purple.rainbow.com (because rainbow.com is not the same as color.com). Wildcard SSL makes it easier than ever to secure multiple sub domains using a single IP address.
Figure 22 -‐ Wildcard certs explanation
Every Wildcard begins with an asterisk * or "star". The star represents the wildcard part of the SSL certificate. The star can be any sub domain that shares the same base domain. All fully-‐qualified-‐domains using a Wildcard must share the same base domain. Every virtual site that you want to use the Wildcard on must be of the form something.base_domain.com.
So going back to the two-‐box cluster we have used previously, we have five DNS entries, four resolve to our interfaces and one to the VIP. If we added a third system to the cluster we’d have six interface DNS entries and one VIP. If we use a wildcard DNS we could replace all of the DATA DNS values with a single wildcard name, and the same for the MGMT DNS entries.
The downside of wildcard certificate is that they are not currently supported by Microsoft Windows 802.1X supplicants. If the deployment is purely a Guest deployment than you’re good to go but if there is a requirement now or later for 802.1X you should not go down the wildcard certificate road.

ClearPass Version 6.x Tech Note: ClearPass Certificates 101 – V1
Aruba Networks 30
Advantage • Only one certificate to manage and maintain • Likely Cheaper to purchase if you have a large CPPM cluster • Can be installed on multiple systems, not just CPPM
Dis-‐advantage • If 802.1X required, will not work under Windows supplicants [a] • Some older browser do not support the use of wildcards certificates • Potentially less safe as if the private key gets inadvertently lost/shared multiple
systems can be come vulnerable • If the wildcard certificate needs to be revoked, all sub-‐domains will need a new
certificate
[a] Under CPPM 6.3, this nuance could be removed by the use of a wildcard for SSL and a non-‐wildcard for 802.1X authentications.
ClearPass Version 6.x Tech Note: ClearPass Certificates 101 – V1
Aruba Networks 31
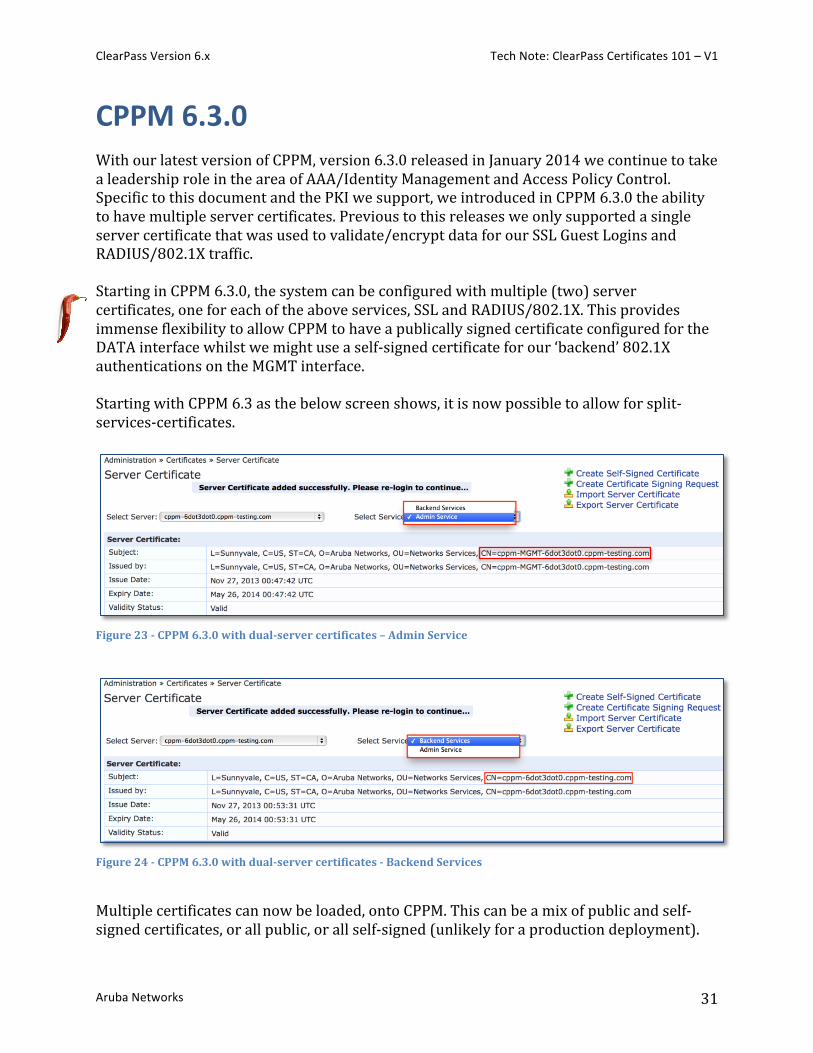
CPPM 6.3.0 With our latest version of CPPM, version 6.3.0 released in January 2014 we continue to take a leadership role in the area of AAA/Identity Management and Access Policy Control. Specific to this document and the PKI we support, we introduced in CPPM 6.3.0 the ability to have multiple server certificates. Previous to this releases we only supported a single server certificate that was used to validate/encrypt data for our SSL Guest Logins and RADIUS/802.1X traffic. Starting in CPPM 6.3.0, the system can be configured with multiple (two) server certificates, one for each of the above services, SSL and RADIUS/802.1X. This provides immense flexibility to allow CPPM to have a publically signed certificate configured for the DATA interface whilst we might use a self-‐signed certificate for our ‘backend’ 802.1X authentications on the MGMT interface. Starting with CPPM 6.3 as the below screen shows, it is now possible to allow for split-‐services-‐certificates.
Figure 23 -‐ CPPM 6.3.0 with dual-‐server certificates – Admin Service
Figure 24 -‐ CPPM 6.3.0 with dual-‐server certificates -‐ Backend Services
Multiple certificates can now be loaded, onto CPPM. This can be a mix of public and self-‐signed certificates, or all public, or all self-‐signed (unlikely for a production deployment).

ClearPass Version 6.x Tech Note: ClearPass Certificates 101 – V1
Aruba Networks 32
CPPM 6.3.0 Enhancements for CSR and self-‐signed certificate creation In addition under CPPM 6.3.0 we have enhanced the ability CSR and self-‐signed certificate creation. We now support the ability to generate up to a 4K private key. With Aruba adding support for FIPS software level certification we have also added and enabled the ability to use Elliptical Curve DSA and NIST which are typically required for Government and Federal use.
Figure 25 -‐ Additional Private Key Algorithms added in CPPM 6.3
Also in CPPM 6.3.0 we have added an additional set of digest algorithms to support the demands from our customers…224,256,384 and 512. These are collectively known as SHA-‐2 algorithms.
Figure 26 – Additional Message Digest Algorithm added in CPPM 6.3

ClearPass Version 6.x Tech Note: ClearPass Certificates 101 – V1
Aruba Networks 33
We are strongly suggesting that if a deployment running CPPM 6.3.x is using multiple server certificates you do not ‘cross-‐reference’ attributes between certificates.
For example, in your public-‐SSL certificate DO NOT populate the SAN field when you create your CSR with management IP addresses, or management side FQDN’s. The same goes for the self-‐signed certificate on the private 802.1x/RADIUS side, DO NOT populate the SAN field when you create your CSR use public-‐facing IP addresses, or public side FQDN’s.
In short, treat the two certificates as two independent entities. Both certificate will belong to the same company; typically the domain part will/may be different.
Obviously if you cluster multiple systems then the SAN field will be used to alias multiple systems but ensure they reference the SSL or 802.1x/RADIUS servers only.
Figure 27 -‐ CPPM 6.3.x Dual Cert Scenario

ClearPass Version 6.x Tech Note: ClearPass Certificates 101 – V1
Aruba Networks 34
Other Certificate Bits… Depending on the Certificate Authority you use, or the migration your doing you need to import them into CPPM. You need to ensure as we’ve mentioned that the entire trust-‐chain is imported and valid. Depending on your CA you may receive your certs in a single file or in separate files.
If they come in a PEM-‐format file it is the most common format that Certificate Authorities issue certificates in. It contains the “-‐-‐-‐-‐-‐BEGIN CERTIFICATE-‐-‐-‐-‐-‐“ and “-‐-‐-‐-‐-‐END CERTIFICATE-‐-‐-‐-‐-‐” statements. Several PEM certificates and even the Private key can be included in one file, one below the other. They have extensions such as .pem, .crt, .cer, .key
If they come in a .p7b/PKCS#7 file you‘ll not have the private key, but you should have the certificate and the chain certificates. They have extensions .p7b, .p7c
If they come in a .p12/PKCS#12 file you will have the private key, but you should have the certificate and the chain certificates. They have extensions .pfx, .p12
If you don’t receive all the certs required, you’ll need to get all of the certs in separate PEM files and then we can concatenate them into a single file and import, or just import them individually in to CPPM.
Converting Certificates between different Formats
Convert PEM to DER openssl x509 -‐outform der -‐in certificate.pem -‐out certificate.der
Convert PEM to P7B openssl crl2pkcs7 -‐nocrl -‐certfile certificate.cer -‐out certificate.p7b -‐certfile CAcert.cer
Convert certificate and private key PEM to PFX openssl pkcs12 -‐export -‐out certificate.pfx -‐inkey privateKey.key -‐in certificate.crt -‐certfile CAcert.crt
DER Convert DER to PEM openssl x509 -‐inform der -‐in certificate.cer -‐out certificate.pem
P7B Convert P7B to PEM openssl pkcs7 -‐print_certs -‐in certificate.p7b -‐out certificate.cer
Convert P7B to PFX openssl pkcs7 -‐print_certs -‐in certificate.p7b -‐out certificate.cer openssl pkcs12 -‐export -‐in certificate.cer -‐inkey privateKey.key -‐out certificate.pfx -‐certfile CAcert.cer
ClearPass Version 6.x Tech Note: ClearPass Certificates 101 – V1
Aruba Networks 35
PFX Convert PFX to PEM openssl pkcs12 -‐in certificate.pfx -‐out certificate.cer -‐nodes
NOTE: While converting PFX to PEM format, openssl will put all the Certificates and Private Key into a single file. You will need to open the file in Text editor and copy each Certificate & Private key(including the BEGIN/END statements) to its own individual text file and save them as certificate.cer, CAcert.cer, privateKey.key respectively.
Extended Key Usage
This extensions consists of a list of usages indicating purposes for which the certificate public key can be used for,
These can either be object short names of the dotted numerical form of OIDs. While any OID can be used only certain values make sense. In particular the following PKIX, NS and MS values are meaningful:
Value Meaning -‐-‐-‐-‐-‐-‐-‐ -‐-‐-‐-‐-‐-‐-‐-‐-‐-‐-‐ serverAuth SSL/TLS Web Server Authentication. clientAuth SSL/TLS Web Client Authentication. codeSigning Code signing. emailProtection E-‐mail Protection (S/MIME). timeStamping Trusted Timestamping msCodeInd Microsoft Individual Code Signing (authenticode) msCodeCom Microsoft Commercial Code Signing (authenticode) msCTLSign Microsoft Trust List Signing msSGC Microsoft Server Gated Crypto msEFS Microsoft Encrypted File System nsSGC Netscape Server Gated Crypto Examples: extendedKeyUsage=critical,codeSigning,1.2.3.4 extendedKeyUsage=nsSGC,msSGC
ClearPass Version 6.x Tech Note: ClearPass Certificates 101 – V1
Aruba Networks 36
Appendix A -‐ Moving certs from Amigopod to CPPM Not something we encounter very often but something we need to be aware of. Imagine the situation where an existing Amigopod customer has a publically signed or Amigopod self-‐signed certificate on their system. They want to migrate to ClearPass Policy Manager and as a part of that migration maintain the use of their existing server certificate.
Typically you’d expect the first step to be the process of exporting the certificate from the Amigipod system as a PFX/p12 file which bundles the private key, the certificate and optionally certificates required to establish a trust chain for the certificate.
Unfortunately, we do not support the option via GUI/CLI of exporting the certificate and private key from an Amigopod system.
If you need it, contact Aruba support or your local ClearPass specialist who can arrange for the SSL key to be extracted from an Amigopod backup file.
You must be aware that after the migration the hostname on CPPM must match the hostname on Amigopod, this is because as we have discussed the CN in the certificate needs to match the hostname in the browser URL.

ClearPass Version 6.x Tech Note: ClearPass Certificates 101 – V1
Aruba Networks 37
Appendix B PKI 50,000ft Overview of why we need PKI?
PKI is needed to support large-‐scale deployment of a number of security services. In particular:
• Origin authentication: Verification that a document or message was created by the person claimed. This is often referred to as 'digital signature', although digital signatures can be used to authenticate things other than origin.
• Content integrity: Securely show that a document has not been tampered with. • Content confidentiality (encryption): This is protecting the contents of a document
or message so that it can be read only by specifically identified users. • Non-‐repudiation: A security service whereby creation of a document or message
cannot subsequently be denied.
The requirement for large scale PKI come from situations where one or more of these services needs to be supported across multiple organizations. A common example of this is “e Government” initiatives such as the US eGov initiative supported by the Federal PKI.
The goal of a large scale PKI is to enable some or all of these services for users of the infrastructure. In most situations where an infrastructure is properly built, it will be used heavily. Once there is a capability to digitally sign and verify messages, it will generally make sense to use this for all transactions. Benefits:
• General improvement in security. • Regular use of digital signatures improves security of the digital signature. • If everything is signed, anything without signature is immediately suspicious. • This assumption has implications later, in discussions on provisioning directory.
Private and Public Keys
This is not intended to be a general tutorial on PKI. There are many detailed descriptions. This section and the next try to simply explain the essence of why a PKI is needed and how it works, so that enough information is provided to understand the directory elements of the whitepaper Distributed Directory in support of large scale PKI.
Distributed security services using PKI are based around a technique called “asymmetric cryptography”. The central components of asymmetric cryptography are public and private keys. A simple understanding can be gained by looking at the answers to three related questions:
Q1: What is a Key Pair?

ClearPass Version 6.x Tech Note: ClearPass Certificates 101 – V1
Aruba Networks 38
1. A Key Pair comprises a 'public key' and a 'private key', which are both very large numbers.
2. The key pair is generated using special techniques from two very large randomly generated prime numbers.
3. One can be confident that every key pair is unique, in the same way that one can be confident that every finger print in the world is unique.
Q2: What is a Private Key?
1. A private key is stored securely by its owner, perhaps on a smart card or securely stored on the owner’s computer. It is held in a way that only the owner has access to it. This is the “private” element.
2. A private key can be used by the owner to create digital signatures that are unique to the owner of the private key.
3. A private key can be used (typically using a complex mechanism) to decrypt documents, and it can be guaranteed that only the holder of the private key can decrypt the document.
Q3: What is a Public Key?
1. The public key can be published and shared widely. There is no requirement to keep it secret. This is the unique and useful property of asymmetric cryptography.
2. A public key is used to verify the digital signature created by the associated private key.
3. A public key can be used by anyone to encrypt a document, such that only the holder of the private key can decrypt it.
As an example of digital signature, user Joe will create an electronic signature for a document using his private key. Anyone can view this digital signature using Joe’s public key. This approach is very flexible and powerful, simply because Joe’s public key can be published and distributed freely, so that anyone can verify Joe’s digital signature.
Why Do Public Keys need PKI?
The basic cryptography and verification provided by a public/private key mechanism does not require a PKI. To understand the need for PKI, one needs to consider the trust assumptions behind digital signature verification. Consider for example that I am given a document that is purported to be signed by Joe using Joe’s private key, along with his public key. I can use asymmetric cryptography to be certain that the public key provided is linked to the private key that was used to sign the document. The important question is: “How can I be certain that this public key belongs to Joe?”
It may be that Joe gave me a copy of his public key, or that I have other signed documents from Joe, which I have verified with the same public key (because only Joe’s public key can verify documents signed by Joe). In some small-‐scale situations, digital signature verification with public keys can work fine on an ad hoc basis without a PKI.

ClearPass Version 6.x Tech Note: ClearPass Certificates 101 – V1
Aruba Networks 39
In general, this trust question is a big problem. How can you establish trust that a given public key is owned by a particular person or entity? This is the problem that PKI sets out to solve, and is fundamental to using digital signatures on a large scale.
The basic building block of a PKI is a (digital) Certificate. The entity creating a certificate is called a Certification Authority (CA). The core components of a Certificate are:
1. The name of the entity that the Certificate refers to. For convenience the certificate might contain several names for the entity, such as the email address and LDAP directory name.
2. The public key of the entity (e.g., Joe's public key). 3. A digital signature created by the CA (using the CA’s private key). This signature
binds together the components of the Certificate.
By creating a Certificate containing Joe’s name and public key, the CA is stating that it has verified that the public key in the certificate does in fact belong to Joe. This can be verified using the CA’s public key.
Certificates and CAs enable a trust chain to be built. This is shown in the diagram below:
Figure 28 -‐ End-‐to-‐End CA/cert chain
The starting point of the trust chain is that the CA is trusted. Technically, this means that the identity of the CA’s public key is trusted. This trust leads to trust of Certificates issued by the CA, because the digital signature on the certificate can be verified using the CA’s public key. Because Joe’s name and Joe’s public key are contained in the certificate, trust is gained that Joe’s public key really does belong to Joe. Now, a document signed by Joe’s private key is linked back by cryptographic trust to Joe’s public key (in which trust was established in the previously). It can be seen that starting with the point of only trusting the CA, that a trust chain can be established to build trust that a document was signed by Joe.

ClearPass Version 6.x Tech Note: ClearPass Certificates 101 – V1
Aruba Networks 40
An important extension is that a CA can also issue certificates for other CAs. This means that a trust chain can be established through multiple CAs, going CA -‐> CA -‐> CA -‐> User’s Public Key. This enables a mesh of CAs with trust links to be used.
There is a lot of PKI complexity not covered here, which does not need to be understood for the purpose of this paper. One concept that is important for the following examples is CA policy. A CA is participating in a trust chain. When a CA creates a Certificate, it will follow certain process with more or less care to be certain that the information being certified is correct. These processes are published as a CA policy. When a CA has certain policies that are expected by those that trust it, this also needs to be reflected into other CAs that it certifies. Higher trust and care has higher cost, and so different CAs will have different policies. High trust CAs will not generally certify lower trust CAs, in order to provide consistent trust quality. This leads to partially interlinked meshes of CAs with different policies.
An Example PKI This section shows how this structure might come together in a non-‐trivial example that we also look at in terms of directory support. This is formulated in terms of a government digital signature organization for a fictitious country (C=TY).
Figure 29 -‐ CA/PKI complex structure.....
The overall structure is a somewhat complex mesh, which is somewhat hierarchical. Arrows show trust, which is reflected by issue of a certificate. The core of this government structure is CAs associated with departments. These CAs are in a position to certify users within the department.

ClearPass Version 6.x Tech Note: ClearPass Certificates 101 – V1
Aruba Networks 41
CAs will generally (but not always) have mutual trust reflecting aligned policies. Mutual trust will be represented by certificates being issued in both directions between CAs. Because there are many government departments, it would be overly complex to have every department certify each other department, Therefore, the government has established a number of central CAs which are used to provide a trust path between all government departments.
This example structure does not (and should not) contain well-‐known or generally trusted CAs, such as the visible public CAs for which trust is often installed by default on many computers. A typical user will establish trust with a local CA. For example Joe Farmer will establish trust with the Agriculture CA. This will typically be done by providing Joe Farmer with a certificate that includes the Agriculture CA’s public key that will be installed on Joe Farmer’s computer. This is his initial trust point, and means that he will trust certificates signed by the Agriculture CA.
Consider an example where Joe wants to verify a document signed by Fred Train Driver. The trust chain requires two certificates:
1. A Railways CA Certificate, signed by the Agriculture CA. Certificates are referred to by their “subject” (in this case the Railways CA) and will always contain the name and public key of the subject, Joe can verify this certificate using the public key of the Agriculture CA (which he trusts), and thus gain trust in the Railways CA (and its public key).
2. Fred Train Driver’s Certificate, signed by the Railway CA. Joe can verify this using the public key of the Railways CA. Joe has now gained trust of the Fred’s public key, from this certificate.
Joe can now use Fred’s public key to verify the document, and this example verification is complete.
A longer trust chain is listed below, to show how Joe could verify a digitally signed email from Admiral Tim.
1. Low Assurance CA Certificate (signed by Agriculture CA). 2. High Assurance CA Certificate (signed by Low Assurance CA). 3. Military CA Certificate (signed by High Assurance CA). 4. Navy CA Certificate (signed by Military CA). 5. Admiral Tim’s Certificate (signed by Navy CA).
Certificate Life Cycle Certificates do not last forever. If a user ceases to be trusted, perhaps because of ceasing to be an employee, the certificate must be deactivated. If a user’s private key is stolen or otherwise compromised, signatures made by the user’s private key can no longer be trusted and so the certificate must be deactivated (just like handling a lost credit card).
ClearPass Version 6.x Tech Note: ClearPass Certificates 101 – V1
Aruba Networks 42
There are two primary mechanisms to achieve this:
1. At regular intervals each CA issues a Certificate Revocation List (CRL), and sometimes an associated Authority Revocation List (ARL), which has a similar function. The CRL contains a list of revoked certificates, and the issue date of the CRL. A recent CRL for each CA must be checked as part of the verification process. A CRL indicates when the next update will be issued, so that it is clear when a CRL is out of date.
2. Certificates have an expiry date. This is important, as it enables old certificates to be removed from the CRL, and thus prevent the CRL from getting too large. The certificates used for verification must be up to date. Note that when a certificate is renewed, the public key will not generally change. Essentially the same certificate is re-‐issued with a new expiry date.
What is a Digital Certificate? Digital Certificates are the electronic counterparts to driver licenses, passports and membership cards. You can present a Digital Certificate electronically to prove your identity or your right to access information or services online. Digital Certificates, also known as digital certificates, bind an identity to a pair of electronic keys that can be used to encrypt and sign digital information. A Digital Certificate makes it possible to verify someone's claim that they have the right to use a given key, helping to prevent people from using phony keys to impersonate other users. Used in conjunction with encryption, Digital Certificates provide a more complete security solution, assuring the identity of all parties involved in a transaction. A Digital Certificate is issued by a Certification Authority (CA) and signed with the CA's private key. A Digital Certificate typically contains the:
• Owner's public key • Owner's name • Expiration date of the public key • Name of the issuer (the CA that issued the Digital Certificate • Serial number of the Digital Certificate • Digital signature of the issuer
The most widely accepted format for Digital Certificates is defined by the CCITT X.509 international standard; thus certificates can be read or written by any application complying with X.509. Further refinements are found in the PKCS standards and the PEM standard.
What are Digital Certificates used for? Digital Certificates can be used for a variety of electronic transactions including e-‐mail, electronic commerce, groupware and electronic funds transfers. Netscape's popular Enterprise Server requires a Digital Certificate for each secure server.

ClearPass Version 6.x Tech Note: ClearPass Certificates 101 – V1
Aruba Networks 43
For example, a customer shopping at an electronic mall run by Netscape's server software requests the Digital Certificate of the server to authenticate the identity of the mall operator and the content provided by the merchant. Without authenticating the server, the shopper should not trust the operator or merchant with sensitive information like a credit card number. The Digital Certificate is instrumental in establishing a secure channel for communicating any sensitive information back to the mall operator.
Certificate Purposes The certificate purpose defines the intended primary use of the certificate. The certificate purpose can be one of four settings:
• Encryption. A certificate with this purpose will contain cryptographic keys for encryption and decryption.
• Signature. A certificate with this purpose will contain cryptographic keys for signing data only.
• Signature and encryption. A certificate with this purpose covers all primary uses of a certificate’s cryptographic key, including encryption of data, decryption of data, initial logon, or digitally signing data.
• Signature and smartcard logon. A certificate with this purpose allows for initial logon with a smart card, and digitally signing data; it cannot be used for data encryption.
SSL is probably the first protocol to use digital certificates. Now a day they are widely used where ever there is a need for signing and encryption.
Why do I need a Digital Certificate? Virtual malls, electronic banking, and other electronic services are becoming more commonplace, offering the convenience and flexibility of round-‐the-‐clock service direct from your home. However, your concerns about privacy and security might be preventing you from taking advantage of this new medium for your personal business. Encryption alone is not enough, as it provides no proof of the identity of the sender of the encrypted information. Without special safeguards, you risk being impersonated online. Digital Certificates address this problem, providing an electronic means of verifying someone's identity. Used in conjunction with encryption, Digital Certificates provide a more complete security solution, assuring the identity of all parties involved in a transaction. Similarly, a secure server must have its own Digital Certificate to assure users that the server is run by the organization it claims to be affiliated with and that the content provided is legitimate.
What is authentication? Authentication allows the receiver of a digital message to be confident of both the identity of the sender and the integrity of the message.
ClearPass Version 6.x Tech Note: ClearPass Certificates 101 – V1
Aruba Networks 44
What is a digital signature? A digital signature functions for electronic documents like a handwritten signature does for printed documents. The signature is an unforgettable piece of data that asserts that a named person wrote or otherwise agreed to the document to which the signature is attached. A digital signature actually provides a greater degree of security than a handwritten signature. The recipient of a digitally signed message can verify both that the message originated from the person whose signature is attached and that the message has not been altered either intentionally or accidentally since it was signed. Furthermore, secure digital signatures cannot be repudiated; the signer of a document cannot later disown it by claiming the signature was forged. In other words, Digital Signatures enable "authentication" of digital messages, assuring the recipient of a digital message of both the identity of the sender and the integrity of the message.
How is a digital signature used for authentication? Suppose Alice wants to send a signed message to Bob. She creates a message digest by using a hash function on the message. The message digest serves as a "digital fingerprint" of the message; if any part of the message is modified, the hash function returns a different result. Alice then encrypts the message digest with her private key. This encrypted message digest is the digital signature for the message. Alice sends both the message and the digital signature to Bob. When Bob receives them, he decrypts the signature using Alice's public key, thus revealing the message digest. To verify the message, he then hashes the message with the same hash function Alice used and compares the result to the message digest he received from Alice. If they are exactly equal, Bob can be confident that the message did indeed come from Alice and has not changed since she signed it. If the message digests are not equal, the message either originated elsewhere or was altered after it was signed. Note that using a digital signature does not encrypt the message itself. If Alice wants to ensure the privacy of the message, she must also encrypt it using Bob's public key. Then only Bob can read the message by decrypting it with his private key. It is not feasible for anyone to either find a message that hashes to a given value or to find two messages that hash to the same value. If either were feasible, an intruder could attach a false message onto Alice's signature. Specific hash functions have been designed to have the property that finding a match is not feasible, and are therefore considered suitable for use in cryptography. One or more Digital Certificates can accompany a digital signature. If a Digital Certificate is present, the recipient (or a third party) can check the authenticity of the public key.
ClearPass Version 6.x Tech Note: ClearPass Certificates 101 – V1
Aruba Networks 45
APPENDIX – C
How a Client validates a Server – more detail SSL server authentication allows a client to confirm a server's identity by using standard techniques of public key cryptography to validate that a server's certificate is valid and has been issued by a certificate authority (CA) listed in the client's list of trusted CAs. This confirmation could be important, for example, if the client is sending a credit card number over the network and wants to verify the receiving server's identity.
A client uses the following steps with the server's certificate to authenticate its identity.
Step1. Determine whether the issuing CA is a trusted CA. Each client maintains a list of trusted CA certificates. This list determines which server certificates the client will accept. If the distinguished name (DN) of the issuing CA matches the DN of a CA on the client's list of trusted CAs, the issuing CA is considered a trusted CA and the client continues with step 3. If the issuing CA is not on the client's list of trusted CA certificates, the server is not authenticated unless the client can verify a certificate chain that ends in a CA that is on the list.
Step2. Determine whether the issuing CA's public key validates the issuer's digital signature. The client uses the public key from the CA certificate to validate the CA digital signature on the server certificate that is being presented. If the server certificate information changed since it was signed by the CA, or the public key for the CA certificate does not correspond to the private key used by the CA to sign the server certificate, the client does not authenticate the server's identity.
Step3. Validate the current date to ensure it is within the validity period. The client checks the server certificate's validity period. If the current date and time are not within a valid range, the authentication process does not continue. If the current date and time are within the certificate's validity period, the client goes to step 4.
Step4. Determine whether the domain name in the server's certificates matches the domain name of the server. By performing this step, the client is confirming that the server is truly located at the same network address as specified by the domain name in the server certificate. If the domain names do not match, the client will refuse to authenticate the server or establish a connection. If the domain names do match, the client continues with step 5. The client has now determined that the server certificate is valid.
Step5. Check for a certificate revocation list (CRL) to see if the certificate has been revoked.
Step6. Authenticate the server. The client continues with the SSL handshake. If for some reason the client does not reach this step, the server that the certificate has identified is not

ClearPass Version 6.x Tech Note: ClearPass Certificates 101 – V1
Aruba Networks 46
authenticated and no connection is established. If the server requires client authentication, the steps provided in SSL client are completed.
The server is now ready to use its private key to decrypt the master key that the client sends during the SSL handshake. Otherwise, the SSL session is ended.
How a Server validates a Client – more detail SSL client authentication allows a server to confirm a client's identity by using the same techniques of public key cryptography as those used for server authentication to validate that a client's certificate is valid and has been issued by a certificate authority (CA) listed in the server's list of trusted CAs. This confirmation could be important, for example, if a bank is sending confidential financial information to a customer and the bank wants to verify the recipient's identity.
You can configure a server application to require Client authentication. Then, when the server requests client authentication through the SSL handshake, the client sends the server a certificate and digitally signed data to authenticate itself. The server uses this digitally signed data to validate the certificate's public key and to authenticate the identity that the certificate claims to represent.
To authenticate the binding between the public key and the person or entity that the certificate has identified as containing the public key, the server uses the following steps to authenticate the client's identity:
Determines whether the user's public key validates the user's digital signature by checking that the digital signature can be validated with the public key in the certificate. If the validation can occur, the server has established that the public key asserted to belong to a particular person or entity matches the private key used to create the digital signature, and that the data was not tampered with since it was signed. The binding between the public key and the distinguished name (DN) specified in the certificate has not been established. The server must complete steps 3 and 4 to validate the binding between the public key and the DN.
Validates the current date to ensure it is within the validity period. The client checks the server certificate's validity period. If the current date and time are not within a valid range, the authentication process does not continue any further. If the current date and time are within the certificate's validity period, the client goes to step 3.
Determines whether the issuing CA is a trusted CA. Each server maintains a list of trusted CA certificates. This list determines which certificates the server will accept. If the DN of the issuing CA matches the DN of a CA on the server's list of trusted CAs, the issuing CA is considered a trusted CA and the server continues with step 4. If the issuing CA is not on the server's list of trusted CA certificates, the client is not authenticated unless the server can verify a certificate chain that contains a CA that is on the list. You have the ability to control

ClearPass Version 6.x Tech Note: ClearPass Certificates 101 – V1
Aruba Networks 47
which certificates are trusted or not by controlling the lists of CA certificates maintained by the clients and servers.
Determines whether the issuing CA's public key validates the client certificate issuer's digital signature. The server uses the public key from the CA certificate to validate the CA digital signature on the certificate that is being presented. If the certificate information changed since it was signed by the CA, or the public key for the CA certificate does not correspond to the private key used by the CA to sign the server certificate, the server does not authenticate the user's identity. If the CA digital signature is validated, the server handles the user's certificate as a valid letter of introduction from that particular CA and continues. The server now considers the client authenticated and will continue with the connection.
Checks a certificate revocation list (CRL) to see if the certificate has been revoked.