Embed Size (px)
Citation preview

Page 1 of 41 When in doubt, click for the nearest Help Button!
CleanOpsStaff-3ed Program Administration Help Updated 5/31/2017
(Click here to open the most recent version of this document from the Website) (Click here to open Recent New Features Help file from Website)
(Recommend you print this file)
Contents
CleanOpsStaff-3ed Program Administration Help Updated 5/31/2017 .................................. 1
More Help: When in doubt look for the nearest Help Button! .......................................................................................... 3
About CleanOpsStaff-3ed and this Document: ................................................................................................................... 4
CleanOpsStaff-3ed New Features .......................................................................................... 4
Updated for APPA Operational Guidelines for Educational Facilities, Custodial Third Edition: .......................... 5
NetEnabled with ShareAware: ............................................................................................................................ 5
SpacePicker --Improved Data Input Tool: ............................................................................................................ 5
Improved Configuration Form and Configuration What-If Features: ................................................................. 5
Improved Standard Space Category Navigation: ................................................................................................ 5
MultiMonitor Enabled: ........................................................................................................................................ 5
Quick Entry Tool Improvement: ........................................................................................................................... 6
Tool Movement and Pinning Improvements ....................................................................................................... 6
Quick Staff Calculator Improvements: ................................................................................................................ 6
justDoNext Import Wizard Improvement ........................................................................................................... 6
Context Help Center Improvement ...................................................................................................................... 6
PDA interface Improvements .............................................................................................................................. 6
Downloading and Installing CleanOpsStaff-3ed: ................................................................................................................ 6
CleanOpsStaff-3ed Two Major Components: ..................................................................................................................... 7
Program Manager ....................................................................................................................................................... 8
Main Program ............................................................................................................................................................. 8
Running CleanOpsStaff-3ed in Demonstration Mode: ..................................................................................................... 10
Purchasing Product Code: ................................................................................................................................................. 10
Requesting Your Activation Key: ....................................................................................................................................... 10
Activating CleanOpsStaff-3ed: .......................................................................................................................................... 11
Run CleanOpsStaff-3ed in Full Feature Mode:.................................................................................................................. 12

Page 2 of 41 When in doubt, click for the nearest Help Button!
Run CleanOpsStaff-3ed in Specialized Training Mode: ..................................................................................................... 12
Run CleanOpsStaff-3ed in UpGrade SubScription Mode: ................................................................................................. 12
Purchasing Upgrades: ....................................................................................................................................................... 13
Activating Your Upgrades: ................................................................................................................................................ 13
Getting Latest Release: ..................................................................................................................................................... 14
Configuration to Match Your Local Conditions: ................................................................................................................ 14
Entering you inventory data: ............................................................................................................................................ 15
Use CleanOpsStaff-3ed Tools to Speed up Data Entry: .................................................................................................... 16
Navigating Within CleanOpsStaff-3ed Worksheet: ........................................................................................................... 16
Use the SpacePicker to Speed up Data Entry.................................................................................................................... 16
Using SpacePicker to Enter Data in Macro Staffing and Inventory Worksheet ........................................................ 16
Using SpacePicker to Enter Rows of Data in the Inventory Worksheet .................................................................... 17
Using SpacePicker Quick CSF Feature for Fast CSF Entry .......................................................................................... 18
Using SpacePicker Cleaning Level Section Feature for Fast Cleaning Level Entry and Editing .................................. 18
Using SpacePicker Space Category List Feature for Fast Space Category Entry and Editing .................................... 19
Using SpacePicker Cleaning Level Section Feature for Fast Cleaning Level Entry and Editing .................................. 19
Using SpacePicker Quick Space Feature for Fast Space Category Entry and Editing ................................................ 20
Use the KeyPad, Short Cut Menus, and QEntry to Speed up Data Entry: ......................................................................... 20
Generating Reports: .......................................................................................................................................................... 21
Managing Space Inventory Files: ...................................................................................................................................... 22
Backing Up Your Space Inventory Files: ............................................................................................................................ 22
Creating a Sixth Cleaning Level for a Standard Space Category: ...................................................................................... 23
Custom Standard Category File: ....................................................................................................................................... 24
Local Space Categories: ..................................................................................................................................................... 24
Granting Permission for Shared Users to Run CleanOpsStaff-3ed on the Same Computer: ............................................ 25
Setting Up File Sharing in Network Shared Folder (NetEnabled with ShareAware): ........................................................ 27
Sharing Inventory Files in Network Shared Folder (NetEnabled with ShareAware): ........................................................ 29
Network Inventory File Sharing Instructions by Example ................................................................................................. 29
Sharing Audit Package Files in Network Shared Folder (NetEnabled with ShareAware): ................................................ 30
Network Audit Package File Sharing Instructions by Example .......................................................................................... 31
Using CleanOpsStaff-3ed with Multiple Monitors (MultiMonitor Enabled) ..................................................................... 32
Setting Up Dual Monitors for Your Computer (MultiMonitor Enabled) ........................................................................... 32
File Locking and Protection: .............................................................................................................................................. 34
Steps for Locking and Protecting a Data File: ................................................................................................................... 35
Available Upgrades For CleanOpsStaff-3ed .......................................................................... 36

Page 3 of 41 When in doubt, click for the nearest Help Button!
(HCT-5x) Upgrade to CleanOpsStaff-3ed-Pro and Purchase Increase Record Capacity ............................................ 36
(HCT-9) CleanOpsStaff-3ed-ProMobilePlus-PC/PDA ............................................................................................ 36
(HCT-10) CleanOpsStaff-3ed-ProMobilePlus-PDA Add-In ......................................................................................... 38
(HCT-6) CleanOpsStaff-3ed justDoNext Data Import Wizard.................................................................................... 38
(HCT-8) CleanOpsStaff-3ed ProScheduler Add-In ...................................................................................................... 38
(HCT-11) CleanOpsStaff-3ed-ProLocal .................................................................................................................... 39
CleanOpsStaff-3ed Files: ...................................................................................................... 40
More Help: When in doubt look for the nearest Help Button! The below documents are on your hard drive in the C:\CleanOpsStaff-3ed Program Files folder – they end with a .pdf or .ppt extension. The most recent version of the documents is on the CleanOpsStaff-3ed web site at https://www.hunterct.com/cleanopsstaff-3ed-home at the bottom of the web page. If you are setting out to become a CleanOpsStaff-3ed power user to learn all the many powerful features of CleanOpsStaff-3ed in detail, then it is recommended that you print these documents and place them in a binder for ready reference.
Document and Content How to Access
This Help File: this is the best document to read in its entirety since it covers all the main aspects of CleanOpsStaff-3ed in a summary manner.
Click Help Getting Started button in Program Manager
Click Getting Started Button in the Main Program main menu worksheet
Click below link www.hunterconsultingtraining.com/CleanOpsStaff-3ed-Docs/CleanOpsStaff-3ed%20Program%20Admin%20Help.pdf
Recently Add Features Help File: Get the latest information and instructions on how to use recently added features
Click www.hunterconsultingtraining.com/CleanOpsStaff-3ed-Docs/CleanOpsStaff-3ed%20New%20Features.pdf
CleanOpsStaff-3ed User Manual: This document can double as a training manual complete with screen shots and exercises from the APPA Guidelines book.
Click User Manual File button on main menu in Main Program Click www.hunterconsultingtraining.com/CleanOpsStaff-3ed-
Docs/CleanOpsStaff-3ed-Documentation.pdf
CleanOpsStaff-3ed Quick Help: Contains step-by-step instructions for command buttons and other aspect of the basic program.
Click Quick Help File button on main menu in Main Program
Click www.hunterconsultingtraining.com/CleanOpsStaff-3ed-Docs/Quick-3ed%20Help.pdf
Click Help buttons throughout the application to see portions of this file as contextual help
JustDoNext Import Wizard: Instructions for use of the JustDoNext Data Import Wizard.
Click Help Button on JustDoNext Toolbox
click link www.hunterconsultingtraining.com/CleanOpsStaff-3ed-Docs/CleanOpsStaff-3ed%20Import%20Wizard%20Help.pdf
Flex Field Editor and Advance Reports: Instructions for using Flex Fields and Advance Reports.
Click www.hunterconsultingtraining.com/CleanOpsStaff-3ed-Docs/FlexField%20Adder%20and%20Advance%20ReportsHelp.pdf
iPad/iPhone CleanOpsStaff-3ed-ProMobile Help: Instructions for use of the CleanOpsStaff-3ed-ProMobilePlus-PC/PDA.
Click Help button in iPad/iPhone App
Click below link www.hunterconsultingtraining.com/CleanOpsStaff-3ed-Docs/iOSProMobileUserManual.pdf

Page 4 of 41 When in doubt, click for the nearest Help Button!
iOS-DropBox File Explorer Help.pdf: Instructions for use of the DropBox to transfer files to and from iPad/iPhone/Android.
Click below link www.hunterconsultingtraining.com/CleanOpsStaff-3ed-Docs/iPad-iPhone%20Mobile%20File%20Explorer%20Help.pdf www.hunterconsultingtraining.com/CleanOpsStaff-3ed-Docs/Android%20Mobile%20File%20Explorer%20Help.pdf
iTunes File Transfer: Instructions for use of the iTunes file transfer.
Click below link www.hunterconsultingtraining.com/CleanOpsStaff-3ed-Docs/iTunes%20File%20Transfer%20Instructions.pdf
CleanOpsStaff-3ed-ProMobilePlus-PC/PDA Help: Instructions for use of the CleanOpsStaff-3ed-ProMobilePlus-PC/PDA.
Click Help Button on PDA Interface in Main Program
Click below link www.hunterconsultingtraining.com/CleanOpsStaff-3ed-Docs/CleanOpsStaff-3ed%20ProMobile%20Help.pdf
CleanOpsStaff-3ed ProScheduler Help: Instructions for use of the CleanOpsStaff-3ed ProScheduler
Click Help button in the ProScheduler tool
Click www.hunterconsultingtraining.com/CleanOpsStaff-3ed-Docs/ProScheduler-3ed%20Help.pdf
FlexScheduler Help.pdf: Instructions for use of the CleanOpsStaff-3ed FlexScheduler
Click Help button on the FlexScheduler tool
Click www.hunterconsultingtraining.com/CleanOpsStaff-3ed-Docs/FlexScheduler-3ed%20Help.pdf
About CleanOpsStaff-3ed and this Document: CleanOpsStaff-3ed is a custodial operation and staffing computer application implementing the new APPA Custodial Operational Guidelines for Educational Facilities, Custodial Third Edition, just recently published in late 2011. It is a newer version of the Old CleanOpsStaff which implements the APPA Custodial Staffing Guidelines for Educational Facilities Second Edition. CleanOpsStaff-3ed replaces the 33 standard room matrices (categories) with updates ones based on revised cleaning times developed by a task team commissioned by APPA to review and update the guidelines. In addition to implementing the new and improved room matrices, CleanOpsStaff-3ed includes other major enhancements over the Old CleanOpsStaff. While users of the older CleanOpsStaff may continue to use it, they will need to migrate to CleanOPsStaff-3ed to take advantage of the new and revised room matrices and cleaning times as well as the new major enhancements. While Hunter Consulting and Training will continue to support the Old CleanOpsStaff, it will be frozen at the current release and no new releases of the Old CleanOpsStaff will be uploaded to the web site. All new client-requested and company sponsored enhancements will be incorporated into CleanOpsStaff-3ed only. User of the Old CleanOpsStaff can create local category matrices using the third edition cleaning times if they wish, however, to gain instant access to the new matrices, and the new major enhancements such as network file sharing and multiple monitor switching, you will want to consider moving up to CleanOpsStaff-3ed. This document contains screenshots to help illustrate the narrative. The screenshots are not intended for you to read the text in them, but instead to give to a visual impression of what you should be looking to see in the application itself while performing certain tasks.
CleanOpsStaff-3ed New Features

Page 5 of 41 When in doubt, click for the nearest Help Button!
Compared to the Old CleanOpsStaff, this is what’s new in CleanOpsStaff-3ed:
Updated for APPA Operational Guidelines for Educational Facilities, Custodial Third Edition: While you can create local category matrices in the old CleanOpsStaff to match the new times in the third edition guidelines book, it is more convenient to move up to CleanOpsStaff-3ed with the new matrices built in. This is a major enhancement giving user instant access to the new APPA matrices. CleanOpsStaff-3ed will read all Old CleanOpsStaff files; however, the Old CleanOpsStaff cannot read CleanOpsStaff-3ed files.
o The 33 Standard Room Matrices have been updated to match the revisions made in the APPA third edition guidelines.
o The Standard Service Level Table has been updated to match the revisions made in the APPA third edition guidelines.
o The cleaning times have been up updated to match the revisions made in the APPA third edition guidelines.
o All CleanOpsStaff-3ed documentation and help files have been updated to match the APPA Operational Guidelines for Educational Facilities, Custodial Third Edition
NetEnabled with ShareAware: CleanOpsStaff-3ed is Network File Sharing Enabled (NetEnabled) with ShareAware which means that multiple users can share the same data and audit files on a shared network drive without conflict. This is a major enhancement allowing organizations to store all inventory and audits files in a single location for all users. Inventory files are marked for Read-Only and Audit files are locked out when opened by another user. This prevents users from overwriting the files while other users have them open, but allowing Read-Only access to the inventory file by all other users. There is always a ShareAware button which allows you to see who is using what file in the network folder. See the NetEnabled section later in this manual for instructions on how to operate CleanOpsStaff-3ed in a network file sharing environment.
SpacePicker --Improved Data Input Tool: The SpacePicker which uses to be available only with the justDoNext Data Import Wizard upgrade has been made a free feature of the basic package with improved features to help speed up data entry. With the SpacePicker you can quickly enter data into a data input form instead of in the worksheet itself. SpacePicker has several different input modes that allow you to quickly while ever typing anything twice. This is a major enhancement to make data entry easier and much more efficient. Help file has been updated.
Improved Configuration Form and Configuration What-If Features: The Configuration Form has been improved and made accessible from more worksheet within CLenOpsStaff-3ed. This allows you to change configuration local variables and immediately see the impact of the change in more worksheets of the application. This greatly improves your capability to do what-if analysis on your inventory. The form is now resizable allowing you better visibility of your worksheet. Help file has been updated.
Improved Standard Space Category Navigation: The Standard Space Category Navigator has been improves so that you can move from matrix to matrix without causing the matrix to update unless you customize the matrix. This improvement allows you to move quickly through the matrix as you seek to decide what category to assign to your inventory based on the tasks and frequency to be performed. Help file has been updated.
MultiMonitor Enabled: CleanOpsStaff-3ed is now Multiple-Monitor Enabled, which mean you can have multiple monitors connected to your computer and switch CleanOpStaff-3ed from monitor to monitor with just the click of a button. With improved Drag-And-Pin behavior for all the tools, you can now have full view of your data on monitor while dragging and pinning the tool onto your second monitor. See the Multiple-Monitor

Page 6 of 41 When in doubt, click for the nearest Help Button!
Enabled section later in this manual for instructions on how to operate CleanOpsStaff-3ed with multiple or dual monitors.
Quick Entry Tool Improvement: The QEntry (Quick Entry) tool has been redesigned by placing more of the commonly used data input buttons, worksheet navigation buttons, and data manipulation buttons on the tool. The tool now performs better as a stand along data input and data manipulation tool providing similar capability as SpacePicker while also assisting you in implementing Excel Auto Filter capability without using the Auto Filter button within the worksheet. The Tall Mode/Short Mode switching behavior has also been improved to more easily give you optimum view of your data and the tool. This is a major enhancement that allows you to have more flexibility and better visibility of your worksheets and the various tools. Help file has been updated.
Tool Movement and Pinning Improvements: To help you get maximum visibility of your worksheets and the many tools at the same time a Pin Button has been added to most of the tools. This allows you to move the tool around on the screen and pin the tool to the position that provide you maximum visibility of your worksheet and tools. This is especially useful with the new monitor-switching feature. In some instances, you get a much improved view of your worksheet by pinning the tool to the screen of a different monitor.
Quick Staff Calculator Improvements: In the all Old CleanOpsStaff, the Quick Staff did not compute the cleaning level number when the level fell between two of the five APPA cleaning level. It displayed two levels (Example: 3->4) with a dash and a greater than sing to indicate that the calculated level is somewhere between the two levels. The CleanOpStaff-3ed Calculator Quick Staff Calculator now computes actual cleaning level number (Example: 3.25) when level falls between two levels. This significant enhancement that provide you a more accurate quick calculation of clean levels for combination of space category, FTEs, and CSF. Help file has been updated.
justDoNext Import Wizard Improvement : The justDoNext Import Wizard automatic flow has been improved with updated interactive instructions. The basic flow for the justDoNext Import Wizard upgrade is the same. However, the interactive instructions that you see when importing data have been updated and improve. Help file has been updated.
Context Help Center Improvement: The Context Help buttons that are throughout the application take you to an improved Help Center with an added Keyword search feature. You can now search the Help Center text box by entering a keyword and clicking a Find First and Find Next button. You can also search the entire Quick Help file using the Search All Help button. Help file has been updated.
PDA interface Improvements: The PDA interface has been updated to make it easier to manage files on the remote device from within CleanOpsStaff-3ed. It does not close after each action anymore. Help file has been updated.
Downloading and Installing CleanOpsStaff-3ed: CleanOpsStaff-3ed can be downloaded from the Hunter Consulting and Training Web site using the below steps:
1. Go to https://www.hunterct.com/download-cleanopsstaff-3ed and follow steps 1 through 15. In step 7, after you download and extract the CleanOpsStaff-3ed files, you will run Setup.exe in the C:\CleanOpsStaff-3ed Program Files folder to install CleanOpsStaff-3ed.
2. A shortcut to CleanOpsStaff-3ed will be added to your Windows Start button under Hunter Consulting and Training. To run CleanOpsStaff-3ed in the future click Start, click All Programs, click Hunter Consulting and

Page 7 of 41 When in doubt, click for the nearest Help Button!
Training and then click CleanOpsStaff-3ed. You may also place a shortcut of CleanOpsStaff-3ed on your desktop or pin it into your Start menu or pin it to your taskbar if you wish by right clicking on the CleanOpsStaff-3ed shortcut.
To Run CleanOpsStaff-3ed
Click the Windows Start button
Click All Programs
Scroll to Hunter Consulting and Training folder shortcut
Click Hunter Consulting and Training folder shortcut
Click CleanOpsStaff-3ed shortcut to run the program
Or right click CleanOpsStaff-3ed to Pin shortcut to Start Menu
Or right click CleanOpsStaff-3ed to Pin shortcut to Task bar
Or right click CleanOpsStaff-3ed to Copy shortcut and then paste to desktop.
3. NOTE TO IT STAFF: If the computer main user does not have administrative rights on the computer, it is recommended that you give the main user temporary administrative rights and run Setup.exe while logged in under the main user login ID. This will register the application to the main user in the Windows registry. See Granting Permission for Shared Users to Run CleanOpsStaff-3ed on the Same Computer in this help document for information on providing shared user access to CleanOpsStaff-3ed on computers with multiple users. It is important to note that you must run setup for all shared users if you intend to share use of CleanOpsStaff-3ed with other users with access to the same computer.
4. NOTE TO IT STAFF AND MAIN USER: Before CleanOpsStaff-3ed can be used in full feature mode, it must be activated using the Product Code from APPA and the Activation Key from Hunter Consulting and Training. It is important to be logged into the computer under the Main User’s login ID when you activate CleanOpsStaff-3ed. CleanOpsStaff-3ed designates the user who activates the program as the Main User. The Main User can then designate other users as shared users (See Granting Permission for Shared Users to Run CleanOpsStaff-3ed on the Same Computer ). Only one user can activate CleanOpsStaff-3ed on the same computer.
CleanOpsStaff-3ed Two Major Components: CleanOpsStaff-3ed has two major components: (1) Program Manager and (2) Main Program. The Program Manager is the first components you will see after you download and install CleanOpsStaff-3ed and the first component you will see each time you run CleanOpsStaff-3ed. The functions of the Program Manager are described in later paragraphs of this help document. You will launch the Main Program by clicking the Run

Page 8 of 41 When in doubt, click for the nearest Help Button!
CleanOpsStaff-3ed as Demo button, or the Run in Full Feature Mode button or the Run in Specialized Training Mode button, or the Run in Upgrade Subscription Mode button in the Program Manager. You can learn more about navigating around the Main Program by going to pages 19 through 25 in the User Manual www.hunterconsultingtraining.com/CleanOpsStaff-3ed-Docs/CleanOpsStaff-3ed-Documentation.pdf.
Program Manager Main Program
Program Manager Components CleanOpsStaff-3ed Program Manager Web Navigation Buttons – These buttons are located at the top of the Program Manager screen above the Program Manager Brower and they are used to move around the CleanOpsStaff-3ed web site to get Information and instructions. Use these buttons to read the instruction web page on how to perform certain actions within the Program Manager. The buttons are also called Information Buttons.
CleanOpsStaff-3ed Program Manager Web Browser Window – This built-in web browser lets you browse the CleanOpsStaff-3ed web site without leaving the Program Manager. Use this browser to stay up to date on CleanOpsStaff-3ed news and to read instructions on how to use the Program Manager and other parts of CleanOpsStaff-3ed. It is recommended that you do not use the CleanOpsStaff-3ed built in browser to buy upgrades. Instead use your normal internet browser to by upgrades.

Page 9 of 41 When in doubt, click for the nearest Help Button!
Program Manager Components (cont.) CleanOpsStaff-3ed Program Manager Action Buttons – These buttons are located in the Left Panel of the Program Manager screen and they are used to take action. You will click one of these buttons when you are ready to take the action indicated by the button’s caption. You can first use the CleanOpsStaff-3ed Program Manager Web Navigation Buttons to read the instruction on how to perform the action if you are not already familiar with what the action button will do.
CleanOpsStaff-3ed Program Manager Terms/Agreement/Status/Message Box – you should read this box to make sure you understand the terms of the single user license, and to get information on the activation status of your program. Do not check the ‘I agree with the above terms’ checkbox until you have read the text in this box. Basically, CleanOpsStaff-3ed is intended to be used by a single user. The Product Code (license) allows the single user to activate the same Product Code his/her desktop and laptop so long as the application only run on one computer at time. If an organization intends for CleanOpsStafff-3ed to run on more than one computer at a time, then additional Product Codes must be purchased from APPA.
CleanOpsStaff-3ed Program Manager Deactivate CleanOpsStaff-3ed button – Use this button to deactivate CleanOpsStaff-3ed on your computer. This does not remove or uninstall the program files from your computer and it does not remove your data files.
Use this button to deactivate CleanOpsStaff-3ed on the current computer so you can legally activate it on a different computer. An email will be sent to the Hunter Consulting and Training to record the deactivation in the CleanOpsStaff-3ed database. If your IT department changes the name of your computer, CleanOpsStaff-3ed will no longer run on that computer and will have to be activated again. This activation will appear to the CleanOpsStaff -3ed server as if it is being activated on a new computer. Therefore, it is recommended that CleanOpsStaff-3ed be deactivated prior to any computer name change and then activated again after the name change.
CleanOpsStaff-3ed Program Manager Check Upgrade Status Button – Use this button to check the status of the CleanOpsStaff-3ed –Pro upgrades that you purchase. It will take several hours before your upgrade purchases are registered in the upgrade server. Use this button to confirm that your

Page 10 of 41 When in doubt, click for the nearest Help Button!
purchased upgrades have been registered in the CleanOpsStaff-3ed upgrade server. Then you will need to use the CleanOpsStaff-3ed-Pro Upgrades button to activate your upgrades on your end.
Running CleanOpsStaff-3ed in Demonstration Mode: You can run CleanOpsStaff-3ed in Demo mode to evaluate it to decide whether you want to purchase it. In order to keep CleanOpsStaff-3ed a low cost high quality product, Hunter Consulting and Training has adopted a No Return Policy for all products and services purchased from Hunter Consulting and Training. It is therefore very important that you do a complete evaluation of the products and services before making a purchase to ensure it is what you need. The Demo mode provides all the functionality needed for you to make an informed purchase decision. Additionally, Hunter Consulting and Training will provide on-line demonstrations of CleanOpsStaff-3ed upon request.
1. In the Program Manager, check the I agree with the above terms checkbox 2. Click the Run CleanOpsStaff-3ed as Demo button 3. The Main Program will be launched 4. Allow a few moments for CleanOpsStaff-3ed to gather information about your computer to
properly configure itself 5. Immediately click the Macro Staffing and Inventory button and then return to the Main Menu to
ensure CleanOpsStaff-3ed has gathered all necessary information about your computer
Purchasing Product Code: Before you can use the full features of CleanOpsStaff-3ed, you must purchase a Product Code from APPA
1. Go to to purchase a product code. 2. APPA will email you your Product Code and ship the book separately 3. The book will contain an insert containing the Product Code 4. You can request your Activation Key immediately after receiving your Product Code
Requesting Your Activation Key: Once you get your Product Code from APPA, you will need to request an Activation Key from Hunter Consulting and Training using the Request Activation Key action button.
1. OPTIONAL -- Click Activation Key Request Information Button and read the instruction in the CleanOpsStaff-3ed web browser window at
https://www.hunterct.com/request-activation-key

Page 11 of 41 When in doubt, click for the nearest Help Button!
2. Click the Request Activation Key action button to launch the activation key request form.
3. Fill out the CleanOpsStaff-3ed Activation Key Request Form including the Product Code
4. Check the ‘I agree with the Terms’ checkbox 5. Click the Request Key button in the lower right corner of
the CleanOpsStaff-3ed Activation Key Request Form 6. Allow a few moments while the Program Manager
connects with the Server and submit the form. Several message boxes will popup. Click OK when prompted.
7. You will receive an email containing your Activation Key within 24 hours, but most of the time you will receive the email within the hour or immediately, depending of the volume of CleanOpsStaff-3ed server activity at the time.
Activating CleanOpsStaff-3ed: Once you receive your Activation Key from the Hunter Consulting and Training Activation Server by email, you can activate CleanOpsStaff-3ed to operate in Full Feature Mode. You will receive your activation key within 24 hours and most of the time within the hour and sometimes immediately.
1. OPTIONAL -- Click Program Activation Information Button and read instructions in the CleanOpsStaff-3ed web browser window at https://www.hunterct.com/program-activation
2. Click the Activate CleanOpsStaff-3ed button action button to activate the activation key request form.
3. The CleanOpsStaff-3ed Program Activation Form will be automatically filled out except for the Product Code and the Activation Key
4. Fill in the Product Code and the Activation Key input boxes
5. Read the Terms and Conditions. Check the ‘I agree with the above Terms and condition’ checkbox
6. Click the Activate CleanOpsStaff-3ed button in the lower right corner of the CleanOpsStaff-3ed Program Activation Form
7. Allow a few moments while the Program Manager to connects with the Server and submit the form. Several informational messages will popup. Click OK after reading each message.
8. You program will be activated and you will see the word “Congratulations” in the Terms/Agreement/Status/Message Box. It might take several hours for your activation record to be added to the activation server, however, you do not have to wait until then to begin using full feature mode.
9. You will receive an email from Hunter Consulting and Training thanking you for your activation and providing instructions on activating your purchased upgrades. You cannot activate your purchased upgrades until you your activation record has been registered in the activation server.

Page 12 of 41 When in doubt, click for the nearest Help Button!
Run CleanOpsStaff-3ed in Full Feature Mode: 1. After you activate CleanOpsStaff-3ed you can immediately run it in
full feature mode by clicking the Run Full Feature Mode button. 2. The Main Program flash screen will appear and the Main Program
will be launched and start up in Demo Mode. Allow a bit of time for the Main Program to configure itself.
3. Immediately after the Main Program has finished launching, click the Macro Staffing and Inventory button and then return to the Main Menu to activate full feature mode.
Run CleanOpsStaff-3ed in Specialized Training Mode: 1. Hunter Consulting and Training offers specialized training in the use
of CleanOpsStaff-3ed at the user site or online. During the training session, users can be granted access to all the full features of CleanOpsStaff-3ed and all the upgrades through the Specialized Training Mode. This allows the trainee to follow along with the CleanOpsStaff-3ed trainer and perform all the training exercises. Prior to the specialized training sessions, Hunter Consulting and Training provides the users with a Specialized Training Access Code.
2. To run in Specialized Training Mode, click the Run in Specialized Training Mode button and enter the Specialized Training Access Code
3. The Main Program will be launched and start up in Demo Mode 4. Immediately click the Macro Staffing and Inventory button and then
return to the Main Menu. The Specialized Training Mode will be activated
Run CleanOpsStaff-3ed in UpGrade SubScription Mode: 1. Hunter Consulting and Training offers the UpGrade SubScription
program to allow users to “Rent-A-Upgrade” by the month (subscribe). If you do not want to purchase an upgrade for any reason, or if you are not sure, you want to buy the upgrade, you can subscribe to the upgrade to try it out. If you only have a short-term need for the upgrade, you can rent it. Go to the web site and use the rent link in the left panel of the web site to subscribe to as many or as few upgrades as you wish
2. To run in UpGrade SubScription Mode, click the Run in UpGrade SubScription Mode button
3. The Main Program will be launched and start up in Demo Mode 4. Immediately click the Macro Staffing and Inventory button and then
return to the Main Menu to activate UpGrade SubScription Mode.
Page 13 of 41 When in doubt, click for the nearest Help Button!
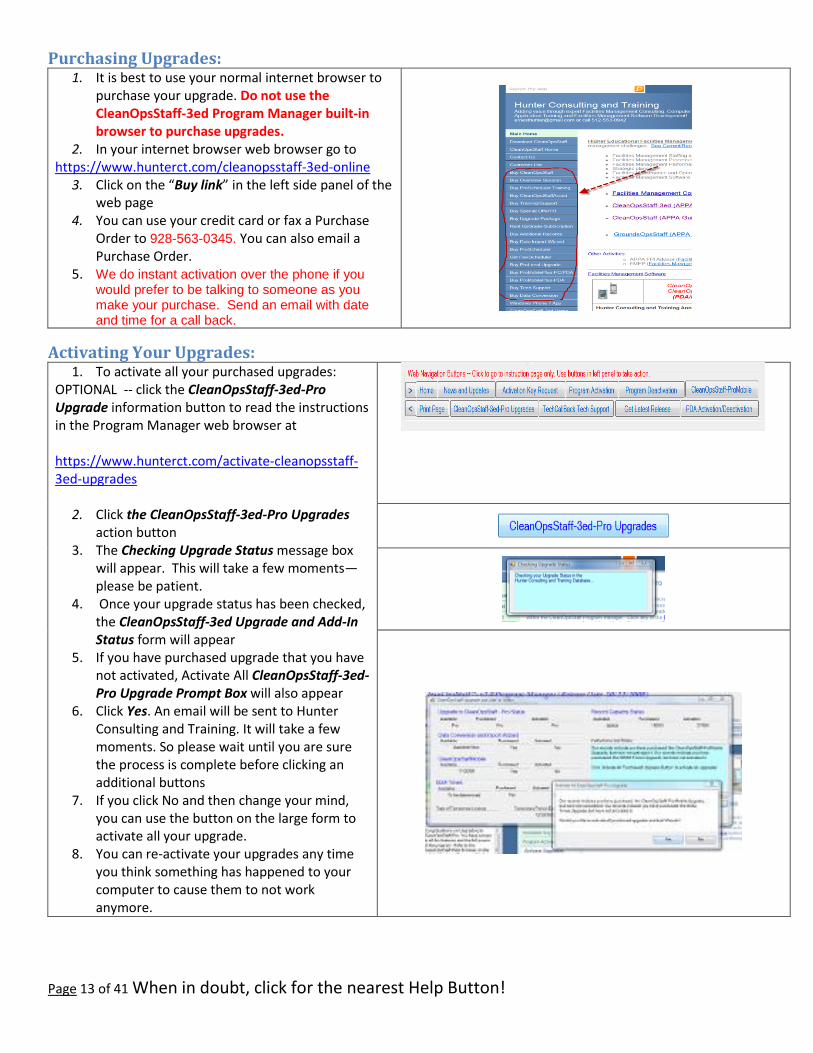
Purchasing Upgrades: 1. It is best to use your normal internet browser to
purchase your upgrade. Do not use the CleanOpsStaff-3ed Program Manager built-in browser to purchase upgrades.
2. In your internet browser web browser go to https://www.hunterct.com/cleanopsstaff-3ed-online
3. Click on the “Buy link” in the left side panel of the web page
4. You can use your credit card or fax a Purchase Order to 928-563-0345. You can also email a Purchase Order.
5. We do instant activation over the phone if you would prefer to be talking to someone as you make your purchase. Send an email with date and time for a call back.
Activating Your Upgrades: 1. To activate all your purchased upgrades:
OPTIONAL -- click the CleanOpsStaff-3ed-Pro Upgrade information button to read the instructions in the Program Manager web browser at https://www.hunterct.com/activate-cleanopsstaff-3ed-upgrades
2. Click the CleanOpsStaff-3ed-Pro Upgrades action button
3. The Checking Upgrade Status message box will appear. This will take a few moments—please be patient.
4. Once your upgrade status has been checked, the CleanOpsStaff-3ed Upgrade and Add-In Status form will appear
5. If you have purchased upgrade that you have not activated, Activate All CleanOpsStaff-3ed-Pro Upgrade Prompt Box will also appear
6. Click Yes. An email will be sent to Hunter Consulting and Training. It will take a few moments. So please wait until you are sure the process is complete before clicking an additional buttons
7. If you click No and then change your mind, you can use the button on the large form to activate all your upgrade.
8. You can re-activate your upgrades any time you think something has happened to your computer to cause them to not work anymore.

Page 14 of 41 When in doubt, click for the nearest Help Button!
Getting Latest Release: 1. Periodically Hunter Consulting and Training will upload a
new release of CleanOpsStaff-3ed to the web site to add enhancements and to resolve reported issues.
2. OPTIONAL -- In the Program Manager click Get Latest Release information button at the top of the CleanOpsStaff-3ed Browser Window to read instructions in the Program Manager web browser at https://www.hunterct.com/get-latest-release
3. Click Get Latest Release action button 4. Wait a few moments, while the Program Manager
connects to the CleanOpsStaff-3ed Release Update server. 5. The Getting Latest Release information box will appear.
Compare the file dates and read the note in the message box to determine if you have the latest release.
6. Click ‘Yes’ to get the latest release 7. You will be directed to the web site for download and re-
installation instructions.
Configuration to Match Your Local Conditions: 1. Once you have run CleanOpsStaff-3ed in Demo or Full feature
mode and the Main Program is running, you can change the variables CleanOpsStaff-3ed uses to perform its calculations
2. From Main Menu click the Configuration button to launch the Configuration Form
3. Click the Help button and read the help information provided for filling out this form.
4. You will enter information and write the form to memory for it to have an effect on the CleanOpsStaff-3ed Calculations. (NOTE: Entering information in the form has no effect until you write it to memory or set the form as your default configuration).
5. To make the information in the form load up automatically each time you run CleanOpsStaff-3ed, click the Set as Start Up Default Configuration button – this will make it so that you do not have to change the variables each time you run CleanOpsStaff-3ed.

Page 15 of 41 When in doubt, click for the nearest Help Button!
Entering you inventory data: 1. After completing the Configuration form, you will now
want to get your space inventory data into CleanOpsStaff-3ed. If you have a small number of records or do not already have your data in electronic form, you will enter the space inventory data into CleanOpsStaff-3ed Macro Staffing & Inventory worksheet in much the same way you would into a regular spreadsheet.
2. From Main Menu click the Macro Staffing & Inventory button
3. Click the Help button to the right of the Hide/Show button in the upper right corner of the screen and read the help information for entering data
4. Click inside the first blank row under the Building Name/Number column and type the Building Name or Number
5. Press the Tab key to move to the next field and enter the required data elements (Floor Name/Number, Space Name/Number, and CSF. Flex Field is optional)
NOTE: Certain features require the space name or number to be unique for each floor of the same building. In other words, do not assign the same space name or number to more than one space on the same floor of the same building.
6. Tab to the Standard Space Category Or Local Custom Space Category column and select a Space Category from the dropdown list (to see the list of category names, you might have to scroll up using the right side bar in the dropdown list)
7. Tab to the Cleaning Level and select a Cleaning Level from the dropdown list 8. When you enter the last require data element, CleanOpsStaff-3ed computes the vital custodial macro
staffing information and summarized it in the summary row – gray background row above the data headings.
9. Repeat this process until you are ready to quit entering data 10. If you have a large amount of space inventory data and it is in electronic form, you can purchase the
JustDoNext Data Import and Conversion Wizard upgrade and import and convert your data without typing it into CleanOpsStaff-3ed.

Page 16 of 41 When in doubt, click for the nearest Help Button!
Use CleanOpsStaff-3ed Tools to Speed up Data Entry: CleanOpsStaff-3ed is designed to allow you to manually enter your data if you do not have it electronically already or to import it using the justDoNext Data Import Wizard upgrade if you have electronic data and want to avoid manually retyping data that has already been save in an electronic file. If you choose to enter your data manually, you can do so in the same manner as you would enter data into a normal spreadsheet. However, to speed up the process, CleanOpsStaff-3ed basic package comes with the below tools to help implement the concept of never typing the same information more than once. Through the use of copy and paste, room number incrementing, pick list and other features of the tools you should be able to quickly enter a many rows of data without ever typing the same data twice.
SpacePicker – this tool serves as a data input form which allows you to enter data without typing into the inventory worksheet. SpacePicker is the most versatile and easy to use tool for entering many rows of data. You should click the Help button on this tool to learn use its more advance capabilities.
KeyPad – this tool doubles as a calculator so you can compute square feet from room dimensions and it also serves as a quick single column copy and paste tool. It allows you to capture data from a single cell or enter data into its input box and then paste the data to multiple cells in the same columns.
QEntry – this is an advance data entry and data manipulation tool. It has similar capabilities as the SpacePicker, but it can also help you once your data has been entered. It can sort, filter, and select row of data in many variations to assist you in answering what if questions. You should click the Help button on this tool to learn use its more advance capabilities.
Right-Click Short Cut Menu – by right clicking inside the worksheet you can activate a shout cut menu to gain access to similar copy, paste, delete, insert
General instructions for the above tools are given below; however, click the tool Help button for more detail information on the use of the tool.
Navigating Within CleanOpsStaff-3ed Worksheet: 1. Once you have data in you inventory worksheet, you will move from row to row and column to column in
the same way as you would in a regular spreadsheet. Practice using the Arrow keys, Tab key, Shift-Tab key, Page Up key, and Page Dn key
2. CleanOpsStaff-3ed also has Navigation tools to help you move around 3. Records Navigator -- Click the Help on the Records Navigator and read the instructions on how to use it
to move around a worksheet and for how to use the other command button on the Records Navigator
Use the SpacePicker to Speed up Data Entry
Using SpacePicker to Enter Data in Macro Staffing and Inventory Worksheet
CleanOpsStaff-3ed added the SpacePicker to the basic package instead of requiring JustDoNext Data Input Wizard. You can use the SpacePicker to speed up data entry into the Macro Staffing and Inventory worksheet.

Page 17 of 41 When in doubt, click for the nearest Help Button!
o The SpacePicker is now part of the basic application and no upgrade is needed to use it o It combines some of the features of the KeyPad and the QEntry tool to make data input fast and easy o It has three sections: (a) the Data Input Form section; (b) the Cleaning Level Section; and (c) the
Space Category List Section.
To activate the SpacePicker, right click in the worksheet and select Space Picker from the short cut menu
Or Click the SpacePicker button and then click the Space Picker button in the MiniToolBox
Using SpacePicker to Enter Rows of Data in the Inventory Worksheet
The SpacePicker starts up as a data input form which allows you to enter data without typing into the worksheet
This is a very flexible data input tool and you should consider making it your main data input tool
You can change the way the tool behave by checking and unchecking the various checkboxes
To enter data into your inventory worksheet, click the row you want to start entering data into
Move the SpacePicker to a position on the screen that gives you a good view of the worksheet
Uncheck the Prompt on checkbox. Check the Auto Increment checkbox. Check the Next After Paste checkbox.
Enter data into the Data Input Form section
Use the keyboard “ENTER” key to move from one input box to the next and to invoke the Paste button after the last data has been entered.
After the data has been pasted, the SpacePicker will move the worksheet insertion point to the next row and set focus to the Building input box in the Data Input Form section.
Continue using the keyboard “ENTER” keyboard cycling through the input boxes entering and changing only the data that is different for the previous pasted row.

Page 18 of 41 When in doubt, click for the nearest Help Button!
Using SpacePicker Quick CSF Feature for Fast CSF Entry
Enter all data into your inventory worksheet for as many rows as you wish but leave the CSF column blank if you wish
Click the Quick CSF button in the SpacePicker. This will turn the SpacePicker into a tool that will now only paste CSF into the worksheet row while leaving the rest of the data in the worksheet unchanged
Click in the first row of the worksheet to begin entering or editing GSF
Enter the CSF value in the CSF input box and hit the keyboard ENTER key. The worksheet insertion point will advance to the next row and focus will be given to the CSF input box
Enter the CSF value for the next row and hit the keyboard ENTER key.
Repeat the previous two steps until you have entered or edited CSF values for all the rows
Using SpacePicker Cleaning Level Section Feature for Fast Cleaning Level Entry and Editing
Enter all data into your inventory worksheet for as many rows as you wish but leave the Cleaning Level column blank if you wish
Check the Next After Level checkbox to the left of the SpacePicker Cleaning Level section. This will cause the worksheet to advance to the next row each time you click one of the six level buttons
Click in the first row of the worksheet to begin entering or editing Cleaning Level
Click the desired Cleaning Level button. Observe that the level has been pasted into the worksheet and the worksheet advanced to the next row
Repeat the above step until you have entered or edited the cleaning level for all desired rows

Page 19 of 41 When in doubt, click for the nearest Help Button!
Using SpacePicker Space Category List Feature for Fast Space Category Entry and Editing
Enter all data into your inventory worksheet for as many rows as you wish but leave the Space Category column blank if you wish
Click inside the macro staffing and inventory worksheet in the row you wish to add or edit data
Check the Next After Space checkbox to the left of the SpacePicker Cleaning Level section. This will cause the worksheet to advance to the next row each time you click one of the Space Category buttons
Click the Show Space List button
Click one of the Space Category button to paste the space category in to the row
Observe that the space category has been pasted into the worksheet and the worksheet has advanced to the next row
Repeat the above step until space category has been pasted in all desired rows
You can manually advance to the next row in the worksheet by clicking one of the three sets of gray up/down arrows in the SpacePicker
Note the four tabs in the Category list section giving you access to all of your Local Categories as well as the 33 APPA standard categories
Using SpacePicker Cleaning Level Section Feature for Fast Cleaning Level Entry and Editing
You can use the Row Copy and Paste Section of the SpacePicker to copy an existing row and then paste all or part of the row to a new single row or to a range of rows o Click inside the row you wish to copy and click
the Copy button in the Row Copy and Paste Section
o Observe the data now in the input boxes of the Data Input Form section
o Click inside the worksheet in the row you want to paste into or select a range of rows you wish to paste into
Click the Paste button and click Yes if prompted. Observe the data pasted to the new row or rows
Note the six blue Data Copy Bars in each data input section. Click these bars to copy an individual cell from the worksheet into the input box. This allows you to copy data into the form without copying yhr entire row
Note the six red Data Clear Bars in each data input frame. Click these bars to clear the associated input box. If a input box is blank then no data will be pasted into that field during the paste operation. This

Page 20 of 41 When in doubt, click for the nearest Help Button!
allows you to copy an entire row, but only paste some of it’s data
You can manual increase or decrease the space number in the form before pasting with the Manual Inc Rm No. arrows buttons. The row number will increase/decrease by the number in the Inc Amt input box.
You can enter a different increment number or use the up/down arrow buttons to change the increment in the Inc Amt input box
Check the Auto Increment checkbox to automatically increment the row number of a range of rows with pasting operation
Check the Prompt on checkbox to turn on prompting before pasting feature.
Reminder: you can pause the mouse pointer over items in the SpacePicker to get a screentip on what the item will do when clicked.
Using SpacePicker Quick Space Feature for Fast Space Category Entry and Editing
Enter all data into your inventory worksheet for as many rows as you wish but leave the Space Category column blank if you wish
Click the Quick Space button in the SpacePicker. This will turn the SpacePicker into a tool that will now only paste Space Category into the worksheet row while leaving the rest of the data in the worksheet unchanged
Click in the first row of the worksheet to begin entering or editing Space Category
Select the Space Category from the dropdown list in the CSF input box and click the Paste button. The worksheet insertion point will advance to the next row and focus will be given to the Space Category input box
Select the space category for the next row and click the Paste button.
Repeat the previous two steps until you have entered or edited Space Category for all the rows
Use the KeyPad, Short Cut Menus, and QEntry to Speed up Data Entry: 1. Use the KeyPad, Short Cut Menus, and QEntry tools to
speed up data entry 2. KeyPad
a. On the MiniToolBox in the upper left corner in the Macro Staffing & Inventory worksheet, click the KeyPad button
b. Click the Help button on the MiniToolBox and scroll down to read the instruction for using the KeyPad
3. Short Cut Menus a. Right click in the inventory worksheet and select
‘Rows and Cells’ b. Click a command from the right hand drop down list
4. QEntry a. Click the QEntry button b. Click the Help button on the QEntry toolbox and
read the instruction for using the QEntry. c. You can expand the QEntry tool by dragging it

Page 21 of 41 When in doubt, click for the nearest Help Button!
slightly off the top of the screen then rolling the mouse pointer over it.
d. You can then toggle between expended and collapsed size by clicking in an inactive gray area on the tool.
NOTE: You can also use the User Manual for exercises to practice using these tools.
Generating Reports: 1. Once you have complete data in the Macro Staffing &
Inventory worksheet, you can generating the standard APPA reports found in the guidelines book as well as special reports added by CleanOpsStaff-3ed
2. On the MiniToolBox in the upper left corner on the Macro Staffing & Inventory worksheet, click the Reports button to activate the Report Generator toolbox
3. The report generator will let you run standard APPA Guidelines reports :
a. Macro Staff by Levels b. Micro Staffing by Room c. Micro Staffing by Building d. Cost of Cleaning by Level e. Time to Clean f. Current Levels Cost by Room/Space g. Current Levels Cost by Building h. Audit – see Quick Help file for instructions. Or
click the Help button on the Report Generator. 4. You can also run special reports added by
CleanOpsStaff-3ed: i. Audit Analyzer
ii. ProScheduler 5. Click the Help button on the Report Generator toolbox
and read the instructions for generating reports. The Quick Help file contains detail instructions for the audit report
6. You can click the Help button on the ProScheduler interface to get instructions on how to use the ProScheduler
7. You can move around within report worksheets in much the same way you would in any regular excel worksheet. CleanOpsStaff-3ed also has several tools to assist you in moving around.
8. Category and Record Buttons - these buttons are on the MiniToolbox and allow you to go to the Next, Previous, First and Last item by clicking on the

Page 22 of 41 When in doubt, click for the nearest Help Button!
respective button 9. MiniNavigator – if this tool is not already visible, Right-
Click inside the worksheet and select MiniNavigator from the pop-up short cut menu
10. You can move the MiniNavigator to any location in the worksheet you wish and click the Pin button to pin it to that location for the duration of your current session.
Managing Space Inventory Files: 1. You will use the file management buttons at the
bottom of the Main Menu worksheet to manage your space inventory files in much the same way you would manage regular excel workbook files.
2. CleanOpsStaff-3ed appends “-HECS-DATA.XLS” to the end of all space inventory data file names and stores the file on the hard drive in a folder of your choice. The Default folder for space inventory data files is “C:\CleanOpsStaff-3ed Data”
3. You can have as many Space Inventory files as you wish saved to any drive (local drive and networked shared drive) you have access to.
4. You can also right-click in most worksheets, and select Functions from the short cut menu, and then select one of the file management commands.
5. You will use the Open button to open a data file. It is important to note that opening a CleanOpsStaff-3ed data file behave the same way opening a file in excel behaves, except CleanOpsStaff-3ed actually only make a copy of the data in the data file and places it in memory, and remembers the file name. The work you do in CleanOpsStaff-3ed has no effect on the file on the drive unless you use the Save button.
6. Because CleanOpsStaff-3ed remembers the file name that it opened (copied data from) last, if you click the Save button, the data in the file on the drive will be overwritten with the data in memory.
7. To save the CleanOpsStaff-3ed data file that is currently in memory under a different file name, you will use the Save As button. CleanOpsStaff-3ed will remember the file name used in the last Save As in the same way as Excel does and any subsequent Save operations will overwrite the file used by the last Save or Save As operation
8. To close a file in memory without saving it, and to clear the “remembered file name” you will use the Close button. The Close operation works the same as it does in Excel. It clears the data file from memory, clears the “remembered file name” as well as reloads the default configuration information back into memory.
Backing Up Your Space Inventory Files: As with all your important files, you should make sure you have a file backup procedure that ensures you have backup copies of all your important CleanOpsStaff-3ed data files contained in the CleanOpsStaff-3ed Data folder and any other place you store data files. If is not necessary for you to back up the program files in the CleanOpsStaff-3ed Program Files folder since you can always use the Get Latest Release button in the Program manager to get them again. You should NOT use CleanOpsStaff-3ed files management buttons to manage your backup procedure. You should use the Windows File Explorer to copy the important data files to a different physical drive. These are the files that you should ensure you have backup copies of:
Files that you create ending in “– HECS-Data.xls” (your data files). There is no need to back up the exercise/practice “– HECS-Data.xls data files since you can use the Get Latest Release button to get them again if you need to.
Files that you create ending in “-HECS-Cust.xls” (your custom standard category files)
Files that you create ending in “-HECS-Loc.xls” (your local category files)

Page 23 of 41 When in doubt, click for the nearest Help Button!
Files that you create ending in “-HECS-Var.ini” (your configuration Variable files)
CleanOpsStaff-3ed-HECS-Vars.ini (the default start-up configuration file that determines the default configuration that is load upon startup and after a file Close operation.
PROTECTING YOUR WORK IN PROGRESS:
CleanOpsStaff-3ed does not have an undo function and it does not have an auto-save function. Before you begin extensive data input or data modification work on a CleanOpsStaff-3ed data file or any file for that matter, it is recommended that you use the Windows File Explorer to make a copy of the file to another physical drive.
After about 30 minute of work (or how ever amount of time you are comfortable with in the event of an unusual event such as a power failure that might cause you to lose data),
o save the file using the CleanOpsStaff-3ed file management button, o and then using the Windows File Explorer, copy it to a another physical drive under a name not
already on the backup drive and append a date and maybe time to the file name o Repeat this process at whatever interval you become comfortable with
Creating a Sixth Cleaning Level for a Standard Space Category: 1. The Guidelines book has 33 standard space categories and five
cleaning levels for each of them for you to choose from when entering your data into the inventory work sheet
2. If the five cleaning level do not properly reflect the cleaning activities and frequencies for your space, you can create your own cleaning level that CleanOpsStaff-3ed has designated as Level C2
3. From the Main Menu click the Standard Space Category Matrices button
4. In the Standard Space Category Matrices Navigator that pops up in the right side of the screen, click on the space you are interested in
5. Click the Help button in the MiniToolBox and read the instructions on how to change the frequency of the cleaning activities under Cleaning Level C2.
6. You can also use the Include and Exclude button to exclude and
include activities from all six levels. 7. You can exclude a task for all six levels or you can exclude the task
for Level C2 only. You can not make any other adjustments to the standard room matrices. If you need more than just excluding tasks and modifying frequencies then you must use the Local Category feature to create your own local matrix.
NOTE: Please note that when you include and exclude activities, you would be incorrcet to refer to the level as an APPA standard unless you note the change you made to the frequency and/or the exclusion you made.

Page 24 of 41 When in doubt, click for the nearest Help Button!
Custom Standard Category File: 1. Once you have made changes to customize standard space categories (matrices),
you can save a Custom Standard Space Category File containing all 33 of the standard space categories changes you made.
2. While viewing one of the 33 Standard Category Matrices, Click the Help button on the MiniToolBox and read the instructions on Custom Standard Categories files
3. Click the Save Custom Standard Categories file button on the MiniToolBox
4. You can save and many Custom Standard Space Category Files as you wish to any drive your computer has access to.
5. CleanOpsStaff-3ed appends “-HECS-CUST.XLS” to the end of all Custom Standard Space Category File names and stores the file on the hard drive in a folder of your choice. The Default folder for file is “C:\CleanOpsStaff-3ed Data”
6. You can load them back into memory, one set of 33 at a time, for future use. 7. You can also make any one of your Custom Standard Space Category File the Start-up Default by denoting it as
such in the Configuration form
Local Space Categories: 1. You may have special spaces that are not well
represented by any of the APPA 33 standard space categories. CleanOpsStaff-3ed allows you to create 15 (40 with the ProLocal upgrade) of your own local space categories based on your own cleaning activities and your own frequencies and base times or ISSA cleaning times.
2. From the Main Menu click the Local Space Categories button
3. Click the Help button on the Local Space Categories Navigator and read the instructions for Local Space Categories
4. You will use the Local Space Category Maker to create the local category using the instruction you get when you click the Help button on the Local Space Category Navigator.
5. Once you have created local space categories, you can save a Local Space Category File to disk containing all 15 (40 if you purchase the Pro-Local upgrade) local space categories including the ones you created and the blanks ones. You can save as many Local Space Category Files as you wish.
6. CleanOpsStaff-3ed appends “-HECS-LOC.XLS” to the end of all Local Space Category File names and stores the file on the hard drive in a folder of your choice. The Default folder for files is “C:\CleanOpsStaff-3ed Data”

Page 25 of 41 When in doubt, click for the nearest Help Button!
Granting Permission for Shared Users to Run CleanOpsStaff-3ed on the Same Computer: 1. CleanOpsStaff-3ed is distributed under a Single User License
Agreement, and can legally only be installed on one desktop and one laptop under the same Product Code to be used by a single user. However, if the Product Code is activate on only one single computer, there is no limit as to how many people can use CleanOpsStaff-3ed as long as the program is only running on one computer at a time under the same Product Code.
2. You will use the Manage Shared User button to give other users who can log onto the single computer permission to run CleanOpsStaff-3ed in Full Feature Mode on the single computer.
IMPORTANT NOTE: The user on the single computer who activates CleanOpsStaff-3ed will be recorded by the Program Manager as the Main User. The Main User will be the only user who can grant permission to others to run CleanOpsStaff-3ed in Full Feature mode. Only one user should be logged on when granting permision and running CleanOpsStaff-3ed setup. Each shared user will need to log into the single computer and run CleanOpsStaff-3ed setup once to install CleanOpsStaff-3ed under their user name on the single computer.
3. Click the Manage Shared User button to launch the Manage Shared User tool
4. Enter a user name into the Add User Input Box. 5. Click the Add Shared User To Permission List 6. Repeat for all the shared users you want to give permission to. 7. Click Save Permission List button to activate the permission list and
confirm and save it to disk. 8. Click the Close button 9. Note: you may click on the Read Current Permission List button to
retrieve the current permissions. 10. When you log off the computer and a Shared User log on, the
Shared user will run Setup to install CleanOpsStaff-3ed under their Log-in account. After installing CleanOpsStaff-3ed only once, shared users will run CleanOpsStaff-3ed as they do all other Windows programs. Always ensure there are no others users logged on to the computer when uninstalling and installing programs or running Setup.
11. The Shared user will not have access to all Program Manager functions, but will have access to all Main Program function that the Main user has access to. The Shared user will not have access to the grayed out disable buttons as shown in the screen shot to the right.
12. The Shared User Information box at the top left of the screen will indicated the status of the shared user.
13. If the shared user has not been granted permission by the Main User the Shared User Information box and the Terms/Agreement/Status/Message box will reflect this status and the Shared user will only be able to run in Demo mode
Note: The Main User and all Shared Users will have access to the same two CleanOpsStaff-3ed Folders (“CleanOpsStaff-3ed Program Files” and “CleanOpsStaff-3ed Data”

Page 26 of 41 When in doubt, click for the nearest Help Button!
14. The Main User can use the Remove User From List button and the Delete All Shared Users to revoke permission to Shared Users.
Page 27 of 41 When in doubt, click for the nearest Help Button!
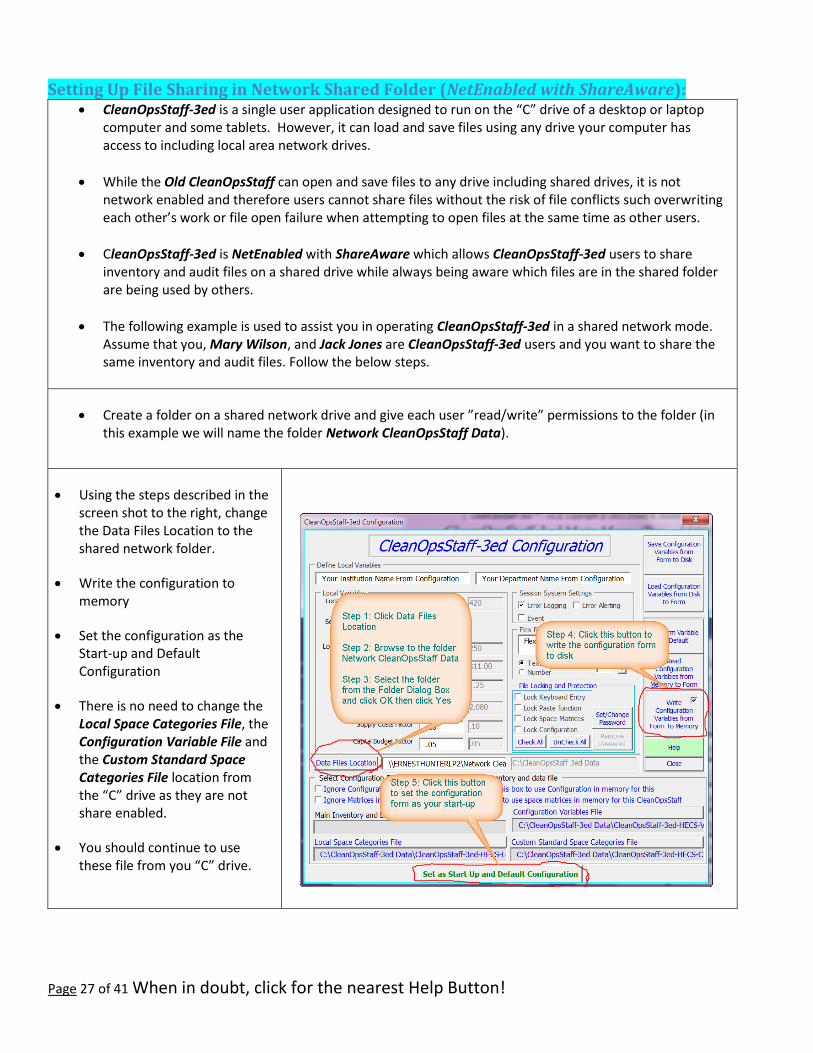
Setting Up File Sharing in Network Shared Folder (NetEnabled with ShareAware): CleanOpsStaff-3ed is a single user application designed to run on the “C” drive of a desktop or laptop
computer and some tablets. However, it can load and save files using any drive your computer has access to including local area network drives.
While the Old CleanOpsStaff can open and save files to any drive including shared drives, it is not network enabled and therefore users cannot share files without the risk of file conflicts such overwriting each other’s work or file open failure when attempting to open files at the same time as other users.
CleanOpsStaff-3ed is NetEnabled with ShareAware which allows CleanOpsStaff-3ed users to share inventory and audit files on a shared drive while always being aware which files are in the shared folder are being used by others.
The following example is used to assist you in operating CleanOpsStaff-3ed in a shared network mode. Assume that you, Mary Wilson, and Jack Jones are CleanOpsStaff-3ed users and you want to share the same inventory and audit files. Follow the below steps.
Create a folder on a shared network drive and give each user ”read/write” permissions to the folder (in this example we will name the folder Network CleanOpsStaff Data).
Using the steps described in the screen shot to the right, change the Data Files Location to the shared network folder.
Write the configuration to memory
Set the configuration as the Start-up and Default Configuration
There is no need to change the Local Space Categories File, the Configuration Variable File and the Custom Standard Space Categories File location from the “C” drive as they are not share enabled.
You should continue to use these file from you “C” drive.

Page 28 of 41 When in doubt, click for the nearest Help Button!
o If your work group want to use identical Local Space Categories File, Configuration Variable File, and Custom Standard Space Categories File, then someone should create these files using the instruction in the Help file and save them to the shared drive. However, user SHOULD NOT change the location for these file to the shared folder. Instead, each user should make a copy of the three files to their own CleanOpsStaff-3ed Data folder and follow the below instructions.
o For this example we will assume that someone created the three files, gave then the below names and copied them to the shared drive Network CleanOpsStaff Data folder. Master Local Variables-HECS-Vars.ini Master Local Categories-HECS-Loc.xls Master Custom Standard Space Categories-HECS-Cust.xls
o You will use the Windows File Explorer to copy these three files from the shared drive to you own CleanOpsStaff-3ed Data
o Follow the step in the screenshot to use the three master configuration files
o So now whenever you are you team mate create new inventory and data files, they will contain the same local variables, the same custom standard categories and the same local category matrices.

Page 29 of 41 When in doubt, click for the nearest Help Button!
Sharing Inventory Files in Network Shared Folder (NetEnabled with ShareAware): o The screenshot to the right
show the three main components of the NetEnabled/ShareAware feature.
o File In Memory Share Status box – let you know if you opened the file with full read/write control of if you opened in read only mode
o Show Files In Use By Other button (ShareAware button) – click to see who is using files in the shared folder
o ShareAware Information box – shows a list of other who has opened files and the time they opened them.
Network Inventory File Sharing Instructions by Example o The user has an inventory file in memory and
was to first to open it, so the use has full control of the file in read/write mode.
o The user has an inventory file in memory and
was to first to open it, so the use has full control of the file in read/write mode.
o Mary Wilson has opened and taken control the North Campus inventory file
o The user has an inventory file in memory and
was to first to open it, so the use has full control of the file in read/write mode.
o Mary Wilson has opened and taken control the North Campus inventory file
o Jack Jones has opened and taken control the East Campus inventory file
o

Page 30 of 41 When in doubt, click for the nearest Help Button!
o Use attempt to open East Campus file, but is warned that Jack Jones has it open and is in control of it
o The use can open in Read/Only, but will not be able to save back to the same file name.
o User opened the East Campus file in Read/Only mode. The user can do all of the same tasks within ClenaOpsStaff-3ed with the file including reports, create and score audit packages. However, the user will not be able to save the inventory file. This prevents the user form overwriting any work that Jack Jones has done to the file.
o If the user attempts to save the read/only file in memory the warning in the screenshot to the right will appear preventing the user from saving.
o When click the Function button on the MiniToolBox and then click the Open button in the Functions tool a dropdown tool appear containing a ShareAware button
o You can click the ShareAware button to find out if anyone is using the file before you open it.
Sharing Audit Package Files in Network Shared Folder (NetEnabled with ShareAware): o When you click the Reports button on the
MiniToolBox and then click the Audit button in the Reports Generator tool, the dropdown tool as shown in the screenshot to the right appears.
o The ShareAware button appears in the dropdown list so you can become aware of what audit files are already in use by other CleanOpsStaff-3ed users
Page 31 of 41 When in doubt, click for the nearest Help Button!
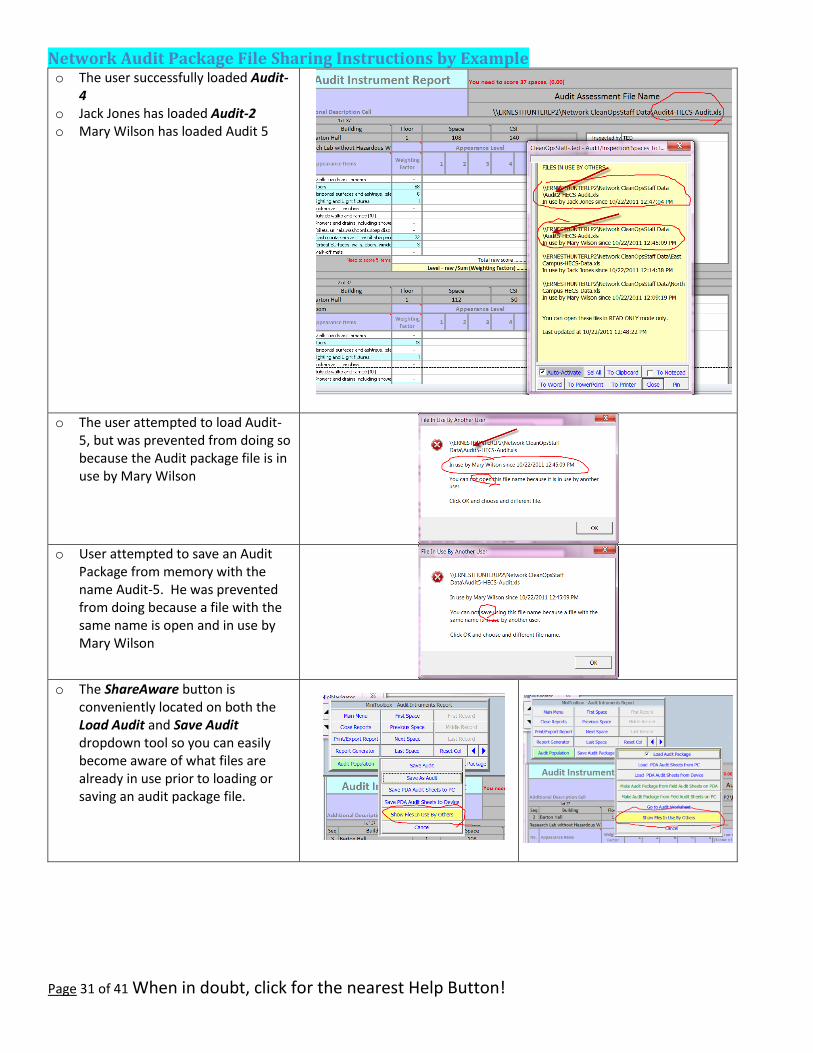
Network Audit Package File Sharing Instructions by Example o The user successfully loaded Audit-
4 o Jack Jones has loaded Audit-2 o Mary Wilson has loaded Audit 5
o The user attempted to load Audit-5, but was prevented from doing so because the Audit package file is in use by Mary Wilson
o User attempted to save an Audit Package from memory with the name Audit-5. He was prevented from doing because a file with the same name is open and in use by Mary Wilson
o The ShareAware button is conveniently located on both the Load Audit and Save Audit dropdown tool so you can easily become aware of what files are already in use prior to loading or saving an audit package file.

Page 32 of 41 When in doubt, click for the nearest Help Button!
Using CleanOpsStaff-3ed with Multiple Monitors (MultiMonitor Enabled) o To protect the integrity of the user interface
and worksheet layout. CleanOpsStaff-3ed is designed to always run in a maximized window and cannot be dragged to different positions on the screen or to different monitor connected to your computer.
o Users of the Old CleanOpsStaff have commented that many of them use dual monitors connected to their computer.
o To provide the ability to move CleanOpsStaff-3ed from monitor to monitor, the Move to Another Monitor button, the Move to Primary Monitor button, and the Select Monitor tool are provided.
o Follow the below steps:
Click the Move to Another Monitor button to launch the Select Monitor tool
Click on one of the four directional buttons to select the monitor to move CleanOpsStaff-3ed to
Click OK button when you have the moved CleanOpsStaff-3ed to the desired monitor
NOTE: You must have at least two monitor connected to your computer in Display Extended mode.
Setting Up Dual Monitors for Your Computer (MultiMonitor Enabled) o The process of setting up dual monitors will vary depending on your computer and operating system. But,
generally it means right-clicking on a blank area on your desktop and then selecting one of the below series of menus and commands.
Window-XP: Properties Setting Tab. This opens up thee Display Properties Dialog Box
Windows 7: Screen Resolution (); or
Windows Vista: Personalize Display Setting. This opens up thee Display Setting Dialog Box o Below are screenshot of the various interfaces you are likely to see on your computer for setting up dual
monitor operations. You can also reach these display management tools through your computer control panel.
o CleanOpsStaff-3ed requires that the monitors be in display extended mode. It does not matter if they as configured side-by-side or top-to-bottom and it does not matter which position your primary monitor occupies.
o Move to Primary Monitor button on the Main Menu screen will quickly move CleanOpsStaff-3ed to your primary monitor with one mouse click.

Page 33 of 41 When in doubt, click for the nearest Help Button!

Page 34 of 41 When in doubt, click for the nearest Help Button!
File Locking and Protection: 1. CleanOpsStaff-3ed has a File Locking and Protection section in the
Configuration form. This feature is useful for organizations who wish to centrally manage the data files and limit user from changing the data. The action performed in this section effect only the current file in memory.
2. File Locking: You can set four different type of file locking in order to protect your data from being accidently change while it is in memory. The screenshot to the right indicate that none of the functions are locked and that no password has been set.
3. File Protection: You can apply password protection to your data before you save it in order to prevent others from changing the Lock Status of your files. Protection allows you to share your files with others so that can open them without the password; however, they would need the password to change any of the four lock statuses.
4. The four locking statuses are contained in the data file when you save them. If you set a password before saving, anyone you share the file with can open it without the password, but users cannot change the locking status.
5. Lock Keyboard Entry: Check this box to prevent being able to enter data in the Macro Staffing and Inventory Worksheet from the keyboard. This is useful to prevent accidently changing data in the worksheet from the keyboard. With this box checked, all the input columns in the Macro Staffing and Inventory Worksheet become write protected. You can still paste data into the worksheet using QEntry, Keypad, Rows and Cells Paste Right-Click short-cut menu, and the Paste button on the Staff Calculator (QStaff).
6. Lock Paste Function: Check this box to lock out all the paste functions found in QEntry, Keypad, Rows and Cells Paste Right-Click short-cut menu, and the Paste button on the Staff Calculator(QStaff). This box also locks out the row Insert/Delete function preventing users from being able to insert and delete rows.
7. Lock Space Matrices: Check this box to lock out the ability to change the Standard Category Matrices and lock out the ability to make Local Space Category Matrices.
8. Lock Configuration: This box prevent users from changing the configuration. This is useful when you want to ensure all users you share a file with do not change the configuration variables and other configuration aspects.

Page 35 of 41 When in doubt, click for the nearest Help Button!
9. Check All and UnCheck All: You can check and uncheck all the Lock boxes at once by using the Check All and UnCheck All buttons. If you want to share a data file but do not want the user to be able to change any of the data, you would (1) click the Check All button, and then (2) click the Set /Change Password button, (3) enter password, and then (4) save the file.
Steps for Locking and Protecting a Data File: 1. The Locking and Protection section will look like the screen shot to the right if
the file in memory is not password protected and no functions locked out. Note that the Remove Password button is disabled (grayed out) indicating that there is not password set for the data in memory
2. Click the Check All button to lock all four functions and the File Locking and Protection section will look like the screen shot to the right.
3. Click the Set/Change Password button launch the Set New Password box: a. Enter your Name (oprional) b. Enter a password ( 4 to 8 characters – letters, numbers and special
characters of your choice) c. Reenter the password and click the Set Password button d. Click OK
4. This will place the data in memory in locked and protected mode. This means that you can not change any of the data in the Macro Staffing and Inventory worksheet and you cannot unlock any of the four locked features unless you click the Unprotect button and enter the password.
5. Note all the Lock checkboxes are disabled (grayed out) which means the data in memory is in Protect mode
6. To regain access to the Lock Checkboxes while keeping the data under password, click the Unprotect button.
7. Enter the password and click OK
8. The File Locking and Protection section will now look like the screen shot on the right. The lock boxes are now available to be changed to allow you to work on the data until you click the Protect button.

Page 36 of 41 When in doubt, click for the nearest Help Button!
9. Saving a Locked and Password Protected data file: regardless of the status of the Protect/Unprotect button, when you save a data file, the lock box status will be saved with the data file. If you have set a password, you will have to enter the password before you can save the file.
10. Users you share your password protected file with will not need the password to open the file, however, they will not be able to change the lock box status without the password. You can save the file with any combination of the lock boxes checked, with all of them checked or with none of them check.
Available Upgrades For CleanOpsStaff-3ed In keeping with the Hunter Consulting and Training goal of users only paying for major features they need, we offer several upgrades for users who have a need for them. You do not need any of these upgrades to fully implement all the basic elements of the APPA operation guidelines book. However, for medium to large organization and for those seeking to become power users, the upgrades add great additional capability and functionality to the application. The software for the upgrades is already embedded into the application and therefore, the product identification is the same for the old CleanOpsStaff upgrade and the CleanOpsStaff-3ed upgrade. However, some of the CleanOpsStaff-3ed upgrades have enhancements not found in the old CleanOpsStaff since the old CleanOpsStaff will be locked at its current release and will new enhancements or changes in the future.
(HCT-5x) Upgrade to CleanOpsStaff-3ed-Pro and Purchase Increase Record Capacity
https://www.hunterct.com/buy-additional-records Capabilities: Add up to 15,000 additional record capacity in 2,500 records batches
(HCT-9) CleanOpsStaff-3ed-ProMobilePlus-PC/PDA
https://www.hunterct.com/buy-promobileplus-pc-ios-ad-wp7 Capabilities:
Activate CleanOpsStaff-3ed-ProMobilePlus-PC on one Desktop and one Laptop
Activate CleanOpsStaff-3ed-ProMobilePlus-PDA on one PDA
Create Audit and Inspection files directly on the PDA and upload to the PC
Download APPA cleaning audit/inspection sheets for 200 rooms from your PC to your PDA and record the results of your inspection on your PDA while in the field.
Easily upload audit/inspection results from your PDA to CleanOpsStaff-3ed-Pro on your PC/Laptop
Create space inventory files directly on the PDA and upload to the PC
Download 200 space inventory records from your PC/Laptop to your PDA
Use your PDA to collect and verify space inventory

Page 37 of 41 When in doubt, click for the nearest Help Button!
data and easily uploaded the verified data to CleanOpsStaff-3ed-Pro on your PC/Laptop
Adds a fast efficient way to export and import partial space inventory data

Page 38 of 41 When in doubt, click for the nearest Help Button!
(HCT-10) CleanOpsStaff-3ed-ProMobilePlus-PDA Add-In https://www.hunterct.com/buy-promobileplus-pc-ios-ad-wp7 Capabilities:
Activates CleanOpsStaff-3ed-ProMobilePlus on one additional PDA See above for PDA Capabilities
(HCT-6) CleanOpsStaff-3ed justDoNext Data Import Wizard
https://www.hunterct.com/z-buy-data-import-wizard
Capabilities: Convert external inventory data that already exist in excel spreadsheets to CleanOpsStaff-3ed data file format using a justDoNext wizard
Use color coded Red, Yellow and Green command buttons a SmartNext button that guide you through process by simply clicking the SmartNext button
Import multiple records from within worksheets within an external data spreadsheet
Automatically convert your existing space/room name to APPA-CleanOpsStaff-3ed category names using keywords
Easy click-to-select "SpacePicker" input tool for entering Category Names and Cleaning Levels in the inventory worksheet and in the import wizard
Export CleanOpsStaff-3ed inventory data file to normal excel spreadsheets
Export CleanOpsStaff-3ed partial inventory data file to normal excel spreadsheets
Edit CleanOpsStaff-3ed Data in the Wizard to copy and paste multiple CleanOpsStaff-3ed records
Automatically convert space cleanable units from Square Meters to Square Feet and from Square Feet to Square Meter -- especially useful for our Canadian customers and for data exchange between users on the two different systems of measurement
Serve as a data input interface that make more use of the native Excel spreadsheet environment
(HCT-8) CleanOpsStaff-3ed ProScheduler Add-In
https://www.hunterct.com/buy-proscheduler Capabilities:
Automatically schedule the Routine Cleaning Activities in a manner that balance day of week work loading, using CleanOpsStaff-3ed "Least/Most Loaded Day" scheduling method. With CleanOpsStaff-3ed-ProScheduler, you can automatically create a weekly schedule of routine activities that will automatically balance the time assignment for each day and inform you of the least and most loaded day to assist you in selecting days of week for scheduling project work. Then you can use ProScheduler to automatically schedule projects. Using the ProScheduler flexible activity selector, you can decide which frequencies you would like to automatically schedule. Produce route sheets to give directly to custodians.
.

Page 39 of 41 When in doubt, click for the nearest Help Button!
(HCT-11) CleanOpsStaff-3ed-ProLocal
https://www.hunterct.com/buy-prolocal Capabilities:
Allow you to make 40 local categories instead of just 15
Allow you to select Cleaning Activities/Tasks and Times from the ISSA 540 Times list
CleanOpsStaff-3ed automatically compute the correct base time adjusted for the base CSF of the category you are making
Allow you to combine APPA activities with ISSA task with CleanOpsStaff-3ed doing all the calculations

Page 40 of 41 When in doubt, click for the nearest Help Button!
CleanOpsStaff-3ed Files: File Purpose Extension Default Folder
Main Program File – “CleanOpsStaff-3ed.xls” (Excel 2003) “CleanOpsStaff-3ed.xlsb” (Excel 2007) (CleanOpsStaff-3ed Program)
Contain CleanOpsStaff-3ed Main Program
.xls or .xlsb C:\CleanOpsStaff-3ed Program Files
Default Configuration Variable File “ CleanOpsStaff-3ed-HECS-Vars.ini” (CleanOpsStaff-3ed System)
Contain the configuration information that is loaded at start up and when you close a inventory file
-HECS-Var.INI C:\CleanOpsStaff-3ed Data
Default Standard Space Category File “CleanOpsStaff-3ed-HECS-Cust.xls” (CleanOpsStaff-3ed System)
Contains the 33 standard matrices with their default values
-HECS-Cust.xls C:\CleanOpsStaff-3ed Data
Default Standard Space Category File “CleanOpsStaff-3ed-HECS-Loc.xls” (CleanOpsStaff-3ed System)
Contains the 15 Blank Local Category matrices s default
-HECS-Loc.xls C:\CleanOpsStaff-3ed Data
Data Field description and data collection template “CleanOpsStaff-3ed Data Input Template.xls” (System)
To help you know how best to prepare your data for import when using JustDoNext Import wizard
.xls C:\CleanOpsStaff-3ed Program Files
CleanOpsStaff-3ed-ProMobile.exe PDA ProMobilePlus application program file
.exe
C:\CleanOpsStaff-3ed Program Files (on PC) \Windows\Start Menu\Programs (on PDA)
Excel Environment Reset File “Reset Environment.xls” (System)
Use to reset your Excel environment back to its default values in the event that CleanOpsStaff-3ed is shut down abnormally. Run Excel and use the Open command to open this file. Enable Macros.
.xls C:\CleanOpsStaff-3ed Program Files
Custom Standard Space Category Files (User)
Contains the 33 standard matrices including any change you made to activities and frequencies of the 33 standard categories as saved by user
-HECS-Cust.xls C:\CleanOpsStaff-3ed Data
Local Space Category Files (User)
Contains 15 local categories file including the one you created and the blank remaining ones as saved by user
-HECS-Loc.xls C:\CleanOpsStaff-3ed Data
Audit Package file (User) The file that contains all three Audit package documents (Audit Assessment
-HECS-Audit.xls C:\CleanOpsStaff-3ed Data

Page 41 of 41 When in doubt, click for the nearest Help Button!
Worksheet report, Audit Assessment Population report, and the Audit Instrument Report.
Field Audit or Daily Inspection Audit Package file
The file created from a Field Audit file originating on the PDA. When you create a Field Audit or Daily Inspection file on the fly in your PDA it has the extension “-f-HECS-Audit.txt” and contains only the audit sheets. When you load the PDA file into the PC, an audit package is generated which you can save with “-f-HECS-Audit.txt” extension
-f-HECS-Audit.xls C:\CleanOpsStaff-3ed Data
PDA formatted Audit Sheets.
This file contains PDA formatted audit sheets be used on the PDA. This file are created when you send PDA formatted audit sheets to the PDA or PC
-HECS-PDAa.txt
C:\CleanOpsStaff-3ed-Promobile Data (on PC) \CleanOpsStaff-ProMobile Data (on PDA)
PDA Formatted Field Audit or Daily Inspection audit sheets.
This file contains PDA formatted audit sheets. This file is created on the PDA in the field to be loaded to the PC.
f-HECS-PDAa.txt
C:\CleanOpsStaff-3ed-Promobile Data (on PC) \CleanOpsStaff-ProMobile Data (on PDA)
PDA formatted Space Inventory file
This file contains PDA formatted inventory data. It can be created on the PC or created directly on the PDA.
-HECS-PDAi.txt
C:\CleanOpsStaff-3ed-Promobile Data (on PC) \CleanOpsStaff-ProMobile Data (on PDA)
Very best regards