Embed Size (px)
Citation preview
www.designpine.com
feb
13
www.designpine.com
Cladding Installation
www.designpine.com
feb
13
www.designpine.com 2
Design Pine Cladding - Installation
ABOUT TIMBER CLADDING IN GENERAL
The term “Cladding” refers to dressed or sawn boards that form part of the external wall covering, whose function includes keeping weather out of a structure. It is produced in a number of decorative profiles such as rusticated, shiplap, log cabin and splayed. The names of the various profiles often differ from State to State (for example, in some areas, the terms cladding and weatherboard are interchangeable but in other areas, weatherboard is a specific profile). Like most building products, timber cladding has both advantages and limitations.Advantages of timber cladding:• It has a history of successful use and performance.• It is relatively easy to fix to the supporting framework.• It has good impact resistance.• It accepts a range of paint and stain finishes.• It is available in a range of profiles. • It can be machined from a range of species although the most common species used today is
radiata pine sourced from managed plantations.• When fixed to the supporting framework correctly, it can accommodate movement resulting from
moisture uptake or loss due to normal seasonal changes. • It can be maintained by the homeowner.
Limitations of timber cladding:• Fixing to the supporting framework can be slower than that of sheet materials. Short cuts can lead
to a shortening of service life.• A degree of skill is required for joints and corners. • Timber can be subject to dimensional movement with changes in moisture content. Correct fixing
to the supporting framework will accommodate normal seasonal changes.• Regular maintenance is required.• Some boards may be subject to resin bleed which may spoil the finished appearance. Remedies are
available—(refer page 8).• The end grain requires sealing to reduce moisture uptake.
www.designpine.com
feb
13
www.designpine.com 3
Successful use of timber cladding requires:• Selection of sufficiently durable timber.• Selection of appropriate corner mouldings, flashings and the like.• Correct fixing to the supporting framework and proper detailing.• A finish that minimises stress on the timber. A light coloured finish (i.e. paint or stain) is recommended. • An understanding by the building owner that the cladding will need periodic maintenance to
maintain its appearance.
Poor performance of timber cladding usually results from one or more of:• Poor design and/or detailing.• Use of lower quality timber.• Poor workmanship and incorrect fixing to the supporting framework.• Dark coloured finish (i.e. paint) • Insufficient allowance for timber movement.• End grain and onsite cuts not being sealed. • Insufficient provision to prevent moisture being trapped behind the cladding.
HISTORY OF DESIGN PINE TIMBER CLADDING Originally, most cladding was supplied without being primed or coated. When the first preservative treated softwood cladding was produced, one of the preservatives used was sometimes affected by UV exposure. The product had a pink coating to protect it from UV exposure until it was fixed to the supporting framework and painted. Because the pink coating was intended only as a short term protection, it was not a genuine primer and became powdery if left too long before painting. The particular preservative that was UV sensitive has been replaced by preservatives that are not UV sensitive. Although the pink primer is no longer necessary, primed cladding has become the accepted norm unless a stained or clear finish is required. Most of the primers applied to treated pine cladding claim to be genuine primers and come in a variety of colours. The colour often serves to identify the producer or product type. If the primer is powdery or comes off when handling, it is not a genuine primer and should be sanded off and the product properly primed. Design Pine sought extensive research to create a genuine primer and we offer products coated with a genuine primer today. Do not take a risk with imitations; there is only one Design Pine.
The organic preservation system in Design Pine protects the timber against decay and insect attack plus it places waxes and resins near the surface to slow the uptake of moisture but it will not prevent the effects of weathering. Paint will offer protection against the impact of weathering. Where raw timber is exposed to sun and rain, it eventually turns a silver/grey with its surface becoming rough or
www.designpine.com
feb
13
www.designpine.com 4
splintery and possibly developing fine surface checks. Design Pine products comply with the Australian Standard AS 4785 or with an applicable industry standard and are treated to level H3—AS 1604.
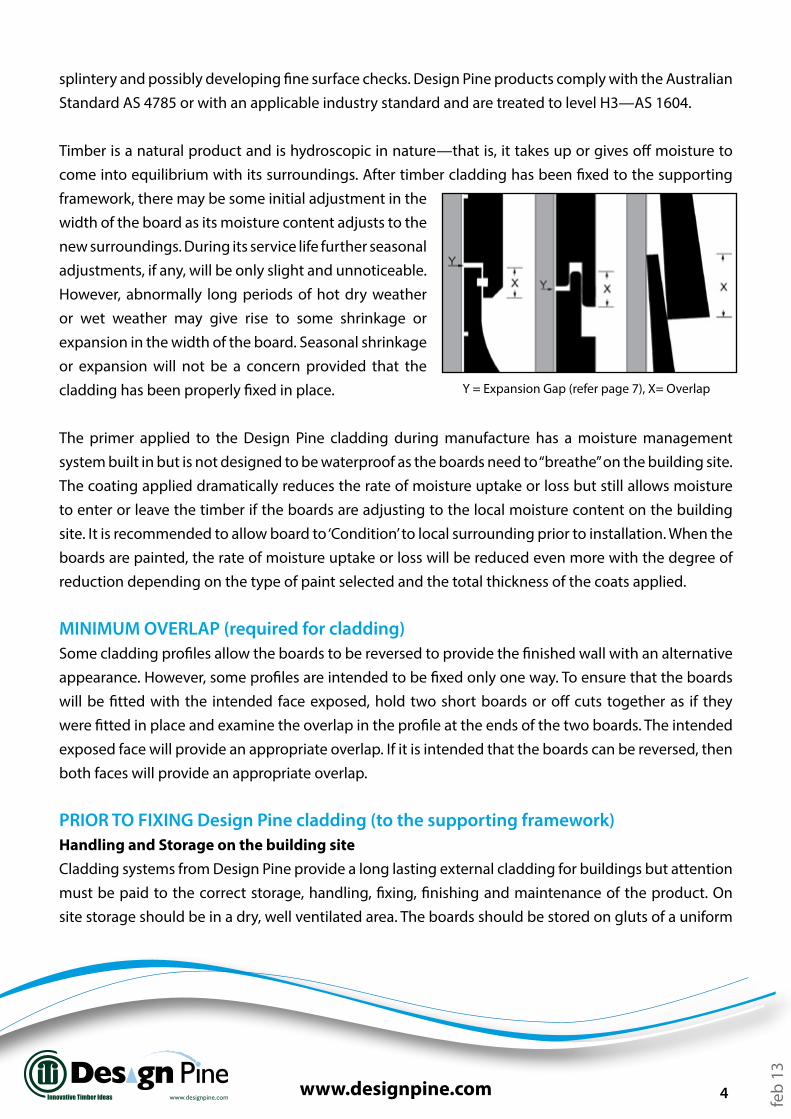
Timber is a natural product and is hydroscopic in nature—that is, it takes up or gives off moisture to come into equilibrium with its surroundings. After timber cladding has been fixed to the supporting framework, there may be some initial adjustment in the width of the board as its moisture content adjusts to the new surroundings. During its service life further seasonal adjustments, if any, will be only slight and unnoticeable. However, abnormally long periods of hot dry weather or wet weather may give rise to some shrinkage or expansion in the width of the board. Seasonal shrinkage or expansion will not be a concern provided that the cladding has been properly fixed in place.
The primer applied to the Design Pine cladding during manufacture has a moisture management system built in but is not designed to be waterproof as the boards need to “breathe” on the building site. The coating applied dramatically reduces the rate of moisture uptake or loss but still allows moisture to enter or leave the timber if the boards are adjusting to the local moisture content on the building site. It is recommended to allow board to ‘Condition’ to local surrounding prior to installation. When the boards are painted, the rate of moisture uptake or loss will be reduced even more with the degree of reduction depending on the type of paint selected and the total thickness of the coats applied.
MINIMUM OVERLAP (required for cladding)Some cladding profiles allow the boards to be reversed to provide the finished wall with an alternative appearance. However, some profiles are intended to be fixed only one way. To ensure that the boards will be fitted with the intended face exposed, hold two short boards or off cuts together as if they were fitted in place and examine the overlap in the profile at the ends of the two boards. The intended exposed face will provide an appropriate overlap. If it is intended that the boards can be reversed, then both faces will provide an appropriate overlap.
PRIOR TO FIXING Design Pine cladding (to the supporting framework)Handling and Storage on the building siteCladding systems from Design Pine provide a long lasting external cladding for buildings but attention must be paid to the correct storage, handling, fixing, finishing and maintenance of the product. On site storage should be in a dry, well ventilated area. The boards should be stored on gluts of a uniform
Y = Expansion Gap (refer page 7), X= Overlap
www.designpine.com
feb
13
www.designpine.com 5
height (minimum 60mm) that are no more than about 1.5 metres apart. There should be a sheet of plastic or similar between the gluts and the boards to prevent any rising moisture affecting the boards. Care must be taken to ensure this protection cannot unintentionally collect water and create pools of water that soak into the timber. It is preferable to leave the plastic wrapping of the pack in place but the pack must be protected from direct sunlight to avoid sweating under the plastic. If the boards are delivered without wrapping or with damaged wrapping, cover the stack with plastic, building paper or sheet material that is firmly held in place to keep the boards clean and dry. Boards should not be stored in rooms which have recently poured concrete slabs or have been recently cement rendered as they will release moisture for weeks to come. Other building products should not be stored on top of the boards.
Sarking / building paper / vapour membraneThe supporting framework should be clad on the outside with a waterproof, but vapour permeable or breather type sarking/building paper to prevent penetration of water into the building under severe rain and wind conditions. The sarking/building paper should be fixed to the outside of the studs using disc type nails at 600 mm centres. Horizontal laps must not be less than 50 mm and vertical laps must be on studs.The use of non-vapour permeable aluminium foil or plastic sarking directly behind timber cladding is not recommended as trapped vapour may cause cupping and distortion of the cladding.
BattensPrior to insulation batts being used in wall cavities and sarking or building paper was regularly fixed to the outside of the framework, cladding was applied directly to the studs. The “empty” framework cavity provided adequate ventilation behind the cladding. Although cladding boards are often fixed against the sarking/building paper, the preferred method is to fix a batten to each stud on the outside of the sarking/building paper. The battens should be between 9 and 20 mm thick and about the width of the stud. It is most important that the battens are securely anchored to the studs prior to fixing the cladding. The use of battens provides an effective airspace between the cladding and the sarking/building paper and does not trap moisture between the two resulting in better stability.
Board preparationStandard preparation methods should be followed:• Check that the board width is equal to or very close (+/- 1mm) to the specified width. A
significant difference would indicate that the moisture content of the boards is unusually high orunusually low and that fixing should not proceed until the moisture content of the boards iswithin an acceptable range.
www.designpine.com
feb
13
www.designpine.com 6
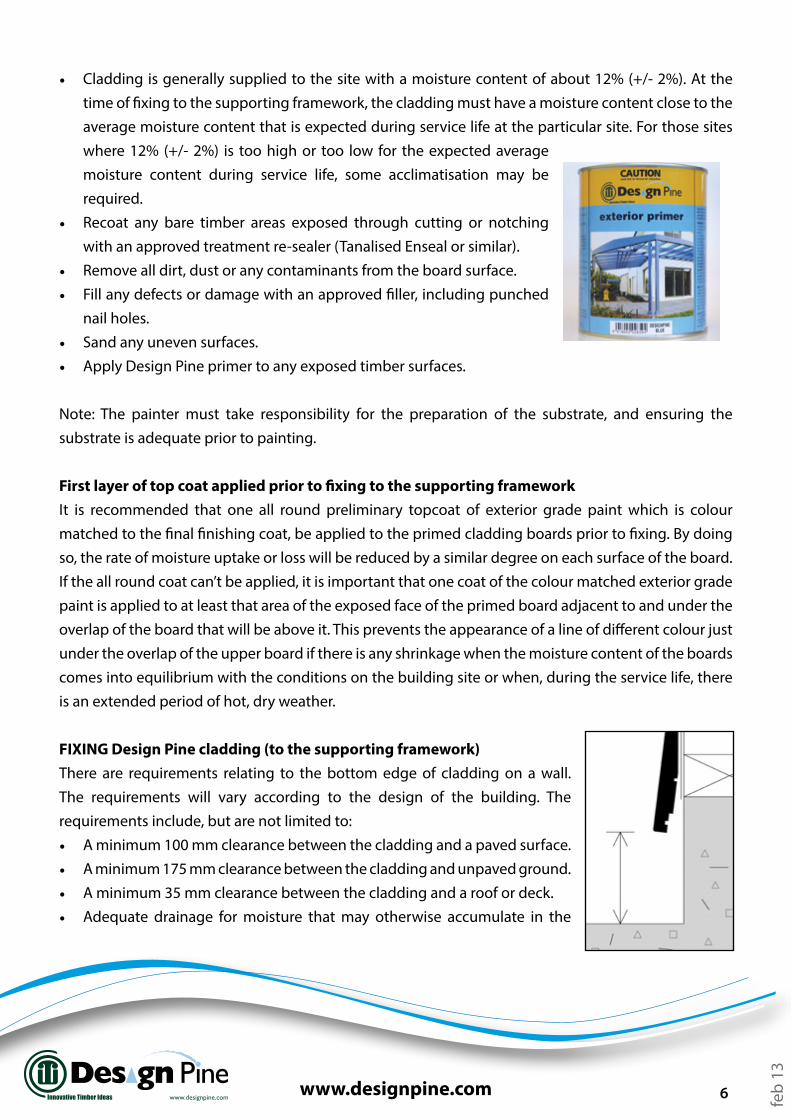
• Cladding is generally supplied to the site with a moisture content of about 12% (+/- 2%). At thetime of fixing to the supporting framework, the cladding must have a moisture content close to theaverage moisture content that is expected during service life at the particular site. For those siteswhere 12% (+/- 2%) is too high or too low for the expected averagemoisture content during service life, some acclimatisation may berequired.
• Recoat any bare timber areas exposed through cutting or notchingwith an approved treatment re-sealer (Tanalised Enseal or similar).
• Remove all dirt, dust or any contaminants from the board surface.• Fill any defects or damage with an approved filler, including punched
nail holes.• Sand any uneven surfaces.• Apply Design Pine primer to any exposed timber surfaces.
Note: The painter must take responsibility for the preparation of the substrate, and ensuring the substrate is adequate prior to painting.
First layer of top coat applied prior to fixing to the supporting frameworkIt is recommended that one all round preliminary topcoat of exterior grade paint which is colour matched to the final finishing coat, be applied to the primed cladding boards prior to fixing. By doing so, the rate of moisture uptake or loss will be reduced by a similar degree on each surface of the board.If the all round coat can’t be applied, it is important that one coat of the colour matched exterior grade paint is applied to at least that area of the exposed face of the primed board adjacent to and under the overlap of the board that will be above it. This prevents the appearance of a line of different colour just under the overlap of the upper board if there is any shrinkage when the moisture content of the boards comes into equilibrium with the conditions on the building site or when, during the service life, there is an extended period of hot, dry weather.
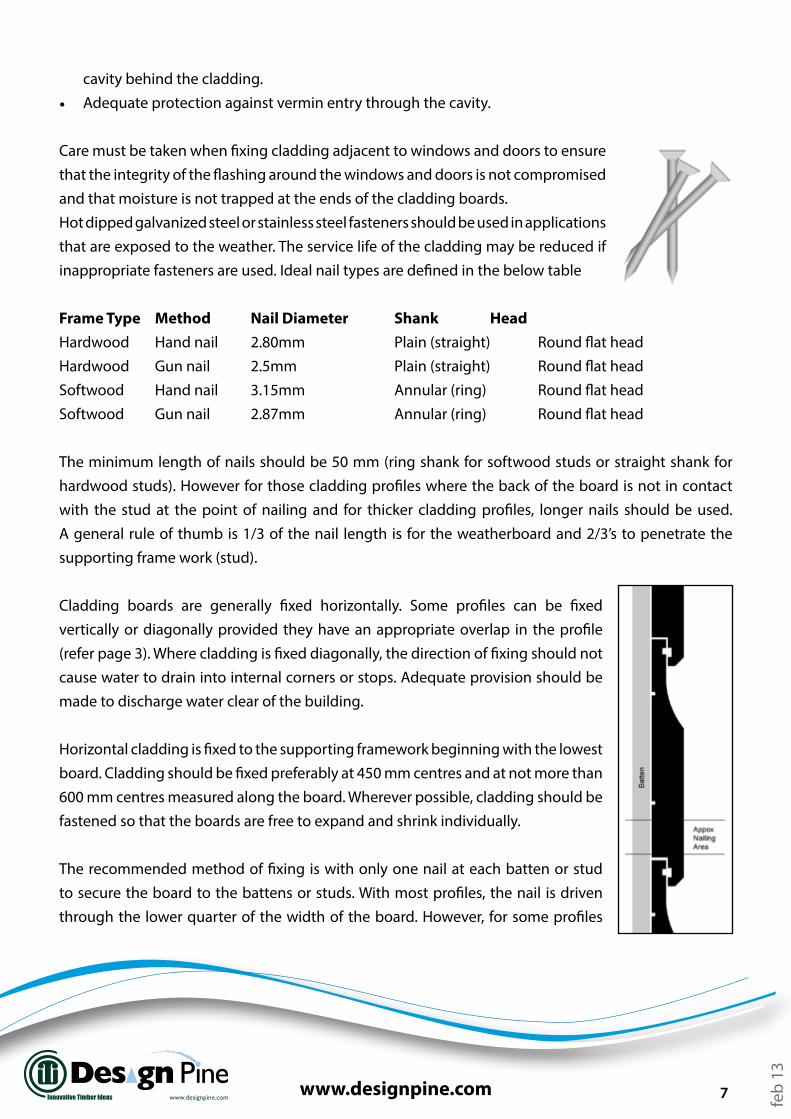
FIXING Design Pine cladding (to the supporting framework)There are requirements relating to the bottom edge of cladding on a wall. The requirements will vary according to the design of the building. The requirements include, but are not limited to:• A minimum 100 mm clearance between the cladding and a paved surface.• A minimum 175 mm clearance between the cladding and unpaved ground.• A minimum 35 mm clearance between the cladding and a roof or deck.• Adequate drainage for moisture that may otherwise accumulate in the
www.designpine.com
feb
13
www.designpine.com 7
cavity behind the cladding.• Adequate protection against vermin entry through the cavity.
Care must be taken when fixing cladding adjacent to windows and doors to ensure that the integrity of the flashing around the windows and doors is not compromised and that moisture is not trapped at the ends of the cladding boards. Hot dipped galvanized steel or stainless steel fasteners should be used in applications that are exposed to the weather. The service life of the cladding may be reduced if inappropriate fasteners are used. Ideal nail types are defined in the below table
Frame Type Method Nail Diameter Shank HeadHardwood Hand nail 2.80mm Plain (straight) Round flat headHardwood Gun nail 2.5mm Plain (straight) Round flat headSoftwood Hand nail 3.15mm Annular (ring) Round flat headSoftwood Gun nail 2.87mm Annular (ring) Round flat head
The minimum length of nails should be 50 mm (ring shank for softwood studs or straight shank for hardwood studs). However for those cladding profiles where the back of the board is not in contact with the stud at the point of nailing and for thicker cladding profiles, longer nails should be used. A general rule of thumb is 1/3 of the nail length is for the weatherboard and 2/3’s to penetrate the supporting frame work (stud).
Cladding boards are generally fixed horizontally. Some profiles can be fixed vertically or diagonally provided they have an appropriate overlap in the profile (refer page 3). Where cladding is fixed diagonally, the direction of fixing should not cause water to drain into internal corners or stops. Adequate provision should be made to discharge water clear of the building.
Horizontal cladding is fixed to the supporting framework beginning with the lowest board. Cladding should be fixed preferably at 450 mm centres and at not more than 600 mm centres measured along the board. Wherever possible, cladding should be fastened so that the boards are free to expand and shrink individually.
The recommended method of fixing is with only one nail at each batten or stud to secure the board to the battens or studs. With most profiles, the nail is driven through the lower quarter of the width of the board. However, for some profiles
www.designpine.com
feb
13
www.designpine.com 8
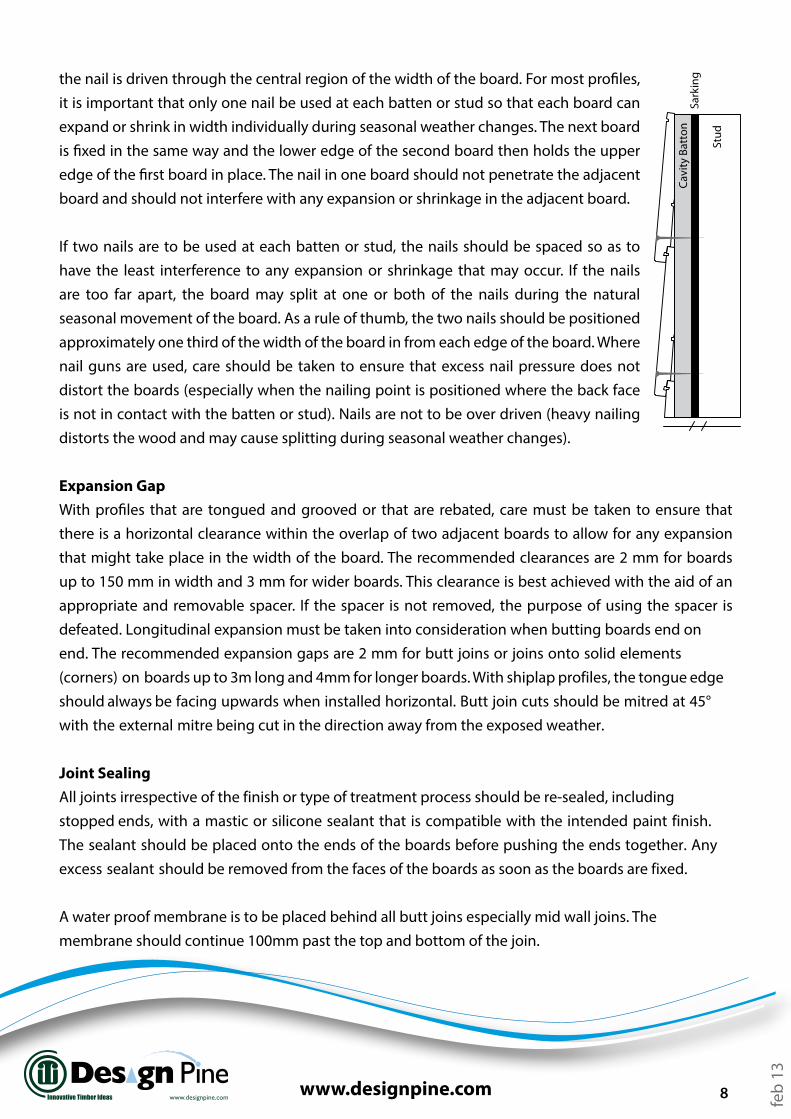
the nail is driven through the central region of the width of the board. For most profiles, it is important that only one nail be used at each batten or stud so that each board can expand or shrink in width individually during seasonal weather changes. The next board is fixed in the same way and the lower edge of the second board then holds the upper edge of the first board in place. The nail in one board should not penetrate the adjacent board and should not interfere with any expansion or shrinkage in the adjacent board.
If two nails are to be used at each batten or stud, the nails should be spaced so as to have the least interference to any expansion or shrinkage that may occur. If the nails are too far apart, the board may split at one or both of the nails during the natural seasonal movement of the board. As a rule of thumb, the two nails should be positioned approximately one third of the width of the board in from each edge of the board. Where nail guns are used, care should be taken to ensure that excess nail pressure does not distort the boards (especially when the nailing point is positioned where the back face is not in contact with the batten or stud). Nails are not to be over driven (heavy nailing distorts the wood and may cause splitting during seasonal weather changes).
Expansion GapWith profiles that are tongued and grooved or that are rebated, care must be taken to ensure that there is a horizontal clearance within the overlap of two adjacent boards to allow for any expansion that might take place in the width of the board. The recommended clearances are 2 mm for boards up to 150 mm in width and 3 mm for wider boards. This clearance is best achieved with the aid of an appropriate and removable spacer. If the spacer is not removed, the purpose of using the spacer is defeated. Longitudinal expansion must be taken into consideration when butting boards end on end. The recommended expansion gaps are 2 mm for butt joins or joins onto solid elements (corners) on boards up to 3m long and 4mm for longer boards. With shiplap profiles, the tongue edge should always be facing upwards when installed horizontal. Butt join cuts should be mitred at 45° with the external mitre being cut in the direction away from the exposed weather.
Joint SealingAll joints irrespective of the finish or type of treatment process should be re-sealed, including stopped ends, with a mastic or silicone sealant that is compatible with the intended paint finish. The sealant should be placed onto the ends of the boards before pushing the ends together. Any excess sealant should be removed from the faces of the boards as soon as the boards are fixed.
A water proof membrane is to be placed behind all butt joins especially mid wall joins. The membrane should continue 100mm past the top and bottom of the join.
Cavi
ty B
atto
n
Stud
Sark
ing
www.designpine.com
feb
13
www.designpine.com 9
FINISHING AFTER FIXING Design Pine cladding Prior to painting, make sure that the surface of the primer is not chalky and that the primer adhesion is good. The ‘X’ test can be used to check this. Use a sharp blade to cut an ‘X’ into the surface of the coating and press sticky tape over the ‘X’ and remove, if the primer lifts the adhesion is not good and should be sanded off.
Paint systems tend to last longer when each longitudinal arris of the cladding board is rounded rather than being square (sharp).
Paint systems on walls with a southern exposure or those protected by roof overhang or shade trees will be less affected by exposure to sun than those with a northern or western exposure.
TopcoatsOne preliminary topcoat of exterior grade paint should be applied to either the exposed face or all sides of the cladding prior to the boards being fixed in place.
Two or Three further topcoats of exterior grade paint should be applied after fixing in accordance with the paint manufacturer’s recommendations. The minimum paint film requirements can be found on the paint tin and is a minimum to gain paint performance. Wet film combs can be used to measure application rates.
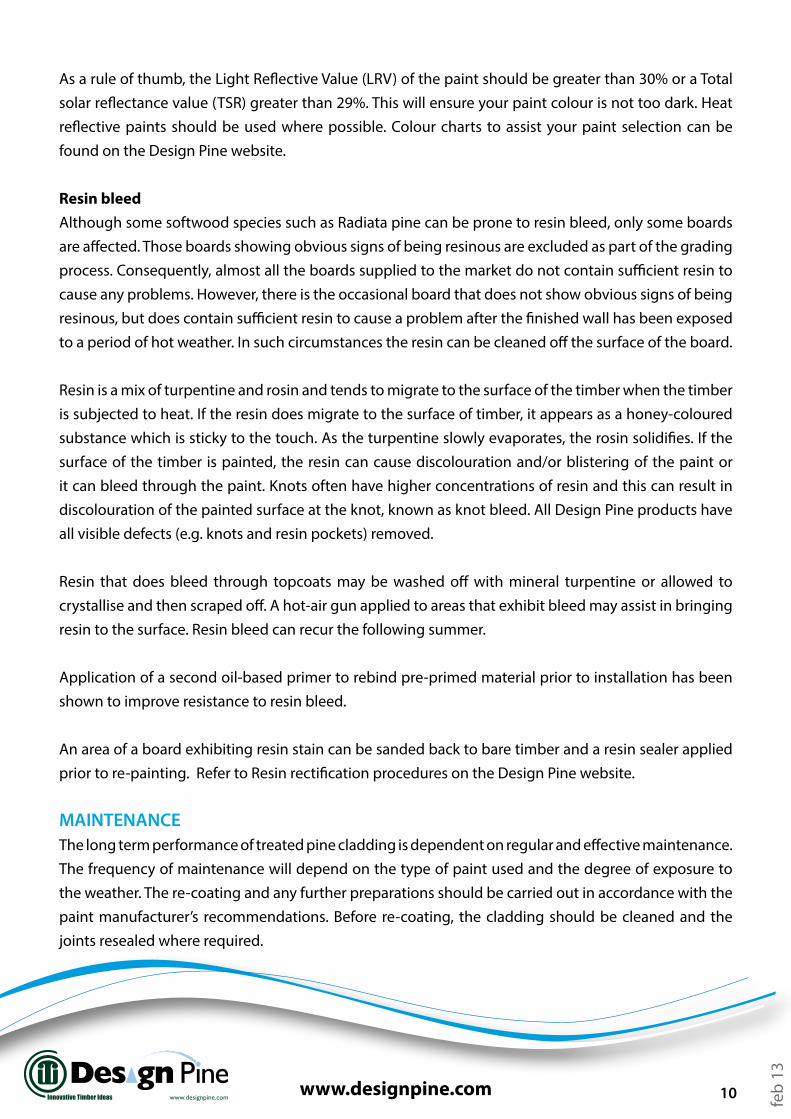
Colour of Paints The use of light coloured paints is highly recommended for cladding. Research has clearly demonstrated that lightly coloured paints provide much better service life for both the timber and paint used externally. Dark coloured surfaces (especially on north or west facing walls) heat up significantly more than light coloured surfaces and this in turn will cause timber to dry to a lower moisture content than it otherwise would. The subsequent greater shrinkage and movement may lead to checking, splitting and perhaps short term cupping. Higher temperatures also promote resin bleed in some boards of those species that can be prone to it.
www.designpine.com
feb
13
www.designpine.com 10
As a rule of thumb, the Light Reflective Value (LRV) of the paint should be greater than 30% or a Total solar reflectance value (TSR) greater than 29%. This will ensure your paint colour is not too dark. Heat reflective paints should be used where possible. Colour charts to assist your paint selection can be found on the Design Pine website.
Resin bleedAlthough some softwood species such as Radiata pine can be prone to resin bleed, only some boards are affected. Those boards showing obvious signs of being resinous are excluded as part of the grading process. Consequently, almost all the boards supplied to the market do not contain sufficient resin to cause any problems. However, there is the occasional board that does not show obvious signs of being resinous, but does contain sufficient resin to cause a problem after the finished wall has been exposed to a period of hot weather. In such circumstances the resin can be cleaned off the surface of the board.
Resin is a mix of turpentine and rosin and tends to migrate to the surface of the timber when the timber is subjected to heat. If the resin does migrate to the surface of timber, it appears as a honey-coloured substance which is sticky to the touch. As the turpentine slowly evaporates, the rosin solidifies. If the surface of the timber is painted, the resin can cause discolouration and/or blistering of the paint or it can bleed through the paint. Knots often have higher concentrations of resin and this can result in discolouration of the painted surface at the knot, known as knot bleed. All Design Pine products have all visible defects (e.g. knots and resin pockets) removed.
Resin that does bleed through topcoats may be washed off with mineral turpentine or allowed to crystallise and then scraped off. A hot-air gun applied to areas that exhibit bleed may assist in bringing resin to the surface. Resin bleed can recur the following summer.
Application of a second oil-based primer to rebind pre-primed material prior to installation has been shown to improve resistance to resin bleed.
An area of a board exhibiting resin stain can be sanded back to bare timber and a resin sealer applied prior to re-painting. Refer to Resin rectification procedures on the Design Pine website.
MAINTENANCEThe long term performance of treated pine cladding is dependent on regular and effective maintenance. The frequency of maintenance will depend on the type of paint used and the degree of exposure to the weather. The re-coating and any further preparations should be carried out in accordance with the paint manufacturer’s recommendations. Before re-coating, the cladding should be cleaned and the joints resealed where required.
www.designpine.com
feb
13
www.designpine.com 11
SAFE WORKINGPersonal Protection Equipment should be worn to protect of the eyes, nose, mouth and hands when sanding, sawing or planing timber or timber products. Refer to tool manufacturer’s safe working recommendations for particular items of equipment. MSDS’s are available on the Design Pine website for further information.
DISPOSAL OF OFFCUTS AND WASTEDo not burn off cuts or sawdust from any preservative treated timber. Such offcuts and sawdust should be disposed of by approved local authority methods.
PRESERVATIVE GUARANTEETo maintain the limited guarantee offered by preservative suppliers details pertaining to the products used on the project must be kept. For example: end tags, proof of purchase. Check with supplier to ensure all necessary details are completed.
Most preservative guarantees require every cut, rebate or hole to have a preservative sealer applied. Check with the supplier for further information
Prepared by
Charlie Herbert on behalf of the Timber Development Association for Design PineAugust 2010.
www.designpine.com
feb
13
www.designpine.com 12
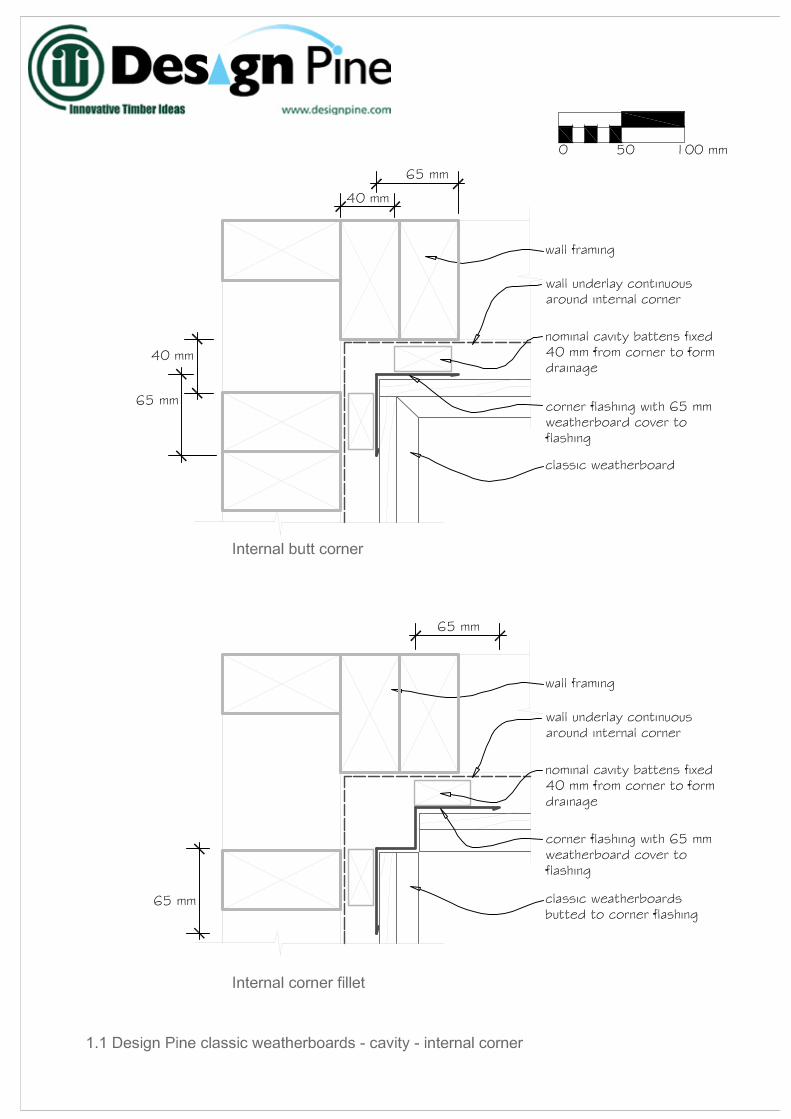
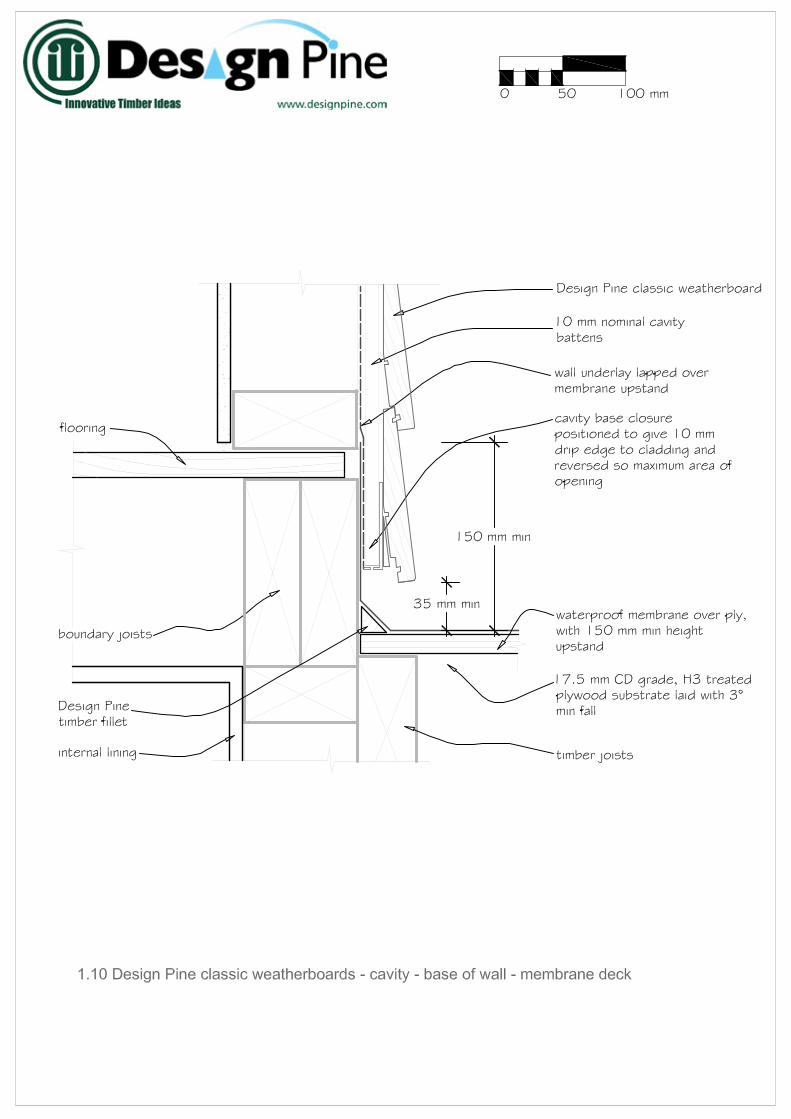
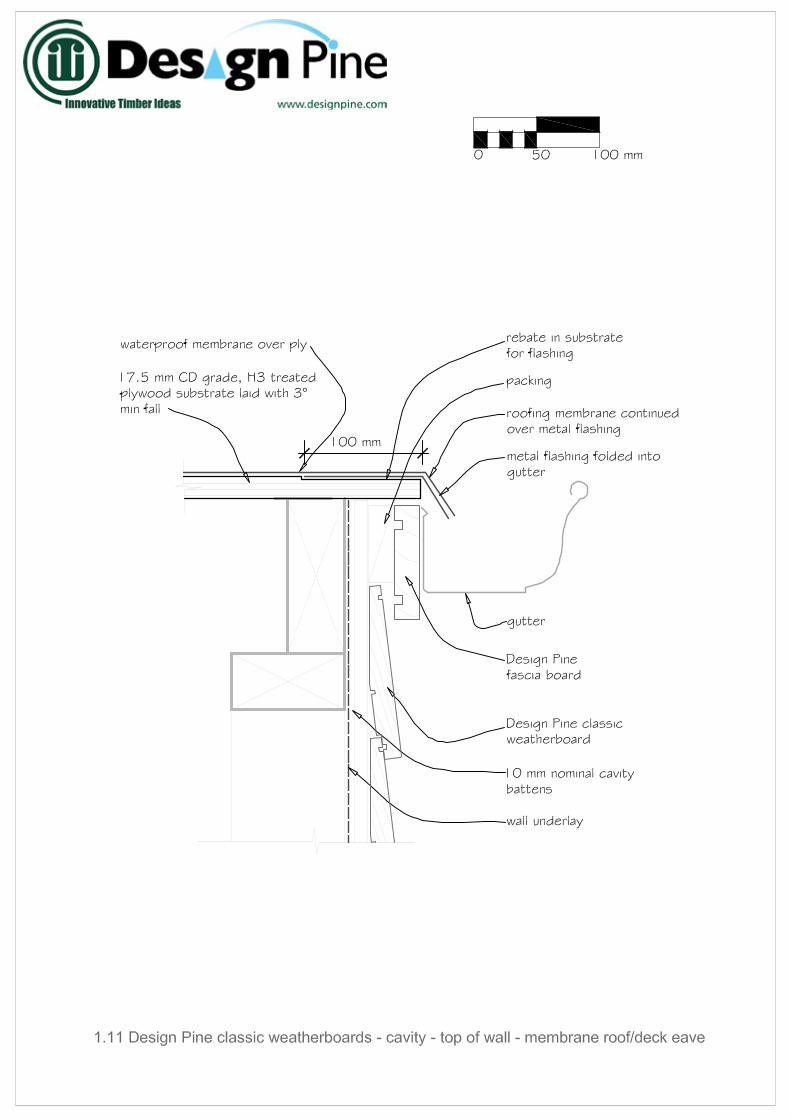
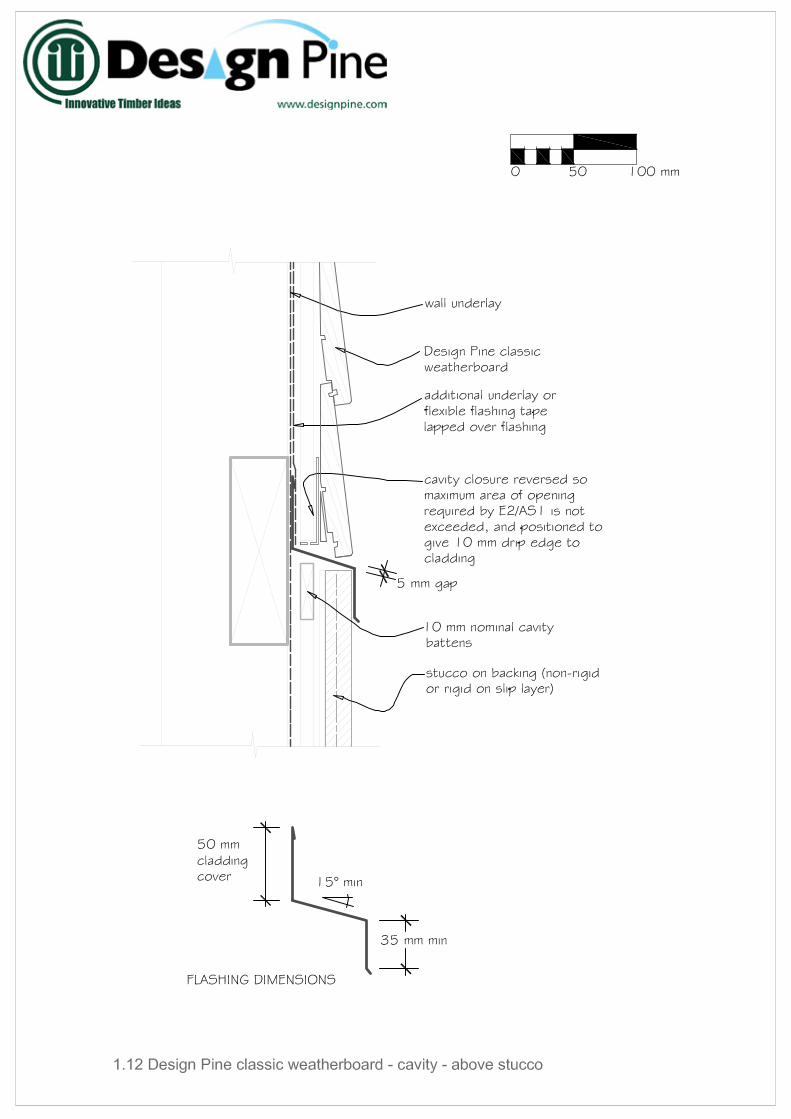
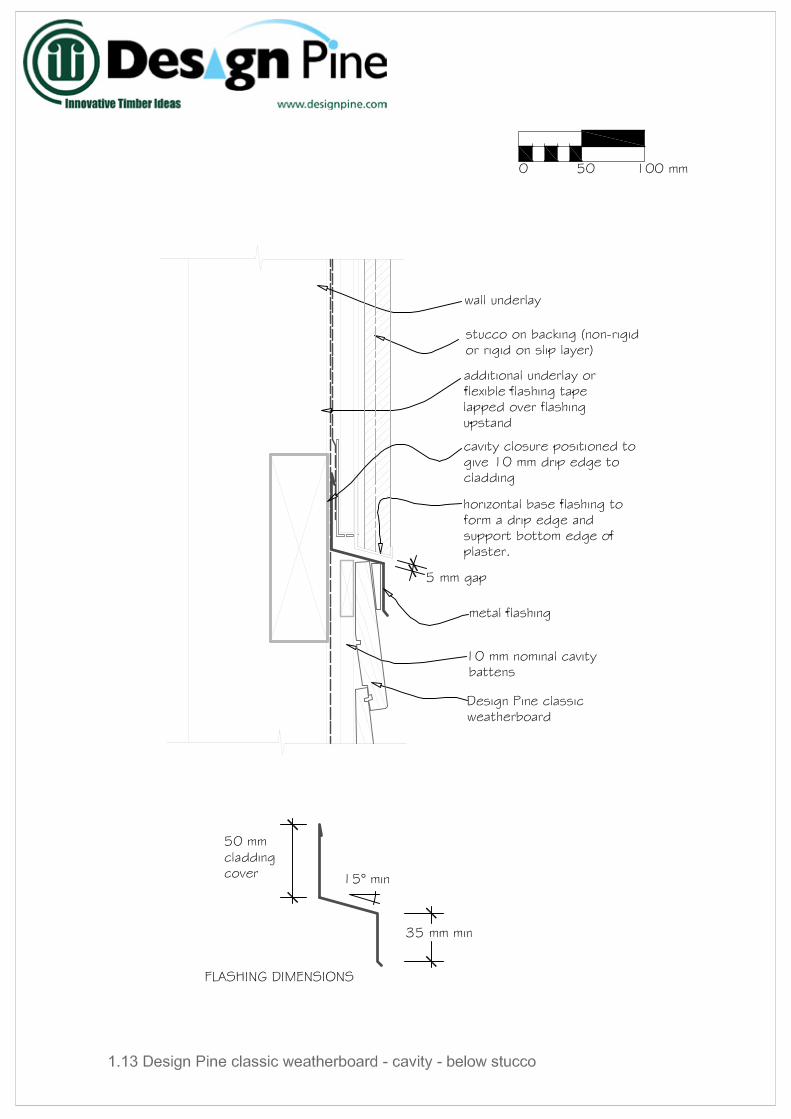
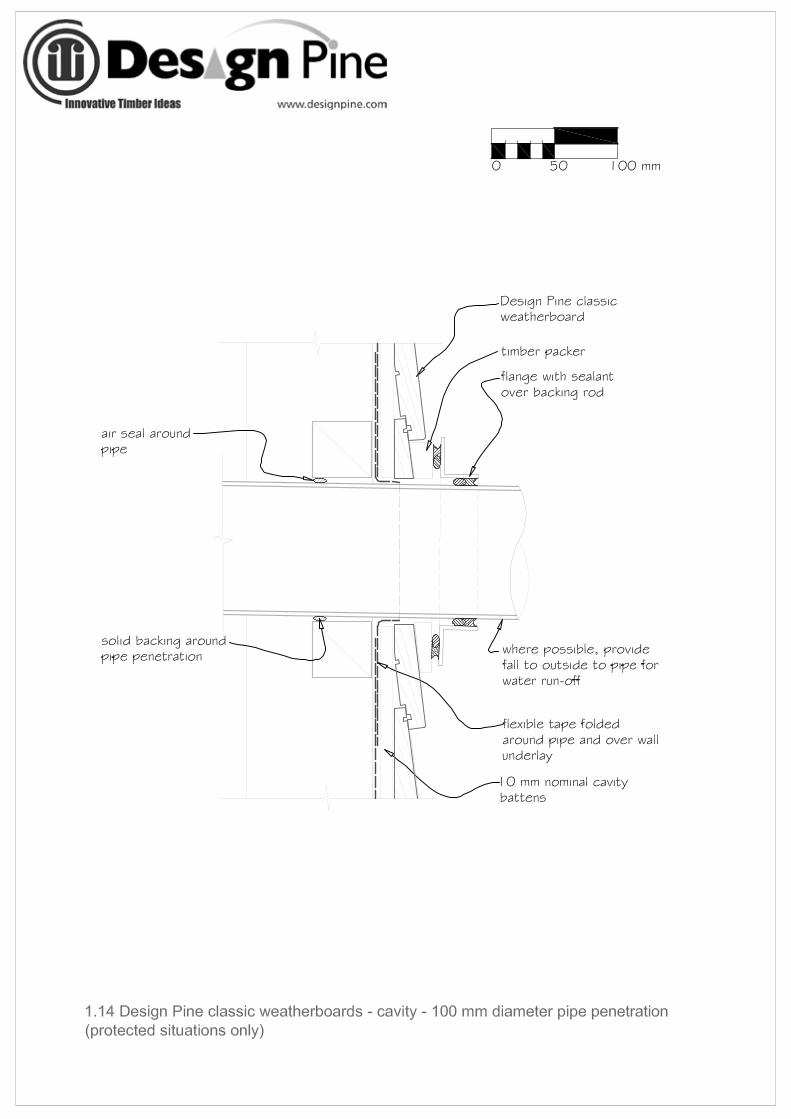
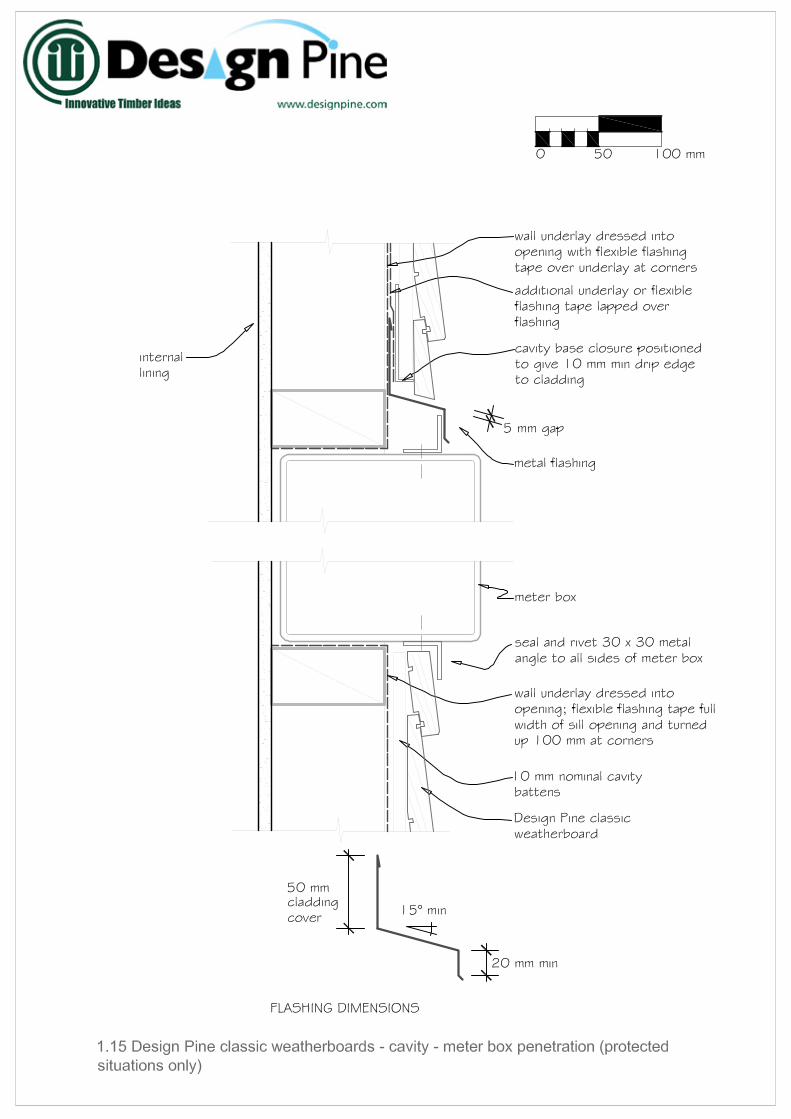
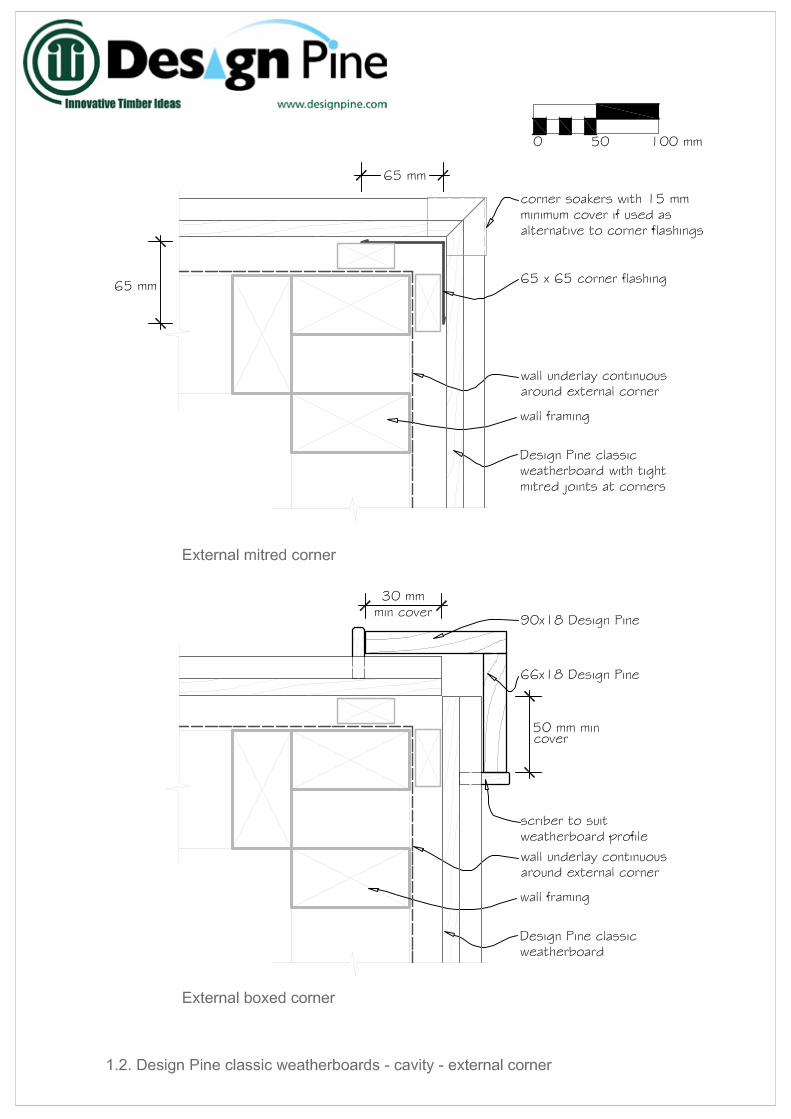
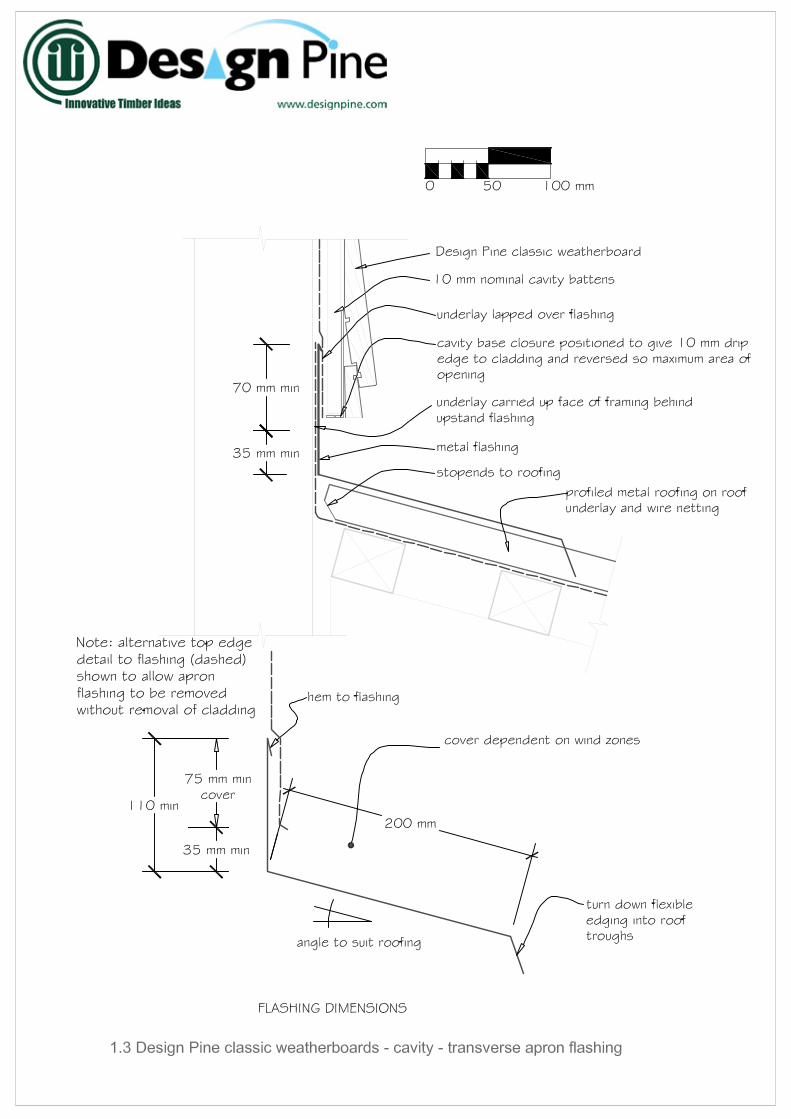
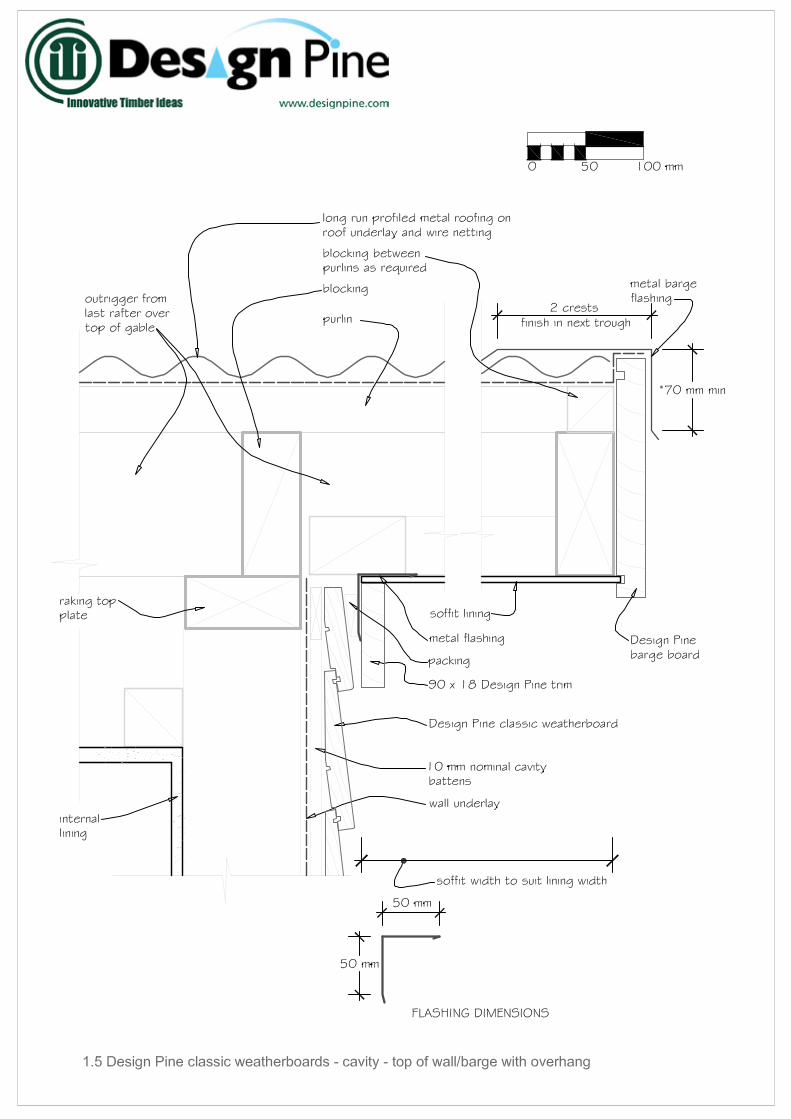
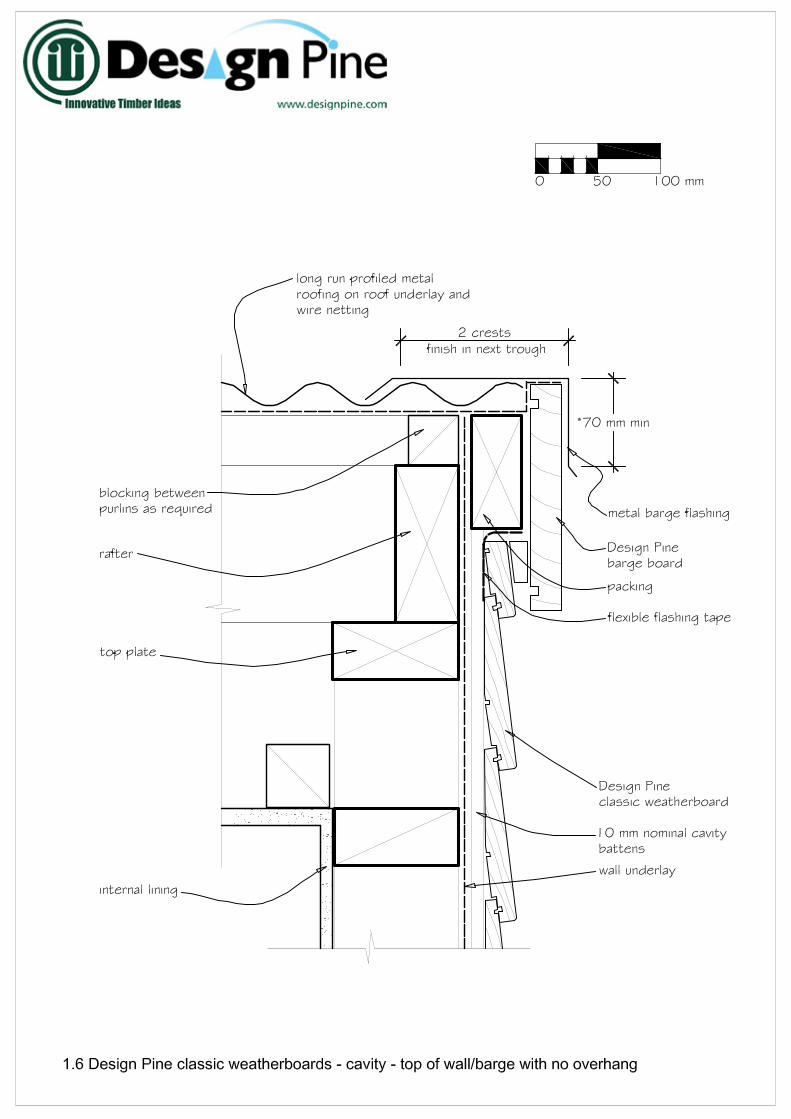
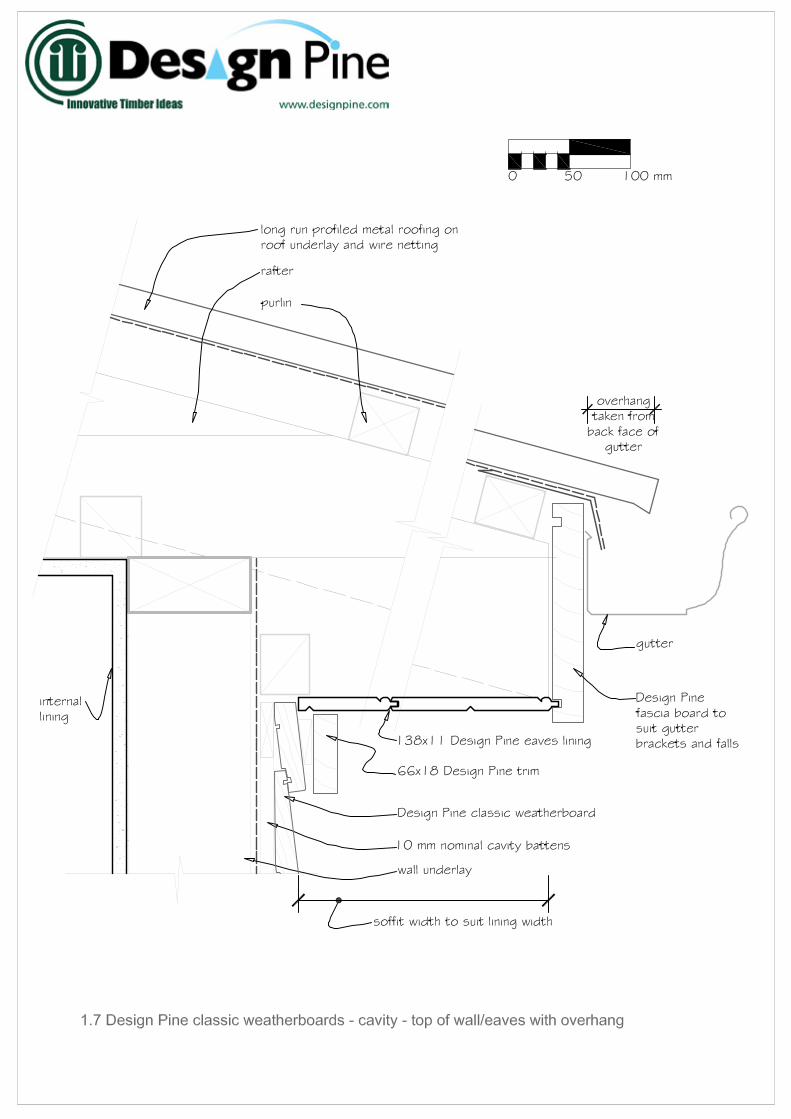
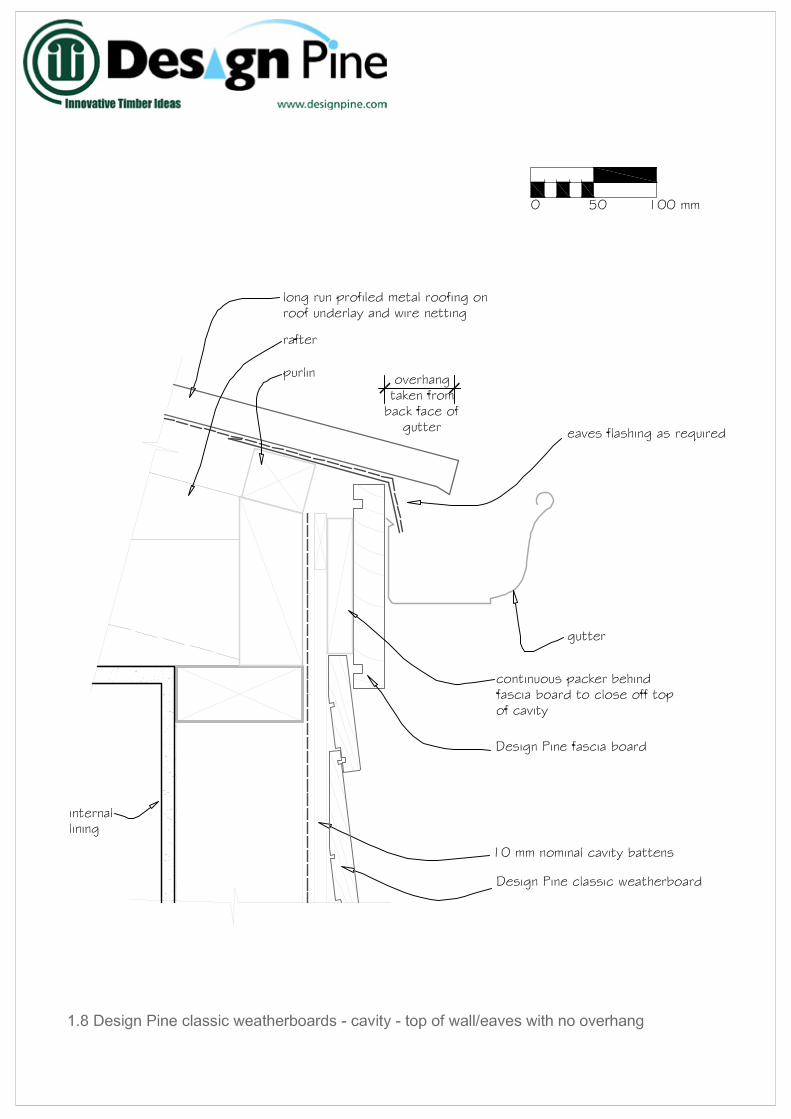
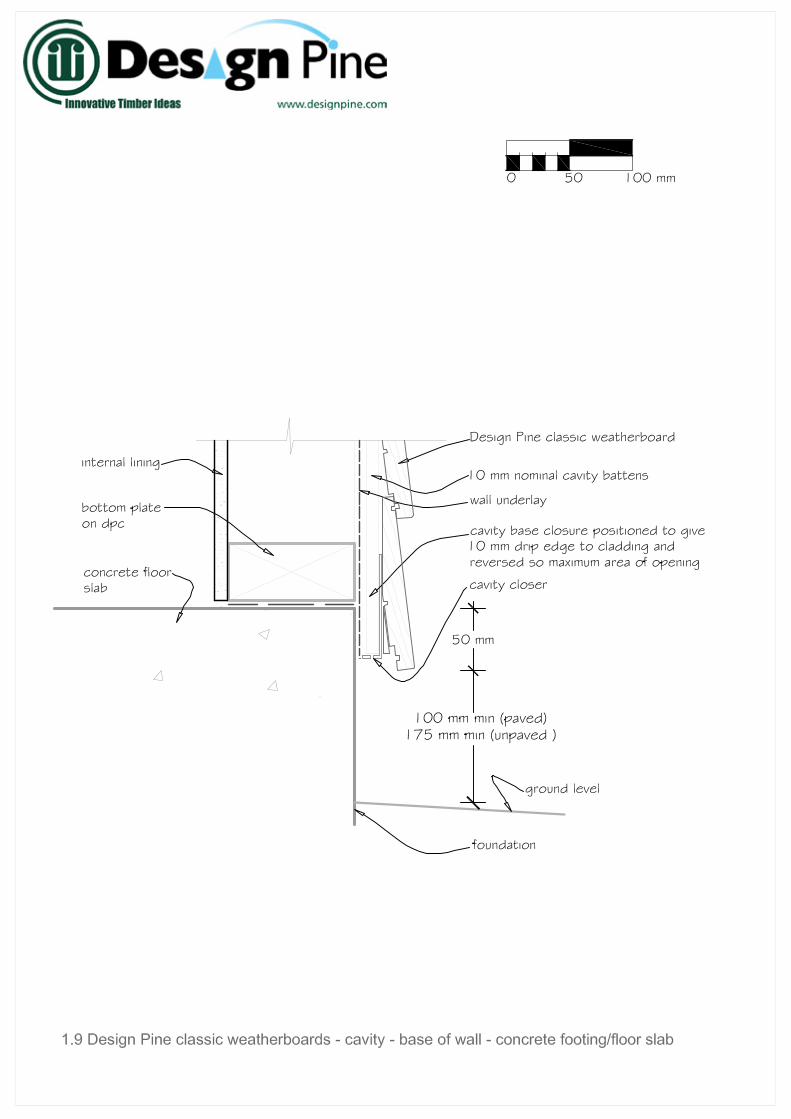
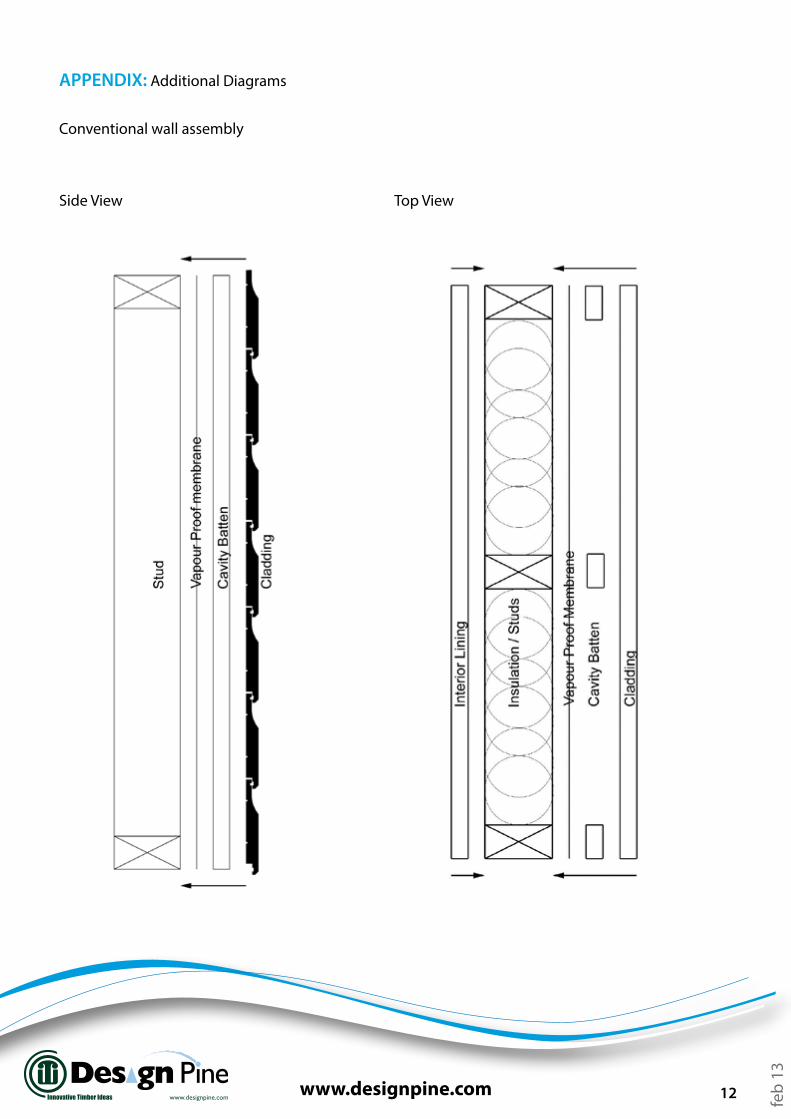
APPENDIX: Additional Diagrams
Conventional wall assembly
Side View Top View