Embed Size (px)
Citation preview
Cisco Mini ACI Fabric and Virtual APICs
New and Changed 2
Cisco Mini ACI Fabric and Virtual APICs Overview 2
Cisco Mini ACI Guidelines and Limitations 3
Installing and Configuring Physical APIC 3
Installing and Configuring Virtual APIC 4
Upgrading or Downgrading Virtual APIC 10
Converting Virtual APIC to Physical 10
Replacing Physical APIC 11
Rebuilding Mini ACI Fabric 11
Revised: April 15, 2020,
New and ChangedThe following table provides an overview of the significant changes up to the current release. The table does not provide an exhaustivelist of all changes or of the new features up to this release.
Table 1: New Features in Cisco APIC
DescriptionFeatureCisco APIC Release Version
Cisco Mini ACI and vAPICs are nowsupported with Cisco ACI Multi-Site.
Cisco Mini ACI Fabric and Multi-Site.Release 4.1(1)
This guide was created for the Cisco MiniACI and Virtual APICs feature.
Cisco Mini ACI Fabric and Virtual APICs.Release 4.0(1)
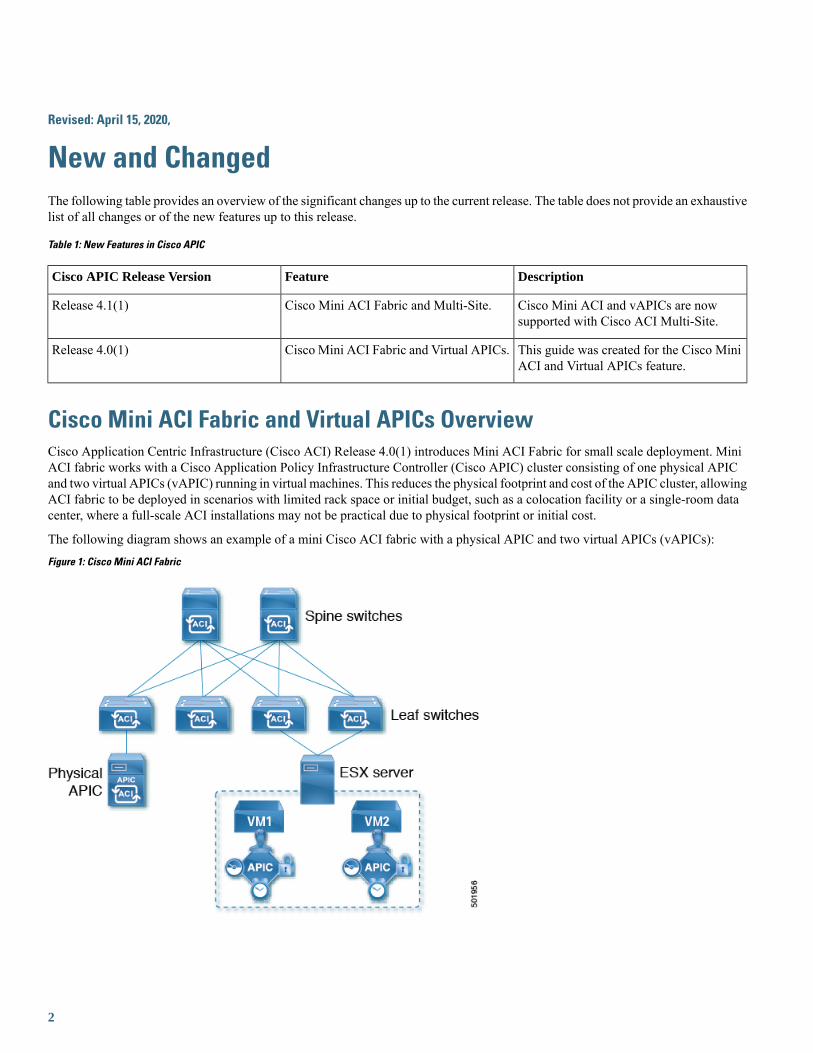
Cisco Mini ACI Fabric and Virtual APICs OverviewCisco Application Centric Infrastructure (Cisco ACI) Release 4.0(1) introduces Mini ACI Fabric for small scale deployment. MiniACI fabric works with a Cisco Application Policy Infrastructure Controller (Cisco APIC) cluster consisting of one physical APICand two virtual APICs (vAPIC) running in virtual machines. This reduces the physical footprint and cost of the APIC cluster, allowingACI fabric to be deployed in scenarios with limited rack space or initial budget, such as a colocation facility or a single-room datacenter, where a full-scale ACI installations may not be practical due to physical footprint or initial cost.
The following diagram shows an example of a mini Cisco ACI fabric with a physical APIC and two virtual APICs (vAPICs):
Figure 1: Cisco Mini ACI Fabric
2
Cisco Mini ACI Guidelines and Limitations
Mini ACI Fabric
Cisco Mini ACI fabric is supported with Cisco ACI Multi-Site starting with Cisco APIC Release 4.1(1) in the following scenarios:
• In Multi-Site deployments with Mini ACI fabric, one of the sites can have the Cisco Cloud APIC running on AWS.
• In Multi-Site deployments with back-to-back Spine connectivity, you can have Mini ACI fabrics in each site.
The following features are not supported with Cisco Mini ACI fabric:
• Multipod
• vPOD
• Remote Leaf
The physical APIC and the ESXi server hosting the virtual APICs must be time synced with the same NTP server. This ensures thatthere are no sync issues during the upgrades or restarts of the virtual APICs and the cluster converges gracefully.
Physical APIC
While two of the three Cisco APICs in a cluster can now be vAPICs as virtual machines running in ESXi hosts, you must still installand configure a physical APIC first. The physical APIC is required to discover the spine and leaf switches in the fabric, discover andconfigure the vAPICs during their installation, and facilitate the APIC cluster upgrades.
Although virtual APICs are fully capable of managing your Cisco ACI environment, physical APIC is responsible for fabric discovery.As such, should the physical APIC become unavailable, no physical fabric changes, such as adding or removing a switch, will bepossible until the physical APIC is recovered.
Virtual APIC
During the first boot of a vAPIC, it will discover and connect to the physical APIC through the Cisco ACI infra VLAN as part of thebootstrap process. Virtual APIC will use a pass-phrase generated by the physical APIC to get its certificate signed by the physicalAPIC. After the certificates are generated, physical and virtual APICs will exchange discovery messages and the cluster will form.The vAPIC will become fully-fit after data layer synchronization with the physical APIC is done.
Installing and Configuring Physical APIC
Procedure
Follow the instructions in Installing or Recovering Cisco APIC Images to install the physical Cisco APIC server.
You install and configure the physical APIC server exactly like you normally would. Keep in mind however, that for thesmall footprint Cisco ACI use case, you must configure the physical APIC server as the first Cisco APIC in your cluster.
What to do next
After you have configured the physical APIC server, you create the virtual machines and install the virtual APIC to complete thecluster, as described in Installing and Configuring Virtual APIC, on page 4.
3
Installing and Configuring Virtual APICInstalling and configuring virtual APICs (vAPIC) in your cluster consists of four steps:
• Configuring ACI leaf switch ports for infra VLAN trunking, as described in Virtual APIC Installation Prerequisites, on page4.
• Configuring VMware standard vSwitch or DVS and ESXi host, as described in Virtual APIC Installation Prerequisites, on page4.
• Obtaining the pass-phrase generated by the physical APIC, as described in Obtaining Passphrase from Physical APIC, on page6
• Installing and configuring each virtual APIC server, as described in Deploying Virtual APIC Using an OVA, on page 7.
Cisco provides an OVA image for easy deployment of vAPIC virtual machines using VMware vCenter. However, you can alsochoose to install the vAPIC directly in the ESXi host using the same ISO file as the physical APIC.
Virtual APIC Installation Prerequisites
Cisco ACI Fabric and Physical APIC Deployment
The ACI fabric must be deployed and running with a physical APIC before any virtual APIC configuration. The physical APIC isresponsible for fabric discovery, as well as discovery and registration of the virtual APICs.
Because vAPIC discovery and synchronization depends on a limited duration pass-phrase from the physical APIC, it is recommendedthat you configure the physical APIC with an NTP server prior to vAPIC installation to avoid any potential time mismatch andcertificate synchronization issues between the physical and virtual APICs. Configuring NTP in APIC is described in ProvisioningCore ACI Fabric Services chapter of the Cisco APIC Basic Configuration Guide, Release 4.x. Ensure that you obtain the currentpassphrase from the physical APIC for the vAPIC deployment.
Leaf Switch Ports and Infra VLAN Trunking
The physical and virtual APICs discover and communicate with each other through the Cisco ACI infra VLAN. The leaf switchesmust have infra VLAN enabled on the ports connected to the ESXi hosts of the vAPIC virtual machines. This is achieved by enablinginfra VLAN in the Attachable Access Entity Profile (AEP) of the leaf ports.
You can make these changes from the physical APIC GUI as described in Configuring Leaf Switch Ports for vAPIC Using the CiscoAPIC GUI, on page 6.
ESXi Host and Virtual Machines
The following are the ESXi host, vCenter, and virtual machine requirements for vAPIC.
• The ESXi host must be running VMware ESXi version 6.5 or later
• The vCenter must be running version 6.5 or later if the ESXi hosts and virtual machines are managed by a vCenter.
• vAPIC must to be able to communicate with the physical APIC via the Infra VLAN, as such one of the following must be true:
• The ESXi host is connected directly to a Cisco ACI leaf switch or a vPC pair of leaf switches.
• The ESXi host is connected through UCS Fabric Interconnects and the Infra VLAN is extended into the UCS Domain tobe available within the UCS Service Profile and vNIC used by the ESX server.
4
• The ESXi host must have correct UTC time configured.
vAPIC uses the host's time when it first starts and connects to the physical APIC. Any significant time mismatch will causecertificate synchronization issues.
• The ESXi host must have sufficient resources to host vAPIC virtual machines. Each vAPIC VM requires the following:
• Memory: 32 GB
• CPU: 8
• HDD 1: 300 GB
A standard HDD can be used for the virtual APIC image installation.
• HDD 2: 100 GB SSD
A second, high-performance storage device is required for the virtual APIC datastore.
• NIC 1 (VMXNET 3): Out of Band
• NIC 2 (VMXNET 3): ACI Infra VLAN trunking
The current release does not support vMotion for the vAPIC virtual machines.Note
Virtual Switch Configuration
Virtual APIC supports VMware DVS and the standard vSwitch. In addition to configuring the leaf switch ports and ESXi host, youmust also configure the following for virtual switch and ESXi host:
• Create a new virtual switch or use an existing one. The virtual switch can be either a standard vSwitch or a DVS
In case of VMM domain integration, a DVS has been created on the vCenter by APIC. vAPIC can use this DVS
• Configure the virtual switch uplinks for VLAN trunking for the ACI infra VLAN in addition to any other data VLANs
• Add the ESXi host vmNICs that are connected to ACI leaf switches to the uplink
• Create a port-group and configure it to VLAN trunking for the ACI infra VLAN
In case of VMM domain integration, the above port-group can be created through VMM integration. In the APIC GUI, navigate toVirtual Networking > VMware VMMdomain > Policy > General and check the Configure Infra Port Groups box. This willautomatically create a port-group named Infra on the VMM Domain DVS in vCenter. However, this port-group is created with aVLAN type and you must manually change it to VLAN Trunking in the port-group's settings using the vSphere client.
In case of a vCenter without VMM integration with ACI, in the left-hand panel of the vCenter UI, navigate to Networking > VDS.Then in the right-hand panel, under Networks > Distributed Port Groups, click New Distributed Port Group. Finally, in thepop-up window, follow the steps to create the port group specifying VLAN trunking for the VLAN type and the Infra VLAN ID forthe VLAN trunk range.
If you are planning to install vAPIC directly in ESXi server without using vCenter, you instead configure the VMware StandardvSwitch in ESXi. In the top menu bar of the vSphere client, select the Configuration tab. Then select Networking. Finally, in thevSwitch VLAN ID (Optional) property, choose All (<VLAN-ID>), replacing <VLAN-ID> with the fabric Infra VLAN.
5
Configuring Leaf Switch Ports for vAPIC Using the Cisco APIC GUIYou can use the Cisco APIC GUI to configure the required Infra VLAN on the leaf switch ports where vAPICs are connected.
If the switch ports where the vAPICs are connected are already in use in your fabric, you can simply enable the Infra VLANon these ports in their Access Entity Profile using the Fabric > Access Policies > Policies > Global > Attachable AccessEntity Profiles > <AEP-name> > Enable Infrastructure VLAN checkbox.
Note
Procedure
Step 1 Log in to your physical APIC GUI.Step 2 From the top menu bar, navigate to System > Controllers
Step 3 In the left-hand navigation pane, navigate to Quick Start > Add Virtual APIC
Step 4 Click Add Virtual APIC.Step 5 Specify the leaf switches to which the vAPIC is connected.
Configure the following settings:
• For Leaf Switches – Leaf 1 node and port, specify the leaf switch and the port to which the vAPIC is connected.
• (Optional) ForLeaf Switches – Leaf 2 node and port, specify the second leaf switch and the port to which the vAPICis connected.
Step 6 Specify the vCenter information for the vAPIC you are adding.
If the vAPIC you are adding is installed using VMware vCenter, you can provide its information here:
• For VMM Domain, select an existing VMM domain or create a new one by providing a unique name.
• For Username, Password, and Confirm Password, provide the log in credentials for the vCenter.
• For Host Name (or IP Address), provide the host name or the IP address of the vCenter.
• For Datacenter, specify the datacenter in vCenter where the vAPIC is located.
Step 7 Click Submit to save the changes.
Obtaining Passphrase from Physical APICThis section provides information on how to obtain the automatically generated passphrase required by the virtual APIC to join thecluster.
Procedure
Step 1 Log in to your physical APIC.Step 2 Navigate to System > System Settings
6
Step 3 In the left-hand sidebar, select APIC Passphrase.
The string in Current Passphrase is the currently active passphrase that you will need to enter during the virtual APICinstallation.
The passphrase is automatically generated by the physical APIC and expires after 60 minutes. If for any reasonthe virtual APIC deployment is delayed for longer than 60 minutes, the passphrase will expire and becomeinvalid. In this case, a new passphrase needs to be obtained using the above procedure.
Note
Deploying Virtual APIC Using an OVAThe following steps provide information on how to install a Cisco APIC inside a virtual machine.
Before you begin
Ensure you have configured the ESX host and the virtual machines, as described in Virtual APIC Installation Prerequisites, on page4.
Procedure
Step 1 Download the virtual Cisco APIC OVA image.a) Browse to the Software Download link:
https://software.cisco.com/download/home/285968390/type
b) Click APIC Software.c) Choose the release version and download the virtual Cisco APIC OVA image to a location accessible from your
VMware vCenter server.
Step 2 Log in to your VMware vCenter server.Step 3 Right-click the ESXi host where the virtual Cisco APIC will be deployed and choose Deploy OVF Template..."
Step 4 Choose the virtual Cisco APIC OVA file and click Next
Step 5 Choose the datacenter or folder where you want to install the image and click Next.Step 6 Review the details and click Next to continue.Step 7 Specify the storage device for the virtual APIC datastore.
a) In the Select storage step of OVF template deployment, click Advanced in the bottom right corner of the window.b) Select the Storage device for the SSD Storage disk group.
You must select a high-performance storage device (SSD) with at least 100GB available space for the SSD Storage
datastore.
c) Select the Storage device for the All other disks disk group.
You can select any available storage device with at least 300GB available space for the virtual Cisco APIC mainimage.
d) Click Next to continue.
Step 8 Specify the Out-of-Band (OOB) and Infra networks for your environment.In the Select networks step of OVF template deployment, select the required networks, then click Next to continue.
7

Step 9 Specify the fabric details.
In the Customize template step of OVF template deployment, you must provide the following details:
• Controller ID – the ID of the controller you are configuring. The controller ID must be 2 or 3, depending onwhether this is the 2nd or 3rd controller you are configuring. The controller ID value of 1 is reserved for thephysical APIC you have installed in previous section.
• TEP Pool – the pool of TEP addresses.
• TEP Netmask – the netmask for the TEP addresses.
• VLAN id – the VLAN ID used for the Infra network.
• IPv4 OOB IP Address – the IP address for the out-of-band management.
• IPv4 OOB network mask – the netmask for the out-of-band management network.
• IPv4 OOB gateway – the gateway for the out-of-band management network.
• Passphrase – The pass-phrase you have obtained in Obtaining Passphrase from Physical APIC, on page 6.
The automatically generated pass-phrase expires after 60 minutes. If VM configuration and OVAdeployment takes longer, you may need to obtain a new pass-phrase from your physical APIC. You canspecify a new pass-phrase after you have already configured the VM in the vApp Options tab of theVM's properties.
Note
Step 10 Review the deployment details and click Finish to deploy your virtual APIC.Step 11 After the OVA deployment process completes, start the virtual APIC VM.
When the VM starts up, the virtual APIC will communicate with the physical APIC and join the cluster.
The initial vAPIC start-up and synchronization can take several minutes to complete.Note
After the installation is complete, the virtual Cisco APIC will be identified by a special icon in the topology diagram.
What to do next
After the virtual Cisco APIC are installed and added to the cluster, you can set up the rest of your environment as described in CiscoAPIC Getting Started Guide and Cisco APIC Basic Configuration Guide and .
Deploying Virtual APIC Directly in ESXiThe following steps provide information on how to install a vAPIC directly inside an ESXi host. This vAPIC installation uses thesame ISO file as the physical APIC installation.
Before you begin
Ensure you have configured the ESX host and switches, as described in Virtual APIC Installation Prerequisites, on page 4.
Procedure
Step 1 Download the APIC ISO image.
8
a) Browse to the Software Download link:
https://software.cisco.com/download/home/285968390/type
b) Click APIC Software.c) Choose the release version and download the APIC image (ISO) to a location accessible from your ESXi server.
Step 2 Copy the APIC ISO image to your ESXi host.Step 3 Log in to your VMware ESXi host using the vSphere client.Step 4 Create a Virtual Machine (VM) where you will install vAPIC.
The hardware requirements for the VM are listed in Virtual APIC Installation Prerequisites, on page 4
Step 5 Specify the APIC ISO image you downloaded as the boot image for the VM where you want to install vAPIC and poweron the VM.
The installation will proceed as it typically would for a physical APIC. After the installation is completed, the VM willpower down.
Step 6 Power on the VM.Step 7 Provide fabric information during vAPIC's initial boot.
When the vAPIC VM first starts up, it will request the following fabric information to complete the configuration:
• Fabric name
• Fabric ID
• Number of active controllers
• POD ID
Answer 1, because only a single POD is currently supported in Mini ACI fabric.
• Whether it is a standby controller
Answer NO, because you are configuring an active controller.
• Whether it is an APIC-X
Answer NO, because a vAPIC is not an APIC-X.
• Controller ID
The ID of the controller you are configuring. The controller ID must be 2 or 3, depending on whether this is the 2ndor 3rd controller you are configuring. The controller ID value of 1 is reserved for the physical APIC you have installedin previous section.
• Controller name
Host name for the vAPIC.
• Pool for TEP addresses
• VLAN ID for infra network
• Out-of-band management information
• Pass-phrase from the physical APIC
The pass-phrase you have obtained in Obtaining Passphrase from Physical APIC, on page 6
9
The automatically generated pass-phrase expires after 60 minutes, it is recommended that you obtain thecurrent passphrase on the physical APIC at this stage of vAPIC deployment.
Note
Step 8 Confirm that the details you have entered are correct and you want to proceed with the deployment.
After the deployment process completes, the virtual APIC will communicate with the physical APIC and join the cluster.
The initial vAPIC start-up and synchronization can take several minutes to complete.Note
After the installation is complete, the virtual Cisco APIC will be identified by a special icon in the topology diagram.
What to do next
After the virtual Cisco APIC are installed and added to the cluster, you can set up the rest of your environment as described in CiscoAPIC Getting Started Guide and Cisco APIC Basic Configuration Guide and .
Upgrading or Downgrading Virtual APICYou do not directly upgrade the virtual APIC servers, instead you upgrade the physical APIC as you normally would and the physicalAPIC then decrypts and sends the upgrade image to the virtual APICs for upgrade.
You can use the same Cisco ACI ISO image you would use for an all-physical APIC cluster upgrade or downgrade to upgrade ordowngrade your single physical APIC, as described in Upgrading and Downgrading the Cisco APIC and Switch Software
Downgrading to a version prior to Cisco APIC 4.0(1) is not supported.Note
Converting Virtual APIC to PhysicalYou can convert one or both of the virtual Cisco APIC servers in your cluster to a physical Cisco APIC server at any time.
Procedure
Step 1 Decommission the virtual Cisco APIC as described in Replacing a Cisco APIC in a Cluster Using the CLI in the CiscoAPIC Cluster Management chapter
You decommission a virtual Cisco APIC in the exact same way as you would a physical one
Step 2 Add a new physical Cisco APIC to the cluster as described in Installing or Recovering Cisco APIC Images in the CiscoAPIC Management, Installation, Upgrade, and Downgrade Guide
10
Replacing Physical APICYou can use the instructions in this section to replace the physical APIC.
Procedure
Step 1 Install a new physical APIC as you normally would.
Installing and configuring a physical APIC for the Mini ACI fabric is described in Installing and Configuring PhysicalAPIC, on page 3.
Step 2 Update the certificates on the new physical APIC.
Youmust obtain the certificates from one of the virtual APIC in order for the new physical APIC to be able to communicatewith them.
In the following command, replace:
• <vapic-ip> with the IP address of any one of the vAPICs
• <vapic-password> with the administrator password for the vAPIC whose IP you provided
Example:
# acidiag vapicjoin -n <vapic-ip> -u admin -p <vapic-password>
Rebuilding Mini ACI FabricThis procedure allows you to rebuild (reinitialize) your mini ACI fabric, which you may need to do for any of the following reasons:
• To change the TEP IPs
• To change the Infra VLAN
• To change the fabric name
• To perform TAC troubleshooting tasks
Using the procedure in this section erases the configuration on the Cisco APIC. If you want to perform a complete fabric rebuild,you must perform the procedure on every APIC. Alternatively, you can choose to use these steps to re-configure the virtual APIConly. You may choose to rebuild the virtual APIC configuration only if, for example, there are any issues with the initial configurationand the virtual APIC cannot join the cluster.
Before you begin
Ensure that the following is in place:
• Regularly scheduled backups of the configuration
• A configured and reachable CIMC for the physical Cisco APIC console access
• Virtual console access for the virtual Cisco APIC
11
Procedure
Step 1 (Optional) Back up the existing configuration.
If you would like to retain your current configuration, you can perform a configuration export as described in Cisco ACIConfiguration Files: Import and Export
Step 2 Erase the configuration on the Cisco APIC.
If you want to simply erase the configuration but preserve the fabric information:
Example:# acidiag touch clean
If you want to erase the configuration and change the fabric information:
Example:# acidiag touch setup
Step 3 Shutdown the vAPICs.Step 4 Reconfigure the physical APIC.
If you are performing touch setup or touch clean operation on the virtual Cisco APIC only, skip this step.
a) Reboot the physical APIC.
Example:# acidiag reboot
b) Execute the setup script.
Example:# setup-clean-config.sh
c) Reload the physical APIC.
Example:# reload
Step 5 Reconfigure and restart the vAPIC VMs.a) Update the virtual APIC configuration.
Re-enter configuration information in the virtual APIC's VM properties as described in Step 9 of Deploying VirtualAPIC Using an OVA, on page 7.
b) Restart the vAPIC virtual machines.
12

© 2018–2019 Cisco Systems, Inc. All rights reserved.

Europe HeadquartersAsia Pacific HeadquartersAmericas HeadquartersCiscoSystemsInternationalBVAmsterdam,TheNetherlands
CiscoSystems(USA)Pte.Ltd.Singapore
Cisco Systems, Inc.San Jose, CA 95134-1706USA
Cisco has more than 200 offices worldwide. Addresses, phone numbers, and fax numbers are listed on theCisco Website at www.cisco.com/go/offices.