Embed Size (px)
Citation preview

Cisco Jabber for iPhone and iPad 9.6 Installation and ConfigurationGuideFirst Published: January 13, 2014
Americas HeadquartersCisco Systems, Inc.170 West Tasman DriveSan Jose, CA 95134-1706USAhttp://www.cisco.comTel: 408 526-4000 800 553-NETS (6387)Fax: 408 527-0883

THE SPECIFICATIONS AND INFORMATION REGARDING THE PRODUCTS IN THIS MANUAL ARE SUBJECT TO CHANGE WITHOUT NOTICE. ALL STATEMENTS,INFORMATION, AND RECOMMENDATIONS IN THIS MANUAL ARE BELIEVED TO BE ACCURATE BUT ARE PRESENTED WITHOUT WARRANTY OF ANY KIND,EXPRESS OR IMPLIED. USERS MUST TAKE FULL RESPONSIBILITY FOR THEIR APPLICATION OF ANY PRODUCTS.
THE SOFTWARE LICENSE AND LIMITEDWARRANTY FOR THE ACCOMPANYING PRODUCT ARE SET FORTH IN THE INFORMATION PACKET THAT SHIPPED WITHTHE PRODUCT AND ARE INCORPORATED HEREIN BY THIS REFERENCE. IF YOU ARE UNABLE TO LOCATE THE SOFTWARE LICENSE OR LIMITED WARRANTY,CONTACT YOUR CISCO REPRESENTATIVE FOR A COPY.
The Cisco implementation of TCP header compression is an adaptation of a program developed by the University of California, Berkeley (UCB) as part of UCB's public domain versionof the UNIX operating system. All rights reserved. Copyright © 1981, Regents of the University of California.
NOTWITHSTANDINGANYOTHERWARRANTYHEREIN, ALL DOCUMENT FILES AND SOFTWARE OF THESE SUPPLIERS ARE PROVIDED “AS IS"WITH ALL FAULTS.CISCO AND THE ABOVE-NAMED SUPPLIERS DISCLAIM ALL WARRANTIES, EXPRESSED OR IMPLIED, INCLUDING, WITHOUT LIMITATION, THOSE OFMERCHANTABILITY, FITNESS FORA PARTICULAR PURPOSEANDNONINFRINGEMENTORARISING FROMACOURSEOFDEALING, USAGE, OR TRADE PRACTICE.
IN NO EVENT SHALL CISCO OR ITS SUPPLIERS BE LIABLE FOR ANY INDIRECT, SPECIAL, CONSEQUENTIAL, OR INCIDENTAL DAMAGES, INCLUDING, WITHOUTLIMITATION, LOST PROFITS OR LOSS OR DAMAGE TO DATA ARISING OUT OF THE USE OR INABILITY TO USE THIS MANUAL, EVEN IF CISCO OR ITS SUPPLIERSHAVE BEEN ADVISED OF THE POSSIBILITY OF SUCH DAMAGES.
Any Internet Protocol (IP) addresses and phone numbers used in this document are not intended to be actual addresses and phone numbers. Any examples, command display output, networktopology diagrams, and other figures included in the document are shown for illustrative purposes only. Any use of actual IP addresses or phone numbers in illustrative content is unintentionaland coincidental.
Cisco and the Cisco logo are trademarks or registered trademarks of Cisco and/or its affiliates in the U.S. and other countries. To view a list of Cisco trademarks, go to this URL: http://www.cisco.com/go/trademarks. Third-party trademarks mentioned are the property of their respective owners. The use of the word partner does not imply a partnershiprelationship between Cisco and any other company. (1110R)
© 2014 Cisco Systems, Inc. All rights reserved.

C O N T E N T S
C H A P T E R 1 Introduction 1
Documentation 1
Community Resources 1
C H A P T E R 2 Deployment Options 3
On-Premises Deployments 3
Product Modes 3
Full UC Diagrams 4
Diagram with Cisco Unified Presence 4
Diagram with Cisco Unified Communications IM and Presence 5
Cloud-Based Deployments 7
Cloud-Based Diagram 8
Hybrid Cloud-Based Diagram 9
How the Client Connects to Services 10
Recommended Connection Methods 10
Sources of Authentication 11
Initial Launch Sequence 11
How the Client Gets an Authenticator 12
Service Discovery 13
How the Client Locates Services 14
Client Issues HTTP Query 15
Cisco UDS SRV Record 16
CUP Login SRV Record 17
Manual Connection Settings 18
Manual Connection Settings for On-Premises Deployments 18
Manual Connection Settings for Cloud-Based Deployments 19
On-Premises Service Connections 20
Full UC and IM-Only Deployments 20
Cisco Jabber for iPhone and iPad 9.6 Installation and Configuration Guide iii

Presence Server Discovery 20
DNS SRV Records 21
Connect to Available Services 21
Cloud-Based Service Connections 21
Connect to Available Services 21
Single Sign-On (SSO) Deployments 22
Cloud-Based SSO 22
Cisco AnyConnect Deployments 23
Cisco AnyConnect Deployment Considerations 23
Application Profiles 24
Automate VPN Connection 25
Set Up Connect On-Demand VPN 25
Set Up Automatic VPN Access on Cisco Unified Communications Manager 26
Set Up Certificate-Based Authentication 28
Distribute Certificates with SCEP 28
Distribute Client Certificate with Mobileconfig File 29
Session Parameters 29
Set ASA Session Parameters 29
Group Policies and Profiles 30
Trusted Network Detection 31
Tunnel Policies 31
C H A P T E R 3 Plan for Installation 33
Device Requirements 33
Software Requirements 34
On-Premises Servers 34
Cloud-Based Servers 35
Directory Servers 36
Accessibility 36
Supported Codecs 36
Network Requirements 37
Ports and Protocols 38
Device COP File for Cisco Jabber for iPhone and iPad 39
Audio and Video Performance Reference 39
Bit Rates for Audio 40
Cisco Jabber for iPhone and iPad 9.6 Installation and Configuration Guideiv
Contents
Bit Rates for Video 40
Maximum Negotiated Bit Rate 40
Performance Expectations for Bandwidth 41
Video Rate Adaption 41
Quality of Service Configuration 41
Port Ranges on Cisco Unified Communications Manager 41
Cross-Launching the Client 42
C H A P T E R 4 Upgrade 43
Upgrade Scenarios 43
Upgrade Cisco Jabber Voice for iPhone by Adding Cisco Unified Presence 45
Upgrade Cisco Jabber Voice for iPhone by Adding Cisco Unified Communications Manager
IM and Presence 47
Upgrade Cisco Jabber Voice for iPhone by Adding Cisco WebEx 49
Upgrade Cisco Jabber Video for iPad on Cisco Unified Presence 49
Upgrade Cisco Jabber Video for iPad on Cisco Unified Communications Manager IM and
Presence 50
Upgrade Cisco Jabber Video for iPad on Cisco WebEx 51
Configuration Differences when Upgrading Cisco Jabber for iPhone and iPad 52
C H A P T E R 5 Set Up Servers 55
Server Setup Guide 55
C H A P T E R 6 Configure the Client 57
Introduction to Client Configuration 57
Configure Client on Cisco Unified Communications Manager 58
Set Parameters on Service Profile 58
Parameters in service profiles 59
Add UC Services 60
Create Service Profiles 61
Apply Service Profiles 62
Set Parameters on Phone Configuration 62
Parameters in Phone Configuration 62
Create and Host Client Configuration Files 63
Client Configuration Files 63
Cisco Jabber for iPhone and iPad 9.6 Installation and Configuration Guide v
Contents

Global Configuration Files 64
Configuration File Requirements 64
Specify Your TFTP Server Address 64
Specify Your TFTP Server on Cisco Unified Presence 65
Specify Your TFTP Server on Cisco Unified Communications Manager IM and
Presence 65
Specify TFTP Servers with the Cisco WebEx Administration Tool 66
Create Global Configurations 66
Host Configuration Files 67
Restart Your TFTP Server 67
Configuration File Structure 68
Group Elements 68
XML Structure 69
Example Configuration 69
Client Parameters 69
Policies Parameters 70
Common Policies 70
Cisco WebEx Policies 72
Service Credentials Parameters 72
Voicemail Parameters 73
C H A P T E R 7 Integrate with Directory Sources 75
Set Up Directory Synchronization and Authentication 75
Synchronize with the Directory Server 76
Enable Synchronization 76
Populate User ID and Directory URI 76
Specify an LDAP Attribute for the User ID 77
Specify an LDAP Attribute for the Directory URI 77
Perform Synchronization 78
Authenticate with the Directory Server 79
Contact Sources 79
Basic Directory Integration 79
Authentication with Contact Sources 80
Specify LDAP Directory Configuration on Cisco Unified Presence 81
Cisco Jabber for iPhone and iPad 9.6 Installation and Configuration Guidevi
Contents

Specify LDAP Directory Configuration on Cisco Unified Communications
Manager 82
Set Credentials in the Client Configuration 83
Use Anonymous Binds 84
Client Configuration for Directory Integration 84
Configure Directory Integration in a Service Profile 85
Directory Profile Parameters 85
Summary of Directory Integration Configuration Parameters 87
Attribute Mapping Parameters 88
Attributes on the Directory Server 89
Directory Connection Parameters 89
Directory Query Parameters 91
Base Filter Examples 93
Contact Photo Parameters 93
Contact Photo Retrieval with BDI 94
Contact Photo Formats and Dimensions 95
Contact Photo Formats 95
Contact Photo Dimensions 95
Contact Photo Adjustments 96
Directory Server Configuration Examples 97
Simple Authentication 97
Simple Authentication with SSL 97
OpenLDAP Integration 97
Anonymous Binds 97
Authenticated Binds 98
Federation 99
Interdomain Federation 99
Intradomain Federation 100
Configure Intradomain Federation 100
Intradomain Federation Example 100
C H A P T E R 8 Troubleshooting 103
Obtain Logs from Cisco Jabber 103
Obtain Logs from Cisco AnyConnect Secure Mobility Client 104
Troubleshooting Tips 104
Cisco Jabber for iPhone and iPad 9.6 Installation and Configuration Guide vii
Contents

Setup Issues 104
Cannot sign in Cisco Jabber when using Cisco Unified Presence server 104
Cisco Jabber Registration Fails 104
Device Icon Is Missing 105
Upgrade Issues 105
Directory Search Does Not Work After Upgrade 105
Device Issues 106
Cannot sign in Cisco Jabber when using Cisco Unified Presence server 106
Cannot Receive Calls in Cisco Jabber 106
Calls Incorrectly Sent to Voicemail 106
Cannot Move Calls from Mobile Network to Cisco Jabber 107
Cannot Send VoIP Calls to Mobile Device 107
Cannot Merge Audio for Calls 107
Cannot Start Video Conferences 107
Voice Quality Issues 108
Battery Drains Faster with Cisco Jabber 108
Search Issues 108
No Directory Search 108
Incorrect or Missing Caller Identification 109
Voicemail Issues 109
Cannot Connect to Voicemail Server 109
Voicemail Prompt is Truncated 109
Cisco AnyConnect Issues 110
Certificate Authentication Failure 110
SCEP Enrollment Failure 110
Issues Launching Cisco AnyConnect Secure Mobility Client 110
Dial via Office Issues 111
Dial via Office Calls End Unexpectedly 111
Dial via Office Calls Cannot Connect 111
Dial via Office Calls Placed From Voicemail or Alternate Number 111
Problems with DVO Callback 112
Cisco Jabber for iPhone and iPad 9.6 Installation and Configuration Guideviii
Contents

C H A P T E R 1Introduction
Cisco Jabber for iPhone and iPad is a unified communications client within the Cisco Jabber suite ofcollaboration software. This document contains the information you need to install and configure the client.
Find out more about Cisco Jabber at www.cisco.com/go/jabber.
• Documentation, page 1
• Community Resources, page 1
DocumentationCisco Jabber for iPhone and iPad provides the following documentation in addition to this guide:
Release Notes
http://www.cisco.com/en/US/products/ps13391/prod_release_notes_list.html
Server Setup Guide
http://www.cisco.com/en/US/products/ps13391/prod_installation_guides_list.html
End-User Guides
http://www.cisco.com/en/US/products/ps13391/products_user_guide_list.html
Licensing Information
http://www.cisco.com/en/US/products/ps13391/products_licensing_information_listing.html
Community ResourcesCisco provides different community resources where you can engage with support representatives or joinother community members in product discussions.
Cisco Jabber for iPhone and iPad 9.6 Installation and Configuration Guide 1

Cisco product conversation and sharing site
Join other community members in discussing features, functions, licensing, integration, architecture,challenges, and more. Share useful product resources and best practices.
https://communities.cisco.com/community/technology/collaboration/product
Cisco support community
Visit the Cisco support community for IT installation, implementation, and administrative questions.
https://supportforums.cisco.com/community/netpro/collaboration-voice-video/jabber
Cisco support and downloads
Find a wealth of product support resources, download application software, and find bugs based onproduct and version.
http://www.cisco.com/cisco/web/support/index.html
Cisco expert corner
Engage, collaborate, create, and share with Cisco experts. The Cisco expert corner is a collection ofresources that various experts contribute to the community, including videos, blogs, documents, andwebcasts.
https://supportforums.cisco.com/community/netpro/expert-corner
Cisco Jabber for iPhone and iPad 9.6 Installation and Configuration Guide2
IntroductionCommunity Resources

C H A P T E R 2Deployment Options
Learn about options for deploying Cisco Jabber for iPhone and iPad.
• On-Premises Deployments, page 3
• Cloud-Based Deployments, page 7
• How the Client Connects to Services, page 10
• On-Premises Service Connections, page 20
• Cloud-Based Service Connections, page 21
• Single Sign-On (SSO) Deployments, page 22
• Cisco AnyConnect Deployments, page 23
On-Premises DeploymentsAn on-premises deployment is one in which you set up, manage, and maintain all services on your corporatenetwork.
Product ModesThe default product mode is one in which the user's primary authentication is to a presence server.
At a minimum, Cisco Jabber for iPhone and iPad users have instant messaging and presence capabilities.Users can also have audio and video, voicemail, and conferencing.
You can deploy the client in the following modes.
Full UC
To deploy full UC mode, you enable instant messaging and presence capabilities. You then provisionusers with devices for audio and video in addition to voicemail and conferencing capabilities.
IM-Only
To deploy IM-only mode, you enable instant messaging and presence capabilities. You do not provisionusers with devices.
Cisco Jabber for iPhone and iPad 9.6 Installation and Configuration Guide 3

Full UC DiagramsReview architecture diagrams for on-premises deployments with full UC capabilities.
Both full UC and IM-only deployments require a presence server as the user's primary authenticationsource. However, IM-only deployments require only instant messaging and presence capabilities. You donot need to provision users with devices in an IM-only deployment.
Remember
Diagram with Cisco Unified Presence
This topic refers to Cisco Unified Presence Release 8.6.
The following diagram illustrates the architecture of an on-premises deployment that includes Cisco UnifiedPresence:
Figure 1: On-Premises architecture
The following are the services available in an on-premises deployment:
Presence
Users can publish their availability and subscribe to other users' availability through Cisco UnifiedPresence.
Cisco Jabber for iPhone and iPad 9.6 Installation and Configuration Guide4
Deployment OptionsFull UC Diagrams

Instant Messaging
Users send and receive instant messages through Cisco Unified Presence.
Audio Calls
Users place audio calls through mobile devices through Cisco Unified Communications Manager.
Video
Users place video calls through Cisco Unified Communications Manager.
Voicemail
Users send and receive voice messages through Cisco Unity Connection.
Conferencing
Integrate with one of the following:
Cisco WebEx Meeting Center
Provides hosted meeting capabilities.
Cisco WebEx Meetings Server
Provides on-premises meeting capabilities.
For information about contact sources in on-premises deployments, see the Contact Sources topic.
Related Topics
Contact Sources, on page 79
Diagram with Cisco Unified Communications IM and Presence
This topic refers to Cisco Unified Communications Manager IM and Presence Release 9.0 and later.
The following diagram illustrates the architecture of an on-premises deployment that includes Cisco UnifiedCommunications Manager IM and Presence:
Cisco Jabber for iPhone and iPad 9.6 Installation and Configuration Guide 5
Deployment OptionsFull UC Diagrams

Figure 2: On-Premises architecture
The following are the services available in an on-premises deployment:
Presence
Users can publish their availability and subscribe to other users' availability through Cisco UnifiedCommunications Manager IM and Presence.
Instant Messaging
Users send and receive instant messages through Cisco Unified Communications Manager IM andPresence.
Audio Calls
Users place audio calls through mobile devices through Cisco Unified Communications Manager.
Video
Users place video calls through Cisco Unified Communications Manager.
Voicemail
Users send and receive voice messages through Cisco Unity Connection.
Cisco Jabber for iPhone and iPad 9.6 Installation and Configuration Guide6
Deployment OptionsFull UC Diagrams
Conferencing
Integrate with one of the following:
Cisco WebEx Meeting Center
Provides hosted meeting capabilities
Cisco WebEx Meetings Server
Provides on-premises meeting capabilities
For information about contact sources in on-premises deployments, see the Contact Sources topic.
Related Topics
Contact Sources, on page 79
Cloud-Based DeploymentsA cloud-based deployment is one in which Cisco WebEx hosts services. You manage and monitor yourcloud-based deployment with the Cisco WebEx Administration Tool.
Cisco Jabber for iPhone and iPad 9.6 Installation and Configuration Guide 7
Deployment OptionsCloud-Based Deployments

Cloud-Based Diagram
The following diagram illustrates the architecture of a cloud-based deployment:
Figure 3: Cloud-based architecture
The following are the services available in a cloud-based deployment:
Contact Source
The Cisco WebEx Messenger service provides contact resolution.
Presence
The Cisco WebEx Messenger service lets users publish their availability and subscribe to other users'availability.
Instant Messaging
The Cisco WebEx Messenger service lets users send and receive instant messages.
Conferencing
Cisco WebEx Meeting Center provides hosted meeting capabilities.
Cisco Jabber for iPhone and iPad 9.6 Installation and Configuration Guide8
Deployment OptionsCloud-Based Diagram

Hybrid Cloud-Based Diagram
The following diagram illustrates the architecture of a hybrid cloud-based deployment:
Figure 4: Hybrid cloud-based architecture
The following are the services available in a hybrid cloud-based deployment:
Contact Source
The Cisco WebEx Messenger service provides contact resolution.
Presence
The Cisco WebEx Messenger service lets users publish their availability and subscribe to other users'availability.
Instant Messaging
The Cisco WebEx Messenger service lets users send and receive instant messages.
Conferencing
Cisco WebEx Meeting Center provides hosted meeting capabilities.
Audio Calls
Users place audio calls through mobile devices through Cisco Unified Communications Manager.
Video
Users place video calls through Cisco Unified Communications Manager.
Voicemail
Users send and receive voice messages through Cisco Unity Connection.
Cisco Jabber for iPhone and iPad 9.6 Installation and Configuration Guide 9
Deployment OptionsHybrid Cloud-Based Diagram

How the Client Connects to ServicesTo connect to services, Cisco Jabber requires the following information:
• Source of authentication that enables users to sign in to the client.
• Location of services.
You can provide that information to the client with the following methods:
Service Discovery
The client automatically locates and connects to services.
Manual Connection Settings
Users manually enter connection settings in the client user interface.
Recommended Connection MethodsThe method you should use to provide the client with the information it needs to connect to services dependson your deployment type, server versions, and product modes.
On-Premises Deployments
Discovery MethodServer VersionsProduct Mode
A DNS SRV request against_cisco-uds .<domain>
Version 9 and higher:
• Cisco UnifiedCommunications Manager
• Cisco UnifiedCommunications ManagerIM and Presence
Full UC (Default Mode)
A DNS SRV request against_cuplogin.<domain>
Version 8.x:
• Cisco UnifiedCommunications Manager
• Cisco Unified Presence
Full UC (Default Mode)
A DNS SRV request against_cisco-uds .<domain>
Version 9 and higher:
CiscoUnified CommunicationsManager IM and Presence
IM Only (Default Mode)
A DNS SRV request against_cuplogin .<domain>
Version 8.x:
Cisco Unified Presence
IM Only (Default Mode)
Cisco Jabber for iPhone and iPad 9.6 Installation and Configuration Guide10
Deployment OptionsHow the Client Connects to Services

Cisco Unified Communications Manager version 9 and higher can still discover full UnifiedCommunications and Instant Messaging only services using the _cuplogin DNS SRV request but a_cisco-uds request will take precedence if it is present.
Note
Hybrid Cloud-Based Deployments
Connection MethodServer Versions
HTTPS request againsthttp://loginp.webexconnect.com/cas/FederatedSSO?org=<domain>Cisco WebEx Messenger
Cloud-Based Deployments
Connection MethodDeployment Type
Cisco WebEx Administration ToolEnabled for single sign-on (SSO)
Cisco WebEx Administration ToolNot enabled for SSO
Sources of AuthenticationA source of authentication, or an authenticator, enables users to sign in to the client.
Possible sources of authentication, include the following:
Cisco Unified Presence
On-premises deployments in either full UC or IM only.
Cisco WebEx Messenger Service
Cloud-based or hybrid cloud-based deployments.
Initial Launch SequenceOn the initial launch after installation, Cisco Jabber starts in the default product mode. The client then getsan authenticator and signs the user in. After sign in, the client determines the product mode.
The following diagram illustrates the initial launch sequence:
Cisco Jabber for iPhone and iPad 9.6 Installation and Configuration Guide 11
Deployment OptionsSources of Authentication

How the Client Gets an AuthenticatorCisco Jabber looks for an authenticator as follows:
1 Client checks cache for manual settings.
Users can manually enter authenticator through the client user interface.
2 Client checks cache to discover if the user's domain is a WebEx organization.
The client chooses WebEx as the authenticator.
3 Client makes a WebEx cloud service HTTP request to discover if the user's organization domain is aWebEx organization.
The client chooses WebEx as the authenticator.
4 Client checks cache for service discovery.
The client loads settings from previous queries for service (SRV) records.
5 Client queries for SRV records.
The client queries the DNS name server for SRV records to locate services.
If the client finds the _cisco-uds SRV record, it can get the authenticator from the service profile.
if the client cannot get an authenticator, it prompts the user to manually select the source of authentication inthe client user interface.
Cisco Jabber for iPhone and iPad 9.6 Installation and Configuration Guide12
Deployment OptionsSources of Authentication

Service DiscoveryService discovery enables clients to automatically detect and locate services on your enterprise network.Clients query domain name servers to retrieve service (SRV) records that provide the location of servers.
The primary benefits to using service discovery are:
• Speeds time to deployment.
• Allows you to centrally manage server locations.
Migrating from Cisco Unified Presence 8.x to Cisco Unified Communications IM and Presence 9.0 orlater.
You must specify the Cisco Unified Presence server FQDN in the migrated UC service on Cisco UnifiedCommunications Manager. Open Cisco Unified Communications Manager Administration interface.Select User Management > User Settings > UC Service.
For UC services with type IM and Presence, when you migrate from Cisco Unified Presence 8.x to CiscoUnified Communications IM and Presence the Host Name/IP Address field is populated with a domainname and you must change this to the Cisco Unified Presence server FQDN.
Important
However, Cisco Jabber can retrieve different SRV records that indicate to the client different servers arepresent and different services are available. In this way, the client derives specific information about yourenvironment when it retrieves each SRV record.
The following table lists the SRV records you can deploy and explains the purpose and benefits of each record:
Cisco Jabber for iPhone and iPad 9.6 Installation and Configuration Guide 13
Deployment OptionsService Discovery

Why You DeployPurposeSRV Record
• Eliminates the need tospecify installationarguments.
• Lets you centrally manageconfiguration in UC serviceprofiles.
• Enables the client to discoverthe user's home cluster.
As a result, the client canautomatically get the user'sdevice configuration andregister the devices. You donot need to provision userswith CCMCIP profiles orTFTP server addresses.
• Supports mixed productmodes.
You can easily deploy userswith full UC or IM-onlymode capabilities.
Provides the location of CiscoUnified CommunicationsManagerversion 9.0 and higher.
The client can retrieve serviceprofiles from Cisco UnifiedCommunications Manager todetermine the authenticator.
_cisco-uds
• Supports deployments withCisco UnifiedCommunications Managerand Cisco Unified Presenceversion 8.x.
• Supports deployments whereall clusters have not yet beenupgraded to Cisco UnifiedCommunicationsManager 9.
Provides the location of CiscoUnified Presence.
Sets Cisco Unified Presence as theauthenticator.
_cuplogin
How the Client Locates ServicesThe following steps describe how the client locates services with SRV records:
1 Client's host computer or device gets a network connection.
When the client's host computer gets a network connection, it also gets the address of a DNS name serverfrom the DHCP settings.
2 User starts Cisco Jabber.
3 User inputs email-like address or through URL provisioning to discover the service on the welcome screenfor the first sign-in.
Cisco Jabber for iPhone and iPad 9.6 Installation and Configuration Guide14
Deployment OptionsService Discovery

URL provisioning allows users to click a link to cross launch Jabber without manually inputting email-likeaddress for service discovery. The link will be sent by the administrator through email and contains thedomain information that Jabber needs for service discovery. The link will be like:ciscojabber://provision?servicesdomain=<domain_for_service_discovery>, e.g., cisco.com.
Note
4 The client gets the address of the DNS name server from the DHCP settings.
5 The client queries the name server for the following SRV records in order of priority:
• _cisco-uds
• _cuplogin
The client caches the results of the DNS query to load on subsequent launches.
The following are examples of SRV record entries:
•_cisco-uds._tcp.DOMAIN SRV service location:priority = 0weight = 0port = 8443svr hostname=192.168.0.25
•_cuplogin._tcp.DOMAIN SRV service location:priority = 0weight = 0port = 8443svr hostname=192.168.0.26
For information about deploying SRV records on your enterprise DNS structure, see the Cisco Jabber DNSConfiguration Guide. The Cisco Jabber DNS Configuration Guide provides detailed information about howthe client retrieves and uses SRV records and explains how to deploy SRV records on internal and externalDNS name servers.
Client Issues HTTP QueryIn addition to querying the name server for SRV records to locate available services, Cisco Jabbersends anHTTP query to the CAS URL for the Cisco WebEx Messenger service. This request enables the client todetermine cloud-based deployments and authenticate users to the Cisco WebEx Messenger service.
When the client gets a domain from the user, it appends that domain to the following HTTP query:http://loginp.webexconnect.com/cas/FederatedSSO?org=
For example, if the client gets example.com as the domain from the user, it issues the following query:http://loginp.webexconnect.com/cas/FederatedSSO?org=example.com
That query returns an XML response that the client uses to determine if the domain is a valid Cisco WebExdomain.
If the client determines the domain is a valid Cisco WebEx domain, it prompts users to enter their CiscoWebEx credentials. The client then authenticates to the Cisco WebEx Messenger service.
If the client determines the domain is not a valid Cisco WebEx domain, it uses the results of the query to thename server to locate available services.
Cisco Jabber for iPhone and iPad 9.6 Installation and Configuration Guide 15
Deployment OptionsService Discovery

The client will use any configured system proxies when sending the HTTP request to the CASURL. Proxysupport for this request has the following limitations :
Note
• Proxy Authentication is not supported.
•Wildcards in the bypass list are not supported. Use example.com instead of *.example.com forexample. instead of for example.
Cisco UDS SRV RecordIn deployments with Cisco Unified Communications Manager version 9 and higher, Cisco Jabber canautomatically discover services and configuration with the following SRV record: _cisco-uds.
The following image illustrates how the client uses the _cisco-uds SRV record:
1 The client queries the domain name server for SRV records.
2 The name server returns the _cisco-uds SRV record.
3 The client locates the user's home cluster.
As a result of automatically locating the user's home cluster, the client can retrieve the device configurationfor the user and automatically register telephony services.
Cisco Jabber for iPhone and iPad 9.6 Installation and Configuration Guide16
Deployment OptionsService Discovery

In an environment with multiple Cisco Unified Communications Manager clusters, you must configurethe Intercluster Lookup Service (ILS). ILS enables the client to find the user's home cluster.
See the appropriate version of the Cisco Unified Communications Manager Features and Services Guideto learn how to configure ILS.
Note
4 The client retrieves the user's service profile.
The user's service profile contains the addresses and settings for UC services and client configuration.
The client also determines the authenticator from the service profile.
5 The client signs the user in to the authenticator.
CUP Login SRV RecordCisco Jabber can automatically discover and connect to Cisco Unified Presence or Cisco UnifiedCommunications Manager IM and Presence with the following SRV record: _cuplogin.
The following image illustrates how the client uses the _cuplogin SRV record:
1 The client queries the domain name server for SRV records.
2 The name server returns the _cuplogin SRV record.
As a result, Cisco Jabber can locate the presence server and determine that Cisco Unified Presence is theauthenticator.
3 The client prompts the user for credentials and authenticates to the presence server.
4 The client retrieves service profiles from the presence server.
Cisco Jabber for iPhone and iPad 9.6 Installation and Configuration Guide 17
Deployment OptionsService Discovery

The _cuplogin SRV record also sets the default server address on theManual setup and sign in screen.Note
Manual Connection SettingsWhen you launch Cisco Jabber, you can specify the authenticator and server addresses in theManual setupand sign in screen. The client then caches the server addresses to the local application configuration that itloads on subsequent launches.
Cisco Jabber prompts users to enter settings in theManual setup and sign in screen on the initial launch asfollows:
On-Premises with Cisco Unified Communications Manager Version 9.x and Higher
If the client cannot get the authenticator and server addresses from the service profile.
Cloud-Based or On-Premises with Cisco Unified Communications Manager Version 8.x
The client prompts users to enter server addresses in theManual setup and sign in screen if you donot set server addresses with SRV records.
Settings that you enter in theManual setup and sign in screen take priority over any other sources includingSRV records.
Manual Connection Settings for On-Premises DeploymentsUsers can set Cisco Unified Presence or Cisco Unified Communications Manager IM and Presence as theauthenticator and specify the server address in theManual setup and sign in screen.
You can automatically set the default server address with the _cuplogin SRV record.Remember
The following diagram illustrates how the client uses manual connection settings in on-premises deployments:
Cisco Jabber for iPhone and iPad 9.6 Installation and Configuration Guide18
Deployment OptionsManual Connection Settings

1 Users manually enter connection settings in theManual setup and sign in screen.
2 The client authenticates to Cisco Unified Presence or Cisco Unified Communications Manager IM andPresence.
3 The client retrieves service profiles from the presence server.
Manual Connection Settings for Cloud-Based DeploymentsUsers can set the Cisco WebEx Messenger service as the authenticator and specify the CAS URL for loginin theManual setup and sign in screen.
The following diagram illustrates how the client uses manual connection settings in cloud-based deployments:
1 Users manually enter connection settings in theManual setup and sign in screen.
Cisco Jabber for iPhone and iPad 9.6 Installation and Configuration Guide 19
Deployment OptionsManual Connection Settings

2 The client authenticates to the Cisco WebEx Messenger service.
3 The client retrieves configuration and services.
On-Premises Service ConnectionsLearn how the client can discover and connect to services in on-premises deployments.
Full UC and IM-Only DeploymentsBy default, the client connects to the presence server to authenticate users and retrieve service profiles. Theclient can automatically discover the presence server.
Presence Server DiscoveryThe client supports automatic server discovery using DNS SRV. The client can automatically discover eitherCisco Unified Presence or Cisco Unified Communications Manager IM and Presence if the user does notspecify the presence server address during sign in.
To discover the presence server, the client must first determine the domain. The client gathers this informationfrom users, who must enter their username and domain when they sign in to the client.
After the client finds the domain, it gets the presence server address from the Domain Name Server (DNS).
When the client gets the presence server address, it connects to the presence server and then caches the addressof the presence server.
If a redirect occurs to another server in the cluster, the client caches the address of the presence server to whichit connects, not the address of the server before the redirect.
Cisco Jabber for iPhone and iPad 9.6 Installation and Configuration Guide20
Deployment OptionsOn-Premises Service Connections

DNS SRV RecordsThe client retrieves the _cuplogin._tcp SRV record from the Domain Name Server (DNS) to lookup eitherCisco Unified Presence or Cisco Unified Communications Manager IM and Presence.
Notes:
• You must add this SRV record to the DNS server on the presence server domain.
• The client uses port 8443 to connect to Cisco Unified Presence or Cisco Unified CommunicationsManager IM and Presence.
• The client supports weight and priority in SRV records.
The following is an example SRV record:_cuplogin._tcp.domain SRV 0 1 8443 cup_server.domain
Connect to Available ServicesIf you use Cisco Unified Communications Manager IM and Presence Version 9 or later or Cisco UnifiedCommunications Manager Version 9 or later, you can set up service profiles.
After the client retrieves the service profiles, it connects to available services.
• If the profile contains conferencing settings, the client connects to the conferencing service.
• If the profile contains voicemail settings, the client connects to the voicemail service.
• If the profile contains settings for Cisco Unified CommunicationsManager, the following actions occur:
◦The client retrieves the device list for the user.
◦The client retrieves the client configuration from the TFTP server.
◦The client registers with Cisco Unified Communications Manager.
Cloud-Based Service ConnectionsLearn how the client can discover and connect to services in cloud-based deployments.
Connect to Available ServicesAfter the client connects to the Cisco WebEx Messenger service, users get instant messaging and presencecapabilities and contact resolution. Users can also get conferencing capabilities if you enable hostedconferencing with Cisco WebEx Meeting Center.
In hybrid cloud-based deployments, the client gets the connection details for on-premises services. You specifythe connection details with the Cisco WebEx Administration Tool.
• If the deployment includes Cisco Unity Connection, the client connects to the voicemail service.
• If the deployment includes Cisco Unified Communications Manager, the following actions occur:
Cisco Jabber for iPhone and iPad 9.6 Installation and Configuration Guide 21
Deployment OptionsConnect to Available Services

◦The client retrieves the device list for the user.
◦The client retrieves the client configuration from the TFTP server.
◦The client registers with Cisco Unified Communications Manager.
Single Sign-On (SSO) DeploymentsYou can enable single sign-on (SSO) in certain deployment scenarios.
Learn what SSO capabilities are available and review login flows to understand how client authenticationworks in an SSO deployment.
Cloud-Based SSOIn cloud-based deployments, the client supports SSO with the Cisco WebEx Messenger service.
The following steps describe the login flow for cloud-based SSO after users start the client:
1 The client sends a login request to the Cisco WebEx Messenger service.
2 The Cisco WebEx Messenger service redirects the client to the domain where your identity providerresides.
3 The client follows the redirect and requests a login token from the identity provider.
4 The identity provider gives a login token to the client.
5 The client passes that login token to the Cisco WebEx Messenger service.
As a result, the client authenticates with the Cisco WebEx Messenger service.
The following diagram illustrates the login flow for cloud-based SSO:
Cisco Jabber for iPhone and iPad 9.6 Installation and Configuration Guide22
Deployment OptionsSingle Sign-On (SSO) Deployments

Cisco AnyConnect DeploymentsCisco AnyConnect refers to a server-client infrastructure that enables the client to connect securely to yourcorporate network from remote locations such as Wi-Fi networks or mobile data networks.
The Cisco AnyConnect environment includes the following components:
Cisco Adaptive Security Appliance
Provides a service to secure remote access.
Cisco AnyConnect Secure Mobility Client
Establishes a secure connection to Cisco Adaptive Security Appliance from the user's device.
For information about requirements for Cisco Adaptive Security Appliance and Cisco AnyConnect SecureMobility Client, see the Software Requirements topic.
Related Topics
Software Requirements, on page 34
Cisco AnyConnect Deployment ConsiderationsCisco Adaptive Security Appliance provides a flexible architecture that can meet the needs of many differentdeployments. It is beyond the scope of this document to provide end-to-end deployment procedures. Rather,the purpose of this section is to provide information that you should consider when deploying Cisco AdaptiveSecurity Appliance and Cisco AnyConnect Secure Mobility Client for Cisco Jabber for iPhone and iPad .
You should refer to the configuration guides for Cisco Adaptive Security Appliance to obtain task-basedinformation on installing and configuring Cisco Adaptive Security Appliance.
Cisco Jabber for iPhone and iPad 9.6 Installation and Configuration Guide 23
Deployment OptionsCisco AnyConnect Deployments

Cisco supports Cisco Jabber for iPhone and iPad withCisco AnyConnect SecureMobility Client . Althoughother VPN clients are not officially supported, you may be able to use Cisco Jabber for iPhone and iPadwith other VPN clients. If you use another VPN client, set up VPN as follows:
Note
1 Install and configure the VPN client using the relevant third-party documentation.
2 Set up On-DemandVPN using the Set Up Automatic VPNAccess on the Cisco Unified CommunicationsManager topic.
Related Topics
Configuration Guides for Cisco ASA 5500 Series Adaptive Security AppliancesSet Up Automatic VPN Access on Cisco Unified Communications Manager, on page 26
Application ProfilesAfter users download the Cisco AnyConnect Secure Mobility Client to their device, the ASA must provisiona configuration profile to the application.
The configuration profile for the Cisco AnyConnect Secure Mobility Client includes VPN policy informationsuch as the company ASA VPN gateways, the connection protocol (IPSec or SSL), and on-demand policies.
You can provision application profiles for Cisco Jabber for iPhone and iPad in one of the following ways:
ASDM
Cisco recommends that you use the profile editor on the ASA Device Manager (ASDM) to define theVPN profile for the Cisco AnyConnect Secure Mobility Client.
When you use this method, the VPN profile is automatically downloaded to the Cisco AnyConnectSecure Mobility Client after the client establishes the VPN connection for the first time. You can usethis method for all devices and OS types, and you can manage the VPN profile centrally on the ASA.
Formore information, see theCreating and Editing an AnyConnect Profile topic of theCisco AnyConnectSecure Mobility Client Administrator Guide for your release.
iPCU
You can provision iOS devices using an Apple configuration profile that you create with the iPhoneConfiguration Utility (iPCU). Apple configuration profiles are XML files that contain information suchas device security policies, VPN configuration information, and Wi-Fi, mail, and calendar settings.
The high-level procedure is as follows:
1 Use iPCU to create an Apple configuration profile.
For more information, see the iPCU documentation.
2 Export the XML profile as a .mobileconfig file.
3 Email the .mobileconfig file to users.
After a user opens the file, it installs the AnyConnect VPN profile and the other profile settings tothe client application.
Cisco Jabber for iPhone and iPad 9.6 Installation and Configuration Guide24
Deployment OptionsCisco AnyConnect Deployment Considerations

MDM
You can provision iOS devices using an Apple configuration profile that you create with third-partyMobile DeviceManagement (MDM) software. Apple configuration profiles are XML files that containinformation such as device security policies, VPN configuration information, and Wi-Fi, mail, andcalendar settings.
The high-level procedure is as follows:
1 Use MDM to create the Apple configuration profiles.
For information on using MDM, see the Apple documentation.
2 Push the Apple configuration profiles to the registered devices.
Related Topics
Cisco AnyConnect Secure Mobility Client Administrator Guides
Automate VPN ConnectionWhen users open Cisco Jabber from outside the corporateWi-Fi network, Cisco Jabber needs a VPN connectionto access the Cisco UC application servers. You can set up the system to allow Cisco AnyConnect SecureMobility Client to automatically establish a VPN connection in the background, which helps ensure a seamlessuser experience.
Set Up Connect On-Demand VPN
The Apple iOS Connect On Demand feature enhances the user experience by automating the VPN connectionbased on the user's domain.
When the user is inside the corporate Wi-Fi network, Cisco Jabber can reach the Cisco UC infrastructuredirectly. When the user leaves the corporate Wi-Fi network, Cisco AnyConnect automatically detects if it isconnected to a domain that you specify in the AnyConnect client profile. If so, the application initiates theVPN to ensure connectivity to the UC infrastructure. All applications on the device including Cisco Jabbercan take advantage of this feature.
Connect On Demand supports only certificate-authenticated connections.Note
The following options are available with this feature:
• Connect If Needed: Apple iOS attempts to initiate a VPN connection to the domains in the list only ifit cannot resolve the address using DNS.
• Never Connect: Apple iOS never attempts to initiate a VPN connection to domains in this list.
Cisco Jabber for iPhone and iPad 9.6 Installation and Configuration Guide 25
Deployment OptionsCisco AnyConnect Deployment Considerations

Apple plans to remove the Always Connect option in the near future. After the Always Connect option isremoved, users can select the Connect If Needed option. In some cases, Cisco Jabber users may haveissues when using the Connect If Needed option. For example, if the hostname for the Cisco UnifiedCommunications Manager is resolvable outside the corporate network, iOS will not trigger a VPNconnection. The user can work around this issue bymanually launching Cisco AnyConnect SecureMobilityClient before making a call.
Attention
Procedure
Step 1 Use the ASDM profile editor, iPCU, or MDM software to open the AnyConnect client profile.Step 2 In the AnyConnect client profile, under the Connect if Needed section, enter your list of on-demand domains.
The domain list can include wild-card options (for example, cucm.cisco.com, cisco.com, and *.webex.com).
Set Up Automatic VPN Access on Cisco Unified Communications Manager
Before You Begin
• The mobile device must be set up for on-demand access to VPN with certificate-based authentication.For assistance with setting up VPN access, contact the providers of your VPN client and head end.
• For requirements for Cisco AnyConnect SecureMobility Client and Cisco Adaptive Security Appliance,see the Software Requirements topic.
• For information about setting up Cisco AnyConnect, see the Cisco AnyConnect VPN Client Maintainand Operate Guides.
Procedure
Step 1 Identify a URL that will cause the client to launch VPN on Demand.a) Use one of the following methods to identify a URL that will cause the client to launch VPN on Demand.
Connect if Needed
• Configure Cisco Unified Communications Manager to be accessed through a domain name(not an IP address) and ensure that this domain name is not resolvable outside the firewall.
• Include this domain in the “Connect If Needed” list in the Connect On Demand Domain Listof the Cisco AnyConnect client connection.
Cisco Jabber for iPhone and iPad 9.6 Installation and Configuration Guide26
Deployment OptionsCisco AnyConnect Deployment Considerations

Always Connect
• Set the parameter in step 4 to a nonexistent domain. A nonexistent domain causes a DNS queryto fail when the user is inside or outside the firewall.
• Include this domain to the “Always Connect” list in the Connect On Demand Domain List ofthe Cisco AnyConnect client connection.
The URLmust include only the domain name. Do not include a protocol or a path (for example,use “cm8ondemand.company.com” instead of “https://cm8ondemand.company.com/vpn”.
b) Enter the URL in Cisco AnyConnect and verify that a DNS query on this domain fails.
Step 2 Open the Cisco Unified CM Administration interface.Step 3 Navigate to the TCT/TAB device page for the user.Step 4 In the Product Specific Configuration Layout section, in theOn-Demand VPN URL field, enter the URL
that you identified and used in Cisco AnyConnect in step 1.The URL must be a domain name only, without a protocol or path.
Step 5 Select Save.When Cisco Jabber opens, it initiates a DNS query to the URL (for example, ccm-sjc-111.cisco.com). If thisURL matches the On-Demand domain list entry that you defined in this procedure (for example, cisco.com),Cisco Jabber indirectly initiates the AnyConnect VPN connection.
What to Do Next
• Test this feature.
◦Enter this URL into the Internet browser on the iOS device and verify that VPN launchesautomatically. You should see a VPN icon in the status bar.
◦Verify that the iOS device can connect to the corporate network using VPN. For example, accessa web page on your corporate intranet. If the iOS device cannot connect, contact the provider ofyour VPN technology.
◦Verify with your IT department that your VPN does not restrict access to certain types of traffic(for example, if the administrator set the system to allow only email and calendaring traffic).
• Verify that you set up the client to connect directly to the corporate network.
Related Topics
Cisco AnyConnect VPN Client Maintain and Operate GuidesSoftware Requirements, on page 34iOS: Supported protocols for VPNiPhone User GuideiPad User GuideGeneral information about iPhoneGeneral information about iPad
Cisco Jabber for iPhone and iPad 9.6 Installation and Configuration Guide 27
Deployment OptionsCisco AnyConnect Deployment Considerations

Set Up Certificate-Based AuthenticationCisco recommends that you use certificate-based authentication for negotiating a secure connection to CiscoAdaptive Security Appliance from Cisco AnyConnect Secure Mobility Client.
ASA supports certificates issued by standard Certificate Authority (CA) servers such as Cisco IOS CA,Microsoft Windows 2003, Windows 2008R2, Entrust, VeriSign, and RSA Keon. This topic gives you a,high-level procedure for setting up ASA for certificate-based authentication. See the Configuring DigitalCertificates topic in the appropriate ASA configuration guide for step-by-step instructions.
Procedure
Step 1 Import a root certificate from the CA to the ASA.Step 2 Generate an identity certificate for the ASA.Step 3 Use the ASA identity certificate for SSL authentication.Step 4 Configure a Certificate Revocation List (CRL) or an Online Certificate Status Protocol (OCSP).Step 5 Configure the ASA to request client certificates for authentication.
What to Do Next
After you set up certificate-based authentication on ASA, you must distribute certificates to your users. Youcan use one of the following methods:
• Distribute Certificates with SCEP
• Distribute Client Certificate with Mobileconfig File
Related Topics
Configuring Digital Certificates: Cisco ASA 5500 Series Configuration Guide using the CLI, 8.4 and 8.6
Distribute Certificates with SCEP
You can use Simple Certificate Enrollment Protocol (SCEP) on Microsoft Windows Server to securely issueand renew certificates for client authentication.
To distribute certificates with SCEP, you must install the SCEP module on Microsoft Windows Server. Seethe following topics for more information:
• ASA 8.X: AnyConnect SCEP Enrollment Configuration Example
• Simple Certificate Enrollment Protocol (SCEP) Add-on for Certificate Services
Related Topics
ASA 8.X: AnyConnect SCEP Enrollment Configuration ExampleSimple Certificate Enrollment Protocol (SCEP) Add-on for Certificate Services
Cisco Jabber for iPhone and iPad 9.6 Installation and Configuration Guide28
Deployment OptionsCisco AnyConnect Deployment Considerations

Distribute Client Certificate with Mobileconfig File
Use this procedure to create a mobile configuration file that includes a certificate. You can use this file todistribute the certificate to users.
Procedure
Step 1 Use the iPCU software to create a mobileconfig file and include the certificate (.pfx) file.Step 2 Forward the mobileconfig file to the user.Step 3 Use the Cisco ISE native supplicant provisioning process to distribute user certificates.Step 4 Use the Enterprise MDM software to provision and publish certificates to registered devices.
Session ParametersYou can configure ASA session parameters to improve performance for secure connections. For the best userexperience, you should configure the following ASA session parameters:
Datagram Transport Layer Security (DTLS)
DTLS is an SSL protocol that provides a data path that prevents latency and data loss.
Auto Reconnect
Auto reconnect, or session persistence, lets Cisco AnyConnect Secure Mobility Client recover fromsession disruptions and re-establish sessions.
Session Persistence
This parameter allows the VPN session to recover from service disruptions and re-establish theconnection.
Idle Timeout
Idle timeout defines a period of time after which ASA terminates secure connections, if nocommunication activity occurs.
Dead-Peer Detection (DTD)
DTD ensures that ASA and Cisco AnyConnect Secure Mobility Client can quickly detect failedconnections.
Set ASA Session Parameters
Cisco recommends that you set up the ASA session parameters as follows to optimize the end user experiencefor Cisco AnyConnect Secure Mobility Client.
Cisco Jabber for iPhone and iPad 9.6 Installation and Configuration Guide 29
Deployment OptionsCisco AnyConnect Deployment Considerations

Procedure
Step 1 Set up Cisco AnyConnect to use DTLS.For more information, see the Enabling Datagram Transport Layer Security (DTLS) with AnyConnect (SSL)Connections topic in the Configuring AnyConnect Features Using ASDM chapter of the Cisco AnyConnectVPN Client Administrator Guide, Version 2.0.
Step 2 Set up session persistence (auto-reconnect).a) Use ASDM to open the VPN client profile.b) Set the Auto Reconnect Behavior parameter to Reconnect After Resume.For more information, see the Configuring Auto Reconnect topic in the Configuring AnyConnect Featureschapter (Release 2.5) or Configuring VPN Access chapter (Releases 3.0 or 3.1) of the Cisco AnyConnectSecure Mobility Client Administrator Guide for your release.
Step 3 Set the idle timeout value.a) Create a group policy that is specific to Cisco Jabber clients.b) Set the idle timeout value to 30 minutes.For more information, see the vpn-idle-timeout section of the Cisco ASA 5580 Adaptive Security ApplianceCommand Reference for your release
Step 4 Set up Dead Peer Detection (DPD).a) Disable server-side DPD.b) Enable client-side DPD.For more information, see the Enabling and Adjusting Dead Peer Detection topic of the Configuring VPNchapter of the Cisco ASA 5500 Series Configuration Guide using the CLI, 8.4 and 8.6.
Related Topics
Cisco AnyConnect VPN Client Administrator Guide, Version 2.0Cisco AnyConnect Secure Mobility Client Administrator GuideCisco ASA 5580 Adaptive Security Appliance Command ReferenceCisco ASA 5500 Series Configuration Guide using the CLI, 8.4 and 8.6
Group Policies and ProfilesYou should use the ASA Device Manager (ASDM) to create group policies, client profiles, and connectionprofiles. Create your group policies first and then apply those policies to the profiles. Using the ASDM tocreate profiles ensures that Cisco AnyConnect SecureMobility Client downloads the profiles after it establishesa connection to ASA for the first time. The ASDM also lets you manage and maintain your policies andprofiles in a central location.
See the Cisco AnyConnect Secure Mobility Client Administrator Guide for instructions on creating policiesand profiles with the ASDM.
Related Topics
Cisco AnyConnect Secure Mobility Client Administrator Guide, Release 3.1
Cisco Jabber for iPhone and iPad 9.6 Installation and Configuration Guide30
Deployment OptionsCisco AnyConnect Deployment Considerations

Configuring Tunnel Groups, Group Policies, and Users: Cisco ASA 5500 Series Configuration Guideusing the CLI, 8.4 and 8.6
Trusted Network Detection
Trusted Network Detection is a feature that automates secure connections based on user location. When usersleave the corporate network, Cisco AnyConnect SecureMobility Client automatically detects that it is outsidethe trusted network and then initiates secure access.
You configure Trusted Network Detection on ASA as part of the client profile. For more information, see theTrusted Network Detection topic in the Cisco AnyConnect Secure Mobility Client Administrator Guide foryour release.
Related Topics
Trusted Network Detection: Cisco AnyConnect Secure Mobility Client Administrator Guide, Release 3.1
Tunnel Policies
Tunnel policies configure howCiscoAnyConnect SecureMobility Client directs traffic over a secure connectionand include the following:
Full Tunnel Policy
Lets you send all traffic over the secure connection to the ASA gateway.
Split Include Policy with Network ACL
Enables you to restrict secure connections based on destination IP addresses. For example, in anon-premises deployment, you can specify the IP addresses for Cisco Unified CommunicationsManager,Cisco Unified Presence, your TFTP server, and other servers to restrict the secure connection only toyour client's traffic.
Split Exclude Policy
Allows you to exclude certain traffic from the secure connection. You can allow client traffic over thesecure connection and then exclude traffic from specific destination subnets.
Related Topics
Configuring Tunnel Groups, Group Policies, and Users: Cisco ASA 5500 Series Configuration Guideusing the CLI, 8.4 and 8.6
Cisco Jabber for iPhone and iPad 9.6 Installation and Configuration Guide 31
Deployment OptionsCisco AnyConnect Deployment Considerations

Cisco Jabber for iPhone and iPad 9.6 Installation and Configuration Guide32
Deployment OptionsCisco AnyConnect Deployment Considerations

C H A P T E R 3Plan for Installation
• Device Requirements, page 33
• Software Requirements, page 34
• Supported Codecs, page 36
• Network Requirements, page 37
• Device COP File for Cisco Jabber for iPhone and iPad, page 39
• Audio and Video Performance Reference, page 39
• Quality of Service Configuration, page 41
• Cross-Launching the Client, page 42
Device RequirementsDevice Support
Cisco Jabber for iPhone and iPad is available from the Apple App Store.
Cisco supports Cisco Jabber for iPhone and iPad on the following iOS devices:
• iPhone model 4, 4S, 5, 5C, and 5S
• iPad second, third, fourth generation, iPad mini with Retina display, and iPad Air
The device must be able to access the corporate network using Wi-Fi or VPN.
Device Operating System Support
iOS support: iOS 7
Bluetooth Headset Support
iPhone: supported (optional)
iPad: Supported (optional)
Cisco Jabber for iPhone and iPad 9.6 Installation and Configuration Guide 33

Software RequirementsFor a successful deployment, you must ensure that your environment meets the Cisco Jabber for iPhone andiPad software requirements.
On-Premises ServersCisco Jabber for iPhone and iPad supports the following on-premises servers:
Cisco Unified Communications Manager
• Cisco Unified Communications Manager Release 8.6(2)
• Cisco Unified Communications Manager Release 9.1(2)
• Cisco Unified Communications Manager Release 10.0
The DVO-R feature is only available on iPhone and it requires:Important
• Cisco Jabber for iPhone and iPad client, Release 9.6
Cisco Unified Presence
• Cisco Unified Presence Release 8.6
Cisco Unified Communications Manager IM and Presence
Cisco Unified Communications Manager IM and Presence is formerly known as Cisco Unified Presence.Note
• Cisco Unified Communications Manager IM and Presence Release 9.1
• Cisco Unified Communications Manager IM and Presence Release 10.0
Cisco Unity Connection
• Cisco Unity Connection Release 8.5 or later
Cisco WebEx Meetings Server
Cisco WebEx Meetings Server version 1.5 or later
Cisco Jabber for iPhone and iPad 9.6 Installation and Configuration Guide34
Plan for InstallationSoftware Requirements
Cisco Adaptive Security Appliance (Optional)
VPN On Demand (Optional)
The Apple iOS On-Demand VPN feature requires certificate-only authentication. If you set up the a(ASA) without certificate-only authentication, the user must manually initiate the AnyConnect VPNconnection as needed.
The iOS device must be able to access the corporate network, servers, and telephony endpoints usinga VPN client, such as Cisco AnyConnect Secure Mobility Client.
Cisco AnyConnect Secure Mobility Client Integration (Optional)
• iOS devices must run Cisco AnyConnect Secure Mobility Client Version 3.0.09115, which isavailable from the Apple App Store
• Cisco ASA 5500 Series Adaptive Security Appliance (ASA) Version 8.4(1) or later
• Cisco Adaptive Security Device Manager (ASDM) Version 6.4 or later
• ASA license requirements: Use one of the following combinations:
• AnyConnect Essentials and AnyConnect Mobile licenses
• AnyConnect Premium and AnyConnect Mobile licenses
For more information about Cisco AnyConnect license requirements, seeVPNLicense and FeatureCompatibility.
• Certificate Authority (CA) if using certificate-based authentication: Cisco IOS Certificate Server,Cisco IOS Certificate Server or Microsoft Windows Server 2003 Enterprise Certificate Authority
Related Topics
Cisco Unified Communications Manager Maintain and Operate GuidesVPN License and Feature Compatibility
Cloud-Based ServersCisco Jabber for iPhone and iPad supports the following cloud-based servers:
• Cisco WebEx Messenger Release 7.5 or later
• Cisco WebEx Administration Tool Release 7.5
• Cisco WebEx Meeting Center as follows:
◦Version T26L with Service Pack 20
◦Version T27L with Service Pack 9
Cisco Jabber for iPhone and iPad 9.6 Installation and Configuration Guide 35
Plan for InstallationCloud-Based Servers

Directory ServersYou can use the following directory servers with Cisco Jabber for iPhone and iPad.
CiscoUnified CommunicationsManager User Data Services (UDS) is not supported for directory integrationin this release.
Note
LDAP
Use one of the following sources for Lightweight Directory Access Protocol (LDAP):
• Microsoft Active Directory 2008
• Microsoft Active Directory 2003
• OpenLDAP 2.4
Cloud-based
Cisco WebEx Messenger Contact Service
Accessibility
Screen Readers
Cisco Jabber for iPhone and iPad is compatible with the VoiceOver screen reader. Users who require screenreaders should always use the most recent version to ensure the best possible user experience.
Assistive Touch
You can navigate Cisco Jabber for iPhone and iPad using Assistive Touch.
Supported CodecsSupported Audio Codecs
• G.711
• G.729a
• G.722.1
Minimum requirement for low-bandwidth availability: G.729a.
Users can turn Low Bandwidth mode on and off in the client settings if they experience voice quality issues.
Normal mode supports G.711 and G.729a.
Low Bandwidth mode supports G.729a only.
Cisco Jabber for iPhone and iPad 9.6 Installation and Configuration Guide36
Plan for InstallationDirectory Servers

Supported Video Codecs
H.264/AVC
Supported Voicemail Codecs
• PCM linear
• G.711 mu-law (default)
• G.711 a-law
• GSM 6.10
Cisco does not support visual voicemail with G.729. However, users can access their voice messagesusing G.729 and the Call Voicemail feature.
Note
Network RequirementsIf you deploy Phone Services, the mobile device must be able to connect to the corporate network usingvoice-ready Wi-Fi.
For optimal user experience when using Cisco Jabber over your corporate Wi-Fi network, Cisco recommendsthat you:
• Design your Wi-Fi network to eliminate gaps in coverage as much as possible, including in areas suchas elevators, stairways, and outside corridors.
• Ensure that all access points assign the same IP address to the mobile device. Calls are dropped if theIP address changes during the call.
• Ensure that all access points have the same SSID. Hand-off may be much slower if the SSIDs do notmatch.
• Ensure that all access points broadcast their SSID. If the access points do not broadcast their SSID, themobile device may prompt the user to join another Wi-Fi network, which interrupts the call.
Conduct a thorough site survey tominimize network problems that could affect voice quality. Cisco recommendsthat you:
• Verify nonoverlapping channel configurations, access point coverage, and required data and traffic rates.
• Eliminate rogue access points.
• Identify and mitigate the impact of potential interference sources.
For more information, see:
• The “VoWLAN Design Recommendations” section in the Enterprise Mobility 4.1 Design Guide.
• The Cisco Unified Wireless IP Phone 7925G Deployment Guide.
• The Capacity Coverage & Deployment Considerations for IEEE 802.11g white paper.
Cisco Jabber for iPhone and iPad 9.6 Installation and Configuration Guide 37
Plan for InstallationNetwork Requirements

• The Solutions Reference Network Design (SRND) for your Cisco Unified Communications Managerrelease.
Bluetooth use can cause voice quality and connectivity issues.
If users connect to the network remotely, the mobile device must be able to connect to the corporate networkusing a solid, high-bandwidth VPN connection. Video and audio quality is dependent on connection qualityand cannot be guaranteed.
Related Topics
Enterprise Mobility 4.1 Design GuideCisco Unified Wireless IP Phone 7925G Deployment GuideCapacity Coverage and Deployment Considerations for IEEE 802.11gSolutions Reference Network Design (SRND)
Ports and ProtocolsThe client uses the ports and protocols listed in the following table. If you plan to deploy a firewall betweenthe client and a server, you must configure the firewall to allow these ports and protocols.
There are no TCP/IP services enabled in the client.Note
DescriptionProtocolPort
Inbound
Receives Real-Time Transport Protocol (RTP)media streamsfor audio and video. You set these ports in Cisco UnifiedCommunications Manager.
UDP16384 to 32766
Outbound
Connects to the Trivial File Transfer Protocol (TFTP) server.UDP69
Connects to the TFTP server to download clientconfiguration files.
HTTP6970
Connects to services such as Cisco WebEx Meeting Centerfor meetings or Cisco Unity Connection for voicemail.
TCP(HTTP)
80
Connects to an LDAP directory service.UDP / TCP389
Connects to a Global Catalog server for contact searches.TCP3268
Connects to services such as such as Cisco WebEx MeetingCenter for meetings or Cisco Unity Connection forvoicemail.
TCP
(HTTPS)
443
Connects securely to an LDAP directory service.LDAPS636
Connects securely to the Global Catalog server.LDAPS3269
Provides Session Initiation Protocol (SIP) call signaling.TCP5060
Cisco Jabber for iPhone and iPad 9.6 Installation and Configuration Guide38
Plan for InstallationPorts and Protocols

DescriptionProtocolPort
Provides secure SIP call signaling.TCP5061
Connects to Cisco Unified Presence or Cisco UnifiedCommunications Manager IM and Presence for instantmessaging and presence.
TCP
(XMPP)
5222
XMPP federation.XMPP5269
Connects to the local port to provide Simple Object AccessProtocol (SOAP) web services.
TCP8191
8443 is the port for web access to Cisco UnifiedCommunications Manager and includes connections for thefollowing:
• Cisco Unified Communications Manager IP Phone(CCMCIP) server for assigned devices.
• User Data Service (UDS) for contact resolution.
HTTPS8443
Sends RTP media streams for audio and video.UDP16384 to 32766
Provides hostname resolution.DNS53
Issues Locally Significant Certificates (LSC) to IP phones.This is the listening port for Cisco Unified CommunicationsManager Certificate Authority Proxy Function (CAPF)enrollment.
TCP3804
Device COP File for Cisco Jabber for iPhone and iPadThe device COP file adds the TCT/TAB device type to Cisco Unified Communications Manager . To obtainthe device COP file, do the following:
1 Go to the software download site: http://www.cisco.com/go/jabber_iphone_cop..
2 Locate cmterm-iphone-install-130917.cop.sgn for TCT device andcmterm-jabberipad-130917.cop.sgn for TAB device..
3 Download the file.
Audio and Video Performance ReferenceLearn about audio and video performance for Cisco Jabber for iPhone and iPad.
Cisco Jabber for iPhone and iPad 9.6 Installation and Configuration Guide 39
Plan for InstallationDevice COP File for Cisco Jabber for iPhone and iPad
The following data is based on testing in a lab environment. This data is intended to provide an idea ofwhat you can expect in terms of bandwidth usage. The content in this topic is not intended to be exhaustiveor to reflect all media scenarios that might affect bandwidth usage.
Attention
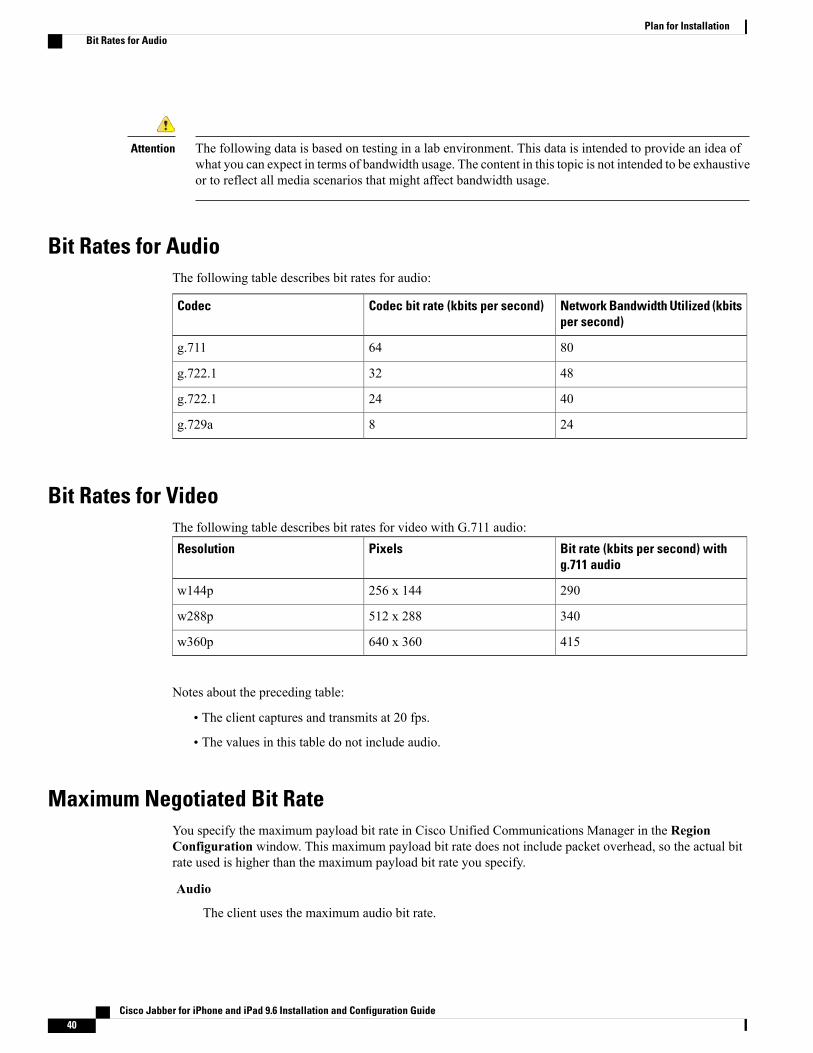
Bit Rates for AudioThe following table describes bit rates for audio:
Network Bandwidth Utilized (kbitsper second)
Codec bit rate (kbits per second)Codec
8064g.711
4832g.722.1
4024g.722.1
248g.729a
Bit Rates for VideoThe following table describes bit rates for video with G.711 audio:
Bit rate (kbits per second) withg.711 audio
PixelsResolution
290256 x 144w144p
340512 x 288w288p
415640 x 360w360p
Notes about the preceding table:
• The client captures and transmits at 20 fps.
• The values in this table do not include audio.
Maximum Negotiated Bit RateYou specify the maximum payload bit rate in Cisco Unified Communications Manager in the RegionConfiguration window. This maximum payload bit rate does not include packet overhead, so the actual bitrate used is higher than the maximum payload bit rate you specify.
Audio
The client uses the maximum audio bit rate.
Cisco Jabber for iPhone and iPad 9.6 Installation and Configuration Guide40
Plan for InstallationBit Rates for Audio

Interactive Video
The client allocates the remaining bit rate as follows: The maximum video call bit rate minus the audiobit rate.
Performance Expectations for BandwidthThe client separates the bit rate for audio and then divides the remaining bandwidth equally between interactivevideo and presentation video. The following table provides information to help you understand whatperformance you should be able to achieve per bandwidth:
Audio + Interactive Video (MainVideo)
AudioUpload speed
Insufficient bandwidth for video.At bandwidth threshold for g.711.Insufficient bandwidth for video.
Sufficient bandwidth for g.729aand g.722.1.
125 kbps under VPN
256 x144 at 20 fpsSufficient bandwidth for any audiocodec.
290 kbps
640 x 360 at 20 fpsSufficient bandwidth for any audiocodec.
415 kbps
Note that VPN increases the size of the payload, which increases the bandwidth consumption.
Video Rate AdaptionThe client uses video rate adaptation to negotiate optimum video quality. Video rate adaptation dynamicallyincreases or decreases video bit rate throughput to handle real-time variations on available IP path bandwidth.
Users should expect video calls to begin at lower resolution and scale upwards to higher resolution over ashort period of time. The client saves history so that subsequent video calls should begin at the optimalresolution.
Quality of Service ConfigurationReview the supported methods to configure Quality of Service (QoS) for the client.
Port Ranges on Cisco Unified Communications ManagerCisco Unified Communications Manager lets you define one port range for the client. The client divides thisport range equally and uses the lower half for audio calls and the upper half for video calls. For example, youdefine a port range of 1000 to 3000 in Cisco Unified Communications Manager. The client uses a port rangeof 1000 to 2000 for audio calls and a port range of 2000 to 3000 for video calls.
Cisco Jabber for iPhone and iPad 9.6 Installation and Configuration Guide 41
Plan for InstallationPerformance Expectations for Bandwidth

To access the SIP Profile Configuration window, select Device > Device Settings > SIP Profile.
The Start Media Port field defines the lowest port available to the client. The StopMedia Port field definesthe highest port available. See the SIP Profile Configuration topic in the Cisco Unified CommunicationsManager documentation for more information.
Related Topics
8.6.x: SIP Profile Configuration9.0.x: SIP profile setup
Cross-Launching the ClientUsers can launch the client from web browsers to perform one of the following tasks:
• Call a phone number
• Start a chat session
The following table lists the cross-launch URLs that you can use in third-party applications to start CiscoJabber conversations.
PrerequisitesCross-Launch URLFunction
Cisco Unified CommunicationsManager account
ciscotel://<phone_number>Call a phone number
One of the following accounts:
• Cisco WebEx Messenger
• Cisco Unified Presence
• Cisco UnifiedCommunicationsManagerIM and Presence
• xmpp://<instant_message_id>
• im://<instant_message_id>
• ciscoim://<instant_message_id>
Start a chat session
Cisco Jabber for iPhone and iPad 9.6 Installation and Configuration Guide42
Plan for InstallationCross-Launching the Client

C H A P T E R 4Upgrade
• Upgrade Scenarios, page 43
• Configuration Differences when Upgrading Cisco Jabber for iPhone and iPad, page 52
Upgrade ScenariosCisco Jabber for iPhone and iPad Release 9.6 now offers a broader feature set.
For iPhone, iPod, and iTouch users, you can install Cisco Jabber for iPhone and iPad app to replace CiscoJabber IM for iPhone and Cisco Jabber for iPhone automatically.
Cisco Jabber IM for iPhone and Cisco Jabber for iPhone Release 9.5 users will receive an automaticupgrade notification from App Store to upgrade to Cisco Jabber for iPhone and iPad Release 9.6.
Note
Cisco Jabber Voice for iPhone users who would like to upgrade to Cisco Jabber for iPhone and iPad, you willneed to upgrade manually. If you already set up a previous version of Cisco Jabber Voice for iPhone and youdo not want to set up a presence server, Cisco recommends that you continue to use Cisco Jabber Voice foriPhone for voice-only configurations.
For more information about Cisco Jabber Voice for iPhone, see the Release Notes at http://www.cisco.com/en/US/products/ps11596/prod_release_notes_list.html.
For iPad users who would like to upgrade to Cisco Jabber for iPhone and iPad, you are highly recommendedto uninstall the previous version of Cisco Jabber Video for iPad first, then install Cisco Jabber for iPhone andiPad Release 9.6. If you already set up a previous version of Cisco Jabber Video for iPad and you do not wantto set up a presence server, Cisco recommends that you continue to use Cisco Jabber Video for iPad forvideo-only configurations. If you want to use Cisco TelePresence
®Video Communication Server (VCS),
Cisco Jabber VideoTM for TelePresence, or Cisco WebEx Telepresence service, Cisco recommends that youcontinue to use Cisco Jabber Video for iPad and install Cisco Jabber for iPhone and iPad Release 9.6 as youwant. Please be careful when you set up Cisco Unified Communications Manager because there may beconflicts when the two APPs exist at the same time.
For more information about Cisco Jabber Video for iPad, see the Release Notes at http://www.cisco.com/en/US/products/ps12430/prod_release_notes_list.html.
With Cisco Jabber for iPhone and iPad Release 9.6, the user's primary authentication is to a presence serverinstead of a Cisco Unified Communications Manager.
Cisco Jabber for iPhone and iPad 9.6 Installation and Configuration Guide 43

At a minimum, you must provision Cisco Jabber for iPhone and iPad Release 9.6 users with instant messagingand presence capabilities. You can also provision users with audio and video, voicemail, and conferencing.
If you currently support only Cisco Jabber Voice for iPhone with Cisco Unified CommunicationsManagerand you do not want to add a presence server, see the Cisco Jabber Voice for iPhone documentation onCisco.com.
Cisco continues to offer a voice-only version of the client that uses Cisco Unified CommunicationsManageras the primary authentication server.
Cisco renamed the voice-only version of the client to Cisco Jabber Voice for iPhone to distinguish it fromthe unified communications version of the product.
Important
The steps to upgrade your clients to Cisco Jabber for iPhone and iPad Release 9.6 vary, depending on yourcurrent deployment. Use the following table to find the applicable procedure for your deployment.
Table 1: Upgrade Procedures for Different Deployments
Upgrade ProcedurePrimary Authentication ServerCurrent Clients
You must deploy one of the following presence serversas the primary authentication server:
Cisco Unified Presence
See Upgrade Cisco Jabber Voice for iPhone byAdding Cisco Unified Presence, on page 45.
Cisco Unified Communications Manager IM andPresence
See Upgrade Cisco Jabber Voice for iPhone byAdding Cisco Unified CommunicationsManagerIM and Presence, on page 47 .
Cisco WebEx
See Upgrade Cisco Jabber Voice for iPhone byAdding Cisco WebEx, on page 49.
Cisco Unified CommunicationsManager
Cisco Jabber Voice for iPhone
Cisco Jabber for iPhone and iPad 9.6 Installation and Configuration Guide44
UpgradeUpgrade Scenarios

Upgrade ProcedurePrimary Authentication ServerCurrent Clients
See Upgrade Cisco Jabber Video for iPad on CiscoUnified Presence, on page 49
Cisco Unified PresenceCisco Jabber Video for iPad
See Upgrade Cisco Jabber Video for iPad on CiscoUnified Communications Manager IM and Presence,on page 50
Cisco Unified CommunicationsManager IM and Presence
See Upgrade Cisco Jabber Video for iPad on CiscoWebEx, on page 51
Cisco WebEx
Not supported.Cisco TelePresence VideoCommunication Server (VCS), CiscoJabber Video for TelePresence(Movi), or Cisco WebExTelepresence service
Upgrade Cisco Jabber Voice for iPhone by Adding Cisco Unified PresenceUpgrade from an earlier release of Cisco Jabber Voice for iPhone to Cisco Jabber for iPhone and iPad Release9.6 by integrating Cisco Unified Presence as the primary presence server.
This topic refers to Cisco Unified Presence Release 8.6.
Before You Begin
Procedure
Step 1 Install and configure a Cisco Unified Presence server.See the Cisco Unified Presence documentation.
Step 2 Integrate Cisco Unified Presence with Cisco Unified Communications Manager.a) Integrate the directory.
See the Configure Directory Integration in On-Premises Deployments chapter of the Server Setup Guide.
b) Provision instant messaging and presence.See the Provision Instant Messaging and Presence on Cisco Unified Presence chapter in the Server SetupGuide.
c) Specify your TFTP server on Cisco Unified Presence.See the Specify Your TFTP Server on Cisco Unified Presence topic in the Provision Audio and VideoCapabilities chapter for your release of Cisco Unified Communications Manager in the Server SetupGuide.
d) (Optional) Set up voicemail.See the Set Up Voicemail on Cisco Unified Presence chapter of the Server Setup Guide.
Step 3 On the Cisco Unified Communications Manager, do the following:a) Install the new device COP file.
See the Install Cisco Options Package File for Devices topic in the Server Setup Guide.
Cisco Jabber for iPhone and iPad 9.6 Installation and Configuration Guide 45
UpgradeUpgrade Cisco Jabber Voice for iPhone by Adding Cisco Unified Presence

After you upgrade to Cisco Jabber for iPhone and iPad Release 9.6, some previous device COPfile settings no longer apply, or must be configured using the global configuration file instead.For more information, see the Configuration Differences when Upgrading Cisco Jabber topic inthis guide.
Note
b) Update your SIP Profile settings with the new values.See the Create SIP Profiles topic in the Server Setup Guide.
c) Verify that you add all end users.d) Associate each TCT/TAB device with the user.
See Configure User Associations in the Server Setup Guide.
e) Grant the correct roles to each user.f) (Optional) Disable video calling.
Video calling is enabled by default. To disable video calling, select Disabled for the Video Capabilitiessetting on the TCT/TAB device page for the user.
g) Verify that you associate the end user with the correct line.Perform this step to ensure that Cisco Unified Presence can correctly display the On a Call availabilitystatus.
See theConfigure User Associations topic in the Provision Audio and Video Capabilities on Cisco UnifiedCommunications Manager chapter for your release in the Server Setup Guide.
Step 4 Add users to any profiles that you set up.DescriptionOption
See the Create a CCMCIP Profile topic in the Provision Audio and Video Capabilitieson Cisco Unified Communications Manager chapter for your release, in the ServerSetup Guide.
CCMCIP
See the Create a Voicemail Profile topic in the Set Up Voicemail on Cisco UnifiedPresence chapter of the Server Setup Guide.
Voicemail
See the Create a Mailstore topic in the Set Up Voicemail on Cisco Unified Presencechapter of the Server Setup Guide.
Mailstore
Use one of the following topics:
• Cisco WebEx Meetings Server: See the Add Cisco WebEx Meetings Server toa Profile topic in the Set Up Conferencing on Cisco Unified CommunicationsManager chapter for your release, in the Server Setup Guide.
• Cisco WebEx Meeting Center: See the Add Cisco WebEx Meeting Center to aProfile topic in the Set Up Conferencing on Cisco Unified CommunicationsManager chapter for your release, in the Server Setup Guide.
Conferencing
Step 5 Create a global configuration file (jabber-config.xml) and upload it to your TFTP server.See the Configure the Client and Integrate with Directory Sources chapters in this guide.
Cisco Jabber for iPhone and iPad 9.6 Installation and Configuration Guide46
UpgradeUpgrade Cisco Jabber Voice for iPhone by Adding Cisco Unified Presence

Related Topics
Cisco Unified Presence Install and Upgrade GuidesServer Setup GuideConfigure the Client, on page 57Integrate with Directory Sources, on page 75
Upgrade Cisco Jabber Voice for iPhone by Adding Cisco UnifiedCommunications Manager IM and Presence
Upgrade from an earlier release of Cisco Jabber Voice for iPhone to Cisco Jabber for iPhone and iPad Release9.6 by integrating Cisco Unified Communications Manager IM and Presence as the primary presence server.
This topic refers to Cisco Unified Communications Manager IM and Presence Release 9.0 and later.
Procedure
Step 1 Install and configure a Cisco Unified Communications Manager IM and Presence server.See the Cisco Unified Communications Manager IM and Presence documentation.
Step 2 Integrate Cisco Unified Communications Manager IM and Presence with Cisco Unified CommunicationsManager.a) Integrate the directory.
See the Configure Directory Integration in On-Premises Deployments chapter of the Server Setup Guide.
b) Provision instant messaging and presence.See the Provision Instant Messaging and Presence on Cisco Unified Communications Manager IM andPresence chapter in the Server Setup Guide.
c) Specify your TFTP server on Cisco Unified Communications Manager IM and Presence.See the Specify Your TFTP Server on Cisco Unified Communications Manager IM and Presence topic inthe Provision Audio and Video Capabilities chapter for your release of Cisco Unified CommunicationsManager in the Server Setup Guide.
d) (Optional) Set up voicemail.See the Set Up Voicemail on Cisco Unified Communications Manager IM and Presence chapter of theServer Setup Guide.
Step 3 On the Cisco Unified Communications Manager, do the following:a) Install the new device COP file.
See the Install Cisco Options Package File for Devices topic in the Server Setup Guide.
After you upgrade to Cisco Jabber for iPhone and iPad Release 9.6, some previous device COPfile settings no longer apply, or must be configured using the global configuration file instead.For more information, see the Configuration Differences when Upgrading Cisco Jabber topic.
Note
b) Update your SIP Profile settings with the new values.See the Create SIP Profiles topic in the Server Setup Guide.
c) Verify that you add all end users.d) Associate each TCT/TAB device with the user.
See Configure User Associations in the Server Setup Guide.
Cisco Jabber for iPhone and iPad 9.6 Installation and Configuration Guide 47
UpgradeUpgrade Cisco Jabber Voice for iPhone by Adding Cisco Unified Communications Manager IM and Presence

e) Grant the correct roles to each user.f) (Optional) Disable video calling.
Video calling is enabled by default. To disable video calling, select Disabled for the Video Capabilitiessetting on the TCT/TAB device page for the user.
g) Verify that you associate the end user with the correct line.Perform this step to ensure that Cisco Unified Communications Manager IM and Presence can correctlydisplay the On a Call availability status.
See theConfigure User Associations topic in the Provision Audio and Video Capabilities on Cisco UnifiedCommunications Manager chapter for your release in the Server Setup Guide.
Step 4 Add users to any profiles that you set up.DescriptionOption
See the Create a CCMCIP Profile topic in the Provision Audio and Video Capabilitieson Cisco Unified CommunicationsManager chapter for your release in the Server SetupGuide.
CCMCIP
See the Create a Voicemail Profile topic in the Set Up Voicemail on Cisco UnifiedCommunications Manager Version 9 and Higher chapter of the Server Setup Guide.
Voicemail
See the Create a Mailstore topic in the Set Up Voicemail on Cisco UnifiedCommunications Manager Version 9 and Higher chapter of the Server Setup Guide.
Mailstore
See the Create a Service Profile topic in the Server Setup Guide.Directory
Use one of the following topics:
• Cisco WebEx Meetings Server: See the Add Cisco WebEx Meetings Server toa Profile topic in the Set Up Conferencing on Cisco Unified CommunicationsManager chapter for your release, in the Server Setup Guide.
• Cisco WebEx Meeting Center: See the Add Cisco WebEx Meeting Center to aProfile topic in the Set Up Conferencing on Cisco Unified CommunicationsManager chapter for your release, in the Server Setup Guide.
Conferencing
Step 5 Create a global configuration file (jabber-config.xml) and upload it to your TFTP server.See the Configure the Client and Integrate with Directory Sources chapters in this guide.
Related Topics
Cisco Unified Communications Manager IM and Presence Install and Upgrade GuidesServer Setup GuideConfigure the Client, on page 57Integrate with Directory Sources, on page 75
Cisco Jabber for iPhone and iPad 9.6 Installation and Configuration Guide48
UpgradeUpgrade Cisco Jabber Voice for iPhone by Adding Cisco Unified Communications Manager IM and Presence
Upgrade Cisco Jabber Voice for iPhone by Adding Cisco WebExUpgrade from an earlier release of Cisco Jabber Voice for iPhone to Cisco Jabber for iPhone and iPad Release9.6 by integrating Cisco WebEx as the primary presence server.
Procedure
Step 1 Create unified communications clusters on Cisco WebEx.See the Creating unified communications clusters topic.
Step 2 Provision the clusters to users.See the Cisco WebEx federation with other instant messaging providers chapter in the Cisco WebEx ConnectAdministrator's Guide.
Step 3 (Optional) Enable meeting integration.See the Set Up Conferencing in Cloud-Based Deployments chapter in the Server Setup Guide.
Step 4 On the Cisco Unified Communications Manager, do the following:a) Install the device COP file.
See the Install Cisco Options Package File for Devices topic in the Server Setup Guide.
b) Update your SIP Profile settings with the new values.See the Create SIP Profiles topic in the Server Setup Guide.
c) Verify that you add all end users.d) Associate each TCT/TAB device with the user.
See Configure User Associations in the Server Setup Guide.
e) Grant the correct roles to each user.f) (Optional) Disable video calling.
Video calling is enabled by default. To disable video calling, select Disabled for the Video Capabilitiessetting on the TCT/TAB device page for the user.
Step 5 (Optional) To use the phone credential to automatically sign in to voicemail, create a global configuration file(jabber-config.xml) and upload it to your TFTP server.See the Service Credentials Parameters topic in this guide.
Related Topics
Server Setup GuideCreating unified communications clustersService Credentials Parameters, on page 72
Upgrade Cisco Jabber Video for iPad on Cisco Unified PresenceUpgrade the clients on your Cisco Unified Presence deployment from Cisco Jabber Video for iPad to CiscoJabber for iPhone and iPad Release 9.6. You can continue to offer the same services. Optionally, you can addsimple provisioning, audio and video, voicemail, and conferencing.
Cisco Jabber for iPhone and iPad 9.6 Installation and Configuration Guide 49
UpgradeUpgrade Cisco Jabber Voice for iPhone by Adding Cisco WebEx

This topic refers to Cisco Unified Presence Release 8.6.
Procedure
Step 1 (Recommended) Set up simple provisioning to simplify the steps required when users install the client.See the Presence Server Discovery topic.
Step 2 (Optional) Provision audio and video calling.See the Provision Audio and Video Capabilities on Cisco Unified Communications Manager chapter for yourrelease in the Server Setup Guide.
Step 3 Create a global configuration file (jabber-config.xml) and upload it to your TFTP server.See the Configure the Client and Integrate with Directory Sources chapters in this guide.
Step 4 Ensure that no CCMCIP or CTI profiles are configured.If you configure CCMCIP or CTI profiles, users see a device configuration error when they try to sign in tothe client.
Step 5 (Optional) Provision users with conferencing capabilities.See the Set Up Conferencing on Cisco Unified Presence chapter in the Server Setup Guide.
Related Topics
Presence Server Discovery, on page 20Server Setup GuideConfigure the Client, on page 57Integrate with Directory Sources, on page 75
Upgrade Cisco Jabber Video for iPad on Cisco Unified CommunicationsManager IM and Presence
Upgrade the clients on your Cisco Unified Communications Manager IM and Presence deployment fromCisco Jabber Video for iPad to Cisco Jabber for iPhone and iPad Release 9.6. You can continue to offer thesame services. Optionally, you can add simple provisioning, audio and video, voicemail, and conferencing.
This topic refers to Cisco Unified Communications Manager IM and Presence Release 9.0 and later.
Procedure
Step 1 (Recommended) Set up simple provisioning to simplify the steps required when users install the client.See the Presence Server Discovery topic.
Step 2 (Optional) Provision audio and video calling.See the Provision Audio and Video Capabilities on Cisco Unified Communications Manager chapter for yourrelease in the Server Setup Guide.
Step 3 Create a global configuration file (jabber-config.xml) and upload it to your TFTP server.See the Configure the Client and Integrate with Directory Sources chapters in this guide.
Cisco Jabber for iPhone and iPad 9.6 Installation and Configuration Guide50
UpgradeUpgrade Cisco Jabber Video for iPad on Cisco Unified Communications Manager IM and Presence

Step 4 Ensure that no CCMCIP or CTI profiles are configured.If you configure CCMCIP or CTI profiles, users see a device configuration error when they try to sign in tothe client.
Step 5 (Optional) Provision users with conferencing capabilities.See the Set Up Conferencing on Cisco Unified Communications Manager IM and Presence chapter in theServer Setup Guide.
Related Topics
Presence Server Discovery, on page 20Server Setup GuideConfigure the Client, on page 57Integrate with Directory Sources, on page 75
Upgrade Cisco Jabber Video for iPad on Cisco WebExUpgrade the clients on your Cisco WebEx deployment from Cisco Jabber Video for iPad to Cisco Jabber foriPhone and iPad Release 9.6. Perform the following optional steps if you want to add simple provisioning,audio and video, voicemail, or conferencing to your current deployment.
Procedure
Step 1 (Recommended) Set up simple provisioning to simplify the steps required when users install the client.See the Presence Server Discovery topic.
Step 2 (Optional) Set up audio and video calling.Audio and video calling are not required for a Cisco WebEx deployment. If you want to add audio and videocalling, you must first deploy Cisco Unified Communications Manager.
For information about setting up audio and video capabilities, see the Provision Audio and Video Capabilitiesin Hybrid Cloud-Based Deployments chapter in the Server Setup Guide.
Step 3 (Optional) Set up voicemail.Voicemail is not required for a Cisco WebEx deployment. If you want to add voicemail, you must first deployCisco Unity Connection.
For information about setting up voicemail capabilities, see the Set Up Voicemail in Hybrid Cloud-BasedDeployments chapter in the Server Setup Guide.
Step 4 (Optional) Provision users with conferencing capabilities.See the Set Up Conferencing in Cloud-Based Deployment chapter in the Server Setup Guide.
Related Topics
Presence Server Discovery, on page 20Server Setup Guide
Cisco Jabber for iPhone and iPad 9.6 Installation and Configuration Guide 51
UpgradeUpgrade Cisco Jabber Video for iPad on Cisco WebEx

Service Credentials Parameters, on page 72
Configuration Differences when Upgrading Cisco Jabber foriPhone and iPad
Speed dial label is disabled and limit of the line is changed from 26 to 1.
Apart from that, there is no configuration difference between Cisco Jabber for iPhone Release 9.5 and CiscoJabber for iPhone and iPad Release 9.6.
The following tables compare the configuration method used for Cisco Jabber Video for iPad Release 9.3(3)and Cisco Jabber for iPhone and iPad Release 9.6.
Table 2: Directory Configuration
Cisco Jabber for iPhone and iPad Release 9.6Cisco Jabber Video for iPad Release 9.3(4)
Device COP file settings are no longer applicable.
Cisco Unified Presence and Cisco UnifiedCommunications Manager IM and Presence
Configure the directory service using the globalconfiguration file.
The global configuration file does notinclude parameters to configure thefollowing options:
Note
• Country Code
• Directory Lookup Rules URL
These options are no longer supportedfor this release.
Cisco WebEx
No global configuration required.
Configure with the following device COP filesettings:
• Country Code
• Directory Lookup Rules URL
• Application Dial Rules URL
• Enable LDAP User Authentication
• LDAP Username
• LDAP Password
• LDAP Server
• Enable LDAP SSL
• LDAP Search Base
• LDAP Field Mappings
• LDAP Photo Location
Cisco Jabber for iPhone and iPad 9.6 Installation and Configuration Guide52
UpgradeConfiguration Differences when Upgrading Cisco Jabber for iPhone and iPad

Table 3: Voicemail Configuration
Cisco Jabber for iPhone and iPad Release 9.6Cisco Jabber Video for iPad Release 9.3(4)
Device COP file settings are no longer applicable.
Cisco Unified Presence
Now configured on the Cisco Unified Presenceserver.
CiscoUnifiedCommunicationsManager IMandPresence
Now configured on Cisco UnifiedCommunications Manager Release 9 or later.
Cisco WebEx
Now configured using the global configurationfile.
Configure with the following device COP file settings:
• Voicemail Username
• Voicemail Server
• Voicemail Message Store Username
• Voicemail Message Store
Table 4: Audio and Video Configuration
Cisco Jabber for iPhone and iPad Release 9.6Cisco Jabber Video for iPad Release 9.3(4)
Configured using the following Device COP filesettings.
• Default Ringtone
• Video Capabilities (new)
Configure with the following Device COP filesettings.
• Default Ringtone
Table 5: VPN Configuration
Cisco Jabber for iPhone and iPad Release 9.6Cisco Jabber Video for iPad Release 9.3(4)
Configuration is the same. Use the following DeviceCOP file settings.
• Preset Wi-Fi Networks
• On-Demand VPN URL
Configure with the following Device COP filesettings.
• Preset Wi-Fi Networks
• On-Demand VPN URL
Cisco Jabber for iPhone and iPad 9.6 Installation and Configuration Guide 53
UpgradeConfiguration Differences when Upgrading Cisco Jabber for iPhone and iPad
Other Feature Configuration
The following settings are no longer applicable in this release.
• Disallow Shake To Lock
• Normal Mode Codecs
• Low Bandwidth Codecs
• Meeting Place Numbers
•WebEx Numbers
• Contacts
• XML Options
• Secure Connect
• Secure Connect Gateway Address
• Secure Connect Authentication
• Group
• Secure Connect Certificate
• Enrollment Groupd (SCEP)
• Secure Connect Username
For information about global configuration files, see the Configure the Client and Integrate with DirectorySources chapters in this guide.
For information about configuring the device COP file, see the Provision Audio and Video Capabilities onCisco Unified Communications Manager chapter for your release in the Server Setup Guide.
Cisco Jabber for iPhone and iPad 9.6 Installation and Configuration Guide54
UpgradeConfiguration Differences when Upgrading Cisco Jabber for iPhone and iPad

C H A P T E R 5Set Up Servers
Before you install Cisco Jabber for iPhone and iPad , you must set up the servers to add users to yourenvironment, enable and configure services, and provision users with capabilities.
• Server Setup Guide, page 55
Server Setup GuideThe Cisco Jabber for iPhone and iPad Server Setup Guide describes the tasks you need to complete to set upand configure services for Cisco Jabber for iPhone and iPad.
Related Topics
Server Setup Guide
Cisco Jabber for iPhone and iPad 9.6 Installation and Configuration Guide 55

Cisco Jabber for iPhone and iPad 9.6 Installation and Configuration Guide56
Set Up ServersServer Setup Guide

C H A P T E R 6Configure the Client
• Introduction to Client Configuration, page 57
• Configure Client on Cisco Unified Communications Manager, page 58
• Create and Host Client Configuration Files, page 63
• Configuration File Structure, page 68
• Example Configuration, page 69
• Client Parameters, page 69
• Policies Parameters, page 70
• Service Credentials Parameters, page 72
• Voicemail Parameters, page 73
Introduction to Client ConfigurationCisco Jabber can retrieve configuration settings from the following sources:
Service Profiles
You can configure some client settings in UC service profiles on Cisco Unified CommunicationsManager version 9 and higher. When users launch the client, it discovers the Cisco UnifiedCommunications Manager home cluster using a DNS SRV record and automatically retrieves theconfiguration from the UC service profile.
Applies to on-premises deployments only.
Phone Configuration
You can set some client settings in the phone configuration on Cisco Unified CommunicationsManagerversion 9 and higher. The client retrieves the settings from the phone configuration in addition to theconfiguration in the UC service profile.
Applies to on-premises deployments only.
Cisco Jabber for iPhone and iPad 9.6 Installation and Configuration Guide 57

Cisco Unified Presence or Cisco Unified Communications Manager IM and Presence
You can enable instant messaging and presence capabilities and configure certain settings such aspresence subscription requests.
If you do not use service discovery with Cisco Unified CommunicationsManager version 9 and higher,the client retrieves UC services fromCisco Unified Presence or Cisco Unified CommunicationsManagerIM and Presence.
Applies to on-premises deployments only.
Client Configuration Files
You can create XML files that contain configuration parameters. You then host the XML files on aTFTP server. When users sign in, the client retrieves the XML file from the TFTP server and appliesthe configuration.
Applies to on-premises and cloud-based deployments.
Cisco WebEx Org Admin
You can configure some client settings with the Cisco WebEx Administration Tool.
Applies to cloud-based deployments only.
Configure Client on Cisco Unified Communications ManagerYou can configure some client settings in UC service profiles on Cisco Unified Communications Managerversion 9 and higher.
Important • Cisco Jabber only retrieves configuration from service profiles on Cisco Unified CommunicationsManager if the client gets the _cisco-uds SRV record from a DNS query.
You cannot configure the client with service profiles if you do not set up your DNS environmentfor service discovery.
• In an environment withmultiple CiscoUnified CommunicationsManager clusters, youmust configurethe Intercluster Lookup Service (ILS). ILS enables the client to find the user's home cluster anddiscover services.
See the appropriate version of the Cisco Unified Communications Manager Features and ServicesGuide to learn how to configure ILS.
Set Parameters on Service ProfileThe client can retrieve UC service configuration and other settings from service profiles.
Cisco Jabber for iPhone and iPad 9.6 Installation and Configuration Guide58
Configure the ClientConfigure Client on Cisco Unified Communications Manager

Parameters in service profilesLearn which configuration parameters you can set in service profiles. Review the corresponding parametersin the client configuration file.
IM and Presence Profile
The following table lists the configuration parameters you can set in the instant messaging and presenceprofile:
DescriptionIM and Presence Service Configuration
Provides the primary source of authentication to CiscoJabber and has the following values:
Unified CM (IM and Presence)
Cisco Unified Presence or Cisco UnifiedCommunications Manager IM and Presence isthe primary source of authentication.
WebEx (IM and Presence)
The Cisco WebEx Messenger service is theprimary source of authentication.
Product type
Specifies the address of your primary presence server.
On-Premises Deployments
You should specify the fully qualified domainname (FQDN) of Cisco Unified Presence orCiscoUnified CommunicationsManager IM andPresence.
Cloud-Based Deployments
The client uses the following URL as defaultwhen you selectWebEx as the value for theProduct type parameter:https://loginp.webexconnect.com/cas/auth.do
This default URL overrides any value that youset.
Primary server
Voicemail Profile
The following table lists the configuration parameters you can set in the voicemail profile:
Cisco Jabber for iPhone and iPad 9.6 Installation and Configuration Guide 59
Configure the ClientSet Parameters on Service Profile
DescriptionVoicemail Service Configuration
Specifies connection settings for the voicemail server.
Refer to the Server Setup Guide for detailed instructionson provisioning users with voicemail capabilities in aservice profile.
Voicemail server
Specifies that the client uses the credentials for theinstant messaging and presence or conferencing serviceto authenticate with the voicemail service.
Ensure that the credentials source that you set matchthe user's voicemail credentials. If you set a value forthis parameter, users cannot specify their voicemailservice credentials in the client user interface.
Credentials source for voicemail service
Conferencing Profile
The following table lists the configuration parameters you can set in the conferencing profile:DescriptionConferencing Service Configuration
Specifies connection settings for the conferencingserver.
Refer to the Server Setup Guide for detailedinstructions on provisioning users with meetingscapabilities in a service profile.
Conferencing server
Specifies that the client uses the credentials for theinstant messaging and presence or voicemail serviceto authenticate with the conferencing service.
Ensure that the credentials source that you set matchthe user's conferencing credentials.
Credentials source for web conference service
Directory Profile
See the Integrate with Directory Sources chapter for information about configuring directory integration ina service profile.
Add UC ServicesAddUC services to specify the address, ports, protocols and other settings for services such as instant messagingand presence, voicemail, conferencing, and directory.
Cisco Jabber for iPhone and iPad 9.6 Installation and Configuration Guide60
Configure the ClientSet Parameters on Service Profile

Procedure
Step 1 Open the Cisco Unified CM Administration interface.Step 2 Select User Management > User Settings > UC Service.
The Find and List UC Services window opens.
Step 3 Select Add New.The UC Service Configuration window opens.
Step 4 Select the UC service type you want to add and then select Next.Step 5 Configure the UC service as appropriate and then select Save.
What to Do Next
Add your UC services to service profiles.
Create Service ProfilesAfter you add and configure UC services, you add them to a service profile. You can apply additionalconfiguration in the service profile.
Procedure
Step 1 Open the Cisco Unified CM Administration interface.Step 2 Select User Management > User Settings > Service Profile.
The Find and List UC Services window opens.
Step 3 Select Add New.The Service Profile Configuration window opens.
Step 4 Enter a name for the service profile in the Name field.Step 5 SelectMake this the default service profile for the system if you want the service profile to be the default
for the cluster.On Cisco Unified CommunicationsManager version 9.x only, users who have only instant messagingcapabilities (IM only) must use the default service profile. For this reason, you should set the serviceprofile as the default if you plan to apply the service profile to IM only users.
Note
Step 6 Add your UC services, apply any additional configuration, and then select Save.
What to Do Next
Apply service profiles to end user configuration.
Cisco Jabber for iPhone and iPad 9.6 Installation and Configuration Guide 61
Configure the ClientSet Parameters on Service Profile

Apply Service ProfilesAfter you add UC services and create a service profile, you apply the service profile to users. When userssign in to Cisco Jabber, the client can then retrieve the service profile for that user from Cisco UnifiedCommunications Manager.
Procedure
Step 1 Open the Cisco Unified CM Administration interface.Step 2 Select User Management > End User.
The Find and List Users window opens.
Step 3 Enter the appropriate search criteria to find existing users and then select a user from the list.The End User Configuration window opens.
Step 4 Locate the Service Settings section.Step 5 Select a service profile to apply to the user from the UC Service Profile drop-down list.
Cisco Unified Communications Manager version 9.x only: If the user has only instantmessaging and presence capabilities (IM only), you must selectUse Default. For IM only users,Cisco Unified Communications Manager version 9.x always applies the default service profileregardless of what you select from the UC Service Profile drop-down list.
Important
Step 6 Apply any other configuration as appropriate and then select Save.
Set Parameters on Phone ConfigurationThe client can retrieve configuration settings in the phone configuration from the following locations on CiscoUnified Communications Manager:
Cisco Dual Mode for iPhone (TCT) Configuration
Applies to individual TCT devices and takes priority over the group configuration.
Cisco Jabber for Tablet (TAB) Configuration
Applies to individual TAB devices and takes priority over the group configuration.
Parameters in Phone ConfigurationThe following table lists the configuration parameters you can set in the Product Specific ConfigurationLayout section of the phone configuration and maps corresponding parameters from the client configurationfile:
DescriptionMobile Client Settings Configuration
URL for initiating on-demand VPN.On-Demand VPN URL
Cisco Jabber for iPhone and iPad 9.6 Installation and Configuration Guide62
Configure the ClientSet Parameters on Phone Configuration

DescriptionMobile Client Settings Configuration
Enter the SSIDs for Wi-Fi networks (SSIDs) approved byyour organization. Separate SSIDs with a forward slash (/).Devices do not connect to secure connect if connected to oneof the entered Wi-Fi networks.
Preset Wi-fi Networks
Sets the default ringtone to Normal or Loud.Default Ringtone
Enables or disables video capabilities.
Enabled
Users can send and receive video calls. This is thedefault value.
Disabled
Users cannot send or receive video calls.
Video Capabilities
Enables or disables Dial via Office.
Enabled
Users can dial via office.
Disabled
Users cannot dial via office. This is the default value.
Dial via OfficeIt is for TCT deviceonly.
Note
Create and Host Client Configuration FilesIn on-premises and hybrid cloud-based deployments you can create client configuration files and host themon the Cisco Unified Communications Manager TFTP service.
In cloud-based deployments, you should configure the client with the Cisco WebEx Administration Tool.However, you can optionally set up a TFTP server to configure the client with settings that are not availablein Cisco WebEx Administration Tool.
You must create a global configuration file to set up:Important
• Directory integration for on-premises deployments.
• Voicemail service credentials for hybrid-cloud deployments.
Client Configuration FilesReview details about configuration files and understand requirements such as supported encoding.
Cisco Jabber for iPhone and iPad 9.6 Installation and Configuration Guide 63
Configure the ClientCreate and Host Client Configuration Files

Global Configuration FilesGlobal configuration files apply to all users. The client downloads the global configuration file from yourTFTP server during the login sequence.
The default name for the global configuration file is jabber-config.xml.
Do not rename the jabber-config.xml file. The client does not support jabber-config.xml files with adifferent name.
Note
Configuration File Requirements• Configuration filenames are case sensitive. Use lowercase letters in the filename to prevent errors andto ensure the client can retrieve the file from the TFTP server.
• You must use utf-8 encoding for the configuration files.
• The client cannot read configuration files that do not have a valid XML structure. Ensure you check thestructure of your configuration file for closing elements and that elements are nested correctly.
• Your XML can contain only valid XML character entity references. For example, use & insteadof &. If your XML contains invalid characters, the client cannot parse the configuration file.
Open your configuration file in Microsoft Internet Explorer to see if any characters orentities are not valid.
If Internet Explorer displays the entire XML structure, your configuration file does notcontain invalid characters or entities.
If Internet Explorer displays only part of the XML structure, your configuration filemost likely contains invalid characters or entities.
Tip
Specify Your TFTP Server AddressThe client gets configuration files from a TFTP server. The first step in configuring the client is to specifyyour TFTP server address so the client can access your configuration file.
If Cisco Jabber gets the _cisco-uds SRV record from a DNS query, it can automatically locate theuser's home cluster. As a result, the client can also locate the Cisco Unified Communications ManagerTFTP service.
You do not need to specify your TFTP server address if you deploy the _cisco-uds SRV record.
Attention
Cisco Jabber for iPhone and iPad 9.6 Installation and Configuration Guide64
Configure the ClientSpecify Your TFTP Server Address

Specify Your TFTP Server on Cisco Unified PresenceComplete the steps to specify the address of your TFTP server on Cisco Unified Presence.
Procedure
Step 1 Open the Cisco Unified Presence Administration interface.Step 2 Select Application > Cisco Jabber > Settings.
In some versions of Cisco Unified Presence, this path is as follows: Application > Cisco UnifiedPersonal Communicator > Settings.
Note
The Cisco Jabber Settings window opens.
Step 3 Locate the fields to specify TFTP servers in one of the following sections, depending on your version of CiscoUnified Presence:
• Cisco Jabber Security Settings
• CUPC Global Settings
Step 4 Specify the IP address of your primary and backup TFTP servers in the following fields:
• Primary TFTP Server
• Backup TFTP Server
• Backup TFTP Server
Step 5 Select Save.
Specify Your TFTP Server on Cisco Unified Communications Manager IM and PresenceComplete the steps to specify the address of your TFTP server on Cisco Unified Communications ManagerIM and Presence.
Procedure
Step 1 Open the Cisco Unified CM IM and Presence Administration interface.Step 2 Select Application > Legacy Clients > Settings.
The Legacy Client Settings window opens.
Step 3 Locate the Legacy Client Security Settings section.Step 4 Specify the IP address of your primary and backup TFTP servers in the following fields:
• Primary TFTP Server
• Backup TFTP Server
• Backup TFTP Server
Cisco Jabber for iPhone and iPad 9.6 Installation and Configuration Guide 65
Configure the ClientSpecify Your TFTP Server Address

Step 5 Select Save.
Specify TFTP Servers with the Cisco WebEx Administration ToolIf the client connects to the Cisco WebEx Messenger service, you specify your TFTP server address with theCisco WebEx Administration Tool.
Procedure
Step 1 Open the Cisco WebEx Administration Tool.Step 2 Select the Configuration tab.Step 3 Select Unified Communications in the Additional Services section.
The Unified Communications window opens.Step 4 Select the Clusters tab.Step 5 Select the appropriate cluster from the list.
The Edit Cluster window opens.Step 6 SelectAdvanced Server Settings in theCisco Unified CommunicationsManager Server Settings section.Step 7 Specify the IP address of your primary TFTP server in the TFTP Server field.Step 8 Specify the IP address of your backup TFTP servers in the Backup Server #1 and Backup Server #2 fields.Step 9 Select Save.
The Edit Cluster window closes.Step 10 Select Save in the Unified Communications window.
Create Global ConfigurationsConfigure the client for all users in your deployment.
If your environment has multiple TFTP servers, you must ensure that the configuration file is the sameon all TFTP servers.
Remember
Procedure
Step 1 Create a file named jabber-config.xml with any text editor.
• Use lowercase letters in the filename.
• Use utf-8 encoding.
Step 2 Define the required configuration parameters in jabber-config.xml.
Cisco Jabber for iPhone and iPad 9.6 Installation and Configuration Guide66
Configure the ClientCreate Global Configurations

If the structure of your configuration file is not valid, the client cannot read the values you set. Reviewthe XML samples in this chapter for more information.
Step 3 Host the group configuration file on your TFTP server.
Host Configuration FilesYou can host configuration files on any TFTP server. However, Cisco recommends hosting configurationfiles on the Cisco Unified Communications Manager TFTP server, which is the same as that where the deviceconfiguration file resides.
Procedure
Step 1 Open the Cisco Unified OS Administration interface on Cisco Unified Communications Manager.Step 2 Select Software Upgrades > TFTP File Management.Step 3 Select Upload File.Step 4 Select Browse in the Upload File section.Step 5 Select the configuration file on the file system.Step 6 Do not specify a value in the Directory text box in the Upload File section.
You should leave an empty value in the Directory text box so that the configuration file resides in the defaultdirectory of the TFTP server.
Step 7 Select Upload File.
Restart Your TFTP ServerYou must restart your TFTP server before the client can access the configuration files.
Procedure
Step 1 Open the Cisco Unified Serviceability interface on Cisco Unified Communications Manager.Step 2 Select Tools > Control Center - Feature Services.Step 3 Select Cisco Tftp from the CM Services section.Step 4 Select Restart.
A window displays to prompt you to confirm the restart.
Step 5 Select OK.The Cisco Tftp Service Restart Operation was Successful status displays.
Step 6 Select Refresh to ensure the Cisco Tftp service starts successfully.
Cisco Jabber for iPhone and iPad 9.6 Installation and Configuration Guide 67
Configure the ClientHost Configuration Files

What to Do Next
To verify that the configuration file is available on your TFTP server, open the configuration file in anybrowser. Typically, you can access the global configuration file at the following URL:http://tftp_server_address:6970/jabber-config.xml
Configuration File StructureYou create client configuration files in an XML format that contains the following elements:
XML Declaration
The configuration file must conform to XML standards and contain the following declaration:<?xml version="1.0" encoding="utf-8"?>
Root Element
The root element, config, contains all group elements. You must also add the version attribute to the rootelement as follows:<?xml version="1.0" encoding="utf-8"?><config version="1.0"></config>
Group Elements
Group elements contain configuration parameters and values. You must nest group elements within the rootelement.
Group ElementsThe following table describes the group elements you can specify in a client configuration file:
DescriptionElement
Contains configuration parameters for the client.Client
Contains configuration parameters for directory integration.Directory
Contains configuration parameters for policies.Policies
Contains configuration parameters for the voicemail service.Voicemail
For information about directory parameters, see the Integrate with Directory Sources chapter.Note
Cisco Jabber for iPhone and iPad 9.6 Installation and Configuration Guide68
Configure the ClientConfiguration File Structure

XML StructureThe following snippet shows the XML structure of a client configuration file:<Client><parameter><value><parameter>
</Client><Directory><parameter><value><parameter>
</Directory><Policies><parameter>value</parameter>
</Policies><Voicemail><parameter><value><parameter>
</Voicemail>
Example ConfigurationThe following is an example configuration for an on-premises deployment:<?xml version="1.0" encoding="utf-8"?><config version="1.0"><Client><CachePasswordMobile>true</CachePasswordMobile>
</Client><Directory><DirectoryServerType>BDI</DirectoryServerType><BDIPhotoUriSubstitutionEnabled>True</BDIPhotoUriSubstitutionEnabled><BDIPhotoUriSubstitutionToken>sAMAccountName</BDIPhotoUriSubstitutionToken><BDIPhotoUriWithToken>http://staffphoto.example.com/sAMAccountName.jpg
</BDIPhotoUriWithToken><BDIPrimaryServerName>11.22.33.456</BDIPrimaryServerName><BDIPresenceDomain>cisco.com</BDIPresenceDomain><BDIServerPort1>389</BDIServerPort1><BDISearchBase1>CN=Users,DC=cisco,DC=com</BDISearchBase1>
</Directory><Policies>
<EnableSIPURIDialling>false</EnableSIPURIDialling></Policies></config>
Client ParametersThe following table describes the parameters you can specify within the Client element:
Cisco Jabber for iPhone and iPad 9.6 Installation and Configuration Guide 69
Configure the ClientXML Structure

DescriptionValueParameter
Specifies whether the password is remembered or not onthe client side.
true
The password will be prefilled and Automaticsign-in will be shown.
Users can allow the client to cache their password.This option allows users to automatically sign inwhen the client starts. This is the default value.
false
The password field will be empty and Automaticsign-in will not be shown.
Users cannot allow the client to cache theirpassword. Users must enter their password eachtime the client starts.
true
false
CachePasswordMobile
Policies ParametersPolicies parameters let you control specific client functionality.
Common PoliciesThe following table describes the parameters you can specify within the Policies element in both on-premisesdeployments and hybrid cloud-based deployments:
DescriptionValueParameter
Enables or disables video capabilities.
true
Users can make and receive video calls. This is thedefault value.
false
Users cannot make or receive video calls.
true
false
EnableVideo
Cisco Jabber for iPhone and iPad 9.6 Installation and Configuration Guide70
Configure the ClientPolicies Parameters

DescriptionValueParameter
Enables meetings capabilities and user interface in theclient.
true
Enables meetings capabilities and user interface.This is the default value.
false
Disables meetings capabilities and user interface.
true
false
Meetings_Enabled
Enables audio and video capabilities and user interface inthe client.
true
Enables audio and video capabilities and userinterface. This is the default value.
false
Disables audio and video capabilities and userinterface.
true
false
Telephony_Enabled
Enables voicemail capabilities and user interface in theclient.
true
Enables voicemail capabilities and user interface.This is the default value.
false
Disables voicemail capabilities and user interface.
true
false
Voicemail_Enabled
Enables URI dialing with Cisco Jabber and allows usersto make calls with URIs.
true
Users can make calls with URIs.
false
Users cannot make calls with URIs. This is thedefault value.
true
false
EnableSIPURIDialling
Cisco Jabber for iPhone and iPad 9.6 Installation and Configuration Guide 71
Configure the ClientCommon Policies

DescriptionValueParameter
Specifies the directory attribute that holds the SIP URI forusers.
On-Premises Deployments
Set one of the following as the value:
• msRTCSIP-PrimaryUserAddress
Cloud-Based Deployments
Jabber uses email by default and it cannot bemodified.
The value you specify must match thedirectory URI setting for users in CiscoUnified Communications Manager or theCisco WebEx Administration Tool.
Important
In order to support URI search in BDI, setBDIUseANR to false in jabber-config.xml.
Important
See thedescriptionon the rightcolumn
DirectoryURI
Cisco WebEx PoliciesIf you use the Cisco WebEx Messenger service for instant messaging and presence capabilities, you can setpolicies for the client through the Cisco WebEx Administration Tool. See Using policy actions available inCisco WebEx for a list of available policies and descriptions.
All settings in the service profile obtained via UDS will overwrite the configuration in Cisco WebExAdministration Tool.
Note
Related Topics
Using policy actions available in Cisco WebEx
Service Credentials ParametersYou can specify service credentials parameters so that users do not need to authenticate with certain services.
Voicemail Service Credentials
You can specify the following parameter to configure voicemail service credentials within the Voicemailelement:
Cisco Jabber for iPhone and iPad 9.6 Installation and Configuration Guide72
Configure the ClientCisco WebEx Policies

DescriptionValueParameter
Specifies that the client uses the phone servicecredentials to access voicemail services.
Ensure the user's phone service credentials match theirvoicemail service credentials. If you set thisconfiguration, users cannot specify voicemail servicecredentials in the client interface.
This parameter is not set by default.
You should set this parameter in hybrid cloud-baseddeployments only.
In on-premises deployments, you should set thecredentials source for voicemail services on thepresence server.
phoneVoiceMailService_UseCredentialsFrom
The following is an example of the voicemail service credentials parameter:<?xml version="1.0" encoding="utf-8"?><config version="1.0"><Voicemail><VoicemailService_UseCredentialsFrom>phone</VoicemailService_UseCredentialsFrom>
</Voicemail></config>
Voicemail ParametersThe following table describe the voicemail service configuration parameters you can specify within theVoicemail element:
DescriptionValueKey
Specifies the address of your voicemail server. Setone of the following as the value:
• Hostname (hostname)
• IP address (123.45.254.1)
• FQDN (hostname.domain.com)
Hostname
IP address
FQDN
VVM_Mailstore_Server_0
Cisco Jabber for iPhone and iPad 9.6 Installation and Configuration Guide 73
Configure the ClientVoicemail Parameters

Cisco Jabber for iPhone and iPad 9.6 Installation and Configuration Guide74
Configure the ClientVoicemail Parameters

C H A P T E R 7Integrate with Directory Sources
• Set Up Directory Synchronization and Authentication, page 75
• Contact Sources, page 79
• Client Configuration for Directory Integration, page 84
• Federation, page 99
Set Up Directory Synchronization and AuthenticationWhen you set up an on-premises deployment, you should configure Cisco Unified Communications Managerto do both of the following:
• Synchronize with the directory server.
• Authenticate with the directory server.
Synchronizing with the directory server replicates contact data from your directory to Cisco UnifiedCommunications Manager.
Enabling authentication with the directory server lets Cisco Unified Communications Manager proxyauthentication from the client to the directory server. In this way, users authenticate with the directory server,not with Cisco Unified Communications Manager or a presence server.
Cisco Jabber for iPhone and iPad 9.6 Installation and Configuration Guide 75

Synchronize with the Directory ServerDirectory server synchronization ensures that contact data in your directory server is replicated to CiscoUnified Communications Manager.
Enable SynchronizationThe first step to synchronize with a directory server is to enable synchronization on Cisco UnifiedCommunications Manager.
Procedure
Step 1 Open the Cisco Unified CM Administration interface.Step 2 Select System > LDAP > LDAP System.
The LDAP System Configuration window opens.
Step 3 Locate the LDAP System Information section.Step 4 Select Enable Synchronizing from LDAP Server.Step 5 Select the type of directory server from which you are synchronizing data from the LDAP Server Type
drop-down list.
What to Do Next
Specify an LDAP attribute for the user ID.
Populate User ID and Directory URIWhen you synchronize your LDAP directory server with Cisco Unified Communications Manager, you canpopulate the end user configuration tables in both the Cisco Unified Communications Manager and the CiscoUnified Communications Manager IM and Presence databases with attributes that contain values for thefollowing:
User ID
You must specify a value for the user ID on Cisco Unified Communications Manager. This value isrequired for the default IM address scheme and for users to log in. The default value issAMAccountName.
Directory URI
You should specify a value for the directory URI if you plan to:
• Enable URI dialing in Cisco Jabber.
• Use the directory URI address scheme on Cisco Unified Communications Manager IM andPresence version 9.1(1) and higher.
Cisco Jabber for iPhone and iPad 9.6 Installation and Configuration Guide76
Integrate with Directory SourcesSynchronize with the Directory Server
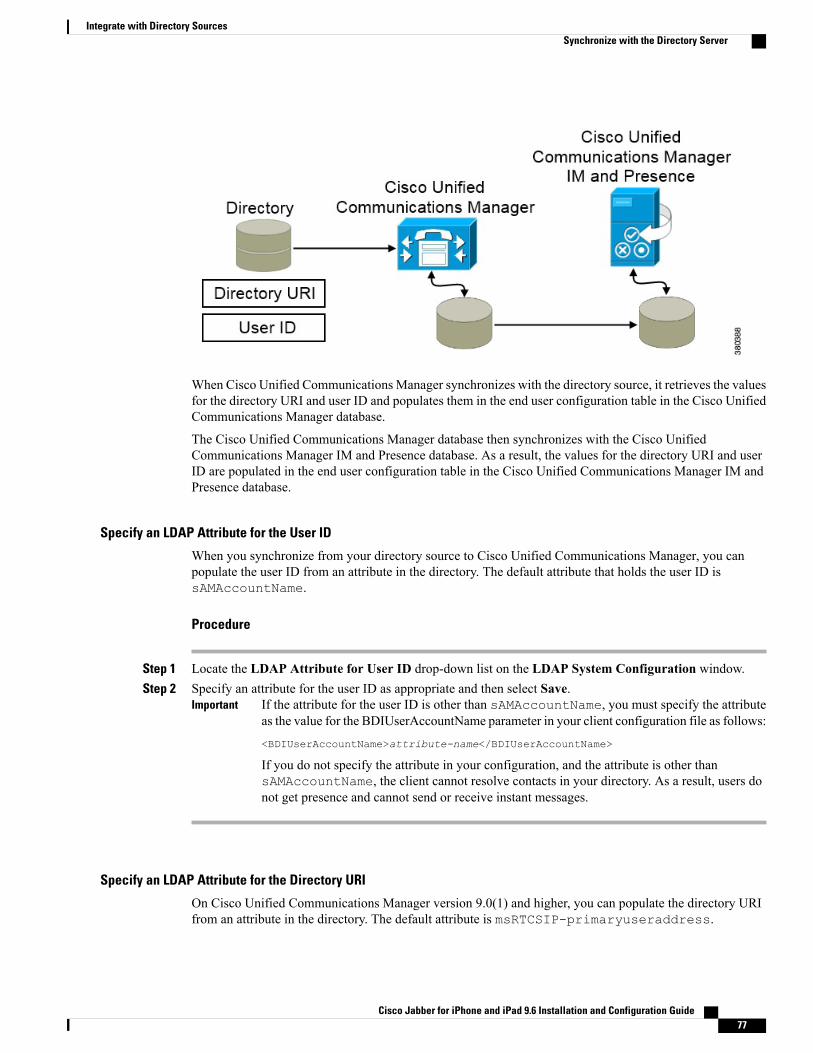
When Cisco Unified Communications Manager synchronizes with the directory source, it retrieves the valuesfor the directory URI and user ID and populates them in the end user configuration table in the Cisco UnifiedCommunications Manager database.
The Cisco Unified Communications Manager database then synchronizes with the Cisco UnifiedCommunications Manager IM and Presence database. As a result, the values for the directory URI and userID are populated in the end user configuration table in the Cisco Unified Communications Manager IM andPresence database.
Specify an LDAP Attribute for the User ID
When you synchronize from your directory source to Cisco Unified Communications Manager, you canpopulate the user ID from an attribute in the directory. The default attribute that holds the user ID issAMAccountName.
Procedure
Step 1 Locate the LDAP Attribute for User ID drop-down list on the LDAP System Configuration window.Step 2 Specify an attribute for the user ID as appropriate and then select Save.
If the attribute for the user ID is other than sAMAccountName, you must specify the attributeas the value for the BDIUserAccountName parameter in your client configuration file as follows:
<BDIUserAccountName>attribute-name</BDIUserAccountName>
If you do not specify the attribute in your configuration, and the attribute is other thansAMAccountName, the client cannot resolve contacts in your directory. As a result, users donot get presence and cannot send or receive instant messages.
Important
Specify an LDAP Attribute for the Directory URI
On Cisco Unified Communications Manager version 9.0(1) and higher, you can populate the directory URIfrom an attribute in the directory. The default attribute is msRTCSIP-primaryuseraddress.
Cisco Jabber for iPhone and iPad 9.6 Installation and Configuration Guide 77
Integrate with Directory SourcesSynchronize with the Directory Server

Procedure
Step 1 Select System > LDAP > LDAP Directory.To add or edit an LDAP directory, youmust first enable synchronization.Remember
Step 2 Select the appropriate LDAP directory or select Add New to add an LDAP directory.Step 3 Locate the Standard User Fields To Be Synchronized section.Step 4 Select the appropriate LDAP attribute for the Directory URI drop-down list.Step 5 Select Save.
Perform SynchronizationAfter you add a directory server and specify the required parameters, you can synchronize Cisco UnifiedCommunications Manager with the directory server.
Before You Begin
If your environment includes a presence server, you should ensure the following feature service is activatedand started before you synchronize with the directory server:
• Cisco Unified Presence: Cisco UP Sync Agent
• Cisco Unified Communications Manager IM and Presence: Cisco Sync Agent
This service keeps data synchronized between the presence server and CiscoUnified CommunicationsManager.When you perform the synchronization with your directory server, Cisco Unified Communications Managerthen synchronizes the data with the presence server. However, theCisco Sync Agent service must be activatedand started.
Procedure
Step 1 Select System > LDAP > LDAP Directory.Step 2 Select Add New.
The LDAP Directory window opens.
Step 3 Specify the required details on the LDAP Directory window.See theCisco Unified CommunicationsManager Administration Guide for more information about the valuesand formats you can specify.
Step 4 Select Save.Step 5 Select Peform Full Sync Now.
The amount of time it takes for the synchronization process to complete depends on the number ofusers that exist in your directory. If you synchronize a large directory with thousands of users, youshould expect the process to take some time.
Note
Cisco Jabber for iPhone and iPad 9.6 Installation and Configuration Guide78
Integrate with Directory SourcesSynchronize with the Directory Server

User data from your directory server is synchronized to the Cisco Unified CommunicationsManager database.Cisco Unified Communications Manager then synchronizes the user data to the presence server database.
Related Topics
Administration Guide version 8.6: LDAP Directory ConfigurationAdministration Guide version 9.0: LDAP directory setup
Authenticate with the Directory ServerYou should configure Cisco Unified Communications Manager to authenticate with the directory server.When users log in to the client, the presence server routes that authentication to Cisco Unified CommunicationsManager. Cisco Unified Communications Manager then proxies that authentication to the directory server.
Procedure
Step 1 Open the Cisco Unified CM Administration interface.Step 2 Select System > LDAP > LDAP Authentication.Step 3 Select Use LDAP Authentication for End Users.Step 4 Specify LDAP credentials and a user search base as appropriate.
See the Cisco Unified Communications Manager Administration Guide for information about the fields onthe LDAP Authentication window.
Step 5 Select Save.
Related Topics
Administration Guide version 8.6: LDAP Directory ConfigurationAdministration Guide version 9.0: LDAP directory setup
Contact SourcesIn on-premises deployments, the client requires a contact source to resolve directory look ups for userinformation. You can use the following as a contact source:
Basic Directory Integration
Basic Directory Integration (BDI) is an LDAP-based contact source.
Basic Directory IntegrationWhen using Basic Directory Integration (BDI), the client retrieves contact data from the directory service asfollows.
1 The client connects to the Cisco Unified Presence or Cisco Unified Communications Manager IM andPresence server.
Cisco Jabber for iPhone and iPad 9.6 Installation and Configuration Guide 79
Integrate with Directory SourcesAuthenticate with the Directory Server

2 The client gets the LDAP profile configuration section in the service profile from the Cisco UnifiedPresence or Cisco Unified Communications Manager IM and Presence server.
The service profile contains the location of Cisco Unified Communications Manager (TFTP) server.Depending on your configuration, the service profile can also contain the credentials to authenticate withthe directory.
3 The client connects to the Cisco Unified Communications Manager server.
4 The client downloads the client configuration file from the Cisco Unified CommunicationsManager server.
The client configuration file contains the location of the directory. Depending on your configuration, theclient configuration file can also contain the credentials to authenticate with the directory.
5 The client uses the directory location and the authentication credentials to connect to the directory.
Authentication with Contact SourcesBDI requires users to authenticate with the directory source to resolve contacts. You can use the followingmethods to authenticate with the contact source, in order of priority:
Specify credentials in Cisco Unified Presence or Cisco Unified Communications Manager
Specify credentials in a profile on the server. The client can then retrieve the credentials from the serverto authenticate with the directory.
This method is the most secure option for storing and transmitting credentials.
Cisco Jabber for iPhone and iPad 9.6 Installation and Configuration Guide80
Integrate with Directory SourcesBasic Directory Integration

Set common credentials in the client configuration file
You specify a shared username and password in the client configuration file. The client can thenauthenticate with the directory server.
The client transmits and stores these credentials as plain text.
You should use only a well-known or public set of credentials. The credentialsshould also be linked to an account that has read-only permissions.
Important
Use anonymous binds
Configure the client to connect to the directory source with anonymous binds.
Related Topics
Specify LDAP Directory Configuration on Cisco Unified Presence, on page 81Specify LDAP Directory Configuration on Cisco Unified Communications Manager, on page 82Set Credentials in the Client Configuration, on page 83Use Anonymous Binds, on page 84
Specify LDAP Directory Configuration on Cisco Unified Presence
If your environment includes Cisco Unified Presence version 8.x, you can specify directory configuration inthe LDAP profile. The client can then get the directory configuration from the server to authenticate with thedirectory source.
Complete the steps to create an LDAP profile that contains authentication credentials, and then assign thatprofile to users.
Procedure
Step 1 Open the Cisco Unified Presence Administration interface.Step 2 Select Application > Cisco Unified Personal Communicator > LDAP Profile.Step 3 Select Add New.Step 4 Specify a name and optional description for the profile in the following fields:
• Name
• Description
Step 5 Specify a password that the client can use to authenticate with the LDAP server in the following fields:
• Password
• Confirm Password
Step 6 Specify the IP address of your primary and backup LDAP servers in the following fields:
• Primary LDAP Server
Cisco Jabber for iPhone and iPad 9.6 Installation and Configuration Guide 81
Integrate with Directory SourcesBasic Directory Integration

• Backup LDAP Server
• Backup LDAP Server
Step 7 Select Add Users to Profile and add the appropriate users to the profile.Step 8 Select Save.
Specify LDAP Directory Configuration on Cisco Unified Communications Manager
If your environment includes Cisco Unified CommunicationsManager version 9.x and higher, you can specifycredentials when you add a directory service. The client can then get the configuration from the server toauthenticate with the directory source.
Complete the steps to add a directory service, apply the directory service to the service profile, and specifythe LDAP authentication configuration for the directory service.
Procedure
Step 1 Open the Cisco Unified CM Administration interface.Step 2 Add a directory service as follows:
a) Select User Management > User Settings > UC Service.The Find and List UC Services window opens.
b) Select Add New.The UC Service Configuration window opens.
c) In the Add a UC Service section, select Directory from the UC Service Type drop-down list.d) Select Next.e) Specify details for the directory service as follows:
Product Type
Select Directory.
Name
Enter a descriptive name for the server, for example, PrimaryDirectoryServer.
Description
Enter an optional description.
Hostname/IP Address
Enter the address of the directory server in one of the following formats:
• Hostname
• IP Address
• FQDN
Cisco Jabber for iPhone and iPad 9.6 Installation and Configuration Guide82
Integrate with Directory SourcesBasic Directory Integration

Port
You do not need to specify a port number. By default, the client always uses port 3268 to connectto the directory server. For this reason, any value you specify does not take effect.
Protocol Type
Select one of the following protocols from the following drop-down list:
• TCP
• UDP
• TLS
f) Select Save.
Step 3 Apply the directory service to your service profile as follows:a) Select User Management > User Settings > Service Profile.
The Find and List Service Profiles window opens.
b) Find and select your service profile.The Service Profile Configuration window opens.
c) In the Directory Profile section, select up to three services from the following drop-down lists:
• Primary
• Secondary
• Tertiary
d) Specify the credentials that the client can use to authenticate with the LDAP server in the following fields:
• Username
• Password
e) Select Save.
Set Credentials in the Client Configuration
You can set credentials in the client configuration with the following parameters:
• BDIConnectionUsername
• BDIConnectionPassword
The client transmits and stores these credentials as plain text.
You should use only a well-known or public set of credentials. The credentials should also be linked toan account that has read-only permissions.
Important
Cisco Jabber for iPhone and iPad 9.6 Installation and Configuration Guide 83
Integrate with Directory SourcesBasic Directory Integration

The following is an example configuration:<Directory><BDIConnectionUsername>[email protected]</BDIConnectionUsername><BDIConnectionPassword>password</BDIConnectionPassword>
</Directory>
Use Anonymous Binds
To use anonymous binds, you set the following parameters in the client configuration file:
ValueParameter
BDIDirectoryServerType
IP address
FQDN
BDIPrimaryServerName
TrueBDIEnableTLS
Searchable organizational unit (OU) in the directorytree
BDISearchBase1
Object class that your directory service uses; forexample, inetOrgPerson
BDIBaseFilter
uid or other search filterA search filter is optional.
BDIPredictiveSearchFilter
The following is an example configuration:<Directory><BDIPrimaryServerName>11.22.33.456</BDIPrimaryServerName><BDIEnableTLS>True</BDIEnableTLS><BDISearchBase1>ou=people,dc=cisco,dc=com</BDISearchBase1><BDIBaseFilter>(&(objectClass=inetOrgPerson)</BDIBaseFilter><BDIPredictiveSearchFilter>uid</BDIPredictiveSearchFilter>
</Directory>
Client Configuration for Directory IntegrationDirectory integration can be configured through Service Profiles using CiscoUnified CommunicationsManager9 or higher or with the configuration file. Use this section to learn how to configure the client for directoryintegration.
In instances where a Service Profile and the configuration file are present, settings in the Service Profiletake priority.
Note
Cisco Unified Presence 8 profiles cannot be used for directory integration.Note
Cisco Jabber for iPhone and iPad 9.6 Installation and Configuration Guide84
Integrate with Directory SourcesClient Configuration for Directory Integration

Configure Directory Integration in a Service ProfileWith Cisco Unified Communications Manager version 9 and higher, you can provision users with serviceprofiles and deploy the _cisco-uds SRV record on your internal domain name server.
The client can then automatically discover Cisco Unified Communications Manager and retrieve the serviceprofile to get directory integration configuration.
To configure directory integration in a service profile, do the following:
Procedure
Step 1 Open the Unified CM Administration interface.Step 2 Add a directory service.
a) Select User Management > User Settings > UC Service.The Find and List UC Services window opens.
b) Select Add New.The UC Service Configuration window opens.
c) Select Directory from the UC Service Type menu and then select Next.d) Set all appropriate values for the directory service and then select Save.
Step 3 Apply the directory service to a service profile.a) Select User Management > User Settings > Service Profile.
The Find and List Service Profiles window opens.b) Select Add New.
The Service Profile Configuration window opens.c) Add the directory services to the directory profile.d) Select Save.There is no need to check Use UDS for Contact Resolution and Use Logged On User Credential boxes.
When both the directory profile and jabber-config.xml file are used at the same time, the configurationin the directory profile have the higher priority and will be used except manual sign-in and service discovery.
When manually sign in,Username and Password from the directory profile will be used to connect to LDAPserver for contact search.
For service discovery, Username, Password, Search Base, and Primary server in the directory profile willbe used to connect to LDAP server for contact search.
To make it work consistently, it is highly recommended that Username and Password in both directoryprofile and jabber-config.xml are exactly the same.
Directory Profile ParametersThe following table lists the configuration parameters you need to set in the directory profile:
Cisco Jabber for iPhone and iPad 9.6 Installation and Configuration Guide 85
Integrate with Directory SourcesConfigure Directory Integration in a Service Profile

DescriptionDirectory Service Configuration
Specifies the address of the primary directory server.
This parameter is required for manual connectionswhere the client cannot automatically discover thedirectory server.
Primary server
Lets youmanually specify a shared username that theclient can use to authenticate with the directory server.You should use this parameter only in deploymentswhere you cannot authenticate with the directoryserver using Microsoft Windows credentials.
If you must use this parameter, you should use onlya well-known or public set of credentials. Thecredentials should also be linked to an account thathas read-only permissions.
Username
Lets youmanually specify a shared password that theclient can use to authenticate with the directory server.You should use this parameter only in deploymentswhere you cannot authenticate with the directoryserver using Microsoft Windows credentials.
If you must use this parameter, you should use onlya well-known or public set of credentials. Thecredentials should also be linked to an account thathas read-only permissions.
Password
Specifies a location in the directory server fromwhichsearches begin. In other words, a search base is theroot from which the client executes a search.
By default, the client searches from the root of thedirectory tree. You can specify the value of up to threesearch bases in your OU to override the defaultbehavior.
Active Directory does not typically require a searchbase. You should specify search bases for ActiveDirectory only for specific performance requirements.
You must specify a search base for directory serversother than Active Directory to create bindings tospecific locations in the directory.
Specify an OU to restrict searches to certainuser groups.
For example, a subset of your users haveinstant messaging capabilities only. Includethose users in an OU and then specify that asa search base.
Tip
Search Base 1
Cisco Jabber for iPhone and iPad 9.6 Installation and Configuration Guide86
Integrate with Directory SourcesConfigure Directory Integration in a Service Profile

Attribute Mappings
It is not possible to change the default attribute mappings in a service profile. If you plan to change any defaultattribute mappings, you must define the required mappings in a client configuration file.
Related Topics
Directory Server Configuration Examples, on page 97
Summary of Directory Integration Configuration ParametersThis topic lists all the parameters you can specify to configure directory integration.
The following table lists the parameters you can use for attribute mapping:Attribute Mapping Parameters
• BDITitle
• BDICompanyName
• BDIUserAccountName
• BDIDomainName
• BDILocation
• BDINickname
• BDIPostalCode
• BDICity
• BDIState
• BDIStreetAddress
• BDICommonName
• BDIDisplayName
• BDIFirstname
• BDILastname
• BDIEmailAddress
• BDISipUri
• BDIPhotoSource
• BDIBusinessPhone
• BDIMobilePhone
• BDIHomePhone
• BDIOtherPhone
The following table lists the parameters you can use to connect to a directory server:Directory Server Connection Parameters
• BDIConnectionUsername
• BDIConnectionPassword
• BDIEnableTLS
• BDILDAPServerType
• BDIPresenceDomain
• BDIPrimaryServerName
• BDIServerPort1
The following table lists the parameters you can use for contact resolution and directory queries:
Cisco Jabber for iPhone and iPad 9.6 Installation and Configuration Guide 87
Integrate with Directory SourcesSummary of Directory Integration Configuration Parameters

Contact Resolution and Directory Query Parameters
• BDIPhotoUriSubstitutionEnabled
• BDIPhotoUriSubstitutionToken
• BDIPhotoUriWithToken
• BDIUseSIPURIToResolveContacts
• BDIUriPrefix
• BDIBaseFilter
• BDIUseANR
• BDIPredictiveSearchFilter
• BDISearchBase1
Attribute Mapping ParametersThe following table describes the parameters for mapping directory attributes:
Set forAmbiguous NameResolution (ANR)by Default
Is Indexed byDefault
Exists in GlobalCatalog byDefault
Directory AttributeParameter
NoYesYescnBDICommonName
YesYesYesdisplayNameBDIDisplayName
YesYesYesgivenNameBDIFirstname
YesYesYessnBDILastname
YesYesYesmailBDIEmailAddress
YesYesYesmsRTCSIP-PrimaryUserAddressBDISipUri
NoNoNothumbnailPhotoBDIPhotoSource
NoNoYestelephoneNumberBDIBusinessPhone
NoNoYesmobileBDIMobilePhone
NoNoYeshomePhoneBDIHomePhone
NoNoYesotherTelephoneBDIOtherPhone
NoNoYestitleBDITitle
NoYesYescompanyBDICompanyName
YesYesYessAMAccountNameBDIUserAccountName
NoYesYesuserPrincipalNameBDIDomainName
NoNoYescoBDILocation
YesYesYesdisplayNameBDINickname
NoNoYespostalCodeBDIPostalCode
Cisco Jabber for iPhone and iPad 9.6 Installation and Configuration Guide88
Integrate with Directory SourcesAttribute Mapping Parameters

Set forAmbiguous NameResolution (ANR)by Default
Is Indexed byDefault
Exists in GlobalCatalog byDefault
Directory AttributeParameter
NoYesYeslBDICity
NoYesYesstBDIState
NoNoYesstreetAddressBDIStreetAddress
Related Topics
Specify an LDAP Attribute for the User ID, on page 77
Attributes on the Directory ServerYou must index attributes on your directory server so that the client can resolve contacts.
If you use the default attribute mappings, ensure the following attributes are indexed:
• sAMAccountName
• displayName
• sn
• name
• proxyAddresses
• department
• givenName
• telephoneNumberAdditionally, ensure you index the following attributes for secondary number queries:
• otherTelephone
• mobile
• homePhone
• msRTCSIP-PrimaryUserAddressYou should index msRTCSIP-PrimaryUserAddress for intradomain federation only.
Directory Connection ParametersThe following table describes parameters for configuring your directory connection:
Cisco Jabber for iPhone and iPad 9.6 Installation and Configuration Guide 89
Integrate with Directory SourcesDirectory Connection Parameters

DescriptionValueParameter
Specifies the type of LDAP directory server towhich the client connects.
AD
Connect to Active Directory. This is thedefault value.
OpenLDAP
Connect to OpenLDAP.
AD
OpenLDAP
BDILDAPServerType
Specifies the domain of the presence server.
The client appends this domain to the user ID tocreate an IM address. For example, a user namedAdam McKenzie has the following user ID:amckenzie. You specify example.com asthe presence server domain.
When the user logs in, the client constructs thefollowing IM address for Adam McKenzie:[email protected].
Domain of thepresence server
BDIPresenceDomain
Specifies the address of the primary directoryserver.
This parameter is required for manualconnections where the client cannotautomatically discover the directory server.
IP address
FQDN
BDIPrimaryServerName
Specifies the port for the primary directoryserver.
Port numberBDIServerPort1
Lets you manually specify a shared usernamethat the client can use to authenticate with thedirectory server.
The client transmits and stores thisusername as plain text.
Important
If you must use this parameter, you should useonly a well-known or public set of credentials.The account that you use for integration shouldhave read-only permissions to the directory.
UsernameBDIConnectionUsername
Cisco Jabber for iPhone and iPad 9.6 Installation and Configuration Guide90
Integrate with Directory SourcesDirectory Connection Parameters

DescriptionValueParameter
Lets you manually specify a shared passwordthat the client can use to authenticate with thedirectory server.
The client transmits and stores thispassword as plain text.
Important
If you must use this parameter, you should useonly a well-known or public set of credentials.The account that you use for integration shouldhave read-only permissions to the directory.
PasswordBDIConnectionPassword
Use TLS to secure directory connections.
true
Use TLS.
false
Do not use TLS. This is the default value.
true
false
BDIEnableTLS
Directory Query ParametersThe following table describes parameters for configuring how the client queries your directory:
DescriptionValueParameter
Specifies a base filter for Active Directoryqueries.
Specify a directory subkey name only to retrieveobjects other than user objects when you querythe directory.
The default value is(&(objectCategory=person)).
Configuration files can contain only valid XMLcharacter entity references. Use & insteadof & if you specify a custom base filter.
Base filterBDIBaseFilter
Cisco Jabber for iPhone and iPad 9.6 Installation and Configuration Guide 91
Integrate with Directory SourcesDirectory Query Parameters

DescriptionValueParameter
Specifies if Cisco Jabber issues a query usingAmbiguous Name Resolution (ANR) when itpeforms a predictive search.
true
Use ANR for predictive search. This isthe default value.
false
Do not use ANR for predictive search.
You should set the value to false if youintegrate with a directory source otherthan Active Directory.
Youmust configure your directoryserver to set attributes for ANR ifyou want the client to search forthose attributes.
Important
true
false
BDIUseANR
Defines filters to apply to predictive searchqueries.
You can define multiple, comma-separatedvalues to filter search queries.
This key is only used whenBDIUseANR is set to false. And ifBDIPredictiveSearchFilter is not set,the default search filter will be used.
Note
Search filterBDIPredictiveSearchFilter
Cisco Jabber for iPhone and iPad 9.6 Installation and Configuration Guide92
Integrate with Directory SourcesDirectory Query Parameters

DescriptionValueParameter
Specifies a location in the directory server fromwhich searches begin. In other words, a searchbase is the root from which the client executesa search.
By default, the client searches from the root ofthe directory tree. You can specify the value ofup to five search bases in your OU to overridethe default behavior.
Active Directory does not typically require asearch base. You should specify search basesfor Active Directory only for specificperformance requirements.
You must specify a search base for directoryservers other than Active Directory to createbindings to specific locations in the directory.
Specify an OU to restrict searches tocertain user groups.
For example, a subset of your users haveinstant messaging capabilities only.Include those users in an OU and thenspecify that as a search base.
Tip
Searchableorganizationalunit (OU) in thedirectory tree
BDISearchBase1
Base Filter ExamplesThe following are example base filters you can use to look up specific locations or objects.
Find only specific groups:(&(objectClass=user)(memberOf=cn=group-name,ou=Groups,dc=example,dc=com))
Find a nested group within a group:(&(objectClass=user)(memberOf:search-oid:=cn=group-name,ou=Groups,dc=example,dc=com))
Find only enabled accounts and non-administrator accounts:(&(objectCategory=person)(objectClass=user)(!(userAccountControl:search-oid:=2))(!(sAMAccountName=*_dbo))(!(sAMAccountName=*-admin)))
Contact Photo ParametersThe following table describes parameters for configuring how the client retrieves contact photos:
Cisco Jabber for iPhone and iPad 9.6 Installation and Configuration Guide 93
Integrate with Directory SourcesContact Photo Parameters

DescriptionValueParameter
Specifies if photo URI substitution is enabled.
true
Photo URI substitution is enabled.
false
Specifies if photo URI substitution isdisabled. This is the default value.
true
false
BDIPhotoUriSubstitutionEnabled
Specifies a directory attribute to insert in thephoto URI; for example, sAMAccountName.
Directoryattribute
BDIPhotoUriSubstitutionToken
Specifies a photo URI with a directory attributeas a variable value; for example,http://staffphoto.example.com/sAMAccountName.jpg.
To configure photo URI substitution, you set thedirectory attribute as the value ofBDIPhotoUriSubstitutionToken.
The client must be able to retrievethe photos from the web serverwithout credentials.
Restriction
URIBDIPhotoUriWithToken
Contact Photo Retrieval with BDICisco Jabber retrieves and displays contact photos with the following methods:
URI substitution
Cisco Jabber dynamically builds a URL to contact photos with a directory attribute and a URL template.
To use this method, set the following values in your configuration file:
1 Specify true as the value of the BDIPhotoUriSubstitutionEnabled parameter.2 Specify a directory attribute to use as a dynamic token as the value of the BDIPhotoUriSubstitutionToken
parameter; for example,<BDIPhotoUriSubstitutionToken>sAMAccountName</BDIPhotoUriSubstitutionToken>
3 Specify the URL and the dynamic token as the value of the BDIPhotoUriWithToken parameter; forexample,<BDIPhotoUriWithToken>http://staffphoto.example.com/sAMAccountName.jpg</BDIPhotoUriWithToken>
With the example values in the preceding steps, the sAMAccountName attribute might resolve to msmithin your directory. Cisco Jabber then takes this value and replaces the token to build the following URL:http://staffphoto.example.com/msmith.jpg.
Cisco Jabber for iPhone and iPad 9.6 Installation and Configuration Guide94
Integrate with Directory SourcesContact Photo Parameters

Binary objects
Cisco Jabber retrieves the binary data for the photo from your database.
To use this method to retrieve contact photos, specify the attribute that contains the binary data as the valueof the BDIPhotoSource parameter in the configuration; for example,<BDIPhotoSource>thumbnailPhoto</BDIPhotoSource>
Contact Photo Formats and DimensionsTo achieve the best result with Cisco Jabber, your contact photos should have specific formats and dimensions.Review supported formats and optimal dimensions. Learn about adjustments the client makes to contactphotos.
Contact Photo Formats
Cisco Jabber supports the following formats for contact photos in your directory:
• JPG
• PNG
• BMP
Cisco Jabber does not apply any modifications to enhance rendering for contact photos in GIF format. Asa result, contact photos in GIF format might render incorrectly or with less than optimal quality. To obtainthe best quality, you should use PNG format for your contact photos.
Important
Contact Photo Dimensions
The optimum dimensions for contact photos are 128 pixels by 128 pixels with an aspect ratio of 1:1.Tip
The following table lists the different dimensions for contact photos in Cisco Jabber:DimensionsLocation
128 pixels by 128 pixelsAudio call window
64 pixels by 64 pixelsInvitations and reminders, for example:
• Incoming call windows
• Meeting reminder windows
Cisco Jabber for iPhone and iPad 9.6 Installation and Configuration Guide 95
Integrate with Directory SourcesContact Photo Parameters

DimensionsLocation
32 pixels by 32 pixelsLists of contacts, for example:
• Contact lists
• Participant rosters
• Call history
• Voicemail messages
Contact Photo Adjustments
Cisco Jabber adjusts contact photos as follows:
Resizing
If contact photos in your directory are smaller or larger than 128 pixels by 128 pixels, the clientautomatically resizes the photos. For example, contact photos in your directory are 64 pixels by 64pixels.When Cisco Jabber retrieves the contact photos from your directory, it resizes the photos upwardsto 128 pixels by 128 pixels.
Resizing contact photos can result in less than optimal resolution. For thisreason, you should use contact photos that are 128 pixels by 128 pixels so thatthe client does not automatically resize them.
Tip
Cropping
Cisco Jabber automatically crops non-square contact photos to a square aspect ratio, or an aspect ratioof 1:1 where the width is the same as the height.
Portrait orientation
If contact photos in your directory have portrait orientation, the client crops 30 percent from thetop and 70 percent from the bottom.
For example, if contact photos in your directory have a width of 100 pixels and a height of 200pixels, Cisco Jabber needs to crop 100 pixels from the height to achieve an aspect ratio of 1:1.In this case, the client crops 30 pixels from the top of the photos and 70 pixels from the bottomof the photos.
Landscape orientation
If contact photos in your directory have landscape orientation, the client crops 50 percent fromeach side.
For example, if contact photos in your directory have a width of 200 pixels and a height of 100pixels, Cisco Jabber needs to crop 100 pixels from the width to achieve an aspect ratio of 1:1.In this case, the client crops 50 pixels from the right side of the photos and 50 pixels from theleft side of the photos.
Cisco Jabber for iPhone and iPad 9.6 Installation and Configuration Guide96
Integrate with Directory SourcesContact Photo Parameters

Rounding
Cisco Jabber rounds the corners of contact photos after retrieving them from your directory.
Directory Server Configuration ExamplesThis section describes supported integration scenarios and provides example configurations.
Simple AuthenticationSimple authentication lets you connect to a directory server using simple binds, as in the following exampleconfiguration:<BDIEnableTLS>False</BDIEnableTLS><BDIConnectionUsername>username</BDIConnectionUsername><BDIConnectionPassword>password</BDIConnectionPassword>This configuration specifies that the client:
• Does not use SSL.
• Uses simple authentication.
• Uses custom credentials.
As a result of the simple bind, the client transmits the credentials in the payload of the bind request in plaintext.
Simple Authentication with SSLEnable SSL in directory server connections with the BDIEnableTLS parameter. You can use SSL to encryptcredentials when you use simple authentication, as in the following example configuration:<BDIEnableTLS>True</BDIEnableTLS><BDIConnectionUsername>username</BDIConnectionUsername><BDIConnectionPassword>password</BDIConnectionPassword>
This configuration specifies that the client:
• Uses SSL.
• Uses simple authentication.
• Uses custom credentials.
As a result, the client uses SSL to encrypt the credentials in the client configuration.
OpenLDAP IntegrationYou can integrate with OpenLDAP using anonymous binds or authenticated binds.
Anonymous Binds
To integrate with OpenLDAP using anonymous binds, set the following parameters:
Cisco Jabber for iPhone and iPad 9.6 Installation and Configuration Guide 97
Integrate with Directory SourcesDirectory Server Configuration Examples

ValueParameter
OpenLDAPBDILDAPServerType
IP address
Hostname
BDIPrimaryServerName
TrueBDIEnableTLS
Root of the directory service or the organizationalunit (OU)
BDISearchBase1
Unique identifier such as uid or cnBDIUserAccountName
Object class that your directory service uses; forexample, inetOrgPerson.
BDIBaseFilter
uid or other search filter(Optional) BDIPredictiveSearchFilter
The following is an example configuration:<Directory><BDILDAPServerType>OpenLDAP</BDILDAPServerType><BDIPrimaryServerName>11.22.33.456</BDIPrimaryServerName><BDIEnableTLS>True</BDIEnableTLS><BDISearchBase1>ou=people,dc=cisco,dc=com</BDISearchBase1><BDIUserAccountName>uid</BDIUserAccountName><BDIBaseFilter>(&(objectClass=inetOrgPerson)</BDIBaseFilter><BDIPredictiveSearchFilter>uid</BDIPredictiveSearchFilter>
</Directory>
Authenticated Binds
To integrate with OpenLDAP using authenticated binds, set the following parameters:ValueParameter
OpenLDAPBDILDAPServerType
IP address
Hostname
BDIPrimaryServerName
FalseBDIEnableTLS
Root of the directory service or the organizationalunit (OU)
BDISearchBase1
Unique identifier such as uid or cnBDIUserAccountName
Object class that your directory service uses; forexample, inetOrgPerson.
BDIBaseFilter
uid or other search filter(Optional) BDIPredictiveSearchFilter
UsernameBDIConnectionUsername
Cisco Jabber for iPhone and iPad 9.6 Installation and Configuration Guide98
Integrate with Directory SourcesDirectory Server Configuration Examples
ValueParameter
PasswordBDIConnectionPassword
The following is an example configuration:<Directory><BDILDAPServerType>OpenLDAP</BDILDAPServerType><BDIPrimaryServerName>11.22.33.456</BDIPrimaryServerName><BDIEnableTLS>False</BDIEnableTLS><BDISearchBase1>ou=people,dc=cisco,dc=com</BDISearchBase1><BDIUserAccountName>uid</BDIUserAccountName><BDIBaseFilter>(&(objectClass=inetOrgPerson)</BDIBaseFilter><BDIPredictiveSearchFilter>uid</BDIPredictiveSearchFilter><BDIConnectionUsername>cn=administrator,dc=cisco,dc=com</BDIConnectionUsername><BDIConnectionPassword>password</BDIConnectionPassword>
</Directory>
FederationFederation lets Cisco Jabber users communicate with users who are provisioned on different systems and whoare using client applications other than Cisco Jabber.
Interdomain FederationInterdomain federation enables Cisco Jabber users in an enterprise domain to share availability and sendinstant messages with users in another domain.
• Cisco Jabber users must manually enter contacts from another domain.
• Cisco Jabber supports federation with the following:
◦Microsoft Office Communications Server
◦Microsoft Lync
◦IBM Sametime
◦XMPP standard-based environments such as Google Talk
◦AOL Instant Messenger
You configure interdomain federation for Cisco Jabber on Cisco Unified Presence or Cisco UnifiedCommunications Manager IM and Presence. See the appropriate server documentation for more information.
Related Topics
Integration Guide for Configuring Cisco Unified Presence Release 8.6 for Interdomain FederationInterdomain Federation for IM and Presence Service on Cisco Unified Communications
Cisco Jabber for iPhone and iPad 9.6 Installation and Configuration Guide 99
Integrate with Directory SourcesFederation
Intradomain FederationIntradomain federation enables users within the same domain to share availability and send instant messagesbetweenCiscoUnified Presence andMicrosoft Office Communications Server,Microsoft Live CommunicationsServer, or other presence server.
Intradomain federation allows you tomigrate users to CiscoUnified Presence or CiscoUnified CommunicationsIM and Presence from a different presence server. For this reason, you configure intradomain federation forCisco Jabber on the presence server. See the following documents for more information:
• Cisco Unified Presence: Integration Guide for Configuring Partitioned Intradomain Federation forCisco Unified Presence Release 8.6 and Microsoft LCS/OCS
• Cisco Unified Communications IM and Presence: Partitioned Intradomain Federation for IM andPresence Service on Cisco Unified Communications Manager
Configure Intradomain FederationIn addition to configuring intradomain federation on the presence server, you might need to specify someconfiguration settings in the Cisco Jabber configuration files.
To resolve contacts during contact search or retrieve contact information from your directory, Cisco Jabberrequires the contact ID for each user. Cisco Unified Presence uses a specific format for resolving contactinformation that does not always match the format on other presence servers such as Microsoft OfficeCommunications Server or Microsoft Live Communications Server.
Procedure
Step 1 Set the value of the BDIUseSIPURIToResolveContacts parameter to true.Step 2 Specify an attribute that contains the contact ID that Cisco Jabber uses to retrieve contact information as the
value of the BDISipUri parameter. The default value is msRTCSIP-PrimaryUserAddress.Step 3 Specify any text that prefixes each contact ID as the value of the BDIUriPrefix parameter.
The prefix is any text that exists before the username in the contact ID.
For example, you specifymsRTCSIP-PrimaryUserAddress as the value of BDISipUri. In your directorythe value of msRTCSIP-PrimaryUserAddress for each user has the following format:sip:username@domain.
The following XML snippet provides an example of the resulting configuration:<Directory><BDIUseSIPURIToResolveContacts>true</BDIUseSIPURIToResolveContacts><BDISipUri>non-default-attribute</BDISipUri><BDIUriPrefix>sip:</BDIUriPrefix>
</Directory>
Intradomain Federation ExampleThis topic provides an example of intradomain federation contact resolution using the BDISipUri,BDIUseSIPURIToResolveContacts, and BDIUriPrefix parameters.
Cisco Jabber for iPhone and iPad 9.6 Installation and Configuration Guide100
Integrate with Directory SourcesIntradomain Federation

In this example, your configuration has the following settings:
• The value of the BDISipUri parameter is msRTCSIP-PrimaryUserAddress.
• The value of the BDIUseSIPURIToResolveContacts parameter is true.
• The value of the BDIUriPrefix parameter is sip:.
• The directory contains sip:[email protected] as the value of themsRTCSIP-PrimaryUserAddress attribute for a user named Mary Smith.
Cisco Jabber connects to your directory to resolve contact information
1 Your presence server passes [email protected] to Cisco Jabber.
2 Cisco Jabber appends sip: to [email protected] and then queries your directory.
3 sip:[email protected] matches the value of the msRTCSIP-PrimaryUserAddressattribute.
4 Cisco Jabber retrieves contact information for Mary Smith.
Cisco Jabber users search for Mary Smith
Cisco Jabber removes the prefix of sip: from sip:[email protected] and gets the contact IDof [email protected].
Cisco Jabber for iPhone and iPad 9.6 Installation and Configuration Guide 101
Integrate with Directory SourcesIntradomain Federation

Cisco Jabber for iPhone and iPad 9.6 Installation and Configuration Guide102
Integrate with Directory SourcesIntradomain Federation

C H A P T E R 8Troubleshooting
• Obtain Logs from Cisco Jabber, page 103
• Obtain Logs from Cisco AnyConnect Secure Mobility Client, page 104
• Troubleshooting Tips, page 104
Obtain Logs from Cisco JabberHave the user follow this procedure to send you logs from Cisco Jabber.
Before You Begin
• Ask the user to verify that an email application is set up on the device.
• Ensure that you send the user the email address for problem reports.
Procedure
Step 1 If you cannot sign in to Cisco Jabber, tap the Send Problem Report link in the error message.Step 2 If you can sign in to Cisco Jabber, go to the navigation drawer and tap Settings.Step 3 Under Help, tap Problem Reporting.Step 4 If you have a problem and you can reproduce it, turn on theDetailed Logging setting and reproduce the issue,
noting the time that the problem occurred.Step 5 Tap Send Problem Report.
Your Email application launches with a new message that contains a prepopulated subject line and attachedlog files.
Step 6 Enter a description of the problem in the body of the email message and send it to your system administrator.Include the approximate time when the problemoccurred.
Tip
Cisco Jabber for iPhone and iPad 9.6 Installation and Configuration Guide 103

What to Do Next
After the user sends the problem report, the Detailed Logging setting is no longer needed. Be sure that theuser turns off Detailed Logging after reproducing the issue to prevent excessive battery use.
Obtain Logs from Cisco AnyConnect Secure Mobility ClientHave the user follow this procedure to send you logs from Cisco AnyConnect Secure Mobility Client.
1 From to the Cisco AnyConnect Secure Mobility Client home screen, tap Diagnostics.
2 Turn on Debug Logs.
3 Try to reproduce the problem to capture the details in the logs.
4 Tap Email Logs.
5 Describe the problem.
6 Tap Send.
Troubleshooting Tips
Setup Issues
Cannot sign in Cisco Jabber when using Cisco Unified Presence serverProblem User cannot sign in Cisco Jabber when using Cisco Unified Presence as the presence server.
Solution Make sure you configure xmpp server Name to IP address or FQDN rather than host name underSystem >Cluster Topology >Node Configuration on Cisco Unified Presence server version 9.0 and earlier.
Cisco Jabber Registration FailsProblem Cisco Jabber registration fails or times out.
Solution The following list describes different possible causes for and solutions to registration failure or timeoutconditions:
• Have the user check the troubleshooting tips in the Cisco Jabber for iPhone and iPad User Guide foryour release.
• Verify that the mobile device can reach Cisco Unified Communications Manager. To verify, use thebrowser on the mobile device to try to connect to the Cisco Unified CM Administration interface.
• If registration is rejected with error 503, go to the TCT/TAB device page in Cisco Jabber for iPhone andiPad and select Reset, and then try again.
• Make sure your DNS server can resolve the hostname of the Cisco Unified Communications Managerserver that is used as the TFTP server address.
Cisco Jabber for iPhone and iPad 9.6 Installation and Configuration Guide104
TroubleshootingObtain Logs from Cisco AnyConnect Secure Mobility Client

• Registration failure with the error message “failed to get device configuration” can indicate that you didnot reboot all Cisco Unified Communications Manager servers in the cluster after you installed thedevice COP file. Make sure you reboot all Cisco Unified Communications Manager servers after youinstall the device COP file.
• Make sure you have enough licenses to accommodate your deployment.
• If you use Cisco Unified Communications Manager 9.1(2) or lower, make sure you checked the EnableCisco Unified Mobile Communicator check box on the device page for the user. For more information,see the Set Up Dial Via Office for Each Device topic in the Server Setup Guide for your release.
• If you are attempting to connect over VPN:
◦Verify that the mobile device can reach internal resources independently of Cisco Jabber. Tryaccessing an intranet web page or other resource behind the firewall.
◦If your Cisco Jabber deployment includes Directory Services, try accessing the directory fromwithin Cisco Jabber.
◦If the mobile device cannot connect over VPN, contact the provider of your VPN technology forassistance.
• Make sure that you specified the organization's top level domain. InCisco Unified CMAdministrationinterface, select System > Enterprise Parameters. Under the Clusterwide Domain Configurationsection, check that you entered the organization top domain name (for example, cisco.com).
Related Topics
Cisco Jabber for iPhone and iPad End-User GuidesServer Setup Guide
Device Icon Is MissingProblem The device icon does not appear in the Cisco Unified CM Administration interface.
Solution Try the following:
1 Restart the Tomcat service.2 Reload the device page in your browser.3 Clear the browser cache if necessary.4 If the problem is not resolved, restart the Cisco Unified Communications Manager server.
Upgrade Issues
Directory Search Does Not Work After UpgradeProblem After users upgrade the client from an earlier release to this release, the directory search does notwork.
Solution If you have an on-premises deployment, check that you uploaded thejabber-config.xml fileto the Cisco Unified Communications Manager and restarted the TFTP service.
Cisco Jabber for iPhone and iPad 9.6 Installation and Configuration Guide 105
TroubleshootingUpgrade Issues

To verify that the configuration file is available on your TFTP server, open the configuration file in anybrowser. Typically, you can access the global configuration file at the following URL:http://tftp_server_address:6970/jabber-config.xml.
Related Topics
Configure the Client, on page 57
Device Issues
Cannot sign in Cisco Jabber when using Cisco Unified Presence serverProblem User cannot sign in Cisco Jabber when using Cisco Unified Presence as the presence server.
Solution Make sure you configure xmpp server Name to IP address or FQDN rather than host name underSystem >Cluster Topology >Node Configuration on Cisco Unified Presence server version 9.0 and earlier.
Cannot Receive Calls in Cisco JabberProblem An incoming call arrives briefly in Cisco Jabber while it is running, but then the call is terminatedand diverted to the native mobile phone number using Mobile Connect instead.
Solution In Cisco Unified Communications Manager, set the SIP Dual Mode Alert Timer as described in theIncrease SIP Dual Mode Alert Timer Value topic in the Server Setup Guide.
Problem After Cisco Jabber is idle for a few minutes, incoming VoIP calls are sent directly to voicemail andare displayed as missed calls.
Solution In Cisco Unified Communications Manager, ensure that the SIP Dual Mode Alert Timer is set asdescribed in the Increase SIP Dual Mode Alert Timer Value topic in the Server Setup Guide.
Problem Cisco Jabber for iPhone and iPad users who have a PIN on the device cannot answer calls beforethe calls go to voicemail.
Solution Increase the value of the NoAnswer RingDuration (seconds) setting to ensure that users have enoughtime to enter the PIN and answer the call before the call goes to voicemail.
To change the No Answer Ring Duration (seconds) setting, go to the DN of the TCT/TAB device, and locatethe setting under the Call Forward and Call Pickup Settings section.
If you increase the No Answer Ring Duration (seconds) setting, see related cautions for this setting in theonline help in Cisco Unified Communications Manager.
Note
Related Topics
Server Setup Guide
Calls Incorrectly Sent to VoicemailProblem Calls are routed directly to voicemail.
Cisco Jabber for iPhone and iPad 9.6 Installation and Configuration Guide106
TroubleshootingDevice Issues

Solution In Cisco Unified Communications Manager, modify the call timer values on the Mobility Identitypage. For more information, see the Add Mobility Identity topic in the Server Setup Guide for your release.
Problem After Cisco Jabber is idle for a few minutes, incoming VoIP calls are sent directly to voicemail andare displayed as missed calls.
Solution In Cisco Unified Communications Manager, ensure that the SIP Dual Mode Alert Timer is set asdescribed in the Increase SIP Dual Mode Alert Timer Value topic in the Server Setup Guide for your release.
Related Topics
Server Setup Guide
Cannot Move Calls from Mobile Network to Cisco JabberProblem User is unable to transfer a call from the mobile network to Cisco Jabber.
Solution Users can transfer calls to the mobile network from Cisco Jabber, but not in the other direction.
Cannot Send VoIP Calls to Mobile DeviceProblem User cannot send an active VoIP call from Cisco Jabber to the mobile phone number.
Solution Try one of the following:
• If you used the Mobility Softkey method for transferring VoIP calls to the mobile device, check thatyou set up the Mobility Identity for the user. If so, check that the Mobility Identity number is the correctnumber and you are able to dial that number as entered from the client. See the Enable Active CallTransfer from VoIP to Mobile Network topic in the Server Setup Guide for your release.
• If you used the Handoff DN method for transferring VoIP calls to the mobile device, check that you setit up correctly. See the Set Up Handoff DN topic in the Server Setup Guide for your release.
• Check that Mobile Connect works by exiting the client and dialing the extension. If you hear a fast busysignal, make sure you entered the Mobility Identity phone number in a routable format.
Related Topics
Server Setup Guide
Cannot Merge Audio for CallsProblem User cannot merge the audio for two active VoIP calls.
Solution Ensure that the Media Resource Group List is set on the user's device page. For more information,see the Create TCT/TAB Software Phone Devices topic in the Server Setup Guide for your release.
Related Topics
Server Setup Guide
Cannot Start Video ConferencesProblem Users cannot start a video conference call from within the client.
Cisco Jabber for iPhone and iPad 9.6 Installation and Configuration Guide 107
TroubleshootingDevice Issues

Solution Verify that the Multipoint Control Unit (MCU) settings are set up properly on the Cisco UnifiedCommunicationsManager. For more information, see theConference Bridge setup chapter in theCisco UnifiedCommunications Manager Administration Guide for your release.
Related Topics
Cisco Unified Communications Manager Administration Guide
Voice Quality IssuesProblem Voice quality is poor.
Solution Voice quality cannot be guaranteed because of variable network conditions. Because network issuesoutside your enterprise are neither under the control of nor specific to the client, the Cisco Technical AssistanceCenter (TAC) does not troubleshoot these issues.
However:
• For actions the user can take, see the Troubleshoot chapter of theUser Guide for Cisco Jabber for iPhoneand iPad for your release.
• For general information about optimizing your corporate Wi-Fi network for voice transmission, see theNetwork Requirements section of the Release Notes for your release of Cisco Jabber for iPhone andiPad.
Related Topics
Cisco Jabber for iPhone and iPad End-User GuidesCisco Jabber for iPhone and iPad Release Notes
Battery Drains Faster with Cisco JabberProblem The device battery seems to drain more quickly when using the client.
Solution Ask the user to check the following:
• Detailed Logging: Enable this option only if you are collecting troubleshooting logs to resolve problemswith the client. Keep it disabled otherwise. In the client, tap Settings > Problem Reporting. Tap theDetailed Logging switch to turn it off.
•Weak Wi-Fi connection: A weak Wi-Fi connection can affect the battery life. Ask the user to move toa location with a stronger network signal.
• VPN use: Prolonged VPN use can affect the battery life.
Search Issues
No Directory SearchProblem Directory search is not available.
Solution If you have an on-premises deployment, check the following:
Cisco Jabber for iPhone and iPad 9.6 Installation and Configuration Guide108
TroubleshootingSearch Issues

• Ensure that you uploaded the jabber-config.xml file to the Cisco Unified CommunicationsManager and restarted the TFTP service. Typically, you can access the global configuration file at thefollowing URL: http://tftp_server_address:6970/jabber-config.xml. For moreinformation, see the Configure the Client chapter in this guide.
• Ensure that you did not rename the jabber-config.xml file. The client does not support jabber-config.xmlfiles with a different name.
• If you upgrade the Cisco Unified Communications Manager in an on-premises deployment, ensure thatyou re-apply the jabber-config.xml file.
• Verify that your directory configuration parameters are set up correctly in your global configuration file.For more information, see the Integrate with Directory Sources chapter.
Related Topics
Configure the Client, on page 57Integrate with Directory Sources, on page 75
Incorrect or Missing Caller IdentificationProblem Some callers are not identified correctly.
Solution Consider the following:
•When you add users or change user information in Microsoft Active Directory, correct identification ofcallers in Recents or Voicemail in the client can take up to 24 hours. This delayminimizes synchronizationactivity that can affect performance.
• If a number does not match a contact using Directory Lookup Rules, the client displays the phone numberas passed by Cisco Unified Communications Manager, unmodified by any Directory Lookup Rules.
• If you made changes to the Directory Lookup Rules, make sure you ran the designated COP file to makethose changes available to the client, and then restarted the TFTP service.
Voicemail Issues
Cannot Connect to Voicemail ServerProblem User repeatedly receives “Invalid credentials” error when attempting to access voicemail.Solution Check the voicemail server to determine if the user account is locked because the user made toomany incorrect attempts to sign in.
Voicemail Prompt is TruncatedProblem The first few seconds of voicemail prompts are truncated.
The start of the audio that prompts users to leave voice messages can be truncated in some instances. Theresult of the truncation is that users do not hear the first second or two of the voicemail prompt.
Cisco Jabber for iPhone and iPad 9.6 Installation and Configuration Guide 109
TroubleshootingVoicemail Issues
Solution To resolve this issue, set a value for the Delay After Answer field in the Cisco Unity Connectionadvanced telephony integration settings. See the Edit Advanced Settings section of the Interface ReferenceGuide for Cisco Unity Connection Administration.
Related Topics
Interface Reference Guide for Cisco Unity Connection Administration Release 8.x
Cisco AnyConnect Issues
Certificate Authentication FailureProblem Cisco AnyConnect Secure Mobility Client cannot authenticate with the Cisco Adaptive SecurityAppliance using a certificate.
Solution Verify the following:
• The certificate is still valid and the CA server has not revoked the certificate.
• You set the correct VPN connection profile for authentication.
• You set the Key Usage setting of the certificate to TLS Web Client Authentication.
Related Topics
Set Up Certificate-Based Authentication, on page 28
SCEP Enrollment FailureProblem Cisco AnyConnect Secure Mobility Client cannot enroll for a certificate using SCEP.
Solution Verify the following:
• The CA server is set up to automatically grant the certificate.
• The Clock skew between the Cisco Adaptive Security Appliance and CA server is less than 30 seconds.
• The CA server enrollment URL is reachable over the VPN tunnel.
• The Automatic SCEPHost value in the VPN client profile matches theGroup-Alias of the connectionprofile. For example, if the Group Alias is set as certenroll and the Cisco Adaptive Security Applianceaddress is asa.example.com, you need to set the SCEP Automatic Host as asa.example.com/certenroll.
• You enabled the ssl certificate-authentication interface outside port 443 command on the CiscoAdaptive Security Appliance.
Issues Launching Cisco AnyConnect Secure Mobility ClientProblem Cisco Jabber does not auto-launch the Cisco AnyConnect Secure Mobility Client on iOS devices.
Solution Try the following:
• Ensure that the On-Demand VPNURL is configured inside the Cisco Unified CommunicationsManagerfor the device.
Cisco Jabber for iPhone and iPad 9.6 Installation and Configuration Guide110
TroubleshootingCisco AnyConnect Issues

• Ensure that the On-Demand domain list in the AnyConnect profile includes the On-Demand VPNURL.
• Check whether the user selected the Connect If Needed option. In some cases, Cisco Jabber users mayhave issues when using the Connect If Needed option. For example, if the hostname for the Cisco UnifiedCommunications Manager is resolvable outside the corporate network, iOS will not trigger a VPNconnection. The user can work around this issue by manually launching the Cisco AnyConnect SecureMobility Client before making a call.
Dial via Office Issues
Dial via Office Calls End UnexpectedlyProblem After the user places a DVO call and presses any number on the keypad, the call ends without anotification. This problem can occur if you enable DVO and user-controlled Voicemail Avoidance, and theperson that the user calls has a busy line and did not set up voicemail on the deskphone.
Solution Try the following:
• Ask the user to call again later.
• Set up the end user with timer-based voicemail avoidance instead of user-controlled voicemail avoidance.For more information, see the Set Up Voicemail Avoidance chapter in the Server Setup Guide for yourrelease.
Related Topics
Server Setup Guide
Dial via Office Calls Cannot ConnectProblem The user sets the Cisco Jabber calling option to “Always use DVO” or “Auto-select”, but when theuser tries to make a DVO call, the call does not connect.
Solution Check the following:
• Check whether you enabled DVO on an unsupported release of Cisco Unified CommunicationsManager.If you enable DVO on an unsupported release of Cisco Unified Communications Manager, the end usersees the DVO calling options and can attempt to make a DVO call, but the calls cannot connect.
• Check whether the user installed the client on multiple devices. If the user installs the client on a seconddevice, and the mobility identity number is configured for the first mobile device, then the user will notsee the incoming DVO-R call on the second device.
Dial via Office Calls Placed From Voicemail or Alternate NumberProblem People receive calls from the user's voicemail system or alternate phone number.
Solution Try the following:
• Checkwhether the user set up the DVOCallbackNumber with an alternate number. An alternate numberis any phone number that the user enters in the DVO Callback Number field on the client that does not
Cisco Jabber for iPhone and iPad 9.6 Installation and Configuration Guide 111
TroubleshootingDial via Office Issues
match the phone number that you set up on the user's Mobility Identity in Cisco Unified CommunicationsManager.If so, you can resolve this issue by setting up the trunk Calling Search Space (CSS) to route to destinationof the alternate phone number. For more information, see the EnableMobile Connect or Set Up EnterpriseFeature Access Number topics in the in the Server Setup Guide for your release.
• Ask users to verify if their mobile voice connection was weak when they placed the Dial via Office call.To prevent further issues, tell users to ensure that they have a strong mobile voice connection beforethey place Dial via Office calls.
Problem Users cannot place outgoing DVO-R calls when using an alternate callback number.
Solution Ensure that the partition for the alternate callback number is in the outgoing trunk CSS (CallingSearch Space). For more information, see the Enable Mobile Connect or Set Up Enterprise Feature AccessNumber topics in the in the Server Setup Guide for your release.
Related Topics
Server Setup Guide
Problems with DVO CallbackProblem After the user places a DVO-R call, the callback does not reach the mobile device, or it shows upbriefly and goes away before the user can answer it. If Mobile Connect is set up for the user, the user mayreceive a Mobile Connect call.
Solution In Cisco Unified Communications Manager, increase the SIP Dual Mode Alert Timer to 5000milliseconds. If the user still experiences this issue, you can further increase this setting in increments of 500milliseconds, to a maximum of 10 000 milliseconds. For details about how to increase the SIP Dual ModeAlert Timer Value, see the Increase SIP Dual Mode Alert Timer Value topic in the Server Setup Guide.
Related Topics
Server Setup Guide
Cisco Jabber for iPhone and iPad 9.6 Installation and Configuration Guide112
TroubleshootingDial via Office Issues