Embed Size (px)
Citation preview
Cisco Commerce
Getting Started With Cisco Commerce
User Guide
Cisco Proprietary
Getting Started With Cisco Commerce User Guide
Cisco Proprietary © 2018 Cisco and/or its affiliates. All rights reserved.
Last Updated: 14 March 2018 Page 2
Cisco.com | Privacy Statement | Trademarks Provide Feedback on this Training Resource
TABLE OF CONTENTS
Click a topic or sub-topic name below to move directly to that section.
1 Conventions Used in this Document ............................................................................................ 5
2 Getting Access to Cisco Commerce ............................................................................................. 6
3 General Information ....................................................................................................................... 7
3.1 Logging In to Cisco Commerce ......................................................................................... 7
3.2 Cisco Commerce Workflow ............................................................................................... 7
3.2.1 Guided Deal Registration .......................................................................................... 7
3.2.2 Estimates .................................................................................................................. 7
3.2.3 Deals and Quotes ..................................................................................................... 8
3.2.4 Orders ....................................................................................................................... 9
3.2.5 Service Contracts .................................................................................................... 10
3.2.6 Services and Subscriptions ..................................................................................... 10
3.2.7 Software ................................................................................................................. 10
3.3 Terminology ...................................................................................................................... 11
3.4 Accessing Cisco Commerce Support ............................................................................. 11
4 Navigating the Homepage ........................................................................................................... 13
4.1 Cisco Navigation Banner ................................................................................................. 13
4.2 Cisco Commerce Navigation Banner .............................................................................. 14
4.3 Global Navigation Bar ...................................................................................................... 14
4.3.1 Catalog ................................................................................................................... 14
4.3.2 Estimates Tab ......................................................................................................... 15
4.3.3 Deals & Quotes Tab ................................................................................................ 15
4.3.4 Orders Tab.............................................................................................................. 15
4.3.5 Services and Subscriptions Tab .............................................................................. 15
4.3.6 Software Tab .......................................................................................................... 15
4.4 Creating Custom Homepage Tiles .................................................................................. 15
4.5 Search Capability ............................................................................................................. 17
4.5.1 Global Search ......................................................................................................... 17
4.5.2 Basic Search ........................................................................................................... 19
Getting Started With Cisco Commerce User Guide
Cisco Proprietary © 2018 Cisco and/or its affiliates. All rights reserved.
Last Updated: 14 March 2018 Page 3
Cisco.com | Privacy Statement | Trademarks Provide Feedback on this Training Resource
4.5.3 Advanced Search.................................................................................................... 21
4.6 Feedback ........................................................................................................................... 22
5 Personalizing and Setting Preferences ...................................................................................... 24
5.1 Updating Profile ................................................................................................................ 24
5.1.1 Uploading or Deleting an Electronic Signature ........................................................ 25
5.1.2 Viewing User Account Access ................................................................................. 26
5.2 Reviewing Company Details ............................................................................................ 27
5.2.1 Viewing Company Info Section ............................................................................... 27
5.2.2 Viewing Company Qualifications ............................................................................. 28
5.2.3 Viewing Partner Deal Administrators ....................................................................... 28
5.2.4 Viewing Cisco Channel Account Managers ............................................................. 29
5.2.5 Viewing Additional Partner Info ............................................................................... 29
5.3 Setting Preferences .......................................................................................................... 29
5.3.1 Setting General Preferences ................................................................................... 29
5.3.2 Setting Estimates Preferences ................................................................................ 31
5.3.3 Setting Export Preferences ..................................................................................... 31
5.3.4 Setting Sharing Preferences ................................................................................... 33
5.3.5 Setting Addresses Preferences ............................................................................... 36
5.3.6 Setting Order Preferences ...................................................................................... 41
5.3.7 Setting Shipping Preferences .................................................................................. 43
5.3.8 Setting Services Preferences .................................................................................. 46
5.3.9 Setting Payment Preferences ................................................................................. 47
5.4 Adding Contacts ............................................................................................................... 50
5.4.1 Adding or Removing a Contact ............................................................................... 51
5.4.2 Editing a Contact..................................................................................................... 51
5.5 Setting Notifications Preferences ................................................................................... 51
5.5.1 Global Settings ....................................................................................................... 52
5.5.2 My Orders ............................................................................................................... 53
5.5.3 Orders Shared with Me ........................................................................................... 55
5.5.4 Billing Addresses .................................................................................................... 56
5.5.5 Specific Orders ....................................................................................................... 56
6 Common Utilities ......................................................................................................................... 57
Getting Started With Cisco Commerce User Guide
Cisco Proprietary © 2018 Cisco and/or its affiliates. All rights reserved.
Last Updated: 14 March 2018 Page 4
Cisco.com | Privacy Statement | Trademarks Provide Feedback on this Training Resource
6.1 Viewing Records .............................................................................................................. 57
6.1.1 Edit View ................................................................................................................. 58
6.2 Tagging ............................................................................................................................. 58
6.2.1 Adding a Tag .......................................................................................................... 59
6.2.2 Viewing Tags .......................................................................................................... 59
6.2.3 Deleting a Tag ........................................................................................................ 59
6.3 Exporting .......................................................................................................................... 60
6.4 Printing .............................................................................................................................. 61
6.5 Sharing .............................................................................................................................. 62
6.5.1 Sharing Using an Access Key ................................................................................. 62
6.5.2 Sharing Using the Share Utility ............................................................................... 64
7 Partner Initiated Customer Access ............................................................................................. 66
8 Miscellaneous Information .......................................................................................................... 67
8.1 Products and Services-related Icons .............................................................................. 67
8.2 List Price Catalog ............................................................................................................. 67
8.2.1 Current Price List Tab ............................................................................................. 67
8.2.2 Price List History Tab .............................................................................................. 69
8.2.3 Product Price Search Tab ....................................................................................... 71
8.3 Lead Time Search ............................................................................................................. 72
8.3.1 Search By Product Description or SKU ................................................................... 72
8.3.2 Lead Time Search by ERP Product Family ............................................................. 73
8.3.3 Exporting Lead Time Search Results ...................................................................... 74
8.3.4 View Available Options from the Lead Time Search Results ................................... 75
8.4 CICS File Manager ............................................................................................................ 76
8.4.1 Searching for a File ................................................................................................. 76
8.4.2 Creating a New File ................................................................................................ 77
8.4.3 Editing a File ........................................................................................................... 78
8.4.4 Deleting the File ...................................................................................................... 79
8.4.5 Removing Selected Files ........................................................................................ 79
Getting Started With Cisco Commerce User Guide
Cisco Proprietary © 2018 Cisco and/or its affiliates. All rights reserved.
Last Updated: 14 March 2018 Page 5
Cisco.com | Privacy Statement | Trademarks Provide Feedback on this Training Resource
1 Conventions Used in this Document
Keyboard sequences you press are shown in bold. Example: “Press Tab to move to the next field.”
Links that appear in blue on the Cisco Commerce homepage, whether underlined or not, are underlined in the user guide. Example: “On the Items tab, click Find Products.”
Menu or sub-menu paths are separated by a “>”. Example: “Select Intended Use > Managed Service.”
Tabs you click have no special formatting. Example: “Click the Items tab.”
Buttons you click on the screen are shown in bold. Example: “Click Continue.”
The labels on radio buttons, drop-down menus, checkboxes, and fields that correspond have no special formatting. Examples: “Click the Yes radio button.” “Click the Service Program drop-down menu.”
When there are multiple ways of accomplishing a specific task, preferred methods are highlighted as follows:
The blue circle around a lower case “i” means reader take note. Notes contain helpful suggestions or reference to material not covered in the manual.
For example:
Best Practice: Search for an address before creating a new one. Add a shipping address only if the address is not found.
Active hyperlinks to other documents or within the same document are shown in blue and underlined. Example: “Additional information is available in the Cisco Commerce Order User Guide.” or “See the section Creating Custom Homepage Tiles for more details.”
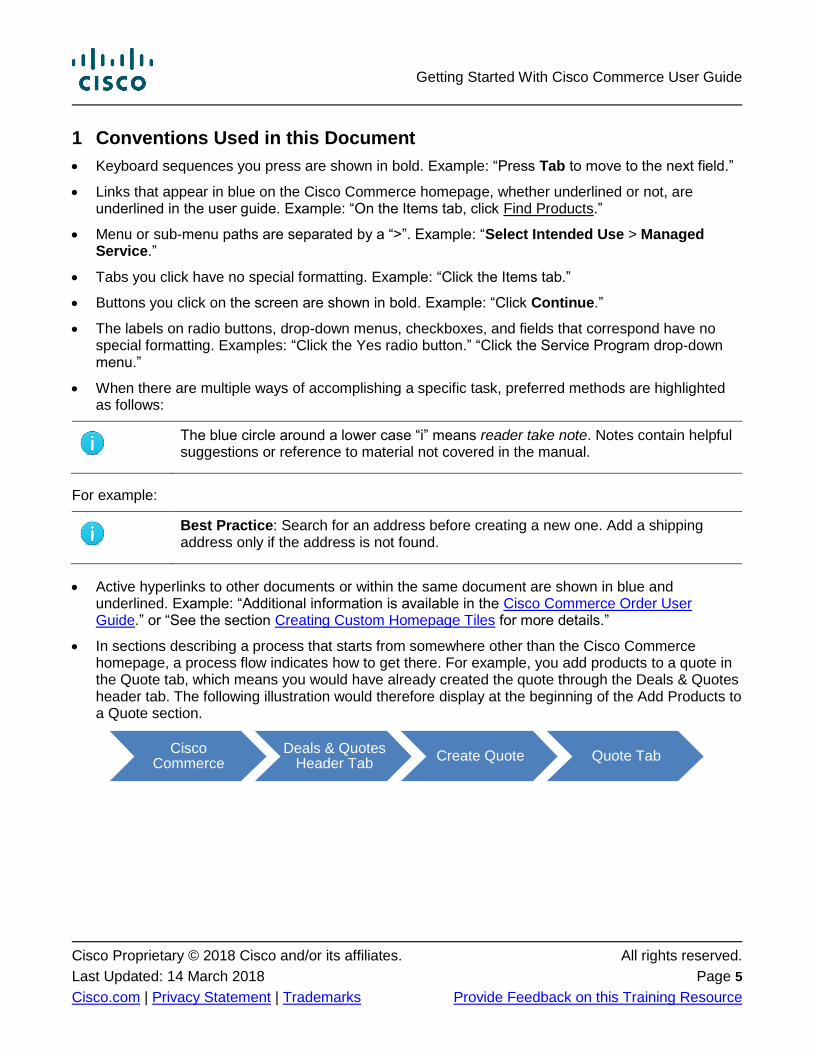
In sections describing a process that starts from somewhere other than the Cisco Commerce homepage, a process flow indicates how to get there. For example, you add products to a quote in the Quote tab, which means you would have already created the quote through the Deals & Quotes header tab. The following illustration would therefore display at the beginning of the Add Products to a Quote section.
Cisco Commerce
Deals & Quotes Header Tab
Create Quote Quote Tab
Getting Started With Cisco Commerce User Guide
Cisco Proprietary © 2018 Cisco and/or its affiliates. All rights reserved.
Last Updated: 14 March 2018 Page 6
Cisco.com | Privacy Statement | Trademarks Provide Feedback on this Training Resource
2 Getting Access to Cisco Commerce
See the Getting Access to Cisco Commerce Job Aid for information on how to request user access to Cisco Commerce and how to become a registered Cisco Partner.
Getting Started With Cisco Commerce User Guide
Cisco Proprietary © 2018 Cisco and/or its affiliates. All rights reserved.
Last Updated: 14 March 2018 Page 7
Cisco.com | Privacy Statement | Trademarks Provide Feedback on this Training Resource
3 General Information
3.1 Logging In to Cisco Commerce
Launch your web browser and navigate to the Cisco Commerce URL. If this is not the first time you have logged in to Cisco Commerce, you might be taken directly to the homepage. Otherwise, continue with the following steps: On the Cisco.com log in screen, enter your Cisco.com user ID and password.
The Cisco Commerce page times out in about 30 minutes of non-activity (with a 5 minute warning before timeout occurs). If that happens, simply log in again with your Cisco.com user ID and password.
Best Practice: Log out of Cisco Commerce at the end of each session to avoid potential cookie or cache conflicts with future sessions.
3.2 Cisco Commerce Workflow
The primary function of Cisco Commerce is to allow users to browse through the rich catalog, estimate, configure, quote, and order Cisco products and services using one centralized tool. This section provides a high-level overview of those functions within Cisco Commerce.
3.2.1 Guided Deal Registration
Guided Deal Registration in Cisco Commerce provides an intuitive incentive portfolio that can help you simplify and streamline deal execution. You will be able to take advantage of market relevant pricing, with stacking incentives and/or promotional discounts, provided the deal parameters align with the eligibility criteria.
For more information on current Cisco incentive programs and promotions, visit the Incentives and Promotions page.
Registered deals from Cisco Commerce may be auto-approved, but may also require additional qualification and approval by Cisco before the discounted pricing will be confirmed. Cisco Account Managers can view and approve deals that have been shared with them from Cisco Commerce.
Best Practice: Get the best price for Cisco solutions by creating a deal and adding eligible incentives and/or promotional discounts.
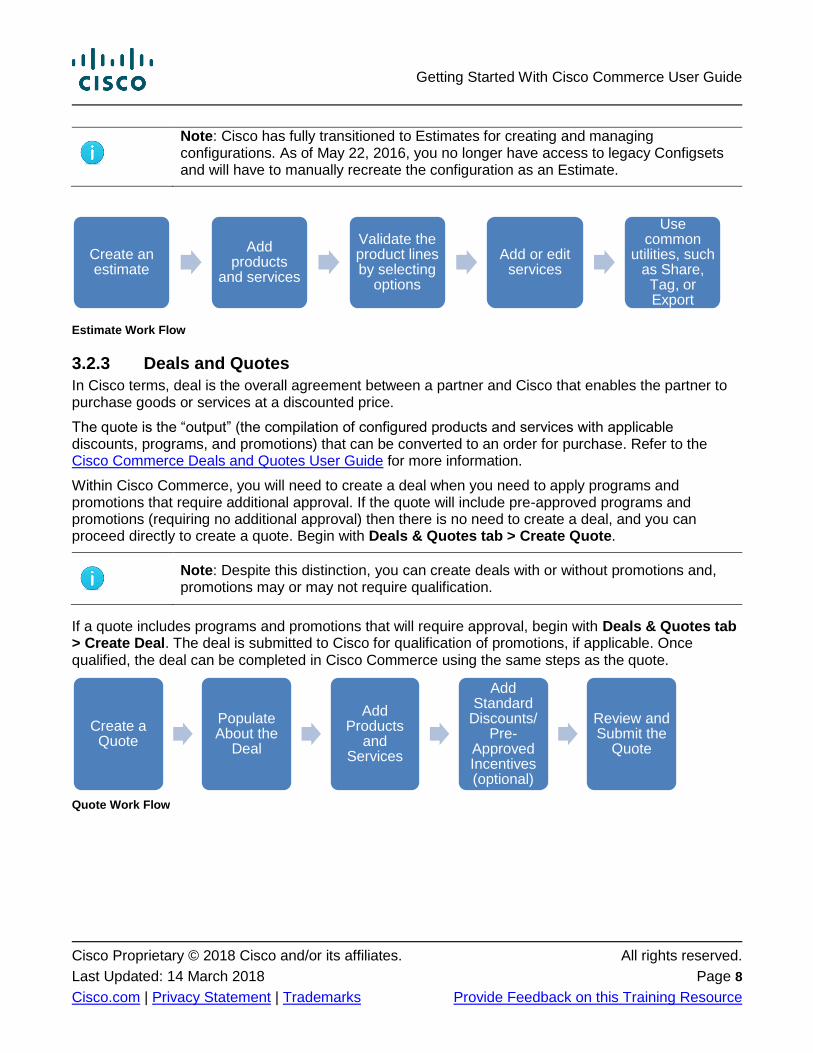
3.2.2 Estimates
An estimate is a pre-configured collection of products and/or services that form a solution. This collection can be validated and saved for many purposes, such as, reuse, sharing with others, and purchasing.
In the Estimates tab in Cisco Commerce, you can create, manage, and view your estimates, access a shared estimate, and claim estimates created by guest users. Refer to the Cisco Commerce Estimates and Configurations User Guide for information on creating an estimate.
Getting Started With Cisco Commerce User Guide
Cisco Proprietary © 2018 Cisco and/or its affiliates. All rights reserved.
Last Updated: 14 March 2018 Page 8
Cisco.com | Privacy Statement | Trademarks Provide Feedback on this Training Resource
Note: Cisco has fully transitioned to Estimates for creating and managing configurations. As of May 22, 2016, you no longer have access to legacy Configsets and will have to manually recreate the configuration as an Estimate.
Estimate Work Flow
3.2.3 Deals and Quotes
In Cisco terms, deal is the overall agreement between a partner and Cisco that enables the partner to purchase goods or services at a discounted price.
The quote is the “output” (the compilation of configured products and services with applicable discounts, programs, and promotions) that can be converted to an order for purchase. Refer to the Cisco Commerce Deals and Quotes User Guide for more information.
Within Cisco Commerce, you will need to create a deal when you need to apply programs and promotions that require additional approval. If the quote will include pre-approved programs and promotions (requiring no additional approval) then there is no need to create a deal, and you can proceed directly to create a quote. Begin with Deals & Quotes tab > Create Quote.
Note: Despite this distinction, you can create deals with or without promotions and, promotions may or may not require qualification.
If a quote includes programs and promotions that will require approval, begin with Deals & Quotes tab > Create Deal. The deal is submitted to Cisco for qualification of promotions, if applicable. Once qualified, the deal can be completed in Cisco Commerce using the same steps as the quote.
Quote Work Flow
Create an estimate
Add products
and services
Validate the product lines by selecting
options
Add or edit services
Use common
utilities, such as Share, Tag, or Export
Create a Quote
Populate About the
Deal
Add Products
and Services
Add Standard
Discounts/Pre-
Approved Incentives (optional)
Review and Submit the
Quote
Getting Started With Cisco Commerce User Guide
Cisco Proprietary © 2018 Cisco and/or its affiliates. All rights reserved.
Last Updated: 14 March 2018 Page 9
Cisco.com | Privacy Statement | Trademarks Provide Feedback on this Training Resource
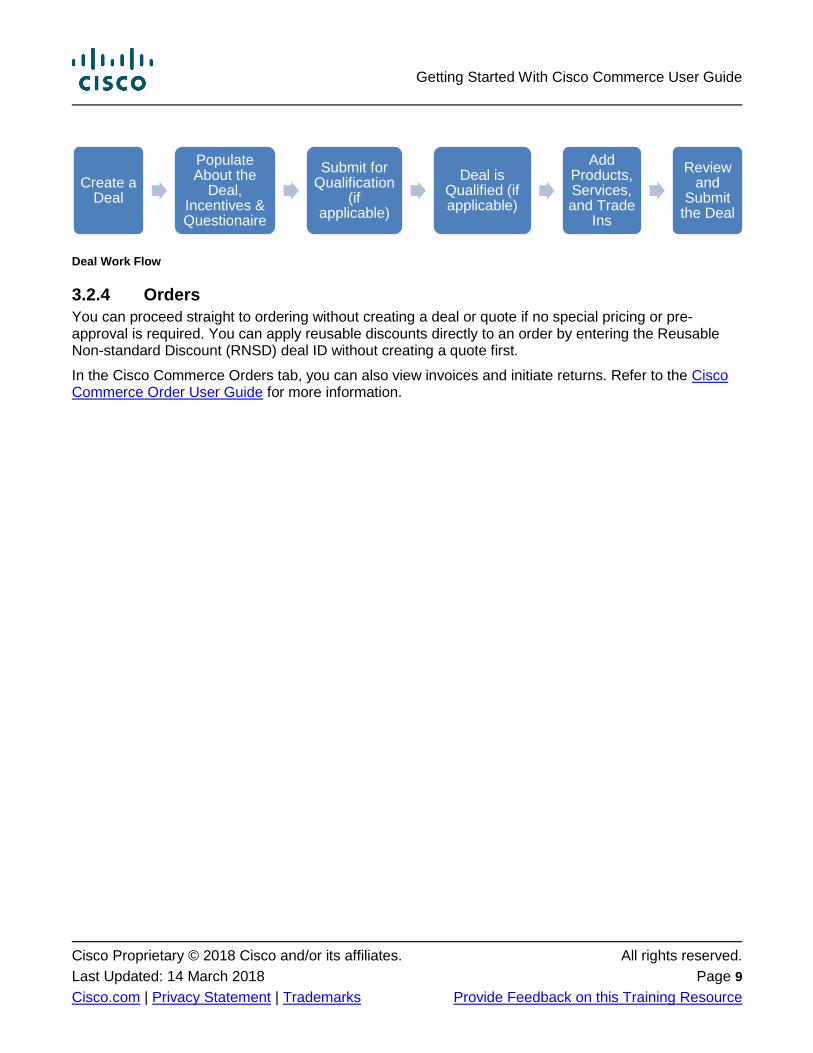
Deal Work Flow
3.2.4 Orders
You can proceed straight to ordering without creating a deal or quote if no special pricing or pre-approval is required. You can apply reusable discounts directly to an order by entering the Reusable Non-standard Discount (RNSD) deal ID without creating a quote first.
In the Cisco Commerce Orders tab, you can also view invoices and initiate returns. Refer to the Cisco Commerce Order User Guide for more information.
Create a Deal
Populate About the
Deal, Incentives & Questionaire
Submit for Qualification
(if applicable)
Deal is Qualified (if applicable)
Add Products, Services, and Trade
Ins
Review and
Submit the Deal
Getting Started With Cisco Commerce User Guide
Cisco Proprietary © 2018 Cisco and/or its affiliates. All rights reserved.
Last Updated: 14 March 2018 Page 10
Cisco.com | Privacy Statement | Trademarks Provide Feedback on this Training Resource
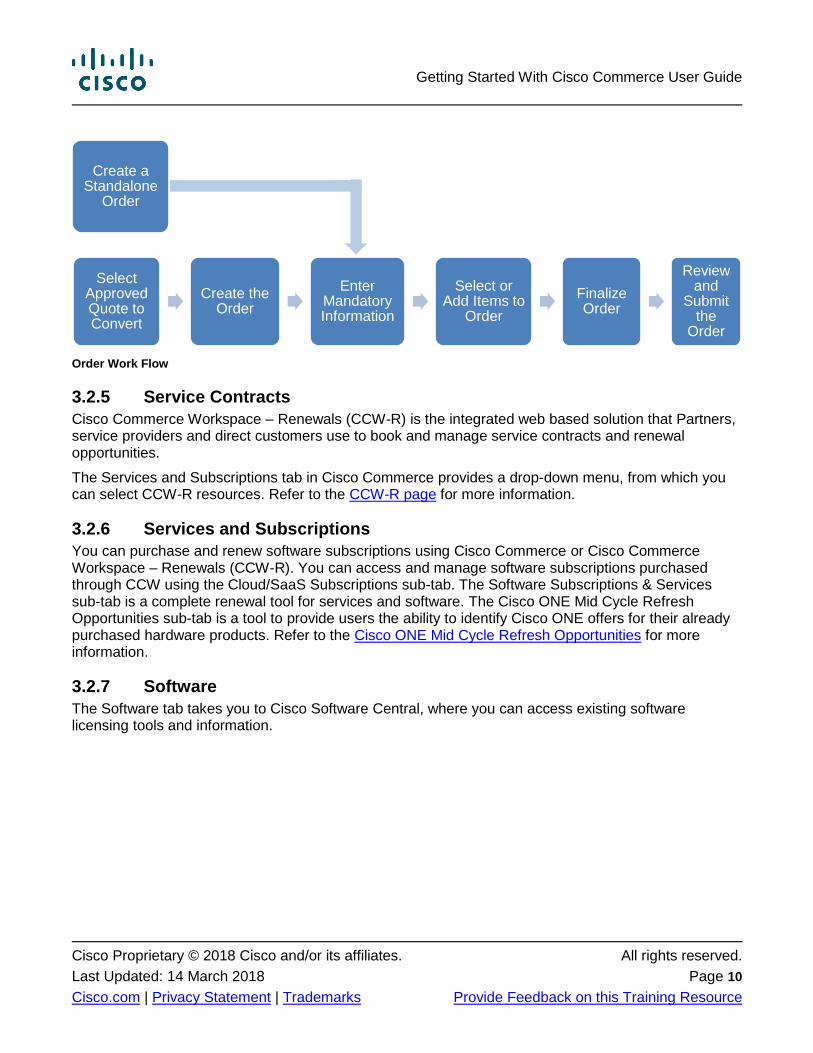
Order Work Flow
3.2.5 Service Contracts
Cisco Commerce Workspace – Renewals (CCW-R) is the integrated web based solution that Partners, service providers and direct customers use to book and manage service contracts and renewal opportunities.
The Services and Subscriptions tab in Cisco Commerce provides a drop-down menu, from which you can select CCW-R resources. Refer to the CCW-R page for more information.
3.2.6 Services and Subscriptions
You can purchase and renew software subscriptions using Cisco Commerce or Cisco Commerce Workspace – Renewals (CCW-R). You can access and manage software subscriptions purchased through CCW using the Cloud/SaaS Subscriptions sub-tab. The Software Subscriptions & Services sub-tab is a complete renewal tool for services and software. The Cisco ONE Mid Cycle Refresh Opportunities sub-tab is a tool to provide users the ability to identify Cisco ONE offers for their already purchased hardware products. Refer to the Cisco ONE Mid Cycle Refresh Opportunities for more information.
3.2.7 Software
The Software tab takes you to Cisco Software Central, where you can access existing software licensing tools and information.
Create a Standalone
Order
Select Approved Quote to Convert
Create the Order
Enter Mandatory Information
Select or Add Items to
Order
Finalize Order
Review and
Submit the
Order
Getting Started With Cisco Commerce User Guide
Cisco Proprietary © 2018 Cisco and/or its affiliates. All rights reserved.
Last Updated: 14 March 2018 Page 11
Cisco.com | Privacy Statement | Trademarks Provide Feedback on this Training Resource
3.3 Terminology
Term or Acronym Definition
1-Tier A partner who resells Cisco products/services and has direct purchasing relationship with Cisco
2-Tier A partner who resells Cisco products/services and purchases exclusively through a distributor
AM Account Manager
CAM Channel Account Manager, also referred to as PAM
DAM Distributor Account Manager
DCAM/DPAM Distributor Channel Account Manager/ Distributor Partner Account Manager
PAM Partner Account Manager (formerly CAM)
3.4 Accessing Cisco Commerce Support
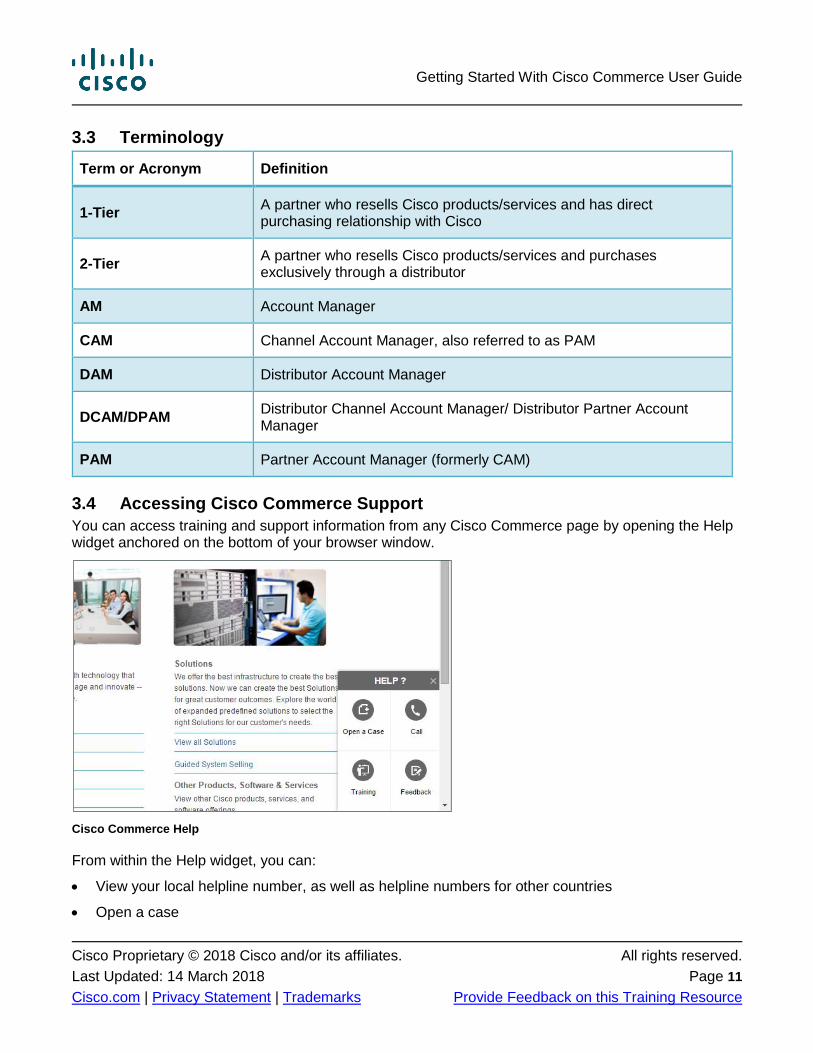
You can access training and support information from any Cisco Commerce page by opening the Help widget anchored on the bottom of your browser window.
Cisco Commerce Help
From within the Help widget, you can:
View your local helpline number, as well as helpline numbers for other countries
Open a case
Getting Started With Cisco Commerce User Guide
Cisco Proprietary © 2018 Cisco and/or its affiliates. All rights reserved.
Last Updated: 14 March 2018 Page 12
Cisco.com | Privacy Statement | Trademarks Provide Feedback on this Training Resource
Refer to self-serve training materials
Provide feedback on Cisco Commerce (see Feedback)
The table below summarizes the different support channels available for help with Cisco Commerce.
Support Type of Contact
Description
Customer Service Central
Web
Customer Service Central is the first line of support for Cisco Commerce system questions and issues. This self-service portal allows you to create, track, and manage support cases.
For more information about Customer Service Central, see the Customer Service Central (CSC) page on the Operations Exchange.
Support Community
Web Available from within Cisco Commerce: http://forums.cisco.com/ecom/web/ccw/
Community Discussion Forum
Web
You may also join community discussion forums or log a case for technical issues that arise when you are using CCW by going to the support and downloads site at: http://www.cisco.com/cisco/web/support/index.html
Sales Acceleration Centre (SAC)
Web Distributor Account Manager
E-mail SAC Support email: [email protected]
Operations Exchange
Web You can view the Partner and Direct Customer, and Distributor training pages, release news, FAQs, and information about system downtime on Operations Exchange.
Partner Central
Web You can use this support channel for accessing international Partner Central pages and information about other initiatives within Cisco Commerce.
Distribution Central
Web
You can use Distribution Central to obtain distributor specific information including information relevant for Cisco Commerce.
Refer to the Cisco Commerce Companion User Guide for Distributors alongside other training materials to use Cisco Commerce as a Distributor.
Getting Started With Cisco Commerce User Guide
Cisco Proprietary © 2018 Cisco and/or its affiliates. All rights reserved.
Last Updated: 14 March 2018 Page 13
Cisco.com | Privacy Statement | Trademarks Provide Feedback on this Training Resource
4 Navigating the Homepage
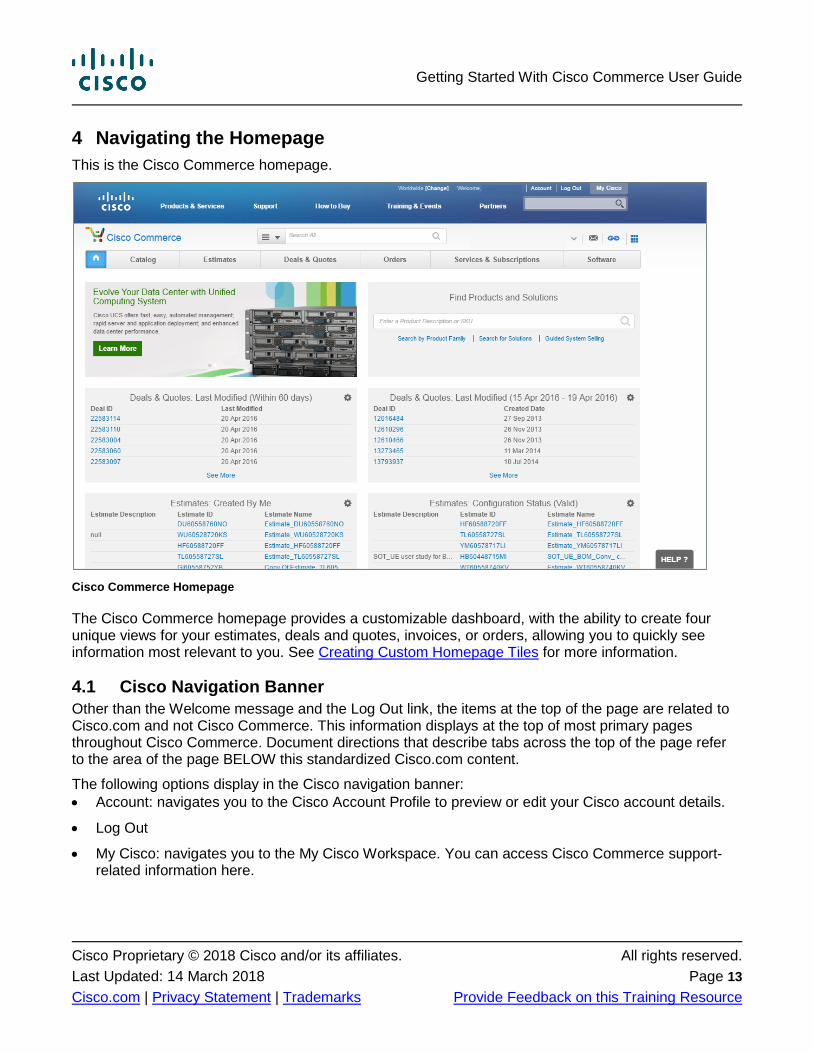
This is the Cisco Commerce homepage.
Cisco Commerce Homepage
The Cisco Commerce homepage provides a customizable dashboard, with the ability to create four unique views for your estimates, deals and quotes, invoices, or orders, allowing you to quickly see information most relevant to you. See Creating Custom Homepage Tiles for more information.
4.1 Cisco Navigation Banner
Other than the Welcome message and the Log Out link, the items at the top of the page are related to Cisco.com and not Cisco Commerce. This information displays at the top of most primary pages throughout Cisco Commerce. Document directions that describe tabs across the top of the page refer to the area of the page BELOW this standardized Cisco.com content.
The following options display in the Cisco navigation banner:
Account: navigates you to the Cisco Account Profile to preview or edit your Cisco account details.
Log Out
My Cisco: navigates you to the My Cisco Workspace. You can access Cisco Commerce support-related information here.
Getting Started With Cisco Commerce User Guide
Cisco Proprietary © 2018 Cisco and/or its affiliates. All rights reserved.
Last Updated: 14 March 2018 Page 14
Cisco.com | Privacy Statement | Trademarks Provide Feedback on this Training Resource
4.2 Cisco Commerce Navigation Banner
Just below the Cisco Navigation Banner is the Global Search and links for the following options:
User Profile: Click your name to view your profile and preferences. First-time users should setup their preferences, which will automatically apply across all Cisco Commerce functions. See the section Personalizing and Setting Preferences to customize your profile and set your preferences. You can also select your default language from the User Profile drop-down menu.
Notifications: To learn how to set notification preferences, see Setting Notifications Preferences.
Quick Links: Drop-down menu for links to Cisco tools that support the quote and ordering process.
Workspaces: Allows quick navigation to other Cisco workspaces.
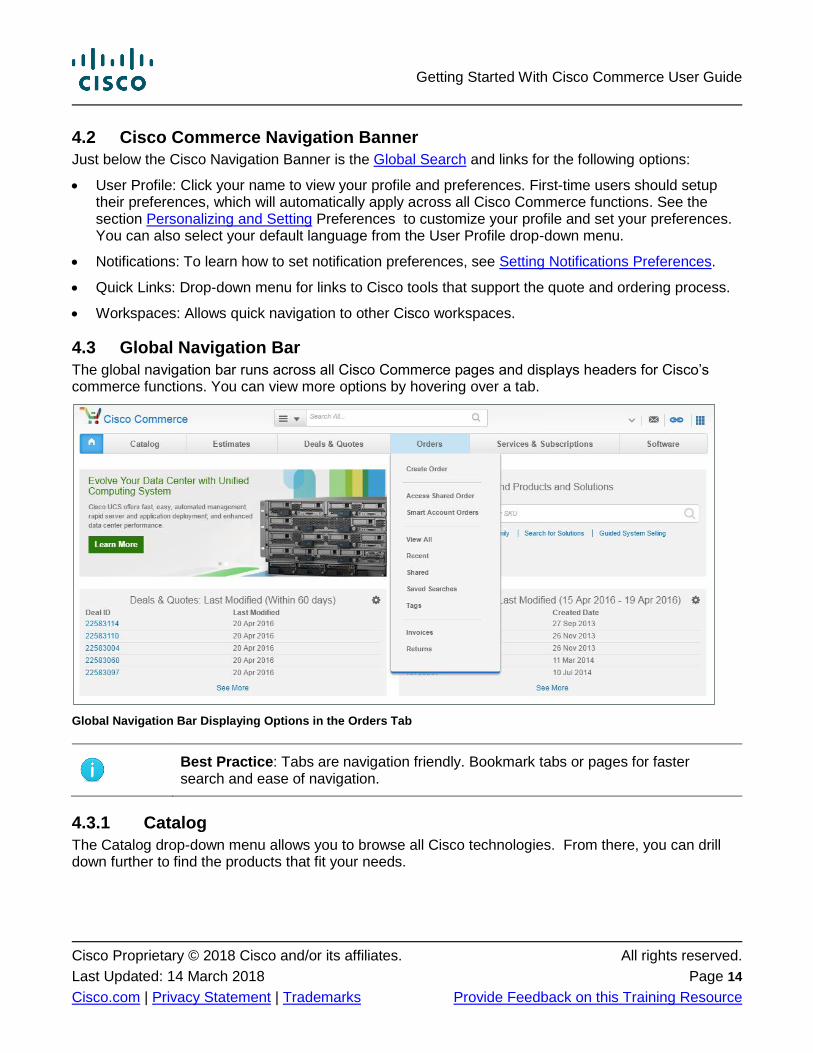
4.3 Global Navigation Bar
The global navigation bar runs across all Cisco Commerce pages and displays headers for Cisco’s commerce functions. You can view more options by hovering over a tab.
Global Navigation Bar Displaying Options in the Orders Tab
Best Practice: Tabs are navigation friendly. Bookmark tabs or pages for faster search and ease of navigation.
4.3.1 Catalog
The Catalog drop-down menu allows you to browse all Cisco technologies. From there, you can drill down further to find the products that fit your needs.
Getting Started With Cisco Commerce User Guide
Cisco Proprietary © 2018 Cisco and/or its affiliates. All rights reserved.
Last Updated: 14 March 2018 Page 15
Cisco.com | Privacy Statement | Trademarks Provide Feedback on this Training Resource
Note: While browsing through the catalog, you can view upcoming products that do not have a Product Identification (PID) number; however, you will not be able to configure or order these items using the Customize, Configure, or Add to Cart buttons.
Refer to the Cisco Commerce Estimates and Configurations User Guide for more information on how to use the Catalog.
4.3.2 Estimates Tab
The Estimates tab in Cisco Commerce allows you to create and manage your estimates for sharing, quoting, and ordering. See Estimates for more details.
4.3.3 Deals & Quotes Tab
The Deals & Quotes tab allows you to create deals and quotes, with or without promotions for sharing and ordering. See Deals and Quotes for more details.
4.3.4 Orders Tab
The Orders tab allows you to create, share, and view orders, view and pay invoices, and request returns. See Orders for more details.
4.3.5 Services and Subscriptions Tab
The Services and Subscriptions tab in Cisco Commerce provides a drop-down menu, from which you can select Cloud/SaaS Subscriptions, to view information related to your subscriptions. Software Subscriptions & Services (CCW-R) sub-tab is a complete renewal tool for services and software. The Cisco ONE Mid Cycle Refresh Opportunities sub-tab is a tool to provide users the ability to identify Cisco ONE offers for their already purchased hardware products. Refer to the Cisco ONE Mid Cycle Refresh Opportunities for more information.
4.3.6 Software Tab
The Software tab takes you to Cisco Software Central, where you can access existing software licensing tools and information.
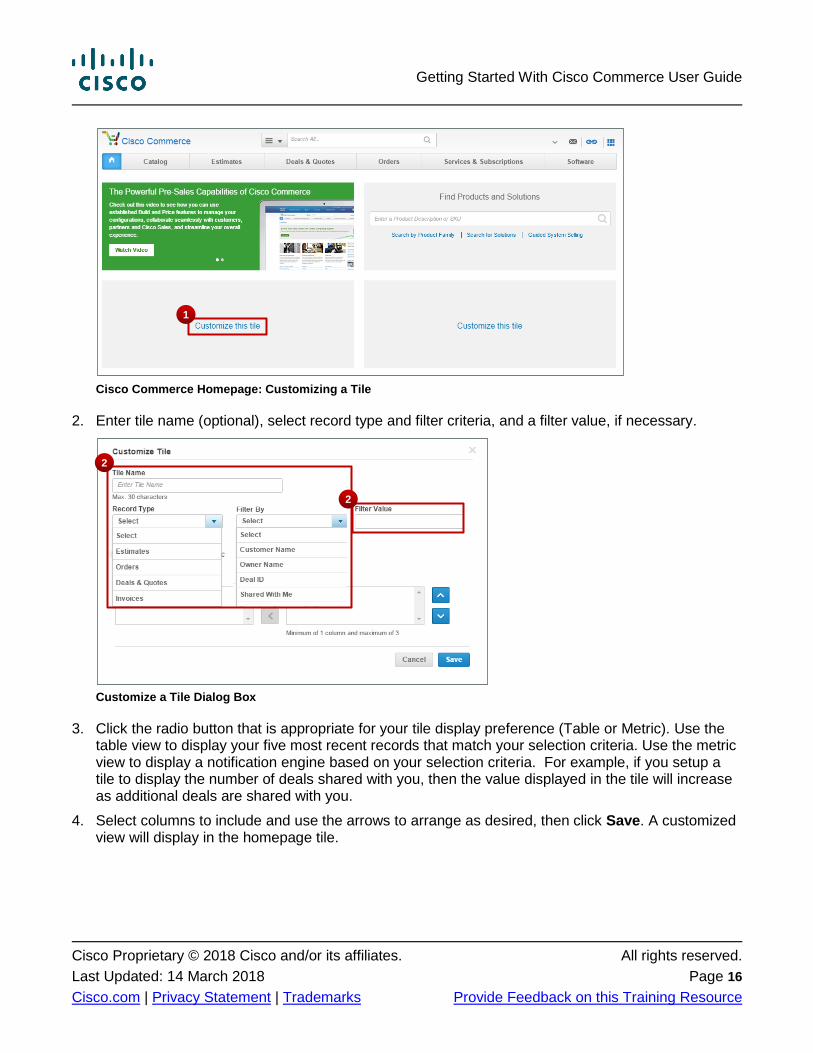
4.4 Creating Custom Homepage Tiles
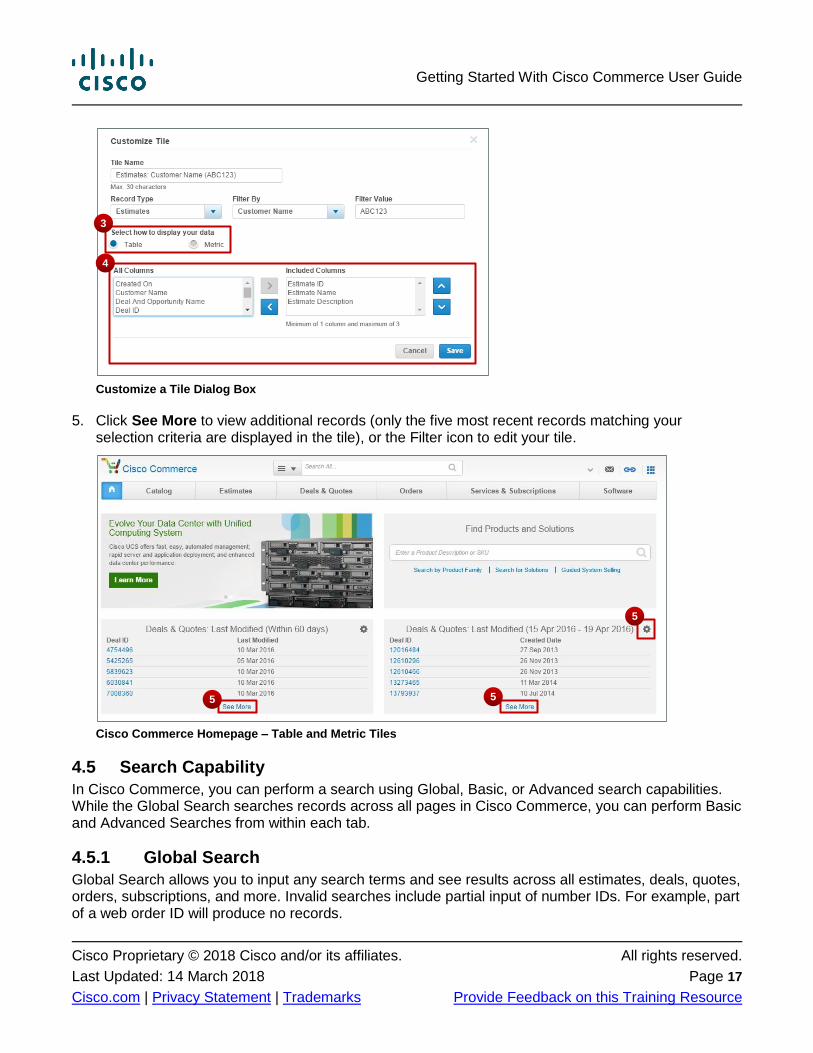
The Cisco Commerce homepage contains customizable tiles that allow you to create unique, relevant views. You can create a tile that displays information in a table or as a metric. The table view allows you to see data for your five most recent records meeting your selection criteria. The metric view allows you to see the numeric value based on your selection criteria. To customize a tile:
1. Click Customize this tile.
Getting Started With Cisco Commerce User Guide
Cisco Proprietary © 2018 Cisco and/or its affiliates. All rights reserved.
Last Updated: 14 March 2018 Page 16
Cisco.com | Privacy Statement | Trademarks Provide Feedback on this Training Resource
Cisco Commerce Homepage: Customizing a Tile
2. Enter tile name (optional), select record type and filter criteria, and a filter value, if necessary.
Customize a Tile Dialog Box
3. Click the radio button that is appropriate for your tile display preference (Table or Metric). Use the table view to display your five most recent records that match your selection criteria. Use the metric view to display a notification engine based on your selection criteria. For example, if you setup a tile to display the number of deals shared with you, then the value displayed in the tile will increase as additional deals are shared with you.
4. Select columns to include and use the arrows to arrange as desired, then click Save. A customized view will display in the homepage tile.
2
1
2
Getting Started With Cisco Commerce User Guide
Cisco Proprietary © 2018 Cisco and/or its affiliates. All rights reserved.
Last Updated: 14 March 2018 Page 17
Cisco.com | Privacy Statement | Trademarks Provide Feedback on this Training Resource
Customize a Tile Dialog Box
5. Click See More to view additional records (only the five most recent records matching your selection criteria are displayed in the tile), or the Filter icon to edit your tile.
Cisco Commerce Homepage – Table and Metric Tiles
4.5 Search Capability
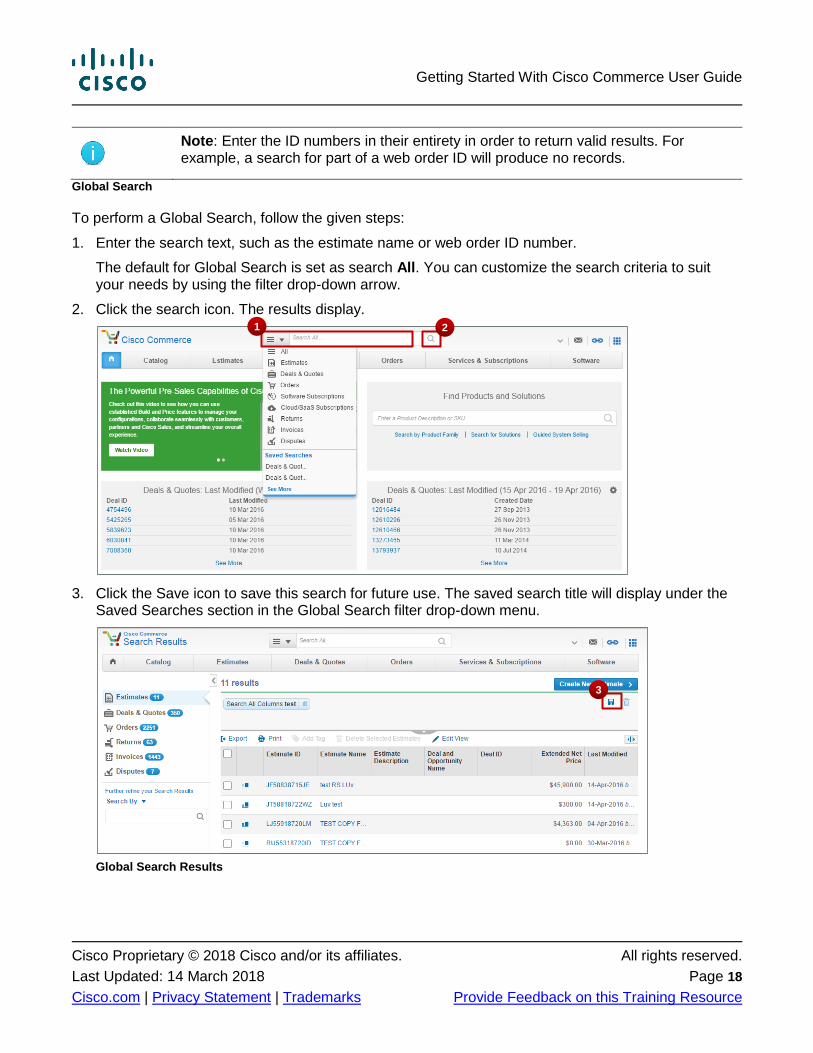
In Cisco Commerce, you can perform a search using Global, Basic, or Advanced search capabilities. While the Global Search searches records across all pages in Cisco Commerce, you can perform Basic and Advanced Searches from within each tab.
4.5.1 Global Search
Global Search allows you to input any search terms and see results across all estimates, deals, quotes, orders, subscriptions, and more. Invalid searches include partial input of number IDs. For example, part of a web order ID will produce no records.
3
4
5
5
5
Getting Started With Cisco Commerce User Guide
Cisco Proprietary © 2018 Cisco and/or its affiliates. All rights reserved.
Last Updated: 14 March 2018 Page 18
Cisco.com | Privacy Statement | Trademarks Provide Feedback on this Training Resource
Note: Enter the ID numbers in their entirety in order to return valid results. For example, a search for part of a web order ID will produce no records.
Global Search
To perform a Global Search, follow the given steps:
1. Enter the search text, such as the estimate name or web order ID number.
The default for Global Search is set as search All. You can customize the search criteria to suit your needs by using the filter drop-down arrow.
2. Click the search icon. The results display.
3. Click the Save icon to save this search for future use. The saved search title will display under the Saved Searches section in the Global Search filter drop-down menu.
Global Search Results
3
1 2
Getting Started With Cisco Commerce User Guide
Cisco Proprietary © 2018 Cisco and/or its affiliates. All rights reserved.
Last Updated: 14 March 2018 Page 19
Cisco.com | Privacy Statement | Trademarks Provide Feedback on this Training Resource
You can view, export, or tag the search results, as needed. In addition, you can customize the way your search results display.
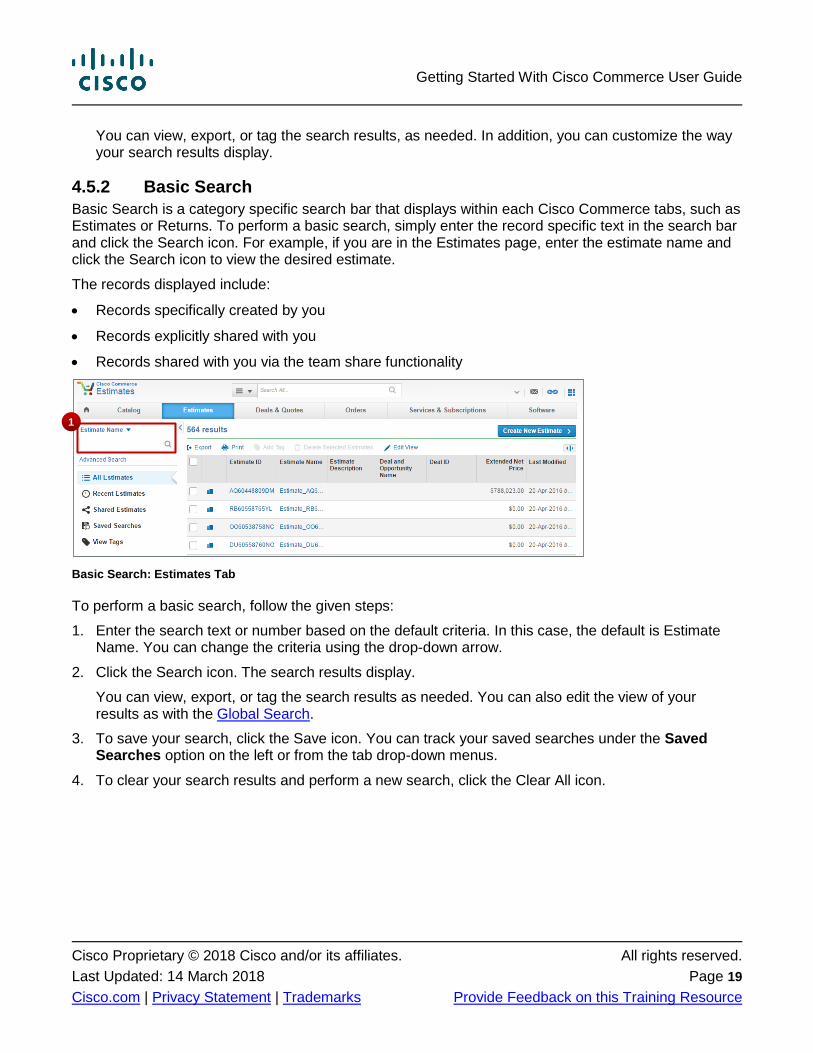
4.5.2 Basic Search
Basic Search is a category specific search bar that displays within each Cisco Commerce tabs, such as Estimates or Returns. To perform a basic search, simply enter the record specific text in the search bar and click the Search icon. For example, if you are in the Estimates page, enter the estimate name and click the Search icon to view the desired estimate.
The records displayed include:
Records specifically created by you
Records explicitly shared with you
Records shared with you via the team share functionality
Basic Search: Estimates Tab
To perform a basic search, follow the given steps:
1. Enter the search text or number based on the default criteria. In this case, the default is Estimate Name. You can change the criteria using the drop-down arrow.
2. Click the Search icon. The search results display.
You can view, export, or tag the search results as needed. You can also edit the view of your results as with the Global Search.
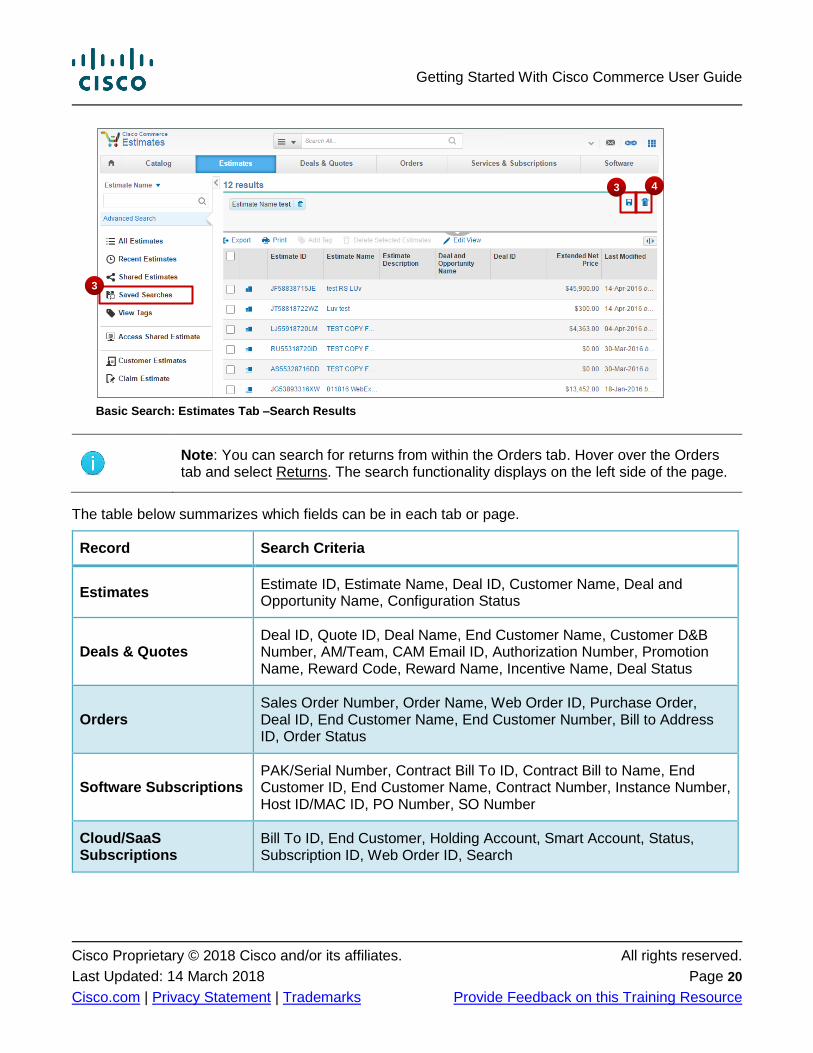
3. To save your search, click the Save icon. You can track your saved searches under the Saved Searches option on the left or from the tab drop-down menus.
4. To clear your search results and perform a new search, click the Clear All icon.
1
Getting Started With Cisco Commerce User Guide
Cisco Proprietary © 2018 Cisco and/or its affiliates. All rights reserved.
Last Updated: 14 March 2018 Page 20
Cisco.com | Privacy Statement | Trademarks Provide Feedback on this Training Resource
Basic Search: Estimates Tab –Search Results
Note: You can search for returns from within the Orders tab. Hover over the Orders tab and select Returns. The search functionality displays on the left side of the page.
The table below summarizes which fields can be in each tab or page.
Record Search Criteria
Estimates Estimate ID, Estimate Name, Deal ID, Customer Name, Deal and Opportunity Name, Configuration Status
Deals & Quotes Deal ID, Quote ID, Deal Name, End Customer Name, Customer D&B Number, AM/Team, CAM Email ID, Authorization Number, Promotion Name, Reward Code, Reward Name, Incentive Name, Deal Status
Orders Sales Order Number, Order Name, Web Order ID, Purchase Order, Deal ID, End Customer Name, End Customer Number, Bill to Address ID, Order Status
Software Subscriptions PAK/Serial Number, Contract Bill To ID, Contract Bill to Name, End Customer ID, End Customer Name, Contract Number, Instance Number, Host ID/MAC ID, PO Number, SO Number
Cloud/SaaS Subscriptions
Bill To ID, End Customer, Holding Account, Smart Account, Status, Subscription ID, Web Order ID, Search
3
3
4
Getting Started With Cisco Commerce User Guide
Cisco Proprietary © 2018 Cisco and/or its affiliates. All rights reserved.
Last Updated: 14 March 2018 Page 21
Cisco.com | Privacy Statement | Trademarks Provide Feedback on this Training Resource
Record Search Criteria
Invoices Transaction Number, Purchase Order, Sales Order, RMA, Commercial Invoice #, Transaction Status
Deviations Authorization Number, Deal/Quote Name, Deal ID, Quote ID, End Customer, Reseller Name, CAM ID, AM ID, Promotion Name, Status
Returns AA/AAR Number, RMA Number, Ref. Sales Order Number, Purchase Order Number, Web Order ID, Deal ID, Bill To, CTMP Quote Number, Return Status
Invitations Invitation Name, AM Email ID, End Customer Name, Invitation Status
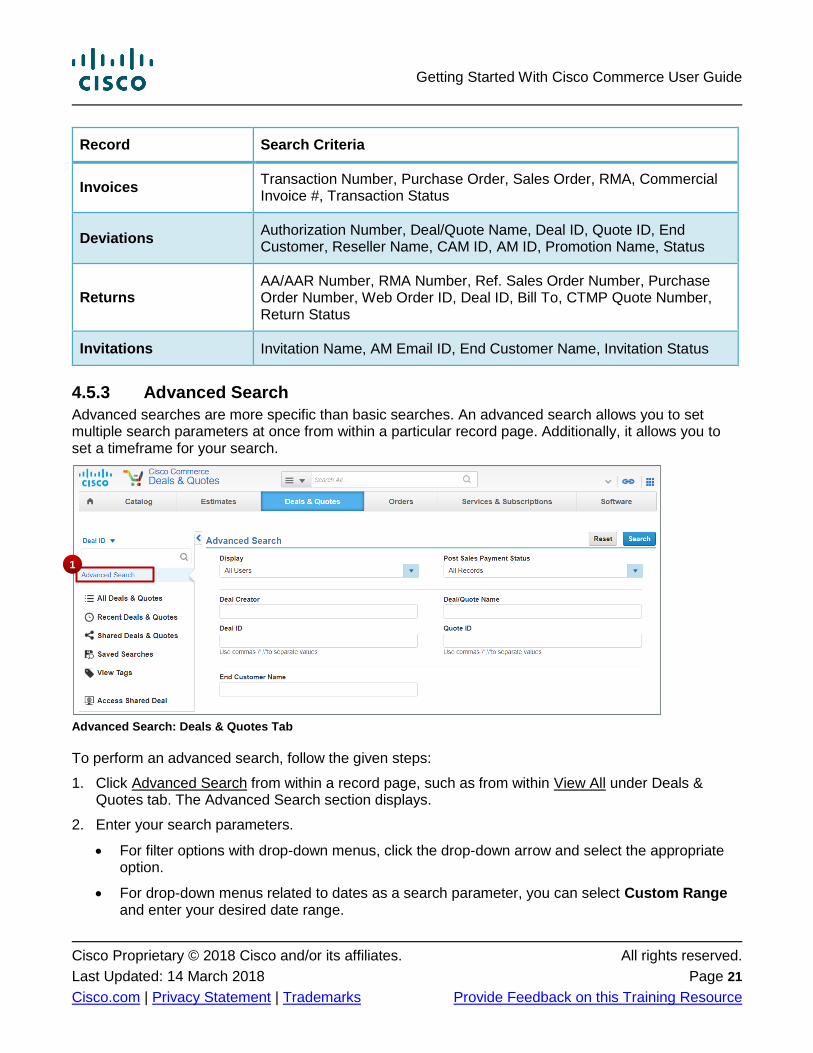
4.5.3 Advanced Search
Advanced searches are more specific than basic searches. An advanced search allows you to set multiple search parameters at once from within a particular record page. Additionally, it allows you to set a timeframe for your search.
Advanced Search: Deals & Quotes Tab
To perform an advanced search, follow the given steps:
1. Click Advanced Search from within a record page, such as from within View All under Deals & Quotes tab. The Advanced Search section displays.
2. Enter your search parameters.
For filter options with drop-down menus, click the drop-down arrow and select the appropriate option.
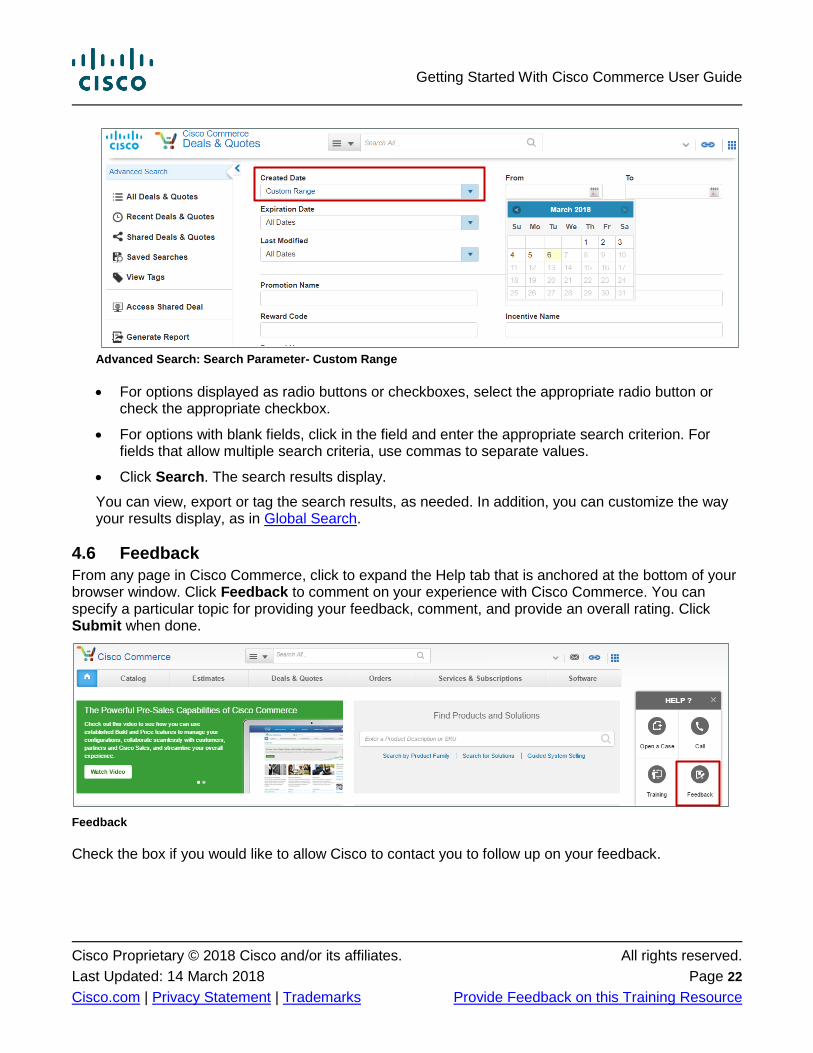
For drop-down menus related to dates as a search parameter, you can select Custom Range and enter your desired date range.
1
Getting Started With Cisco Commerce User Guide
Cisco Proprietary © 2018 Cisco and/or its affiliates. All rights reserved.
Last Updated: 14 March 2018 Page 22
Cisco.com | Privacy Statement | Trademarks Provide Feedback on this Training Resource
Advanced Search: Search Parameter- Custom Range
For options displayed as radio buttons or checkboxes, select the appropriate radio button or check the appropriate checkbox.
For options with blank fields, click in the field and enter the appropriate search criterion. For fields that allow multiple search criteria, use commas to separate values.
Click Search. The search results display.
You can view, export or tag the search results, as needed. In addition, you can customize the way your results display, as in Global Search.
4.6 Feedback
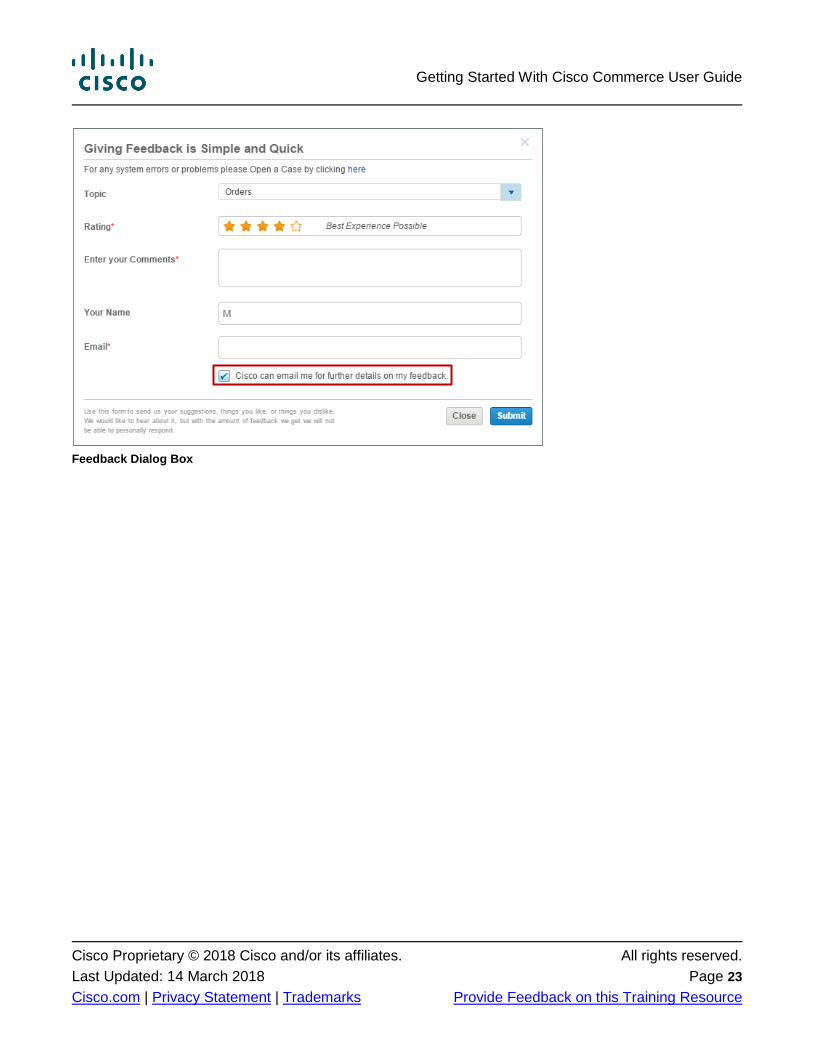
From any page in Cisco Commerce, click to expand the Help tab that is anchored at the bottom of your browser window. Click Feedback to comment on your experience with Cisco Commerce. You can specify a particular topic for providing your feedback, comment, and provide an overall rating. Click Submit when done.
Feedback
Check the box if you would like to allow Cisco to contact you to follow up on your feedback.
Getting Started With Cisco Commerce User Guide
Cisco Proprietary © 2018 Cisco and/or its affiliates. All rights reserved.
Last Updated: 14 March 2018 Page 23
Cisco.com | Privacy Statement | Trademarks Provide Feedback on this Training Resource
Feedback Dialog Box
Getting Started With Cisco Commerce User Guide
Cisco Proprietary © 2018 Cisco and/or its affiliates. All rights reserved.
Last Updated: 14 March 2018 Page 24
Cisco.com | Privacy Statement | Trademarks Provide Feedback on this Training Resource
5 Personalizing and Setting Preferences
Set your Profile and Preferences settings for a seamless commerce experience. The preferences set in Cisco Commerce will automatically apply across all Cisco Commerce functions, such as Estimates, Deals & Quotes, Orders, and others.
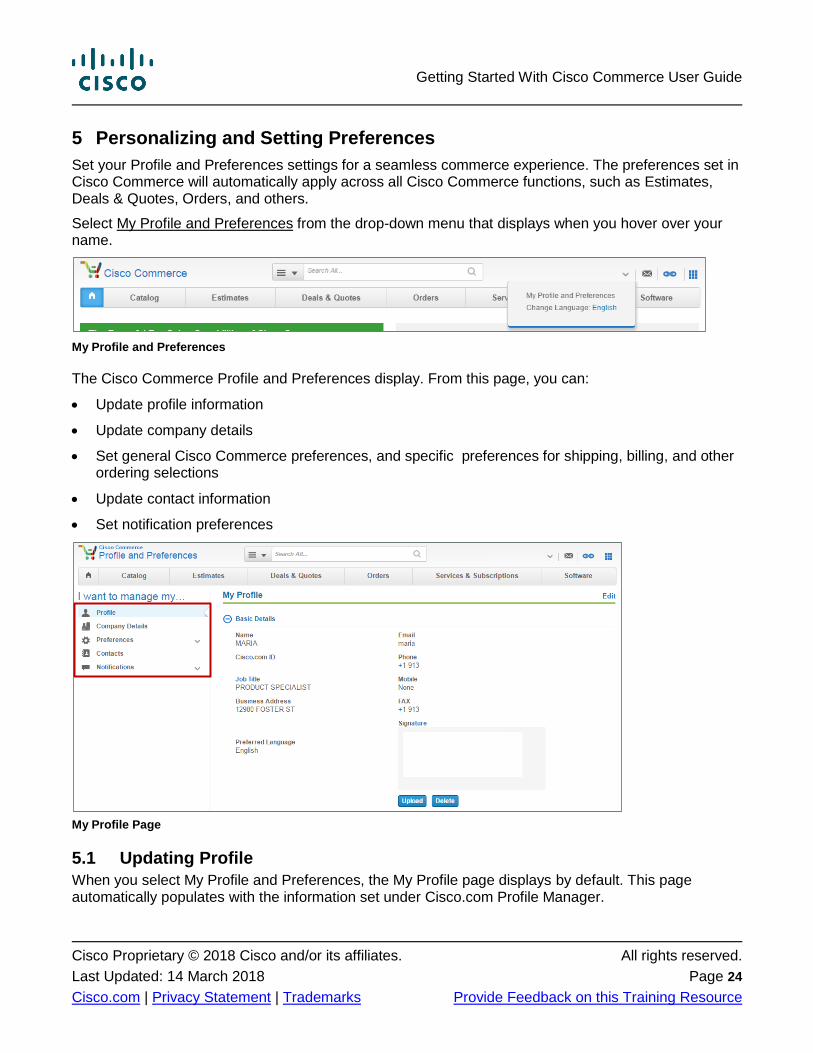
Select My Profile and Preferences from the drop-down menu that displays when you hover over your name.
My Profile and Preferences
The Cisco Commerce Profile and Preferences display. From this page, you can:
Update profile information
Update company details
Set general Cisco Commerce preferences, and specific preferences for shipping, billing, and other ordering selections
Update contact information
Set notification preferences
My Profile Page
5.1 Updating Profile
When you select My Profile and Preferences, the My Profile page displays by default. This page automatically populates with the information set under Cisco.com Profile Manager.
Getting Started With Cisco Commerce User Guide
Cisco Proprietary © 2018 Cisco and/or its affiliates. All rights reserved.
Last Updated: 14 March 2018 Page 25
Cisco.com | Privacy Statement | Trademarks Provide Feedback on this Training Resource
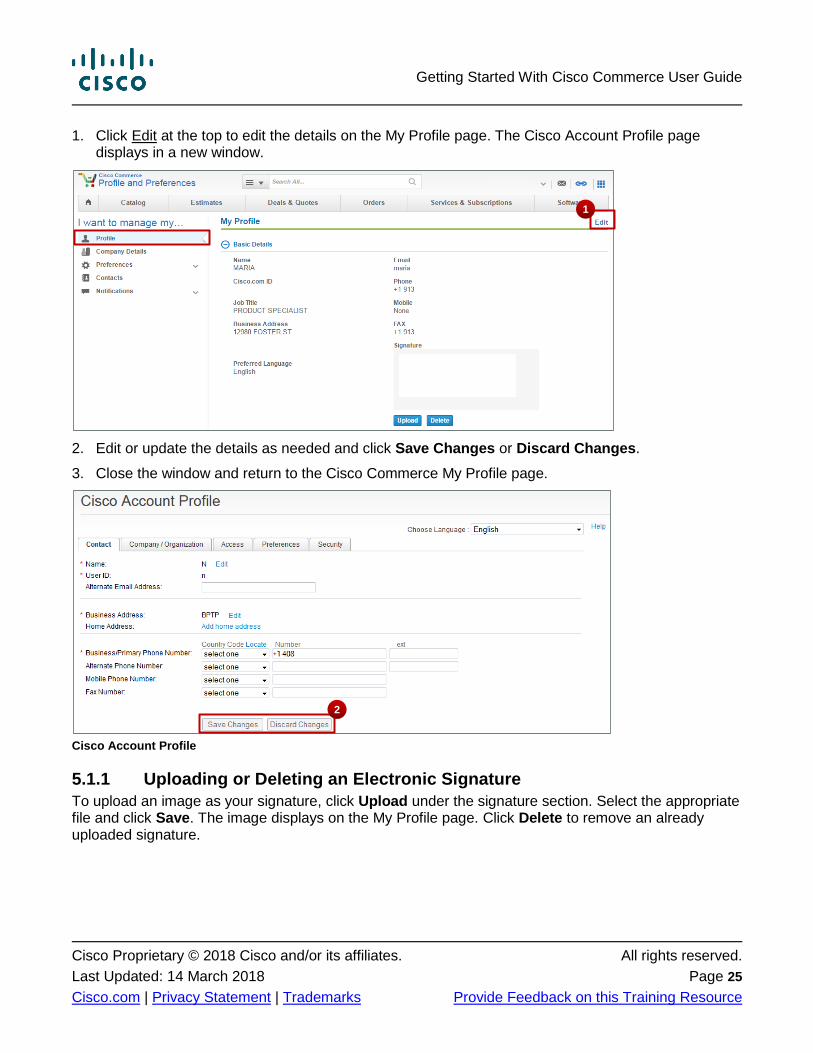
1. Click Edit at the top to edit the details on the My Profile page. The Cisco Account Profile page displays in a new window.
2. Edit or update the details as needed and click Save Changes or Discard Changes.
3. Close the window and return to the Cisco Commerce My Profile page.
Cisco Account Profile
5.1.1 Uploading or Deleting an Electronic Signature
To upload an image as your signature, click Upload under the signature section. Select the appropriate file and click Save. The image displays on the My Profile page. Click Delete to remove an already uploaded signature.
1
2

Getting Started With Cisco Commerce User Guide
Cisco Proprietary © 2018 Cisco and/or its affiliates. All rights reserved.
Last Updated: 14 March 2018 Page 26
Cisco.com | Privacy Statement | Trademarks Provide Feedback on this Training Resource
Upload User Signature Dialog Box
Signature on My Profile Page
5.1.2 Viewing User Account Access
Access to Cisco Commerce functionalities varies depending on your account access level. To view your user capabilities within Cisco Commerce, expand the Status Info section.
Status Info Section
Getting Started With Cisco Commerce User Guide
Cisco Proprietary © 2018 Cisco and/or its affiliates. All rights reserved.
Last Updated: 14 March 2018 Page 27
Cisco.com | Privacy Statement | Trademarks Provide Feedback on this Training Resource
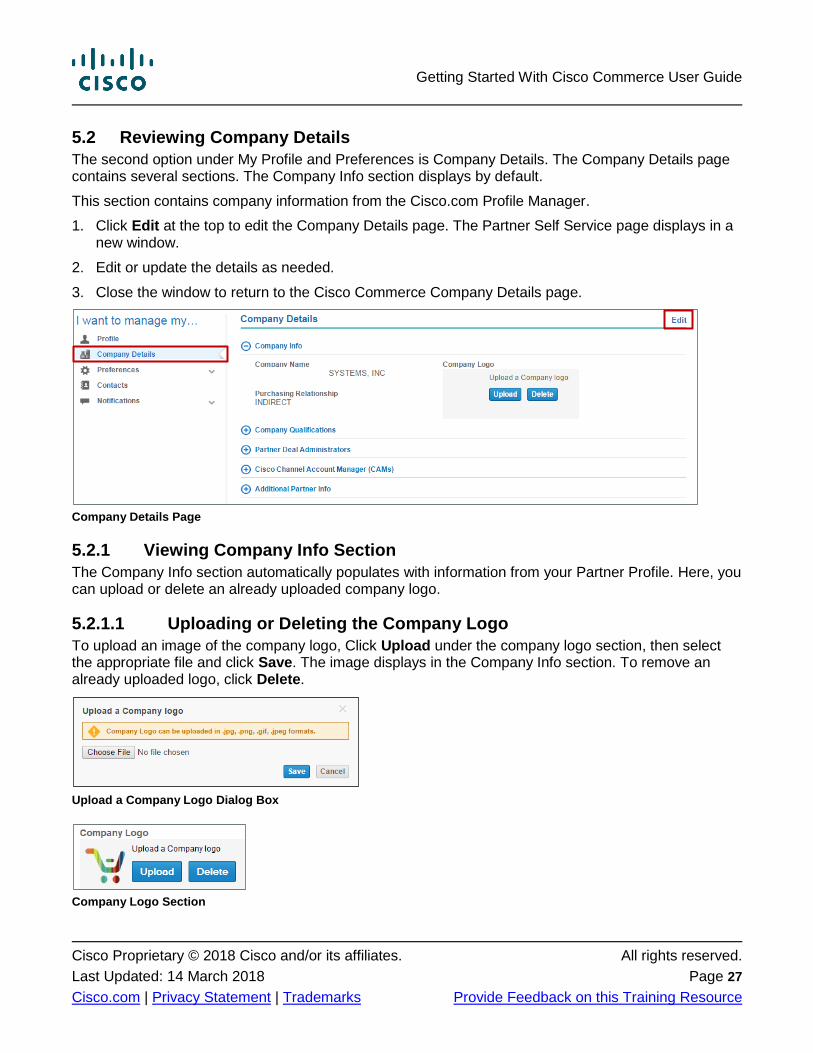
5.2 Reviewing Company Details
The second option under My Profile and Preferences is Company Details. The Company Details page contains several sections. The Company Info section displays by default.
This section contains company information from the Cisco.com Profile Manager.
1. Click Edit at the top to edit the Company Details page. The Partner Self Service page displays in a new window.
2. Edit or update the details as needed.
3. Close the window to return to the Cisco Commerce Company Details page.
Company Details Page
5.2.1 Viewing Company Info Section
The Company Info section automatically populates with information from your Partner Profile. Here, you can upload or delete an already uploaded company logo.
5.2.1.1 Uploading or Deleting the Company Logo
To upload an image of the company logo, Click Upload under the company logo section, then select the appropriate file and click Save. The image displays in the Company Info section. To remove an already uploaded logo, click Delete.
Upload a Company Logo Dialog Box
Company Logo Section
Getting Started With Cisco Commerce User Guide
Cisco Proprietary © 2018 Cisco and/or its affiliates. All rights reserved.
Last Updated: 14 March 2018 Page 28
Cisco.com | Privacy Statement | Trademarks Provide Feedback on this Training Resource
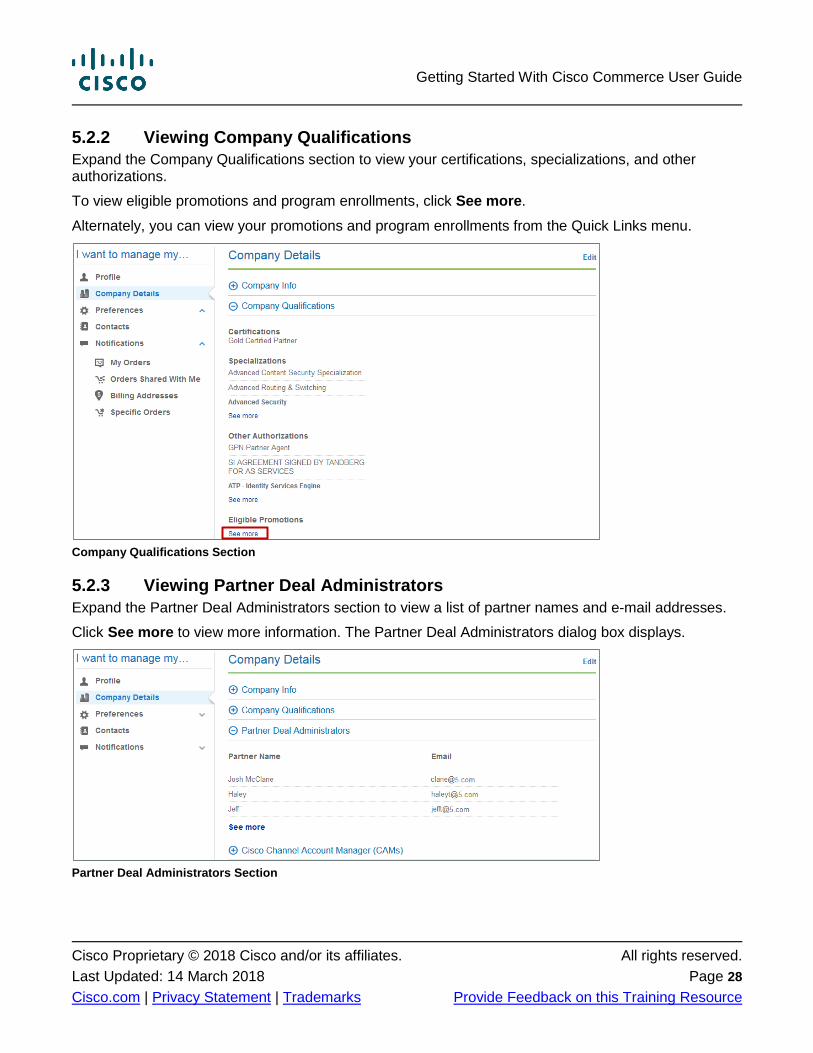
5.2.2 Viewing Company Qualifications
Expand the Company Qualifications section to view your certifications, specializations, and other authorizations.
To view eligible promotions and program enrollments, click See more.
Alternately, you can view your promotions and program enrollments from the Quick Links menu.
Company Qualifications Section
5.2.3 Viewing Partner Deal Administrators
Expand the Partner Deal Administrators section to view a list of partner names and e-mail addresses.
Click See more to view more information. The Partner Deal Administrators dialog box displays.
Partner Deal Administrators Section
Getting Started With Cisco Commerce User Guide
Cisco Proprietary © 2018 Cisco and/or its affiliates. All rights reserved.
Last Updated: 14 March 2018 Page 29
Cisco.com | Privacy Statement | Trademarks Provide Feedback on this Training Resource
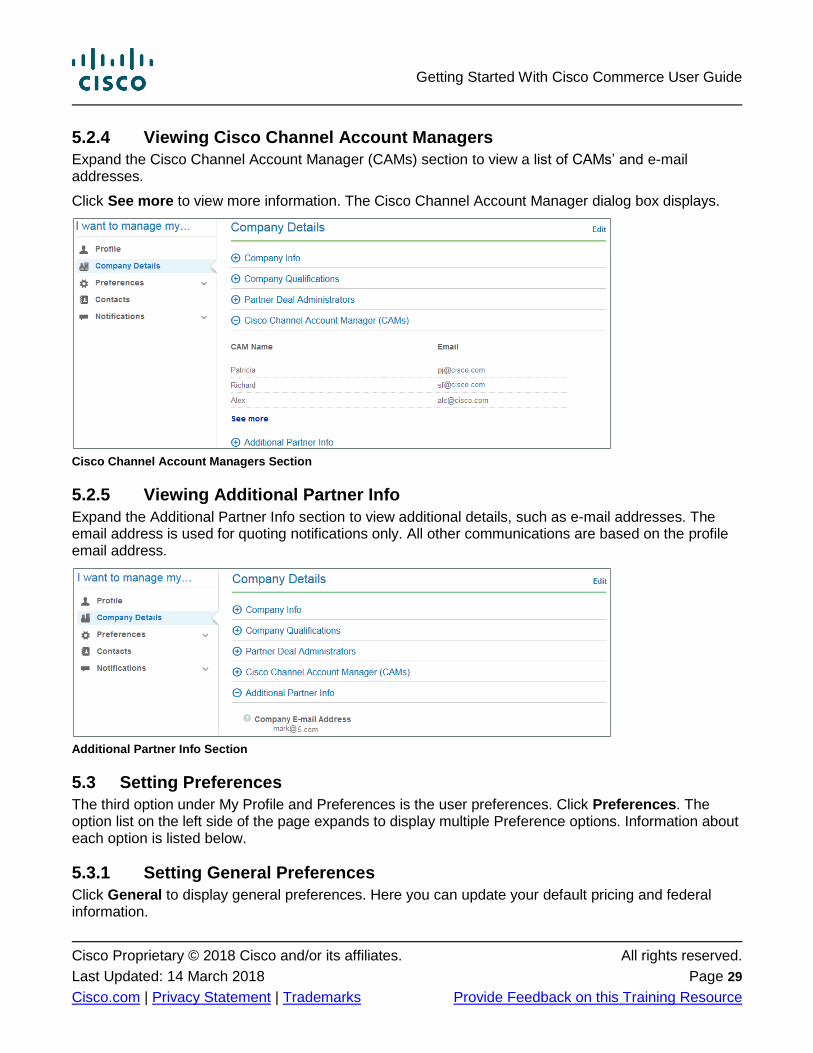
5.2.4 Viewing Cisco Channel Account Managers
Expand the Cisco Channel Account Manager (CAMs) section to view a list of CAMs’ and e-mail addresses.
Click See more to view more information. The Cisco Channel Account Manager dialog box displays.
Cisco Channel Account Managers Section
5.2.5 Viewing Additional Partner Info
Expand the Additional Partner Info section to view additional details, such as e-mail addresses. The email address is used for quoting notifications only. All other communications are based on the profile email address.
Additional Partner Info Section
5.3 Setting Preferences
The third option under My Profile and Preferences is the user preferences. Click Preferences. The option list on the left side of the page expands to display multiple Preference options. Information about each option is listed below.
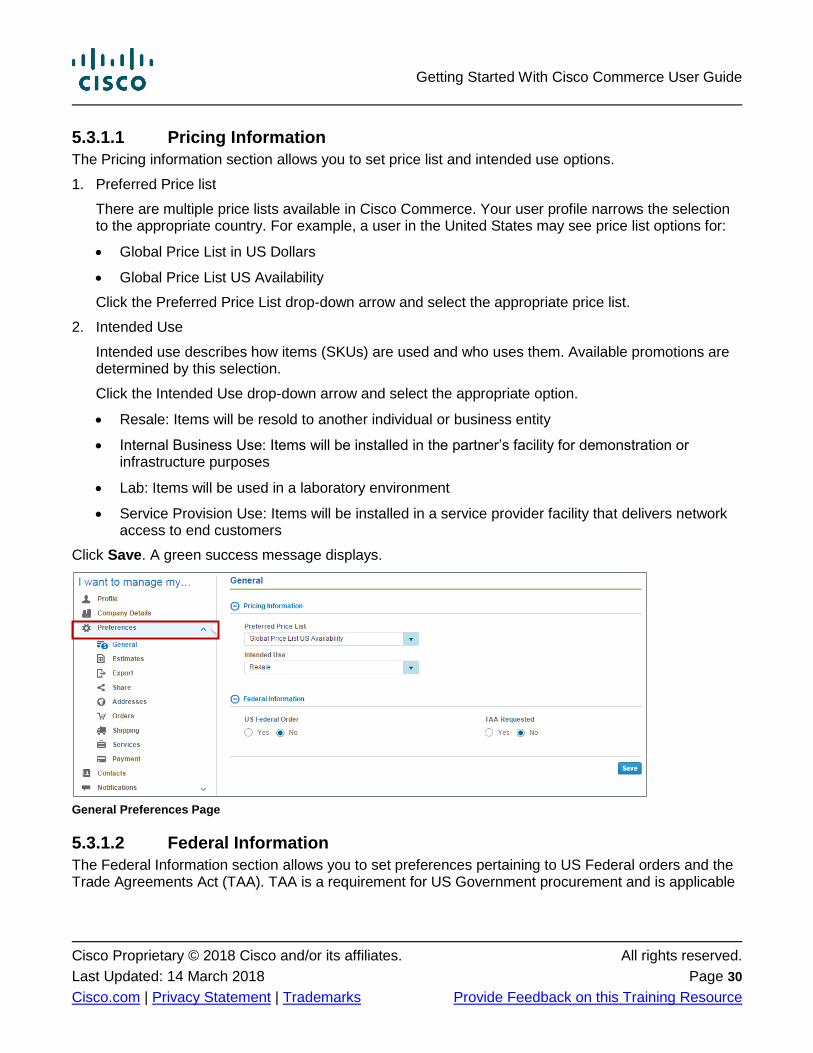
5.3.1 Setting General Preferences
Click General to display general preferences. Here you can update your default pricing and federal information.
Getting Started With Cisco Commerce User Guide
Cisco Proprietary © 2018 Cisco and/or its affiliates. All rights reserved.
Last Updated: 14 March 2018 Page 30
Cisco.com | Privacy Statement | Trademarks Provide Feedback on this Training Resource
5.3.1.1 Pricing Information
The Pricing information section allows you to set price list and intended use options.
1. Preferred Price list
There are multiple price lists available in Cisco Commerce. Your user profile narrows the selection to the appropriate country. For example, a user in the United States may see price list options for:
Global Price List in US Dollars
Global Price List US Availability
Click the Preferred Price List drop-down arrow and select the appropriate price list.
2. Intended Use
Intended use describes how items (SKUs) are used and who uses them. Available promotions are determined by this selection.
Click the Intended Use drop-down arrow and select the appropriate option.
Resale: Items will be resold to another individual or business entity
Internal Business Use: Items will be installed in the partner’s facility for demonstration or infrastructure purposes
Lab: Items will be used in a laboratory environment
Service Provision Use: Items will be installed in a service provider facility that delivers network access to end customers
Click Save. A green success message displays.
General Preferences Page
5.3.1.2 Federal Information
The Federal Information section allows you to set preferences pertaining to US Federal orders and the Trade Agreements Act (TAA). TAA is a requirement for US Government procurement and is applicable
Getting Started With Cisco Commerce User Guide
Cisco Proprietary © 2018 Cisco and/or its affiliates. All rights reserved.
Last Updated: 14 March 2018 Page 31
Cisco.com | Privacy Statement | Trademarks Provide Feedback on this Training Resource
only to US Federal users who meet additional requirements. This section will display if you are a US Federal user.
For more information see the TAA page.
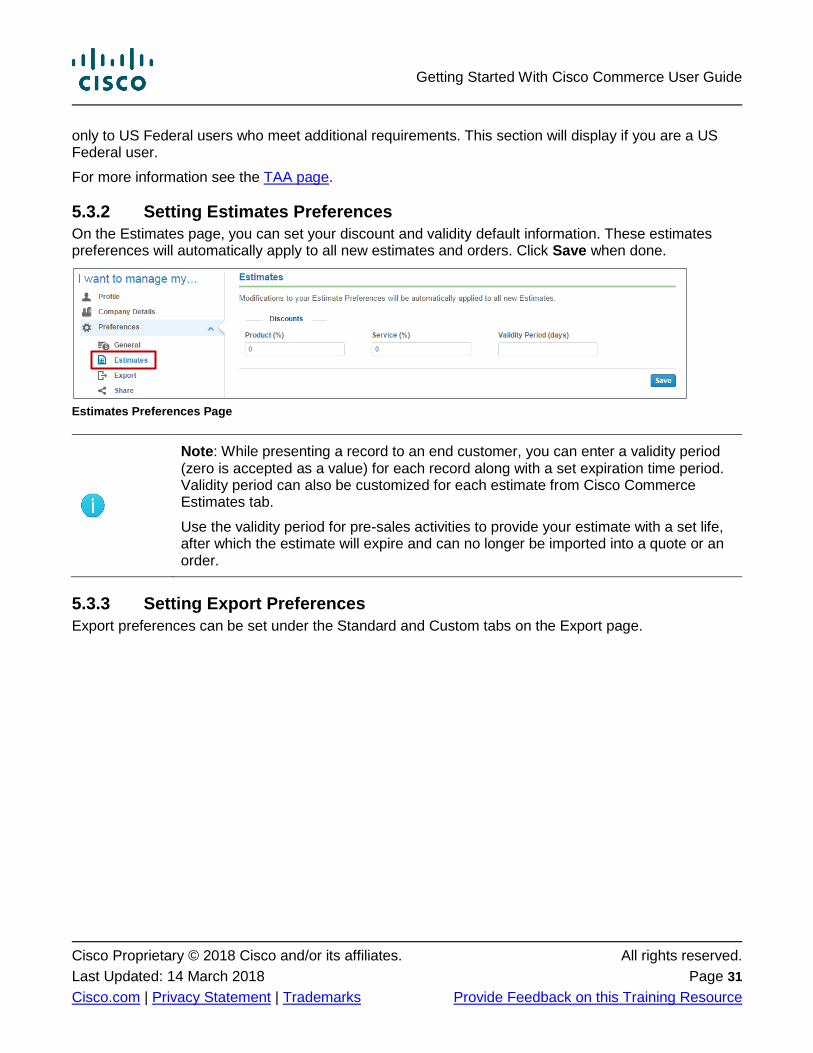
5.3.2 Setting Estimates Preferences
On the Estimates page, you can set your discount and validity default information. These estimates preferences will automatically apply to all new estimates and orders. Click Save when done.
Estimates Preferences Page
Note: While presenting a record to an end customer, you can enter a validity period (zero is accepted as a value) for each record along with a set expiration time period. Validity period can also be customized for each estimate from Cisco Commerce Estimates tab.
Use the validity period for pre-sales activities to provide your estimate with a set life, after which the estimate will expire and can no longer be imported into a quote or an order.
5.3.3 Setting Export Preferences
Export preferences can be set under the Standard and Custom tabs on the Export page.
Getting Started With Cisco Commerce User Guide
Cisco Proprietary © 2018 Cisco and/or its affiliates. All rights reserved.
Last Updated: 14 March 2018 Page 32
Cisco.com | Privacy Statement | Trademarks Provide Feedback on this Training Resource
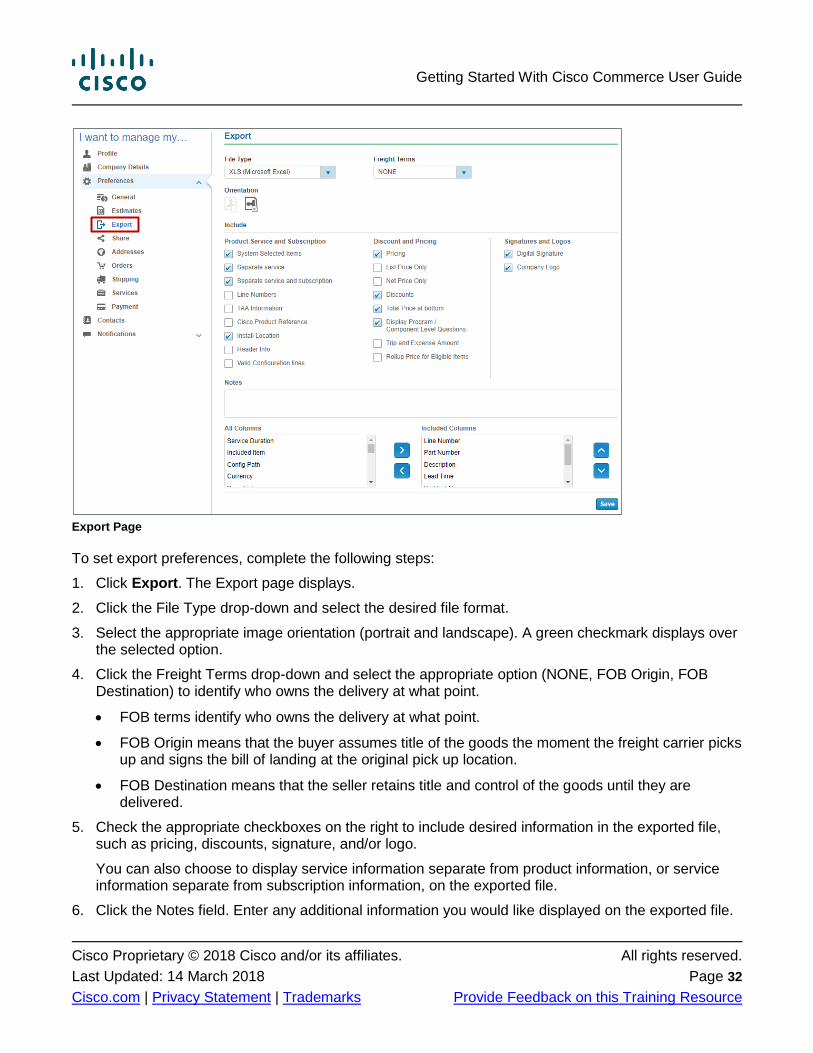
Export Page
To set export preferences, complete the following steps:
1. Click Export. The Export page displays.
2. Click the File Type drop-down and select the desired file format.
3. Select the appropriate image orientation (portrait and landscape). A green checkmark displays over the selected option.
4. Click the Freight Terms drop-down and select the appropriate option (NONE, FOB Origin, FOB Destination) to identify who owns the delivery at what point.
FOB terms identify who owns the delivery at what point.
FOB Origin means that the buyer assumes title of the goods the moment the freight carrier picks up and signs the bill of landing at the original pick up location.
FOB Destination means that the seller retains title and control of the goods until they are delivered.
5. Check the appropriate checkboxes on the right to include desired information in the exported file, such as pricing, discounts, signature, and/or logo.
You can also choose to display service information separate from product information, or service information separate from subscription information, on the exported file.
6. Click the Notes field. Enter any additional information you would like displayed on the exported file.
Getting Started With Cisco Commerce User Guide
Cisco Proprietary © 2018 Cisco and/or its affiliates. All rights reserved.
Last Updated: 14 March 2018 Page 33
Cisco.com | Privacy Statement | Trademarks Provide Feedback on this Training Resource
7. Select the desired fields under the All Columns section and use the arrows to arrange as desired.
8. Click Save. A green success message displays.
5.3.4 Setting Sharing Preferences
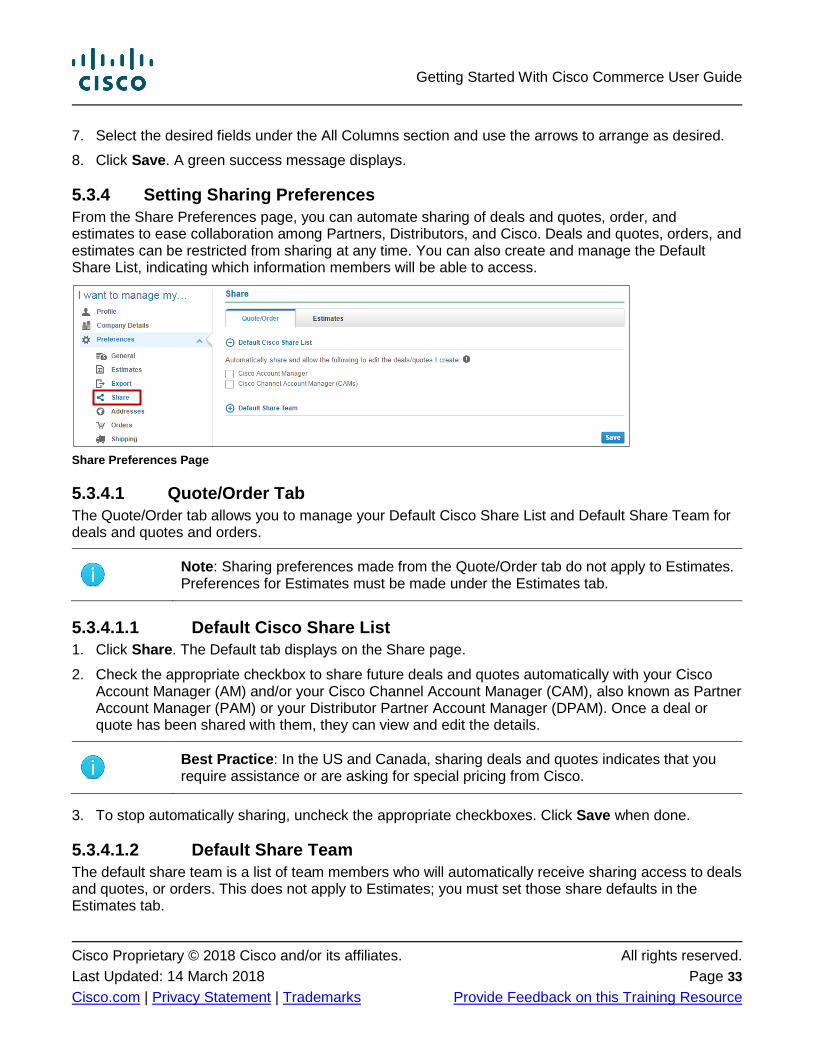
From the Share Preferences page, you can automate sharing of deals and quotes, order, and estimates to ease collaboration among Partners, Distributors, and Cisco. Deals and quotes, orders, and estimates can be restricted from sharing at any time. You can also create and manage the Default Share List, indicating which information members will be able to access.
Share Preferences Page
5.3.4.1 Quote/Order Tab
The Quote/Order tab allows you to manage your Default Cisco Share List and Default Share Team for deals and quotes and orders.
Note: Sharing preferences made from the Quote/Order tab do not apply to Estimates. Preferences for Estimates must be made under the Estimates tab.
5.3.4.1.1 Default Cisco Share List
1. Click Share. The Default tab displays on the Share page.
2. Check the appropriate checkbox to share future deals and quotes automatically with your Cisco Account Manager (AM) and/or your Cisco Channel Account Manager (CAM), also known as Partner Account Manager (PAM) or your Distributor Partner Account Manager (DPAM). Once a deal or quote has been shared with them, they can view and edit the details.
Best Practice: In the US and Canada, sharing deals and quotes indicates that you require assistance or are asking for special pricing from Cisco.
3. To stop automatically sharing, uncheck the appropriate checkboxes. Click Save when done.
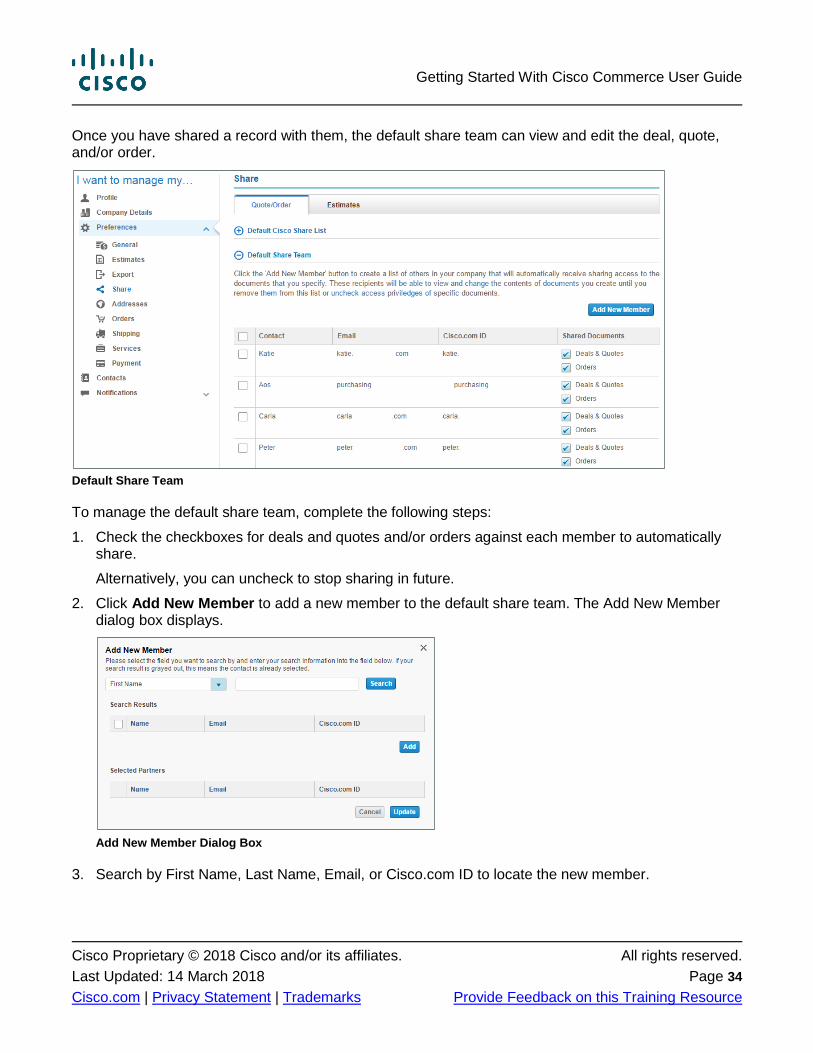
5.3.4.1.2 Default Share Team
The default share team is a list of team members who will automatically receive sharing access to deals and quotes, or orders. This does not apply to Estimates; you must set those share defaults in the Estimates tab.
Getting Started With Cisco Commerce User Guide
Cisco Proprietary © 2018 Cisco and/or its affiliates. All rights reserved.
Last Updated: 14 March 2018 Page 34
Cisco.com | Privacy Statement | Trademarks Provide Feedback on this Training Resource
Once you have shared a record with them, the default share team can view and edit the deal, quote, and/or order.
Default Share Team
To manage the default share team, complete the following steps:
1. Check the checkboxes for deals and quotes and/or orders against each member to automatically share.
Alternatively, you can uncheck to stop sharing in future.
2. Click Add New Member to add a new member to the default share team. The Add New Member dialog box displays.
Add New Member Dialog Box
3. Search by First Name, Last Name, Email, or Cisco.com ID to locate the new member.
Getting Started With Cisco Commerce User Guide
Cisco Proprietary © 2018 Cisco and/or its affiliates. All rights reserved.
Last Updated: 14 March 2018 Page 35
Cisco.com | Privacy Statement | Trademarks Provide Feedback on this Training Resource
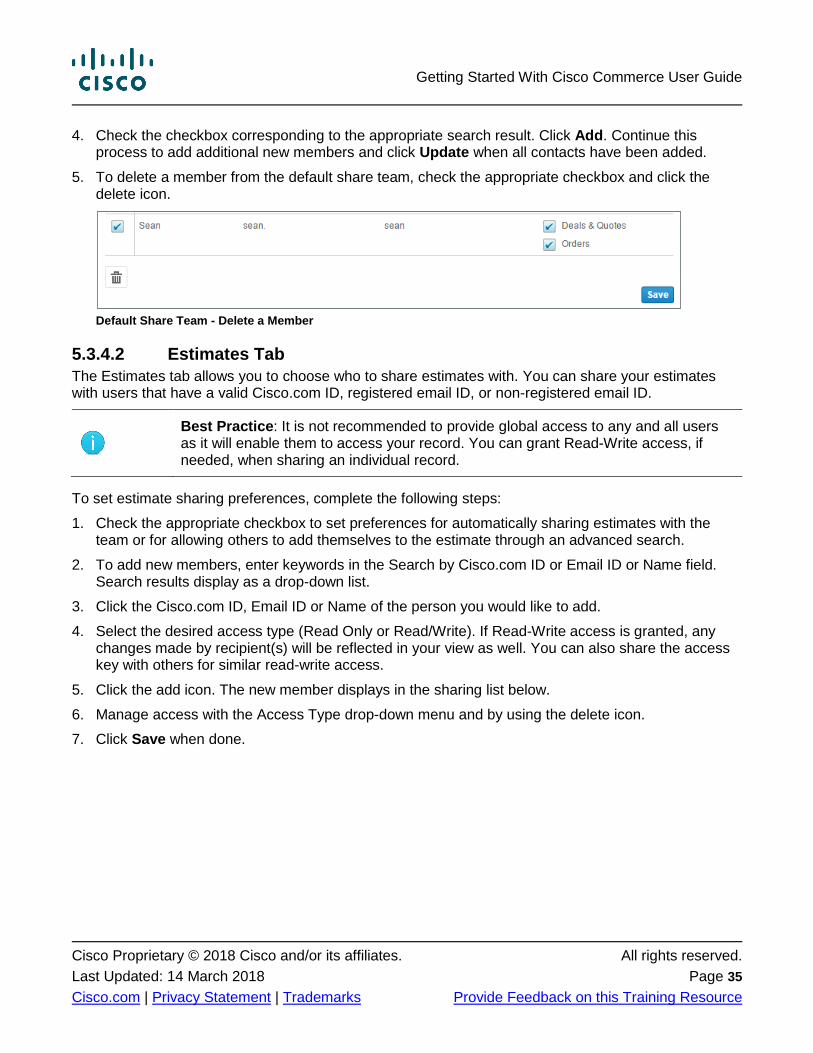
4. Check the checkbox corresponding to the appropriate search result. Click Add. Continue this process to add additional new members and click Update when all contacts have been added.
5. To delete a member from the default share team, check the appropriate checkbox and click the delete icon.
Default Share Team - Delete a Member
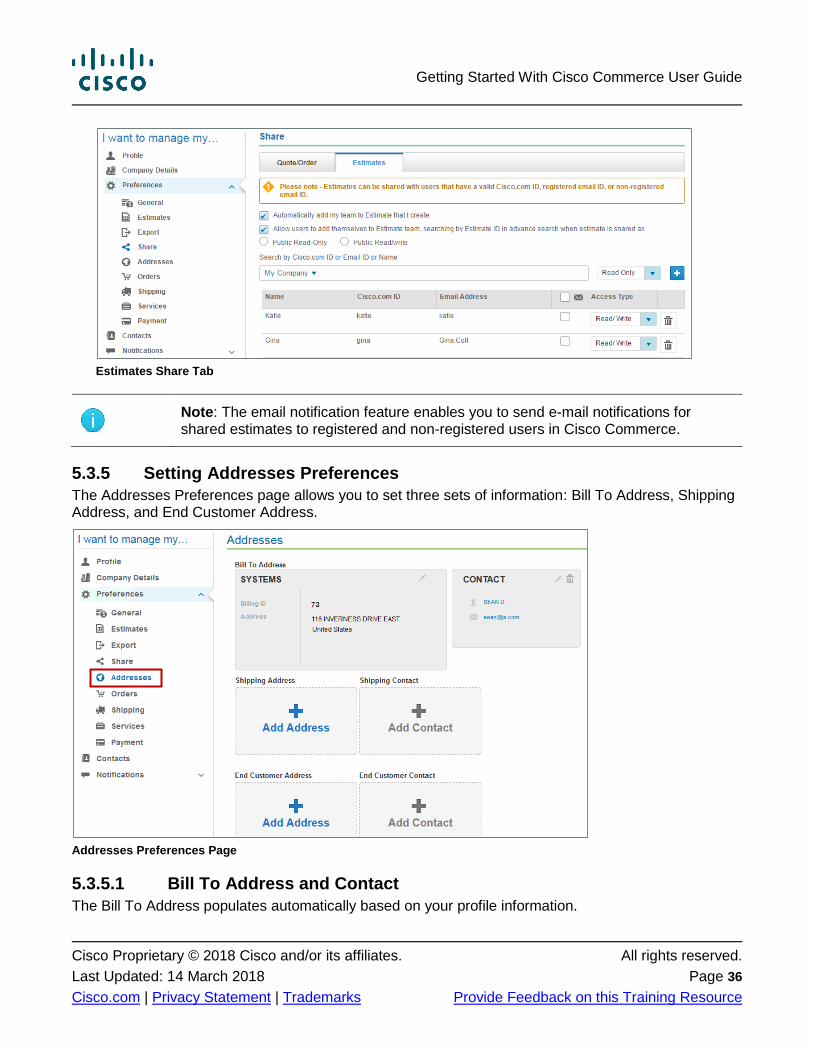
5.3.4.2 Estimates Tab
The Estimates tab allows you to choose who to share estimates with. You can share your estimates with users that have a valid Cisco.com ID, registered email ID, or non-registered email ID.
Best Practice: It is not recommended to provide global access to any and all users as it will enable them to access your record. You can grant Read-Write access, if needed, when sharing an individual record.
To set estimate sharing preferences, complete the following steps:
1. Check the appropriate checkbox to set preferences for automatically sharing estimates with the team or for allowing others to add themselves to the estimate through an advanced search.
2. To add new members, enter keywords in the Search by Cisco.com ID or Email ID or Name field. Search results display as a drop-down list.
3. Click the Cisco.com ID, Email ID or Name of the person you would like to add.
4. Select the desired access type (Read Only or Read/Write). If Read-Write access is granted, any changes made by recipient(s) will be reflected in your view as well. You can also share the access key with others for similar read-write access.
5. Click the add icon. The new member displays in the sharing list below.
6. Manage access with the Access Type drop-down menu and by using the delete icon.
7. Click Save when done.
Getting Started With Cisco Commerce User Guide
Cisco Proprietary © 2018 Cisco and/or its affiliates. All rights reserved.
Last Updated: 14 March 2018 Page 36
Cisco.com | Privacy Statement | Trademarks Provide Feedback on this Training Resource
Estimates Share Tab
Note: The email notification feature enables you to send e-mail notifications for shared estimates to registered and non-registered users in Cisco Commerce.
5.3.5 Setting Addresses Preferences
The Addresses Preferences page allows you to set three sets of information: Bill To Address, Shipping Address, and End Customer Address.
Addresses Preferences Page
5.3.5.1 Bill To Address and Contact
The Bill To Address populates automatically based on your profile information.
Getting Started With Cisco Commerce User Guide
Cisco Proprietary © 2018 Cisco and/or its affiliates. All rights reserved.
Last Updated: 14 March 2018 Page 37
Cisco.com | Privacy Statement | Trademarks Provide Feedback on this Training Resource
5.3.5.1.1 Changing the Bill To Address
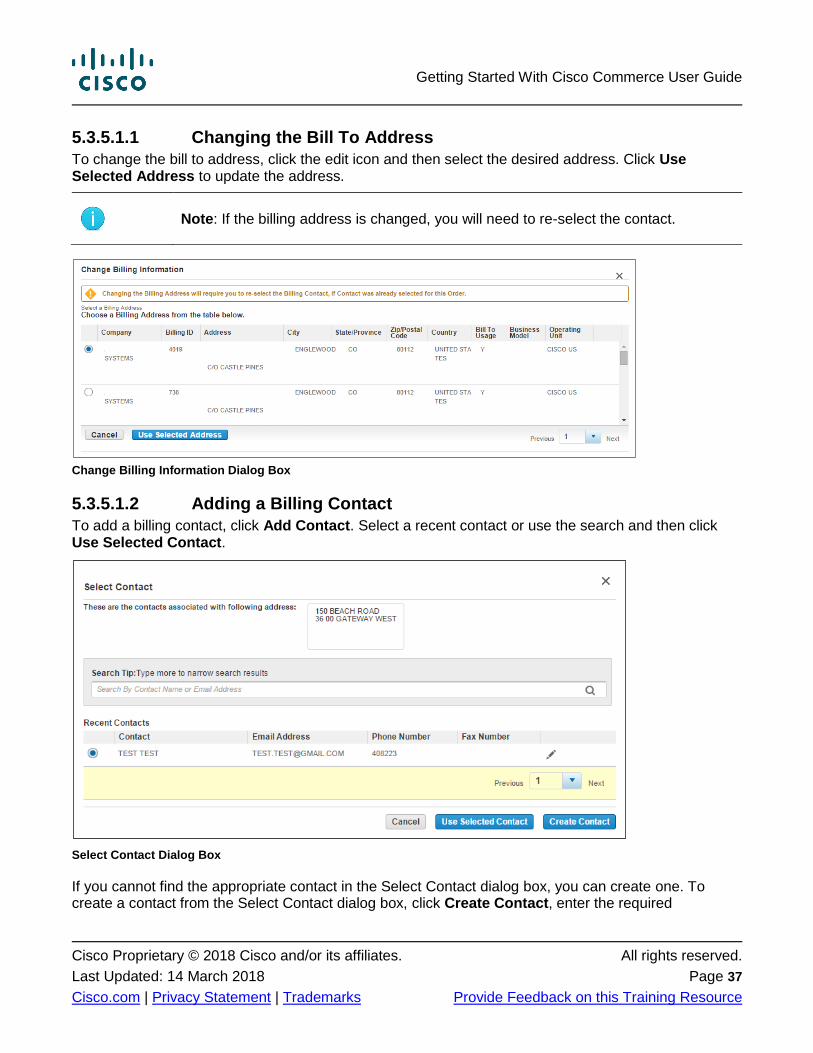
To change the bill to address, click the edit icon and then select the desired address. Click Use Selected Address to update the address.
Note: If the billing address is changed, you will need to re-select the contact.
Change Billing Information Dialog Box
5.3.5.1.2 Adding a Billing Contact
To add a billing contact, click Add Contact. Select a recent contact or use the search and then click Use Selected Contact.
Select Contact Dialog Box
If you cannot find the appropriate contact in the Select Contact dialog box, you can create one. To create a contact from the Select Contact dialog box, click Create Contact, enter the required
Getting Started With Cisco Commerce User Guide
Cisco Proprietary © 2018 Cisco and/or its affiliates. All rights reserved.
Last Updated: 14 March 2018 Page 38
Cisco.com | Privacy Statement | Trademarks Provide Feedback on this Training Resource
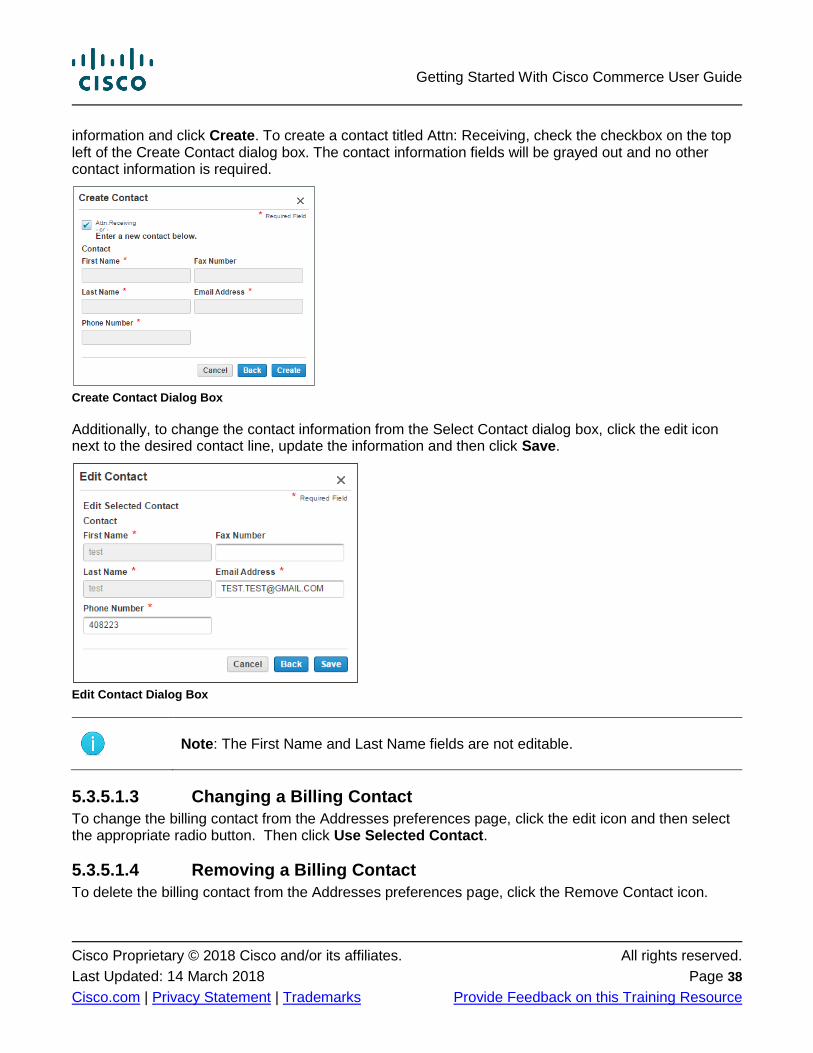
information and click Create. To create a contact titled Attn: Receiving, check the checkbox on the top left of the Create Contact dialog box. The contact information fields will be grayed out and no other contact information is required.
Create Contact Dialog Box
Additionally, to change the contact information from the Select Contact dialog box, click the edit icon next to the desired contact line, update the information and then click Save.
Edit Contact Dialog Box
Note: The First Name and Last Name fields are not editable.
5.3.5.1.3 Changing a Billing Contact
To change the billing contact from the Addresses preferences page, click the edit icon and then select the appropriate radio button. Then click Use Selected Contact.
5.3.5.1.4 Removing a Billing Contact
To delete the billing contact from the Addresses preferences page, click the Remove Contact icon.
Getting Started With Cisco Commerce User Guide
Cisco Proprietary © 2018 Cisco and/or its affiliates. All rights reserved.
Last Updated: 14 March 2018 Page 39
Cisco.com | Privacy Statement | Trademarks Provide Feedback on this Training Resource
5.3.5.2 Shipping Addresses and Contact
To add or update the shipping address and contact, review the following sections.
5.3.5.2.1 Adding a Shipping Address
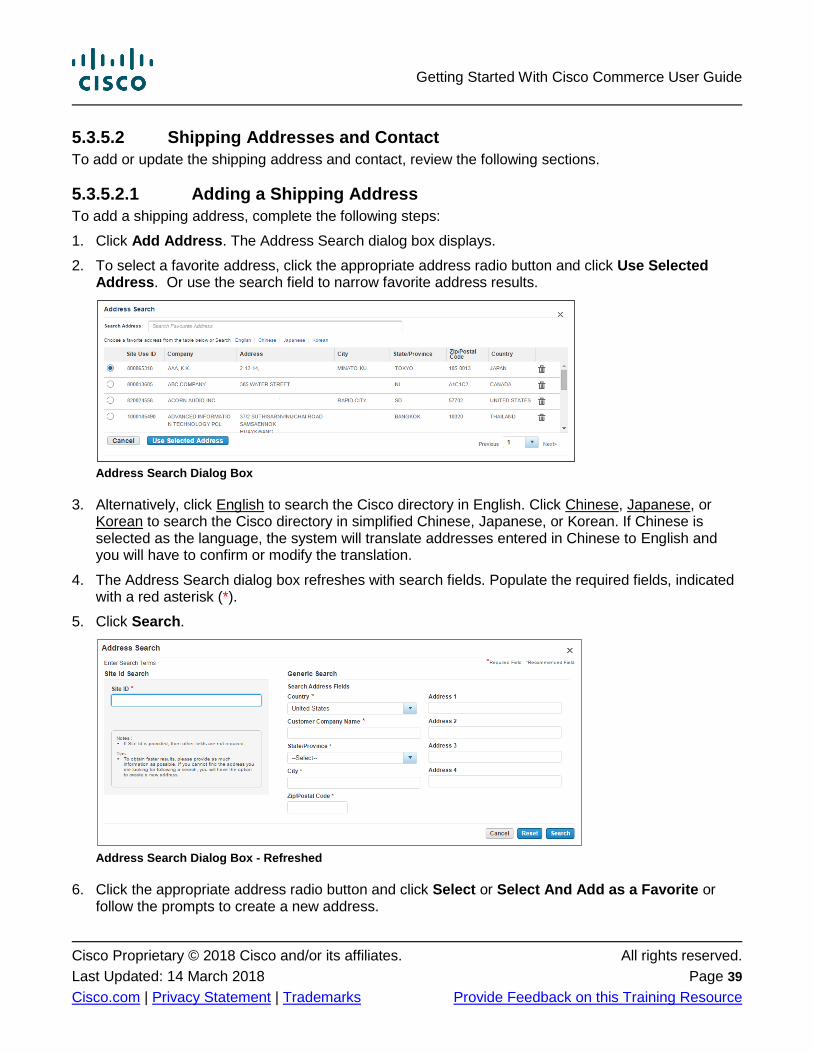
To add a shipping address, complete the following steps:
1. Click Add Address. The Address Search dialog box displays.
2. To select a favorite address, click the appropriate address radio button and click Use Selected Address. Or use the search field to narrow favorite address results.
Address Search Dialog Box
3. Alternatively, click English to search the Cisco directory in English. Click Chinese, Japanese, or Korean to search the Cisco directory in simplified Chinese, Japanese, or Korean. If Chinese is selected as the language, the system will translate addresses entered in Chinese to English and you will have to confirm or modify the translation.
4. The Address Search dialog box refreshes with search fields. Populate the required fields, indicated with a red asterisk (*).
5. Click Search.
Address Search Dialog Box - Refreshed
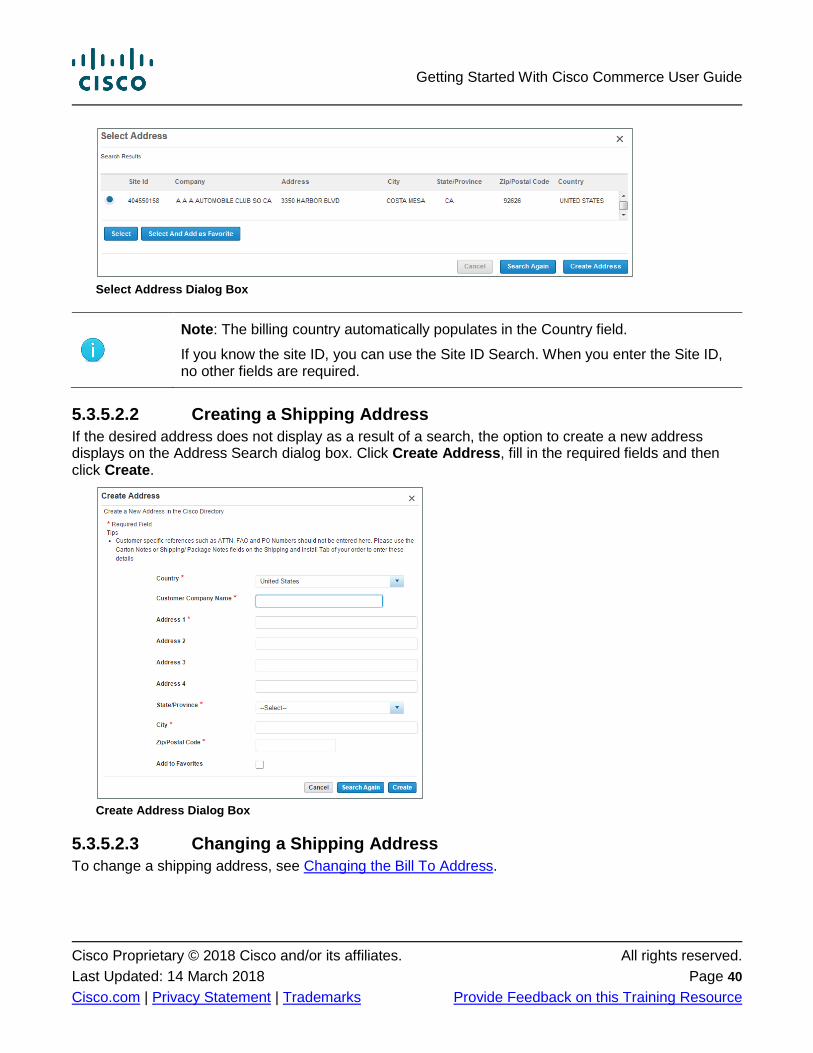
6. Click the appropriate address radio button and click Select or Select And Add as a Favorite or follow the prompts to create a new address.
Getting Started With Cisco Commerce User Guide
Cisco Proprietary © 2018 Cisco and/or its affiliates. All rights reserved.
Last Updated: 14 March 2018 Page 40
Cisco.com | Privacy Statement | Trademarks Provide Feedback on this Training Resource
Select Address Dialog Box
Note: The billing country automatically populates in the Country field.
If you know the site ID, you can use the Site ID Search. When you enter the Site ID, no other fields are required.
5.3.5.2.2 Creating a Shipping Address
If the desired address does not display as a result of a search, the option to create a new address displays on the Address Search dialog box. Click Create Address, fill in the required fields and then click Create.
Create Address Dialog Box
5.3.5.2.3 Changing a Shipping Address
To change a shipping address, see Changing the Bill To Address.
Getting Started With Cisco Commerce User Guide
Cisco Proprietary © 2018 Cisco and/or its affiliates. All rights reserved.
Last Updated: 14 March 2018 Page 41
Cisco.com | Privacy Statement | Trademarks Provide Feedback on this Training Resource
5.3.5.2.4 Deleting a Shipping Address
To remove a shipping address, click the Remove Address icon.
5.3.5.2.5 View Localized Address
Click the Globe icon to view the localized address, if available.
5.3.5.2.6 Adding a Shipping Contact
To add a shipping contact, see section Adding a Billing Contact
5.3.5.2.7 Changing or Removing a Shipping Contact
To change or remove a shipping contact, see Changing a Billing Contact and Removing a Billing Contact.
5.3.5.3 End Customer Address and Contact
The steps for adding, creating, changing, or deleting the end customer address are the same as for the shipping address.
See Adding a Shipping Address
See Creating a Shipping Address
See Changing a Shipping Address
See Deleting a Shipping Address
The steps for changing or deleting the end customer contact information are the same as for the billing contact.
See Adding a Billing Contact
See Changing a Billing Contact
See Removing a Billing Contact
5.3.6 Setting Orders Preferences
The Order Preferences page allows you to manage payment information. Any modifications made on this page will automatically apply to all new orders. The Order Processing Issues Contact is expanded by default.
5.3.6.1 Setting Order Processing Issues Contact
To set Order preferences, complete the following steps:
1. PO Line References: Click the appropriate radio button to indicate if there is a purchase order (PO) line reference.

Getting Started With Cisco Commerce User Guide
Cisco Proprietary © 2018 Cisco and/or its affiliates. All rights reserved.
Last Updated: 14 March 2018 Page 42
Cisco.com | Privacy Statement | Trademarks Provide Feedback on this Training Resource
Note: PO Line Reference is mandatory for companies that are invoiced electronically; click the Yes radio button. For companies that do not require electronic invoicing, the setting can be Yes or No. Click the Yes radio button if the internal PO line number will be referenced on orders.
2. Payment Terms: The system parameters define the payment terms.
3. Issues Contact Information: Enter the contact information for who should be contacted in case there is an issue with an order. Click Use my information to automatically populate the fields with your contact information.
To manually complete this section, click each field and enter the appropriate information.
4. Click Save.
Order Preferences Page
Note: You can assign a holding smart account and/or a customer smart account by expanding the Assign Smart Account section. However, the Default Holding Smart Account will only be used for B2B orders.
5.3.6.2 Assigning Smart Account
To assign a smart account for a B2B order, complete the following steps:
1. Click Assign Smart Account. The Assign Default Holding Smart Account dialog box displays.
2. If you have a smart account domain identifier, enter the same in the field; else, click Request New Holding Smart Account. The New Holding Smart Account Request dialog box displays.
Getting Started With Cisco Commerce User Guide
Cisco Proprietary © 2018 Cisco and/or its affiliates. All rights reserved.
Last Updated: 14 March 2018 Page 43
Cisco.com | Privacy Statement | Trademarks Provide Feedback on this Training Resource
Default Holding Smart Account Dialog Box
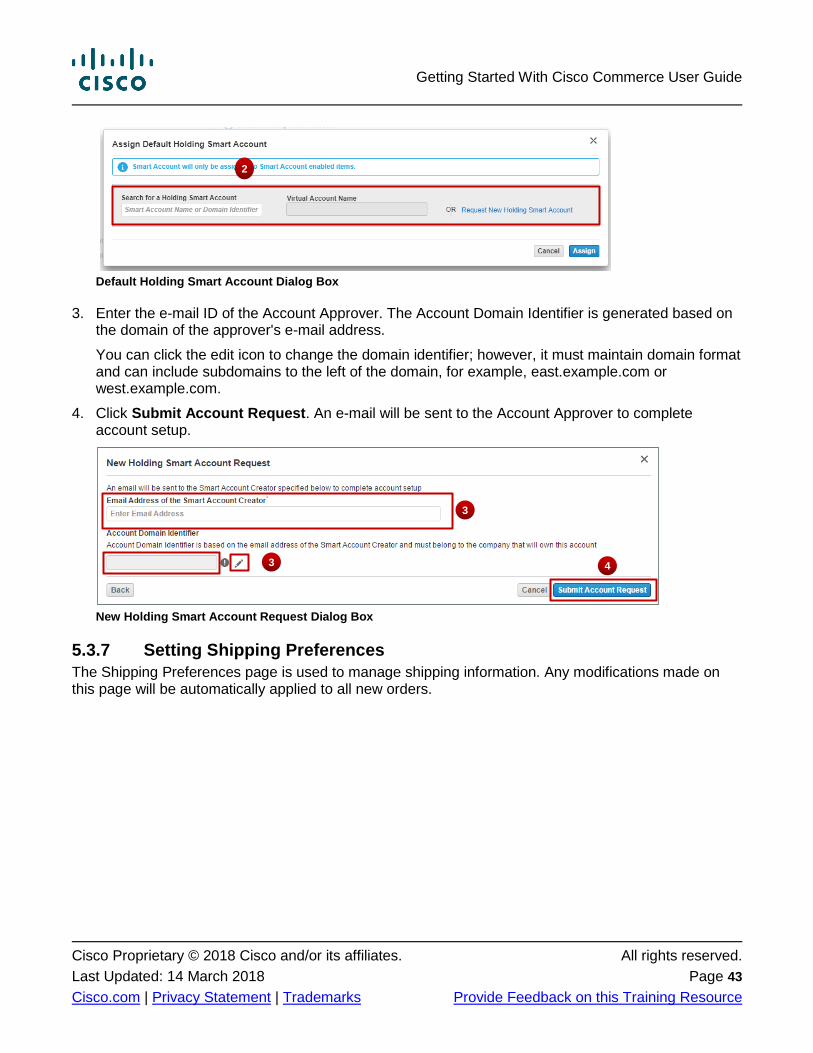
3. Enter the e-mail ID of the Account Approver. The Account Domain Identifier is generated based on the domain of the approver's e-mail address.
You can click the edit icon to change the domain identifier; however, it must maintain domain format and can include subdomains to the left of the domain, for example, east.example.com or west.example.com.
4. Click Submit Account Request. An e-mail will be sent to the Account Approver to complete account setup.
New Holding Smart Account Request Dialog Box
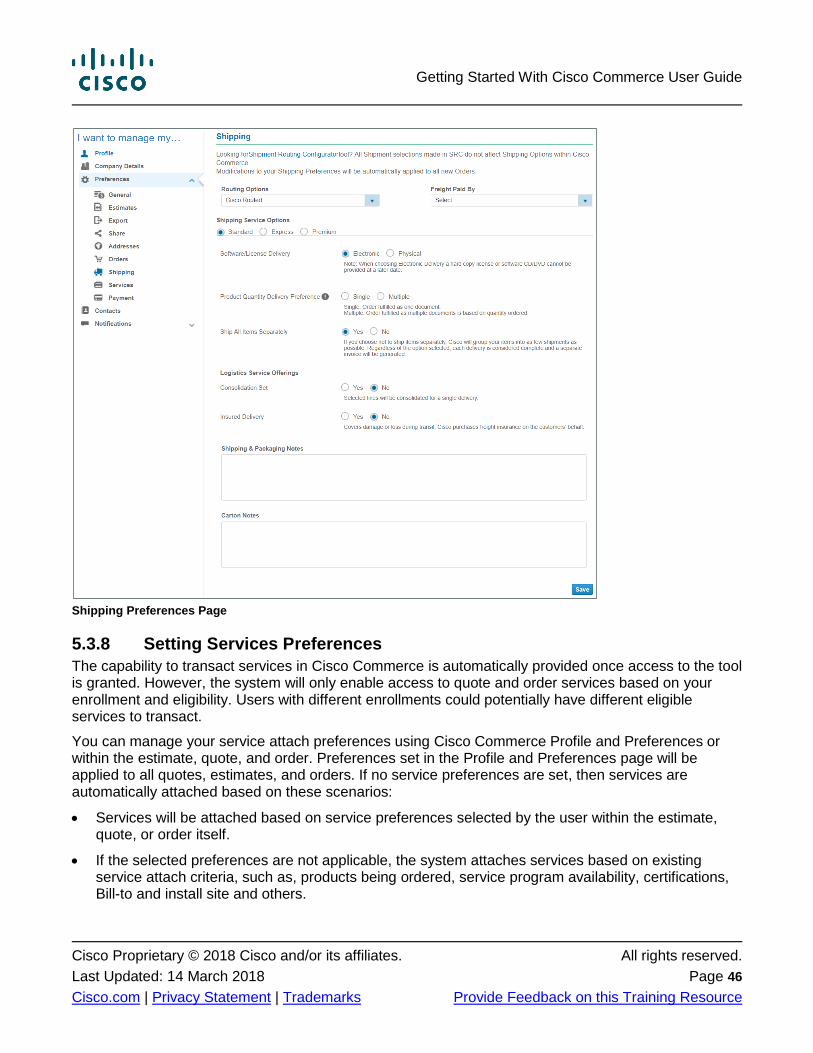
5.3.7 Setting Shipping Preferences
The Shipping Preferences page is used to manage shipping information. Any modifications made on this page will be automatically applied to all new orders.
2
3
3 4

Getting Started With Cisco Commerce User Guide
Cisco Proprietary © 2018 Cisco and/or its affiliates. All rights reserved.
Last Updated: 14 March 2018 Page 44
Cisco.com | Privacy Statement | Trademarks Provide Feedback on this Training Resource
Shipping Preferences Page
Note: Access the Shipment Routing Configurator tool from the Shipping Preference page to configure and optimize detailed global shipment routing and delivery preferences. By establishing defaults, the efficiency and accuracy of the routing process is maximized.
1. Routing Options: Click the Routing Options drop-down arrow and select the desired option.
Cisco Routed: Available options include Pre-shipment Inspections and Special Transport.
Self-Routed: Available options include Special Delivery Time, Carrier Will Call, Contact Prior to Delivery, Pre-shipment Inspection, Authorized Receiving Party, Remove Packaging, Inside Delivery and Special Transport.
2. Freight Paid By: Click the Freight Paid By drop-down arrow and select the desired option
3. Shipping Service Options: Select the desired option to indicate the shipping option - Standard, Express, or Premium. Refer to the following table and click the appropriate radio button.
Option US EMEAR APJC
Standard 3-7 days 3-5 days 5-9 business days
Express 2 days 1-2 days 5-7 business days
Premium Next day Not available in EMEAR 5 business days
4. Software/License Delivery: Indicate whether software and licensing should be delivered
electronically or through physical mail.
Getting Started With Cisco Commerce User Guide
Cisco Proprietary © 2018 Cisco and/or its affiliates. All rights reserved.
Last Updated: 14 March 2018 Page 45
Cisco.com | Privacy Statement | Trademarks Provide Feedback on this Training Resource
Click the Electronic radio button to indicate that software and licensing should be delivered via email.
When choosing electronic delivery, a hard-copy license or software CD/DVD cannot be provided at a later date.
Alternatively, click the Physical radio button to indicate that software and licensing should be delivered through physical mail.
5. Product Quantity Delivery Preference: When ordering multiple licenses of a single product, indicate single or multiple license keys.
Click the Single radio button to indicate that only one license key is needed for the multiple licenses. If 100 licenses are ordered and Single is selected, one (1) PAK is delivered.
Alternatively, click the Multiple radio button to indicate that multiple license keys are needed for the licenses. If 100 licenses are ordered and Multiple is selected, 100 different PAKs are delivered.
6. Ship All Items Separately: Indicate whether it is acceptable for Cisco to ship the items separately.
Click the Yes radio button to indicate that it is acceptable to ship order items as they become available, even if that means that there will be multiple separate shipments. If separate shipments are made, separate invoices will also be generated.
Click the No radio button to indicate that all order items should be held for a one-time shipment.
7. Logistics Service Offerings: Provides Logistics related service offerings
Consolidation Set: Click the Yes radio button, if you would like the items to be consolidated for a single delivery. If consolidation is not needed, Click on No radio button
Insured Delivery: Covers damage or loss during transit. Cisco purchases freight insurance on the customers’ behalf. Click the Yes radio button, if you would like Cisco to purchase freight insurance on your behalf. If freight insurance is not needed, Click on No radio button
8. Shipping & Packaging Notes: In this section, enter any information that needs to display on all packaging slips and invoices. Click the field and enter appropriate information. This field can be modified for specific orders.
9. Carton Notes: In this section, enter any information that needs to display on carton labels. Click the field and enter appropriate information.
10. Click Save. A green success message displays.
Getting Started With Cisco Commerce User Guide
Cisco Proprietary © 2018 Cisco and/or its affiliates. All rights reserved.
Last Updated: 14 March 2018 Page 46
Cisco.com | Privacy Statement | Trademarks Provide Feedback on this Training Resource
Shipping Preferences Page
5.3.8 Setting Services Preferences
The capability to transact services in Cisco Commerce is automatically provided once access to the tool is granted. However, the system will only enable access to quote and order services based on your enrollment and eligibility. Users with different enrollments could potentially have different eligible services to transact.
You can manage your service attach preferences using Cisco Commerce Profile and Preferences or within the estimate, quote, and order. Preferences set in the Profile and Preferences page will be applied to all quotes, estimates, and orders. If no service preferences are set, then services are automatically attached based on these scenarios:
Services will be attached based on service preferences selected by the user within the estimate, quote, or order itself.
If the selected preferences are not applicable, the system attaches services based on existing service attach criteria, such as, products being ordered, service program availability, certifications, Bill-to and install site and others.
Getting Started With Cisco Commerce User Guide
Cisco Proprietary © 2018 Cisco and/or its affiliates. All rights reserved.
Last Updated: 14 March 2018 Page 47
Cisco.com | Privacy Statement | Trademarks Provide Feedback on this Training Resource
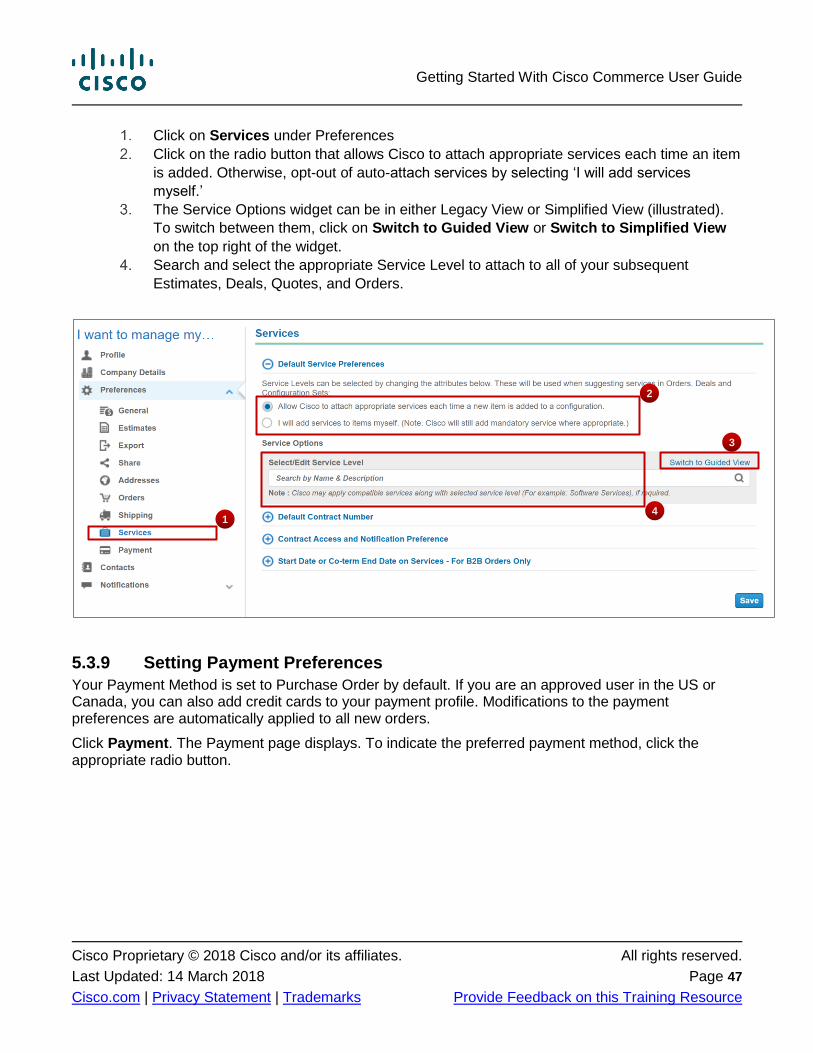
Click on Services under Preferences
Click on the radio button that allows Cisco to attach appropriate services each time an item
is added. Otherwise, opt-out of auto-attach services by selecting ‘I will add services
myself.’
The Service Options widget can be in either Legacy View or Simplified View (illustrated).
To switch between them, click on Switch to Guided View or Switch to Simplified View
on the top right of the widget.
Search and select the appropriate Service Level to attach to all of your subsequent
Estimates, Deals, Quotes, and Orders.
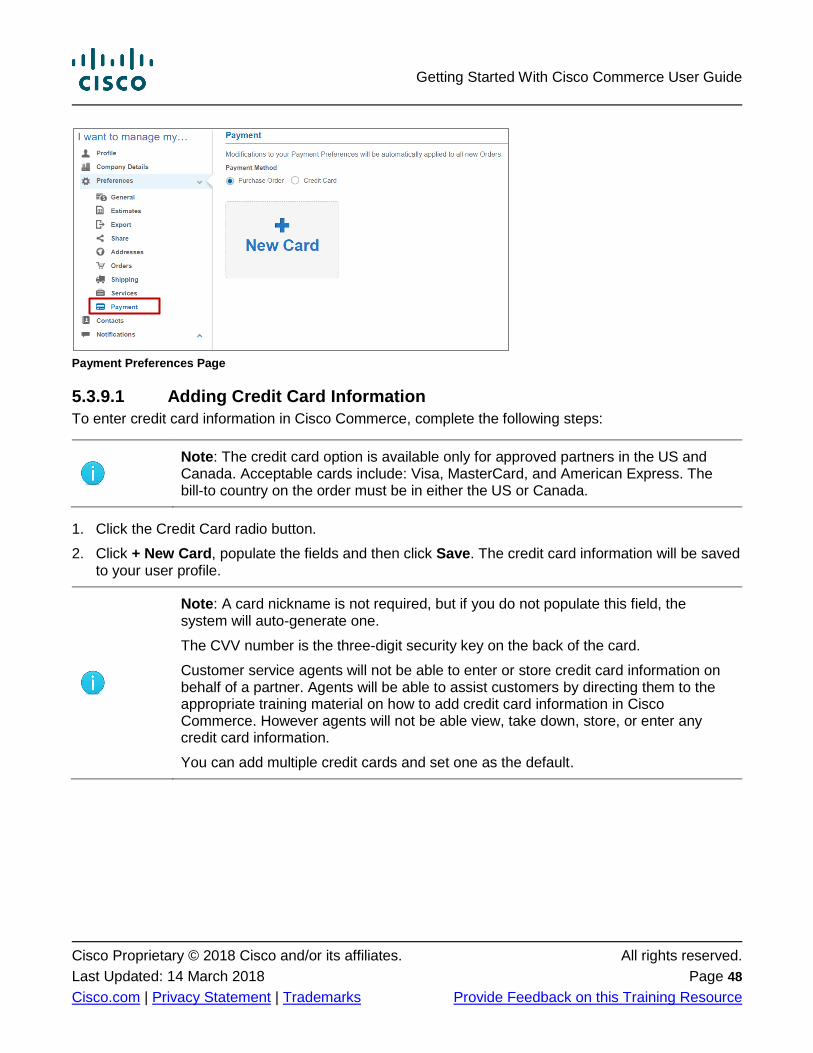
5.3.9 Setting Payment Preferences
Your Payment Method is set to Purchase Order by default. If you are an approved user in the US or Canada, you can also add credit cards to your payment profile. Modifications to the payment preferences are automatically applied to all new orders.
Click Payment. The Payment page displays. To indicate the preferred payment method, click the appropriate radio button.
1
2
3
4
Getting Started With Cisco Commerce User Guide
Cisco Proprietary © 2018 Cisco and/or its affiliates. All rights reserved.
Last Updated: 14 March 2018 Page 48
Cisco.com | Privacy Statement | Trademarks Provide Feedback on this Training Resource
Payment Preferences Page
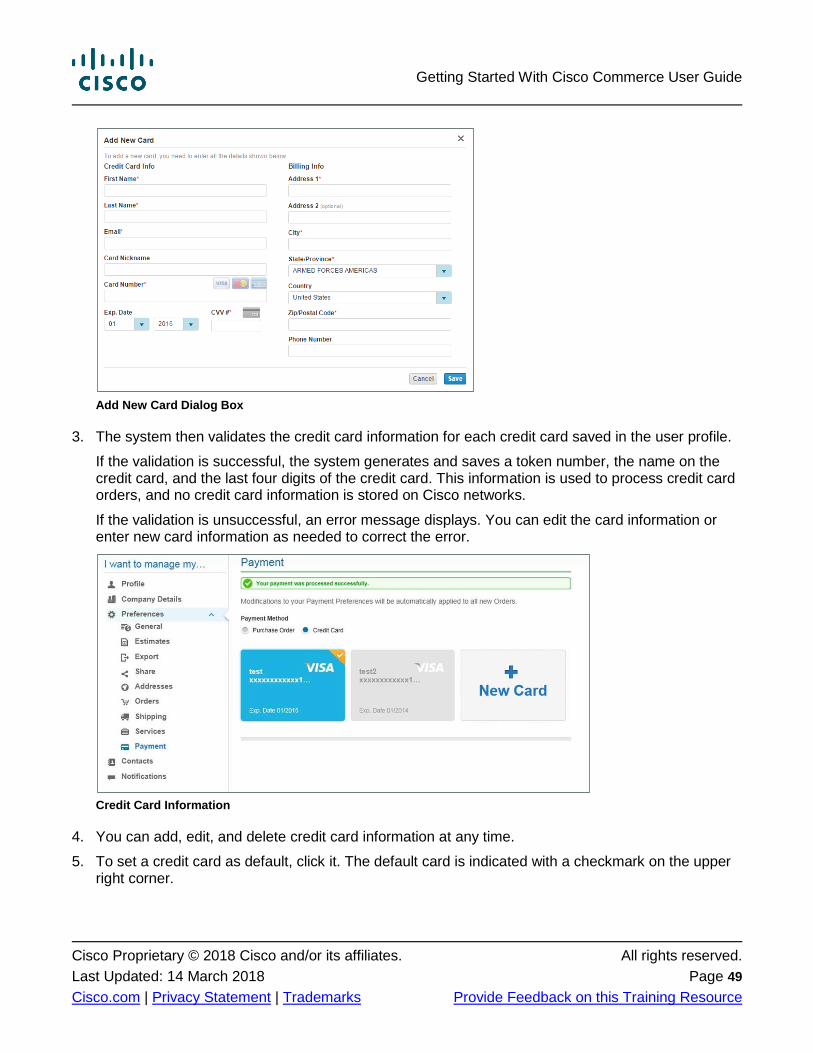
5.3.9.1 Adding Credit Card Information
To enter credit card information in Cisco Commerce, complete the following steps:
Note: The credit card option is available only for approved partners in the US and Canada. Acceptable cards include: Visa, MasterCard, and American Express. The bill-to country on the order must be in either the US or Canada.
1. Click the Credit Card radio button.
2. Click + New Card, populate the fields and then click Save. The credit card information will be saved to your user profile.
Note: A card nickname is not required, but if you do not populate this field, the system will auto-generate one.
The CVV number is the three-digit security key on the back of the card.
Customer service agents will not be able to enter or store credit card information on behalf of a partner. Agents will be able to assist customers by directing them to the appropriate training material on how to add credit card information in Cisco Commerce. However agents will not be able view, take down, store, or enter any credit card information.
You can add multiple credit cards and set one as the default.
Getting Started With Cisco Commerce User Guide
Cisco Proprietary © 2018 Cisco and/or its affiliates. All rights reserved.
Last Updated: 14 March 2018 Page 49
Cisco.com | Privacy Statement | Trademarks Provide Feedback on this Training Resource
Add New Card Dialog Box
3. The system then validates the credit card information for each credit card saved in the user profile.
If the validation is successful, the system generates and saves a token number, the name on the credit card, and the last four digits of the credit card. This information is used to process credit card orders, and no credit card information is stored on Cisco networks.
If the validation is unsuccessful, an error message displays. You can edit the card information or enter new card information as needed to correct the error.
Credit Card Information
4. You can add, edit, and delete credit card information at any time.
5. To set a credit card as default, click it. The default card is indicated with a checkmark on the upper right corner.
Getting Started With Cisco Commerce User Guide
Cisco Proprietary © 2018 Cisco and/or its affiliates. All rights reserved.
Last Updated: 14 March 2018 Page 50
Cisco.com | Privacy Statement | Trademarks Provide Feedback on this Training Resource
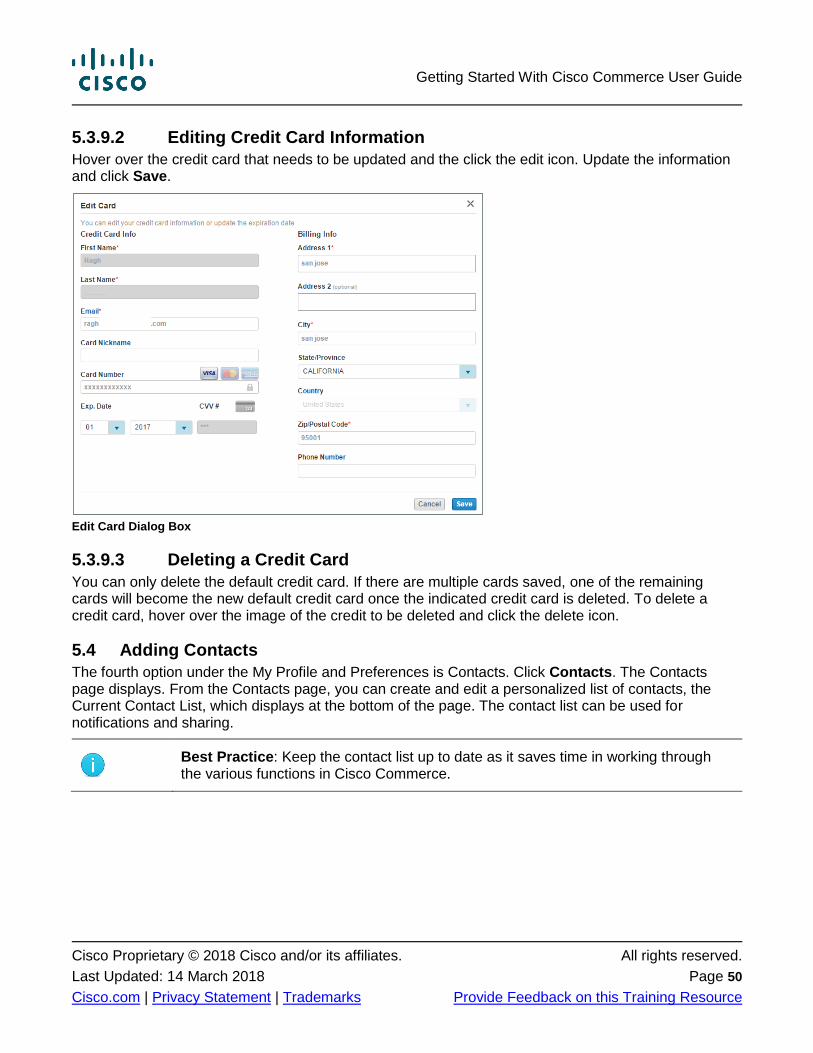
5.3.9.2 Editing Credit Card Information
Hover over the credit card that needs to be updated and the click the edit icon. Update the information and click Save.
Edit Card Dialog Box
5.3.9.3 Deleting a Credit Card
You can only delete the default credit card. If there are multiple cards saved, one of the remaining cards will become the new default credit card once the indicated credit card is deleted. To delete a credit card, hover over the image of the credit to be deleted and click the delete icon.
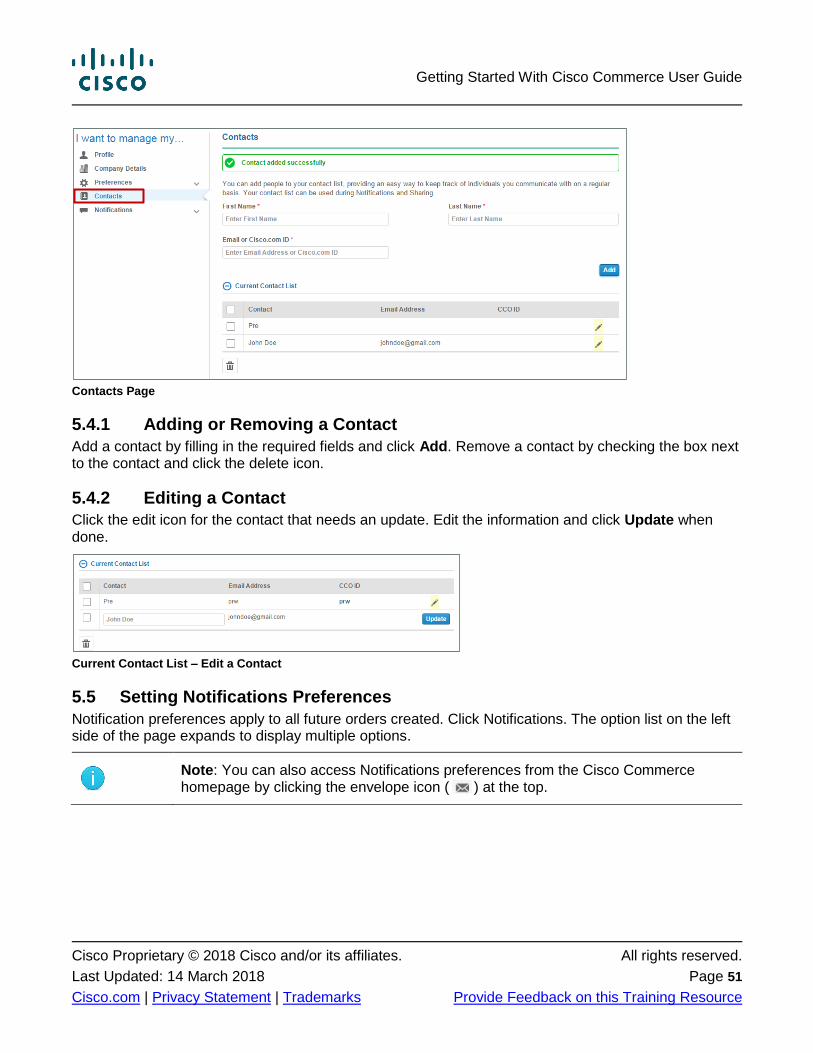
5.4 Adding Contacts
The fourth option under the My Profile and Preferences is Contacts. Click Contacts. The Contacts page displays. From the Contacts page, you can create and edit a personalized list of contacts, the Current Contact List, which displays at the bottom of the page. The contact list can be used for notifications and sharing.
Best Practice: Keep the contact list up to date as it saves time in working through the various functions in Cisco Commerce.
Getting Started With Cisco Commerce User Guide
Cisco Proprietary © 2018 Cisco and/or its affiliates. All rights reserved.
Last Updated: 14 March 2018 Page 51
Cisco.com | Privacy Statement | Trademarks Provide Feedback on this Training Resource
Contacts Page
5.4.1 Adding or Removing a Contact
Add a contact by filling in the required fields and click Add. Remove a contact by checking the box next to the contact and click the delete icon.
5.4.2 Editing a Contact
Click the edit icon for the contact that needs an update. Edit the information and click Update when done.
Current Contact List – Edit a Contact
5.5 Setting Notifications Preferences
Notification preferences apply to all future orders created. Click Notifications. The option list on the left side of the page expands to display multiple options.
Note: You can also access Notifications preferences from the Cisco Commerce homepage by clicking the envelope icon ( ) at the top.
Getting Started With Cisco Commerce User Guide
Cisco Proprietary © 2018 Cisco and/or its affiliates. All rights reserved.
Last Updated: 14 March 2018 Page 52
Cisco.com | Privacy Statement | Trademarks Provide Feedback on this Training Resource
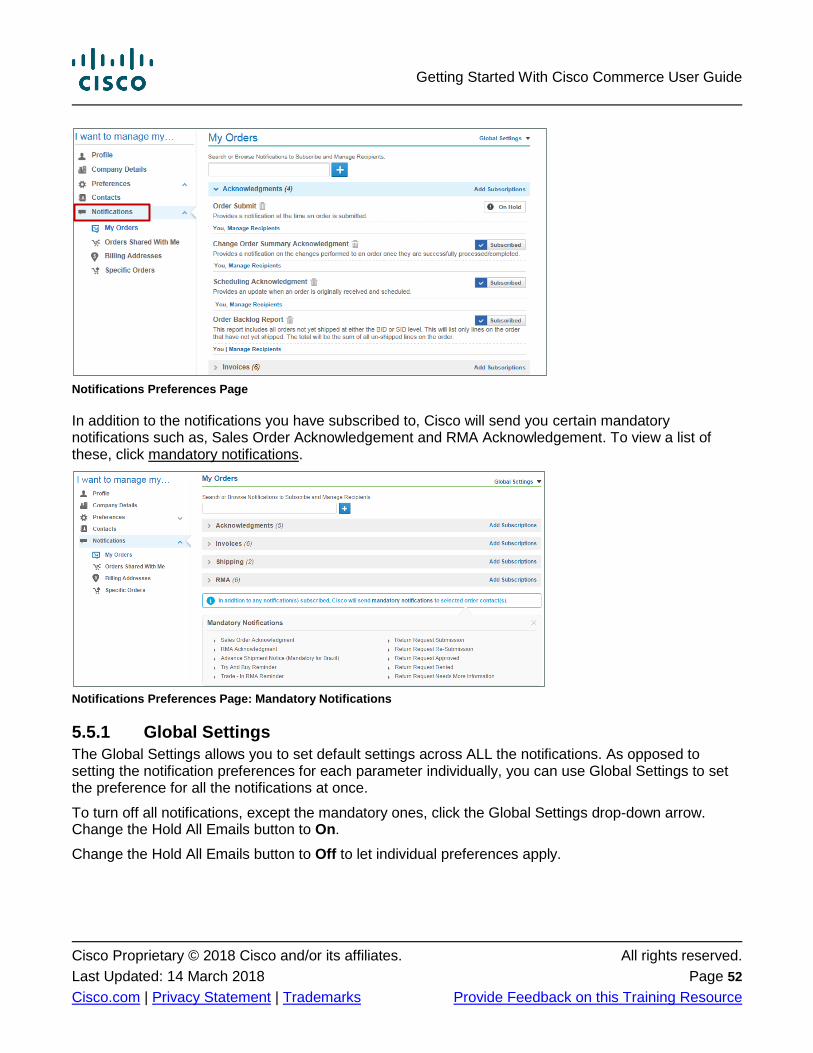
Notifications Preferences Page
In addition to the notifications you have subscribed to, Cisco will send you certain mandatory notifications such as, Sales Order Acknowledgement and RMA Acknowledgement. To view a list of these, click mandatory notifications.
Notifications Preferences Page: Mandatory Notifications
5.5.1 Global Settings
The Global Settings allows you to set default settings across ALL the notifications. As opposed to setting the notification preferences for each parameter individually, you can use Global Settings to set the preference for all the notifications at once.
To turn off all notifications, except the mandatory ones, click the Global Settings drop-down arrow. Change the Hold All Emails button to On.
Change the Hold All Emails button to Off to let individual preferences apply.
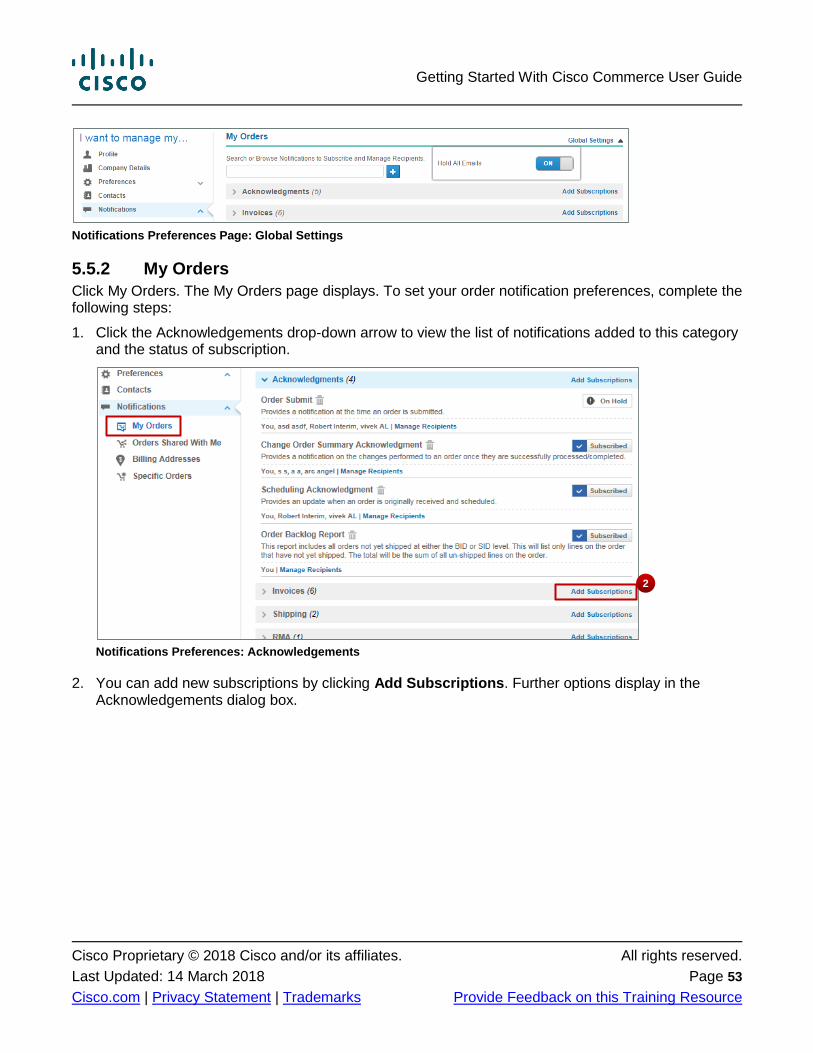
Getting Started With Cisco Commerce User Guide
Cisco Proprietary © 2018 Cisco and/or its affiliates. All rights reserved.
Last Updated: 14 March 2018 Page 53
Cisco.com | Privacy Statement | Trademarks Provide Feedback on this Training Resource
Notifications Preferences Page: Global Settings
5.5.2 My Orders
Click My Orders. The My Orders page displays. To set your order notification preferences, complete the following steps:
1. Click the Acknowledgements drop-down arrow to view the list of notifications added to this category and the status of subscription.
Notifications Preferences: Acknowledgements
2. You can add new subscriptions by clicking Add Subscriptions. Further options display in the Acknowledgements dialog box.
2
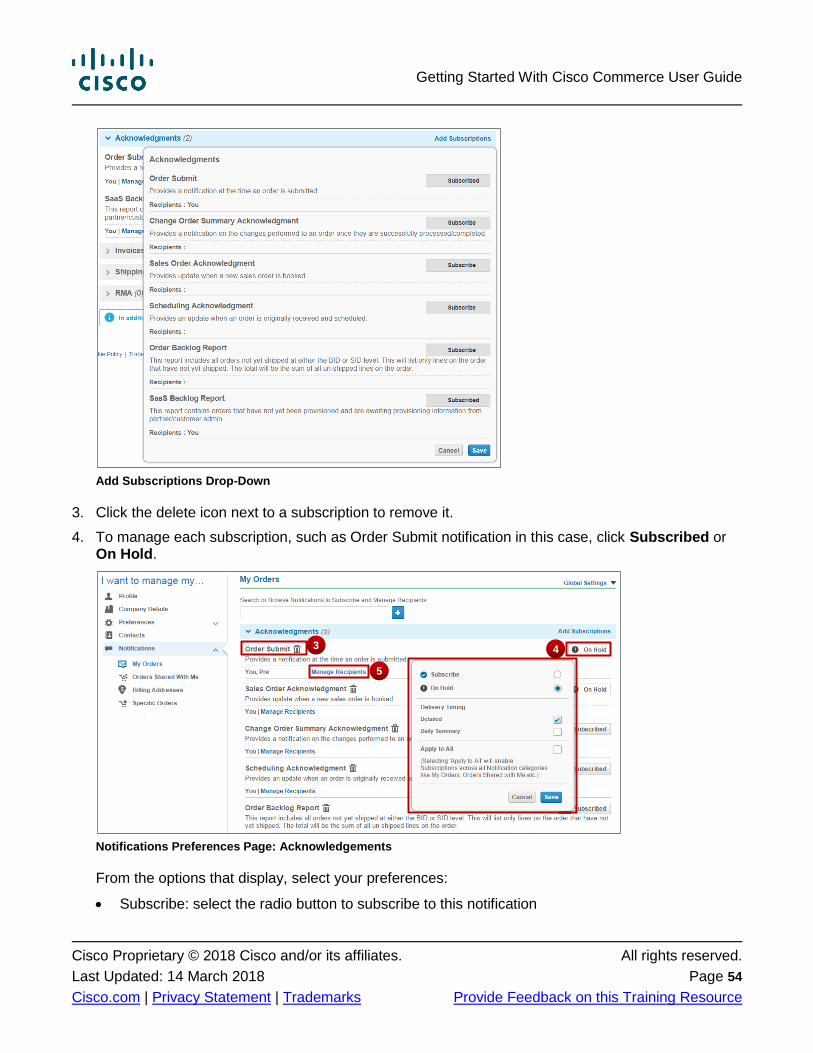
Getting Started With Cisco Commerce User Guide
Cisco Proprietary © 2018 Cisco and/or its affiliates. All rights reserved.
Last Updated: 14 March 2018 Page 54
Cisco.com | Privacy Statement | Trademarks Provide Feedback on this Training Resource
Add Subscriptions Drop-Down
3. Click the delete icon next to a subscription to remove it.
4. To manage each subscription, such as Order Submit notification in this case, click Subscribed or On Hold.
Notifications Preferences Page: Acknowledgements
From the options that display, select your preferences:
Subscribe: select the radio button to subscribe to this notification
5
3 4
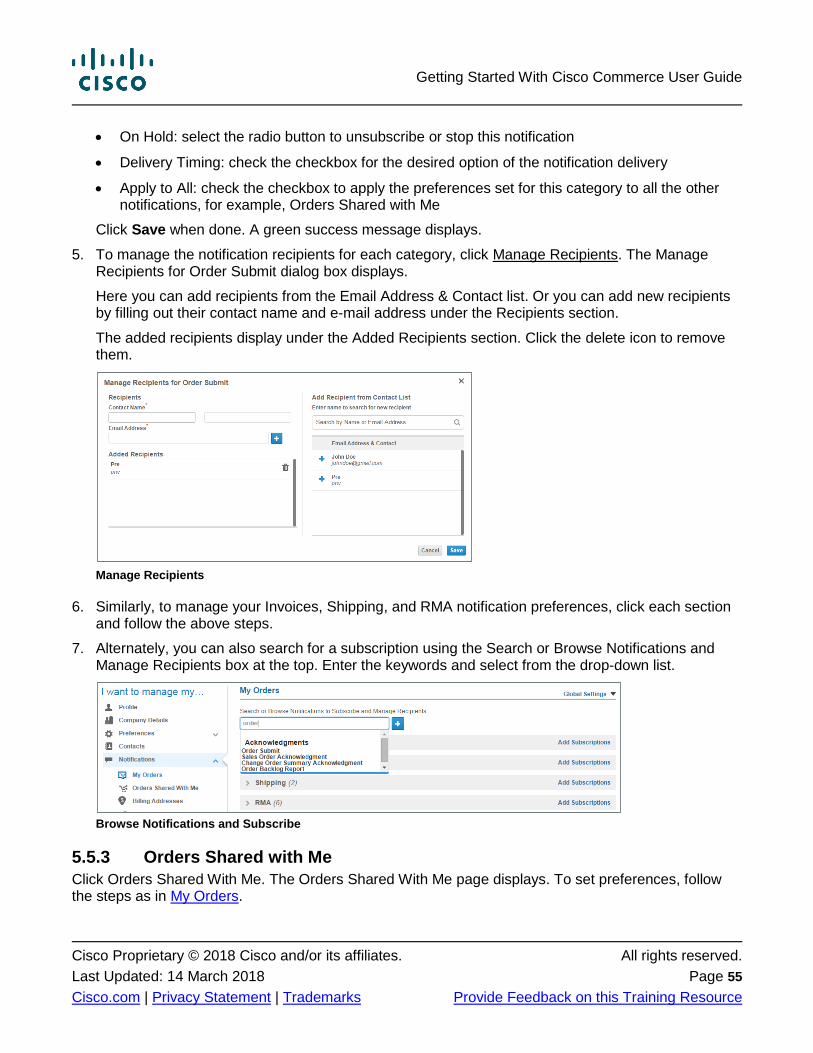
Getting Started With Cisco Commerce User Guide
Cisco Proprietary © 2018 Cisco and/or its affiliates. All rights reserved.
Last Updated: 14 March 2018 Page 55
Cisco.com | Privacy Statement | Trademarks Provide Feedback on this Training Resource
On Hold: select the radio button to unsubscribe or stop this notification
Delivery Timing: check the checkbox for the desired option of the notification delivery
Apply to All: check the checkbox to apply the preferences set for this category to all the other notifications, for example, Orders Shared with Me
Click Save when done. A green success message displays.
5. To manage the notification recipients for each category, click Manage Recipients. The Manage Recipients for Order Submit dialog box displays.
Here you can add recipients from the Email Address & Contact list. Or you can add new recipients by filling out their contact name and e-mail address under the Recipients section.
The added recipients display under the Added Recipients section. Click the delete icon to remove them.
Manage Recipients
6. Similarly, to manage your Invoices, Shipping, and RMA notification preferences, click each section and follow the above steps.
7. Alternately, you can also search for a subscription using the Search or Browse Notifications and Manage Recipients box at the top. Enter the keywords and select from the drop-down list.
Browse Notifications and Subscribe
5.5.3 Orders Shared with Me
Click Orders Shared With Me. The Orders Shared With Me page displays. To set preferences, follow the steps as in My Orders.
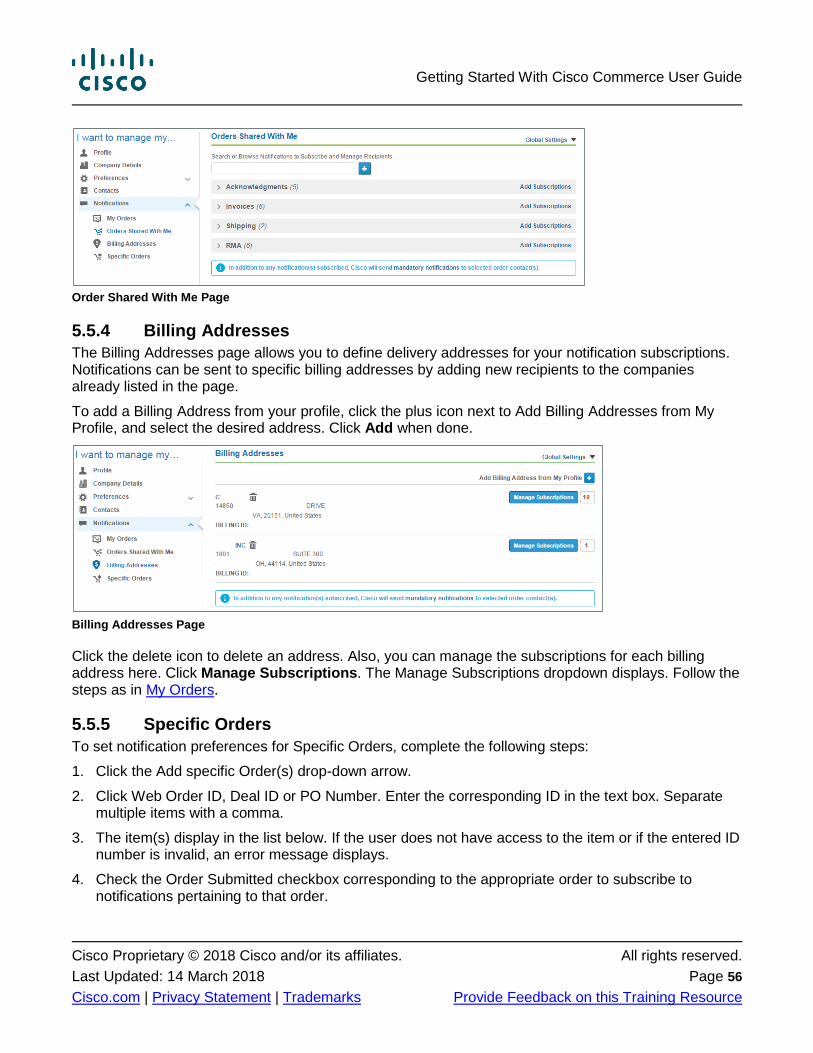
Getting Started With Cisco Commerce User Guide
Cisco Proprietary © 2018 Cisco and/or its affiliates. All rights reserved.
Last Updated: 14 March 2018 Page 56
Cisco.com | Privacy Statement | Trademarks Provide Feedback on this Training Resource
Order Shared With Me Page
5.5.4 Billing Addresses
The Billing Addresses page allows you to define delivery addresses for your notification subscriptions. Notifications can be sent to specific billing addresses by adding new recipients to the companies already listed in the page.
To add a Billing Address from your profile, click the plus icon next to Add Billing Addresses from My Profile, and select the desired address. Click Add when done.
Billing Addresses Page
Click the delete icon to delete an address. Also, you can manage the subscriptions for each billing address here. Click Manage Subscriptions. The Manage Subscriptions dropdown displays. Follow the steps as in My Orders.
5.5.5 Specific Orders
To set notification preferences for Specific Orders, complete the following steps:
1. Click the Add specific Order(s) drop-down arrow.
2. Click Web Order ID, Deal ID or PO Number. Enter the corresponding ID in the text box. Separate multiple items with a comma.
3. The item(s) display in the list below. If the user does not have access to the item or if the entered ID number is invalid, an error message displays.
4. Check the Order Submitted checkbox corresponding to the appropriate order to subscribe to notifications pertaining to that order.
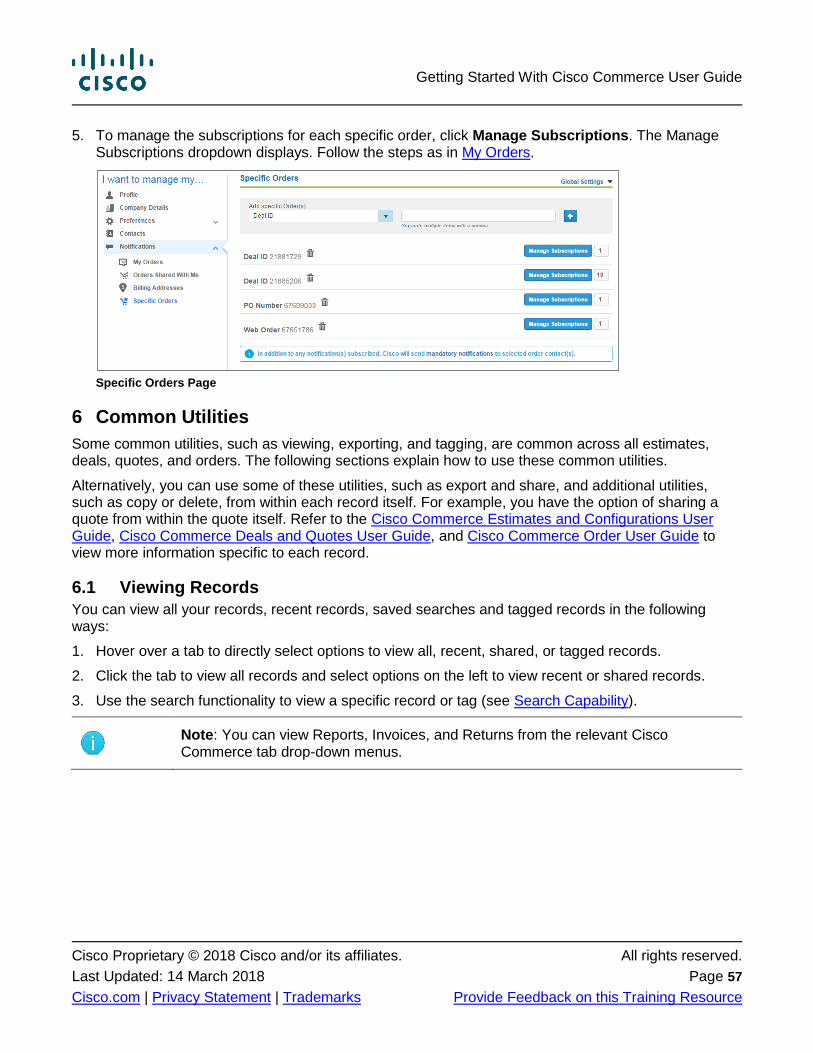
Getting Started With Cisco Commerce User Guide
Cisco Proprietary © 2018 Cisco and/or its affiliates. All rights reserved.
Last Updated: 14 March 2018 Page 57
Cisco.com | Privacy Statement | Trademarks Provide Feedback on this Training Resource
5. To manage the subscriptions for each specific order, click Manage Subscriptions. The Manage Subscriptions dropdown displays. Follow the steps as in My Orders.
Specific Orders Page
6 Common Utilities
Some common utilities, such as viewing, exporting, and tagging, are common across all estimates, deals, quotes, and orders. The following sections explain how to use these common utilities.
Alternatively, you can use some of these utilities, such as export and share, and additional utilities, such as copy or delete, from within each record itself. For example, you have the option of sharing a quote from within the quote itself. Refer to the Cisco Commerce Estimates and Configurations User Guide, Cisco Commerce Deals and Quotes User Guide, and Cisco Commerce Order User Guide to view more information specific to each record.
6.1 Viewing Records
You can view all your records, recent records, saved searches and tagged records in the following ways:
1. Hover over a tab to directly select options to view all, recent, shared, or tagged records.
2. Click the tab to view all records and select options on the left to view recent or shared records.
3. Use the search functionality to view a specific record or tag (see Search Capability).
Note: You can view Reports, Invoices, and Returns from the relevant Cisco Commerce tab drop-down menus.
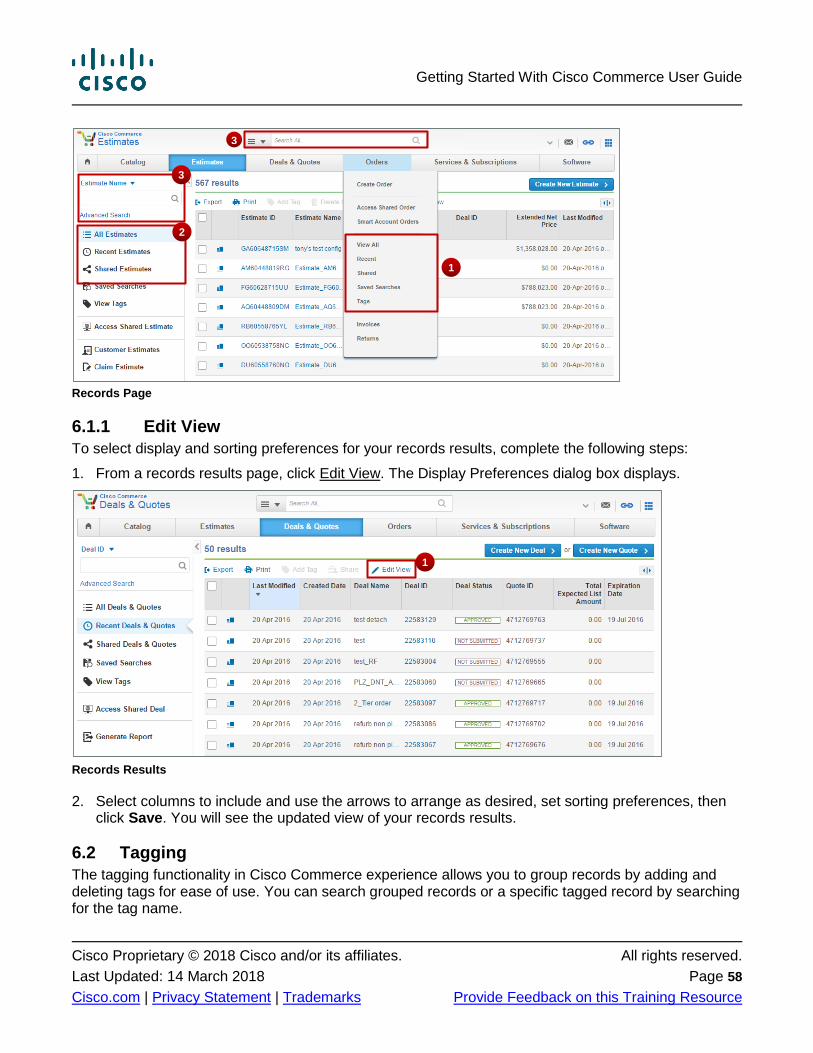
Getting Started With Cisco Commerce User Guide
Cisco Proprietary © 2018 Cisco and/or its affiliates. All rights reserved.
Last Updated: 14 March 2018 Page 58
Cisco.com | Privacy Statement | Trademarks Provide Feedback on this Training Resource
Records Page
6.1.1 Edit View
To select display and sorting preferences for your records results, complete the following steps:
1. From a records results page, click Edit View. The Display Preferences dialog box displays.
Records Results
2. Select columns to include and use the arrows to arrange as desired, set sorting preferences, then click Save. You will see the updated view of your records results.
6.2 Tagging
The tagging functionality in Cisco Commerce experience allows you to group records by adding and deleting tags for ease of use. You can search grouped records or a specific tagged record by searching for the tag name.
3
2
1
3
1
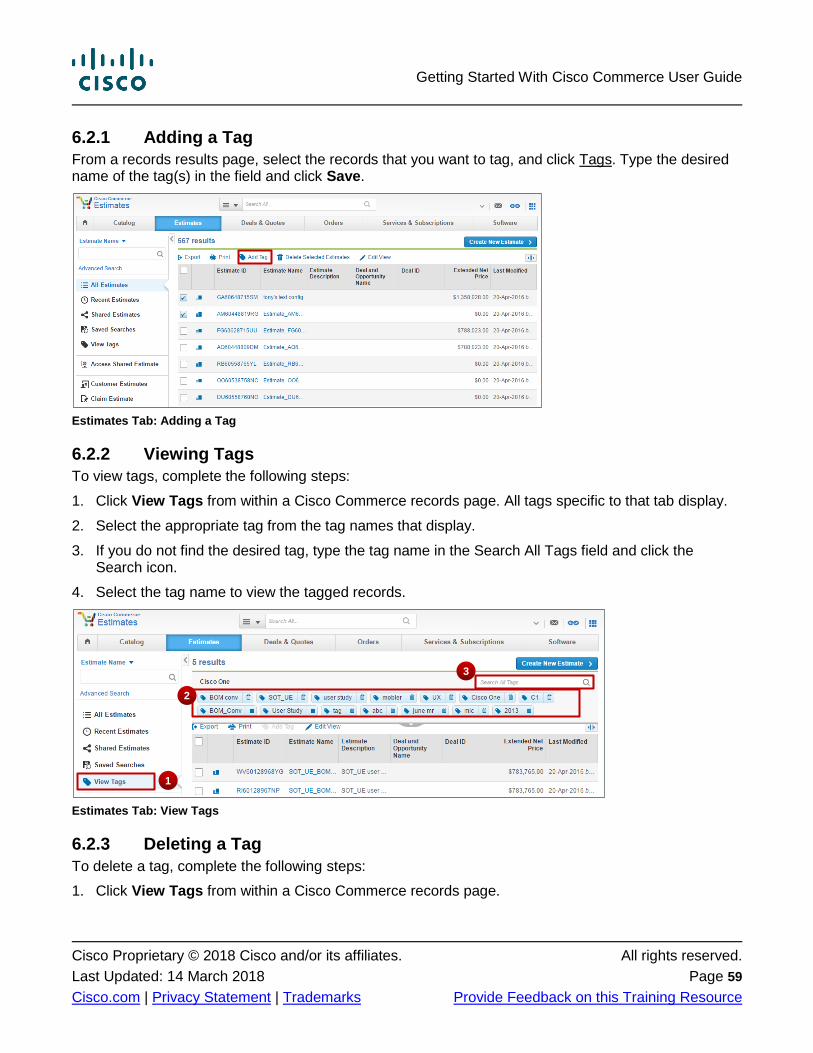
Getting Started With Cisco Commerce User Guide
Cisco Proprietary © 2018 Cisco and/or its affiliates. All rights reserved.
Last Updated: 14 March 2018 Page 59
Cisco.com | Privacy Statement | Trademarks Provide Feedback on this Training Resource
6.2.1 Adding a Tag
From a records results page, select the records that you want to tag, and click Tags. Type the desired name of the tag(s) in the field and click Save.
Estimates Tab: Adding a Tag
6.2.2 Viewing Tags
To view tags, complete the following steps:
1. Click View Tags from within a Cisco Commerce records page. All tags specific to that tab display.
2. Select the appropriate tag from the tag names that display.
3. If you do not find the desired tag, type the tag name in the Search All Tags field and click the Search icon.
4. Select the tag name to view the tagged records.
Estimates Tab: View Tags
6.2.3 Deleting a Tag
To delete a tag, complete the following steps:
1. Click View Tags from within a Cisco Commerce records page.
2
3
1
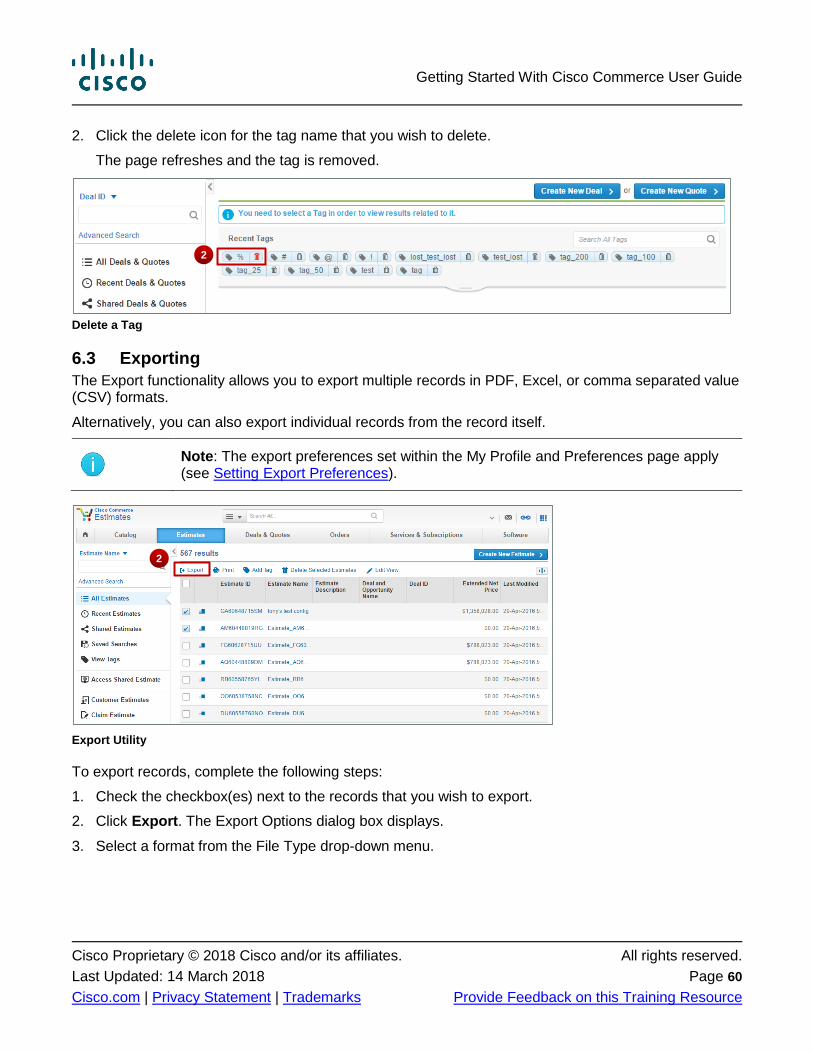
Getting Started With Cisco Commerce User Guide
Cisco Proprietary © 2018 Cisco and/or its affiliates. All rights reserved.
Last Updated: 14 March 2018 Page 60
Cisco.com | Privacy Statement | Trademarks Provide Feedback on this Training Resource
2. Click the delete icon for the tag name that you wish to delete.
The page refreshes and the tag is removed.
Delete a Tag
6.3 Exporting
The Export functionality allows you to export multiple records in PDF, Excel, or comma separated value (CSV) formats.
Alternatively, you can also export individual records from the record itself.
Note: The export preferences set within the My Profile and Preferences page apply (see Setting Export Preferences).
Export Utility
To export records, complete the following steps:
1. Check the checkbox(es) next to the records that you wish to export.
2. Click Export. The Export Options dialog box displays.
3. Select a format from the File Type drop-down menu.
2
2
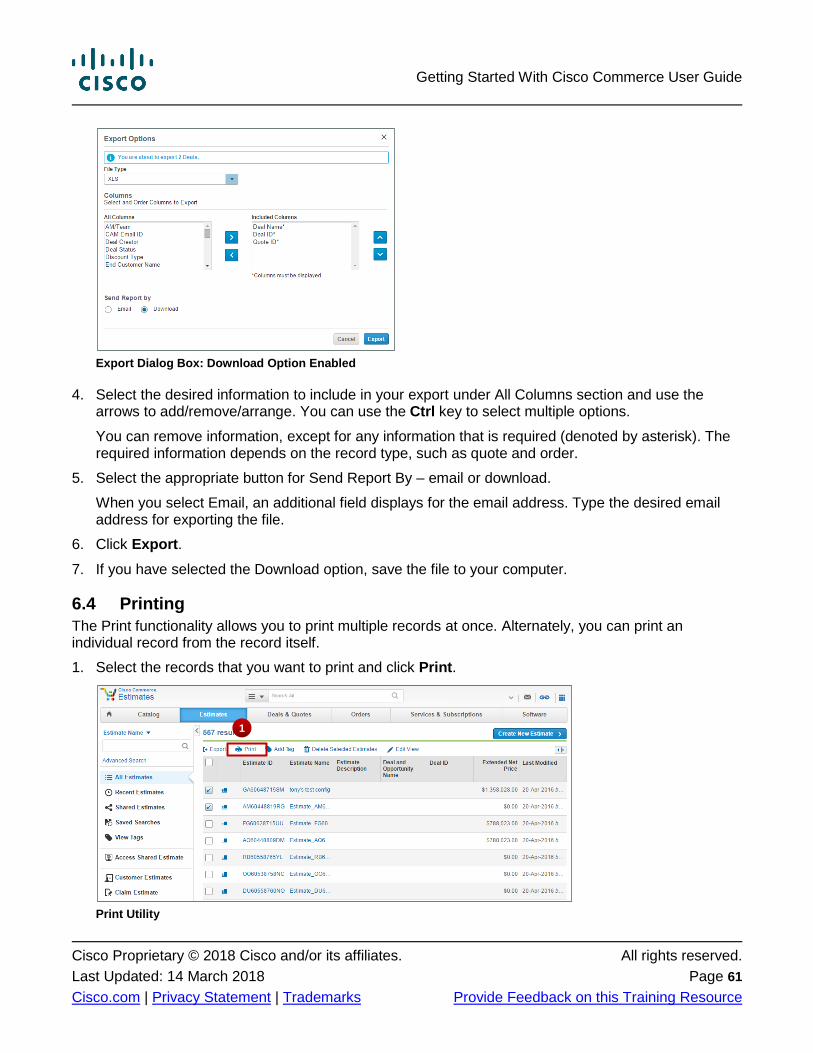
Getting Started With Cisco Commerce User Guide
Cisco Proprietary © 2018 Cisco and/or its affiliates. All rights reserved.
Last Updated: 14 March 2018 Page 61
Cisco.com | Privacy Statement | Trademarks Provide Feedback on this Training Resource
Export Dialog Box: Download Option Enabled
4. Select the desired information to include in your export under All Columns section and use the arrows to add/remove/arrange. You can use the Ctrl key to select multiple options.
You can remove information, except for any information that is required (denoted by asterisk). The required information depends on the record type, such as quote and order.
5. Select the appropriate button for Send Report By – email or download.
When you select Email, an additional field displays for the email address. Type the desired email address for exporting the file.
6. Click Export.
7. If you have selected the Download option, save the file to your computer.
6.4 Printing
The Print functionality allows you to print multiple records at once. Alternately, you can print an individual record from the record itself.
1. Select the records that you want to print and click Print.
Print Utility
1
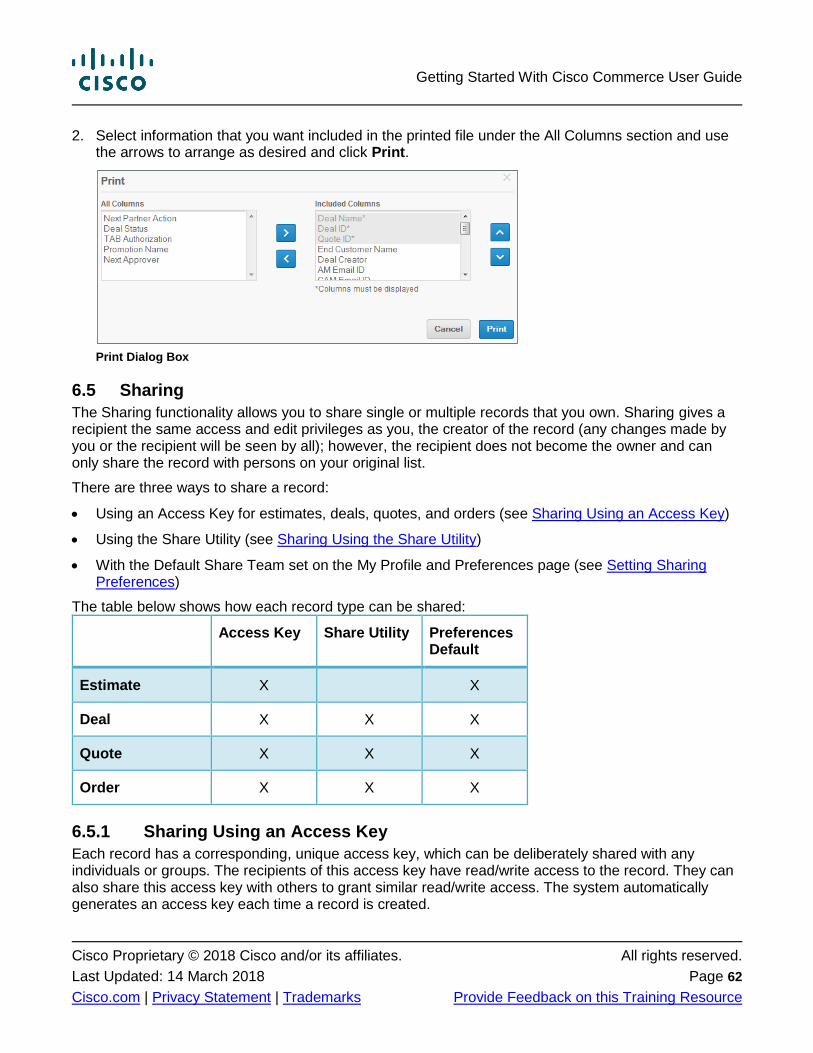
Getting Started With Cisco Commerce User Guide
Cisco Proprietary © 2018 Cisco and/or its affiliates. All rights reserved.
Last Updated: 14 March 2018 Page 62
Cisco.com | Privacy Statement | Trademarks Provide Feedback on this Training Resource
2. Select information that you want included in the printed file under the All Columns section and use the arrows to arrange as desired and click Print.
Print Dialog Box
6.5 Sharing
The Sharing functionality allows you to share single or multiple records that you own. Sharing gives a recipient the same access and edit privileges as you, the creator of the record (any changes made by you or the recipient will be seen by all); however, the recipient does not become the owner and can only share the record with persons on your original list.
There are three ways to share a record:
Using an Access Key for estimates, deals, quotes, and orders (see Sharing Using an Access Key)
Using the Share Utility (see Sharing Using the Share Utility)
With the Default Share Team set on the My Profile and Preferences page (see Setting Sharing Preferences)
The table below shows how each record type can be shared:
Access Key Share Utility Preferences Default
Estimate X X
Deal X X X
Quote X X X
Order X X X
6.5.1 Sharing Using an Access Key
Each record has a corresponding, unique access key, which can be deliberately shared with any individuals or groups. The recipients of this access key have read/write access to the record. They can also share this access key with others to grant similar read/write access. The system automatically generates an access key each time a record is created.
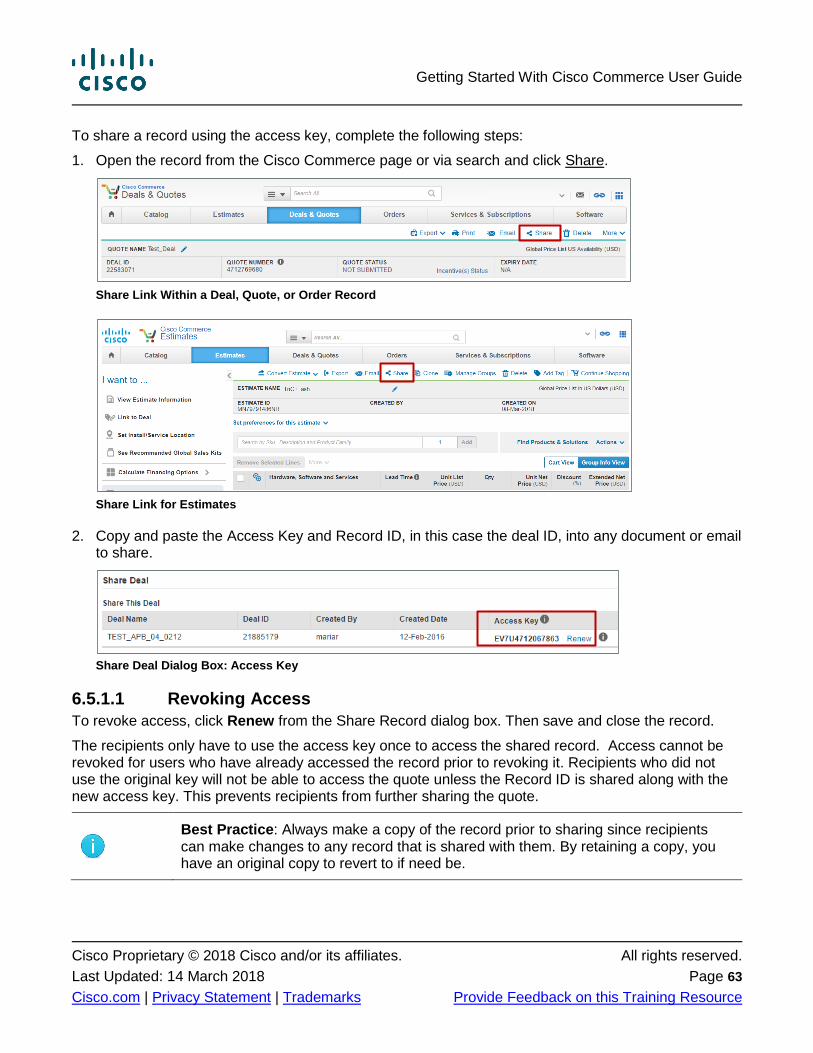
Getting Started With Cisco Commerce User Guide
Cisco Proprietary © 2018 Cisco and/or its affiliates. All rights reserved.
Last Updated: 14 March 2018 Page 63
Cisco.com | Privacy Statement | Trademarks Provide Feedback on this Training Resource
To share a record using the access key, complete the following steps:
1. Open the record from the Cisco Commerce page or via search and click Share.
Share Link Within a Deal, Quote, or Order Record
Share Link for Estimates
2. Copy and paste the Access Key and Record ID, in this case the deal ID, into any document or email to share.
Share Deal Dialog Box: Access Key
6.5.1.1 Revoking Access
To revoke access, click Renew from the Share Record dialog box. Then save and close the record.
The recipients only have to use the access key once to access the shared record. Access cannot be revoked for users who have already accessed the record prior to revoking it. Recipients who did not use the original key will not be able to access the quote unless the Record ID is shared along with the new access key. This prevents recipients from further sharing the quote.
Best Practice: Always make a copy of the record prior to sharing since recipients can make changes to any record that is shared with them. By retaining a copy, you have an original copy to revert to if need be.
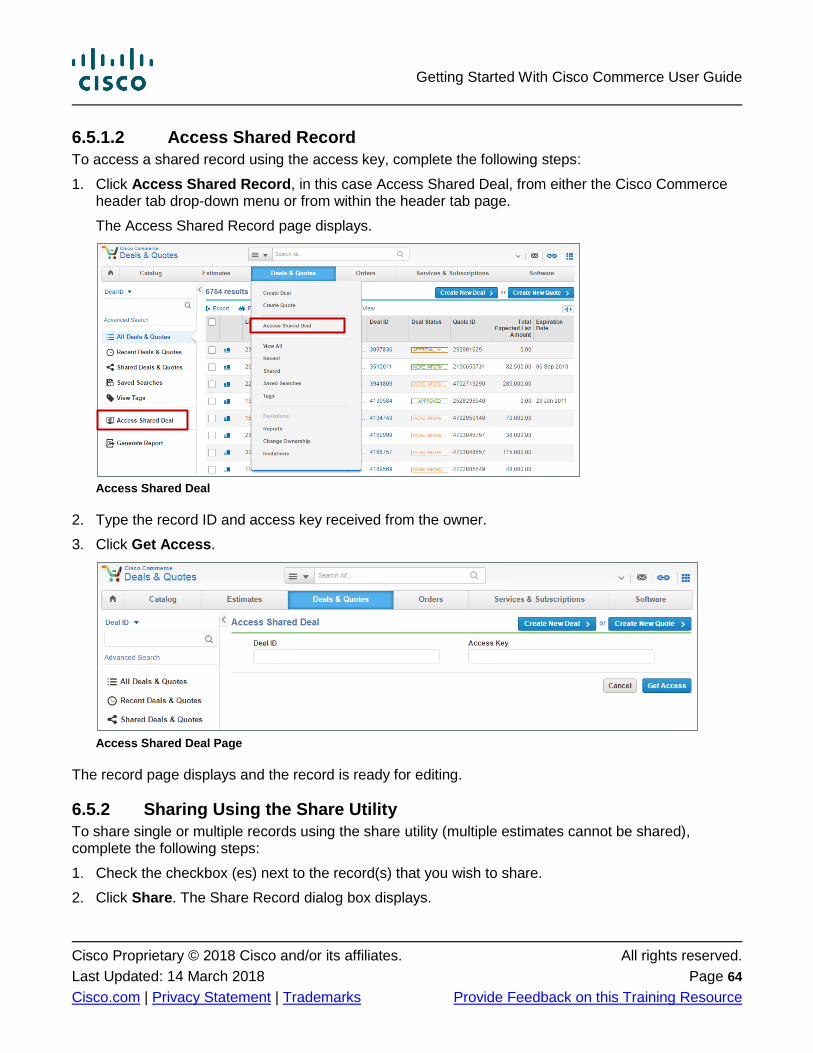
Getting Started With Cisco Commerce User Guide
Cisco Proprietary © 2018 Cisco and/or its affiliates. All rights reserved.
Last Updated: 14 March 2018 Page 64
Cisco.com | Privacy Statement | Trademarks Provide Feedback on this Training Resource
6.5.1.2 Access Shared Record
To access a shared record using the access key, complete the following steps:
1. Click Access Shared Record, in this case Access Shared Deal, from either the Cisco Commerce header tab drop-down menu or from within the header tab page.
The Access Shared Record page displays.
Access Shared Deal
2. Type the record ID and access key received from the owner.
3. Click Get Access.
Access Shared Deal Page
The record page displays and the record is ready for editing.
6.5.2 Sharing Using the Share Utility
To share single or multiple records using the share utility (multiple estimates cannot be shared), complete the following steps:
1. Check the checkbox (es) next to the record(s) that you wish to share.
2. Click Share. The Share Record dialog box displays.
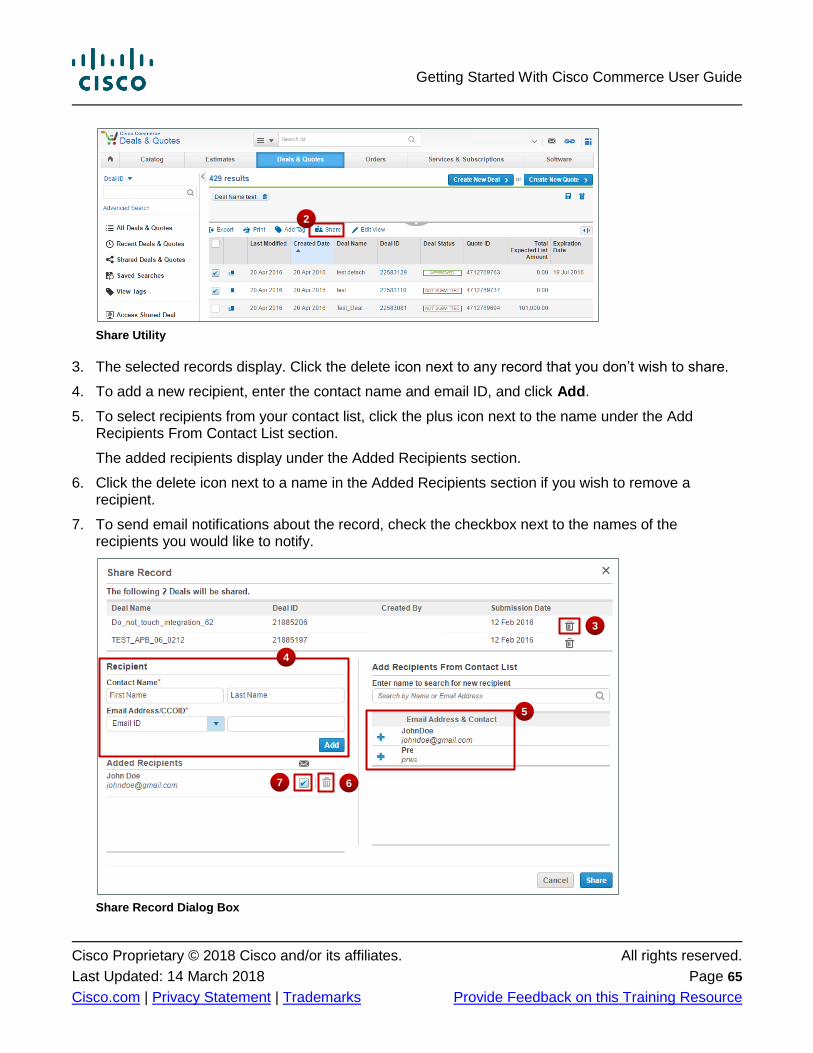
Getting Started With Cisco Commerce User Guide
Cisco Proprietary © 2018 Cisco and/or its affiliates. All rights reserved.
Last Updated: 14 March 2018 Page 65
Cisco.com | Privacy Statement | Trademarks Provide Feedback on this Training Resource
Share Utility
3. The selected records display. Click the delete icon next to any record that you don’t wish to share.
4. To add a new recipient, enter the contact name and email ID, and click Add.
5. To select recipients from your contact list, click the plus icon next to the name under the Add Recipients From Contact List section.
The added recipients display under the Added Recipients section.
6. Click the delete icon next to a name in the Added Recipients section if you wish to remove a recipient.
7. To send email notifications about the record, check the checkbox next to the names of the recipients you would like to notify.
Share Record Dialog Box
2
4
7
5
6
3
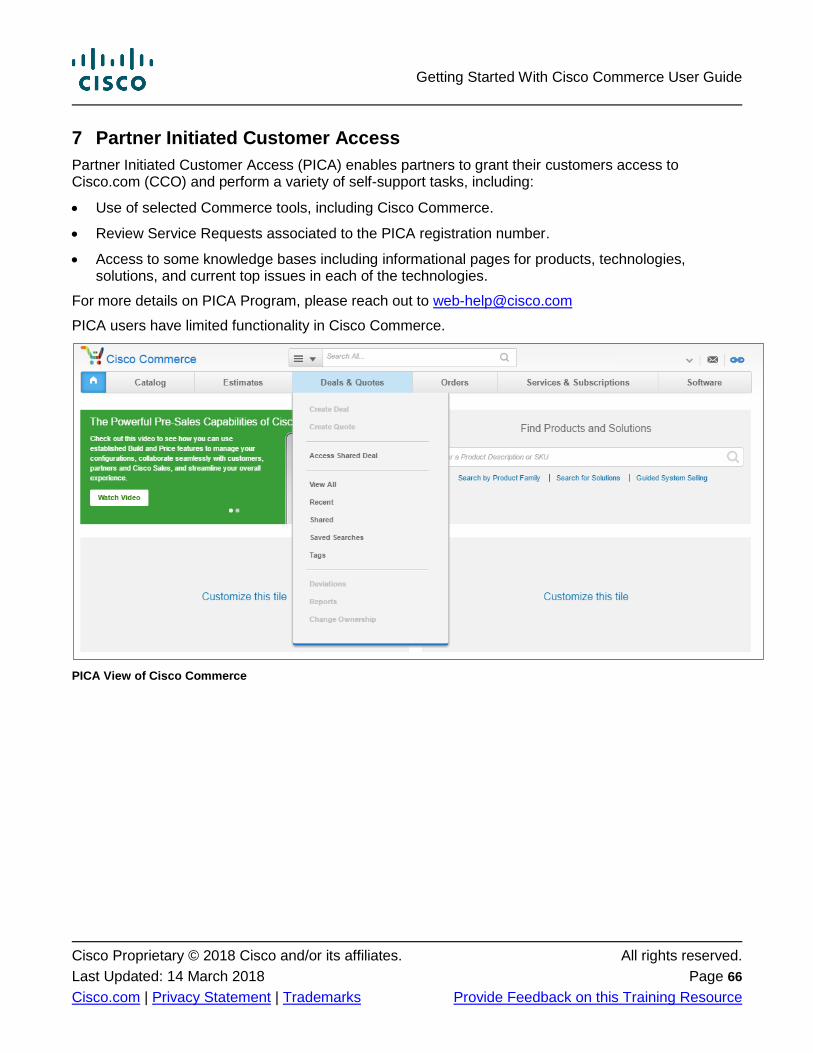
Getting Started With Cisco Commerce User Guide
Cisco Proprietary © 2018 Cisco and/or its affiliates. All rights reserved.
Last Updated: 14 March 2018 Page 66
Cisco.com | Privacy Statement | Trademarks Provide Feedback on this Training Resource
7 Partner Initiated Customer Access
Partner Initiated Customer Access (PICA) enables partners to grant their customers access to Cisco.com (CCO) and perform a variety of self-support tasks, including:
Use of selected Commerce tools, including Cisco Commerce.
Review Service Requests associated to the PICA registration number.
Access to some knowledge bases including informational pages for products, technologies, solutions, and current top issues in each of the technologies.
For more details on PICA Program, please reach out to [email protected]
PICA users have limited functionality in Cisco Commerce.
PICA View of Cisco Commerce
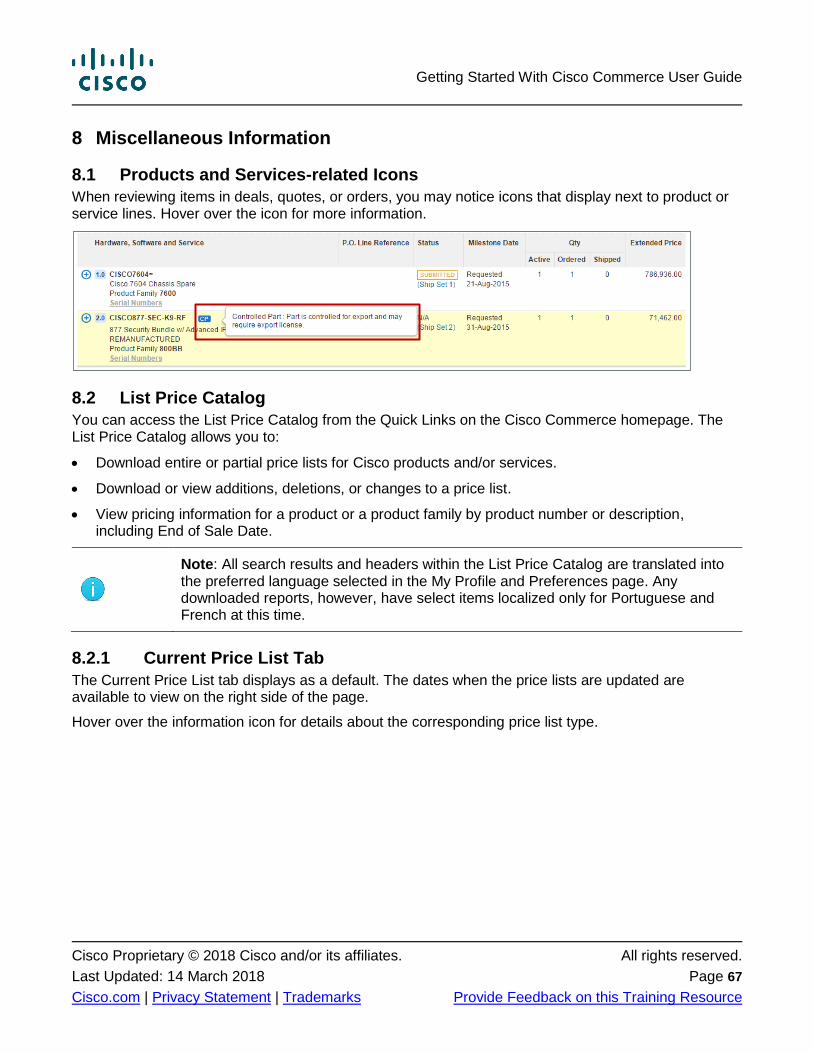
Getting Started With Cisco Commerce User Guide
Cisco Proprietary © 2018 Cisco and/or its affiliates. All rights reserved.
Last Updated: 14 March 2018 Page 67
Cisco.com | Privacy Statement | Trademarks Provide Feedback on this Training Resource
8 Miscellaneous Information
8.1 Products and Services-related Icons
When reviewing items in deals, quotes, or orders, you may notice icons that display next to product or service lines. Hover over the icon for more information.
8.2 List Price Catalog
You can access the List Price Catalog from the Quick Links on the Cisco Commerce homepage. The List Price Catalog allows you to:
Download entire or partial price lists for Cisco products and/or services.
Download or view additions, deletions, or changes to a price list.
View pricing information for a product or a product family by product number or description, including End of Sale Date.
Note: All search results and headers within the List Price Catalog are translated into the preferred language selected in the My Profile and Preferences page. Any downloaded reports, however, have select items localized only for Portuguese and French at this time.
8.2.1 Current Price List Tab
The Current Price List tab displays as a default. The dates when the price lists are updated are available to view on the right side of the page.
Hover over the information icon for details about the corresponding price list type.
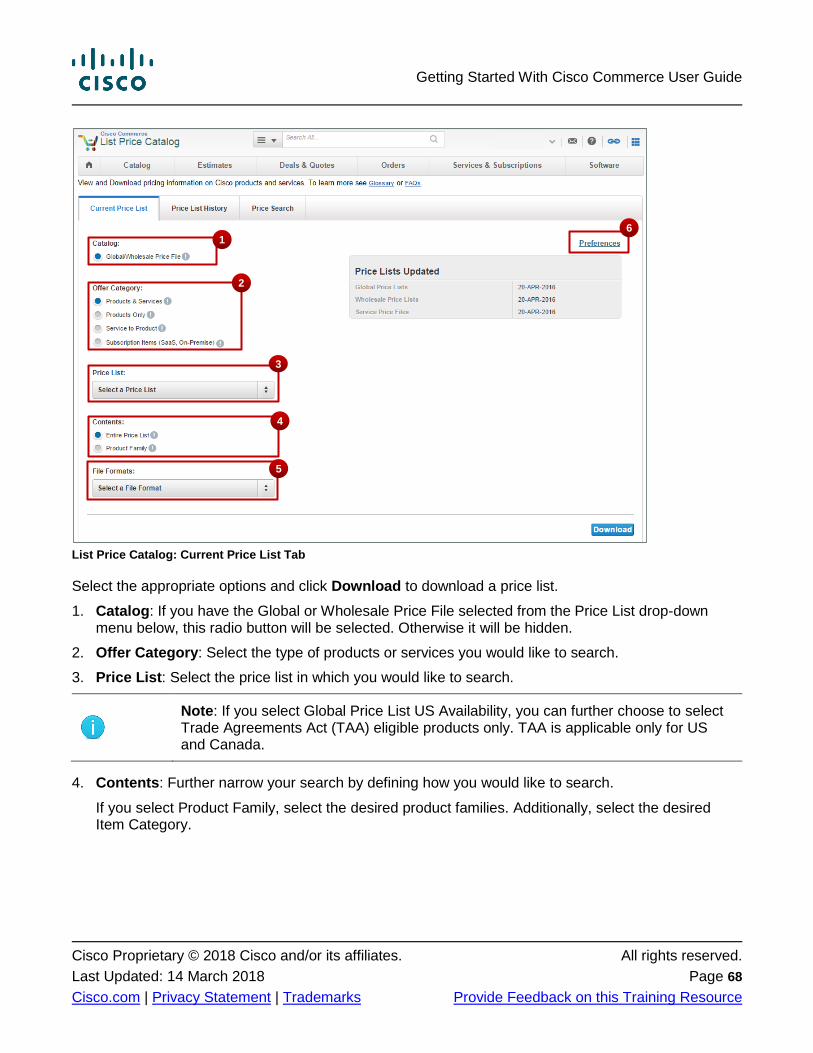
Getting Started With Cisco Commerce User Guide
Cisco Proprietary © 2018 Cisco and/or its affiliates. All rights reserved.
Last Updated: 14 March 2018 Page 68
Cisco.com | Privacy Statement | Trademarks Provide Feedback on this Training Resource
List Price Catalog: Current Price List Tab
Select the appropriate options and click Download to download a price list.
1. Catalog: If you have the Global or Wholesale Price File selected from the Price List drop-down menu below, this radio button will be selected. Otherwise it will be hidden.
2. Offer Category: Select the type of products or services you would like to search.
3. Price List: Select the price list in which you would like to search.
Note: If you select Global Price List US Availability, you can further choose to select Trade Agreements Act (TAA) eligible products only. TAA is applicable only for US and Canada.
4. Contents: Further narrow your search by defining how you would like to search.
If you select Product Family, select the desired product families. Additionally, select the desired Item Category.
1
2
3
4
5
6
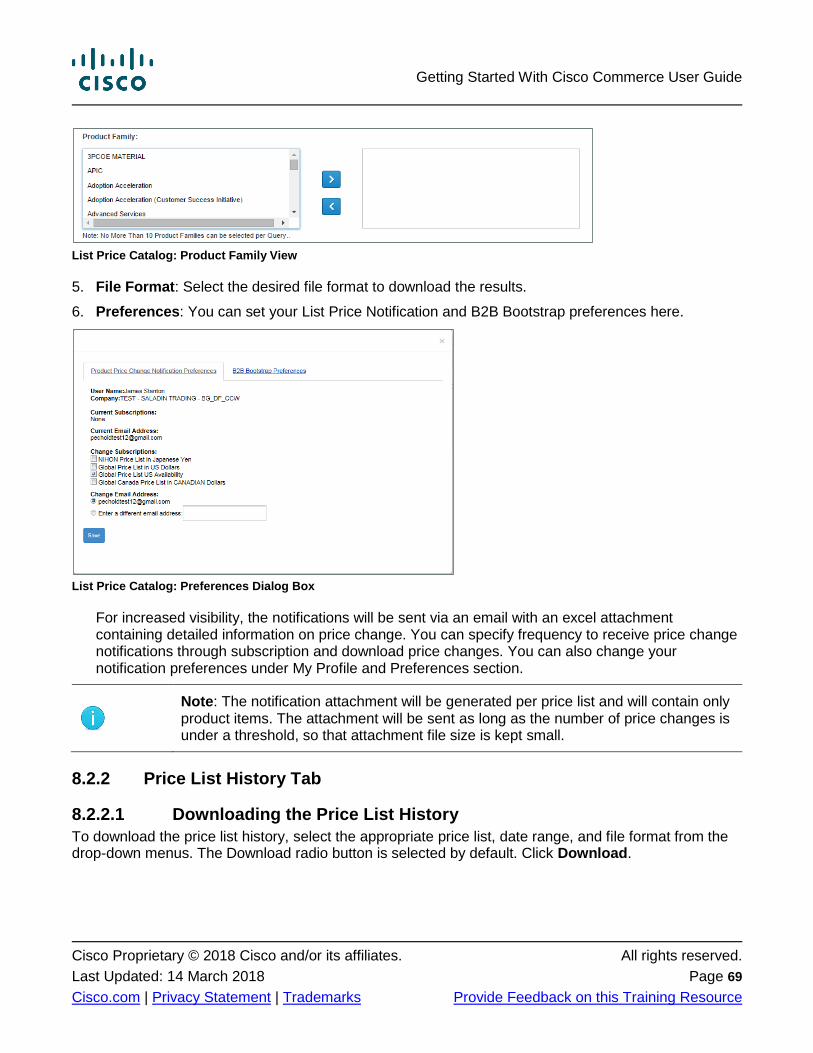
Getting Started With Cisco Commerce User Guide
Cisco Proprietary © 2018 Cisco and/or its affiliates. All rights reserved.
Last Updated: 14 March 2018 Page 69
Cisco.com | Privacy Statement | Trademarks Provide Feedback on this Training Resource
List Price Catalog: Product Family View
5. File Format: Select the desired file format to download the results.
6. Preferences: You can set your List Price Notification and B2B Bootstrap preferences here.
List Price Catalog: Preferences Dialog Box
For increased visibility, the notifications will be sent via an email with an excel attachment containing detailed information on price change. You can specify frequency to receive price change notifications through subscription and download price changes. You can also change your notification preferences under My Profile and Preferences section.
Note: The notification attachment will be generated per price list and will contain only product items. The attachment will be sent as long as the number of price changes is under a threshold, so that attachment file size is kept small.
8.2.2 Price List History Tab
8.2.2.1 Downloading the Price List History
To download the price list history, select the appropriate price list, date range, and file format from the drop-down menus. The Download radio button is selected by default. Click Download.
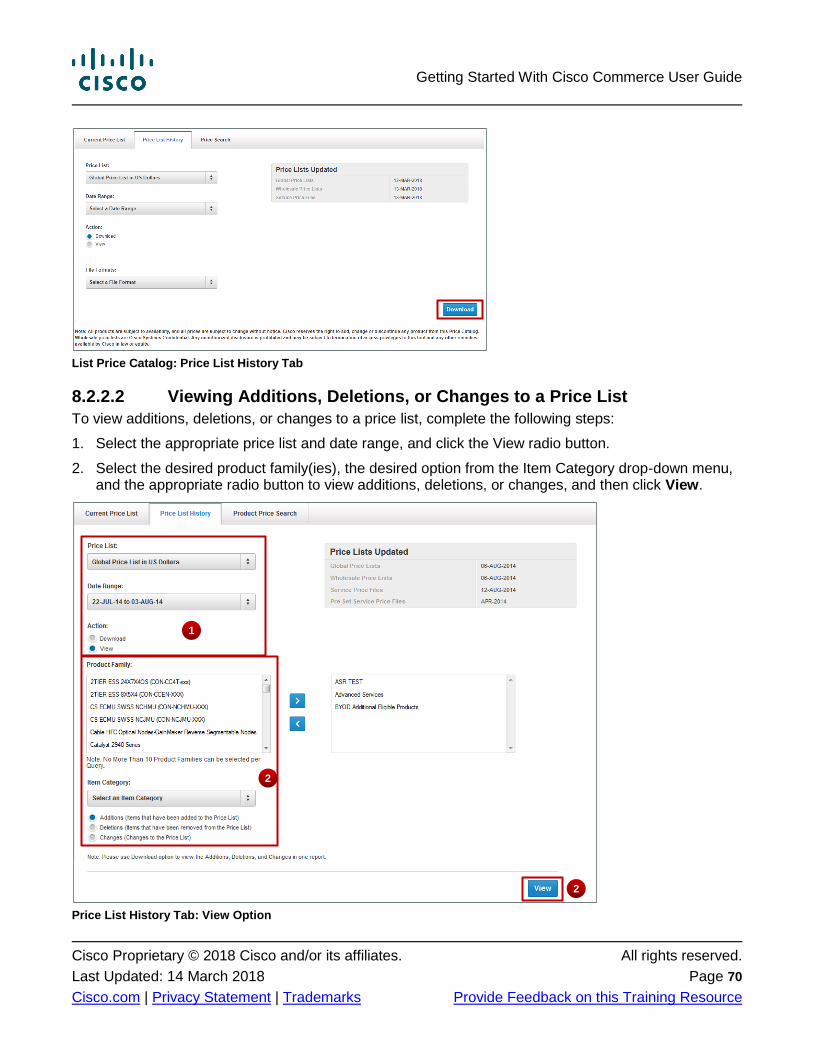
Getting Started With Cisco Commerce User Guide
Cisco Proprietary © 2018 Cisco and/or its affiliates. All rights reserved.
Last Updated: 14 March 2018 Page 70
Cisco.com | Privacy Statement | Trademarks Provide Feedback on this Training Resource
List Price Catalog: Price List History Tab
8.2.2.2 Viewing Additions, Deletions, or Changes to a Price List
To view additions, deletions, or changes to a price list, complete the following steps:
1. Select the appropriate price list and date range, and click the View radio button.
2. Select the desired product family(ies), the desired option from the Item Category drop-down menu, and the appropriate radio button to view additions, deletions, or changes, and then click View.
Price List History Tab: View Option
1
2
2
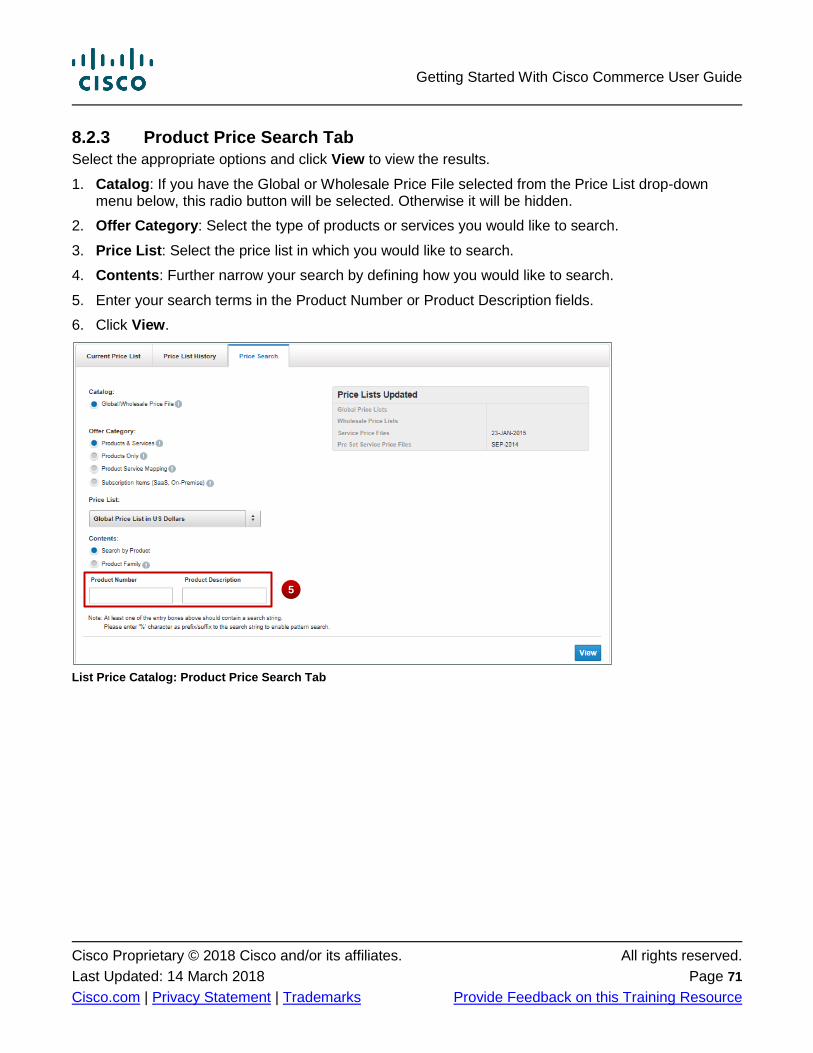
Getting Started With Cisco Commerce User Guide
Cisco Proprietary © 2018 Cisco and/or its affiliates. All rights reserved.
Last Updated: 14 March 2018 Page 71
Cisco.com | Privacy Statement | Trademarks Provide Feedback on this Training Resource
8.2.3 Product Price Search Tab
Select the appropriate options and click View to view the results.
1. Catalog: If you have the Global or Wholesale Price File selected from the Price List drop-down menu below, this radio button will be selected. Otherwise it will be hidden.
2. Offer Category: Select the type of products or services you would like to search.
3. Price List: Select the price list in which you would like to search.
4. Contents: Further narrow your search by defining how you would like to search.
5. Enter your search terms in the Product Number or Product Description fields.
6. Click View.
List Price Catalog: Product Price Search Tab
5
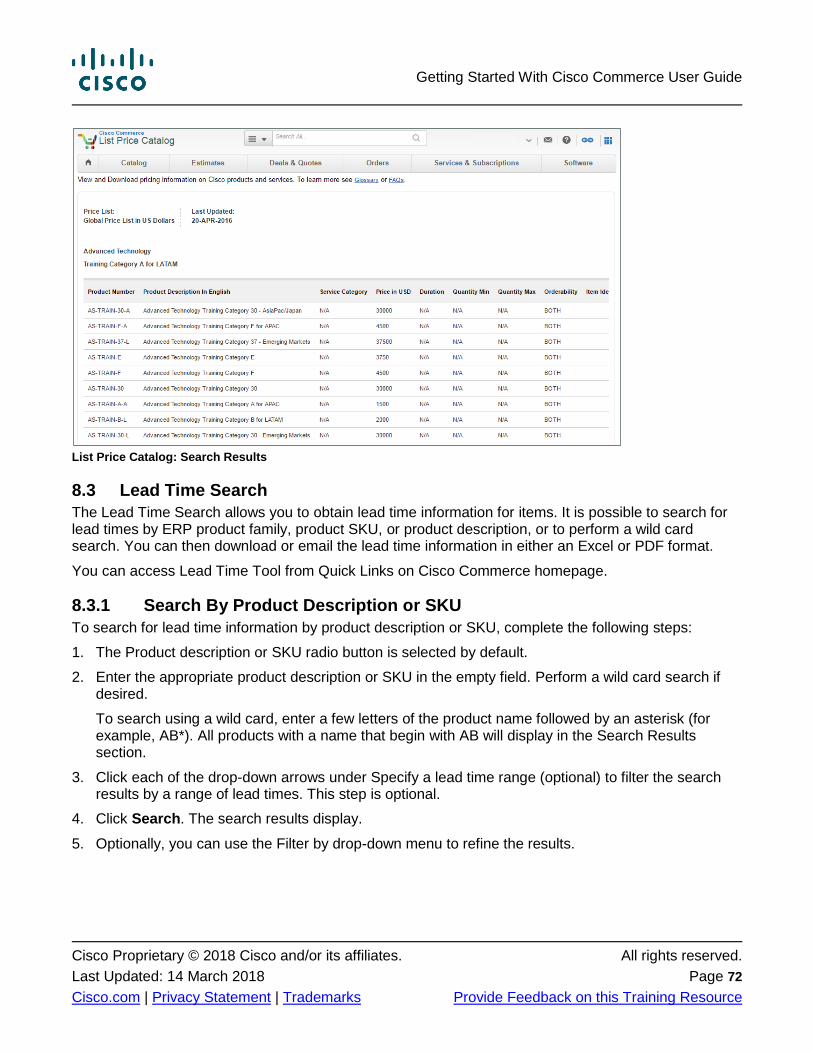
Getting Started With Cisco Commerce User Guide
Cisco Proprietary © 2018 Cisco and/or its affiliates. All rights reserved.
Last Updated: 14 March 2018 Page 72
Cisco.com | Privacy Statement | Trademarks Provide Feedback on this Training Resource
List Price Catalog: Search Results
8.3 Lead Time Search
The Lead Time Search allows you to obtain lead time information for items. It is possible to search for lead times by ERP product family, product SKU, or product description, or to perform a wild card search. You can then download or email the lead time information in either an Excel or PDF format.
You can access Lead Time Tool from Quick Links on Cisco Commerce homepage.
8.3.1 Search By Product Description or SKU
To search for lead time information by product description or SKU, complete the following steps:
1. The Product description or SKU radio button is selected by default.
2. Enter the appropriate product description or SKU in the empty field. Perform a wild card search if desired.
To search using a wild card, enter a few letters of the product name followed by an asterisk (for example, AB*). All products with a name that begin with AB will display in the Search Results section.
3. Click each of the drop-down arrows under Specify a lead time range (optional) to filter the search results by a range of lead times. This step is optional.
4. Click Search. The search results display.
5. Optionally, you can use the Filter by drop-down menu to refine the results.
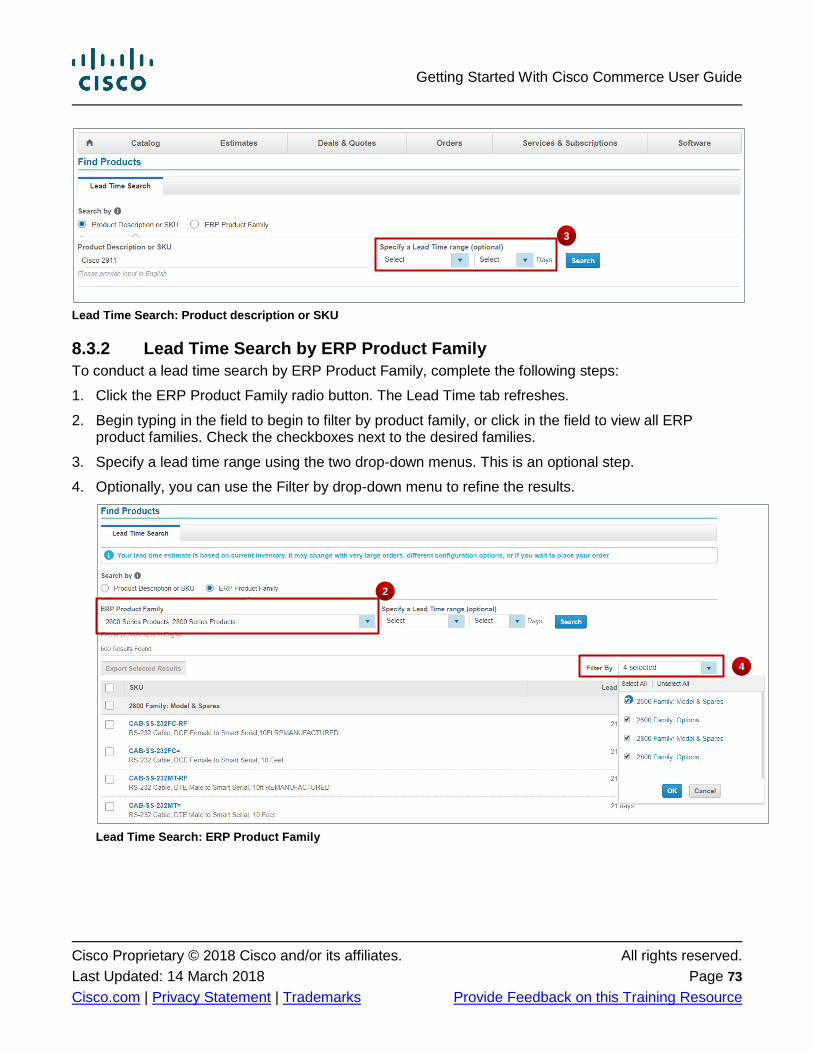
Getting Started With Cisco Commerce User Guide
Cisco Proprietary © 2018 Cisco and/or its affiliates. All rights reserved.
Last Updated: 14 March 2018 Page 73
Cisco.com | Privacy Statement | Trademarks Provide Feedback on this Training Resource
Lead Time Search: Product description or SKU
8.3.2 Lead Time Search by ERP Product Family
To conduct a lead time search by ERP Product Family, complete the following steps:
1. Click the ERP Product Family radio button. The Lead Time tab refreshes.
2. Begin typing in the field to begin to filter by product family, or click in the field to view all ERP product families. Check the checkboxes next to the desired families.
3. Specify a lead time range using the two drop-down menus. This is an optional step.
4. Optionally, you can use the Filter by drop-down menu to refine the results.
Lead Time Search: ERP Product Family
2
3
4

Getting Started With Cisco Commerce User Guide
Cisco Proprietary © 2018 Cisco and/or its affiliates. All rights reserved.
Last Updated: 14 March 2018 Page 74
Cisco.com | Privacy Statement | Trademarks Provide Feedback on this Training Resource
8.3.3 Exporting Lead Time Search Results
You can export or email the lead time search results. To export the results, complete the following steps:
1. Check the checkbox(es) that correspond to the desired line items.
Check the checkbox at the very top of the Results list to select all results.
Check the checkbox(es) at the grey family level line item to select all results under that product family.
Check the individual checkbox(es) to select specific individual lines.
2. Click Export Selected Results to export all the products selected. The Export Selected Results dialog box displays.
3. Click the appropriate radio button to download or email the search results.
If you select Download, choose the appropriate file format and click Export.
If you select Email, choose the appropriate file format. Additionally, type the email address in the To field. You can customize the auto-populated subject and the message to the recipients. Click Send.
Export Results: Download
Export Results: Email
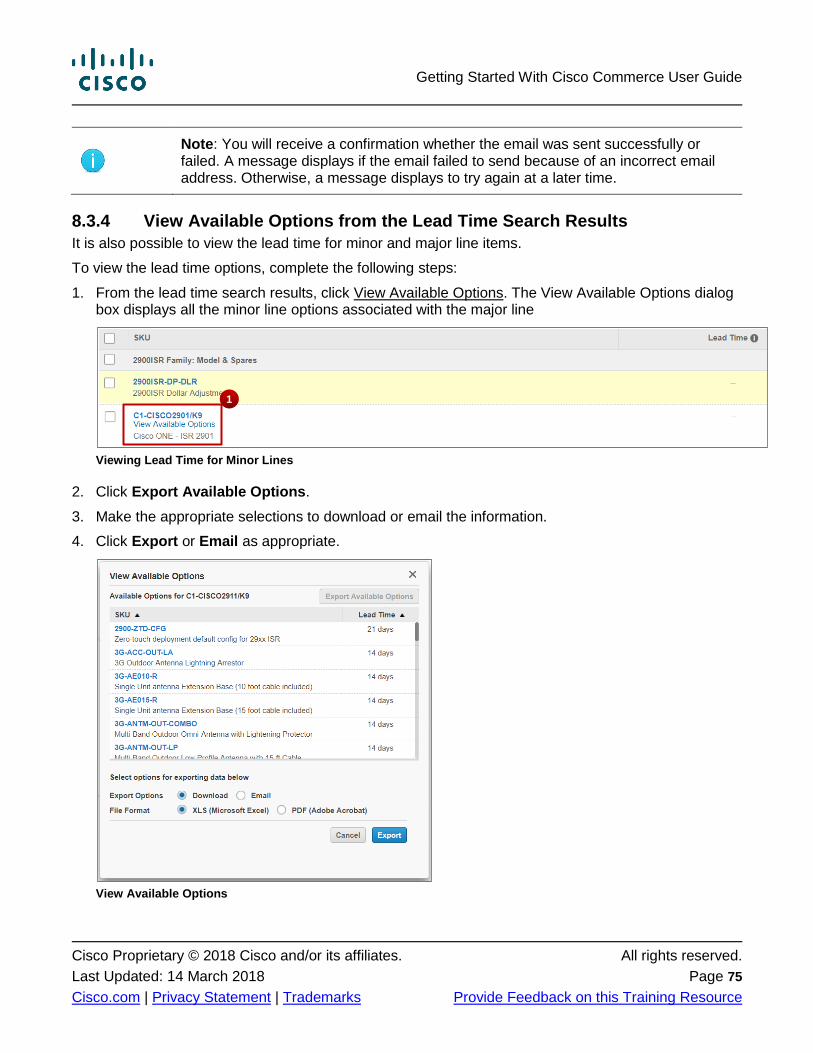
Getting Started With Cisco Commerce User Guide
Cisco Proprietary © 2018 Cisco and/or its affiliates. All rights reserved.
Last Updated: 14 March 2018 Page 75
Cisco.com | Privacy Statement | Trademarks Provide Feedback on this Training Resource
Note: You will receive a confirmation whether the email was sent successfully or failed. A message displays if the email failed to send because of an incorrect email address. Otherwise, a message displays to try again at a later time.
8.3.4 View Available Options from the Lead Time Search Results
It is also possible to view the lead time for minor and major line items.
To view the lead time options, complete the following steps:
1. From the lead time search results, click View Available Options. The View Available Options dialog box displays all the minor line options associated with the major line
Viewing Lead Time for Minor Lines
2. Click Export Available Options.
3. Make the appropriate selections to download or email the information.
4. Click Export or Email as appropriate.
View Available Options
1
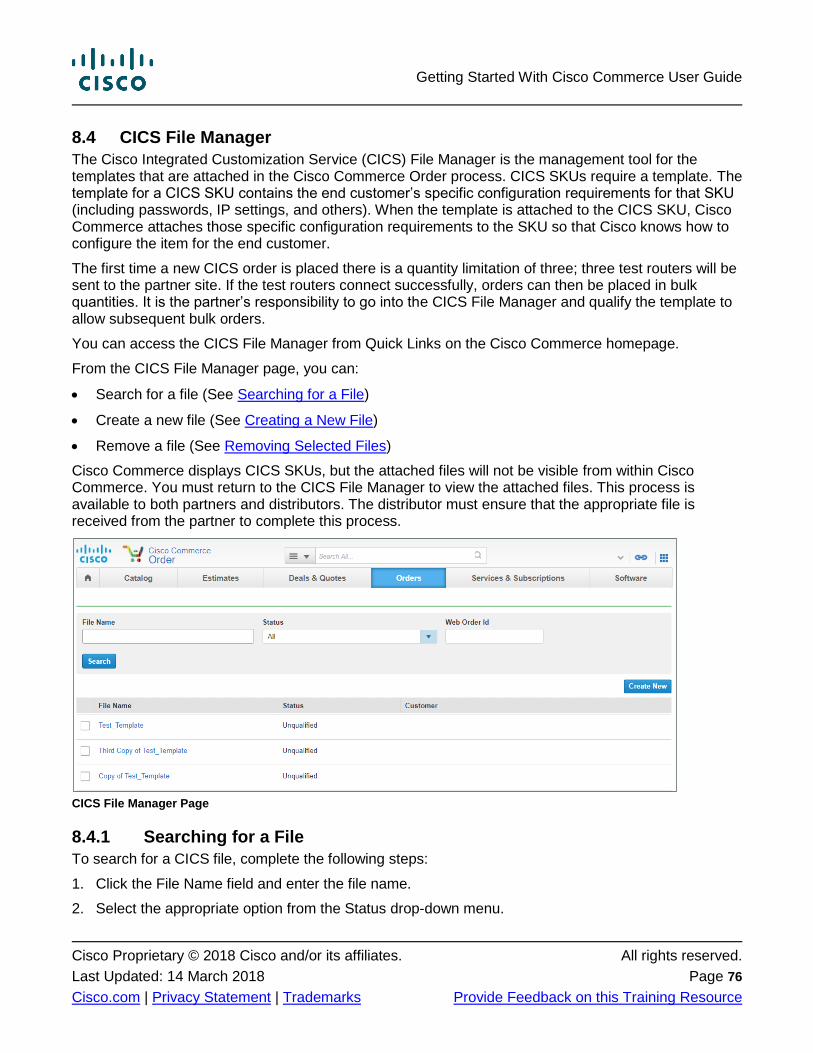
Getting Started With Cisco Commerce User Guide
Cisco Proprietary © 2018 Cisco and/or its affiliates. All rights reserved.
Last Updated: 14 March 2018 Page 76
Cisco.com | Privacy Statement | Trademarks Provide Feedback on this Training Resource
8.4 CICS File Manager
The Cisco Integrated Customization Service (CICS) File Manager is the management tool for the templates that are attached in the Cisco Commerce Order process. CICS SKUs require a template. The template for a CICS SKU contains the end customer’s specific configuration requirements for that SKU (including passwords, IP settings, and others). When the template is attached to the CICS SKU, Cisco Commerce attaches those specific configuration requirements to the SKU so that Cisco knows how to configure the item for the end customer.
The first time a new CICS order is placed there is a quantity limitation of three; three test routers will be sent to the partner site. If the test routers connect successfully, orders can then be placed in bulk quantities. It is the partner’s responsibility to go into the CICS File Manager and qualify the template to allow subsequent bulk orders.
You can access the CICS File Manager from Quick Links on the Cisco Commerce homepage.
From the CICS File Manager page, you can:
Search for a file (See Searching for a File)
Create a new file (See Creating a New File)
Remove a file (See Removing Selected Files)
Cisco Commerce displays CICS SKUs, but the attached files will not be visible from within Cisco Commerce. You must return to the CICS File Manager to view the attached files. This process is available to both partners and distributors. The distributor must ensure that the appropriate file is received from the partner to complete this process.
CICS File Manager Page
8.4.1 Searching for a File
To search for a CICS file, complete the following steps:
1. Click the File Name field and enter the file name.
2. Select the appropriate option from the Status drop-down menu.
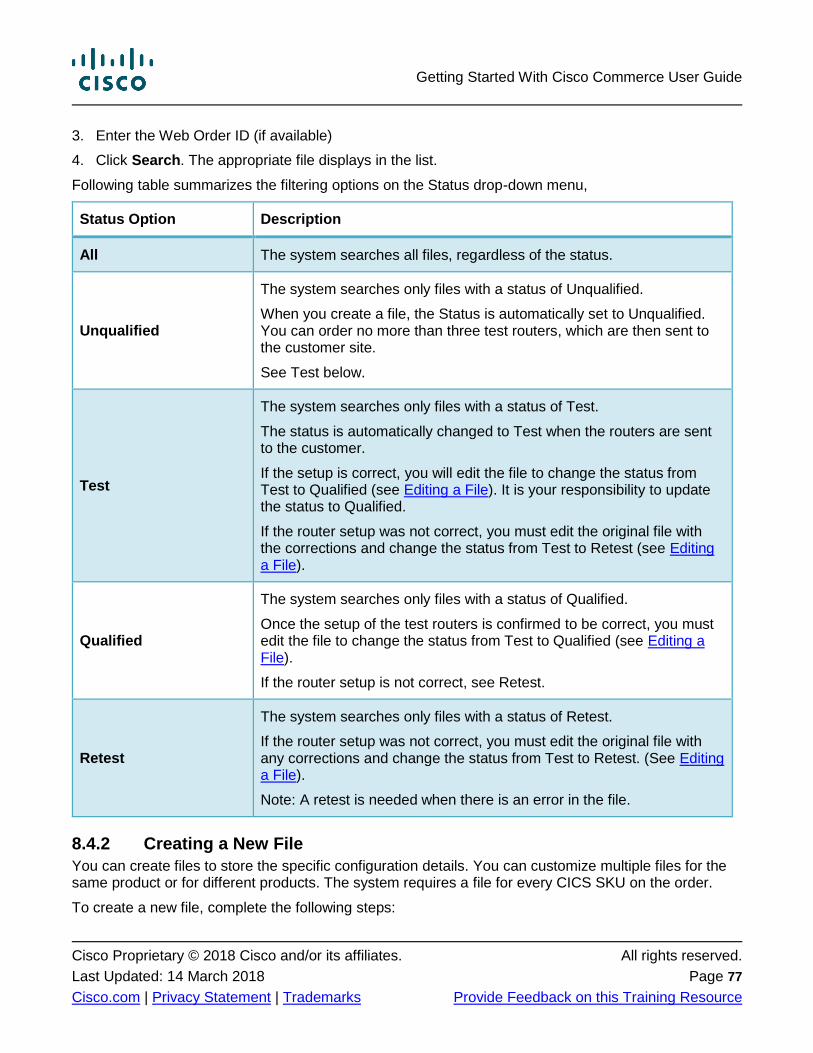
Getting Started With Cisco Commerce User Guide
Cisco Proprietary © 2018 Cisco and/or its affiliates. All rights reserved.
Last Updated: 14 March 2018 Page 77
Cisco.com | Privacy Statement | Trademarks Provide Feedback on this Training Resource
3. Enter the Web Order ID (if available)
4. Click Search. The appropriate file displays in the list.
Following table summarizes the filtering options on the Status drop-down menu,
Status Option Description
All The system searches all files, regardless of the status.
Unqualified
The system searches only files with a status of Unqualified.
When you create a file, the Status is automatically set to Unqualified. You can order no more than three test routers, which are then sent to the customer site.
See Test below.
Test
The system searches only files with a status of Test.
The status is automatically changed to Test when the routers are sent to the customer.
If the setup is correct, you will edit the file to change the status from Test to Qualified (see Editing a File). It is your responsibility to update the status to Qualified.
If the router setup was not correct, you must edit the original file with the corrections and change the status from Test to Retest (see Editing a File).
Qualified
The system searches only files with a status of Qualified.
Once the setup of the test routers is confirmed to be correct, you must edit the file to change the status from Test to Qualified (see Editing a File).
If the router setup is not correct, see Retest.
Retest
The system searches only files with a status of Retest.
If the router setup was not correct, you must edit the original file with any corrections and change the status from Test to Retest. (See Editing a File).
Note: A retest is needed when there is an error in the file.
8.4.2 Creating a New File
You can create files to store the specific configuration details. You can customize multiple files for the same product or for different products. The system requires a file for every CICS SKU on the order.
To create a new file, complete the following steps:
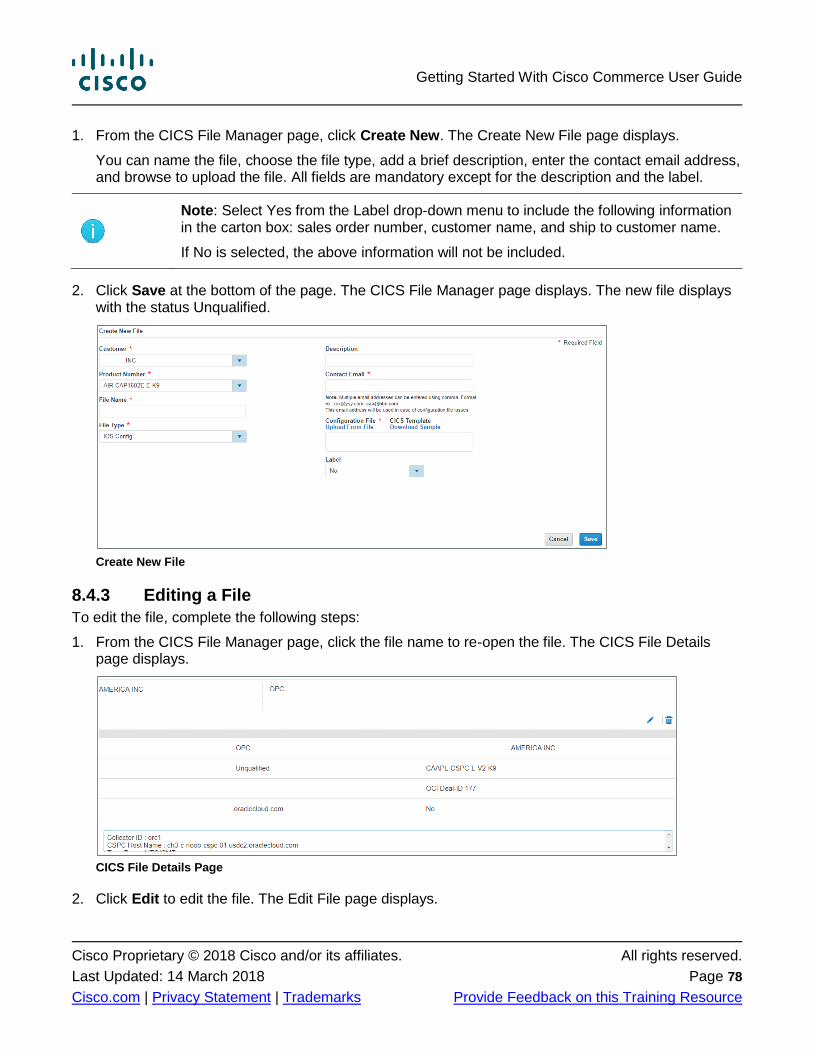
Getting Started With Cisco Commerce User Guide
Cisco Proprietary © 2018 Cisco and/or its affiliates. All rights reserved.
Last Updated: 14 March 2018 Page 78
Cisco.com | Privacy Statement | Trademarks Provide Feedback on this Training Resource
1. From the CICS File Manager page, click Create New. The Create New File page displays.
You can name the file, choose the file type, add a brief description, enter the contact email address, and browse to upload the file. All fields are mandatory except for the description and the label.
Note: Select Yes from the Label drop-down menu to include the following information in the carton box: sales order number, customer name, and ship to customer name.
If No is selected, the above information will not be included.
2. Click Save at the bottom of the page. The CICS File Manager page displays. The new file displays with the status Unqualified.
Create New File
8.4.3 Editing a File
To edit the file, complete the following steps:
1. From the CICS File Manager page, click the file name to re-open the file. The CICS File Details page displays.
CICS File Details Page
2. Click Edit to edit the file. The Edit File page displays.
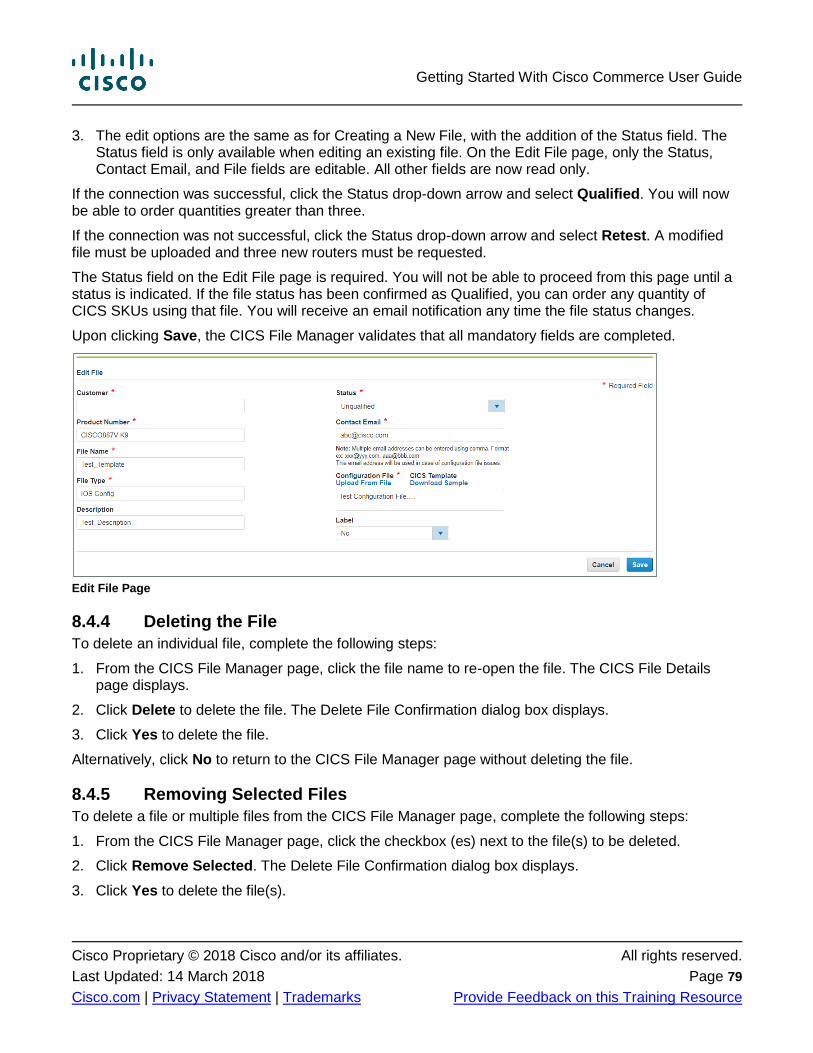
Getting Started With Cisco Commerce User Guide
Cisco Proprietary © 2018 Cisco and/or its affiliates. All rights reserved.
Last Updated: 14 March 2018 Page 79
Cisco.com | Privacy Statement | Trademarks Provide Feedback on this Training Resource
3. The edit options are the same as for Creating a New File, with the addition of the Status field. The Status field is only available when editing an existing file. On the Edit File page, only the Status, Contact Email, and File fields are editable. All other fields are now read only.
If the connection was successful, click the Status drop-down arrow and select Qualified. You will now be able to order quantities greater than three.
If the connection was not successful, click the Status drop-down arrow and select Retest. A modified file must be uploaded and three new routers must be requested.
The Status field on the Edit File page is required. You will not be able to proceed from this page until a status is indicated. If the file status has been confirmed as Qualified, you can order any quantity of CICS SKUs using that file. You will receive an email notification any time the file status changes.
Upon clicking Save, the CICS File Manager validates that all mandatory fields are completed.
Edit File Page
8.4.4 Deleting the File
To delete an individual file, complete the following steps:
1. From the CICS File Manager page, click the file name to re-open the file. The CICS File Details page displays.
2. Click Delete to delete the file. The Delete File Confirmation dialog box displays.
3. Click Yes to delete the file.
Alternatively, click No to return to the CICS File Manager page without deleting the file.
8.4.5 Removing Selected Files
To delete a file or multiple files from the CICS File Manager page, complete the following steps:
1. From the CICS File Manager page, click the checkbox (es) next to the file(s) to be deleted.
2. Click Remove Selected. The Delete File Confirmation dialog box displays.
3. Click Yes to delete the file(s).
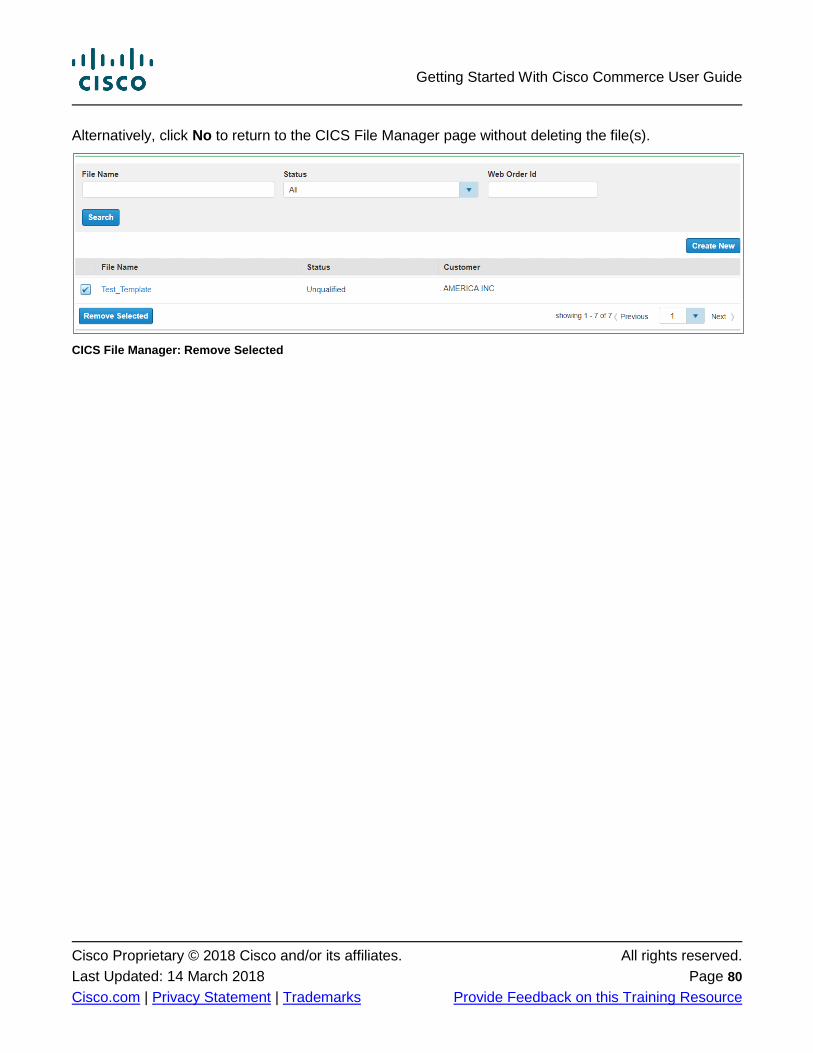
Getting Started With Cisco Commerce User Guide
Cisco Proprietary © 2018 Cisco and/or its affiliates. All rights reserved.
Last Updated: 14 March 2018 Page 80
Cisco.com | Privacy Statement | Trademarks Provide Feedback on this Training Resource
Alternatively, click No to return to the CICS File Manager page without deleting the file(s).
CICS File Manager: Remove Selected