Embed Size (px)
Citation preview
Genesys 7601 Interactive Way Indianapolis, IN 46278
Telephone/Fax (317) 872-3000 www.genesys.com
CIC Integration to Workforce Management Historical and Real-Time Adherence
Technical Reference
2018 R1
Last updated August 4, 2017 (See Change Log for summary of changes.)
Abstract
This technical reference shows how to install, configure, and use Genesys Workforce Management Integration software, including its Historical and Real-Time Adherence modules.
CIC Integration to Workforce Management Historical and Real-Time Adherence ii
Copyright and Trademark Information Interactive Intelligence, Interactive Intelligence Customer Interaction Center, Interaction Administrator, Interaction Attendant, Interaction Client, Interaction Designer, Interaction Tracker, Interaction Recorder, Interaction Mobile Office, Interaction Center Platform, Interaction Monitor, Interaction Optimizer, and the “Spirograph” logo design are registered trademarks of Genesys Telecommunications Laboratories, Inc. Customer Interaction Center, EIC, Interaction Fax Viewer, Interaction Server, ION, Interaction Voicemail Player, Interactive Update, Interaction Supervisor, Interaction Migrator, and Interaction Screen Recorder are trademarks of Genesys Telecommunications Laboratories, Inc. The foregoing products are ©1997-2017 Genesys Telecommunications Laboratories, Inc. All rights reserved. Interaction Dialer and Interaction Scripter are registered trademarks of Genesys Telecommunications Laboratories, Inc. The foregoing products are ©2000-2017 Genesys Telecommunications Laboratories, Inc. All rights reserved. Messaging Interaction Center and MIC are trademarks of Genesys Telecommunications Laboratories, Inc. The foregoing products are ©2001-2017 Genesys Telecommunications Laboratories, Inc. All rights reserved. Interaction Director is a registered trademark of Genesys Telecommunications Laboratories, Inc. e-FAQ Knowledge Manager and Interaction Marquee are trademarks of Genesys Telecommunications Laboratories, Inc. The foregoing products are ©2002-2017 Genesys Telecommunications Laboratories, Inc. All rights reserved. Interaction Conference is a trademark of Genesys Telecommunications Laboratories, Inc. The foregoing products are ©2004-2017 Genesys Telecommunications Laboratories, Inc. All rights reserved. Interaction SIP Proxy and Interaction EasyScripter are trademarks of Genesys Telecommunications Laboratories, Inc. The foregoing products are ©2005-2017 Genesys Telecommunications Laboratories, Inc. All rights reserved. Interaction Gateway is a registered trademark of Genesys Telecommunications Laboratories, Inc. Interaction Media Server is a trademark of Genesys Telecommunications Laboratories, Inc. The foregoing products are ©2006-2017 Genesys Telecommunications Laboratories, Inc. All rights reserved. Interaction Desktop is a trademark of Genesys Telecommunications Laboratories, Inc. The foregoing products are ©2007-2017 Genesys Telecommunications Laboratories, Inc. All rights reserved. Interaction Process Automation, Deliberately Innovative, Interaction Feedback, and Interaction SIP Station are registered trademarks of Genesys Telecommunications Laboratories, Inc. The foregoing products are ©2009-2017 Genesys Telecommunications Laboratories, Inc. All rights reserved. Interaction Analyzer is a registered trademark of Genesys Telecommunications Laboratories, Inc. Interaction Web Portal and IPA are trademarks of Genesys Telecommunications Laboratories, Inc. The foregoing products are ©2010-2017 Genesys Telecommunications Laboratories, Inc. All rights reserved. Spotability is a trademark of Genesys Telecommunications Laboratories, Inc. ©2011-2017. All rights reserved. Interaction Edge, CaaS Quick Spin, Interactive Intelligence Marketplace, Interaction SIP Bridge, and Interaction Mobilizer are registered trademarks of Genesys Telecommunications Laboratories, Inc. Interactive Intelligence Communications as a Service℠ and Interactive Intelligence CaaS℠ are trademarks or service marks of Genesys Telecommunications Laboratories, Inc. The foregoing products are ©2012-2017 Genesys Telecommunications Laboratories, Inc. All rights reserved. Interaction Speech Recognition and Interaction Quality Manager are registered trademarks of Genesys Telecommunications Laboratories, Inc. Bay Bridge Decisions and Interaction Script Builder are trademarks of Genesys Telecommunications Laboratories, Inc. The foregoing products are ©2013-2017 Genesys Telecommunications Laboratories, Inc. All rights reserved. Interaction Collector is a registered trademark of Genesys Telecommunications Laboratories, Inc. Interaction Decisions is a trademark of Genesys Telecommunications Laboratories, Inc. The foregoing products are ©2013-2017 Genesys Telecommunications Laboratories, Inc. All rights reserved. Interactive Intelligence Bridge Server and Interaction Connect are trademarks of Genesys Telecommunications Laboratories, Inc. The foregoing products are ©2014-2017 Genesys Telecommunications Laboratories, Inc. All rights reserved. The veryPDF product is ©2000-2017 veryPDF, Inc. All rights reserved. This product includes software licensed under the Common Development and Distribution License (6/24/2009). We hereby agree to indemnify the Initial Developer and every Contributor of the software licensed under the Common Development and Distribution License (6/24/2009) for any liability incurred by the Initial Developer or such Contributor as a result of any such terms we offer. The source code for the included software may be found at http://wpflocalization.codeplex.com. A database is incorporated in this software which is derived from a database licensed from Hexasoft Development Sdn. Bhd. ("HDSB"). All software and technologies used by HDSB are the properties of HDSB or its software suppliers and are protected by Malaysian and international copyright laws. No warranty is provided that the Databases are free of defects, or fit for a particular purpose. HDSB shall not be liable for any damages suffered by the Licensee or any third party resulting from use of the Databases. Other brand and/or product names referenced in this document are the trademarks or registered trademarks of their respective companies.
DISCLAIMER GENESYS TELECOMMUNICATIONS LABORATORIES (GENESYS) HAS NO RESPONSIBILITY UNDER WARRANTY, INDEMNIFICATION OR OTHERWISE, FOR MODIFICATION OR CUSTOMIZATION OF ANY GENESYS SOFTWARE BY GENESYS, CUSTOMER OR ANY THIRD PARTY EVEN IF SUCH CUSTOMIZATION AND/OR MODIFICATION IS DONE USING GENESYS TOOLS, TRAINING OR METHODS DOCUMENTED BY GENESYS.
Genesys Telecommunications Laboratories, Inc. 2001 Junipero Serra Boulevard Daly City, CA 94014 Telephone/Fax (844) 274-5992 www.genesys.com
CIC Integration to Workforce Management Historical and Real-Time Adherence iii
Table of contents Who should read this document .................................................................. 6
Requirements .............................................................................................. 6
WFM licensing ............................................................................................. 6
Chapter 1: Introduction to Workforce Management Integration ................. 8 What WFM Integration is ........................................................................................ 8 Third-party software supported by WFM ................................................................... 8
Chapter 2: Installing Workforce Management Integration .......................... 9 Before installing WFM ............................................................................................ 9 Creating custom tables on the database server ......................................................... 9 GMT and IEX users only: create a master workgroup................................................. 10 Installing WFM on an application server ................................................................... 10
Chapter 3: Configuring and using WFM Historical ..................................... 12 Starting WFM ...................................................................................................... 12 Switching between Historical and Real-Time Adherence ............................................. 13 Understanding WFM Historical feeds ....................................................................... 13 Step 1: Creating a feed ......................................................................................... 14 Step 2: Configuring WFM to work with a CIC server and its workgroups ....................... 14 Step 3: Configuring WFM to work with a database .................................................... 16 Step 4: Configuring the WFM service ...................................................................... 18 Step 5: Configuring WFM for the third-party software ................................................ 19 Step 6: Configuring sign-in/sign-out mappings ......................................................... 21 Step 7: Saving your feed configuration ................................................................... 22 Using the Historical Import Utility ........................................................................... 22 Using the Configuration Import Utility ..................................................................... 23 Starting, stopping, and restarting the Historical Service ............................................. 24
Chapter 4: Configuring and using WFM Real-Time Adherence ................... 26 Switching from Historical to Real-Time Adherence ..................................................... 26 Understanding RTA plug-ins................................................................................... 26 Step 1: Creating a plug-in ..................................................................................... 27 Step 2: Configuring the plug-in to work with a CIC server .......................................... 29 Background information for the third-party WFM software vendors .............................. 30 Step 3: Verifying or changing status key mappings ................................................... 31
Settings for Aspect ............................................................................................ 32 Step 4: Save your plug-in configuration .................................................................. 33 Using the Configuration Import Utility ..................................................................... 33 Starting, stopping, and restarting the RTA service .................................................... 34
Appendix A: Settings for Blue Pumpkin Enterprise .................................... 35 Style sheet parameters ...................................................................................... 35 Style sheet global variables ................................................................................ 35

CIC Integration to Workforce Management Historical and Real-Time Adherence iv
DCS (Direct Contact Statistics) ............................................................................ 35 Sample DCS output ........................................................................................... 37 Additional templates .......................................................................................... 37
Multimedia reporting ............................................................................................ 37 Chat application reporting .................................................................................. 38 Sample chat report output .................................................................................. 39 Email application reporting ................................................................................. 39 Sample email report output ................................................................................ 40
Advisor Agent Stats Interface Report ...................................................................... 40 Sample Advisor Agent Stats output ...................................................................... 42
Appendix B: Settings for Aspect ................................................................ 43 Aspect template description ................................................................................... 43
Style sheet parameters ...................................................................................... 43 Style sheet global variables ................................................................................ 43 Agent Productivity Report ................................................................................... 43 ACD Forecasting/Scheduling Report ..................................................................... 45 Sample Aspect output file* ................................................................................. 47
Appendix C: Settings for GMT .................................................................... 48 GMT template modification .................................................................................... 48
Style sheet parameters ...................................................................................... 48 Style sheet global variables ................................................................................ 48 Call Group Report ............................................................................................. 48 Sample GMT report output ................................................................................. 50 Additional templates .......................................................................................... 50 Agent Detail Report ........................................................................................... 50 Sample GMT report output ................................................................................. 53 Additional templates .......................................................................................... 53
Appendix D: Settings for IEX ..................................................................... 54 IEX template description ....................................................................................... 54
Style-sheet parameters ...................................................................................... 54 Style-sheet global variables ................................................................................ 54 Agent Profile Report .......................................................................................... 54 Call Group Report ............................................................................................. 55 Agent Detail Report ........................................................................................... 57 Agent System Report ......................................................................................... 59 Sample IEX output file* ..................................................................................... 61
Appendix E: Settings for Invision .............................................................. 62 Invision template description ................................................................................. 62
Call Group Report ............................................................................................. 62 Historical Agent Adherence Report ....................................................................... 64
Appendix F: User queue status .................................................................. 65
Appendix G: Multimedia reporting ............................................................. 69
CIC Integration to Workforce Management Historical and Real-Time Adherence v
Agent Profile report ........................................................................................... 69 Agent Detail Report ........................................................................................... 69 Agent System Report ......................................................................................... 69
Appendix H: Date-time formatting characters ........................................... 70
Appendix I: Miscellaneous tips .................................................................. 73 Setting up WFM Historical 2.0.23 to work with multiple CIC servers sharing a single database ......................................................................................................... 73
Change log ................................................................................................ 74

CIC Integration to Workforce Management Historical and Real-Time Adherence 6
Who should read this document This document is for system administrators and people who want to:
• Understand the Workforce Management (WFM) Integration software
• Install and configure the WFM Integration software
This document shows how to install and configure Genesys WFM Integration software.
Requirements Component Requirement
CIC server Customer Interaction Center 2016 R2
Application server
Windows 2008 R2 SP1 (64-bit), 2012 R2 (64-bit)
Note: Do not install the WFM Integration on a CIC server. Typically, the WFM Integration is installed on the SQL Server running the Genesys DB repository (if applicable) or the WFM vendor’s server (if it is a Windows operating system). Both Historical and Real-Time Adherence (RTA) are lightweight applications and can easily be run on the same server with other applications.
Microsoft .NET Framework
.NET 4.0 is required. Without it, Interactive Update does not function correctly.
Database server
SQL Server or Oracle (tables added to existing Genesys database repository)
Third-party WFM software supported
• Blue Pumpkin/Witness/Verint
• IEX TotalView/NICE
• Aspect eWFM
• GMT
• Invision/Injixo (cloud version of Invision)
• Pipkins (applies only to RTA)
Other requirements
• Connectivity to joint file share or FTP location on WFM server (Blue Pumpkin, IEX, GMT, Invision, or Aspect eWFM)
• Access to PureConnect database instance on SQL Server or Oracle
• For GMT and IEX, set up status-reporting workgroup in Interaction Administrator before configuring Real-Time Adherence.
WFM licensing WFM Integration is sold in two modules, Historical and Real-Time Adherence. Each module is licensed separately per CIC server. If a customer has three CIC servers (with switchover/backup servers), the customer would need three licenses for WFM Historical and RTA. You can run Historical without an RTA license; you can run RTA without a Historical license.

CIC Integration to Workforce Management Historical and Real-Time Adherence 7
The license strings are feature based. Each CIC server license must have the necessary features in order for the application modules to function.
• WFM Historical License Name: I3_FEATURE_WFM_HISTORICAL
• WFM RTA License Name: I3_FEATURE_WFM_REALTIME
Even without the required licenses, the user can still configure both WFM modules, but the integration services do not start unless there is at least one licensed server. If there is at least one server, integration services start, but the unlicensed servers are not functional from the integration perspective.
CIC Integration to Workforce Management Historical and Real-Time Adherence 8
Chapter 1: Introduction to Workforce Management Integration This chapter covers:
• What Workforce Management (WFM) Integration is
• Third-party software supported by WFM
• How WFM works
What WFM Integration is WFM Integration is a software package that (in separate modules) collects historical statistics and reports real-time user status updates from your CIC servers. WFM Integration makes these historical statistics and real-time user status updates available to third-party workforce management products.
Companies that have PureConnect's Interaction Optimizer software do not need WFM because Interaction Optimizer provides complete workforce management features and is integrated with CIC server software. WFM is for companies that do not have Optimizer and instead use third-party workforce management software. The WFM Historical and Real-Time Adherence (RTA) modules both extract user status information from your CIC servers and make it available to third-party workforce management software. The difference is that:
• WFM Historical extracts historical information. Use such information to plan workloads and staffing levels. WFM Historical collects historical statistics about the workgroups you select, such as calls handled, average talk time, and abandons. It collects the statistics at intervals. Each third-party software vendor has different requirements for historical reports, so we pull data from different historical tables.
• WFM Real-Time Adherence extracts up-to-the-minute information about status changes of employees in call centers and other organizational units that you choose to monitor. RTA listens for real-time changes in user status and reports them to the vendor in real time. RTA does not query for historical data and only cares about statuses.
At a high level, the two modules mainly differ in this way. WFM Historical provides historical information so you can analyze and plan for the future. WFM RTA provides real-time information so you can manage your staff and resources in the present.
The same setup program installs both modules of WFM. You configure and run both modules from the same interface. However, each module needs its own license to run.
You can find more information about WFM on the PureConnect Product Information site:
https://my.inin.com/support/products/integrations/Pages/Workforce-Management.aspx
Third-party software supported by WFM WFM is a versatile product that can work with multiple third-party vendors of workforce management software:
• Blue Pumpkin/Witness/Verint • IEX TotalView/NICE • GMT • Aspect eWFM • Invision/Injixo (cloud version of Invision) • Pipkins (applies only to RTA)

CIC Integration to Workforce Management Historical and Real-Time Adherence 9
Chapter 2: Installing Workforce Management Integration This chapter covers:
• Installing Workforce Management (WFM) Historical and Real-Time Adherence (RTA)
There are two main steps in installing WFM.
1. Create custom database tables for the application in the CIC reporting database
2. Install WFM Historical and RTA software on your workforce management servers or on another designated server
Before installing WFM If you are using WFM with the GMT or IEX workforce management software:
1. Start Interaction Administrator.
2. Create a logical workgroup that “Has No Queue” to hold all users whose status information will be collected and sent by WFM
Creating custom tables on the database server Before installing WFM, create custom database tables for the application in the CIC reporting database. WFM supports all database platforms. Download WFM from
https://my.inin.com/support/products/integrations/Pages/Workforce-Management.aspx
The SQL folder in your installation download contains installation scripts to help you create these tables, as outlined below.
1. Complete and verify a full backup of your CIC database.
2. Locate the correct script file in the installation download. The script files are located in the \Installs\Integrations\WorkforceManagement directory in the installation download and are named as follows:
Platform File name
MS SQL Server WFMTABLES.MSS
Oracle WFMTABLES.ORA
3. Open the script in the utility or development tool appropriate for your database platform.
4. Edit the GRANT statements at the bottom of the script. Based the grant statements on the release of CIC that you are running.
5. Connect to the CIC Reporting database, using the same User ID and password that was originally used during the CIC installation to create the original database (eic_admin in most cases).
6. Execute the script and verify that the creation of the objects is completed.
Create the tables using the same table-space or schema, and owner as the original reporting tables.
CIC Integration to Workforce Management Historical and Real-Time Adherence 10
GMT and IEX users only: create a master workgroup Unlike Blue Pumpkin and Aspect, GMT and IEX do not require the workgroup membership information that WFM typically sends together with CIC user status data.
The most effective way to tell WFM which CIC user data to send:
• Create a new logical workgroup that “Has No Queue”.
Note: Create the workgroup in Interaction Administrator before you install and configure WFM.
• Include all monitored users in that workgroup.
Installing WFM on an application server The same setup program installs both modules. Run both modules from the same interface. You can license only one of the modules (Historical or Real-Time Adherence) or both of the modules. If you license only one of the modules, you can still install and configure both modules, but you will only be able to run the module you have licensed.
To install WFM Historical and Real-Time Adherence:
1. Using an account with administrator rights, log on to your WFM server or designated application server.
2. Start the setup program:
a. Locate and double-click the installation file WFMRTAIntegration_2016_R2.msi.
b. If a dialog box asks, "Do you want to run this file?", click the Run button.
c. In the Welcome window, click the Next button.
The wizard displays its Custom Setup window.
3. In the Custom Setup window, change options if necessary.
• To change installation type from full installation (the default) to on-demand installation (not recommended), click the disk drive icon.
• If you have changed options and want to reset them to their default values, click the Reset button.
• To verify that you have enough disk space to install, click the Disk Usage button.
• To select a different folder in which to install the software, click the Browse button.
• When finished, click the Next button.
The wizard displays its Ready to Install window.
4. Click the Install button. When the wizard displays its Completed window, click the Finish button.
The installation program sets up two Windows Services, one for WFM Historical and one for WFM RTA (see the following figure). After you have configured WFM Historical and WFM RTA, WFM provides a menu choice to start their Windows Services if they are licensed. You can configure both modules without a license. However, starting the Windows Service requires a license for the particular module you want to run.

CIC Integration to Workforce Management Historical and Real-Time Adherence 11
The following screenshot shows the Windows Services window with WFM services highlighted.

CIC Integration to Workforce Management Historical and Real-Time Adherence 12
Chapter 3: Configuring and using WFM Historical This chapter covers:
• Starting WFM
• Switching between WFM Historical and Real-Time Adherence
• Creating feeds
• Using the Historical Import utility
Starting WFM Configure and run both the WFM Historical and WFM Real-Time Adherence modules from the same control interface. To start WFM:
Note: Run WFM Integration Configurator as an administrator.
1. Click the Windows Start button, point to PureConnect, and click WFM Integration Configurator.
When WFM starts, it displays the main window for the Historical module.
CIC Integration to Workforce Management Historical and Real-Time Adherence 13
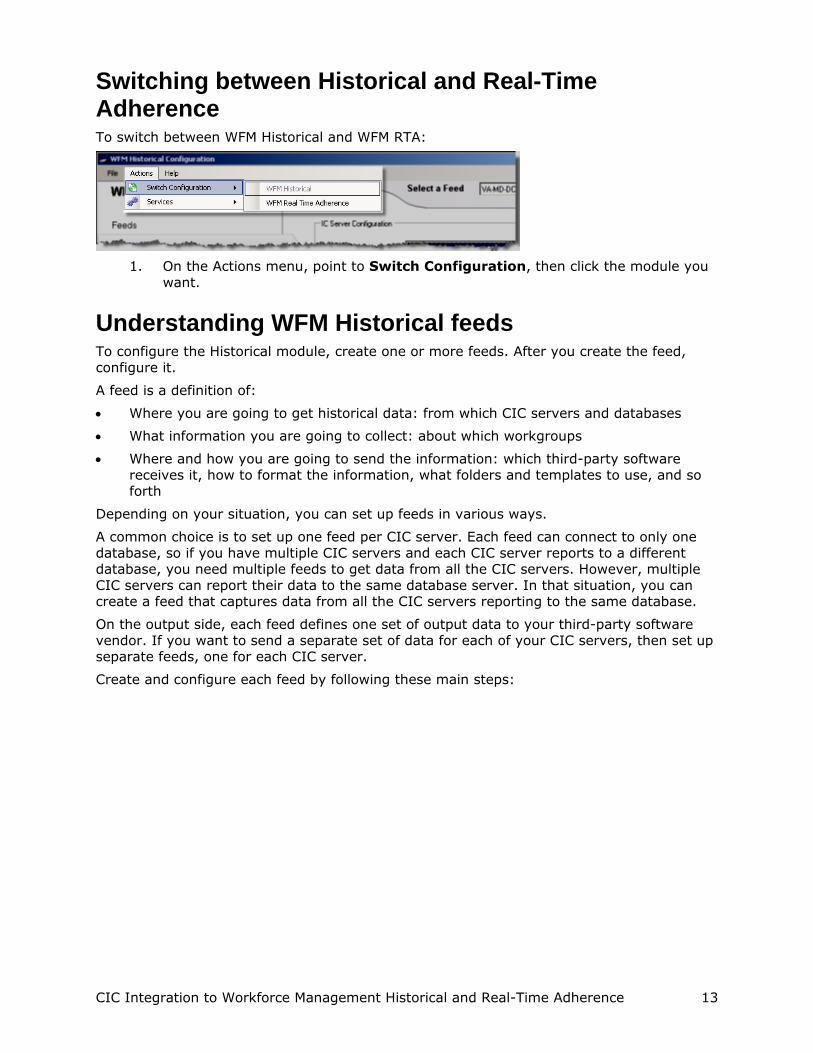
Switching between Historical and Real-Time Adherence To switch between WFM Historical and WFM RTA:
1. On the Actions menu, point to Switch Configuration, then click the module you
want.
Understanding WFM Historical feeds To configure the Historical module, create one or more feeds. After you create the feed, configure it.
A feed is a definition of:
• Where you are going to get historical data: from which CIC servers and databases
• What information you are going to collect: about which workgroups
• Where and how you are going to send the information: which third-party software receives it, how to format the information, what folders and templates to use, and so forth
Depending on your situation, you can set up feeds in various ways.
A common choice is to set up one feed per CIC server. Each feed can connect to only one database, so if you have multiple CIC servers and each CIC server reports to a different database, you need multiple feeds to get data from all the CIC servers. However, multiple CIC servers can report their data to the same database server. In that situation, you can create a feed that captures data from all the CIC servers reporting to the same database.
On the output side, each feed defines one set of output data to your third-party software vendor. If you want to send a separate set of data for each of your CIC servers, then set up separate feeds, one for each CIC server.
Create and configure each feed by following these main steps:
CIC Integration to Workforce Management Historical and Real-Time Adherence 14
Main step
Action
Step 1 Creating the feed.
Step 2 Configuring WFM to work with a CIC server and its workgroups.
Step 3 Configuring WFM to work with a database.
Step 4 Configuring the WFM Historical service, such as telling it how to group status information by time intervals.
Step 5 Configuring WFM for the third-party software.
Step 6 Configuring sign-in/sign-out mappings for software that uses status key mappings.
Step 7 Saving your feed configuration.
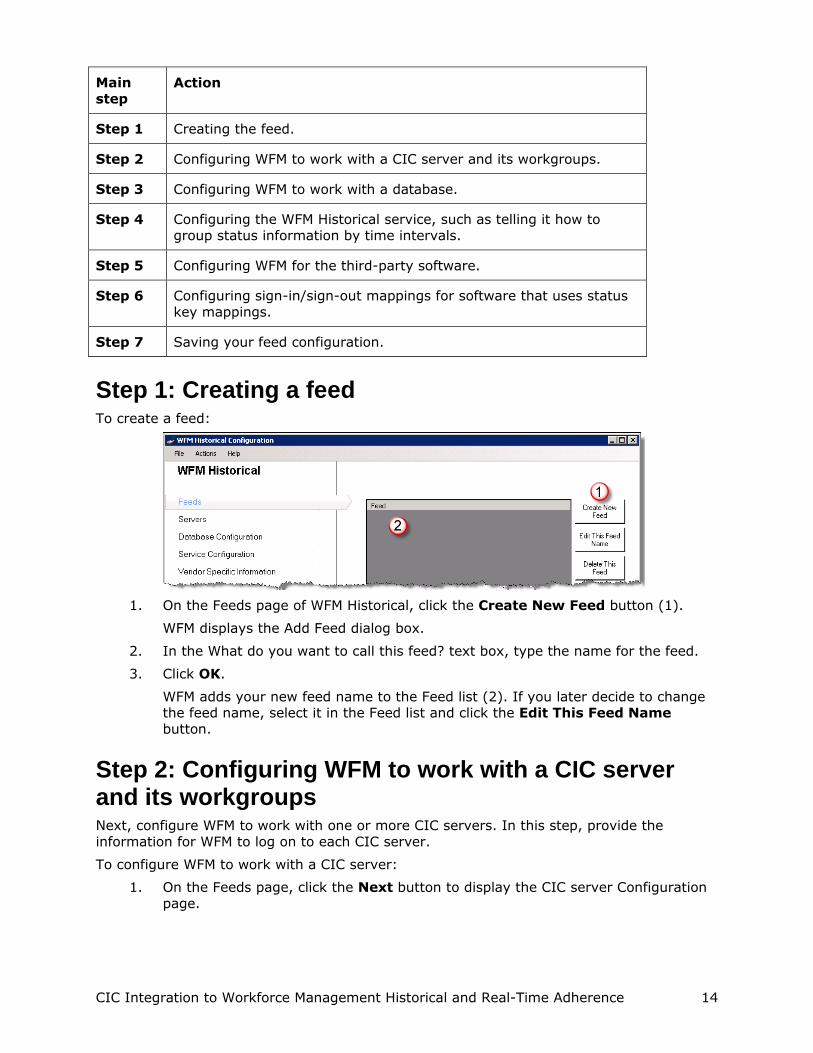
Step 1: Creating a feed To create a feed:
1. On the Feeds page of WFM Historical, click the Create New Feed button (1).
WFM displays the Add Feed dialog box.
2. In the What do you want to call this feed? text box, type the name for the feed.
3. Click OK.
WFM adds your new feed name to the Feed list (2). If you later decide to change the feed name, select it in the Feed list and click the Edit This Feed Name button.
Step 2: Configuring WFM to work with a CIC server and its workgroups Next, configure WFM to work with one or more CIC servers. In this step, provide the information for WFM to log on to each CIC server.
To configure WFM to work with a CIC server:
1. On the Feeds page, click the Next button to display the CIC server Configuration page.

CIC Integration to Workforce Management Historical and Real-Time Adherence 15
2. Add a new CIC server name:
a. Click the New IC Server button.
b. In the dialog box, type the name of the IC server, and then click OK.
3. Add logon information for the server.
a. Input your user name and password.
i. In the Username text box, type a logon ID for the server.
ii. In the Password text box, type the corresponding password.
Note: Alternatively, select Use Windows Auth. WFM then uses your Windows credentials to log on.
b. In the Server Port text box, type the number 0. The Server Port overrides the port for connection to the Session Manager process. Using 0 (or leaving the text box blank) uses the default connection port to connect to Session Manager.
Note: Configure the account you use to connect to the CIC server in Interaction Administrator as a master administrator account. The WFM service accesses data in your CIC server that is unavailable to other account types.
4. Click the Connect button to test the connection with your CIC server.
WFM displays a progress bar while it makes the connection. When it connects, WFM displays a success message in the gray text box to the right of the Connect button.
5. To configure more CIC servers, repeat steps 2 through 4.
Tip: If you are running CIC in a switchover environment, do not create a separate server for the backup. Ensure though that the server entered during the initial setup is the current primary server and is running. Otherwise, you cannot configure many of the other items during installation.
6. Click the Next button.

CIC Integration to Workforce Management Historical and Real-Time Adherence 16
WFM displays the Workgroups page.
The Select a Feed list box (1) shows the feed for which you are selecting workgroups. If you have defined multiple feeds, use this list box to select a different feed.
The Select a Server list box (2) shows the CIC server from which you are selecting workgroups. If you defined multiple servers for the selected feed, use this list box to select a different CIC server and choose workgroups from it.
7. In the Available Workgroups list (3), click each workgroup to monitor, and then click the Add button.
WFM displays the selected workgroups in the Monitored Workgroups list (4).
Step 3: Configuring WFM to work with a database Next, configure WFM to work with a database on one of your CIC servers. In this step, you provide the information that WFM needs to log on to each database and obtain status information from it.
To configure a server:
1. On the Workgroups page, click the Next button.
WFM displays the Database Configuration page.

CIC Integration to Workforce Management Historical and Real-Time Adherence 17
The Select a Feed list box (1) displays the feed for which you are setting up database access. You can change to a different feed.
2. In the DB Type section (2), click the radio button for the type of database WFM connects to.
WFM automatically fills in the appropriate value for the Provider text box.
3. In the Connection String section, add database logon information:
a. In the Data Source text box, type the name of the data source.
b. In the DB Username text box, type the user ID WFM uses.
c. In the DB Password text box, type the corresponding password.
d. In the DB Name text box, type the name of the database to use.
WFM automatically fills in the connection string text box based on the values you enter.
4. Click the Test Connection button. This button tests WFM’s connection to the database.
WFM tries to connect to the database with the logon information you provided. If it succeeds, it displays a success message.
WFM automatically fills in the text boxes in the Connection Parameters section:
• Command Timeout: the number of seconds that a command can execute before timing out. Typically the default of 30 seconds is sufficient, except for large customers.
• DB Qualifier: the qualifier that is used for database transactions. This value changes when the DB Type parameter changes. The default values are correct for most cases, but verify that they are correct for your situation.
• Persist Connection: a setting that determines if the database connection is maintained (kept alive) as long as the service is running.

CIC Integration to Workforce Management Historical and Real-Time Adherence 18
Step 4: Configuring the WFM service Next, specify various things about how WFM provides status information to the third-party software.
To configure the WFM service:
1. On the Database Configuration page, click the Next button.
WFM displays the Service Configuration page.
The Select a Feed list box (1) shows the feed for which you are configuring the service and lets you switch to a different feed.
2. In the Service Configuration section (2), expand the Interval list box and select the time interval for grouping status data. The default value is 30 minutes. Match the Interval to the Reporting Interval defined in Interaction Administrator.
3. Specify Execution Timer values:
a. In the Execution Timer Interval list box, select the number of minutes between interval executions. The default value is 30 minutes. Set a higher value for organizations with large amounts of historical data or for organizations that are not concerned about historical data being delivered quickly. Set the Execution Timer Interval to the same value as the Interval configured in the previous step.
b. In the Execution Timer Delay list box, select the number of minutes after the interval execution time that WFM waits before querying your CIC data. If WFM queries your CIC server database at the same time that the CIC server is writing its data to the database, performance will suffer and data could be missed. This parameter tells WFM how long to wait after that time before it queries your CIC server data.
Note: If you set up WFM to query multiple CIC servers, the data is retrieved in the order of the configured servers.
CIC Integration to Workforce Management Historical and Real-Time Adherence 19
4. Specify service level, load attempts, and throttle:
a. In the Service Level Threshold list box, select how many service "buckets" to include as acceptable wait times.
Each bucket indicates how long a customer has to wait before a call center agent picks up the call. Interaction Center ships with six default buckets, each of which is 10 seconds longer than the previous one. With the WFM default service level threshold of 3, WFM sends the percentage of calls answered within the first 3 buckets (1 to 10 seconds, 11 to 20 seconds, and 21 to 30 seconds).
b. In the Load Attempts text box, enter how many times WFM tries to load an interval before giving up.
The default value is 0, meaning that WFM keeps trying until it succeeds in loading a particular interval.
c. In the Throttle text box, enter the number of intervals WFM processes simultaneously if it needs to catch up.
If you have turned the service off for several days or there is a network outage, WFM might need to process many intervals to catch up.
5. Click the Browse button next to the Output Directory text box. Browse to the folder where WFM places its output files for the third-party software.
Note: If you are configuring for FTP, the Output Directory text box disappears and a Relative FTP Directory text box appears in the FTP Configuration section.
Each third-party software package has a preferred location for these files; consult your vendor documentation. For software that receives data via FTP, this location is the folder on the FTP server where WFM puts its output files.
6. In the Backup Retention text box, type the number of days you want to keep backups of your output files after you create them.
7. Click one of the Test Mode radio buttons to turn test mode on or off.
By default, test mode is turned on. After you install WFM, keep test mode turned on until you have verified that the system is configured and working the way you want. Test Mode saves the XML data sets that get run through the vendor’s XSL. Use this data for debugging the flat file outputs that the WFM Historical Module generates.
8. If you want WFM to send its output files via FTP:
a. Select the Use FTP check box.
b. Fill in the boxes for FTP server, relative FTP directory, user ID, password, and port.
Step 5: Configuring WFM for the third-party software Next, set values to help WFM provide status data to the third-party software.
To configure WFM for the third-party software:
1. On the Service Configuration page, click the Next button to display the WFM Type Configuration page.

CIC Integration to Workforce Management Historical and Real-Time Adherence 20
2. Expand the Vendor list box and click the vendor name for your third-party
software.
WFM automatically displays the correct controls and labels for your vendor.
3. To include a report that groups historical data by agent and by workgroup, select the Include radio button labeled:
• Advisor Agent Status Report for Blue Pumpkin
• Agent Profile Report for IEX or GMT
• Agent Activity Report for Aspect eWFM
• Agent Historical Adherence for Invision
4. Template Names check boxes instruct WFM to create separate files for different categories of data. The check boxes are available or unavailable depending on your software vendor.
• Select Calls to create a separate file with call data.
• Select Agents to create a separate file with agent data.
• Select Chats to create a separate file with chat data.
• Select Emails to create a separate file with e-mail data.
As you select templates, WFM adds their file names to the Filename Format text box. WFM inserts commas between the file names to separate them.
Warning: Do not modify the contents of the Filename Format text box unless the change is needed and you understand what you are doing.
5. To put each file in its own directory, select the Use Separate Directories check box.
This feature is only available for Blue Pumpkin and Aspect.
6. To show outbound calls by workgroup, select the Show Outbound Calls via Workgroup check box.
This feature is only available for IEX. It shows a per-workgroup breakdown of the outbound calls made on behalf of the workgroups each interval from an agent and workgroup perspective.
7. Write the name of the CIC custom tables column in which WFM stores the extension data, if:
• You included an agent-based report in Step 3.

CIC Integration to Workforce Management Historical and Real-Time Adherence 21
• Your software identifies agents by their telephone extension.
Suggested values are:
• Blue Pumpkin: Leave blank
• IEX: CUSTOMVALUE1
• GMT: CUSTOMVALUE1
• Aspect: CUSTOMVALUE1
• Invision: CUSTOMVALUE1
If you are already using the CUSTOMVALUE1 column for something else, you can use CUSTOMVALUE2, CUSTOMVALUE3, or some other available column.
8. If you use Aspect and included an agent-based report in Step 3, you can change the values in the SumColsAgent and MaxColsAgent boxes (only used by Aspect). However, do not change the values unless you are sure about what you are doing and why. The boxes are as follows: • SumColsAgent: Lists the columns to be summed when creating the Agent
Profile report. The Agent Profile report pulls numerous intervals from the IAgentQueueStats table. Those rows must be summarized within the SignIn/SignOut combinations. This list of columns is added for each row.
• MaxColsAgent: Similar to SumColsAgent, but this column takes the maximum value across all rows in the SignIn/SignOut combination.
Step 6: Configuring sign-in/sign-out mappings This page is blank for every third-party package except Aspect eWFM, which displays status mapping if you set Include Agent Profile to a value of Yes. Use this page to configure sign-in/sign-out status mappings. WFM Historical uses these mappings to generate a historical report for Aspect that shows agents' summary results for each day. The status mappings determine how WFM Historical flags statuses as signed in or signed out and how to group the results during the day.
For example, a user logs on at 8:00am, goes to lunch at 11:30am, returns at 12:15pm, and goes home at 4:30pm. WFM Historical breaks that day into 2 sets of sign-in/sign-outs: 8:00-11:30am and 12:15-4:30pm.
To configure sign-in/sign-out mappings:
1. On the WFM Type Configuration page, click the Next button.
WFM displays the Status Key Mappings page. The default mappings match those mappings required by the third-party software package you specified. If you specified a third-party package that does not use status keys, then the page displays a message that your package does not use status key mappings.

CIC Integration to Workforce Management Historical and Real-Time Adherence 22
2. If needed, add or remove statuses from the Mapped Sign In Statuses list.
Your WFM Historical feed is now configured.
Step 7: Saving your feed configuration To save your feed configuration:
1. Open the File menu and click Save.
Using the Historical Import Utility Use the Historical Import Utility to reprocess old intervals. For example, if you just installed WFM Historical and you want to see the previous two months of data, use the Historical Import utility to do it. Such reprocessing can give you a "historical baseline" for your future scheduling.
Because the Historical Import Utility is not part of the process to configure a feed, you cannot reach its page by clicking the Next button from the Status Key Mappings page.
To use the Historical Import Utility:
1. In the navigation menu at the left side of WFM Historical, click Historical Import Utility.
WFM displays the Historical Import Utility page.

CIC Integration to Workforce Management Historical and Real-Time Adherence 23
2. Expand the Import Start Date list box and select the starting date from the pop-
out calendar.
3. Expand the Import End Date list box and select the ending date from the pop-out calendar.
4. Click the Insert Intervals to Process button.
WFM imports the CIC server status data for the period you specified.
Using the Configuration Import Utility Use the Configuration Import Utility to import a configuration file for WFM Historical.
Because the Configuration Import Utility is not part of the process to configure a feed, you cannot reach its page by clicking the Next button from the Status Key Mappings page.
To use the Configuration Import Utility:
1. In the navigation menu at the left side of the page, click Configuration Import Utility.
WFM displays the Configuration Import Utility page.

CIC Integration to Workforce Management Historical and Real-Time Adherence 24
2. Click the Pre-3.0 Configuration File Location button (1) and browse to the
location of the configuration file to import. Select the file.
3. Click the Import Now button (2).
WFM imports the selected configuration file.
Starting, stopping, and restarting the Historical Service If you make configuration changes in WFM Historical, you might need to restart its Windows Service. WFM usually prompts you to stop or restart the service.
The WFM Actions menu lets you start, stop, and restart the Windows WFM Historical Service from within your WFM software. Previously, you did this through Windows Service.
To start, stop, or restart the Windows Service for WFM Historical:
1. On the Actions menu, point to Services, then point to the module you want to start, stop, or restart.

CIC Integration to Workforce Management Historical and Real-Time Adherence 25
2. On the submenu, click Start Service, Stop Service, or Restart Service.
WFM starts, stops, or restarts the Windows Service as directed. WFM displays a message that confirms the result of your action.
CIC Integration to Workforce Management Historical and Real-Time Adherence 26
Chapter 4: Configuring and using WFM Real-Time Adherence This chapter covers:
• Switching from Historical to Real-Time Adherence (RTA)
• Creating a plug-in
• Configuring RTA to connect to a CIC server
• Selecting workgroups
• Verifying or changing status key mappings
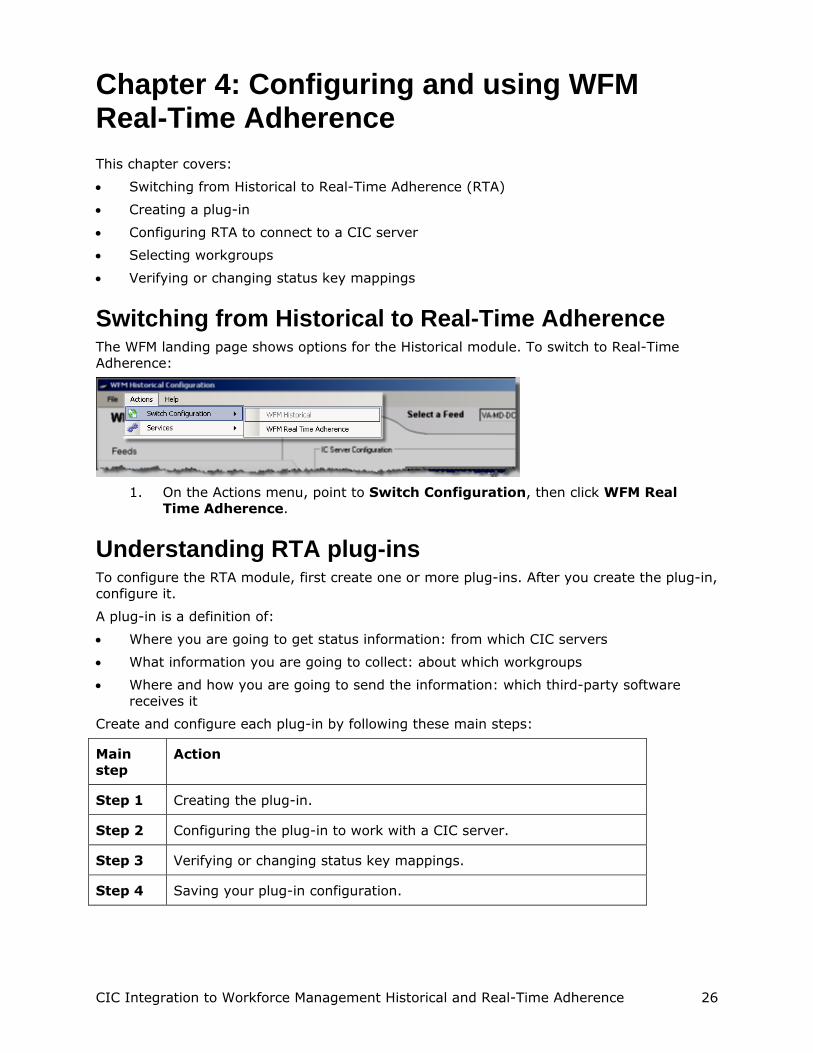
Switching from Historical to Real-Time Adherence The WFM landing page shows options for the Historical module. To switch to Real-Time Adherence:
1. On the Actions menu, point to Switch Configuration, then click WFM Real
Time Adherence.
Understanding RTA plug-ins To configure the RTA module, first create one or more plug-ins. After you create the plug-in, configure it.
A plug-in is a definition of:
• Where you are going to get status information: from which CIC servers
• What information you are going to collect: about which workgroups
• Where and how you are going to send the information: which third-party software receives it
Create and configure each plug-in by following these main steps:
Main step
Action
Step 1 Creating the plug-in.
Step 2 Configuring the plug-in to work with a CIC server.
Step 3 Verifying or changing status key mappings.
Step 4 Saving your plug-in configuration.

CIC Integration to Workforce Management Historical and Real-Time Adherence 27
Step 1: Creating a plug-in To configure RTA, first create one or more plug-ins. Each plug-in defines how RTA sends status information to a particular third-party workforce management package. The simplest approach is to create one plug-in for each third-party software package to which RTA sends status data. Most organizations only need to create one plug-in, but you can create multiple plug-ins if needed and switch between them.
Tip: If you are having trouble connecting to the WFM provider and you are running Windows Server 2012, disable IPv6.
To create a plug-in:
1. Display the RTA Main Configuration page.
2. Click the Configure New Plug-in button.
3. In the Add Plug-in dialog box, type a name for the plug-in and click OK.
Give the plug-in the same name as the third-party software to which it sends information. If you later decide to change the name, select the plug-in and click the Edit This Plug-in Name button.
4. Expand the Vendor Name list box and click the name of your third-party software vendor.
Based on the vendor you selected, RTA fills in appropriate values for the Destination IP and Destination Port. Different fields appear in the Vendor Specific Configuration section. RTA fills in those fields with appropriate values for the vendor you selected.
CIC Integration to Workforce Management Historical and Real-Time Adherence 28
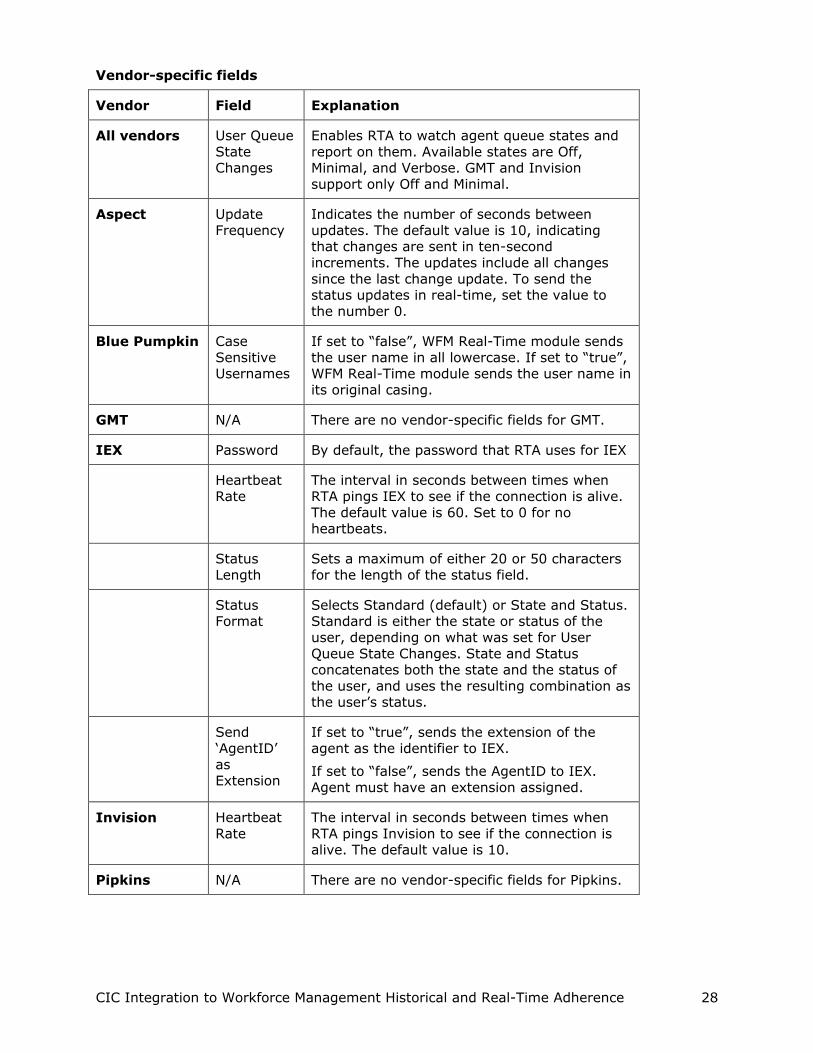
Vendor-specific fields
Vendor Field Explanation
All vendors User Queue State Changes
Enables RTA to watch agent queue states and report on them. Available states are Off, Minimal, and Verbose. GMT and Invision support only Off and Minimal.
Aspect Update Frequency
Indicates the number of seconds between updates. The default value is 10, indicating that changes are sent in ten-second increments. The updates include all changes since the last change update. To send the status updates in real-time, set the value to the number 0.
Blue Pumpkin Case Sensitive Usernames
If set to “false”, WFM Real-Time module sends the user name in all lowercase. If set to “true”, WFM Real-Time module sends the user name in its original casing.
GMT N/A There are no vendor-specific fields for GMT.
IEX Password By default, the password that RTA uses for IEX
Heartbeat Rate
The interval in seconds between times when RTA pings IEX to see if the connection is alive. The default value is 60. Set to 0 for no heartbeats.
Status Length
Sets a maximum of either 20 or 50 characters for the length of the status field.
Status Format
Selects Standard (default) or State and Status. Standard is either the state or status of the user, depending on what was set for User Queue State Changes. State and Status concatenates both the state and the status of the user, and uses the resulting combination as the user’s status.
Send ‘AgentID’ as Extension
If set to “true”, sends the extension of the agent as the identifier to IEX.
If set to “false”, sends the AgentID to IEX. Agent must have an extension assigned.
Invision Heartbeat Rate
The interval in seconds between times when RTA pings Invision to see if the connection is alive. The default value is 10.
Pipkins N/A There are no vendor-specific fields for Pipkins.

CIC Integration to Workforce Management Historical and Real-Time Adherence 29
Step 2: Configuring the plug-in to work with a CIC server Next, configure the plug-in to work with one or more CIC servers. In this step, you provide the information for the plug-in to log on to each CIC server.
To configure the plug-in to work with a CIC server:
1. On the RTA Main Configuration page, click the Next button to display the IC Server Configuration page.
2. Add a new CIC server name.
a. Click the New IC Server button.
b. In the dialog box, type the name of the CIC server, and then click OK.
3. Add logon information for the server.
a. Input your user name and password.
i. In the Username text box, type a logon ID for the server.
Note: The user account must have sufficient rights to see all user statuses on the CIC server. This requires Access Controls rights to all Directory Status Columns.
ii. In the Password text box, type the corresponding password.
Note: Alternatively, check Use Windows Auth. WFM then uses your Windows credentials to log on.
b. In the Server Port text box, WFM automatically fills in the default value of the number 0. The 0 value tells WFM to use the default connection port to connect to Session Manager. If you change the value in this text box, you override the default port to connect to the Session Manager process.
CIC Integration to Workforce Management Historical and Real-Time Adherence 30
c. Select the Assigned Plug-in that receives the status changes for this CIC server.
Note: Multiple servers can send information to one plug-in, but a single-server configuration can only send information to one plug-in.
4. Click the Connect button to test the connection with your CIC server.
RTA displays a progress bar while it makes the connection. If you have a license for RTA, when it connects, RTA displays a success message in the gray text box to the right of the Connect button.
5. To create more CIC server configurations, repeat steps 2 through 4.
6. Click the Next button.
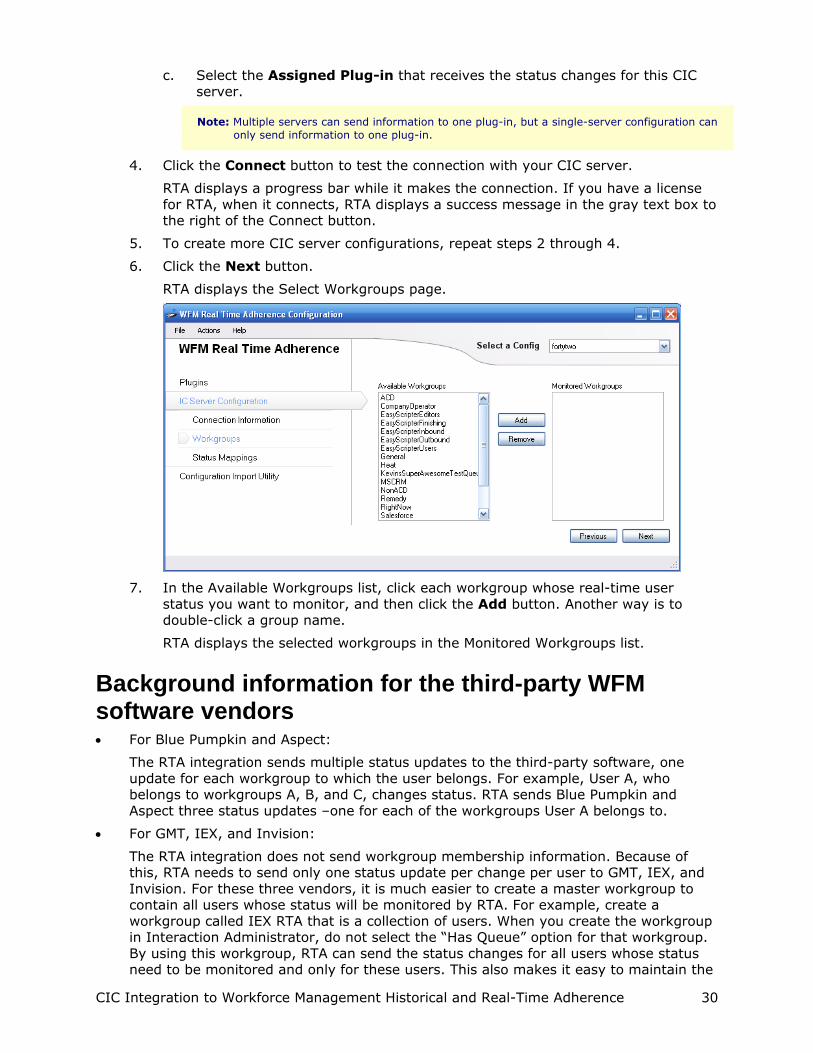
RTA displays the Select Workgroups page.
7. In the Available Workgroups list, click each workgroup whose real-time user
status you want to monitor, and then click the Add button. Another way is to double-click a group name.
RTA displays the selected workgroups in the Monitored Workgroups list.
Background information for the third-party WFM software vendors • For Blue Pumpkin and Aspect:
The RTA integration sends multiple status updates to the third-party software, one update for each workgroup to which the user belongs. For example, User A, who belongs to workgroups A, B, and C, changes status. RTA sends Blue Pumpkin and Aspect three status updates –one for each of the workgroups User A belongs to.
• For GMT, IEX, and Invision:
The RTA integration does not send workgroup membership information. Because of this, RTA needs to send only one status update per change per user to GMT, IEX, and Invision. For these three vendors, it is much easier to create a master workgroup to contain all users whose status will be monitored by RTA. For example, create a workgroup called IEX RTA that is a collection of users. When you create the workgroup in Interaction Administrator, do not select the “Has Queue” option for that workgroup. By using this workgroup, RTA can send the status changes for all users whose status need to be monitored and only for these users. This also makes it easy to maintain the
CIC Integration to Workforce Management Historical and Real-Time Adherence 31
users to be synchronized by adding and removing users from this workgroup. See the section Creating custom tables on the database server.
Before installing WFM, create custom database tables for the application in the CIC reporting database. WFM supports all database platforms.
The SQL folder in your installation download contains installation scripts to help you create these tables, as outlined below.
1. Complete and verify a full backup of your CIC database.
2. Locate the correct script file in the installation folders. The script files are located in the \Installs\Integrations\WorkforceManagement directory and are named as follows:
Platform File name
MS SQL Server WFMTABLES.MSS
Oracle WFMTABLES.ORA
3. Open the script in the utility or development tool appropriate for your database platform.
4. Edit the GRANT statements at the bottom of the script. Base the grant statements on the release of CIC that you are running.
5. Connect to the CIC Reporting database, using the same User ID and password that was originally used during the CIC installation to create the original database (eic_admin in most cases).
6. Execute the script and verify that the creation of the objects is completed.
The tables must be created using the same table-space or schema, and owner as the original reporting tables.
GMT and IEXUsers Only: Create a Master Workgroup. See in Chapter 2: Installing Workforce Management Integration.
Step 3: Verifying or changing status key mappings The next step is to verify or change the default status key mappings. When you select the third-party vendor for your plug-in, RTA automatically sets status key values for that vendor, if appropriate. You can change those values if needed. Blue Pumpkin, Aspect, and GMT use this status key conversion feature. Only IEX and Pipkins do not use it.
To verify or change status key mappings:
1. On the Select Workgroups page, click the Next button.
RTA displays the Status Mappings page.

CIC Integration to Workforce Management Historical and Real-Time Adherence 32
2. Blue Pumpkin and GMT have two columns in their Status Mappings tables. As
shown in the figure, Aspect eWFM adds a third column. The columns are:
• Status Key: This is the text string for the status name on your CIC servers.
• Value: This is the numeric value that Blue Pumpkin, GMT, and Aspect receive indicating that particular status.
• Reason Code (Aspect only): This is the reason that Aspect attaches to the particular status.
3. To change a status key value, click its row in the Value column, and then type the new value.
4. If you change values and want to revert to RTA's default values, click the Restore Default Values button.
Settings for Aspect Aspect requires specific settings.
Settings for Aspect
Setting Value Controlled by RTA service
Use RTA config tool to define
Not used
UserStatusCodeConversion True
Sign In 1 X
Sign Out 2 X
Available 11 X
Unavailable 12 X
Inbound Line 1 (Inbound ACD Call)
13 X

CIC Integration to Workforce Management Historical and Real-Time Adherence 33
Setting Value Controlled by RTA service
Use RTA config tool to define
Not used
Inbound Line 2 (Inbound Non-ACD Call)
14 X
Outbound Line 1 (Outbound ACD Call)
15 X
Outbound Line 2 (Outbound Non-ACD Call)
16 X
Hold 17 X
Internal Call 18 X
After Call Work 19 X
Conference 20 X
Supervisor 21 X
Working Off-Line 22 X
User-defined 1 23 X
User-defined 2 24 X
User-defined 3 25 X
User-defined 4 26 X
User-defined 5 27 X
User-defined 6 28 X
If you have any "On Call" statuses, set them to status code 13.
Step 4: Save your plug-in configuration To save your plug-in configuration:
1. Open the File menu and click Save.
Using the Configuration Import Utility Use the Configuration Import Utility to import a configuration file for WFM Real-Time Adherence.
Because the Configuration Import Utility is not part of the process to configure RTA, you cannot reach its page by clicking the Next button from the Status Mappings page.
To use the Configuration Import Utility:
1. In the navigation menu at the left side of the page, click Configuration Import Utility.
WFM displays the Configuration Import Utility page.

CIC Integration to Workforce Management Historical and Real-Time Adherence 34
2. Click the Pre-3.0 Configuration File Location button (1) and browse to the
location of the configuration file to import. Select the file.
3. Click the Import Now button (2).
WFM imports the selected configuration file.
Starting, stopping, and restarting the RTA service If you make configuration changes in RTA, such changes might require you to restart the Windows RTA service. WFM usually prompts you to stop or restart the service.
The WFM Actions menu lets you start, stop, and restart the Windows RTA service from within your RTA software. Previously, you did this through Windows itself.
To start, stop, or restart the Windows Service for WFM RTA:
1. On the Actions menu, point to Services, then point to the module you want to start, stop, or restart.
2. On the submenu, click Start Service, Stop Service, or Restart Service.
WFM starts, stops, or restarts the Windows service as directed. WFM displays a message that confirms the result of your action.

CIC Integration to Workforce Management Historical and Real-Time Adherence 35
Appendix A: Settings for Blue Pumpkin Enterprise XSLT templates control the formatting and layout of the reports. These templates are contained in a single style sheet called BluePumpkinEnterprise_Output.xsl. To alter the headings, data elements, field delimiter, or even product custom calculations, modify these templates.
The integration sends status update information to Blue Pumpkin via a TCP/IP socket:
• Event Type (26=Logged On, 27=Logged Off, 28=Status Change)
• Agent's CIC User ID
• Agent's Extension
• Status Change Timestamp
• Status Code (converted to a numeric status code per the configuration in the WFM Configuration utility)
• Workgroup Name (only populated if handling a call of a specific workgroup)
Editing the templates requires knowledge of XML/XSLT transformations and the XSL language. Many resources are available on the Internet and in your local bookstore on these subjects.
The examples displayed in the following sections contain sample data that was formatted using the default template. Check with your workforce management application vendor regarding the specific requirements for their system.
Style sheet parameters The I3WFMService passes configuration information to the style sheet at the time it is applied to the data for transformation. These parameters control the output of the individual templates and which templates are used to produce the output.
Warning: Do not modify or delete the top-level parameters.
Style sheet global variables To facilitate easier modifications to the template outputs, the style sheet uses global variables for some of the common characters or properties. The individual templates reference these variables repeatedly. To apply changes, only modify the declaration of the variable contents.
DCS (Direct Contact Statistics) The DCS report provides information regarding call interactions for the configured workgroups.
Group This field is the name of the workgroup queue identifying this row of data.
Table: WFM_iWrkGrpQueueStats (WFM_iStatsGroup if using skills)
Column: cName (cReportGroup if using skills)

CIC Integration to Workforce Management Historical and Real-Time Adherence 36
Date This field is the formatted date indicating the start of the reported interval.
Time This field is the formatted time indicating the start of the reported interval.
Int This field is the duration, in minutes, of the reported interval.
CV This field is the total number of call interactions that entered the workgroup queue during this interval.
Table: WFM_iWrkGrpQueueStats (WFM_iStatsGroup if using skills)
Column: nEnteredAcd
SL This field is the percentage of calls that agents handled within a specified threshold. Configure the threshold in the plug-in parameters described in the previous section.
Table: WFM_iWrkGrpQueueStats (WFM_iStatsGroup if using skills)
Column: Calculated Field
AB This field is the number of calls that abandoned during this interval.
Table: WFM_iWrkGrpQueueStats (WFM_iStatsGroup if using skills)
Column: nAbandonedAcd
ASA This field is the average speed of answer, or delay time, of calls in this workgroup queue during this interval.
Table: WFM_iWrkGrpQueueStats (WFM_iStatsGroup if using skills)
Column: Calculated Field
AHT This field is the average handle time, or talk time, of calls in this workgroup queue during this interval.
Table: WFM_iWrkGrpQueueStats (WFM_iStatsGroup if using skills)
Column: Calculated Field
Staff This field is the total amount of number of minutes that all agents are logged on during this interval, divided by the interval duration. When using the skills reporting option rather than workgroups, this field cannot be calculated and is always 0.
Table: WFM_iWrkGrpQueueStats (not included when using skills)
Column: Calculated Field

CIC Integration to Workforce Management Historical and Real-Time Adherence 37
Occ This field is not currently used.
BL This field is not currently used.
Sample DCS output
Additional templates The XSL style sheet contains other templates that are used for formatting specific elements included in one or more reports. If the default template does not meet the needs of your workforce management application, modify these templates.
DateTimeFormat template This field returns the date and/or time of the report interval and is formatted according to the parameters passed by the calling template. Potential customizations to this template include changing the delimiters used for each value, such as “/,” “-,” and “:.”
SumSvcLevel template This template returns the sum of interactions that either abandoned or that agents answered during or before the configured service level threshold. For example, configure the service level parameter for the adapter as '3.' The template then returns the sum of the 1st, 2nd, and 3rd service level categories or "buckets."
CalcStaff template This template performs the report-specific calculations to determine the value for the Staff field. The calculation varies based on the report type (DCS, chat, or email).
Multimedia reporting Most workforce management application vendors provide a multimedia option with their products that allows customers to categorize the statistics by interaction type. When using the multimedia option, the output for certain reports is slightly different. Also, configuration changes to the CIC server are required.
By default, the CIC server does not store media or interaction type data in reporting tables. To enable media-type logging, an administrator must configure the StatServer subsystem to log this information.
Note: Because the process for enabling this feature is subject to change in future versions of CIC, this document does not include the instructions for enabling media type logging. Use the knowledgebase on the PureConnect Customer Care website for instructions.
To generate the output from the I3WFMService, use the same XSLT templates and style sheet that were covered previously in this document for standard historical reporting. To accommodate the requirements of your specific workforce management application, modify
Group;Date;Time;Int;CV;AHT;AB;SL;ASA;Staff;Occ;BL
Marketing;2003/04/07;20:30;30;78;63;5;8;60;0
Support;2003/04/07;20:30;30;72;34;0;22;37;0

CIC Integration to Workforce Management Historical and Real-Time Adherence 38
the templates and style sheet. The Marquee Packager application passes a style-sheet parameter that instructs the style-sheet templates to report data using the multimedia option. The following sections describe the differences in the output for these templates when the multimedia option is enabled.
Chat application reporting The chat application report includes information for chat interactions.
ReportDate This field is the formatted date indicating the start of this interval.
TimeInterval This field is the formatted time indicating the start of this interval.
Queue This field is the name of the workgroup queue identifying this row of data.
Table: WFM_iWrkGrpQueueStats (WFM_iStatsGroup if using skills)
Column: cName (cReportGroup if using skills)
Chats This field is the number of chat interactions that entered the queue during this interval
Table: WFM_iWrkGrpQueueStats (WFM_iStatsGroup if using skills)
Column: nEnteredAcd
Replied This field is the number of chat interactions that agents answered during this interval.
Table: WFM_iWrkGrpQueueStats (WFM_iStatsGroup if using skills)
Column: nAnsweredAcd
SL This field cannot be calculated and is always 0 in this report.
ASA This field cannot be calculated and is always 0 in this report.
AHT This field cannot be calculated and is always 0 in this report.
Staff This field is the total number of agents that handled chat interactions for this workgroup during this interval. When using the skills reporting option, this field cannot be calculated and is always 0.
Table: WFM_iAgentQueueStats (not included if using skills)
Column: Calculated Field

CIC Integration to Workforce Management Historical and Real-Time Adherence 39
Abd This field is the total number of chat interactions that abandoned during this interval.
Table: WFM_iWrkGrpQueueStats (WFM_iStatsGroup if using skills)
Column: nAbandonedAcd
Sample chat report output
Email application reporting The email application report contains information regarding email interactions.
ReportDate This field is the formatted date indicating the start of this interval.
TimeInterval This field is the formatted time indicating the start of this interval.
Queue This field is the name of the workgroup queue identifying this row of data.
Table: WFM_iWrkGrpQueueStats (WFM_iStatsGroup if using skills)
Column: cName (cReportGroup is using Skills)
Emails This field is the number of email interactions that entered the queue during this interval.
Table: WFM_iWrkGrpQueueStats (WFM_iStatsGroup if using skills)
Column: nEnteredAcd
Replied This field is the number of email interactions that agents answered during this interval.
Table: WFM_iWrkGrpQueueStats (WFM_iStatsGroup if using skills)
Column: nAnsweredAcd
SL This field cannot be calculated and is always 0 in this report.
ASA This field cannot be calculated and is always 0 in this report.
AHT This field cannot be calculated and is always 0 in this report.
ReportDate;TimeInterval;Queue;Chats;Replied;SL;ASA;AHT;Staff;Abd
2003/04/07;20:30;Marketing;78;73;0;0;0;0;5
2003/04/07;20:30;Support;72;72;0;0;0;0;0

CIC Integration to Workforce Management Historical and Real-Time Adherence 40
Staff This field is the total number of agents that handled email interactions for this workgroup during this interval. When using the skills reporting option, this field cannot be calculated and is always 0.
Table: WFM_iAgentQueueStats (not included if using skills)
Column: Calculated Field
Backlog This field is the number of email interactions that are still waiting to be answered when this interval expired.
Table: WFM_iWrkGrpQueueStats (WFM_iStatsGroup if using skills)
Column: nEndWaitAlertAcdCalls
Sample email report output
Advisor Agent Stats Interface Report Blue Pumpkin also supports an agent-level report that shows each individual agent’s queue-based data. This report is optional. Enable it using the TemplateNames field in the WFM Service Configuration Tool. Add the “Agents” to the template names parameter and specify the file name format in the corresponding field. The WFM Service then generates a separate report for Blue Pumpkin with the required data. Below are the columns of the report and the corresponding table and column names that we pull the data from.
AGENT_ID This field is the name of the workgroup queue identifying this row of data.
Table: WFM_iAgentQueueStats
Column: cName
DATE This field is the formatted date indicating the start of the reported interval.
STAFF_TIME This field is the duration, in seconds, of the reported interval.
ENTEREDACD This field is the total number of ACD interactions that entered the agent’s queue (but the agent did not necessarily answer) during this interval.
Table: WFM_iAgentQueueStats
Column: nEnteredAcd
ReportDate;TimeInterval;Queue;Emails;Replied;SL;ASA;AHT;Staff;Backlog
2003/04/07;20:30;Marketing;78;73;0;0;0;0;0 2003/04/07;20:30;Support;72;72;0;0;0;0;1

CIC Integration to Workforce Management Historical and Real-Time Adherence 41
ANSWEREDACD This field is the total number of ACD interactions that an agent answered during this interval.
Table: WFM_iAgentQueueStats
Column: nAnsweredAcd
ABANDONS This field is the number of calls that abandoned while alerting this agent during this interval.
Table: WFM_iAgentQueueStats
Column: nAbandonedAcd
LOGIN_TIME This field is the sum of time (in seconds) that the agent was logged on to the Interaction Client (in the system).
Table: WFM_iAgentQueueStats
Column: tAgentAcdLoggedIn
TALK_TIME This field is the total handle time (in seconds), or talk time, of calls in this agent’s queue during this interval. This field does not include hold time or ACW time in the value.
Table: WFM_iAgentQueueStats
Column: tTalkAcd
ACW_TIME This field is the sum of time (in seconds) that the agent spent in an “After Contact Work” status.
Table: WFM_iAgentQueueStats
Column: tAcw
HOLD_TIME This field is the sum of time (in seconds) that all ACD interaction spent on hold while in this agent’s queue.
Table: WFM_iAgentQueueStats
Column: tHoldAcd
AVAIL_TIME This field is the sum of time (in seconds) that the agent was in an Available status. This field relates specifically to the agent and not the interaction type. This time includes ringing.
Table: WFM_iAgentQueueStats
Column: tAgentAvailable
UNAVAIL_TIME This field is the sum of time (in seconds) that the agent was not available to take ACD interactions, but was logged on to the system.
Table: WFM_iAgentQueueStats

CIC Integration to Workforce Management Historical and Real-Time Adherence 42
Column: tAgentNotAvailable
AUX_TIME This field is the sum of time (in seconds) that the agent was working on non-ACD interactions (personal calls).
Table: WFM_iAgentQueueStats
Column: tAgentOnNonAcdCall
AUX_IN_TIME The WFM Service always sends 0 because we are unable to get this piece of data.
AUX_OUT_TIME The WFM Service always sends 0 because we are unable to get this piece of data.
Sample Advisor Agent Stats output
AGENT_ID;DATE;STAFF_TIME;ENTEREDACD;ANSWEREDACD;ABANDONS;LOGIN_TIME;TALK_TIME;ACW_TIME;HOLD_TIME;AVAIL_TIME;UNAVAIL_TIME;AUX_TIME;AUX_IN_TIME;AUX_OUT_TIME
andrew.rogosin;07/01/2005;55800;0;0;0;55388;0;0;0;1;47296;2137;0;0
david.clark;07/01/2005;86400;10;8;0;86389;3128;1411;89;19113;3079;295;0;0
david.recktenwald;07/01/2005;34200;3;3;0;31516;5733;0;0;0;20452;0;0;0
jason.carter;07/01/2005;37800;1;0;0;31731;0;0;0;8827;4639;1164;0;0
jasonm;07/01/2005;86400;10;8;0;86400;6211;2343;0;9398;0;3144;0;0
jim.fillmore;07/01/2005;64800;0;0;0;63679;0;0;0;0;0;0;0;0
kevin.glinski;07/01/2005;86400;11;9;0;86297;3992;2199;194;19190;1132;0;0;0
mark.liggett;07/01/2005;86400;5;3;0;86400;961;900;71;12285;356;4121;0;0
peter.nees;07/01/2005;86400;9;9;0;86400;9660;2700;649;12163;0;1567;0;0
philip.weust;07/01/2005;86400;3;1;0;86400;147;300;0;5144;10583;4778;0;0
rich.schram;07/01/2005;86400;9;9;0;86400;10129;1500;0;11778;0;2086;0;0
richard.jones;07/01/2005;36000;8;8;0;34429;13864;1755;0;13055;0;756;0;0
roberto.rovelo;07/01/2005;86400;4;4;0;86400;18851;1200;0;4703;2153;22225;0;0
stephen.rusnak;07/01/2005;86400;1;1;0;86400;2495;0;0;0;24311;112;0;0
CIC Integration to Workforce Management Historical and Real-Time Adherence 43
Appendix B: Settings for Aspect Aspect template description XSLT templates control the formatting and layout of the reports. These templates are contained in a single style sheet called Aspect_Output.xsl. The installation files include example templates for common workforce management applications. To alter the headings, data elements, field delimiter, or even product custom calculations, modify these templates.
The integration sends eWFM status update messages to Aspect:
• Timestamp delivered in header
• Agent's Extension (maximum of six characters)
• Status Code (converted to a numeric status code per the configuration in the WFM Configuration utility)
• Workgroup Name (only populated if handling a call of a specific workgroup)
• Time in state in seconds (if batch mode is used since the status change would have happened between the batch intervals)
• Agent's ID (can be delivered as either the Agent's Extension or their CIC User ID. This field is controlled via configuration within the WFM Configuration utility. The field is limited to 10 characters.)
• Reason Code (further sub identification of Status Code. Configured within the WFM Configuration utility.)
Editing the templates requires knowledge of XML/XSLT transformations and the XSL language. Many resources are available on the Internet and in your local bookstore on these subjects.
The examples displayed in the following sections contain sample data that was formatted using the default template. Check with your workforce management application vendor regarding the specific requirements for their system.
Style sheet parameters The I3WFMService passes select configuration information to the style sheet at the time it is applied to the data for transformation. These parameters control the output of the individual templates and which templates are used to produce the output.
Warning: Do not modify or delete the top-level parameters.
Style sheet global variables To facilitate easier modifications to the template outputs, the style sheet uses global variables for some of the common characters or properties. The individual templates reference these variables repeatedly. To apply changes, modify only the declaration of the variable contents.
Agent Productivity Report The Agent Profile template generates output often referred to as the Agent Profile Report. This report is often an optional report that is generated at the end of each day. The report includes information regarding agent status information in the CIC system. The fields used in this report include:
CIC Integration to Workforce Management Historical and Real-Time Adherence 44
Title This field is a string that uniquely identifies the beginning of this report. Typically, the title is the report name.
Date This field is the formatted date and time indicating the beginning this statistics interval.
AGENT ID This field is the Agent’s Extension of the CIC user. CIC Agent IDs are strings, typically containing the Windows User ID. Because some workforce management applications cannot handle string identifiers, WFM uses the extension.
Table: WFM_AgentActivityDetailLog
Column: EXT
ACD Group This field is the name of the ACD group that the agent is handling calls for. Aspect restricts the length on this field to 15 characters. If the workgroup is more than 15 characters long, Aspect removes any extra characters.
Table: WFM_AgentActivityDetailLog
Column: EXT
SIT This field is the time that the agent logged on. To find a sign-in, use the SignInStatusKey parameter. If the status is listed, then the status is considered a sign-in request.
Table: WFM_AgentActivityDetailLog
Column: SignInDateTime
SOUT This field is the time that the agent logged out. To find a sign-out, use the SignOutStatusKey parameter. If the status is listed, then the status is considered a sign-in request.
Table: WFM_ AgentActivityDetailLog
Column: SignOutDateTime
NCH This field is the number of incoming ACD calls handled for the sign-in period.
Table: WFM_ AgentActivityDetailLog
Column: NANSWEREDACD
ATT This field is the average talk time for incoming ACD calls handled during the signed-in period. Talk time includes all the talking time spent on incoming calls, including time when a client is on hold.
Table: WFM_ AgentActivityDetailLog
Column: Calculated Field

CIC Integration to Workforce Management Historical and Real-Time Adherence 45
AWT This field is the average after-call work time for both incoming and outbound calls. We cannot separate the incoming from the outbound calls on the after call work.
Table: WFM_ AgentActivityDetailLog
Column: Calculated Field
NOC This field is the number of outbound ACD calls handled for the sign-in period Table: WFM_ AgentActivityDetailLog
Column: NINTERNTOEXTERNACDCALLS
AOTT This field is the average talk time for outbound ACD calls handled during the signed-in period. Talk time includes all the talking time spent on incoming calls, including time when a client is on hold.
Table: WFM_ AgentActivityDetailLog
Column: Calculated Field
AOWT This field is the average after-call work time for both incoming and outbound calls. We cannot separate the incoming from the outbound calls on the after call work.
Table: WFM_ AgentActivityDetailLog
Column: Calculated Field
Footer This field is a string that uniquely identifies the end of this report.
This data is based on a subset of the information in the WFM_AgentActivityDetailLog and is limited to the previously listed fields.
ACD Forecasting/Scheduling Report
Header There is no header for the report. Everything is shown in record format.
DateTime This field is the formatted data and time indicating the beginning of this statistics interval.
Identifying String This field is “TCSDATA.” This field is used to denote the type of report.
ACD Group ID This field is the group by which the statistics are organized. Some workforce management applications are not capable of grouping by media type as a subset of the queue. By default, this column contains the name of the workgroup queue followed by an underscore (-) and the media type. This field creates a unique row of data for the output. When using skill reporting, the skill name is used rather than the workgroup name.

CIC Integration to Workforce Management Historical and Real-Time Adherence 46
Table: WFM_iWrkGrpQueueStats (WFM_iStatsGroup if using skills
Column: cName + “_” + cReportGroup
Call Offered This field is the number of ACD interactions (answered and abandoned calls) that entered the queue during this interval.
Table: WFM_iWrkGrpQueueStats (WFM_iStatsGroup if using skills)
Column: nEnteredAcd
Calls Handled This field is the number of ACD interactions that agents handled during this interval.
Table: WFM_iWrkGrpQueueStats (WFM_iStatsGroup if using skills)
Column: nAnsweredAcd
Average Talk Time This field is the average talk time in seconds for the ACD Group.
Table: WFM_iWrkGrpQueueStats (WFM_iStatsGroup if using skills)
Column: Calculated field
Average After Call Work Time This field is the average after-call work time in seconds for the ACD Group.
Table: WFM_iWrkGrpQueueStats (WFM_iStatsGroup if using skills)
Column: Calculated field
Average Delay This field is the average speed that ACD calls are answered. Also known as ASA.
Table: WFM_iWrkGrpQueueStats (WFM_iStatsGroup if using skills)
Column: Calculated field
Percent Service Level This field is the sum of ACD interactions that agents answered during this interval on or before the configured threshold.
Table: WFM_iWrkGrpQueueStats (WFM_iStatsGroup if using skills)
Column: Calculated Field
Average Positions Staffed This field is the total seconds agents are available to take calls and are taking calls divided by number of seconds in the period.
Table: WFM_iWrkGrpQueueStats (WFM_iStatsGroup if using skills)
Column: Calculated Field
Footer There is no footer for this report.

CIC Integration to Workforce Management Historical and Real-Time Adherence 47
Sample Aspect output file*
*Line wrapping does not appear in production output.
03/03/2005 11:00 TCSDATA Marketing 3 3 474 0 2 100.00 18
03/03/2005 11:00 TCSDATA Support.Centra 2 1 53 112 6 50.00 9
03/03/2005 11:00 TCSDATA Support.East 0 0 0 0 0 0 6
03/03/2005 11:00 TCSDATA Support.NoCent 0 0 0 0 0 0 6
03/03/2005 11:00 TCSDATA Support.West 0 0 0 0 0 0 4
Agent Productivity Report
Date:03/03/2005
ID ACD SIT SOT NCH ATT AWT PIP NOC AOTT AOWT
197 Support.East 07:22:08 08:55:19 0 0 0 0 0 0 0
197 Support.East 09:01:05 09:54:07 0 0 0 0 0 0 0
197 Support.East 11:57:11 12:03:10 0 0 0 0 0 0 0
197 Support.East 12:12:58 12:45:00 0 0 0 0 0 0 0
197 Support.East 13:09:41 14:04:22 0 0 0 0 0 0 0
197 Support.East 14:45:03 15:50:05 0 0 0 0 0 0 0
197 Support.East 15:59:00 16:26:29 0 0 0 0 0 0 0
197 Support.East 16:33:25 23:59:59 0 0 0 0 0 0 0
8213 Support.Centra 07:28:10 10:15:28 0 0 0 0 0 0 0
8213 Support.Centra 10:40:25 12:39:06 3 480.33 200.00 0 0 0 0
8213 Support.Centra 12:50:51 13:02:12 1 1187.00 51.00 0 0 0 0
8213 Support.Centra 14:17:09 15:44:03 0 0 0 0 0 0 0
8212 Support.NoCent 09:42:10 09:44:39 0 0 0 0 0 0 0
8212 Support.NoCent 09:57:25 10:52:55 1 481.00 300.00 0 0 0 0

CIC Integration to Workforce Management Historical and Real-Time Adherence 48
Appendix C: Settings for GMT GMT template modification XSLT templates control the formatting and layout of the reports. These templates are contained in a single style sheet called GMT_Output.xsl. To alter the headings, data elements, field delimiter, or even product custom calculations, modify these templates.
The integration sends the following information in a GMT Status Update Message:
• Agent's CIC User ID
• Agent's Extension
• Status Code (converted to a numeric status code per the configuration in the WFM Configuration utility)
• Sub State (INACD=Inbound ACD Call, IN=Inbound non-ACD Call, OUTACD=Outbound ACD Call, OUT=Outbound non-ACD Call)
• Timestamp
• Workgroup Extension (only populated if handling a call of a specific workgroup)
Editing the templates requires knowledge of XML/XSLT transformations and the XSL language. Many resources are available on the Internet and in your local bookstore on these subjects.
The examples displayed in the following sections contain sample data that was formatted using the default template. Check with your workforce management application vendor regarding the specific requirements for their system.
Style sheet parameters The I3WFMService passes select configuration information to the style sheet at the time it is applied to the data for transformation. These parameters control the output of the individual templates and which templates are used to produce the output.
Warning: Do not modify or delete the top-level parameters.
Style sheet global variables To facilitate easier modifications to the template outputs, the style sheet uses global variables for some of the common characters or properties. The individual templates reference these variables. To apply changes, modify only the declaration of the variable contents.
Call Group Report The Call Group Report outputs information regarding the selected workgroup queue interactions. Some vendors refer to this output as "Call Group Report" or "Contact Report.” The fields included in this report typically include:
Header This field is a string that uniquely identifies the beginning of this report. Typically, this field is the report name.
Interval This field is the formatted date and time indicating the beginning this statistics interval.

CIC Integration to Workforce Management Historical and Real-Time Adherence 49
CALLGRP This field is the group by which the statistics are organized. By default, this field typically is the name of the workgroup. When using skill reporting rather than workgroup queue reporting, this field is name of the skill.
Table: WFM_iWrkGrpQueueStats (WFM_iStatsGroup if using skills)
Column: cName
ANSW This field is the number of ACD interactions that agents answered during this interval.
Table: WFM_iWrkGrpQueueStats (WFM_iStatsGroup if using skills)
Column: nAnsweredAcd
ABAN This field is the number of ACD interactions that were abandoned during this interval.
Table: WFM_iWrkGrpQueueStats (WFM_iStatsGroup if using skills)
Column: nAbandonedAcd
ANSGOS This field is the sum of ACD interactions that agents answered during this interval on or before the configured threshold.
Table: WFM_iWrkGrpQueueStats (WFM_iStatsGroup if using skills)
Column: Calculated Field
ABANGOS This field is the sum of ACD interactions that abandoned during this interval on or before the configured threshold.
Table: WFM_iWrkGrpQueueStats (WFM_iStatsGroup if using skills)
Column: Calculated Field
TOTTALK This field is the total number of seconds that agents spent handling ACD interactions during this interval.
Table: WFM_iWrkGrpQueueStats (WFM_iStatsGroup if using skills)
Column: tTalkAcd
DELAYCALLS This field is the total number of ACD interactions that were queued before being delivered to an agent.
Table: WFM_iWrkGrpQueueStats (WFM_iStatsGroup if using skills)
Column: nAnsweredAcd
DELAYTIME This field is the total number of seconds that ACD interactions waited in queue before being delivered to an agent.
Table: WFM_iWrkGrpQueueStats (WFM_iStatsGroup if using skills)

CIC Integration to Workforce Management Historical and Real-Time Adherence 50
Column: tAnsweredAcd
NENTERED This field is the total number of ACD interactions that entered the workgroup queue during this interval.
Table: WFM_iWrkGrpQueueStats (WFM_iStatsGroup if using skills)
Column: nEnteredAcd
WRKTIME This field is the total number of seconds that agents spent in an ACW (After Call Work) status. Configure statuses of these types in Interaction Administrator. After completing an ACD interaction, the agent is automatically placed into this status for a specified period.
Table: WFM_iWrkGrpQueueStats
Column: tAcw
Footer This field is a string that uniquely identifies the end of this report.
The fields in this report are based on the WFM_iWrkGrpQueueStats table, or if using skills, WFM_ iStatsGroup. If the previously listed fields do not meet the needs of your workforce management application, use any field in that table in the report.
When using skills reporting, you might need to change your existing IVR handlers.
Sample GMT report output
Additional templates The XSL style-sheet also contains other templates that are used for formatting specific elements included in one or more reports. If the default template does not meet the needs of your workforce management application, modify these templates.
Agent Detail Report The Agent Detail Report output differs from the standard historical output in that it provides agent by workgroup queue information. If your workforce management application requires additional information, modify this template.
Header This field is a string that uniquely identifies the beginning of this report. Typically, this field is the report name.
CALL GROUP REPORT
04/07/03 20:30
CALLGRP ANSW ABAN ANSGOS ABANGOS TOTTALK DELAYCALLS DELAYTIME NENTERED
Marketing 0000000073 0000000005 0000000063 0000000000 0000004398 0000000073 0000000600 0000000078
Support 0000000072 0000000000 0000000034 0000000000 0000002636 0000000072 0000001583 0000000072
END CALL GROUP REPORT

CIC Integration to Workforce Management Historical and Real-Time Adherence 51
Interval This field is the formatted date and time indicating the beginning of this statistics interval.
CALLGRP This field is the group by which the statistics are organized. When using skill reporting, the skill name is used rather than the workgroup name.
Table: WFM_iAgentQueueStats
Column: cReportGroup (cHKey3 if using skills)
AGTNM This field is the agent’s user name for the CIC user.
Table: WFM_iAgentQueueStats
Column: CNAME
AGTID This field is the Agent’s Extension of the CIC user. This value is stored in a column specified in the plug-in adapter parameters. By default, CustomValue1 is used.
Table: WFM_iAgentQueueStats
Column: CUSTOMVALUE1 (or other configured custom column)
ANSWCALL This field is the total number of ACD interactions that the agent handled during this interval.
Table: WFM_iAgentQueueStats
Column: nAnsweredAcd
TALKTIME This field is the total number of seconds that the agent spent handling ACD interactions during this interval.
Table: WFM_iAgentQueueStats
Column: tTalkAcd
INTNCALL This field is the number of internal interactions (station to station or Intercom) that the agent handled.
Table: WFM_iAgentQueueStats
Column: nInternToInternCalls
INTNTALK This field is the total number of seconds that the agent spent handling internal interactions (station to station or Intercom).
Table: WFM_iAgentQueueStats
Column: tInternToInternCalls

CIC Integration to Workforce Management Historical and Real-Time Adherence 52
RDYTIME This field is the total number of seconds that the agent spent in an Available status. In this status, the agent is available and ready to receive ACD interactions.
Table: WFM_iAgentQueueStats
Column: tAgentAvailable
WRKTIME This field is the total number of seconds that the agent spent in an ACW (After Call Work) status. Configure statuses of these types in Interaction Administrator. After completing an ACD interaction, the agent is automatically placed into this status for a specified period.
Table: WFM_iAgentQueueStats
Column: tAgentInAcw
IDLETIME This field is the total number of seconds that the agent was in an Unavailable status. In this status, the agent is not available and cannot receive interactions.
Table: WFM_iAgentQueueStats
Column: tAgentDnd
OUTCALL This field is the number of outbound interactions that the agent placed.
Table: WFM_iAgentQueueStats
Column: nInternToExternCalls
OUTTIME This field is the total talk time of outbound interactions that the agent placed.
Table: WFM_iAgentQueueStats
Column: tInternToExternCalls
LOGTIME This field is the total number of seconds that the agent was logged on to the system. If the agent does not log off from Interaction Client, this field includes all time.
Table: WFM_iAgentQueueStats
Column: tAgentLoggedIn

CIC Integration to Workforce Management Historical and Real-Time Adherence 53
Sample GMT report output
Additional templates The XSL style sheet also contains other templates that are used for formatting specific elements included in one or more reports. If the default template does not meet the needs of your workforce management application, modify these templates.
OUTBOUNDTIME This field is the total number of seconds that the agent spent handling outbound interactions.
Table: WFM_iAgentQueueStats
Column: tInternToExternCalls
TOTALLOGINTIME This field is the total number of seconds that the agent was logged on to the CIC system.
Table: WFM_iAgentQueueStats
Column: tAgentLoggedIn
Footer This field is a string that uniquely identifies the end of this report.
DateTimeFormat template This template returns the date and/or time of the report interval formatting according to the parameters passed by the calling template. Potential customizations to this template include changing the delimiters used for each value, such as "/," "-," and ":." .
SumSvcLevel template This template returns the sum of interactions that either abandoned or the agents answered during or before the configured service level threshold. For example, configure the service level parameter for the adapter as '3'. The template then returns the sum of the 1st, 2nd, and 3rd service level categories or "buckets."
AGENT DETAIL REPORT
09/27/05 14:00
CALLGRP AGTID ANSWCALL TALKTIME INTNCALL INTNTALK RDYTIME WRKTIME IDLETIME OUTCALL OUTTIME LOGTIME
Support.Central 8562 0000000001 0000001422 0000000000 0000000000 0000000378 0000000000 0000000000 0000000000 0000000000 0000001800
Support.West 8550 0000000001 0000000281 0000000000 0000000000 0000000201 0000000000 0000000637 0000000000 0000000000 0000001800
END AGENT DETAIL REPORT

CIC Integration to Workforce Management Historical and Real-Time Adherence 54
Appendix D: Settings for IEX IEX template description XSLT templates control the formatting and layout of the reports. These templates are contained in a single style sheet called IEX_Output.xsl. The installation files include example templates for common workforce management applications. To alter the headings, data elements, field delimiter, or even product custom calculations, modify these templates.
The integration sends the following information in an IEX Status Update Message:
• Agent's Extension
• Status (limited to 20 characters, commas and pipes removed)
• Status Change timestamp
• Status Change date
Editing the templates requires knowledge of XML/XSLT transformations and the XSL language. Many resources are available on the Internet and in your local bookstore on these subjects.
The examples displayed in the following sections contain sample data that was formatted using the default template. Check with your workforce management application vendor regarding the specific requirements for their system.
Style-sheet parameters The I3WFMService passes select configuration information to the style sheet at the time it is applied to the data for transformation. These parameters control the output of the individual templates and which templates are used to produce the output.
Warning: Do not modify or delete the top-level parameters.
Style-sheet global variables To facilitate easier modifications to the template outputs, the style sheet uses global variables for some of the common characters or properties. The individual templates reference these variables repeatedly. To apply changes, modify only the declaration of the variable contents.
Agent Profile Report The Agent Profile template generates output often referred to as the Agent Profile Report. This report is often an optional report that is generated at the end of each day. The report includes information regarding agent status information in the CIC system. The fields used in this report include:
Header This field is a string that uniquely identifies the beginning of this report. Typically, this field is the report name.
Interval This field is the formatted date and time indicating the beginning this statistics interval.

CIC Integration to Workforce Management Historical and Real-Time Adherence 55
AGENTID This field is the Agent’s Extension of the CIC user. CIC Agent IDs are strings, typically containing the Windows User ID. Because some workforce management applications cannot handle string identifiers, WFM uses the extension.
Table: WFM_AgentActivityLog
Column: Ext
SIGN-IN This field is the time this status was entered. In CIC, a status change does not always indicate a logon or logoff action.
Table: WFM_AgentActivityLog
Column: StatusDateTime
SIGN-OUT This field is the time this status was exited or changed. In CIC, a status change does not always indicate a logon or logoff action.
Table: WFM_AgentActivityLog
Column: EndDateTime
REASON This field is the Status Key, as configured in Interaction Administrator, for this record. The Status Key, not the Status Text, is used for reporting. (There could be slight variations between Status Key and Status Text.) IEX has a 20-character maximum on this field. If the Status Key is greater than 20 characters, the remaining characters past the 20th character are removed.
Table: WFM_AgentActivityLog
Column: StatusKey
Footer This field is a string that uniquely identifies the end of this report.
This data is based on a subset of the information in the WFM_AgentActivityLog and is limited to the previously listed fields.
Call Group Report
The Call Group Report output for multimedia reporting is often similar to the standard historical output, but the method used to identify the call group changes significantly. When the multimedia option is enabled, this template outputs the following fields.
Header This field is the string that uniquely identifies the beginning of this report. Typically, this field is the report name. This name does not change when the multimedia option is enabled.
Interval This field is the formatted data and time indicating the beginning of this statistics interval.

CIC Integration to Workforce Management Historical and Real-Time Adherence 56
CALLGROUP This field is the group by which the statistics are organized. Some workforce management applications are not capable of grouping by media type as a subset of the queue. By default, this column contains the name of the workgroup queue followed by an underscore (-) and the media type. This field creates a unique row of data for the output. When using skill reporting, the skill name is used rather than the workgroup name.
Table: WFM_iWrkGrpQueueStats (WFM_iStatsGroup if using skills)
Column: cName + “_” + cReportGroup
RECEIVEDACD This field is the number of ACD interactions that entered the queue during this interval.
Table: WFM_iWrkGrpQueueStats (WFM_iStatsGroup if using skills)
Column: nEnteredAcd
ANSWEREDACD This field is the number of ACD interactions that agents handled during this interval.
Table: WFM_iWrkGrpQueueStats (WFM_iStatsGroup if using skills)
Column: nAnsweredAcd
ABANDONED This field is the total number of ACD interactions that abandoned during this interval.
Table: WFM_iWrkGrpQueueStats (WFM_iStatsGroup if using skills)
Column: nAbandonedAcd
ANSWEREDSVCLVL This field is the sum of ACD interactions that agents answered during this interval on or before the configured threshold.
Table: WFM_iWrkGrpQueueStats (WFM_iStatsGroup if using skills)
Column: Calculated Field
ABANDONEDSVCLVL This field is the sum of ACD interactions that abandoned during this interval on or before the configured threshold.
Table: WFM_iWrkGrpQueueStats (WFM_iStatsGroup if using skills)
Column: Calculated Field
TOTALTALK This field is the total number of seconds that agents spent handling ACD interactions during this interval.
Table: WFM_iWrkGrpQueueStats (WFM_iStatsGroup if using skills)
Column: tTalkAcd

CIC Integration to Workforce Management Historical and Real-Time Adherence 57
AFTERCALLWORKTIME This field is the total number of seconds that the agent spent in an ACW (After Call Work) status. Configure statuses of these types in Interaction Administrator. After completing an ACD interaction, the agent is automatically placed into this status for a specified period.
Table: WFM_iWrkGrpQueueStats (WFM_iStatsGroup if using skills)
Column: tAgentInAcw
ANSWEREDACD This field is the total number of ACD interactions that agents answered during this interval.
Table: WFM_iWrkGrpQueueStats (WFM_iStatsGroup if using skills)
Column: nAnsweredAcd
DELAYEDTIME This field is the total number of seconds that ACD interactions waited in queue before being delivered to an agent.
Table: WFM_iWrkGrpQueueStats (WFM_iStatsGroup if using skills)
Column: tAnsweredAcd
SERVICELEVEL Some workforce management applications require an overall service level field based on a custom calculation provided by the vendor. This requirement could apply not only to multimedia reporting but also to other historical reports. The XSLT style sheet provides a customization point in the CustomServiceLevel template that can be used to calculate this field based on the vendor's specifications.
BACKLOGEXPIRED This field is the total number of interactions that have not been handled yet when the current interval expired.
Table: WFM_iWrkGrpQueueStats (WFM_iStatsGroup if using skills)
Column: nEndWaitAlertAcdCalls
BACKLOGNOTEXPIRED This field cannot be calculated and is always 0 in this report.
Footer This field is a string that uniquely identifies the end of this report.
Agent Detail Report The Agent Detail Report output for multimedia reporting differs from the standard historical output in that it provides less information. The Agent System template provides the information that is not included in this report. If your workforce management application requires additional information, modify this template.
Header This field is a string that uniquely identifies the beginning of this report. Typically, this field is the report name. This field does not change when using the multimedia option.

CIC Integration to Workforce Management Historical and Real-Time Adherence 58
Interval This field is the formatted date and time indicating the beginning of the statistics interval.
CALLGROUP This field is the group by which the statistics are organized. When using skill reporting, then the skill name is used rather than the workgroup name.
Table: WFM_iAgentQueueStats
Column: cReportGroup (cHKey3 if using skills)
AGENTID This field is the Agent’s Extension. This value is stored in a column specified in the plug-in adapter parameters. By default, CustomValue1 is used.
Table: WFM_iAgentQueueStats
Column: CustomValue1 (or other configured custom column)
ANSWEREDACD This field is the total number of ACD interactions that the agent handled during this interval.
Table: WFM_iAgentQueueStats
Column: nAnsweredAcd
TALKTIME This field is the total number of seconds that the agent spent handling ACD interactions during this interval.
Table: WFM_iAgentQueueStats
Column: tTalkAcd
AFTERCALLWORKTIME This field is the total number of seconds that the agent spent in an ACW (After Call Work) status. Configure statuses of these types in Interaction Administrator. After completing an ACD interaction, the agent is automatically placed into this status for a specified period.
Table: WFM_iAgentQueueStats
Column: tAgentInAcw
Footer This field is a string that uniquely identifies the end of this report.
CIC Integration to Workforce Management Historical and Real-Time Adherence 59
Agent System Report The Agent System Report outputs information for agents that cannot be assigned to a specific workgroup queue, skill, or media type. The output is often referred to as the "Agent System Performance Report" or "Agent System Profile Report." Unlike the Agent Detail information in the previous section, the output of this template does not contain a Call Group identifier (only the Agent Identifier). Also, there is only a single row for each agent.
Header This field is a string that uniquely identifies the beginning of this report. Typically, this field is the report name.
Interval This field is the formatted date and time indicating the beginning of this statistics interval.
AGENTID This field is the Agent’s Extension of the CIC user. This value is stored in a column specified in the plug-in adapter parameters. By default, CustomValue1 is used.
Table: WFM_iAgentQueueStats
Column: CustomValue1 (or other configured custom column)
INTERNALCALLS This field is the number of internal interactions (station to station or Intercom) that the agent handled.
Table: WFM_iAgentQueueStats
Column: nInternToInternCalls
INTERNALTALK This field is the total number of seconds that the agent spent handling internal interactions (station to station or Intercom).
Table: WFM_iAgentQueueStats
Column: tInternToInternCalls
READYTIME This field is the total number of seconds that the agent spent in an Available status. In this status, the agent is available and ready to receive ACD interactions.
Table: WFM_iAgentQueueStats
Column: tAgentAvailable
IDLETIME This field is the total number of seconds that the agent was in an Unavailable status. In this status, the agent is not available and cannot receive interactions.
Table: WFM_iAgentQueueStats
Column: tAgentDnd
CIC Integration to Workforce Management Historical and Real-Time Adherence 60
OUTBOUNDCALLS This field is the number of outbound interactions that the agent placed.
Table: WFM_iAgentQueueStats
Column: nInternToExternCalls
OUTBOUNDTIME This field is the total number of seconds that the agent spent handling outbound interactions.
Table: WFM_iAgentQueueStats
Column: tInternToExternCalls
TOTALLOGINTIME This field is the total number of seconds that the agent was logged on to the CIC system.
Table: WFM_iAgentQueueStats
Column: tAgentLoggedIn
Footer This field is a string that uniquely identifies the end of this report.
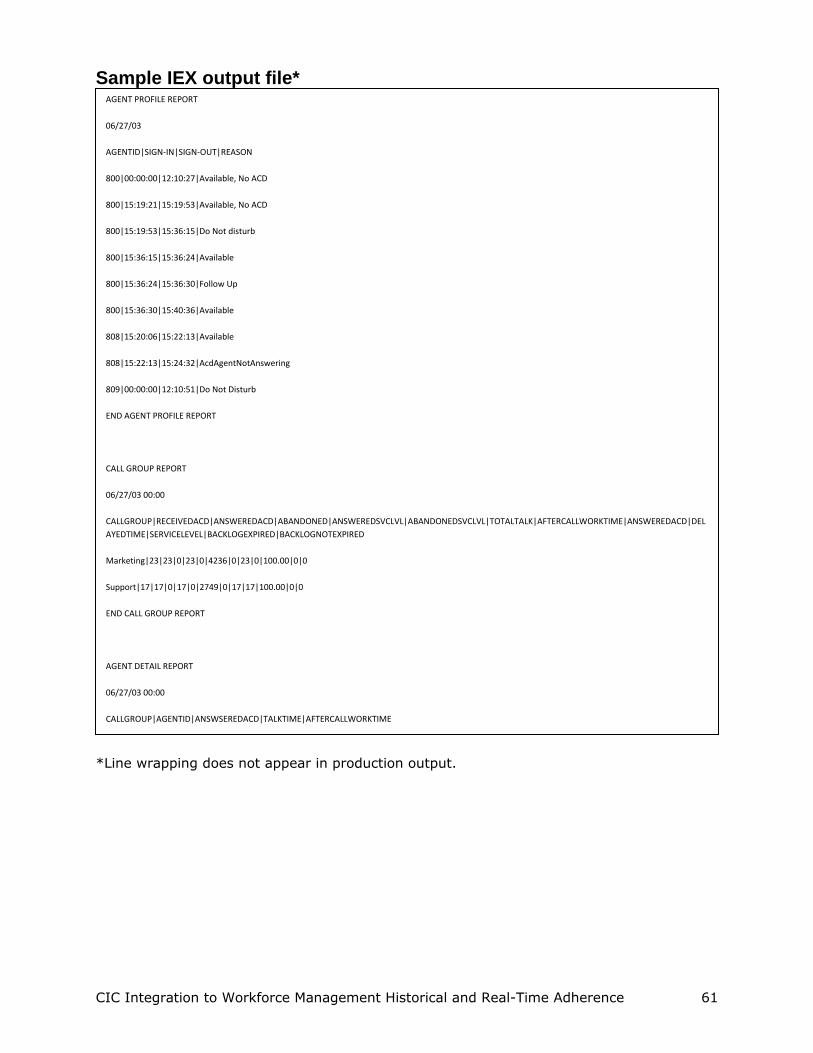
CIC Integration to Workforce Management Historical and Real-Time Adherence 61
Sample IEX output file*
*Line wrapping does not appear in production output.
AGENT PROFILE REPORT
06/27/03
AGENTID|SIGN-IN|SIGN-OUT|REASON
800|00:00:00|12:10:27|Available, No ACD
800|15:19:21|15:19:53|Available, No ACD
800|15:19:53|15:36:15|Do Not disturb
800|15:36:15|15:36:24|Available
800|15:36:24|15:36:30|Follow Up
800|15:36:30|15:40:36|Available
808|15:20:06|15:22:13|Available
808|15:22:13|15:24:32|AcdAgentNotAnswering
809|00:00:00|12:10:51|Do Not Disturb
END AGENT PROFILE REPORT
CALL GROUP REPORT
06/27/03 00:00
CALLGROUP|RECEIVEDACD|ANSWEREDACD|ABANDONED|ANSWEREDSVCLVL|ABANDONEDSVCLVL|TOTALTALK|AFTERCALLWORKTIME|ANSWEREDACD|DELAYEDTIME|SERVICELEVEL|BACKLOGEXPIRED|BACKLOGNOTEXPIRED
Marketing|23|23|0|23|0|4236|0|23|0|100.00|0|0
Support|17|17|0|17|0|2749|0|17|17|100.00|0|0
END CALL GROUP REPORT
AGENT DETAIL REPORT
06/27/03 00:00
CALLGROUP|AGENTID|ANSWSEREDACD|TALKTIME|AFTERCALLWORKTIME

CIC Integration to Workforce Management Historical and Real-Time Adherence 62
Appendix E: Settings for Invision Our integration to Invision supplies two historical reports:
• Call Group Report
• Agent Historical Adherence
Invision template description XSLT templates control the formatting and layout of the reports. These templates are contained in a single style sheet called Invision_Output.xsl.
The integration sends the following information in an InVision Status Update Message:
• Agent's CIC User ID
• Agent's Extension
• Status Code (converted to a numeric status code per the configuration in the WFM Configuration utility)
• Logged in flag (1=Logged in, 0=Logged out)
• Timestamp
• Workgroup Name (only populated if handling a call of a specific workgroup)
Call Group Report The Call Group Report outputs information regarding the selected workgroup queue interactions. Some vendors refer to this output as "Call Group Report" or "Contact Report." The fields included in this report are:
Header The top rows include the names of all the data columns in the report.
DATETIME This field is the formatted date/time indicating the start of the reported interval.
WORKGROUPNAME This field is the name of the workgroup queue identifying this data.
MEDIATYPE This field is the media type (calls, emails, chats).
Note: By default, the CIC server does not store media or interaction type data in reporting tables. To enable media-type logging, an administrator must configure the StatServer subsystem to log the information.
RECEIVEDACD This field is the number of ACD interactions that were received during this interval.
Table: WFM_iWrkGrpQueueStats (WFM_iStatsGroup if using skills)
Column: NENTEREDACD

CIC Integration to Workforce Management Historical and Real-Time Adherence 63
HANDLEDACD This field is the number of ACD interactions that agents handled during this interval.
Table: WFM_iWrkGrpQueueStats (WFM_iStatsGroup if using skills)
Column: NANSWEREDACD
ABANDONED This field is the number of ACD interactions that were abandoned during this interval.
Table: WFM_iWrkGrpQueueStats (WFM_iStatsGroup if using skills)
Column: NABANDONEDACD
ANSWEREDSVCLVL This field is the number of ACD interactions that agents answered during this interval.
Table: WFM_iWrkGrpQueueStats (WFM_iStatsGroup if using skills)
Column: Calculated Field (SumSvcLevel Template)
ABANDONEDSVCLVL This field is the number of ACD interactions that agents answered during this interval.
Table: WFM_iWrkGrpQueueStats (WFM_iStatsGroup if using skills)
Column: Calculated Field (SumSvcLevel Template)
TOTALTALK This field is the total number of seconds that agents spent handling ACD interactions during this interval.
Table: WFM_iWrkGrpQueueStats (WFM_iStatsGroup if using skills)
Column: TTALKACD
TOTALHOLD This field is the total number of seconds that ACD interactions waited in queue before being delivered to an agent.
Table: WFM_iWrkGrpQueueStats (WFM_iStatsGroup if using skills)
Column: THOLDACD
AFTERCALLWORKTIME This field is the average after-call work time in seconds for the ACD Group.
Table: WFM_iWrkGrpQueueStats (WFM_iStatsGroup if using skills)
Column: TACW
DELAYEDTIME This field is the average speed that ACD calls are answered. Also known as ASA.
Table: WFM_iWrkGrpQueueStats (WFM_iStatsGroup if using skills)
Column: TANSWEREDACD

CIC Integration to Workforce Management Historical and Real-Time Adherence 64
Historical Agent Adherence Report The Historical Agent Adherence template generates an optional report at the end of each day. The report includes information about agent status information in the CIC system. The fields used in this report are:
Header The top rows include the names of all the data columns included in the report.
AGENTID This field is the Agent’s Extension of the CIC user. CIC Agent IDs are strings, typically containing the Windows User ID. Because some workforce management applications cannot handle string identifiers, WFM uses the extension.
Table: WFM_AgentActivityLog
Column: Ext
ACTIVITYID This field is the Status Key.
Table: WFM_AgentActivityLog
Column: STATUSKEY
STARTDATETIME This field is the time that this status was entered. In CIC, a status change does not always indicate a logon or logoff action.
Table: WFM_AgentActivityLog
Column: STATUSDATETIME
ENDDATETIME This field is the time that this status was exited or changed. In CIC, a status change does not always indicate a logon or logoff action.
Table: WFM_AgentActivityLog
Column: ENDDATETIME

CIC Integration to Workforce Management Historical and Real-Time Adherence 65
Appendix F: User queue status In RTA, the User Queue Status Changes setting has three parameters:
• Off: The service works as it has previously worked. It forwards status change information to the vendors whenever it receives the information.
• Minimal: The service takes into account the user's phone state. RTA does not send status changes when a user is indicated as on-phone. However, RTA does send phone state changes, which differ from status changes.
• Verbose: The service sends status changes (while not indicated as on-phone), 63 other phone state changes, and 17 transition state changes.
To map all of these states, use the User Queue State Messages section of the Status Mappings area of the WFM RTA Configurator. To map a group of User Queue States, use the Quick State Configuration option in the Status Mappings section.
The following table shows the 63 queue states possible in Verbose mode. The table after it shows the 17 transition states possible in Verbose mode.
Queue state Explanation
XIn An inbound non-ACD call
XInInHld An inbound non-ACD call AND a held inbound interaction
XInOutHld An inbound non-ACD call AND a held outbound interaction
XACDInInHld An inbound ACD call AND a held inbound interaction
XACDInOutHld An inbound ACD call AND a held outbound interaction
XInHld A held inbound non-ACD call
XInHldIn A held inbound non-ACD call AND an inbound interaction
XInHldInHld A held inbound non-ACD call AND a held inbound interaction
XInHldOut A held inbound non-ACD call AND an outbound interaction
XInHldOutHld A held inbound non-ACD call AND a held outbound interaction
XACDInHld A held inbound ACD call
XACDInHldIn A held inbound ACD call AND an inbound interaction
XACDInHldInHld A held inbound ACD call AND a held inbound interaction
XACDInHldOut A held inbound ACD call AND an outbound interaction
XACDInHldOutHld A held inbound ACD call AND a held outbound interaction
XACDXfrIn An inbound ACD call that has been transferred to a user that is not in a queue
XACDXfrInInHld An inbound ACD call that has been transferred to a user that is not in a queue AND a held inbound interaction

CIC Integration to Workforce Management Historical and Real-Time Adherence 66
Queue state Explanation
XACDXfrInOutHld An inbound ACD call that has been transferred to a user that is not in a queue AND a held outbound interaction
XACDXfrInHld A held inbound ACD call that has been transferred to a user that is not in a queue
XACDXfrInHldIn A held inbound ACD call that has been transferred to a user that is not in a queue AND an inbound interaction
XACDXfrInHldInHld A held inbound ACD call that has been transferred to a user that is not in a queue AND a held inbound interaction
XACDXfrInHldOut A held inbound ACD call that has been transferred to a user that is not in a queue AND an outbound interaction
XACDXfrInHldOutHld
A held inbound ACD call that has been transferred to a user that is not in a queue AND a held outbound interaction
XACDXfrOut An outbound ACD call that has been transferred to a user that is not in a queue
XACDXfrOutInHld An outbound ACD call that has been transferred to a user that is not in a queue AND a held inbound interaction
XACDXfrOutOutHld An outbound ACD call that has been transferred to a user that is not in a queue AND a held outbound interaction
XACDXfrOutHld A held outbound ACD call that has been transferred to a user that is not in a queue
XACDXfrOutHldIn A held outbound ACD call that has been transferred to a user that is not in a queue AND an inbound interaction
XACDXfrOutHldInHld
A held outbound ACD call that has been transferred to a user that is not in a queue AND a held inbound interaction
XACDXfrOutHldOut A held outbound ACD call that has been transferred to a user that is not in a queue AND an outbound interaction
XACDXfrOutHldOutHld
A held outbound ACD call that has been transferred to a user that is not in a queue AND a held outbound interaction
XOut An outbound non-ACD call
XOutInHld An outbound non-ACD call AND a held inbound interaction
XOutOutHld An outbound non-ACD call AND a held outbound interaction
XACDOut An outbound ACD call
XACDOutInHld An outbound ACD call AND a held inbound interaction
XACDOutOutHld An outbound ACD call AND a held outbound interaction
XOutHld A held outbound non-ACD call
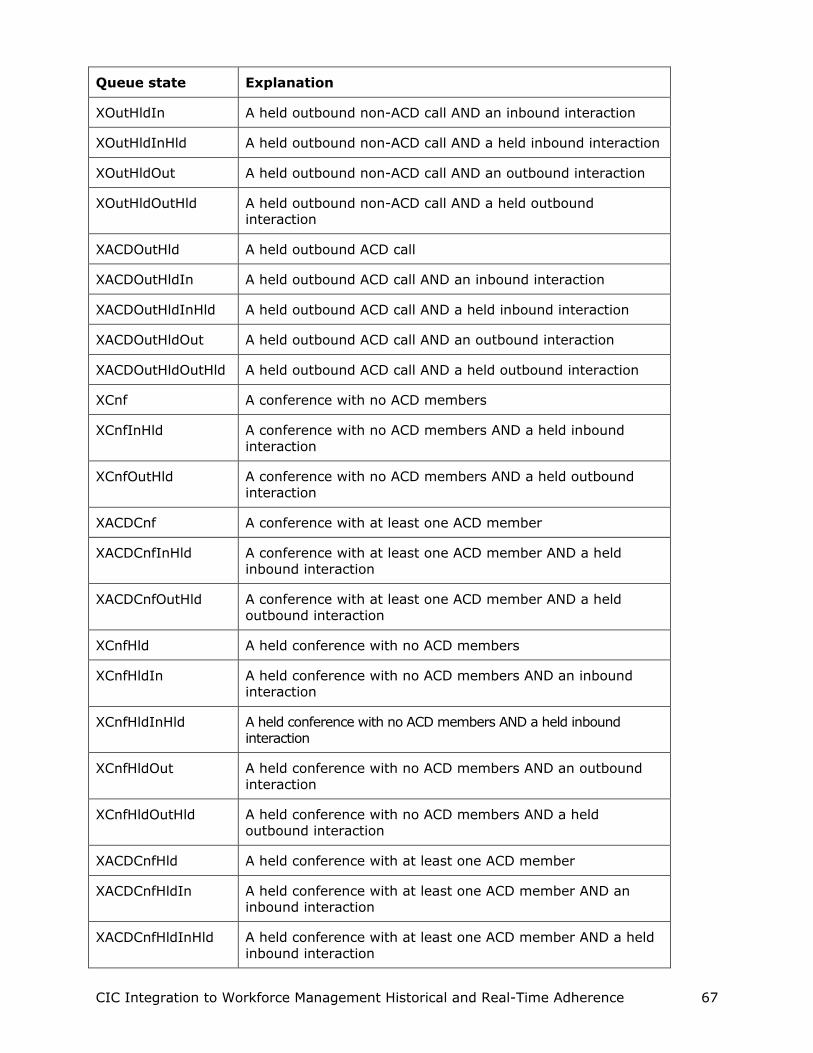
CIC Integration to Workforce Management Historical and Real-Time Adherence 67
Queue state Explanation
XOutHldIn A held outbound non-ACD call AND an inbound interaction
XOutHldInHld A held outbound non-ACD call AND a held inbound interaction
XOutHldOut A held outbound non-ACD call AND an outbound interaction
XOutHldOutHld A held outbound non-ACD call AND a held outbound interaction
XACDOutHld A held outbound ACD call
XACDOutHldIn A held outbound ACD call AND an inbound interaction
XACDOutHldInHld A held outbound ACD call AND a held inbound interaction
XACDOutHldOut A held outbound ACD call AND an outbound interaction
XACDOutHldOutHld A held outbound ACD call AND a held outbound interaction
XCnf A conference with no ACD members
XCnfInHld A conference with no ACD members AND a held inbound interaction
XCnfOutHld A conference with no ACD members AND a held outbound interaction
XACDCnf A conference with at least one ACD member
XACDCnfInHld A conference with at least one ACD member AND a held inbound interaction
XACDCnfOutHld A conference with at least one ACD member AND a held outbound interaction
XCnfHld A held conference with no ACD members
XCnfHldIn A held conference with no ACD members AND an inbound interaction
XCnfHldInHld A held conference with no ACD members AND a held inbound interaction
XCnfHldOut A held conference with no ACD members AND an outbound interaction
XCnfHldOutHld A held conference with no ACD members AND a held outbound interaction
XACDCnfHld A held conference with at least one ACD member
XACDCnfHldIn A held conference with at least one ACD member AND an inbound interaction
XACDCnfHldInHld A held conference with at least one ACD member AND a held inbound interaction

CIC Integration to Workforce Management Historical and Real-Time Adherence 68
Queue state Explanation
XACDCnfHldOut A held conference with at least one ACD member AND an outbound interaction
XACDCnfHldOutHld A held conference with at least one ACD member AND a held outbound interaction
The following table shows the 17 transition states possible in Verbose mode.
Transition state
Explanation
XInIn An inbound non-ACD call AND an inbound interaction
XInOut An inbound non-ACD call AND an outbound interaction
XACDIn An inbound ACD call
XACDInIn An inbound ACD call AND an inbound interaction
XACDInOut An inbound ACD call AND an outbound interaction
XACDXfrInIn An inbound ACD call that has been transferred to a user that is not in a queue AND an inbound interaction
XACDXfrInOut An inbound ACD call that has been transferred to a user that is not in a queue AND an outbound interaction
XACDXfrOutIn An outbound ACD call that has been transferred to a user that is not in a queue AND an inbound interaction
XACDXfrOutOut An outbound ACD call that has been transferred to a user that is not in a queue AND an outbound interaction
XOutIn An outbound non-ACD call AND an inbound interaction
XOutOut An outbound non-ACD call AND an outbound interaction
XACDOutIn An outbound ACD call AND an inbound interaction
XACDOutOut An outbound ACD call AND an outbound interaction
XCnfIn A conference with no ACD members AND an inbound interaction
XCnfOut A conference with no ACD members AND an outbound interaction
XACDCnfIn A conference with at least one ACD member AND an inbound interaction
XACDCnfOut A conference with at least one ACD member AND an outbound interaction
CIC Integration to Workforce Management Historical and Real-Time Adherence 69
Appendix G: Multimedia reporting Most workforce management application vendors provide a multimedia option with their products that allows customers to categorize the statistics by interaction type. The output for certain reports is slightly different when using the multimedia option. Also, configuration changes to the CIC server are required.
By default, the CIC server does not store media or interaction type data in reporting tables. To enable media-type logging, an administrator must configure the StatServer subsystem to log this information.
Note: Because the process for enabling this feature is subject to change in future versions of CIC, this document does not include instructions for enabling media type logging. Use the knowledgebase on the PureConnect Customer Care website for instructions.
The same XSLT templates and style sheet that were covered previously in this document for standard historical reporting generate the output from the WFM Historical Module. To accommodate the requirements of your specific workforce management application, modify the templates and style sheet. The Marquee Packager application passes a style-sheet parameter that instructs the style-sheet templates to report data using the multimedia option. The following sections describe the differences in the output for these templates when the multimedia option is enabled.
Agent Profile report
There are currently no differences in the output of the Agent Profile template for multimedia versus standard historical reporting.
Agent Detail Report When the multimedia option is enabled, the Agent Detail Report changes the method used to identify the call group field. Some workforce management applications are not capable of grouping by media type as a subset of the queue. By default, this column contains the name of the workgroup queue followed by an underscore (-) and the media type. This field creates a unique row of data for the output. When using skill reporting, the skill name is used rather than the workgroup name.
Table: WFM_iAgentQueueStats
Column: cReportGroup (cHKey3 if using skills)
Agent System Report There are currently no differences in the output of the Agent System template for multimedia versus standard historical reporting.

CIC Integration to Workforce Management Historical and Real-Time Adherence 70
Appendix H: Date-time formatting characters The following table lists the standard format characters used when formatting the file names for output files. Any of these characters are replaced with the information specified below based on the current interval for which the file contains data. The format characters are case-sensitive; for example, 'g' and 'G' represent slightly different patterns.
The following table lists the patterns that can be combined to construct custom patterns. The patterns are case-sensitive; for example, "MM" is recognized, but "mm" is not. If the custom pattern contains white-space characters or characters enclosed in single quotation marks, the output string also contains those characters. Characters not defined as part of a format pattern or as format characters are reproduced literally.
Format pattern Description
d The day of the month. Single-digit days do not have a leading zero.
dd The day of the month. Single-digit days have a leading zero.
ddd The abbreviated name of the day of the week
dddd The full name of the day of the week
M The numeric month. Single-digit months do not have a leading zero.
MM The numeric month. Single-digit months have a leading zero.
MMM The abbreviated name of the month
MMMM The full name of the month
y The year without the century. If the year without the century is less than 10, the year is displayed without a leading zero.
yy The year without the century. If the year without the century is less than 10, the year is displayed with a leading zero.
yyyy The year in four digits, including the century
gg The period or era. This pattern is ignored if the date to be formatted does not have an associated period or era string.
h The hour in a 12-hour clock. Single-digit hours do not have a leading zero.
hh The hour in a 12-hour clock. Single-digit hours have a leading zero.
H The hour in a 24-hour clock. Single-digit hours do not have a leading zero.
HH The hour in a 24-hour clock. Single-digit hours have a leading zero.

CIC Integration to Workforce Management Historical and Real-Time Adherence 71
Format pattern Description
m The minute. Single-digit minutes do not have a leading zero.
mm The minute. Single-digit minutes have a leading zero.
s The second. Single-digit seconds do not have a leading zero.
ss The second. Single-digit seconds have a leading zero.
f The fraction of a second in single-digit precision. The remaining digits are truncated.
ff The fraction of a second in double-digit precision. The remaining digits are truncated.
fff The fraction of a second in three-digit precision. The remaining digits are truncated.
ffff The fraction of a second in four-digit precision. The remaining digits are truncated.
fffff The fraction of a second in five-digit precision. The remaining digits are truncated.
ffffff The fraction of a second in six-digit precision. The remaining digits are truncated.
fffffff The fraction of a second in seven-digit precision. The remaining digits are truncated.
t The first character in the AM/PM designator
tt The AM/PM designator
z The time zone offset ("+" or "-" followed by the hour only). Single-digit hours do not have a leading zero. For example, Pacific Standard Time is "-8."
zz The time zone offset ("+" or "-" followed by the hour only). Single-digit hours have a leading zero. For example, Pacific Standard Time is "-08."
zzz The full-time zone offset ("+" or "-" followed by the hour and minutes). Single-digit hours and minutes have leading zeros. For example, Pacific Standard Time is "-08:00."
: The default time separator
/ The default date separator
% c Where c is a format pattern if used alone. The "%" character can be omitted if the format pattern is combined with literal characters or other format patterns.
\ c Where c is any character. Displays the character literally. To display the backslash character, use "\\".

CIC Integration to Workforce Management Historical and Real-Time Adherence 72
Example: If the current interval is 06/26/2003 4:30 PM and the file name format is: “Call_MMdd_HHmm.\tx\t, the resulting file name is: “Call_0626_1630.txt.”
CIC Integration to Workforce Management Historical and Real-Time Adherence 73
Appendix I: Miscellaneous tips This appendix contains miscellaneous tips about situations that users of WFM Historical and Real-Time Adherence have encountered.
Setting up WFM Historical 2.0.23 to work with multiple CIC servers sharing a single database When multiple CIC servers share a single database, SiteIDs are used to differentiate the data for each server. By default, WFM Historical 2.0.23 behaves as though there is only one CIC server per database and does not separate data by SiteID.
To correct this problem, configure WFM to be aware of multiple CIC servers (and therefore SiteIDs). Open the WFMConfigurationFile.xml for each WFM instance and add this line to the configuration: <WFMServiceCount key="wfmservicecount" value="1" desc="Number of sites/services utilizing the same reporting database. Typically this should always be set to one, but if you have multiple sites it may be set to more than one." type="integer" />
Make the number set in the value="" setting match the number of CIC servers sharing the database.
After making this change, restart the WFM Historical service. At that point, the service uses SiteIDs to differentiate the CIC server data in the WFM tables of the database.
CIC Integration to Workforce Management Historical and Real-Time Adherence 74
Change log Change log date Changes made
2009-10-28 Updated Prerequisites section to state that Interactive Update needs .NET 3.0.
2009-11-10 Removed incorrect reference to skills-based routing.
2010-03-12 Updated copyright information and other front matter.
2010-03-25 Redid screen caps of main window to show the Config Import utility, which was added. Added sections about the new utility to the Historical and RTA chapters.
2010-03-30 In Chapter 3, Step 1, added instruction about how to rename a feed. In Chapter 4, Step 1, added instruction about how to rename a plug-in.
2010-12-02 Added Appendix E: User Queue Status
2011-11-04 Added information for IEX sites about showing outbound calls by workgroup.
2011-11-22 Added information about Invision.
2011-12-08 Added more information about Invision.
2012-08-23 Updated for CIC 4.0 Service Update 2. Updated title per naming guidelines.
2012-08-29 Minor corrections.
2013-07-11 Removed obsolete references to handlers. Updated copyright page and made other minor tweaks.
2013-08-29 Added information to appendices about format and fields of information sent to third-party vendors. Added information to Chapters 1 and 3 about Pipkins.
2014-06-17 In pre-requisites section, added information that Windows Server 2003 requires .NET 3.5.
2014-09-01
Updated documentation to reflect changes required in the transition from version 4.0 SU# to CIC 2015 R1, such as updates to product version numbers, system requirements, installation procedures, references to Interactive Intelligence Product Information site URLs, and copyright and trademark information.
2015-01-22 Updated requirement of CIC 2015 R2. Added note about running WFM Integration Configurator as an administrator. Added tip about disabling IPv6.
2015-01-23 Added information about Status Length and Status Format in the Vendor-specific fields table.
2015-03-06 Added Injixo to the list of supported third-party WFM software. Added information about using Windows Authentication.
CIC Integration to Workforce Management Historical and Real-Time Adherence 75
Change log date Changes made
2015-04-16 Updated for 2015 R3.
2015-06-24 Updated for 2015 R4.
2015-09-14 Updated for 2016 R1.
2015-12-21 Updated for 2016 R2.
2016-02-18 Added “Send ‘AgentID’ as Extension” to Vendor-specific fields table for IEX.
2016-05-12
Corrected location of table creation scripts to \Installs\Integrations\WorkforceManagement directory in the Creating custom tables on the database server and the Background information for the third-party WFM software vendors sections.
In the Step 2: Configuring the plug-in to work with a CIC server section, updated note. Note: The user account must have sufficient rights to see all user statuses on the CIC server. This requires Access Controls rights to all Directory Status Columns.
2017-06-08 Corrected step 6 in the Step 4: Configuring the WFM service section. Now reads: 6. In the Backup Retention text box, type the number of days you want to keep backups of your output files after you create them.
2017-08-04
Renamed document from Interaction Center Integration with Workforce Management Historical and Real-Time Adherence to CIC Integration to Workforce Management Historical and Real-Time Adherence.
Updated Copyright and Trademark Information.
Rebranded content to apply Genesys terminology.