Embed Size (px)
Citation preview
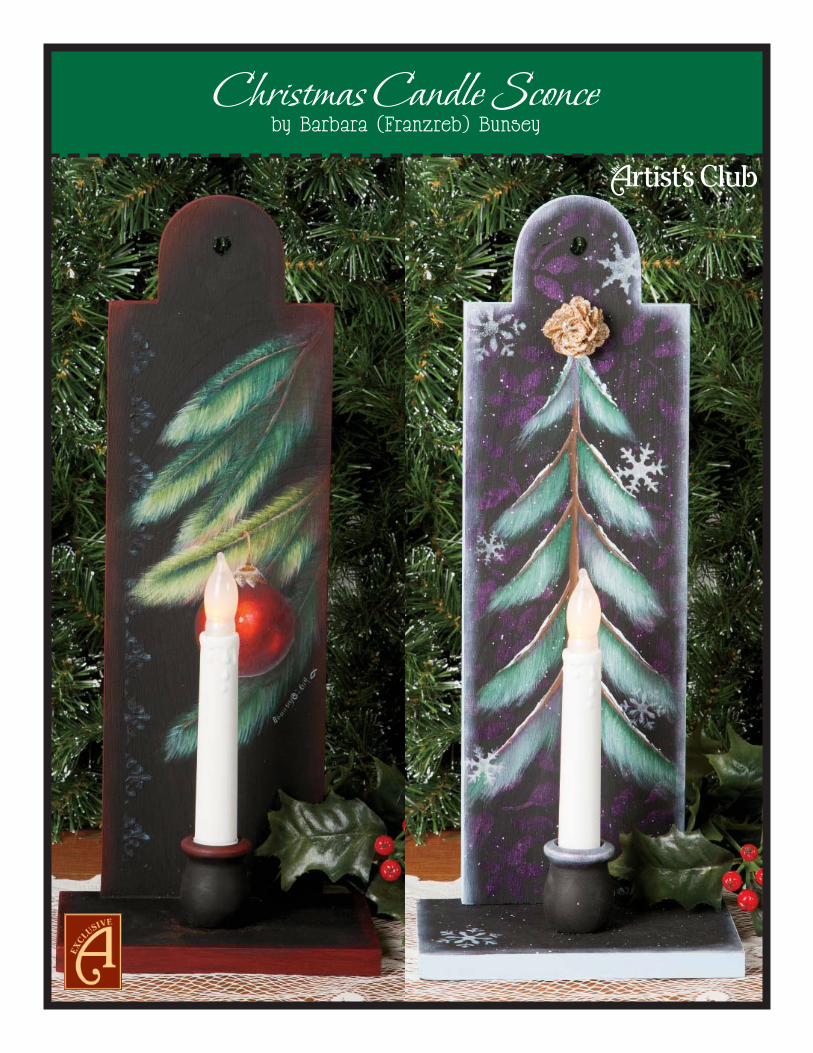
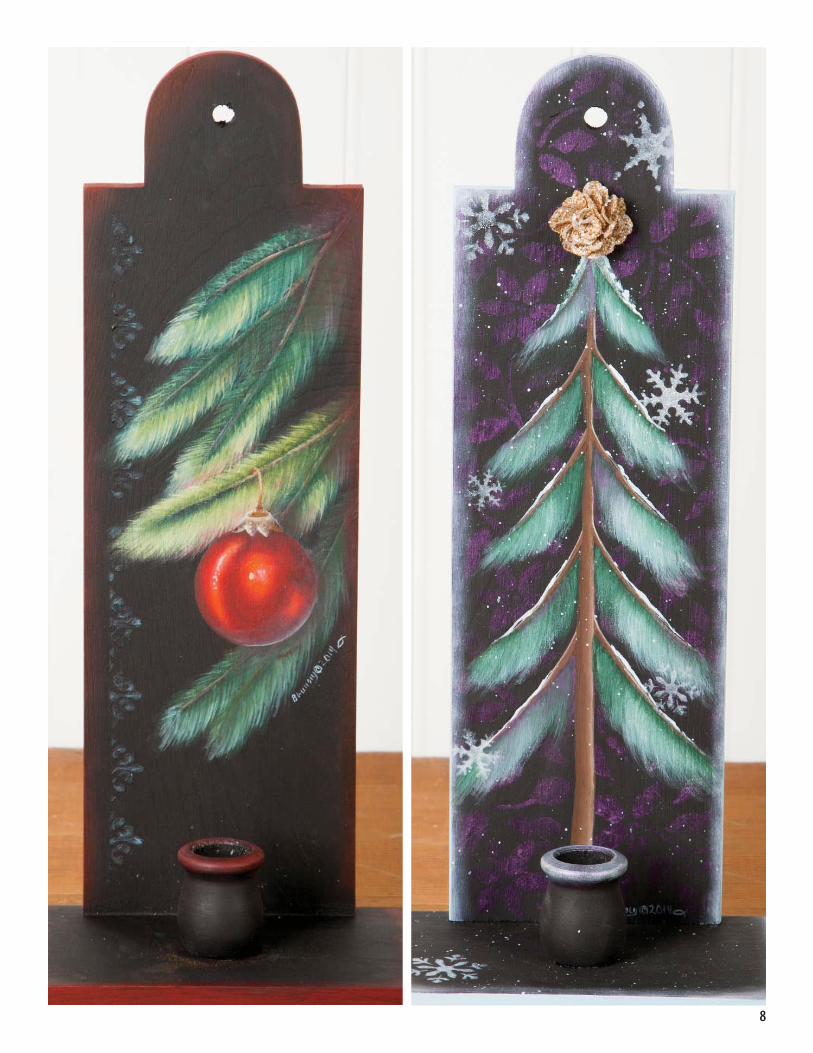
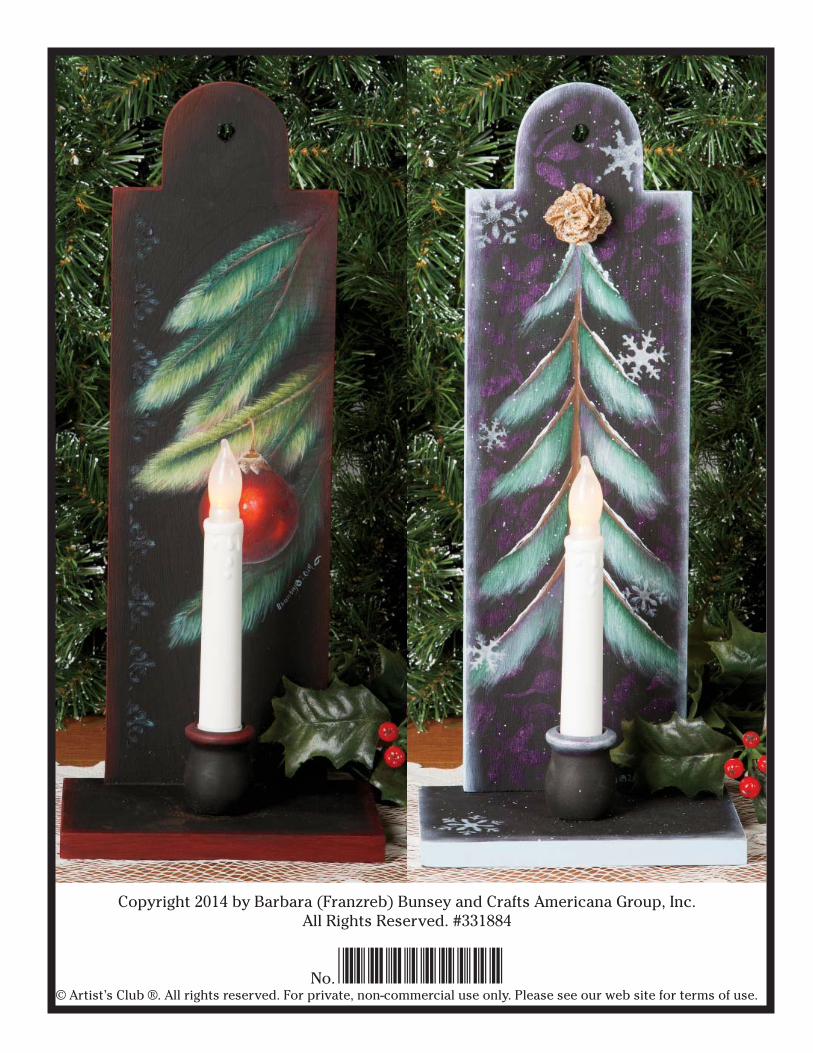
Christmas Candle Sconceby Barbara (Franzreb) Bunsey
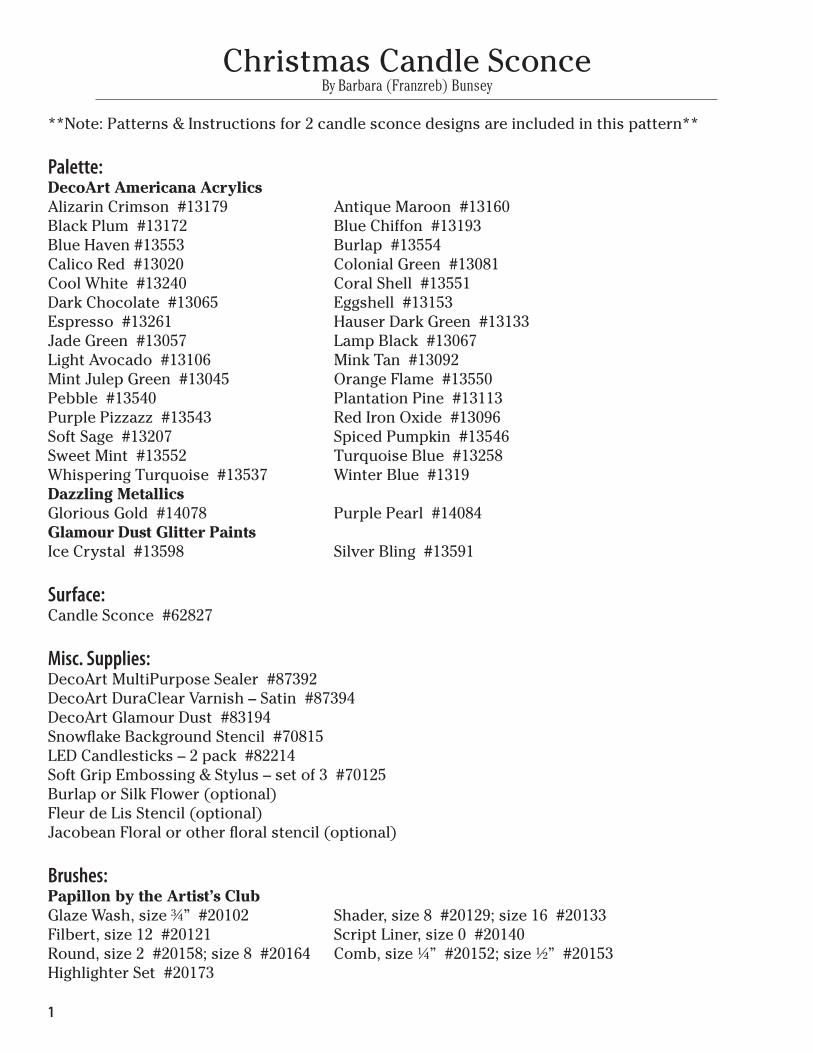
Christmas Candle SconceBy Barbara (Franzreb) Bunsey
**Note: Patterns & Instructions for 2 candle sconce designs are included in this pattern**
Palette: DecoArt Americana AcrylicsAlizarin Crimson #13179 Antique Maroon #13160Black Plum #13172 Blue Chiffon #13193Blue Haven #13553 Burlap #13554 Calico Red #13020 Colonial Green #13081 Cool White #13240 Coral Shell #13551 Dark Chocolate #13065 Eggshell #13153Espresso #13261 Hauser Dark Green #13133Jade Green #13057 Lamp Black #13067 Light Avocado #13106 Mink Tan #13092Mint Julep Green #13045 Orange Flame #13550Pebble #13540 Plantation Pine #13113Purple Pizzazz #13543 Red Iron Oxide #13096Soft Sage #13207 Spiced Pumpkin #13546Sweet Mint #13552 Turquoise Blue #13258Whispering Turquoise #13537 Winter Blue #1319Dazzling Metallics Glorious Gold #14078 Purple Pearl #14084Glamour Dust Glitter PaintsIce Crystal #13598 Silver Bling #13591
Surface: Candle Sconce #62827
Misc. Supplies:DecoArt MultiPurpose Sealer #87392DecoArt DuraClear Varnish – Satin #87394DecoArt Glamour Dust #83194Snowfl ake Background Stencil #70815LED Candlesticks – 2 pack #82214Soft Grip Embossing & Stylus – set of 3 #70125Burlap or Silk Flower (optional)Fleur de Lis Stencil (optional)Jacobean Floral or other fl oral stencil (optional)
Brushes: Papillon by the Artist’s ClubGlaze Wash, size ¾” #20102 Shader, size 8 #20129; size 16 #20133Filbert, size 12 #20121 Script Liner, size 0 #20140Round, size 2 #20158; size 8 #20164 Comb, size ¼” #20152; size ½” #20153Highlighter Set #20173
1
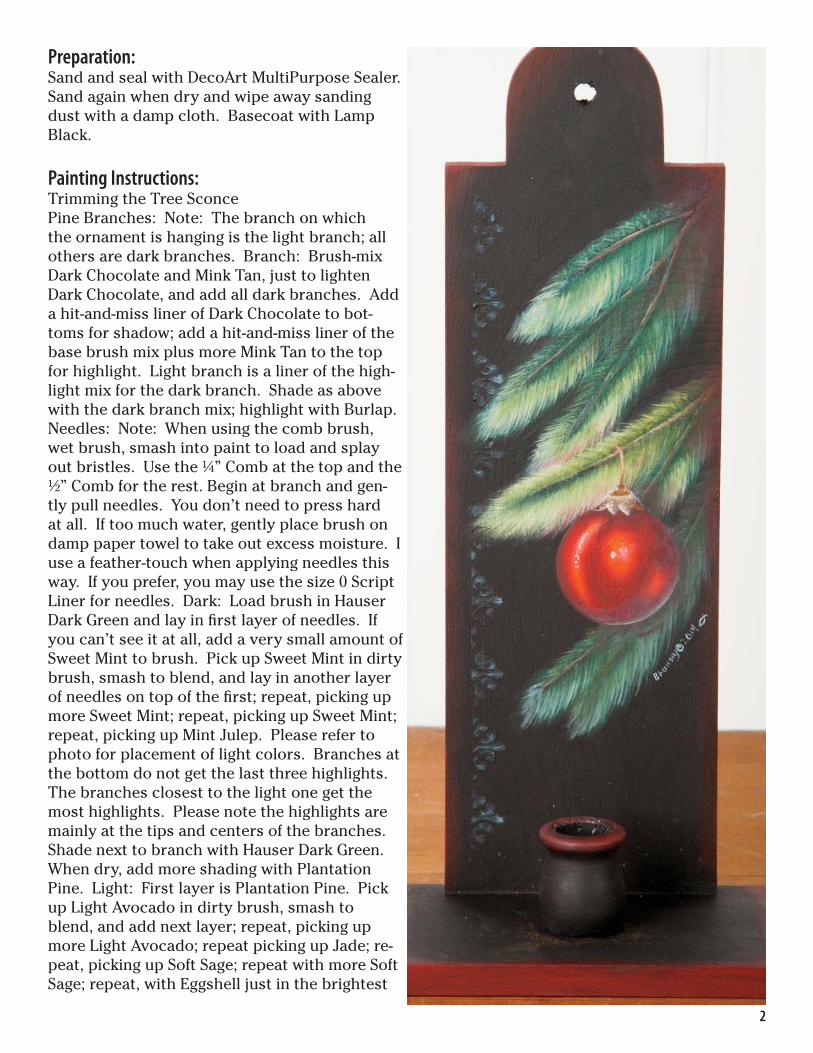
Preparation:Sand and seal with DecoArt MultiPurpose Sealer. Sand again when dry and wipe away sanding dust with a damp cloth. Basecoat with Lamp Black.
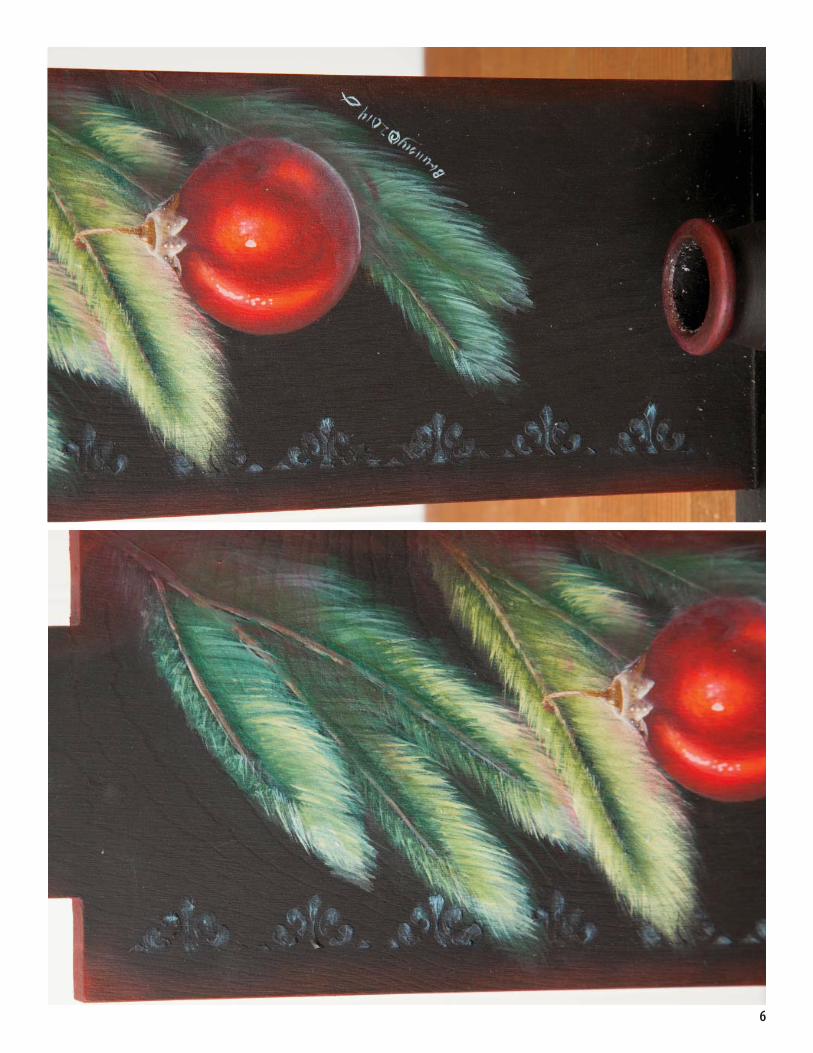
Painting Instructions:Trimming the Tree SconcePine Branches: Note: The branch on which the ornament is hanging is the light branch; all others are dark branches. Branch: Brush-mix Dark Chocolate and Mink Tan, just to lighten Dark Chocolate, and add all dark branches. Add a hit-and-miss liner of Dark Chocolate to bot-toms for shadow; add a hit-and-miss liner of the base brush mix plus more Mink Tan to the top for highlight. Light branch is a liner of the high-light mix for the dark branch. Shade as above with the dark branch mix; highlight with Burlap. Needles: Note: When using the comb brush, wet brush, smash into paint to load and splay out bristles. Use the ¼” Comb at the top and the ½” Comb for the rest. Begin at branch and gen-tly pull needles. You don’t need to press hard at all. If too much water, gently place brush on damp paper towel to take out excess moisture. I use a feather-touch when applying needles this way. If you prefer, you may use the size 0 Script Liner for needles. Dark: Load brush in Hauser Dark Green and lay in fi rst layer of needles. If you can’t see it at all, add a very small amount of Sweet Mint to brush. Pick up Sweet Mint in dirty brush, smash to blend, and lay in another layer of needles on top of the fi rst; repeat, picking up more Sweet Mint; repeat, picking up Sweet Mint; repeat, picking up Mint Julep. Please refer to photo for placement of light colors. Branches at the bottom do not get the last three highlights. The branches closest to the light one get the most highlights. Please note the highlights are mainly at the tips and centers of the branches. Shade next to branch with Hauser Dark Green. When dry, add more shading with Plantation Pine. Light: First layer is Plantation Pine. Pick up Light Avocado in dirty brush, smash to blend, and add next layer; repeat, picking up more Light Avocado; repeat picking up Jade; re-peat, picking up Soft Sage; repeat with more Soft Sage; repeat, with Eggshell just in the brightest
2
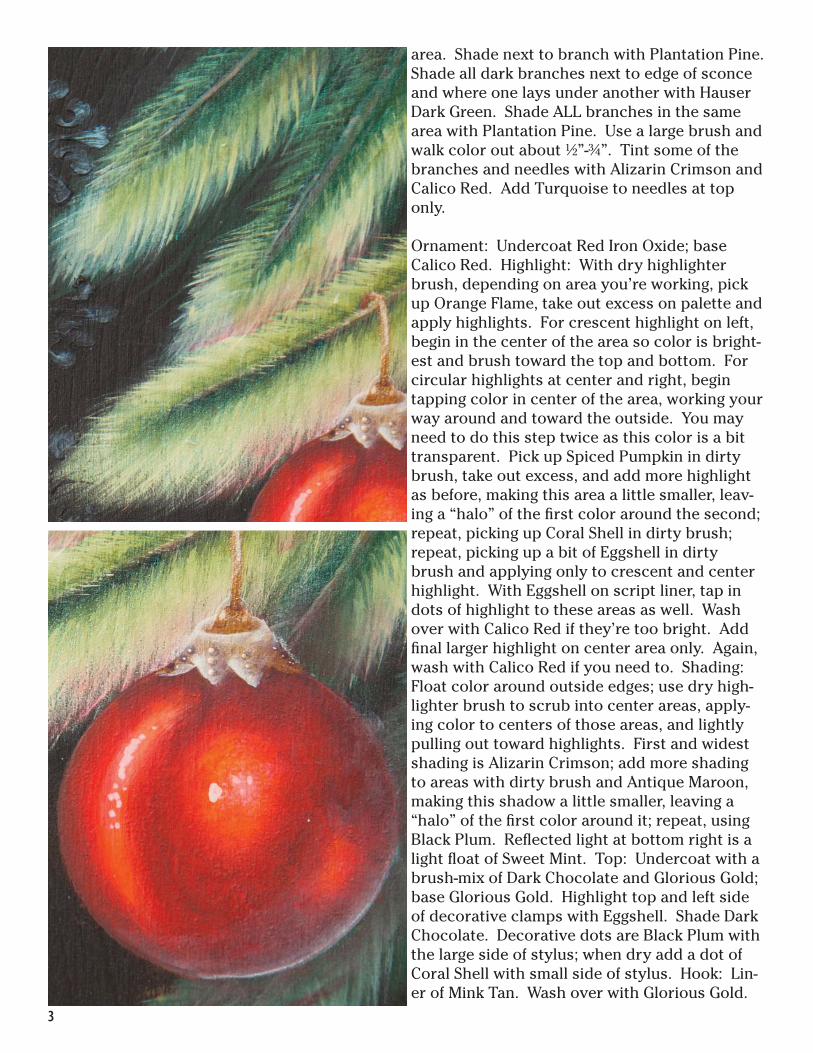
area. Shade next to branch with Plantation Pine. Shade all dark branches next to edge of sconce and where one lays under another with Hauser Dark Green. Shade ALL branches in the same area with Plantation Pine. Use a large brush and walk color out about ½”-¾”. Tint some of the branches and needles with Alizarin Crimson and Calico Red. Add Turquoise to needles at top only.
Ornament: Undercoat Red Iron Oxide; base Calico Red. Highlight: With dry highlighter brush, depending on area you’re working, pick up Orange Flame, take out excess on palette and apply highlights. For crescent highlight on left, begin in the center of the area so color is bright-est and brush toward the top and bottom. For circular highlights at center and right, begin tapping color in center of the area, working your way around and toward the outside. You may need to do this step twice as this color is a bit transparent. Pick up Spiced Pumpkin in dirty brush, take out excess, and add more highlight as before, making this area a little smaller, leav-ing a “halo” of the fi rst color around the second; repeat, picking up Coral Shell in dirty brush; repeat, picking up a bit of Eggshell in dirty brush and applying only to crescent and center highlight. With Eggshell on script liner, tap in dots of highlight to these areas as well. Wash over with Calico Red if they’re too bright. Add fi nal larger highlight on center area only. Again, wash with Calico Red if you need to. Shading: Float color around outside edges; use dry high-lighter brush to scrub into center areas, apply-ing color to centers of those areas, and lightly pulling out toward highlights. First and widest shading is Alizarin Crimson; add more shading to areas with dirty brush and Antique Maroon, making this shadow a little smaller, leaving a “halo” of the fi rst color around it; repeat, using Black Plum. Refl ected light at bottom right is a light fl oat of Sweet Mint. Top: Undercoat with a brush-mix of Dark Chocolate and Glorious Gold; base Glorious Gold. Highlight top and left side of decorative clamps with Eggshell. Shade Dark Chocolate. Decorative dots are Black Plum with the large side of stylus; when dry add a dot of Coral Shell with small side of stylus. Hook: Lin-er of Mink Tan. Wash over with Glorious Gold.
3
Highlight centers of hook and loop with Burlap. Shade where hook goes around branch and at bottom; at bottom of loop and on loop next to hook with Dark Chocolate.
Side Design: Transfer the Fleur de Lis design (or use a stencil), paint using a brush mix of Lamp Black and Whispering Turquoise.
Finishing: Edges of sconce are Alizarin Crimson. Using dry ½” highlighter brush, drybrush edges of piece, including over pine branches, and edge of cup with Alizarin Crimson. Pick up Calico Red in dirty brush and add more color to cup and here-and-there on edges. Varnish with DecoArt Dura Clear Varnish – Satin.
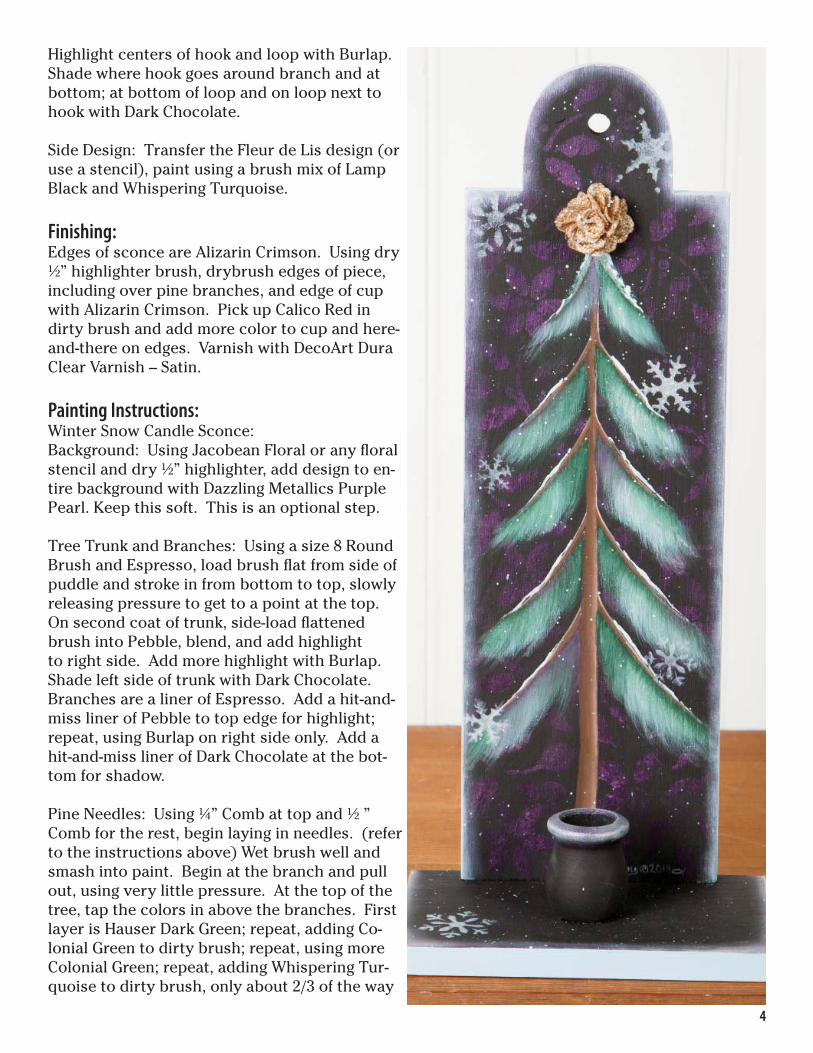
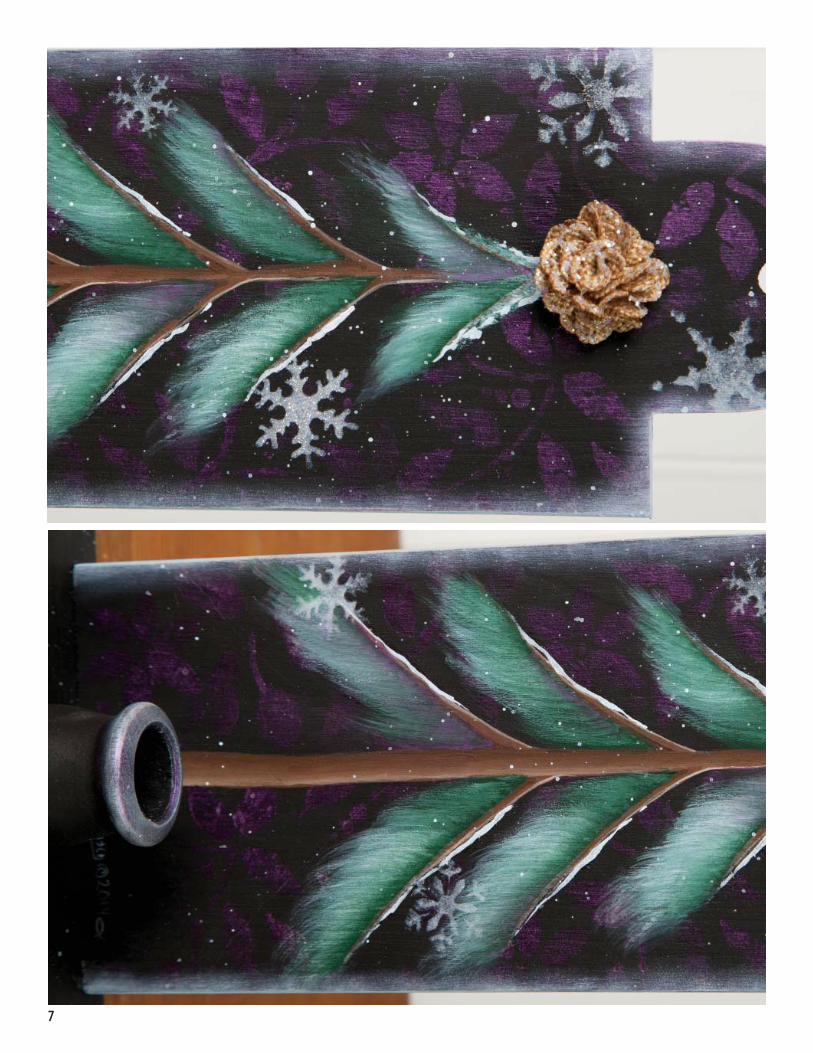
Painting Instructions: Winter Snow Candle Sconce:Background: Using Jacobean Floral or any fl oral stencil and dry ½” highlighter, add design to en-tire background with Dazzling Metallics Purple Pearl. Keep this soft. This is an optional step.
Tree Trunk and Branches: Using a size 8 Round Brush and Espresso, load brush fl at from side of puddle and stroke in from bottom to top, slowly releasing pressure to get to a point at the top. On second coat of trunk, side-load fl attened brush into Pebble, blend, and add highlight to right side. Add more highlight with Burlap. Shade left side of trunk with Dark Chocolate. Branches are a liner of Espresso. Add a hit-and-miss liner of Pebble to top edge for highlight; repeat, using Burlap on right side only. Add a hit-and-miss liner of Dark Chocolate at the bot-tom for shadow.
Pine Needles: Using ¼” Comb at top and ½ ” Comb for the rest, begin laying in needles. (refer to the instructions above) Wet brush well and smash into paint. Begin at the branch and pull out, using very little pressure. At the top of the tree, tap the colors in above the branches. First layer is Hauser Dark Green; repeat, adding Co-lonial Green to dirty brush; repeat, using more Colonial Green; repeat, adding Whispering Tur-quoise to dirty brush, only about 2/3 of the way
4
5
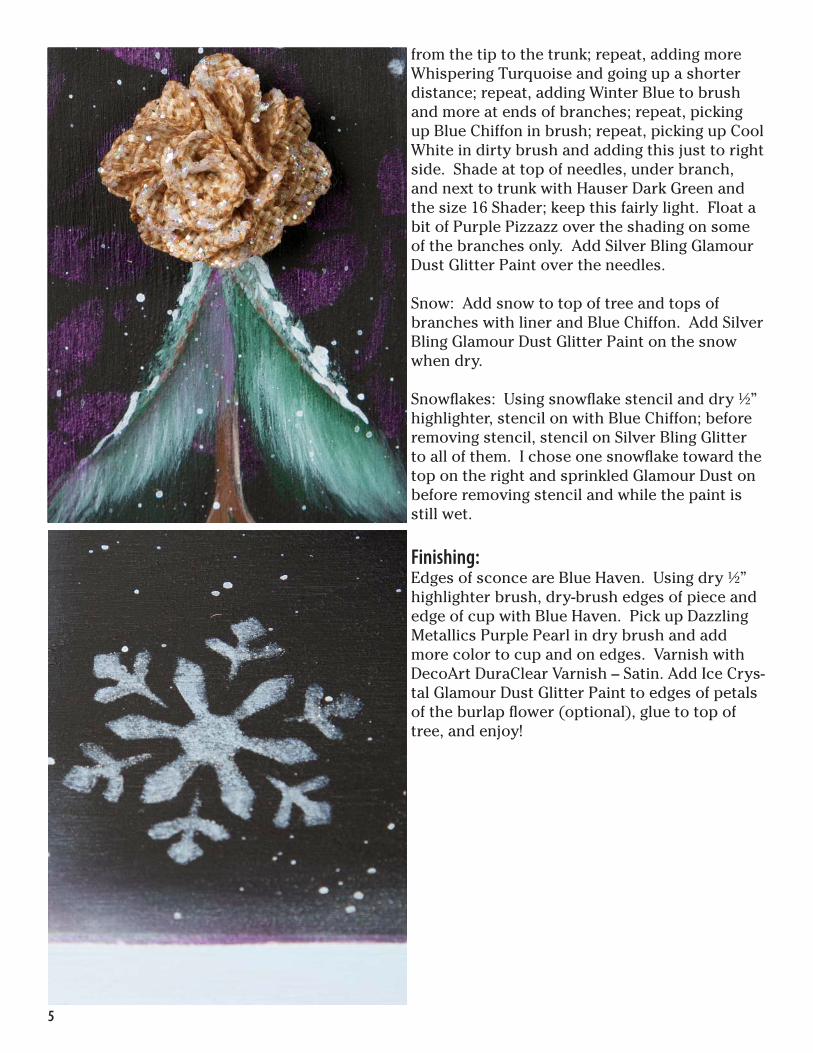
from the tip to the trunk; repeat, adding more Whispering Turquoise and going up a shorter distance; repeat, adding Winter Blue to brush and more at ends of branches; repeat, picking up Blue Chiffon in brush; repeat, picking up Cool White in dirty brush and adding this just to right side. Shade at top of needles, under branch, and next to trunk with Hauser Dark Green and the size 16 Shader; keep this fairly light. Float a bit of Purple Pizzazz over the shading on some of the branches only. Add Silver Bling Glamour Dust Glitter Paint over the needles.
Snow: Add snow to top of tree and tops of branches with liner and Blue Chiffon. Add Silver Bling Glamour Dust Glitter Paint on the snow when dry.
Snowfl akes: Using snowfl ake stencil and dry ½” highlighter, stencil on with Blue Chiffon; before removing stencil, stencil on Silver Bling Glitter to all of them. I chose one snowfl ake toward the top on the right and sprinkled Glamour Dust on before removing stencil and while the paint is still wet.
Finishing: Edges of sconce are Blue Haven. Using dry ½” highlighter brush, dry-brush edges of piece and edge of cup with Blue Haven. Pick up Dazzling Metallics Purple Pearl in dry brush and add more color to cup and on edges. Varnish with DecoArt DuraClear Varnish – Satin. Add Ice Crys-tal Glamour Dust Glitter Paint to edges of petals of the burlap fl ower (optional), glue to top of tree, and enjoy!
6
7
8
9
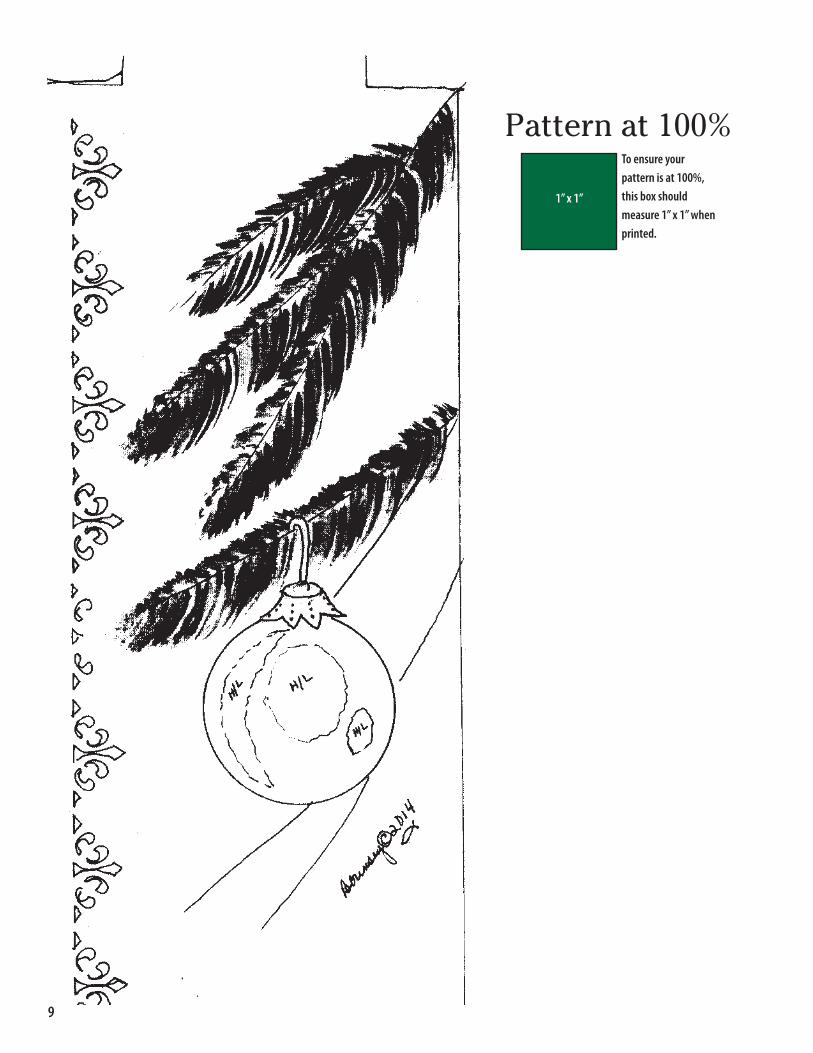
Pattern at 100%
1” x 1”
To ensure your pattern is at 100%, this box should measure 1” x 1” when printed.
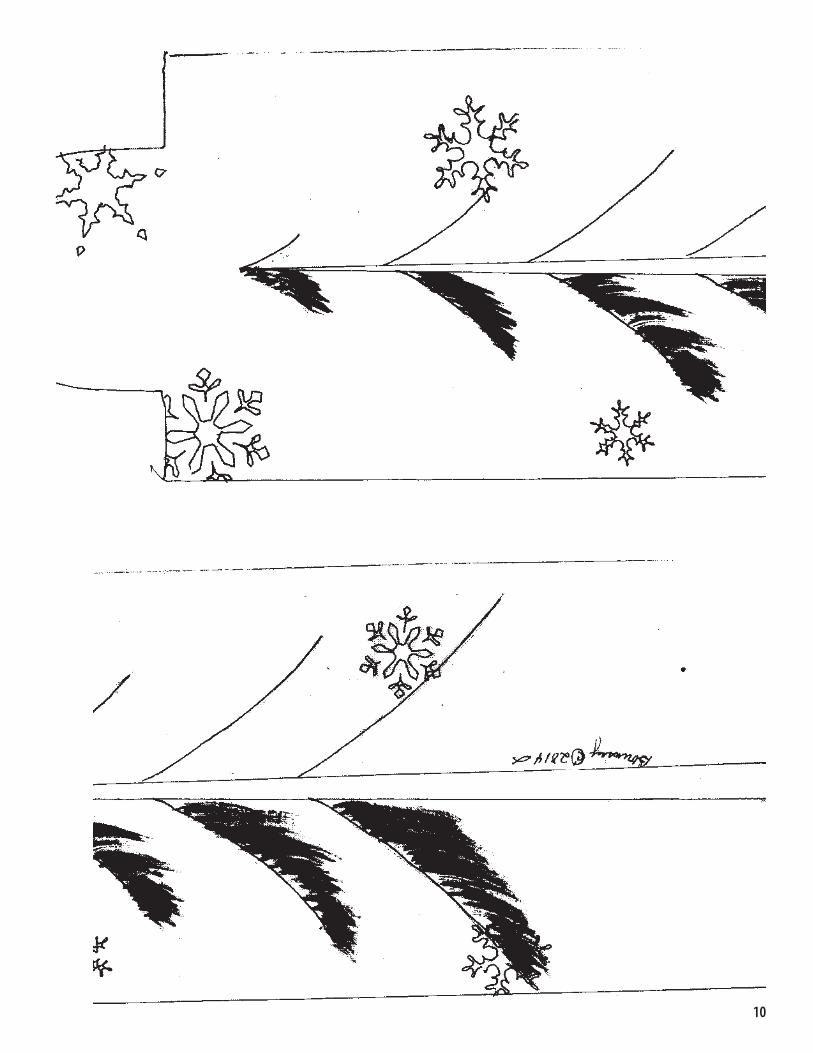
10
Copyright 2014 by Barbara (Franzreb) Bunsey and Crafts Americana Group, Inc. All Rights Reserved. #331884
No. *A331884*© Artist’s Club ®. All rights reserved. For private, non-commercial use only. Please see our web site for terms of use.